

Page 1
Hall Research Technologies, Inc
1163 Warner Ave.
Tustin, CA 92780
Phone: (714) 641-6607
Fax: (714) 641-6698
Oppeerraattiioonn IInnssttrruuccttiioonnss
O
Advanced Projector Controller
And Video Splitter
• Composite, VGA, and S-Video inputs
• Composite, S-Video, and 2 VGA outputs
• Discrete (Digital) Input and Output
• Programmable RS-232 Port
UMA 1026 REV B
Page 2

Projector Controller w/ Built-n VGA Splitter
Table of Contents
Description .....................................................................3
Features.........................................................................3
How To Obtain the Windows® Programming Software.........3
Setup to Program HR-3P ..................................................3
Setup to Use HR-3P.........................................................4
Operation.......................................................................4
How To Use The HR-3P ....................................................5
Selecting the Baud Rate ...................................................5
Selecting the Scan Priority................................................6
Selecting a delay for the No Input Active string...................6
Selecting a string for each of the 7 events..........................7
How to Build a String with the HR-3P Programmer ..............8
Uploading to the HR-3P....................................................9
Loading or Saving Configurations ......................................9
Putting the HR-3P into Operation.......................................9
Important!............................................................................................................................................................................................ 9
Federal Communications Commission Statement ..............11
Warranty...................................................................... 11
Limited Liability............................................................. 11
2
Page 3

Projector Controller w/ Built-n VGA Splitter
Description
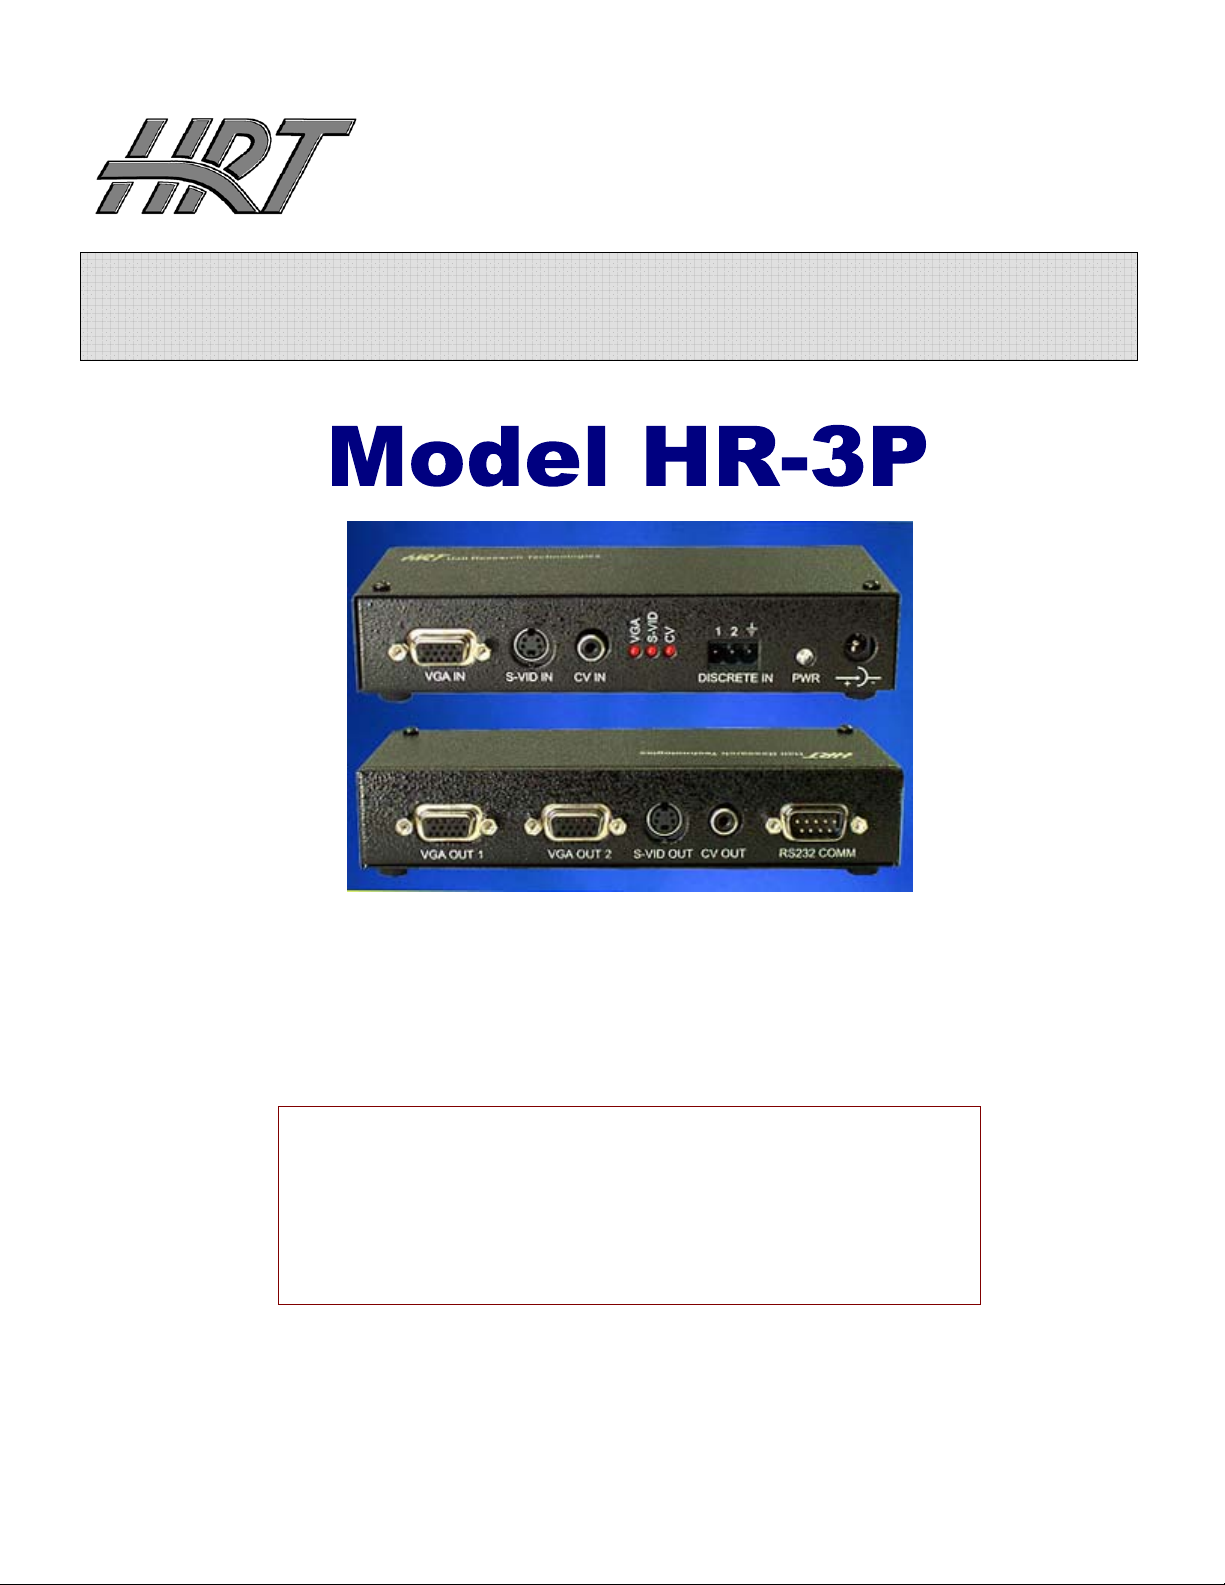
The Model HR-3P is a programmable serial device with 3 video inputs VGA, Composite
Video (CV) and S-Video (Y/C). The VGA input supports all PC resolutions to 1600x1200 and
the TV video inputs are NTSC, PAL, and SECAM compliant. The unit has a VGA splitter with
2 VGA outputs, but the CV and S-Video have only one output each (pass through). The
HR-3P can detect video on any of the inputs and issue preprogrammed serial commands
via its RS-232 port. It also features 1 discrete (digital or contact closure) input and 1
discrete output. The discrete input can be used to issue commands on its high-to-low, and
low-to-high transitions. The unit also keeps track of ON/OFF state of the projector and
outputs a TTL (hi/lo digital) signal on its discrete output line for controlling other external
devices such as lowering and raising a screen. The HR-3P is an ideal tool for the
automation of a projector.
The commands sent to the projector can be any ASCII (or non-ASCII) data with
programmable delays embedded in the string.
Hall Research Technologies, Inc. provides a powerful Windows™ based application that is
used to create the data files and upload it to the HR-3P.
Features
1. Compact, Rugged, Reliable, and Economical
2. High Resolution VGA Distribution amp can drive cables to 150 feet on outputs
3. Wide bandwidth supports resolutions to 1600x1200 at any refresh rate
4. Up to 8 user-programmable Command Strings
5. Allows multiple instances of user-defined delays within each string
6. Detects video on any input , or no video at all
7. Digital (discrete) input and output on screw terminals
8. Intuitive Operation
9. Comes with Windows™ software for programming
10. Made in USA
How to Obtain the Windows® Programming Software
The GUI (Graphical User Interface) needed to program the HR-1P can be downloaded at:
http://www.hallresearch.com/page/Products/HR-3P
Setup to Program HR-3P
1. Connect the provided power supply to the power port on the back right side of
the device.
2.
Connect a crossover serial cable (provided) from a PC to the HR-3P.
3.
Install the HR-3P Programmer software on the PC.
3
Page 4

Projector Controller w/ Built-n VGA Splitter
Setup to Use HR-3P
1. Connect the provided power supply to the power port on the back right side of
the device.
2. Attach any VGA, Composite, and/or S-Video signals as necessary to the
appropriate input jacks on the back of the device.
3. Connect the output from the video signals to appropriate video display devices.
4. Connect the discrete inputs to an appropriate switch. Connect the discrete output
to a relay. These discrete inputs/outputs are not required for the HR-3P to have
some functionality, but usually you will want to use at least one of them. These
discrete input and output are intended to operate using the power from the HR3P. Do not supply any power to the discrete input/outputs. You simply need to
open or close the circuit between a discrete and the ground connection provided
on the discrete input/output terminal.
5. Connect the HR-3P to the projector via a crossover serial cable or a straight
through serial cable depending on the projectors pinout.
Operation
The HR-3P is designed to send a string of commands that you create to a projector or
other device via a serial interface anytime 1 of 7 events occurs. The following is a list of
each event and the conditions necessary to facilitate each event:
1. When any video is first detected, the discrete output will be pulled low and the
Video First Detected
2. When Discrete Input transitions from a high to a low signal, the HR-3P will send
the Discrete OFF
3. When Discrete Input transitions from a low to a high signal, the HR-3P will send
the Discrete ON
4. When the VGA video input is selected, the HR-3P will send the VGA Input Active
string out the serial port.
5. When the Composite video input is selected, the HR-3P will send the Composite
Input Active string out the serial port.
6. When the S-Video input is selected, the HR-3P will send the S-Video Input Active
string out the serial port.
7. When no video inputs are active, the HR-3P will send the No Input Active
out the serial port and set the discrete output high.
Each of these 7 strings can have a maximum of 30 characters and minimum of 0
characters. Within each string wait times can be inserted. Each wait can be a maximum
wait time of 16 hrs, 59 min, 59 sec. Each wait takes 3 characters so a maximum of 8 waits
is possible per string. (3 characters x 8 waits = 24 characters) Non-printing control
characters may also be inserted into the strings. The following is a list of the possible
control characters and their corresponding hexadecimal values.
string will be sent out the serial port.
string out the serial port.
string out the serial port.
string
4
Page 5

Projector Controller w/ Built-n VGA Splitter
CHAR HEX CHAR HEX CHAR HEX CHAR HEX CHAR HEX
NULL 0x00 BEL 0x07 SO 0x0E NAK 0x15 FS 0x1C
SOH 0x01 BS 0x08 SI 0x0F SYN 0x16 GS 0x1D
STX 0x02 HT 0x09 DLE 0x10 ETB 0x17 RS 0x1E
ETX 0x03 LF 0x0A DC1 0x11 CAN 0x18 US 0x1F
EOT 0x04 VT 0x0B DC2 0x12 EM 0x19
ENQ 0x05 FF 0x0C DC3 0x13 SUB 0x1A
ACK 0x06 CR 0x0D DC4 0x14 ESC 0x1B
These strings can either be constructed directly in the HR-3P Programmer or by using a
hex editor to create a file containing the desired string.
The projector will communicate with the HR-3P at the baud rate specified in the user’s
manual of the projector. The HR-3P Programmer will allow the user to select that baud rate
for the projector. The HR-3P will also allow the user to select which video input if any has
priority over the others. The user also has the ability to delay the No Input Active string
before it is sent out the serial port.
You will need to consult the manual or the manufacturer’s data for how to construct the
correct string for various functions of the projector. Since each manufacturer uses there
own set of commands, Hall Research Technologies, Inc. cannot help in obtaining this
information for you.
How to Use the HR-3P
The first step to programming the HR-3P with the HR-3P
Programmer is to connect the HR-3P to the computer that is
running the HR-3P Programmer via the COM port you will
select when you start the HR-3P Programmer software. The
com. ports the HR-3P Programmer supports are COM1 thru
COM5.
After selecting a COM port, you will need to decide if you want to
edit an existing configuration file or create a new configuration file.
A configuration file is all the information that will be uploaded to the
HR-3P. It consists of the baud rate, the video priority, the delay of
the No Input Active string and the 8 different strings. Configuration
files will have the file extension of “.hrt”
.
Selecting the Baud Rate
Select the baud rate from the drop down menu labeled Projector
Baud Rate. This is the baud rate that your projector is set to for
sending and receiving serial commands. This will be found in your
user’s manual for the projector or from the projector’s
manufacturer.
5
Page 6

Projector Controller w/ Built-n VGA Splitter
Selecting the Scan
Priority
The scan priority exists to give one
video input priority over the other two.
You may also choose to give none of the
video inputs priority. The way the HR-3P
selects a video input is by cycling
through each video input. It will cycle in
the order of VGA, S-Video, Composite,
and then it will start again with VGA and
continue to scan. As soon as a signal is
detected on any of the inputs, that
video input is selected. After an input is
selected, no other input will be selected
until that original video input is
unplugged or turned off or the video
input with priority is turned on. If for
example S-Video had priority and no
video inputs were selected then the HR-3P would just cycle through each input looking for
a signal. If the first signal it finds is Composite then it would select composite and send the
Composite Input Active string out the serial port. If it then found the VGA signal to be
active, it would not select the VGA input since the VGA input does not have priority. If the
Composite input were to be unplugged then the HR-3P would select the next active signal
in order of scanning. In this case it would select VGA since VGA is the next signal in the
scanning cycle that is active. If S-Video were to become active later while VGA was
selected, S-Video would then become selected over VGA since S-Video has priority. Only 1
video input may have priority at any given time. By default, scan priority is given to none.
Selecting a delay for the No Input Active string
By default, the No Input Active string is sent out through
the serial port as soon as there are no active inputs to
select from, i.e.: there is no video signal at any of the three
input connectors. If you want to delay the No Input Active
string then you simply fill in the fields for the amount of
wait you want to add. If, for example, you wanted to send
out the No Input Active string 1 hour, 15 minutes and 30
seconds after the HR-3P had detected no active signals
then you would enter a 1, 15 and 30 in the respective
fields. Typical commands to send in this situation might be to have the projector enter
standby mode or to turn it off.
6
Page 7

Projector Controller w/ Built-n VGA Splitter
Selecting a string for each of the 7 events
To specify a string for any of the 7 events, first select the string you want to specify from
the drop down menu labeled, Select a String.
After you have selected the string you want to work with you then need to choose how you
will input that string. You have two options for inputting the string. You may create the
string in a third-party hexadecimal editor and then save that file with a “.str” extension and
then click the “Select File” button to select the file you created. Or you can build the string
directly in the hexadecimal editor built into the HR-3P Programmer by clicking on Build
String. If you choose “Select File” only the name of the file containing the string will be
displayed in the window directly above the “Select File” button. If you choose to build the
string then the actual characters in the string will be displayed in the window above the
“Build String” button.
7
Page 8

Projector Controller w/ Built-n VGA Splitter
How to Build a String with the HR-3P Programmer
To build your own string using the HR-3P Programmer, click on the “Build String” button.
To enter any characters from the keyboard, simply click in the window labeled “Enter
Codes for <name of string>” and begin typing. If you need to enter any of the non-printing
control characters, select them from the “Control Characters” menu and click the “Insert
Control Character” button and that character will be inserted into the string. If you want to
insert a wait in the string, fill in the appropriate time fields and click the “Insert Wait Time”
button. When you have finished building the string, click the “Done” button and you will
see the string you just built in the main HR-3P Programmer screen. Here is an example of
a string with several characters entered from the keyboard, then a wait time, then a
control character, and then some more characters from the keyboard.
8
Page 9

Projector Controller w/ Built-n VGA Splitter
There are a few restrictions you need to be aware of when you are building your string.
You may not backspace or delete as you are building the string. Doing so will delete the
entire string you have constructed. You may not use the Windows “Paste” function to insert
more than one character at a time. Doing so will result in the string being deleted. You
may only insert a character at the end of the string. If you attempt to enter a string over
25 characters, your string will be deleted. This can be avoided by watching the “File
length:” indicator at the bottom of the screen. Any character input from the keyboard will
increment the File length by 1, same for a Control Character. A wait time will increment
the File length by 3.
Uploading to the HR-3P
After you have selected a baud rate, priority, No Input Active string delay, and strings for
each of the 7 strings, you can then click the “Save and Upload” button and this
configuration will be saved to the configuration file you created or opened at the start and
this configuration will be uploaded to the HR-3P. If you leave any of the strings blank then
a 0 length string will be used meaning nothing will be sent out the serial port for that
event. If you do not specify a delay for the No Input Active string then there will be no
delay before that string is sent out the serial port. The upload procedure should take 4-7
seconds. When it is finished you will see a message indicating the success or failure of the
upload procedure.
Loading or Saving Configurations
You can save or load a configuration file by clicking on the File menu and choosing the
appropriate icon. You can also create a blank, new configuration file from the File menu.
Putting the HR-3P into Operation
After you have successfully uploaded a configuration to the HR-3P, disconnect the HR-3P
from the computer and power it off. Connect the HR-3P to the projector via the serial
interface.
Important!
You may need to use a straight through serial cable (also know as a NULL-modem
cable) (not included) to connect the HR-3P to the device you want to control.
There are 2 types of serial devices:
1. DTE (Data Terminal Equipment) ex. Computer/ PC , HR-3P
2. DCE (Data Communication Equipment) e.g. Serial controlled projector,
modem
9
Page 10

Projector Controller w/ Built-n VGA Splitter
DTEs talk directly to DCEs. If you have 2 DTEs trying to talk, they need a
crossover serial cable connecting them. In the same way if you have 2 DCEs
trying to talk, they will need a crossover serial cable connecting them as well.
Generally DTEs will have a male DB9 connector and DCEs will have a female
DB9 connector. You will notice that the serial cable included with the HR-3P has
a female DB9 connector on both ends. This is a crossover serial cable. This cable
is required to connect the HR-3P to the PC to upload the strings. Because the
HR-3P has a Male DB0 connector, this indicates that the HR-3P is a DTE, which
is why it requires a crossover serial cable to connect to a computer/PC serial
port. When you are done uploading the strings to the HR-3P, you will need to
use a crossover or straight through serial cable to connect the HR-3P to your
serial device depending on what type of serial device you are trying to control.
Here is the pinout of the HR-3P. The pinout of the DB9 male connector on the
HR-3P is as follows:
Pin Function Pin Function
1 Not Used 6 Not Used
2 Receive (input) 7 RTS (output, pulled high)
3 Transmit (output) 8 Not Used
4 DTR (output, pulled high) 9 Not Used
5 Ground
Connect the discrete input and output to the appropriate switches; connect the necessary
video inputs and outputs to the correct ports on the HR-3P and power on the HR-3P. The
HR-3P is now scanning for active video signals and change in the discrete input.
The discrete I/O is not designed to source or sink much current.
The input is pulled up by a 4.7K resistor. You can short the input to ground
or open it (contact closure operation) You can also apply a voltage to this
pin from 0 to 12 v max (a diode is provided to block current flow into the
unit) any input higher than 1.5v is considered to be logic high and an input
less than 0.5v is considered logic low. Make sure that this pin does not go
negative, as a below zero voltage at this pin can damage the device.
The discrete output is directly driven from a CMOS source that can sink 25
mA, and source about 1 mA when high. We recommend that you use an
external optical isolator or transistor to isolate and buffer this output from
any external circuit that you may want to use it with.
NOTE
10
You should not pull the discrete output above 5v or below ground. You can
operate a 5 volt relay with it or use a transistor or optical isolator to control
higher loads.
DISCRETE IN/OUT
J9
1
2
3
3 POS TERM BLOCK
Figure 3 –Internal Circuit of
4.7K
+5V
4.7K
DISCIN
DISCOUT
Page 11

Projector Controller w/ Built-n VGA Splitter
Federal Communications Commission Statement
This equipment generates; uses and radiates radio frequency energy and, if not installed
and used in accordance with the instructions, may cause harmful interference to radio
communications. This equipment has been designed to comply with the limits for a Class A
computing device, pursuant to Part 15 of the FCC rules. Harmful interference when
operated in a commercial environment. Operation of this equipment in a residential area is
likely to cause interference, in which case the user, at his own expense, will be required to
take whatever measures are necessary to correct the interference.
If necessary, you should consult the place of purchase or and experienced radio/television
technician for additional suggestions.
Warranty
HRT warrants that the supplied equipment is free from defective workmanship and
material. Subject to the agreements set forth, will repair or replace, at its option, the
defective components for a period of 2 years after purchase. The following conditions
apply to the Warranty:
Warranty void if item subject to improper use, negligence, or unauthorized modification
Instructions must be followed in obtaining RMA number as explained below
Any defective part should be returned, insured and freight prepaid, to Hall Research, with
the following:
• Return Material Authorization Number (RMA#)
• Description of failure, as detailed as possible
• Shipping address and contact name and phone number
Limited Liability
IN NO EVENT SHALL THE DIRECT VENDOR'S LIABILITY EXCEED THE PRICE PAID FOR THE
PRODUCT FROM DIRECT, INDIRECT, SPECIAL INCIDENTAL OR CONSEQUENTIAL
DAMAGES RESULTING FROM THE USE OF THE PRODUCT OR ITS DOCUMENTATION
11
Page 12

Products Designed and Made in the USA
© Copyright 2006. Hall Research Technologies, Inc.
All rights reserved.
1163 Warner Ave., Tustin, CA 92780
Ph: (714)641-6607, Fax: (714)641-6698
 Loading...