

Halcro SSP100 Quick Start Guide

SSP Video
DVD Video
SSP100 Quick Setup Guide
Introduction
The purpose of this quick setup guide is to enable an individual with minimal experience of
the SSP100 to get the SSP operational within a home cinema. The first steps are,
· Get a picture on the screen or display
· Connect a source e.g. DVD player and get its video onto the display
· Get the audio system operational
When the system is operational the fine-tuning of the system can begin.
Setup Overview
The flow chart below indicates typical steps required to get a home theatre connected and
operational to the point where fine-tuning can commence. The flow chart assumes the
audio system is in place. If the audio system is not in place connect a display and source to
the SSP100 and continue with the setup.
Read SSP80/100
Manual &
Safety Instructions
Display Setup
DVD Setup
Connect Display
to SSP Video O/P
Press SSP Menu
No
No
Check
O/P
Yes
SSP Display setup
Scaler setup
Video Resolutions pref:
Connect DVD to
SSP SRC 1
SSP Source 1 setup
Play DVD
Check
O/P
Yes
Check DVD O/P &
Source 1 Setup
Connect Amplifier
to SSP 7.1 O/P
& Trigger 1
Connect Speakers
to Amplifier O/P
Speaker Setup Size
Select Mode
Check
Audio
O/P
Yes
Fine Tune System
Level Setup 2
Distance setup
No
Audio Setup Menu
Is
Amplifier
On
Yes
Check DVD
No
Check Trigger 1 &
Power Connections
The sequence in the flow chart above shows a typical setup but it is not necessary to follow
the sequence as outlined. The steps which follow show how to get a video picture on the
main display, how to setup a source and how to get the audio system working.
It is essential to understand the capabilities and specifications of the display and sources
to ensure you get the best performance from your system. It is as important to setup
the display and sources correctly as it is to set up the SSP100 correctly.
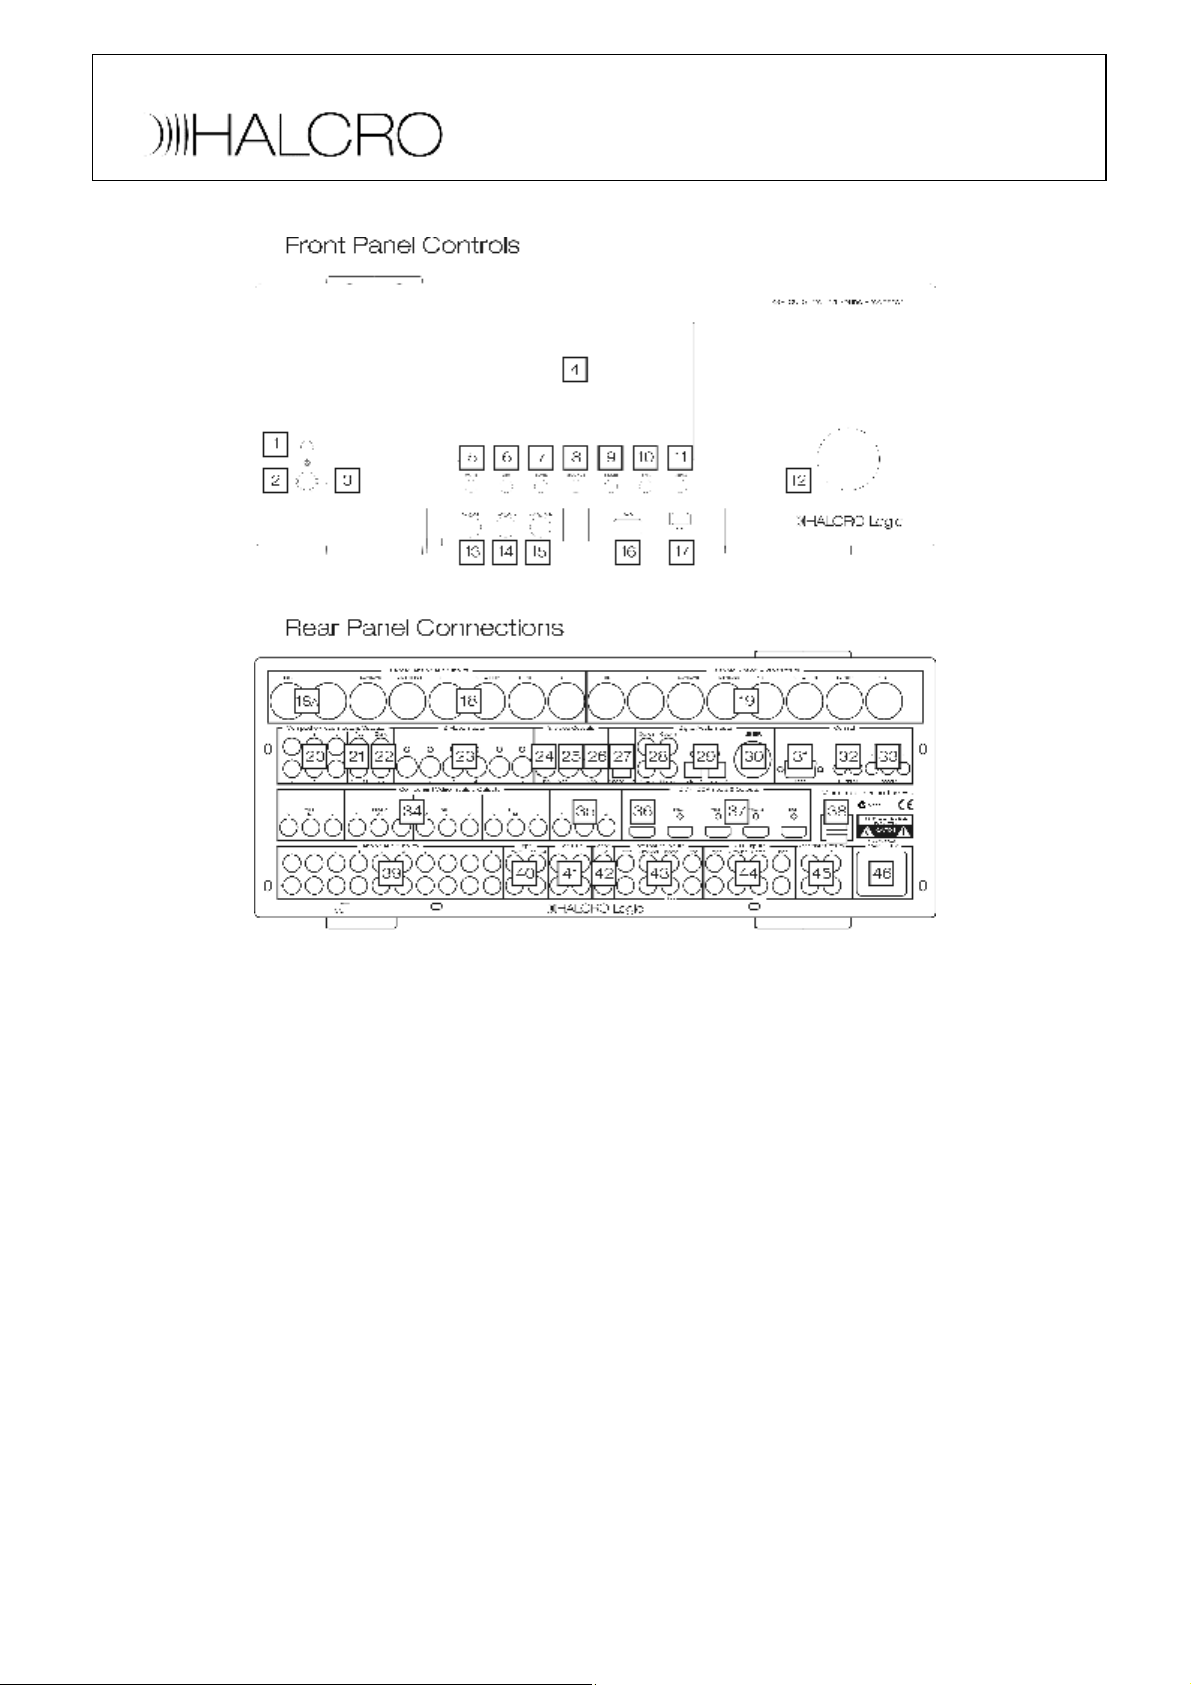
SSP100 Front and Rear Panels
Front Panel
1 IR receiver
2 Standby/On button
3 Standby LED
4 Display
5 Mute Button
6 DIM button
7 Zone button
8 Source button
9 Mode button
Rear panel
18 7.1 balanced audio input (SSP100)
18a Stereo balanced audio input
19 7.1 balanced audio outputs
20 Composite video inputs 1 to 6
21 Composite video outputs Rec &
Mon+OSD
22 Composite video outputs Zone &Mon
23 S-Video inputs 1 to 6
24 S-Video REC output
25 S-Video monitor output (with OSD)
26 S-Video monitor output (without OSD)
27 Optical digital output
28 Coaxial digital audio inputs 1 to 4
29 Optical digital audio inputs 1 to 2
30 AES/EBU balanced digital audio input
31 RS232 control interface
10 THX button
11 Menu
12 Volume control
13 Headphone audio output 1
14 Headphone audio output 2
15 Microphone input socket
16 RS232 control interface
17 USB control interface
32 IR inputs
33 Trigger outputs 1 to 3
34 Component video inputs
35 Component video outputs
36 HDMI outputs
37 HDMI inputs
38 USB control interface
39 Analog audio inputs 1 to 10
40 Tape input/output
41 Record outputs 1 to 2
42 Zone audio output
43 External 7.1 audio input
44 7.1 unbalanced audio output
45 Special audio outputs 1 & 2
46 Power socket and mains switch
Home Page
SSP 1/3
I/P SELECTION
SETUP
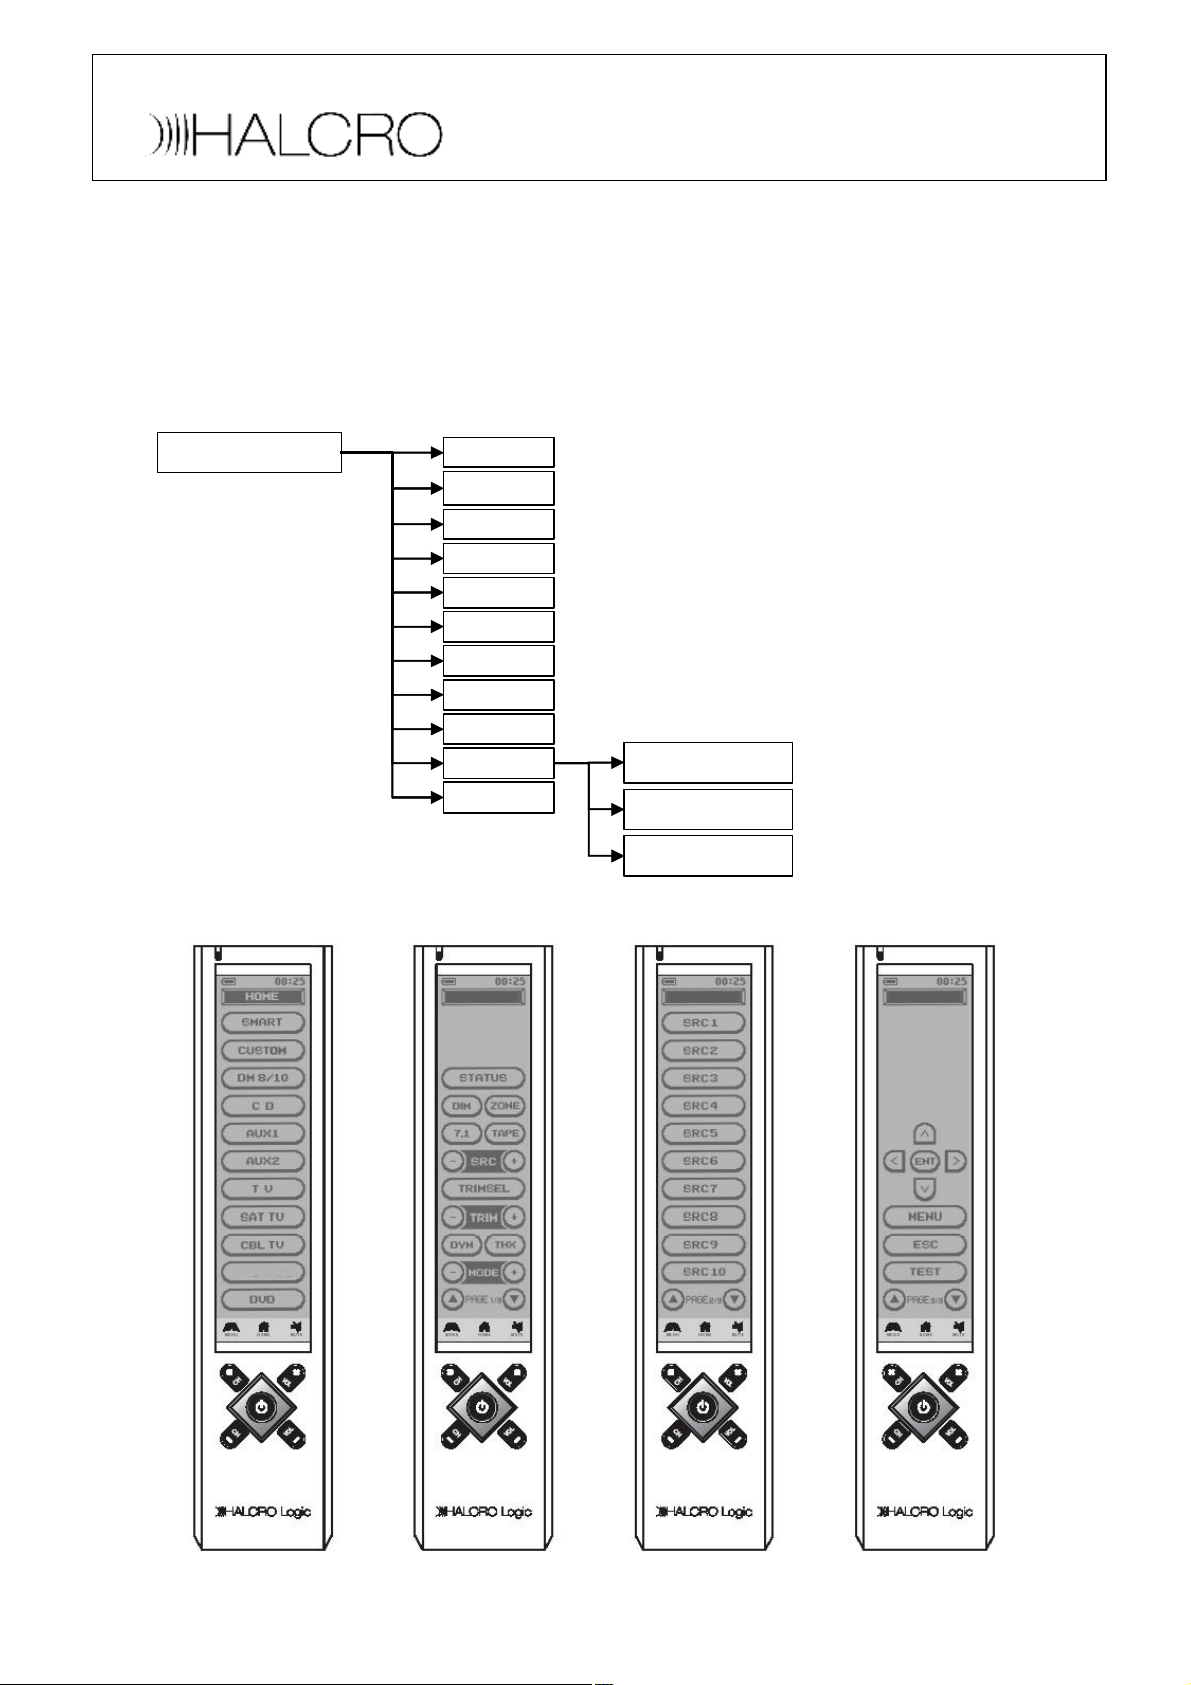
Remote Control
The remote control layout is shown below. The home (top) page details the different pieces
of equipment in the home theatre system, which can be controlled by the remote. When the
SSP is selected the first of three SSP pages is activated. The up/down arrows at the bottom
of the display can be used to scroll through them. Pages 1, 2 and 3 contain the keys for
SSP100 operation, source input selection and setup keys.
SMART
CUSTOM
DM8/10
CD
AUX1
AUX2
TV
SAT TV
SSP
SSP
SSP
CBL TV
SSP
DVD
Remote Control Layout
SSP SSP SSP
SSP SSP SSP
SSP SSP SSP
OPERATION
SSP 2/3
SSP 3/3
EQUIPMENT
EQUIPMENT
SELECTION
SELECTION
SSP80/100
SSP80/100
OPERATION
OPERATION
SOURCE
SOURCE
SELECTION
SELECTION
SSP80/100
SSP80/100
SETUP
SETUP
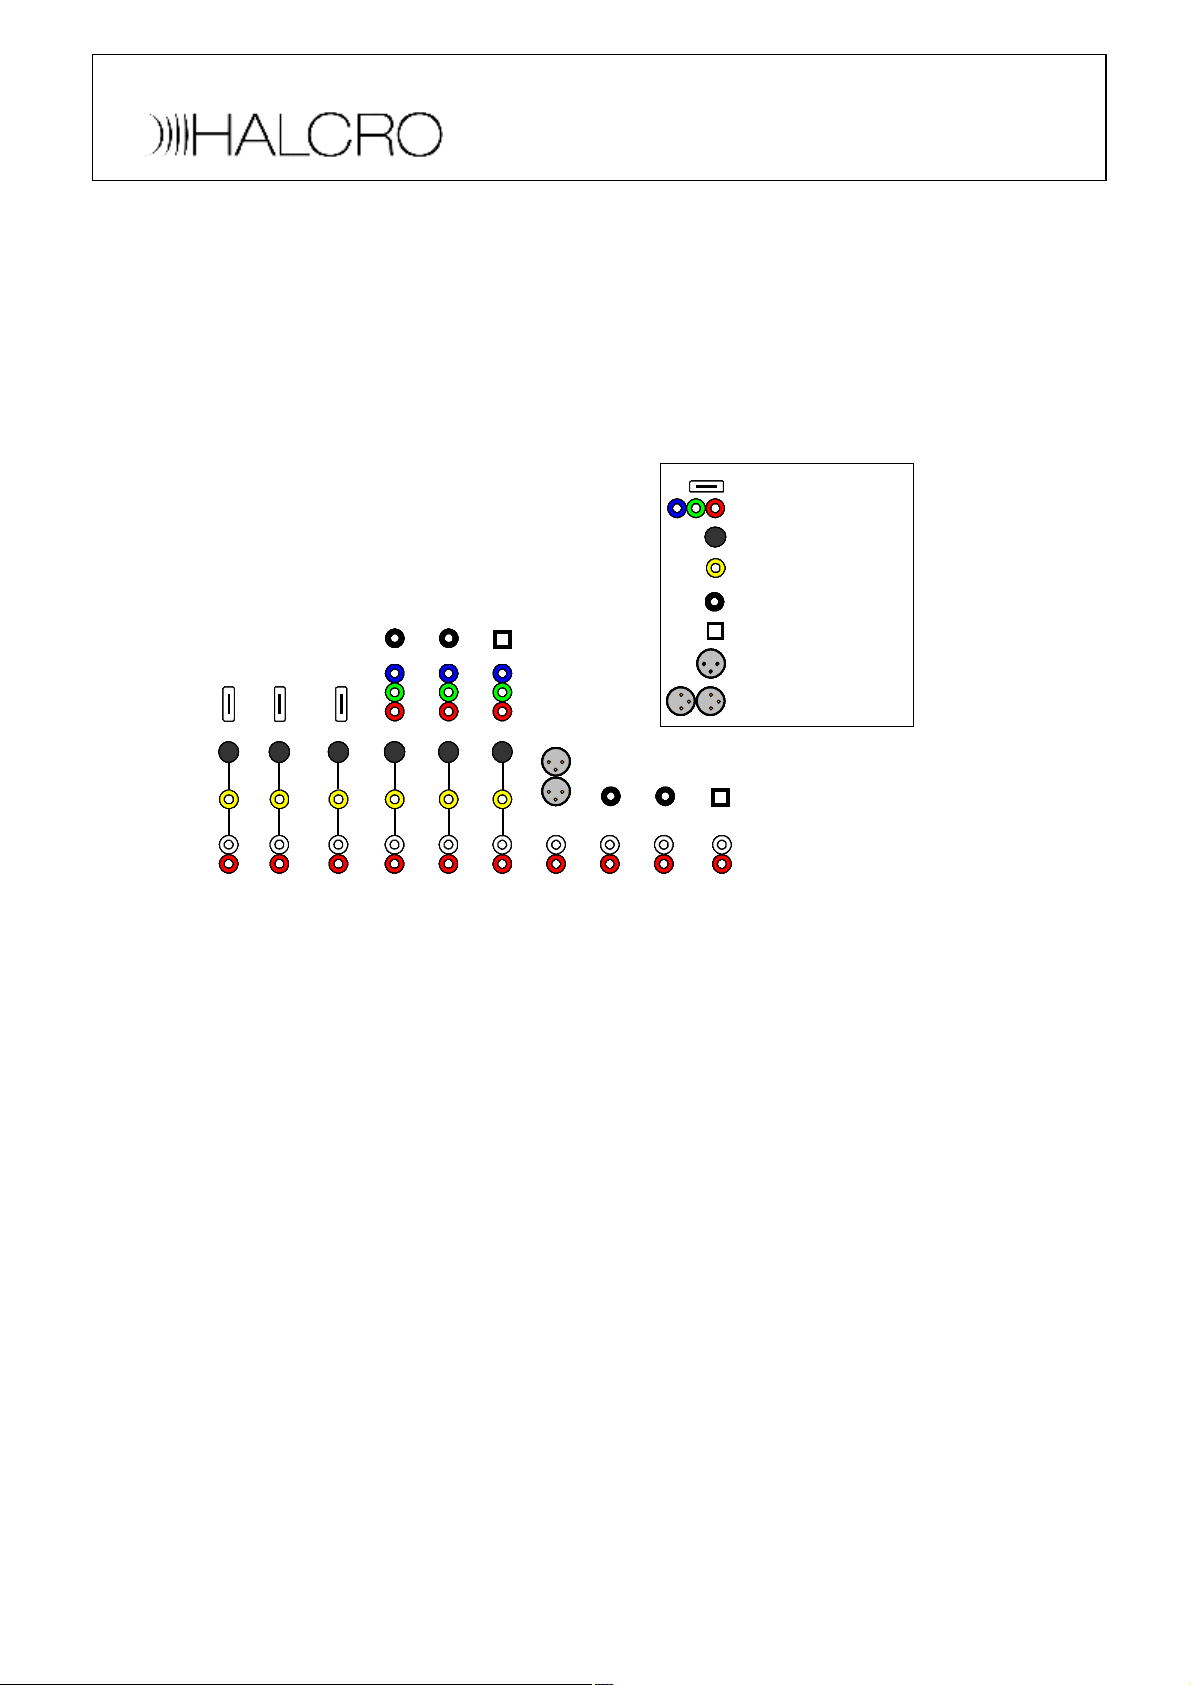
SSP100 Default Settings for Input Sources 1- 10.
To simplify the setup of the SSP100 the factory default settings are in place. To get a video
and audio signal from HDMI sources without going into the setup menu simply connect the
source HDMI output to SSP100 HDMI inputs 1, 2 or 3. For sources with component video
outputs use component video inputs 1, 2 or 3. See SSP80/100 Default Settings below.
HDMI
HDMI
HDMI
HDMI
SSP80/100 Default Settings
SSP80/100 Default Settings
1
2
1
1
1
1
1
2
1
2
1
2
2
1
1
HDMI HDMI
Component Video
Component Video
Component Video
Component Video
Component VideoComponent Video
S-Video
S-Video
S-Video
S-Video
S-VideoS-Video
Composite Video
Composite Video
Composite Video
Composite Video
Composite VideoComposite Video
Coax
Coax
Coax
Coax
Coax Coax
Optical
Optical
Optical
Optical
Optical Optical
AES/EBU
AES/EBU
AES/EBU
AES/EBU
AES/EBU AES/EBU
1
1
1
1
1
2
SRC1
SRC1
SRC1
SRC1
SRC1
SRC22SRC33SRC4
SRC22SRC33SRC4
SRC22SRC33SRC4
SRC2
SRC2SRC22SRC3
1
1
1
1
1
3
SRC33SRC4
SRC4SRC4SRC4
2
2
2
2
2
SRC5
SRC5
SRC5
SRC5
SRC5SRC5
3
3
3
3
3
SRC6
SRC6
SRC6
SRC6
SRC6
SRC7
SRC7
SRC7
SRC7SRC7SRC7
3
3
3
3
3
SRC8
SRC8
SRC8
SRC8
SRC8SRC8SRC8
4
4
4
4
4
SRC9
SRC9
SRC9
SRC9
SRC9SRC9SRC9
Balanced input
Balanced input
Balanced input
Balanced input
Balanced inputBalanced input
2
2
2
2
2
SRC10
SRC10
SRC10
SRC10
SRC10SRC10SRC10
Points to note on the default settings,
· The first six source inputs are audio / video and the last four, 7 10 are audio only. It is
important to remember that the composite video and S-Video inputs 1-6 are directly
linked to analog audio inputs 1-6 and source 1-6 respectively.
· Assignable audio and video inputs can be assigned to all 10 source inputs. Assignable
inputs are
· HDMI 1 4
· Component video 1 4
· Digital audio coaxial 1 4
· Digital audio optical 1 & 2
· AES/EBU (SPDIF)
· To see the video on the front panel display always connect the composite video
output of a source to the SSP100 composite inputs
· To see the volume level from audio sources set the video type to Up-conv
Note: When a digital audio input is active it takes priority over an analog input to that source.
 Loading...