

Haikelite HK4S User Manual
HK4S
Options for Luminus-SST20 / Luminus-SST40
USER MANUAL
Safety precautions
Please use high quality power battery (discharge
capacity greater than 20a),.
The flashlight battery uses single lithium 26800, 26650
or 21700, that is, the battery used is power battery.
Remove and recharge cells when the low voltage
indication is given by the Lamp (repeated
stepdowns in light level and eventual shutdown of
the light).
The HK4S is a very high-intensity flashlight. Do not
point it directly at a person, animal, moving vehicles
or flammable materials. When running at higher
output levels the head of the Lamp will quickly heat
up. This is normal. In warmer ambient conditions
this temperature may exceed 60ºC, so please take
the necessary precautions when handling it.
Open the back of the flashlight and put in the single
lithiumbattery. Ready to use.
Double check the polarity every time before closing:
The lowerseated batteriesmust pointwith plus (nipple)
towards the head. The higher ones must look with plus
totheopenback! All flatendslookat thesprings.
Screw the battery tube back. The HK4S will flash
once when electrical contact is made. Continue to
tighten the battery tube to a gentle stop. Do not
overtighten.
There is a very small drain on the battery while OFF.
This should not be of any concern, but we
recommend removing the cells (or partially
loosening the tail-cap) if the HK4S will not be used
for several months.
For the complete user manual and any questions
you might have about your HK4S, please visit the
support on Haikelite Web. The link is on the last
page of this manual.
Basic Parameters
Emitter
Flux
Range
Luminus-SST20
4000LM
650m
Luminus-SST40
7000LM
500m
Specifications
Body: 6063 aluminum alloy material with
type III hard-coat anodizing.
Stainless steel head pressing ring.
Lens: Double-side AR coated toughened
glass lens 98% light transmission.
Reflector: Triple cup reflector fromaluminum
aluminum, smooth finish
Color: silvery white/Black/Sand yellow
(Option)
Springs: Silver plated copper alloy with low
internal resistance
Battery: ThreeSingle lithium 26800, 26650
or 21700, that is, the battery
used is a power battery.
Charging: Type-C fast charge port is usable.
The indicator light of the switch
is red when charging and it
changes to blue when fully
charged. single 4000MA 21700
cells take about 1.5 hours to fully
change..
Emitter: Four LEDs. Two choices total: Luminus-
SST20 or Luminus-SST40, all are the
highest rank in cold white (6500K) and
neutral white (5000K).
Ingress rating: IPX7
Dimension: 42mm Ø head x 127mmlength
33 mm Ø at the handle
Weight: N.W 180g,
G.W 455g
Packing list: HK4S Flashlight *1
O ring *2
Product Instruction *1
Portable hand rope *1
Type-C USB pallet *1
Quick Start
Ramping: To access this mode when the light is off:
- Click: Turn on at the memorized brightness.
- Hold the button to change brightness.
- Release and hold again to change brightness the
other way.
TURBO: Single-click or double-clicks, and then double-
clicks again for Turbo when the light is OFF
Strobes: Click+ click+ holding button to access the strobe
modes when the light is OFF, then double-clicks again
switch to cycle forward through the different types of
strobes (candle-bike flasher-parte strobe- Tactical
strobe- Lightning storm)
Battery voltage check: Click 3 times from Off to enter
battery voltage check mode (4 blinks+1 blink=4.1V), then
click 2 times again enter to blink modes. (Battery checksunset mode-beacon mode-Temperature check)
Ramping/Stepped Ramping Switch:3 Clicks to enter
Ramping and Stepped Ramping Switch while the light is
ON.
LockoutMode:Click4timesfromOfftoenterLockoutmode. To
exitlockoutmode,click4times.
Momentary Mode: Click 5 times from Off to enter
Momentary mode, unscrew the battery tube to exit this
mode. Momentary mode does either a steady brightness
level or a strobe, details refer to Anduril instruction.
Anduril UI Briefing
Ramping / Stepped Ramping Modes
Anduril's normal operation mode uses a smooth ramp or a
stepped ramp, depending on which style the user prefers.
Each ramp has its own settings -- floor (lowest level),
ceiling (highest level), and the stepped ramp can also have
a configurable number of steps.
OFF
Clicks
Function
1 Click
Turn
ON
Hold
Change brightness (up)
Click+Hold
Change brightness (down)
2 Clicks
Turbo and go back to the last
memorized brightness
3 Clicks
Switch to the ramping and stepped
ramping modes
5 Clicks
Config the current brightness as
default from ON
4 Clicks +
Hold
Go back to automatic memory1.
Hold
From floor level to ramp up the
brightness
Click+Hold
From the celling level to ramp
down the brightness
short Hold
Moon mode
Double-Click
Turn on at the ceiling level
1
In automatic mode, it uses the last brightness the user ramped
to.
Blinky / Utility Modes
----------
Click 3 times from Off to access Anduril's blinky / utility
modes. This always starts at battery check and the user can
proceed to other blinky modes from there. The sequence is:
Clicks
Function
1 Click
Turn Off
1. Battery
check
1
2. Sunset
mode
2
2 Clicks
Next Blink mode
4 Clicks
(Beacon)
Beacon config mode, Click N
times to config beacon interval
time as N second
4Clicks(Temperature)
3.
Beacon
mode
4.
Temperat
ure check
*……
3
Click N times to config the
current temperature as a
calibrate thermal N℃
*……**……
Click N times to config
temperature limit as
(N+30)℃
1
Battery check mode(4 blinks+1 blink=4.1V),and so on
2
This starts at a low level, then dims gradually for an hour, and then
shuts off
3
To represent a series quick blinks are followed once slow blink
Strobe / Mood Modes
----------
Anduril includes a few extra modes for a variety of
purposes: 1. Candle mode
1
;
2. Bike flasher
2
;
3. Party
strobe3;4. Tactical strobe4;5. Lightning storm
mode5。
Click 2 times + Hold from Off to access these
Clicks
Function
1 Click
Turn Off
2 Clicks
Next strobe / mood mode
Hold
Increase brightness, or strobe
faster.
Click+Hold
Decrease brightness, or strobe
slower.
3 Clicks(Candle mode)
Add 30 minutes to the timer
1
Candle mode: Brightness changes randomly in a pattern resembling
a candle flame
2
Runs at a medium level, but stutters to a brighter level once per
second.
3
Motion-freezing strobe light. Can be used to freeze spinning fans
and falling water
4
Disorienting strobe light. Can be used to irritate people. Speed is
configurable, and the duty cycle is always 33%
5
Flashes at random brightness and random speed to simulate
lightning strikes during a busy lightning storm. Do not look directly
at the flashlight when this mode is running, because it may suddenly
go to full power without warning.
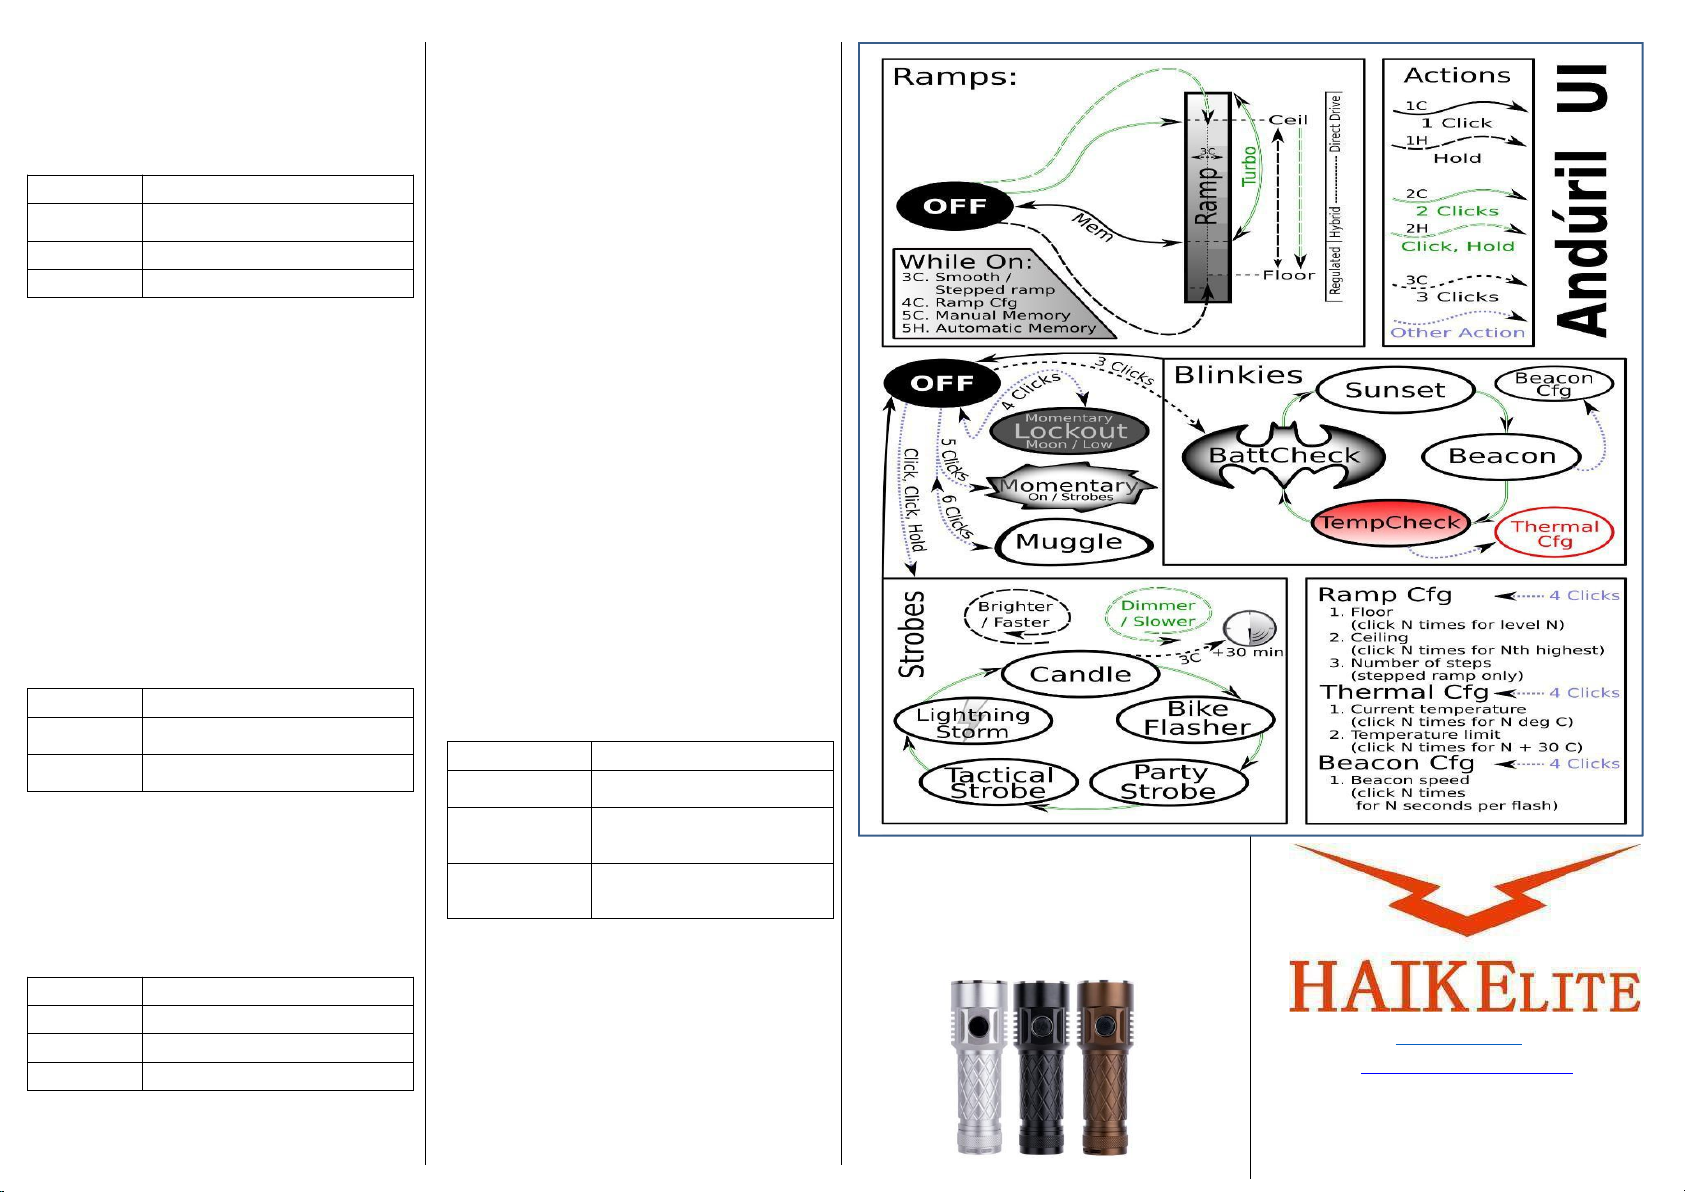
Lockout Mode
----------
Click 4 times from Off to enter Lockout mode. This makes
the light safe to carry in a pocket or a bag or anywhere else
the button might be pressed by accident. The brightness in
lockout mode has two levels:
Clicks
Function
Hold
light up at the floor level of the current
ramp.
2 Clicks
light up at the floor level of the other ramp
4 Clicks
To exit lockout mode
Momentary Mode
----------
Click 5 times from Off to enter Momentary mode. This
locks the flashlight into a single-mode interface where
the LEDs are only on when the button is held down. It is
intended for Morse code, light painting, and other tasks
where the light should be on only for a short time and
probably in a pattern.
Momentary mode does either a steady brightness level
or a strobe. To select which one, go to the mode you
want to use, adjust the brightness and speed and other
settings, then turn the light off. Then click 5 times to
enter momentary mode.
Supported momentary modes are steady (normal
ramping mode) and strobes (everything in the "strobe"
mode group).
In steady mode, brightness is the last-ramped level, so
adjust that before entering momentary mode.
In momentary strobe mode, the settings are copied from
the last-used strobe mode, such as party strobe, tactical
strobe, or lightning.
To exit this mode, physically disconnect power by
unscrewing the tail-cap or battery tube.
Clicks
Function
5 Clicks
Momentary strobe from the last-used
strobe mode
Unscrew the
battery tube
To exit this mode
Muggle Mode (Safety Mode
)
----------
Click 6 times from Off to enter Muggle mode. This
is a simpler and less-bright interface which makes
the light relatively safe to lend to children or other
people who could use the light unsafely. (The
brightness in this mode usually goes from about
10 lm to 600 lm) In Muggle mode, there are only a
few available actions:
Clicks
Function
1 Click
The Light turn ON or OFF
Hold
Change the brightness
6 Clicks
Exit Muggle mode
Muggle mode is remembered even after changing the
battery. This helps prevent children from exiting the
mode by unscrewing the tailcap. However, be sure to
supervise children whenever they are using any powerful
tools,
including a bright flashlight.
Note: If the light steps down in muggle mode, it probably
needs to have the temperature sensor calibrated. Use
thermal config mode to do this.
Configuration Modes
----------
Every config mode has the same interface. The menu
has one or more options the user can configure, and it
will go through them in order.
For each menu item, the light will follow the same
pattern:
1.
Blink one or more times, corresponding to the item
number.
2.
Stutter or "buzz" quickly between two brightness
levels for a few seconds. This indicates that the
user
can click one or more times to enter a number. It
will keep buzzing until the user stops clicking, so
there is no need to hurry.
3. Pause, and then go to the next option.
After the light has gone through all of the menu options,
it should return to whatever mode the light was in
before entering the config mode.
If the user doesn't press a button during a menu item's
"buzz" phase, that item remains unchanged from its
previous value.
Ramp Config Mode
----------
While the light is on in a ramping mode, click 4 times to
enter the config mode for the current ramp.
Clicks
Function
*……
Click N times to config floor brightness
as N/150
*……**……
Click N times to config celling
brightness as (151- N)/150
*……**……***……
Clicks N times to config N of steps
(only use in the stepped ramping
mode)
To configure the floor level, click the button equal to the
number of ramp levels (out of 150) at which the floor
should be. To set the lowest possible level, click once.
To configure the ceiling level, each click goes one level
lower. So 1 click sets the highest possible level, 2 clicks is
the 2nd-highest, 3 clicks is the 3rd-highest level, etc. To
set the default of 120/150, click 31 times.
When configuring the number of steps, the value can be
anything from 2 to 150.
Haikelite Web: http://haikelite.top
Haikelite : https://Haikelite.es.aliexpress.com
Welcome to our website, we will be happy to serve you
.There are more interesting and exciting
flashlights for your choosing.
 Loading...