

Page 1

1
Content
Get Started ......................................................................... 3
Knowing Your Phone........................................................... 3
Removing the back cover ................................................... 5
Inserting the SIM Card ........................................................ 5
Inserting SD card ................................................................ 6
Installing the battery .......................................................... 7
Removing the battery ......................................................... 7
Charging the battery ........................................................... 8
Battery Performance .......................................................... 9
Basic Operations ................................................................. 9
Turning on and off the phone ............................................. 9
Get Started ......................................................................... 9
Main Screen ..................................................................... 10
Making a call .................................................................... 15
Main Function .................................................................. 16
Chrome ............................................................................ 16
Play Store ......................................................................... 17
Manage Download ........................................................... 17
Optimize Battery Life ........................................................ 18
Optimize Data Usage ........................................................ 20
Optimize Memory Usage .................................................. 22
Calculator ......................................................................... 22
Calendar ........................................................................... 23
Camera ............................................................................. 23
Camcorder........................................................................ 25
Clock ................................................................................ 26
Email ................................................................................ 27
FM Radio .......................................................................... 28
Gallery .............................................................................. 28
Gmail ................................................................................ 29
Page 2

2
Google Settings ................................................................ 29
Google + ........................................................................... 29
Hangouts .......................................................................... 30
Google Drive..................................................................... 30
Google Maps .................................................................... 30
Play Books ........................................................................ 31
Play Games ....................................................................... 31
Play Music ........................................................................ 31
WPS Office ....................................................................... 31
Messaging ........................................................................ 31
Music ............................................................................... 32
Contacts ........................................................................... 33
Search .............................................................................. 33
Settings ............................................................................ 34
Sound Recorder ................................................................ 40
Video ................................................................................ 41
Task Manager ................................................................... 41
Safety Information and Use .............................................. 42
Disclaimer ........................................................................ 51
USB Driver Installation Guide ........................................... 51
Page 3
3
Get Started
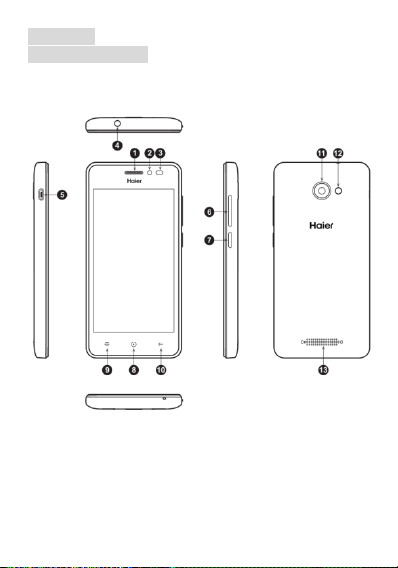
Knowing Your Phone
Page 4
4
Name
Function
1
Ear Piece
Receive the voice from the phone
2
Front
Camera
Capturing images using front camera
3
Sensors
1. Ambient sensor, for detecting the light
or surrounding brightness
2. Proximity sensor, used to measure
distance between the phone and turn off
the display during a call
4
Headset
Port
To connect your 3.5” hands free or audio
port
5
Micro-USB
Port
To connect the charger or data cable
6
The volume
keys
Increasing or decreasing volume level
7
Power Key
Long press To turn on / off the phone from,
and short press to tur n on / off the screen
backlight or screen lock the phone
8
Home Key
Short Press to return to home screen
9
Recent
Apps Key
To display the recent app list
10
Return Key
Return to the previous menu or screen
11
Rear
Camera
Capturing images using rear camera
12
Flashlight
Brighten the environment when you
capture images using rear camera.
13
Loud
Speaker
Produces t he sound, phone ringtone,
notification and loud the conversation
sound
Page 5
5
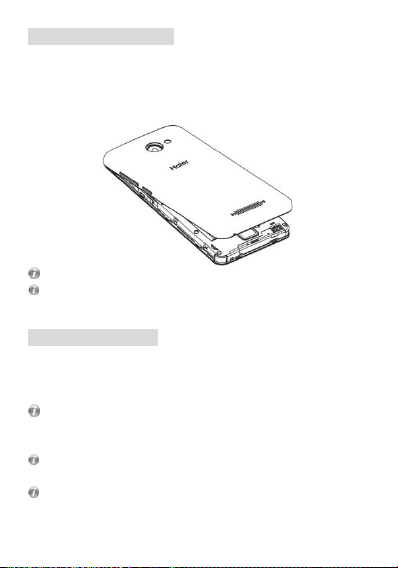
Removing the back cover
You must remove the back cover to install 4G LTE SIM card, SD
card and Battery. Hold the lower half of the phone with battery
cover upwards, and lift the bottom of the battery cover, then
the battery cover can be removed.
Please turn the phone off before open the battery to prevent damage.
Please be careful when opening the back cover, follow it accordingly to prevent
damage.
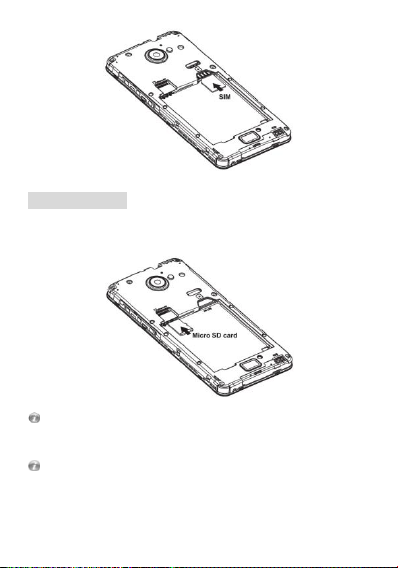
Inserting the SIM Card
You must insert 4G LTE SIM card is o n the phone to enjoy and enable
all the features. Your card contains all your subscription information.
Insert 4G LTE SIM a nd SD ca rd with the metal contacts facing down
and the cut corner is aligned with the cutting on the slot.
If 4G LTE SIM card is not installed, or there are errors in the insertion, or the
card is damaged, “No service” notification will appear on the screen after your
phone is powered on.
If the PIN i s enabled you need input the PIN number to unlock it before you
contrast using the phone.
Please use factory default Micro SIM card only, do not cut or modified from
regular size SIM card and do not u se converter from Nano SIM to Micro due it
might damage the SIM card slot and SIM card connector on the phone.
Page 6
6
Inserting SD card
Insert Micro SD card with the metal contacts facing down and
the cut corner aligned with that of the slot
Please insert or remove the Micro SD card when the phone is powered off, o r
the Micro SD-Card or the phone might get damaged and the data on the Micro
SD-Card could be lost.
The phone might not have SD card indicator when inserted, you may check you
Micro-SD card status through SettingsStorage or check through File
Manager.
Page 7
7
You might need to restart your phone after setting the storage to SD-Card or
when inserting an SD-Card.
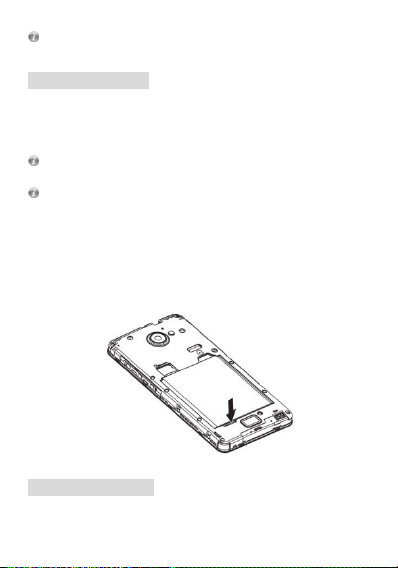
Installing the battery
You must install and charge the battery to use your phone.
Insert the ridge at the top of the battery into the base of the
phone, make sure to touch the metal contact on the phone,
then push the battery down and snap it into place.
Do not forces to turn the phone back on over and over if the battery is too low,
it might cause damage to the phone and the battery.
Please turn the phone off before open the batteryto prevent damage.
Note:
Your phone is designed to be used only with the original
batteries and chargers. The use of other battery or charger is
not recommended it may cause damage to your phone and the
warranty will be void.
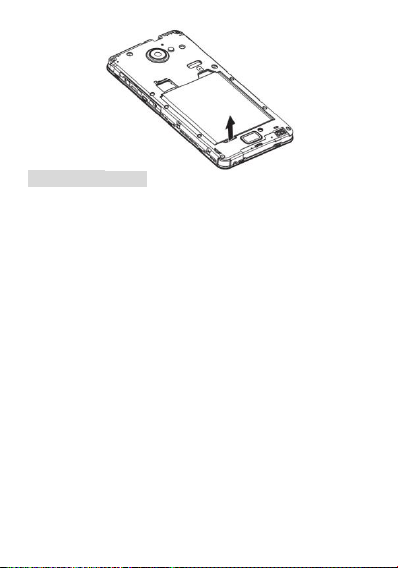
Removing the battery
Make sure your phone is powered off before taking out the
battery to prevent data loss from the phone.
Page 8
8
Charging the battery
New batteries are shipped partially charged. Before you can use
your phone, you need to charge the battery. Some batteries will
have best performance after several full charge/discharge c ycles,
follow the instruction bellow:
1. Connect data cab le and charger, plu g one end into your
phone’s data port.
2. Plug the other end of the charger into the appropriate
electrical outlet (100~240V AC).
3. When your phone indicates that the battery is fully
charged, remove the charger.
Notes:
● The battery is removable, please properly install them to prevent
damage, and use the original battery and charger
● Your phone is designed to be used only with original built-in batteries
and chargers
● The battery can discharge gradually even when your ph one is
powered off. If the battery i s drained for a long time, the information
stored in the phone could possibly be lost.
● Even when you are not using the phone, it would be best to charge
your phone periodically to keep it away from draining.
● If the battery is charged after draining, the phone cannot be turned
Page 9
9
on. The battery needs to be charged for a while, a fterward then the
phone will go to power -off charging mode and you can turned on the
phone
● You need longer charging period with the lower voltage.
● Recommendations do not operate phone during charging.
● The normal temperature of charging is during 0⁰C- 40⁰C.
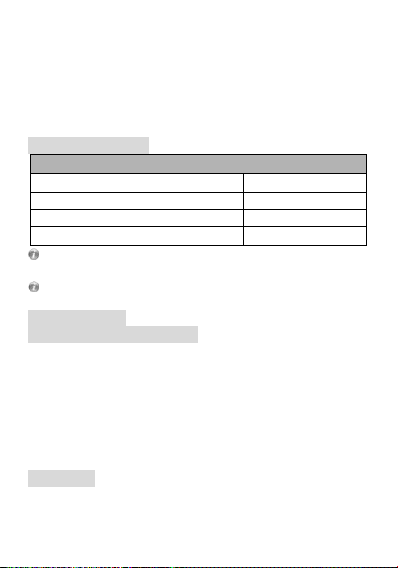
Battery Performance
Information
Capacity
1950mAH
Standby time (LTE only)*
±150H
Standby time (LTE+G)*
±100H
Talk time*
±8H
Many conditions can a ffect battery’s standby time, such as local network
conditions, phone’s settings, frequent operations, using data services, etc.
The battery performance is also affected by charge state and temperature.
Basic Operations
Turning on and off the phone
To turn on the phone:
Press and hold Power key for more than 3 seconds to turn on
your phone.
Turn off the phone:
Press and hold Power key to pop up option menu, select “power
off”. If it is powered off you cannot receive, make a call or do
other operations.
Get Started
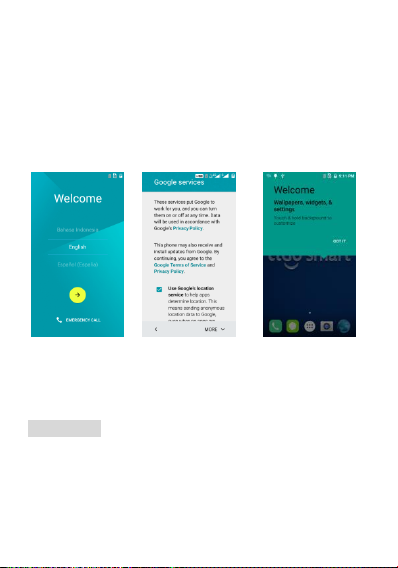
Set up your phone
The first time you turn on the phone, you'll see a Welcome
screen.
Page 10
10
To choose a different language, touch the Start.
To set up your phone, touch the Start and follow the
instruction, such as set up the time/ input ph one name,
etc.
You need to connect to an active network or WI-FI to
proceed.
There will be series of screens takes you through the setup
process. Set up complete, click “GOT IT” to enter home screen.
As you go through the setup screens, you have the option to
skip some steps. Then input your name allows your phone to
personalize some apps.
Main Screen
Screen lock
There are four (4) options for the screen lock function, which
consist of:
1. Swipe: Touch Settings Security Screen lock
Swipe. You can unlock the screen by swipe up the key.
2. Pattern: Touch Settings Security Screen lock
Page 11
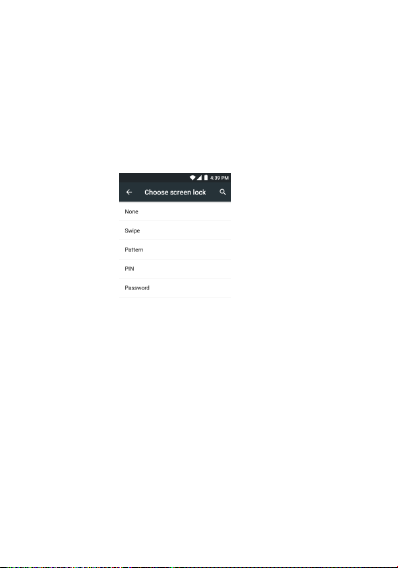
11
Pattern. You can use the pattern as you desired to
unlock the screen, after you set it up.
3. PIN: Touch Settings Security Screen lockPIN.
You can use the PIN as you desired to unlock the screen,
after you set it up.
4. Password: Touch Settings Security Screen lock
Password. You can use the Password as you desired to
unlock the screen, after you set it up.
Important:
Screen lock options are listed in approximate order of the
strength of their security, starting with None and Swipe, which
provide no security. Pattern lock provides more security than
None and Swipe but less then the stronger option, although
they can be more convenient than the stronger lock options.
Widgets and Icons
Touch menu to see all Application Icons and long press on idle
Page 12
12
screen to select Wigets.
Press and hole the widget on the menu sa desired, drag then
release it on desktop.
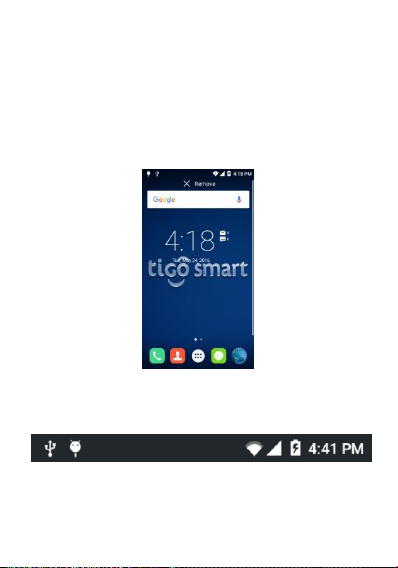
Delete Icon
Press and hold a selected icon on desktop, you will find ‘X
Remove’ appearing. At this time drag the icon to ‘X Remove’,
then release.
Status Bar
A status bar at the top of the screen displays phone status
information and notifications.
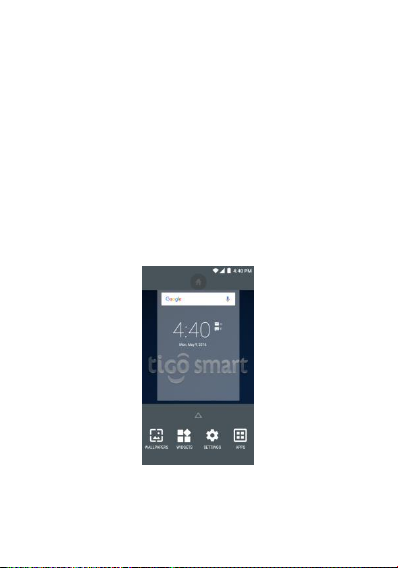
Change Wallpaper
Touch & hold anywhere on a Home screen that's not occupied.
A list of options appears.
Touch a wallpaper source, and it will appear selection:
Page 13
13
1. Pick image, it will appear to select image from:
Gallery. Choose from pictures that you've taken with
Camera or downloaded to your device.
Photos. Choose from pictures that you've taken with
Camera, and Other.
File Explorer. Choose from pictures that you've taken
with Camera or downloaded to your device.
2. Default wallpaper:
Wallpapers. Choose from thumbnails of default
images.
Live Wallpapers. Choose from a scrolling list of
animated wallpapers.
To set a wallpaper image, touch the image then it will replace
you previous wallpaper.
Notification Panel
You can open notifications such as unread messages or missed
calls directly from the notification panel.
Page 14

14
To open the panel, hold the status bar with your finger, and
drag it downward. And you can touch notification and swipe it
to left or right to clear the notifications one by one.
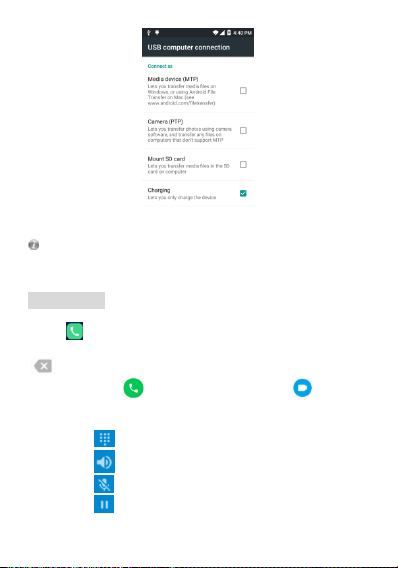
Connection Mode
You can select the connection mode on phone as Media device
(MTP), Camera (PTP), Mount SD Card and Charging and after
your phone is connected to PC via Data Cable. By holding the
status bars with your finger, and drag it downward, then you
will see the Connection mode on notification panel. Touch it
then it will open the option as picture below, then you can
select it as desired.
Page 15
15
The USB MTP and PTP might not work on Ma c OS due to the li mitation and
might required 3rd party application on the Mac Computers for the MTP
function.
Making a call
Making call
Touch to enter dialer interface o n idle screen or main menu
screen, input phone number. If you make a mistake, you can touch
to delete the number or hold it to delete all numbers before
the cursor. Touch to make a voice call or touch to make a
video call.
During a call, you can do the following:
1. Touch to open the dial pad.
2. Touch to enable or disable the loud speaker function.
3. Touch to enable or disable your microphone.
4. Touch to hold the call.
Page 16
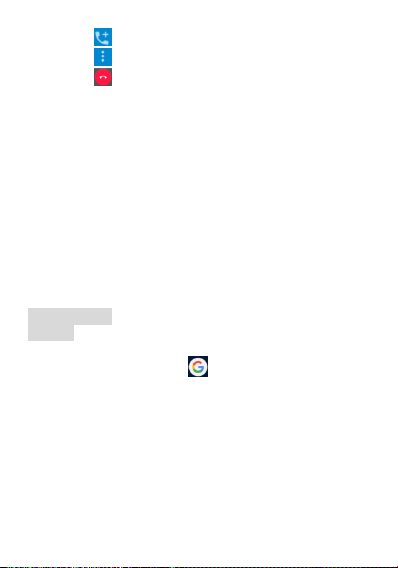
16
5. Touch to add a call.
6. Touch to open menu, hold calll.
7. Touch to end the call.
To see the setting of voice mail, you can do the following:
Touch Settings Call settings Voicemail. Inside the voice mail
settings, you can see or edit the number. You can dial the voice mail
number manually from the dial pad.
To see the settings of Speed dial, you can do the following:
Touch Settings General settings Speed dial settings
Inside the Speed dial settings, you can see or edit the number
correspond to 2 t o 9 accordingly, you can long p ress any number of
2 to 9 in dialer to make a call to the corresponding number you have
set.
To see the settings of call forwarding, you can do then following:
Touch Settings Call Settings Call forwarding.
To see the setting of call waiting, you can do the following:
Touch Setting Call settings additional settings Call waiting
Main Function
Chrome
Connect the web page with the mobile network. Click the
Chrome icon on the Desktop , and then you can open the
web browser.
You can in put different website to view different web page.
Press menu key you can do these lists:
Add a new ta b.
Add a new bookmark or manage bookmarks.
Settings, to enter the browser settings menu.
Help, to enter the browser help menu.
Page 17

17
Play Store
From this application you can download many applications such
as Games, Books & Reference, Communication, Education,
Entertainment etc, where it contain both free or paid
application you can choose that provided from Android market.
This function can work after you create and activate or login
using your Google account.
Touch the icon once you connec ted, the main screen
appears and then afterward you can download any
application based on the categories.
You can manage your Play Store setting from the main
menu when you access the Play Store application
If there are other applications that you have downloaded from
unknown source, you need to enable the function before you
can install it.
Idle, Touch Menu SettingsSecurityUnknown source
select it then press OK, to allow installation of non-Market
apps.
Not all application provided from the Play Store or any other third party can be
supported or compatible with this device due to the specification and develop
requirement differentiation
Some 3rd party application from trusted or untrusted resource may cause the
phone to malfunction or not working properly
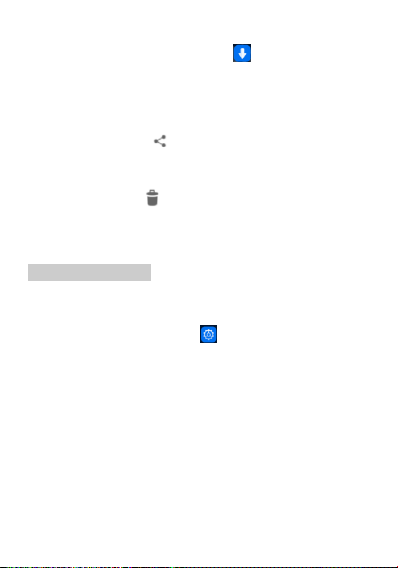
Manage Download
To store the files, apps, and other items you download from
Gmail l, Email, Android Market, or in many other ways, it will
required SD-Card inserted. You can use the Downloads app to
view, copy or delete what you've downloaded.
Page 18
18
Open Downloads and manage downloaded files
Touch the Downloads icon from a Home or all
Apps screen.
Touch an item to open it.
Touch headings for earlier downloads to view them.
Check items you want to share. Then touch the
Share icon and choose a sharing method from
the list.
Check items you want to delete. Then touch the
Trash icon .
At the bottom of the screen, touch Sort by size or
Sort by date to switch back and forth.
Optimize Battery Life
You can extend your battery's between charges charges by
turning off features that you don't need.
First touch the Settings icon on a Home or All Apps
screen.
Extend the life of your battery
If you aren't using Wi-Fi, Bluetooth, or GPS, use the
Settings app to turn them off: Settings Personal
Location.
Turn off GPS: Touch SettingsPersonal
Location, then switch off the Location.
Turn down screen brightness and set a shorter Sleep
timeout: SettingsDeviceDisplay.
Page 19

19
If you don't need it, turn off automatic syncing for all
apps: SettingsAccount. Or you can touch
icon to enable/disable it from taskbar.
Note that this means you need to sync manually to
collect messages, email, and other recent
information, and won't receive notifications when
updates occur.
If you know you won't be near a mobile or WI-FI
network for a while, switch to Airplane Mode.
Check battery level and usage details
Open Settings DeviceBattery. The list at the
bottom of the screen shows the breakdown of
battery usage for individual apps and services.
Warning! If you stop some apps or services, your
device may not work correctly.
Page 20

20
Optimize Data Usage
Date usage refers to the amount of data uploaded or
downloaded by your device during a given period.
Data usage settings allow you to:
Set the data usage level at which you'll receives
warning.
Set a data usage limit.
View or restrict data usage app.
To adjust the settings described:
1 Touch the Settings icon on a Home or All App s
screen.
2 Touch Wireless & networksData usage.
By default, you see the settings for mobile data or networks
provided by your carrier.
It’s possible to settings in a separate tab, to do s o, touch the
Menu key, then Show W-Fi usage.
Set data usage warning
Drag the orange line by its right side to the level where
you want to receive a warning.
Set data usage limit
1 Check Set mobile data limit.
A dialog appears that describes the limit you're setting.
2 Read the message. If you're willing to proceed, click OK.
3 The red line at the top of the graph activates, so you can
drag it up or down.
4 Drag the red line by its right side to the limit you want to
set.When your data usage reaches the limit, mobile data
will be turned off automatically and many features of
Page 21

21
your phone won’t work correctly. You’ll receive a
notifacaiton when this occurs.
View or restrict data usage by app
Check whether data usage can be restricted from the app's
own settings (available from within the app) before restricting
it here.
1 Make sure you're viewing the network for which you
want to view or restrict app data usage.
2 Scroll down to find the app whose data usage you want
to view. The blue bar for each app indicates its total
data usage for the cycle displayed above the main graph,
near the top of the screen.
3 To see more details for an app, touch iss name.
4 Tostop background data usage for this app, check
Restrict background data.
5 Read the message that appears, If you’re willing to
proceed ,click OK
Advanced data usage settings
Two other settings available from the Menu key can have
dramatic effects, but may sometimes be useful:
Data roaming can result in steep additional charges.
However, in some locations this may be the only way
to connect to the internet.
Restrict background data affects all your apps across
all available networks, and may cause some features
to stop working. This is an extreme step that should
be used with caution.
Auto‐sync data helps sync each account
automatically to collect recent information. If you
Page 22

22
turn it off, you’ll need to collect recent sync manually,
and you won’t receive notifications when updates
occur.
Optimize Memory Usage
Apps use two kinds of memory: internal storage and RAM. They
use internal storage for themselves and any files, settings, a nd
other data they use. They also use RAM (memory designed for
temporary storage and fast access) when they're running.
The memory available capacity shown is based on the actual usage capacity
after reduced by system usage.
Android also manages how apps use RAM. It may cache some
things you've been using recently, for quicker access if you need
them again, but it will erase the cache if it needs the RAM for
new activities.
You affect the way apps use internal storage directly and
indirectly in many ways, for example by:
Installing or uninstalling apps.
Downloading files in Browser, Gmail, and other apps.
Creating files (for example, by taking pictures).
Deleting downloaded files or files you created.
Copying files between your device and a computer via
USB or Bluetooth.
You rarely need to manage t he way apps use RAM. But you can
monitor apps RAM usage and stop them if they misbehave.
Calculator
Perform basic arithmetics such as addition, subtraction,
multiplication and division.
Page 23

23
1. Touch the Calculator application icon.
2. Touch the number and operation symbols to do the
calculation.
3. Touch “DEL” to clear the result one, or long press ”DEL”
to clear all.
Calendar
The Calendar app lets you view and edit your schedule. Touch
on a Home or Apps screen.
To change the Calendar view, touch the date at the top left
corner and choose Day, Week, Month or Year.
Create agenda
1. Press menu key and click “New event” button.
2. Before you can add an event, you must add at least one
calendar account to your device and make a calendar
visible.
3. Input name/Location/Time and so on.
4. Click “Done” button.
The new agenda will appear on the calendar menu when you
entering again.
Camera
The Camera app is a combination camera and camcorder that
actually consists of two cameras, front camera (facing you) an d
main camera behind the phone. The camera includes a
Panorama mode that allows you to create a single image by
panning across a scene. You can view photos and videos you
take with Camera in the Gallery app .
To take pictures and videos, first touch the Camera icon on
Page 24

24
the Application list screen.
When the Camera opens, it will have three modes
and additional settings and shortcut and
option to switch camera on the side.
Photo, Take pictures by touching the camera button
icon .
Video recording, Take video by touching the record
button .
Panorama, Take panorama by touching the panorama
button icon .
Touch the thumbnail near the blue or red button to
view the most recently taken pictures or videos. You
can also slide the camera screen to right to view the
most recently taken pictures or videos.
You can share the picture by Gmail, Messaging, Bluetooth, or
other menus displayed af ter pressing the menu key touch
“Share”.
To view this picture and others in the Gallery app, touch the
picture.
Install Micro-SD before taking any pictures or record videos o r you may use
the internal memory by turning the switching the storage location to phone
You might need to restart your phone after setting the storage to SD Card.
Storing pictures and videos to your phone memory may consume the free
space and when it gets low it will impact the phone performance
Please ensure you have already enabled the GPS function before turning on
the Store Location function and you can view your location from the image
details
When taking picture in Panorama mode, it will consume the RAM, if the RAM
usage is high it may not work properly.
Page 25

25
Camcorder
To use camcorder function, first touch the Camcorder icon
on the Application list screen. Then touch to switch
camcorder, When the Camcorder opens, it will have the option
button to use front or rear camera. Click Flash button
to turn on or off LED flashlight. Touch button to start
recording video.
Click button to end recording.
You can activate t he camera function when your phone
screen is locked, by sliding the pad lock icon to the left
toward the dialer icon, then the camera will open, as
shown:
Page 26

26
Clock
Touch the Clock application icon . You can see the time and
date.
Add Alarm
1. Touch the Clock application icon.
2. Touch to set alarm and click to add alarm.
3. Set up your alarm as desired.
4. Touch “OK”.
5. Select the alarm clock.
Shut Off Alarm Alert
When a scheduled alarm is activated, a pop-up window with
the alarm title appears.
Touch Snooze if you want to be reminded again in 10 minutes.
Page 27

27
Touch Dismiss to cancel the alert.
Turn Alarm on
1. In the Alarm list, find the desire alarm.
2. Click the on the left.
3. After the change to , then alarm is
active.
Edit Alarm
Touch on t he alarm you want to edit in the alarm list, and then
you will enter into the editing screen. After editing, touch OK.
Delete Alarm
1. Touch on the alarm you want to delete.
2. Touch at the top right corner.
3. Select OK on the pop-up message.
Notes:
1. Press menu key to enter Settings of alarm clock.
2. The alarm clock will still work even the phone is
powered off.
3. Don not set the phone in silence mode to guarantee the
alarming effect (unless if t he vibrate mode is set to
always on).
4. If the battery is empty the alarm function will not work.
Email
You can configure Email for most accounts in just a few
steps according the tip on the screen.
Page 28

28
The functions of the Email:
1.Receive email and view the text and attachments via your
phone.
2.Reply and forward a received email.
3.And create a new Email.
Apart from this, you also can set the inbox checking frequency.
Not all email account and protocols can be supported by default, it might
require advance and additional setting or some exception from the email
provider
FM Radio
You should insert headset before using FM Radio, the headset is
also functioning as the external antenna. Please always use the
original headset. The usage of non original headset might not
compatible with the phone.
Search radio settings and play it:
1. Touch the radio icon
2. Click menu key, select “Scan” scan all stations.
3. Select some stations and play it.
4. Touch or icon to search the channel manually.
5. Touch the icon to turn off the radio.
Gallery
Touch t he application icon to view pictures and videos
stored in phone or memory card.
The top of screen show several tabs to view the images based
on its classification
Not all media files can be viewed or played due to codec, resolution and size
differentiation
You can find additional 3rd party multimedia from the Play Store to
accommodate your need.
Page 29

29
Gmail
You can access and use Gmail to read and write email from
your account on any mobile de vice or browser.Gmail is not just
about email. Your Gmail name and password can provide you
access into to all Google apps and services.
Launch Gmail. Touch the Gmail icon on a Home or
All Apps screen. The first time you launch Gmail, you will
be asked to sign in or create an account if you do not
have Gmail account when you first set up your device.
Read email. Touch a message to read it. Unread message
are bold.
Organize email. Touch the icon in the front of a mail to
select it. Then use the icons and menu at the top of the
screen to manage the selected mails.
Change your settings. Touch the Menu key to change
your preferences, add an account, or get Help.
No matter where you are within Gmail, you can always get back
to the Inbox by touching in the top left corner of the screen
and select inbox.
Google Settings
Google Settings app lets you know which apps you've
signed into using Google+, as well as allowing a method of
shutting them off, with the option of removing all associated
content from your Google+ pages.
Google +
Google+ Sign-in allows you to use your Google ID as a
universal sign-in for online apps and services, in the same way
as you've been able to with your Facebook log-in for a number
Page 30

30
of years.
The advantage to consumers is fewer passwords to remember
and less time spent tapping in emails and passwords, or going
through a complete registration process.
Hangouts
Hangouts bring conversation to life with photos, emoji,
and video calls for free. Connect with friends through computer,
android devices, etc.
Google Drive
You can store your files in Google Drive by uploading them
directly from both your phone and computer. Then you can
access to the files or even download them and share them with
others from anywhere with the phone or computer.
To upload the files, click the icon at the top right corner,
select Upload;
To download the uploaded file, touch the icon beside the
file name, then click the icon to Download;
To share with others, touch Share link and select a way to
share the file.
Google Maps
This app can help you locate where you are. You can also find
local entertainments, view maps and get driving directions with
Google Maps . Touch the top left corner, you can do:
Select Local to find nearby restaurants, bars, attractions, etc;
Select Navigation to get directions after typing destination;
Touch My places to see your starred location, recent location,
directions, etc;
Page 31

31
Select Join Latitude to find family and friends on the ma p and
share where you are with people you choose.
Play Books
From Play Book you can choose from millions of books on
Google Play including new re leases, New York Times®
bestsellers, textbooks and free class ics. Easily adjust font size
and customize even more of your reading experience. Read
online or offline and pick up where you left off on your phone,
tablet, or computer.
Play Games
Google Play Games app is the easiest way for you to
discover new games, track achievements and scores, and play
with friends around the world. It brings all your gaming on
Google Play together in a unified Android experience.
Play Music
Google Play Music makes it easy to discover, play and
share the music you love on Android and the web.
You can play millions of songs on G oogle Play, listen to radio
with no limits, and e njoy playlists handcrafted by our music
experts.
WPS Office
This app provides the basic function to read or edit office
documents in the phone.
Touch the icon to start the application.
Messaging
Send and receive message.
Page 32

32
Create text message
Touch Messaging icon to open the program.
Click to create message.
Input receiver’s phone number and edit contents.
For phone number:
1. You can click the keyboard to input number directly.
2. You can select number from messages, contacts or groups
3. You can select several numbers to send.
4. Tou ch t o se nd t he m essa ge.
Message with attachment, Multimedia Message (MMS) are not supported
Notes:
If the message editing is interrupted by incoming calls, alarm
clock, powering off, the entered texts will be saved temporarily.
Click “Type message” to edit the message.
Touch button to show the menu.
Message with attachment are not supported features.
Music
Touch the Music application icon to enter music player.
1. Songs: shown the list of all available songs
2. Artists: view the list based on the artists
3. Albums: view based on the albums list.
4. Playlists: view current playlist and saved playlist.
Long Pres splaying song, you can do :
Add the song to playlist.
Set the song as ringtone.
Delete the song.
Search.
Share the music.
Page 33

33
You also have Snapdragon Audio+ audio enhancer as an
additional, you can go to Settings Sound & notification
Snapdragon Audio+ to open and use S napdragon Audio+ or
through the drop down bar.
Adjust the volume level in accordance with your hearing preference in
order to avoid injury to your hearing.
Use your stereo earphones or headphones for a better audio experience.
Not all multimedia or applications can be supported due to its limitation.
If you use another audio enhancer, equalizer or application, it will affect
the current audio enhancer function and it will not work properly.
Contacts
Touch Contacts application icon to enter the contact
information.
Search for a contact
1. Click fast search key or click
2. Enter the first few letters of the contact name, all contacts
beginning with these letters appear.
Add a contact
Click , you can add a new contact to the phone or SIM card.
Manage contact
Click the item to v iew the deta il information about the contact.
Hold the menu key to view the submenu: Delete /share/send
contact via SMS/ copy to phone / place on home screen.
Search
Google Search is available from the top of Home screen:
Page 34

34
Speak search terms: Touch the Microphone icon ,
After you say what you’re looking for, the Browser
opens to a list of search results.
Type search terms: Touch Google. As you type,
suggestion appear below the Search box. The first few
suggestions attempt to complete what you’ve typing:
To search for a suggestion immediately, touch it.
To a dd a suggestion to the search field, touch the
arrow to its right. You can then keep on typing or
choose further suggestions.
To search for the contents of the search field, touch
the Search button near the lower right corner of
the keyboard.
YOU also can input the contact with soft key or voice.
Click to search the network resource.
Settings
Touch the Settings application icon, t hen you can see some
submenus that you can choose as follows:
Wireless & Networks
Through this menu you can set the connection and network on
LTE, and other functions.
From the Wi-Fi function you can switch it on / off, and
select the Wi-Fi network available as desired.
Touch the Data connection icon from the settings
to enable/disable it or from the status bar with your
finger, and drag it downward.
From the Bluetooth function you can switch it on / off,
and select the available devices to paired.
Page 35

35
Turn on Data usage.
Click to turn on Airplane mode.
Set the VPN network
Set the tethering & portable hotspot.
- Touch More Tethering & portable hotspot
USB tethering. You can enable or disable theUSB
tetheringby ticking the box, As illustrated below
You need to plug using the data cable to the computer to use
handset for Data connection sharing through USB port.
For Win XP SP2 or below and Macintosh OS, you need to install
the modem driver before you can use the modem function. You
may find the installation guide on the page 40
Drivers are provided inside phone as a virtual CD ROM, where you
can install it in accordance with the OS you use.
- Click Portable Wi-Fi hotspot to enable / disable
portable network connection. And you can
configure the hotspot as open or secure
connection by touching Set up Wi-Fi hotspot
You can share the Wi-Fi connection up to 5 users.
Page 36

36
- Bluetooth tethering enables your phone sharing
Internet connection with other phones. To enable
it, touch More Tethering & portable hotspot
Bluetooth tethering.
To use Bluetooth tethering, the phones needs to be connected
first through Bluetooth.
Device
1. SIM Settings
Touch MoreCellular network Preferred network
type to select the preferred network mode, two option
available, 4G/3G/2G, 3G/2G.
Touch MoreCellular network Access Point Names to
see the APNS Setting information.
I f you experience difficulties on data connection you may try switching
in between the APN
2. Call Settings
This function can configure the call function on SIM card.
Touch Change strings to “Call settings to select phone
ringtone and vibrate, also to configure the
supplementary services including voicemail, call
forwarding, call waiting, etc.
Other call settings provides the switch for Dial pad
touch tones, proximity sensor, call vibrate, dual
microphone, display duration, etc. Y ou can also set the
length of DTMF tones by touching DTMF tones.
3. Gesture
Turn on gesture function:
There are nine (9) options for the screen lock function, which
consist of:
Double tap to awake: When screen is black, double tap
Page 37

37
the same place of your phone can awake the screen.
Slide down to camera: When screen is black, slide
down can photograph.
Slide up to unlock: When screen is black, slide up can
unlock.
Sideslip change songs: When screen is black, slide to
left or right can change-over music.
Draw “C ” to dial: When screen is black, draw “C” can
dial.
Draw “O” to contacts: When screen is black, draw “O”
to contacts.
Draw “W” to Chrome: When screen is black, draw “W”
to chrome.
Draw “e” to Gallery: When screen is black, draw “e” to
gallery.
Draw “M” to Music: When screen is black, draw “M”’
can play music.
4. Sound& notification
Set volume for ringtone / media or alarm.
Set vibrate and ring.
Set your default phone ringtone.
Set your default notification ringtone.
Turn on / off Dial pad touch tones / Touch sound and so
on.
5. Display
Adjust the brightness of the screen, you can adjust the
brightness level from this menu or from the home panel
status bar you can quickly set the brightness to low,
medium, high and auto.
Page 38

38
By default the handset brightness is set to auto where the backlight
brightness is adjusted base on your surrounding environment using
the ambience sensor
You can adjust the brightness manually by disabling the automatic
brightness function from the display menu or through the shortcut
menu bar
Choose the wallpaper from gallery / live wallpapers /
wallpapers.
Adjust the delay before the screen automatically turns
off.
Select the font size.
6. Storage
View the external (Micro-SD) and internal memory storage
capacity and usage.
7. Battery
View the battery usage data based on the process and
application that were consuming the battery.
8. Apps
Manage and remove installed apps, View and control currently
running services, view storage used by apps.
Personal
1. Location access
Turn on Access to my location to let apps and Google’s
location service use your location information
Set the location sources from GPS satellites or Wi-Fi &
mobile network location.
2. Security
Page 39

39
Lock screen with slide, pattern, PIN or password.
Edit owner information displayed on the lock screen.
Encrypt your accounts, settings, downloaded apps and
their data, media, and other files.
Set up SIM card lock and edit passwords.
Select device administrators.
Credential storage.
3. Language & input
Select language and edit personal dictionary.
Select android keyboard or Google voice typing.
Set the voice search and text-to-speech output.
Set the pointer speed.
4. Backup & reset
Turn on or off “Back up my data” or “Automatic
restore”.
Erase all data in phone.
Accounts
1. Add account
With this function, you can manage your accounts &synchronize
them. You can add accounts using corporate, other email
account and Google accounts.
Touch Add account to add account as desired. And you can
switch ON/OFF to activate or deactivate the synchronization
To remove accounts, touch the account, touch menu button
then select Remove account.
Not all email account and protocols can be supported by default, it might
require advance and additional setting or some exception from the email
Page 40

40
provider
System
1. Date and time
Set the date, time, time zone and formats.
The current date and time will display on the idle
screen.
LTE network is able to automatically set the date and
time, so Automatic date & time cannot be used after
the phone is inserted with SIM card.
If you do not choose automatic, you need to set the
date and time zone manually.
2. Accessibility
View services installed.
Turn on large text / Power button ends call and so on.
3. About phone:
Touch the Settings About phone, then you can see sub
menu as follows:
Status, to check the status of the network, battery, IP
address, WIFI & Bluetooth address serial number and
up time.
Legal information, to see the legal information from
open source and Google legal
Model number
Software version. Etc.
Sound Recorder
With sound recorder application, you can record for a
Page 41

41
long time, please make sure your phone has enough storage.
To record the sound, follow the instructions as below:
1. Keep the phone near the sound source.
2. Click “ ” to record, click “ ” to stop.
3. Finish the recording; you can select “Done” or “Discard”.
Video
Touch the Video application icon you can view and play the
video on the SD card.
Not all video files can be viewed or played due to codec, resolution and size
differentiation.
Video can played and view in PIP Mode (Picture in Picture) but not all video
can be supported.
When play the video in PIP Mode, it will consume th e RAM usage, if the
RAM usages are high it may not work properly.
You can find additional 3part multimedia player or view from play store to
accommodate your need.
Task Manager
Android does not automatically stop applications after they are
loaded or opened, so you must manually stop the applications
as desired.
You can kill tasks using Task Manager Application on the phone
Page 42

42
To open the Task Manager, press menu button, then select
“Task manager” you can press to close the application as
you des ired, or press button to close all the active
applications.
Safety Information and Use
Please read this safety information carefully to ensure safe and
proper use.
Note: This equipment has been tested and found to comply
with the limits for a Class B digital device, pursuant to part 15
of the FCC Rules. These limits are designed to provide
reasonable protection against harmful interference in a
residential installation. This equipment generates, uses and can
radiate radio frequency energy and, if not installed and used in
accordance with the instructions, may cause harmful
interference to radio communications. However, there is no
Page 43

43
guarantee that interference will not occur in a particular
installation. If this equipment does cause harmful interference
to radio or television reception, which can be determined by
turning the equipment off and on, the user is encouraged to try
to correct the interference by one or more of the following
measures: —Reorient or relocate the receiving antenna.
—Increase the separation between the equipment and receiver.
—Connect the equipment into an outlet on a circuit different
from that to which the receiver is connected. —Consult the
dealer or an experienced radio/TV technician for help.
Driving
Using a mobile phone can distract the user and result in an
accident. You must fully comply with the local regulations and
laws regarding the use of cell phones whilst driving.
Near Sensitive Electronics
Don’t use your phone near sensitive electronic equipment –
particularly medical devices such as pacemakers and electronic
implants, as it could cause them to malfunction. Your phone
may cause interference with TV, radio, fire detectors, and other
automatic-control equipment.
For more information about how your phone affects
pacemakers or other electronic equipment, please contact the
manufacturer or your local distributor.
Flying
Your phone can cause interference with aircraft equipment. So
Page 44

44
please turn your phone off when flying.
Hospitals
Your phone may interfere with the operation of medical
equipment. You must observe and follow any instructions or
warnings in hospitals and treatment centers.
At Petrol Stations
Don’t use your phone in petrol stations. In fact, it’s suggested
to be switched off near any fuels, chemicals or explosives.
Contact with liquid
Keep your phone away from water (or any other liquid). Any
damage caused by liquid may be irreparable.
Making Repairs
Never take your phone apart. Please handle the repairs with
the professionals. Any unauthorized repairs would break
warranty terms.
Broken Antenna
Don’t use your phone if t he antenna is damaged, as it could
cause injury.
Around Children
Keep your mobile out of children’s reach. It should never be
Page 45

45
used as a toy and it might not be good for their health.
Original Accessories
Only use t he original accessories supplied with your phone or
those approved by the ma nufacturer. The use of unauthorized
accessories may damage your phone or cause a safety risk.
Near Explosives and Fire hazard
Turn off your phone in or near explosive materials or heat
sources such as radiators or cookers. Always obey local
regulations and laws. Turn off your phone when requested.
Emergency Calls
To make an emergency call your phone must be turned on and
in an area where there’s network coverage. Dial the national
emergency number and press ‘send’. Explain exactly where you
are and don’t hang up until help has arrived.
Working Temperature
The working temperature for the phone is between 0 Degree
and 40 Degree Celsius. Please don’t use the phone outside the
range. Using the phone under too high or too low temperature
might cause malfunction.
Always make a backup or keep a written record of all important
Backup
Page 46

46
data in your mobile phone.
Attention:
Use cell phone when the signal is good. Keep
your calls s hort, use headset or send a text
message. This advice applies especially to children, adolescents
and pregnant women.
If you are using a Bluetooth headset device, please make
sure it has a low power emitter.
Information about the meaning of Logo WEEE (Waste
Electrical and Electronic Equipment):
The WEEE logo on the product or on its box
indicates that this product must not be
disposed of or dumped with your other
household waste. You are liable to dispose
of all your electronic or electrical waste equipme nt by
relocating over to the specified collection point for recycling of
such hazardous waste. Isolated collection and proper recovery
of your electronic and electrical waste equipment at the time
of disposal will allow us to help conserving natural resources.
Moreover, proper recycling of the electronic and electrical
waste equipment will ensure safety of human health and
environment.
Caution: risk of explosion if battery is replaced by an
incorrect type.
Dispose of used batteries according to the instructions.
For pluggable e quipment, the socket-outlet shall be installed
near the equipment and shall be easily accessible.
Page 47

47
RADIO WAVES:
Proof of compliance with international standards (ICNIRP) or
with European Directive 1999/5/EC (R&TTE) is required of all
mobile phone models before they can be put on the market.
The protection of the health and safety for the user and any
other person is an essential requirement of these standards or
this directive.
THIS DEVICE MEETS INTERNATIONAL GUIDELINES FOR
EXPOSURE TO RADIO WAVES.
Your mobile device is a radio transmitter and receiver. It is
designed not to exceed the limits for exposure to radio waves
(radio frequency electromagnetic fields) recommended by
international guidelines. The guidelines were developed by an
independent scientific organization (ICNIRP) and include a
substantial safety margin designed to assure the safety of all
persons, regardless of age and health.
The radio wave exposure guidelines use a unit of measurement
known as the Specific Absorption Rate, or SAR. The SAR limit
for mobile devices is 1.6 W/kg.
Tests for SAR are conducted using standard operating positions
with the device transmitting at its highest certified power level
in all tested frequency bands. The highest SAR values under the
ICNIRP guidelines for this device model are:
Maximum SAR for this model and conditions under which it
was recorded.
SAR
Body
0.788 W/kg
SAR
Head
0.874 W/kg
Page 48

48
During use, the actual SAR values for this device are usually
well below the values stated above. This is because, for
purposes of system efficiency and to minimize interference on
the network, the operating power of your mobile device is
automatically decreased when full power is not needed for the
call. The lower the power output of the device, the lower its
SAR value.
If you are not using an approved accessory ens ure that
whatever product is used is free of any metal and that it
positions the phone the indicated distance away from the body.
Organizations such as the World Health Organization has stated
that if people are concerned and want to reduce their exposure
they could use a hands-free device to keep the phone away
from the head and body during phone calls, or reduce the
amount of time spent on the phone.
As mobile devices offer a range of functions, they can be used
in positions other than against your ear. In such circumstances
the device will be compliant with the guidelines when used
with headset or USB data cable. If you are using another
accessory ensure that whatever product is used is free of any
metal and that it positions the phone at least 1.0 cm away from
the body.
To prevent possible hearing damage, do not listen at
high volume levels for long periods.
Page 49

49
Using the battery and charger
Only use batteries and chargers approved by the manufacturer.
Do not use batteries or chargers t hat are not compatible with
your model to avoid any explosion.
Do not throw a battery in a fire as it might catch fire or explode.
Do not cause a short circuit to the charger as it might result in
malfunction, smoke or fire.
Do not place conductors like metals, keys or jewels, against the
battery poles or allow them to touch the ends of the battery to
avoid short circuiting the battery and causing injury (burns, for
example) as a result of battery overheating
If the power cable is damaged (wires exposed or broken) or the
connection to the plug is loose, do not use it to avoid electric
shock, short-circuit of the charger or a fire.
Do not dismantle the battery or weld the two poles of the
battery to prevent the battery from leaking, overheating,
catching fire or exploding.
Keep the charger away from any container of water or other
liquids. Infiltration of liquid may cause electric leakage or other
malfunction to the charger.
If the battery leaks, emits smoke or a strange odour, cease use
immediately and move it far away from naked flames or people
to avoid a fire or injury from explosion.
Do not charge the battery in a dusty or damp environment and
keep the cable away from heated objects.
The battery is not fully charged when leaving the factory.
Therefore, you should charge the battery for two hours before
use. Before charging, make sure the charge plug is correctly
inserted in the power socket. If it is incorrectly inserted, electric
shock might occur and the phone or battery may catch fire or
explode. When charging is completed, pull out the charger plug
Page 50

50
from the power socket, and do not pull the cable.
If the liquid in the battery splashes into your eyes, do not rub
the eyes to avoid damaging your vision, rinse the eyes
immediately in clean water and go to a hospital for assistance.
Do not place heavy objects on the charger cable. Do not
damage, twist or pull the cable to avoid causing electric shock
or fire.
When the battery cannot be installed correctly in the phone, do
not press down on it heavily to prevent it from leaking or
exploding. Do not remove the battery when the phone is on.
If the battery is distorted, has changed colour or is unusually
hot when charging or when it is stored, remove immediately
the battery and stop using it or it may leak, become overheated,
explode or catch fire.
If a battery is not used for a long period of time after charging,
store it at room temperature
Do not touch the power socket, power cable or charger with
wet hands to avoid electric shock.
If water or other liquid enters the charger, immediately
disconnect the charger plug from the power socket to prevent
it from overheating, catching a fire or malfunction.
Explanation: The instructions in this user manual apply to
English mode. In other language operating modes, slight
differences may appear.
Warning: The manufacturer disclaims any liability for damage,
which may result as a consequence of improper use of this
mobile phone or use contrary to the instructions contained in
this manual.
Page 51

51
Disclaimer
The usage of non-original accessories such as headsets,
batteries, chargers etc, will cause incompatibility between
the mobile phone and the accessories that may cause a
reduction in performance and malfunction, and we are not
responsible for any damage that might occur.
Specifications and functions of your mobile phone can be
differ t o those c ontained in this user manual due the user
manual is only contain general overview.
Specifications and functions of your mobile phone have
been confirmed to work properly since produced from the
factory. If there is damage or defect due to the
manufacturing and not by usage, it would follow terms and
condition in the warranty card.
If the functions of your mobile phone related to features
and services by carrier then those functions will follow the
terms & conditions applicable by the carrier.
Please note that your mobile phone still has its limitations
referring to the specifications and functions. These
limitations cannot consider as damage or defect and cannot
be regarded as manufacturer damage. P lease use your
mobile phone in accordance with the purposes and
functions.
USB Driver Installation Guide
On some computers, firewall or antivirus software
might block the installation process, you may
disable them temporary until the process is
completed
Page 52

52
On some computers the flow and process may
appears differently from what have shown on the
guide
Ensure that you have an access as a Super User or
Administrator to do installation
Ensure the phone modem mode is turn on
The device may conflict with another modem that
have already been installed on the computer
In order for the auto installation sequence to run,
please ensure your computer Auto run feature /
option is active, otherwise you may have to install
them manually
Win7 and Windows XP
After USB cable connected between device and computer,
there will pop up USB menu as shown below.
Page 53

53
Choose the Charging, and then the virtual CD-ROM Driver will
be displayed in My Computer.
If your OS can not auto run driver installation, please open
windows explorer a nd enter the virtual CD-ROM named
Andromax_AB16C2H and double click “ install.exe” to start the
installation process.
Page 54

54
Follow the instruction below until the installation is completed.
The first step of installation is shown as below. Click Next.
Then the installation process is running, wait until the process
is finish.
After the successful installation click Finish.
Page 55

55
On Win 8 the process below will run automatically!
On XP OS, Select “Install the software automatically”, Click
Next.
After successful installation process click Finish.
Page 56

56
Installation is completed, and you are connected to the
internet.
Macintosh OS:
After USB cable connected between device and Apple
Computer, a CD-ROM named “ Andromax_AB16C2H” and
folders will appear on desktop, e nter “RNDIS” folder, double
click it to display installation driver. Double click
“RNDIS_Driver.pkg” to start the installation process.
Page 57

57
A pop-up will display as shown below, Click Continue and then
click Install.
Page 58

58
Fill the “Password” descr iption according to the Computer
Login Password, click Install Software.
Page 59

59
Wait until the installation process is completed, click Closed.
Restart the computer. Then the installation is completed.
Page 60

60
To enable the USB tethering function, please change USB
Computer Connection to Charging. Then follow guidance on
the page 37.
 Loading...