

Page 1

English
User Manual
Model: M560C
Read this manual carefully before
operation
Music Cell Phone
Summary
Welcome to select M560C mobile phone. This instruction
manual explains the excellent performance of M560C mobile
phone for details. Besides basic talking function, M560C mobile
phone and sys tem network also provides you with multiple
practical functions and services to facilitate your work and leisure
activity.
M560C mobile phone is specially designed for CDMA800
network environment.
We provides with multiple special fitting parts including
charging batt ery and rapid charger for your selection in M 560C
mobile phone, your can refer to chapter 19 of this instruction
manual for the detailed description on these fitting parts. It is
possible to result in danger if using fitting parts without permission
from the providers, the resulted damage is beyond maint enance
guarantee.
M560C mobile phone has passed the network access test
from the PRC Mi nistry of Information Industry, all indexes reach
the requirements for national standar d and acquire the “telecom
device network access license” issued by the Ministry of
Information Industry.
Haier company r e serves the right to modify the technical
specification in this in struction manua l without befor ehand
informing.
1
2
Page 2

Contents
User Manual ----------------------------------------------------------------------------- 1
Summary --------------------------------------------------------------------------------- 2
Contents ---------------------------------------------------------------------------------- 3
Safety and Maintenance ------------------------------------------------------------- 7
Basic Knowledge -------------------------------------------------------------------- 12
BRIEF INTRODUCTION ............................................................................. 12
Your Mobile Phone ------------------------------------------------------------------ 14
1.1 APPEARANCE ................................................................................... 14
1.2 KEY DESCRIPTION ............................................................................ 15
1.3 STATE ICONS ................................................................................... 16
1.4 SCREEN BACKGROUND LIGHT ............................................................ 17
Instructions before Use ----------------------------------------------------------- 18
2.1 BATTERY DISASSEMBLY AND IN STA LL ATI ON ........................................ 18
2.2 CHARGE BATTERY ............................................................................ 19
2.3 INSTALL UIM CARD ........................................................................... 21
2.4 REMOVE UIM CARD .......................................................................... 22
2.5 HOW TO POWER ON/OFF ................................................................... 22
2.6 SECURITY PASSWORD ...................................................................... 22
Quick Guide --------------------------------------------------------------------------- 24
3.1 DIAL NUMBERS ................................................................................. 24
3.2 ANSWER CALL .................................................................................. 26
3.3 TERMINATE CALL .............................................................................. 26
3.4 CALL HISTORY ................................................................................. 26
3.5 CALL OPTIONS ................................................................................. 26
3.6 KEYBOARD LOCK .............................................................................. 28
Basic Functions ---------------------------------------------------------------------- 29
4.1 DIAL PHONE ..................................................................................... 29
4.2 ANSWER INCOMING CALL .................................................................. 30
4.3 TALK OPTIONS .................................................................................. 30
4.4 TEXT EDIT ........................................................................................ 32
4.5 SMART ENGLISH INPUT MODE ............................................................ 33
4.6 BASIC ENGLISH INPUT MODE ............................................................. 33
4.7 NUMBER INPUT MODE ....................................................................... 34
4.8 HANDWRITING INPUT ........................................................................ 34
4.9 QUIT FROM THE MENU ...................................................................... 34
Menu Function List ----------------------------------------------------------------- 35
5.1 Phonebook ................................................................................... 35
5.2 Messages ..................................................................................... 35
5.3 Call center..................................................................................... 35
5.4 Organizer ...................................................................................... 35
5.5 Multimedia .................................................................................... 36
5.6 User profiles ................................................................................. 36
5.7 Services ........................................................................................ 36
5.8 Settings ......................................................................................... 36
5.9 File manager ................................................................................. 37
Menu Functions ---------------------------------------------------------------------- 38
6.1 PHONE BOOK .................................................................................. 38
6.1.1 Quick search .............................................................................. 38
6.1.2 Search contact ........................................................................... 38
6.1.3 Add new contact ........................................................................ 38
6.1.4 Copy all ...................................................................................... 39
6.1.5 Delete ........................................................................................ 39
6.1.6 Caller groups ............................................................................. 39
6.1.7 Settings ...................................................................................... 39
3
4
Page 3

6.1.8 Caller picture ............................................................................. 39
6.1.9 Caller ringtone ........................................................................... 39
6.1.10 PHB backup entries ................................................................. 39
6.2 MESSAGES ...................................................................................... 39
6.2.1 Text message ............................................................................ 39
6.2.2 MMS .......................................................................................... 41
6.3 CALL CENTER .................................................................................. 44
6.3.1 UIM missed calls ....................................................................... 44
6.3.2 UIM dialed calls ......................................................................... 44
6.3.3 UIM received calls ..................................................................... 44
6.3.4 UIM call time .............................................................................. 44
6.3.5 UIM text message counter ........................................................ 44
6.4 ORGANIZER ..................................................................................... 44
6.4.1 Shortcus..................................................................................... 44
6.4.2 Extra .......................................................................................... 44
6.4.3 Fun & Games ............................................................................ 45
6.4.4 Calendar .................................................................................... 45
6.4.5 To Do ......................................................................................... 46
6.4.6 Alarm ......................................................................................... 46
6.4.7 World Clock ............................................................................... 46
6.5 MULTIMEDIA .................................................................................... 46
6.5.1 Camera ...................................................................................... 46
6.5.2 Image Viewer ............................................................................. 47
6.5.4 Video Recorder .......................................................................... 47
6.5.4 Video Player .............................................................................. 48
6.5.5 Audio Player .............................................................................. 48
6.5.6 Sound Recorder ........................................................................ 49
6.5.7 FM Radio ................................................................................... 50
6.5.8 Schedule FM record .................................................................. 50
6.5.9 Slide show ................................................................................. 50
6.6 USER PROFILES ............................................................................... 50
6.7 SERVICES ........................................................................................ 51
6.7.1 WAP ........................................................................................... 51
6.7.2 Data Account ................................................ 错误!未定义书签。
6.8 SETTINGS ........................................................................................ 51
6.8.1 Mode setting .............................................................................. 51
6.8.2 Pen calibration ........................................................................... 51
6.8.3 Phone Setup .............................................................................. 51
6.8.4 General call settings .................................................................. 52
6.8.5 Security Setup ........................................................................... 53
6.8.6 Restore Factory Setting ............................................................. 53
6.8.7 Sound effect .............................................................................. 53
6.9 FILE MANAGER ................................................................................. 53
AQ ---------------------------------------------------------------------------------------- 54
T-Flash Card Introduction -------------------------------------------------------- 57
T-FLASH CARD INSTALL/REMOVE ............................................................ 57
T-FLASH CARD USE ................................................................................ 57
5
6
Page 4

Safety and Maintenance
While using the cell phone, please check it with the following table:
• Before use, please read i nstruction m anual careful ly.
• Do not power on the cell phone when use of cell phone is
prohibited or it may cause interruption or danger.
• Please keep your cell phone off when you are on a plane. If
functions that will automatically power on your cell phone, such as
alarm clock or calendar, are set up, please check an d cancel the
configuration before boarding the plane.
• While using the cell phone, please keep away from heat source
and high voltage environment, such as electric appliances or
electric cooking devices. Please use the cell phone under normal
temperature. Use it under temperature above 55 or ℃ below
-10 may damage the phone.℃
• Pay attention to fire prev ention. Power off the phone while near
flammable materials, such as gas-filling station a nd fuel stor age.
• Do not hold t h e c ell phone in yo ur ha n d while drivi ng. Do not put
the phone above air bag or within reach of air bag so as to prevent
damage when airbag is inflated.
• Standard battery, charger and accessories approved by Novo
should be used. Novo is not responsible for any consequence
caused by use of third party accessories.
• Cell phone may cause interference to nearby electronic devices,
so keep it away from electronic devices such as TV set, radio, PC,
pacemaker and hear in g aid , et c. D o not pl ace the c ell phone near
credit card or magnetic field. Please power off your cell phone in
hospital and other special places according to specific regulations
there.
• Keep the cell phone away from mecha nic vibration or sh aking.
Do not hit the screen of your phone with sharp tool.
• If plast ic cover or case is used f or cell phone, surfac e coating
may be damaged.
• Do not disassemble the cell phone boldly.
• Do not use benzene, thinner or alcohol to clean the cover of your
cell phone. K eep your cell p hone away from cor rosive chemical s
such as detergent. Use clean and soft cloth instead and wipe
gently.
• Prevent your c ell phon e f rom i nsul ati on or p lac es w ith exc ess ive
smoke or dust.
• Your cell p hone i s not water -pro of, so plea se ke ep it dry. D o not
use it in damp environment, such as bathroom. Keep it away from
rain and moisture.
• If your cell phone has external antenna, do not touch the
antenna when it is not necessary. Use original antenna only, for
use of unauthorized antenna may cause damage to the phone.
• When you are t o pull the charg er away from you r cell phone or
cut off power supply of ch arger, ple ase hold the c onnector tightly
and then pull out. Do not drag the power cabl e.
• Do not rely on cell phone only as communication device for
emergency, such as medical rescue.
• Keep the cell phone out of reach of children so as to avoid
danger.
7
8
Page 5

While using battery, please observ e foll owi ng poi nts:
• Before use, plea s e read i ns tr uct ions for use and as well as l abel
on the surface of battery.
• Please charge the battery in a cool and well-ventilated room.
Otherwise, high environment temperature may lead to over heat,
smoking, burning, distortion or even explosion of battery.
• There are s pecial protect ion circuit s and devices i nside battery ,
so do not open the battery ; Otherwise it ma y lead to short circu it or
electrolyte leak. If electrolyte enters eyes, there is danger of
blindness. In such case, i mmediate ly wash eyes wi th clean water
(Do remember not to rub the eyes with hands) and then go to
hospital for treatment.
• Do not squeeze the battery and keep it away from mechanical
vibration and shaking. Do not short connect the battery, for this
may damage the b attery and components c onnected to it. Short
circuit may be caused by coin or clip directly connecting anode
and cathode of the battery, so do not put the battery together with
metal objects.
• Please keep the metal contact points and battery clean.
• Do not use dam aged or depleted battery.
• The battery should be replaced when it can not meet the
requirement for performance. Battery can be charged hundreds of
times before it should be replaced. Battery belongs to
consumables. Though it can be charged hundreds of times, its
quantity of el ect ric char ge may decr ease g rad ually. Whe n s ervi ce
time (talk time and s tandby time) is found to have decreased, the
battery shal l be replaced.
• Prevent the battery from exposure to the sin or places with
excessive smoke or dust. Do not use it in damp environment, such
as bathroom. The battery is not waterproof; so keep it away from
rain and moisture.
• Do not put the battery in places that are too hot or too cold.
Temperature above 55 or below ℃ -10 may affect perfor mance ℃
of the battery.
• Do not put the battery in fire so as to avoid e x plosion.
• Do not put the battery in water so as to avoid short circuit inside,
resulting in battery overheat, smoking, distortion, damage or even
explosion.
• Treat battery according to local regulations (for example,
recycling). Do not treat battery as domestic garbage so a s to avoid
explosion and pollution.
• Special charger sh oul d be us e d for th is batt er y for char gin g, an d
charging time should not exceed 12 hours.
• Keep battery out of reach of children to avoid danger.
While using battery charger, plea se ob se r ve fo ll owin g points:
• Before use, plea s e read i ns tr uct ions for use and as well as l abel
on the surface of the charger.
• Do not disas semble or modify t he charger or use it when p ower
cable is damaged; otherwise there will be electric shock or fire, or
the charger may be damaged.
• Do not touc h the charger wi t h wet hands. I f the charger contacts
water or other liquid, imm ediately cut off the power supply.
9
10
Page 6

• Do not short connect the charger and keep it away from
mechanical vibration or shaking and direct sun shine. Do not use it
in damp environm ent, such as bathroom. The bat tery charger is
not waterproof; so keep it away from rain and m oisture.
• Do not use the charger near electric appliances such as TV set
and radio.
• When to pull out the plug, hold the charger instead of dragging
the power cable so as to avoid damage of power cable.
• Keep the charger out of reach of children so as to avoi d danger.
Basic Knowledge
Brief Introduction
Thank you for choosing the Music cell phone M560C. You will
know how to use this phone roundly after reading the manual.
Design this cell phone is aim at CDMA800 network environment,
except the call function, there are basic English inpu t mode,
contacts, indivi du atey ringtone/image, MP3 ringtone, short
message, multimedia message, camera, MP3, alarm, calculator,
auto on/off, calendar, world clock, stopwatch, E-book, T-Flash,
keyboard lock,video recorder, video player, et c. This cell phone
interface is individuatey, the functions of design is perfect, it can
satisfy your deferent demand.
General
Product name: CDMA digital mobile phone
Model: M560C
System: CDMA800
Ambient temperature
Highest: +55 °C
Lowest: -10 °C
Basic parameters
Weight: 74g ( including standard battery)
Dimension: Approximately 107 x 46x 16.2mm
Talk time:200-450min*
11
12
Page 7
Standby time: 100-200h*
Battery capacity: 1200mAh
* Depending on local network signal con ditions.
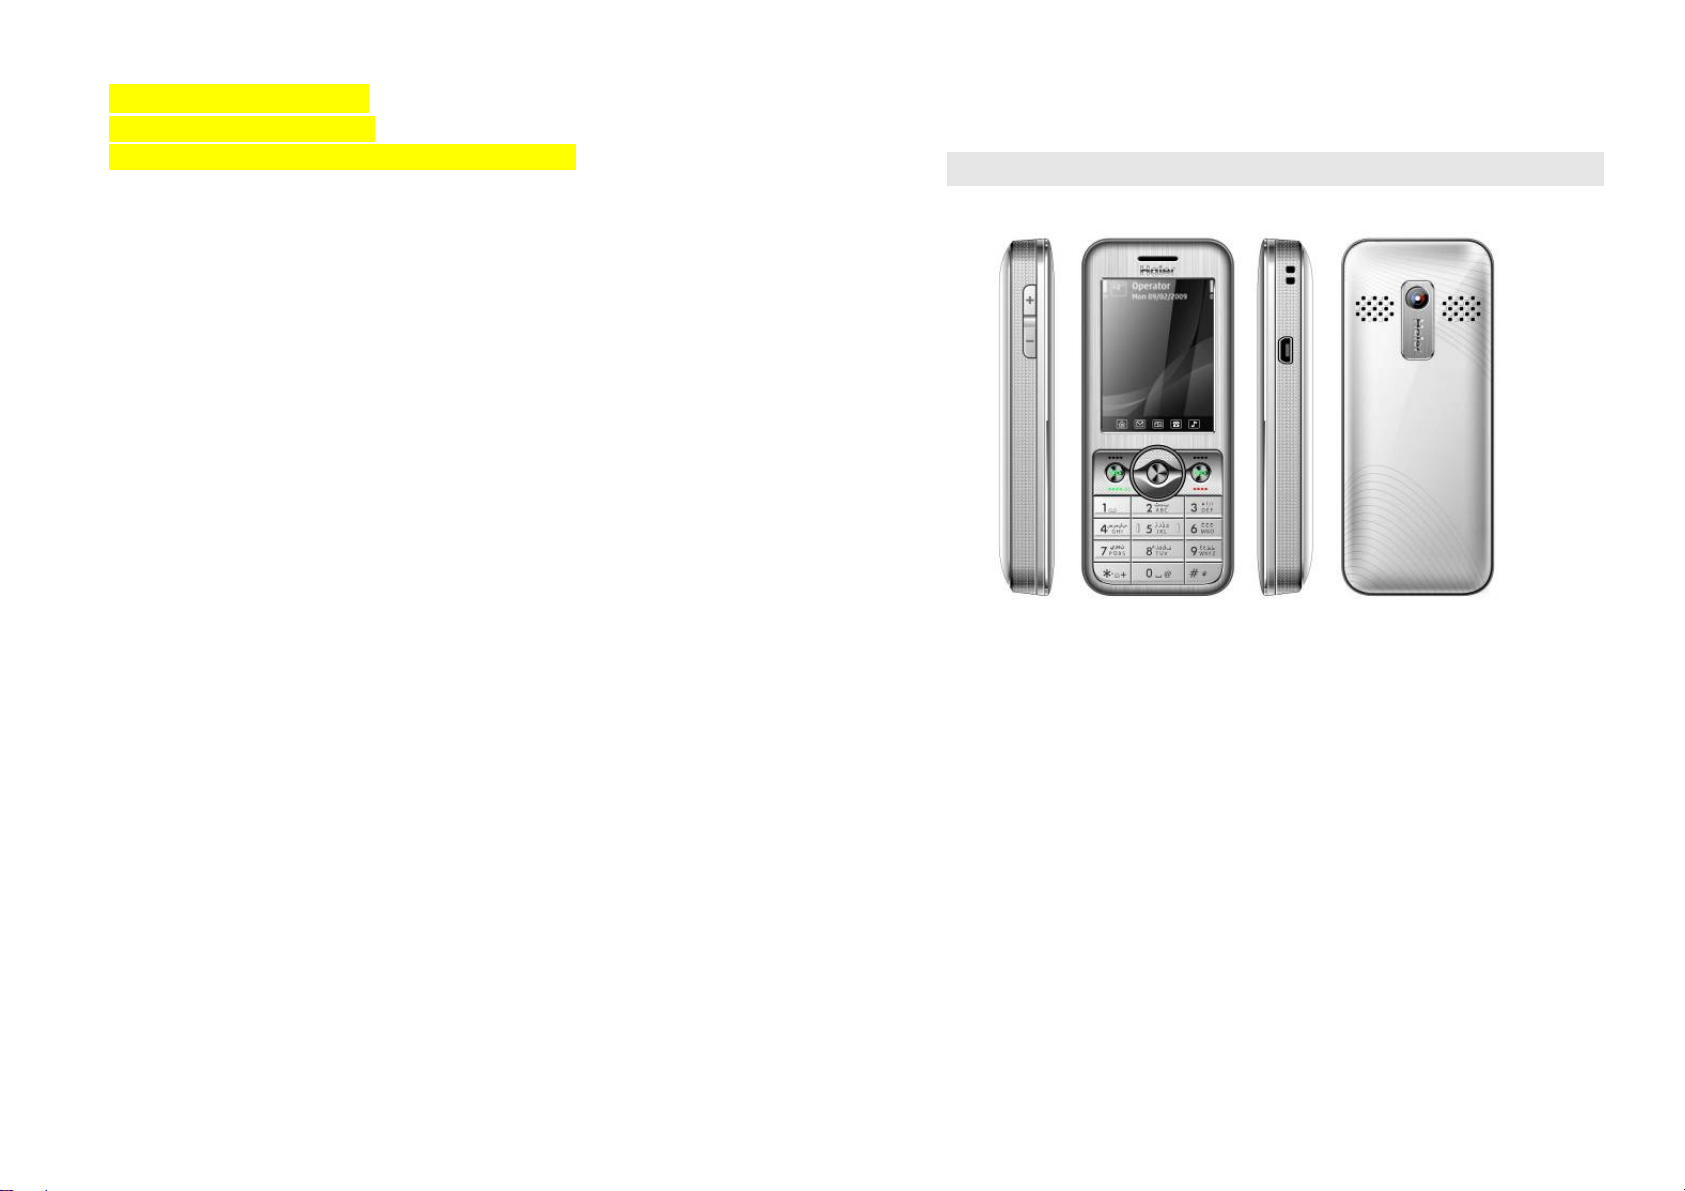
Your Mobile Phone
1.1 Appearance
13
14
Page 8
1.2 Key description
Key Description
Send
key
End key
Left soft
key
Right
soft key
OK key Confirm operations you have operated.
Number
key
#
*
Making or answering a call.In standby mode, press this
key to access the All calls screen.
End calls or reject calls.
Long press: Power on, power off.
In standby mode, press left soft key to enter Menu.
In standby mode, press right soft key to Names.
Enter numbers, letters, and some special characters.
In standby mode, long press this key to enable or
disable the Meeting mode; short press this key to Input
the symbol “#”.
In standby mode, long press this key to input the symbol
“*”、”+”、”p”、”w”; short press this key to Input the symbol
“*”.
Four-way navigation key is used to quickly enter 4 fixed menus
and select menu items in menu operation. Use navigation key
properly as fo l lows:
1. Press [lef t navigation key] to enter User profiles in standby
state.
2. Press [right navigation key] to enter Tone setupr in standby
state.
3. Press [up navigation key] to enter Audio player in standby state.
4. Press [down n avigation key] to enter Alarm in standby stat e.
5. Press [OK key] to enter main menu in standby state.
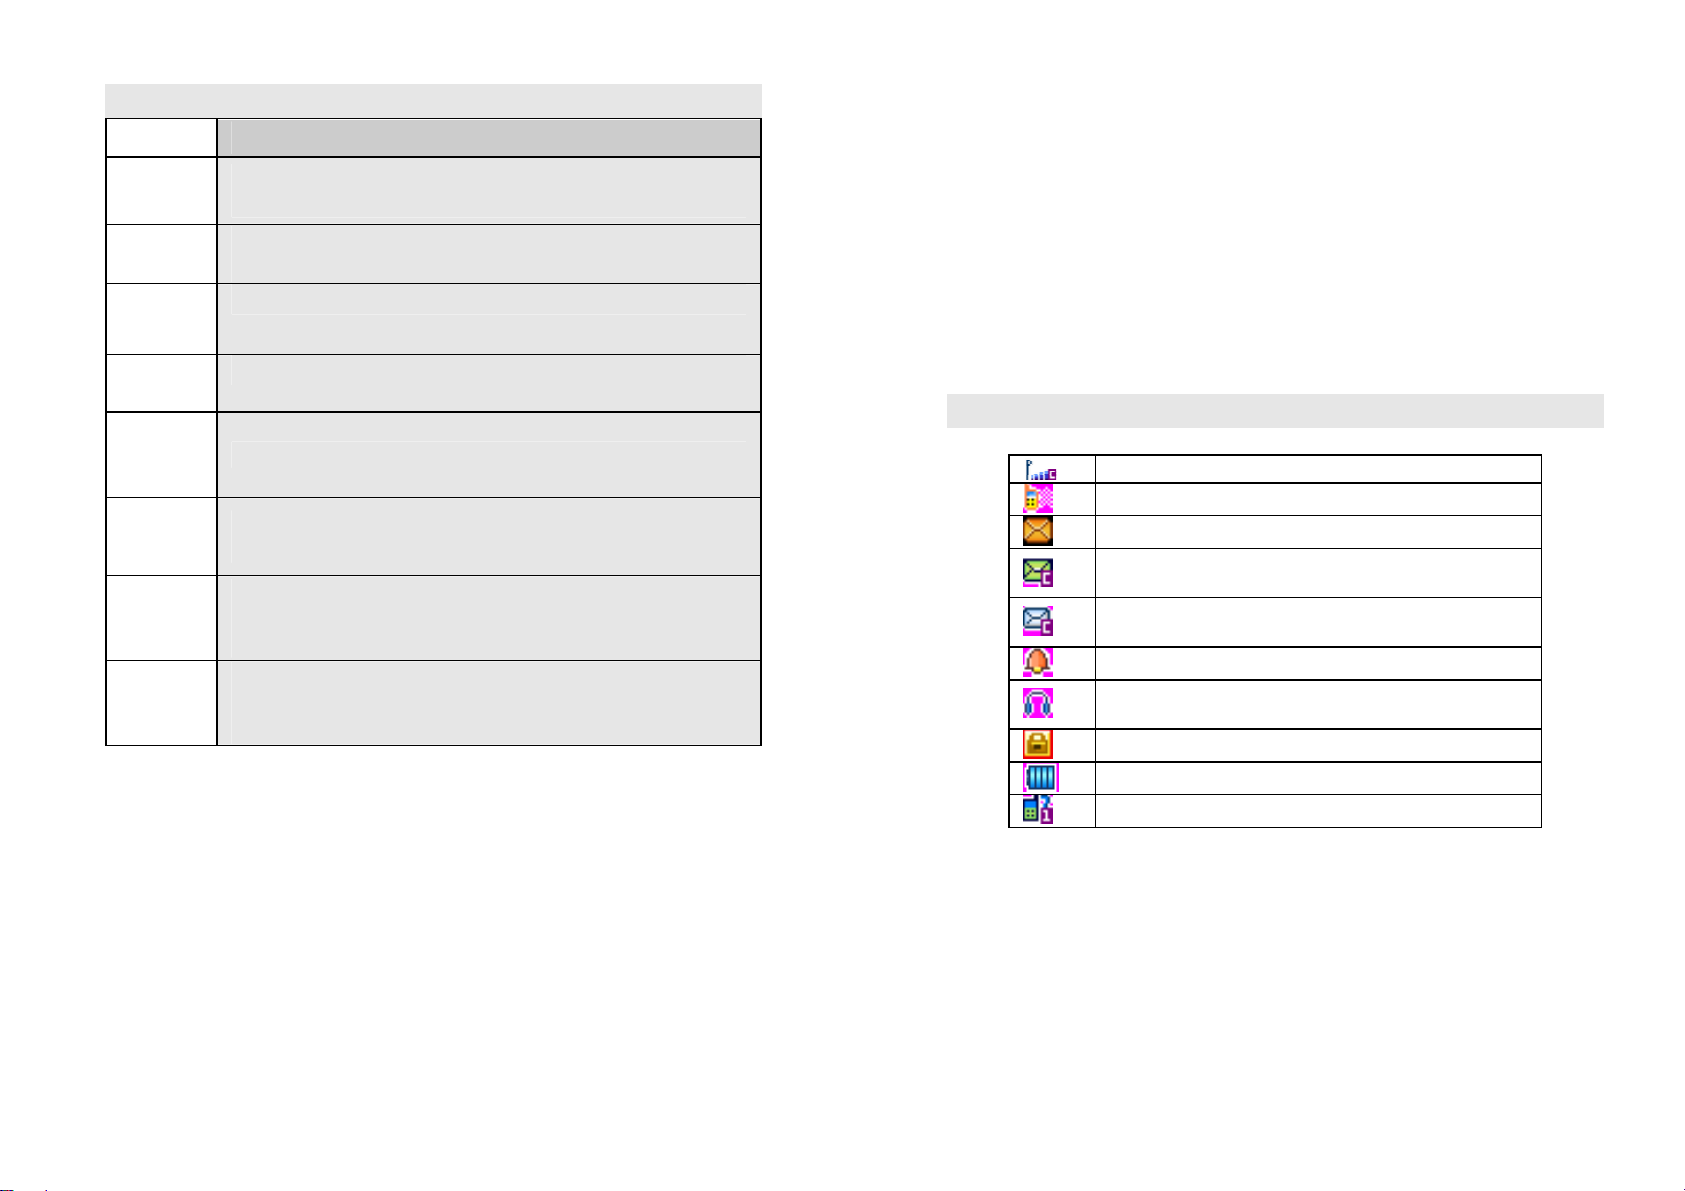
1.3 State icons
<Icons on the screen: >
Indicates UIM Card signal strength.
Indicates vibration mode has been activated.
New short message(s) received.
The SIM card receives one new text
message.
The SIM card receives one new multimedia
message.
Alarm clock has been activated.
Indicates a headset is connected to the
phone.
Indicates keyboard has been locked.
Indicates battery power level.
You have one or several missed call.
15
16
Page 9
Open the Bluetooth
Starts the multi-direction stopwatch function.
If your cell phone is within coverage of CDMA network and has
registered the network, the name of the registered network service
operator will be displayed at upper part of the screen.
1.4 Screen background light
Background light can illumina te the screen. When you pow er on your
cell phone, background light will turn on for a certain period. If no key is
pressed within the period, the background light will turn off
automatically so as to save battery. Se tup b ack gr ound ligh t bri ghtnes s
in [Settings] –[Phone Setup] –[ [Misc settings] – [LCD Backlight].
Instructions before Use
2.1 Battery disassembly and installation
Install battery
1. Aim the small button at the bottom of battery to corresponding
slot at the bottom of battery bank.
2. Press battery towards the cell phone and press it until it is
locked.
take out battery
Ensure the cell phone powered off .
1. Holds down the back of the handset, glide outer covering
downward, then unloads the battery exterior top plate.
2. Buckle the battery to buckle hand's position in the chart
underneath, lifts gently the battery and takes down.
17
18
Page 10

2.2 Charge battery
Hold buttons at the two sides of the battery charger and then plug
the charger to the charging socket at the right of cell phone as
follows:
Note: Please handle carefully. D o not pull out charging plug by
force. This may damage your cell phone or charger.
• Before use, battery supplied with your cell phone should be
completely charged.
• Displayed four grid electricity when the battery is full
• While charging, do not remove the battery or UIM card.
19
20
Page 11

2.3 Install UIM card
• When UIM card is not used, carefully put it in a secure place.
• UIM card is easy to be damaged because of scratching or
bending, so it should be used carefully.
When you perform following operations, ensure the cell phone
is powered off and separated with charger. Remove the battery
and put UIM card in fixer. While inserting UIM card, ensure the
metal side fac es d ownw ard and ai m t he cut -c or ner of UI M car d at
that of UIM card slot.
2.4 Remove UIM card
When you perform following operations, ensure the cell phone is
powered off and separated with charger.
Remove the battery and take out UIM card from holder.
Note: UIM card is a computer chip containing protocol details,
security information and personal phonebook, etc.
2.5 How to power on/off
Ensure battery is properly installed.
Power on and hold [End key] bu tton until b oot screen ap pears.
Some UIM cards have PIN code pr otection. If there is prompt fo r
input your PIN code, input your PIN code and then press [OK].
Default PIN code is 1234.
After power on, if UIM card inserted is valid, your cell phone will
automatically search available network; If not, it will prompt: No
UIM card is available.
To power off, hold [End key] until shutdown screen appears.
2.6 Security password
You can use ac cess passw ord to avoid una uthorized us e of your
UIM card.
PIN code
PIN code is used to prevent illegal use of user’s UIM card. If your
cell phone has enabled P IN code prot ection, t here will be prompt
for entering PIN code. If wro ng PIN code is e ntered for th re e tim es,
UIM card will be automatically locked. You have to enter PUK
21
22
Page 12

code so as to unlock it. PIN code is related to UIM card instead of
the cell phone, and is provided by networ k service op erator.
PUK code
PUK code, referring to personal unlock code, is used to unlock
UIM card that is locked because of wrong input of PIN code. If
wrong input of P U K c ode am ou nt s to ten times , UIM card will los e
efficacy. PUK code is provided by network service operator.
Quick Guide
3.1 Dial numbers
When logo of network provider appears on the screen, you can dial or
answer calls. Information bars at upper le ft corner of the scree n show
intensity of network signal. (Four information bars represent most
intense signal.)
Since quality of call is greatly affected by barrier, movement in
small range can effectively improve quality of call.
Make domestic phone call
Use number keys to input phone number in sta ndby state and then
press send key to start the call. If the phone number needs to be
changed, please delete characters by pressing right soft key “Clear”.
While dialing, dialing animation will be displayed on the s creen. Once
the other side is put through, talk state information will be dis pl aye d o n
the screen.
After the call, please press End key to hang up the call.
You can enter domestic phone numbers according to following
sequence:
Area code Phone number Send key
Make international Call
To make an international call, press number key 0 until pre-fix s ymbol
“+” for international long-distance call appears on the screen.
23
24
Page 13

You can enter international phone number according to following
sequence:
+ Country code Complete phone number Send key
After pre-fix, enter countr y code an d co mplet e p hone nu m ber y ou want
to dial. According to conventions, county code fo r Germany is 49, and
44 for UK and 46 for Sweden, etc.
Similar to making an international cal l, “0” before city code should be
removed.
For example, you must dial +86 21 114 if you want to dial Shanghai’s
service hotline from anot he r count ry .
Note: In some networks, it is not allowed to use “+” to dial
international phone numbers.
Dial a number in the list
Every phone number you dialed or re ceived is saved i n Call history in
your mobile phone. Phone numbers you dialed or received recently are
recorded in four sub-menus under the list according to category,
namely missed, Received, Dialed and Rejected. Phone number of
the call you received most recently is located at the top of every list.
When phone number list is full, old numbers will be deleted
automatically. Operate as follows:
Press Send key to view record of dialed numbers and press [Right
navigation key] and [Left navigation key] to view record of rejected,
missed and received calls.
Phone numbers appear in the lists can be dialed directly by pressing
Send key.
In phone number list, press OK key to view details and press Option
soft key to save the numbers to phonebook or delete them.
3.2 Answer call
You can choose different ways to answer calls. You can press
Send key or Left soft key to answer. If Any Key Answer is
actived in answ er mode, you can press any key besi de End key
and Right soft key to answer calls.
3.3 Terminate call
When there is an incoming call, press End key to reject the call.
During the call, press End key to terminate current call.
Call that has just been dialed c an be cancelled b y pressing End
key or [End soft key].
3.4 Call History
Your phone can store your most recent missed, received, dailed calls
and record the last minutes, and has a total answer the ph on e, the
phone has been allocated a total of ta lk time, and so on.
3.5 Call options
In talk state, press Left soft key “Options” to enter talk options.
Operation method of talk options is the same as that of function
menu.
25
26
Page 14

Talk options can only be seen in the process of talk, and functions
such as call wait and multi-party tal k have to be supported by network.
Please contact your network provider.
You can directly enter phone number at current talk screen and press
Send key to dial new phone number.
In talk options, you can make following operations:
Switch *
Switch between current talk and held talk.
Conference*
Enter multi-party talk state. You can hold multi-party talk or terminate
the call.
New call
Call the new call.
Phonebook
Press this key in this state to enter phone book.
Messages
Press this key in this state to enter short message
Note: Menu items marked with * appear in specific conditions
only. For example, “Switch” appears only when calls in talk state
and hold state exist at the same time. Besides, mu lti-party talk
function should be applied from network service operator.
3.6 Keyboard lock
You can select time for automatic keyboard lock via
[Settings][Security settings][keyboard lock], so that your cell phone
can automatically locks the keyboard.
You can also press [End key]] to lock keyboard in standby state.
Once keyboard is locked, you can press [left soft key] and then [*]
according to directions on the screen to unlock the keyboard.
27
28
Page 15

Basic Functions
4.1 Dial phone
Direct dial
In standby state, press number keys to enter the telephone
number you want to dial.
To delete wrong i nput, press [ Clear soft key] to delete a number
before the c ursor. To delet e all numbers, please hold [ Cl ear soft
key] until all numbers are delet ed or press [End k ey] to return to
standby interface directly. Once phone number to dial has been
input, press [Send key].
If the phone number being dialed out can be recognized by
phonebook, name and i con of c onta ct pers on wi ll be dis pla yed on
dialing screen, and calling animation is displayed at the same
time.
Press [End soft key] or [End key] to end a call.
Quick dial from contacts list
Press [Right soft key] to enter contact interface.
Press [Up navi gation key] or [Down nav igation key] to selec t the
phone number you want to dial.
Press [Send key] to dial out the nu mber.
Quick dial from dialed phone number list
Press [Send key] to enter dialed phone number r ecord page.
Press [Up navi gation key] or [Down nav igation key] to selec t the
person you want to call or the number you wan t to dial.
Press [Send key] to dial out the nu mber.
Quick dial
Open the speed dial function, and then set different name for different
number keys. In standby mode,press and hold the number key to
speed dial.
4.2 Answer incoming call
When there is an incoming call, incoming call animation will be
displayed together with special ringtone or vibration. If phone
number of the caller can be recognized, the number will be
displayed on incoming call screen. If information about the
number is st ored in contacts, c aller’s name and icon wi ll also be
displayed. A t the same time, spec ified ringtone wil l be played or
play music o r vibrate accor ding to curr ent settings. If caller hides
his/her number or the network bans c all indication, the inc oming
call is displayed as ******.
Press [Ans wer s oft k ey] or [S end k ey] to an sw er c all s. I f Any K ey
Answer is selected, you can press any key apart from End key
and Right soft key to answer calls.
When you want to reject the incoming call, press [End key]
directly.
4.3 Talk options
29
30
Page 16

The cell phone provides some talk control functions in the process
of talk. Press [Options soft key] to access the talk control
functions in the process of talk.
Hold/retrieve single call
If network supports, you can hold curren t talk.
Press [Options soft key] and select Hold option in the menu.
To activat e hel d talk, pres s [O p t io ns soft key] and s elect Retrieve
option in the menu.
End single call
You can select this option to end the call in the process of talk.
New call
When you are making a call, you can dial anot her number.
Enter the second number or press [Phonebook] option in [Options
soft key] to select in phonebook and then press [Send key]. When
the second number is put through, the first call will be held
automatically.
Answer second incoming call
If there is a second incoming call in the process of talk, the screen
will display a second call is waiting. Call wait function is only
available when the network supports this service and you have set
to Enabled in Call wait menu.
Press [Answer soft key] or [Send key] to answer second call.
When the second call is put through, the first call will be switched
to hold state .
Press [End key] to terminate the second call.
Select current phone number
Information o f the o ther si de is i ndi cated b y sm all icon in tit le ar ea
of the screen.
Select the number in talking and press [Option soft key] to display
following opti o ns :
Conference: Add held call to conference call.
End all call: End all calls.
New call : You can dial another call in the process of talk.
Phonebook: Press this key in this state to enter phone book.
Message: Press this key in this state to enter short message
Turn up tone
When you are on the line you can adjust volume through the k ey on
the left of phone.
4.4 Text edit
Input mode
When you use your c ell phone, you may need to enter text. For
example, to s ave a name in phonebook, write a short message ,
and create an agenda. You can enter letters, symbols and
numbers thro ugh keyboard of your cell phone.
31
32
Page 17

In edit state, press [#] key to select proper text input mode. This
cell phone provides Smart English capital/small letter, English
capital/sm all letter and Number input modes.
Default input mode after power-on is Smart English. If you hav e
changed input method in edit window, the setting will be saved
when you enter e dit screen again as l ong as the cell phone has
not been powered off.
Press [*] to enter symbol selection mode.
4.5 Smart English input mode
In Smart English input mode, each letter needs to be pressed
once only. A key on the keyboard represents several letters.
When it is pressed, Smart English input mode will automatically
compare the word with wor ds in languag e database a nd make a
correct choice .
4.6 Basic English input mode
In Bas ic Englis h input mode, y ou may ha ve to press a key on the
keyboard several times to enter a letter.
Pressing a key continuously can select English letters
represented by this key. Press once to enter the first letter and
press twice to enter the second letter.
Character list:
Key Charatecters
[1] . , - ? ! ’ @ : # $ / _ 1
[2] ABCabc2
[3] DEFdef3
[4] GHIghi4
[5] JKLjkl5
[6] MNOmno6
[7] PQRSpqrs7
[8] TUVtuv8
[9] WXYZwxyz9
4.7 Number input mode
Use keyboard to enter numbers.
4.8 Handwriting input
Allow input letters in the function of the use of mobile phones in writing
tips allow incidental use of a touch pen to write. At the b ottom center o f
the screen by touch the pen click to toggle input. ABC representatives
capital letter input method; abc representatives lowercase alphabet
input method; 123 representatives digital input method; fight on behalf
of Pinyin input method. Right key touch with pen or touch screen can
be removed remove the word wrong.
4.9 Quit from the menu
In commonly, you can press right soft key to quit form the menu, and
you also can touch be low right icon t o quit from t he curren tly st ate. You
can press End key to enter the IDLE interface.
33
34
Page 18

Menu Function List
5.1 Phonebook
5.1.1 Quick search
5.1.2 Search contact
5.1.3 Add new contact
5.1.4 Copy all
5.1.5 Delete
5.1.6 Caller groups
5.1.7 Settings
5.1.8 Caller picture
5.1.9 Caller ringtone
5.1.10 PHB backup entries
5.2 Messages
5.2.1 Test message
5.2.2 MMS
5.3 Call center
5.3.1 UIM call history
5.4 Organizer
5.4.1 Shortcuts
5.4.2 Extra
5.4.3 Fun & Gamers
5.4.4 Calendar
5.4.5 To do
5.4.6 Alarm
5.4.7 World clock
5.5 Multimedia
5.5.1 Camera
5.5.2 Image viewer
5.5.3 Video recorder
5.5.4 Video player
5.5.5 Audio player
5.5.6 Sound recorder
5.5.7 FM radio
5.5.8 Schedule FM record
5.5.9 Slide show
5.6 User profiles
5.6.1 General
5.6.2 Meeting
5.6.3 Outdoor
5.6.4 Indoor
5.6.5 Headset
5.6.6 Bluetooth
5.7 Services
5.7.1 UIM card service provider
5.7.2 WAP
5.7.3 Data account
5.8 Settings
5.8.1 Mode setting
5.8.2 Pen calibration
5.8.3 Phone setup
5.8.4 General call settings
5.8.5 Security setup
35
36
Page 19

5.8.6 Restore factory settings
5.8.7 Sound effect
5.9 File manager
5.9.1 Phone
5.9.2 Memory card
Menu Functions
You can press [OK] key in standby state to enter the main menu.
Once you have entered the main menu, you can select
corresponding options by using [Navigation key] to move the
cursor.
Stop the cursor on an option and press [OK] key to enter the
function window of the option.
You can also us e short- cut met hod, i.e. press a number key f rom
1 to 9 directly to enter function window of corresponding option.
Press [Back soft key] or [End key] to return to standby mode.
6.1 Phone Book
You can save names and phone numbers (contacts) in the phone
memory or in the UIM card memory.
Note: This phone can store 500 phone numbers.
6.1.1 Quick search
Input the name you want to search the contacts quickly.
Contacts i n the phone book a re listed in the o rder of English
alphabet.
Press the number key continuousl y to select lette r or number you
want. For example, press t he key “2” to select “a” 、“b”、“c” or
“2” .
Long press the key “2” to select the four characters quickly.
6.1.2 Search contact
Input the name to search the c ontact you want.
6.1.3 Add new contact
37
38
Page 20

Use the menu to add a new contact. It provides two storage routes:
To UIM and To phone.
6.1.4 Copy all
Use the menu to copy all records betw ee n the ca rd an d th e phone .
6.1.5 Delete
Use the menu to delete records from the card or phone.
6.1.6 Caller groups
There are five groups: Friends, Family, VIP, Business, Others. You
can change group name, ring to nes, caller picture.
6.1.7 Settings
Enter the menu to operate the following operations: Memory
Status, Preferred Storage, Fields, My vCard.
6.1.8 Caller picture
Use the menu to set Caller picture.
6.1.9 Caller ringtone
Set the caller ring tone with system default or tones in memory
card and phone.
6.1.10 PHB backup entries
Use the menu to set the back up for th e phonebo ok. It c ontai ns Output
all entries to csv, Input entries from csv, Help.
6.2 Messages
6.2.1 Text message
Use the menu to send and receive short messages.
6.2.1.1 Write message
In the edit mode, press the [options] to operate the followings:
C done : Indic ate the mess age be edited i n UIM card. It provides
five options: Send only, Save and send, Save, Send to many,
Send by group.
Use templates: use the templates to the message.
Insert object: Insert the object in the message. The objects
include picture, My picture, Predefined animation, My animation,
Melody, My melody, Predefined sound.
Format text: It contains Text size, Text style, Alignment, New
paragraph.
Insert Number: Insert the phone nu mber in th e mes sag e fro m th e
PHB.
Insert name: Insert the name in the message from the PHB.
Insert bookmark: Insert the bookmark from the phon e.
Input method: change the input method.
6.2.1.2 Inbox
Enter UIM Inbox to view text message you received. Open a short
message and press the “option ” to operate th e followings:
Reply: Reply the message to the sender.
Delete: Delete the message you selected.
Edit: Edit the message you received.
Forward: F orward the message.
Copy to phone: Copy the message to the phone or copy the
message to the UIM card.
39
40
Page 21

Move to phone: Move the message to phone or move the
message to the UIM card.
Delete all: Delete all the messages in the UIM inb ox.
Use Number: Use the number in the message.
Use URL: Use the URL in the message.
6.2.1.3 Outbox
View send message saved in outbox and press the “options” to
operate the followings:
Send from UIM: Send the message from UIM card.
Edit: Edit the message you saved.
Delete: Delete the message you selected.
Copy to Phone: Copy the message to the phone or copy the
message to the UIM card.
Move to Phone: Move the message to phone or move the
message to the UIM card.
Delete all: Delete all the short messages in the UIM outbox.
Use number: Use the number in the message.
Use URL: Use the URL in the message.
6.2.1.4 Templates
Use the menu to edit the templates.
6.2.1.5 Message Settings
Use the menu to enter UIM message settings. UIM card message
settings contain Priority settings, VP settings, Report settings and
Preferred storage.
6.2.2 MMS
Use the menu to send and received MMS.
6.2.2.1 Write message
In the edit mode, select the [Edit content] to press the [edit], then
press the [o ptions] to opera te the following options:
Done: Finish the message.
Input method: Change the input method.
Add picture: Add pictures from phone or memo ry card.
Add audio: A dd audio from phone or memory card.
Add video: Add video from phone or memory card.
Add attachment: Add attachment from phone or memory card.
Add slide bef ore: Add a slide before here.
Add slide after: Add a slide after here.
Add bookmark t ext: Add a bookmark Text.
Preview: Preview the MMS.
Slide timing: Settings time interval.
6.2.2.2 inbox
Open the MMS you received. Press [options] to operate the
following oper at i on s:
View: view th e message you received.
Reply: reply the message to the sender.
Reply by SMS: reply SMS to the sender.
Reply All: reply all the MMS.
Forward: Forward the messag e .
Delete: Delete the MMS you selected.
41
42
Page 22

Delete All: Delete all MMS from the phone.
Save as template: Save the MMS to template.
Properties: Property of the MMS.
Use Details : Use the MMS details.
6.2.2.3 Outbox
Open the MMS you sent. Press [options] to enter the following
options:
View: view the message you sent.
Forward: Forward the message to others.
Edit: Edit the SMS.
Delete: Delete the MMS you selected.
Delete all: Delete all MMS.
Save as template : Save the MMS to template .
Properties: Property of the MMS.
Use Details : Use the MMS details.
6.2.2.4 Draft
Enter the MMS you saved. Press [options] to operate the following
operations:
View: view the message you saved.
Send: sent the MMS.
Edit: Edit the MMS.
Delete: Delete the MMS you selected.
Delete All: Delete all MMS from the phone.
Save as template: Save the MMS as template.
Properties: Property of the MMS.
Use Details: Use the MMS details.
6.2.2.5 Templates
It contains User defined and Default.
6.2.2.6 MMS Settings
It provides six options, for example: Compose, Send, Retrieve,
Filter, Server profile, Memory s tatus.
6.3 Call center
Enter the menu to view UIM call history.
6.3.1 UIM missed calls
View the missed calls list.
6.3.2 UIM dialed calls
View the dialed calls list.
6.3.3 UIM received calls
View the received calls list.
6.3.4 UIM call time
View the call time
6.3.5 UIM text message counter
View the quantity of the SMS you received and sent.
6.4 Organizer
6.4.1 Shortcus
Use the menu to entry quick function.
6.4.2 Extra
43
44
Page 23

6.4.2.1 Calculator
Use the menu to do basic calculations, such as addition,
subtraction, multiplication and division.
Key operations:
Left navigation key: Multiplication.
Right navigation key: Division.
Up navigation key: Addition.
Down navigation key: Subtraction.
OK: Equal. Press the key to display calculation result.
Press [Clear] to clear the contents you input .
6.4.2.2 Currency Converter
Input the currency rate ,then press OK to input local currency.
6.4.2.3 Stopwatch
Enter the menu to use the stopwatch. It provides two options: Typical
stopwatch, nWay stopwatch.
6.4.2.4 Bluetooth
Enter the menu to set the followings: Power, Inquiry audio device,
Remote control, My device, Active device, Settings, About.
6.4.3 Fun & Games
6.4.3.1 Games
Use the menu to play the games. It conta ins three games, Mah jong,
Panda and UFO.
6.4.3.2 Themes
It contains three themes, you may choose different th eme acco rdi n g to
your enjoy.
Enter the menu to show date, press [options] to set the followings:
View tasks: Set or view the task.
Add task : Select a date a nd add a new task for the dat e. When
the set time phone will alarm to remind you that the task.
Jump to date: Jump to the date you selected.
6.4.5 To Do
Enter the menu, view the task lists and choose the task you saved.
Press [Option] to set the followings:
View: You can view the task.
Add : Add a new task.
Edit: Edit the task you selected.
Delete: Delete the task what you select.
Delete All: Delete all the tasks in the phone.
Send vCalend ar : It provi des four opti ons: send by SMS , send by
MMS, send by Bluetooth, Save to file.
6.4.6 Alarm
Phone can set five alarm clocks. In edit mode, press [Edit] to set
the followings: time, repeat, alarm tone, snooze(mins), alert
type.
6.4.7 World Clock
You can look up the time of the other city in the world.
6.5 Multimedia
6.4.4 Calendar
45
6.5.1 Camera
46
Page 24

Press the number key to set some functions, such as Effect settings,
White balance, Delay timer, Cont. shot, Scene mode, Image Quality,
Image size. Press the Option function button to start the following
settings:
Photos: View the images you saved. Choose one image to
operate the followings: View, Slide show,Browse style, Use,Send,
Rename, Delete, Delete all files, Sort by, Storage.
Camera Settings: It contains six functions: LED
highlight,Shutter sound, EV, Banding, Delay timer, Cont.shot.
Image Settings: You can set the size and quality of the i m age.
White balance: It contains six options: Auto, Daylinght,
Tungsten , F luorescent , Cloud, Incandescence.
Scene mode: It contains two modes: Auto and Night.
Effect Settings: It contains six effects: Normal, Grayscale, Sepia,
Sepia Green, Sepia Blue, color invert.
Storage: It contains two storage addresses: Phone and Memory
card.
Restore Default: You can restore the default settings.
6.5.2 Image Viewer
Enter the menu, press [options] to set the followings: View, Browse
style, Forward, Rename, Delete, Delete all files, Sort by, Storage.
6.5.4 Video Recorder
Enter the menu, press [options] to set the followings:
Camcorder Setting:It contains the following options: White
balance,EV,Night mode ,Banding;
Video settings: To set the quality of Video. It contains three
options: Normal , Low , High .
Effect settings: It provides six options: Normal, Grayscale,
Sepia ,Sepia Green, Sepi a Blue, color invert.
Storage: It provides two storage addresses: Phone and
Memory card.
Restore Default: You can restore the default settings of the
camcorder.
6.5.4 Video Player
Choose the video you saved, press [options] to set the following
functions:
Play:Play the video file.
Send: Send the video file to someone by mms or Bluetooth.
Rename : Rename the video file.
Delete: Delete the video file.
Delete all files: Delete all the video files in the phone/memory
card.
Sort by : Order the video file s by name ,type, t ime, size or none .
Storage: Store the video files to the phone or memory card.
6.5.5 Audio Player
Play the music that you saved in the phone and in memory card.
[OK key]: Play or pause the current music.
[Up Navigation key]: Turn up volume.
[Down Navigation key]: Turn down volume.
[Left Navigati oSn key]: Play the previous file.
47
48
Page 25

[Right Navigation key]: Play the next file.
[List]: List all the music.
Choose the music to set the following functions
Play; Play the selected music.
Details: View the details of the song.
Add To Ringtones: Add the song to the ring.
Refresh List: Refresh the list from phone or memory card.
Settings: It contains four function setup: player settings, display
settings, sound effect and bluetooth settings.
functions: Pre. play list, List auto gen. Repeat, Shuffle,
Background play, BT stereo output, BT stereo headset, Lyrics
display and so on.
6.5.6 Sound Recorder
Use the menu to record the voice .Choose the file you saved to
operate the followings:
Record: Record the new file.
Play: Play the recorder file.
Append: Append the new record to the file what you select.
Rename: Rename the video file.
Delete: Delete the video file.
Delete All Files: Delete all the video files in the phone.
Settings: It contains three options: Pref. storage, File format,
Audio quality.
Use:Send the recorder file to user profi l es.
Send: It contains two options: To MMS, To Bluetooth.
To set the following
6.5.7 FM Radio
Use the menu to listen to the radio. Press [options] to set the
followings:
Channel List: List the channel of the FM radio.
Manual Input: Input the channel of the FM radio.
Preset Auto Search: Preset Auto search.
Settings: To set Background play and Loud speaker.
Record: Record the FM radi o file of one cha nnel.
Append: Append the new record to the file what you select.
File list: View the file list.
6.5.8 Schedule FM record
Use the menu t o sc hedule t he F M file of one c hann el, p ress [ edit]
to set the followings: time, repeat, channel settings and record
settings.
6.5.9 Slide show
Choose one images to play by way of slide show.
6.6 User Profiles
It provides six profiles: General, Meeting, Outdoor, Indoor,
Headset, Bluetooth.
Press [option s] to set the followings:
Activate: Activate the profile.
Customize: It contains six options: Tone setup, Volume, Alert
type, Ring type, Extra tone, Answer mode. Headset mode can be
set to automatically answer the call.
49
50
Page 26

6.7 Services
6.7.1 WAP
Home page: Connect to home page.
Bookmarks: E n ter bookmarks where have five bookmarks
Recent Pages: Enter the history page
Offline Pages: Choice t he old page
Input Addres s: Input a web page
Service Inbox: Get the service message
Settings : Set the web. It contains these operations: select SIM,
edit account, browser options, service message settings, clear
cache, clear cookies, tr usted certificat es.
6.8 Settings
6.8.1 Mode setting
Use the menu to open or close the mode of UIM.
6.8.2 Pen calibration
Use the menu to calibrate the pen.
6.8.3 Phone Setup
6.8.3.1Tim e and Date
Use the menu t o set time and date. It contains th ree options : Set
home city, Set time/date, Set format.
6.8.3.2 Sche dule Power O n/Off
Use the menu to schedule the time of power on/off
6.8.3.3 Language
Use the menu to set the language.
6.8.3.4 Pref. input methods
Use the menu to set the pref. input methods.
6.8.3.5 Displ ay characteristic
Use the menu to set display characteristic. It contains six options:
Wallpaper, Screen saver, Power on display, Power off display, Show
date and time and show owner number.
6.8.3.6 Dedicated Key
You can set the shortcuts f or the direction key.
6.8.3.7 Shortcuts
Set the shortcuts you want.
6.8.3.8 Hand writing
You can set th e pen speed and p en color.
6.8.3.9 Misc. Settings
You can set the LCD Backlight. Change the brightness and
time of the background light by the left and the right direction key.
6.8.4 General call settings
6.8.4.1 UIM Call settings
Enter the menu to set the followings:
Call waiting
Activate: Activate the Call waiting function.
Deactivate: Deactivate the Call waiting function.
Call divert:
51
52
Page 27

Divert the inc oming calls t o t he o t he r ph on e n um ber. It cont a i ns
three options: divert all voice calls, divert if no answer, divert if
busy.
6.8.4.2 Spe ed dial
First, power on the function, then set the number.
6.8.4.3 More
It contains Call time display, Call time reminder, Auto quick end.
6.8.5 Security Setup
6.8.5.1 UIM security setup
Use the menu to power on or power off the UIM lock, fixed dial
and change the password of UIM PIN.
6.8.5.2 Phone lock
Use the menu to set the phone loc k. The default password is
0000.
6.8.5.3 Auto keypad lock
Power on the mode, and choose the waiting time.
6.8.5.4 Change password
Change the password of the phone.
6.8.6 Restore Factory Setting
The default password is 0000.
6.8.7 Sound effect
Open or clo se sound effect, it contains eight choices : rock, normal,
bass, dance, classical, treble, party, pop.
6.9 File manager
Manage the files that saved in the phone and memory card.
AQ
If any problems are encountered while using the cell phone,
please solve them with reference to following items. If the
problems still exit, please contact dealers or service provider
appointed b yNovo immediately.
■ “Enter PIN code" appears on the screen:
Enter valid PIN code of your SIM card. Please contact network
service operator immediat ely if you do not k no w the code.
■ “Enter PUK code" appears on the screen:
Your SIM card will be locked if you enter wro n g PIN code for three
times. To unlock your SIM card, you have to enter PUK code.
Please cont act network service operator immediately.
■ “Insert UIM card" appears on the screen:
Make sure SIM ca rd is co rre ctly in st a lle d. Che ck i f SI M card w or ks
properly. It may have defects or faults. If so, hand it over to
network service operator.
■ “Not in service area. Network failure.” is displayed.
Check signal i ntensity indic ator. If there is no signal, you may be
in the basement o r network blind area in a bui lding. P lease move
to other locati ons to receive signal. Anoth er situation is that you
are not covered by network. You can ask your network service
operator to provide netw ork coverage.
■ Poor sound quality, echo or noise makes communication
difficult:
Hang-up your phone and dial again. Network service operator
may connect you to a line with better communication quality.
53
54
Page 28

■ Standby time declines:
Signal at your location is weak so that the cell phone has to
search signal for a long time. When you don’t want to answer any
call, pleas e power off for a time bei ng. It is al so possibl e that the
battery has been used for a long time and approaches its life-span.
In this cas e, please replace the battery.
■ Cell phone fails to boot:
Check battery volume or charge the battery. Try to power on while
charging. If your cell phone is put off for a long time, the battery is
likely to discharge excessively. You cannot power on it in this case,
and the phone will give no response for quite a long time. The
phone cannot be powered on until batte ry is restored.
■ Cannot send short message:
Please check your service center number option to see if you
have set up service center number or if the number is correct.
Perhaps you have not open SMS service, or recipient of short
message is invalid, or network service operator of your region
does not support this service.
■ Cannot charge:
There are thr ee possibilities: 1. Char ger of your cell phone does
not work properly. You can contact nearest service provider or
dealer appointed by Novo; 2. Ambient temperature is not
appropriate. Please change charging environment; 3. Poor
contact. Please check plug of your charger.
■ Can not add entries into phonebook:
Phonebook is full. Please delete some useless entries.
■ Can not select some functions:
The service is not available or network service operator of your
location does not support this service. Please contact service
provider or d ealer or network service op erator appoint ed by Novo
immediately.
55
56
Page 29

T-Flash Card Introduction
The cell phone support T-Flash card to enlarge the storage.
Operations as follows:
T-Flash card install/remove
The T-Flash card is on the left side of the SIM socket. Take out
battery first if you install the T-Flash card, move the sheet metal ,
put the T-Flash card on it, then close the sheet metal, that is ok.
If you remove it, operate as contrary operations of installing.
T-Flash card use
T-Flash as one of the memorizer of cell phone, format it when you
first use, operations as follows:
1. Ensure you already installed the T-Flash card properly.
2. Press OK key into main menu, then into Documents,T-Flash , select
T-Flash Format option, pres s OK k ey. Later on, restar the phon e, th en
you can use the T-Flash card normally.
You can use T-Flash card conn ect with computer by the
commutator, a nd then, can copy data from the computer.
User can check-up whether there are catalogs in the root, the
catalog like these: AUDIO,VIDEO, PHOTO, SMS,BOOK,
PHONEBOOK. without, you can establish them. These catalogs
saved relevant files only, otherwise, can’t show what you save. for
example:
AUDIO can sav e these format files : amr, mid, MP3.
BOOK can save the format file: txt.
PHONEBOOK can save the contacts what exported from the cell
phone.
PHOTO can save these format files: bmp, gif, jpg.
SMS can save t he messages what exported from the cell phone.
VIDEO can save these format files: MP4, 3GP.
57
58
Page 30

RF Exposure Information and Statement
The SAR limit of USA (FCC) is 1.6 W/kg averaged over one gram of
tissue. Device types M560C (FCC ID: SG70911M560C) has also been
tested against this SAR limit. The highest SAR value reported under
this standard during product certification for use at the ear is 0.441
W/kg and when properly worn on the body is 0.392 W/kg. This device
was tested for typical body-worn operations with the back of the
handset kept 1.5cm from the body. To maintain compl iance with FCC
RF exposure requirements, use accessories that maintain a 1.5cm
separation distance between the user's body and the back of the
handset. The use of belt clips, holsters and similar accessories shou ld
not contain metallic components in its assembly. The use of
accessories that do not satisfy these requirements may not comply
with FCC RF exposure requirement s, an d shou ld be avoi ded.
This device complies with part 15 of the FCC rules. Operation is
subject to the following two conditions: (1) this device may not cause
harmful interference, and (2) this device must accept any interference
received, including interference that may cause undesired operation.
NOTE: The manufacturer is not responsible for any radio or TV
interference caused by unauthorized modifications to this equipment.
Such modifications could void the user’s authority to operate the
equipment.
NOTE: This equipmen t has been tested a nd found to com ply with the
limits for a Class B digital device, pursuant to part 15 of the FCC Rules.
These limits are designed to provide reasonable protection against
harmful interference in a residential installation. This equipment
generates uses and can radiate radio frequency energy and, if not
installed and used in accordance with the instructions, may cause
harmful interference to radio com munications. However, there is no
guarantee that interference will not occur in a particular installation. If
this equipment does cause harmful interference to ra dio or television
reception, which can be determined by turn ing the equipment off and
on, the user is encouraged to try to correct the interference by one or
more of the following measures:
- Reorient or relocate the receiving antenna.
- Increase the separation between the equipment and receiver.
-Connect the equipment into an outlet on a circuit different from that to
which the receiver is connected.
-Consult the dealer or an experien ced r a di o/ TV techn ici an fo r he lp
59
60
 Loading...