

Page 1

Users' Guide
Thanks for purchasing Haier mobile p ho ne s, w hi ch a re a c om bi na ti on o f th e
es se nc e of hig h tech no lo gy, styli sh d es ig ns a nd a plent y of functio ns . Th ey
are expected to bring endless funs to your life.
BeforetheuseofHaiermobilephones,pleasereadthisusers'guideandkeep
it ca r efu lly for f u rth er ref eren ce. Th i s guid e s erv es as an ope rat i on gui de
instead of a quality warranty. Qingdao Haier Telecom Co.,Ltd reserves all
therightstointerprettypingerrorsinthisguide,inconsistencywiththelatest
ma te rials and u pgrading of s oft wares a nd make cha ng es at any t ime. Such
changeswilldirectlybeeditedintotheneweditionofusers'guidewithout
further notice.
This users' guide is edited and printed by Qingdao Haier Telecom Co .,Ltd.
Copyrights reserved! Quality guarantee to be held responsible for reprint!
Page 2

CONTENTS
Important notes
FCC SAR
1. Parts of the Phone
1.1 Screen lcons
1.2 Install battery and UIM card
1.3 Charge battery
1.4 Switch on/off
1.5 Dial a number
1.6 End a call
1.7 Redial a number
1.8 Make an international calls
1.9 During a phone call
2. Operation of menu
2.1 Names
2.1.1 Using the Keypad to Enter Information
2.1.2 Editing Names
2.1.2.1 list
1
2
12
13
15
16
17
18
18
18
19
19
20
20
20
23
23
1
Page 3

2 New
2.1.2.
2.1.2.3 Search
2.1.3 Multicopy
2.1.4 Groups
2.1.5 Erase All
2.1.6 Speed Dial
2.1.7 Memory state
2.1.8 My number
2.2 Messages
2.2.1 Write Message
2.2.2 Inbox
2.2.3 Outbox
2.2.4 Draft
2.2.5 Templates
2.2.6 Erase Msgs
2.2.7 Voice Mail
2.2.8 Settings
2
23
23
24
24
24
25
25
25
26
26
27
28
29
29
30
30
30
Page 4

2.2.9 Multimedia Box
2.3 Call Logs
2.3.1 Missed
2.3.2 Received Call
2.3.3 Dialled Call
2.3.4 Erase Lists
2.3.5 Call Ti me rs
2.4 Tools
2.4.1 Schedule
2.4.2 Alarm Clock
2.4.3 Calculator
2.4.4 Tip C al cu la to r
2.4.5 Stop Wa tc h
2.5 Settings
2.5.1 Ringers
2.5.2 Profiles
2.5.3 Display
32
33
33
33
33
34
34
36
36
37
37
38
38
39
39
39
43
3
Page 5

2.5.4 Security
2.5.5 Call Setup
2.5.6 Phone Info
2.5.7 Key guard
2.5.8 Network Service
2.6 Amusement
2.6.1 Kong Ming
2.7 TATA Zone
3. Input method
4
. Maintenances and repairs
. Tro ub le s ho ot in g
5
4
43
44
45
45
46
47
47
48
49
50
53
Page 6

Important n otes
Please follow t he f ollowing rule s be fo re you use the phon e. O therwise, it ma y re su lt in
dangers or make y ou v iolate laws.
Follow traffi c re gulations
Do not use the mobi le p ho ne without han d- free setti ng s w hi le dr iving . Ple as e s to p y ou r c ar
before you want t o us e yo ur phone.
Switch off your p ho ne at filling sta ti on s
Do not use your phone at fil ling stations or the area s with infl ammables and explosive produ cts
or chemicals.
Switch off your p ho ne on the plane
Mobile phones w il l ca use interf erence. Using mobile phones on the plane is bot h a danger and
a violation of la ws .
Switch off your p ho ne in the hospita l
Switch off yo ur phone when you are c lose to me dical equi pm ents and f ollow all th e e xi sti ng
provisions.
Special provi si ons
Fo llow the s pecia l rul es of r elati ve pl ac es. P lea se swit ch off your phone w her e the u se of
mobile phones is forbidden or may ca use interference or dangers (for example,in th e ho sp ital).
Careful Use
Use your phone normally (near your ears ). Do not touch the wire without reason after switching
off your ph on e.
Emergency cal ls
You ca n di al emergency ca ll s an ytime, even the P IN /P UK locked, no UIM c ar d or the phone
locked.Inpu t lo ca l emergency num be r and press send key.
The Emergency c al l nu mber are 100/10 1/ 102/12524.
1
Page 7
FCC SAR
This chapter addresses the safety guidelines and precautions to follow when operating your phone.
Please make sure to be aware of all the details about the safety to operate your phone in the way that
you are supposed to.
Before operating your phone, please be aware of all the safety details.
SAFETY INFORMATION FOR WIRELESS
HANDHELD PHONES
SAFETY INFORMATION FOR FCC RF EXPOSURE
SAR INFORMATION
FDA CONSUMER UPDATE
PROTECT YOUR WARRANTY
12 MONTHS LIMITED WARRANTY
2
Page 8

Read This Information Before Using Your Handheld
Portable Cellular Telephone
EXPOSURE TO RADIO FREQUENCY SIGNALS
Your wireless handheld portable telephone is a low power radio transmitter and receiver. When it is ON,
it receives and also sends out radio frequency (RF) signals.
In August 1996, the Federal Communications Commissions (FCC) adopted RF exposure guidelines with
safety levels for handheld wireless phones. Those guidelines are consistent with the safety standards
previously set by both U.S. and international standards bodies:
ANSI C95.1 (1992) *
NCRP Report 86 (1986) *
ICNIRP (1996) *
Those standards were based on comprehensive and periodic evaluations of the relevant scientific
literature. For example, over 120 scientists, engineers, and physicians from universities, government
health agencies, and industry reviewed the available body of research to develop the ANSI Standard
(C951).
The design of your phone complies with the FCC guidelines (and those standards).
3
Page 9

ANTENNA CARE
Use only the supplied or an approved replacement antenna.
Unauthorized antennas, modifications, or attachments could damage the phone and may violate FCC
regulations.
1* : American National Standards Institute.
2* : National Council on Radiation protection and measurements.
3* : International Commission on Nonionizing Radiation Protection.
DRIVING SAFETY
Talking on the phone while driving is extremely dangerous and is illegal in some states. Remember,
safety comes first. Check the laws and regulations on the use of phones in the areas where you drive.
Always obey them.
Also, if using your phone while driving, please:
Give full attention to driving. Driving safely is your first responsibility.
Use hands-free operation, if available.
Pull off the road and park before making or answering a call, if driving conditions so require.
4
Page 10

If you must use the phone while driving, please use one-touch, speed dialing, and auto answer modes.
An airbag inflates with great force. DO NOT place objects, including both installed or portable wireless
equipment, in the area over the airbag or in the air bag deployment area. If in-vehicle wireless equipment
is improperly installed and the air bag inflates, serious injury could result.
WARNING
damage.
: Failure to follow these instructions may lead to serious personal injury and possible property
5
Page 11

ELECTRONIC DEVICES
Most modern electronic equipment is shielded from RF energy.
However, certain electronic equipment may not be shielded against the RF signals from your wireless
phone.
PACEMAKERS
The Health Industry Manufacturers Association recommends that a minimum separation of six (6"
be maintained between a handheld
wireless phone and a pacemaker to avoid potential interference
) inches
with the pacemaker. These recommendations are consistent with the independent research by and
recommendations of Wireless Technology Research.
Persons with pacemakers :
ALWAYS keep the phone more than six inches from your pacemaker when the phone is turned on.
Do not carry the phone in a breast pocket.
Use the ear opposite the pacemaker to minimize the potential for interference.
If you have any reason to suspect that interference is taking place, turn your phone OFF immediately.
OTHER MEDICAL DEVICES
If you use any other personal medical device, consult the manufacturer of your device to determine if
they are adequately shielded from external RF energy Your physician may be able to assist you in
obtaining this information.
Turn your phone OFF in healthcare facilities when any regulations posted in these areas instruct you to
do so. Hospitals or healthcare facilities may be using equipment that could be sensitive to external RF
energy.
6
Page 12

POSTED FACILITIES
Turn your phone OFF where posted notices so require.
OTHER SAFETY GUIDELINES
AIRCRAFT
FCC and Transport Canada Regulations prohibit using your phone while in the air. Turn your phone
OFF before boarding an aircraft.
BLASTING AREAS
To avoid interfering with blasting operations, turn your phone OFF when in a "blasting area" or in areas
posted: "Turn off two-way radio". Obey all signs and instructions.
POTENTIALLY EXPLOSIVE ATMOSPHERES
Turn your phone OFF when in any area with a potentially explosive atmosphere and obey all signs and
instructions. Sparks in such areas could cause an explosion or fire resulting in bodily injury or even death.
Areas with a potentially explosive atmosphere are often, but not always,clearly marked. They include
fueling areas such as gas stations ; below deck on boats ; fuel or chemical transfer or storage facilities;
vehicles using liquefied petroleum gas (such as propane or butane); areas where the air contains
chemicals or articles, such as grain, dust, or metal powders; and any other area where you would
normally be advised to turn off your Vehicle's engine.
7
Page 13
PRECAUTIONS
Your Handheld Portable Telephone is a high quality piece of equipment. Before operating, read all instructions
and cautionary markings on (1) AC Adaptor (2) Battery and (3) Product Using Battery.
DO NOT use this equipment in an extreme environment where high temperature or high humidity
exists.
DO NOT abuse the equipment. Avoid striking, shaking or shocking. When not using, lay down the
unit to avoid possible damage due to instability.
DO NOT expose this equipment to rain or spilled beverages.
DO NOT use unauthorized accessories.
DO NOT disassemble the phone or its accessories. If service or repair is required, return unit to
an authorized Audiovox cellular service center. If unit is disassembled, the risk of electric shock or
fire may result.
DO NOT short-circuit the battery terminals with metal items etc.
8
Page 14

WARNING! Read this Information before using
CAUTIONS
In August 1996 the Federal Communications Commossion (FCC) of the United States with its action in
Rep ort and Order FCC 96-326 adopted a n updated saf ety stand ard for human exposure to radio
frequency electr om agnetic e nergy e mitted by FCC regulat ed tran sm itters. T hose gu idelines are
consistent with the safety standard previously set by both U.S. and international standards bodies.
The design of this phone complies with the FCC guidelines and these international standards.
Use only the supplied or an approved antenna. Unauthorized antennas, modifications, or attachments
could impair call quality, damage the phone, or result in violation of FCC regulations.
Do not use the phone with a demaged antenna. If a demaged antenna comes into contact with the skin,
a minor burn may result. Please contact your local dealer for replacement antenna.
BODY-WORN OPERATION
Thisdevicewastestedfortypicalbody-wornoperationswiththebackofthephonekept
1
.5cm.from
the body. To maintain compliance with FCC RF exposure requirements, use only belt-clips, holsters or
similaraccessoriesthatmaintaina
1
.5cm.separationdistancebetweentheuser'sbodyandtheback
of the phone, including the antenna. The use of belt-clips, holsters and similar accessories should not
contain metallic components in its assembly.
TheuseofaccessoriesthatdonotsatisfytheserequirementsmaynotcomplywithFCCRFexposure
requirements, and should be avoided.
NOTE : For more information about RF exposure, please visit the FCC website at www.fcc.gov
9
Page 15

THIS MODEL PHONE MEETS THE GOVERNMENT 'S REQUIREMENTS FOR EXPOSURE TO
RADIO WAVES.
Your wireless phone is a radio transmitter and receiver. It is designed and manufactured not to exceed
the emission limits for exposure to radiofrequency (RF) energy set by the Federal Communications
Commission of the U.S. Government. These limits are part of comprehensive guidelines and establish
permitted levels of RFenergy for the general population. The guidelines are based on standards that
were developed by independent scientific organizations through periodic and thorough evaluation of
scientific studies. The standards include a substantial safety margin designed to assure the safety of all
persons, regardless of age and health.
The exposure standard for wireless mobile phones employs a unit of measurement known as the
Specific Absorption Rate, or SAR. The SAR limit set by the FCC is 1.6 W
conducted
with the phone transmitting at its highest certified power level in all tested frequency bands.
/kg. * Tests for SAR are
Although the SAR is determined at the highest certified power level, the actual SAR level of the phone
while operating can be well below the maximum value. This is because the phone is designed to operate
at multiple power levels so as to use only the power required to reach the network. In general, the closer
you are to a wireless base station antenna, the lower the power output.
Before a phone model is available for sale to the public, it must be tested and certified to the FCC that
it does not exceed the limit established by the governmentadopted requirement for safe exposure. The
10
Page 16

W/Kg;and when worn on the body with the back of the unit to the user is 0.716W/Kg.(Body worn measurements
differ among phone models,depending upon available accessories and FCC requirements.While there may be
differences between the SAR levels of various phones and at various positions,they all meet the govement
requirement for safe exposure.
Page 17
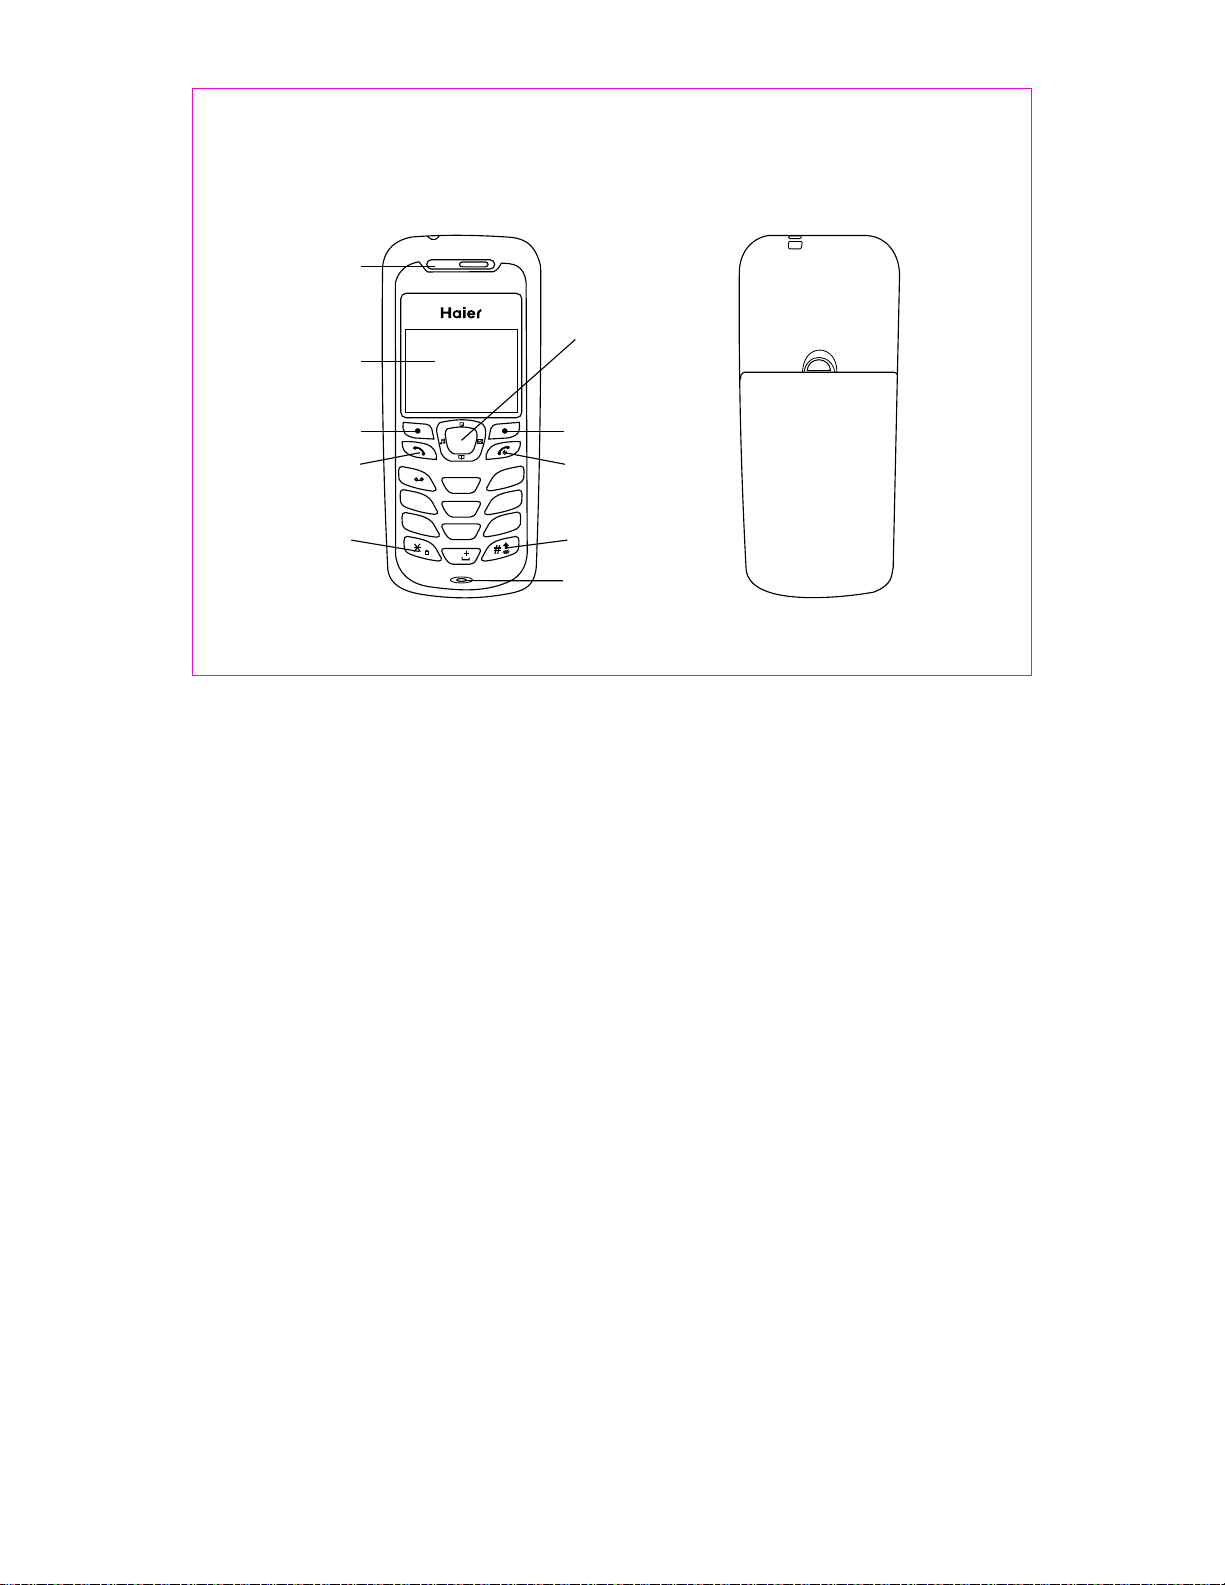
1. Parts of the Phone
The illustrat io n be low shows the mai n co mponents of your ph on e.
(in the text boxe s in t he picture below, ty pe i n names of the major co mp onents)
Receiver
Up/down key
LCD screen
12
Soft key
Send
key
*
Soft key
1
4
GHI
PQRS
7
DEF
3
ABC
2
MNO
6
5
JKL
WXYZ
9
8
TUV
0
End
# key
Microphone
Page 18
(type in descri pt io ns of the phone's c om ponents in the tabl e be low)
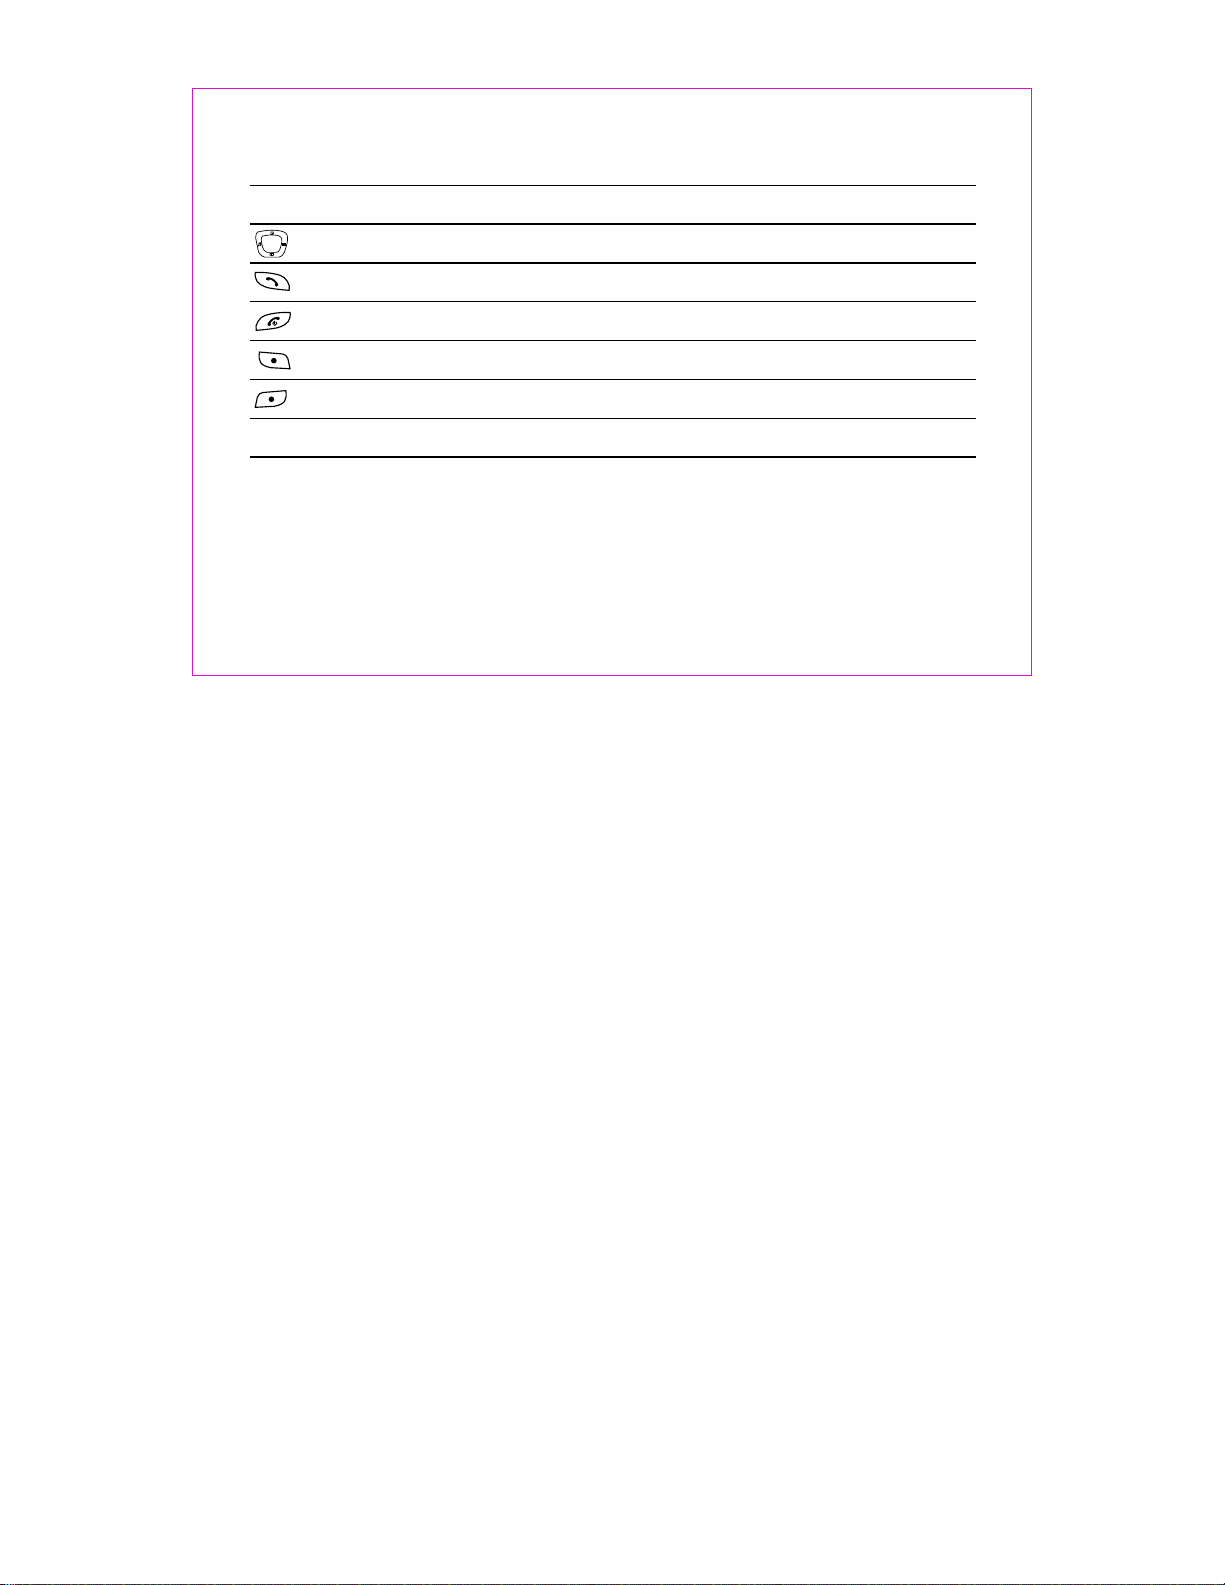
Key Descrip ti on
Up/down key Use up/down to na vi ga te in menus
Send key Use th is k ey t o dial, or answer a c al l
End key Use thi s ke y to e nd a call, or turn po we r on /off
Soft key (left) Use this key to sel ec t or confirm someth in g
Soft key (right ) Us e this key to cance l so me thing
Alphanumeri c ke yp ad Use these keys t o in put numbers, or c ha ra cters
1.1 Screen Ic ons
(insert all of th e sc reen icons in the tab le b elow--or instea d of u sing the table, i ns er t a sample
LCD screen with c al l- outs showing ea ch o f the possible scre en i cons)
When the phone is p ow er ed on, the follow in g icons may display :
13
Page 19

DescriptionIcon
Indicate the st re ng th of rssi
Indicate the al ar m is s et
Indicate the le ve l of b attery
Indicate call f or wa rd enabled
Indicate the ph on e is i n a call
Indicate new me ss ag e's arrival
Indicate new ur ge nt m essage
Indicate voic e ma il
Indicate phon e is i n ro aming
( )
Indicate all ki nd s of p hone mode
No ring
Ring
14
Page 20

1.2 Install battery and UIM card
Install the bat te ry
aim the protrud in g pa rt at the bottom of t he b attery at the bot to m of p hone.
push the top part o f th e battery to the phon e an d press down the lo ck u nt il it is locked.
Take out the b at tery
Switch off th e phone, push up th e lo ck a t the bottom of the b at te ry to uplift the to p of t he battery
and separate wi th t he m ain machine.
Install UIM car d
Purchase a UIM ca rd f rom network opera tor. Your ph on e n um ber a nd re gistr at ion i nform ation
are stored in you r UI M ca rd. Your U IM card can be used i n an y a CDMA phone. Your number and
information w il l no t change.
Make sure to swit ch o ff your pho ne b ef ore take out the ba tt er y.
Make the metal fa ce o f the UIM card down and p ut i t conferring th e be ve l of the card.
Cover the sheet m et al u sed for fixing an d in stall the batte ry.
15
Page 21

Take out UIM c ar d
take out the batt er y after switch off your phone.
uncover the she et m et al and take out the U IM c ard.
install the bat te ry
1.3 Charge ba ttery
Connect the cha rg er w ith power suppl y.
Insert the plug o f th e charger into char gi ng connector of the b ot tom of the phone.
The rolling of th e el ec tric quantity b ar i ndicates that the p ho ne begins to char ge .
When the batter y le ve l full and stop rol le d to displays charg in g finishes.
Disconnect th e ch ar ger and the phone a ft er the charging of th e ph one. Take out charg er f ro m
supply socket .
Notes:
1. Pres s and hold the but ton s of bo th s ide s o f th e c h arg er a fte r t h e c har gin g to pl u g o ut t he
charger.
2. We sugge st y ou to charge the ba tt er y fully when you us e th e ph one for the first t im e. I t takes
about 3 hours for f ul l ch arging.
16
Page 22

3. Do not pull out th e pl ug o f the charger dur in g the charging to avo id h arming of the pho ne a nd
charger.
1.4 Switch on/off
Pressing and ho ld in g can switch on/o ff the phone.
If you have set PIN c od e, please enter PIN w he n switch on your ph on e.
Input PIN code
You c an se t p ro tecti on co de (P IN CODE ) in order to p rev e nt ran dom usi ng o f y our pho ne b y
others. Each ti me y ou restart your pho ne , the phone will ask yo u to i nput PIN code aft er s et ting.
Input PIN code (s up pl ied by network op er ator which can be rev is ed. In order to kee p it i n
security, will be shown on th e sc re en to replace the n um ber you input.)
Press OK, and aft er a s hort time, your mob il e phone will conf ir m it s correctness a nd b eg in to
register on the n et wo rk. Once the netw or k name is shown on the screen, you can dia l or answer
a call. If no netwo rk n ame is shown on the scr ee n, you need to regist er a gain.
Input wrong PIN c od e
17
Page 23

If you make a wro ng in put, yo u c an pr es s to reen ter n umb e rs. Th ree con tin uou s wr ong
inputs of PIN cod e wi ll l ock the UIM card. I f th is circumstan ce a pp ears, please co nt ac t the UIM
card supplier s.
Do not touch the wi re i n un necessary con di tions after the pho ne i s turned on. Othe rw is e,
Note:
it will aff ec t the call quality an d ma ke the phone cons um e so m ore energy.
1.5 Dial a number
you can only use th e fu nc tion only after t he n etwork name is sh ow n on t he screen.
input distric t co de a nd telephone nu mb er or mobile phone nu mb er, press to dial.
1.6 End a call
Pressing can en d a ca ll.
1.7 Redial a number
You ca n pr ess twice to redi al t he n umber you dial la st t im e.
The mobile phon e ca n st ore 29 latest cal l lo gs ( in com in gs or outg oi ngs ). In o rder to re dial one
of the numbers, y ou c an d o as the followin gs :
18
Page 24

1 if characters a re s ho wn on the screen pr es ses to return to th e id le m ode.
2 press to displa y th e latest call list.
3 press up/down k ey s of n avigation key t o vi ew the telephone nu mb ers and display t he n ee ded
names and numbe rs .
4 press to dial the d is played numbers.
1.8 Make an int ernational calls
in idle mode, pre ss a nd h old until app ea rs on the screen.
press country c od e
input distric t co de ( usually no 0 in the f ro nt) and telephone n um ber
press to dial
0
1.9 During a phone call
Pressing menu k ey l ef t soft key can:
Recent calls
Message
Record
Silence
19
Page 25

2 Operation of menu
2.1 Names
Na mes is a li st of your cont ac ts. E ach n ame c an co ntain thre e pho ne numb ers, ad dre ss ,
email, URL, and note.
2.1.1 Us in g the Keypad to Enter Informa ti on
you can use keypa d to e nt er something. T he re is a cu rsor, which look s lik e | , a t t he ri gh t s id e
of current char ac ter.
To enter tex t
1.press alpha nu me ric key to insert t ex t before cursor.
2. if yo u mak e a m istak e, yo u can p res s the r ight soft key E ra se to dele te cur rent chara cter
before cursor.
3.you can use to mo ve t he cursor.
4.after editi ng , select Save to save y ou r editing.
5.to cancel edi ti ng , long-press Er as e key until it chan ge s to B ack , then press it a ga in .
To enter num be rs
1.press sever al t imes unti 123 is d isplayed at the t op -r ight corner of th e sc re en.
20
Page 26

2.press numbe ri c ke ys to input numbe rs .
To enter upp er case or lowerca se l et ters
1.p ress # several time s until abc is displayed at the top-right corner of the screen, then you
can input lower ca se d letters.
2.press # sev er al times until AB C is di sp layed at t he to p-rig ht co rn er of the scree n, th en
you can input upp er ca sed letters.
3.press alpha nu me ric key several times(no longer than 0.5 seconds betw een each two pressing)
to enter a specif ie d le tter written in t he k ey.
4.if the cursor i s hidden, you can keep on pressing to change current charact er. current character
will be entered w he n th e cursor appear s.
5.if you want to en te r a letter wh ich in the same key, you must wait for 0.5 seconds unt il the curs or
appears, so you c an p re ss the key again. I f you want to enter a letter whic h in a different key, you
need not wait for t he c ur sor, and can press t he k ey as you want direct ly.
To enter sym bo ls or special cha ra ct ers
1.press * .
2. Use up and dow n to select the sym bo l yo u need.
21
Page 27

3.Press the lef t so ft key to confirm.
To change th e la nguage
1.select Se tt in gs in main menu
2.select Di sp la y
3.select La ng ua ge
4.select the la ng ua ge you want.
5.if you set you r phone to a nothe r lan gu age w hich you c annot read , you c an pr ess 5 ,3,3 after
entering the ma in m en u, then select th e co rrect language.
22
Page 28

2.1.2 Ed it ing Names
2.1.2.1 list
1.select Names in main menu
2.select List
2.1.2.2 New
1.At the main men u, s elect Na mes .
2.Select new .
3.input the con ta ct name, press Save
4.choose [mob il e] , press change
5.press save a fter editing
2.1.2.3 Search
1.select Names in main menu
2.select Search
3.enter the ful l na me y ou want to search , pr ess Fi nd
23
Page 29

2.1.3 Mu lt icopy
With the copy fun ct ion, allows you cop y it ems in the mobile p ho ne e ntries in UIM car d me mo ry
to phone memory a nd v ic e versa.
All Copy: you can c op y al l of the UIM card mem or y entries to phon e me mo ry and vice versa .
Choice Copy: You can sele ct o ne o r more of the recor de d li st to copy it.
Note: in the selecting op tion of the popup menu, through pres s left soft key to sel ect multi-records ,
then press left s of t key to copy these sel ec ted records in th e po pu p menu.
2.1.4 Gr ou ps
There are five gr ou ps : 'No Group'. 'Fa mi ly','Friend s' ,' Colleagues' ,' VI P',
Press 'option ' ke y yo u may enter the fol lo wing menus:
No group:
You ca n vi ew/add group an d ch an ge/Erase the gr ou p' s name here.
2.1.5 Er as e All
Select Erase All in menu to erase all t he c on tacts.
24
Names
Page 30

2.1.6 Sp ee d Dial
1.select in Main Me nu
2.select Speed Dial
3.select one sh or t nu mber (the index i s th e short number) , pre ss Options soft key
4.select Set Entry in Option m enu
5.select one co nt ac t
6.select one ph on e nu mber, save it to spe ed l ist
Default Speed N um be r:
1# 1500 - Voice Mail ;
2# 1590 - Fundoo Ca ll in g;
3# 121 - Customer C ar e;
4# 197 - Director y As si stance.
Names
2.1.7 Me mo ry state
Allows you inqu ir e th e m em ory s tate of th e UIM card and ph one bo ok, i nclud in g u se d n um ber
and total memor ie s.
2.1.8 My n um ber
This function a ll ow s you to set and view t hi s UIM card number.
25
Page 31

2.2 Message s
This chapter in tr od uces the usage of S ho rt Message and Ring Ton e.
Using Short Mes sa ge
You c an us e S ho rt Me ssage func ti on to send and recei ve me ss age,T he re is an i nbo x and a n
outbox in you pho ne , ea ch messages can c on tain a maximum of 150 c ha racters, you ca n se nd
the message now o r la te r, etc.
2.2.1 Write Mess ag e
Allows you writ e te xt l etter, the numbe r at t he top right come r sh ow c haracter numb er f or e nable
input. Press nu mb er k ey to input lette r yo u need. Press opt io n ke y as following ac ti on :
1. Send
You ca n se nd a message.
Pressing Opti on s el ect object you wa nt t o insert your SMS m es sa ge.
Press number ke y in pu t phone number or p re ss Option to select p ho ne number from th e ph on e
book.
26
Page 32

2. Insert templ at es
You ca n in sert template s wh en c omposing an SMS m es sa ge.
3. Send to many
To send this messag e to m ul ti-user.
Press Option to s el ect number interf ac e.
Press Select Se nd \Select One\Sel ec t All\Cancel Al l to s en d this message.
4. Insert Numbe r
Press Select to c ho ice a phone number fr om c ontacts.
5. Save
You ca n sa ve the contents o f ed it ed to outbox.
Note: The SMS mes sa ge length is 160 char ac ters.There' s a so un d alert when text e di t fu ll.
2.2.2 In bo x
When you receiv e a ne w me ssage, the new me ss age-prompting i co n will be displayed o n th e
screen, to vie w messages in the Inbo x. Press up/do wn key to scroll and then choose either SMS
27
Page 33

messages to vie w. Wh il e you view the mess ag e press to enter th e fo ll owing options :
Reply: you can re pl y th e selected mess ag e.
If you wand to repl y th e message, press ke y to e ntry the Edit Int er fa ce.
Press key to send t he m essage after fi ni sh ed it.
Forward: to for wa rd the selected and e di ted message.
If you wand to forw ar d the message, pres s ke y to entry the edit i nt er face.
Press key to sele ct s end option to enter t ex t interface.
Input the desir ed p ho ne number then pr es s key to send the mes sa ge .
Call: to call the s en de r of the selected m es sage.
If you wand to dial t he s en der's number, pr es s key confirm the n di al ing.
Move to phone box : Mo ve t he selected mes sa ge to the phone box.
If you wand to save t he m essage in the phone b ox , press key to move t o th e ph one box.
Notice: only to s av e the message of the UI M ca rd into the phone b ox .
Save number: To sav e th e nu mber of the sende r.
Erase: To erase the s el ec ted message.
2.2.3 Ou tb ox
Your m ob ile phone will st or e me ssages in outbo x list. Select a message, press key to scroll
28
Page 34

the desired op tion press to view the details of the messages and press to open a message
and to enter the follo wi ng op tio ns as t he 2. 2: Fo rward , sav e add re ss, c opy t o pho ne bo x and
erase.
2.2.4 Dr af t
Store the messa ge s wh ich you save.
2.2.5 Templates
Al lows you t o set the no m or e th e 2 0 qu ick tex ts, 11 t ext s ca n n o t b e e d ite d a n d C hin e se or
English displ ay s, t he o the r 9 tex ts c an be e dit ed a nd onl y ei the r Ch ine se o r E ngl i sh dis p lay.
Press key scrol l to t he desired mess ag e an d press key to acce ss t he f ollowing:
The quick text ca n be e di ted:
Edit: allows yo u re vi sed text then sav e it .
Erase: erase th e se le cted text.
Add new: you can ed it t ex t then save it.
Se nd: y ou ca n sen d the sele ct ed te xt. W hen t he qu ic k t ex t c ann ot b e e d ite d, you can se l ect
add an d se nd option.
29
Page 35

2.2.6 Er as e Msgs
Inbox
1.
Erase the entir e me ss ages in the inbox f ol der
2. Outbox
You ca n de lete the entire m es sa ges in the outbox f ol de r.
3. Erase all
To delete message s in t he m obile phone and S IM c ard folder
2.2.7 Voice Mail
The network det er mi nes whither thi s fu nction is aff ec tive or not.
Press key to view d et ails of the voice mai l.
Press k ey t o vi ew the followin g op tion:
Call: Dialing t he c al lback number or t he v oice mail number.
Erase: to erase t he s elected voice mai l.
2.2.8 Se tt ings
Press key to disp la y the following opt io n:
1. Auto save
Allows you sele ct A ut o save or no save opt io n. If you select 'a ut o sa ve' option, you c an s av e
30
Page 36

the send messag e or u n- send message at t he m emory space is not be f ul l state.
2. Auto Delete
Allows you sele ct O n or Off opti on . If you select 'On' opt ion, you ca n delete th e send mess age
or un-send mess ag e at t he memory space i s be f ull state.
3. Call back
You ca n pr ess dial key to cal l ba ck d irectly.
4. Send Time
In acco rdanc e wit h diffe re nt re quire me nts t o s et t im e s f orm a t, you can se t th e l eng t h t he
messages try ou t to s end: you can choose i mm ediate, after 3 d ay s, a fter 2 days, afte r 1 da y,
after 12 hours, a ft er 2 hours, after 1 hou r, after 30 min ute s. First th e text send s to the me ssage
center, the cent er w il l send the text to ob je ct terminal aft er t he t ime is expiring .
Notice: the net wo rk d etermines whi th er this functio n is a ffective or n ot .
5. Validit y
In acco rdanc e wit h diffe re nt re quire me nts t o s et t im e s f orm a t, you can se t th e l eng t h t he
messages try ou t to s end: immediate, a ft er 3 days, aft er 2 days, a fte r 1 d ay, afte r 12 hours ,
after 2 hours, af te r 1 hour, after 30 minut es . The message cen te r will be try to send t he t ext to
object termin al , wh en the send time fo r a lo ng time the operati on m ay be failure.
Notice: the net wo rk d etermines whi th er this functio n is a ffective or n ot .
31
Page 37

6. Priority
With the functi on a ll ow you to select ge ne ral or emergency.
7. Voice Mailbox
Select menu Voice Mail bo x #
Enter Voice mail bo x nu mber, then press Save k ey.
8. Broadcast
1.Select menu Broadc as t Se rvice
2.Select On/Off to enabl e/ disable broad ca st m essage servic e.
9. Delivery rep or ts
Allow you selec t tu rn o n or off.
You can ch o ose on or off to se t th e s t atu s o f me ssa ge y ou sen t , i f yo u s ele c t t urn on, th e
information t ha t yo u have successf ul ly sent the messa ge i s di splayed throu gh n et work.
Notice: the net wo rk d etermines whi th er this functio n is a ffective or n ot .
2.2.9 Mu lt imedia Box
Store the Multi me di a files Rington e.
32
Page 38

2.3 Call Logs
2.3.1 Mi ss ed
With the functi on , you can view the curr en t missed calls (n o mo re t han 30 messages ). You can
sa ve an d vie w thi s sav ed nu mb er an d a ls o t o s end the me s sag e a n d d ial ing to the sel ect e d
number.
Please refer to t he s ub menu of the recen t ca lls.
2.3.2 Re ce ived Call
Th is fu nctio n all ow s y ou to p revie w the 30 m ost r ec ent r ece iv ed nu mbers , you c an sa ve an d
view this saved n um be r and also to send th e me ssage and dialing t o th e selected numb er.
Please refer to t he s ub menu of the recen t ca lls.
2.3.3 Di al led Call
This function a ll ow s you to preview th e 30 m ost recent dialed n um bers, you can sav e an d vi ew
this saved numb er a nd a lso to send the mes sa ge and dialing to the s el ected number.
Please refer to t he s ub menu of the recen t ca lls.
33
Page 39

The recent call s su bm enu
Details: You can save the n um be r to the phone or vie w th e de tails of the phon e nu mb er.
Send message: y ou c an s end a message to th e ph one number.
Call: call this n um be r.
Erase: erase th e se le cted text.
Erase All: eras e al l th e text.
2.3.4 Er as e Lists
With the functi on y ou can erase all the re co rded in the missed calls, incoming calls and outgoi ng
calls option.
2.3.5 Ca ll Timer s
Allows you view t he l at est call time and t o vi ew total time of al l th e di aled outgoing c al ls a nd the
incoming call s. A ll ow you clear the ca ll -timer.
1. Last
Your p ho ne displays the l as t ca ll times. Displ ay t he t ime used by the las t ca ll .
2. Incoming
34
Page 40

Display the tim e us ed b y the last call.
3. Outgoing
Display total t im e us ed by all outgoin g ca lls since the timer w as r eset.
4. Reset Timer
This function c le ar s all call histor y an d resets the histor y ti mers
5. Total Airtime
35
Page 41

2.4 Tools
Phone tools men u in cl udes schedule , al arm clock, calcul at or,tip calcula to r.
2.4.1 Sc he dule
You ca n us e schedule to ass oc ia te an alert with an e ve nt .
The Tim e entry in 12 hour fo rm at o nly.
To add a sched ul e
1.select Tools fr om main menu
2.select Schedule
3.select add new
4.edit the date, t he n press OK to save.
5.add the descri pt io n, then press Ok
6.set the time, th en p ress Ok
To delete th e sc hedule
1.select Tools in m ain menu
2.select Schedule
3.select List All
4.select the ite m yo u wa nt to delete
5.Select Erase in options
36
Page 42

2.4.2 Al ar m Clock
To set the ala rm t ime
1.select Tools in m ain menu
2.select Alarm Clock
3.press the option
4. select set in O ption
5.set alarm time , th en press Done
To turn on /o ff t he alarm
1.select Tools in m ain menu
2.select Alarm Clock
3.press the option
4.select Enble or D is able i n Op tion
2.4.3 Ca lc ulator
Calculate
1.select Tools in m ain menu
2.Select Calculato r .
3.Enter the numb er.
4.Select optio n to s el ect an operator.
37
Page 43

5.Enter anoth er n um ber.
6.Select the option it em .
7.Select = o pe rator to get the re su lt.
2.4.4 Tip Calculat or
To calcula te a t ip
1.select Tools in m ain menu
2.Select Tip C alculator , and enter bil l am ou nt.
3.Select the 'Ne xt '.
4.select Rate
5.Press left sof t ke y, and get the r es ul t.
6.select Option soft key.
7.select Split option to spli t th e payment.
2.4.5 St op Watch
1. select Sta rt ,sta rt t o co unt the time in sec on d.
2. select Sto p , st op t o count the time.
3. select Spl it , c ou nt every period o f ti me .
4. select Res tart , g o on counting the t im e.
5. select Res et , r es et the time.
38
Page 44

2.5 Settings
To per s ona liz e y o ur pho n e, you can se l ec t ri ng t one s, v olu mes , a l ert s,
password,
phone informa ti on , network servi ce .
2.5.1 Ri ng ers
Can select d ifferen t ri ng tones, can set rin g to nes for calls wit h or w it hout caller id, r es tr icted
calls.
1.Select Set tings in ma in m enu
2.Select Rin ger of Call or SMS Ringe r
3.Select one; pr es s the selec t soft key to sav e.
4
2.5.2 Pr of iles
Call Prompt mod e
1.Select Ca ll mode men u it em.
2.Select a call m od e an d select se le ct soft k ey t o sa ve.
Message Promp t Mo de
1.Select Me ssage Prompt Mo de menu item.
2.Select a mess ag e pr ompt mode and sel ec t select soft key to save.
Volume
Change volume o f ri ng er, key beep and spe ak er
.
dis pla y, ca ll set u p,
39
Page 45

the Ringer volu me
1.Select Volu me menu i te m.
2.Select Rin ger men u it em .
3.Sele ct on e lev el fr om Hi gh , H ig h M ed , Me d , Med Low , Low . the n sel ec t
ok to sav e.
the Key Beep
1.Select Volu me menu i te m.
2.Select Key B eep men u it em .
3.Select one lev el f ro m me d , med low , l ow , off , and then select ok to save .
the Speaker vol um e
1.Select Volu me menu i te m.
2.Select Spe aker me nu i te m.
3.Sele ct on e lev el fr om Hi gh , H ig h M ed , Me d , Med Low , Low . t he n s el ect
ok to sav e.
the Key Tone
1.Select Key Ton e menu it em .
2.Select an opti on a nd s elect ok to save.
Alerts
You ca n se t alerts for serv ic e ch ange, minute be ep , ca ll connect on/o ff.
Minute beep is a be ep w he n your call near to m in utes.
40
Page 46

Setting alert f or S ervice Change
Wh en th e ale rt fo r Ser vi ce Ch ang e is en abled , it means that ever y time your phone lose s
service, or cha ng es f rom its carrier t o a di fferent c ar ri er, an alert will be s ou nd .
1.Select Ale rts men u it em .
2.Select Ser vice Change menu item.
3.Select On to enable s er vi ce change alert .
Minute Beep
When the alert fo r Minute Beep is enabled, du ri ng a p hone call, as you r co nn ection nears a
mi nute, an a le rt wi ll so und 1 0 s ec onds befor e eve ry mi nu te. T his is to help the us er k no w how
many minutes ha ve g on e by while they are t al king (if conversa ti on is short.)
1.Select Ale rts men u it em .
2.Select Min ute Beep me nu i tem.
3.Select On to enable M in ut e Beep alert.
Call Connect
When the alert fo r Call Connec t is enabled, w he n a us er has successf ul ly connected when
making a phone ca ll , an a lert will sound .
1.Select Ale rts men u it em .
2.Select Cal l Connect men u item.
3.Select On to enable C al l Co nnect alert.
Call End
41
Page 47

When an alert for Call End is en abled, when a cal l is e nd ed (either by the c al le r, or ithe call
is dropped), an a le rt w ill sound.
1.Select Ale rts men u it em .
2.Select Cal l End men u it em .
3.Select On to enable D ro pp ed Call alert.
Fail on Outgoin g
Wh en th e ale rt fo r Fai l on Outgo in g i s ena bl ed, t he al ert i s mad e whe n a c all i s una bl e t o
connect.
1.Select Ale rts men u it em .
2.Select Fai l on Outgoing menu item.
3.Select On to enable F ai l on O utgoing alert .
Charger Beep
1.Select Ale rts men u it em .
2.Select Cha rger Beep men u item.
3.Select on or off to tu rn o n / off the charg e be ep
Power Tone
1.Select Ale rts men u it em .
2.Select Pow er Tone men u it em .
3.Select On to enable P ow er Ton e alert.
42
Page 48

2.5.3 Di sp lay
Customizing your display by creating a banner, a dju sting the ba cklight, select ing the lan guage
for display tex t, e tc.
Creating a disp la y banner
1.Select Dis play me nu i te m.
2.Select Ban ner men u it em .
3.Editing the ba nn er
4.Select OK to save ban ne r.
Setting backl ig ht
Setting the tim er f or the backlight.
1.Select Dis play me nu i te m.
2.Select Bac klight me nu i tem.
3.Select an opti on .
4.Select OK to save.
Setting the dis pl ay language
1.Select Lan guage men u it em.
2.Select a langu ag e an d select OK to save.
2.5.4 Se cu rity
Provide passw or d pr otection for Re se t to Default, Cal l Re st riction.
43
Page 49

Login Securit y
1.Select Sec urity men u it em.
2.Enter the pass wo rd , and the default p as sword is 00 00 .
Changing lock c od e
1.Select Cha nge code me nu i tem.
2.Input new pass wo rd .
3.Confirm pass wo rd
Reset to defaul t
1.Select Res et to Default menu item.
2.Select Yes soft key t o re se t to default.
Call Restrict io n
Ca ll re stric ti on pr ovide meth od s f or th e user to re stric t the oper at ions of or igina ti ng ou tgoin g
calls, accept in g in coming calls or v ie wing phone book.
2.5.5 Ca ll S etup
1 Auto a ns wer
.
Close: Close th e au to a nswer functio n.
Af ter 3 seco nd s: th e c al ling will auto answe r whe n the i nco mi ng ca ll di splay afte r 3 s ec onds.
44
Page 50

.
2 Voi ce privacy
The function al lo ws y ou set the voice pr iv acy mode in enhance d.
3. Auto Redial
1.Select Ca ll Setup me nu i tem.
2.Select Au to Redial men u item.
3.Select an opt io n, a nd then save or bac k.
4.Answer Call
1.Select Cal l Setup men u it em.
2.Select An swer Call l men u item.
3.Select an opti on , an d then save or back .
2.5.6 Ph on e Info
All ows yo u se arc h so ftw are ver sio n of th e m o bil e p h one wh e n t he s oft war e b e up gra d ed.
2.5.7 Ke y gu ard
Enable user to lo ck t he k eypad during ph on e's idle status.
1.Select Ke y guard men u it em.
2.Select Off to di sa ble key guard. Or s el ect Custo mi ze to enabl e ke y guard.
45
Page 51

2.5.8 Ne tw ork Service
1.Divert Call
1.Select Ne twork Service menu item.
2.Select Divert Call menu item.
3.Select a opti on t he n press sel ec t soft key.
2.Call Waiting
1.Select Net work Service menu item.
2.Select Cal l Wai ti ng menu i te m.
3.Select Dis able or Enable .
46
Page 52

2.6 Amus em ent
2.6.1 Kong Ming
If you have saved the former game record, you can choose start game or resume game, or select
game to start it ag ai n.
1. Start Game
2. Resume Game
3. Select Games
4. Instructio ns
Using up (2), dow n (4 ), l eft (4), right (6 ), t hose four keys to m ov e th e red square to sel ec t th e
chess. If the A che ss man jumps over the B ch es sman, the forme r ch es s eats over the lat te r on e.
Only chess can ju mp i n on e process. At las t on ly chess left on th e ch es sboard is winni ng .
47
Page 53

2.7 TATA Zone
Thi s function is a kind of network value added service of CDMA. Press en ter key to come into the
sub-menu of thi s fu nc tion under the al er t condition.
Onl y your R-UI M card supp orts this kind of functio n, you can use it. Different UIM cards are vary
in menu name and co nt en t.
48
Page 54

3.Input method
This mobile pho ne u se d the eZi input met ho d. When using your mo bi le phone there will b e ma ny
times that you wi ll n ee d to input text e.g .s ending messag es , en tering names in to t he P honebook ,
editing the gre et in gs message ,edi ti ng Browser settin gs , etc.
There are 5 input m et ho ds:
1.Number(12 3) :To pr ovide input num be r.
2.Character (a bc ): To provid input ch ar acter with lowerc as e , Press the deman de d nu mber key ,
one times press t o in pu t a character , twi ce p ress quickly to d is pl ay the second cha ra ct er , by
analogy to fini sh ed t he text.
3.Character (A BC ): To provid input ch ar acter with upperc as e , Press the deman de d nu mber key ,
one times press t o in pu t a character , twi ce p ress quickly to d is pl ay the second cha ra ct er , by
analogy to fini sh ed t he text.
4.en: Allows yo u us e eZ i English input m et hod.
5.En: Allows yo u us e eZ i English input m et hod, and the first ch ar acter of every wo rd i s ca pital.
Note: If you pr es s th e key , you find no th ing but a > dis play at last li ne o n sc reen .Don,t worry
ab out t hi s , it,s just a p ag e dow n mar k . W he n y ou pres s the d own k ey , t he inpu t cha ra cter
will display at t he l as t line on screen.
49
Page 55

4. Maintenances and repairs
Your m ob ile is in fine desi gn in g an d e la borat e man uf actur e. Pl ea se us e y ou r p ho ne ca reful ly
and maintain it . Th e fo llowing sugge st ions can help you ext en d the useful life o f yo ur p hone:
Put your phone an d th e fi ttings in the pla ce w here children can no t reach.
Keep your phone d ry. Mineral subs ta nce co ntain ed in r ain, moist ure a nd li qu id wi ll er ode
the electric ci rc ui t of your phone.
Do not put your pho ne a t di rty, dis or de red and dusty pla ce .
Do not use or store y ou r ph one in high t emp er ature plac e. Hi gh temp eratu re wi ll shor ten
th e lif e of elect ro nic c omp on ents, dama ge the phone and disto rt or dis sol ve t he pla s tic
parts of the phon e.
Do not use o r sto re yo ur ph on e i n low temp er ature plac e. Wh en it c omes back to no rmal
te mpera tu re, t he mo istur e wil l coa gu late in th e p ho ne an d cau se th e dam ag es of ci rc uit
board.
Do not open your ph on e by y ourself, as non -p rofessional dis po sal may damage th e ph on e.
Pl ease avoid thro wi ng; k nocki ng an d sha ki ng yo u r p hon e , i mpr o per ex ter n al for c e m ay
result in the dam ag e of i nner circuit.
Do not use chemic al s ol vents or deterg en t to clean your phone . Please use cotton mate ria l
50
Page 56

with water or soa p wa te r to clean the oute r sh ell of mobile phone .
Please use or pur ch as e Haier fitting s.
Please contac t pr of essional main te nance personnel t o re pair your phone if your phone and
its fittings ar e in t rouble.
Us e the batt er ies a nd fi tting s man uf act ur ed by Haie r Com pa ny. Th e u se of o ther fitti ng s m ay
cause dangero us a cc idents and make a ll g ua rantees null an d vo id.
Haier phone can u se t he f ollowing fitt in gs:
Earphones (no ns tandard collo ca ti on)
If you connect th e ea rphone with the pho ne :
To activate earph on e mo de.
To match the volume o f ea rp hone with that of m ob ile phone.
Increase or dec re as e the volume thro ug h up and down side key du ri ng call.
If you plug out the e ar ph one from the phon e, t he phone will return to normal mode automatically.
Charger:
Insert charge r, th e ba ckground ligh t is o n and send out prompt in g sound. The phon e en te rs into
charging mode a ut om atically.
Plug out th e charger, the backg ro und light is on and t he p ho ne returns to nor ma l mo de
51
Page 57

automatical ly.
You ca n ch arger a battery b ot h in o n/off mod e.
Table mode c ha rger:
Connect the pow er s ou rce with one side o f th e original travel in g ch arger. In se rting it i nto s pa n
of tab le m ode ch a rge r t h at it c onn ect s w i th the plu g o f mo bil e ph one , t h e g ree n li ght of the
indicator lig ht i s on ; put battery int o ta ble mode charger, th e re d light of indica to r li ght is on, it is
charging norm al ; af ter definite ti me t he green light is on sh ow t he battery comp le te ly.
Batteries
* Use t he ba tteri es sp ec ified by t he ma nufac tu res. The s tan d ard co l loc ati on o f t he p hon e i s
600mAh lithiu m- po lymer battery w ho se waiting time is 70-90 hrs an d c al l t im e i s 160 -1 80 hr s,
The 880mAh lith iu m- polymer batte ry w hose waiting time i s 120-140 hrs and call time is 190-210
hrs (w ait i ng tim e an d c a ll tim e wi ll var y wi t h the n etw o r k en v i ron m e nts) . The u se o f othe r
chargers may ca us e da ngerous accid en ts and make all guarantees null and vo id. You wil l mobile
phone respons ib le f or maintain whe n da ma ges are induce by a pp lying other batte ri es specified
by the manufact ur es to the mobile phon e.
* Do not allow meta l ob je cts (such as keys i n yo ur pocket) to sho rt c ir cuit the batter y co nt acts.
* Do not deform or op en t he b attery.
* Avoid exp os ure to moisture or fi re .
52
Page 58

5. Trouble shooting
If there are troubles when using your phone, please refer to the following table. If there are still questions,
please dial Haier service telephone to solve.
Abnormal
circumstance
Bad signals or
drop the line
Echo or noise
Waiting time
becomes short.
Trouble reasons
1.Using mobile phone in bad signal area,
such as near the high building or in the
basement.
2. In call rush hour. The line is stuffed so
you cannot make a call.
3. keep away from base station of network
operator.
4.Electromagnetic interference source
nearby
1. Imperfect function line of network operator.
2. Imperfect local line in some calling areas.
1. Waiting time and network's operator system
is connected. The same mobile phone is used
in different networks.
2. The user's moving make the frequent
switchover between areas.
Means of settlement
Please move near the window if you
are in a building, and move to a wild
place if the signal is weak.
Try to avoid
Ask network operator supply service
Map.
Try to avoid using your phone here
Hang up and redial.
Power off in week signal place.
Make a call at a fixed place as possible
as you can.
53
 Loading...