

Page 1
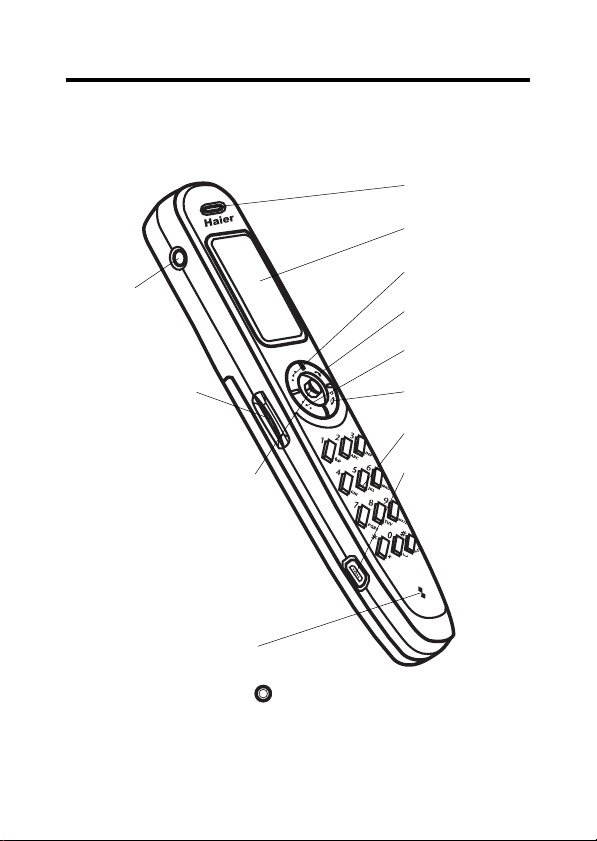
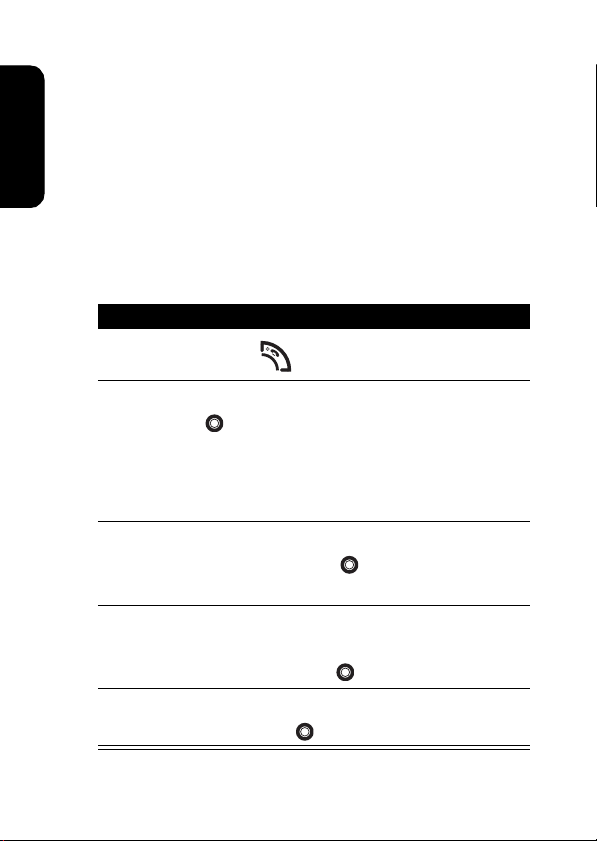
Phone Overview
Welcome to the world of Haier digital wireless
communications!
Headset
D
R
Jack
Volume Key
Navigation Key: Scroll
to the up, down, left or
right. Press to perform
left soft key function
A
(OK key).
Earpiece
Main Display
Left Soft Key
Send Key
Right Soft Key
Power/End Key
Keypad
Charger/
Accessory Port
F
T
Microphone
Tip:
The navigation key also serves as the shortcut to
specific phone features (scroll down),
Browser
Camera
(press straight in).
Quick access
(scroll left),
(scroll up),
Msg. center
Ringing style
(scroll right), and
1
Page 2

Haier Group Company
No.1 Haier Road Hi-tech Zone Qingdao China 266101
(086)532-8939999
www.haier.com
Haier is the registered trademark of Haier Inc. in China and other
countries. Java and all other Java-based marks are trademarks or
registered trademarks of Sun Microsystems, Inc. in the U.S. and other
countries. All other product or service names are the property of their
respective owners.
© Haier, Inc. 2004.
Software Copyright Notice
The Haier products described in this manual may include copyrighted
Haier and third-party software stored in semiconductor memories or
other media. Laws in China and other countries preserve for Haier and
third-party software providers certain exclusive rights for copyrighted
software, such as the exclusive rights to distribute or reproduce the
copyrighted software. Accordingly, any copyrighted software contained
in the Haier products may not be modified, reverse-engineered,
distributed, or reproduced in any manner to the extent allowed by law.
Furthermore, the purchase of the Haier products shall not be deemed
to grant either directly or by implication, estoppel, or otherwise, any
license under the copyrights, patents, or patent applications of Haier or
any third-party software provider, except for the normal, non-exclusive,
royalty-free license to use that arises by operation of law in the sale of
a product.
(China)
D
R
A
F
T
2
Page 3

Menu Options
Your phone features the following which is the standard
phone menu layout. Menu organization and feature names
may vary on your phone. Not all features may be available
for all users.
Note:
vary in different regions. Please contact your local
customer service centers, agencies or retailers if you have
any question about the mobile phone functions. Haier
reserves all rights to revise and change this user's manual
without obligation to notify any person of such revisions or
changes.
D
The functions available on this mobile phone may
R
A
F
T
3
Page 4

Phonebook
•Search
•Add
•Erase
• Copy
•Option
D
• Speed dial
• Caller group
• Personal number
• Fixed dial number
• Voice tags
•My Own Card
Msg. center *
• Text messages
• Multi media msgs.
• Voice mail box
• Cell broadcast
•Settings
• Sending history
• Service command
Call Meter
• Missed calls
• Received calls
• Dialed calls
•Erase all
•Call time
• Call cost
• GPRS data counter
• GPRS connection time
• In-call count
• Session information
Profile
•Normal
•Meeting
• Outdoor s
•Car
•Customized
• Office
• Handsfree
• Headset
•Silence
* Optional network, SIM card, or subscription-dependent feature.
# Order of items under this feature is changeable by users.
R
A
F
Setting
• Language
• Backlight
• Adjust contrast
•Clock
• Auto power of f
•Display
•Key lock
• Input mode
• Restore factory settings
•Security
• Call feature
•Network
• Connection indication
• Minute reminder
PIMS
•Alarm clock
• Calendar
•Game
•Calculator
•Stopwatch
• Voice command
• Voice notes
• Firewall
• Haier service number
Media center
• New picture
• Photo album
•Picture
•Animation
• Melody
• Voice notes
• Download media
• View free space
Camera
T
4
Page 5
Ouick access
•Browser
• Add entry to phonebook
• Write message
• Missed calls
• Profile setting
• Calendar
• Message Inbox
• Meeting mode
• Media center
•Edit
Ringing style
• Ringing volume
• Ringing tone
• Incoming call alert
•Vibrating
• Message alert tone
• Key tone volume
• Key tone type
• Warning tones
• Startup music
Browser *
•Home
•Bookmark
• Profiles
• Appearance settings
• Download settings
• Go to address
• Clear the cache
• Service Inbox
• Certificates
STK *
#
D
R
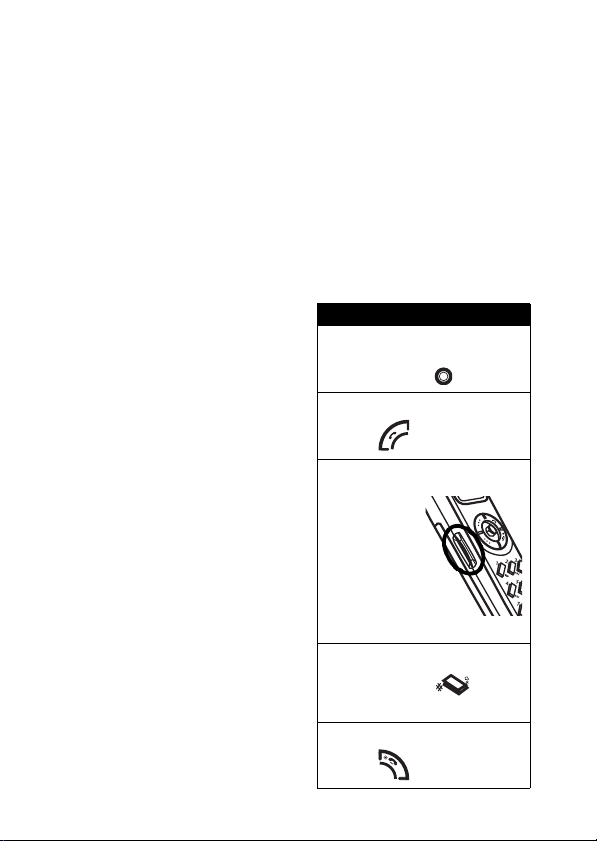
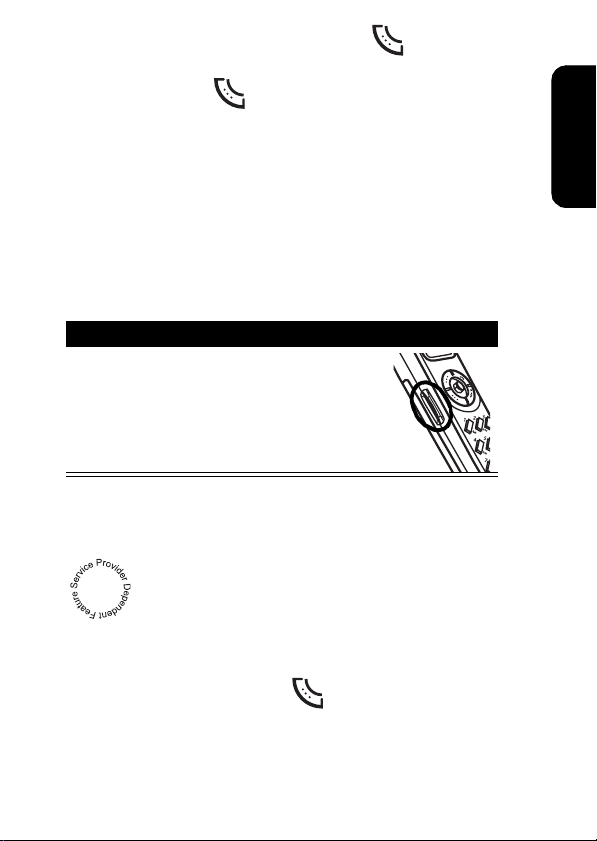
Quickly access phone
features:
A
Go to dialed calls list:
Use voice
commands:
F
T
Turn the ringer on or off:
Exit menu system:
Shortcuts
Scroll or press (in idle).
Press (in idle).
Press and
hold the
volume key
straight in (in
idle) and then
say a
command
into the
microphone.
Press and hold (in
idle).
Press .
5
Page 6

Contents
Phone Overview . . . . . . . . . . . . . . . . . . . . . . . . . . . . . . . . 1
Menu Options . . . . . . . . . . . . . . . . . . . . . . . . . . . . . . . . . . 3
Contents . . . . . . . . . . . . . . . . . . . . . . . . . . . . . . . . . . . . . . 6
Important Safety Precautions . . . . . . . . . . . . . . . . . . . . 11
Getting Started . . . . . . . . . . . . . . . . . . . . . . . . . . . . . . . . 16
What’s in the Box? . . . . . . . . . . . . . . . . . . . . . . . . . . . . 16
About This Guide . . . . . . . . . . . . . . . . . . . . . . . . . . . . . 16
Installing the SIM Card . . . . . . . . . . . . . . . . . . . . . . . . . 17
Installing the Battery . . . . . . . . . . . . . . . . . . . . . . . . . . . 20
Charging the Battery . . . . . . . . . . . . . . . . . . . . . . . . . . . 22
Battery Use . . . . . . . . . . . . . . . . . . . . . . . . . . . . . . . . . . 23
Turning On Your Phone. . . . . . . . . . . . . . . . . . . . . . . . . 24
Adjusting Volume . . . . . . . . . . . . . . . . . . . . . . . . . . . . . 25
Displaying Your Phone Number . . . . . . . . . . . . . . . . . . 25
Making a Call . . . . . . . . . . . . . . . . . . . . . . . . . . . . . . . . 26
Answering a Call . . . . . . . . . . . . . . . . . . . . . . . . . . . . . . 26
Muting a Call . . . . . . . . . . . . . . . . . . . . . . . . . . . . . . . . . 27
Basic Operation . . . . . . . . . . . . . . . . . . . . . . . . . . . . . . . 28
Using the Main Display . . . . . . . . . . . . . . . . . . . . . . . . . 28
Using Menus . . . . . . . . . . . . . . . . . . . . . . . . . . . . . . . . . 33
Entering Text . . . . . . . . . . . . . . . . . . . . . . . . . . . . . . . . . 34
Locking and Unlocking Your Phone. . . . . . . . . . . . . . . . 39
Locking and Unlocking the Keypad . . . . . . . . . . . . . . . . 40
Setting Closed User Groups . . . . . . . . . . . . . . . . . . . . . 41
Setting and Changing Codes . . . . . . . . . . . . . . . . . . . . 41
If You Forget Codes. . . . . . . . . . . . . . . . . . . . . . . . . . . . 42
D
R
A
F
T
6
Page 7

If You Enter the Wrong PIN or PIN2 Code 3 Times
in a Row . . . . . . . . . . . . . . . . . . . . . . . . . . . . . . . . . . . . . 42
Customizing Your Phone . . . . . . . . . . . . . . . . . . . . . . . . . 43
Adjusting the Backlight . . . . . . . . . . . . . . . . . . . . . . . . . . 43
D
Adjusting Display Contrast . . . . . . . . . . . . . . . . . . . . . . . 43
Adjusting Display Color. . . . . . . . . . . . . . . . . . . . . . . . . . 43
Setting Date and Time . . . . . . . . . . . . . . . . . . . . . . . . . . 44
Setting Power-Off Time. . . . . . . . . . . . . . . . . . . . . . . . . . 45
Setting a Wallpaper Image . . . . . . . . . . . . . . . . . . . . . . . 45
Selecting a Language. . . . . . . . . . . . . . . . . . . . . . . . . . . 46
Customizing the Main Display . . . . . . . . . . . . . . . . . . . . 46
Restoring Factory Settings . . . . . . . . . . . . . . . . . . . . . . . 46
Creating Application Shortcuts . . . . . . . . . . . . . . . . . . . . 47
Managing Phone Profiles . . . . . . . . . . . . . . . . . . . . . . . . 47
Muting the Phone . . . . . . . . . . . . . . . . . . . . . . . . . . . . . . 50
Calling Features . . . . . . . . . . . . . . . . . . . . . . . . . . . . . . . . 51
Putting a Call on Hold . . . . . . . . . . . . . . . . . . . . . . . . . . . 51
Answering a New Call. . . . . . . . . . . . . . . . . . . . . . . . . . . 51
Making a New Call . . . . . . . . . . . . . . . . . . . . . . . . . . . . . 52
Making an Emergency Call . . . . . . . . . . . . . . . . . . . . . . . 53
Selecting a Phone Number to Use . . . . . . . . . . . . . . . . . 53
Redialing Automatically . . . . . . . . . . . . . . . . . . . . . . . . . 53
Checking Recent Calls . . . . . . . . . . . . . . . . . . . . . . . . . . 54
Sending DTMF Tones . . . . . . . . . . . . . . . . . . . . . . . . . . . 54
Making a Conference Call . . . . . . . . . . . . . . . . . . . . . . . 55
Diverting Calls. . . . . . . . . . . . . . . . . . . . . . . . . . . . . . . . . 56
Blocking Calls . . . . . . . . . . . . . . . . . . . . . . . . . . . . . . . . . 56
Making a Fax or Data Call . . . . . . . . . . . . . . . . . . . . . . . 57
Connecting to Your Service Provider Network
Manually or Automatically . . . . . . . . . . . . . . . . . . . . . . . . 57
Setting a Voice Call Connection Alert . . . . . . . . . . . . . . . 58
R
A
F
T
7
Page 8

Setting a Voice Call Timer Reminder . . . . . . . . . . . . . . 58
Viewing How Much Time You Spent on Calls . . . . . . . . 58
Viewing How Much Money You Spent on Calls. . . . . . . 59
Activating the Voice Call Timer and Cost Counter
during a Call . . . . . . . . . . . . . . . . . . . . . . . . . . . . . . . . . 60
Activating the Voice Call Timer and Cost Counter
after a Call . . . . . . . . . . . . . . . . . . . . . . . . . . . . . . . . . . . 61
Using STK Services . . . . . . . . . . . . . . . . . . . . . . . . . . . 61
Messages. . . . . . . . . . . . . . . . . . . . . . . . . . . . . . . . . . . . . 62
Writing an SMS Message . . . . . . . . . . . . . . . . . . . . . . . 62
Activating MMS Service . . . . . . . . . . . . . . . . . . . . . . . . 65
Writing an MMS Message . . . . . . . . . . . . . . . . . . . . . . . 66
Reading a Received SMS/MMS Message . . . . . . . . . . 74
Reading a Sent or Unsent SMS/MMS Message. . . . . . 75
Reading a Draft Message . . . . . . . . . . . . . . . . . . . . . . . 75
Erasing SMS/MMS Messages . . . . . . . . . . . . . . . . . . . 76
Managing SMS/MMS Messages. . . . . . . . . . . . . . . . . . 77
Editing MMS Message Templates. . . . . . . . . . . . . . . . . 78
Creating Quick Notes . . . . . . . . . . . . . . . . . . . . . . . . . . 79
Setting a Voicemail Service Number . . . . . . . . . . . . . . . 79
Editing Topic Messages . . . . . . . . . . . . . . . . . . . . . . . . 80
Clearing Sending History . . . . . . . . . . . . . . . . . . . . . . . 80
Editing Service Commands. . . . . . . . . . . . . . . . . . . . . . 81
Configuring SMS Settings . . . . . . . . . . . . . . . . . . . . . . . 81
Configuring MMS Settings . . . . . . . . . . . . . . . . . . . . . . 82
Selecting Memory for Saving SMS Messages . . . . . . . 82
Checking SIM Card or Phone Memory Which Saves
SMS Messages . . . . . . . . . . . . . . . . . . . . . . . . . . . . . . . 83
Checking Phone Memory Which Stores MMS
Messages . . . . . . . . . . . . . . . . . . . . . . . . . . . . . . . . . . . 83
D
R
A
F
T
8
Page 9

Managing Your Phonebook . . . . . . . . . . . . . . . . . . . . . . . 84
Selecting Memory for Saving Phonebook Entries . . . . . 84
Checking SIM Card or Phone Memory Which Stores
Phone Numbers and Notes . . . . . . . . . . . . . . . . . . . . . . 84
D
Creating Phonebook Entries. . . . . . . . . . . . . . . . . . . . . . 85
Using Phonebook Entry Options . . . . . . . . . . . . . . . . . . 86
Creating a Photo Caller ID . . . . . . . . . . . . . . . . . . . . . . . 88
Sorting Phonebook Entries. . . . . . . . . . . . . . . . . . . . . . . 90
Browsing Your Phonebook to Make a Call . . . . . . . . . . . 90
1-Touch Dialing . . . . . . . . . . . . . . . . . . . . . . . . . . . . . . . . 91
Customizing Ring Tone for a Caller Group . . . . . . . . . . . 92
Creating a Photo Caller ID for a Caller Group . . . . . . . . 93
Creating Your Personal Phonebook Entries . . . . . . . . . . 95
Fixed Dialing . . . . . . . . . . . . . . . . . . . . . . . . . . . . . . . . . . 96
Voice Dialing . . . . . . . . . . . . . . . . . . . . . . . . . . . . . . . . . . 99
Creating Your Personal Profile . . . . . . . . . . . . . . . . . . . 101
Advanced Features . . . . . . . . . . . . . . . . . . . . . . . . . . . . 103
Using the Alarm Clock . . . . . . . . . . . . . . . . . . . . . . . . . 103
Creating a Calendar . . . . . . . . . . . . . . . . . . . . . . . . . . . 104
Creating an Account Book . . . . . . . . . . . . . . . . . . . . . . 108
Using the Calculator . . . . . . . . . . . . . . . . . . . . . . . . . . . 110
Using the Stopwatch . . . . . . . . . . . . . . . . . . . . . . . . . . . 112
Using Voice Launchers . . . . . . . . . . . . . . . . . . . . . . . . . 114
Setting Firewall . . . . . . . . . . . . . . . . . . . . . . . . . . . . . . . 116
Displaying World Time . . . . . . . . . . . . . . . . . . . . . . . . . 116
Using Voice Notes . . . . . . . . . . . . . . . . . . . . . . . . . . . . 117
Media Entertainment . . . . . . . . . . . . . . . . . . . . . . . . . . . 124
Playing a Game . . . . . . . . . . . . . . . . . . . . . . . . . . . . . . 124
Managing a Photo Album . . . . . . . . . . . . . . . . . . . . . . . 124
Managing Pictures in a Photo Album . . . . . . . . . . . . . . 124
Drawing a Picture . . . . . . . . . . . . . . . . . . . . . . . . . . . . . 125
R
A
F
T
9
Page 10

Composing a Melody . . . . . . . . . . . . . . . . . . . . . . . . . 128
Viewing a Media Object . . . . . . . . . . . . . . . . . . . . . . . 133
Sending a Media Object . . . . . . . . . . . . . . . . . . . . . . . 135
Renaming a Media Object. . . . . . . . . . . . . . . . . . . . . . 138
Moving a Picture or Drawing to Another Photo Album 139
Using the Camera . . . . . . . . . . . . . . . . . . . . . . . . . . . . 140
Customizing the Camera. . . . . . . . . . . . . . . . . . . . . . . 146
Managing a Network Profile . . . . . . . . . . . . . . . . . . . . 151
Connecting to the Internet. . . . . . . . . . . . . . . . . . . . . . 151
Managing Bookmarks . . . . . . . . . . . . . . . . . . . . . . . . . 153
Downloading Media Objects . . . . . . . . . . . . . . . . . . . . 154
Customizing the Web Page Display Mode . . . . . . . . . 154
Allowing or Rejecting Cookies. . . . . . . . . . . . . . . . . . . 154
Clearing Cache Memory . . . . . . . . . . . . . . . . . . . . . . . 154
Reading Your Service Provider or Network
Administrator’s Service Messages . . . . . . . . . . . . . . . 155
Reading Certificates . . . . . . . . . . . . . . . . . . . . . . . . . . 155
Troubleshooting . . . . . . . . . . . . . . . . . . . . . . . . . . . . . . 156
Care and Maintenance . . . . . . . . . . . . . . . . . . . . . . . . . 162
D
R
A
F
T
10
Page 11

Important Safety Precautions
When using this product, the safety precautions below must be taken
against possible legal issues and damages.
D
SAFETY IN AIRCRAFT
The interference would be caused by this product
to an aircraft's navigation system and its network.
R
In most countries, using this product on board an
airplane is against the law.
SAFETY FOR ENVIRONMENTS
Do not use this product in gas stations. Also the
use of this product is prohibited in fuel storehouse,
A
chemical plants and locations containing
explosives.
SAFETY ON THE ROAD
Vehicle drivers in motion are not permitted to use
telephony services with the handheld device,
except in the case of emergency. In some
countries, using hand-free devices as an
alternative is allowed.
F
SAFETY ABOUT RADIATION
This product should be operated in the suggested
normal condition only to ensure the radiative
performance and safety of the interference.
T
11
Page 12
D
Attention
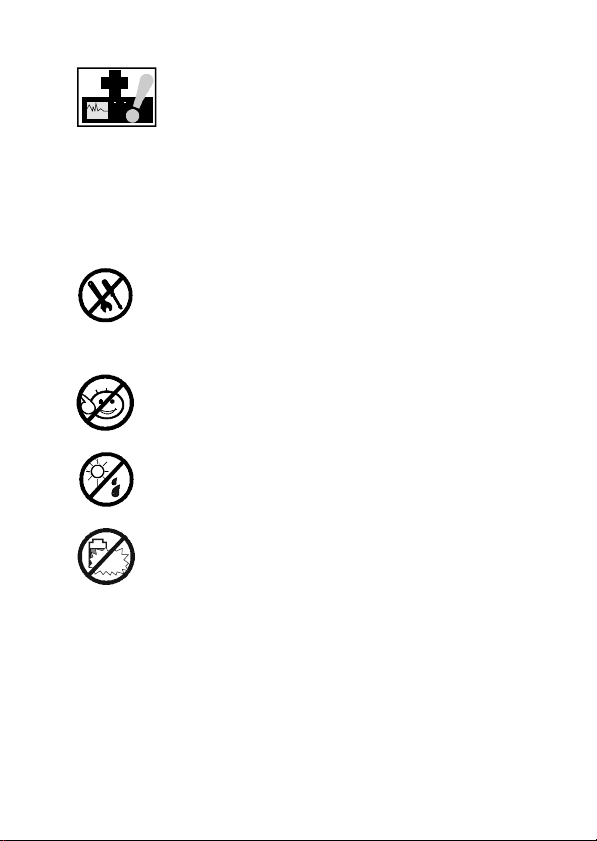
SAFETY FOR MEDICAL EQUIPMENT
This product may cause malfunctions of medical
equipment. In most hospital or medical centers,
use of this product is forbidden.
There are no user serviceable parts inside this product.
If this product appears to be broken, call a qualified
R
service personnel or send this product to your original
dealer. Do not attempt to disassemble or repair this
product as it may result in electric shock or
unrecoverable damage to the product itself.
Keep this product out of reach of small children.
Store this product in its protective case in a cool dry
place.
A
Tips When Using
•
Avoid using the product near metal structures (for example, large
metal furniture or steel frames of a building). The transmission
and reception of signal can be effected by these objects.
•
Avoid using the product near strong electromagnetic sources,
such as microwave ovens, sound speakers, TV and radio.
12
Do not throw the battery into fire or other heat source.
F
Dispose of used batteries according to your local
regulations.
T
Page 13

•
Avoid using the product right after dramatic change of
temperature.
FCC Compliance Statement
This device complies with Part 15 of the FCC Rules. Operation is
subject to the following two conditions: (1) this device may not cause
harmful interference, and (2) this device must accept any interference
received, including interference that may cause undesired operation.
FCC ID: SG70408000P7
Statement according to FCC part 15.21
Modifications not expressly approved by
user's authority to operate the equipment.
Statement according to FCC part 15.105
Note:
limits for a Class B digital device, pursuant to Part 15 of the FCC
Rules. These limits are designed to provide reasonable protection
against harmful interference in a residential installation. This
equipment generates, uses and can radiate radio frequency energy
and, if not installed and used in accordance with the instructions, may
cause harmful interference to radio communications. However, there is
no guarantee that interference will not occur in a particular installation.
If this equipment does cause harmful interference to radio or television
reception, which can be determined by turning the equipment off and
on, the user is encouraged to try to correct the interference by one or
more of the following measures:
•
•
•
•
D
R
this company could void the
This equipment has been tested and found to comply with the
A
F
T
Reorient or relocate the receiving antenna.
Increase the separation between the equipment and receiver.
Connect the equipment into an outlet on a circuit different from
that to which the receiver
Consult the dealer or an experienced radio/TV technician for
help.
is connected.
13
Page 14

Health and Safety Information - RF Exposure
Information (SAR)
This model phone meets the government’s requirements for exposure
to radio waves. This phone is designed and manufactured not to
exceed the emission limits for exposure to radio frequency (RF) energy
set by the Federal Communications Commission of the U.S.
Government.
The exposure standard for wireless mobile phones employs a unit of
measurement known as the Specific Absor ption Rate, or SAR. The
SAR limit set by the FCC is 1.6 W/kg.
using standard operating positions accepted by the FCC with the
phone transmitting at its highest certified power level in all tested
frequency bands. Although the SAR is determined at the highest
certified power level, the actual SAR level of the phone while operating
can be well below the maximum value. This is because the phone is
designed to operate at multiple power levels so as to use only the
poser required to reach the network. In general, the closer you are to a
wireless base station antenna, the lower the power output.
The highest SAR value for the model phone as reported to the FCC
when tested for use at the ear is 0.586 W/kg and when worn on the
body is 0.586 W/kg. (Body-worn measurements differ among phone
models, depending upon available enhancements and FCC
requirements.)
D
R
A
1
Tests for SAR are conducted
F
T
1. The SAR limit recommended by international guidelines (FCC) for mobile
phones used by the public is 1.6 watts/kilogram (W/kg) averaged over
ten grams of tissue. The limit incorporates a substantial margin for safety
to give additional protection for the public and to account for any
variations in measurements.
14
Page 15

While there may be differences between the SAR levels of various
phones and at various positions, they all meet the government
requirement.
The FCC has granted an Equipment Authorization for this model
phone with all reported SAR levels evaluated as in compliance with the
FCC RF exposure guidelines. SAR information on this model phone is
on file with the FCC and can be found under the Display Grant section
of http://www.fcc.gov/oet/fccid after searching on
FCC ID: SG70408000P7.
For body worn operation, this phone has been tested and meets the
FCC RF exposure guidelines for use with an accessory that contains
no metal and positions the handset a minimum of 1.5 cm from the
body. Use of other enhancements may not ensure compliance with
FCC RF exposure guidelines. If you do no t use a body-worn
accessory and are not holding the phone at the ear, position the
handset a minimum of 1.5 cm from your body when the phone is
switched on.
D
R
A
F
T
15
Page 16

Getting Started
What’s in the Box?
Your digital wireless phone comes with a battery and travel
charger. You can purchase other accessories to customize
your phone for maximum performance and portability.
To purchase the Haier accessories, contact your local
service centers, agencies or retailers.
To view the Haier service numbers for different regions,
Getting Started
press
display.
About This Guide
Optional Features
provider for more information.
Optional Accessories
D
R
MENU
>
PIMS >Haier service number
from the idle
A
This label identifies an optional network, SIM
card, or subscription-dependent feature that
may not be offered by all service providers in all
geographical areas. Contact your service
F
T
This label identifies a feature that requires an
optional Haier accessory.
16
Page 17
Installing the SIM Card
Your Subscriber Identity Module (SIM) card contains your
phone number, service details, and phonebook/message
information.
D
Caution:
exposing your SIM card to static electricity, water, or dirt.
Do not bend or scratch your SIM card. Avoid
Step
1
If the phone’s battery
door is already in place,
press the latch to remove
the battery door from
your phone.
Note:
every time when you
remove/insert the SIM
card.
R
Turn off your phone
A
Latch
F
T
Getting Started
17
Page 18
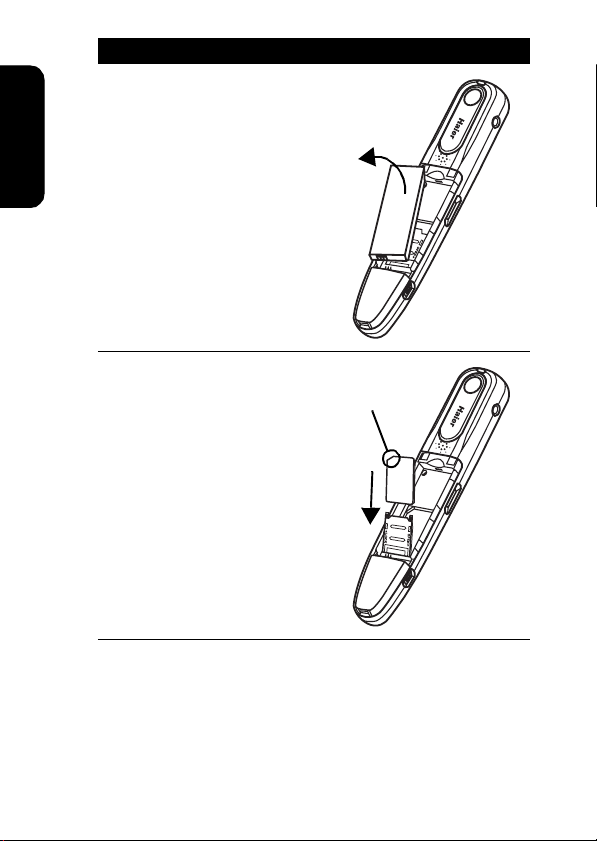
Step
2
Lift the battery up from
the top end and remove it
from the phone.
D
R
18
Getting Started
3
Fit the SIM card into the
slot, with the metal
contacts facing down and
the beveled corner
pointed at the notch of
the SIM card
compartment (as shown).
A
Beveled
corner
F
T
Page 19

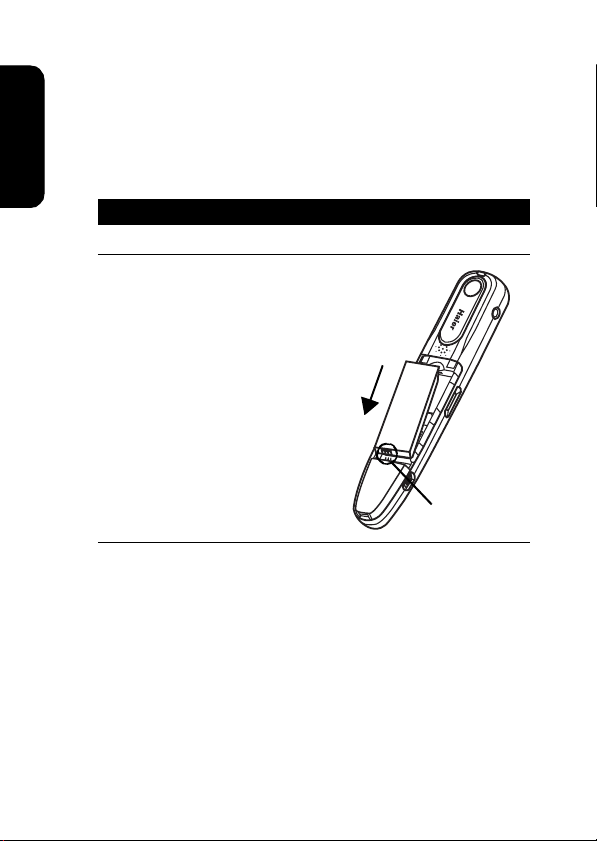
Step
4
Push the slot into the SIM
card compartment so that
it clicks into place.
D
R
5
Slide the slot upper cover
in the direction shown
until it locks into place.
Getting Started
A
F
T
19
Page 20
Installing the Battery
You must install and charge the battery to use your phone.
Your phone is designed to use only the Haier batteries and
accessories. We recommend that you store batteries in
their protective cases when not in use.
Getting Started
D
Step
1
Remove the battery from the plastic case.
2
R
Insert the battery with the
metal contacts on the
bottom end in alignment
with the ones on the
phone. Push the top end
of the battery into the
battery compartment so
that it clicks into place.
A
F
Metal contacts
T
20
Page 21
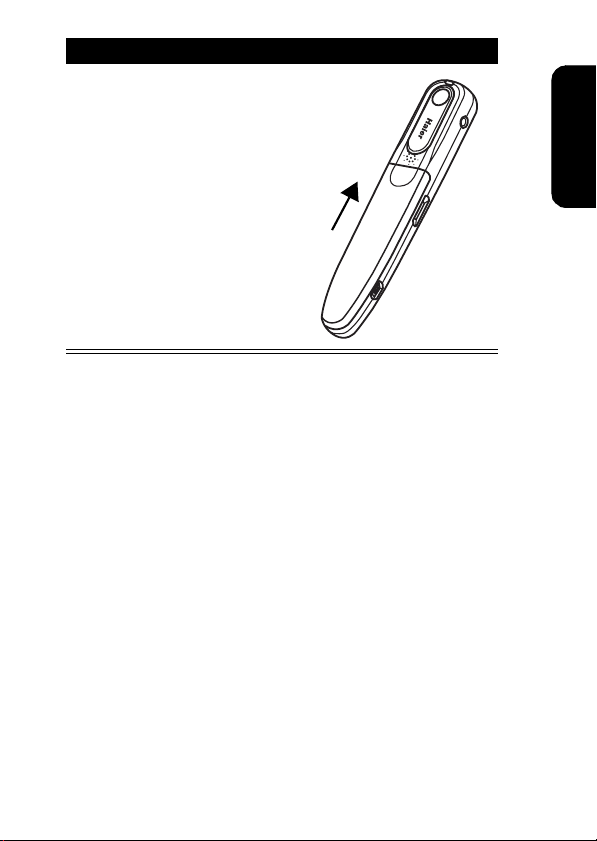
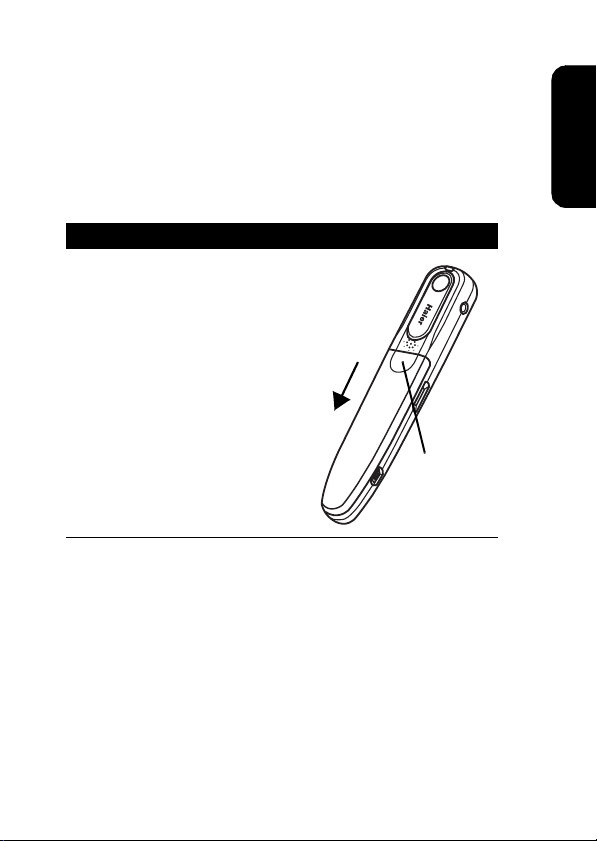
Step
3
Place the battery door
back on the phone,
aligning the tabs on the
D
battery door with the
groove on the phone.
Slide the battery door in
the direction shown until
it locks into place.
R
Getting Started
A
F
T
21
Page 22
Charging the Battery
New batteries are partially charged. Before using your
phone, charge the battery as described below. Some
batteries perform best after several full charge/discharge
cycles.
Getting Started
D
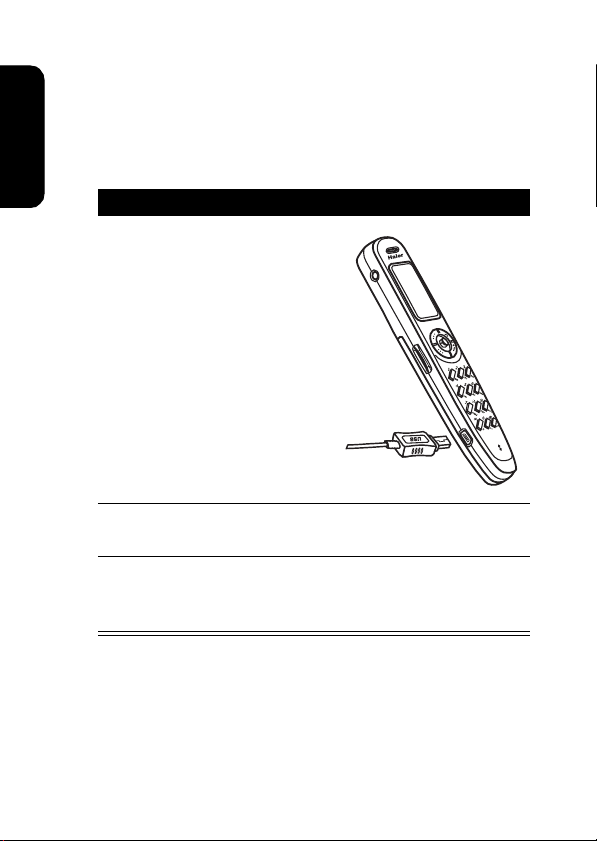
Step
1
With the phone facing up,
plug in the travel charger.
R
Note:
The charger
connector is keyed and
can only be inserted 1
way (with the text
facing up).
A
USB
2
Plug the other end into the USB port on your
personal computer.
3
When done charging, unplug the travel charger
from the USB port and then disconnect it from
your phone.
When you charge the battery, the battery power level
indicator in the display shows how much of the charging
process is complete. At least 1 segment of the battery
power level indicator must be visible to ensure full phone
functionality while charging.
22
F
T
Page 23

When battery power is low, your phone will play the
warning tones to warn you (see page 49). Charge the
battery immediately.
If battery power runs out, your phone turns off.
Battery Use
D
To maximize your battery’s performance:
•
Always use the Haier batteries and battery chargers.
The phone warranty does not cover damage caused
from using non-Haier batteries and battery chargers.
•
Charging begins when the battery power level
indicator appears in the display. Batteries stored for a
long time may require 10-20 minutes to charge before
the display is turned on.
•
Battery life would be shorter than normal if users play
games or use phones in low signal strength areas.
•
Maintain the battery at or near room temperature
when charging.
•
Do not expose batteries to temperatures below -10°C
(14°F) or above 45°C (113°F). Always take your
phone with you when you leave your vehicle.
•
When you do not intend to use a battery for a while,
store it uncharged in a cool, dark, dry place, such as a
refrigerator.
•
Over time, batteries gradually wear down and require
longer charging times. This is normal. If you charge
your battery regularly and notice a decrease in talk
R
A
F
T
Getting Started
23
Page 24
time or an increase in charging time, then it is
probably time to buy a new battery.
Caution:
must be disposed of properly and may need to be
recycled. Contact your local recycling center for proper
disposal methods. Never dispose of batteries in a fire
because they may explode. Refer to your battery’s label for
battery type.
The rechargeable batteries that power this phone
D
Turning On Your Phone
Getting Started
24
1
2
3
4
5
R
Step
Press and hold to turn on the phone.
If necessary, enter your SIM card PIN code and
press
Caution:
times in a row, your phone disables the SIM card
and displays SIM Blocked.
If necessary, enter your 4-digit (up to 8-digit)
unlock code and press
card.
Enter the current time according to the default
24-hour format (for example, enter 14:00 instead
of 2:00 pm) and press
Enter the current date (for example, enter
07/20
A
OK
to unlock the SIM card.
If you enter an incorrect PIN code 3
F
) and press
OK
OK
to unlock the SIM
T
OK
to confirm.
to confirm.
2004/
Page 25
Tip:
To reset date and time, press
>
Set the date
format, press
format
Your phone starts to connect to your service provider and
then enters the idle display if connection is successfully
established.
Adjusting Volume
On the idle display:
Step
Scroll the volume key up or down to
increase or decrease earpiece volume
during a call. The phone saves the
settings seconds later.
and
.
D
Set the time
MENU
>
R
A
. To select a date format or time
Setting >Clock >Date format
MENU
>
Setting >Clock
or
Time
Getting Started
Displaying Your Phone Number
You can display your phone number to people
you call.
Tip:
Scroll to
by your service provider.
Find the Feature
F
Preset
to use the settings configured
T
MENU
Show number
>
Setting > Call feature >
>
On
25
Page 26
Making a Call
On the idle display:
Press To
D
1
keypad keys enter a phone number
R
Tip:
If you make a mistake,
press
CLEAR
last digit, or press and hold
CLEAR
to clear the
to clear all digits.
2
Getting Started
3
Tip:
To enter an extension, press and hold to insert a
“P” (pause character) and then enter an extension.
Tip:
To make an international call from the idle display,
press and hold to insert a “+” and then enter the
country code, area code (omitting the starting 0), and
phone number.
Answering a Call
When you receive a call, your phone rings and/or vibrates
and displays an incoming call message.
Press To
1
26
make the call
end the call
A
F
T
answer the call
Page 27
Press To
2
end the call
Tip:
When
Anykey answer
except to answer the call. (To activate, press
MENU
Note:
calls.
Muting a Call
You can make the 3rd party not hear your voice when a
call is in progress.
1
2
3
>
Setting >Call feature >Anykey answer > ON
If the phone is locked, you must unlock it to answer
Press To
OPTIONS
up/down
OK
is active, press any of the keys
R
A
open the options menu
F
scroll to
mute the call
Mute
.)
T
D
Getting Started
27
Page 28
Basic Operation
Using the Main Display
D
R
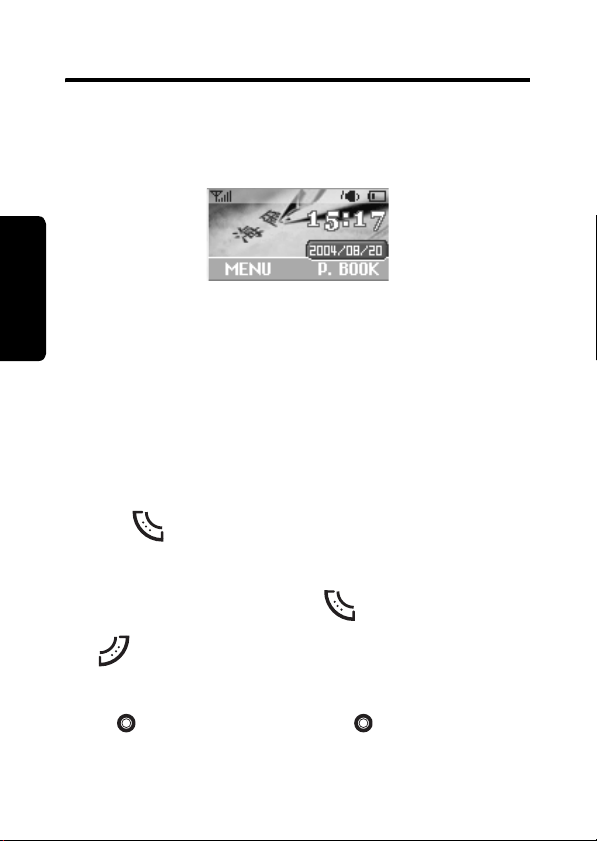
The
idle display
on a call or using the menu. The main display shows the
phone status, including network signal, battery power level
and time as well as date indicators. You can press any of
the keys to turn backlight on if the display turns off after a
while.
The MENU indicator indicates that you can press the left
Basic Operation
soft key to display the main menu.
Labels at the bottom corners show the current soft key
functions. Press the left soft key or right soft
is the standard display when you are
A
F
T
key to perform the function indicated by the left or
right soft key label.
not
Scroll up/down/left/right or press straight in from the
idle display to quickly access 5 phone features.
28
Page 29
When you receive an incoming call, the main display may
show the caller’s number and name.
Tip:
To see a caller’s name in the display, the caller’s
number must match an entry in your phonebook. To create
a phonebook entry, see page 85.
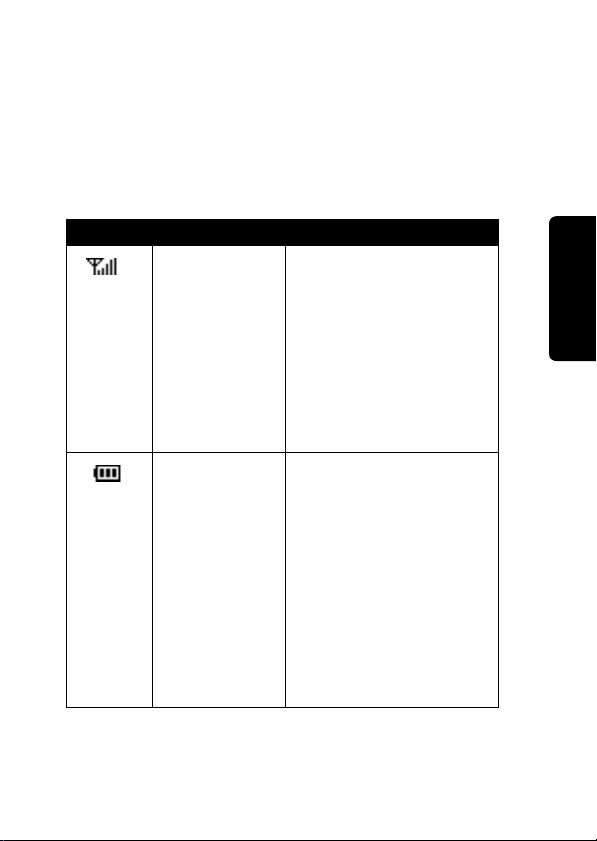
At the top of the display are the following status indicators:
Icon Name Description
D
Signal Strength
R
A
Battery Power
Level
Indicates strength of
signal being received.
The more vertical bars,
the better the reception
(5 bars maximum).
Bars differ in color by
signal strength:
orange > red
Indicates remaining
battery power. The more
bars, the more battery
F
power available (3 bars
maximum). The icon
flashes when battery
power is near empty.
T
Bars differ in color by
battery power level:
green > orange > red
green >
.
.
Basic Operation
29
Page 30
30
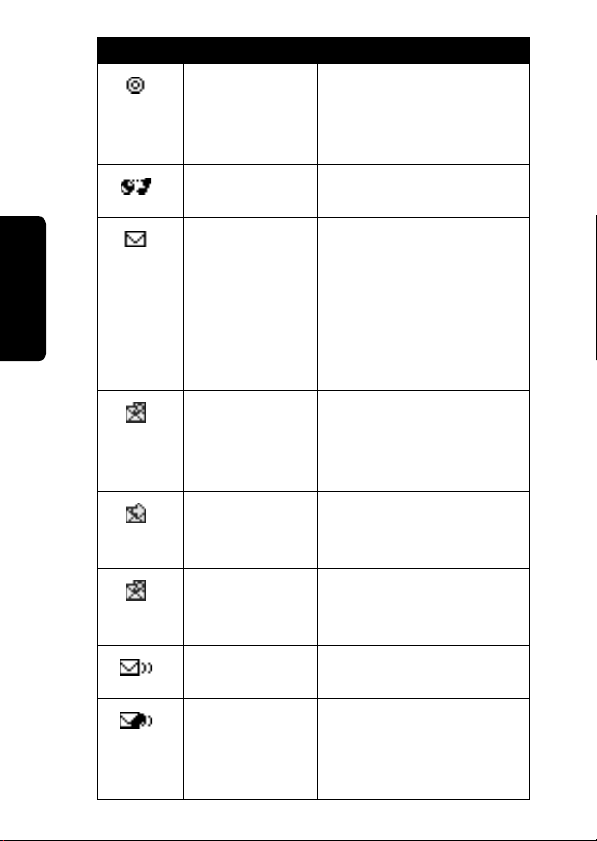
Icon Name Description
Roaming
D
Call Connected
New SMS Message
R
A
SMS Draft Message
Basic Operation
Sent SMS Message
Unsent SMS
Message
New Voicemail
Message
New SMS and
Voicemail Messages
Indicates you are surfing
over another service
provider’s wireless
network.
Indicates you are on a
call.
Indicates new unread
SMS message(s). The
icon flashes when the
SMS memory is full. You
must read new SMS
messages to receive
more SMS messages.
Indicates the SMS
message(s) stored in
Msg. center
Drafts
Indicates the SMS
F
message(s) you have
successfully sent out.
Indicates the SMS
message(s) you failed to
send out.
T
Indicates new unheard
voicemail message(s).
Indicates new unread
SMS message(s) and
new unheard voicemail
message(s).
.
>
Text messages
>
Page 31

Icon Name Description
New MMS Message
MMS Memory Full
D
MMS Message
R
Processing
MMS Draft
Message
Sent MMS Message
Unsent MMS
Message
New SMS and MMS
Messages
Ringer On
Vibrator On
Indicates new unread
MMS message(s).
Indicates the MMS
memory is full. You must
read new MMS
messages to receive
more MMS messages.
Indicates you are
receiving/sending MMS
message(s).
Indicates the MMS
message(s) stored in
Msg. center
A
>
Drafts
.
Indicates the MMS
message(s) you have
successfully sent out.
Indicates the MMS
F
message(s) you failed to
send out.
Indicates new unread
SMS and MMS
T
message(s).
Indicates incoming call
alert is turned on.
Indicates vibrator is
turned on.
>
Multimedia msgs.
Basic Operation
31
Page 32

Icon Name Description
Ringer and Vibrator
On
D
Silence
GPRS Mode Support
R
GPRS Call Connected
Line 2 (Phone
Number 2)
A
Call Muted
Basic Operation
Indicates incoming call
alert and vibrator are
turned on.
Indicates all the ringer is
turned off.
Indicates your service
provider supports GPRS
communication method.
Indicates you are surfing
over the GPRS network.
Indicates the other
telephone line or phone
number you are using to
receive and send calls.
Indicates the
microphone is turned off
and other party(ies) on a
call cannot hear your
F
voice.
32
T
Page 33

Using Menus
From the idle display, press
menu.
Selecting a Menu Feature
To select a phone feature, starting from the idle display:
Find the Feature
D
R
Use to scroll, and to select the soft key
functions listed in the bottom left and right corners of the
display. Pressing straight in (
as the left soft key. To select
press .
Note:
In this user’s guide, “Find the Feature” always
indicates the feature's position in the main menu.
Entering Feature Information
Some features require you to enter information:
•
Enter numbers or text with keypad keys. A
cursor
shows where text is entered.
•
Press left/right to select an option. Press right
to check/uncheck a feature.
•
If you enter or edit information and do not want to save
changes, press to exit without saving.
MENU
MENU
A
>
OK
Add
in a list, you may
F
T
to display the main
Phonebook >Add
) functions the same
flashing
Basic Operation
33
Page 34

Entering Text
Multiple text entry modes make it easy for you to enter
names, numbers, and messages on your phone. Most text
entry screens let you enter letters, numbers, and/or
symbols as required. Press from a text entry screen to
select a text entry mode. The text entry mode you select
remains active until you change it by selecting another
mode.
To select a text entry mode with ease:
•
•
•
•
Basic Operation
Setting Ready-to-Use Text Entry Modes
You can predefine your custom text input modes.
D
R
Press once to insert a space.
In the
TAP English
switch among
letters)/
In the
iTAP English
toggle between
Press or to select the
text entry mode, press and hold to
abc
(lower case)/
ABC
(upper case).
A
text entry mode, press and hold to
a (lower case) and A (upper case).
Abc
Symbol
F
(initial capital
text entry mode.
34
TAP English
iTAP English
123
Symbol
Type letters, numbers, and symbols by
pressing a key 1 or more times (see
page 36).
Let the phone predict each word as you
type it (see page 37).
Enter numbers only (see page 39).
Enter symbols only (see page 38).
T
Page 35

Find the Feature
Press To
D
1
2
3
4
ON
BACK
OK
up/down
R
MENU
>
scroll to the desired text entry
mode
select the text input mode
change the settings
save the settings
>
Setting >Input mode
Preferred input mode
Setting Words to Complete Automatically
Word completion
key in the 1st 3 characters.
Find the Feature
In the
Press To
1
keypad keys enter the 1st 3 characters of a
2
3
4
OK
allows you to quickly enter a word after you
TAP English
up
up/down
A
MENU
>
Word completion>ON
F
text entry mode:
word
open the word candidates list
scroll to the desired word
select the word
>
Setting >Input mode
T
Basic Operation
35
Page 36

Using TAP English
TAP English
phone.
Press from any text entry screen and select
General Text Entry Rules
Press a key repeatedly to cycle through its characters.
Basic Operation
is the standard mode for entering text on your
D
Press To
1
keypad key 1 or
more times
2
3
R
keypad keys enter remaining characters
OK
select a letter, number, or
symbol
store text
A
•
If you do not press a key for 2 seconds, the highlighted
character is accepted, and the cursor moves to the
next position.
F
T
TAP English
.
36
Page 37

Using iTAP™ Software Predictive Text
Entry Mode
iTAP English
a word using 1 keypress per letter.
Press from any text entry screen and select
Entering Words
1
2
3
4
is a predictive text entry mode that lets you enter
D
Press To
keypad key 1
time
keypad keys (1
per letter)
right
OK
R
up/down/left/
enter the 1st letter of a word
Tip:
The letters associated
with the key are shown at the
bottom of the display.
A
enter the rest of a word
Tip:
Alternative words and
letter combinations are
shown at the bottom of the
display. The word choices
F
update with each keypress.
highlight the word you want
enter the word at flashing
cursor location
Tip:
inserts a space after each
word.
T
iTAP English
automatically
iTAP English
.
Basic Operation
37
Page 38

For example, to spell the word “phone,”
press . The display shows
Entering Novel Words
You can coin words
Basic Operation
Your phone stores the unrecognized word and includes it
in the list of alternative word choices. When memory space
for unrecognized words is filled, your phone deletes the
oldest words as it adds new words.
D
Step
1
Press
until a letter combination matches the start of a
word.
2
Press up/down/left/right to highlight the
desired letter or letter combination.
3
Press
combination.
4
Press left to move cursor to the left and “lock”
the selected word portion.
5
Continue to enter letters and highlight the letter
combinations you want to spell a word.
iTAP English
CLEAR
does not recognize.
1 or more times to delete letters
R
OK
to select the letter or letter
A
F
T
phone
.
Entering Punctuation
Press To
or
38
enter punctuation
Page 39

Entering Numbers
Press To
1
keypad key 1
time
D
2
3
4
Deleting Letters and Words
With the cursor to the right of the text you want to delete:
Locking and Unlocking Your
up/down/left/
right
keypad keys enter numbers
OK
•
Press
•
Press and hold
R
CLEAR
prepare to put
text entry mode
123
scroll to the number
enter the numbers at flashing
cursor location
A
to delete 1 letter at a time.
CLEAR
to delete the entire line.
iTAP English
in the
Basic Operation
Phone
You can lock your phone manually or set your phone to
lock automatically whenever you turn it off. To use a locked
phone, you must enter the unlock code. A locked phone
still rings and/or vibrates for incoming calls/messages,
you must unlock it to answer/read
You can make emergency calls on your phone even when
it is locked.
F
T
.
but
39
Page 40

Tip:
The default phone code is “1234.” Please change the
phone code after you receive your phone and keep it
safely.
Locking Your Phone Manually or
Automatically
Tip:
Basic Operation
Locking and Unlocking the Keypad
You can lock the keypad to avoid accidental keypresses.
Press to answer calls even if the keypad is locked.
The keypad will be locked when no activity occurs in 20
seconds if you choose to lock it automatically.
D
Find the Feature
R
Press To
1
keypad keys enter your phone lock/unlock
2
OK
To unlock the phone, refer to the steps above.
MENU
>
now
code if you want to lock the
phone manually
A
lock the phone
>
Setting >Security
Code status>Phone lock >Lock
or
Automatic lock > ON
F
T
40
Find the Feature
MENU
>
Lock now/Auto
>
Setting >Key lock
Page 41

Tip:
To unlock the keypad, press
the idle display.
Setting Closed User Groups
D
You can subscribe closed user groups that are
able to call you and receive your calls to the
service provider. Select
closed user group you subscribed to your
service provider.
Find the Feature
Setting and Changing Codes
You can set and change the following codes that block
other people from using your phone and data in it.
R
MENU
>
A
UNLOCK
Preset
to use the default
>
Setting >Security
Closed user group >On
and from
Basic Operation
PIN code
PIN2
Phone code
SIM lock
Tip:
Contact your service provider for those codes.
Lock your SIM card when you turn your
phone off.
Lock certain subscription-dependent
features every time you use them.
Lock your phone when you turn it off.
Lock your phone when you insert an
unidentified SIM card.
F
T
41
Page 42

To set or change codes:
Find the Feature
D
To activate codes:
Find the Feature
MENU
>
Change code
MENU
>
Code status
>
Setting >Security
>
Setting >Security
R
If You Forget Codes
If you forget your codes, contact your service provider.
If You Enter the Wrong PIN or PIN2 Code 3 Times in a Row
If you enter a wrong PIN or PIN2 code 3 times in a row,
your phone prompts you to enter the PUK or PUK2 code to
Basic Operation
unblock your SIM card. For the PUK and PUK2 codes,
contact your service provider.
A
F
T
42
Page 43

Customizing Your Phone
D
Adjusting the Backlight
You can set the amount of time that the display and the
keypad backlights remain on.
Find the Feature
Adjusting Display Contrast
R
MENU
>
Setting >Backlight
Find the Feature
Press To
1
2
Adjusting Display Color
Find the Feature
left/right
OK
A
MENU
contrast
scroll to the desired display
contrast
select the display contrast
>
Setting >Adjust
F
T
MENU
>
Setting >Display >Skin
Customizing Your Phone
43
Page 44

Setting Date and Time
To see date and time in the idle display, set date and time
1st:
D
Find the Feature
You can select a date format:
MENU
the date
>
Setting >Clock > Set
/
Set the time
Find the Feature
You can also select a time format (24-hour format is the
default setting):
Find the Feature
To display time in the idle display:
Find the Feature
To display date in the idle display:
Find the Feature
Customizing Your Phone
44
R
MENU
format
A
MENU
format
F
MENU
>
MENU
>
>
Setting >Clock > Date
>
Setting >Clock > Time
>
Setting >Display
Clock type >Digital or Analog
T
>
Setting >Display
Show information >Date
Page 45

You may specify a place and display the corresponding
date and time:
Find the Feature
D
Setting Power-Off Time
You can let your phone turn off automatically in a specified
time.
Find the Feature
Tip:
Press left/right to select a
off time setting.
Setting a Wallpaper Image
You can set a picture or animation as a wallpaper
(background) image shown in your phone’s main display.
Note:
When you set an animation as a wallpaper image,
only the 1st frame of the animation displays.
Find the Feature
R
MENU
time zone
MENU
off
>
>
>
On
Repeat type
A
F
MENU
>
Wall paper
>
T
Setting >Clock > Local
Setting >Auto power
for the power-
Setting >Display
Customizing Your Phone
45
Page 46

Selecting a Language
You can specify a language for your phone to use.
Find the Feature
D
Tip:
If you select
predefined by your service provider.
Customizing the Main Display
You can display in the idle display the current date
indicator or the service provider name.
Find the Feature
Restoring Factory Settings
You can let the phone use the factory settings after
customizing it.
Find the Feature
Tip:
Enter your phone’s lock/unlock code to restore the
factory-set configurations.
Automatic
R
MENU
, you can use the default language
MENU
>
A
>
Setting >Language
>
Setting >Display
Show information
F
MENU
factory settings
>
Setting >Restore
T
Customizing Your Phone
46
Page 47

Creating Application Shortcuts
You can create application shortcuts in
the applications you frequently use.
Find the Feature
1
2
3
4
To quickly access an application:
Find the Feature
1
2
D
Press To
up/down
R
OK
keypad keys enter a number
SAVE
Press To
up/down
OK
up >
Edit
scroll to the desired
application
select the application
from to
save the setting
A
up
F
scroll to the desired
application shortcut
open the selected application
T
Quick access
to launch
Customizing Your Phone
Managing Phone Profiles
You can edit phone profiles, including ring tone, key tone,
and vibrator settings. You can also rename phone profiles.
47
Page 48

Selecting a Phone Profile
Find the Feature
D
Tip:
To use
Handsfree
, plug a handsfree kit in your phone’s
accessory port. To use
phone’s headset jack.
Customizing a Phone Profile
You can customize the following options for a phone
profile.
Find the Feature
Ringing volume
Ringing tone
Incoming call
alert
Customizing Your Phone
Vibrating
R
Select ring tone volume. Maximum is
Volume 5
Select a ring tone and it will play when
you receive incoming calls.
Define how a ring tone works with your
incoming calls.
Tip:
turn
the phone vibrates when you receive
calls.
Turn vibrator on or off.
MENU
Meeting/Outdoors/Car/Customized
Office > Activate
Headset
, plug a headset kit in your
A
MENU
Meeting/Outdoors/Car/Customized
Office/Handsfree/Headset >Customize
.
F
>
Profile >Normal
>
Profile >Normal
T
Select
Off
to turn
Ringing tone
Ringing tone
off and turn
off. If you
Vibrating
/
/
/
/
on,
48
Page 49

Message alert
tone
D
Key tone volume
Key tone type
Warning tones
Startup music
Voice dial
Auto answer
Select an alert tone and it will play when
you receive messages.
Tip:
Select
Off
to turn
Message alert tone
If you turn
Vibrating
receive messages.
Select key tone volume. Maximum is
Level 5
Select a key tone.
R
Tip:
Tu r n
played when battery power is low or
there is any operation error.
Tu r n
played when you turn the phone on or
off.
Tu r n
entries, see page 99.
Note:
Tu r n
Note:
Message alert tone
on, the phone vibrates when you
.
Select
Off
to turn key tone off.
Warning tones
on or off.
off and turn
Warning tones
A
Startup music
Voice dial
on or off.
on or off. To edit voice dial
Startup music
F
Voice dial
is for
Handsfree/Headset
Auto answer
Auto answer
on or off.
is for
Handsfree/Headset
T
off.
is
is
only.
only.
Customizing Your Phone
49
Page 50

Renaming a Phone Profile
Find the Feature
D
Muting the Phone
You can turn all ringers in your phone off.
Find the Feature
Tip:
Press and hold to quickly mute or unmute your
phone from the idle display.
R
MENU
Outdoors/Car/Customized/Office
Rename
MENU
>
Profile >Meeting
>
Profile >Silence >ON
A
F
T
/
>
Customizing Your Phone
50
Page 51

Calling Features
Putting a Call on Hold
When you are on a call, you can put the current call on
hold.
1
2
3
Answering a New Call
To t ur n
Find the Feature
D
Press To
OPTIONS
OK
Call waiting
R
up/down
When you are on a call, you can answer a new
incoming call.
open the options menu
scroll to
Tip:
the call on hold.
A
put the current call on hold
Hold
Scroll to
F
on 1st:
Activate
to answer
T
MENU
Call waiting > On
>
Setting >Call feature
>
Calling Features
51
Page 52

To answer a new incoming call:
Press To
1
D
2
Tip:
If you have an active call and a held call, and you want
to answer a new incoming call, you must end the active or
held call to answer the new call. Depending on your
service provider, you can also transfer current incoming
calls to another phone number when you are not available.
(To activate, press
desired phone number > press .)
Making a New Call
When you are on a call, you can make a new outgoing call.
Calling Features
R
OPTIONS
put the current call on hold
and answer the new call
end the new call and continue
with the call on hold
> select
Deflection
A
> enter the
52
Press To
1
OPTIONS
2
OK
3
keypad keys enter the desired phone
4
F
open the options menu
select
Dial new call
T
number
dial the phone number
Page 53

Making an Emergency Call
With or without the SIM card installed, you can make an
emergency call to the Emergency phone number your
service provider gave you.
1
2
D
Press To
keypad keys enter the emergency phone
number
R
dial the emergency call
Selecting a Phone Number to Use
A
You can select a phone number (phone line) to
make and receive calls.
Find the Feature
Redialing Automatically
You can immediately redial the last call you failed to make.
Find the Feature
F
MENU
>
Phone lines
T
MENU
>
Auto redial>ON
>
Setting >Call feature
>
Setting >Call feature
Calling Features
53
Page 54

Checking Recent Calls
You can view the recent history for the calls you missed,
received or dialed on your phone.
D
Find the Feature
Tip:
If the selected recent call entry includes a phone
number, you may directly press to dial. You can also
OPTIONS
press
phonebook. To erase the recent call entry, press
R
>
Save
MENU
calls
to store the recent call entry in your
>
Call Meter >Missed
/
Received calls/Dialed calls
OPTIONS
Clearing
Calling Features
Sending DTMF Tones
You can send Dual Tone Multi-Frequency (DTMF) tones
when a call is in progress. For example, enter your account
number during a banking service call.
>
Erase
.
Recent Call History
Find the Feature
A
MENU
>
Call Meter >Erase all
F
Press To
keypad keys enter your account number,
T
for example
54
Page 55

Making a Conference Call
You can join calls to make a conference if you
have subscribed this to your service provider.
D
In the idle display:
Press To
1
keypad keys enter a phone number
R
2
3
keypad keys enter another phone number
4
5
OPTIONS
make the 1st call
make the 2nd call
Note:
A
The 1st call is put on
hold when the 2nd call is
active.
open the options menu
Calling Features
6
7
Removing a Call from the Conference
You can end any call out of the conference.
1
2
up/down
OK
Press To
OPTIONS
up/down
scroll to
make a conference call
open the options menu
scroll to
Conference
F
T
End calls
55
Page 56

Press To
3
OK
4
up/down
D
select
End calls
scroll to the call you want to
end
or
5
OK
Diverting Calls
You can use
another phone number.
Find the Feature
Calling Features
Blocking Calls
You can block outgoing and/or incoming calls.
Find the Feature
Tip:
Enter the password your service provider provided to
use
Call barring
56
.
scroll to
at once)
R
confirm your selection
Call divert
A
MENU
>
F
MENU
>
All calls
(to end all calls
to forward incoming calls to
>
Setting >Call feature
Call divert
T
>
Setting >Call feature
Call barring
Page 57

Making a Fax or Data Call
In addition to voice calls, you can receive or send fax and
data calls.
D
To receive or send fax and data calls, use an
optional Haier data cable to connect the phone to
your personal computer.
Find the Feature
R
Connecting to Your Service
Provider Network Manually or
MENU
>
Next call
>
Setting >Call feature
A
Automatically
You can either manually connect the phone to your service
provider network, or let the phone automatically connect to
your service provider network whenever you turn the
phone on.
Find the Feature
F
MENU
>
Setting >Network
T
Calling Features
57
Page 58

Setting a Voice Call Connection Alert
Use a voice call connection alert to notify you if the call you
just made is connected.
Tip:
Setting a Voice Call Timer Reminder
Use a voice call timer reminder to notify you how much
time you have spent on an active call.
Calling Features
Tip:
Viewing How Much Time You Spent on Calls
D
Find the Feature
Select
Off
to disable the voice call connection alert.
R
Find the Feature
Select
Off
to disable the voice call timer reminder.
MENU
indication
A
MENU
reminder
F
>
Setting >Connection
>
Setting >Minute
T
You can view the time you spent on different kinds of voice
calls.
58
Find the Feature
MENU
Last call/All calls/Received calls/Dialed
calls
>
Call Meter > Call time >
Page 59

Clearing Voice Call Time History
You can reset the voice call timer for all different calls.
Find the Feature
D
Viewing How Much Money You Spent on Calls
MENU
>
Clear timer
>
Call Meter >Call tim e
R
You can use a voice call cost counter to
calculate how much money you spent on
different calls.
To set up the voice call cost counter 1st:
Find the Feature
Tip:
Enter the PIN2 code to configure the voice call cost
counter.
To view how much money you spent on the last call or all
calls:
Find the Feature
A
MENU
>
>
Setting
F
MENU
>
T
>
Last call/All calls
Call Meter >Call cost
Call Meter >Call cost
Calling Features
59
Page 60

Clearing Voice Call Cost History
You can reset the voice call cost counter for all calls.
Find the Feature
D
Tip:
Enter the PIN2 code to reset the voice call cost
counter.
Displaying Your Voice Call Credit
You can view how much you have to your voice call credit.
Find the Feature
Tip:
Reset the voice call cost counter if you exceed the
credit limit and cannot make more phone calls.
Calling Features
Activating the Voice Call Timer and Cost Counter during a Call
R
You can activate the voice call timer and voice
call cost counter when you are on a call.
MENU
>
Clear cost
MENU
>
A
Credit remaining
F
>
Call Meter >Call cost
>
Call Meter >Call cost
T
Find the Feature
MENU
count
>
>
Call Meter >In-call
Call time/Call cost
60
Page 61

Activating the Voice Call Timer and Cost Counter after a Call
You can activate the voice call timer and voice
D
call cost counter shortly after you end a call.
Find the Feature
R
Using STK Services
You can use the SIM Tool Kit (STK) services
your service provider provides on your phone.
Contact your service provider for more
information on the STK services.
Find the Feature
MENU
information
>
>
A
MENU
>
ON
F
T
Call Meter >Session
Calling Features
STK
61
Page 62

Messages
You can write, send and receive messages, either by Short
Messaging Service (SMS) or by Multimedia Messaging
Service (MMS).
Writing an SMS Message
You can insert quick notes, phonebook entries (numbers or
names), image objects (pictures or animations), and sound
objects (sounds or melodies) when composing an SMS
Messages
message.
D
R
Find the Feature
Press To
1
keypad keys enter text
2
OPTIONS
3
4
5
6
up/down
OK
up/down
OK
MENU
A
messages
open the options menu
F
scroll to the desired option
beginning with
select the option
scroll to the desired suboption, if necessary
select the sub-option, if
necessary
>
Msg. center >Text
>
Write message
T
Insert
62
Page 63

Press To
7
8
up/down
D
OK
scroll to the object you want
to insert to your SMS
message
select the object
Tip:
Repeat steps 2-8 to insert
more objects, if necessary.
Messages
Sending an SMS Message
Press To
1
OPTIONS
2
OK
3
P. BOOK
4
5
OK
R
To send your SMS message right after you finish
editing it:
A
open the options menu
select
Send
open your phonebook
F
up/down
scroll to the desired entry
select the entry
Tip:
than 1 phone numbers,
continue the following steps;
otherwise, repeat steps 4-5 to
add other recipients or go to
steps 9-12 to send your SMS
message immediately.
T
If the entry includes more
63
Page 64

Press To
6
7
8
up/down
OK
D
OK
R
9
10
11
12
OK
OPTIONS
up/down
OK
Messages
Saving an SMS Message as a Draft
scroll to the desired phone
number
select the phone number
return to the previous menu
Tip:
Repeat steps 4-5 to add
other recipients or continue
the following steps to send
your SMS message.
return to the previous menu
open the options menu
scroll to
A
send your SMS message
Send
To save your SMS message in the
finish editing it:
Press To
1
OPTIONS
2
3
4
64
up/down
OK
NAMES
Drafts
F
open the options menu
folder after you
T
scroll to
select
select a recipient
Save to drafts
Save to drafts
Page 65

Press To
5
6
7
8
up/down
OK
D
up/down
OK
R
9
SAVE
Activating MMS Service
scroll to the desired
phonebook entry
select the phonebook entry
scroll to the desired phone
number, if necessary
select the phone number, if
necessary
save your SMS message
along with recipient(s) in
>
Text messages > Drafts
center
Msg.
A
To send/receive MMS messages, you must
subscribe for MMS service from your service
provider and then activate your service provider
on the phone. MMS service works via GPRS
your service provider supports. To activate your service
provider, follow the steps:
F
Messages
Find the Feature
Press To
1
up/down
MENU
>
settings
scroll to the service provider
you have subscribed for using
MMS service
>
Msg. center >Settings
Multimedia msgs. >Connection
T
65
Page 66

Press To
2
OK
3
OK
select the service provider
activate the service provider
D
Writing an MMS Message
An MMS message may consist of several page sets. A
page set can include an image object (photo/picture/
R
animation), a sound object (melody/voice note), and/
Messages
or text objects (quick notes/phone numbers).
Note:
You can insert only 1 image object and 1 sound
object to a page set. To insert more image and sound
objects, press
add to next page?
.
YES
A
when your phone displays:
... existed,
66
Find the Feature
Press To
1
keypad keys enter text
2
OPTIONS
3
4
5
6
up/down
OK
up/down
OK
MENU
>
F
open the options menu
scroll to
select
scroll to the desired option
select the option
>
Msg. center
Multimedia msgs. >Write message
T
Insert object
Insert object
Page 67

Press To
7
8
9
up/down
OK
D
up/down
R
10
OK
scroll to the desired suboption, if necessary
select the sub-option, if
necessary
Tip:
Repeat steps 7-8, if
necessary.
scroll to the object you want
to insert to your MMS
message
insert the selected object
Tip:
Repeat this step if you
select
Media center
A
objects.
Tip:
Repeat steps 2-10 to
insert more objects, if
necessary.
to add
Messages
Switching among Page Sets
You can go to a desired page set and view the objects on
it.
Press To
1
OPTIONS
2
3
up/down
OK
F
T
open the options menu
scroll to
select
Go to...
Go to...
67
Page 68

Press To
4
5
up/down
OK
scroll to the desired page set
go to the selected page set
D
Viewing Media Objects
You can view any media objects in the current page set.
Press To
1
R
OPTIONS
Messages
2
3
4
5
Deleting Media Objects
You can delete any media objects from the current page
set.
1
up/down
OK
up/down
OK
Press To
OPTIONS
open the options menu
scroll to
select
A
scroll to the desired object
view the selected object
View object
View object
F
open the options menu
T
68
2
3
4
up/down
OK
up/down
scroll to
select
scroll to the desired object
Remove object
Remove object
Page 69

Press To
5
OK
6
OK
D
Deleting Page Sets
select the object
delete the selected object
You can delete a page set, including all objects and a page
itself in it. If there is only 1 page set, you can only delete all
objects, not a page itself in it.
In the current page set (if it is not the only 1):
Press To
1
OPTIONS
2
3
OK
up/down
R
open the options menu
A
scroll to
delete the selected page set,
including all objects and a
page itself in it
Delete page
F
In the only 1 page set:
Press To
1
2
3
OPTIONS
up/down
OK
open the options menu
scroll to
delete all objects, not a page
itself in it
T
Delete page
Messages
69
Page 70

Previewing an MMS Message
You can preview your created MMS message before
sending it.
D
Press To
1
OPTIONS
open the options menu
2
3
Messages
4
Sending an MMS Message
To send via a phone number:
1
2
3
4
up/down
OK
R
up/down/left/
right
A
You can send your MMS message to friends via
either their phone numbers or email addresses.
Press To
OPTIONS
OK
P. BOOK
up/down
scroll to
select
preview the next/previous
page set(s)
Preview
Preview
F
open the options menu
T
select
Send
open your phonebook
scroll to the desired entry
70
Page 71

Press To
5
OK
D
R
6
7
8
9
10
11
12
up/down
OK
OK
OK
OPTIONS
up/down
OK
select the entry
Tip:
If the entry includes more
than 1 phone numbers,
continue the following steps;
otherwise, repeat steps 4-5 to
add other recipients or go to
steps 9-12 to send your MMS
message immediately.
scroll to the desired phone
number
select the phone number
return to the previous menu
A
Tip:
Repeat steps 4-5 to add
other recipients or continue
the following steps to send
your MMS message.
return to the previous menu
F
open the options menu
scroll to
send your MMS message
Send
T
Messages
71
Page 72

To send via an email address:
Press To
1
OPTIONS
D
2
OK
3
OK
4
5
Messages
6
7
8
9
10
Configuring Sending Options for MMS
Messages
up/down
R
OK
keypad keys enter an email address
OK
OPTIONS
up/down
OK
open the options menu
select
Send
open the options menu
scroll to
select
add the email address to the
Recipients
Tip:
A
other recipients.
open the options menu
scroll to
F
send your MMS message
New e-mail address
New e-mail address
box
Repeat steps 3-7 to add
Send
T
You can read delivery status reports for sent
MMS messages, specify how long MMS
messages will be stored in the message center,
select a message priority level, choose to send
MMS messages anonymously, let the message center
72
Page 73

send you notes if recipients read the MMS messages you
sent to them, and determine when you want MMS
messages to be sent.
Find the Feature
1
2
3
4
Saving an MMS Message as a Draft
You can save your MMS message in the
you finish editing it.
1
2
3
4
D
Press To
up/down
R
OK
up/down
OK
MENU
>
scroll to the desired sending
option
select the sending option or
check/uncheck the selected
sending option
scroll to the desired sub-
A
sending option, if necessary
select the sub-sending
option, if necessary
>
Multimedia msgs. >Sending options
F
Press To
OPTIONS
up/down
OK
keypad keys enter a name
open the options menu
scroll to
select
T
Set title
Set title
Msg. center >Settings
Drafts
folder after
Messages
73
Page 74

Press To
5
OK
6
OPTIONS
D
7
8
up/down
OK
save the name
open the options menu
scroll to
save your MMS message in
Msg. center > Multimedia msgs. >
Drafts
Save to drafts
R
Reading a Received SMS/MMS
Messages
Message
You can open the SMS/MMS messages you received in
the
Inbox
folder.
A
74
Find the Feature
Press To
1
2
up/down
OK
MENU
messages
>
Msg. center >Text
/
Multimedia msgs. >Inbox
F
scroll to the desired message
read the selected message
T
Page 75

Reading a Sent or Unsent SMS/ MMS Message
You can open the SMS/MMS messages you sent or failed
to send in the
Find the Feature
1
2
Reading a Draft Message
You can open the SMS/MMS messages you saved in the
Drafts
Find the Feature
D
Outbox
folder.
MENU
messages
R
Indicates a sent SMS message.
Indicates an unsent SMS message.
Indicates a sent MMS message.
Indicates an unsent MMS message.
Press To
up/down
OK
A
scroll to the desired message
read the selected message
>
/
Multimedia msgs. >Outbox
F
T
folder.
MENU
messages
>
/
Multimedia msgs. >Drafts
Msg. center >Text
Msg. center >Text
Messages
75
Page 76

Indicates a draft SMS message.
Indicates a draft MMS message.
D
Press To
1
2
up/down
OK
scroll to the desired message
read the selected message
Erasing SMS/MMS Messages
Messages
You can erase SMS/MMS messages stored in the
Outbox, Drafts
delete all the messages from a specified folder, scroll and
select
Erase all
Find the Feature
R
, or
Trashbox
.
(for SMS messages only) folder. To
A
MENU
messages
Outbox/Drafts/Trashbox
>
Msg. center >Text
/
Multimedia msgs. >Inbox
F
Press To
scroll to the desired message
select the message
T
open the options menu
select
Erase
delete the selected message
76
1
2
3
4
5
up/down
OK
OPTIONS
OK
OK
Inbox
,
/
Page 77

Managing SMS/MMS Messages
You can perform these functions on a SMS/MMS message
stored in the
•
Erase
•
Erase all
•
Send/Resend
•
Reply
•
Forward
•
Edit
•
View
message)/
message)/
from the selected message)
•
Use address
a URL, or to save a URL as a bookmark from the
selected message)
•
Callback
•
Move to Inbox/Outbox/Drafts/Trashbox
message to the
Inbox, Outbox, Drafts
D
(to erase the selected message)
(to erase all messages from the
(to send/resend the selected message)
(to reply the selected message)
R
(to forward the selected message)
(to edit the selected message)
(to display objects included in the selected
Save object
Object info.
A
(to dial/save a phone number, to connect to
(to call to the sender of the selected message)
Inbox/Outbox/Drafts/Trashbox
, or
Trashbox
folder:
Trashbox
(to save objects from the selected
(to read information on objects
F
(move the selected
folder)
folder)
Messages
Find the Feature
Press To
1
up/down
MENU
messages
Outbox/Drafts/Trashbox
scroll to the desired message
>
Msg. center >Text
T
/
Multimedia msgs. >Inbox
/
77
Page 78

Press To
2
OK
3
OPTIONS
D
Editing MMS Message Templ at e s
select the message
open the options menu
You can edit MMS message templates and save them in
Msg. center
Messages
Find the Feature
R
>
Multimedia msgs.
>
MMS template
MENU
Multimedia msgs.
.
>
Msg. center >
>
MMS template
A
Press To
scroll to any blank entry
select the blank entry
scroll to
F
select
open the options menu and
select an option from it to edit
your MMS message template
open the options menu
scroll to
save the created MMS
message template
Edit template
Edit template
T
Save template
78
1
2
3
4
5
6
7
8
up/down
OK
up/down
OK
OPTIONS
OPTIONS
up/down
OK
Page 79

Creating Quick Notes
You can create new quick notes for use in SMS messages.
Find the Feature
1
2
3
4
5
6
Setting a Voicemail Service Number
Your service provider may have set a voicemail service
number before you receive your phone. If not, refer to the
following procedures.
Find the Feature
D
Press To
up/down
OK
OK
keypad keys enter text
SAVE
R
up/down
MENU
messages
scroll to any blank entry
select the blank entry
scroll to
select
Edit quick note
A
save the created quick note
F
MENU
mailbox
>
Msg. center > Text
>
Quick note
Edit quick note
T
>
Msg. center >Voice
Messages
79
Page 80

Press To
1
keypad keys enter the voicemail service
number your service provider
D
2
OK
Editing Topic Messages
You can edit topic messages you want to receive
R
from your service provider, such as traffic
Messages
reports and today’s news.
provided
save the setting
Find the Feature
Clearing Sending History
You can clear the SMS and/or MMS sending history from
your phone memory.
Find the Feature
Press To
1
OPTIONS
2
80
up/down
MENU
A
broadcast
F
MENU
>
Text messages/Multimedia
history
msgs.
T
open the options menu
scroll to
>
Msg. center >Cell
>
Msg. center >Sending
Erase all
Page 81

Press To
3
OK
clear the SMS/MMS sending
history
Editing Service Commands
D
You can edit service commands you want your
service provider to operate.
R
Find the Feature
Press To
1
keypad keys enter the service command
2
OK
MENU
command
>
Msg. center >Service
A
you want your service
provider to operate
send the service command to
your service provider
F
Configuring SMS Settings
You can select a service provider which supports SMS
service, read delivery status reports for SMS messages,
let the message center send you notes after recipients
read your sent SMS messages, and specify a wireless
T
Messages
81
Page 82

communication protocol for use in sending and receiving
SMS messages.
Find the Feature
D
Configuring MMS Settings
You can choose to seamlessly receive MMS messages,
receive MMS messages even if you are roaming over
another network, save MMS messages you sent, reject the
message center to send you notes if recipients have read
Messages
the MMS messages you sent to them, configure and
activate MMS service, block certain MMS messages, and
set various options when you send MMS messages.
R
MENU
>
Text messages
>
Msg. center >Settings
A
Find the Feature
Selecting Memory for Saving SMS Messages
You can select either SIM card memory or phone memory
to store your SMS messages.
Find the Feature
MENU
>
>
Msg. center >Settings
Multimedia msgs.
F
T
MENU
>
>
Msg. center >Settings
Memory in use >Select SMS memory
82
Page 83

Checking SIM Card or Phone Memory Which Saves SMS Messages
D
You can read the details of SIM card or phone memory that
saves your SMS messages.
Find the Feature
R
Checking Phone Memory Which Stores MMS Messages
You can view the details of phone memory that stores your
MMS messages.
Find the Feature
MENU
>
>
Msg. center >Settings
Memory in use >SMS status
A
MENU
>
>
Msg. center >Settings
Memory in use >MMS status
F
T
Messages
83
Page 84

Managing Your Phonebook
D
Selecting Memory for Saving Phonebook Entries
You can select either SIM card memory or phone memory
to store your phonebook entries.
Find the Feature
R
MENU
>
Memory
>
Phonebook >Option
A
Checking SIM Card or Phone Memory Which Stores Phone Numbers and Notes
You can read the details of SIM card memory or phone
memory that saves your phone numbers and notes.
Find the Feature
Managing Your Phonebook
F
MENU
>
>
Memory status
T
Phonebook >Option
84
Page 85

X/100
X/300
X/100
Creating Phonebook Entries
Number (X) of phone numbers in SIM
card memory. You can store up to 100
phone numbers in SIM card memory.
Note:
D
The capacity of SIM card memory
depends on your service provider’s
settings.
Number (X) of phone numbers in phone
memory. You can store up to 300 phone
numbers in phone memory.
R
Number (X) of notes in phone memory.
You can store up to 100 notes in phone
memory.
A
Managing Your Phonebook
You can add phonebook entries to
Find the Feature
Press To
1
keypad keys enter a name
2
OK
3
keypad keys enter a phone number
4
OK
Tip:
You can press
quickly look up your phonebook entries.
MENU
F
save the name
save the phone number
P. BOOK
Phonebook
>
Phonebook >Add
T
from the idle display to
on your phone.
85
Page 86

Using Phonebook Entry Options
You can perform various functions on the selected
phonebook entry.
D
Option Description
Managing Your Phonebook
Edit
Add voice tag *
Set as default *
Add number *
Change type
Add text *
Change group
Edit name
Speed dial
R
edit the selected phone
number and select a number
type, or edit the name
record a name command and
use it to dial the
corresponding number by
voice
set the selected phone
number to be called by
A
default
add phone number(s) (up to
4)
change the number type of
the selected phone number
F
add note(s)
select a caller group for the
selected entry
edit the name
T
assign a 1-touch dial key
86
from to for the
selected phone number
Page 87

Option Description
Send message
D
Send business card
R
Copy
Erase
Add picture *
Remove picture *
* The option is available only for the phone number or
name saved on phone memory.
edit an SMS
message and send
it by the default
mobile phone
number (SMS number)
send the selected
entry as a business
card by SMS
service or text
copy/move the selected entry
saved on SIM card memory
to phone memory and vice
versa
A
remove the selected entry or
note
create a photo caller ID for
the selected entry
remove a photo caller ID from
F
the selected entry
T
Find the Feature
MENU
>
Phonebook >Search
Managing Your Phonebook
Press To
1
keypad keys enter the 1st letter(s) of a
name
87
Page 88

Press To
2
OK
3
4
5
6
Creating a Photo Caller ID
You can add an image (photo caller ID) to a phonebook
entry. The main display shows that image when the caller
places a call to you.
Note:
on phone memory.
up/down
D
OK
up/down
R
OPTIONS
To create photo caller IDs, save phonebook entries
open your phonebook
scroll to the desired entry
select the entry
scroll to the name or the
desired phone number or
note
open the options menu
A
Managing Your Phonebook
88
Find the Feature
Press To
1
keypad keys enter the 1st letter(s) of a
2
OK
3
4
5
up/down
OK
up/down
F
MENU
name
open your phonebook
scroll to the desired entry
select the entry
scroll to the name
>
Phonebook >Search
T
Page 89

Press To
6
OPTIONS
open the options menu
7
8
9
10
11
12
13
14
15
up/down
D
OK
up/down
OK
up/down
OK
up/down
OK
OK
scroll to
select
scroll to
example)
Tip:
R
Select
the picture you just took as a
photo caller ID.
select
scroll to the desired folder
A
select the folder
scroll to the desired photo
select the photo
set the selected photo as a
F
photo caller ID attached to
the phonebook entry
Add picture
Add picture
Photo album
New picture
Photo album
T
(for
to use
(for example)
Managing Your Phonebook
89
Page 90

Sorting Phonebook Entries
You can sort phonebook entries by a desired type.
Find the Feature
D
Tip:
Selecting
creation priority numbered 1, 2, 3 and so on.
Browsing Your Phonebook to Make a Call
You can from the idle display look up your phonebook and
pick up an entry to make a call.
To t ur n
Find the Feature
To pick up a phonebook entry and dial from the idle
display:
Managing Your Phonebook
1
2
3
Location
lets you classify phonebook entries by
R
Dialing number lookup
Press To
keypad keys enter the 1st letter(s) of a
up/down
MENU
>
A
on 1st:
MENU
>
>
Sort by
>
Dialing number lookup >ON
F
T
name
scroll to the desired entry
make a phone call
Phonebook >Option
Phonebook >Option
90
Page 91

1-Touch Dialing
You can press and hold any of the keys from to
to quickly make a phone call from the idle display.
To t ur n
D
Speed dialing
on 1st:
Find the Feature
To create 1-touch dial entries:
Find the Feature
Press To
1
2
OK
3
4
OK
R
up/down
up/down
MENU
>
Speed dialing>ON
MENU
A
scroll to the desired speed
dial key
open your phonebook
scroll to the desired entry
F
assign the speed dial key for
the default phone number
>
Setting >Call feature
>
Phonebook >Speed dial
T
Managing Your Phonebook
91
Page 92

Changing 1-Touch Dial Entries
Find the Feature
D
Press To
1
2
3
4
5
6
Customizing Ring Tone for a Caller Group
You can select a ring tone for a caller group to use. The
ring tone plays when 1 of the caller group calls you.
Managing Your Phonebook
Find the Feature
up/down
OPTIONS
up/down
OK
up/down
OK
R
MENU
scroll to the desired name
open the options menu
scroll to
open your phonebook
scroll to the desired entry
assign the speed dial key for
the default phone number of
A
the selected entry
>
Phonebook >Speed dial
Change
F
T
MENU
group
>
Phonebook > Caller
92
Press To
1
up/down
scroll to the desired caller
group
Page 93

Press To
2
OK
3
4
5
6
up/down
D
OK
up/down
OK
select the caller group
scroll to
select
scroll to the desired ring tone
select the ring tone
Ring tone
Ring tone
.
on 1st:
up/down
up/down
R
A
F
MENU
group
scroll to the desired caller
group
select the caller group
scroll to
>
Phonebook > Caller
T
Graphic
Tip:
To change the names of caller groups, scroll and
select
Rename
Creating a Photo Caller ID for a Caller Group
You can select an image (photo caller ID) for a caller group
to use. The image displays when 1 of the caller group calls
you.
Find the Feature
To t ur n
Graphic
Press To
1
2
OK
3
Managing Your Phonebook
93
Page 94

Press To
select
turn
Graphic
Graphic
on
4
OK
5
ON
D
To use a preset image as a photo caller ID for a caller
group:
Press To
1
2
3
4
To use your own image as a photo caller ID for a caller
group:
1
Managing Your Phonebook
2
3
4
5
6
R
up/down
OK
up/down
OK
Press To
up/down
OK
up/down
OK
up/down
OK
scroll to
select
scroll to the desired preset
image
A
select the preset image
View
View
F
scroll to
select
scroll to
select
scroll to the desired option
select the option
View
View
Media center
T
Media center
94
Page 95

Press To
7
8
9
10
11
up/down
OK
D
up/down
OK
OK
R
Creating Your Personal Phonebook Entries
scroll to the desired folder, if
necessary
select the folder, if necessary
scroll to the desired object
select the object
set the selected object as a
photo caller ID for the caller
group
A
You can save your name and phone number in the phone.
Managing Your Phonebook
Find the Feature
To create the 1st phonebook entry of your own:
Press To
1
keypad keys enter your name
2
OK
3
keypad keys enter your phone number
4
OK
MENU
number
>
Phonebook >Personal
F
save your name
save your phone number
T
95
Page 96

To create additional phonebook entries of your own:
Press To
1
OPTIONS
D
2
3
4
5
6
7
up/down
OK
keypad keys enter your name
R
OK
keypad keys enter your phone number
OK
open the options menu
scroll to
select
save your name
save your phone number
Add
Add
Fixed Dialing
Tip:
Enter the PIN2 code to use
Find the Feature
Managing Your Phonebook
To t ur n
1
2
Fixed dial number
Press To
ON
keypad keys enter the PIN2 code
96
A
You can restrict outgoing calls to phone
numbers that begin with the same digit(s) you
set on the fixed dialing list.
F
Fixed dial number
MENU
number
.
>
Phonebook >Fixed dial
T
on 1st:
select
Enable fixed dialing
Page 97

Press To
3
OK
turn
Fixed dial number
on
To create the 1st fixed dial entry:
1
2
3
4
5
6
7
8
9
To create other fixed dial entries:
Find the Feature
1
2
3
D
Press To
up/down
OK
OK
keypad keys enter the PIN2 code
OK
keypad keys enter a name
OK
keypad keys enter a phone number
OK
R
scroll to
select
select
confirm the code
A
save the name
save the phone number
Number list
Number list
Add
F
MENU
number
Press To
up/down
OPTIONS
up/down
scroll to any fixed dial entry
open the options menu
scroll to
>
Phonebook >Fixed dial
>
Number list
T
Add
Managing Your Phonebook
97
Page 98

Press To
4
OK
5
keypad keys enter the PIN2 code
D
6
OK
7
keypad keys enter a name
8
OK
9
keypad keys enter a phone number
OK
R
10
Erasing Fixed Dial Entries
select
confirm the code
save the name
save the phone number
Add
Managing Your Phonebook
98
Find the Feature
Press To
1
2
3
4
5
6
7
up/down
OPTIONS
up/down
OK
keypad keys enter the PIN2 code
OK
OK
MENU
A
number
scroll to the desired fixed dial
entry
F
open the options menu
scroll to
select
confirm the code
erase the selected fixed dial
entry
>
>
Number list
Erase
Erase
T
Phonebook >Fixed dial
Page 99

Voice Dialing
Press and hold the volume key straight in to
launch the voice dial application from the idle
display. To dial by voice, say a recorded name
(voice tag) into the microphone.
Note:
only for the phone numbers saved on phone memory.
D
The voice dialing function is available
To create voice tags:
Find the Feature
Press To
1
keypad keys enter the 1st letter(s) of a
2
OK
3
4
OK
5
6
OPTIONS
7
8
OK
up/down
up/down
up/down
R
MENU
A
name
open your phonebook
scroll to the desired entry
select the entry
F
scroll to the desired phone
number
open the options menu
scroll to
select
>
Phonebook >Search
T
Add voice tag
Add voice tag
Managing Your Phonebook
99
Page 100

Press To
9
START
D
Playing Voice Tags
You can play the voice tags you recorded for voice dial
entries.
R
say a name into the
microphone
Tip:
Repeat this step until
displays.
tag saved
Voice
Find the Feature
Press To
1
2
OK
Erasing Voice Tags
Find the Feature
Managing Your Phonebook
Press To
1
2
OPTIONS
3
100
up/down
up/down
up/down
MENU
A
scroll to the desired voice dial
entry
play the voice tag of the
selected voice dial entry
>
Phonebook >Voice tags
F
MENU
>
Phonebook >Voice tags
T
scroll to the desired voice dial
entry
open the options menu
scroll to
Erase
 Loading...