

Haier XQS 52-78 User Manual
Safety precautions
Before Using
Before Using
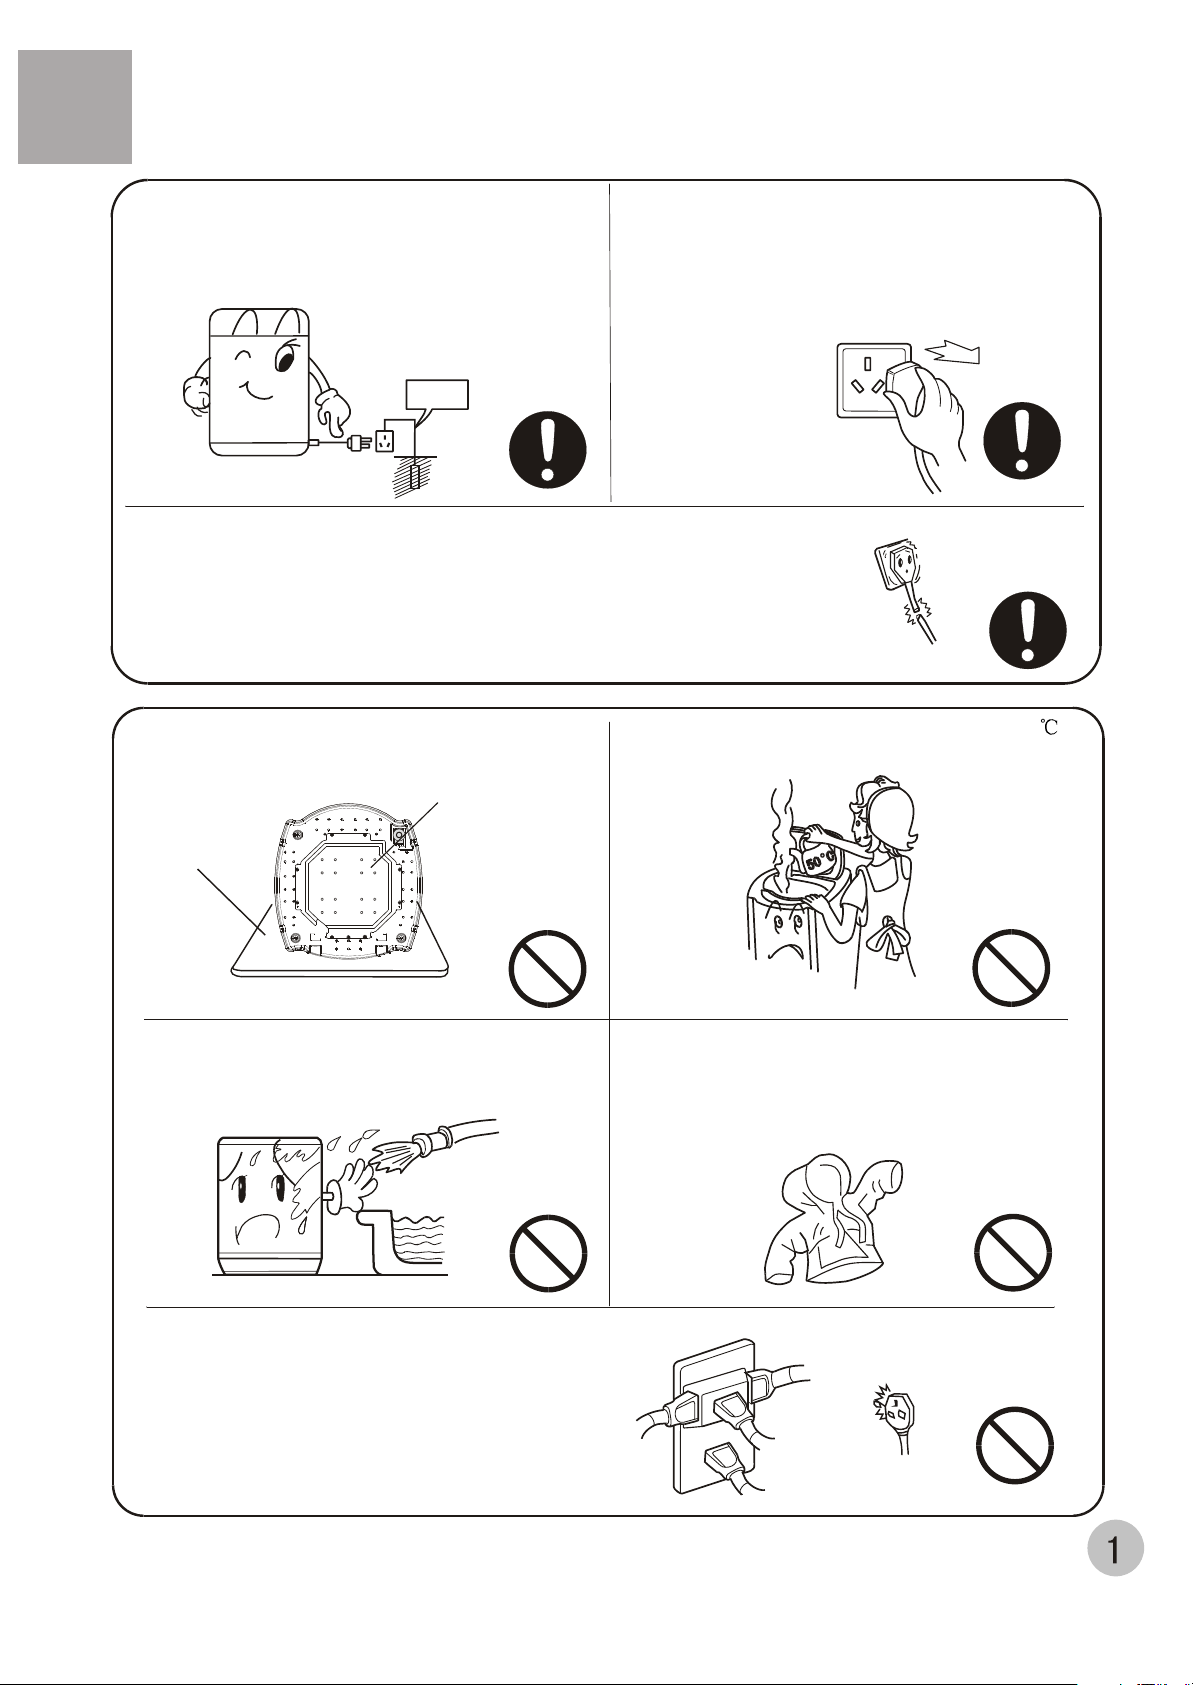
Please plug the plug on special 220V AC receptacle.
Be sure to use three phase power receptacle.Ensure
the earthing prong of the power redeptacle is earthed reliably.Use leakage protector if possible.
earth
Do not bend, stretch, twist, bind the power cord by force, or reformit.
Do not press or clamp it with heavy items. If the power cord and power
plug are bad, or the receptacle is loose, be sure to have it replaced by
the technicians of our special shop or our agent,or the after-sales service
department to avoid any risk.Keep the prong of the power plug clean.If
dust is found on the power plug, please wipe it off with dry cloth.
In case the washing machine is installed on ground
with carpet, be careful not to block the ventilation hole
with carpet.
The ventilation
holes at thebottom
In normal usage of the washing machine, the power
plug shall be ready to be pulled or plugged with hang.
Be sure to pull the plug off and close the water faucet
when occurring power failure,delivering the maching,
setting the machine idle or cleaning the machine,Do
not plug or pull the power plug with wet hand.
Do not use water with temperature higher than 50
Soft object
Do not put the machine at damp place like the
bathroom. Never wash it with water. Do not
put wet laundries on the control panel coating
Do not let the machine share one receptacle with other
electric appliances. If the power plug is damaged, or
the plugging into the receptacle is loose, do not use
the plug any more.
.
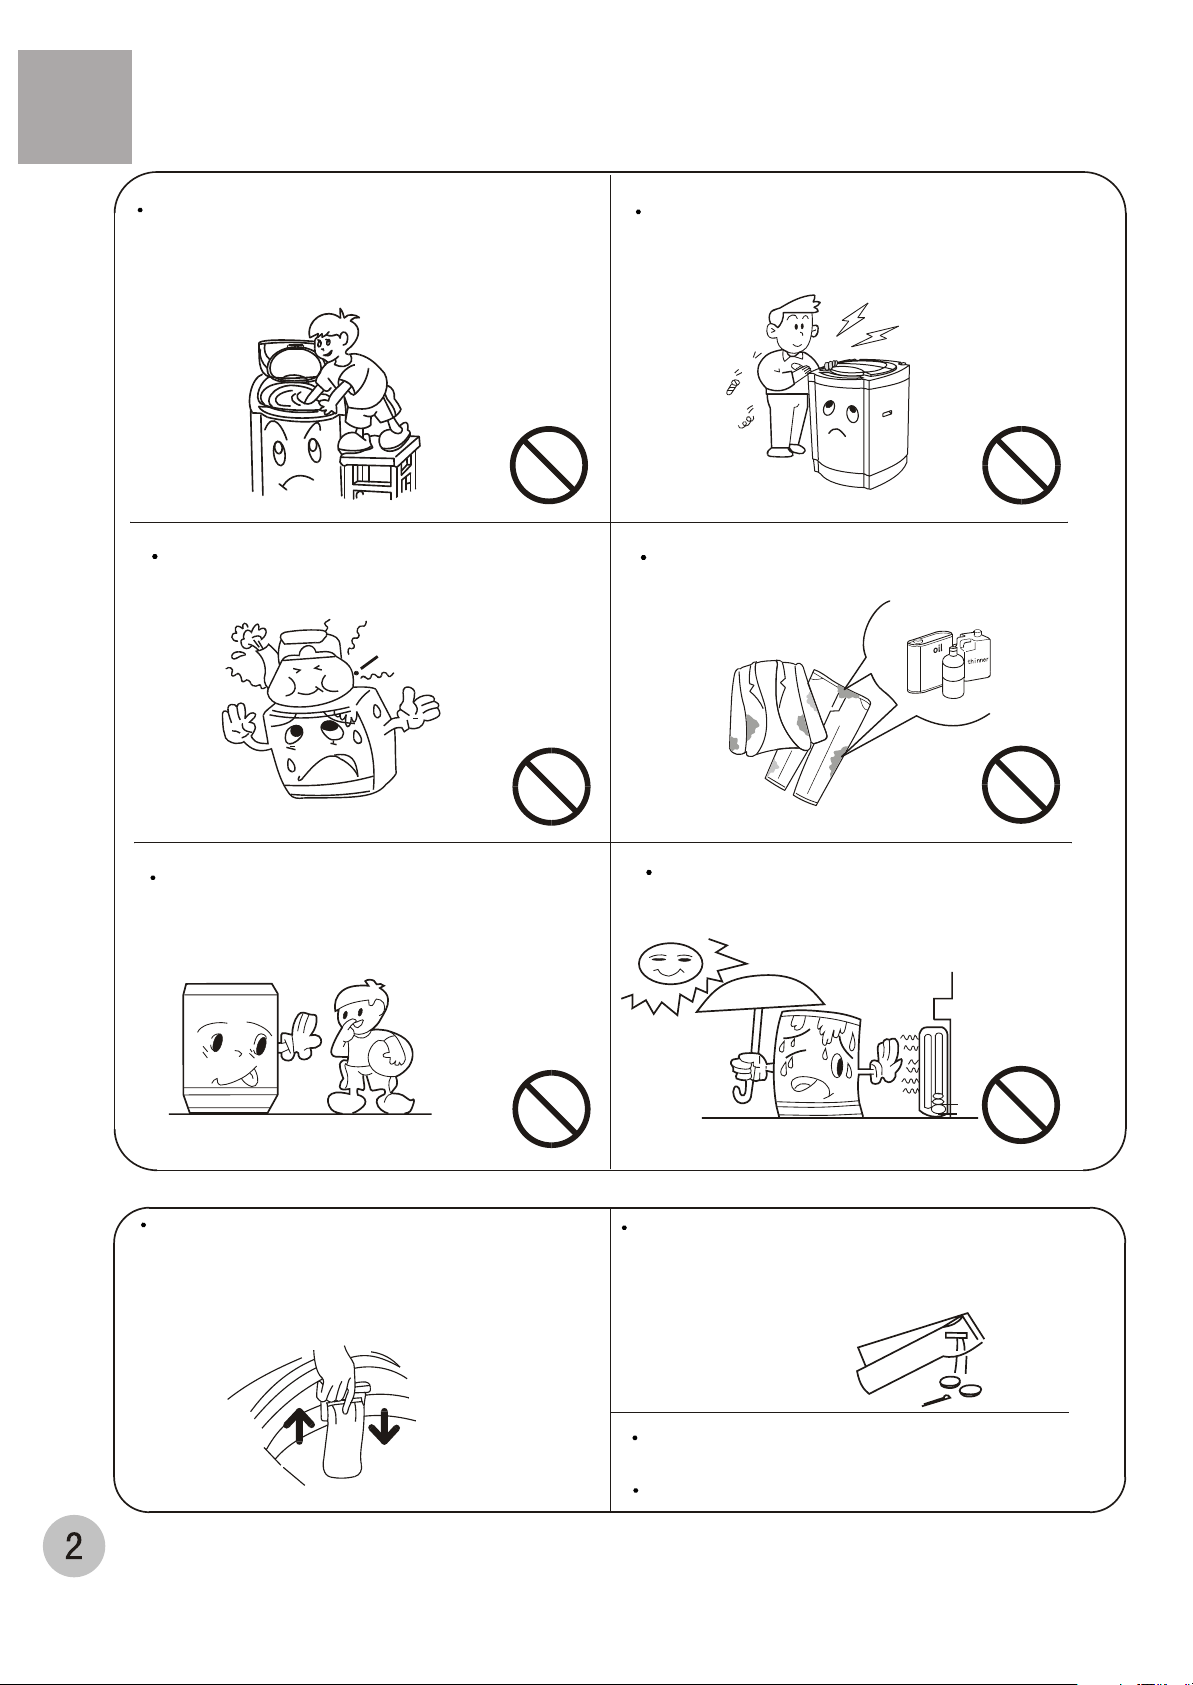
Do not wash water-proof laundry like the raincoat,
bikecovers, down textiles etc. To avoid abnormal
vibrations in spinning and damages to the laundries.
Safety precautions
Before Using
Before Using
Do not put hand into the rotating tub.It is dangerous
even if the rotation speed is slow. Take special care of
the children. Keep children away from the washing
machine to avoid them climbing on.
Do not put any hot or heavy items (such as the
kettle with hot water) on the washing machine.
Do not decompose, repair or alter the machine by
yourself.
Do not wash laundry with volatile materials
(such as thinner, petrol etc.).
Benzene
The handicapped or children without care shall not
use the machine.
Please keep the lint filter in good condition, and
install it to proper position during washing. If the
lint filter is lost or damaged,please contact the local
after-sales service department of our company.
Keep the machine away from direct sunlight and
heat source like the heater.
To protect your laundries and washing machine,
please take out all of the coins, buttons, sand, hairpin
and other foreign materials before washing.
Please check if the water faucet is open, and if the
connection of the water inlet pipe is proper.
It is suggested to use foamless washing powder.
Before Using
Installation and adjustment
Please install and adjust the machine according to the requirement of the mannual.
It is very important to your security and correct operating the machine.
Before Using
Install the inner cover
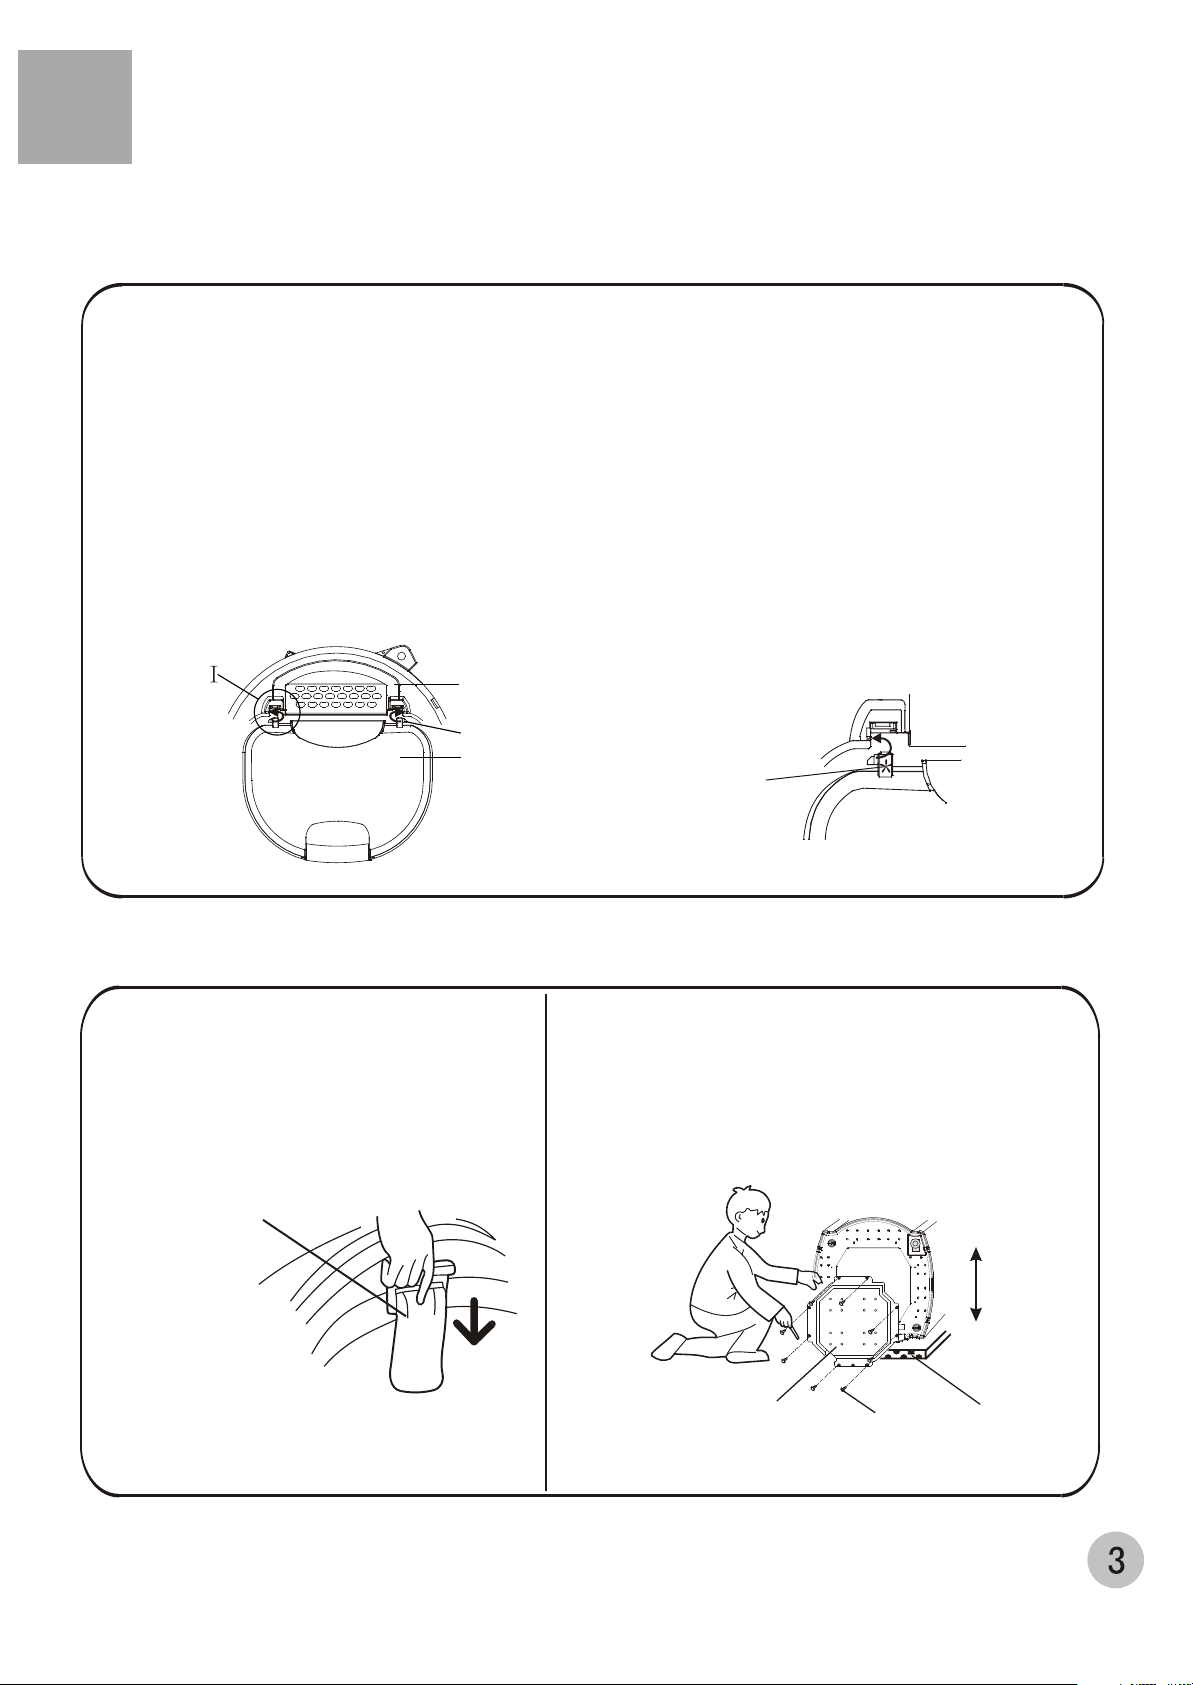
1.Open the top lid of the washing machine.
2.Put the inner cover component on the outer tub cover, aimingthe inner cover
shaft to the installation hole of the correspondingouter tub cover shaft groove.
3.Firstly insert the inner cover shaft of one side into the correspon-ding outer tub
cover shaft groove, then push the another inner cover shaft into the corresponding outer
tub cover shaft groove. Please install to designated position to guarantee there are no
dropping or abnormal sound in opening and closing of the inner cover, and the operation
shall be smooth. Do not dismount the inner cover component after washing.
Outer tube cover
Inner cover shaft
Inner cover
Press this part
Install the bottom plate and lint filter
Install the lint filter in the balance ring.
Install the lint filter
After opening the package, please lean the washing
machine gently down on soft items (like towel cloth,
blanket, etc.). Installthe bottom plate to the bottom of
the machine with eight screwsby a cross screwdriver,
then lift the machine up gently. See to the figure:
I part zoom in
Front
bottom plate
Screw
Back
Soft object
Before Using
Before Using
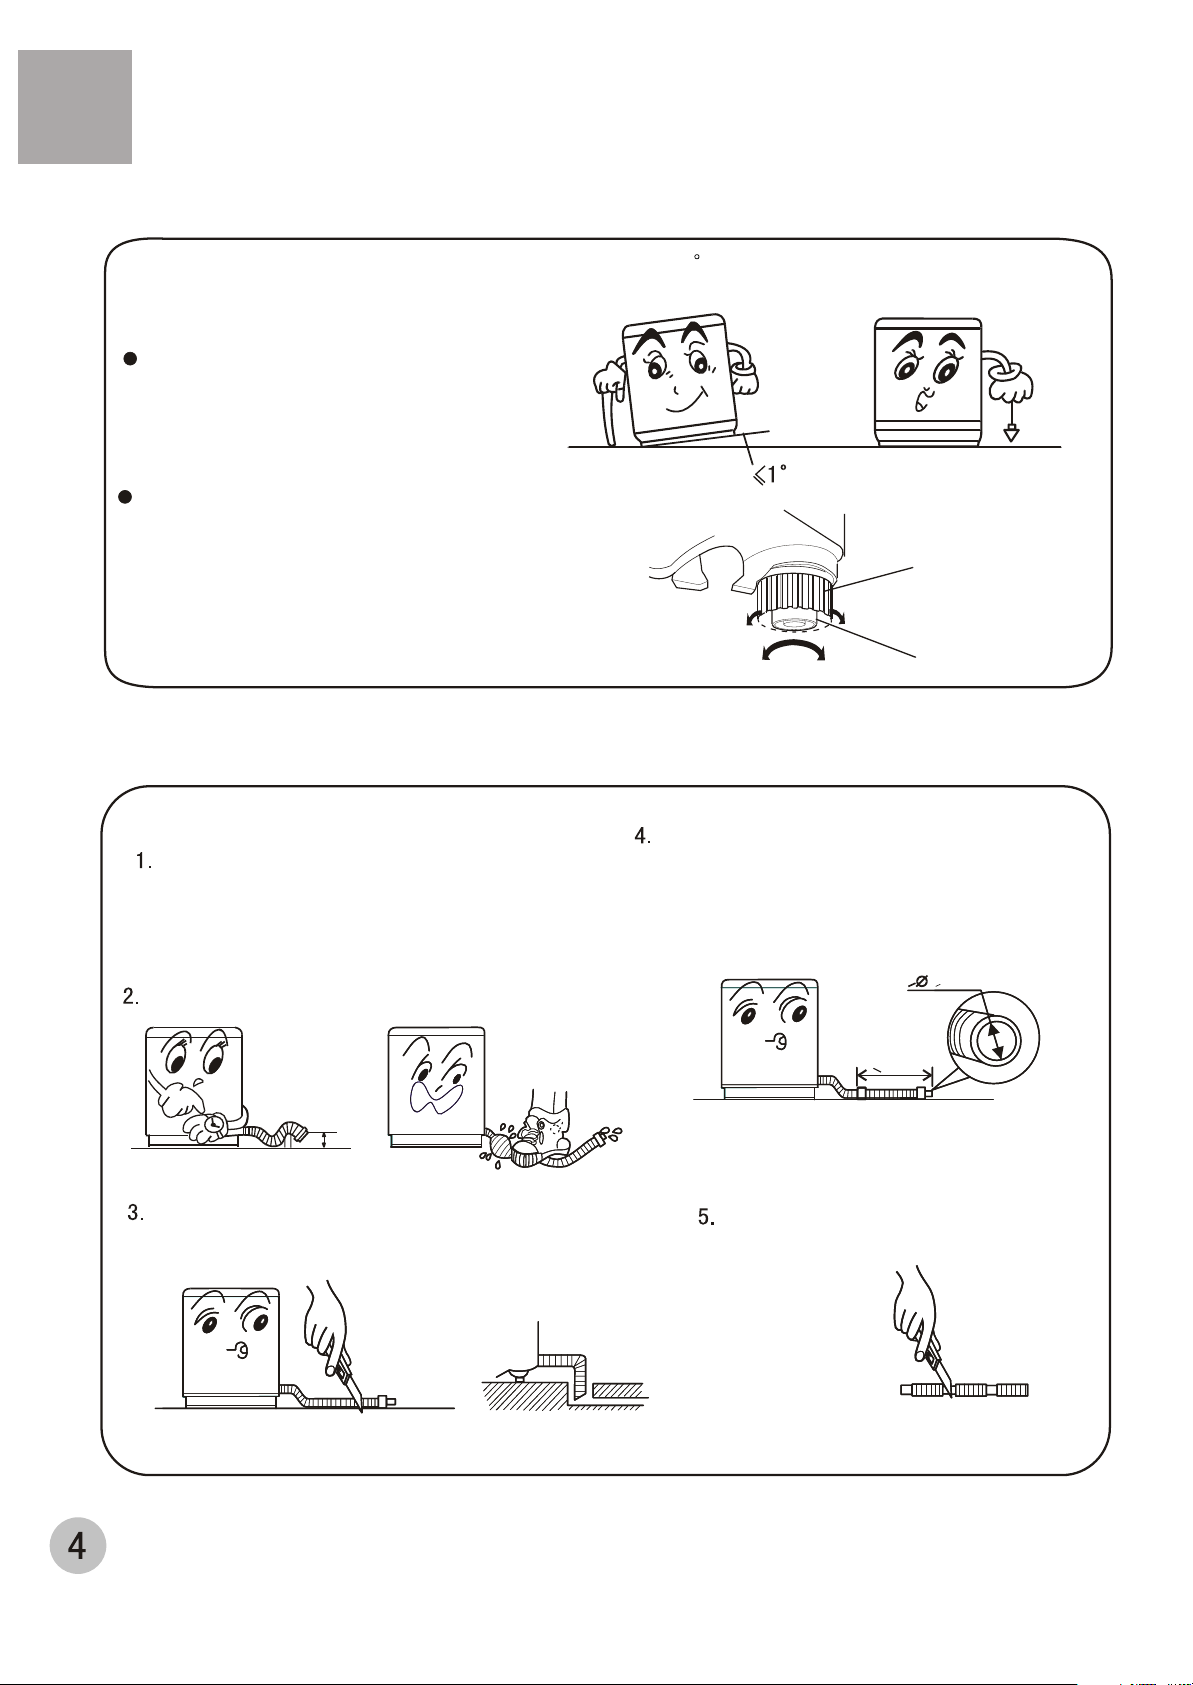
Adjust the Installation position
The largest allowable slope of the shank base of the machine is 1 .The slanting or rough ground will result in
unstable running or stoppage of the machine. Please adjust it with following methods:
Confirm it's horizontal:
Hang the lead line to check if it is
horizontal.
Adjust the adjustable leg:
1 .To twist the adjustable leg, please first lift up the
side of the leg slightly, loosen the adjustable nut,
and twist the leg.
2 . After adjustment, fasten the nut.
the adjustable nut
FastenLoosen
Useage the drain hose
The drainage shall be smooth with the drain hose.
The height of the drain hose shall be less than
10cm, or the drainage will not be smooth, and cost
such long time that the machine may stop at mid
way.
Do not step on or press the drain hose.
<10cm
If the drain hose is too long, cut it at mid point. To make
smooth drainage, cut the front end of the hose slantingly.
High
If extra drain hose is needed, please make separate
purchase. The inner diameter of the extra hose shall
not less than 30mm, and the length shall not exceed
1.5m.
If the extra hose is too long,cut
it either at A or at B point.
Low
the adjustable feet
> 30mm
<1.5m
B
A
A
Before Using
Install the water inlet hose
Before Using
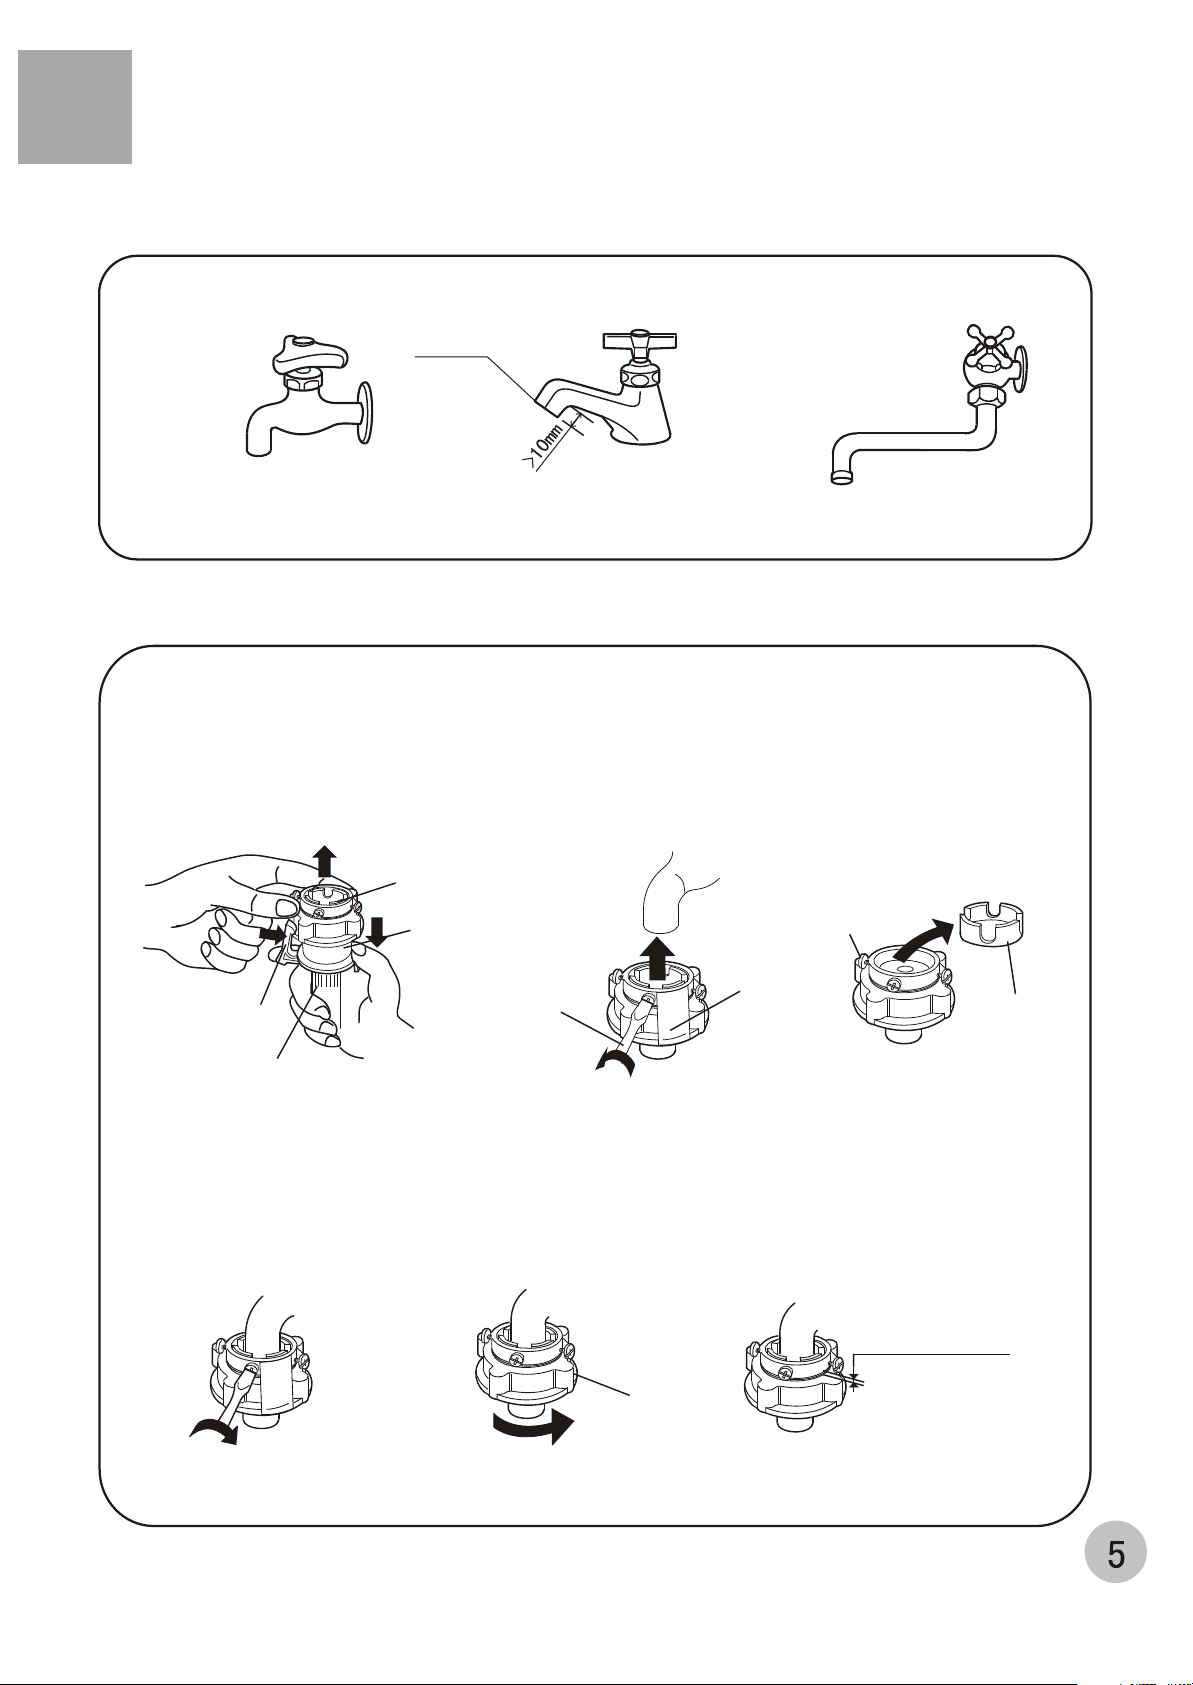
Confirm the water faucet
water faucet, suitable water faucet, not suitable
The exit end face of the faucet
It is required that the front end shall be longer than 10cm.
The exit end face of the faucet shall be flat and smooth. If not please file it to avoid leakage.
Connection between the water inlet hose jointer and the water faucet
1.Press the lower end of the lock lever and push down the slider. Take off the water inlet hose jointer from the
water inlet hose component. See to Figure 1.
2 Loosen the screw till the water faucet can be accessed. Put the jointer of the water inlet hose on the faucet.
See to Figure 2. (If the faucet is too large and the jointer can not be set on the water faucet, please loosen
the four screws and take out the bushing in the jointer. The front end of the faucet must be smooth,
otherwise it may leak water. See to Figure 3.)
water inlet hose jointer
Screw
Lock level
water inlet hose
Figure 1
Slider
Sign plate
Screw knife
Figure 2
3.Fasten the four screws evenly. See to Figure 4.
4 Take off the nameplate. Twist the fastening nut as per the indication of the figure
to seal up the exit end face of the faucet. See to Figure 5.
remark: Before installation, the threading is 4mmabove the upper surface of the nut.
After installation, the threading is 2mm above the upper surface of the nut..(see to figure 6)
About 4mm before twisting
About less than 2mm after twisting
Screw nut
Bushing
Figure 3
Figure 4
Figure 5
Figure 6
Before Using
Connection between the water inlet hose and the washer
Before Using
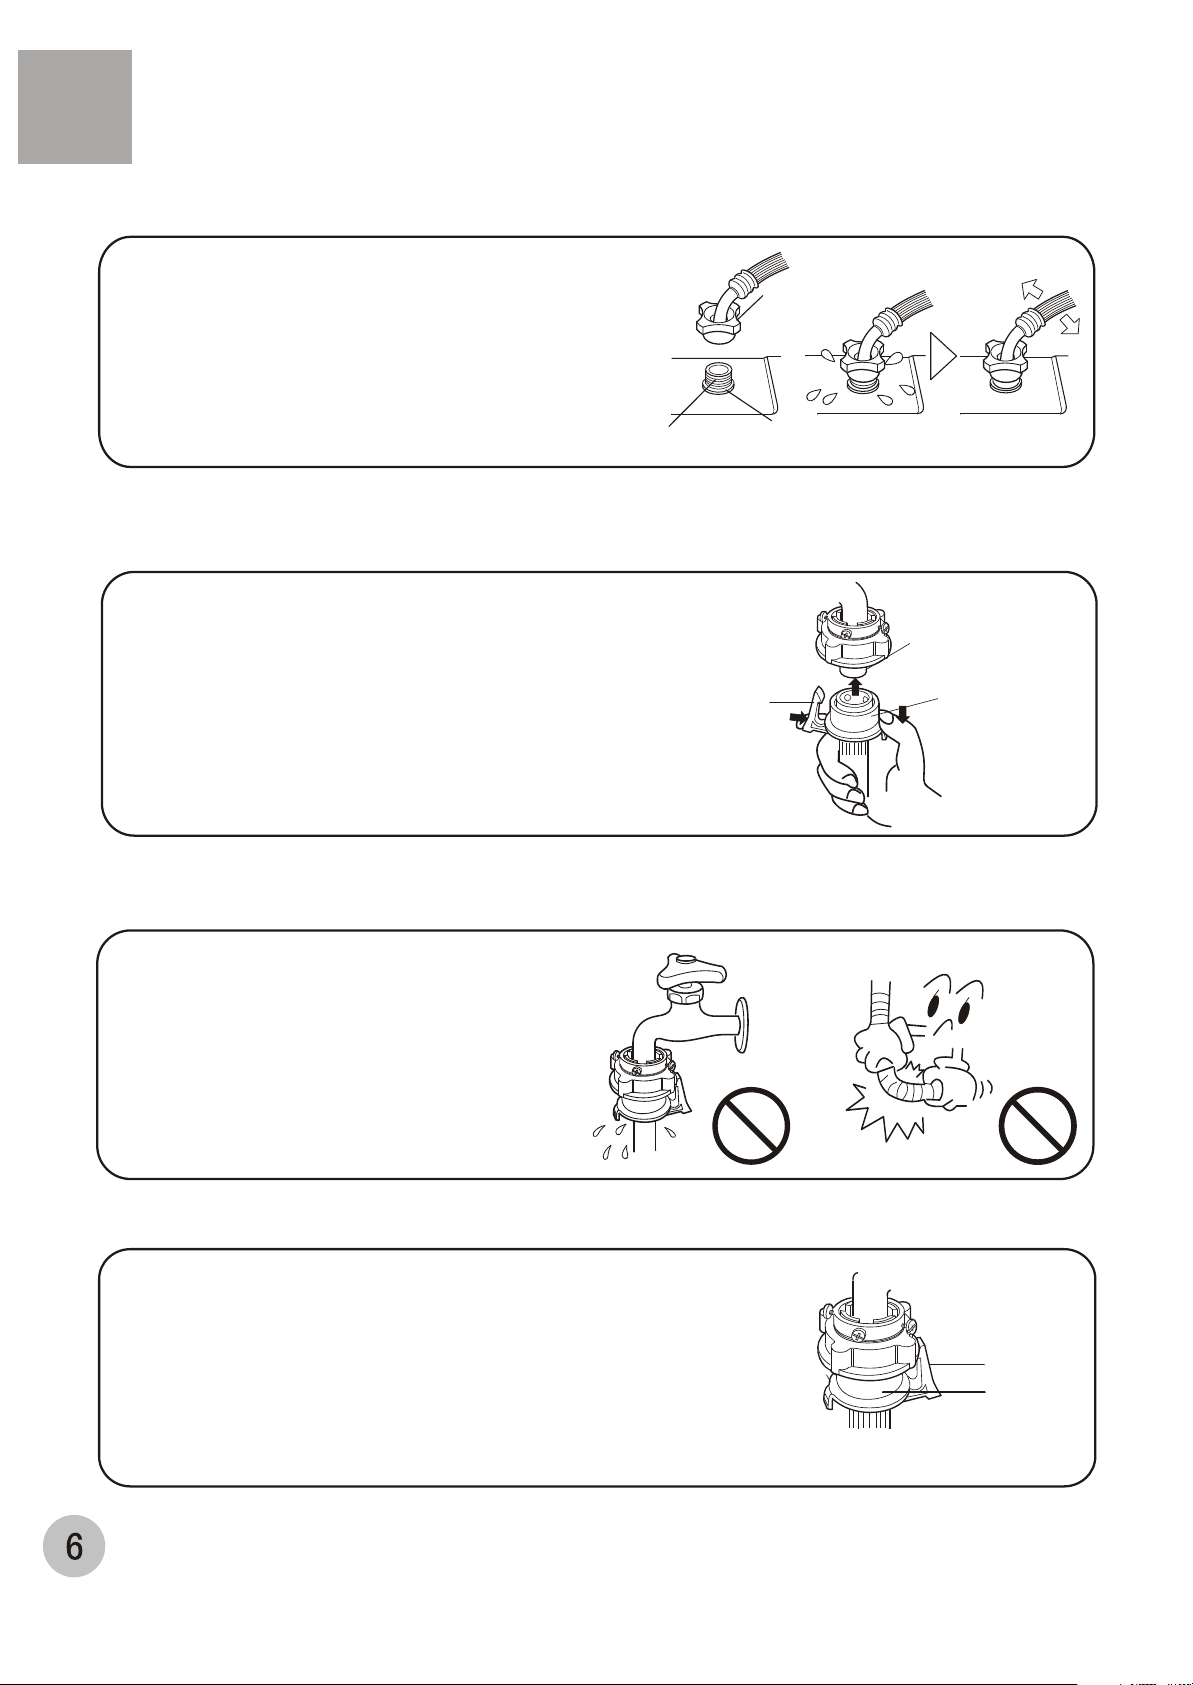
1.Do not take off the water absorption cushion. Please check if the
cushion is dropped or damaged before each usage. If it happens
please contact our after-sale department immediately.
2 Put the nut of the water inlet hose on the valve jointer.
3 Fasten the nut. Swing it gently to confirm if it's suitable.
jointer of the
water inlet valve
nut of the water
inlet hose
water absorption
cushion.
Connection between the jointer of the water inlet hose
and the water inlet hose
1.Push down the slider. Insert the water inlet hose into the jointer.
2 Hang the lock lever to the jointer. Release the slider till a click
sound is heard.
Locking level
the jointer of the
water inlet hose
Slider
Check the connection between the jointer of the water inlet hose
and the water faucet
1.Swing the hose gently to confirm if it is fastened stable.
2.After installation, open the faucet to check if it leaks.
3.Do not bend the hose with overstrain.
4.Before each usage please check if the connection
between the jointer of the water inlet hose and the
water faucet, and the installation of the water inlet
hose are firm, so as to prevent dropping from
improper installation position.
Dismantle the water inlet hose
1. Close the water faucet.
2. Press the locking lever. Push down the slider. Then pull of the water inlet
hose.
If the machine is used frequently, the jointer of the water inlet hose can be
on the faucet to prevent damaging the fixing screw.
kept
Locking level
Slider
 Loading...