

Page 1
User's manual
XQJ85E
Full-auto agitation washing machine
Please check if the power receptacle is earthed
reliably before usage to guarantee your safety.
Please read this manual carefully before use.
The manufacturer is not responsible for any
risks occurred owing to disobey these
stipulations.
Please retain it attentively for future reference.
Contents
Before using
Names of the parts...........the 2nd cover
Safety precautions .............................1
Installation and adjustment ................3
Install the water inlet hose...................4
Using process
Preparation before washing ..............5
Put in the laundries ............................6
Usage of the detergent ...........................7
Usage of the operation buttons .......8
Close the top lid .................................14
Finish washing ..................................14
Disposal after washing ......................15
Trouble shooting Answer to question
Packing list ................................17
Specification ...........the back cover
......16
Page 2
Before using
Before using
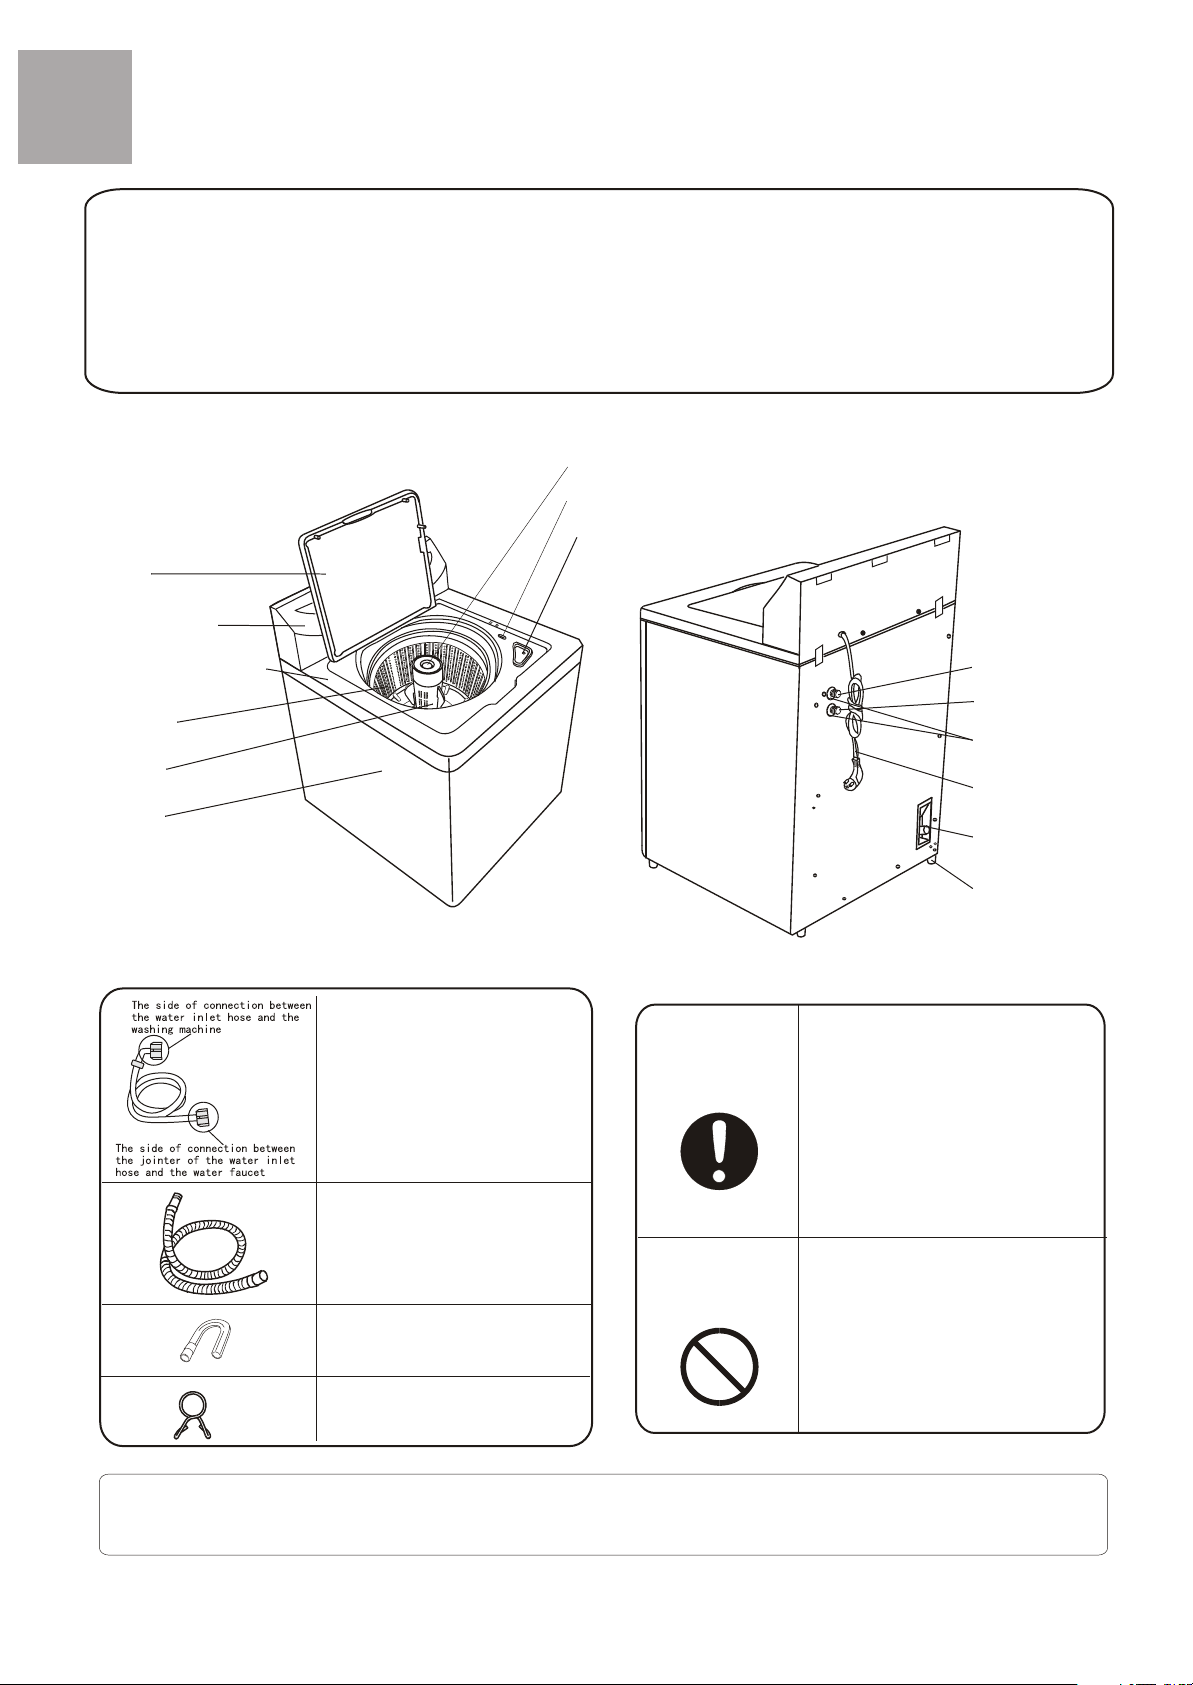
Names of the parts
Honorable users,
Thanks for your choosing Haier products.
To facilitate your operation, please read the manual carefully and operate this machine
according to it.
Haier-sincere forever!
Softener injection inlet
Door switch
Bleach injection inlet
Top lid
Control panel
Control panel seat
Inner tub
Agitator
Cabinet
Accessories
Water inlet hose
(2)
Outer drain hose component
(1)
Drain hose hook
(1)
Drain hose clamp
(1)
Cold water inlet valve
Hot water inlet valve
Water absorption cushion
Power line
Drain hose joint
Adjustable feet
(4)
Meaning and description of the symbols
Contents marked with that symbol
Warning sign
Forbidding sign
are related to the safety of the
product and the personal safety
of the users. Please operate in
strict conformity to the contents,
otherwise it may cause damage
of the machine or injure the
personal safety of the user.
Contents marked with that symbol
are actions forbidden to perform.
Performing of those actions may
result in damage of the machine
or injure the personal safety of
the user.
Please understand the shapes of the washing machine and accessories may be different
from the sketch figures in this manual due to product improvement.
Page 3
Safety precautions
Before using
Before using
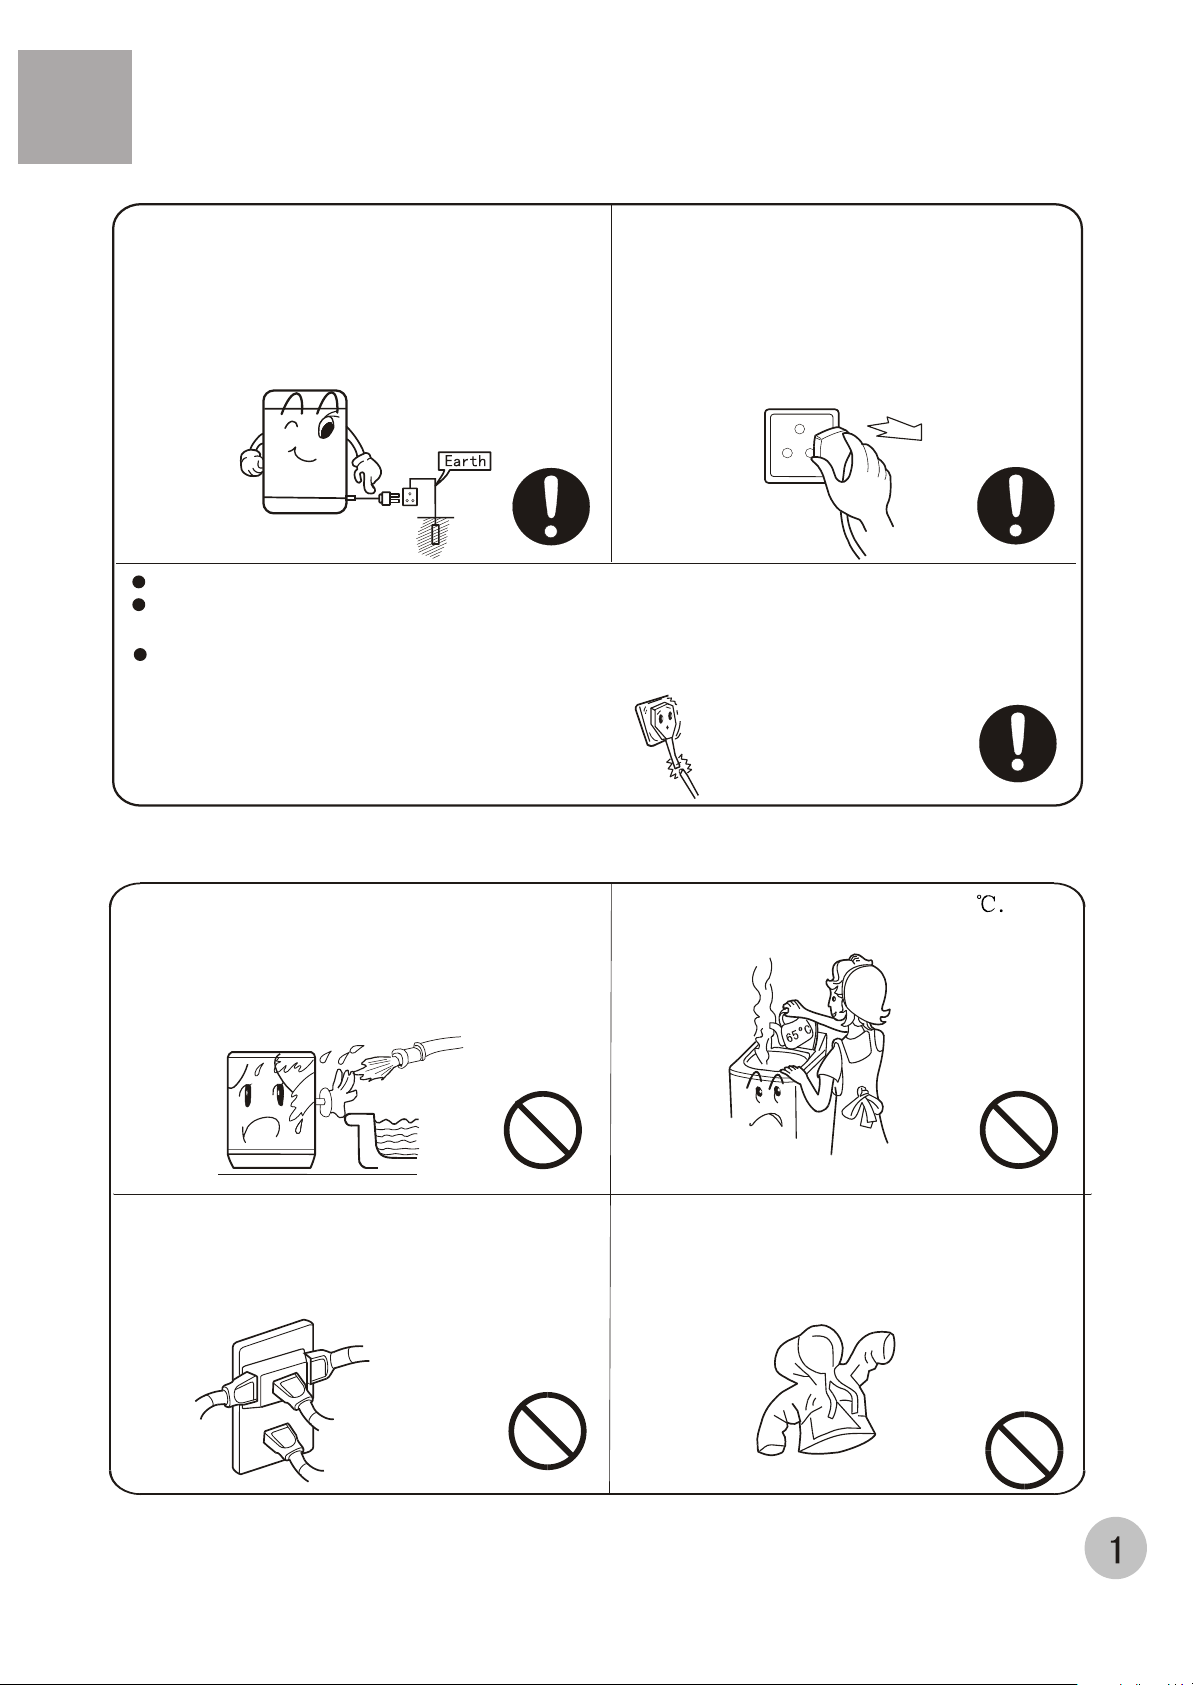
Please insert the power cord into special three
-phase receptacle.The earthing terminal of the
receptacle must be earthed reliably.If possible ,
please adopt electric leakage protector.
Do not bend ,extend,twist,bind by force.Do not press or nip it with weight.
Keep the pin of the power plug clean,if the power plug is polluted with dust,please wipe
with dry cloth carefully.
If the power cord or the power plug is bad, to avoid risk it is required to have it replaced
by the technicians of our special shop or the after-sale service department.
The power cord plug should be convenient
to be pluged in or pluged out with hand
while the washing machine runs normally.
Be sure to pull the plug out and close the
water tap when the machine is idle,when
moving the machine,or when cleaning
the machine.Do not use wet hand to insert or pull out the power plug.
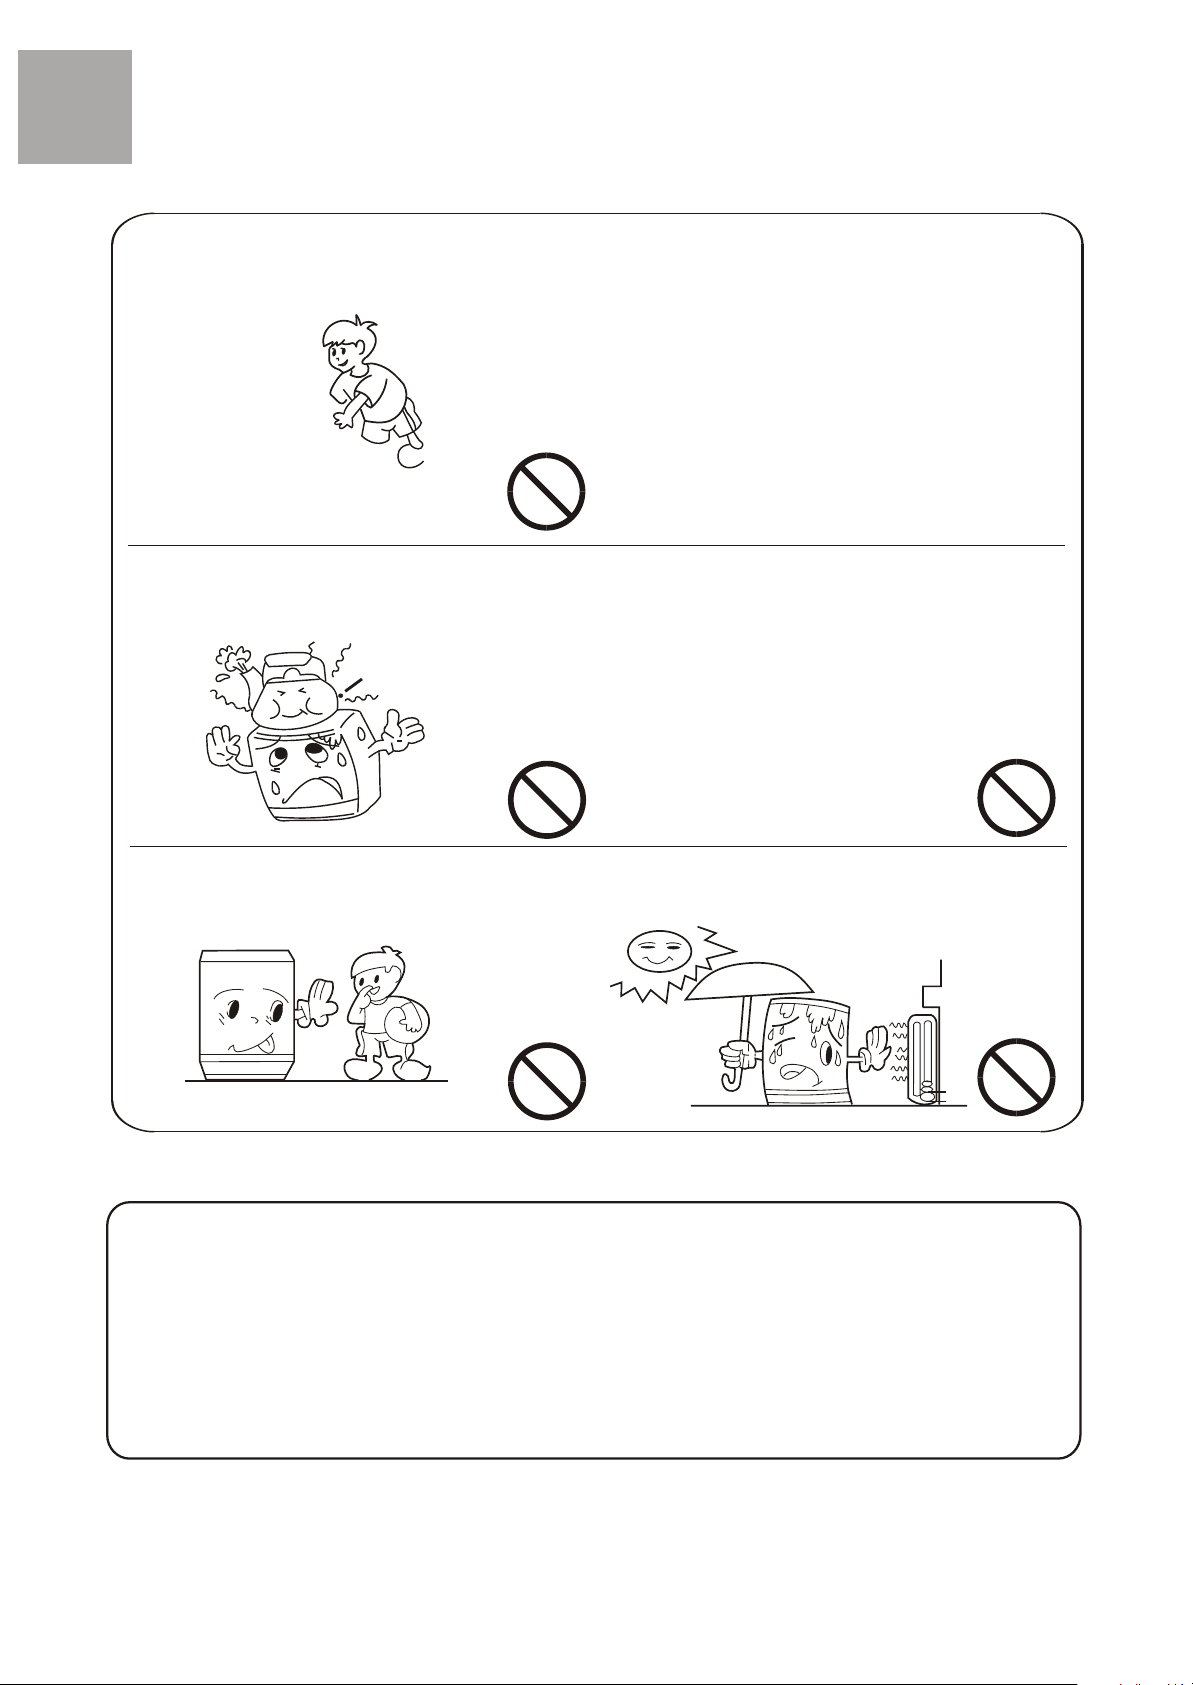
Do not put the machine at damp place like the bath
room. Never wash it with water.Not put wet laundries
on the control panel.
In case the washing machine is installed on ground
with carpet, be careful not to block the ventilation hole
with carpet.
Do not let the machine share one receptacle
with other electric appliances. If the power
plug is damaged, or the plugging into the
receptacle is loose, do not use the plug any
more.
Do not use water hotter than 65
Do not wash water-proof laundries like
the raincoat, bike covers etc. to avoid
abnormal vibrations in spinning.
Page 4
Safety precautions
Before using
Before using
Page 5
Before using
Before using
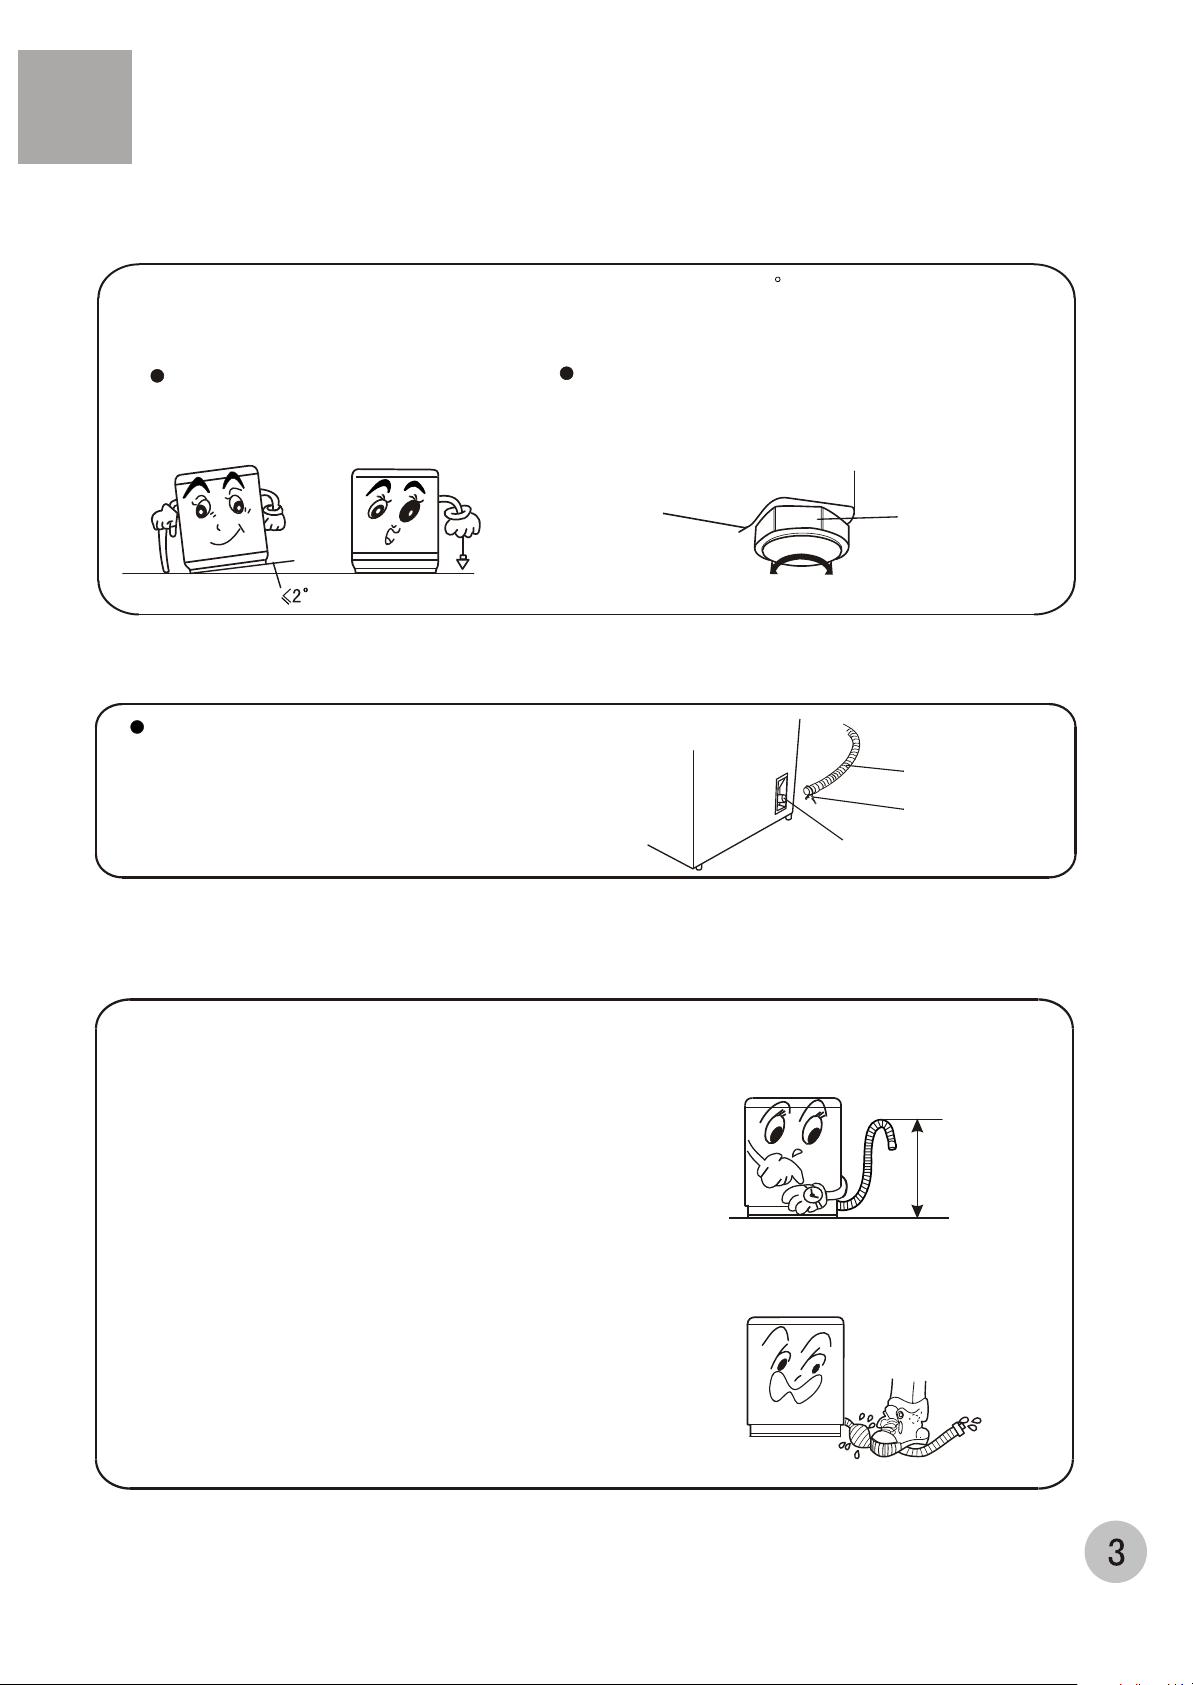
Installation and adjustment
Adjust the installation position
The largest allowed slope of the base of the machine is 2 . The slanting or rough
ground will result in unstable running or stoppage of the machine. Please adjust
it with following methods:
Confirm it's horizontal:
Hang the lead line to confirm
if it is horizontal.
Install the drain hose
Put the drain hose clamp on the outer
drain hose, insert the outer drain hose
into the joint, and then clutch tightly
with drain hose clamp.
Adjust the adjustable foot:
To twist the adjustable foot, please first lift up
the side of the foot slightly, and twist the foot.
.
Adjustable foot
High
Low
Drain hose
Drain hose clamp
Drain hose joint
Usage of the drain hose
The drainage shall be smooth with the drain hose.
1.put the drain hose up to suitable position.
2.Do not step on or press the drain hose.
0.8m-1.2m
Page 6
Before using
Before using
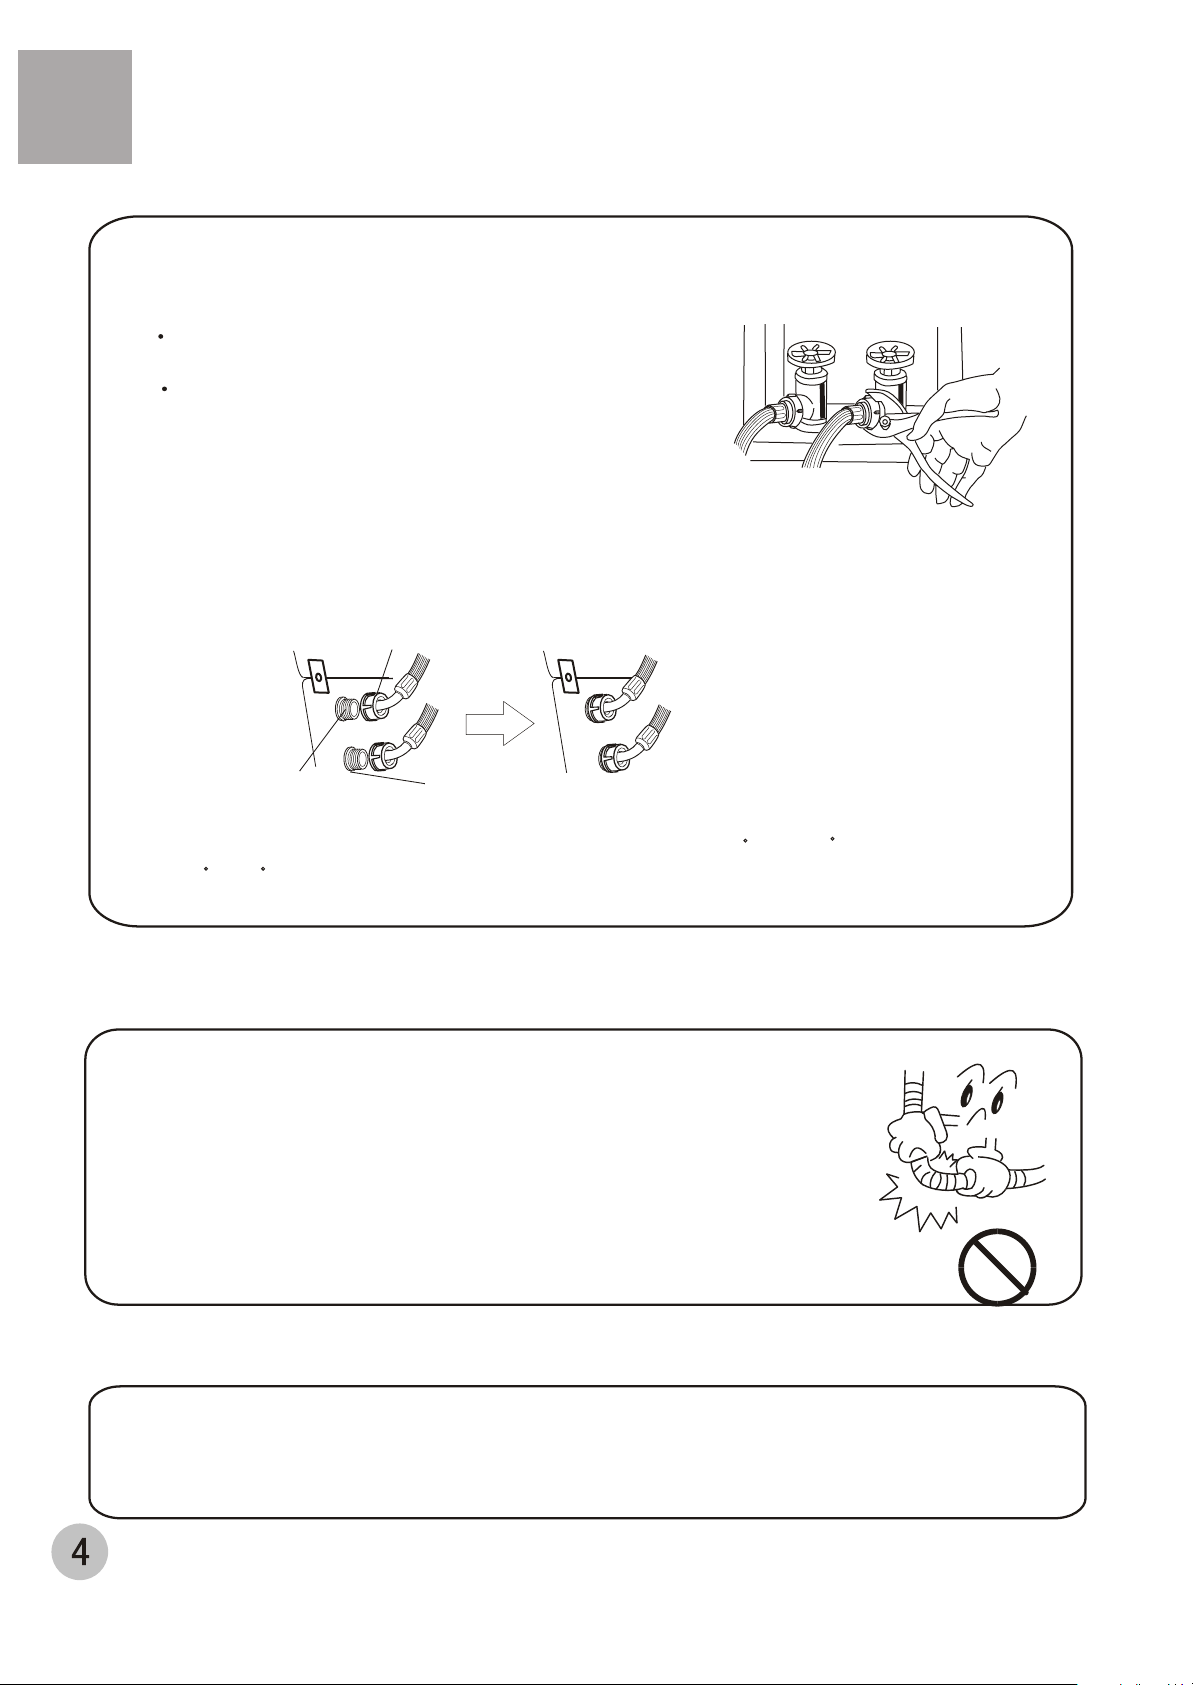
Install the water inlet hose
1. Insert a new flat washer into each end of the inlet hoses. Firmly put the
washers in the coupling.
Note:
Use the new hose sets supplied with the washer.
Any other old hose sets should not be used.
You may have to use pliers to tighten the coupling.
Do not over tighten because you may cause
damage to the valve.
2. Connect the hot and cold water inlet hoses to the hot and cold
water faucet.
3. Connect the other ends to their respective cold and hot water inlet valve
located at the rear of the washer
Jointer of the water inlet hose
Cold
Hot
Jointer of the
water inlet valve
Note:
Hot water needs to be at a temperature of at least 120 F- 140 F.
(49 C-60 C)for the soap to dissolve and to avoid soap residue
remaining on clothes.
Water absorption cushion
Cold
Hot
Check the connection between the water inlet
hose and the water tap
1.Swaying the hose gently to confirm if it is fastened
stable.
2.After installation, open the tap to check if it leaks.
3.Do not bend the hose with overstrain.
4.Before each usage please check if the connection
between the water inlet hose and the water tap,
and the connection between the water inlet hose and
washer are firm, so as to prevent dropping from
improve Installation position.
Take down the water inlet hose
1.Close the water tap.
2. Pull off the water inlet hose from the water tap
and washer
Page 7

Using process
Using process
1 Preparation before washing
Preparation before washing
1.Connect the water inlet hose. Open the water
faucet.
2.Confirm that the washing machine is earthed
reliably. Then insert the power plug into the
receptacle. The earth terminal shall not link to
gas pipeline and faucet water pipeline.
3.Put the drain hose up.
0.8m~1.2m
Pay attention to followings before washing the laundries
Confirm if
there's special
requirment for
the laundries.
a.Please check if the laundries are applicable for washing.
b.Separate those not colorfast from other laundries.
c.For laundries not water absorbing,please put them into water with hands.
d.For laundries with much soil,please remove the soil first.You can add detergent on the
part with serious soil directly.It is much easier to remove the soil by that mean.
e.For laundries likely to get lint ball or with long fiber,please first turn the inside out before
putting them into the water.
f.Do not put the laundries polluted with chemicals directly into the washing machine.
Clear the pocket.
Take out the
coins , sand,
hairpins etc.
Fasten the
buttons and
zippers.
The big laundries
like the jeans
shall be put in
loosely.
When the pulsator
is running , the
buttons of the
laundries may
cause noise. For
the sake of
carefulness,please
put the laundries
with buttons into
other laundries.
Page 8

2 Put in the laundries
Place a load of sorted clothes
into the washer
Page 9

3 Add the detergent
How to use the washing powder
Direct dissolved in the machine
1.Fill water to "Low" water level.
2.Add the power. Run for 30 seconds to dissolve it completely.
3.Put in the laundries. Select suitable water level.
The instant dissolving of the washing powder:
1. Prepare warm water of 30 and a container.
2. Add the powder while stirring to fully dissolve it.
The powder is more prone to pollute the laundries than the detergent.
Therefore please use it with proper quantity.
It is suggested not to use high sudsing detergent.
Different washing powders have different dosage. Please refer to the usage
manual of the washing powder for the details.
How to use the liquid bleacher
Procedures
1.Check clothing care labels for special instructions
2. Measure liquid bleacher carefully, following instructions on the bottle.
Never pour undiluted liquid chorine bleacher directly onto clothes or int
the inner tub.
Do not pour powdered bleacher into bleacher dispenser.
Page 10

Using process
Using process
4 Usage of the Operation Buttons
Explanation of Buttons
Indicator mode and meaning
The indicator is off, indicating that the
program or mode is not selected
The indicator is on, indicating the program
or mode selected and about to run
Normal/Fast
Normal/Slow
XQJ85E
Delicate/Fast
Delicate/Slow
Speed
Wash/spin
Load Size
Delay/Start button
Pushing the button to select the reserve washing
time from 2 hours to 24 hours.
During no delay, the Delay/ Start indicator is
off, the remaining time indicator is on, and
the nixie indicator displays the non-delayed
cycle remaining time.
Time Remaining
Time On
Stain Wash
Heavy
Normal
Light
Soil Level
Normal
Heavy Duty
Delay
Start
Cycles
Speed wash/spin button
Push the button to select the spinning speed
elect the spinning speed
S when program is
normal or delicate casual.
For setting, changing water level and manually
replenishing water. Water levels may be set at
beginning or pause.
During Soak, Wash or Rinse, press this button
to manually replenish water and release it to
stop. But this function is disabled when water
reaches overflow protection level.
Whites
Cycles button
Select following six automatic programs
with the button
Whites
Heavy
Duty
Normal Common washing
Quick
wash
Program
Delicate
Casual
Hand
Wash
Washing the cotton textile
Washing the bigger, thicker or
heavier dirty laundries
Quick washing of the light dirt
laundries
Washing the woollen textile
or underwear
To imitate hand scrub
washing effect
Soil level button
For selecting clothes soiled degree.
Wash cycle increases 2 min for a next
higher soiled degree and decreases 2
min for a next lower soiled degree.
Page 11

Using process
Using process
Quick wash
Delicate Casual
Numeral tube s window
To indicate remaining min. during
program running.
To indicate remaining reserved hr.
during reservation period.
To indicate fault symbols for
abnormal conditions.
Soak
Wash
Rinse
2ND Rinse
Spin
Process
Hot/Cold
Warm/Cold
Cold/Cold
Temp
Wash/Rinse
Louder
Softer
Off
Cycle
Signal
Start/Pause button
After switch on the power, push
it once to start the washing machine
In operating, push the button to pause
the operating.
In pushing, push the button to resume
operating.
Power On/Off button
Push the button once to switch on the power.
When the power is on, push the button once
to cut off the power.
Power
On/Off
Start
Pause
Hand Wash
Process button
For selecting processes. Soak
process is Invalid if Hand wash,
Delicate Casual or Quick Wash
program is selected;
Water level indicator turns off if only
Spin is selected.
After selecting a program, press
Process to select 2ND Rinse the
machine will include an additional
rinse process.
Cycle Signal button
For selecting louder, softer or off
buzzer volume.
For selecting inlet water temperature
during wash and rinse.
Page 12

Using process
Using process
b Operating procedure
Normal/Fast
Speed
Wash/Spin
Normal/Slow
Delicate/Fast
Delicate/Slow
Load Size
Soil level
Stain Wash
Heavy
Normal
Light
Normal
Heavy Duty
Whites
Delay
Start
Cycles
Quick Wash
Delicate Casual
Hand Wash
Process
Soak
Wash
Rinse
2ND Rinse
Spin
Temp
Wash/Rinse
Hot/cold
Warm/Cold
Cold/Cold
Cycle
Signal
Louder
Softer
Off
Start
Pause
Power
1. Press Power On/Off to switch on the power supply
On/Off
Upon switching on the power, the computer board buzzes once and the unit
enters from standby to working status, i.e. initial status (Normal program);
5 minutes after switching on, if Start/Pause button isn't pressed, the unit will
automatically switch off and return to standby;
The unit returns to standby immediately after completion of a program;
Pressing Power On/Off button, all programs will stop and the unit enters standby,
regardless of the computer conditions (start, pause, alarm etc.).
The washer has intelligent wash resumption.After the power is cut off abnormally,
the washer could resump working at stoppage while the power resumption.
Power
On/Off
Buttons initial status for Standard program
Cycle Signal
Temp Wash/Rinse
Process
Cycles
Nixie display Remaining min. of the present cycle
Soil level
Load Size
Speed Wash/Spin
Softer
Warm/Cold
Soak, Wash, Rinse, Spin
Normal
Heavy
6
Normal/Fast
Page 13

Using process
Using process
2. Press the button of cycles to select a suitable
full-automatic program.
After switching on, the Standard program will be the default. If other
full-automatic program is desired, you can press the button of cycles
to get the corresponding indicator on. Refer to button of cycles on
page 9.
Example: Use the Quick program for slightly soiled articles
When Standard program is selected,
the washing machine will perform
full-automatically controlled fuzzy
program to set water level, water flow
and wash duration according to the
cloth nature and weight.
Buttons status for different program selected
Cycles
Page 9
Quick Wash
Delicate Casual
Cycles
Hand Wash
3. Press the button of Process to select suitable
processes.
Page 9
Page 14

Note
Spin shall begin after some time even
there is no water in the tub
Do not use soak process for woolen
articles.
Clothes prone to fade and other clothes
shall be separately washed.
4. Press the button of Load Size to select a suitable
water level.
Page 15

Using process
Using process
5. Press the button of Speed to select suitable wash
and spin speeds
After the power is switched on, the washing machine will automatically set as
Normal/Fast . If the user desires to change it, press this button to select
according to Speed on page 8.
Page 8
6. Press the button of Soil to suit differently
Speed
Wash/Spin
Soil Level
soiled clothes.
After the power is switched on, the washing machine automatically sets at Heavy ,
the user may judge the clothes soil degree and select with the Soil level button
himself. See Soil on page 8.
7. Press the button of Temp. Wash/Rinse to select
different washing temperatures.
After the power is switched on, the washing machine will automatically set at
Warm/Cold . The user could also set three wash conditions of hot, warm and
cold. Refer to Temp. Wash/Rinse on page 9 to select.
Page 8
Temp
Wash/Rinse
Page 9
8. Press the button of Cycle Signal , which will
Cycle
Signal
accordingly remind you of the cycle completion.
After the power is switched on, the washing machine will automatically set at Low .
The user himself could also set three warning volumes Louder, Softer or Off for the
completion of a cycle. Refer to Cycle Signal on page 9 to select.
9 Press the button of Delay/Start to select a suitable
Page 9
Delay
Start
reserve wash program
After switching on, the washing machine reserved wash program will be
automatically set inactive. If you desire a wash cycle to end at a reserved time,
you can press the Delay/Start button to set a reserved wash program. Refer to
The button of 'Delay/Start' on page 8.
Confirming a reserved program
When delay starts, program selected indicator turns off, while
the delay Indicator and remaining time turn on. During
reservation period, pressing Delay/Start button could
get reservation conditions displayed.
Page 8
The wash cycle will end after 18 hrs
Page 16

Using process
Using process
10. Press the Start/Pause button
Press this button when you want the machine to start running.
During machine running, press this button to pause and press once again to
resume operation.
5. Close the top lid
If you open the top lid, the machine
will stop working except for water
filling and spinning
Start
Pause
6. Finish Washing
Rinse once, about 4
5 minutes later,The power will be switched off automatically after the finishing of the washing.
Time list of each program (minute)
Program
Whites
Heavy Duty
Normal
Quick Wash
Delicate
Casual
Hand wash
Total time: including the normal water inlet time and drain time.
Wash time: adjustable automatically according to water temperature
Spin time: the time from intermittent running to finishing.
The Standard program could combine the process of soak during which the washing machine firstly
soak for about 10~30 min with slight agitation after water filling and then begins to wash.
The water filling pressure could affect the wash cycle duration.
Water
level
About 5 About 6
Wash
(min)
Rinse once, about 12 14
Rinse once, about12 14
Rinse once, about 10 12
Rinse once, about 8
Rinse once, about 12
Rinse once, about 12
Rinse
(min)
After Finishing wash
alarm automatically
Spin
(min)
Total time(min)
Including soak
About 77
About 82
About 61 77 About 41 57
Not including soak
About 47
About 52
About 25
About 37
About 39
Page 17

Using process
Using process
7 Disposal after washing
Lint filter
Press
Figure 2
Lint Screen
Figure 3
Pull up out
Agitator
Figure
Page 18

Trouble shooting answer to question
Trouble shooting answer to question
(If there's breakdown, please pull off the power plug before checking) The following
phenomena are not breakdowns sometimes. Please confirm again before sending it to
repair. If there are real breakdowns, please come to the special maintenance department
or after-sale service department of our company. Do not repair it by yourself.
Phenomena The reason How to settle
After the "reserve" is started,
it rings and the digital tube
displays "E0"
The draining does not work,
or the speed of draining is
too slow. The digital tube
displays "E1" and it rings.
It stops running during wash,
rinse or spin. The digital tube
displays "E2" and it rings.
It does not do water inlet or
the speed is slow (the water
level is not reached after 15
minutes). The digital tube
displays "E4" and it rings.
The machine does not act.
(the indicators are off.)
There's abnormal sound
inside the machine.
The water faucet leaks.
The top lid is not closed
Is the drain hose put down?
Is the drain hose blocked by
foreign material?
The top lid is not closed
Is the water faucet open or is
there water supply failure?
Is the water inlet valve is
blocked
Is there power failure?
Is the power plug loose?
Is the machine slanting?
Is there metal material inside
the washing machine?
Are the laundries slanting in
spinning?
Is the jointer screw of the
water inlet hose is loose or
twisted awry?
Close the top lid
Put down the drain hose. Open and
close the top lid once.
Clean the foreign material. Open
and close the top lid once.
Close the top lid
Open the water faucet. Open
and close the top lid once.
Clean the water inlet valve.Open
and close the top lid once.
Use it when the power is on.
Insert the power plug tightly.
Level the machine properly.
Fasten the buttons and zipper
Re-order the laundries. Close the
top lid.
Fasten the jointer screw properly.
If plug is inserted firmly?
No water filling
If tap is turned on?
If Power On/Off and
Start/Pause is pressed?
Normal phenomena
Phenomena
Intermittent spin after spin starts
Spin is selected, yet the machine doesn't spin
While water filling in wash and rinse, the
pulsator pauses rotation
Small amount of water flows out upon the
washing machine is initially used
The machine stops when top cover is opened
during running.
Insert the plug firmly
Turn on the tap
Press Power On/Off and
Start/Pause
Causes (explanations)
Adjust balance to avoid clothes offset
The program sets a drain time, spin starts
after a time.
To prevent splash during water filling.
This is residual water during factory perfor
mance test.
This is a normal fact. Due to the drum rotation,
an open cover alarm function is provided for safety.
Page 19

Packing list
Name
User's manual
Components of the
water inlet hose
Drain hose
Drain hose hook
Drain hose clamp
Full-auto agitating washing
machine
Quantity
1
2
1
1
1
1
Storage position
Inside the document bag
Inside the accessory bag
Inside the spinning tub
Inside the spinning tub
Inside the accessory bag
Page 20

Specification
Model XQJ85E
Rated voltage frequency 220-240V~ 50Hz
Rated washing / spinning capacity 8.5kg (weight of standard dry cloth)
Water level/Water quantity (about)
Max water consumption
Injection pressure 0.03MPa-0.78MPa
Rated washing power 525W
Rated spinning power 380W
Weight( bout) 75kg
Dimension L 686 mm W 686 mm H 1080mm
1/16L, 2/24L, 3/32L, 4/40L, 5/48L,
6/56L, 7/60L, 8/72L, 9/80L, 10/90L
About 180L(High water level; Normal program)
 Loading...