


XQG65-11SU -MANUAL 10/29/02 1:50 PM F/_ 2
What The World Comes Home To _
Lav÷oL ÷ S÷chanta
ChargementFronta_
[fontbad
{_othesWasher &
DryerCombo
UserManual-
GuidedeFUtifi,ateuro
Lavadoray Secadora
de garga [rontaJ
Model#
Modele

XQG65-11SU -MANUAL 10/29/02 1:50 PM r/_ 3
IMPORTANTSAFETYINSTRUCTIONS
Warning - To reduce the risk of fire, electric shock, or injury
to persons when using your appliance, follow basic
precautions, including the following:
1. Read all instructions before using the appliance.
2, Use this appliance only for its intended purpose as described in this use and
care guide.
3, Useonly detergents or softeners recommended for use in this appliance and
keep them out of the reach of children,
4. This appliance must be properly installed in accordance with the installation
instructions before it is used,
5,
Never unplug your appliance by pulling on the power cord. Always grasp the
plug firmly and pull straight out from the outlet.
6.
Replace immediately worn power cords, loose plugs/power outlets,
7.
Unplug your appliance before cleaning or before making any repairs.
8,
If your old appliance is not being used, we recommend that you
remove the door, This will reduce the possibility of danger to children.
9, Do not operate your appliance in the presence of explosive fumes.
10, Do not use this appliance to wash clothes soaked, spotted or washed in
gasoline, dry cleaning solvents or any other explosive or flammable substances
that could ignite and explode.
11, Clothes or rags used to clean flammable or explosive materials should not be
washed in this appliance till all traces of this material has been removed, to
avoid an accident,
12, Do not add or mix any flammable or explosive substances to the wash.
13. Do not try to remove clothes while the tub is moving. Let it come to a complete
stop before use.
14. The appliance loading door must be closed when tub is spinning.
15. Do not operate your appliance when parts are missing or parts are broken,
16. Do not use this appliance for commercial clothes washing,
17, Do not operate this appliance unless all enclosure panels are properly in place.
18, Do not tamper with controls,
19. To reduce risk of injury do not allow children to play in or on the appliance.
Close supervision of children is necessary when the appliance is used
near children.
XQG6S-IISU-Mm_UALI0/29/02I:S0PM rmb_4
20. This appliance must be connected to proper electrical outlet with the correct
electrical supply,
21. Proper grounding must be ensured to reduce the risk of shock and fire. DO
NOT CUT OR REMOVE THE GROUNDING PLUG. If you do not have a
three-prong electric receptacle outlet in the wall, have a certified electrician
install the proper receptacle, The wall receptacle MUST be properly grounded,
22, Hydrogen gas may be produced if the water heater has not been used in more
then 2 weeks, This could be explosive and can explode under certain
circumstances, If this is the case, before using this appliance turn on all the hot
faucets and let the hot water run for a few minutes. This will let the trapped
hydrogen escape. During this process do not turn on an electric appliance,
smoke, light a match/lighter or use a flame to avoid an accident, as hydrogen
gas is flammable and can explode.
23. Do not dry articles that have been previously cleaned in, washed in, soaked in,
or spotted with gasoline, dry-cleaning solvents, or other flammable or explosive
substances, as they give off vapors that could ignite or explode.
24, Do not repair or replace any part of the appliance or attempt any servicing
unless specifically recommended in the user-repair instructions that you
understand and have skills to carry out.
25. Do not use heat dry to articles containing foam rubber or similarly textured
rubber-like materials,
26, Clean lint trap before and after each load.
27. Do not place items exposed to cooking oils in your dryer. Items contaminated
with cooking oils may contribute to a chemical reaction that could cause a load
to catch fire,
28. To reduce the risk or electric shock or fire, do not use extension cords or
adapters to connect the unit to electrical power source.
SAVETHESEINSTRUCTIONS
ForFutureUse
XQG6S-IISU-_UAL I0/29/02I:S0PM _mb_S
DANGER
Risk of child entrapment. Before you throw away your old
appliance, take off the door so that children may
not easily get trapped inside.
Thank you for purchasing our Haler
product. This easy-to-use manual will
guide you in getting the best use of
your washer & dryer combo unit.
Remember to record the model and
serial number, They are on a label in
back of the unit.
Model number
Serial number
Date of purchase
Staple your receipt to your manual. You will need it to obtain
warranty service.
XQ_6S-11su-Mm_UALI0/29/02I:SOPM r_ 6
SAFETY INSTRUCTIONS .................................................................... 1
OPERATING INSTRUCTIONS ............................................................4
Parts and Features.................................................................................. 5
Operations ............................................................................................ 7
Normal Operating Sounds .................................................................... 16
Care and Cleaning Guide ............................................................ 16
Cleaning and Maintenance .................................................................. 16
Moving and Vacationing ...................................................................... 17
Storage of Your Washer ...................................................................... 17
Troubleshooting .............................................................................. 18
PAGE
INSTALLATION INSTRUCTIONS ....................................................21
Tools and Materials Required ................................................................ 21
Unpacking Your Washer ...................................................................... 22
Leveling Your Washer .......................................................................... 23
Steps for Installation ............................................................................ 23
Electrical Connections .................................................................... 26
Grounding Instructions .......................................................................... 26
Power Interruptions .............................................................................. 26
Warranty ........................................................................................ 27
4
XQG65-11SU -MANUAL 10/29/02 1:50 PM F/_'_ 7
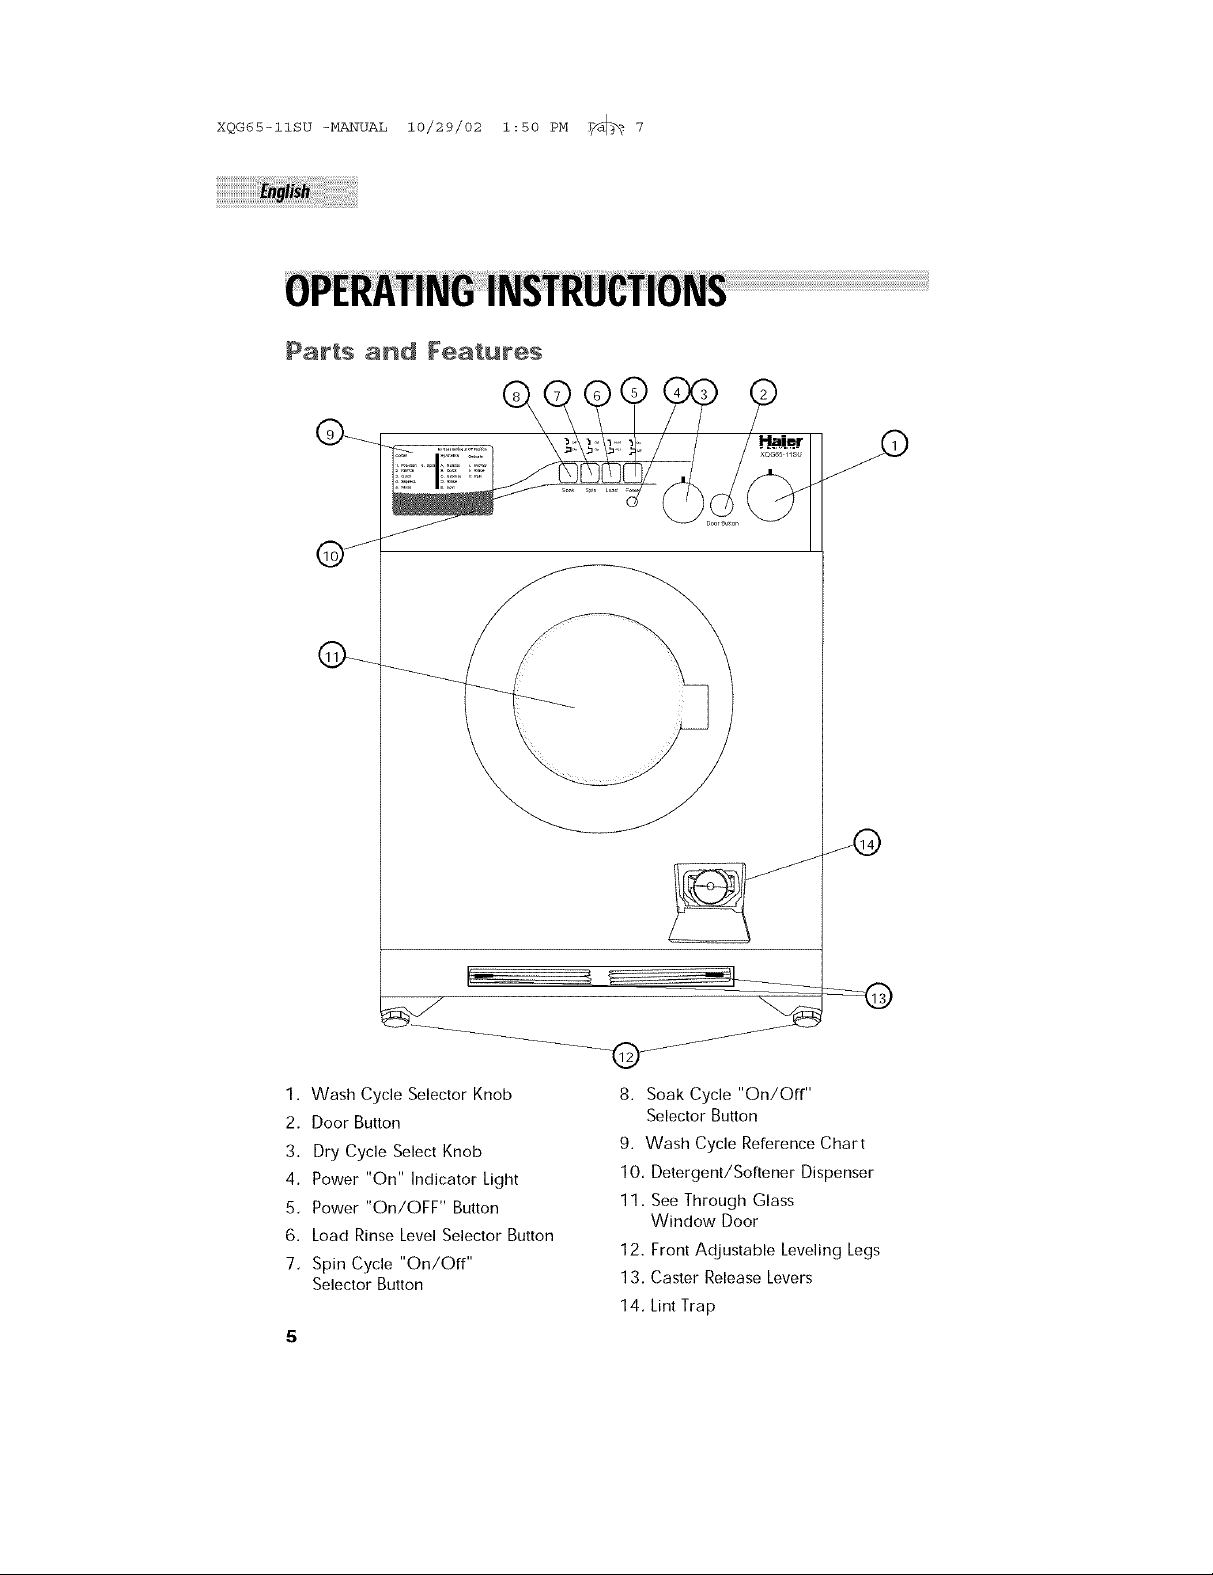
Parisand Features
J
_×Q_65 11su
1. Wash Cycle Selector Knob
2. Door Button
3. Dry Cycle Select Knob
4. Power "On" Indicator Light
5. Power "On/OFF" Button
6. Load Rinse Level Selector Button
7. Spin Cycle "On/Off"
Selector Button
8. Soak Cycle "On/Off"
Selector Button
9. Wash Cycle Reference Chart
10. Detergent/Softener Dispenser
11. See Through Glass
Window Door
12. Front AdJustable Leveling Legs
13. Caster Release Levers
14, Lint Trap
XQG6S-IISU-Mm_UALI0/29/02I:S0PM _mb_8
[ZID
CIIIIlD CIIID
CIIIIIHD
©
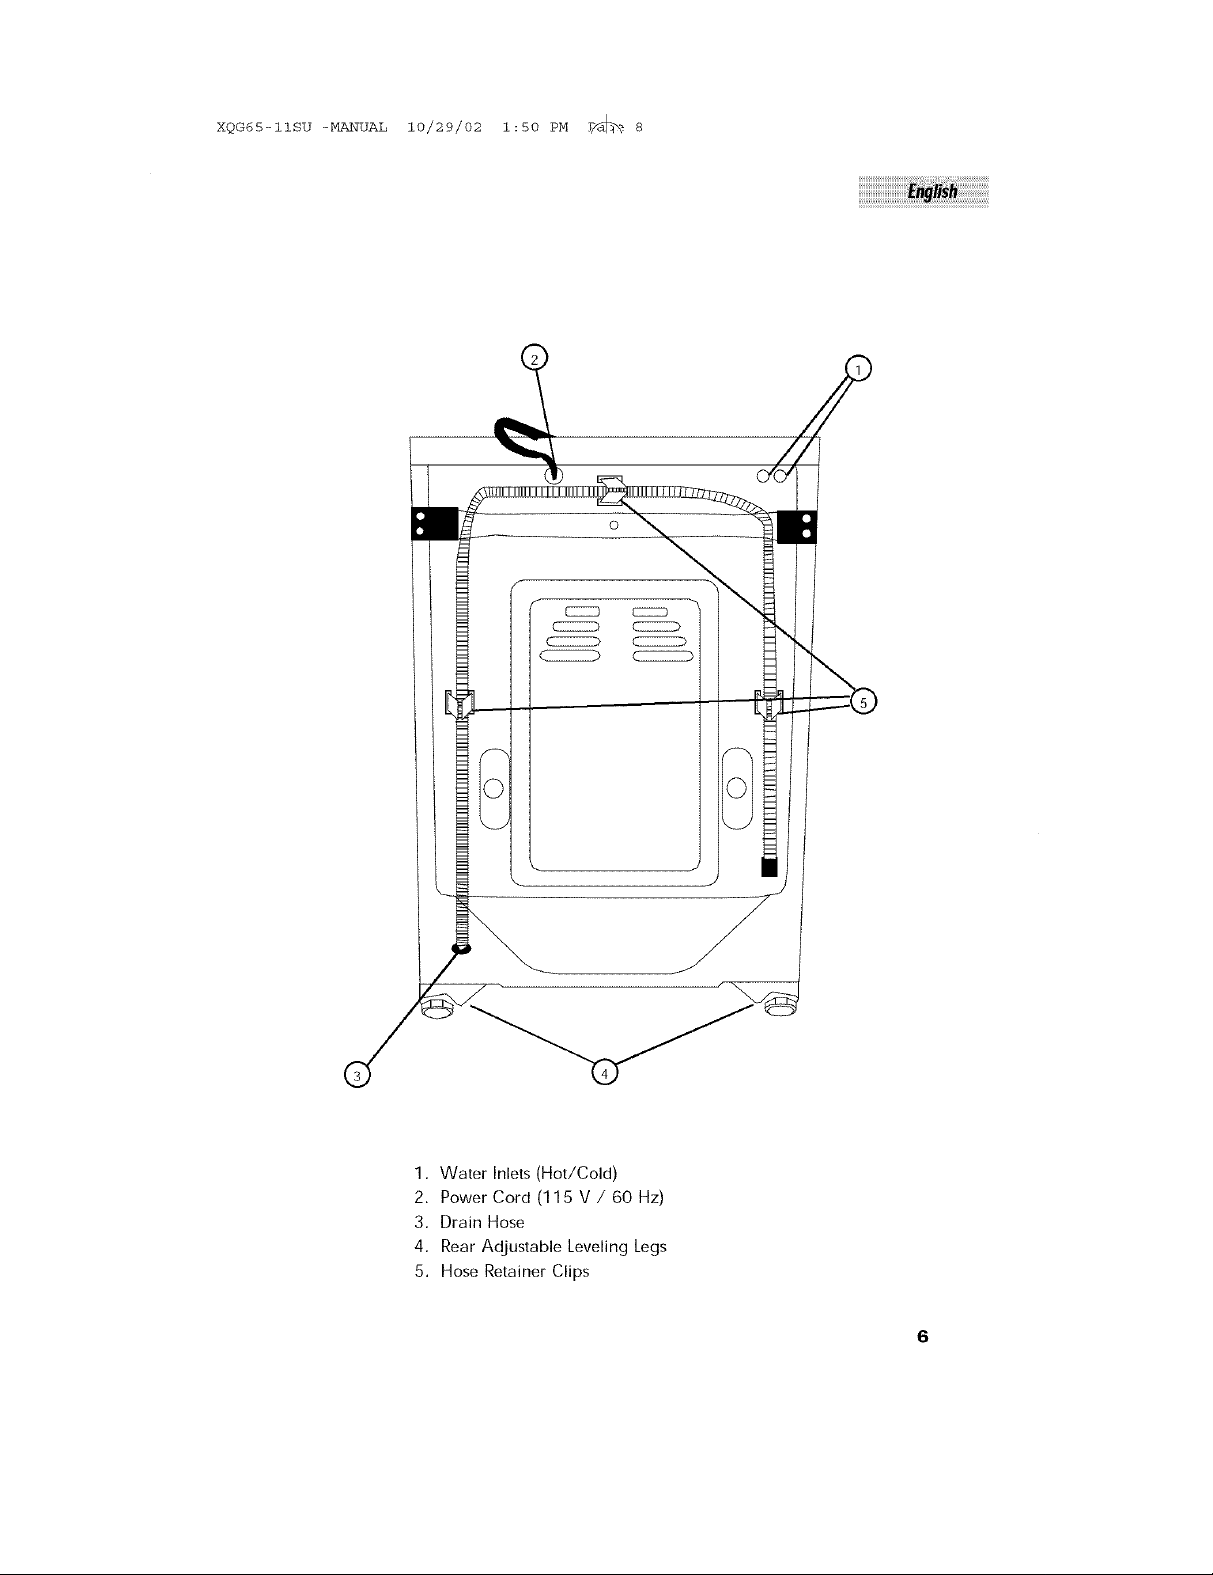
1. Water Inlets (Hot/Cold)
2. Power Cord (115 V / 60 Hz)
3. Drain Hose
4. Rear Adjustable Leveling Legs
5. Hose Retainer Clips
\
©

XQG65-11SU -MANUAL 10/29/02 1:50 PM F/_'_ 9
Understanding Your "Front bad" Washer
This style of washer is gentler on your laundry because it has a tumble wash action
and there is no agitator to damage your clothes Since there is no agitator in this
style of washer, the washer runs quietly This style of washer is designed to save you
money [t uses less water and detergent to clean your laundry
Power Button:
• Push the button in to have your washer "ON". The light will turn on indi-
cating that power is "ON" Push the button out to have your washer
"OFF". The light will go off indicating that power is "OFF".
Load Rinse Level Selector Button:
• Push the button in if you want to reduce water usage during the rinse ._ Haf
cycle Push the button out if you want maximum water usage during the ._
rinse cycle.
Note: Half=Minimum Water Rinse I I
Full=Maximum Water Rinse
"_ on
j._ of_
C2
Power
©
Load
Spin Cycle Selector Button:
• If you want to extract more water from your clothes during the wash cycle, "_ o,
push the button out. Clothes will be drier when this option is selected. _ oo
• If you do not want to extract water from your clothes using the spin cycle,
push the button in, If this option is selected, only the excess water in the tub
will drain leaving the clothes wet,
L_J
Spin
Advantages of Non-Spin Cycle:
• The spin cycle may cause excessive creasing and wrinkling in some fabrics
• High speed spin might be too strong for delicate garments. It could result in
stretching or excessive wear.
Note: When the spin cycle is in the OFF position, the machine will not
automatically go to the spin dry function.
XQG65-11SU -MANUAL 10/29/02 1:50 PM F/_'_ i0
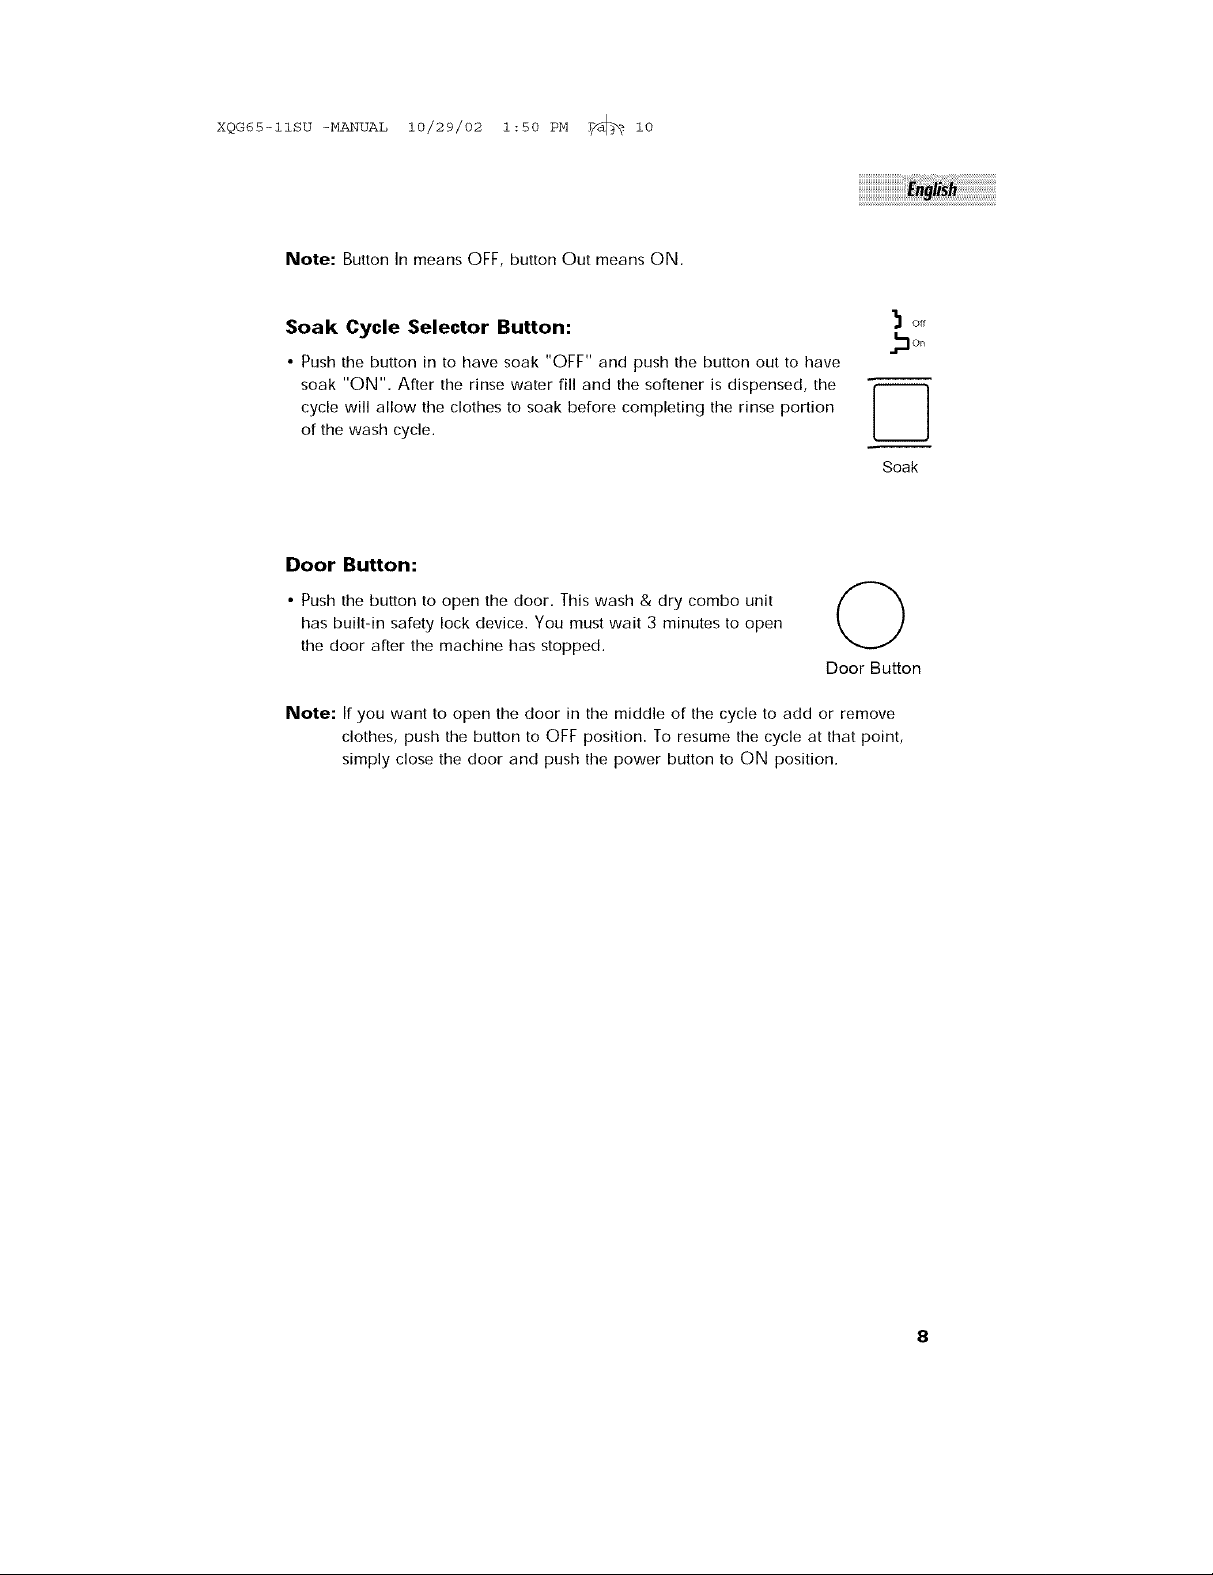
Note: Button In means OFF, button Out means ON,
Soak Cycle Selector Button:
• Push the button in to have soak "OFF" and push the button out to have
soak "ON", After the rinse water fill and the softener is dispensed, the
cycle will allow the clothes to soak before completing the rinse portion
of the wash cycle.
Door Button:
• Push the button to open the door. This wash & dry combo unit
has built-in safety lock device. You must wait 3 minutes to open
the door after the machine has stopped,
Note: If you want to open the door in the middle of the cycle to add or remove
clothes, push the button to OFF position, To resume the cycle at that point,
simply close the door and push the power button to ON position,
©
Door Button
'_ off
.,__or,
Soak
XQG65-11SU -MANUAL 10/29/02 1:50 PM F/_'_ ii
Wash Cycm÷
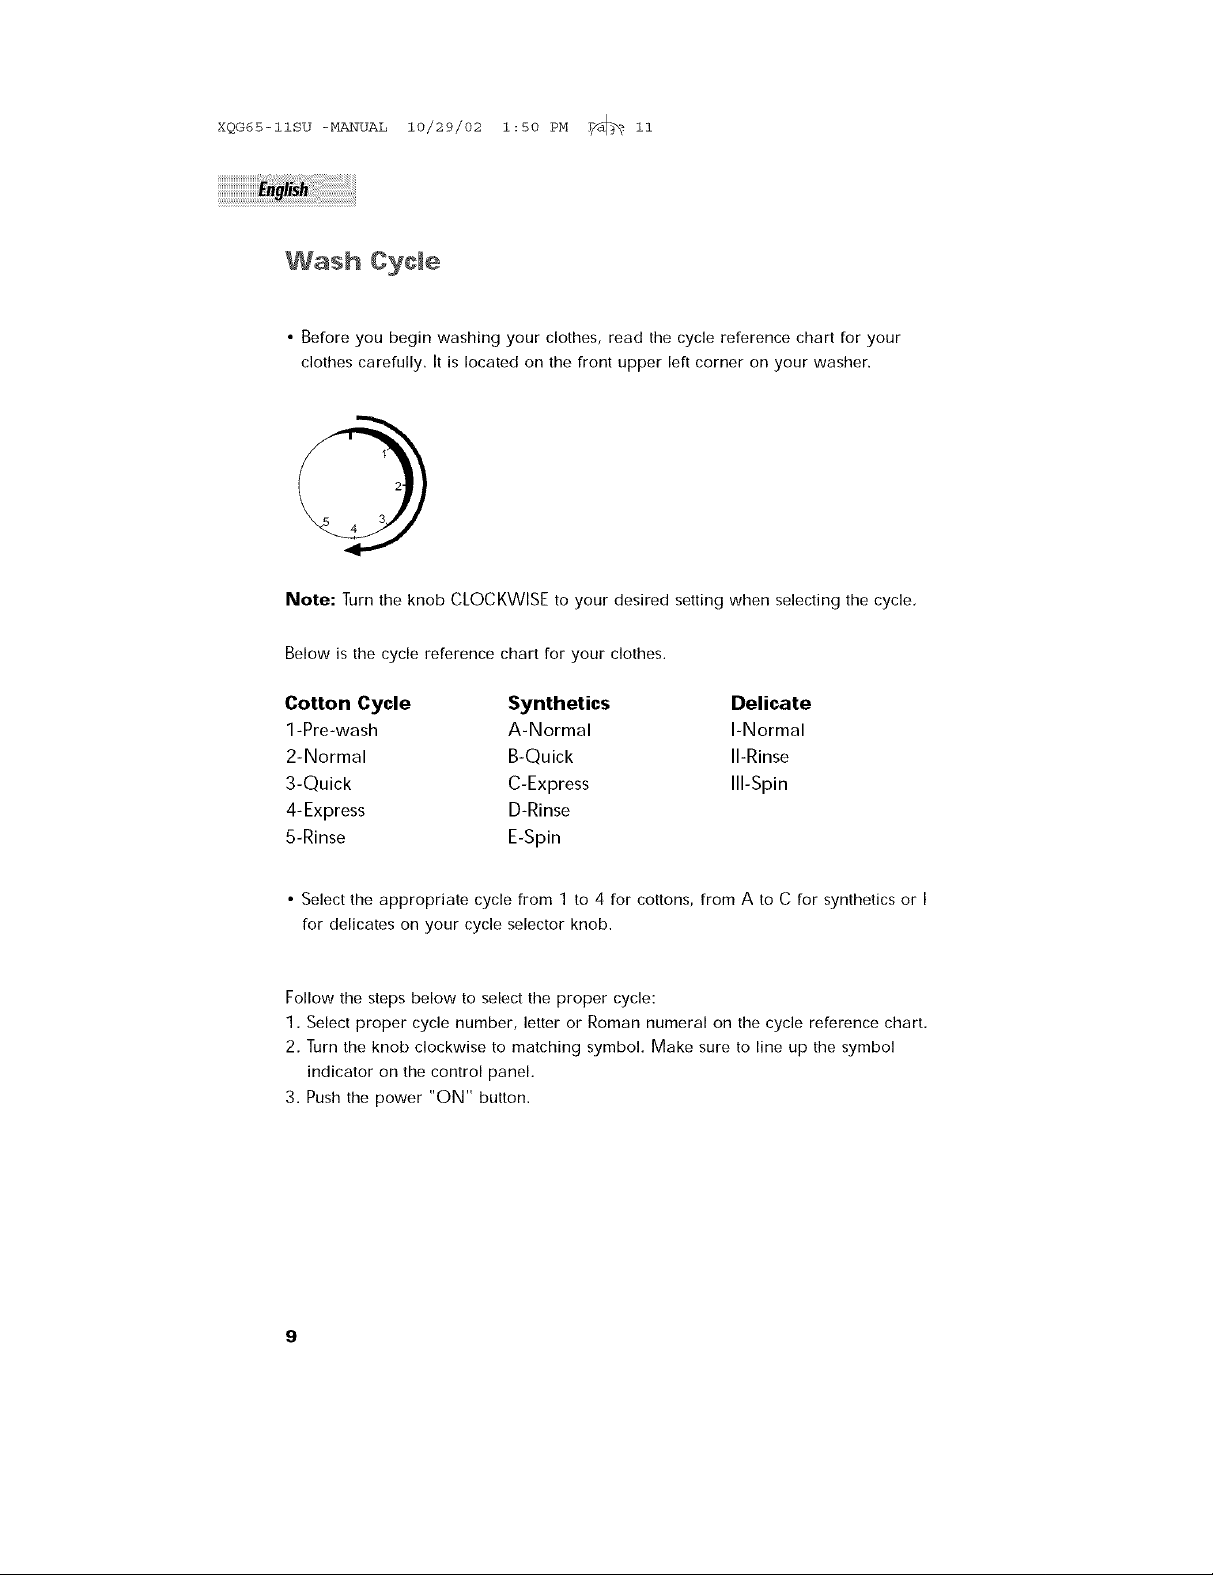
• Before you begin washing your clothes, read the cycle reference chart for your
clothes carefully It is located on the front upper left corner on your washer
Note: Turn the knob CLOCKWISE to your desired setting when selecting the cycle
Below is the cycle reference chart for your clothes.
Cotton Cycle Synthetics
1 Pre wash ANormal
2 Normal BQuick
3 Quick CExpress
Delicate
I-Normal
II-Rinse
Ill-Spin
4 Express DRinse
5 Rinse ESpin
• Select the appropriate cycle from 1 to 4 for cottons, from A to C for synthetics or I
for delicates on your cycle selector knob
Follow the steps below to select the proper cycle:
1. Select proper cycle number, letter or Roman numeral on the cycle reference chart.
2. Turn the knob clockwise to matching symbol. Make sure to line up the symbol
indicator on the control panel.
3. Push the power "ON" button.

XQG65-11SU -MANUAL 10/29/02 1:50 PM F/_'_ 12
Cotton Cycle:
Pre-Wash Cycle: The purpose of this cycle is that if you want to pre-wash heavily
soiled clothes before the actual wash cycle begins. This cycle is configured in such a
manner that it will go through Normal--_Quick--_Express wash cycles time mode
including rinse and spin cycles automatically to complete the wash. The total time
for this cycle is approximately 147 minutes when selected.
Normal Wash Cycle: This is used for work & play, household linens, normal to
lightly soiled and cotton clothes. This cycle is approximately 130 minutes,
Quick Wash Cycle: This is used for a small load of lightly soiled items that needs
to be washed quickly. This cycle is approximately 80 minutes.
Express Wash Cycle: This is also used for small load of lightly soiled items that
needs to be washed quickly. This cycle is approximately 60 minutes.
Synthetics Cycle:
Normal Wash Cycle: This cycle is used for soiled permanent press, silks,
woolens, nylon and acrylic fabrics. This cycle is approximately 60 minutes,
Quick Wash Cycle: This is used for a small load of lightly soiled items that needs
to be washed quickly, This cycle is approximately 45 minutes.
Express Wash Cycle: This cycle is same as quick wash cycle except the time
difference. This cycle is approximately 40 minutes,
iiiiiiiiiiiiiiiiiiiiiiiiiiiiiiiiiiiiiiiiiiiiiiiiiiiiiiii,i ii ii ii ii ii ii ii ii ii ii ii ii ii ii ii ii ii ii ii ii ii ii il
Delicate Cycle:
Normal Wash Cycle: This cycle is used for delicate fabrics that are often
washed by hand. This cycle is approximately 30 minutes.
Note: If the Spin Cycle is at "OFF" position before starting a cycle, the machine
will automatically switch to drain and shut off. Also the machine will not
automatically switch over to the dryer function.
lO
XQG65-11SU -MANUAL 10/29/02 1:50 PM F/_ 13
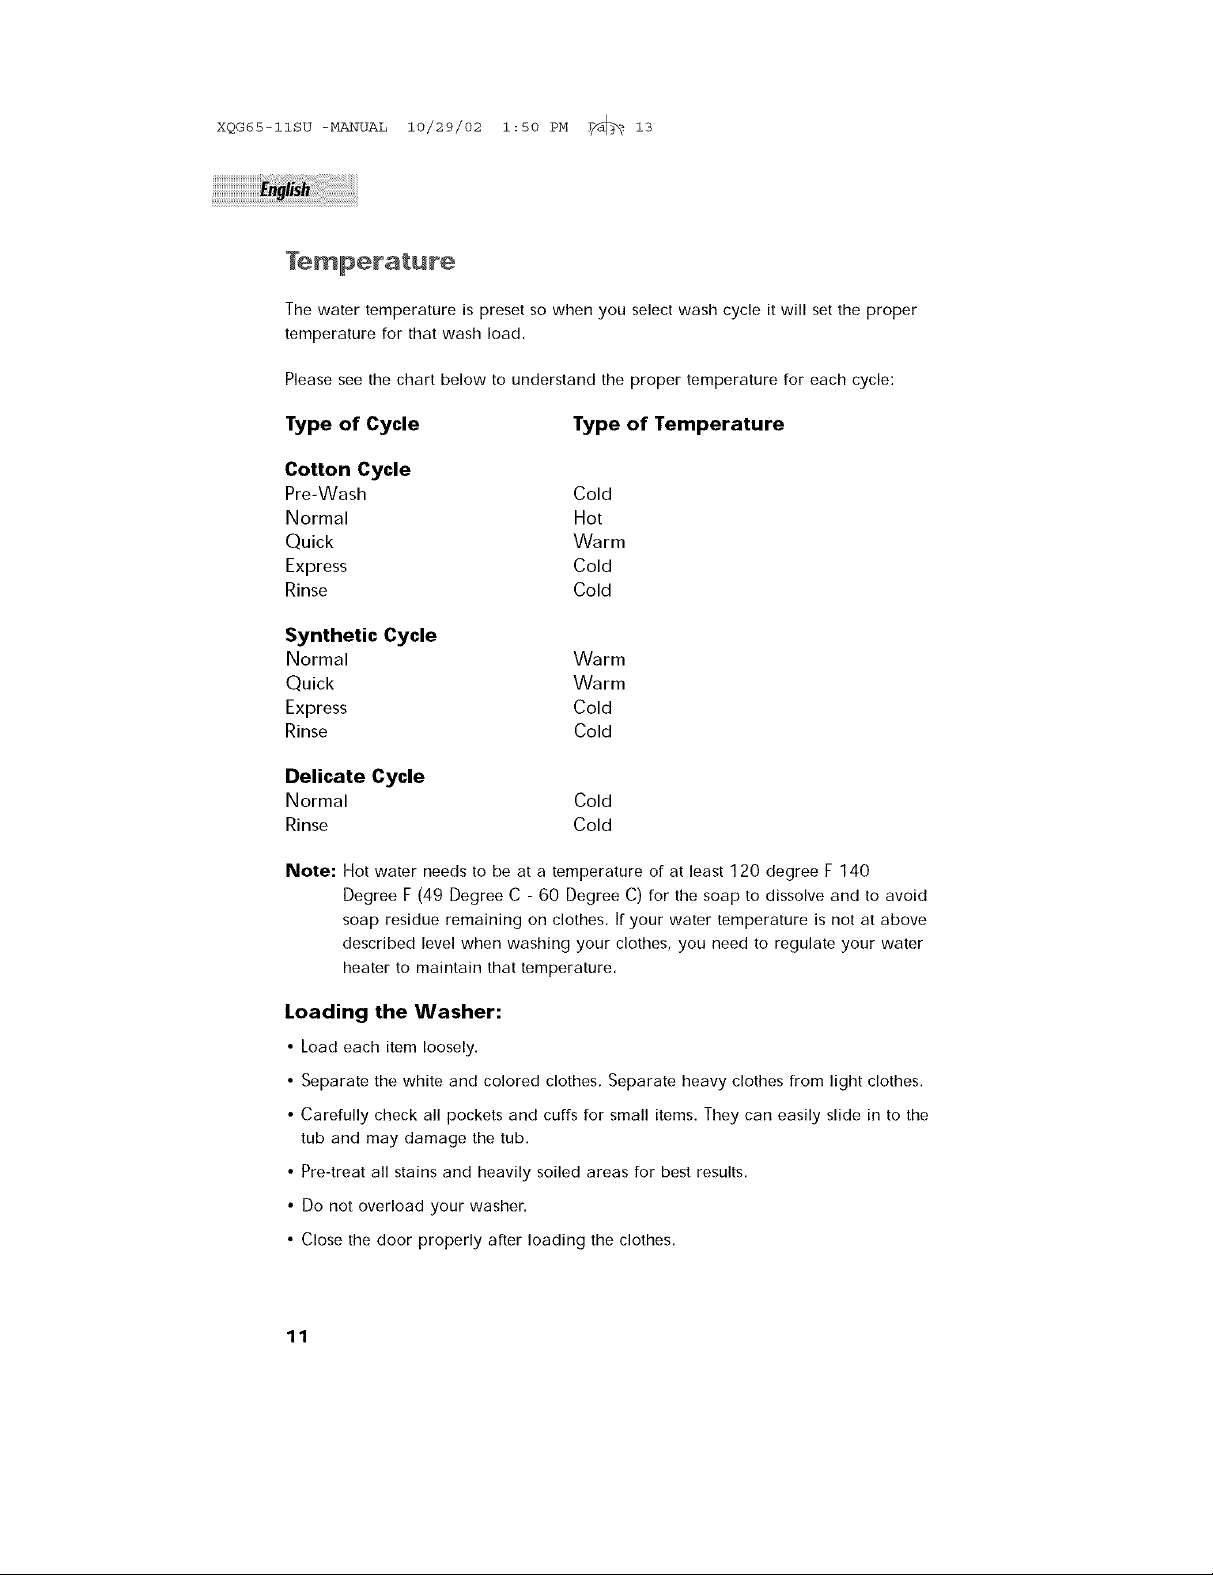
Temperature
The water temperature is preset so when you select wash cycle it will set the proper
temperature for that wash load,
Please see the chart below to understand the proper temperature for each cycle:
Type of Cycle Type of Temperature
Cotton Cycle
Pre-Wash Cold
Normal Hot
Quick Warm
Express Cold
Rinse Cold
Synthetic Cycle
Normal Warm
Quick Warm
Express Cold
Rinse Cold
Delicate Cycle
Normal Cold
Rinse Cold
Note: Hot water needs to be at a temperature of at least 120 degree [ 140
Degree F (49 Degree C - 60 Degree C) for the soap to dissolve and to avoid
soap residue remaining on clothes, If your water temperature is not at above
described level when washing your clothes, you need to regulate your water
heater to maintain that temperature,
Loading the Washer:
• Load each item loosely.
• Separate the white and colored clothes, Separate heavy clothes from light clothes.
• Carefully check all pockets and cuffs for small items. They can easily slide in to the
tub and may damage the tub,
• Pre-treat all stains and heavily soiled areas for best results,
• Do not overload your washer.
• Close the door properly after loading the clothes,
11
XQG65-11SU -MANUAL 10/29/02 1:50 PM F/_'_ 14
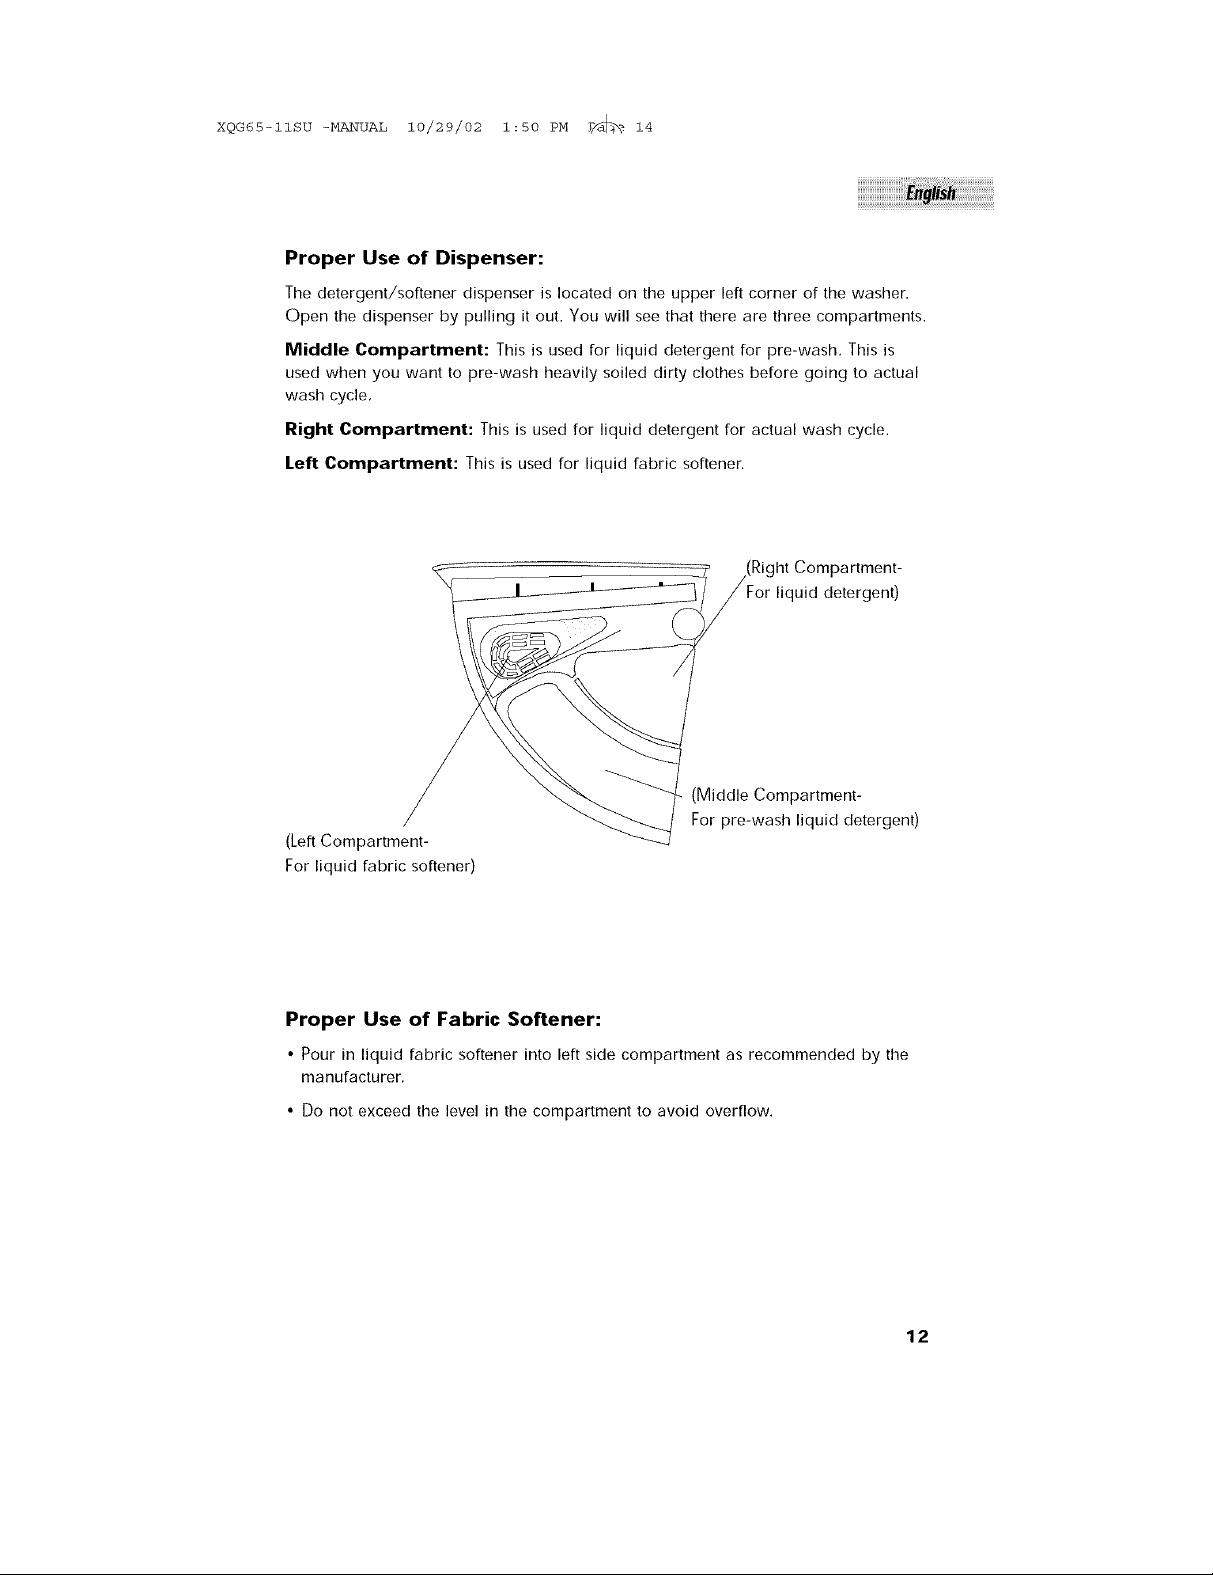
Proper Use of Dispenser:
The detergent/softener dispenser is located on the upper left corner of the washer.
Open the dispenser by pulling it out. You will see that there are three compartments.
Middle Compartment: This is used for liquid detergent for pre-wash, This is
used when you want to pre-wash heavily soiled dirty clothes before going to actual
wash cycle,
Right Compartment: This is used for liquid detergent for actual wash cycle.
Left Compartment: This is used for liquid fabric softener.
iiiiiiiiiiiiiiiiiiiiiiiiiiiiiiiiiiiiiiiiiiiiiiiiiiiii :i}i!ii!ii!ii!ii!ii!ii!ii!ii!ii!ii!ii!ii!ii!ii!ii!ii!ii!ii!ii!ii!ii!i
(Right Compartment-
liquid detergent)
(Middle Compartment-
For pre-wash liquid detergent)
(Left Compartment-
For liquid fabric softener)
Proper Use of Fabric Softener:
• Pour in liquid fabric softener into left side compartment as recommended by the
manufacturer,
• Do not exceed the level in the compartment to avoid overflow.
12

XQG65-11SU -MANUAL 10/29/02 I :50 PH r/_A% ]B
Proper Use of Detergent:
Low-Susding is recommended for front load style washers. This type of detergent
prevents damage to your washing machine; which may be caused by excess
amount of suds entering the condensing compartment.
Note: You can use less or more detergent depending on the size of the load, water
type in your area whether it is soft or hard and whether the clothes are
heavily soiled or lightly soiled. Besides the performance of the washing
machine the quality of the detergent also affect the washing result.
Warning: • Never pour fabric softener directly onto clothes because it will stain
your clothes or you may get spots on your clothes.
• Do not use powder form of softener into dispenser otherwise it will
clog up the dispenser, This dispenser is only designed for liquid form.
Dryer Operation:
• Your dryer is "condensing type" which means it requires no venting. During
the drying process, the evaporating water from your clothes is condensed by the
machine and drained in the form of water out of the drain hose. The machine
uses small amount of fresh water that is automatically fed to the machine from the
inlet hose, You may hear that the machine is drawing water during the dry cycle,
• With this vent-less design, you can install the dryer under the counter to have
built-in look or any other enclosed area, You do not need to worry about
exhausting the hot air from the area where it is installed,
Note: The drying operation of this unit is unlike other dryers you may have used in
the past. Large household and laundromat dryer operate on 220 volt which
supply more elctricity and allows faster drying time. Your dryer operates on
115 volt; which supply less electricity resulting in longer drying time,
• You can select drying time up to 120 mintutes. See below the recommended
temperature and time setting for different clothes:
Dry Time Selection Heat Type
90-120 minutes High
60-80 minutes Medium
40-50 minutes Low
Types of clothes
Forjeans and towel
etc.
For light garments such
as bed sheets, skirts,
socks etc,
For light garments such
as stocking & nylon etc.
13

XQG65-11SU -MANUAL 10/29/02 1:50 PM _ 16
Note: For full loads, you may want to remove 1/3 to 1/2 of the load and dry the
remaining clothes seperately. This will be an efficient way to dry your clothes
and will not take as long to dry. For less than full loads, you may want to
reduce drying time. This will prevent over drying your clothes,
Manual Operation of the Dryer:
• To operate the dryer manually, simply load machine with wet clothes, turn the
"Dryer Selector Knob" to the desired time and push the power button "ON".
Note: When operating the dryer, you must keep "Wash Cycle Selector" knob in
the "OFF" position in order to have dryer "ON".
Automatic Operation of the Dryer:
• For the automatic operation, simply set the "Dry Cycle Selector Knob" to the
desired time at the beginning of the wash cycle. When the wash cycle is finished,
the dryer will turn on automatically.
Note: The dryer will not turn on automatically if the spin cycle is on "OFF"
position. You must keep the spin cycle button in "ON" position in order to go
from wash function to dryer function automatically,
iiiiiiiiiiiiiiiiiiiiiiiiiiiiiiiiiiiiiiiiiiiiiiiiiiiiiii ¸ i ii ii ii ii ii ii ii ii ii ii ii ii ii ii ii ii ii ii ii ii ii ii
Note:
When washing full load, we recommend that you keep the spin cycle in the
"OFF" position to prevent the unit from going to dry mode automatically at
the end of cycle if the spin cycle was in "ON" position. This will give you the
f 1 1
lexibility to take out /3 to /2 of the load and dry the remainder, The
advantage is that your clothes will dry evenly and more quickly.
Loading the dryer:
1. Sort clothes for drying. Seperate dark and light colored items, like you do for
washing. Check for stains that have not been removed in washing, Dryer heat
may permanently set some stains. Properly dried clothes will need minimum of
care when removed from dryer,
2. Load up dryer with washed clothes. For optimum result, use dryer load of similar
weight, fabric and construction. Place small items in a mesh bag to prevent from
tangling. Do not overload the dryer, Add fabric softener sheet if desired,
3, Select the drying time depending on the fabric type and load size,
4, Wait for the drying cycyle to finish before opening the door.
Note: Do not over dry your clothes, over drying can cause shrinkage,
harshness and wrinkling of fabric,
14

XQG65-11SU -MANUAL 10/29/02 1:50 PM _ 17
Lint Trap
• Lint trap is located on the bottom front right corner behind the small door cover.
Push to open the door cover, To remove the lint trap, turn the knob to counter
clockwise position. This will unlock the lint trap, To put it back, turn the knob to
clockwise position, This will lock the lint trap.
• Please clean the lint trap before and after each use, but do not remove for any
reason while the machine is in operation.
Button Trap
Button Trap is designed to collect small objects such as button, coins, etc. As this
may happen very rarely, we recommend to check trap no more than twice a year,
Button Trap is located behind the plastic cover on the bottom right front of the
machine. If you need to access, simply pull the casters out toward you. Remove the
front plastic cover, twist the knob counter clockwise position and pull it out. After
emptying it out, replace it back by twisting it clockwise,
Note: Place shallow pan under the trap opening as small amount of water
may discharge.
Casters
For your convenience, your machine comes with casters so you can move it
wherever you want to, Casters are located on the bottom front right and left side of
the machine, Put both hands in the small gap where caster levers are located.
Simply pull them out toward you. When the machine is moved to appropriate
location just push caster levers back into their in position.
15

XQ_6S-11su-M_UAI_I0/29/02I:S0PM _mb_18
NormaM ©pera ing Sounds
The following sounds are normally heard during the
operation of the washer:
• Tumbling sounds: This isnormal as theheavy wet clothesintheWasher are
continuouslybeing tossedaround.
• Air rushing noise:Thishappens when the Washer tub spins atvery high RPM.
• Wash and Rinsecyclesgoing on and offwillalso make clickingsounds.
Warning: Always unplug your appliance to avoid electric shock before cleaning,
Ignoring this warning may result in death or injury. Before using clean-
ing products, always read and follow manufacturer's instructions and
warnings to avoid personal injury or product damage.
OMeaning and Maintenance
Use only damp or sudsy cloth for cleaning control panel,
• To avoid any kind of damage to cabinet finish, wipe appliance cabinet as need-
ed. If you spill liquid/powdered softener, bleach or detergent on the cabinet, wipe
cabinet immediately because it can damage the finish,
• Do not use any abrasive, harsh chemicals, ammonia, chlorine bleach,
concentrated detergent, solvents or metal scouring pads. Some of these chemicals
may dissolve, damage and/or discolor your appliance,
• Remove pins or other sharp objects from clothes to prevent scratching
interior parts.
• We suggest that you check the button trap no more than twice a year, Do not use
the washer without the button trap in place,
• The Detergent Dispenser Compartment has a removable insert. Over time, this
compartment may accumulate dried detergent, dirt and debris. You must remove
the insert, then rinse in a sink or remove debris with a soft brush,
16

XQG6S-IISU-_UAL I0/29/02I:S0PM Fmb_19
Moving & Vacationing
• Turn off water supply faucets and disconnect hoses Drain water from all hoses
This will prevent from damaging due to water leakage if the hoses accidentally get
ruptured or they become loose
• Disconnect electrical plug
• Dry inner wash tub if moving washer, disconnect drain hose
• Turn the leveling legs clockwise all the way in
• Reinstall both shipping bolts and metal brackets in the back to prevent internal
part from shaking when appliance is moving to another location
• To prevent mold or mildew, leave door open so moisture inside machine
can evaporate
Storage of Your Appliance in Cold Environment
• This appliance must be stored at room temperature
• if you just got delivery of this appliance when outside temperature is below
freezing, do not operate until this appliance has warmed to room temperature
• Do not install or operate this appliance in the area where room temperature is
below freezing
17

XQG65-11SU -MANUAL 10/29/02 1:50 PM F/_ 20
Washer does not operate:
• Check if unit is plugged in. The plug may have come loose.
• Check if the electrical wall receptacle is of proper voltage.
• Check if the circuit breaker needs to be reset or if the fuse needs to be replaced.
• Check if the unit is in "Off" mode.
• Check if the washer is overloaded: load may need to be re-balanced and clothes
may need to be redistributed,
• Check if the door is open, You may have to close the door properly.
• Check if the control knob is set properly, You may have to adjust the control knob.
• The washer pauses in some cycles. This is normal in delicate or hand-washable
cycle, which has short soak period where your clothes are being soaked for very
short period of time. You will not hear washer operation for a short period of
time, When the soak time is over, it will start automatically.
Problems with water:
• Not enough water coming out: Water faucet may need to be turned on fully.
Water hoses may be tangled up or wrinkled up. Straighten up hoses. Check water
level selection, it may need to be readjusted.
• Water Temperature is incorrect: Check your water heater temperature. Hot water
needs to be at a temperature at least 1207 -1407 (49°C - 60°C). Check to
make sure the inlet hoses are properly connected. (e.g. hot to hot & cold to cold)
• Water leaks: This is due to not properly installing drain hose or fill hoses. Your
home drain may be clogged or having constant water pressure. You may need to
tighten hoses, check the plumbing or call a plumber.
• Water pumped out before the cycle is completed: It happens if you open the door
in the middle of cycle.
• Water will not drain: This is due to not installing your drain hose properly. You
may need to connect the drain hose properly. Check the position of the drain
hose. In order to drain properly, make sure that top of drain outlet is less than 4
ft. (1.2 m) above the floor.
18
XQG6 5 -i iSU -MANUAL
Washer is making noise:
• Washer may need to be reinstalled, (Check washer installation section)
• Washer load may need to be re-balanced, as the load may be uneven,
• Coins, loose change, buttons or other heavy objects could make noise
(read Operating Guide - Normal Operating Sounds).
• Squealing Sound: Due to overloaded wash tub,
• Vibration Noise: Due to not leveling washer properly on the floor and uneven
distribution of clothes in the tub.
Problems with clothes:
• Clothes are too wrinkled: this is due to improper sorting, overloading and
washing in too hot water repeatedly, Avoid overloading and resort your load. Do
not mix heavy clothes such as work clothes with light clothes such as blouses, light
shirts and delicate items, You may need to wash in warm or cold water.
• Have soap residue: detergent may not be dissolving in water, Check water
temperature or you need to add detergent as wash tub is being filled with water
before you load your clothes to avoid soap residue on clothes,
• Spots or stains on your clothes: this is due to incorrect use of fabric softener, You
may need to read proper instructions on the container and follow proper
directions for using the softener.
• Clothes are grayed or yellowed: this is due to not pouring enough detergent for
large loads, You may have to add more detergent to the load,
• Clothes are ripped & have holes/excessive wear & tear: this is due to sharp
objects such as pins and belt buckles left in pockets. You will need to remove small
loose sharp objects. Fasten belts, zippers, metal snaps etc. Check if you are using
undiluted bleach. Never add undiluted bleach to wash.
io/29/o2I:soPM 21
Dryer does not operate:
• Check if unit is unplugged. The plug may have come loose,
• Check if the circuit breaker needs to be reset or if the fuse needs to be replaced
• Check if the unit is in "OFF" mode. Press the "ON" button again,
• Check if the door is open,
19

XQ_6S-11su-Mm_UALI0/29/02I:SOPM _mb_22
Dryer is working but not drying the clothes:
• Unit may be over loaded The dryer drum should only be half full
• Check if lint trap is clean and dust free
• Dryer load needs to be resorted Heavy clothes may need to be separated from
regular clothes
• Bulky clothes may require repositioning
• If clothes dry unevenly, a higher dry setting may be required or clothes in the
dryer may need to be resorted
Dryer making noise when drying:
• Coins, loose change, buttons and other heavy objects could make noise
• Dryer may need to be leveled evenly Read Operating Guide Normal
Operating Sounds
Static:
• Caused by over drying, Adjust for shorter drying time,
• Mix with synthetic fabric, Sort and separate different fabrics,
• Use a fabric softener.
20

XQG6S-IISU -MANUAL 10/29/02 I:S0 PM _ 23
TooMsand MaterialsRequired
You will need to have following tools to help
you in the installation of your Washer:
• Scissors
• Phillips SCreWdriVer
• Standard Screwdriver
• Pliers
• Wrench
• Tape Measure
• Gloves
• level
21
Accessories Supplied Quantity
1. Hot & Cold water inlet hoses 2
2. Drain Hose 1
3. Flat Water Inlet Hose Washers 4

XQG65-11SU -MANUAL 10/29/02 1:50 PM F/_'_ 24
Unpacking Your Appliance
• Remove all packing materials including transportation bolts and brackets. Also
remove adhesive tape holding the accessories inside and outside,
• Inspect and remove any remains of packing, tape or printed materials before
using the washer.
• Remove 2 bolts, 4 screws and 1 center bolt holding metal bracket from the back
of the unit that are installed to protect drum and internal components from dam-
age during shipping, (Wrench is included in the instruction manual bag)
• Screws and Bolts must be removed before using the machine. Once removed,
save them so when moving you can reinstall to protect the machine from damage
during shipping.
• Once you remove the bracket, reinstall bracket screws, center bolt and plastic
plug to prevent damage to the machine.
Center bolt
plastic plug (not shown)
iiiiiiiiiiiiiiiiiiiiiiiiiiiiiiiiiiiiiiiiiiiiiiiiiiiiiiii_;_i;_i;_i;_i;_i;_i;_i;_i;_i;_i;_i;_i;_i;_i;_i;_i;_i;_i;_i;_i;_i;_ii_i__i_i_
Bracket
Screws
Bolt
(2)
- Bolt
22

XQG65-11SU -MANUAL 10/29/02 1:50 PM F/_ 25
[eveMing Your Appliance
• Your washer has 4 leveling legs; which are located on the four bottom corners.
After properly placing your washer in its final position, you can level your washer,
• Leveling legs can be adjusted by turning them
counterclockwise to raise your washer or turning
them counter clockwise to lower your washer,
Steps for Installation
Select a suitable location for this appliance on a hard even surface away from
direct sunlight or heat source e.g. radiators, baseboard heaters, cooking appliances
etc. Any floor unevenness should be corrected with the leveling legs located under-
neath, on the bottom corners. This appliance must be placed at room temperature.
You must not place this appliance where the temperature is at below freezing.
Installing Your Washer:
Read install instructions carefully before installation,
Caution: If, after completing these steps, you are unsure that unit is properly
installed, contact a qualified installer, To ensure that your appliance is
properly installed it is recommended that it be installed by a certified
installer,
1. Insert a new flat washer into each end of the inlet hoses. Firmly put the washers
in the coupling,
Note: You may have to use pliers to tighten the coupling. Do not over tighten
because you may cause damage to the valve,
23
XQG65-11SU -MANUAL 10/29/02 1:50 PM F/_'_ 26
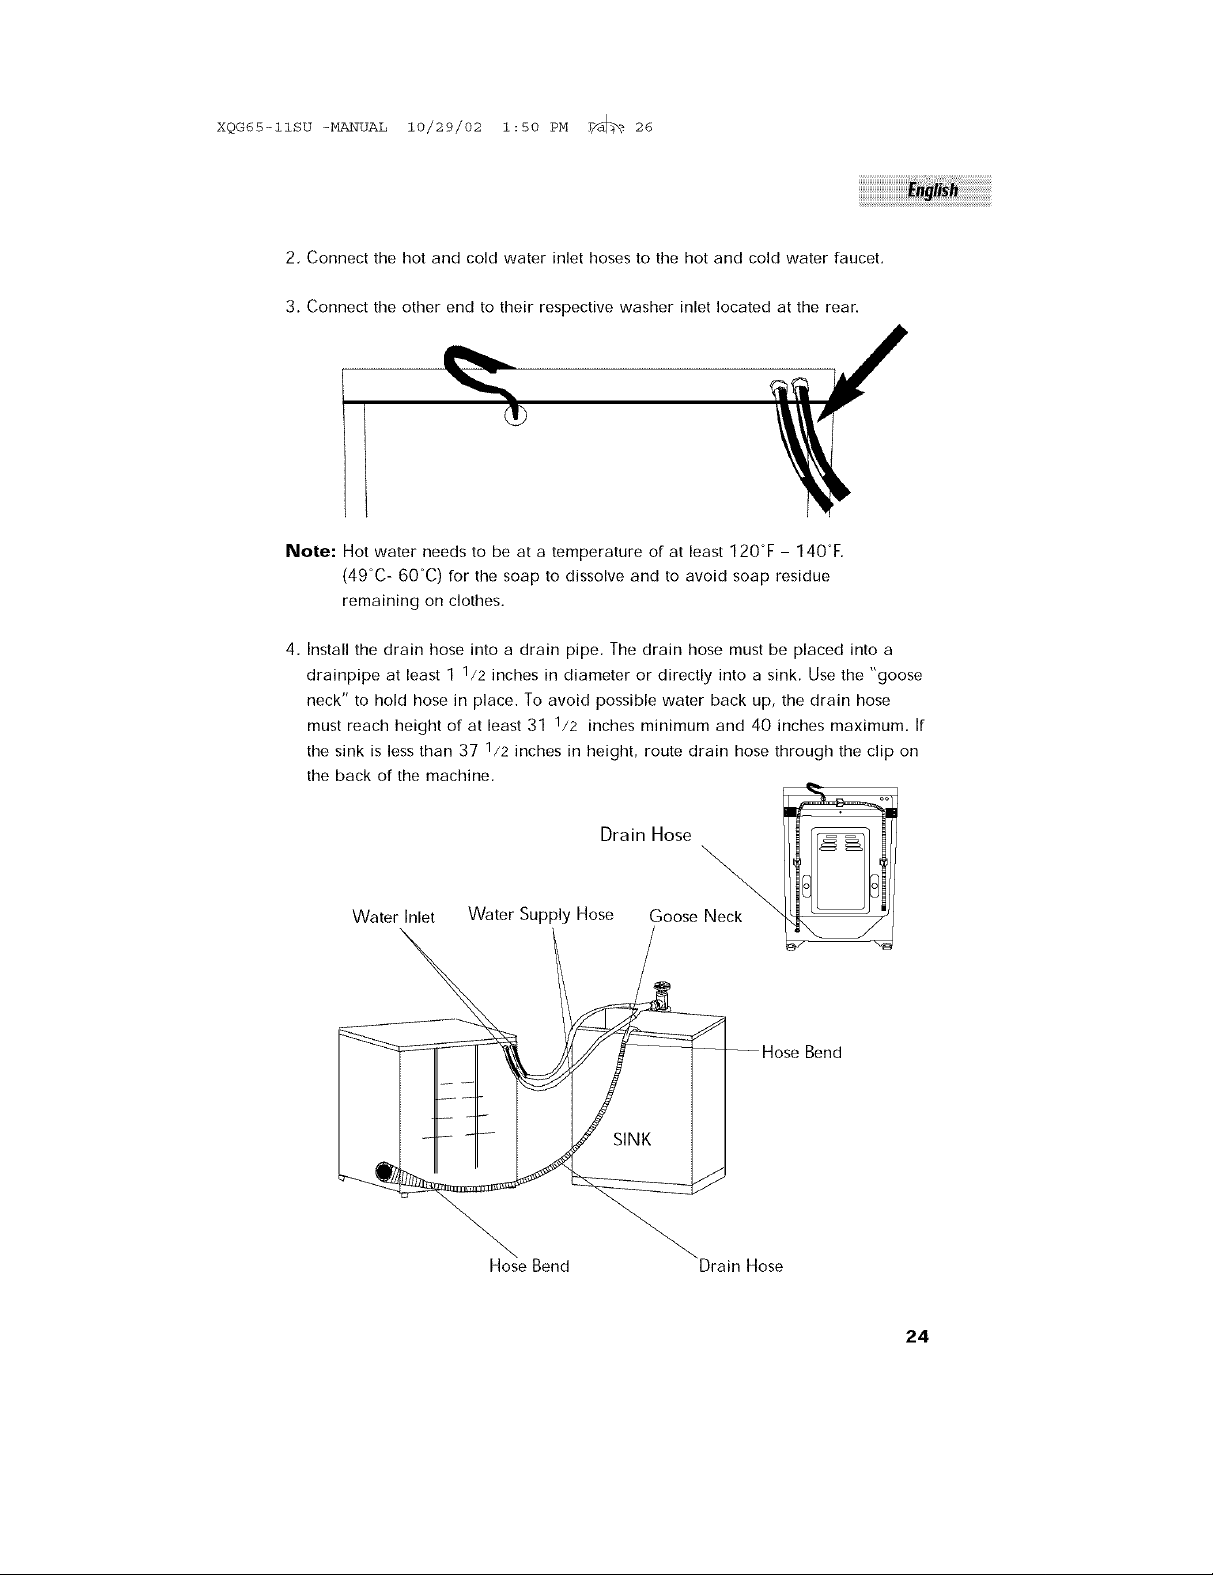
2, Connect the hot and cold water inlet hoses to the hot and cold water faucet,
3. Connect the other end to their respective washer inlet located at the rear.
Note: Hot water needs to be at a temperature of at least 120°F - 140°F,
(49°C - 60°C) for the soap to dissolve and to avoid soap residue
remaining on clothes.
4, Install the drain hose into a drain pipe, The drain hose must be placed into a
drainpipe at least 1 1/2 inches in diameter or directly into a sink, Use the "goose
neck" to hold hose in place. To avoid possible water back up, the drain hose
must reach height of at least 31 1/2 inches minimum and 40 inches maximum. If
the sink is less than 37 1/2 inches in height, route drain hose through the clip on
the back of the machine,
Water Inlet Water Supply Hose
Hose Bend
Drain Hose
Goose Neck
Hose
24

XQG6S=IISU=_UAL I0/29/02I:S0PM Fmb_27
(Route Drain Hose through Clip)
0
Note: Inspect carefully for any leaks around and back of the machine. If leak
occurs, double check to see if any connections are loose. You may need to
tighten any loose connections,
5. Plug in the Washer to a regular 115 volt / 60 Hz, 15 amp outlet.
O0
Unit Dimensions
4 )"
F_ owl" VIEW SIB.£ VIEW
25
]
m
4=
m

XQG65-11SU -MANUAL 10/29/02 1:50 PM F/_'_ 28
Grounding instructions
This appliance must be grounded. In the event of an electrical short circuit,
grounding reduces the risk of electric shock by providing an escape wire for
the electric current. This appliance is equipped with a cord having a grounding
wire with a grounded plug, The plug must be inserted into an outlet that is
properly installed and grounded,
,_ • Improper use of the plug can result in a risk of electric shock
• Consult a qualified electrician or service person if the grounding
instructions are not completely understood or if doubt exists as to
whether the appliance is properly grounded
Wiring Requirements:
• This appliance must be plugged into at least 15 AMP 115120 VOLT,
60 HZ GROUNDED OUTLET,
Note: Where a standard two-prong
outlet is encountered,
it is the personal responsibility
and obligation of the
consumer to have it replaced
with a properly grounded
three-prong outlet.
_ Extension Cords:
We do not recommend that you use an extension cord.
Power interruptions
Occasionally there may be power interruptions due to thunderstorms or other
causes. Remove the power cord from AC outlet when a power outage occurs. When
power has been restored re-plug power cord to AC outlet. Ir outage is for a
prolonged period, clean washer before using it again.
26

XQG65-11SU -MANUAL 10/29/02 1:50 PM F/_ 29
In Home Service
Full ONE Year Warranty
For 12 months from the date of original retail
purchase, Haler will repair or replace any
part free of charge including labor that fails
due to a defect in materials or workmanship.
Limited Warranty
After one year from the original retail
purchase date, Haler will provide a part at
no cost, as indicated below, to replace said
part as a result of a defect in materials or
workmanship. Haler is solely responsible for
the cost of the part. All other costs such as
labor, trip charge, etc are the responsibility
of the owner.
Third through Fifth Year
Haler will provide the cabinet assembly
should the cabinet rust through
Third through Tenth Year
Haler will provide the inner stainless steel
wash tub.
NOTE: This warranty commences on the
date the item was purchased and the original
purchase receipt must be presented to the
authorized service representative before
warranty repairs are rendered.
Exceptions: Commercial or Rental
Use Warranty
90 days labor from date of original purchase
90 days parts from date of original purchase
No other warranty applies
For Warranty Service
Contact your nearest authorized service
center. All service must be performed by a
Haler authorized service center. For the name
and telephone number of the nearest autho-
rized service center please call 1-877-337-
3639.
Before calling please have available
the following information:
Model number and serial number of your
appliance.The name and address of the
dealer you purchased the unit from and the
date of purchase. A clear description of the
problem. A proof of purchase (sales receipt).
This warranty covers appliances
within the continental United States,
Puerto Rico and Canada. What is
not covered by this warranty:
Replacement or repair of household fuses,
circuit breakers, wiring or plumbing.
A product whose original serial number has
been removed or altered.
Any service charges not specifically
identified as normal such as normal
service area or hours.
Damage to clothing.
Damage incurred in shipping.
Damage caused by improper installation
or maintenance.
Damage from misuse, abuse accident, fire,
flood, or acts of nature.
Damage from service other than an
authorized Haler dealer or service center.
Damage from incorrect electrical current,
voltage or supply.
Damage resulting from any product
modification, alteration or adjustment
not authorized by Haler.
Adjustment of consumer operated controls as
identified in the owners manual.
Hoses, knobs, lint trays and all attachments,
accessories and disposable parts.
Labor, service transportation, and shipping
charges for the removal and replacement
of defective parts beyond the initial
12-month period.
Damage from other than normal
household use.
Any transportation and shipping charges.
THIS LIMITED WARRANTY IS GIVEN IN LIEU
OF ALL OTHER WARRANTIES, EXPRESSED
OR, INCLUDING THE WARRANTIES OF
MERCHANTABILITY AND FITNESS FOR A
PARTICULAR PURPOSE
The remedy provided in this warranty is
exclusive and is granted in lieu of all
other remedies.
This warranty does not cover incidental or
consequential damages, so the above
limitations may not apply to you. Some states
do not allow limitations on how long an
implied warranty lasts, so the above
limitations may not apply to you.
This warranty gives you specific legal rights,
and you may have other rights, which vary,
from state to state.
Haler America Trading L.L.C.
New York, NY 10018.
27

XQG6S-IISU-_UAL I0/29/02I:S0PM Fmb_3O
CONSIGNESDESECURITE
IMPORTANTES
Avertissement - Afin de reduire les risques d'incendie,
d'electrocution ou de blessures corporelles Iors de I'utilisation
de cet appareil, respecter les precautions elementaires de
securite, et en particulier:
1. Lire I'ensemble des consignes avant d'utiliser I'appareih
2. Utiliser I'appareil uniquement pour I'usage auquel il est destine, tel qu'il est
decrit dans le present manuel d'utilisation et d'entretien.
3. N'utiliser que des produits detergents ou assouplissants recommandes pour cet
appareil, et conserver hors de portee des enfants.
4. Avant sa raise en service, cet appareil dolt etre installe correctement en se
conformant aux consignes d'installation.
5. Nejamais debrancher I'appareil en tirant sur le cordon. Toujours saisir
refinement la fiche et la retirer de la prise murale en tirant vers I'arriere.
6. Remplacer sans attendre les cordons usages et les fiches ou les prises
desserrees.
7. Debrancher votre appareil avant de proceder au nettoyage ou d'entreprendre
une quelconque reparation.
8. Si vous n'utilisez plus votre ancien lave-linge, nous vous conseillons de
demonter la porte. Vous diminuerez ainsi les risques potentiels pour les
enfants.
9. Ne pas utiliser votre lave-linge en presence d'emanations explosives.
10. Ne pas utiliser I'appareil pour laver des vetements impregnes ou taches par de
I'essence, des solvants pour lavage a sec ou route autre substance explosive ou
inflammable - ou laves avec eux - ces substances pouvant s'enflammer et
provoquer une explosion.
11. Afin d'eviter les accidents, le linge ou les chiffons utilises pour nettoyer les
matieres inflammables ou explosives ne doivent pas etre passes au lave-linge
avant que route trace de ces matieres ait disparu.
12. Ne pas ajouter ou melanger au linge de substances inflammables ou explosives
i3. Ne pas essayer de retirer les vetements Iorsque le tambour est en mouvement.
Attendre I'arret complet avant route operation.
14. [a porte du lave-linge dolt etre fermee Iorsque le tambour est en rotation.
15. Ne pas utiliser votre lave-linge si certaines pieces manquent ou si elles sont
endommagees.
16. Ne pas utiliser ce lave-linge pour le nettoyage commercial des vetements.
17. Ne pas faire tourner le lave-linge si tous les panneaux de la carrosserie ne
sont pas correctement en place.

{QG65-11SU -MANUAL 10/29/02 1:50 PM F/_z 31
18, Ne pas trafiquer les boutons.
19, Afin de reduire les risques de blessures, ne pas laisser les enfantsjouer sur le
lave-linge ou _, I'interieur. [orsque le lave-linge est utilise a proximite d'enfants,
ces derniers doivent etre surveilles avec attention.
20.
[e lave-Iinge dolt etre branche a une prise electrique conforme ayant des
caracteristiques electriques adequates.
21,
Afin de reduire les risques d'incendie et d'electrocution, il est obligatoire de
relier correctement a la terre. NE PAS COUPER NI RETIRER LA PRISE DE
TERRE. Si vous ne disposez pas d'une prise murale _,trois fiches, faites
installer une prise adequate par un electricien qualifie. La prise murale doit
OBLIGATOIREMENT etre reliee a la terre.
22.
Si vous n'avez pas utilise le chauffage de I'eau de lavage pendant plus de
quinzejours, cela peut entrainer une production d'hydrogene. Ceci pourrait
dans certains cas provoquer des risques d'explosion. Si vous etes dans ce cas,
ouvrir tousles robinets et laisser I'eau chaude couler pendant quelques minutes
avant d'utiliser le lave-linge. Cela permettra a I'hydrogene emprisonne dans la
lave-linge de s'evacuer. L'hydrogene etant inflammable et risquant de
provoquer une explosion, eviter de faire fonctionner un appareil electrique, de
ruiner, d'allumer une allumette ou un briquet ou d'utiliser une fiamme hue afin
d'eviter un accident Iors de cette operation.
23.
Ne pas mettre de vetements au seche-linge si vous avez auparavant utilise de
I'essence, des solvants pour nettoyage a sec ou d'autres produits inflammables
ou explosifs pour les nettoyer, les laver, les faire tremper, ou s'ils ont Ore taches
par ces derniers, car ces substances produisent des emanations susceptibles de
s'enflammer ou d'exploser.
24.
Ne pas reparer ni changer une piece quelconque de I'appareil, ni essayer
d'en assurer I'entretien si cela n'est pas specifiquement conseille dans les
consignes d'auto-depannage que vous comprenez et que vous etes capables
d'effectuer vous-meme.
25.
Ne pas utiliser la fonction sechage a chaud pour des vetements contenant de
la mousse de caoutchouc ou des fibres similaires dont la texture s'apparente
au caoutchouc.
iiiiiiiiiiiiiiiiiiiiiiiiiiiiiiiiiiiiiiiiiiiiiiiillii ii ii ii ii ii ii ii ii ii ii ii ii ii ii ii ii ii ii ii iiii
26, Nettoyer le filtre avant et apres chaque cycle de lavage,
27. Ne pas introduire de linge tache par les huiles de cuisson dans le seche-linge.
[e linge souille par les huiles de cuisson peut contribuer _, provoquer une
reaction chimique qui pourrait mettre le feu au contenu du lave-linge,
28, Afin de reduire les risques d'electrocution ou d'incendie, ne pas utiliser de
rallonge ou d'adaptateur pour raccorder I'appareil _, la source electrique.
CONSERVERCESCONSIGNES
POURCONSULTATIONULTERIEURE

XQG65-11SU -MANUAL 10/29/02 1:50 PM r/_ 32
DANGER
Un enfant peut rester coince I'appareil ! Afin d'eviter qu'un
enfant ne se retrouve pris au piege, demonter la porte de
votre ancien lave-linge avant de vous en debarrasser.
Nous vous remercions d'avoir fait
I'acquisition d'un produit Haier. Ires
pratique a utiliser, le present Manuel
vous guidera afin de tirer le meilleur
parti de votre lave-linge sechant.
N'oubliez pas de prendre note du
type et du numero de serie, lls sont
portes sur une etiquette situee au dos
de l'appareil,
Type d'appareil
Numero de S¢_rie
Date d'achat
Agrafer votre ticket de caisse/facture sur votre manuel d'utilisation. II vous
sera indispensable pour tout depannage sous garantie.

XQG65-11SU -MANUAL 10/29/02 1:50 PM F/_z 33
CONSIGNES DE SECURITE ................................................................1
FONCTIONNEMENT .......................................................................... 5
Descriptif et Caracteristiques .................................................................... 5
Fonctionnement ...................................................................................... 7
Emissions Sonores Normales ................................................................ 16
Guide d'Entretien et de Nettoyage ............................................16
Nettoyage et Maintenance .................................................................... 16
Demenagement et Absence Prolongee .................................................. 17
Rangement du Lave-Linge dans un Environnement Froid ........................ 17
PAGE
Depannage ...................................................................................... 18
INSTRUCTIONS CONCERNANT L'INSTALLATION ...................... 21
Outils et materiel necessaires ................................................................ 21
Deballage de votre lave-linge ................................................................ 22
Mise a niveaude votre lave-linge .......................................................... 23
L'lnstallation etape par etape ................................................................ 23
Branchements electriques ............................................................26
Mise a la terre .................................................................................... 26
Coupures de courant ............................................................................ 26
Garantie .......................................................................................... 27

XQG6S-IISU-_UAL I0/29/02I:SIPM Fmb_34
1, Programmateur de lavage
2. Touche de commande de la porte
3, Programmateur de Sechage
4. Temoin d'allumage
5. Touche Marche/Arret (ON/OFF)
6. Selection de la vitesse de rinqage
7. Marche/Arret du programme
d'essorage
8. Marche/Arret du programme de
trempage
9. Tableau des programmes de lavage
10, Distributeur de lessive et d'as
souplissant
11, Hublot de porte
12, Pieds reglables de raise a niveau
avant
13. Bras de support des Roulettes
14, Filtre

XQG65-11SU -HANUAL 10/29/02 1:51 PM r/_ 35
CIIIID
©
1. Arrivees d'eau (chaude et froide)
2, Cordon d'alimentation (115 V/60 Hz)
3. Tuyau de vidange
4. Pieds de raise a niveau arriere
5. Clips de maintien des tuyaux
\

XQG6S-IISU-_UAL I0/29/02I:$IPM Fmb_36
Comment $onctionne Votr÷ lave°ling÷ &
Chargement Frontal
Ce type de machine est moins agressif pour votre linge car elle a un mode de
fonctionnement qui supprime I'agitateur susceptible d'endommager les vetements.
[absence d'agitateur sur ce type de lave-linge autorise un fonctionnement en
douceur. Ce type de lave-linge est con_u pour reduire le cout de fonctionnement, II
effectue votre lavage en consommant moins d'eau et de lessive.
Bouton de Mise en Marche:
• [nfoncer ce bouton pour allumer votre lave-linge. Le voyant s'allume
pour indiquer que I'appareil est sous tension. Relever ce bouton pour
arreter le lave-linge. Le voyant s'eteindra pour indiquer que
I'alimentation est coupee.
Selection de la Vitesse de Rin_;age:
• [nfoncer ce bouton si vous souhaitez reduire la quantite d'eau .r-'3c°'p'_.......
utilisee au cours du cycle de rinqage. Relever ce bouton si vous
souhaitez utiliser la quantite d'eau maximale au cours du cycle de [ I
rinqage.
Remarque: Half = Ouantite minimale
Full : Ouantite maximale
"_ Outre
,_$ur
83
Puissance
_Demi
I I
Chargement
Selection du Cycle d'essorage par Centrifugation: ] o,,_,_e
• Relever ce bouton si vous souhaitez essorer votre linge au cours du cycle
de lavage. Le linge sera plus sec si vous choisissez cette option.
• Si vous ne souhaitez pas essorer votre linge au cours du cycle de lavage,
enfoncer ce bouton, Si vous choisissez cette option, seule I'eau en exces
dans la cuve sera evacuee et le linge restera humide. Essorage
,_Sur
I I
Avantages du Cycle Sans Essorage:
• L'essorage par centrifugation peut provoquer le froissement excessif de certains
tissus,
• Un essorage a grande vitesse peut s'averer trop puissant pour certains vetements
fragiles. Cela pourrait provoquer leur deformation ou leur usure excessive.

XQG65-11SU -MANUAL 10/29/02 1:51 PM F/_'_ 37
Remarque: Lorsque la fonction essorage n'est pas utilisee ('OFF'), I'appareil ne
passe pas automatiquement en mode sechage par centrifugation.
Remarque: Bouton enfonce es Arret, Bouton releve es Marche.
Selecteur du Cycle de Trempage:
• [nfoncer le bouton pour supprimer le trempage. Relever le bouton r-_
pour lancer le trempage. Apres le remplissage du lave-linge par
I'eau de rinqage et la distribution du produit assouplissant, ce cycle
effectuera le trempage du linge avant de terminer la phase de Imbibez
rinqage du cycle de lavage.
'_ Out_e de
,11_ Sl r
I I
Commande de la Porte:
• [nfoncer ce bouton pour operer I'ouverture de la porte, Ce
lave-linge sechant est equipe d'un systeme de verrouillage
integre. Attendre 3 minutes apres I'arret de I'appareil avant
d'ouvrir la porte.
Remarque: Si vous souhaitez ouvrir la porte en cours de cycle pour ajouter ou
retirer du linge, enfoncez le bouton en position 'Arret' ('OFF'). Pour
poursuivre le cycle a I'endroit de I'arret, refermez simplement la porte
et relevez le bouton en position 'Marche' ('On'),
Bouton De Po_e

XQ_6S-ns_-HANUALI0/29/02I:$IPM _mJ-a_38
CycW÷ de Lavag÷
• Avant de commencer le lavage, lire attentivement le tableau des programmes de
lavage concernant le type de v6tements a laver. Jl se trouve dans le coin en haut _,
droite sur la facade de votre lave-linge,
Remarque: Pour selectionner le cycle desire, tourner le bouton DANS LESENS
DESAIGUILLES D'UNE MONTRE,
Vous trouverez ci-dessous le
Coton Synthetiques
1-Prelavage A-Normal
2-Normal B-Rapide
3-Rapide C-Express
tableau des programmes de lavage.
Tissus delicats
I-Normal
II-Rin_.age
III-Essorage
4-Express D-Rin(;age
5-Rinoage E-Essorage
• Choisir le cycle approprie de 1 _, 4 pour les vetements de coton, de A _, C pour
les tissus synthetiques ou I pour les tissus fragiles sur le selecteur de programme,
Pour selectionner le programme approprie, proceder dans I'ordre suivant:
1. Choisir le cycle approprie - numero, lettre ou chiffre romain - sur le tableau des
programmes.
2, Tourner le programmateur darts le sens des aiguilles d'une montre pour I'amener
en [ace du symbole correspondant. Verifier I'alignement avec le symbole situe sur
le tableau de commande.
3. Relever le bouton sur la position 'Marche' ('ON').
9

XQG65-IISU -MANUAL 10/29/02 1:51 PM _ 39
Cycle Coton:
Prelavage: Ce cycle est utilise pour effectuer un prelavage sur des vetements tres
sales avant de lancer le cycle normal. II est programme de maniere a enchainer
automatiquement les modes Cycle Normal_Cycle Rapide--_-Cycle Express, y
compris le rin£;age et I'essorage, afin de terminer le lavage. Si I'on choisit ce cycle,
sa duree normale est de 147 Minutes.
Cycle Normal: II s'utilise pour les vetements de travail et de Ioisirs, le linge de
menage, normal ou peu sale, ainsi que les vetements en coton, Ce cycle dure
environ 130 minutes,
Cycle Rapide: S'utilise pour une demi-charge ou un linge peu sale qui dolt etre
lave rapidement, La duree de ce cycle est d'environ 80 minutes.
Cycle Express: S'utilise egalement pour une demi-charge ou un linge peu sale
qui dolt etre lave rapidement, La duree de ce cycle est d'environ 60 minutes,
Synthetiques:
Cycle Normal: 11s'utilise pour les vetements _, plis permanents, ainsi que pour les
tissus en sole, en laine, en nylon ou en acrylique. Ce cycle dure environ 60 minutes.
Cycle Rapide: S'utilise pour une demi-charge ou un linge peu sale qui dolt etre
lave rapidement. La duree de ce cycle est d'environ 45 minutes,
iiiiiiiiiiiiiiiiiiiiiiiiiiiiiiiiiiiiiiiiiiiiiiiiiiii
Cycle Express: Ce cycle est identique au cycle rapide a I'exception de la duree.
Celle-ci est d'environ 40 minutes.
Cycle Tissus Delicats:
Cycle Normal: Ce cycle s'utilise pour les tissusdelicats, qui la plupart du temps
sont laves a la main. La duree de ce cycle est d'environ 30 minutes,
Remarque: Si le cycle Essorage est en position 'Arret' ('OFF') avant le debut
d'un cycle de lavage, le lave-linge passera automatiquement aux
phases de vidange et d'arret. De meme, I'appareil ne passe pas
automatiquement en mode sechage.
lO

XQG65-IISU -MANUAL i0/29/02 i:Si PM rf_h-_40
La temperature de I'eau est pre-reglee, de sorte que Iorsque vous selectionnez un
programme de lavage, la temperature est ajustee automatiquement a la charge
concernee,
Veuillez consulter le tableau ci-dessous pour connaitre la temperature qui convient
chaque programme:
Programme Temperature
Coton
Prelavage Froid
Normal Chaud
Rapide Tiede
Express Froid
Rin_.age Froid
Synthetiques
Normal Tiede
Rapide TiLde
Express Froid
Rinqage Froid
Tissus delicats
Normal Froid
Rin(;age Froid
Remarque: Pour que la lessive se dissolve et afin d'eviter qu'elle ne laisse des
traces sur les v6tements, la temperature de I'eau chaude doit 6tre
comprise entre 49 ° et 60°C (120 et 140 F). Si la temperature de I'eau
n'atteint pas le niveau ci-dessus Iors du lavage, il convient de regler le
chauffage de I'eau pour maintenir la temperature,
Chargement du lave-linge:
• Charger le linge dans le lave-linge sans le tasser.
• Separer le blanc de la couleur, Separer les vetements Iourds des vetements legers,
• Verifier que toutes les poches soient vides et retirer les boutons de manchettes. Les
petits objets peuvent facilement tomber dans la cuve et I'endommager,
• Pour un resultat optimum, traiter les taches des v6tements les plus sales avant de
les introduire dans le lave-linge.
• Ne pas surcharger le lave-linge.
• Bien fermer la porte apres avoir charge le lave-linge,
11

ZQ@65-ilsu -MANUAL i0/29/02 i:51 PM _ 4i
Utilisation Correcte du Distributeur de Produits:
Le distributeur de lessive et d'assouplissant est situe sur I'angle superieur gauche du
lave-linge. Tirer sur le distributeur pour I'ouvrir. Vous remarquerez trois
compartiments.
Oompartiment Oentrah II est destine a recevoir le liquide de prelavage. On
I'utilise Iorsque I'on souhaite effectuer un prelavage sur des vetements tres sales
avant de lancer le cycle de lavage proprement dit.
Oompartimenl Broil: II est destine a recevoir le detergent liquide utilise pour le
cycle de lavage proprement dit.
Compartimenl Gauche: II est destine a recevoir le liquide assouplissant.
iiiiiiiiiiiiiiiiiiiiiiiiiiiiiiiiiiiiiiiiiiiiii['i iii'ii'ii'ii'ii'ii'ii'ii'ii'ii'ii'ii'ii'ii'ii'ii'ii'ii'ii'if ili'
Compartiment Droit
(pour le detergent
liquide)
Compartiment Central
(pour le liquide de prelavage)
Compartiment Gauche
(pour le liquide assouplissant)
Utilisation Correcte de I'Assouplissant:
• Verser le liquide assouplissant dans le compartiment gauche en suivant les
recommandations du fabricant.
• Afin d%viter le debordement, ne pas depasser le niveau indique dans le
compartiment.
12

XQ@6S=IISU -MANUAL i0/29/02 1:51 PM _ 42
Utilisation correcte du liquide detergent:
Dans un lave-linge ._ chargement frontal, il est recommande d'utiliser un detergent
peu moussant, Ce type de detergent evite a votre machine les degats que peut
provoquer un exces de mousse dans la partie condensation.
Remarque: Vous pouvez utiliser une quantite plus ou moins grande de detergent
selon I'importance de la charge, selon la nature de I'eau - son degre
de durete - darts votre region, ou si le linge est plus ou moins sale. En
plus des performances du lave-linge, la qualite du detergent a
egalement une influence sur la qualite du lavage obtenu,
Avertissement: • Ne verserjamais I'assouplissant pour textiles sur les vetements;
cela pourrait les tacher ou laisser des traces,
• Ne pas utiliser d'assouplissant en poudre darts le distributeur
sous peine de I'obstruer, Ce distributeur est conqu uniquement
pour la presentation liquide.
Fonctionnement du Sechage:
• Le sechage est du type "a condensation", ce qui signifie que la presence
d'une sortie aerienne n'est pas necessaire. Au cours du sechage, la vapeur d'eau
produite par les vetements est condensee par I'appareil et evacuee sous forme liq-
uide par le tuyau d%vacuation. L'appareil n'utilise qu'une faible quantite d'eau
qui est delivree automatiquement par le tuyau d'arrivee d'eau. On entend I'eau
arriver Iors du cycle de sechage,
• Ce systeme sans sortie aerienne permet d'encastrer le lave-linge sechant soit sous
un plan de travail, pour donner I'apparence d'un element integre, soit dans tout
autre endroit ferme. II n'est pas necessaire de veiller a I%vacuation de I'air chaud
de la piece ou il est installe,
Remarque: Le sechage avec ce type d'appareil se deroule differemment de celui
des appareils que vous avez peut-etre utilises par le passe. Les gros
appareils menagers et ceux des laveries fonctionnent sur le 220 V, ce
qui fournit plus de courant et permet de raccourcir les temps de
sechage, Votre lave-linge sechant fonctionne sur le 115 V, ce qui
fournit moins de courant et doric augmente les temps de sechage.
• Vous pouvez programmer le temps de sechagejusqu% 120 minutes, Vous
trouverez ci-dessous les temperatures et les temps de sechage recommandes pour
differents types de vetements :
Temps de sechage Temperature
90 a 120 minutes I__levee
60 a 80 minutes Moyenne
40 a 50 minutes Basse
13
Types de
v6tements
Jeans, serviettes, etc.
Linge leger tels que
draps,jupes, chaus-
settes, etc.
linge leger tel que has,
nylon, etc.

XQG65-11SU -MANUAL 10/29/02 1:51 PM FF_'_ 43
Remarque: Dans le cas d'une pleine charge, il est possible de retirer le tiers ou la
moitie du linge et de secher le reste a part. Ce sera une maniere
efficace d'effectuer le sechage, et cela prendra moins Iongtemps, Pour
les charges incompletes, il est possible de reduire le temps de
sechage. Cela evitera P, votre linge un sechage excessif,
Fonctionnement Manuel du Programme de Sechage:
• Pour lancer manuellement le sechage, il suffit de charger la machine avec le linge
humide, de tourner "le bouton de programmation du sechage" sur le temps desire
et d'enfoncer le bouton de raise en marche 'ON',
Remarque: : Lors de I'utilisation du sechage, laisser le bouton du programmateur
de lavage sur la position 'Arret' ('OFF') afin que le programmateur
de sechage soit en position 'Marche' ('ON').
Fonctionnement Automatique du Programme de Sechage:
• Pour un [onctionnement automatique, il suffit de tourner le bouton du
programmateur de sechage sur le temps souhaite au debut du programme de
lavage. I_orsque le lavage est termine, le sechage demarre automatiquement.
iiiiiiiiiiiiiiiiiiiiiiiiiiiiiiiiiiiiiiiiiiiiiii'i i ii ii ii ii ii ii ii ii ii ii ii ii ii ii ii
Remarque: Le sechage ne demarrera pas automatiquement si I'essorage est en
position 'Arret' ('OFF'), Pour que I'appareil passe automatiquement
du programme de lavage au programme de sechage, le bouton du
programme d'essorage doit etre en position 'Marche' ('ON'),
Remarque: In pleine charge, nous vous conseillons de laisser le programme
d'essorage en position 'Arret' ('OFF') pour empecher I'appareil de
passer automatiquement en mode sechage _, la fin du cycle si le
programme d'essorage etait en position 'Marche' ('ON'). Cela vous
offrira la possibilite de retirer le tiers ou la moitie de la charge et de
secher le reste. L'avantage tient au fair que votre linge sechera plus
uniformement et plus rapidement.
Chargement du Seche-Linge:
1. Trier les vetements en vue du sechage. Separer la couleur comme pour le lavage.
La chaleur du seche-linge peut rendre indelebile certaines taches. Des vetements
correctement seches donneront moins de travail a la sortie du seche-linge.
2. Charger le seche-linge avec le linge lave. Pour un resultat optimal, introduire
dans le seche-linge des vetements dont le poids, le tissu et la fabrication sont
similaires. Placer les petits articles dans un filet pour eviter qu'ils ne s'emmelent.
Ne pas surcharger le seche-linge. Ajouter si vous le desirez du liquide
assouplissant.
3. Programmez le temps de sechage en fonction du type de tissu et de I'importance
de la charge.
4. Attendre la fin du programme de sechage pour ouvrir la porte.
14

KQG65-11SU -MANUAL 10/29/02 1:51 PH .r/@_%44
Remarque: Ne pas trop secher vos vetements. Un sechage excessif peut
provoquer le retrecissement, le durcissement et le froissement du tissu,
Filtre a Fibres
• Le filtre est situe dans le coin en bas a droite derriere la petite trappe. Appuyer
sur la trappe pour I'ouvrir. Pour extraire le filtre, tourner le bouton dans le sens
inverse des aiguilles d'une montre. Le filtre sera deverrouille, Pour le remettre en
place, tourner dans le sens des aiguilles d'une montre. Le filtre sera verrouille.
• Veuillez nettoyer le filtre avant et apres chaque utilisation, mais ne le retirez pas
pour quelle que raison que ce soit Iorsque I'appareil fonctionne,
Le Piege de Bouton
De Piege de bouton est con£;u pour recueillir de petits objets tel que le bouton, les
pieces, etc. Comme ceci peut arriver tres rarement, nous recommandons pour
verifier le piege non plus que deux lois par an. Le Piege de bouton est derriere
Iocalise la couverture en matiere plastique sur le devant inferieur droit de la
machine. Si vous avez besoin d'a I'acces, simplement retirer les roulettes vers vous,
Enleve le devant en matiere plastique couverture, tord le bouton oppose dans le
sens des aiguilles d'une montre position et retire il, Apres avoir vide il hors,
remplacer il soutient en le tordant dans le sens des aiguilles d'une montre.
Remarque: Placer la casserole peu profonde sous le piege qui ouvre comme petit
quantite d'eau peut decharger,
Roulettes
Pour vous faciliter la tache, votre machine est equipee de roulettes de transport pour
vous permettre de la deplacer ou vous voulez. Ces roulettes sont situees en bas ,_
droite et _, gauche a I'avant de la machine. [ntroduire les deux mains dans la petite
fente ou sont loges les bras des roulettes. 11suffit de les tirer vers sol. Lorsque la
machine est arrivee au bon endroit repoussez simplement les bras en position
rentree.
15

XQG6S-IISU-MANUALI0/29/02I:SIPM _mb_4S
[ issions Sonor÷s Nor aI÷s
Lors du fonctionnement du lave-linge, il est normal
d'entendre les bruits suivants:
• Bruits de chute : Ceci est normal, car les vetements trempes et alourdis sont
constamment brasses.
• Sifflements d'air : IIs se produisent Iorsque le tambour du lave linge tourne
grande vitesse
• L'alternance des cycles de lavage et de rinqage produit egalement de legers
cliquetis
Attention: Afin d'eviter les risques d'electrocution, toujours debrancher le
lave linge avant de le nettoyer Le non respect de ces instructions peut
entrainer des blessures ou provoquer la mort Avant d'utiliser des
produits de nettoyage, veuillez consulter les instructions et les
recommandations du fabricant, afin d'eviter les blessures et de ne pas
endommager I'appareil
@÷ttoyag÷ ÷t [ntr÷ti÷n
Pour nettoyer le panneau de controle, utiliser uniquement un chiffon humide ou
impregne d'eau savonneuse
• Afin d'eviter toute degradation de la peinture de la carrosserie, essuyer si
necessaire le lave linge Dans le cas or] celui ci entrerait en contact avec un agent
assouplissant liquide ou en poudre, de I'eau de Javel ou un detergeant, essuyer
immediatement le lave linge afin d'eviter d'endommager la peinture
• Ne pas utiliser de produits chimiques forts et abrasifs, d'ammoniaque, d'eau de
]avel chloree, de produits detergents concentres, de solvants ou de tampons a
recurer metalliques Certains de ces produits chimiques pourraient dissoudre,
endommager, et/ou decolorer la peinture de votre lave linge
• Retirer les aiguilles et autres objets pointus des vetements car ceux ci risqueraient
de rayer les parties interieures de la machine
• Nous suggerons que vous verifiiez le piege de bouton non plus que deux fois par
an Ne pas utiliser la rondelle sans le pmge de bouton A sa place
• Le distributeur de detergeant dispose d'un compartiment amovible A la Iongue,
ce compartiment peut etre encombre par du detergeant desseche, de la salete ou
des debris II est necessaire de retirer et de rincer ce compartiment sous le robinet,
ou d'eliminer les debris a I'aide d'une brosse douce
16

XQG65-11SU -MANUAL 10/29/02 1:51 PM r/_'_ 46
Demenagement et Absence Prolongee
• [teindre les robinets d'arrivee d'eau et debrancher les tuyaux. Vidanger
I'ensemble des tuyaux, Ceci permet d'eviter d'endommager I'appareil par suite de
fuites d'eau provoquees par la rupture accidentelle ou le desserrage des tuyaux,
• Debrancher la prise electrique,
• Secher I'interieur de la cuve. Pour le cas or] vous souhaiteriez deplacer le
lave-linge, debrancher le tuyau de vidange.
• Visser a fond les pieds de raise a niveau dans le sens des aiguilles d'une montre,
• Remonter les boulons et les entretoises de transport a I'arriere de I'appareil, afin
d'eviter que les organes internes de la machine ne subissent des secousses durant
le deplacement du lave-linge.
• Afin d'eviter les moisissures, laisser le couvercle ouvert pour que I'humidite
contenue a I'interieur de la machine puisse s'echapper.
Rangement du Lave-Linge dans un Environnement Froid
• Le lave-linge doit etre range a temperature ambiante,
• Si le lave-linge vient d'etre livre et que la temperature exterieure est en dessous de
zero, veuillez patienterjusqu'_, ce que le lave-linge air atteint la temperature
ambiante.
• Ne pas installer ou faire fonctionner le lave-linge si la temperature de la piece est
en dessous de zero,
17

XQG65-11SU -MANUAL 10/29/02 1:51 PM F/_'_ 47
Le Lave-Linge ne Fonctionne Pas:
• Verifier que I'appareil est bien branche, La prise peut s'etre desserree.
• Verifier que la prise electrique murale soit bien au voltage qui convient.
• Verifier que le disjoncteur Wait pas disjoncte ou que les fusibles n'aient pas fondu.
• L'appareil est en mode 'Arret' ('Off').
• Le lave-linge est surcharge : la charge doit etre reequilibree et les vetements
mieux repartis darts la machine,
• [a porte est ouverte. [lie doit etre fermee correctement.
• Verifier que le bouton de commande soit bien sur le programme qui convient. II
peut s'averer necessaire de regler la position du bouton.
• [e lave-linge marque des pauses durant certains cycles de lavage, Ceci est normal
darts le cas des programmes 'delicats' et 'lavage a la main' qui comportent des
temps de trempage reduits au cours lesquels le lingene subit qu'un trempage tres
bref, Le lave-linge reste doric silencieux pendant ces courtes periodes d'arret.
Lorsque le temps de trempage est ecoule, le programme reprend alors
automatiquement,
Problemes Relatifs a L'eau:
• La quantite d'eau qui sort West pas suffisante : Le robinet d'eau West peut-etre
pas ouvert a fond. [es tuyaux peuvent etre emmeles ou coudes. Remettez-les droit,
Verifier le niveau d'eau selectionne, et modifiez-le si necessaire,
• La temperature de I'eau West pas la bonne : Verifier la temperature de chauffage
de I'eau. L'eau chaude doit etre a une temperature d'au moins 49 ° a 60°C (120
140°[). Verifier que les tuyaux interieurs soient connectes comme il se doit
(ex : chaud a chaud et froid _, froid).
• [uites d'eau : Les fuites se produisent Iorsque le tuyau d'ecoulement ou les tuyaux
de remplissage sont mal installes. II est possible que vos canalisations soient
bouchees, ou qu'elles subissent une pression d'eau constante, II peut s'averer
necessaire de resserrer les tuyaux, de verifier la plomberie, ou d'appeler un
plombier,
• L'eau est evacuee avant la fin du cycle: Ceci se produit Iorsque I'on ouvre la porte
en milieu de cycle.
• L'eau ne s'ecoule pas : Le tuyau d'ecoulement est mal installe. Raccorder ce tuyau
correctement, Verifier la position du tuyau d'evacuation. Afin que I'eau s'ecoule
normalement, veiller ace que la sortie d'ecoulement ne soit pas situee a moins de
1,2 m (4 pieds) au-dessus du sol.
18

XQG65-11SU -MANUAL 10/29/02 1:51 PM _ 48
Le Lave-Linge Fait du Bruit:
• II peut s'averer necessaire de reinstaller le lave-linge. (Be reporter au chapitre
concernant I'installation du lave-linge),
• II peut etre necessaire de mieux repartir la charge si cette derniere s'avere
irreguliere.
• Les pieces de monnaie, les boutons, et autres objets Iourds peuvent faire du bruit
(consulter le Guide d'Utilisation - Bruits d'utilisation normale),
• Grincements: IIs sont causes par la presence d'une trop grande quantite de linge
dans la machine.
• Vibrations: Elles sont dues au fair que le lave-linge n'est pas de niveau et que les
vetements sont real repartis dans la cuve.
Problemes Relatifs aux V_tements:
• Les vetements sont trop [roisses: II n'ont pas ete tries correctement, la machine a
ete surchargee et ils ont ete laves de nombreuses lois a I'eau trop chaude. [viter
de surcharger I'appareil et trier a nouveau le linge. Ne pas melanger les
vetements Iourds tels que des vetements des travail, et des vetements legers tels
que les chemisiers, les chemises legeres et les articles delicats. II peut s'averer
necessaire de laver ces articles _, I'eau tiede ou froide,
• Traces de lessive: La lessive ne se dissout pas correctement dans I'eau. Verifier la
temperature de I'eau ou ajouter la lessive au moment or] la cuve se remplit d'eau,
avant de charger les vetements dans la machine, afin d'eviter les traces de lessive
sur les vetements.
• Vetements presentant des petites marques ou des taches: Ceci est du a une
mauvaise utilisation de I'assouplissant pour textiles, Veuillez consulter les
instructions mentionnees sur le container, et suivre les indications concernant
I'utilisation de I'assouplissant.
• Les vetements deviennent gris oujaun,gtres: Veiller a utiliser suffisamment de
lessive Iorsque la quantite de linge a laver est importante. Ajouter davantage
de lessive,
• [es vetements ont des accrocs, sont dechires ou uses de faqon excessive: Ceci est
cause par la presence d'objets pointus tels que des aiguilles ou des boucles de
ceinture oublies dans les poches. Retirer tous les petits objets pointus. Attacher les
ceintures, [ermer les [ermetures eclair, les boutons pression, etc. Veiller _, bien
utiliser de I'eau de ]avel diluee. Nejamais verser d'eau de ]avel non diluee dans
le lave-linge.
19

XQG65-11SU -MANUAL 10/29/02 1:51 PM F/_ 49
Le Seche-Linge ne Fonctionne Pas:
• Verifier que I'appareil est bien branche. La prise peut s'etre desserree,
• Verifier que le disjoncteur n'ait pas disjoncte ou que les fusibles n'aient pas
besoin d'etre remplaces.
• ['appareil est en mode 'Arret' ('Off'). Appuyer de nouveau sur le bouton de mise
en marche 'ON'),
• Verifier la fermeture de la porte,
L'Appareil Fonctionne, Mais il ne Seche Pas:
• II est en surcharge. Le tambour du seche-linge ne dolt pas etre rempli a plus de
la moitie,
• Verifier si le filtre est propre et s'il n'est pas obstrue,
• Le linge dolt etre trie de nouveau, Separer les gros vetements des vetements plus
legers.
• II peut s'averer necessaire de placer differemment les vetements Iourds,
• Si le sechage est irregulier, utiliser un programme plus puissant ou redistribuer les
vetements a I'interieur du seche-linge.
iiiiiiiiiiiiiiiiiiiiiiiiiiiiiiiiiiiiiiiiiiiiiii illiiiililililililililililililililili
Le Seche-Linge Fait du Bruit Iors du Sechage:
• Ce bruit pourrait etre provoque par la presence de pieces de monnaie, de bou-
tons ou d'autres objets Iourds,
• II peut etre necessaire de remettre I'appareil de niveau. Consulter le Guide
d'Utilisation, a la section : Bruits emis en utilisation normale.
Electricite Statique:
• Due a un sechage excessif, Utiliser un programme de sechage plus court.
• Melange avec un tissu synthetique, Trier et separer les differents types de tissus.
• Utiliser un assouplissant.
20

XQG6 5 -iiSU -MANUAL lO/29/o2
L'INSTALLATION
Ouli_s ÷t Mat6riaux N6cessaires
Les outils suivants sont necessaires pour installer votre
lave-linge:
• Ciseaux
• Tournevis cruciforme
• Tournevis normal
• Pinces
• Cle
• Metre ruban
• Oants
• Niveau
1:51 PM r/_ 50
21
Accessoires fournis Quantite
1, Tuyaux d'arrivee d'eau chaude et froide 2
2, Tuyau de vidange 1
3. Rondelles plates pour les tuyaux d'arrivee 4

XQG65-11SU -MANUAL 10/29/02 1:51 PM r/_ 51
gebaHag÷ de [AppareH
• Retirer I'ensemble des emballages, y compris les boulons et les entretoises de
transport, ainsi que le ruben adhesif maintenant les accessoires du lave-linge _,
I'interieur eta I'exterieur de I'appareil,
• Avant d'utiliser le lave-linge, rechercher et eliminer tous les testes d'emballage, de
ruben adhesif ou d'etiquetage,
• Devisser les 2 boulons, les 4 vis et le boulon central qui maintient I'entretoise fixee
,_ I'erriere de I'appareil, et dont le role est de proteger le tambouret les
composants internes au cours du transport, (Une cle est livree dens le sachet
contenant le Manuel d'lnstructions,)
• Les boulons et les vis doivent etre devisses avant d'utiliser la machine. Conservez-
les afin de pouvoir remonter les protections sur Is machine lors d'un transport,
• Apres avoir depose l'entretoise, revisser les boulons de l'entretoise, le boulon
central et le cache plastique pour eviter d'endommager la machine.
Prise en plastique de boulon
central (non montree)
iiiiiiiiiiiiiiiiiiiiiiiiiiiiiiiiiiiiiiiiiiiiiiiiiiiii!ii!ii!ii!ii!ii!ii!ii!ii!ii!ii!ii!ii!ii!ii!ii!ii!ii!ii!ii!
Parenthese
Boulon
Vis Vis(2)
-Boulon
22

XQ_6S=11su=MImUAI_I0/29/02I:SIPM _mb__S2
Mis÷ Niv÷au de YAppar÷H
• Votre lave-linge est muni de 4 pieds de mise a niveau situes aux quatre coins sous
la machine. Apres avoir installe votre lave-linge a sa place definitive, vous pouvez
proceder a sa mise a niveau.
• Le reglage des pieds de mise _, niveau s'effectue
en les faisant tourner darts le sens inverse des
aiguilles d'une montre pour relever le niveau de
I'appareil, ou darts le sens des aiguilles d'une
montre pour le baisser.
L' nstaHation [tap÷ par [tap÷
Choisir pour cet appareil un emplacement adequat sur une surface stable _, I'abri
de la lumJere du soleil ou de route source de chaleur telle qu'un radiateur, un
chauffage bas, une cuisiniere, etc. Corriger tout defaut du sol a I'aide des pieds de
raise a niveau situes sous le lave-linge. L'appareil dolt etre situe darts un endroit a
temperature ambiante. Ne pas placer le lave-linge dans un endroit o0 la
temperature est inferieure a zero.
Installation du Lave-tinge:
Life attentivement les instructions avant d'installer le lave-linge.
Attention: Si, apres avoir termine ces etapes d'installation, vous n'6tes pas s0r
d'avoir installe I'appareil correctement, veuillez contacter un installateur
qualifie. Pour etre certain que le lave-linge soit installe correctement, il
est recommande de le raire installer par un installateur qualifie.
1, Inserer une rondelle plate neuve darts chaque extremite des tuyaux d'arrivee,
[ixez solidement les rondelles dans le raccordement,
Remarque: II peut s'averer necessaire d'utiliser une pince pour effectuer le
serrage du raccordement, Ne pas trop serrer sous peine d'endom-
mager la soupape,
23

XQG65-11SU -MANUAL 10/29/02 1:51 PM _ 53
2, Raccorder les tuyaux d'alimentation en eau chaude et en eau froide aux robinets
d'eau chaude et d'eau froide.
3. Connecter I'autre extremite a I'arrivee d'eau correspondante du lave-linge, situee
I'arriere de celui-ci.
Remarque: L'eau chaude doit etre a une temperature minimum de 49 ° a 60°C
(120 a 140°F) pour que la lessive puisse de dissoudre et eviter qu'elle
ne laisse des traces sur les vetements,
Inserer le tuyau de vidange dans un tuyau d'ecoulement vers I'exterieur. Le tuyau
de vidange doit etre raccorde a un tuyau d'ecoulement d'un diametre au moins
egal a 4 cm (2"1/2), ou se deverser directement dans un evier. Utiliser le col de
cygne pour maintenir le tuyau en place, Pour eviter un eventuel refoulement, le
tuyau de vidange doit arriver a une hauteur de 80 cm (31 "1/2) au minimum et
de 1 m (40") au maximum. Si I'evier est a moins de 95 cm
(37"1/2) du sol, faire passer le tuyau de vidange dans le ._
clip situe a I'arriere de la machine,
Tuyau de vidange
iiiiiiiiiiiiiiiiiiiiiiiiiiiiiiiiiiiiiiiiiiiiiii'i iiiiiiiiiiiiiiiiiiiiiiiiiiiiiiiiiiiiiiiiiiiiiiiiiiiiiiiiiiiiiili,i! i
Tuyau d'alimentation _,
Arrivee d'eau en eau Col de cygne
Coude de tuyau Tuyau de vidange
detuyau
24

XQG65-11SU -MANUAL 10/29/02 1:51 PM F/_'_ 54
Passer le tuyau de vidange dans ce clip
0
Remarque: Verifier soigneusement qu'il n'y air aucune fuite sur les cotes ou
I'arriere de la machine. Si cela arrive, verifier egalement qu'aucun
branchement West desserre, II peut s'averer necessaire de resserrer un
branchement defectueux,
5. Brancher le lave-linge a une prise normale de 115 volts/6OHz, 15 amperes.
O0
Cotes de 'AppareH
[_Lr".',_Y Lh"59 (,¢nt
25
1
_aut.;ur d_ 85,5cm
I
I
I
I
I
I-,,_l,. i-a_:_,- : .>'1"
b
Vuc Lat.'ral._

XQG65-11SU -MANUAL 10/29/02 1:51 PM _ 55
instructions Concernant _a Mise & _a Terre
Cet appareil doit etre mis _, la terre. Dans le cas ou un court-circuit se produirait, la
raise a la terre permet de reduire les risques d'electrocution grace au fil qui permet
au courant de s'echapper. Cet appareil est equipe d'un cordon comportant un fil
neutre et une prise de terre. La prise doit etre branchee ,_ une prise murale
correctement installee et reliee a la terre,
• Une utilisation non conforme de la prise peut entrainer un
risque d'electrocution,
•Dans le cas ou vous n'auriez pas parfaitement compris les instructions de
raise ,_ la terre, ou si vous n'etes pas sur que I'appareil soit relie a la terre
correctement, consultez un electricien ou un reparateur qualifie.
Conditions a respecter Iors du branchement:
• Cet appareil doit etre raccorde a |
une prise murale d'au moins 15
amperes, 115 volts, 60 Hz AVEC
MISE A LA TERRE.
Remarque: Dans le cas d'une prise ,,b_:z_:_V_ _'_
standard 2 fils, son
remplacement par une
prise 3 fils equipee d'une raise a la terre conforme est de
la responsabilite du consommateur et constitue pour lui
une obligation,
Rallonges I_lectriques:
Nous ne conseillons pas d'utiliser une rallonge electrique.
Le
Coupures de ¢ourant
Des coupures de courant peuvent se produire, provoquees par I'orage ou d'autres
causes. En cas de coupure de courant, debrancher le cordon d'alimentation de la
prise CA. Lorsque I'electricite revient, rebrancher le cordon d'alimentation darts la
prise CA. Si la coupure de courant se prolonge, nettoyer le lave-linge avant de
I'utiliser ,_ nouveau,
26

XQG65-11SU -MANUAL 10/29/02 1:51 PM _ 56
Garantie de UN an sur site
Haier s'engage a reparer ou remplacer toute
piece sans frais, y compris les frais de main
d'oeuvre engendres par des ddauts de
materiaux ou de main d'oeuvre, pendant un
delai de 12 mois.
Garantie limitee
Au bout d'un delai de un an ,_ compte de la
date d'achat du produit, Haler s'engage
fournir les pieces sans frais, tel qu'il est
indique ci-dessous, dans le cas d'une piece
defectueuse dont le defaut provient des
materiaux ou de la main-d'oeuvre. Le tout de
ces pieces est a la charge unique de Haier.
Les couts autres, tels que les frais de
main-d'oeuvre, de deplacement, etc., sont
la charge du proprietaire de I'equipement.
De la troisieme a la cinquieme
annee:
Haler fournit egalement le tambour si celui-ci
vient a rouiller.
De la troisieme a la dixieme annee:
Haier s'engage a fournir la cuve interne en
acier inoxydable.
Remarque: La presente garantie est
applicable a compte de la date d'achat du
produit, dans ]a mesure ou le ticket de caisse
d'origine est presente au representant
autorise avant d'effectuer les reparations
necessaires.
Exceptions: Garantie pour usage
commercial ou location
90jours pour la main d'oeuvre ,_ partir de la
date d'achat d'origine. [xclue les frais de
maintenance sur site.
90jours pour les pieces ,_ partir de la date
d'achat d'origine. Aucune autre garantie
n'est applicable.
Services sous garantie
Contacter le centre de reparation agree le
plus proche. Toute reparation dolt etre
effectuee par un centre de reparation agree
par Haler. Pour obtenir le nom et le numero
de telephone du centre le plus proche,
veuillez contacter le 1-877-337-3639.
Veuillez avoir en votre possession
los documents suivants avant
d'appeler :
Le numero de modele et de serie de
I'apparei] (situe derriere I'appareil, a gauche,
en haut).
Le nomet I'adresse de revendeur aupres
duquel vous avez fait I'achat du produit ainsi
que la date d'achat.
Une description claire du probleme.
Une preuve d'achat (ticket de caisse).
27
CETTE GARANTIE COUVRE LES
APPAREILS UTILISI_S sun LE
TERRITOIRE CONTINENTAL DES
ETATS-UNIS, PUERTO RICO, ET AU
CANADA. ELLE NE COUVRE PAS:
Le remplacement ou la reparation des fusibles
menagers, des dis]oncteurs, des [iis ou de la
plomberie.
Les produits dont le numero de serie d'origine
a ere retire ou modifie.
Les frais supplementaires inhabituels, tels que
les reparations dans un lieu autre que les
lieux habituels, ou en dehors des heures
ouvrabies.
Les dommages aux vetements.
Les dommages survenus en cours de
transport.
Les dommages resultant d'une installation ou
de reparations inadequates.
Les dommages resultant d'un usage incorrect
ou abusif, d'un accident, d'un incendie,
d'inondations, ou de desastres naturels.
Les dommages resultant d'entretiens/de
reparations par quiconque autre que le
revendeur agree Haler.
Les dommages resultant d'un courant
electrique, voltage ou de fournitures
electriques inadequats.
Les dommages resultant de modifications ou
de reglages non autorises par Haler.
Le reglage des commandes utilisees par le
client, tel qu'il est indique dans le guide de
I'utilisateur
Les conduits, boutons, plateaux a peluches et
I'ensemble des accessoires et piecesjetables.
La main d'oeuvre, les frais de transport et
d'expedition engendres pour retirer ou
remplacer les pieces defectueuses, au-dela de
la garantie initiale de12 mois.
Les dommages engendres par une utilisation
autre que I'utilisation menagere normale.
Tous frais de transport ou d'expedition.
CETTE GARANTIE LIMITEE REMPLACE TOUTE
AUTRE GARANTIE ESPRESSE OU ]MPLICITE,
Y COMPRIS LES GARANTIES DE VALEUR
MARCHANDE OU D'ADEQUATION A UN
USAGE PARTICULIER
Le recours offert dans cette garantie est
exclusif et il est accorde a I'exclusion de tout
autre.
La garantie ne couvrant pas les dommages
directs et indirects, les limitations ci-dessus
peuvent ne pas s'appliquer a tousles cas.
Certains etats ne permettant pas la limitation
de ]a duree des garanties implicites, les
limitations ci-dessus peuvent ne pas s'
appliquer a tousles cas.
Cette garantie donne a I'acheteur des droits
specifiques et celui-ci peut beneficier d'autres
droits qui varient selon les etats.
Haier America Trading L.L.C.
New York, NY 10018.

XQG65-11SU -MANUAL 10/29/02 1:51 PM _/_ 57
INSTRUCCIONESDESEGURIDAD
IMPORTANTES
Advertencia - Para reducir el riesgo de incendio, descarga
electrica o lesiones a personas cuando utilice el electrodomes-
tico, siga las precauciones basicas, incluyendo las siguientes:
1. Lea todas las instrucciones antes de usar el electrodomestico.
2. Use este electrodomestico solo para el proposito que rue propuesto, tal como se
describe en esta guia de uso y cuidado.
3. Use solo detergentes o suavizantes recomendados para el use en este
electrodomestico y mantengalos fuera del alcance de los niffos.
4. [ste electrodomestico debe ser propiamente instalado de acuerdo con las
instrucciones de instalacion antes de ser usado,
5. Nunca desconecte su electrodomesticojalando del cable electrico. Siempre
tome la clavija firmemente yjale directamente del tomacorriente,
6, Reemplace inmediatamente los cables eloctricos gastados las clavijas y
tomacorrientes flojos.
7. Desconecte su electrodomestico antes de limpiarlo o antes de hacer cualquier
reparacion,
8, Si su electrodomestico viejo no esta siendo usado, nosotros recomendamos que
le quite la puerta, Esto reducira la posibilidad de peligro para los ninos,
9, No opere su electrodomestico en presencia de humos explosivos,
10, No use el electrodomestico para lavar ropa remojada, manchada o baffada en
gasolina, los solventes para la limpieza en seco o cualquier otra sustancia
explosiva o inflamable que podria encender y explotar.
11, [a ropa o los trapos usados para limpiar materiales inflamables o explosivos no
deber,gn ser lavados en este electrodomestico basra que todas las trazas de
estos materiales hayan sido removidas, para evitar accidentes.
12, No adicione o mezcle ninguna sustancia inllamable o explosiva para el lavado.
13. No trate de quitar la ropa mientras la tina este en movimiento. Deje que la tina
esto en completo alto antes de usarla.
14, La puerta de carga del electrodomestico debe estar cerrada cuando la tina este
en moviento.
15. No opere su electrodomestico cuando falten partes o las partes esten rotas.
16. No use este electrodomestico para el lavado de ropa comercial.
17, No opere este electrodomestico a menos que todos los paneles de cerrado esten
propiamente en su lugar.
XQG6S-IISU -MANUAL 10/29/02 l:Sl PM _ $8
18, Evite una manipulacion imprudente de los controles.
19. Para reducir el riesgo de lesiones, no permita que los ninosjueguen dentro o
sobre el electrodomestico. Es necesario supervisar a los ninos cuando el
electrodomestico es usado en presencia de ellos.
20. Este electrodomestico debe ser conectado a un apropiado tomacorriente
electrico con los correctos suministros electricos,
21. La conexion a tierra debe ser apropiada para reducir el riesgo de descarga e
incendio. NO CORTE O REMUEVA LA CONEXlON A TIERRA. Si usted no tiene
un enchufe electrico trifasico en la pared, un electricista certificado tiene que
instalar el enchufe apropiado, El enchufe de la pared debe estar conectado
apropiadamente a tierra.
22. El gas hidrogeno puede ser producido si el calentador no ha sido usado en
md_sde 2 semanas. Este podria ser explosivo y puede explotar en ciertas
circunstancias. Si este es el caso, antes de usar este electrodomestico, abra
todos los grifos de agua caliente y deje que el agua caliente corra durante
pocos minutos, Esto permitird_ que el hidrogeno acumulado escape, Durante
este proceso no encienda ningun aparato electrico, no fume, ni encienda un
fosforo/encendedor o use ninguna llama para evitar un accidente, El gas
hidrogeno es inflamable y puede explotar.
23, No seque prendas que hayan sido previamente limpiadas, lavadas, mojadas, o
manchadas con gasolina, solventes, u otras substancias inflamables o expIosi-
vas, ya que se pueden producir vapores que pueden encenderse o explotar,
24. No repare o reemplace ninguna parte del electrodomestico ni intente ninguna
reparacion a menos que sea recomendado de manera especifica en las
instrucciones de mantenimiento o reparacion, de las cuales tenga conocimiento
y destreza para desemperlarlas.
25. No utilice calor para secar articulos que contengan hule espuma o materiales
con una textura similar.
26. Limpie el filtro de pelusas antes y despues de cada carga,
27. No coloque los articulos expuestos a los aceites de cocina en su secadora. Los
articulos contaminados con aceite de cocina podrian contribuir a una reaccion
quimica que pudiese causar un incendio,
28, Para reducir el riesgo de descarga electrica o incendio, no utilice cables de
extension o adaptadores para conectar la unidad al suministro electrico,
GUARDEESTASINSTRUCCIONES
Para ReferenciaFutura

XQG65-11SU -MANUAL 10/29/02 1:51 PM r/_ 59
PELIGRO
Riesgo de aprisionamiento infantih Antes de deshacerse de
su antiguo electrodomestico, quite la puerta para evitar que
los nihos puedan quedar atrapados en el interior.
Gracias por adquirir este producto
de Haier. Este sencillo manual Io
guiara para obtener el mejor uso de
su lavadora y secadora,
Recuerde anotar el nt]mero de reg-
istro y el nt]mero de serie. Estos se
encuentran en una etiqueta en la
parte posterior de la unidad,
N_3mero de Modelo
Numero de Serie
Fecha de Compra
Engrape su recibojunto al manual, Lo necesitar;_ para obtener el
servicio de la garantia.

XQG65-11SU -MANUAL 10/29/02 1:51 PM F/_ 60
INSTRUCCIONES DE SEGURIDAD ....................................................1
INSTRUCCIONES DE FUNCIONAMIENTO ......................................5
Partes y Funciones .................................................................................. 5
OperaciOn ............................................................................................ 7
Sonidos Normales de Operacion .......................................................... 16
Guia de Cuidados y Limpieza .................................................... 16
Limpieza y Mantenimiento .................................................................... 16
Mudanza y Vacaciones ........................................................................ 17
Almacenamiento de su Lavadora .......................................................... 17
PAGE
Problemas y Soluciones ................................................................ 18
INSTRUCCIONES DE INSTALACION .............................................. 21
Herramientas y Materiales Requeridos .................................................. 21
Desempacado de su Electrodomestico .................................................... 22
Nivelado de su Electrodom(_stico .......................................................... 23
Pasos para la Instalacion ...................................................................... 23
Conexiones Electricas .................................................................... 26
Instrucciones de la Conexion a Tierra .................................................... 26
Interrupciones Electricas ........................................................................ 26
Garantia .......................................................................................... 27

XQG6S-IISU-_UAL I0/29/02I:$IPM _mb_61
Partesy Funciones
GJ
o
xQ_65 11su
B_,,,on
1. Perilla de Seleccion del Ciclo de
Lavado
2. Boton de la Puerta
3. Perilla de Seleccion del Ciclo de
Secado
4. Luz Indicadora del [ncendido "On"
5. BorOn de Encendido /Apagado
("On/Off")
6. Boron de Seleccion para el Nivel de
Enjuagado de la Carga
7. Boron de Seleccion para el Ciclo de
Exprimido
8. Boron de Seleccion del Ciclo de
Remojo "Encendido/Apagado"
9, Diagrama de Referencia del Ciclo
de Lavado
10, Dispensador del
Detergente/Suavizante de Tela
11. Ventanilla de Vidrio
12. Paras Niveladoras Frontales
Ajustables
13, Palancas Liberadoras de las
Ruedecillas
14. Filtro de Pelusas

XQG6S-ilSU -MANUAL i0/29/02 i:Si PM _ 62
\
©
1. Mangueras para el agua (Caliente/Fria)
2. Cable Electrico (115 V / 60 Hz)
3, Manguera de Desague
4, Patas Niveladoras Traseras Ajustables
5, Clips Retenedores de la Manguera
©

XQ_OS=11s_=M_UAL I0/29/02I:SIPM rmJm-_63
[ami iarizandose{on su [avadora
de Carga [fontal
Este estilo de lavadora es mas docil en el lavado porque esta tiene una accion de
lavado en forma de voltereta y no hay un agitador que dane su ropa. Debido a
que no hay un agitador en este estilo de lavadora, la lavadora trabaja
silenciosamente. [ste estilo de lavadora est_i disenada para ahorrarle dinero.
Utiliza menos agua y detergente.
Boton de Encendido:
• Presione el boton (este estar,:i hacia dentro) para tener su lavadora
encendida, La luz se encendera indicando que est,:i encendida. Vuelva a
presionar el boron (este estara hacia fuera) para tener su lavadora
apagada. La luz se apagara indicando que esta apagada,
Boton de Seleccion para el Nivel de Enjuagado
de la Carga:
"_ A_agado
.I,_E_cendido
C]
Potencia
0
• Presione el boton (este estara hacia dentro) si usted quiere reducir el uso _ M_o
del agua durante el ciclo de enjuagado. Vuelva a presionar el boron ,_P°rO°rn_et°
(este estar,:i hacia fuera) si usted quiere utilizar el m,:iximo de agua
durante el ciclo de enjuagado, I I
Nora: "Half" = [njuagado con minimo de agua Carga
"Full" = Enjuagado con m_,ximo de agua
Boton de Seleccion para el Ciclo de Exprimido:
• Si usted quiere extraer md_sagua de su ropa durante el ciclo de lavado, presione
el boton (este estara hacia fuera). La ropa estar,:i mas seca
cuando esta opcion sea seleccionada. "} Ap_9_o
• Si usted no quiere extraer m,:is agua de su ropa usando el ciclo de
exprimido, presione el boton (este estar,:i hacia dentro). Siesta opcion
no es seleccionada, solo el exceso de agua en la tina se drenar,:i,
dejando la ropa humeda. Vueita
E_lcend do
U
Ventajas de No Utilizar el Ciclo de Exprimido:
• El ciclo de exprimido puede causar exceso de dobleces y arrugas
en algunas telas.
• La velocidad alta en el ciclo de exprimido quiz,:1 sea muy fuerte para prendas
delicadas. Esto podrian resultar por estiramientos o desgastes,
7

XQG65-11SU -MANUAL 10/29/02 1:51 PM r/_ 64
Nota: Cuando el ciclo de exprimido este en posicion "OFF", lamP, quina no se
pasara automaticamente a la funcion de secado.
Nota: El boton hacia adentro significa Apagado, el boron hacia fuera significa
Encendido.
Boton de Seleccion para el Ciclo de Remojo:
• Presione el boton (este estar,:i hacia dentro) para tener el remojo
apagado y vuelva a presionar el boron (este estara hacia fuera) para
tener el remojo encendido. Despues del Ilenado de agua del remojo
y que el suavizante de tela este disperso, el ciclo permitira que la
ropa se remoje antes de completar el enjuagado del ciclo de lavado.
Boton de la Puerta:
• Presione el boton para abrir la puerta. [sta unidad tiene
incorporado un dispositivo de cierre de seguridad. Usted debe
esperar 3 minutos para abrir la puerta despues de que la
maquina ha parado.
Nora: Si usted quiere abrir la puerta a la mitad del ciclo para armdir o remover
ropa, presione el boton en la posicion "OFF". Para continuar el ciclo
simplemente cierre la puerta y presione el boron de encendido a la posicion
"ON".
"_ Apagado
j_ Encendido
Remojo
©
Puerta Empotrada

XQG65=IISU =MANUAL 10/29/02 1:5i PM _f_h_65
Cic ode [avado
• Antes de comenzar el lavado de su ropa, lea cuidadosamente el diagrama de
referencia del ciclo. Este est,:i Iocalizado en la esquina superior izquierda del
frente de su lavadora.
Nora: Gire la perilla hacia la derecha para la posicion deseada CUANDO
SELLECIONE ELCICLO.
Abajo se encuentra el diagrama de referencia del ciclo para su ropa.
Ciclos para Prendas Sinteticas
Prendas de A-Normal
Algodon B-Rapido
1-Pre-lavado C-Expreso
Prendas Delicadas
I-Normal
II-Enjuagado
III-Exprimido
2-Normal D-Enjuagado
3-Rapido E-Exprimido
4-Expreso
5-Enjuagado
• Seleccione el ciclo apropiado: De 1 a 4 para prendas de algodon, de "A" a '%"
para prendas sinteticas o 'T' para prendas delicadas en su perilla de seleccion
para el ciclo,
Siga los siguientes pasos para seleccionar el ciclo apropiado:
1, Seleccione el numero del ciclo apropiado, la letra o el numero romano en el
diagrama de referencia del ciclo,
2, Gire la perilla hacia la derecha para emparejar el simbolo, Asegurese de
alinear el indicador del s[mbolo en el panel del control,
3, Presione el botd.n de encendido ("ON"),
XQG65-IISU -MANUAL 10/29/02 1:51 PM _ 66
Ciclo para Prendas de Algodon:
Ciclo de Pre-lavado: El proposito de este ciclo es para que usted pre-lave ropa
con manchas diffciles antes de comenzar el ciclo de lavado, El ciclo esta configura-
do de tal manera que este ira automaticamente a traves de los ciclos de lavado:
Normal---_-Rapido _ Expreso, incluyendo los ciclos de enjuagado y exprimido
para completar el lavado. El tiempo total de este ciclo es de aproximadamente 147
minutos,
Ciclo de Lavado Normal: [ste es usado para ropa de trabajo yjuego, ropa
domestica blanca, ropa con manchas normales o ligeras y para ropa de algod6n.
Este ciclo es de aproximadamente de 130 minutos.
Ci¢lo de Lavado Rapido: [ste es usado para una carga pequena con manchas
ligeras que necesitan ser lavadas r_,pidamente, Este ciclo es de aproximadamente
de 80 minutos.
Ciclo de Lavado Expreso: Este es usado tambien para cargas pequer_as con
manchas ligeras que necesitan ser lavadas rapidamente. [ste ciclo es de
aproximadamente de 60 minutos.
Ciclo para Prendas Sinteticas:
Ciclo de Lavado Normal: [ste ciclo es usado para manchas en telas de
planchado permanente, seda, lana, nylon y acrflico. [ste ciclo es de
aproximadamente de 60 minutos.
Ciclo de Lavado Rapido: Este es usado para una carga pequena con manchas
ligeras que necesitan ser lavadas rapidamente, Este ciclo es de aproximadamente
de 45 minutos,
Ci¢lo de Lavado Expreso: [ste es el mismo que del ciclo de lavado rapido
excepto por el tiempo. [ste ciclo es de aproximadamente 40 minutos,
Ciclo para Prendas Delicadas:
Ciclo de Lavado Normal: Este ciclo es usado para telas delicadas que
frecuentemente se lavan a mano, Este ciclo es de aproximadamente de 40 minutos.
Nota: Si el ciclo de exprimido esta en posicion "OFF" antes de iniciar el ciclo,
la m_,quina se desaguara autom_,ticamente y se apagara. Asimismo no
se encendera automaticamente para la funcion de secado.
lO

XQG65-11SU -MANUAL 10/29/02 1:51 PM _ 67
mperatura
La temperatura del agua esta predeterminada cuando usted selecciona el ciclo de
lavado, este fijar,:i la temperatura adecuada para cada carga de lavado.
Por favor lea el siguiente diagrama para entender la temperatura adecuada de
cada ciclo:
Tipo de Ciclo Tipo de Temperatura
Ciclo para Prendas de Algodon
Pre-lavado Fria
Normal Caliente
Rapido Tibia
Expreso Fria
Enjuagado Fria
Ciclo para Prendas Sinteticas
Normal Tibia
Rapido Tibia
Expreso Fria
Enjuagado Fria
Ciclo para Prendas Delicadas
Normal Fria
Rinse Fria
Nota: El agua caliente necesita estar a una temperatura de al menos 49°C a 60°C
para que eljabon se disuelva y evite residuos en la ropa. Si la temperatura
del agua no estd_ en los niveles arriba descritos cuando lave su ropa, usted
necesitara regular su calentador de agua para mantener esa temperatura.
Carga de la Lavadora:
• Cargue cada articulo sin apretar.
• Separe la ropa blanca de la de color. Separe la ropa pesada de la ropa ligera.
• Revise cuidadosamente todos los bolsillos y punos, puede haber objetos
pequenos, los cuales pueden resbalar dentro de la tina y causar lesiones.
• De un pre-tramiento a todas las manchas y ,:ireas de manchas dificiles para
mejores resultados.
• No sobrecargue la lavadora.
• Cierre la puerta apropiadamente despues de cargar la ropa.
11

XQG65-11SU -MANUAL 10/29/02 1:51 PM _ 68
Uso Apropiado del Dispensador:
El dispensador del detergente/suavizante esta Iocalizado en la esquina superior
derecha de la lavadora. Abra el dispensadorjalando este hacia fuera. Usted vera
que hay tres compartimentos.
Compartimento de en Medio: Este es usado para el detergente liquido en el
pre-lavado, Este es usado cuando usted quiere pre-lavar ropa sucia con manchas
dificil antes del ciclo de lavado.
Compartimento Derecho: [ste es usado para el detergente liquido en el ciclo
de lavado.
Compartimento Izquierdo: [ste es usado para el suavizante de tela liquido.
(Derecho Compartimiento-
2 Para el detergente liquido)
mpartimiento-Para
(Ido Compartimiento-Para el
suavizador liquido de la tela)
prelave el detergente liquido)
Uso Apropiado del Suavizante de Tela:
• Ponga el suavizante de tela liquido dentro del compartimento de lado izquierdo
como es recomendado por el fabricante,
• Para evitar derrames, no exceda el nivel del compartimento,
12

XQG65-11SU -MANUAL 10/29/02 1:51 PM _ 69
Uso Apropiado del Detergente:
El detergente de baja espuma es recomendado para lavadoras de carga frontal.
Este tipo de detergentes evita danos a su lavadora, los cuales pueden ser causados
por una cantidad excesiva de espuma que entra al compartimento del condensador.
Nota: Usted puede usar menos o mas detergente dependiendo del tamano de la
carga, el tipo de agua en su domicilio, siesta es suave o dura y si la ropa
tiene manchas dificiles o ligeras, Ademas del desempeno de la lavadora, la
calidad del detergente tambien afecta el resultado del lavado,
Advertencia- • Nunca ponga suavizante de tela directamente sobre la ropa
porque este manchara su ropa.
• No use suavizante en polvo dentro del dispensador, de Io
contrario este obstruira el dispensador. El dispensador esta
disenado s01o para liquidos.
Operacion de la Secadora:
• Su secadora es de "tipo condensador", Io que significa que esta no requiere
de ventilacion. Durante el proceso de secado, la evaporacion del agua de su
ropa es condensada por la maquina y drenada por las mangueras de desague.
La maquina utiliza pequerms cantidades de agua que se alimenta
automaticamente de la manguera de entrada. Quiza usted escuche que la
maquina esta absorbiendo agua durante el ciclo de secado.
• Con este diseno sin ventilacion, usted puede instalar la secadora debajo del
mostrador o cualquier area encerrada. Usted no necesita preocuparse por
evacuar el aire caliente proveniente del area en donde esta instalada,
Nota: La operacion de secado de esta unidad es diferente a otras secadoras que
usted haya usado antes. Las secadoras domesticas grandes o de lavanderia
operan con 220 V las cuales se abastecen de mas energia y permiten tiem-
pos de secado mas rapidos. Su secadora opera con 115 V, la cual se
abastece de menos energia resultando un tiempo de secado mas largo.
• Usted puede seleccionar un tiempo de secado de hasta 120 minutos, Vea la
temperatura y el tiempo recomendado para diferentes tipos de ropa:
Seleccion del Tipo de Calor Tipo de ropa
Tiempo de Secado
Parajeans y toallas,
90-120 rninutos Alto etc.
Para prendas ligeras
60-80 rninutos Medio tales corno sabanas,
faldas, calcetines etc.
Para prendas ligeras
40-50 rninutos Bajo tales corno medias y
nylon, etc.
13

KQG65-11SU -MANUAL 10/29/02 1:51 PM F/_z 70
Nota: Para cargas pesadas, quiz,:1 usted quiera remover 1/3 a de la carga y
secar por separado la ropa restante. Esto serd_una manera eficiente para
secar su ropa y no tomara un secado prolongado, para cargas menos
Ilenas, quiza quiera reducir el tiempo de secado. Esto evitara secar
demasiado.
Operaeion Manual de la Seeadora:
• Para operar la secadora manualmente, simplemente cargue la maquina con ropa
humeda, gire la "Perilla de Seleccion de Secado" al tiempo deseado y presione el
boron de encendido a "ON".
Nota: Cuando opere la secadora, usted debe mantener la perilla de
"Seleccion del Ciclo de Lavado" en posicion "OFF" para tener
la secadora en posicion "ON".
Operacion Automatica de la Secadora:
• Para la operacion autom,:itica, simplemente ponga la "Perilla del Ciclo de
Secado" al tiempo deseado al comienzo del ciclo de lavado. Cuando el ciclo de
lavado haya terminado, la secadora se encender,:i automd_ticamente.
Nota: La secadora no se encenderd_ autom,:iticamente si el ciclo de exprimido estd_
en la posicion "OFF". Usted debe mantener el boron del ciclo de exprimido
en posicion "ON" para ir de la funcion de lavado a la funcion de secado
automaticamente.
Nota: Cuando la carga de lavado sea pesada, recomendamos mantener el ciclo
de exprimido en posicion "OFF" para evitar que la unidad vaya al modo de
secado automP, ticamente al final del ciclo si el ciclo de exprimido estuvo en
posicion "ON". Esto le dara a usted la flexibilidad para sacar 1/3 a de la
carga y secar el resto. La ventaja es que su ropa se secara uniforme y
rapidamente.
Carga de la Secadora:
1, Clasifique las prendas para secarlas. Separe las prendas de color obscuro de las
de color claro, como Io hace para lavar. Revise que no existan manchas que
puedan no haber desaparecido durante el lavado. El calor de la secadora puede
fijar permanentemente algunas manchas. Las prendas bien secas necesitardm un
cuidado minimo al sacarlas de la secadora,
2, Cargue la secadora con la ropa lavada, Para mejores resultados, use una carga
de ropa de tela, peso y construccion similar. Coloque las prendas pequenas en
una bolsa de malla para evitar que se enreden, No cargue demasiado la
secadora, Agregue una toallita de suavizante de tela si Io desea.
3, Seleccione la temperatura de secado dependiendo del tipo de telay del tamano
de la carga,
4, Espere a que el ciclo de secado termine antes de abrir la puerta de la secadora,
Nota: No seque demasiado la ropa. El secarla demasiado puede causar
encogimiento, aspereza y arrugas en la tela.
14

XQG65-11SU -MANUAL 10/29/02 1:51 PM r/_ 71
Filtro de Pelusas:
• El filtro de pelusas esta Iocalizado en la esquina frontal inferior derecha detras de
la tapa de la puerta pequena. Presione la tapa de la puerta. Para quitar el filtro
de pelusas, gire la perilla del contador hacia la izquierda. Esto liberar,:i el filtro
de pelusas. Para volver a colocar, gire la perilla hacia la derecha. [sto cerrara el
filtro de pelusas.
• Por favor limpie el filtro antes y despues de cada uso, pero no Io quite por
ninguna razon mientras la maquina este en operacion.
La Trampa del Boton
Trampa del boron se disena para reunir objetos pequeflos tal como boton, las
monedas, etc. Cuando esto puede acontecer muy raramente, recomendamos para
no verificar la trampa m,:is que dos veces al aflo. La Trampa del boron se Iocaliza
atr,:is la cubierta plastica en el rondo la frente correcta de la maquina. Si usted
necesita accesar, sacar el ruedecillas por simplemente hacia usted. Quite la cubierta
plastica anterior, tuerce la perilla contra a la derecha la posicion y Io estira fuera.
Despues que vaciarlo fuera, Io reemplaza apoya torciendolo a la derecha.
Nora: Coloca cacerola superficial bajo la trampa la cantidad como pequena que
abre de agua puede descargar.
Ruedecillas
Para su conveniencia, su maquina cuenta con ruedecillas para que pueda mover
esta a donde usted desee. Las ruedecillas est,:in Iocalizadas en los laterales frontal
inferior derecho e izquierdo de la m,:-iquina. Ponga ambas manos en el hueco
pequeflo donde estan Iocalizadas las palancas de las ruedecillas. Simplemente
empt]jelas hacia usted. Cuando la maquina haya sido traslada a un lugar
apropiado solo empuje las palancas de las ruedecillas hacia arras en su posicion.
L.J <::
15

XQG65-11SU -MANUAL 10/29/02 1:51 PM F/_ 72
$onidos Nor aMes de ©pera{i6n
Los siguientes sonidos son comunes durante el
funcionamiento de la lavadora.
• Sonidos de volteretas: [sto es normal ya que las prendas mojadas son agitadas
continuamente alrededor.
• Sonidos de corriente de aire: Esto ocurre debido a que la tina de la lavadora
gira a altas revoluciones por minuto.
• Los ciclos de lavado y enjuagado en el encendido y apagado haran sonidos
"clic".
Advertencia: Antes de limpiar, siempre desconecte su lavadora para evitar
descargas electricas. El ignorar esta advertencia puede resultar en
lesiones o la muerte. Antes de usar los productos de limpieza,
siempre lea 3/siga las instrucciones 3/advertencias de los
fabricantes para evitar lesiones personales o danos del producto.
Limpieza y Mantenimiento
Use solo un trapo humedo yjabonoso para limpiar el panel de control.
• Para evitar algt]n tipo de dano al acabado del gabinete, limpie el gabinete de la
lavadora como sea necesario. Si usted derrama liquido/suavizante en polvo,
blanqueador o detergente sobre el gabinete, limpie el gabinete inmediatamente
porque puede causar danos al acabado.
• No use ningt]n abrasivo, quimicos agresivos, amonia, blanqueador de cloro,
detergente concentrado, solventes o estropajos de metal. Algunos de estos
quimicos pueden disolver, danar y/o decolorar su electrodomestico.
• Quite los prendedores u otros objetos puntiagudos de la ropa para prevenir
rayaduras en las partes interiores.
• Sugerimos que usted no verifica la trampa del boron masque dos veces al ano.
No use la arandela sin la trampa del boton en el lugar.
• [I Compartimento del Dispensador del Detergente tiene una inserto removible.
Con el paso del tiempo, este compartimento puede acumular detergente seco,
mugre o restos. Usted debe quitar el inserto, enjuagar en el fregadero y quitar los
restos con un cepillo suave.
16

XQG65-11SU -MANUAL 10/29/02 1:51 PM r/_ 73
Mudanza y Vacaciones
• Cierre el grifo del suministro de agua y desconecte las mangueras [scurra el
agua de todas las mangueras Esto evitara danos debido a que el agua gotee si
las mangueras accidentalmente se rompen o se aflojan
• Desconecte la clavija electrica
• Seque el interior de la tina de lavado Si traslada la lavadora, desconecte la
manguera de desague
• Gire las paras niveladoras hacia la derecha
• Reinstale los pernos de embalaje y los soportes metalicos en la parte posterior
para impedir la agitaci6n de las partes internas cuando traslade la lavadora a
otro lugar
• Para prevenir mohos o el enmohecimiento, deje la puerta abierta para que la
humedad que esta dentro de la m_,quina pueda evaporarse
Almacenamiento de su Lavadora en Ambiente Frio
• Este electrodomestico debe ser almacenado a temperatura ambiente
• Si usted a recibido la entrega del electrodomestico cuando la temperatura exteri
or est., congelante, no opere hasta que haya alcanzado la temperatura ambiente
• No instale u opere su electrodomestico donde la temperatura ambiente
este congelante
17

XQG6S-IISU -MANUAL 10/29/02 l:Sl PM rfi_-_ 74
La lavadora no funciona:
• Revise que la unidad este conectada, La clavija puede haberse aflo]ado,
• Revise si el tomacorriente electrico tiene el voltaje apropiado,
• Revise si el cortacircuito necesita reajustarse o si el fusible necesita reemplazarse,
• Revise si la unidad esta en la modalidad de "Apagado',
• Revise si la lavadora esta sobrecargada: la carga puede necesitar ser
rebalanceada y la ropa puede necesitar ser redistribuida,
• Revise si la puerta est,:i abierta, Usted quiza tenga que cerrar la puerta
adecuadamente.
• Revise si la perilla de control esta propiamente fija. Usted quiza tenga que a]ustar
la perilla de control.
• La lavadora se interrumpe en algunos ciclos. Esto es normal en los ciclos para
prendas delicadas y lavado a mano, el cual tiene un periodo de remo]o corto
donde su ropa est,:i siendo remojada. Usted no escuchara a su lavadora
funcionar por un periodo de tiempo corto. Cuando el tiempo de remojo se haya
finalizado, esta comenzar,:i automd_ticamente,
Problemas con el agua:
• No hay suficiente agua saliendo: El grifo puede necesitar ser abierto
completamente. Las mangueras del agua pueden estar enredadas o fruncidas.
[stire las mangueras, Revise la seleccion del nivel del agua, esta puede necesitar
ser reajustada.
• La temperatura del agua es incorrecta: Revise la temperatura de su calentador de
agua. El agua caliente necesita estar a una temperatura de al menos
49°C - 60°C. Asegt]rese que la manguera de entrada este conectada
apropiadamente (por ejemplo: caliente con caliente y fda con fria).
• Goteras: Esto es debido a una instalacion inadecuada de las mangueras de
desague o de las mangueras de Ilenado. Su drena]e domestico puede estar
obstruido o tener presion constante de agua. Usted puede necesitar apretar las
mangueras, verificar la plomeria o Ilamar a un plomero.
• El agua es extraida antes de que el ciclo este completo. Esto sucede si usted abre
la puerta a la mitad del ciclo,
• El agua no es desaguada: Esto es debido a que la manguera de desague no esta
instalada apropiadamente, Usted puede necesitar conectar apropiadamente la
manguera de desague. Revise la posicion de la manguera del drenaje. Para
desaguar apropiadamente, asegt]rese que la punta del drena]e de salida este a
menos de 1,2 m sobre el piso.
18

XQ@6S-ilSU -MANUAL i0/29/02 i:Si PM .r_% 75
La Lavadora Hace Ruido:
• Puede que la lavadora necesite ser reinstalada, (Revise la seccion de instalacion),
• La carga de la lavadora necesita ser rebalanceada, quiza la carga este
desnivelada.
• Las monedas, botones y objetos pesados podrian hacer ruido (lea la Guia de
Funcionamiento y Sonidos Normales de Operacion).
• Sonidos Chillantes: Debido a la sobrecarga de la tina de lavado.
• Vibracion Ruidosa: Debido a la impropia nivelacion del piso y la distribucion
desnivelada de ropa en la tina,
Problemas con la Ropa:
• La ropa esta muy arrugada: Esto es debido a la clasificaciOn impropia,
sobrecarga y el lavado en agua muy caliente repetidamente. Evite la sobrecarga
y clasifique su carga. No mezcle ropa pesada tal como ropa de traba]o con
ropa ligera como blusas, camisas ligeras y delicadas, Puede que necesite lavar
con agua tibia o fria,
• Tiene residuos dejabon: El detergente puede no estar disuelto en el agua. Revise
la temperatura del agua ousted necesita adicionar el detergente cuando la tina
comience a Ilenarse con agua antes de cargar su ropa para evitar residuos de
jabon sobre la ropa,
• Manchas en su ropa: Esto es debido al uso incorrecto del suavizante de tela.
Usted quiza necesite leer las instrucciones en el contenedor y seguir las
indicaciones de uso.
• ka ropa esta de color gris.:iceo o amarillenta: Esto es debido a que no pone
suficiente detergente en cargas grandes. Quizd_ tenga que adicionar mas
detergente a la carga,
• La ropa esta desgarrada y tiene agu]eros/desgastes y rasgones: Esto es debido a
objetos puntiagudos tales como los prendedores y alas hebillas de los cinturones
dejados en las bolsas. Usted necesitara quitar los objetos puntiagudos pequenos
sueltos. Abroche los cinturones, cierres, clips metalicos, etc. Revise si usted esta
utilizando blanqueador diluido, Nunca adicione blanqueador sin diluir a la
lavadora.
La Secadora no Funciona:
• Revise que la unidad este conectada. La clavija puede haberse aflojado,
• Revise si el cortacircuito necesita reajustarse o si el fusible necesita reemplazarse,
• Revise si la unidad est.:i en la modalidad de "Apagado". Presione el boton de
Encendido de nuevo,
• Revise que la puerta no este abierta,
19

XQG6S-IISU -MANUAL 10/29/02 l:Sl PM _ 76
La Secadora esta Funcionando Pero no Seca la Ropa:
• La unidad puede estar demasiado cargada. [I tambor de la secadora debe estar
Ileno hasta la mitad.
• Revise si el filtro de pelusas esta limpio y libre de polvo.
• Tiene que clasificar la carga de la secadora. Las prendas pesadas tienen que sep-
ararse de las prendas regulares.
• Acomode la ropa abultada,
• Si la ropa se seca de manera desigual, puede que requiera un ajuste mas alto de
secado o que tenga que clasificar la ropa.
La Secadora Produce un Sonido al Secar:
• Las monedas, botones y objetos pesados pueden producir estos sonidos,
• Puede que la secadora necesite nivelarse uni[ormemente, Lea la Guia de
Funcionamiento y Sonidos Normales de Operacion.
Estatica:
• Causada por un secado excesivo. Ajuste a un tiempo de secado mas corto.
• Mezcla de telas sinteticas, Clasifique y separe las diferentes telas,
• Use suavizante de tela.
20

XQG65-11SU -MANUAL 10/29/02 1:51 PM _ 77
Herramien[asy Ma[eriaMesRequeridos
Usted necesitara tener las siguientes herramientas para
ayudarle en la instalacion de su lavadora:
Tueras
Destornillador de Cabeza Phillips
Destornillador [st,gndar
Alicates
[lave Inglesa
Cinta Metrica
Guantes
Nivelador
21
Accesorios Provistos Cantidad
1. Mangueras de Entrada
para Agua Caliente y Fria 2
2. Manguera de Desague 1
3. Arandelas Planas de la
Manguera de Entrada de Agua 4

XQG65-11SU -MANUAL 10/29/02 1:51 PM F/_'_ 78
Desempacado de su [m÷{[rodomes[ico
• Retire todo el material de embalaje incluyendo los pernos y los soportes, Retire
las cintas adhesivas que sostienen los accesorios internos y externos,
• Inspecciones y retire cualquier resto de embalaje, cintas adhesivas o materiales
impresos antes de usar la lavadora,
• Quite los 2 pernos, los 4 tornillos y el perno central que sostiene al soporte
metalico de la parte posterior de esta unidad que son instalados para proteger el
tambor y los componentes internos de danos durante el envio. ([a [lave Inglesa
esta incluida en la bolsa del manual de instrucciones)
• Los tornillos y los pernos deben ser retirados antes de usar la maquina. Una vez
retirados, guarde estos para cuando traslade la m,gquina y usted pueda
reinstalarlos para proteger la maquina de danos durante el envio,
• Una vez retirado el soporte, reinstale los tornillos del soporte, el perno central y
la conexiOn de pl,:istico para prevenir danos a la m,:iquina.
Perno Central
Conexion de Plastico (no se muestra)
So
Perno
(2)
Tornillos
-Perno
22

XQG65-11SU -MANUAL 10/29/02 1:51 PH r/_'_ 79
Hive_ado de su EMectrodo_esti¢o
• Su lavadora tiene 4 patas niveladoras; las cuales est,:in Iocalizadas por debajo de
las cuatro esquinas. Despues de ubicar adecuadamente su lavadora en su
posicion final, usted puede nivelarla.
• Las patas niveladoras pueden ajustarse gir,:in-
dolas a la izquierda para elevar la lavadora o
gir,:indolas a la derecha para bajar la lavadora,
Pasos para lnsta aeien
Seleccione un lugar apropiado para este electrodomestico en una superficie dura y
uniforme, le:jos de los rayos directos del sol o fuente de calor, por ejemplo:
radiadores, calentadores, aparatos electrodomesticos, etc., cualquier piso de
snivelado debe ser corregido con las patas niveladoras Iocalizadas por debajo de
las esquinas. Este electrodomestico debe ser colocado a temperatura ambiente,
Usted no debe colocarlo donde la temperatura este congelante.
b_io
Instalacion de su Lavadora:
Lea cuidadosamente estas instrucciones antes de la instalacion,
Precaution: Si despues de completar todos estos pasos, usted no esta seguro de
que la unidad esta instalada adecuadamente, contacte a un
instalador calificado, Para asegurarse que su electrodomestico esta
instalado apropiadamente, es recomendable que este sea instalado
por un instalador certificado,
1. Inserte la arandela plana nueva dentro de cada extremo de las mangueras de
entrada, Ponga firmemente las arandelas en el acoplamiento,
Nota: Usted puede que tenga que usar alicates para apretar el acoplamiento. No
sobreapriete porque puede causar danos a la valvula.
23

XQG65-11SU -MANUAL 10/29/02 1:51 PM F/_ 80
2. Conecte las mangueras de entrada del agua caliente y fria al grifo de agua
caliente y fria.
3. Conecte el otro extremo a las respectivas entradas de la lavadora, Iocalizadas en
la parte posterior.
I_lota: El agua caliente necesita estar a una temperatura de al menos 49°C - 60°C
para que eljabon se disuelva y para evitar residuos dejabon en la ropa.
4. 4. Instale la manguera de desague al drenaje. La manguera de desagiJe debe
estar colocada dentro de un drenaje de al menos 3,8 cm de diametro o
directamente en un fregadero. Use el "cuello de ganso" para sostener la
manguera en su lugar. Para evitar la posibilidad de que el agua regrese, la
manguera de desague debe extenderse al menos 80 cm como minimo y 1 rn
como m,6ximo. Si el fregadero tiene al menos 95 cm de altura, guie de la
manguera de desague a traves del clip en la parte posterior de la maquina.
Manguera de DesagLie
Manguera del
[ntrada de Agua Suministro de Agua Cuello de Ganso
Manguera Curvada Manguera de DesagLie
uera Curvada
24

XQG65=IISU -MANUAL 10/29/02 1:51 PM FfJ_ 81
(Guie de la manguera de desagLie a traves del Clip)
0
Nora: Inspeccione cuidadosamente si existen goteras alrededor yen la parte
posterior de la maquina. Si hay goteras, revise si alguna conexiOn esta
floja, Usted quiza necesite apretar las conexiones flojas,
5. Conecte la lavadora en un tomacorriente regular de 115 V, 60 Hz y 15 A.
O0
Dimensiones de _a Unidad
1
"_ISI'_. l'l{1-bN'l._L
25
itl
I
I
I
I
I
'C
4_
m
V[IJT _ ],/,q'E'_ "_l,

XQG65-11SU -MANUAL 10/29/02 1:51 PM r/_ 82
Jns_ru¢¢iones de _a Conexion a Tierra
Este aparato debe ser conectado a tierra. En el caso de un corto circuito electrico,
la conexion a tierra reduce el riesgo de descarga electrica proveniente de un cable
suelto de la corriente electrica. Este electrodomestico esta equipado con un cable a
conexion a tierra. [sta conexion debe set insertada dentro del tomacorriente
instalado propiamente a tierra.
• [I uso impropio de la conexion trae como consecuencia el riesgo de
A
descarga electrica.
• Consulte a un electricista calificado o al personal de reparacion si las
instrucciones de la conexion a tierra no son completamente comprendidas
o si existe alguna duda de que el aparato este conectado propiamente a
tierra.
Requerimientos de la Instalacion Electrica:
conectado a un tomacorriente
• [ste electrodomestico debe estar _ E(_)
CONECTADO A TIERRA de al
menos 15 A, 115-120 V y 60 Hz. ,.,.,
Nola: Donde se encuentra un
tomacorriente bifasico, es
responsabilidad y obligacion
del consumidor reemplazarlo por un tomacorriente trif,:isico,
con una conexion apropiada a tierra.
_ Cables de Extension:
No se recomienda el uso de cables de extension.
Jnterrupeiones [Meetricas:
Ocasionalmente pueden existir interrupciones de energia electrica debido a
tormentas y otras causas. Quite el cable de energia electrica del tomacorriente de
Corriente Alterna cuando ocurra un paro de energia. Cuando la energia electrica
haya sido restablecida, reconecte el cable de energia electrica al tomacorriente de
Corriente Alterna. Si el paro de energia es por un periodo de tiempo prolongado,
limpie la lavadora antes de usarla.
26
XQG65-11SU -MANUAL 10/29/02 1:51 DM F/_ 83
Garantia de UN Afro Completo
Durante un periodo de 12 meses a partir de
la fecha de compra original, Haler reparar_i
o reemplazar_ cualquier parte, libre de
costo, incluyendo fallas en el funcionamiento
debido a defectos en los materiales o mano
de obra.
Garantia Limitada
Despues de un ano a partir de la fecha de
compra original, Haler proveer,_ una parte,
libre de costo como se indica abajo, para
reemplazar dicha parte debido a defectos en
los materiales o mano de obra. Haler es
responsable solamente por el costo de la
parte. Todos los demas costos tales como
mano de obra, costos de envio, etc. son
responsabilidad del dueno.
fercer al Quinto Afro
Haier proveera el tambor de la secadora si
este se oxida.
fercer al Decimo Afro
Haler proveera a tina de lavado interna de
acero inoxidable.
NOTA: Esta garantia comienza en la fecha
de compra del articulo y la factura original
de compra debe presentarse al centro de
servicio autorizado para poder efectuar
cualquier reparation que este bajo la
garantia.
Excepciones: Garantia pot Uso
Comercial o Bajo Arrendamiento
90 Dias de mano de obra a partir de la
fecha de compra original. Excluyendo costos
de envio.
90 Dias de reemplazo de partes a partir de
la fecha de compra original. Ninguna otra
garantia aplica.
Reparaciones Bajo la Garantia
Contacte el centro de servicio autorizado m_is
cercano. Todas las reparaciones deberan
realizarse pot un centro de servicio
autorizado de Haler. Para obtener el nombre
y el numero telefonico del centro de servicio
autorizado mas cercano, favor de Ilamar al
1-877-337-3639.
Antes de Ilamar debera tener
disponible la siguiente informacion:
NEJmero de modelo y nt]mero de serie del
aparato. El nombre y la direccion del
distribuidor de donde adquirio la unidad y la
fecha de compra.
Una clara descripcion del problema.
Una prueba de compra (recibo de compra).
Testa garantia cubre aparatos den-
tro del territorio continental de los
Estados Unidos y Canada. Esta
garantia no cubre Io siguiente:
Reemplazo o reparacion de los fusibles,
cortacircuitos, instalacion electrica o tuberia
de la casa.Un producto al cual se le ha
removido o alterado el numero de serie
original. Cargos de servicio adicionales no
identificados especificamente como normales,
tales como Ilamadas hechas fuera del area u
horario de servicio.
Danos alas prendas.
Danos durante el envio.
Danos causados por una instalacion o
reparacion inadecuada.
Danos por maltrato, abuso, accidentes,
incendios, inundaciones o actos de la
naturaleza.
Danos por reparaciones no Ilevadas a cabo
por un distribuidor o centro de servicio
autorizado por Haler.
Danos causados por corriente electrica,
voltaje o suministro electrico incorrectos.
Danos causados por modificaciones,
alteraciones o ajustes no autorizados por
Haler.
Ajustes de los controles operados pot el
consumidor como se identifican en el manual
del dueno.
Mangueras, perillas, filtros de pelusa y todos
los aditamentos, accesorios y partes
desecha bles.
Cargos de mano de obra, transportacion y
envio pot remover y reemplazar las partes
defectuosas mas alia del periodo inicial de
12 meses.
Danos que no hayan ocurrido durante el us()
normal domestico.
Cualesquier cargos de transportation y
env[o.
ESTA GARANTIA LIMITADA ES PROVISTA
EN SUSTITUCION DE CUALESQUIER OTRAS
GARANTIA8, EXPLICITAS O QUE INCLUYAN
LAS GARANTIAS DE COMERCIALIZACION
O ADAPTACION PARA UN PROPOSITO
PARTICULAR.
El amparo provisto por esta garantfa es de
uso exclusivo y se otorga en sustitucion a
cualquier otro amparo. Esta garantia no
cubre danos incidentales o consecuentes, por
Io que las anteriores restricciones pueden no
set aplicables en su caso. En ciertos estados
no se permiten restricciones en la duracion
implicita de una garantia, por Io que las
anteriores restricciones pueden no ser
aplicables en su caso. Esta garantia le otorga
derechos legales especificos y puede que
tenga otros derechos, los cuales varian de
estado a estado.
Haler America Trading L.L.C.
New York, NY 10018.
27

XQG65-11SU -MANUAL 10/29/02 1:50 PM F/_'_ 1
IMPORTANT
Do Not Return This Product To The Store
If you have a problem with this product, please contact the "Haler Customer
Satisfaction Center" at 1-877-337-3639.
DATED PROOF OF PURCHASE REQUIRED FOR WARRANTY SERVICE
IMPORTANT
Ne pas Reexpedier ce Produit au Magasin
Pour tout probleme concernant ce produit, veuillez contacter le service des
consommateurs 'Haler Customer Satisfaction Center' au 1-877-337-3639.
UNE PREUVE D'ACHAT DATEE EST REQUISE POUR BENEFICIER DE LA GARANTIE.
IMPORTANTE
No regrese este producto a la tienda
Si tiene algun problema con este producto, por favor contacte el "Centro de Servicio al
NECESITA UNA PRUEBA DE COMPRA FECHADA PARA EL SERVICIO DE LA GARANTIA
Consumidor de Haler" al 1-877-337-3639 (Valido solo en E.U.A).
240 V, 60 Hz
Made in China
Fabrique en Chine
Hecho en China
H II
What The World Comes Home To TM
Haier America Trading, L.L.C.
New York, NY 10018
Printed in China
XQG65-11SU-2
Issued: February 02 Part # WD_999%09
 Loading...