

Page 1

Fuzzy Computerized Automatic
Washing Machine
This manual is for
XQB55-10H
User's manual
Special number:
Please read this manual
carefully before using.
Retain it for future reference.
0030506875
Page 2

Contents
Names of the parts................................................................................................1
Safety precautions ............................................................................................. 2
Installation and adjustment ...................................................................................4
Preparation before washing .................................................................................8
Put in the laundries .............................................................................................. 9
Usage of the detergent ........................................................................................ 9
Use the operation buttons ................................................................................. .10
Close the top lid ................................................................................................. 14
Finish washing ....................................................................................................14
Disposal after washing .................................................................................... ...15
Trouble shooting Answer to questions........................................................ .....16
Packing list ...................................................................................................... ...17
Description of heating function
1. Heating function can be selected for "Normal", "Jeans" , "Gentle"
and"Quick" programs, but it's unavailable for "Rinse"process.
2. If heating function is selected, for water levels
after water reaches the set level, and begins to wash when the set temperature
is reached; for water levels
"2", it continues water supply and gently agitates while heating to the set
temperature, then it begins normal washing; for water levels above
cycle is: after water reaching level
supply continues until level
the set temperature, then it begins to wash while water supply is resuming,
(the hot water temperature then is good for detergent active enzyme function
and for the clothes to be in an optimum detergent concentration with a good
washing effect. The subsequent washing while water supply can facilitate dirt
flushing and removing), water supply stops when reaching the set level, then it
continues to wash normally. For high water levels, only the water amount
below level
supplements water to the set level
3. This washing machine provides 3 temperature selections of 20 , 30 and
40 , each ranging as follows
"6" can be heated to the set temperature, then it washes and
20 3 3 0 3 40 3
"3"-" 6", it begins to heat upon water reaching level
"2", it begins to heat, meanwhile water
"6", water supply stops and it continues heating to
"1"or " 2", it begins to heat
"6", the
Page 3
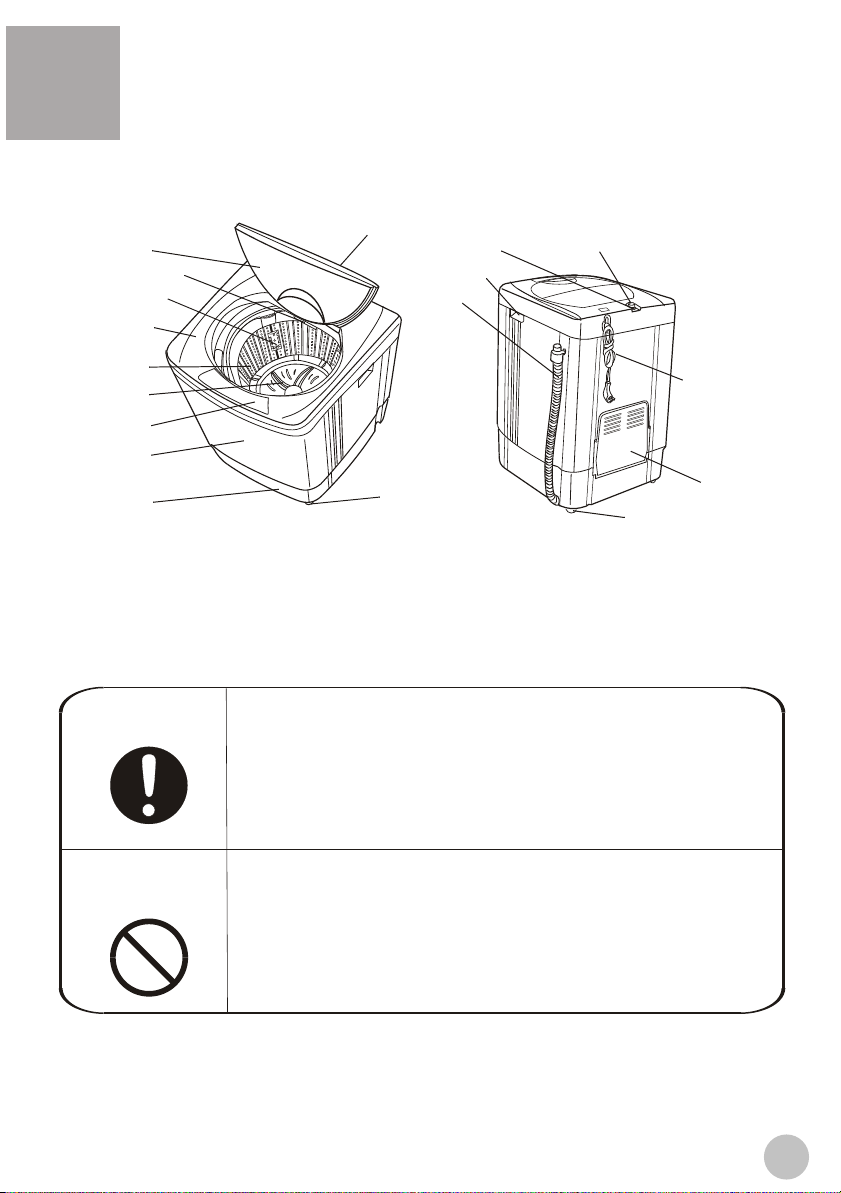
Names of the parts
Top lid B
Detergent box
Filter cover
Control panel
Top lid A
Sop mat
Cabinet handle
Drain hose
Before Using
Before Using
Water valve
Inner tub
Pulsator
Control panel film
Cabinet
base frame
Adjustable foot
Meaning and description of the symbols
Warning sign
Forbidden sign
Contents marked with that symbol are related to the safety
of the product and the personal safety of the users. Please
operate in strict conformity to the contents, otherwise it may
cause damage of the machine or injure the personal safety
of the user.
Contents marked with that symbol are actions forbidden to
perform. Performing of those actions may result in damage
of the machine or injure the personal safety of the user.
Power line
back cover
fixed foot (3)
1
Page 4

Safety precautions
Before Using
Before Using
Please plug the plug on special 220V /10A
receptacle.Be sure to use single-phase
three pins receptacle.Ensurethe earthing
prong of the power receptacle is earthed
reliably.Use leakage protector if possible.
Do not damage the power cord,bend ,extend,twist,bind or alter it by force.Do not press or
nip it with weight.If the power cord or the power plug is bad, or the power plug becomes
flexible,to avoid risk it is required to have it replaced by
the technicians of our special shop or the after-sale
service department. Keep the pin of the power plug
clean,if the power plug is polluted with dust,please
wipe with dry cloth carefully.
Do not put the machine at damp place like
the bathroom. Never wash it with water.
Not put wet laundries on the control panel.
The power cord plug should be convenient
to be pluged in or pluged out with hand
while the washing machine runs normally.
Be sure to pull the plug out and close the
water tap when the machine is idle,when
moving the machine,or when cleaning
the machine.Do not use wet hand to insert or pull out the power plug.
Do not use water hotter above 50 C .
In case the washing machine is installed
on ground with carpet, do not block the
ventilation hole with carpet.
The ventilation holes
at the bottom
soft items
Do not let the machine share one receptacle with other
electric appliances. If the power plug is damaged, or
the plugging into the receptacle is loose,
do not use the plug any more.
Do not wash water-proof laundries like
the raincoat, bike covers etc. to avoid
abnormal vibrations in spinning.
2
Page 5
Safety precautions
Before Using
Before Using
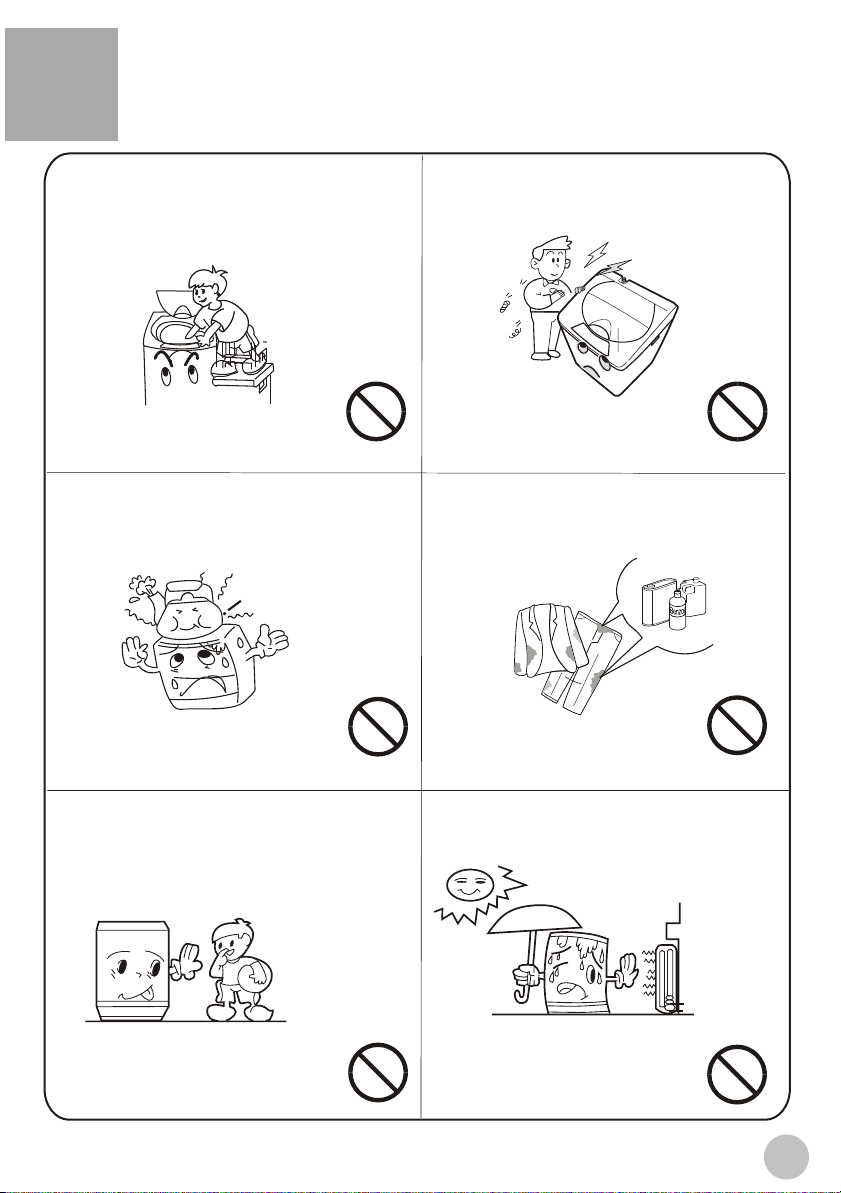
Do not stretch hands into the working
machine. It is dangerous even if the
rotation is slow. Take special care of
the children.Do not let the children
climb the washing machine.
Do not put any hot or heavy items (such
as the kettle with hot water ) on the
washing machine.
Do not decompose, repair or alter the
machine by yourself.
Do not wash laundries with volatile
materials (such as thinner, petrol etc.)
l
Petro
nner
Thi
The handicapped or children without
care shall not use the machine.
Keep the machine away from direct
sunlight and heat source like the heater.
3
Page 6
Before Using
Before Using
Installation and adjustment
Please install and adjust the machine according to the requirement of the manual. It is
very important to your security and correct operating the machine.
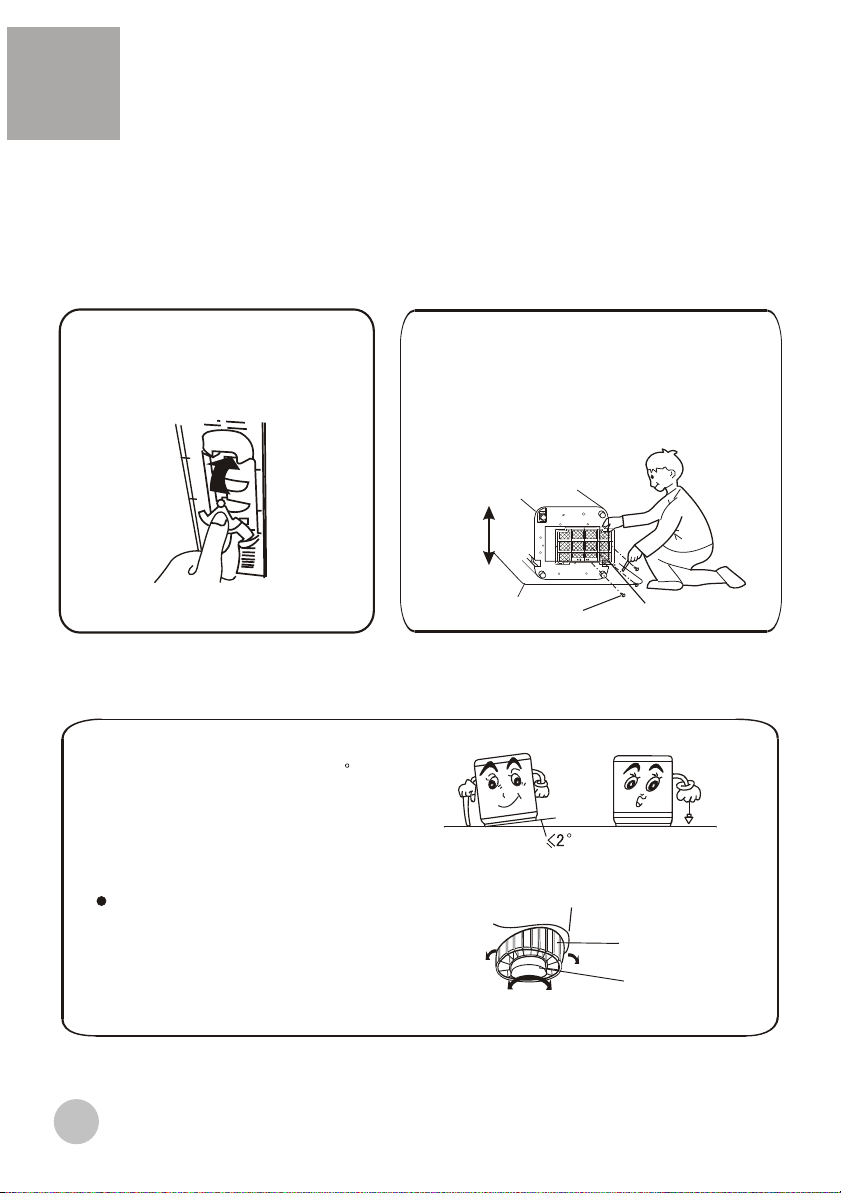
Install the lint filter
1.Press downward to assmble.
2.Pull upward to detach.
Install the bottom plate
After you open the package, please lean
the washing machine gently down on soft
items ( like the towel cloth,blanket, etc. ).
Install the bottom plate to the bottom of the
machine with the eight screws by a cross
screwdriver, then lift the machine up gently.
See to the figure:
Adjust the installation position
The largest allowed slope of the
shank base of the machine is 2 .
The slanting or rough ground will
result in unstable running or
stoppage of the machine. Please
adjust it with following methods:
Front
Back
Soft items
Screw
Bottom plate
Adjust the adjustable foot:
1.To twist the adjustable foot, please
first lift up the side of the foot slightly,
loosen the adjustable nut, and twist
the foot.
2.Fasten the nut after adjustment.
4
Loosen
High
adjustable nut
Fasten
adjustable foot
Low
Page 7

Before Using
Before Using
How to change the direction of the drain hose
1.Loosen the fastening screw of the
back cover to take off the back cover.
Be careful not to do it by force to
prevent breaking the claw of the back
cover.(as indicated in Figure 1)
Back cover
Figure 1
2.Take off the drain hose from the cabinet.
Nip the drain hose outlet slightly.
Dismantle the drain hosehook. Loosen
the fixing screw of the drain hose frame
to dismantle the drain hose frame. Pull
the drain hose into the cabinet from the
left side of the base frame.
Drain hose frame
Nip the drain hose outlet
Screw
and take off the drain hose hook
Figure 2
Usage of the drain hose
The drain hose shall drain smoothly
1.The height of the drain hose shall be
less than 10cm, or the drainage will not
be smooth, and cost such long time that
the machine may stop at mid way.
2.Do not trample or press the drain hose.
3.Extend the drain hose from the installation
hole at the right side of the base frame. Fix
the drain hose onto the base frame with the
drain hose frame and fasten the screw. Then
set the drain hose hook on the drain hose and
hang the drain hose on the hanging hole of
the cabinet. (As
indicated in Figure 3)
Figure 3
4.To install the back cover, first hang the lower
beard of the back cover on the cabinet, then
push the claws at the two side and the upper
end from bottom to top to resume the original
setting. Be careful not to do
it by force. Then fasten
the screw (two points)
(as indicated in Figure 4).
Top claw
Screw
Claws at the
two sides
Lower bread
Figure 4
4.If extra drain hose is needed, please
make separate purchase. The inner
diameter of the extra hose shall not
less than 30mm, and the length shall
not exceed 1.5m.
3.If the drain hose is too long, cut it at mid
point. To make smooth drainage, cut the
front end of the hose slantingly.
If the extra hose is too long, cut it
either at A or at B point.
5
Page 8

Before Using
Before Using
Install the water inlet hose
Confirm the water tap
Water tap,suitable
Outlet end surface
>10mm
It is required that the front end shall be longer than 10mm.
The outlet end surface of the tap shall be flat and smooth. If not please file it to
avoid leakage.
Water tap,not suitable
Connection between the water inlet hose jointer and
the water tap
1.Use the new water inlet hose provided with the machine to connect to the water
faucet.Old hose sets should not be reused.
2.Press the lower end of the lock lever and push down the slider. Take off the water
inlet hose jointer from the water inlet hose component. See to Figure 1.
3.Loosen the screw till the water tap can be accessed. Put the jointer of the water
inlet hose on the tap. See to Figure 2. (If the tap diameter is too large and the jointer
can not be set on the water tap, please loosen the four screws and take out the
bushing in the jointer. See to the figure3.)
Water inlet pipe jointer
Slider
Locking lever
Water inlet pipe
4.Fasten the four screws evenly. See to Figure 4.
5.Take off the nameplate. Twist the fastening nut as per the indication of the figure.
See to Figure 5.
Remarks: Before twisting the fastening nut, the thread is 4mm above the
upper surface of the nut. After twisting the fastening nut, the thread is 2mm
above the upper surface of the nut. See to Figure 6.
Figure 4
Figure 1
Screwdriver
Figure 2
Nut
Figure 5
Screw
Mark label
About 4mm before twisting
About below 2mm after twisting
Figure 6
6
bushing
Figure 3
Page 9

Before Using
Before Using
Connection between the water inlet hose and the
washing machine
1.Do not take off the water absorption
cushion. Please check if the cushion
is dropped or damaged before each
usage. If it happens please contact
our after-sale department immediately.
2.Put the nut of the water inlet hose on
the valve jointer.
3.Fasten the nut. Swaying it gently to
confirm if it's suitable.
Jointer of the water inlet valve
Nut of the water inlet hose
Water absorption cushion
Connection between the jointer of the water inlet
hose and the water inlet hose
1.Push down the slider. Insert the
water inlet hose into the jointer.
2.Hang the lock lever to the jointer.
Release the slider till a click
sound is heard.
Locking lever
Jointer of the water
inlet hose
Slider
Check the connection between the jointer of the
water inlet hose and the water tap
1.Swaying the hose gently to confirm if it is fastened
stable.
2.After installation, open the tap to check if it leaks.
3.Do not bend the hose with overstrain.
4.Before each usage please check if
the connection between the jointer
of the water inlet hose and the water
tap, and the installation of the
water inlet hose are firm, so as to
prevent dropping from improper
Take down the water inlet hose
1.Close the water tap.
2.Press the locking lever. Push down the slider. Then
pull off the water inlet hose. If the machine is used
more than once every week, the jointer of the water
inlet hose can be kept on the tap to prevent
damaging the fixing screw.
Locking lever
Slider
7
Page 10

Preparation before washing
Preparation before washing
1.Connect the water inlet hose and open
the water tap .
2.Confirm that the washing machine is
earthed reliably . Then insert the power
plug into the receptacle. Do not connect
the earth terminal to the gas pipe and
tap water pipe.
3.Put down the drain hose.
Using process
Using process
Pay attention to followings before washing the laundries
Confirm if
there's special
requirment for
the laundries.
a.Please check if the laundries are applicable for washing.
b.Separate those not colorfast from other laundries.
c.For laundries not waterabsorbing,please put them into water with hands.
d.For laundries with much soil,please remove the soil first.You can add detergent on the
part with serious soil directly.It is much easier to remove the soil by that mean.
e.For laundries likely to get lint ball or with long fiber,please first turn the inside out before
putting them into the water.
f. Do not put the laundries polluted with chemicals directly into the washing machine.
g.For those small laundries ,laundries likely to be twisted or worn,and woolen laundries,
please put them into mesh bag before wasing.
h. Do not select heating function for clothes that should avoid hot water or wear.
i . In order to prevent the heating band from being entangled, washing of seriously worn
or linty clothes should be prohibited.
Clear the pocket.
Take out the
coins , sand,
hairpins etc.
Fasten the
buttons and
zippers.
The quantity of
the laundries
shall not exceed
the rated value.
The big laundries
like the jeans
shall be put in
loosely.
When the pulsator
is running , the
buttons of the
laundries may
cause noise. For
the sake of
discretion,please
put the laundries
with buttons into
other laundries.
8
Page 11

Put in the laundries
Usage of the detergent
How to use the washing
powder
Inlet box of the detergent
How to use the whitener
Fill water to decided level. Dilute
the whitener with container. Pour
it slowly into the washing tub.
Avoid using whitener on
laundries with color or pattern as
they are prone to lose color.
The whitener shall not touch the
laundries directly.
Refer to the user's manual for
the usage and quantity of the
whitener.
For powder whitener, please
dissolve it before use.
Using process
Using process
The capacity of washing and spinning of the
machine refer to the largest weight of the standard
laundries under dry condition that can be washed
or spinned in one time. One time washing quantity
shall be lower than the rated capacity. The largest
capacity of this machine is 5.5kg.
The thickness, size, type of the cloth will influence
the actual washing capacity. It is suitable for one
time washing to put in reasonable amount of
laundries and the laundries can be turned round in
washing.
Do not select "High" water level for laundries less
than 1.0kg, so as to avoid splashing of water.
To wash thin laundries like the stocking, silk etc.,
please first put them into washing mesh bag (which
can be purchased separately) before wash.
Direct dissolved in the machine
1.Fill water to "Low" water level.
2.Add the power. Run for 30 seconds
to dissolve it completely.
3.Put in the laundries. Select
suitable water level.
The instant dissolving of the washing
powder:
1.Prepare warm water of 30 and a
container.
2.Add the powder while stirring to
fully dissolve it.
Put in the prorer quantities detergent
according to the water level and the
laundries quantities .
It is suggested not to use high
sudsing detergent.
Washing powder with poor quality or
long time storage maybe caked.
Please pay attention to cleaning the
detergent box in time
9
Page 12

Use the operation buttons
Description of the function of the buttons
a.
a.
Using process
Using process
Using process
Using process
"PROCEDURE"button
With it you can select one or
several processes of soak,
wash, rinse and spin.
WATER
LEVEL
SELECTION
" WATER LEVEL"button
The user selects a suitable water level depending
on the load.
If "Quick" wash is selected, water level will
indicate "2". After water level reaches "2", it will
wash while water filling, and wash normally upon
the water level reaching "4".
After washing for 1 min, pressing "Water level"
button will enable supplemental water filling, which
will stop automatically upon the water reaching
overflow level.
STANDARD
JEANS
GENTLE
QUICK WASH
PROGRAM
SELECTION
PROCEDURE
SELECTION
"PROGRAM " button
You can select from the following four programs.
Standard
Jeans
Gentle
Program
Quick
Normal wash
Large, thick or heavily
soiled laundry
Woolen textiles or underwear
10 min quick wash for
load below 1 kg
SOAK
WASH
RINSE
SPIN
Remarks: After pressing "POWER ON/OFF" to connect power supply, if the washing machine
lasts idle more than 10 min, it would automatically shut off the supply.
10
10
Page 13

SURPLUS(MIN)
To indicate -- during sensing.
To indicate remaining min. During
program running.
To indicate remaining reserved
time (hrs) during reservation period.
To indicate fault symbols for abnormal
conditions (see page 16)
SURPLUS MIN
RESERVE HOURS LATER
RESERV
ATION
CALEFACTION
Page 16
"START/PAUSE"button
After the power is switched on, press it to
start the machine
During working, push it to pause working.
During pause, push this button to restart
and continue operation.
"POWER ON/OFF"button
Press "Power On/Off" button to
connect power supply.
After power is connected,pressing this
button will cut off the supply.
POWER
START
ON/OFF
PAUSE
"RESERVATION/CALEFACTION" button
Press ""button to set scheduling or heating
Function.If heating function is selected, the scheduling function is unavailable.
During machine running, the display indicates the cycle remaining time in
minutes). Press
Indicate the remaining scheduled time to cycle end (in hours), the decimal point
flashes to indicate the scheduled progress.
Heating function can be selected if keep pressing
CALEFACTION
lighted, it means heatingfunction is selected. If keep pressing
The
temperature indicator turns off, and the heating function is cancelled. The
initial temperature is about 30 , and you can select your
desired value in 3 s in a switching sequence 30 40 20 .
After the machine starts running, if selection or cancellation of
heating function is desired, you should switch off the power and reselect.
RESERVATION/CALEFACTION
RESERVATION/CALEFACTION
""button, the display will
RESERVATION/
"
Button for more than 2 s. If the temperature indicator is
"
RESERVATION/CALEFACTION
""button for more than 2 s, the
11
Page 14

Using process
Using process
b.
Operating procedure and explanations for the
buttons
WATER
LEVEL
SELECTION
STANDARD
JEANS
GENTLE
QUICK WASH
PROGRAM
SELECTION
PROCEDURE
SELECTION
SOAK
WASH
RINSE
SPIN
SURPLUS MIN
RESERVE HOURS LATER
RESERV
CALEFACTION
ATION
START
PAUS E
POWER
ON/OFF
1 Press the "POWER ON/OFF" button to switch on
the power supply
POWER
After switching on, the washing machine
heating function
will be
automatically set inactive.
In order to select heating function, the"RESERVATION/CALEFACTION"button
should be pressed for more than 2 s until the heating indicator is lighted,which means
the heating function is selected. The initial status is 30 , and 40 or 20 can be
selected if you press
2 Press the button of" "to
"
RESERVATION/CALEFACTION"button again in 3s.
PROGRAM
select a suitable full-automatic program
After switching on, the "Standard" program will be the default. If other full-automatic program is
desired, you can press the button " " to get the corresponding
indicator on. Refer to the "Button of ' '"
paragraph on page 10.
Example: Use the "Quick" program for slightly soiled articles.
PROGRAM/RESERVATION
PROGRAM/RESERVATION
Page 10
ON/OFF
PROCEDURE
SELECTION
When "standard" program is selected, the washing
machine will perform full-automatically controlled fuzzy
program to set water level, water flow and wash duration
according to the cloth nature and weight
12
Page 15

Using process
Using process
3 Press the button of "PROCEDURE SELECTION"
to select suitable processes.
PROCEDURE
SELECTION
After the power is switched on, the washing machine will automatically
set a normal program comprising of processes of "Wash, Rinse and Spin" .
If other program is desired, press the button of "Process" to select one
or several process of soak, wash, rinse and spin. Refer to the
paragraph "Processes selecting".
Page 10
Attention
Even there's no water in the tub, the
spinning will start after a certain period.
Do not use soak process for woolen laundries
Wash the laundries that are prone to lose
colors separately from other laundries.
The pulsator will not rotate unless the
water is filled to selected water level.
Selection method of the procedure programs
Times of pushing
the"select"button
0
1
2
3
4
5
Selected procedure
program
Wash,rinse,spin
Wash(the washing
liquid remains in the
tub)
Wash,rinse(the
rinsing liquid remains
in the tub)
Rinse,spin
Spin(spin after drain)
Soak,wash,rinse,spin
Applicable procedure
When the common laundries
need washing, rinsing and
spinning.
Repeat using the washing
liquid
The laundry needn't spin to
avoid wrinkles
When the laundries need
rinsing and spinning after
manual washing
When the laundries need only
spinning after manual
washing (first drain then spin)
If the laundries are very dirty,
or the sleeve and collar are
dirty, first soak then wash
.
Contents(the lighted indicators
indicate the programs about to run)
Soak Wash Rinse Spin
Soak Wash Rinse Spin
Soak Wash Rinse Spin
Soak Wash Rinse Spin
Soak Wash Rinse Spin
Soak Wash Rinse Spin
If you push the "PROCEDURE SELECTION" button for 6 times, it will resume the
original mode, and it will circulate like that.
If you select the"QUICK WASH" program, you have to set the full procedure of
wash, rinse and spin. The procedure can not be selected.
If you push the "PROCEDURE SELECTION" button for 6 times, it will resume the
original mode, and it will circulate like that.
If you select the"QUICK WASH" program, you have to set the full procedure of
wash, rinse and spin. The procedure can not be selected.
13
Page 16

Using process
Using process
4 Press the "WATER LEVEL" button to select suitable
water level
WATER
LEVEL
SELECTION
After switching on the power, press the button "WATER LEVEL" to select a water level according
to the load. Please refer to the button " Water level" on page 10.
Page 10
RESERV
ATION
5 Push the " RESERVATION/CALEFACTION"
CALEFACTION
button to select suitable reserve program
After switching on, the washing machine reserved wash program will be automatically set
i
nactive. If you desire a wash cycle to end at a reserved time, you can press the
"RESERVATION/CALEFACTION"button to set a reserved wash program.
Refer to The button of
"RESERVATION/CALEFACTION" on page 11.
Confirm the reserve program
When "Reservation" becomes active, the nixie tube displays the time
to the end of the reserved wash cycle, and the indicator turns on.
To change the running program or cancel the reservation,
you should cut off the supply and reselect.
Confirm the heating function
Keep pressing the"RESERVATION/CALEFACTION" button for more than 2 s,
the heating indicator turns on (red).
Keep pressing the
heating indicator turns off and heating function is cancelled.
After the machine starts running, if selection or cancellation of heating function
is desired, you should switch off the power and reselect.
"RESERVATION/CALEFACTION"button for more than 2 s again, the
6 Press the "start/pause" button
Close the top lid
Except water filling (excluding heating function) and draining process,
if the top lid is opened, the machine will stop running and alarm.
Finish washing
The washing machine cuts off the power supply
automatically when wash cycle ends.
14
Page 11
the washing will finish
about 18 hours later
START
PAUSE
Page 17

Disposal after washing
After using, please clean the lint and foreign materials of the lint filter etc. in time.
Otherwise it may influence your using the machine.
Please first pull off the power plug from the receptacle before cleaning.
Using process
Using process
The lint filter must be used during washing.
It must be cleaned in time after each using.
1. Take off the lint filter
Put hand at the indicated position.
Push down to take it off. ( See to
Figure 1)
2. Clean the lint
Figure 1
Put it in water and clean while it is
still wet.(See to Figure 2)
3. Install the lint filter
After cleaning, insert the bottom
Figure 2
of the lint filter ( marked with
"down side") into the filter frame ,
then push the upper part of the
filter in ( marked with " up side ").
(See to Figure 3)
Figure 3
The filter screen of the water inlet
valve is likely to be blocked by
foreign materials and influence
the water inlet. Please clean it
If the cabinet is dirty, wipe it with wet cloth
Do not flush it directly with water.
Wipe it with neutral detergent.
Do not wipe it with thinner, petrol,
alcoholetc.
Alcohol
inner
Th
Petrol
1.After washing, close the water faucet. ( If needed, you can dismantle the water inlet hose).
2.Do not store water in the washing machine for a long period. Drain the water completely after each using.
3.Be sure to pull off the power plug before maintenance.
4.Hang up the power cord and drain hose.
5.Wipe off the water drops on the surface of the machine and inside the tub. Open the top lid for some time
(about 1 hour), then close the top lid.
15
Page 18

Trouble shooting Answer to question
(If there's breakdown, please pull off the power plug before checking) The
following phenomena are not breakdowns sometimes. Please confirm again
before sending it to repair. If there are real breakdowns, please come to the
special maintenance department or after-sale service department of our
company. Do not repair it by yourself.
Phenomena The reason How to settle
Buzzing upon reservation starts,
Nixie tube indicates "E0"
No or slow drain, nixie tube
indicates
Running pauses during spin,
nixie tube indicates
buzzing
"E1"
, buzzing.
"E2",
Safety switch actuates, not
spin, (after self-correction
twice), nixie tube displays
"E3",
buzzing
No or slow water filling (not
reaching the level in 15 min),
nixie tube indicates
"E4",
buzzing
Poor or no waterfall flow
The machine does
not act
There's abnormal sound inside the
machine
The water faucet leaks
Not wash
Not spin
The top lid is not closed
Is the drain hose put down?
Is the drain hose blocked by
foreign material?
The top cover leaves open
Are the laundries put slantingly?
Is the machine slanting?
The water tap is not open
The water inlet valve is blocked
The water pressure is too
low and the current is
too small
If the nozzle is choked with
foreign bodies
Is there power failure?
Is the power plug loose?
Does the water level arrive at the
set water level?
Is the power plug loose?
Is the top lid closed?
Are the laundries put orderly?
Is the machine slanting?
Are the laundries slanting in
spinning?
Is the jointer screw of the water
inlet hose is loose or twisted
awry?
Close the top lid
Put down the drain hose. Open
and close the top lid once.
Clean the foreign material.
Open and close the top lid once.
Close the top lid
Re-order the laundries. Close the
top lid.Level the machine in right
position.
Open and close the top lid once.
Open the water tap. Push
the "Start/Pause" button.
Clean the water inlet valve.
Push the "Start/Pause" button.
Wait for the normal water pressure
Before use.
Remove the foreign bodies
Use it when the power is on.
Insert the power plug tightly.
Affusion to the set water level.
Insert the power plug tightly.
Close the top lid
Put the laundries orderly.
Level the machine properly.
Re-order the laundries.
Fasten the jointer screw
properly.
16
Page 19

Packing list
Name
User's manual
Components of the
water inlet hose
Lint filter
Bottom plate
Tapping screws
Quantity
One
One
One
One
Five
Storage position
Inside the document bag
Inside the accessory bag
Inside the document bag
Between the upper cushion of
the washing machine package
and the upper seal of the
package carton
Inside the document bag
Automatic washing
machine
Specification
Water level/Water
quantity (about)
Water inlet pressure
Rated washing /
spinning capacity(kg)
One
0.03MPa-0.78MPa
5.5 (weight of standard dry cloth)
17
Page 20

 Loading...