

Haier XPB65-113S, XPB65-114D, XPB65-116S User Manual
Dear Friend,
At the outset, we at Haier t hank you for your interest in ou r range of products. A unique and
international range of appliances desi gned solely with the purpose of making moder n life
simpler. And how! The entire Haier range of appliances, ranging from refrigerators, televisions,
was hin g mac hi nes , air con dit io ner s, mi cro wav e oven s, di shw as her s and
wine-coolers, combines the best of technology, features, performance and styling. All, a result
of our perfect understanding of your lifestyle and your needs.
But what is a great product without great service? Leaving no stone unturned in giving you the
best of ser vice, we have also established an extensive n etwork of aut horised dealers and
authorised service centres, so that you get a lifetime of great and timely service for your Haier
appliance.
It has been an honour and a pleasure bringing these hi-tech products to you and we hope that
you get as much happiness using them as we have got, creating them for you.
Happy Inspired Living!
Thanking you,
CONT ENTS
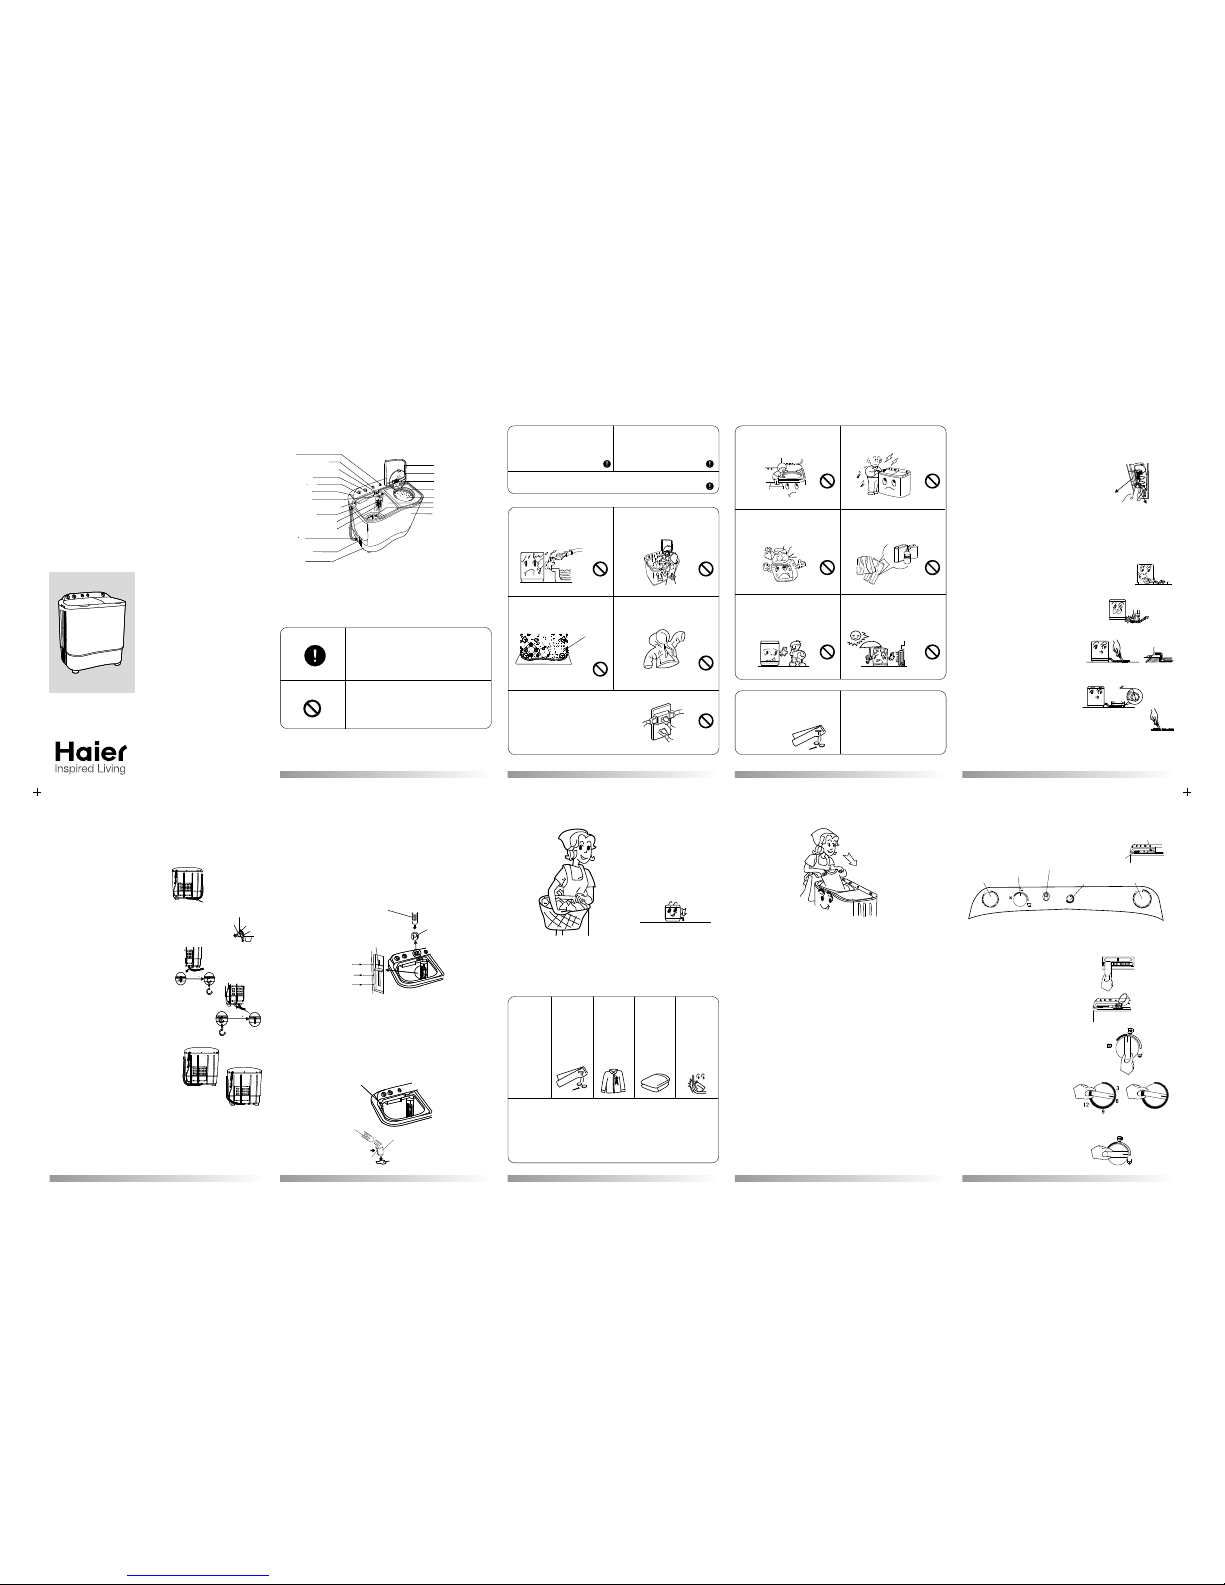
NAMES OF THE PARTS 1
SAFETY PRECAUTIONS 2
INSTALLATION AND ADJUSTMENT 4
PREPARATION BEFORE WASHING 7
THE MANDATORIES FOR WASHING 8
USAGE OF THE DETERGENT 8
WASHING SEQUENCE 9
TROUBLE-SHOOTING 13
PACKING LIST & SPECIFICATIONS 15
Please check if the power receptacle is in good earthing condition
before use, to guarantee your safety.
Buzzer
Water-inlet
Water inlet selector handle
Wash selector
Wash/Soak timer
Control panel
Overflow filter
Quick water-filling entrance
Drain hose hook
Water level adjusting lever
Lint filter(Installed by user)
Drain hose
Wash tub cover
Outer cover of the spin tub
Inner cover of the spin tub
Spin timer
Spin tub frame
Spin tub
Cabinet
Base frame
Wash tub
Pulsator
MEANING AND DESCRIPTION OF THE SYMBOLS
Contents marked with that symbol are related to the safety of
the product and personal safety of the users. Please operate
in strict conformity to the contents, otherwise it may cause
damage to the machine or injure the personal safety of the
user.
Forbidding sign
Contents marked with that symbol are for actions forbidden
to perform. Performing of those actions may result in
damage of the machine or injure the personal safety of the
user.
Warning sign
NAMES OF THE PART S
1
INS TALL ING THE WATER INL ET HOSE ;
SEL ECT THE WATER LEV EL
Insert the water inlet hose into the water-filling entrance on the control panel directly (Pull it
out to dismantle it).
Select water level according to the quantity of the laundry.
Set the water level adjusting lever to the required line.
Use the new water inlet hose provided with the machine to connect to the water faucet. Old
hose sets should not be reused.
You can fill water into the wash tub directly through this entrance. It can reduce the
humidity inside the control panel significantly and prolong the operating life of the
components.
Insert the water inlet hose into the water-filling entrance, then push the water-filling jointer
into the quick water-filling entrance. (To dismantle the water inlet pipe, just push the control
handle as indicated in the figure and pull it out.)
QUICK WATER- FILLING ENTRAN CE
Water inlet hose
Water inlet
Maximum
Max.
Minimum
Min
Medium
Med
Water level
indicator
Quick water-filling entrance
Water inlet hose
Water inlet jointer
Control handle
Push
Quick water-filling entrance
6
HOW TO CHA NGE THE DIR ECTION OF THE
DRA IN H OSE
• Figure 1 indicates the ex-factory installation
position of the drain hose.
EXTEND THE DRAIN H OSE FROM THE
SIDE OF SPIN TUB
Take off the drain hose from the hanging hole
of the cabinet. Pull the drain hose fixing hook
outwards gently to take out the drain hose from
the two fixing hooks. (As per Figure 2)
o
Rotate the drain hose fixing hook by 90 to take
it out from the installation hole. (As per
Figure 3).
Install the two drain hose fixing hooks taken
out into the installation hole at the other side of
the base frame (to aim at the installation hole
accurately you can lean the washing machine
o
forward slightly). Then rotate 90 (As per Figure
4).
Pull the fixing hook outwards slightly. Inlay the
drain hose into the fixing hooks reliably along
the groove at spin tub side, and make it extend
towards the spin tub side.
Then hang the drain hose into the hanging hole
at the spin tub side. (As per Figure 5).
EXTEN D THE DR AIN HOS E FROM
THE RE AR SIDE
Take out the drain hose from the fixing hook. Extend it from the rear side (When the drain
hose is extended from the rear side, it can be hung on the point for drain hose, at the two
sides of the cabinet.) (See Figure 6).
Figure 1
Drain hose
fixing hook
Figure 2
Drain hose
fixing hoo k
Pull outwards
slightly
Side sectional view
Fixing hook
installation hole
Drain hose
Take off
the drain hose
Figure 3
Take off the fixing
hook downwar ds
Rotate the fixing
hook for 90
Figure 4
Insert the fixin g hook into the
installation hole up wards
Rotate the fixing
hook for 90
to fix it
Figur e 5
Figure 6
5
SAFET Y PREC AUTI ONS
Do not put the machine at a damp place
like the bathroom. Never wash it with
water. Do not place wet laundry on the
control panel.
o
Do not use water hotter than 50 C.
For washing machines with ventilation
openings at the base, make sure that a
carpet does not obstruct the openings.
Venti lati on
hole at the
bottom of
the washing
machine
Do not wash water-proof laundry like
raincoat, bike covers etc. to a void
abnormal vibrations in spinning.
• Do not let the machine share one
recepta cle with other electric al
appliances.
• If the power plug is damaged, or the
plugging into the receptacle is loose,
do not use the plug anymore.
When the machine is being used normally,
please put the power plug at the location easy to
be inserted and extracted by hand. Be sure to
pull the plug off when there is power failure or
the machine is being moved, cleaned or when it
is idle.
If the supply cord is damaged, it must be replaced by the manufacturer or its service agent or a
similarly qualified person in order to prevent a mishap.
Please insert the power cord into special
receptacle with rated voltage. Be sure to use
single-phase three pin receptacle. The earthing
terminal of the receptacle must be earthed
reliably. If possible, please adopt electric
leakage protector.
2
PREPA RATIO N BEF ORE WA SHING
PREPARATION BEFORE
WASHING
1. Connect the water inlet hose.
2. Confirm that the washing machine
is earthed reliably. Then insert the
power plug into the receptacle. Do
not connect the earth terminal to
the gas pipe and tap water pipe.
3. Put down the drain hose.
4. Slanting or uneven ground may
result in unstable working or
abnormal noise. Please make the
machine stand horizontally.
PAY ATTENTION TO THE FOLLOWING BEFORE WASHING
THE LAUNDRY
a. Check if the laundry is compatible to washing in machines.
b. Divide the laundry in which colour runs and wash separately.
c. Soak the laundry which absorbs water with difficulty by hand.
d. For the heavily soiled laundry, first remove dirt like mud or dust. Please apply
detergent on the soiled parts in advance. This makes it easier for the stain to clean.
e. For laundry which may get stuck in lint ball or with fur, please turn the cloth over
before putting in the machine.
f. Do not put laundry polluted by chemicals into the washing machine directly.
Check if the
laundry
has special
requirement
for
washing.
Clear the
pocket. Take
out the coins,
sand, hairpins
etc.
The quantity
of the laundry
should not be
too large.
Stretch and
loosen the
laundry
before putting
it in the
tub.
When the
pulsator is
running, the
buttons
of the laundry
may make noise.
For the sake
of discretion,
please put the
laundry with
buttons
separately.
Tie the long
strips, fasten
the buttons,
close zippers.
7
SAFET Y PREC AUTI ONS
Do not stretch hands into the machine
when it is switched ON. It is dangerous
even if the rotation is slow. Take special
care of children.
Do not dismantle, repair or alter the
machine by yourself.
Do not put any hot or heavy items (such
as a kettle with hot water) on the washing
machine.
Do not wash laundry with volatile materials
(such as thinner, petrol etc.).
Petr
o
l
T
h
i
n
ner
Handi capp ed or childr en witho ut
supervision must not use the machine.
Keep the machine away from direct
sunlight and heat source like heater.
• To protect your laundry and washing
machine, please take out all coins,
buttons, sand, hairpins and other
foreign materials from the clothes
before washing.
• Please check if the water faucet is
open, and the connection of the water
inlet pipe is proper.
• It is suggested to use foamle ss
washing powder.
3
HOW TO USE WHITENER
• Fill water to the decided level. Dilute
whitener with container. Pour it slowly
into the washing tub.
• Avoid using whitener on laundry with
colours or patterns as they are prone
to losing colour.
• The whitener should not touch the
laundry directly.
• Refer to the user's manual for the
usage and quantity of the whitener to
be used.
• Please dissolve whitener before using.
• The capacity of washing and spinning
of the machine refer to the largest
weight of the standard laundry under
dry conditions that can be washed or
spinned at one time. Laundry quantity
in one washing cycle should be less
than the rated capacity if washing and
spinning at the same time.
• The thickness, size, type of cloth will
influence the actual washing capacity.
It is suitable to put in reasonable
amount of laundry and the laundry can
be turned round in washing for one
time washing.
• Do not select "Maximum" water level
for laundry less than 2.4 kg. to avoid
splashing of water.
• It is suggested not to use high sudsing
detergent.
HOW TO USE WASHING POWDER
• To directly dissolve it in the machine:
1. Fill small quantity of water.
2. Add the powder to it. Run for 3
seconds to dissolve it completely.
3. Put in the laundry. Select the
suitable water level.
• For instant dissolving of the washing
powder:
o
1. Prepare warm water of 30 C and
pour into a container.
2. Add the powder and keep stirring
to fully dissolve it.
• The powder is more prone to polluting
the laundry than the detergent.
Therefore please use in with proper
quantities.
• Dosage of different washing powders
is different. Pl ease refer to the
instructions of the washing powder
for the detailed dosage.
THE MA NDATO RIES FOR WA SHING
USAGE OF DET ERGENT
8
INSTA LLATI ON AN D ADJU STMEN T
INSTA LLING T HE LINT FILTER
Overflow filter
Lint filter
Please install and adjust the machine according to the requirements mentioned in the
manual. It is very important for your security and correct operation of the machine.
After opening the package, please take out the lint filter
from the document bag, and install it to the overflow
filter of the wash tub. (See figure)
USAGE OF THE DRAIN H OSE
THE DR AIN AGE SHO ULD BE
SMOOTH WITH THE DRAIN HOSE.
1. The height of the drain hose should be
less than 10cm else the drainage will not
be smooth and will be incomplete.
2. Do not tramp on or press the drain hose.
3. If the drain hose is too long, cut it at mid
point. For smooth drainage, cut the front
end of the hose at a slant.
4. If extra drain hose is needed, please make
a separate purchase. The inner diameter
of the extra hose should not be less than
30mm, and the length should not exceed
1.5m.
If the extra hose is too long, cut it either at
point A or B. (See figure)
.
<10cm
> 30mm
<1.5m
BA
4
WASHI NG SEQ UENC E
Overfilling sign
Water-filling selector handle
Wash/Soak timer
Wash selector
Buzzer
Water inlet
(To set to below 2 minutes,
first set to 5 minutes then
turn it back. It increases
the life of the timer).
(Strong speed,
Standard speed)
(The buzzer will ring
when the washing cycle
finishes)
Spin timer
(To set to below 1 minute,
first set to 2 minutes then
turn it back. It increases
the life of the timer).
OFF
DRAIN
STRONG
STANDARD
MAX
SPIN TIMER
WASH/SOAK TIMER
WASH SELECTOR
BUZZER
OFF
OFF
WASH
1. Water-filling selector
(1) Set the water-filling selector to the
"WASH" side. (Figure 1)
(2) Set the water level adjusting lever to
the desired line.
2. Fill the water and add the dissolved
washing powder to make the water level
reach the preset position. (Figure 2)
Run washing program for some time to
stir and dissolve the powder completely.
3. Put in the laundry. If the water quantity is
insufficient, please add more water.
4. Select the speed.
Selec t the s trength of the speed
according to the laundry. (Figure 3)
5. Select the washing time.
Select the washing time according to the
laundry. (Figure 4)
6. After the washing cycle finishes, the
buzzer will ring. Set the " WASH
SELECTOR" at "DRAIN". (Figure 5).
DRAIN
STRONG
STANDARD
WASH SELECTOR
OFF
* WASH TIMER
Figure 3
DRAIN
STRONG
STANDARD
WASH SELECTOR
Figure 4
Figure 5
Figure 2
Figure 1
SPIN
WASH
9
* For model with Wash Timer
#
For model with Soak Timer
OFF
5
15
25
35
#
SOAK TIMER

U S ER G U I D E F O R W A S H I N G M A C H I N ES F R O M
B-1/A-14, Moh an Co-opera tive Indust rial Estate , Mathura Ro ad, New Delh i-110044.
Tel: 011-3067 4000/5000. Fax: 011-26 971562. Ema il: info@ha ierindia.c om Website: www.haieri ndia.com
Haier Appli ances (Indi a) P. Limite d
HAIER APPLIANCES (INDIA) PVT. LTD. (hereinafter referred to as “the Company”) hereby
offers the following warranty to the original domestic purchaser commencing from the date
of the purchase. The Company, at its sole discretion, will free of charge repair or replace
any defective part or parts which prove to be defective in workmanship and/or materials
and not due to abnormal or improper usage.
HAIER WARRAN TY
Customer Name.......... ......... ......... ......... .......... ......... ......... .. A ddress.... ......... ......... ......... ......... .......... ......... ......... .......
Serial No.... .......... .......... .......... .......... .......... ........Da te of purch ase....... ........... .......... .......... .......Mod el No....... .......... ......
Dealer Seal.. .......... .......... .......... .......... .......... ........... .......... .......... .......... .......... .......... .......... .......... .......... .......... .......... ....
1) This warranty will automatically terminate on the
expiry of the warranty period from the date of
delivery.
2) The Company is not liable for any delay in
servicing due to reasons beyond the control of
the Company or any of its authorised service
centres.
3) Parts replaced or repaired under this warranty
are warranted throughout the remaining of the
original warranty period.
4) It is entirely left to the Company’s discretion to
repair/replace parts at the site of installation or
at the authori sed servic e centre of the
Company.
5) This warranty shall be strictly limited to the
repairs or replacement of defective par ts
specified in the warranty. This warranty shall not
cover any consequential or resulting liability.
6) This warranty shall not, in any case, extend towards payment of any monetary consideration whatsoever or replacement
or return of the product.
7) The Company may repair/supply parts free of cost during the warranty period. This warranty does not cover any Excise
duty, Central or Sales tax, Octroi and other local taxes or levies on the components/parts.
8) The parts shall be replaced by functionally operating equivalent material only and not with brand new ones and are likely
to be different from the one originally fitted. The parts thus removed shall be taken back by the Company.
9) The Company reserves the right to retain any part or component replaced at its sole discretion during the warranty
period.
10) In no event the Company or its authorised service centre be liable for any consequential damages or resulting liability,
damage or loss arising directly or indirectly out of any defect in the product.
11) This warranty is not valid in case of the following events:
a) If the Product has been Installed/Serviced/Repaired/Opened or Tampered by any unauthorised personnel.
b) If defects arise/caused by accidents, alteration, misuse, neglect, substitution of original components with
spurious/non-genuine components, attacked by household pest / rodents, fi re, f lood, earthquake, li ghtning
and/or any other act of God/natural calamities.
c) The product is shifted outside India.
12) For any service under this warranty beyond city/town/municipal limits from the Company/authorised service centre, a
fixed charge of Rs. 50 will be collected from the customer in addition to the actual to and fro charges by the shortest route.
13) Any change of location or change in the ownership during the warranty period must be intimated in writing to the
Company.
14) The Company’s employees or its authorised representatives have no authority to vary the terms of this warranty.
15) This warranty is effected in New Delhi and claims, if any, shall be made only before the courts having jurisdiction in New
Delhi and no claim shall be made against the Company outside New Delhi notwithstan ding that t he Applian ce may
have been sold or delivered elsewher e.
CONDITIONS OF WARRANTY
Customer Name. .......... .......... .......... .......... .......... .......... ... Address.... .......... .......... .......... .......... .......... .......... .......... .......... ..
Serial No...... .......... .......... .......... .......... .......... ..Date of purc hase...... .......... .......... .......... .....Model N o........... .......... .......... ....
Dealer Seal... .......... .......... .......... .......... .......... .......... .......... .......... .......... .......... .......... .......... .......... .......... .......... .......... ........
HAIER AP PLIAN CES ( INDIA ) PV T. LTD., B -1/A- 14, Mo han Co-op erati ve In dustr ial Estat e, New Delh i-44
Ph: 3067 4000/ 5000. Fax: 011-2 69715 62
Product
Colour TV
Refrigerator
Washing Machine
Airconditioner
Microwave
Dishwasher
Cloth Dryer
DVD
Parts not coveredPeriod
Warranty
12 Months
Comprehensive: 12 Months
Compressor: 60 Months
Comprehensive: 24 Months
Motor: 60 Months
Comprehensive: 12 Months
Compressor: 60 Months
12 Months
24 Months
12 Months
12 Months
Plastic, Glassware,
Light Bulb
Remote, Cabinet
Top Lid, Outer
Casing
Air Filter, Front Grill
Glass, Plate, Bulb
RINSE WITH STORED WATER
1. Put the laundry into the wash tub. Select
suitable speed according to the laundry.
2. Fill water to preset water level.
3. Rinse:
Adjust the wash timer to 2-3 minutes to
do rinsing.
When the laundry quantity is below 2.4 kg.,
please use "Standard" speed. If you use
"Strong" speed, water may splash.
To do spinning and draining or rinsing
with water-filling together, please first
do spinning for around 1 minute, then
do draining or rinsing with water-
filling. Otherwise the spinning will stop
owing to too much water stored in the
spin tub.
1. Put the laundry into the spin tub evenly and smoothly.
2. Press the gland in the tub properly. Close the inner and outer cover of the spin tub.
3. Spin:
Select suitable spin time according to the laundry, and do the spinning. During
spinning, if there is any abnormal sound, it is generally owing to slanting placement
of the laundries. Please stop the machine and rearrange the laundry properly.
• In spinning, it will pause the work if you open the outer cover of the spin tub. Close
it to resume the spinning.
SPIN NING
DISPOSAL AFTER WASHING
• After using, please clean the lint and foreign materials of the lint filter and overflow
filter in time. Otherwise it may influence your using the machine.
• Please first pull off the power plug from the receptacle before cleaning.
CLEA NING TH E LINT F ILTER
• The lint filter must be used during washing.
• It must be cleaned in time after each use.
Put hand at the indicated position. Push down
to take it off. (See Figure 1)
Put it in water and clean while it is s till wet.
(See Figure 2)
After cleaning, insert the bottom of the lint filter
(marked with "down side") into the overflow
filter, then push the upper part of the filter in
(marked with "up side"). (See Figure 3)
1. TAKE OFF THE LINT FILTER
2. CLEAN THE LINT
3. INSTALL THE LINT FILTER
Figure 2
Figure 3
Figure 1
11
The machine does
not start
• Is there power failure?
• Is the power plug loose?
• Is the pulsator twisted by foreign materials?
• Is the drain hose put down?
• Is the drain hose frozen?
• Is the drain hose blocked by foreign
material?
• Is the laundry falling to the outer side of
the spin tub?
The draining does
not work
• It is the water remaining from factory
inspection of performance?
Th ere may be
s o m e w a t e r
flowing out of the
drain hose in the
first use of the
machine
• Is the machine slanting?
• Is the gland pressed evenly?
• Is the laundry falling to the outer side of the
spin tub?
• Is the laundry in spin tub too much in
quantity?
There's abnormal
sound and violent
vibra tion duri ng
spinning
• Are there hair pins, coins or metal items
inside the tub?
There's abnormal
so u nd du r in g
washing
TROUB LE-SH OOTI NG (co nt.)
(If there's a breakdown, please pull off the power plug before checking). The
following phenomena do not necessarily mean breakdowns sometimes. Please
confirm again before sending it for repair. If there are real breakdowns, please
come to the special maintenance department or after-sales service department of
our company. Do not attempt to repair it by yourself.
PHENOMENA
POSSIBLE CAUSES
14
Outer cover of
The spin tub
Inner cover of
The spin tub
The laundry
is slanting
Gland
Push
Proper
Push
Proper
No gland
SPIN
WASH
1. Put the laundry into the spin tub evenly and smoothly.
2. Spin
(1) Put the gland in properly, even if the laundry quantity is small.
(2) Close the inner and outer cover of the spin tub.
(3) Spin for 1-2 minutes.
3. Run the foam-removing spin.
(1) Open the outer cover of the spin tub.
(2) Set the water-filling selector control rod
at the "SPIN" side. Fill water for about 1
minute. If the water quantity filled is too
large, the water may flow out from the
wash tub side. Please twist the water tap
to limit the water level.
(3) Close the outer cover of the spin tub.
Spin for 1-2 minutes.
MIDW AY SPIN NING
RINS ING
RINSE WITH WATER-FILLING
1. Put the laundry into the wash tub. Select
suitable current according to the laundry.
2. Adjust the water level. Set the water level
adjusting lever according to the quantity of
laundry. Then fill suitable quantity of water
continuously.
3. Rinse:
Adjust the wash timer to 5-7 minutes to do
rinsing.
(Repeat the midway spinning and
rinsing with stored water 2-3
times).
OVERFILL
If you find wat er
flow ing out here,
please twist the water
tap to limit the water
level.
10
CLEA NING TH E OVERF LOW FIL TER
• Too much lint on the overflow filter will
influence the normal usage of the machine.
Please clean it every two months.
1. Take off the overflow filter. As indicated in
the figure, nip the elastic fixing claw and
pull it to the direction of the arrow to take it
off.
2. Take off the corrugation pipe. Dismantle
the upper part of the corrugation pipe
inside the overflow filter (as indicated in
Figure 1).
3. Clean the lint around the filter and flush with
tap water.
4. Install the overflow filter.
(1) Install the corrugation pipe.
(2) Insert the mounting plate at the bottom
of the filter into the valve cover.
(3) Hang up the hook at the left upper side.
(4) Push the upper part in as indicated in
Figure 2.
Elastic fixing
claw
DISP OSAL OF THE COM PLETE U NIT
Hook
Figure 2
Corrugation
Pipe
Figure 1
Water level
adjusting lever
• After washing, dismount the water
inlet hose.
• Do not store water in the tub for a long
per io d. Dis ch arg e the wate r
immediately after each use.
• Pull off the power plug and hang up
the power cord.
• Hang up the drain hose. Wipe off the
water drops on the surface and inside
the tub with a clean soft cloth.
• Open the cover of the wash tub and
the inner/outer cover of the spin tub
for some time (about one hour), then
close them.
• Wipe the complete unit with soft
cloth twisted dry.
• Wipe with neutral detergent if too
dirty.
• Do not wash it directly with water.
Thinner
Alcohol
Petrol
12
TROUB LE-SH OOTI NG
IF TH E LAUND RY FALL S TO TH E
OUTE R SIDE O F THE S PIN TUB
WHEN THE REM AINING WATER I S FROZE N
If the laundry falls to the outer side of the spin tub,
please take it out immediately.
As indicated in the figure, pull the spin tub frame
obliquely upwards to dismantle it.
After installing the back edge of the spin tub
frame to proper position, push the frame at four
locations as indicated to reset it.
Please check carefully. The laundries may fall to
the lower part of the outer side of the spin tub (as
indicated in the figure).
If the laundry fall to the outer side of the spin tub,
during spinning the drain will get blocked and the
rotation speed of the spin will reduce.
1. DISMANTLE
2. INSTALL
1.
Spin tub
Laundry
Spin tub frame
• Prevent the freezing (be sure to discharge
the water completely after using)
After complete draining, set the "WASH
SE LE C TO R" to "S T RO NG " or
"STANDARD". If it is set at "DRAIN", it will
be difficult for the frozen water to melt.
• When the water is frozen, pour hot water
O
below 50 C into the wash tub to soak it
completely. Then turn thepulsator gently
with your hands. Please confirm that the
drainage is working normally before next
use.
2~3L
Below 50 c
13
NAME
PACK ING LIS T
• User's manual
• Warranty manual
• Water inlet hose
• Lint filter
• Water-filling jointer
• Gland
• Twin-tub washing machine
QUANTITY
• One piece
• One piece
• One piece
• One piece
• One piece
• One piece
• One set
Water level/Water quantity (about)
Injection pressure(MPa)
Rated washing/spinning capacity(kg.)
SPEC IFICATI ONS
Maximum/55L Medium/46L Minimum/36L
0.02~0.2
6.5 / 6.0 (weight of standard dry cloth)
15
 Loading...