

Page 1
Installation
Instructions-
Model #
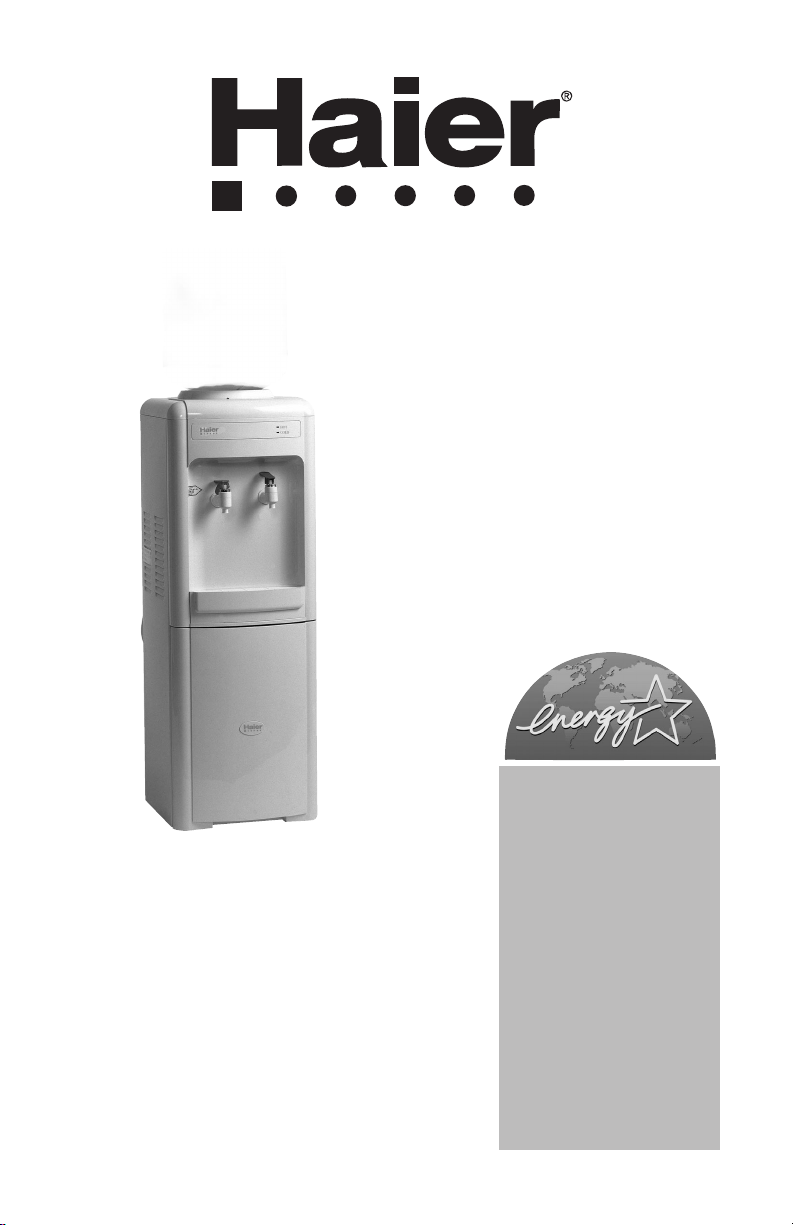
Water Dispenser
WDQS055
WDQS045
WDQS005
WDQS015
WDQT005
WDQT015
WDQT165
WDQSC145
WDQSC245
Fontaine d'eau
Réfrigérée
Instructions
d’installation-
Modèle #
Dispenser de agua
Instrucciones de
instalación-
Modelo #
Page 2

SAFETY PRECAUTIONS
Read all of the instructions before using this appliance.
When using this appliance, always exercise basic safety
precautions, including the following:
1. Use this appliance only for its intended purpose as described in this use and
care guide.
2. This water dispenser must be properly installed in accordance with the
installation instructions before it is used. See the grounding instructions in the
installation section.
3. Never unplug your water dispenser by pulling on the power cord. Always
grasp the plug firmly and pull straight out from the outlet.
4. Repair or replace immediately, all electric service cords that have become
frayed or otherwise damaged. Do not use a cord that shows cracks or abrasion
damage along its length, on the plug or at the connector end.
5. Unplug your water dispenser before cleaning and making any repairs.
Note: If for any reason this product requires service, we strongly recommend
that a certified technician perform the ser vice.
6. This water dispenser should not be recessed or built into an enclosed cabinet. It
is designed for freestanding installation only.
7. This appliance is designed for INDOOR USE ONLY and should not be used
outdoors.
8. Do not operate your water dispenser in the presence of explosive fumes.
9. Close supervision is necessar y when any appliance is used by or near children.
10. To protect against electric shock, do not immerse the cord, plug, or any other
part of the water dispenser in water or other liquids.
SAVE THESE INSTRUCTIONS
For Future Use
1
English
Thank you for purchasing our Haier
product. This easy-to-use manual will
guide you in getting the best use of
your water dispenser.
Remember to record the model and
serial number. They are on a label in
back of the unit.
Model number
Serial number
Date of purchase
Staple your receipt to your manual. You will need it to obtain
warranty service.
Page 3

English
2
Table of Contents
PAGE
SAFETY PRECAUTIONS............................................................................1
UNPACKING ............................................................................................3
PARTS AND FEATURES......................................................................4-12
PROPER LOCATION ..............................................................................13
ASSEMBLY INSTRUCTIONS ............................................................13-14
Installing Your Water Dispenser ..................................................................13
ELECTRICAL CONNECTIONS ................................................................15
Grounding Instructions ................................................................................ 15
Wiring Requirements..................................................................................15
Extension Cords ........................................................................................15
Power Interruptions ....................................................................................15
OPERATING YOUR WATER DISPENSER........................................16-18
Cold/Hot Water Faucets ............................................................................16
Cold/Hot Water Switches ..........................................................................16
Cold/Hot Water Indicator Lights..................................................................16
Using the Refrigerator Compartment............................................................17
Using the Storage Compartment..................................................................17
Replacing the Fuse......................................................................................17
Removable Drip Tray ..................................................................................18
PROPER CARE AND CLEANING ....................................................18-19
General ....................................................................................................18
Cleaning the Condenser Coils ....................................................................19
For Long Vacations or Absences / Moving ..................................................19
TROUBLESHOOTING GUIDE ..........................................................20-21
WARRANTY............................................................................................22
Page 4

3
English
1. Remove all packing materials. This includes the foam base and all adhesive tape
holding the accessories inside and outside.
2. Inspect and remove any remaining packaging, tape and printed materials before
turning on the water dispenser.
Note: Allow the water dispenser to stand in an upright position for at least
8 hours before turning on the power.
Unpacking
Page 5
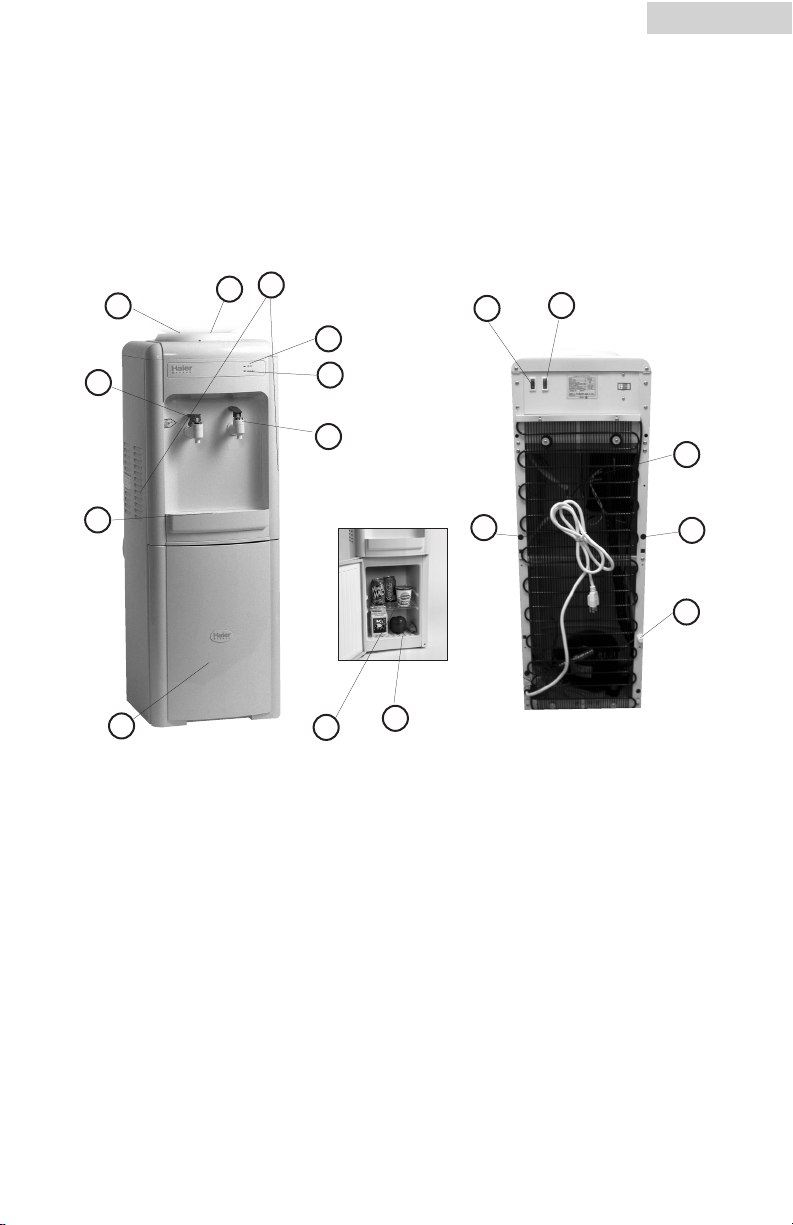
4
English
Parts and Features
1. Dust Cover (save for cleaning
purposes)
2. Water Bottle Guard
3. Hot Water Faucet (red)
4. Removable Drip Tray
5. Refrigerator Compartment
6. Removable Adjustable Shelf
7. Water-Collecting Tray
8. Cold Water Faucet (blue)
9. Cold Water Indicator Light (green)
10. Hot Water Indicator Light (red)
11. Vent (right and left sides)
1
2
3
4
5
6
7
8
9
10
Model: WDQS055
Water Dispenser with Refrigerator
Front View Rear View
1. Hot Water On/Off Power Switch
(red)
2. Cold Water On/Off Power Switch
(green)
3. Power Cord (115Volt / 60Hz)
4. Drain
5. Fuse Holder (15Amp)
6. Condenser Coils
1
3
4
5
2
6
11
Page 6
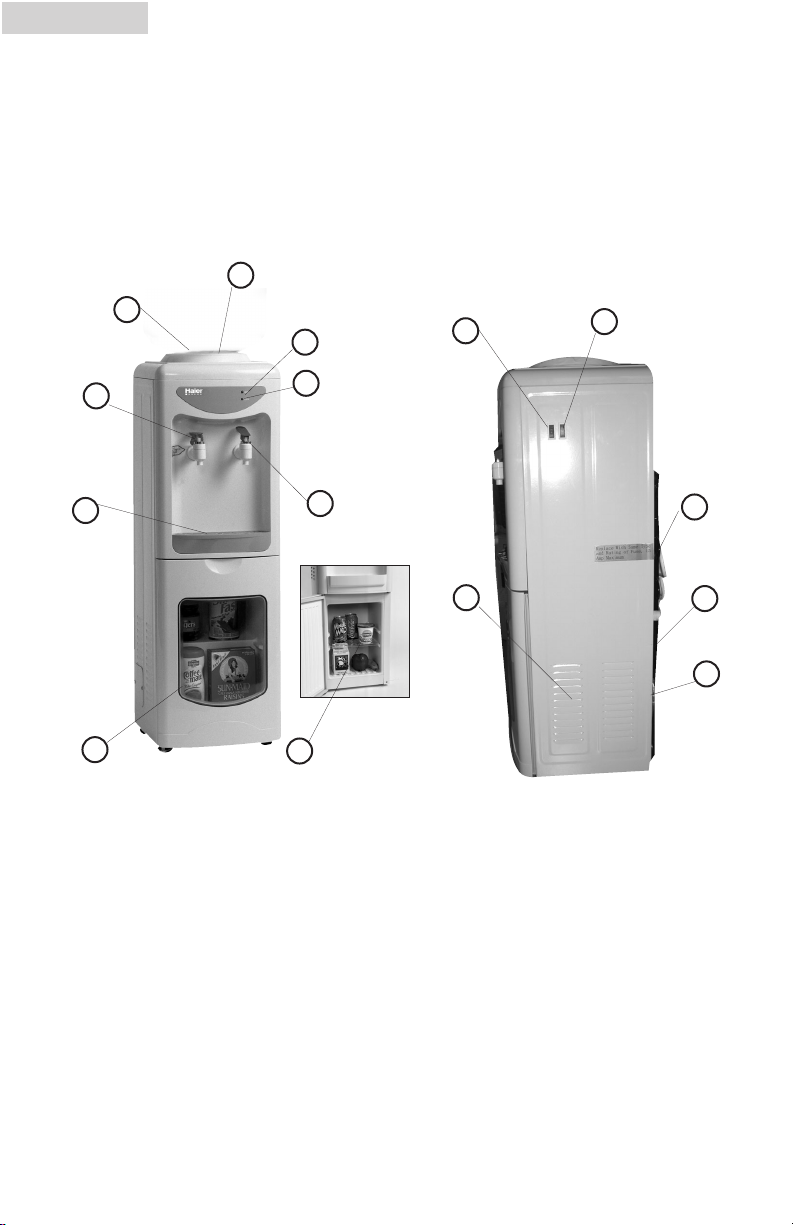
5
English
Parts and Features
1. Dust Cover (save for cleaning
purposes)
2. Water Bottle Guard
3. Hot Water Faucet (red)
4. Removable Drip Tray
5. Clear Storage Compartment
6. Removable Shelf
7. Cold Water Faucet (blue)
8. Cold Water Indicator Light (green)
9. Hot Water Indicator Light (red)
Model: WDQS015
Water Dispenser with Clear Window Storage
Compartment
Side View
1. Hot Water On/Off Power Switch
(red)
2. Cold Water On/Off Power Switch
(green)
3. Vent (right and left sides)
4. Fuse Holder
5. Condenser Coils
6. Drain (not shown)
1
2
3
4
5
6
7
8
9
Front View
1
2
3
4
5
6
Page 7
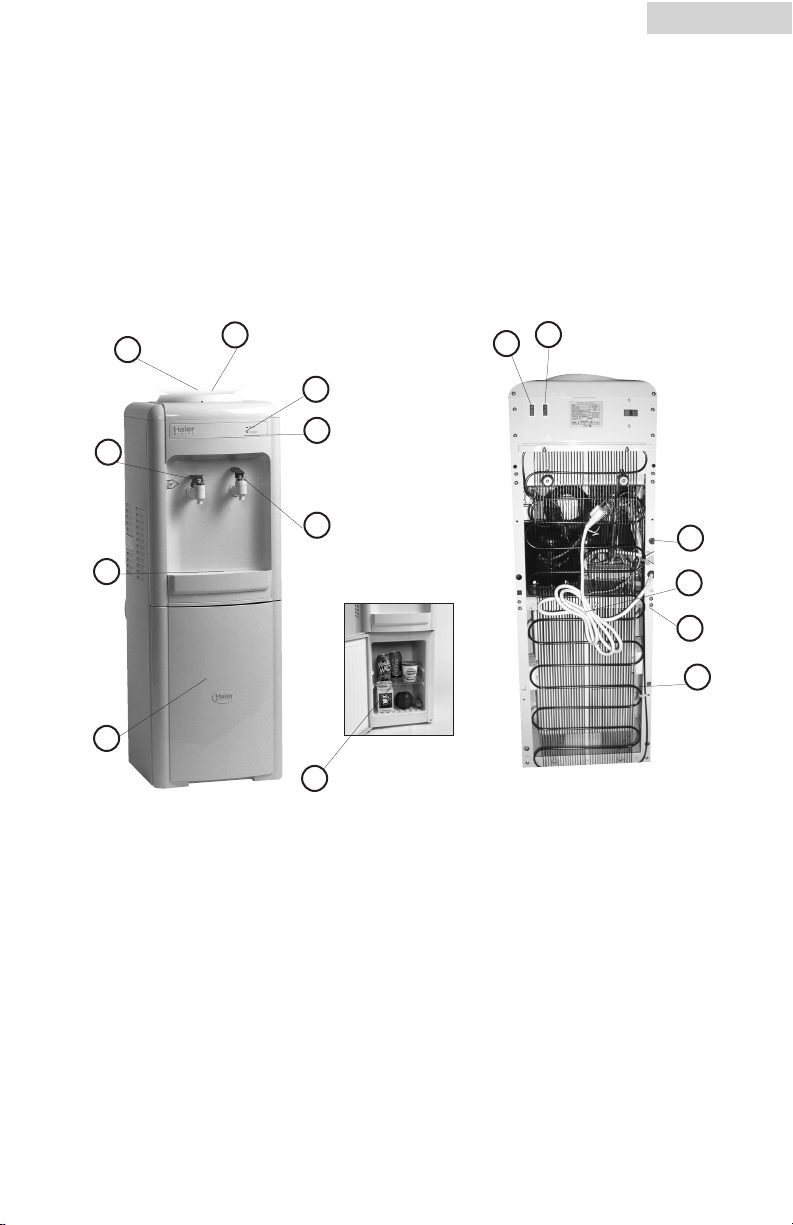
6
English
Parts and Features
1. Dust Cover (save for cleaning
purposes)
2. Water Bottle Guard
3. Hot Water Faucet (red)
4. Removable Drip Tray
5. Storage Compartment
6. Removable Shelf
7. Cold Water Faucet (blue)
8. Cold Water Indicator Light (green)
9. Hot Water Indicator Light (red)
Model: WDQS045
Water Dispenser with Storage Compartment (Without Clear Window)
Front View Rear View
1. Hot Water On/Off Power Switch
(red)
2. Cold Water On/Off Power Switch
(green)
3. Drain
4. Fuse Holder (15Amp)
5. Power Cord (115Volt / 60Hz)
6. Condenser Coils
1
2
3
4
5
6
7
8
9
1
2
3
4
5
6
Page 8
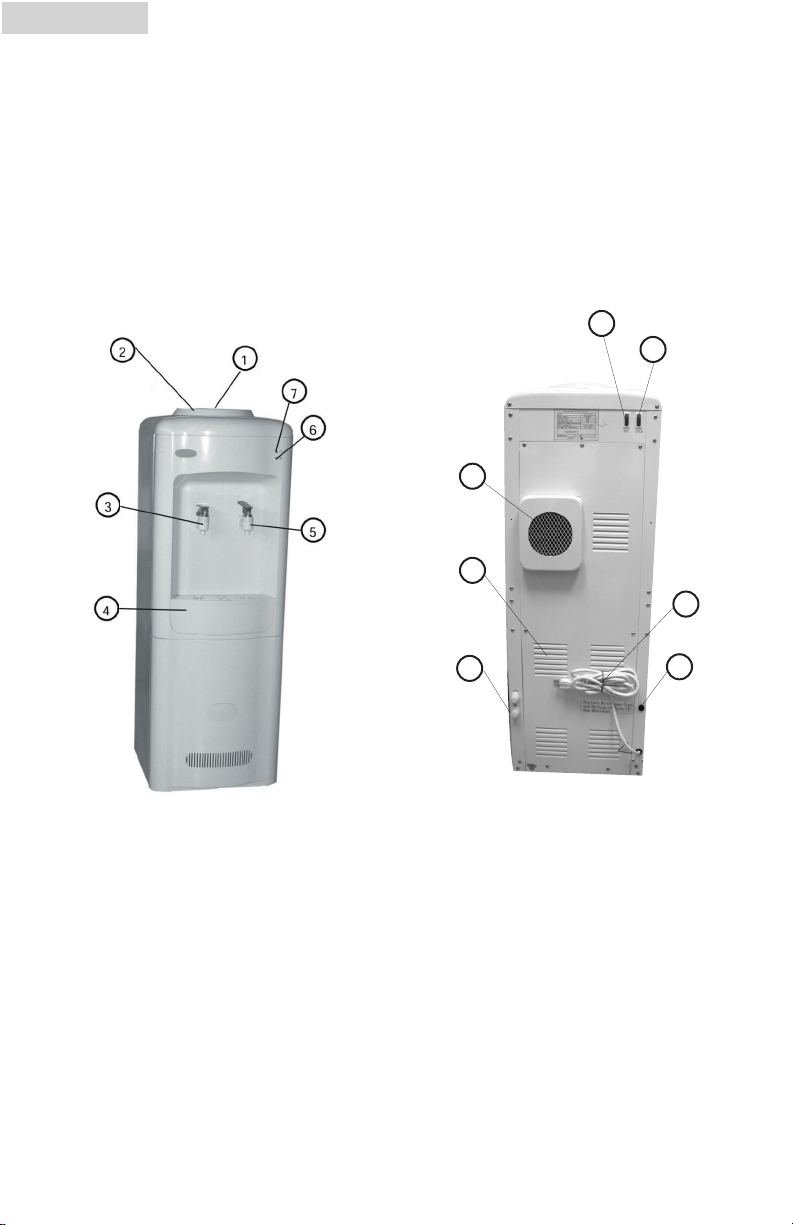
7
English
Parts and Features
1. Dust Cover (save for cleaning
purposes)
2. Water Bottle Guard
3. Hot Water Faucet (red)
4. Removable Drip Tray
5. Cold Water Faucet (blue)
6. Cold Water Indicator Light (green)
7. Hot Water Indicator Light (red)
Model: WDQS005
Water Dispenser
Front View
Rear View
1. Power Cord (115Volt / 60Hz)
2. Fuse Holder (15Amp)
3. Drain
4. Pressure Release Vent
5. Cooling Fan
6. Hot Water Switch (red)
7. Cold Water Switch (green)
1
2
3
4
5
6
7
Page 9
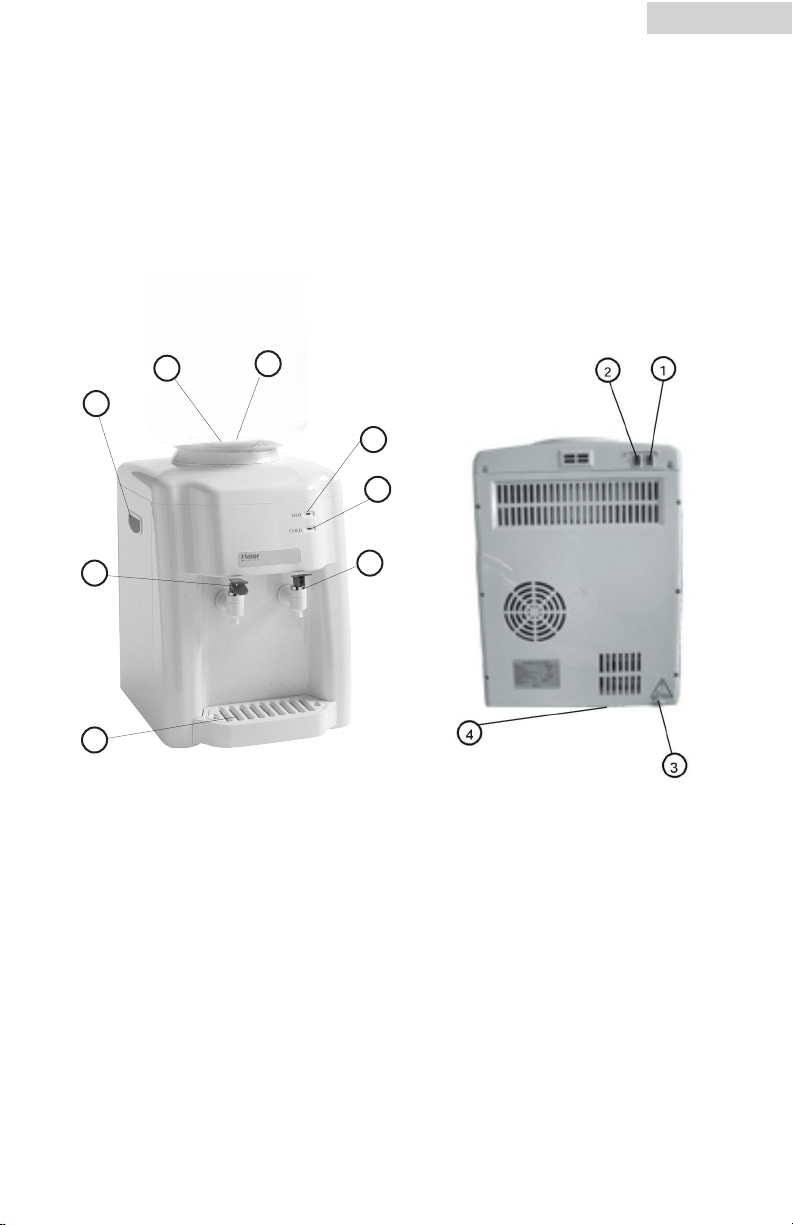
8
English
Parts and Features
1. Dust Cover (save for cleaning
purposes)
2. Water Bottle Guard
3. Handles (right and left sides)
4. Hot Water Faucet (red)
5. Removable Drip Tray
6. Cold Water Faucet (blue)
7. Cold Water Indicator Light (green)
8. Hot Water Indicator Light (red)
Model: WDQT005
Desktop Water Dispenser
Front View
Rear View
1. Hot Water Power Switch (red)
2. Cold Water Power Switch (black)
3. Power Cord (115Volt / 60Hz)
4. Drain (not shown - located under
the unit)
1
2
3
4
5
6
7
8
Page 10
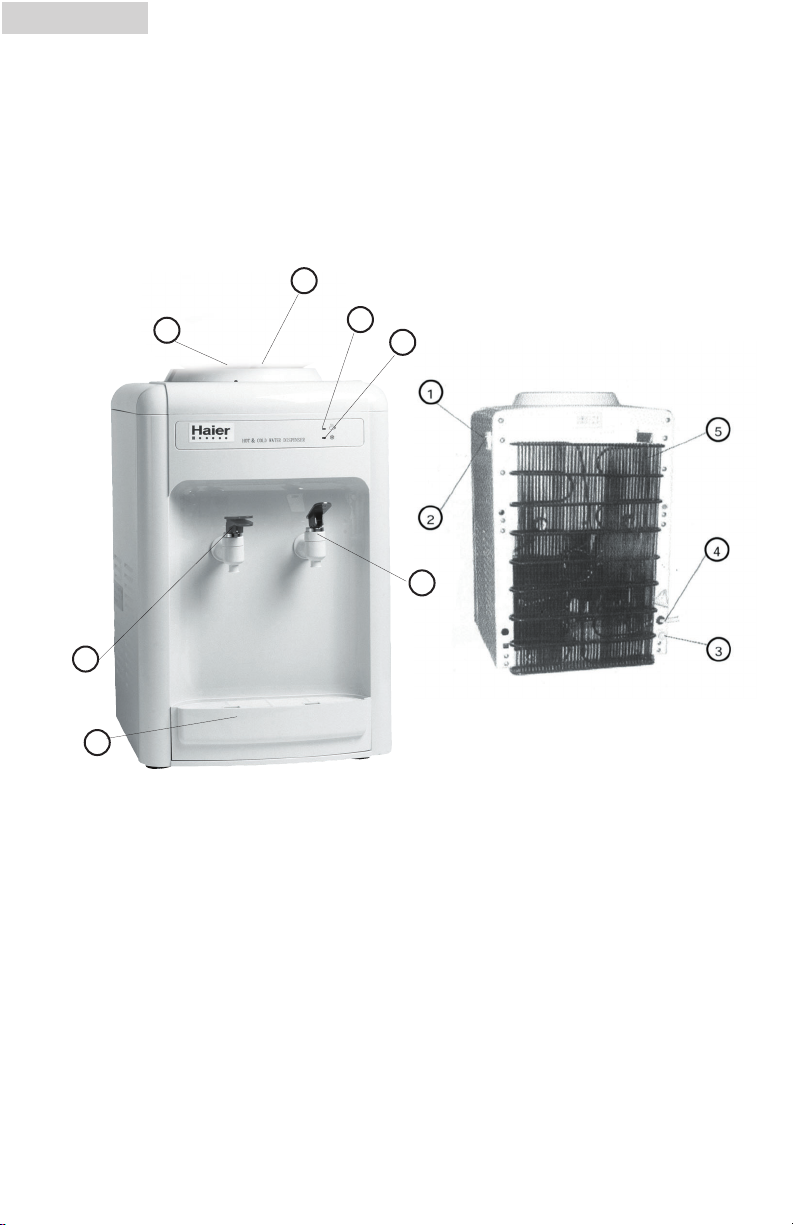
9
English
Parts and Features
1. Dust Cover (save for cleaning
purposes)
2. Water Bottle Guard
3. Hot Water Faucet (red)
4. Removable Drip Tray
5. Cold Water Faucet (blue)
6. Cold Water Indicator Light (green)
7. Hot Water Indicator Light (red)
Model: WDQT015
Desktop Water Dispenser
Front View
Rear View
1. Hot Water Power Switch (red)
2. Cold Water Power Switch (green)
3. Drain
4. Power Cord (115Volt / 60Hz)
5. Condensor Coils
1
2
3
4
5
6
7
Page 11
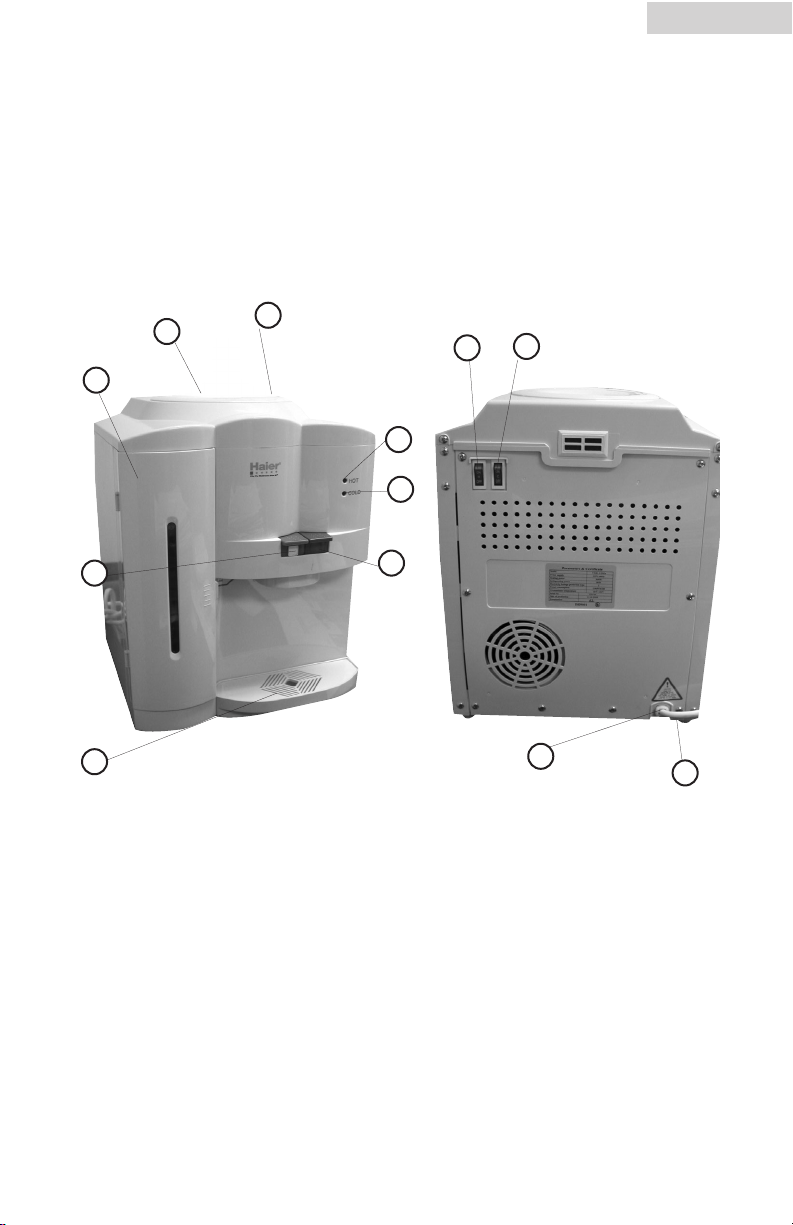
10
English
Parts and Features
1. Dust Cover (save for cleaning
purposes)
2. Water Bottle Guard
3. Cup Storage
4. Hot Water Faucet (red)
5. Removable Drip Tray
6. Cold Water Faucet (blue)
7. Cold Water Indicator Light (green)
8. Hot Water Indicator Light (red)
Model: WDQT165W
Desktop Water Dispenser
Front View
Rear View
1. Cold Water Power Switch (green)
2. Hot Water Power Switch (red)
3. Power Cord (115Volt / 60Hz)
4. Drain (not shown - located under
the unit)
1
2
3
4
5
6
7
8
1
2
3
4
Page 12
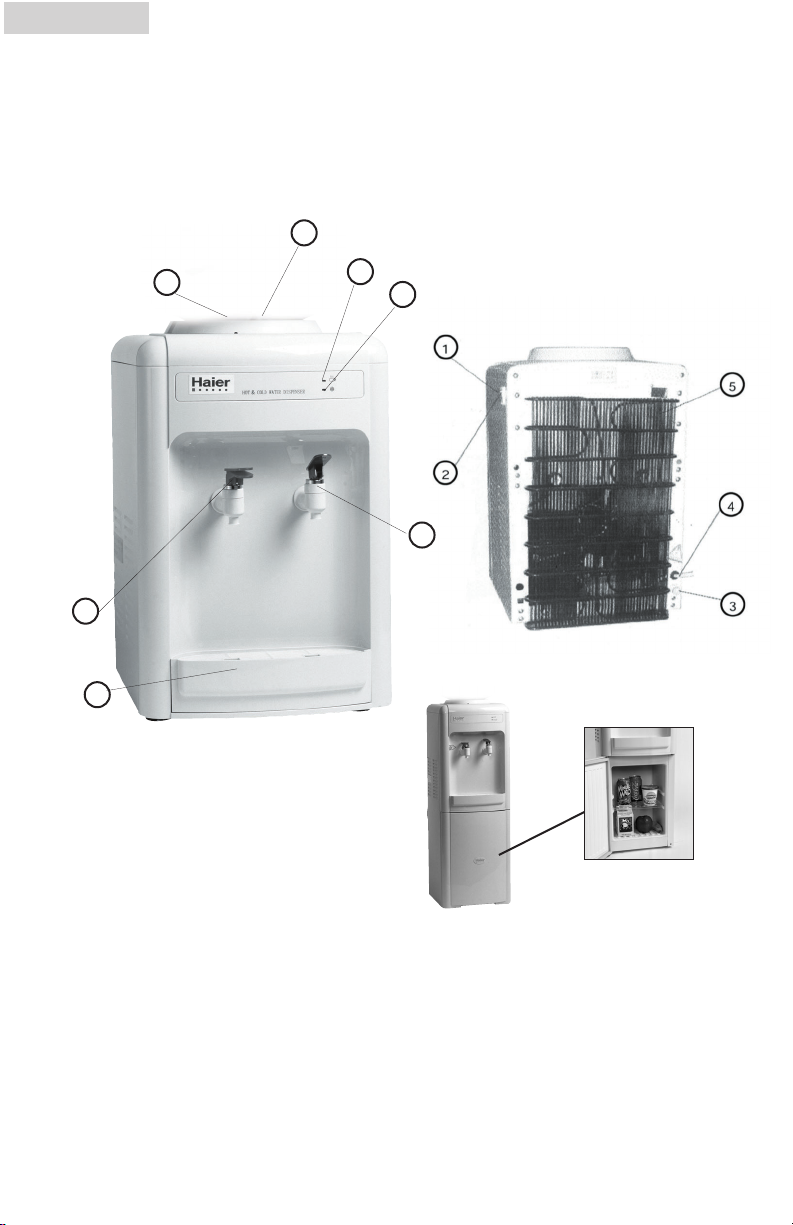
Parts and Features
1. Dust Cover(save for cleaning
purposes)
2. Water Bottle Guard
3. Hot Water Faucet (red)
4. Removable Drip Tray
5. Cold Water Faucet (blue)
6. Cold Water Indicator Light (green)
7. Hot Water Indicator Light (red)
Model: WDQSC145
Combo Desktop/Free Standing Water Dispenser
Front View
Rear View
1. Hot Water Power Switch (red)
2. Cold Water Power Switch (green)
3. Drain
4. Power Cord (115Volt / 60Hz)
5. Condensor Coils
1
2
3
4
5
6
7
Full View
11
English
Page 13
English
13
• To ensure that your water dispenser works at the maximum efficiency it was
designed for, you should install it in a location where there is proper air
circulation and electrical connections.
• The following are the recommended clearances around the water dispenser.
Sides..........3/4" (19mm)
Back ..............2" (50mm)
• Do not install your water dispenser in any location that is not properly insulated
or heated because the unit is not designed to operate in temperature settings
below 55˚F / 13˚C.
Note: The built-in thermostat maintains the hot and cold temperatures
automatically. The hot water temperature will be between
176-203˚F / 80-95˚C and the cold water temperature will be between
36-50˚F / 2-10˚C during this operation.
• Select a suitable location for the unit on a hard even surface away from direct
sunlight and heat sources (e.g., radiators, baseboard heaters, cooking
appliances, etc.).
Note: Hot and cold water will not be instantly available as the unit will need
time to heat up and cool down the water.
CAUTION: DO NOT plug in the water dispenser until water
flows through both Hot and Cold water faucets.
Read carefully and understand all installation instructions
before installing the water dispenser.
Installing Your Water Dispenser
Follow the steps below to install the water dispenser.
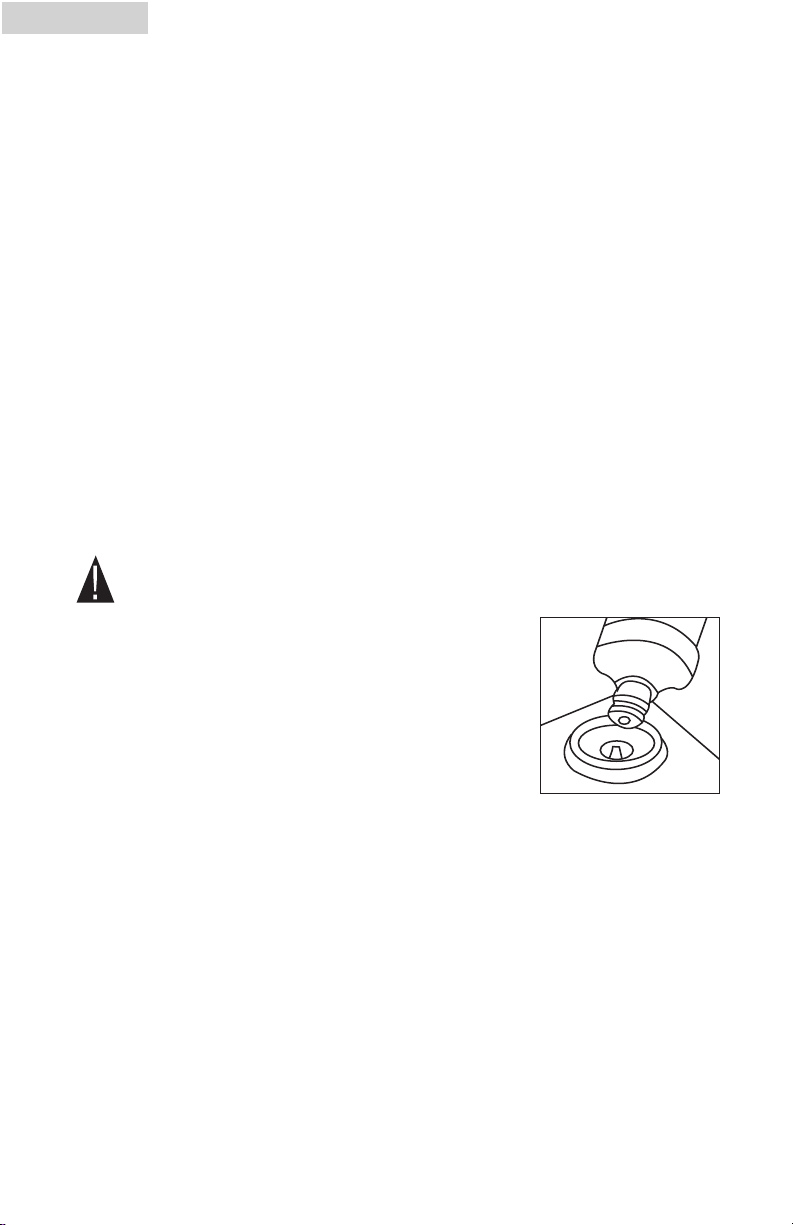
1. Remove the cap from the water bottle first. Lift up the
water bottle and quickly place it into the water guard.
Make sure it is standing in an upright position. (The water bottle is not included.)
2. DO NOT plug in the water dispenser until you have checked that
water flows out of both the red and blue faucets when pressed.
Never turn on the water dispenser without water in it. Doing so
may cause the unit to catch fire or malfunction.
Note: To avoid spilling water on the floor, we recommend that you use
"Spill-Proof" bottles, which are available at any water distributor.
"Spill-Proof" bottles are easy to install since cap removal is not necessary.
Contact your local water distributor for more information.
3. Check that water flows out by pressing both the red and blue faucets one at a
time.
4. Plug the power cord into an 115Volt / 60Hz outlet.
5. To activate the water heater and cooler, turn ON the red and green switches on
the back of the unit. The hot & cold indicators in the front will be lit.
Assembly Instructions
Proper Location
Page 14
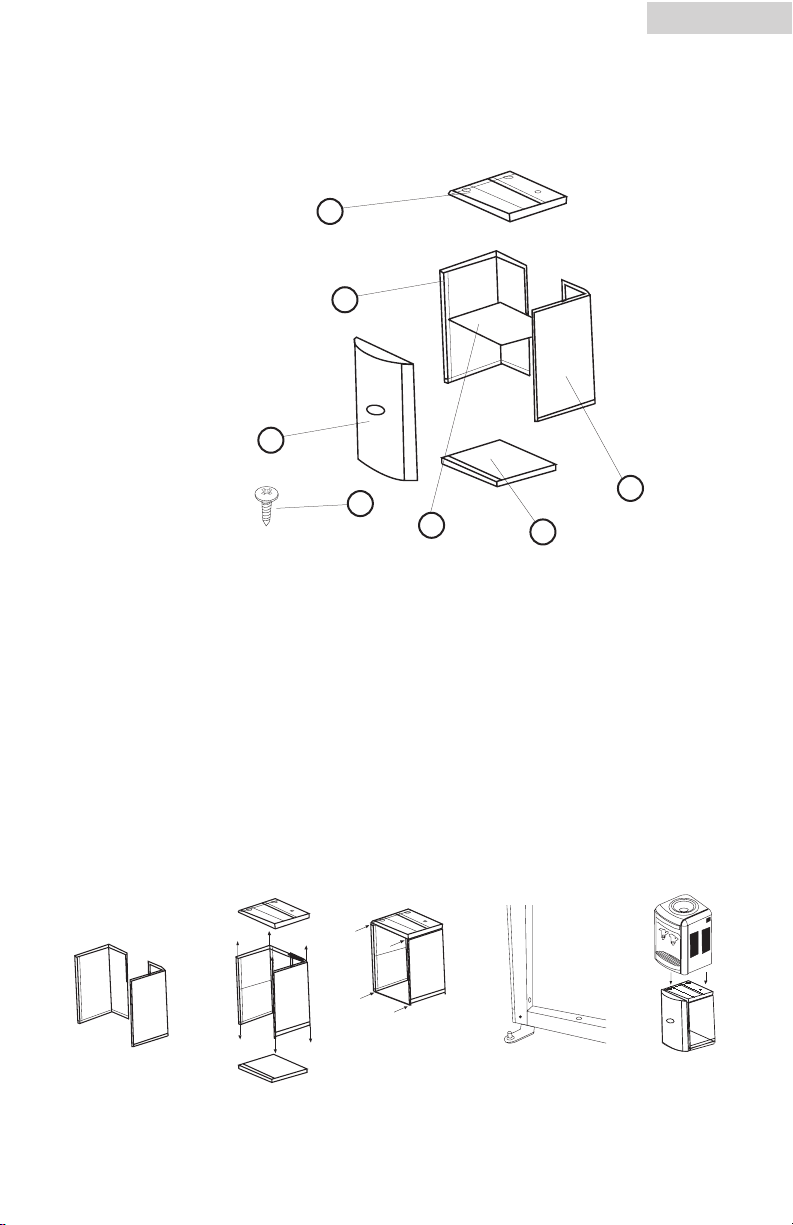
Assembly instructions for storage compartment (WDQSC models only)
Picture of parts:
1) Door
2) Left side panel
3) Top cover
4) Right side panel
5) Base
6) Inner shelf
7) 16 Screws
1) Join the left panel to the right panel. (fig. A )
2) Attach the top cover and the base to the side panels with 8 supplied screws. (fig. B)
3) Secure the top and the bottom base to the side panels with 4 screws. (fig. C)
4) Install the door bottom hinge to the base with 2 of the supplied screws. Hinge should
be angled out. (fig D)
5) Align the bottom hinge axel to the hole on the bottom of the door.
6) Install the top door hinge with 2 screws.
7) Put the inner shelf in place.
8) Align the feet of the water cooler with the groves on the top cover of the stand. (fig. E)
English
Assembly of Storage Compartment
(WDQSC145 and WDQSC245 Only)
14
1
2
3
4
5
6
7
Fig. A Fig. B Fig. C Fig. D Fig. E
Page 15
English
15
Grounding Instructions
This appliance must be grounded. In the event of an electrical short circuit,
grounding reduces the risk of electric shock by providing an escape wire for the
electric current. This appliance is equipped with a cord containing a grounding wire
and a grounded plug. The plug must be inserted into an outlet that is properly
installed and grounded.
• Improper use of the plug may result in the risk of electric shock.
• Consult a qualified electrician or service technician if the grounding
instructions are not completely understood or if in doubt as to whether
the appliance has been properly grounded.
Wiring Requirements
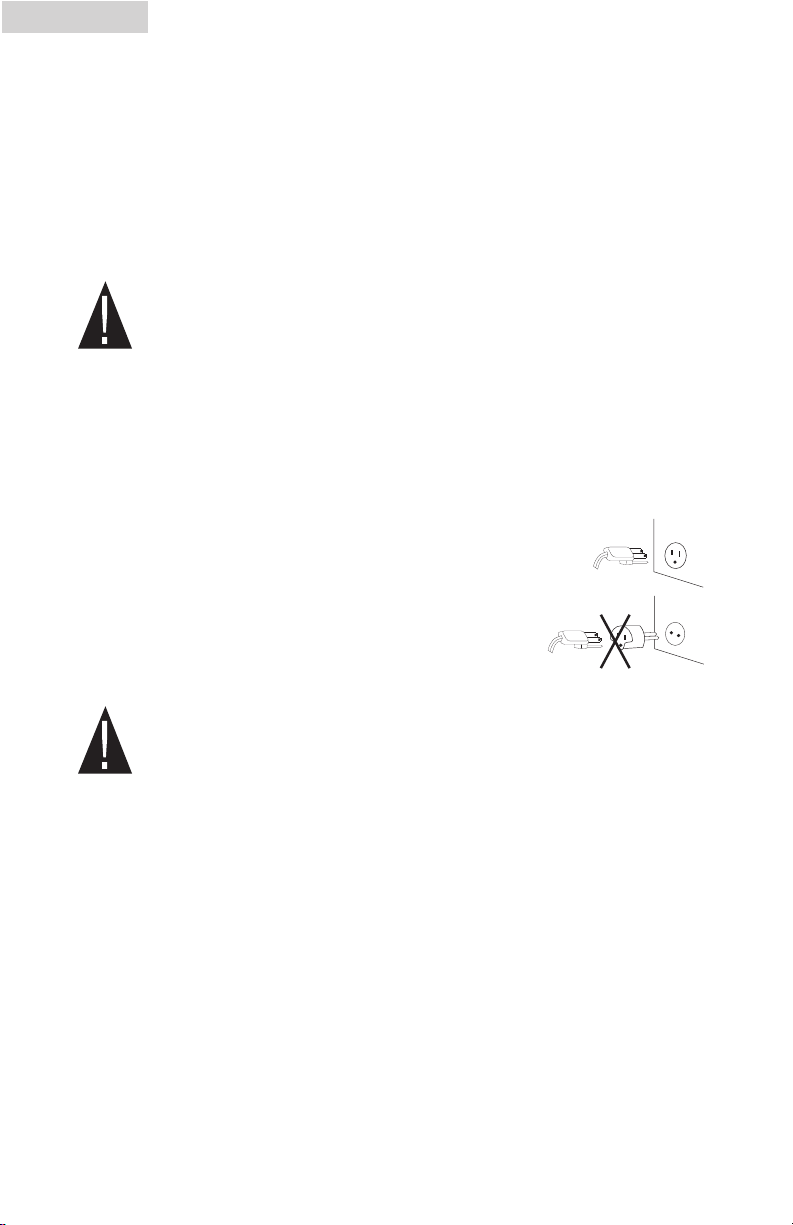
This appliance must be plugged into a 15Amp, 115 Volt, 60Hz
GROUNDED OUTLET.
Note: Where a standard two-prong outlet is encountered, it
is the personal responsibility and obligation of the
consumer to have it replaced with a properly
grounded three-prong outlet.
Extension Cords
We DO NOT recommend the use of an extension cord with this unit.
Power Interruptions
Occasionally, there may be power interruptions due to thunderstorms or other
causes. Remove the power cord from wall outlet when a power outage occurs.
When power has been restored, re-plug the power cord into wall outlet.
Electrical Connections
Page 16
English
This water dispenser maintains instant hot and cold water for your cooking and
drinking needs. It accepts 2, 3 or 5-gallon water bottles.
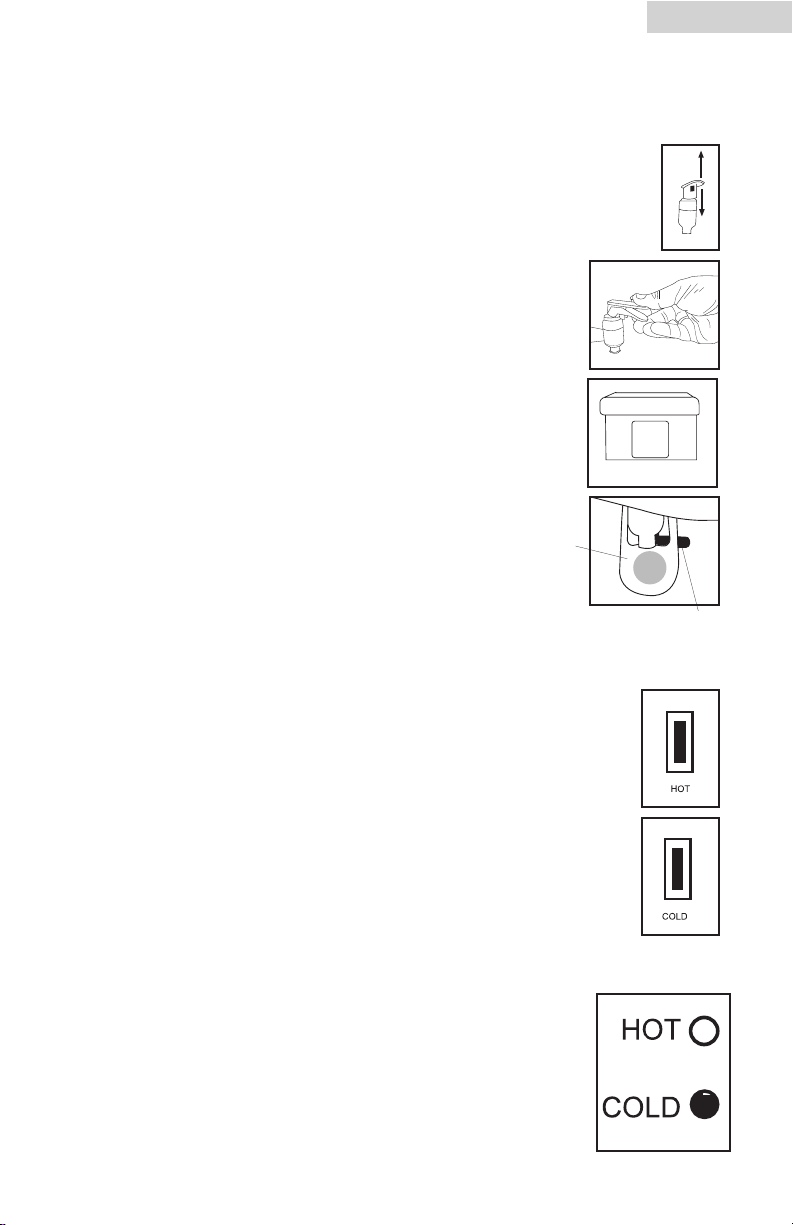
Cold (blue) / Hot (red) Water Faucets
• Press the tap lever down to release the water flow.
• Pull the tap lever up to stop the water flow.
Note: The hot (red) water faucet is equipped with a child
safety lock to prevent accidental spilling of hot water. To
release the hot water flow, the tap lever must be
squeezed and then pushed down.
• In the case of WDQT165W press in the hot water safety child
lock and then push down. Release the lever to stop the water
flow.
• In case of the WDQSC245 for hot water press the child safety
latch down and press in the hot water lever.
Cold (green) / Hot (red) Water Switches
Cold Water Switch (green):
The cold water switch activates the cooling process when turned ON.
• Press the switch to the ON position. The switch should become lit.
Note: When turning on the unit for the first time, it will take
some time to chill the water.
Hot Water Switch (red):
The hot water switch activates the heating process when turned ON.
• Press the switch to the ON position. The switch should become lit.
Caution! Be careful when carrying hot water in your cup or
container to avoid any injury or harm from spills.
Cold (green) / Hot (red) Water Indicator Lights
When the green and red lights are illuminated on the front of the
unit, the heating and cooling process is in progress. When the cold
and hot water has reached their proper temperatures, both lights
will turn off automatically. Normally, hot water reaches proper
temperature first.
Operating Your Water Dispenser
16
Hot water lever (red)
Child safety latch
Page 17
English
17
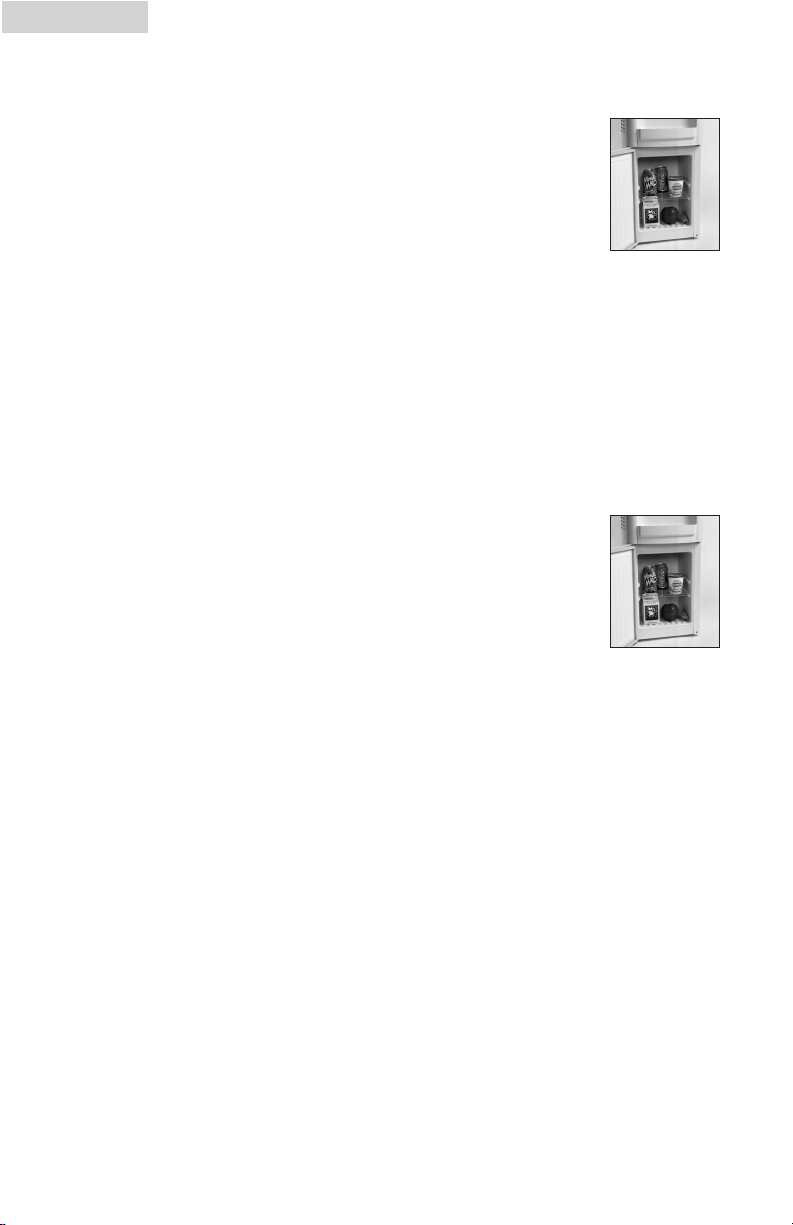
Using the Refrigerator Compartment
(Not in all models)
The convenient refrigerator compartment can be very useful in storing
beverages and other perishable food items.
• When the dispenser is turned on for the first time, avoid food
spoilage by waiting at least 8 hours before putting any food or
beverages into the compartment, as the compartment may not be
cool enough to store foods.
• The refrigerator is frost free. During the automatic defrost cycle, ice build-up on
the rear interior wall of the compartment will melt and drip into the
water-collecting tray and then evaporate naturally.
Using the Storage Compartment
(Not in all models)
The convenient storage compartment can be very useful in storing instant drink
mixes such as coffee, tea, hot chocolate powder and other snacks.
You may store items in both the upper and lower levels of the
compartment. Remove the plastic shelf to store taller items.
Replacing the Fuse (Not in all models)
When the fuse is blown, none of the indicator lights will be illuminated. You may
need to replace it with a new fuse.
Follow the instructions below to replace a blown fuse.
1. First, unplug the unit.
2. Use a small flathead screwdriver to open the fuse holder on the back of the unit
by turning the knob in a counter-clockwise direction. The fuse holder will pop out.
3. Remove the bad fuse and replace it with a new one. Use a 15Amp rating fuse
ONLY.
4. Close the fuse holder by pushing and turning the knob in a clockwise direction.
5. Plug the unit into the outlet.
6. If the indicator lights are still not illuminated after you have replaced the blown
fuse with a new one,
a) The new fuse may be defective. Check the fuse status.
b) You may have installed the fuse improperly. Repeat the steps above.
Page 18
English
Removable Drip Tray
The spilled water in the drip tray must be removed regularly and cleaned properly
to avoid any bacteria and residue build-up. To remove it gently, lift the tray up.
Caution! Before using any cleaning product, always read and follow the
manufacturer’s instructions and warnings to avoid personal injury and/or
product damage.
Note: It is best to clean the dispenser and its surrounding area in between
replacing the empty bottle with a new one. This way you can move the unit
easily without the weight of the bottle.
General
• Before cleaning, place the dust cover on top of the water guard to prevent dust
and debris from going into the dispenser while cleaning.
• Prepare a cleaning solution of 3-4 tablespoons of baking soda mixed with warm
water. Use a sponge or a soft cloth dampened with the cleaning solution to wipe
down the unit.
• Wipe with clean warm water and dry with a soft cloth.
• Do not use harsh chemicals, abrasives, ammonia, chlorine bleach, concentrated
detergents, solvents or metal scouring pads. Some of these chemicals may
dissolve, damage and/or discolor the unit.
• The spilled water in the drip tray must be removed regularly and cleaned properly
to avoid any bacteria and residue build-up.
• We recommend that you clean the water dispenser at least twice a year. When
cleaning, you do not need to take anything apart. Simply pour the baking
soda/water solution through the water guard. Then rinse with plenty of water and
allow the water to drain.
WARNING!
Always unplug the unit before cleaning to
avoid electric shock. Failure to do so may
result in death or injury.
Proper Care and Cleaning
18
Page 19
English
19
Cleaning the Condenser Coils (Not in all models)
• We recommend that you move the dispenser away from the wall and vacuum or
brush the coils on the rear of the unit at least 4 times a year. Some operating
environments may require more frequent cleaning.
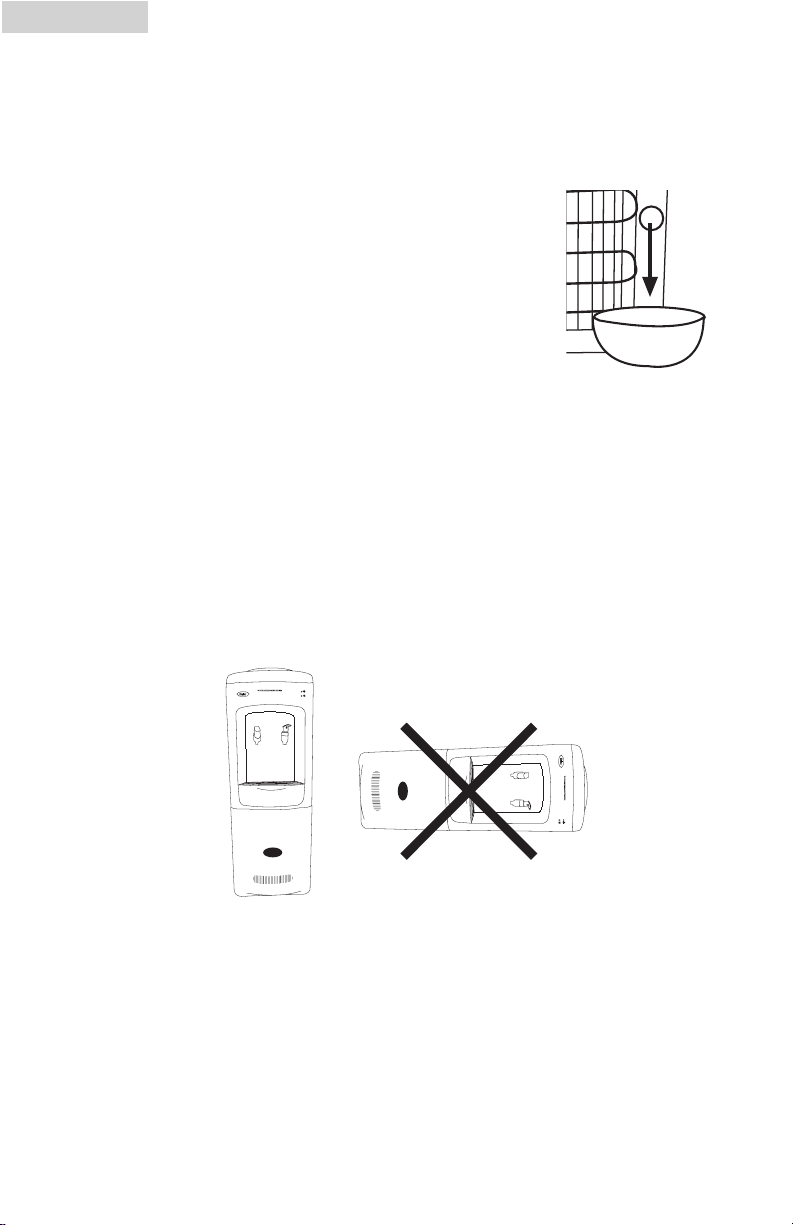
For Long Vacations or Absences / Moving
• Turn OFF the cold and hot water switches.
• Unplug the unit.
• Drain the unit completely and remove the empty water bottle.
Put a container or bucket on the floor under the drain on the
back of the unit to catch the water released from the drain tube.
Note: The location of the drain may vary depending on the model type.
• Remove the drain plug to release the water.
• After completing the drain process, replace the drain plug to its original position.
• You must store the unit at room temperature.
• Avoid storing the unit where the temperature is at or below freezing.
• When moving, the unit must be moved vertically. DO NOT move the unit in
horizontal position as this may cause possible damage to internal parts.
• You must cover the unit to avoid dust and debris from entering the water guard.
Page 20

Troubleshooting Guide
The unit does not operate.
• Check if your water dispenser is plugged in.
• Check the circuit breaker and the fuse to make sure there is power at the outlet.
The unit is plugged in but the indicator lights are not illuminated.
• Read the "Replacing the Fuse" section on page 17.
There is no water from the faucet.
This is due to an improper setting of the water bottle or from blocked airflow.
• Adjust the position of the bottle properly on the water bottle guard so the air
opening is not blocked.
There is no hot water coming from the faucet.
• Too much hot water was used in too short a period of time.
• You may need to wait awhile for more water to be heated.
• Check if the hot water switch is in the ON position.
The water is not cool.
This is due to either a compressor malfunction (for units with compressor) or the cold
water switch may be in the OFF position.
• Check if the cold water button is in the ON position.
English
20
Page 21

English
21
Compressor runs too frequently.
This may be necessary to maintain a constant temperature during hot and humid
days.
• Clean the condenser coils on the back of the unit.
The water is leaking from the drip tray.
This is due to over-spilling of the water in the drip tray.
• You must remove the drip tray from the dispenser and empty out the water.
• Replace it once you have emptied the water.
What happens if the water dispenser is running dry
(without the water)?
• You must never let the water dispenser run dry as this may cause damage to the
unit and create a fire. DO NOT let the dispenser run without water.
• You must replace the empty bottle immediately.
What size of water bottle can I use with this water dispenser?
• You can use 2, 3 or 5-gallon bottles with our water dispenser.
Page 22

Limited Warranty
What is covered and for how
long?
This warranty covers all defects in workmanship or materials for a period of:
12 months labor (carry-in only)
12 months parts
The warranty commences on the date
the item was purchased and the original
purchase receipt must be presented to
the authorized service center before
warranty repairs are rendered.
EXCEPTIONS: Commercial or
Rental Use warranty
90 days labor (carry-in only)
90 days parts
No other warranty applies
What is covered.
1. The mechanical and electrical parts,
which serve as a functional purpose
of this appliance, for a period of 12
months. This includes all parts except
finish, and trim.
What will be done?
1. We will repair or replace, at our
discretion, any mechanical or
electrical part which proves to be
defective in normal usage during the
warranty period so specified.
2. There will be no charge to the
purchaser for parts and labor on any
covered items during the initial 12
month period. Beyond this period,
only parts are covered in the
remaining warranty. Labor is not
provided and must be paid by the
customer.
3. Contact your nearest authorized
service center. For the name of the
nearest service center please visit our
website at www.HaierAmerica.com or
call 1-877-337-3639 for more
information.
THIS WARRANTY COVERS
APPLIANCES WITHIN THE
CONTINENTAL UNITED STATES,
PUERTO RICO AND CANADA.
IT DOES NOT COVER
THE FOLLOWING:
Damages from improper installation.
Damages in shipping.
Defects other than manufacturing.
Damage from misuse, abuse, accident,
alteration, lack of proper care and
maintenance or incorrect current or
voltage.
Damage from other than household use.
Damage from service by other than an
authorized dealer or service center.
Decorative trims or replaceable light
bulbs.
Transportation and shipping.
Labor (after the initial 12 months).
THIS LIMITED WARRANTY IS GIVEN IN
LIEU OF ALL OTHER WARRANTIES,
EXPRESSED OR, INCLUDING THE
WARRANTIES OF MERCHANTABILITY
AND FITNESS FOR A PARTICULAR
PURPOSE.
The remedy provided in this warranty is
exclusive and is granted in lieu of all
other remedies.
This warranty does not cover incidental
or consequential damages, so the above
limitations may not apply to you. Some
States do not allow limitations on how
long an implied warranty lasts, so the
above limitations may not apply to you.
This warranty gives you specific legal
rights, and you may have other rights,
which vary, from state to state.
Haier America
New York, NY 10018
22
English
Page 23

115V, 60Hz
Made in China
Fabriqué en Chine
Hecho en China
Haier America
New York, NY 10018
IMPORTANT
Do Not Return This Product To The Store
If you have a problem with this product, please contact the
"Haier Customer Satisfaction Center" at 1-877-337-3639.
DATED PROOF OF PURCHASE REQUIRED FOR WARRANTY SERVICE
IMPORTANT
Ne pas Réexpédier ce Produit au Magasin
Pour tout problème concernant ce produit, veuillez contacter le service des
consommateurs ‘Haier Customer Satisfaction Center’ au 1-877-337-3639.
UNE PREUVE D’ACHAT DATEE EST REQUISE POUR BENEFICIER DE LA GARANTIE.
IMPORTANTE
No regrese este producto a la tienda
Si tiene algún problema con este producto, por favor contacte el "Centro de Servicio al
Consumidor de Haier" al 1-877-337-3639 (Válido solo en E.U.A).
NECESITA UNA PRUEBA DE COMPRA FECHADA PARA EL SERVICIO DE LA GARANTIA
Issued: March - 04
Part # RF-9999-157
 Loading...