

Page 1
Page 2

Important Safeguards
To reduce the risk of fire, electric shock or injury when using electrical appliances, please follow these basic safety
precautions:
FOR YOUR SAFETY
x
Read all instructions carefully, even if you are
familiar with the appliance.
x
This appliance is not intended for use by
children or infirm persons without supervision.
x
Do not allow children to play with the appliance.
x
INDOOR USE ONLY – this appliance
is not intended for outdoor use.
x
Do not place naked flames, such as
candles, on the appliance.
x
Keep the appliance and cord away from heat
sources such as radiators, heaters, air ducts or
direct sunlight.
x
Keep all vents and openings clear. Ensure
they are not covered by newspapers,
tablecloths, curtains, etc.
x
Do not run the cord under floor coverings.
Instead, arrange the cord away from traffic
areas where it will not become a trip hazard.
x
Grasp the plug firmly and pull to unplug from the
power supply. Never pull on the cord.
x
Do not operate the appliance if it has a damaged
cord or plug.
x
If the appliance malfunctions; or has been
dropped or damaged in any way, consult a
qualified service technician.
x
Do not attempt to repair, disassemble or modify
this appliance. The warranty becomes void if
repairs have been carried out by anyone other
than a qualified service technician.
Do not place items that have been soiled with
flammable liquids inside the dryer without
washing them with detergent thoroughly first.
x
Do not excessively bend, stretch, twist the
power cord or place heavy objects on it.
x
Do not use an extension cord or multiple outlet
with this appliance.
x
Do not install in a tight fitting cupboard.
x
Do not overload the tumble dryer.
x
Ensure pockets in clothing are empty so that
foreign objects do not find their way into the
drum of the tumble dryer.
x
The door window may be hot after a drying
cycle. Please ensure children are kept away.
x
If the tumble dryer is not wall mounted, place on
a flat, firm and dry surface. Use the adjustable
front legs to level the dryer if needed. Do not
place it on any soft material such as foam or
plastic.
x
Do not use flammable or combustible materials
such as gas, petrol, alcohol or lacquer in the
tumble dryer.
x
After turning off the power supply to the tumble
dryer, wait at least 2 minutes before turning it
back on again.
x
Please remove the transport packaging at the
rear of the tumble dryer, prior to use.
SAVE THESE INSTRUCTIONS
2
Page 3
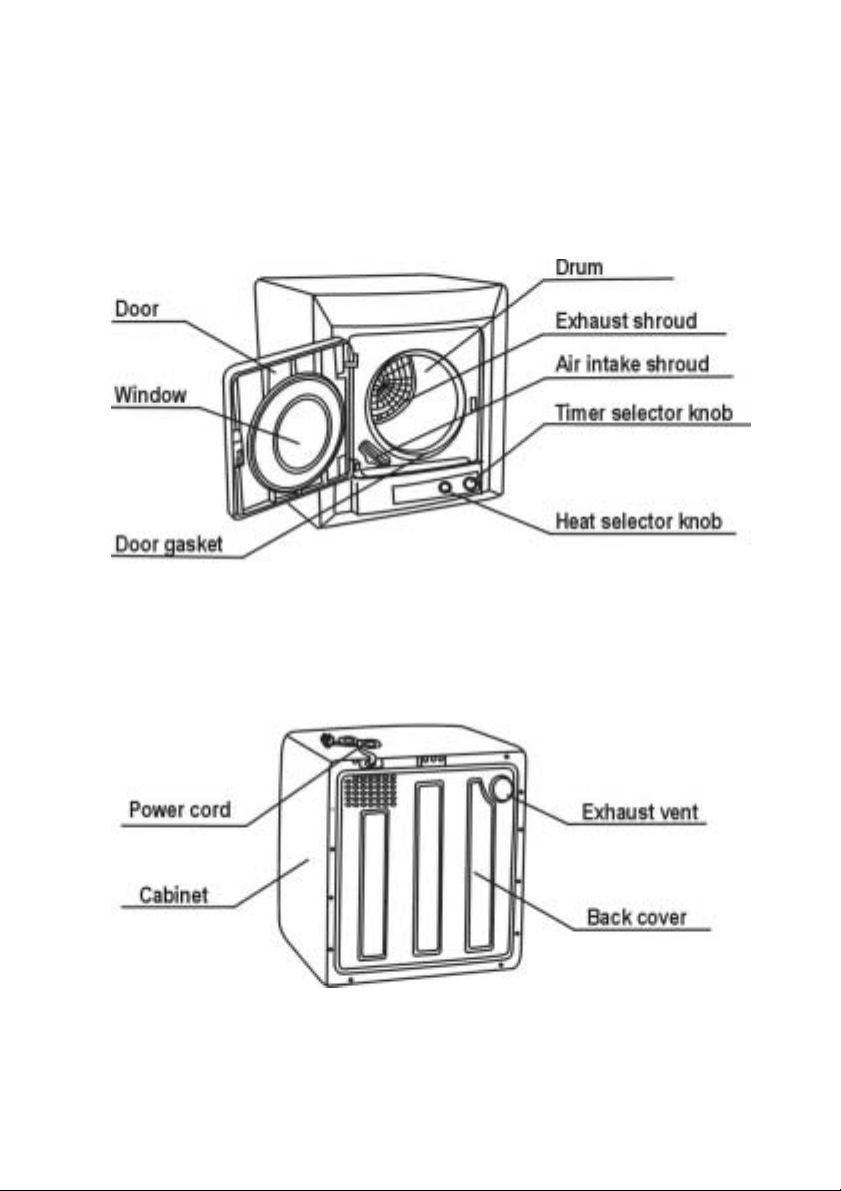
Name of Components
3
Page 4

Operating your Dryer
Electrical Requirements
Connect the unit to a standard earthed three pin
outlet.
The power supply must be 220-240V.
Loading the Dryer
x
Ensure that items do not contain combustible
materials or foreign objects (pins, coins etc.)
x
Turn items with zippers inside out and fasten
buckles.
x
Place items into the dryer one at a time to
ensure they are not tangled (tangled clothing
results in uneven drying). Ensure there are no
items jammed in the door before closing.
Drying Tips
x
Do not add items to a load which is already
partially dry.
x
Dryer heat may permanently set stains,
ensure stains are removed prior to drying.
x
Separate dark and light coloured items as
you would do when washing.
x
For best results load the dryer with similar
fabrics. Place small delicate items in a mesh bag
and do not overload the dryer.
x
If drying large items such as a blanket, it is
recommended that from time to time you open
the dryer door, remove and shake the item,
place it back into the dryer and close the door.
This will ensure even drying.
x
To ensure you get the most out of the
Anti-wrinkle function, do not overload the dryer,
and remove the dried items from the dryer as
soon as they have finished tumbling. Hang on
coat hangers and iron the items if desired.
x
Prior to loading the dryer check that the items do
not have the following symbols on them.
x
If they do, do not dry them in this appliance.
Do not Hang to dry Drip dry
tumble dry
Drying Time Reference Table
Drying
Capacity
Approx. 1 kg Approx.30min Approx. 55 min
Approx. 2 kg Approx.60min Approx. 110 min
Approx. 3 kg Approx. 120 min
Approx. 3.5 kg Approx. 220 min
Drying times are affected by many factors, such
as the type of material, bulkiness, how full the
dryer is etc. The above list is a guide only.
Dry Time
Heavy Delicate
4
Page 5

Control Panel Functions
Temperature Selector Button
Select ‘Heavy’ for items that are particularly bulky or large quantities.
elect ‘Delicate’ for materials like Silk, Nylon, Linen etc.
S
Drying Timer Dial
There are five drying combinations available: Cool, Anti-wrinkle, Warm, Hot and Air Dry.
5
Page 6

Installation Instructions
Where to place your dryer
Place the dryer in a dry, well ventilated area, away
from heat and direct sunlight.
If the dryer is not wall mounted, it must be placed on
a firm level surface. Do not place the dryer on carpet
as this will block the intake. There should be at least
100mm between the dryer and the walls.
Fit the legs that come with the dryer to ensure
stability.
Leg
If the dryer is permanently mounted, at least
100mm between the dryer and walls is required.
Wall Mounting Instructions
Wall Mounting Kit Includes
Description Wall Hanging Brackets 2
Hook 1
Plastic Spacers 2
Exhaust Duct 4 pieces
2. Fix the wall hanging brackets to the wall securely
(eg. into the stud.) If the studs are too far apart fit a
timber slat to the studs then mount the brackets
onto the slat. The distance between each bracket is
155mm as per diagram.
Wall Mounting Instructions
1. Determine the location of the dryer on the
wall and mark the bracket position.
* A minimum 50mm is needed between the top of the
dryer and the ceiling for ease of installation.
* If mounting above a washing machine, allow
sufficient room to open the lid of the washer.
For Plaster/
Wooden Wall
Tools Required
Drill & 3mm Bit
Philips Head Screw Driver
Wood Screws, 1 2g x 50mm
Timber Screws
1
1
4
3.
To install the hook to the dryer, remove screws 1,
2, 3 & 4 as indicated in Fig. 2.
4.
Align bracket as shown in Fig. 3 and refit
screws tightly.
5.
Remove lower side screws and install the
spacers provided as per Fig. 2.
6.
Install exhaust duct: for upwards discharge, join
sections 1 and 3, for downwards discharge, join
sections 1, 2, 2 & 3 as per Fig. 4.
7.
With assistance, mount dryer on wall brackets.
See Fig. 5.
6
Page 7

Wall Mounting Instructions
Maintenance
Cleaning the Lint Filter
Unplug the power cord prior to any cleaning. The lint
filter must be cleaned before and after each use.
Never use the dryer without the filter in place.
1. Removing the Filters
Insert fingers into the four holes around the exhaust
vent shroud and pull out to remove. The filter is in 3
parts: Exhaust vent shroud, lint filter and exhaust
filter (as shown in figure 1).
2. Cleaning the filter
Separate the filters from the shroud and remove the
lint with a soft brush or vacuum cleaner. Take care
not to damage the filters. (See fig 2).
3. Re-installing the Filter
Reinstall in the reverse order, align the recess in the
centre of the filters with the spigot in the centre of the
drum and ensure that it is fitted firmly. (as shown in
figure 3).
Note: The filter fixed in the bottom of the
drum should also be cleaned with a soft
brush.
7
Page 8

Maintenance
r
Cleaning of the Air Intake Filter
The filter should be cleaned once a month. Hold
the upper and lower edges of the air intake shroud,
push upwards gently with your thumb to disconnect
the latch hook then pull outwards to remove.
Remove the filter from the shroud and clean it with
a soft brush and refit.
Cleaning the Interior & Exterior of the Dryer
Do not use excessive water, just a damp cloth.
Do not use solvents.
Do not use spray cleaners when cleaning the interior.
If the drum becomes stained, clean it with a damp
cloth and allow to dry before using.
Clean the cabinet with mild soap and water. Do not use
harsh or abrasive cleaners.
Troubleshooting
Review the following pages before calling for service.
Problem Possible Cause What to do
Timer knob does not turn. • Is the power on? • Insert the plug and turn on.
Drum does not turn. • Is the door closed?
Exhaust air is not hot. • Is the timer incorrectly set on cold air? • Set the timer to hot air.
The laundry has not
dried thoroughly.
• Is the power on?
• Is there power to the wall socket?
• Are the front and back filters clogged?
• Is there too much laundry in the dryer?
• Have items been added whilst the drye
is in operation?
• Has the laundry become twisted whilst
drying?
• Has the dryer been placed in a small
and badly ventilated area?
• Close the door.
• Insert the plug and turn on.
• Check another appliance in the
wall socket.
• Clean the filter.
• Reduce the amount in the dryer.
• Re-dry the items again.
• Untwist the items and re-dry.
• Place the dryer in a well vented
area.
Dryer does not start. • Is there a power failure?
• Is the machine plugged in?
• Is the door closed?
• Is the timer in the OFF position?
• Try again when there is power.
• Insert the power plug firmly.
• Close the door.
• Set the dry time.
If none of these circumstances applies and you are not able to repair the fault,
please phone 0800 TELMANN (0800 835 6266)
for an authorised service agent.
8
 Loading...