

Page 1
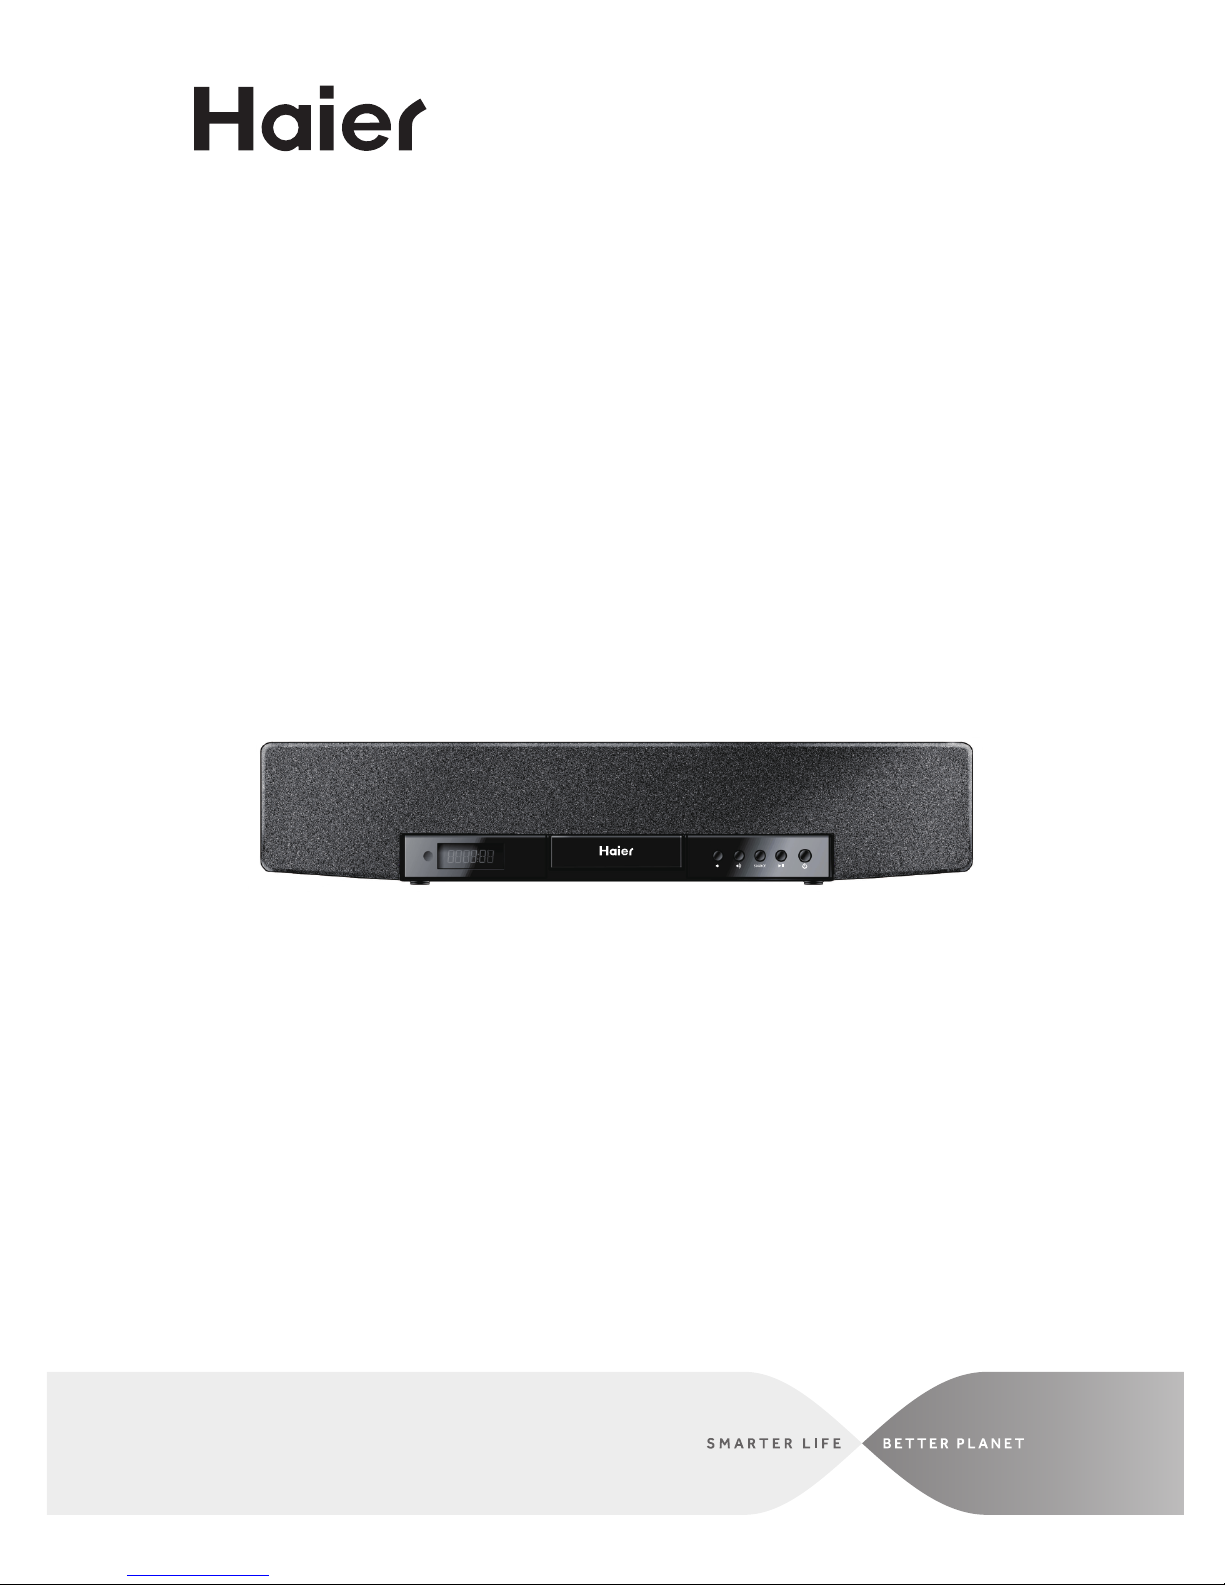
20" Core 2.0 Channel Soundbar
with iPod®, iPhone®, and iPad®
docking
User Manual
Guide de l’Utilisateur
Manual del Usuario Modelo
MODEL: SBC20
Page 2

English
TABLE OF CONTENTS
WARNING . . . . . . . . . . . . . . . . . . . . . . . . . . . . . . . . . . . . . . . . 2
IMPORTANT SAFETY INSTRUCTIONS . . . . . . . . . . . . . . . . . . . . . 3
FCC WARNINGS . . . . . . . . . . . . . . . . . . . . . . . . . . . . . . . . . . . . 4
IN THE BOX . . . . . . . . . . . . . . . . . . . . . . . . . . . . . . . . . . . . . . . 5
MAIN UNIT . . . . . . . . . . . . . . . . . . . . . . . . . . . . . . . . . . . . . . . . 6
REMOTE CONTROL . . . . . . . . . . . . . . . . . . . . . . . . . . . . . . . . . . 7
OPERATION . . . . . . . . . . . . . . . . . . . . . . . . . . . . . . . . . . . . . 8-11
POWER SUPPLY . . . . . . . . . . . . . . . . . . . . . . . . . . . . . . . . . . . 8
SLEEP TIMER SETTING . . . . . . . . . . . . . . . . . . . . . . . . . . . . . . . 8
HOW TO SET TIME . . . . . . . . . . . . . . . . . . . . . . . . . . . . . . . . . 8
PAGE
CLOCK SYNC . . . . . . . . . . . . . . . . . . . . . . . . . . . . . . . . . . . . . 8
PLAYING YOUR iPod, iPhone, AND iPad . . . . . . . . . . . . . . . . . 8
FM RADIO . . . . . . . . . . . . . . . . . . . . . . . . . . . . . . . . . . . . . . . 9
TUNING THE FM RADIO . . . . . . . . . . . . . . . . . . . . . . . . . . . . . 9
STORING YOUR FAVORITE RADIO STATION . . . . . . . . . . . . . . . 9
MUTE THE UNIT . . . . . . . . . . . . . . . . . . . . . . . . . . . . . . . . . . . 9
VOLUME LEVEL ADJUSTMENT . . . . . . . . . . . . . . . . . . . . . . . . . 9
EQ EFFECT . . . . . . . . . . . . . . . . . . . . . . . . . . . . . . . . . . . . . . . 9
CLOCKRADIO . . . . . . . . . . . . . . . . . . . . . . . . . . . . . . . . . . 9-10
MANUALLY DOWNLOADING THE CLOCKRADIO . . . . . . . . . . . . 9
CLOCKRADIO
ALARM . . . . . . . . . . . . . . . . . . . . . . . . . . . . . . . . . . . . . . . . 10
SLEEP . . . . . . . . . . . . . . . . . . . . . . . . . . . . . . . . . . . . . . . . . . 10
iPod . . . . . . . . . . . . . . . . . . . . . . . . . . . . . . . . . . . . . . . . . . . 10
RADIO . . . . . . . . . . . . . . . . . . . . . . . . . . . . . . . . . . . . . . . . . 10
EQ . . . . . . . . . . . . . . . . . . . . . . . . . . . . . . . . . . . . . . . . . . . . 10
CONNECTING TO OTHER DEVICES . . . . . . . . . . . . . . . . . . . . . 11
. . . . . . . . . . . . . . . . . . . . . . . . . . . . . . . . . . . . 10
AUX IN . . . . . . . . . . . . . . . . . . . . . . . . . . . . . . . . . . . . . . . . 11
A/V INPUT . . . . . . . . . . . . . . . . . . . . . . . . . . . . . . . . . . . . . . 11
COMPOSITE VIDEO OUTPUT . . . . . . . . . . . . . . . . . . . . . . . . . 12
COMPONENT VIDEO OUTPUT . . . . . . . . . . . . . . . . . . . . . . . . 12
TROUBLESHOOTING . . . . . . . . . . . . . . . . . . . . . . . . . . . . . . . . 13
LIMITED WARRANTY . . . . . . . . . . . . . . . . . . . . . . . . . . . . . . . . 14
1
Page 3
English
WARNING
- CAUTION: USE OF ANY CONTROLS, ADJUSTMENTS, OR PROCEDURES
OTHER THAN THOSE SPECIFIED HEREIN MAY RESULT IN HAZARDOUS
RADIATION EXPOSURE.
- CAUTION: DANGER OF EXPLOSION IF BATTERY IS INCORRECTLY REPLACED.
REPLACE ONLY WITH THE SAME OR EQUIVALENT TYPE.
- TO PREVENT FIRE OR SHOCK HAZARD, DO NOT USE THIS PLUG WITH AN
EXTENSION CORD, RECEPTACLE OR OTHER OUTLET UNLESS THE BLADES
CAN BE FULLY INSERTED TO PREVENT BLADE EXPOSURE.
- WARNING: TO REDUCE THE RISK OF FIRE OR ELECTRIC SHOCK, DO NOT
EXPOSE THIS DEVICE TO RAIN OR MOISTURE.
- WARNING: THE BATTERIES SHALL NOT BE EXPOSED TO EXCESSIVE HEAT
SUCH AS SUNLIGHT, FIRE OR THE SOMETHING SIMILAR.
- MAINS PLUG AND PLUG-IN ADAPTER REMAIN READILY OPERABLE DURING
INTENDED USE. IN ORDER TO DISCONNECT THE APPARATUS, THE MAINS
PLUG AND PLUG-IN ADAPTER SHOULD BE DISCONNECTED FROM THE
MAINS SOCKET OUTLET COMPLETELY.
The lightning flash with
arrowhead symbol, within
an equilateral triangle, is
intended to alert the user to
the presence of uninsulated
"dangerous voltage" within
the product's enclosure that
may be of sufficient
magnitude to constitute a
risk of electric shock.
CAUTION
RISK OF ELECTRIC SHOCK
DO NOT OPEN
WARNING: TO REDUCE THE
RISK OF ELECTRIC SHOCK,
DO NOT REMOVE COVER
(OR BACK). NO USERSERVICEABLE PARTS INSIDE.
REFER SERVICING TO
QUALIFIED SERVICE
PERSONNEL.
The exclamation point
within an equilateral
triangle is intended to alert
the user to the presence of
important operating and
maintenance (servicing)
instructions in the literature
accompanying the device.
2
Page 4

English
IMPORTANT SAFETY INSTRUCTIONS
1) Read these instructions.
2) Keep these instructions.
3) Heed all warnings.
4) Follow all instructions.
5) Do not use this apparatus near water.
6) Clean only with dry cloth.
7) Do not block any ventilation openings. Install in accordance with the
manufacturer's instructions.
8) Do not install near any heat sources such as radiators, heat registers, stoves, or
other apparatus (including amplifiers) that produce heat.
9) Do not defeat the safety purpose of the polarized or grounding-type plug. A
polarized plug has two blades with one wider than the other. A grounding type
plug has two blades and a third grounding prong. The wide blade or the third
prong are provided for your safety. If the provided plug does not fit into your
outlet, consult an electrician for replacement of the obsolete outlet.
10) Protect the power cord from being walked on or pinch particularly at plugs,
convenience receptacles, and the point where they exit from the apparatus.
11) Only use attachments/accessories specified by the
manufacturer.
12) Use only with the cart, stand, tripod, bracket, or table
specified by the manufacturer, or sold with the apparatus.
When a cart is used, use caution when moving the
cart/apparatus combination to avoid injury from tip-over.
13) Unplug this apparatus during lightening storms or when
unused for long periods of time.
14) Refer all servicing to qualified service personnel. Servicing is required when
the apparatus has been damaged in any way, such as power-supply cord or
plug is damaged, liquid has been spilled or objects have fallen into the
apparatus, the apparatus has been exposed to rain or moisture, does not
operate normally, or has been dropped.
15) This device shall not be exposed to dripping or splashing water and that no
object filled with liquid such as vases shall be placed on the apparatus.
16) Rating label is located at the bottom of enclosure.
17) "CAUTION" mark is located at the back of enclosure.
S3125A
3
Page 5

English
FCC WARNINGS
WARNING: Changes or modifications to this unit not expressly approved by the
party responsible for compliance could void the user's authority to operate the
equipment.
NOTE: This equipment has been tested and found to comply with the limits for a
Class B digital device, pursuant to Part 15 of the FCC Rules. These limits are
designed to provide reasonable protection against harmful interference in a
residential installation. This equipment generates, uses, and can radiate radio
frequency energy and, if not installed and used in accordance with the
instructions, may cause harmful interference to radio communications. However,
there is no guarantee that interference will not occur in a particular installation. If
this equipment does cause harmful interference to radio or television reception,
which can be determined by turning the equipment off and on, the user is
encouraged to try to correct the interference by one or more of the following
measures:
— Reorient or relocate the receiving antenna.
— Increase the separation between the equipment and receiver.
— Connect the equipment into an outlet on a circuit different from that to which the
receiver is connected.
— Consult the dealer or an experienced radio/TV technician for help.
4
Page 6
English
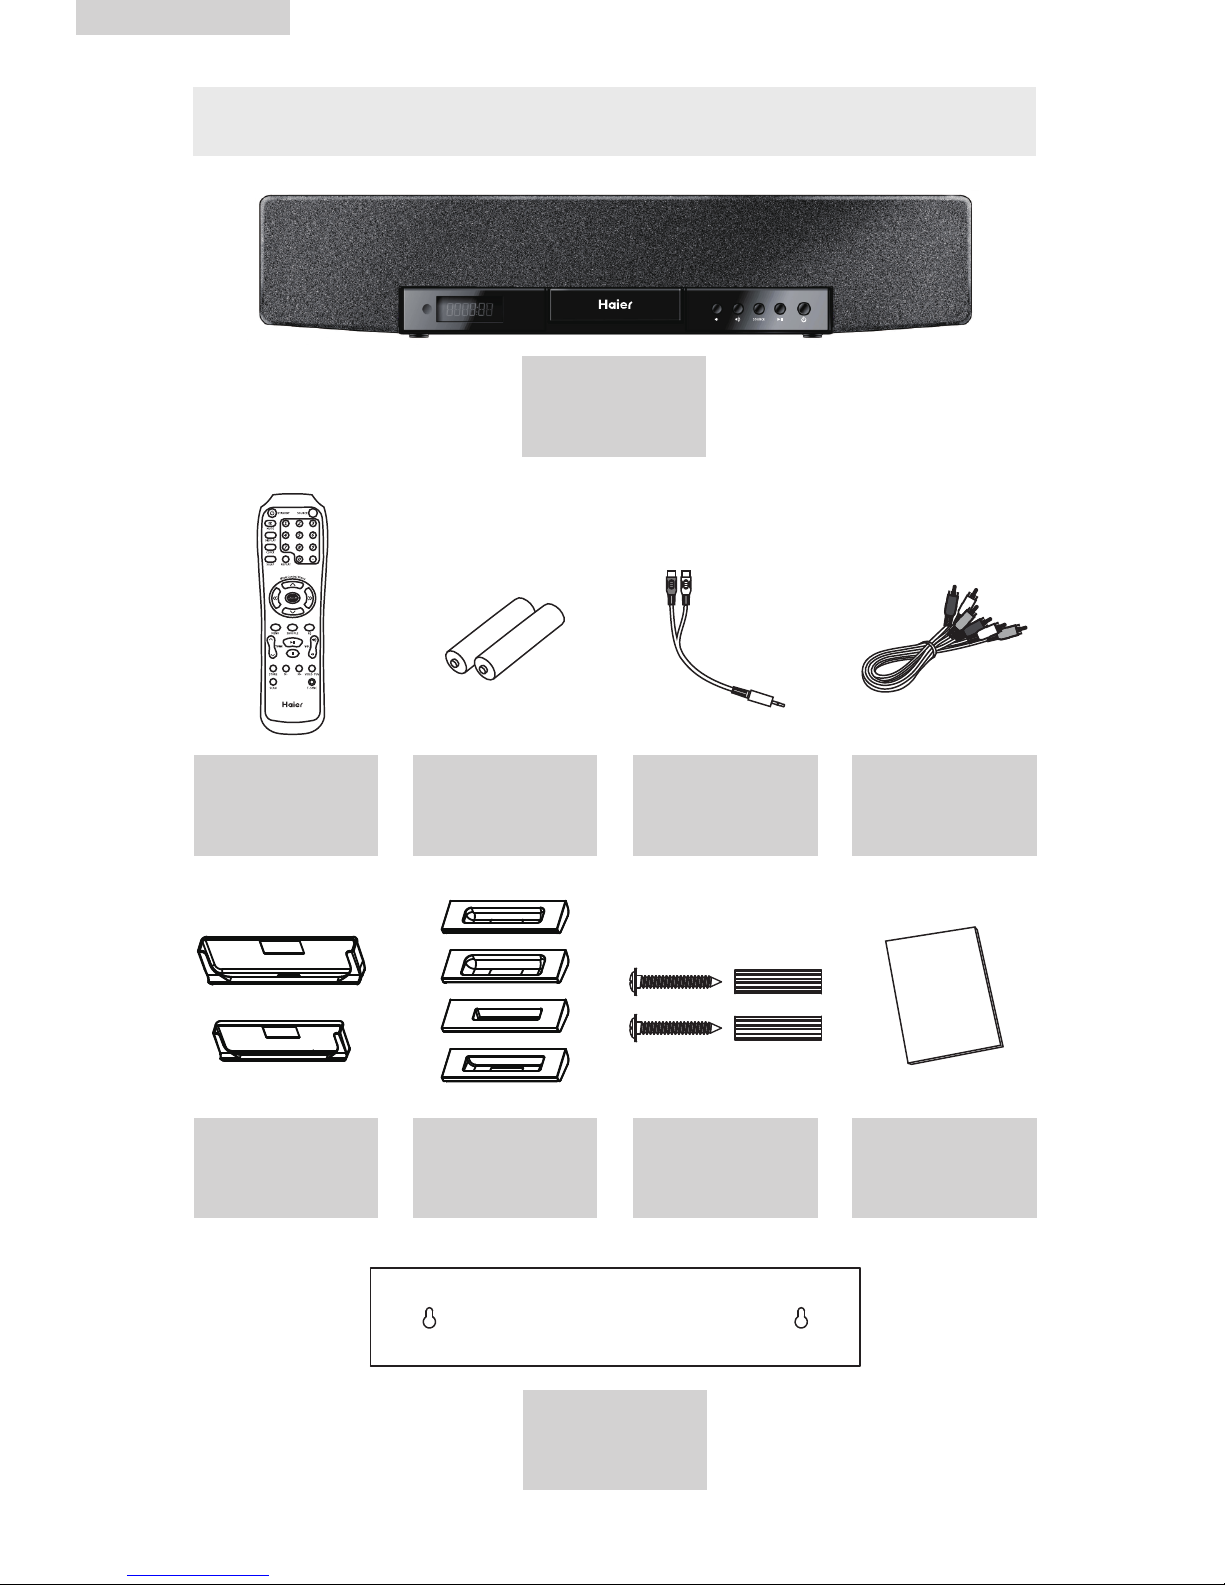
IN THE BOX
Main Unit
/
Remote Control
(1 pc)
iPad 2 cradle
(2 pcs)
“AAA” Battery
(2 pcs)
iPod & iPhone
bracket adaptor
(4 pcs)
RCA Adaptor
(1 pc)
Screw (2 pcs)
Anchor (2 pcs)
AV Cable
(1 pc)
User Manual
User Manual
(1 pc)
5
Wall mounting
illustration
(1 pc)
Page 7
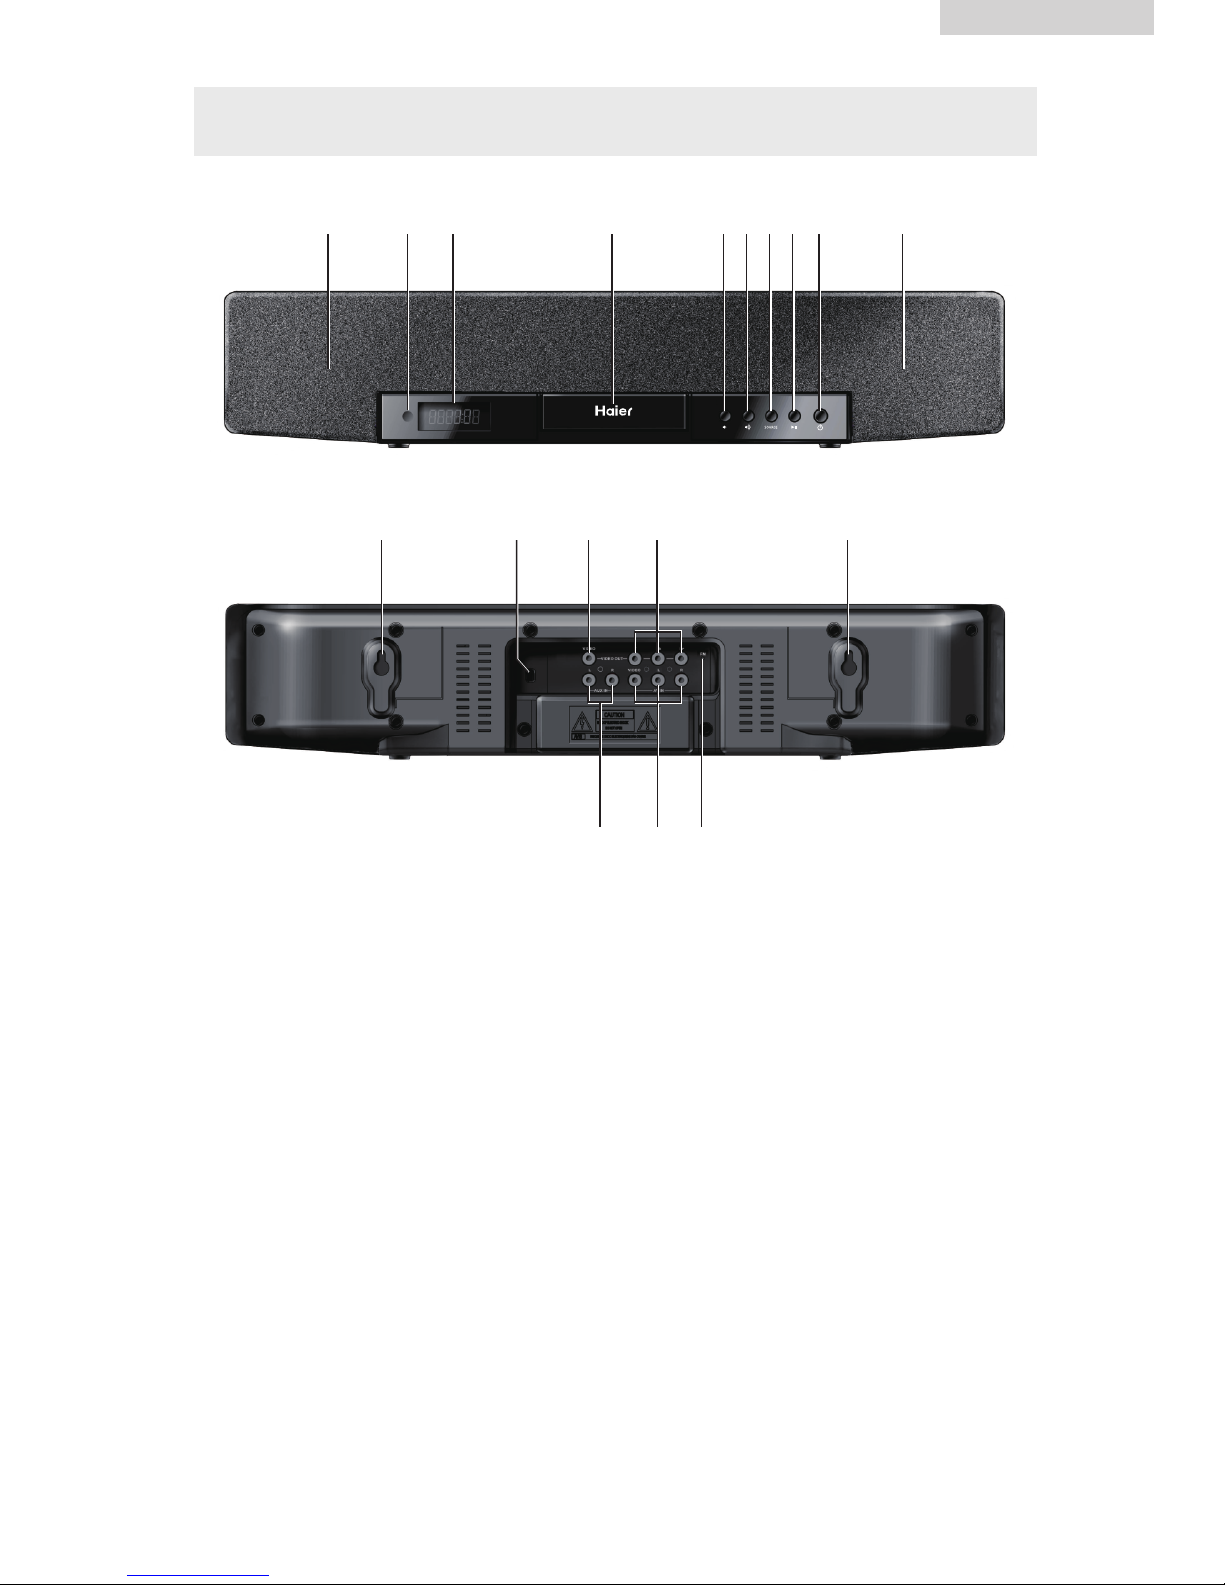
MAIN UNIT
English
1 12
10 1012
3
11
4
13
5
6 7 8 9
1415 16
1. SPEAKERS
2. REMOTE SENSOR
3. LCD DISPLAY
4. iPod, iPhone, iPad DOCKING (Press to eject docking)
5. VOL - BUTTON
6. VOL + BUTTON
7. SOURCE BUTTON
8. PLAY/PAUSE BUTTON
9. STANDBY BUTTON
10. WALL-MOUNT HOLES
11. AC CORD
12. COMPOSITE VIDEO OUTPUT JACK
13. COMPONENT VIDEO OUTPUT JACKS
14. FM PIGTAIL ANTENNA
15. AUX IN JACKS
16. A/V INPUT JACKS
6
Page 8
English
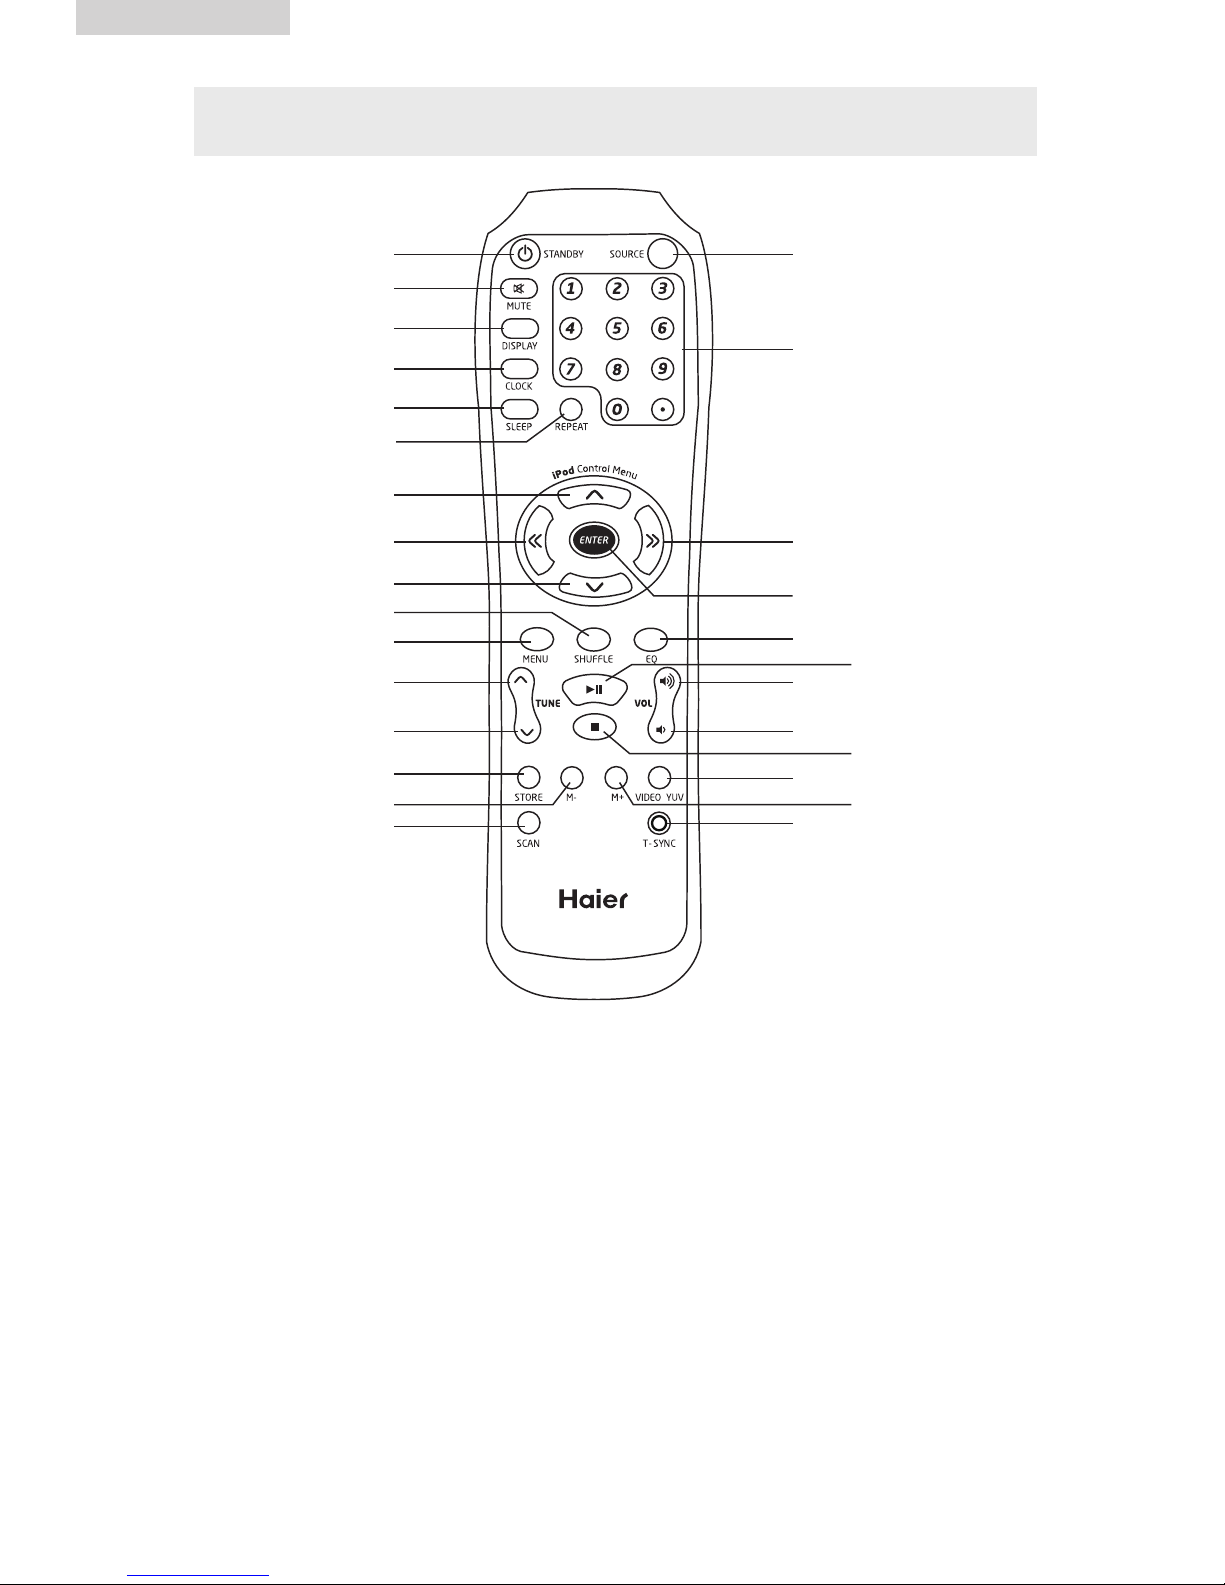
REMOTE CONTROL
10
11
12
13
14
15
16
1
17
2
3
18
4
5
6
7
8
9
19
20
21
22
23
24
25
/
26
27
28
1. STANDBY BUTTON 14. STORE BUTTON
2. MUTE BUTTON 15. M - BUTTON
3. DISPLAY BUTTON 16. SCAN BUTTON
4. CLOCK BUTTON 17. SOURCE BUTTON
5. SLEEP BUTTON 18. NUMERIC BUTTONS
6. REPEAT BUTTON 19. NEXT & F.FWD BUTTON
7. IPOD CONTROL MENU UP 20. ENTER BUTTON
BUTTON 21. EQ BUTTON
8. PREVIOUS & F.BWD BUTTON 22. PLAY/PAUSE BUTTON
9. IPOD CONTROL MENU DOWN 23. VOL + BUTTON
BUTTON 24. VOL - BUTTON
10. SHUFFLE BUTTON 25. STOP BUTTON
11. MENU BUTTON 26. VIDEO/YUV BUTTON
12. TUNE UP BUTTON 27. M + BUTTON
13. TUNE DOWN BUTTON 28. T-SYNC BUTTON
7
Page 9

English
OPERATION
POWER SUPPLY
Connect the AC cord to main power.
SLEEP TIMER SETTING
During playback, press SLEEP button repeatedly to select the sleep time
until the desired sleep time showing on the LCD screen.
After finishing the sleep time setting, you can play the unit freely. Once the
sleep time is expired, the unit will be switched off automatically.
HOW TO SET TIME
At standby mode, press CLOCK button once to light up the LCD screen; press
CLOCK button twice, the Hour numbers will flash on the screen, use TUNE
UP/DOWN button to adjust the hour and confirm the setting by pressing CLOCK
button; After, the Minute numbers will start blinking on the screen, press TUNE
UP/DOWN button to set the minutes accordingly, press CLOCK again to confirm
the setting.
Note: The time can only be set at standby mode.
CLOCK SYNC
1. At iPod mode, clock synchronization starts automatically at the first docking
when the unit has been connected to AC power supply. Subsequent to the first
docking, it is necessary to press the T-SYNC button to conduct clock
synchronization (The T-SYNC button only works at power on mode.).
2. At Tuner/iPod/Aux/AV mode, press DISPLAY button to check the current time.
PLAYING YOUR iPod, iPhone, AND iPad
1. Power on the unit. Dock an iPod, iPhone, iPad to the unit, and then press
SOURCE button repeatedly to switch to iPod mode. The playback will start
automatically.
2. Press PLAY/PAUSE button to start or pause the playback.
3. Press STOP button to stop the iPod/iPhone playback.
4. Press NEXT/PREVIOUS button to skip to the next track/ previous track.
5. Press and hold F.BWD/F.FWD button to search through the track
forward/backward.
6. Press MENU button on the remote to return back to the iPod menu, press IPOD
CONTROL MENU UP/DOWN buttons to select your desired track for
playback. Confirm your selection by pressing ENTER button.
7. Press SHUFFLE button to enable or disable the shuffle function.
8. Press REPEAT button repeatedly to cycle through the repeat options (repeat 1,
repeat album and repeat off).
8
Page 10

English
FM RADIO
TUNING THE FM RADIO
1. Power on the unit, switch to TUNER(RADIO) mode by pressing the SOURCE
button repeatedly.
2. Press SCAN button to auto scan and auto store radio stations to the memory.
During searching radio stations, press STOP button to stop searching.
3. Press TUNE UP/DOWN button to fine tune the radio station. Press and hold
TUNE UP/DOWN button to auto scan radio station forward or backward
respectively (When an available station is found, the unit will broadcast it
immediately and the searching will be stopped). During searching radio
stations, press STOP button to stop searching.
4. At radio mode, it is possible to access the frequency via numeric buttons on the
remote control. For example, press buttons 8, 9, point (.) and 8 to get to 89.8
MHz.
STORING YOUR FAVORITE RADIO STATION
1. At radio mode, press STORE button for storing the current station until
memory cell number "P01" flashes on the screen.
2. Use M +/- button to select the corresponding memory cell among P01-
P20 for storing the station.
3. Confirm your selection by pressing the STORE button.
4. During radio playback, press M+/- button repeatedly to recall the stored
stations.
MUTE THE UNIT
During playback, press MUTE button to mute the audio. Press the button
again to resume the audio.
VOLUME LEVEL ADJUSTMENT
Press VOLUME +/- button to adjust the volume output level.
EQ EFFECT
During playback, press EQ button repeatedly to cycle through the EQ
options to the desired EQ effect.
CLOCKRADIO
MANUALLY DOWNLOADING THE APPS
1. When an Apple device is docked onto the unit. The Apps installation prompt
will appear on the device screen.
2. Touch “YES” to download the Apps, touch “NO” to disregard the installation
prompt. (Note: Make sure the Apple device has connected to Internet via 3G or
WI-FI network).
3. To download the Apps (ClockRadio), just follow all installation procedures
showed on the Apple device.
9
Page 11

English
CLOCKRADIO
Touch the ClockRadio icon on the main menu of the iPhone or iPod Touch. The
ClockRadio displays on the iPhone/iPod's screen with the information of your
location, weather, time, calendar, etc and the following five icons on the bottom of
the screen:
Remarks: To get more information about Haier ClockRadio App, please visit
http://www.haieramerica.com/apps/#appsupport.
ALARM
Set the alarms as the following steps:
1. Enter the Alarm page by touching the Alarm icon on the screen.
2. Press "+" icon on the right top of the screen to enter Add Alarm page.
3. Setting alarm as the indication displays on the page.
4. Press "DONE" button to confirm your setting and return back to Alarm page.
5. After setting the alarm, touch "Edit" button on the right top of the screen to edit
the alarm again.
6. On the Alarm page, touch the Alarm Switch on/off button to enable or disable
the alarm.
When the alarm wakes up, you could set it to snooze or OFF mode.
SLEEP
1. Touch "SLEEP" icon to enter Sleep Time setting page.
2. Use finger to slide the minute scale on the screen for selecting the proper sleep
time.
3. Touch "SAVE" button on the right top of the screen to save your setting.
4. Once the sleep time is expired, the unit will be switched off automatically.
iPod
Touch iPod icon to play the music on the docked iPod, iPhone, or iPad freely by
touching the buttons on the screen. It is possible to press “+” button to select the
desired songs for playback, confirm the selections by press 'DONE” button on the
screen.
RADIO
1. Short touch TUNING UP/DOWN button to fine tune the radio station.
2. Long touch the TUNING UP/DOWN button to search the radio forward or
backward automatically.
3. Press "MEM" icon to store the current radio station to the memory
4. Touch Favorite button to select the preset radio stations for broadcasting.
EQ
1. Touch the EQ icon on the iPhone/iPod's screen to enter the EQ effect setting
page.
2. Select your desired EQ effect.
3. Touch "Save" button on the right top of the screen to save your setting.
10
Page 12
English
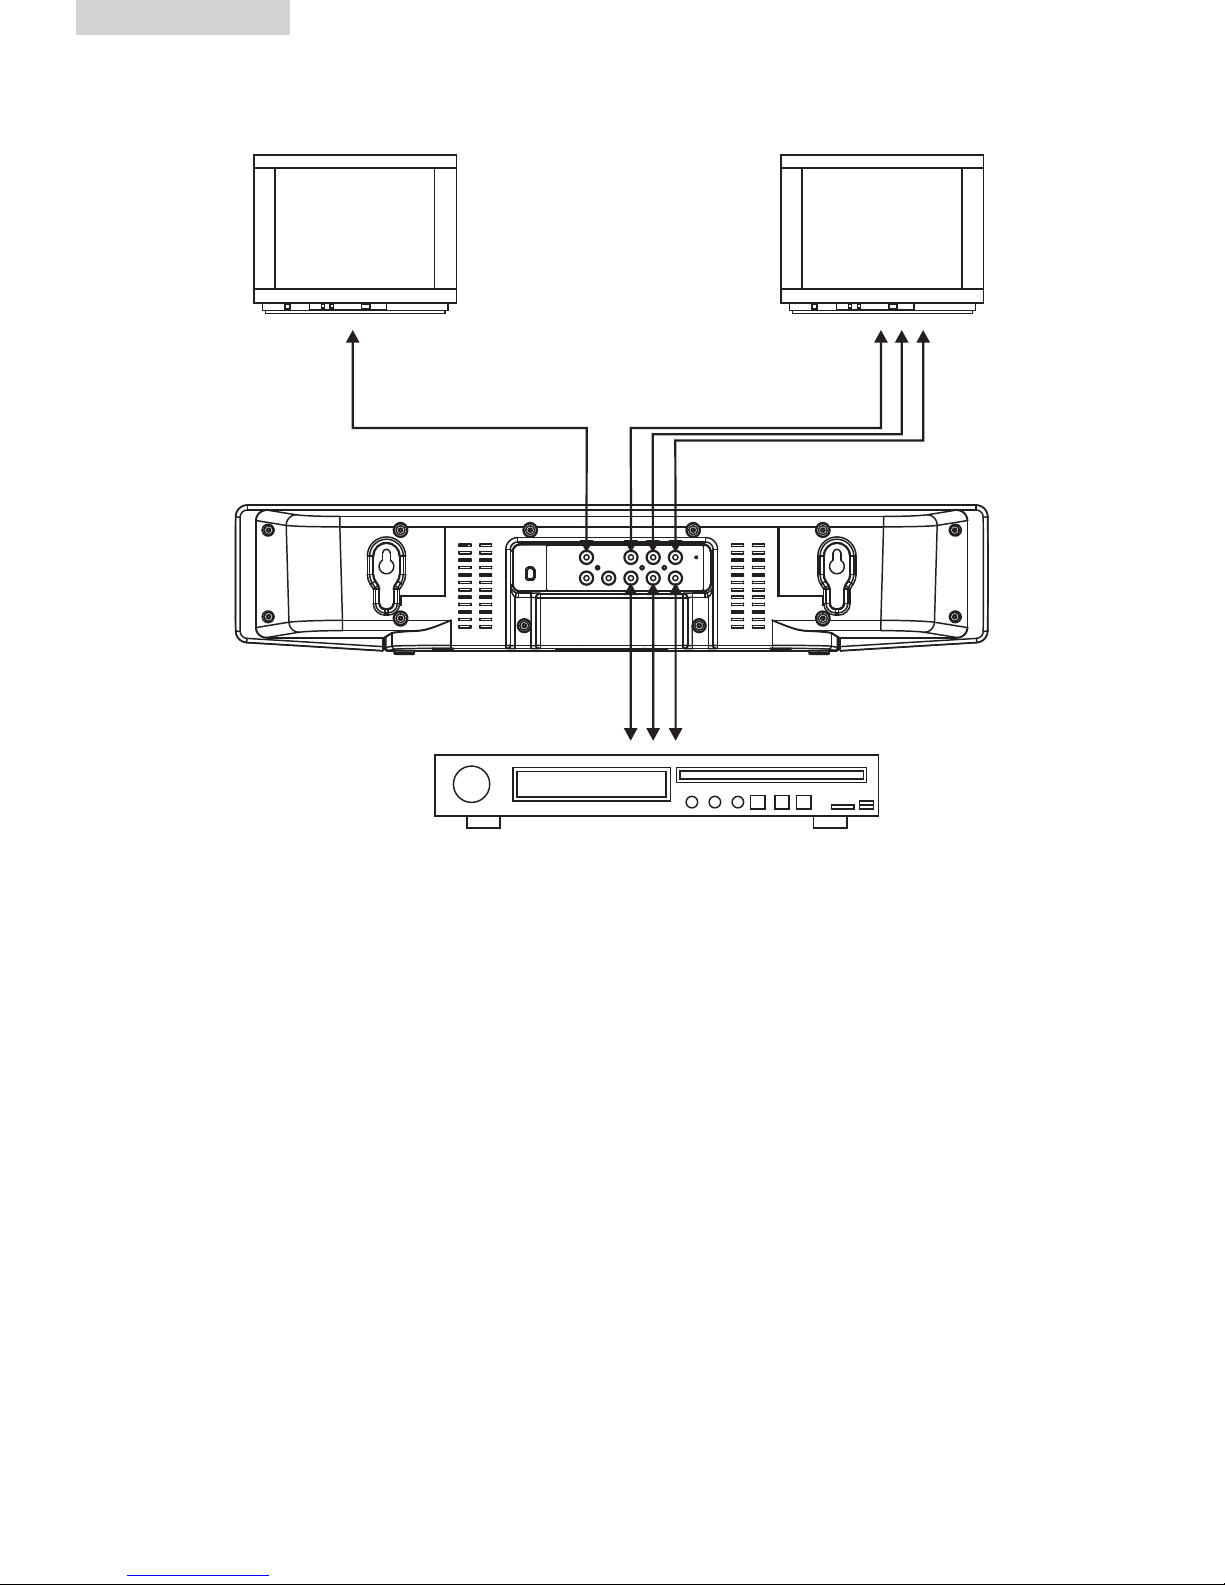
CONNECTING TO OTHER DEVICES
Composite video output Component video output
A/V input
AUX IN
Follow below steps to connect the unit to another audio device like MP3
player and the like:
1. Connect the Audio Out of the device to AUX IN jacks with audio cable.
2. Press STANDBY button to turn the unit on.
3. Press SOURCE button repeatedly to switch the unit to AUX mode.
4. Power on the device and begin playback.
A/V INPUT
1. Connect the A/V jacks to audio&video source, for example, DVD player
with an AV cable.
2. Press the STANDBY button to turn the unit on.
3. Press the SOURCE button repeatedly to switch to AV mode.
4. Use the native controls on the connected audio&video device to begin
playing music through the connected the unit.
5. Audio input signal can only be completed through the Audio Right&Left
Jacks of the A/V Jacks to the unit.
11
Page 13

English
COMPOSITE VIDEO OUTPUT
1. Connect a RCA cable to the Composite Video Output jack on the unit and
to a television.
2. Power on the TV set and the unit.
3. Adjust the connected television to the proper input setting.
4. Press VIDEO/YUV button repeatedly to switch between Composite and
Component video output modes.
5. Video from a docked iPod, iPhone, iPad or a DVD player or the like
devices can be connected can be passed through the device to the
connected television.
Note: Make sure the docked iPod, iPhone or iPad's video out option is
turned on.
COMPONENT VIDEO OUTPUT
The Component Video Output jacks only works in iPod, iPhone, and iPad
docking mode. It cannot output video from the A/V input.
1. Connect a component video cable to the Component Video Output jacks
and to the television.
2. Adjust the connected television to the proper input setting and make sure
the docked iPod, iPhone, or iPad's video out option is turned on.
3. Press VIDEO/YUV button on the remote to switch to Component video
output modes.
4. Video from a docked iPhone/iPod can now be played through the bar
speaker to the connected television.
12
Page 14
English
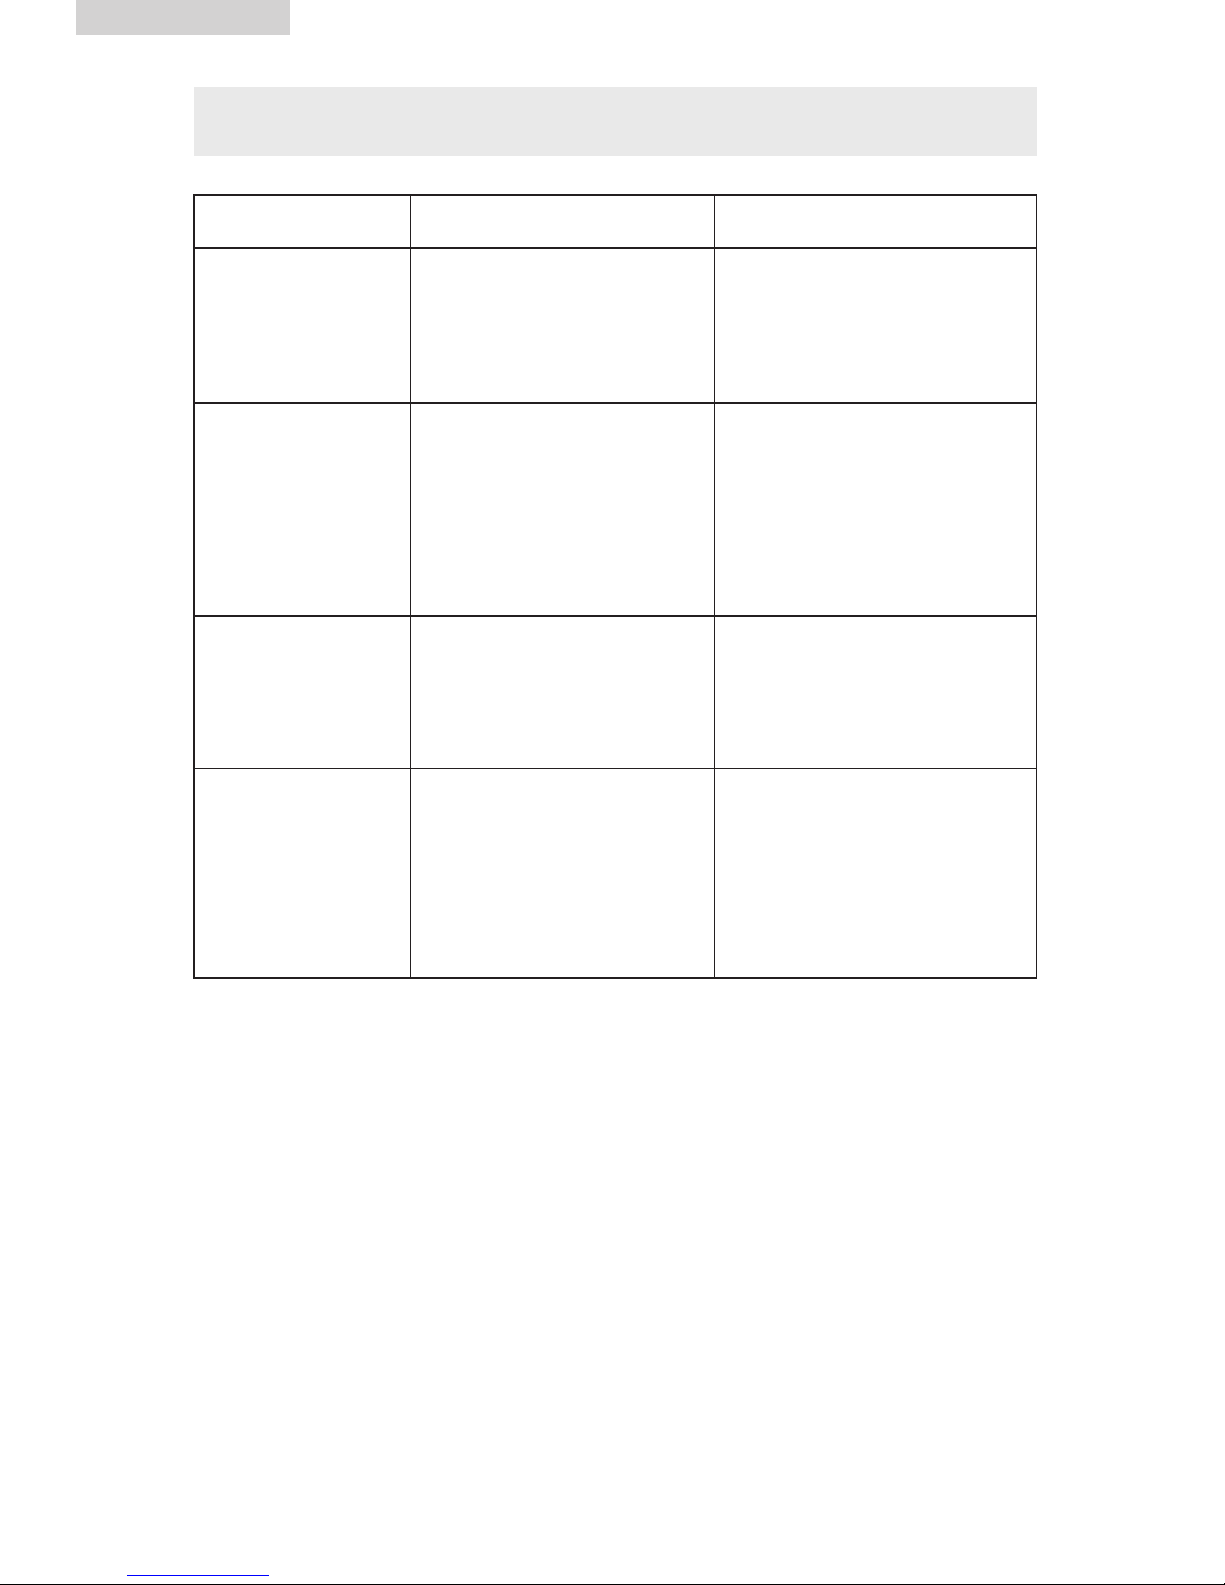
TROUBLESHOOTING
Symptom
Radio sound
distorted.
No radio sound.
The iPod will not
play.
No iPod sound.
Possible Cause
1. The station is not tuned
in.
2. The signal is poor.
1. The unit is not in tuner
mode.
2. The volume has been
muted or is on the
minimum setting.
1. The unit is not in iPod
mode.
2. The iPod is not
connected correctly.
1. The unit is not in iPod
mode.
2. The volume has been
muted or is on the
minimum setting.
Solution
1. Fine tune the station.
2. Extend the FM pigtail
antenna or change the
direction of the antenna.
1. Press SOURCE button
repeatedly until switching
to tuner.
2. Adjust the volume level or
press MUTE button to
resume audio.
1. Press SOURCE button
repeatedly until switching
to iPod.
2. Reconnect the iPod.
1. Press SOURCE button
repeatedly until switching
to iPod.
2. Adjust the volume level or
press MUTE button to
resume audio.
13
Page 15

LIMITED WARRANTY
English
This Haier brand product, when shipped in its
original container will be free from defective
workmanship and materials, and agrees that
it will, at its option, either repair the defect or
replace the defective product with a new or
remanufactured equivalent at to the
purchaser, for parts or labor for the periods
set forth below:
This warranty does not apply to the
appearance of the product or the exterior of
the product, which has been damaged or
defaced, altered or modified in design or
construction. It does not apply to the
additional excluded items set forth below:
The warranty commences on the date the item
was purchased and the original purchase
receipt must be presented and the original
purchase receipt must be presented to the
authorized service center before warranty
repairs are rendered.
The limited warranty described herein is in
addition to whatever implied warranties may
be granted to the purchasers by law.
ALL IMPLIED WARRANTIES INCLUDING THE
WARRANTIES OF MERCHANTABILITY AND
FITNESS FOR USE ARE LIMITED TO THE
PERIOD(s) FROM THE DATE OF PURCHASE
SET FORTH BELOW. Some states do not allow
limitation on how long an implied warranty
lasts, so the above limitation may not apply to
you.
Neither the sales personnel of the seller nor
any other person is authorized to make any
warranties other than those described herein,
or to extend the duration of any warranties
beyond the time period described herein on
behalf of Haier.
The warranties described herein shall be the
sole and exclusive remedy available to the
purchaser. Corrections of defects in the
manner and for the period of time described
herein, shall constitute complete fulfillment of
all abilities and Responsibility of Haier to the
purchaser with respect to the product, and
shall constitute full satisfaction of all claims,
whether based on contract, negligence, strict
duality or otherwise. In no event shall Haier
be liable, or in any way responsible for any
damages or defects in the product which were
caused by repairs or attempted repairs
performed by anyone other than an
authorized service center or dealer; nor shall
Haier be liable, or in any way responsible for
incidental or consequential economic or
property damage. Some states do not allow
the exclusion of incidental or consequential
damages, so that above exclusion may not
apply to you.
THIS WARRANTY GIVES YOU SPECIFIC
LEGAL RIGHTS. YOU MAY ALSO HAVE
OTHER RIGHTS WHICH VARY FROM STATE
TO STATE.
Warranty period for this product: 1 year
parts and labor.
Additional items excluded from warranty
coverage: non-rechargeable batteries. Where
to obtain service: For the location of the
nearest Haier authorized service center or to
obtain product literature, accessories, supplies
or customer assistance, please call 1-877337-3639.
What to do to obtain service: ship or carry in
your product to an authorized service dealer
or center. Be sure to have proof of purchase.
If you ship the product, be sure it is packaged
carefully.
Haier America
New York, NY 10018
14
Page 16

IMPORTANT
Do Not Return This Product To The Store
If you have a problem with this product, please contact the
“Haier Customer Satisfaction Center” at 1-877-337-3639.
DATED PROOF OF PURCHASE, MODEL # AND SERIAL # REQUIRED FOR
WARRANTY SERVICE
IMPORTANT
Ne pas renvoyer cet appareil au magasin.
Si vous avez un problème avec cet appareil, veuillez contacter
le service à la clientèle de Haier au 1-877-337-3639.
IL EST OBLIGATOIRE DE FOURNIR UNE PREUVE D'ACHAT DATÉE, LE NUMÉRO DU MODÈLE
ET SON NUMÉRO DE SÉRIE AFIN DE BÉNÉFICIER DE LA COUVERTURE DE LA GARANTIE.
IMPORTANTE
No Devuelva Este Producto al Establecimiento Compra.
Si tiene problemas con este producto, por favor póngase en contacto con el
“Centro Haier de Atención al Cliente” en el 1-877-337-3639.
PARA EL SERVICIO DE GARANTÍA SE REQUIERE PRUEBA DE COMPRA, FECHADA,
No. DE MODELO Y No. DE SERIE
Model: SBC20
Issued Date: July, 2011
©2011 Haier America Trading, LLC.
100-240 V, 50/60 Hz
Made in China
Fabriqué en Chine
Hecho en China
Haier America
New York, NY 10018
Printed in China
 Loading...