

Top Load Clothes Washer
User Manual
Model # RWT200AW, RWT300AW, RWT400AW
Quality . Innovation . Style

English
IMPORTANT SAFETY INSTRUCTIONS
Warning - To reduce the risk of fire, electric shock, or injury to
persons when using yo ur appliance, follow basic precautions,
including the following:
1. Read all instructions b efore using the a ppliance.
2. Use this appli ance only for its i ntended purpose as describ ed in this
use and care guid e.
3. Use only deter gents or so ften ers recommended for use in a clo thes
washer and keep them out of th e reach of childr en.
4. Thi s wash er must be pro perly install ed in accordance with the
installatio n instruction s before it is used.
5. Neve r unplug yo ur washer by pul ling on the power cord. Always
grasp the plug fi rmly and pull str aight out from the outlet.
6. Replace immediately w orn power cords, loose plugs/ powe r outlets.
7. Unplug your wa sher before cle aning.
8. If your old wash er is not being use d, we recom mend that you rem ove
the door. Thi s w ill reduce the possi bility o f danger to child ren.
9. Do not operate yo ur washer in the p resence of explosi ve flame s.
10. Do not use wash er to wash clothe s soaked, sp otted or w ash ed in
gasoline, dry clean ing solve nts or any other expl osi ve or flamma ble
subst ances th at could ignite a nd explode.
11. Clothes or ra gs used to clean fl ammable or explosi ve mater ials
should not be wash ed in the wash er t ill all traces of this materia l has
been remove d, to avo id an ac cident.
12. Do not add or mix a ny flammable or e xplosive su bst ances to the w ash .
13. Do not try to re move clothes wh ile the tub or the agitator is movi ng.
Let it come to a complete st op before use.
14. Wash er loading doo r must be close d when agitator a nd tub is spinnin g.
15. Do not operat e your wash er when parts are missing or parts are
broken.
16. Do not use the washer for commercial clothes washing.
17. Do not operate washer unless all enclosure panels are properly in place.
18. Do not tamper with controls.
1

19. To reduce risk of in jury do not allo w children to pla y in or on the
washer.
20. Was her must be conne cted to proper electrical ou tlet with the cor rect
electrical su pply.
21. Proper grounding mus t be ensured to red uce the risk of sho ck or fire.
DO NOT CU T OR REMO VE THE GROU NDING PLUG. If yo u do not
have a 3-prong el ectric receptacle outlet in the wall, have a certified
electrician i nstall the prop er receptacle. The w all receptacl e MUST be
properly grou nded.
22. Hydrogen ga s may be produced if the water hea ter has not been
used in more than 2 w eeks. T his could be explosive and can e xplode
under certain c ircumstance s. If this is the case, before us ing the
washer, turn o n all the hot water faucet’s and let t he hot water run
for a few minutes. This wi ll let the trapped hydrogen es cape. D uring
this process do n ot turn on an elect ric appliance, smo ke, light a
match/light er or use a flame to av oid an accident, as hydrogen ga s
is flamma ble an d can explode.
SAVE THESE INSTRUCTIONS
For Future Use
DANGER
Risk of child entrapment. Before you throw away your old
washer, take off the door so that
children may not easily get trapped inside.
English
Thank you for using our Haier
product. This easy-to-use manual
will guide you in getting the best
use of your washer.
Remember to record the model and
serial number. They are on a label
in back of the washer.
Staple your receipt to your manual. You will need it to obtain
warranty service.
Model number
Serial number
Date of purchase
2

English
Table Of Contents
PAGE
SAFETY INSTRUCTIONS
OPERA TING INSTRUCTIONS
Parts and
Operations ............................................................................................ 5
Nor mal Operating Sounds
Lint Filter.............................................................................................. 13
Safety Lid Switch.................................................................................. 13
Care and Cleaning Guide ............................................................ 14
Cleaning and Maintenance
Moving and
Storage of Your W asher ...................................................................... 15
Tr oubleshooting .............................................................................. 16
INSTALLATION INSTRUCTIONS
Tools and Materials Required................................................................ 18
Unpacking
Leveling Your Washer .......................................................................... 19
Steps for Installation ............................................................................ 20
Electrical Connections .................................................................... 22
Grounding
Power Interruptions .............................................................................. 22
Features
Vacationing
Your Washer
Instructions
....................................................................
............................................................
..................................................................................
....................................................................
..................................................................
......................................................................
....................................................
...................................................................... 19
..........................................................................
12
14
15
18
22
1
4
4
Warranty
3
........................................................................................
23
OPERATING INSTRUCTIONS
Parts and Features
7
English
8
1
2
3
4
5
6
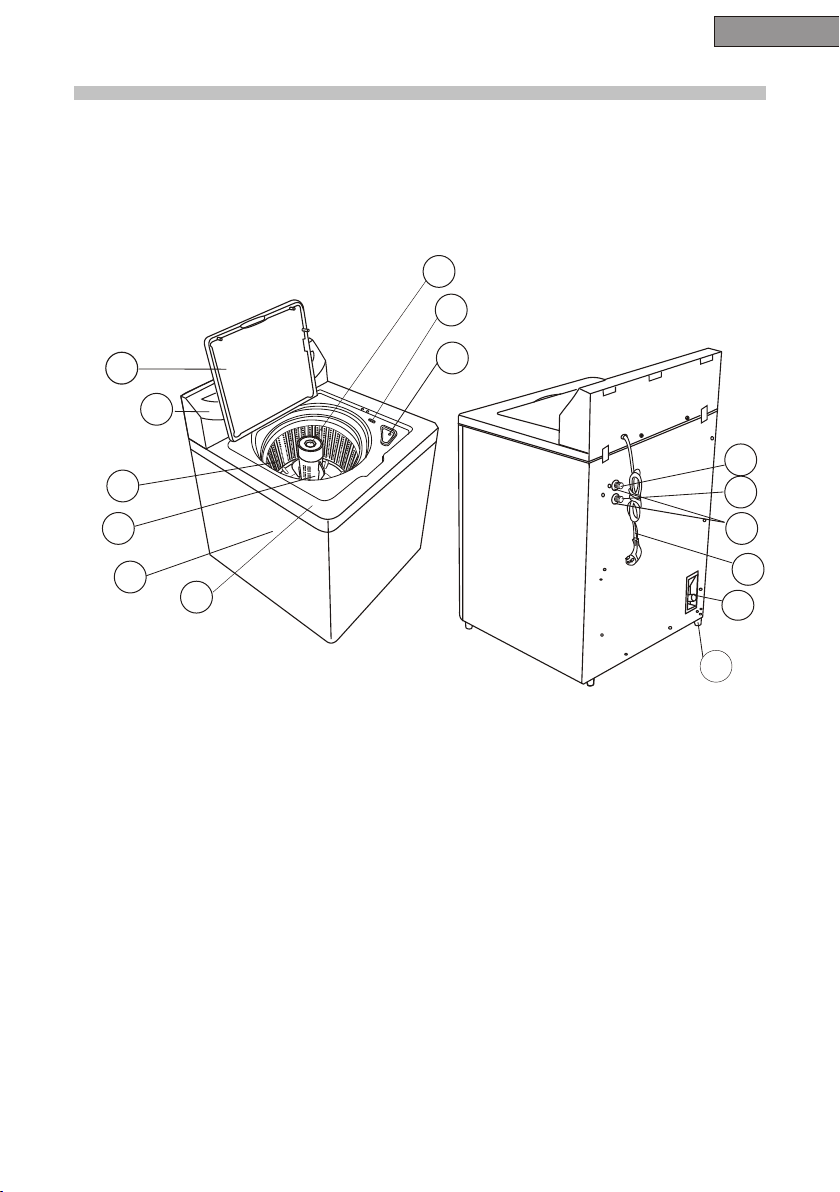
1. Top Lid
2. Control Panel
3. Inner Wash Tub
4. Agitator
5. Cabinet
6. Control Panel Seat
7. Liquid Fabric Softener Dispenser
9
10
11
12
13
14
15
8. Door Switch
9. Bleach Injection Inlet
10. Cold Water Inlet Valve
11. Hot Water Inlet Valve
12. Water Absorption Cushion
13. Power Line
14. Drain Hose Joint
15. Adjustable Fee (4)
4
English
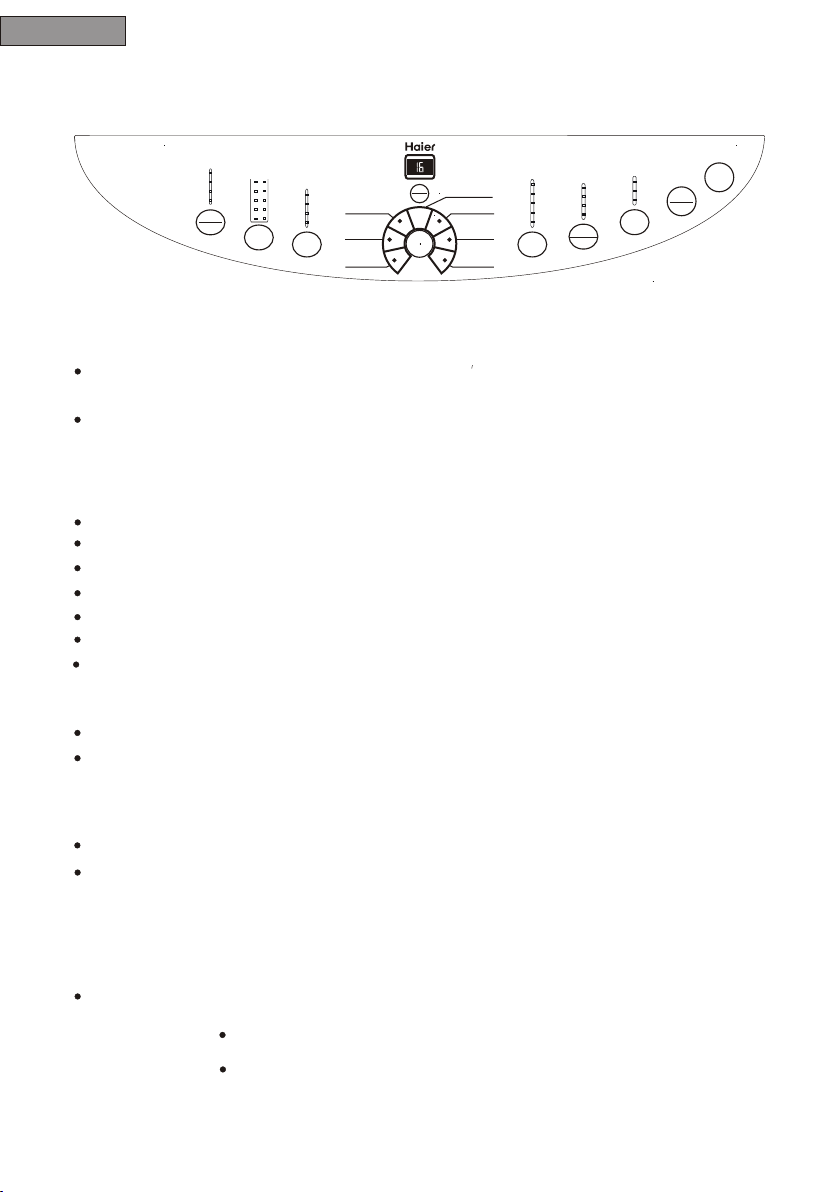
Operations
Time Remain ing
Time On
Delay
Start
Cycles
Permanent Press
Quick Wash
Delicate Casual
Hand Wash
Process
Pre-wash
Wash
Rinse
Extra Rinse
Spin
Temp
Wash/Rinse
Hot/cold
Warm/Cold
Cool/Cold
Cold/Cold
Cycle
Signal
Louder
Softer
Off
Speed
Wash/Spin
Normal/Fast
Normal/Slow
Delicate/Fast
Delicate/Slow
9
7
5
3
1
Load Size
10
8
Stain Wash
6
Heavy
4
2
Soil Level
Normal
Light
Normal
Heavy Duty
Whites
Note: Features may vary per model.
Delay Start
When not activated, the display shows a cycles remaining time through
the wash process.
When Delay Start is selected, the indicator light will display a minimum delay
of 2 hours. Push button once for every additional 1 hour delay for up to 24
hours.
Cycles
Normal - For regular washing.
Heavy Duty - For washing bigger, thicker and heavily soiled laundry.
Whites - For washing cotton fabrics and whites
Quick Wash - For quick washing of lightly soiled laundry.
Delicate Casual - For washing of delicate fabrics.
Hand Wash - To have hand wash effect on clothes.
Permanent Press-This cycle is for heavy-duty fabrics or synthetics.
Soil level
Selecti ng clothe s soil leve l.
Wash cycle inc reases 2 mi nutes for e very soil level increase d.
Start
Pause
Off
Load Size
Water levels m ay be set at be ginning o f the wash or pause.
During Pre-wash, Was h or Rinse, pres s this butt on to manua lly replenish water.
Release to stop. Function au tomatic ally is ina ctive when water r eaches ov erflow prot ection le vel.
Speed Wash/Spin
Select spin speed when program is in Normal or Delicate Casual cycle.
Note:
Flashing light indicates the program is running.
Steady light indicates the program is the selected mode or is about
to operate.
5

Off
Push the button once to shut off the power
Start /Pa use
Once wash er is power ed and sele ction are chose push this but ton once
to Start th e wash.
While u nite is work ing pus h thi s butto n once to paus e it.
If unit is in Paus e mode,push th is button once to re sume oper ation.
Cycle Sig nal
Signal vo lume can be a djusted s oft-l oud or off.
Tempera ture Wash /Rinse
To se lect inle t water tem perature for wash and rinse.
Process Select
This is to select a wash process.
Pre-wash will not work in the Hand Wash, Delicate Casual and Quick Wash Cycles.
Water level indicator will shut off if only Spin is selected.
Once a program is selected press the Process Select button to have Extra Rinse.
The washer will add a . Extra Rinse
English
Delay Sta rt Indicator
Indicat es remain ning minu tes when cycle is in progress.
Indicat es remain ning hour s during delay process.
Indicat es faults c odes or con ditions that are not normal.
6

English
Operating Procedure
1. Press power on bu tton
The washer will now be in the working status in the Normal cycle
If Start/ Pau se button isn't pressed wit hin 5 minut es after po wering on the unit
will auto matical ly switch o ff and return to stand by mode.
The washer will also return to stand by mode immediately after completion of the
wash process.
Regardless of se ttings by p ressing t he Power On/ Off butto n all programs will
stop and th e unit ente rs stand by m ode.
The washe r has intel ligent wa sh resumption. If the power was inte rrupted a t
the power s ource and t hen when th e power is resumed the washer w ill resum e
working a t the stopp ed positi on.
2. Selection of Cycles
When the wa sher is pow ered on the N ormal cycle is the default cy cle. If other
cycle is re quired pr ess the cyc le button for desired progr am.
3. Process Select
Once the po wer is swit ched on t
Normal cy cle which
are desir ed, pre ss the Pr ocess Sel ect button to choose.
Note: Spin shall begin after some time even if there is no water in the tub. Do not use
Pre-wash process for woolen articles. Clothes prone to fade and other clothes shall be
washed separately .
will Wash, Rinse and Sp in. If ot her selec tion comb inations
he washin g machine w ill autom atically set the
7

Process S electing
English
Time s of pres sing
Proc ess(N ormal,
Heav y Duty an d
Whit e
0
1
2
3
4
5
6
7
Select ed Proces ses
Was h, Rin se, Spi n
Was h(Was h water
rem ains in t he tub)
Was h, rin se(R inse Wa ter
rem ains in t he tub)
Rinse, S pin
Extra Rinse
Wash, Rinse,
Spin
Extra Rinse/
Spin
(to spin a fte r drain)
Pre -wash, Wash
Rinse, S pin
Applic ati ons
Com mon clo thes ne eding
was h, rins e & spin
Rep eate dly us e the
was h water
Rep eate dly us e the
rin se wate r
Whe n rinse a nd spin a re
nee ded aft er hand w ash
Whe n the clo thes
nee d
Ext ra Rins e
Whe n only sp in is nee ded
aft er hand w ash
(fi rst dra in and th en spin )
For h eavil y soil ed clot hes
shi rt cuff s and col lars,
fir st Pre-w ash and t hen was h
Operat ion ( the on indi cat or
repres ent t he proces ses t o run )
Pre-w ash
Pre-w ash
Pre-w ash
Pre-w ash
Pre-w ash
Pre-w ash
Pre-w ash
Pre-w ash
Was h
Was h
Was h
Was h
Was h
Was h
Was h
Was h
Rin se
Rin se
Rin se
Rin se
Rin se
Rin se
Rin se
Rin se
Extra Rinse
Extra Rinse
Extra Rinse
Extra Rinse
Extra Rinse
Extra Rinse
Extra Rinse
Extra Rinse
Spi n
Spi n
Spi n
Spi n
Spi n
Spi n
Spi n
Spi n
4. Load S ize
After Wash Cyc le select ion press t he Lo ad Size but ton to select the proper
water lev el for wash.
Note: See c hart belo w for Load Size se lection.
5. Speed Wash/Spin
Time s of pres sing
Proc ess(Q uick Was h,
Deli cate Ca sual or
Hand Wa sh
0
1
2
3
/
4
5
/
Once the po wer is swit ched on the m achine will automatical ly set to
Normal/ Fast.Press bu tton to change selection. (See pag e 5)
Level
6. Soil
When the wa sher is pow ered the ma chine will automaticall y set at
Normal. Select d ifferen t soil leve ls by pressing but ton.
7. Temperature Wash/Rinse
Initial s etting is Warm /Cold whe n washer is powered on. Press butt on to
change se lection b ased on clo thes put in the washer.
8. Cycle Signal
This is set a t Low when washer is starte d. Pr ess butto n to adjust.
8

English
9. Delay Start
To st art the was her at a late r lime press the Delay Start bu tton and se t the time.
When acti vated the i ndicato r displays 2. Push button o nce for eve ry
1 hour dela y for up to 24 ho urs
Press Start butt on to activ ate Delay Start.
When the delay timer starts the program select indicator turns off. The indicator
will display The remaining time to turn on the unit. In the lower right corner of the
display, a blinking light will indicate that Delay Start has been activated.
By pressi ng the Dela y/Start b utton the selected Proc ess progr ams will be
display ed.
By alteri ng the runn ing progr am, the w asher will have to b e reset.
10. Start/Pause
Press this butto n when you wa nt the mach ine to start.
During op eration p ress this b utton to pause and press it aga in to resum e
operati on.
Note:
By openin g the top lid w ill stop th e machine except for water fi lling or
drainin g.
9

Time list o f each program (mi nute)
English
Program
White
Heavy Duty About 77-83 About 47-53
Normal
Quick W ash
Delicate Casual
Hand Wash
Including
Total T ime (min)
Not
Pre-wash
About 75-81 About 45-51
About 59-69 About 39-49
including
Pre-wash
About 25
About 36-42
About 38-44
Note: Total time may be affected by water inlet and drain time. It may a lso be
affected by the water pressure. N ormal, Heavy Duty and White programs could
combine the process of Pre-wash during which the washing machine first Pr e-w ash
for about 20-30 minutes with slight agitation after water filling and then
begins to wash.
Loading the W asher:
Load each item loosely.
Separate the white and colored clothes. Separ ate hea vy clot hes fro m light c lothe s.
Careful ly check al l pocke ts and cuffs for small items.
They can ea sily slid e in to the tub a nd may damage the tub.
Pre-treat al l stains an d heavily s oiled areas for best result s.
Do not overload your washer.
When load ing wet ite ms, keep wat er level hi gh enough so items
can float e asily in th e water.
Avoid w rapping large it ems such as b ed sheets a round the agitator.
Close the d oor prope rly after l oading the clothes. If you keep the lid
up, the agitat ion will no t start.
Proper Use of Deter gent:
It is good wa shing pra ctice to ad d the detergent to the water
before yo u add the clo thes so tha t the detergent can work
effecti vely on you r clothes.
Note: You can use less or more detergen t dependi ng on the siz e of the load,
water typ e in your liv ing area, whethe r it is soft or hard and whether th e
clothes are heavil y soiled or l ightly so iled.
10
English
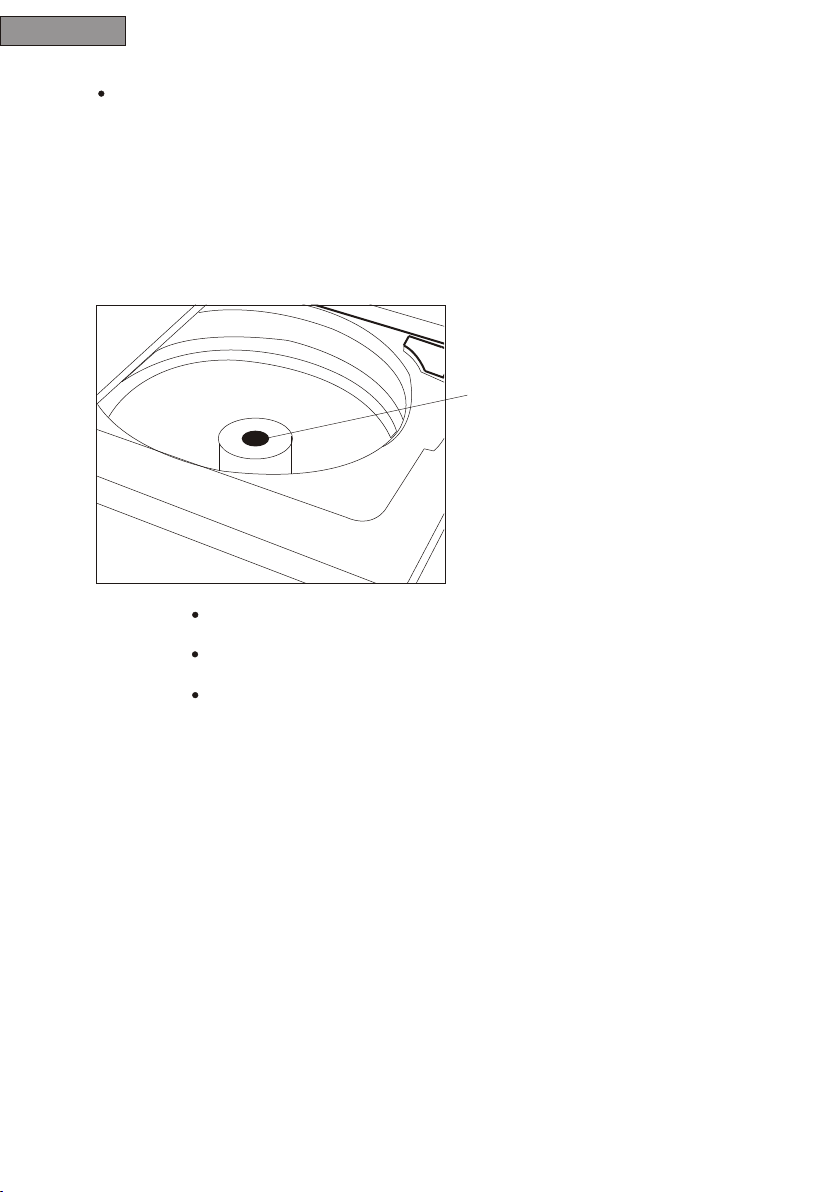
Fabric Softener Dispenser:
The fabri c softene r dispens er is located on the top of the agi tator.
Dispens er will aut omatica lly release liquid fabric s oftener a t proper time
during ri nse cycle.
Steps to use the dispenser:
1. Pour in liquid fabric softener into dispenser as recommended
by the manufacturer.
2. Add water up to its fill level, but do not exceed the level.
fabric so ftener di spenser
W arning:
11
Never pour fabric softener directly onto clothes because it will stain
your clothes or you may get spots on your clothes.
Do not stop washer during its first spin or dispenser will automatically
release the softener in to the wash load.
Do not use powder form of softener into dispenser other wi se it wil l
clog up the dispenser. This dis pense r is only d esign ed for li quid fo rm.

Bleach Dispenser:
Bleach di spenser i s located o n front corner under the load ing door.
Pou r in recomm ended amount of bleach into d ispense r
during th e first was h fill.
English
Note: Use only liquid bleach
W arning: Be careful not to spill undiluted bleach on the washer cabinet or your
clothes. As it is a strong chemical, it may damage some of your
clothes or the finish of the washer if not properly diluted.
Use the manufacturer s chart, on product container for recommended
use of liquid or powder bleach.
in dispenser.
Normal Operating Sounds
The following sounds are normally heard during the
operation of the washer:
Tumbl ing sou nds: Th is is nor mal as th e heavy w et clot hes in th e Washer
are continuously being tossed around.
Air rushing noise: Th is happ ens whe n the Washer t ub spin s at
very high RPM.
Was h and Rin se cycl es goin g on and off will also make c licki ng soun ds.
12

English
Lint Filter
The lint fi lter must b e used duri ng washing.
It must be cl eaned in ti me after ea ch using.
1. Take off the lint filter.
Pull up the lint filter from the agitator.
2. Remove lint
Press t he lint s creen c lip wit h your th umb and i ndex fi nger, and get the screen
downward as shown in figure below. Whi le wet, re move th e lint fr om the sc reen.
3. Install the lint filter
After cleaning, ins tall th e scree n back on to the li nt filt er. Then put the lint filter
back in the agitator barrel.
Safety Lid Switch
If for any reason you open the lid in the middle of the wash cycle, the
washer will not spin and will shut off automatically. Once the lid is
closed, the wa sher wi ll star t back on.
13

English
Care and Cleaning
W arning: Always unplug your washer to avoid electric shock before cleaning.
Ignoring this warning may result in death or injury. Before using
cleaning products, always read and follow manufacturer s instructions
and warnings to avoid personal injury or product damage.
Guide
Cleaning and Maintenance
Use Only damp or sudsy cloth for cleaning control panel.
To av oid any k ind of da mage to c abine t finis h, wipe washer cabinet as
needed. If you s pill li quid/ powde red sof tener, bleach or detergent on the
cabinet, wipe cabinet immediately because it can damage the finish.
Do not use any abrasive, harsh chemicals, ammonia, chlorine bleach,
concentrated detergent, solvents or metal scouring pads. Some of these
chemicals may dissolve, damage and/or discolor your washer.
Remov e pins or o ther sh arp obj ects fr om clot hes to pr event s cratc hing of
interior parts.
Leave Lid open after you are done washing to allow inside of washer to
dr y and prevent bad odors.
14

English
Moving & Vacationing
Turn off water supply faucet's
This will prevent from damaging due to water leakage if the hoses accidentally
get ruptured or they become loose.
Disconn ect elect rical plu g.
Dr y inne r wash tub. If mov ing washe r, disco nnect drain hose.
Turn th e levelin g legs cloc kwise all the way in.
Move and st ore your wa sher in upr ight position only.
To pr event mol d or mildew, leave li d open so moisture inside
machine c an evapor ate.
and disconnect
hoses. Drain water from all hoses.
Storage of Your W asher in Cold Envir onment
The Washer m ust be stored at r oom tem perat ure.
If you just got delivery of a washer when outside temperature is below freezing,
do not operate until washer has warmed to room temperature.
Do not install or operate your washer where room temperature is below freezing.
15

Troubleshooting
W asher does not operate:
Check if un it is plugg ed in. Th e plug may ha ve come loose.
Check if th e electri cal wall re ceptacle is of proper volta ge.
Check if th e circuit b reake r needs to be r eset or if the fuse
needs to be r eplaced.
Check if th e washer is o verload ed: load may need to be
re-bala nced and cl othes may n eed to be redistri buted.
Check if th e lid is open. You may have to clo se the lid pr operly.
The washer pauses in some cycles. This is normal in delicate or
hand-was hable c ycle, whic h has sho rt soak p eriod w here yo ur clot hes
are being soaked for ve ry sho rt peri od of tim e. You will n ot hear w asher
operation for a short period of time. When t he soak t ime is over,
it will start automatically.
Pr oblems with water:
Not enough water coming out: Wate r fauce t may nee d to be tur ned on
fully. Water hoses may be tangled up or wrinkled up. Straighten up
hoses. Che ck wate r level s elect ion, it m ay need t o be readjuste d.
English
Wat er Te mpera ture is i ncorr ect: Ch eck you r water h eater t emper ature.
Hot water needs to be at a temperature at least 120°F. -140°F
(49°C – 60°C. ). Chec k to make sure the inlet hoses are properly
connected. ( e.g. hot t o hot & col d to cold )
Water leaks: T his is due to n ot proper ly installing drain hose or f ill
hoses. Your hom e drain may be clogg ed or havin g constan t
water pre ssure. You may need to tig hten hose s, ch eck the
plumbin g or call a plu mber.
Wat er will n ot drai n: This i s due to not installing your drain hose
properly. You may nee d to conn ect the d rain ho se prop erly. Check the
position of the drain hose. In order to drai n prope rly, make sure that top
of drain outlet is less than 4 ft. (1.2 m) above the floor.
16

English
W asher is making noise:
Washer may nee d to be reins talled. (Check w asher installation sect ion)
Washer load ma y need to be re -balanc ed, as th e load may be uneven.
Coins, loose c hange, butto ns or other h eavy objects could make noise
(read Ope rating Gu ide – Norma l Operating Sounds).
Squeali ng Sound: D ue to overl oaded wash tub.
Vibrati on Noise: Due to not l eveling w asher properly o n the floor a nd
uneven di stribut ion of clot hes in the tub.
Pr oblems with clothes:
Clothes a re too wrin kled: thi s is due to improper sorting, overlo ading
and washi ng in too hot w ater repe atedly. Avoid over loading and resort
your load. Do not mi x heavy clo thes such a s work clothes with light
clothes s uch as blou ses, light shi rts and del icate items. You may nee d to
wash in war m or cold wat er.
Have soap r esidue: deterg ent may not b e dissolving in wa ter.
Check wat er temper ature or yo u need to add deterg ent as wash
tub is bein g filled wi th water be fore you load your clothes to a void
soap resi due on clot hes.
Spots or st ains on you r clothes : this is due to incorrect use of f abric
softene r. You may need to read proper in structi ons on the co ntainer
and follo w proper di rection s for using the softener.
Clothes a re grayed o r yellowe d: this is due to not pouring
enough de tergent f or large lo ads. You may ha ve to add mor e
deterge nt to the loa d.
Clothes a re ripped & h ave holes /excessive wear & tear: thi s is due to
sharp obj ects such a s pins and be lt buckles left in pocket s. You w ill need
to remove s mall loos e sharp obj ects. Fasten belts, zippers, metal s naps
etc. Check if yo u are using u ndilute d bleach. Never add undiluted
bleach to w ash.
Note:
rouble Codes Reason
T
E0 Top lid not closed
E1 Blockage
E2 Top lid not closed during wash Operation
E4
17
The water i nlet time e xceeds th e preset time(40
minutes )
of drain hose
during delay start sequence
English
INST
ALLA
TION
INSTRUCTIONS
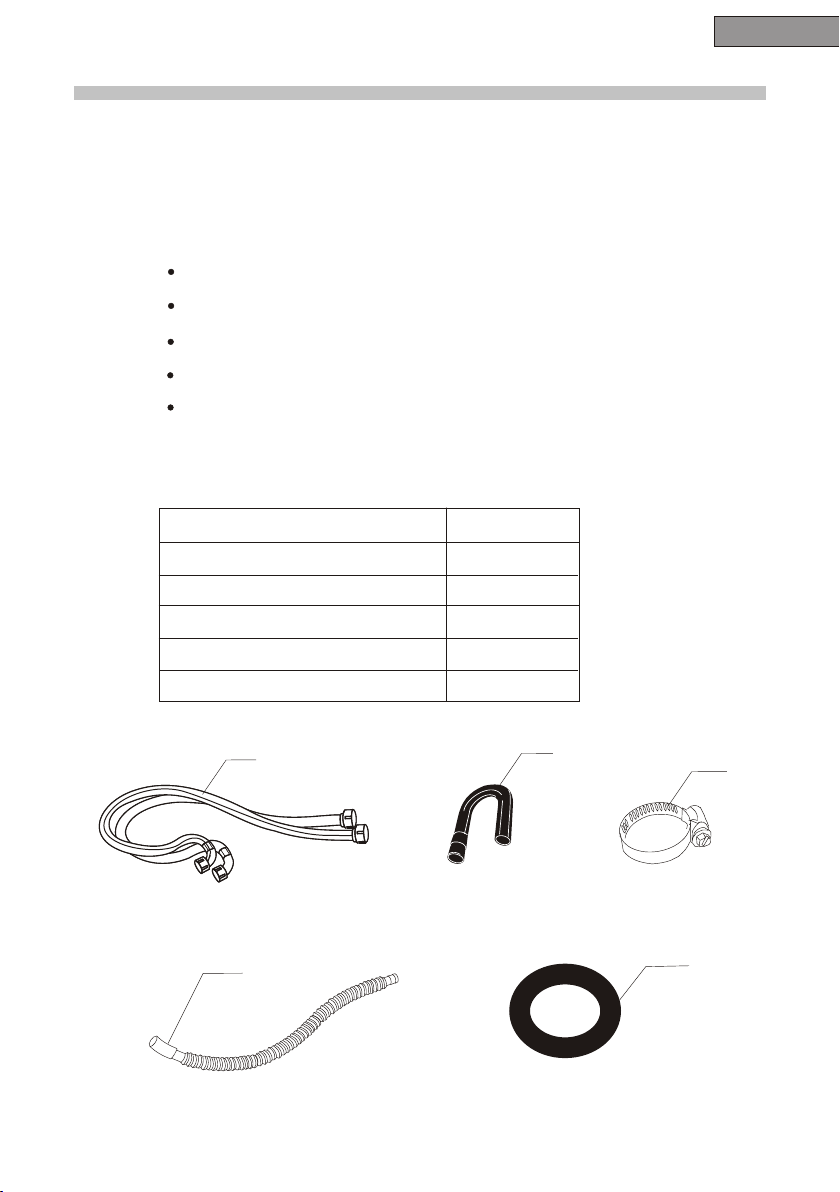
Tools and Materials Required
You will need to have following
you in the installation of your W asher:
Pliers
W rench
Tape Measure
Gloves
Level
Accessories Supplied Quantity
1. Hot & Cold water inlet hoses 2
2. Drain Hose Hook 1
3. Drain Hose Clamp 1
4. Outer Drain Hose 1
5. Flat W ater Inlet Hose W ashers 4
tools to help
1
4
2
3
5
18

English
Unpacking Your W asher
Remove all packi ng materi als. This incl udes the foam base and all
adhesiv e tape hold ing the was her accessories inside an d outside.
Open the to p lid to remo ve the styr ofoam drum brace. Pull to remove.
Note:
Save drum b race. Rein stall whe n moving th e washer.
Inspect a nd remove a ny remain s of packing, tape or print ed
materia ls before u sing the wa sher.
Leveling Your Washer
Your washer has 4 leveling leg s; which ar e located o n the four bottom
corners. Aft er proper ly placin g your washer in its final posi tion, y ou can
level you r washer.
Level ing legs can be adju sted by tur ning them c ounterclockwise to rais e
your wash er or turni ng them clo ckwise to lower your washer.
High
Warning : Leveling of wash er is very im portant to preve nt vibration
during sp in.
19
Low

Steps for Installation
Select a su itabl e locatio n for the w asher on a hard even s ur face away f rom direct
sunligh t or heat source e.g. r adiators, baseboard heat ers, cooking applia nces et c.
Any floor u nevenness shou ld be cor rected with the le veling legs loca ted on th e
bottom co rners o f the washe r. The washer mus t be plac ed at room te mpera ture.
You must not place wa sher wh ere the tem perat ure is at below free zing.
English
Installing Your W
Read installat ion instr uctions c arefully befor e install ation.
Caution:
Note:
If, after completing these steps, you are unsure that unit is properly
installed, contact a qualified installer. To ensure that your Washer is
properly installed it is recommended that it be installed by a certified
installer.
1. Insert a new flat washer into each end of the water inlet hoses.
Firmly put the washers in the coupling.
You may have to use pliers to tigh ten the cou pling.
Do not over t ighten be cause you m ay cause damage to the valve.
2. Connect the hot and cold water inlet hoses to the hot and
cold water faucet.
asher:
20

English
3. Connec t the other e nd to their r espective washer inlet lo cated
at the rear o f the washe r.
Col d
Hot
Note: Hot water ne eds to be at a te mperature of at least 120°F – 140°F.
(49°C- 60°C) fo r the soap to d issolve a nd to avoid soap residue
remaini ng on cloth es.
4. Using th e drain hos e clamp, attac h the drain hose to the unit as sho wn
below. Install th e drain hos e hook to the o uter drain hose tube.
5. Plug in th e Was her to a regu lar 115 vol t / 60 Hz, 15 amp outl et.
21

English
Electrical
Connections
Grounding Instructions
This appl iance mus t be ground ed. In th e event of an electrical shor t circuit,
groundi ng reduce s the risk of e lectric shock by providin g an escape w ire for
the elect ric curre nt. This app liance is e quipped with a cor d having a gr ounding
wire with a g rounded p lug. Th e plug must b e inserted into an outlet tha t is
properl y install ed and grou nded.
Imprope r use of the pl ug can resu lt in a risk of electric shock.
Consult a q ualifie d electri cian or ser vice person i f the groun ding
instruc tions are n ot comple tely understood or if doubt e xists as to
whether t he applia nce is prop erly grounded.
Wiring Requirements:
The washe r must be plu gged into a t least 15 AMP 115-120 VOLT,
60 HZ GROUN DED OUTLE T.
Note:
Where a sta ndard two -prong
outlet is e ncounte red,
it is the per sonal res ponsibi lity
and oblig ation of th e
consume r to have it re placed
with a prop erly grou nded
three-p rong outl et.
X
Extension
We do not recomm end that yo u use an exte nsion cord.
Cords:
Power Interruptions
Occasio nally the re may be pow er interruptions due to thu ndersto rms or othe r
causes. Remove the po wer cord fr om AC outle t when a power outag e occurs.
When powe r has been re stored re -plug power cord t o AC outlet. I f outage is
for a prolo nged peri od, cle an washer before using it aga in.
22

English
Limited
Warranty
Full ON E Year Warra nty
For 1 2 mon ths f rom t he da te of o rig ina l ret ail
purchase, H aie r wil l rep air o r rep lac e any
part free of charge including labor that fai ls
due to a defect in materials or workmanship.
Limited
After one year from the original retail
purchase date, H aie r wil l pro vid e a part at
no cost, as indicated below, to rep lac e sai d
part as a result of a defect in materials or
workmanship. H aie r is so lel y res pon sible for
the cost of the part. All other costs such as
labor, tr ip ch arg e, etc are the responsibility
of the owner.
Warranty
Second Year
Haier will
Third thr ough Fifth Year
Haier will provide the transmission assembl y.
Haier will provide the cabinet assembly
should the cabinet rust through
Third through
Haier will provide the outer wash tub and
related outer tub assembly parts should the
part fail to hold water.
provide All Par ts.
Tenth Year
Lifetime
Haier will provide the inner stainless steel
wash tub.
NOTE: This warranty commences on the
date the item was purchased and the original
purchase receipt must be presented to the
authorized service representative before warranty repairs are rendered.
Exceptions: Commercial or Rental
Use Warranty
90 days labor from date of original purchase
90 days parts from date
No other
warranty applies
of original purchase
For Warranty Ser vice
Contact your nearest authorized servi ce ce nter. All serv ice m ust b e per formed by a Haier
authorized servi ce ce nte r. For the name and
telephone number of the nearest authorized
servi ce ce nte r ple ase c all 1 -87 7-3 37- 363 9.
Before calling please have available
the following information:
Model number and serial number of your
appliance (found on the rear of the unit on
the upper left hand side).
The name and address of the dealer you
purchased the unit from and the date
of purchase.
A clear description of the problem.
A proof of purchase (sales receipt).
This wa rranty cov ers applia nces
withi n the contin ental Unit ed States,
Puert o Rico and Can ada. What is
not cov ered by this w arranty:
Replac eme nt or r epa ir of h ous eho ld fu ses,
circuit breake rs, wiring or plumbing.
A product whose original serial number has
been removed or altered.
Any ser vic e cha rge s not s pec ifi cal ly
identified as normal such as normal
servi ce ar ea or h our s.
Damage to clothing.
Damage incurred in shipping.
Damage caused by improper installation
or maintenance.
Damage from misuse, a bus e acc ide nt, fi re,
flood, o r act s of na tur e.
Damage from ser vic e oth er th an an
authorized Haier dealer or serv ice c ent er.
Damage from incorrect electrical curre nt,
voltage or supply.
Damage resulting from any product
modification, alt era tio n or ad jus tme nt
not authorized by Haier .
Adjustment of consumer operated contro ls as
identified in the owners manual.
Hoses, k nob s, lin t tra ys an d all a tta chm ent s,
accessories and disposable parts.
Lab or, se rvice trans por tat ion , and s hip pin g
charges for the removal and replacement
of defective parts beyond the initial
12-month period.
Damage from other than normal
household use.
Any transportation and shipping charges.
THIS LIMITED WARRANTY IS GIVEN IN LIEU
OF ALL OTH ER WA RRA NTI ES, EX PRE SSE D
OR, INCLUDIN G THE W ARR ANT IES O F
MERCHANTA BIL ITY A ND FI TNE SS FO R A
PARTICULAR PURPOSE
The remedy provided in this warranty is
exclusive and is granted in lieu of all
other remedies.
This warranty does not cover incidental or
consequential damages, so t he ab ove
limitations may not apply to you. So me st ate s
do not allow limitations on how long an
implied warranty lasts, so th e abo ve
limitations may not apply to you.
This warranty gives you specific legal rights,
and you may have other rights, wh ich v ar y,
from state to state.
America
New York, N Y 100 18
23

IMPORTANT
Do Not Return This Product To The Store
If you have a problem with thi s pro duc t, pl eas e con tac t the " C ustomer
Satisfaction Center" a t 1-8 77- 337 -36 39.
DATED PROOF OF PURCHASE RE QUI RED F OR WA RRA NTY S ERV ICE
RWT200AW-01
Issued: JanuarY-06
120
V, 60 Hz
Made in China
America
New York, NY 10018
Printed in China
Part #WD-9999-17
 Loading...