

Page 1

User Manual
RTC1700EBSS
Guide de l’Utilisateur
RTC1700EBSS
Manual del Usuario Modelo
RTC1700EBSS
Quality •Innovation •Style
Convection / Rotisserie Oven
Mini Four Rotissoire/Convection
Naturelle
La Convección / Horno de Rotisserie
Page 2

IMPORTANT SAFEGUARDS
When using electrical appliances, basic safety precautions
should always be followed, including the following:
1. Read all instructions carefully.
2. Do not touch hot surfaces. Use handles or knobs.
3. Close supervision is necessary when any appliance is used by or
near children.
4. To protect against electric shock, do not immerse cord, plug, or any
parts of the oven in water or other liquids.
5. Do not let the cord hang over edge of the table or counter, or touch
hot surfaces.
6. Do not operate an appliance with a damaged cord or plug or after
the appliance malfunctions, or has been damaged in any manner.
Return the appliance to the nearest Authorized Service Center for
examination, repair or adjustment.
7. The use of accessory attachments not recommended by the
manufacturer may cause hazard or injury.
8. Do not place on or near a hot gas or electric burner, or in a heated
oven or in a microwave oven.
9. When operating the oven, keep at least four inches of space on all
sides of the oven to allow for adequate air circulation.
10. Unplug the unit from the outlet when not in use and before
cleaning. Allow to cool before putting on or taking off parts, and
before cleaning.
11. To disconnect, turn the control to OFF, then remove the plug. Always
hold the plug, but never pull the cord.
12.
Extreme caution must be used when moving an appliance
containing hot oil or other hot liquids.
13. Do not cover the crumb tray or any part of the oven with metal foil.
This may cause overheating of the oven.
14. Use extreme caution when removing tray or disposing of hot grease
or other hot liquids.
1
English
Page 3

2
Staple your receipt to your manual.
You will need it to obtain warranty service.
15. Do not clean with metal scouring pads. Pieces can break off the
pad and touch electrical parts, creating a risk of electric shock.
16. Oversized foods or metal utensils must not be inserted in a toaster
oven as they may create a fire or risk of electric shock.
17. A fire may occur if the oven is covered or touching flammable
material including curtains, draperies, walls and the like when in
operation. Do not store any item on the oven during operation.
18. Extreme caution should be exercised when using containers
constructed of any material other than metal or glass.
19. Do not place any of the following materials in the oven: cardboard,
plastic, paper, or anything similar.
20. Do not store any materials other than the manufacturer’s
recommended accessories in this oven when not in use.
21. This appliance has a tempered safety glass door. The glass is
stronger than ordinary glass and more resistant to breakage.
Tempered glass can break, but the pieces will not have sharp edges.
Avoid scratching door surface or nicking edges. If the door has a
scratch or nick, contact our toll-free consumer relations line before
using the oven.
22. Do not use outdoors.
23. Do not use appliance for other than its intended use.
SAVE THESE INSTRUCTIONS
HOUSEHOLD USE ONLY
English
Page 4

PAGE
Important Safeguards ....................................................................1
Power Cord
......................................................................................1
Parts and Accessories
......................................................................5
Before Using Your Oven
................................................................6
Using Your Oven ....................................................................................6
Function Control ........................................................................................6
Roasting ....................................................................................................6
Rotisserie ..................................................................................................6
Time/Temperature Control..........................................................................6
Cleaning and Maintenance ............................................................8
Troubleshooting ..............................................................................9
Limited Warranty ..........................................................................10
English
3
TABLE OF CONTENTS
Page 5

English
4
A short cord is provided in accordance with Underwriters’ Laboratories
Safety Standards to reduce the hazards of becoming entangled or
tripping over a longer cord. An extension cord may be used if the
rating is equal to or greater than the rating of this appliance and if care
is taken to arrange the extension cord so that it cannot be pulled or
tripped over accidentally.
Warning! This appliance is equipped with a polarized alternating
current line plug (one blade is wider than the other). This plug fits into
a polarized power outlet only one way. This is a safety feature. If you
are unable to insert the plug fully into the outlet, try reversing the plug.
If the plug still fails to fit, contact a qualified electrician to replace the
obsolete outlet. Do not attempt to modify the plug in any way. Do not
defeat the safety purpose of the polarized plug.
If the electric circuit is overloaded with other appliances, your appliance
may not operate properly. It should be operated on a separate electric
circuit from other appliances.
Power Cord
Polarized Plug
Page 6
5
English
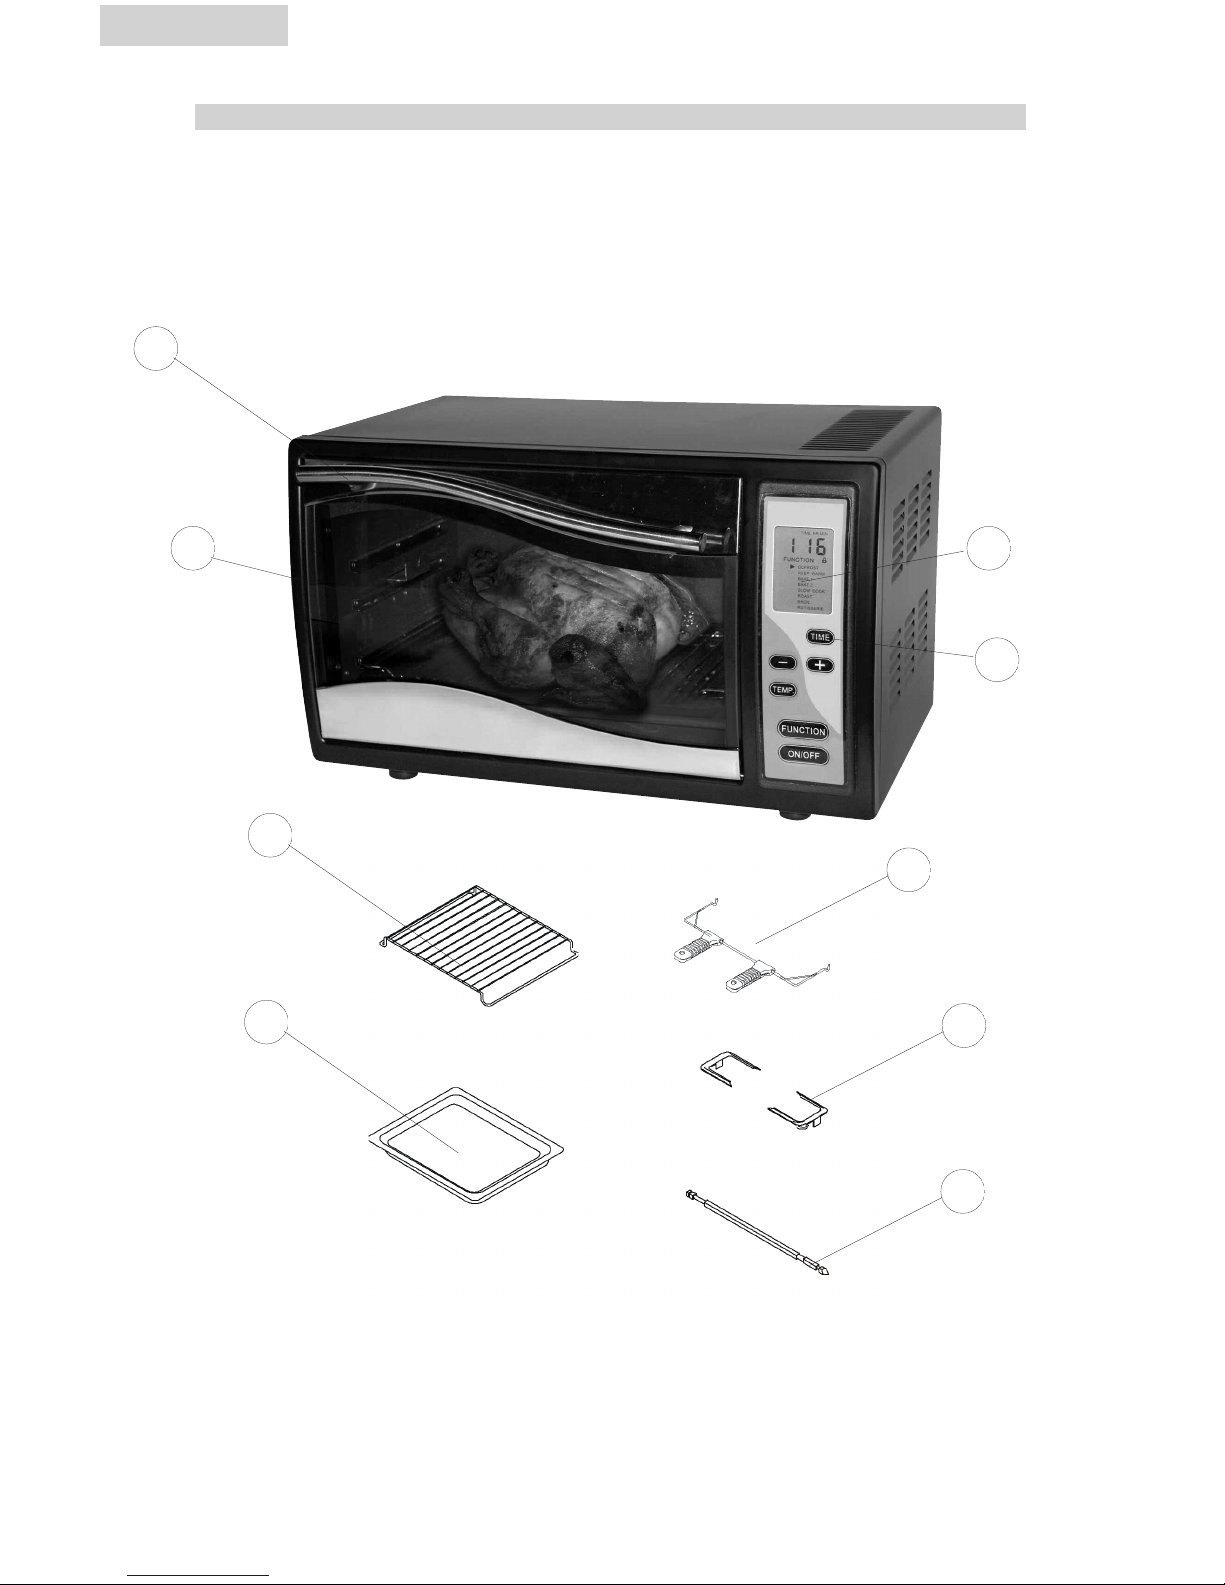
PARTS AND ACCESSORIES
1. Handle
2. Glass Door
3. LCD Display
4. Control P
anel
5. Wire Rack
6. Drip/Baking P
an
7. Hand Grip
8. Rotisserie Spit Forks
9. Rotisserie Spit
Please take some time to familiarize yourself with the controls, parts and
accessories before using the oven. This will save time later.
1
2 3
4
7
6
5
8
9
Page 7

English
6
BEFORE USING YOUR OVEN
Before using your oven for the first time, be sure to do the following:
• Read all instructions carefully.
• Remove all packing materials from the oven.
• Peel off the static label from the LED.
• Wash the handle, handgrip, wire rack, drip pan, rotisserie spit and
forks with warm soapy water. Rinse thoroughly.
• Use a damp cloth with a small amount of dish detergent to lightly
wipe the inner walls of the oven.
NOTE: Do not use a spray or any abrasive polishing agent. Do not
touch the electric heating elements and do not soak the inside of the
oven with water.
• Place the wire rack, drip pan, rotisserie spit and skewers inside the
oven and close the oven door.
• Plug the oven into a properly wired outlet.
• Preheat the oven at the highest temperature for 5 minutes.
Afterwards, preheating will not be necessary.
• Turn off the oven. Open the door to let out any smoke residue inside
the oven. Let the wire rack, drip pan, rotisserie and skewers cool
before handling.
Wire Rack
This rack supports food during broiling, roasting and toasting.
Drip Pan
Use this as a baking tray, broiling/roasting pan, or as a cookie sheet. It
can also be used to catch drips and crumbs from food cooking on the
wire rack or rotisserie spit.
Handgrip
Use this to remove food roasted on the rotisserie spit.
Rotisserie Spit and Forks
Use these for roasting larger items such as chicken or large pieces of
meat, etc. First, insert the rotisserie spit into the food. Place the left and
right forks onto the spit, then skewer the food to be cooked. Insert the
forks at different angles to hold the food more firmly. Install the fixing
screws to fix the rotisserie spit and forks into place.
Page 8

7
English
USING YOUR OVEN
Caution! During the baking process, be sure that no metallic accessory
comes into contact with the heating elements. Always wear an oven
mitt or use a handgrip or tongs to remove food from the oven.
FUNCTION CONTROL
This control button has eight functions. When you press the
FUNCTION button, one of the eight functions (DEFROST, KEEP WARM,
BAKE1, BAKE2, SLOWCOOK, BROIL, ROAST, ROTISSERIE) will be
selected, with an arrow indicating the selection. Continue pressing the
function button until the desired setting has been selected. Press the
ON/OFF button to begin cooking.
The toaster oven has a child lock feature. Press and hold the
FUNCTION button, and then press the ON/OFF button once to lock the
settings so that they cannot be changed. To deactivate the child lock
feature, press and hold the function button and press the ON/OFF
button again.
DEFROST
When this function is selected, only the fan is operating. The
temperature is not displayed. The time is set at 2 hours.
1. Set the function to DEFROST.
2. Put the frozen food on the wire rack and place the rack in the middle
shelf position. Place the drip pan at the lowest level.
3. Set the time according to the size and quantity of food to be
defrosted.
4. Check the progress of the defrosting frequently.
KEEP WARM
When this function is selected, the lower heating elements (half the
power) are operating with the fan. The temperature is set at 150º F.
The cooking time is 1.5 hours. The temperature cannot be changed.
1. Set the function to KEEP WARM.
2. Select the time according to the size and quantity of food.
3. The temperature is automatically set at 150º F and cannot be
changed.
BAKE1
When this function is selected, the upper heating elements (half the
power), the lower heating elements and the fan are operating. The
temperature is set at 350º F. The cooking time is 40 minutes. The
temperature is adjustable, with a range from 150º F to 450º F.
1. Place the wire rack or drip pan at the desired rack level. The top
and center positions in the oven will provide the best results.
2. Set the function to BAKE1.
3. Set the temperature to the desired level.
4. Set the required cooking time.
Page 9

English
8
BAKE2
This function is identical to BAKE1, except that the fan is NOT
operating.
1. Place the wire rack or drip pan at the desired rack level. The top
and center positions in the oven will provide the best results.
2. Set the function to BAKE2.
3. Set the temperature to the desired level.
4. Set the required cooking time.
SLOW COOK
When this function is selected, the upper and lower heating elements
(half the power) are operating with the fan. The temperature is set at
250º F. The working time is 2 hours. The temperature is adjustable,
with a range from 150º F to 350º F.
1. Position the drip pan on the lowest rack level.
2. Set the function to SLOW COOK.
3. Set the required cooking time.
NOTE: This setting is ideal for re-heating already cooked foods such as
pies, pastries or bread.
ROASTING
When this function is selected, the upper and lower heating elements
are operating with the fan. The temperature is set at 450º F. The
working time is 30 minutes. The temperature is adjustable, with a
range from 300º F to 450º F.
1. Place the wire rack at the highest level. If there is insufficient space,
move the rack down to the next level. The drip pan should be
placed at the lowest level. The wire rack and drip pan should be
kept apart at different levels for proper air circulation.
2. Set the temperature to the desired level.
3. Set the required cooking time.
NOTE: When a glass roasting pan is used, the heat will be reflected off
the pan so a longer cooking time is required.
BROIL
When this function is selected, the upper heating element is operating
with the fan. The temperature is set at 350º F. The working time is 1
hour. The temperature is adjustable, with a range from
150º F to 400º F.
1. Place the wire rack or drip pan at the highest level. If there is
insufficient space, move the rack or tray down to the next level.
2. Set the cooking time and the temperature to the desired position.
3. You can also use this function to roast meat, poultry and fish. The
wire rack and drip pan should be kept apart at different levels for
proper air circulation.
Page 10

9
ROTISSERIE
When this function is selected, the upper heating element is operating
with the fan and the rotisserie motor. The temperature is set at 400º F.
The working time is 45 minutes. The temperature is adjustable, with a
range from 300º F to 400º F.
1. Trim any loose hangings on the poultry or meat before placing on
the rotisserie. Wings and legs on poultry should be tied together
with wet string or butcher’s twine to prevent them from touching the
heating elements as it rotates. They should be secured close to the
body. Cut off any excess string.
2. Then insert the rotisserie spit into the food. Loosen the screws on the
forks and place one onto the spit on either side of the food. Center
the food on the spit and then skewer the food to be cooked. Insert
the forks at different angles to hold the food more firmly in place.
Tighten the fixing screws to fix the rotisserie forks into place.
3. Insert the pointed end of the spit into the hole on the right inner wall
of the oven and lower the left side into the cradle on the left inner
wall of the oven.
4. Place the drip pan at the lowest level.
5. Set the temperature to the desired level.
6. Set the required cooking time.
NOTE: When cooking at half the power, the oven alternates between
working for 1 minute and shutting off for 1 minute.
TIME / TEMPERATURE CONTROL
Press the “+” and “–“ buttons to change the baking time and
temperature. The “+” button increases the length of time or
temperature. The “–“ button decreases the length of time or
temperature.
NOTE: The maximum operation time is 10 hours. You can add or
decrease cooking time in increments of 1 minute. The temperature range is 150º F to 450º F. When adjusting the temperature, it
increases or decreases in 25º F increments.
English
Page 11

10
CLEANING AND MAINTENANCE
• First, remove the plug of the power cord from the wall outlet.
• After the oven cools, use a damp cloth or sponge to clean the unit.
Do not soak the inside of the oven or wash it in running water, as this
will cause serious damage to the appliance.
• Do not use a sharp or hard kitchen utensil on the oven since this
could damage the surface of the appliance.
• The wire rack, drip pan, rotisserie spit and forks can be removed and
washed with running water or in a dishwasher. If food particles are
hard to remove, soak them in hot soapy water before rinsing.
• To replace the oven light, make sure that the oven is shut off and has
completely cooled. Loosen the screw on the light bulb cover on the
upper rear corner of the right interior wall. Remove the cover. Turn
the bulb counterclockwise to remove. Replace the new bulb in the
socket and turn the bulb clockwise to tighten. Replace the light bulb
cover and tighten the screw.
• If the oven has not been used for a long time, be sure to wipe off any
dust and moisture before operating.
TROUBLESHOOTING
1. The oven does not become hot after being turned on.
• Check that the unit is plugged in.
• Make sure that the cooking time has been set.
• Make sure that the temperature has been set.
2. There is a metallic sound when the oven is in use.
• Shut the unit off. Do not dismantle the oven. Send it to an
authorized service agent right away for an examination
of the fan.
3. Food is often overcooked or burned, even when cooked according to
the recipe.
• Have an authorized service agent check the temperature
settings.
• Check that the fan motor is operating normally.
NOTE: If the power supply cord is damaged, it must be replaced by the
manufacturer, its service agent or a similarly qualified person in
order to avoid a hazard.
English
Page 12

FUNCTION
SYMBOL
Temperature
Setting
FUNCTION FOOD
Accessory
Setup
DEFROST N/A
Fan motor
(ON)
Defrosted
food
Drip pan
SLOW
COOK
320˚F ~ 420˚F
Lower heater
Fan motor
(ON)
Heating
food
Wire rack
Baking tray
BAKE
400˚F ~ 450˚F
Upper heater
(half- power)
Lower heater
Fan motor (ON)
Chicken, Pork,
Beef, Bread,
Cookies
Wire rack
Drip pan
ROAST /
PIZZA
400˚F ~ 450˚F
Upper heater
Lower heater
(ON)
Steak, Pizza,
Pork Chops
Wire rack
Drip pan
BROIL
320˚F ~ 420˚F
Upper
heater (ON)
Cooking
Wire rack
Drip pan
ROTISSERIE
320˚F ~ 420˚F
Upper heater
Rotisserie motor
(ON)
Chicken, Pork,
Beef, Meat
Drip pan
Handgrip
Rotisserie pit
and skewers
English
11
Page 13

LIMITED WARRANTY
Full One Year
This warranty covers all defects in
workmanship or materials for a period
of 12 months from the date of
purchase, provided you are able to
present a valid proof-of-purchase (the
original receipt)
Exceptions: Commercial or Rental Use
Warranty is 90 days from date of
original purchase.
This warranty covers appliances within
the Continental United States, Puerto
Rico and Canada.
What is not covered by this
warranty:
Damage from other than normal use
or improper installation.
Damage from misuse, abuse, accident,
alteration, lack of proper care and
maintenance.
Failure caused by build-up of food
matter or water deposits.
Product, whose rating label has been
removed or altered.
Product serviced by other than
authorized service center.
Replacement or repair of household
fuses, circuit breakers or wiring.
Labor, shipping charges and
replacement of defective parts beyond
the initial 12-month period.
Do not return this product to the store.
If you need assistance with this
product, please contact "Haier
Customer Satisfaction Service at
1-877-337-3639 between 9:00 AM
and 5:00 PM (EST) Monday to F
riday
.
Before calling, please have the
following information available:
Model number of your appliance. The
name and address of the store you
purchased the unit from and the date
of purchase. A clear description of the
problem.
Haier will repair or replace any part
free of charge including labor that fails
due to a defect in materials or
workmanship, or replace with a
comparable model.
THIS LIMITED WARRANTY IS
GIVEN IN LIEU OF ALL OTHER
WARRANTIES, EXPRESSED OR,
INCLUDING THE WARRANTIES OF
MERCHANTABILITY AND FITNESS
FOR A PARTICULAR PURPOSE.
The remedy provided in this warranty is
exclusive and is granted in lieu of all
other remedies.
This warranty does not cover incidental
or consequential damages, so the
above limitations may not apply to
you.
Some states do not allow limitations on
how long an implied warranty lasts, so
the above limitations may not apply to
you.
This warranty gives you specific legal
rights, and you may have other rights,
which vary
, from state to state.
Haier America
New York, NY 10018
English
12
Page 14

115V, 60 Hz
Made in China
Fabriqué en Chine
Hecho en China
Haier America
New York, NY 10018
Printed in China
Issued: July - 06
IMPORTANT
Do Not Return This Product To The Store
If you have a problem with this product, please contact the "Haier Customer Satisfaction
Center" at 1-877-337-3639.
DATED PROOF OF PURCHASE REQUIRED FOR WARRANTY SERVICE
IMPORTANT
Ne pas Réexpédier ce Produit au Magasin
P
our tout problème concernant ce produit, veuillez contacter le service des
consommateurs ‘Haier Customer Satisfaction Center’
au 1-877-337-3639.
UNE PREUVE D’ACHAT DATEE EST REQUISE POUR BENEFICIER DE LA GARANTIE.
IMPORTANTE
No regrese este producto a la tienda
Si tiene algún problema con este producto, por favor contacte el "Centro de Servicio al
Consumidor de Haier" al 1-877-337-3639 (Válido solo en E.U.A).
NECESITA UNA PRUEBA DE COMPRA FECHADA PARA EL SERVICIO DE LA GARANTIA
 Loading...