

Page 1

VIDEO
USER MANUAL
PDVD9KIT
PORTABLE DVD PLAYER
WITH 9" TFT LCD SCREEN
IMPORTANT
READ THESE INSTRUCTIONS
BEFORE USE AND RETAIN
FOR FUTURE REFERENCE.
VIDEO
Page 2

CAUTION:
DVD/CD PLAYER ISACLASS 1 LASER PRODUCT.
HOWEVER THIS DVD/CD PLAYER USES A
VISIBLE LASER BEAM WHICH COULD CAUSE
HAZARDOUS RADIATION EXPOSURE IF
DIRECTED. BE SURE TO OPERATE THE DVD/CD
PLAYER CORRECTLY AS INSTRUCTED.
WHEN THIS DVD/CD PLAYER IS PLUGGED TO
THE WALL OUTLET, DO NOT PLACE YOUR EYES
CLOSE TO THE OPENING OF THE DISC TRAY
AND OTHER OPENINGS TO LOOK INTO THE
INSIDE OF THIS PLAYER.
USE OF CONTROLS OR ADJUSTMENTS OR PERFORMANCE OF PROCEDURES OTHER THAN
THOSE SPECIFIED HEREIN MAY RESULT IN
HAZARDOUS RADIATION EXPOSURE.
DO NOT OPEN COVERS AND DO NOT REPAIR
YOURSELF. REFER SERVICING TO QUALIFIED
PERSONNEL.
WARNING:
- TO PREVENT FIRE OR SHOCK HAZARD. DO
NOT USE THIS PLUG WITH AN EXTENSION
CORD. RECEPTACLE OR OTHER OUTLET
UNLESS THE BLADES CAN BE FULLY INSERTED
TO PREVENTBLADEEXPOSURE.
- TO PREVENT FIRE OR SHOCK HAZARD. DO
NOT EXPOSE THIS APPLIANCE TO RAIN OR
MOISTURE.
TO REDUCE THE RISK OF FIRE OR ELECTRIC
SHOCK, AND ANNOYING INTERFERENCE, USE
THE RECOMMENDEDACCESSORIESONLY.
THIS DEVICE IS INTENDED FOR CONTINUOUS
OPERATION!
SAFETY INFORMATION
CAUTION
CAUTION: TO REDUCE THE RISK OF ELECTRIC
SHOCK, DO NOT REMOVE COVER
(OR BACK). NO USER -SERVICEABLE
PARTS INSIDE. REFER SERVICING
TO QUALIFIED SERVICE
PERSONNEL.
The lightning flash with arrowhead symbol,
within an equilateral triangle, is intended to
alert the user to the presence of
uninsulated "dangerous voltage" within the
product's en-closure that may be of
sufficient magnitude to constitute a risk of
electric shock to persons.
The exclamation point within an equilateral
triangle is intended to alert the user to the
presence of important operating and maintenance (servicing) instructions in the
literature accompanying the appliance.
VENTILATION WARNING:
THE NORMAL VENTILATION OF THE PRODUCT
SHALL NOTBEIMPEDEDFORINTENDEDUSE.
CAUTION - LASER RADIATION WHEN OPEN
DO NOT STARE INTO BEAM.
IMPORTANT SAFETY INSTRUCTIONS
1) Read these instructions.
2) Keep these instructions.
3) Heed all warnings.
4) Follow all instructions.
5) Do not use this apparatus near water.
6) Clean only with dry cloth.
7) Do not block any ventilation openings. Install in
accordance with the manufacture's instructions.
8) Do not install near any heat sources such as
radiators, heat registers, stoves, or other apparatus
(including amplifiers)that produce heat.
9) Do not defeat the safety purpose of the polarized
or grounding-type plug. A polarized plug has two
blades with one wider than the other. A grounding
type plug has two blades and a third grounding
prong. The wide blade or the third prong are
provided for your safety. If the provided plug does
not fit into your outlet, consult an electrician for
replacement of the obsolete outlet.
10)Protect the power cord from being walked on or
pinch particularly at plugs, convenience receptacles,
and the point where they exit from the apparatus.
11)Only use attachments/accessories specified by the
manufacturer.
12)Unplug this apparatus during lightening storms or
when unused for long periods of time.
13)Refer all servicing to qualified service personnel.
Servicing is required when the apparatus has been
damaged in any way, such as power-supply cord or
plug is damaged, liquid has been spilled or objects
have fallen into the apparatus, the apparatus, has
been exposed to rain or moisture, does not operate
normally, or has been dropped.
14)This appliance shall not be exposed to dripping or
splashing water and that no object filled with liquid
such as vases shall be placed on the apparatus.
1
Invisible laser radiation when open and interlock
failed or defeated. Avoid direct exposure to laser
beam.
Page 3

2
NOTE:
This equipment has been tested and found to comply with the limits for a Class B digital device, pursuant to Part 15 of the FCC
Rules. These limits are designed to provide reasonable protection against harmful interference in a residential installation. This
equipment generates, uses and can radiate radio frequency energy and, if not installed and used in accordance with the
instructions, may cause harmful interference to radio communications. However, there is no guarantee that interference will not
occur in a particular installation. If this equipment does cause harmful interference to radio or television reception, which can be
determined by turning the equipment off and on, the user is encouraged to try to correct the interference by one or more of the
following measures:
-- Reorient or relocate the receiving antenna.
-- Increase the separation between the equipment and receiver.
-- Connect the equipment into an outlet on a circuit different from that to which the receiver is connected.
-- Consult the dealer or an experienced radio/TV technician for help.
The manufacturer is not responsible for any radio or TV interference caused by unauthorized modifications to this equipment.
Such modifications could void the user authority to operate the equipment.
This device complies with Part 15 of the FCC Rules. Operation is subject to the condition that this device does not cause
harmful interference.
REGION CODE SETTING
Region coding: All DVD discs are coded by the sales territory. Please note the player is set to region 1 coding by the factory
which cannot be changed. This is in compliance with the DVD patent requirements.
1
The region number for this DVD player is
BATTERY
BATTERY
COVER
Installing the rechargeable battery pack into the main
unit as illustrated below:
Installing the batteries into the remote control as
illustrated below:
Install two size AAA batteries.
Ensure that the batteries are inserted with positive and
negative terminals in the correct direction corresponding to
the (+) and (-) marks in the battery compartment.
+
+
OPEN
BATTERY
COVER
ACCESSORIES:
VIDEO
USER MANUAL
PDVD9KIT
PORTABLEDVDPLAYER
WITH9"TFT LCD SCREEN
IMPORTANT
READTHESEINSTRUCTIONS
BEFOREUSEANDRETAIN
FORFUTUREREFERENCE.
1 x Remote control
(with two AAA batteries)
1 x DC power adaptor
1 x Audio/Video cable
2 x Earphones
1x Car cigarette lighter
adapter
1x Carry bag
1x User manual
1 x Rechargeable
battery pack
Page 4
3
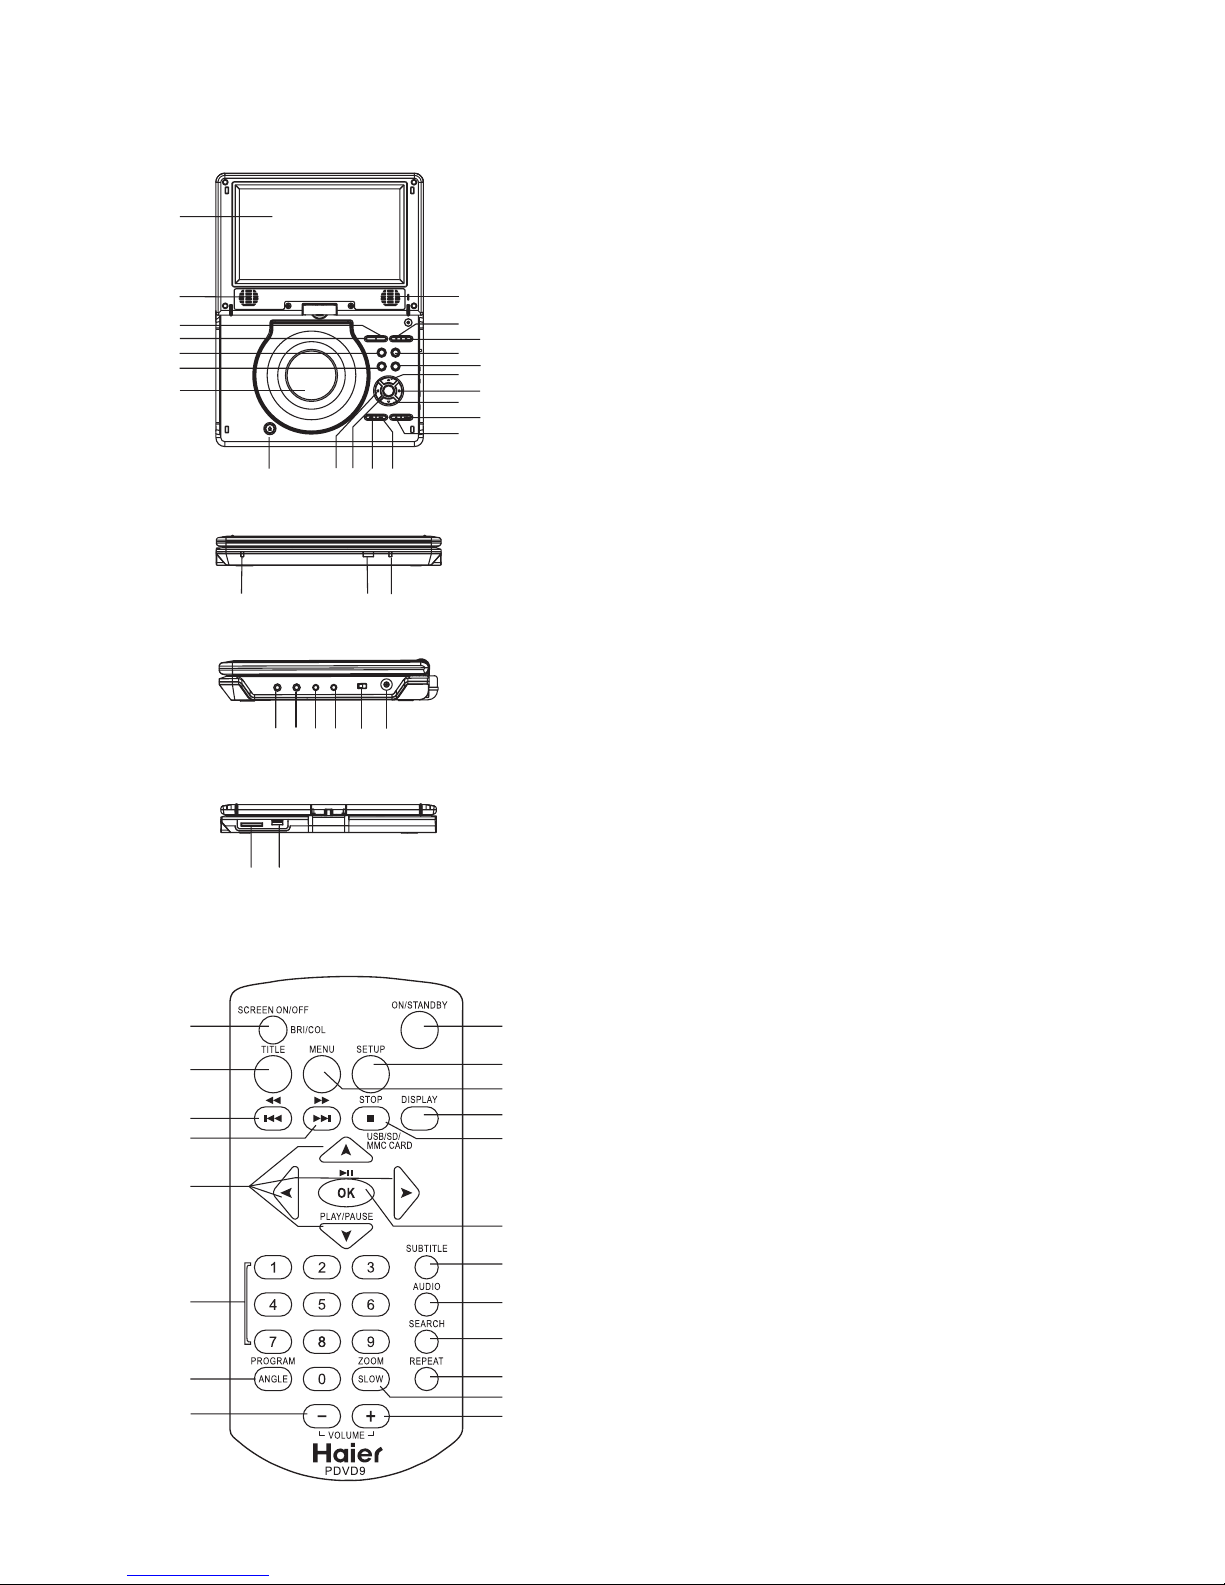
OVERVIEW OF THE DVD PLAYER:
1. TFT SCREEN
2. VOLUME- KEY
3. VOLUME+ KEY
4. MENU KEY
5. TITLE KEY
6. DISPLAY KEY
7. SETUP KEY
8. AUDIO KEY
9. SUBTITLE KEY
10. NAVIGATION UP KEY
11. NAVIGATION RIGHT KEY
12. NAVIGATION DOWN KEY
13. PLAY/PAUSE KEY
14. STOP&USB/SD/MMC CARD KEY
15. NEXT&F.FWD KEY
16. PREVIOUS&F.BWD KEY
17. ENTER KEY
18. NAVIGATION LEFT KEY
19. OPEN KEY
20. CHARGE INDICATOR
21. REMOTE SENSOR
22. ON/STANDBY INDICATOR
23. PHONES SOCKET
24. PHONES SOCKET
25. AUDIO OUT SOCKET
26. VIDEO OUT SOCKET
27. POWER ON/OFF SWITCH
28. DC IN 9V~12V SOCKET
29. DISC COVER
30. USB PORT
31. SD/MMC CARD SLOT
32. SPEAKERS
1. SCREEN ON/OFF&BRI/COL button
2. TITLE button
3. PREVIOUS&F.BWD button
4. NEXT&F.FWD button
5. NAVIGATION buttons
6. NUMERIC buttons
7. /ANGLE button
8. VOLUME- button
9. ON/STANDBY button
10. SETUP button
11. MENU button
12. DISPLAY button
13. STOP&USB/SD/MMC CARD button
14. OK&PLAY/PAUSE button
15. SUBTITLE button
16. AUDIO button
17. SEARCH button
18. REPEAT button
19. ZOOM/SLOW button
20. VOLUME+ button
PROGRAM
REMOTE CONTROL
1
2
3
4
5
6
7
8
20
19
18
17
16
15
14
13
12
11
10
9
1
2
4
5
6
9
19
18
17
15
14
12
11
10
8
3
7
13
16
29
3232
20
21 22
FRONT VIEW
28
27
2625
24
23
RIGHT VIEW
31 30
REAR VIEW
Page 5
4
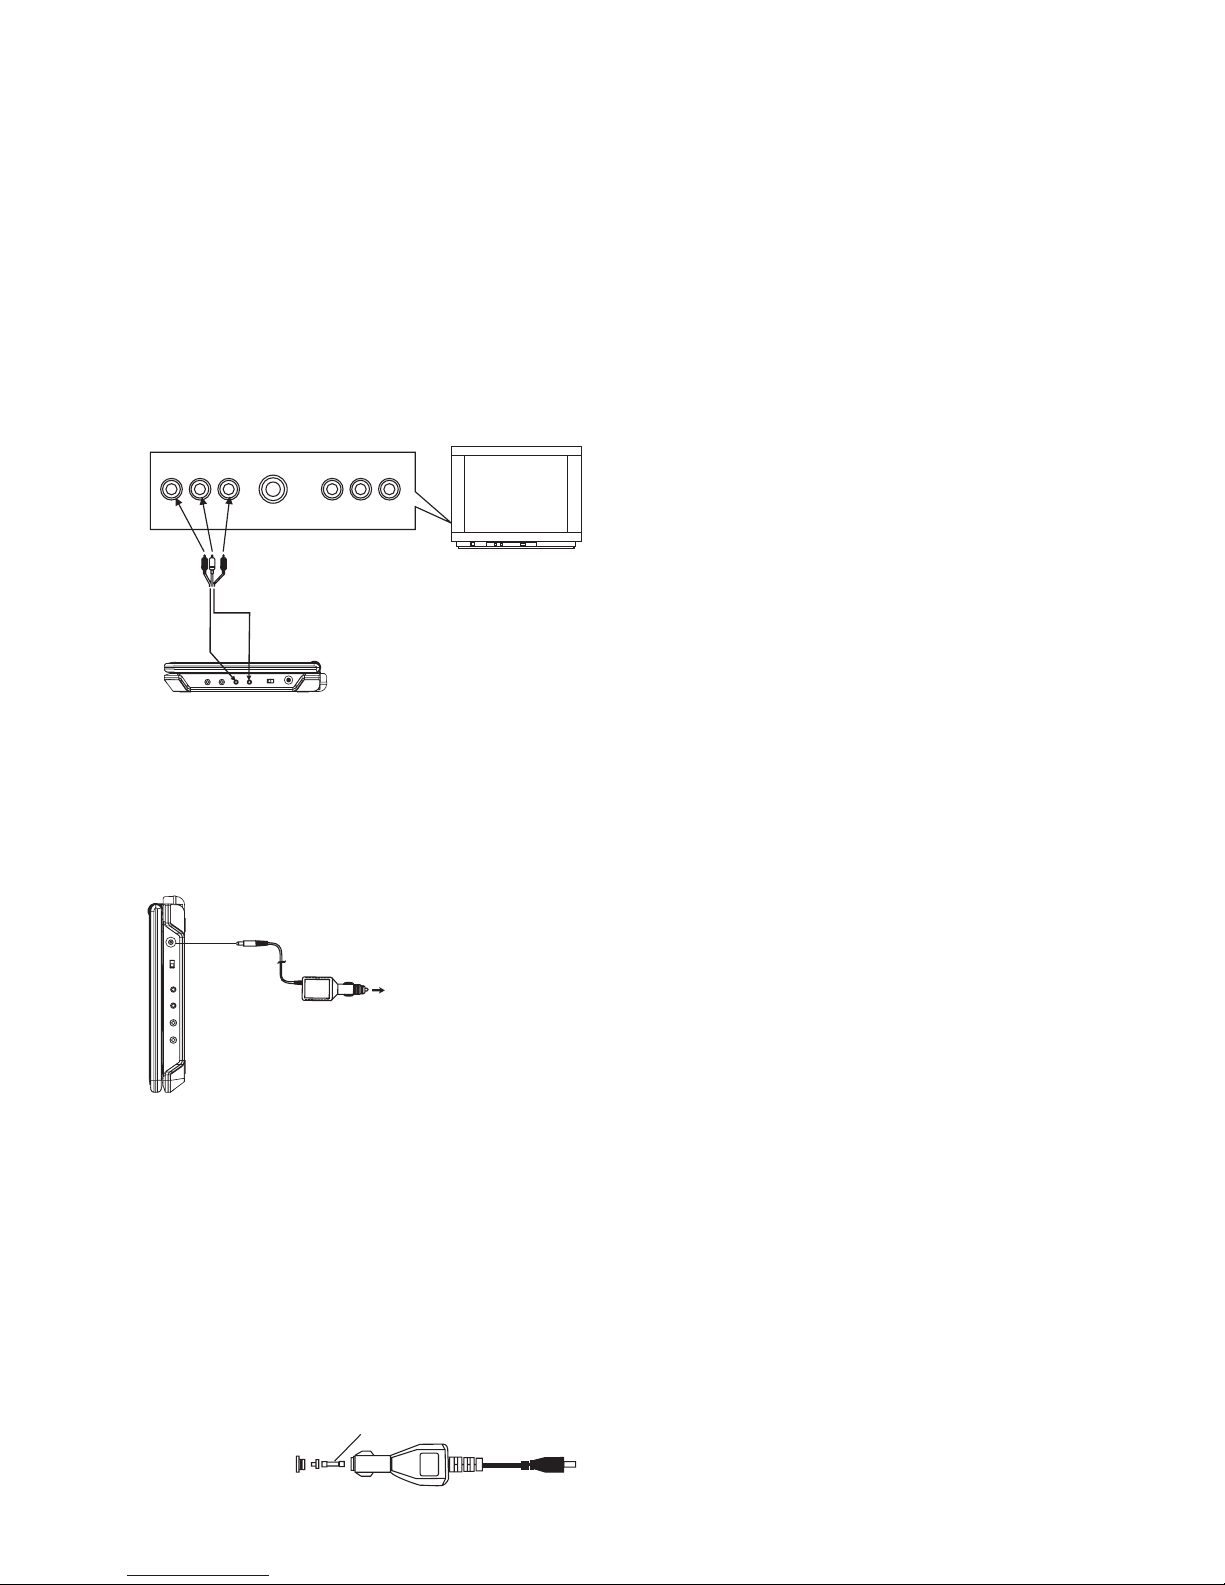
CONNECT DVD PLAYER TO OTHER
DEVICES
It is recommended you connect the player to a multi-system
TV.
Ensure that this player and other devices (TV set and
amplifier) that will be connected to the player are set to OFF
mode and that the AC cords are disconnected from the wall
outlet.
Avoid blocking ventilation holes of the connected devices
and make sure air around there can circulate freely.
Read carefully and follow the instructions before connecting
other devices.
Observe the color coding when connecting audio and video
cables.
The mains plug is used as disconnect device, the
disconnect device shall remain readily operable.
Connecting to a car adaptor
The 9V car power adaptor is designed for use with vehicles
that have a 12V~24V, negative ground electrical system.
WARNING:
Disconnect the car power adaptor when not in use.
To the cigarette lighter socket
CAUTIONS:
! Use the unit only with 9V car power adaptor, use with other
car power adaptor could damage the unit.
!
!
!
!
!
The recommended 9V car power adaptor is for use with this
unit only. Do not use it with other equipment.
In the interests of road traffic safety, do not operate the unit or
view video software while driving a vehicle.
Make sure the unit is fastened securely to prevent from
moving about inside the vehicle in the event of an accident
When the inside of the cigarette lighter socket is dirty with
ashes or dust, the plug section may become hot due to poor
contact. Be sure to clean the cigarette lighter socket before
use.poor contact. Be sure to clean the cigarette lighter socket
before use.
After use, disconnect the 9V car power adaptor from both the
unit and cigarette lighter socket.
FUSE REPLACEMENT
FUSE
CONNECTING THE HEADPHONES
You can attach a pair of headphones or earphones with a
stereo mini-jack plug to the earphones socket for private
listening.
NOTE:
1. Turn the Volume down before connecting.
2. The speakers are disconnected once earphones are
attached to the phones Socket.
3. Adjust the volume to a comfortable level using the
Volume keys.
CAUTION:
Listening at high power for a long moment could damage
users' ears.
A/V cable
AUDIOR
AUDIOL
VIDEOIN
S-VIDEO
YUVINPUT
AVAUDIO/VIDEO INPUT
TV SET
OPERATIONS
PREPARATION
Power on the TV set and select video input mode.
Power on the audio system which is connected to the player.
1. Press POWER switch to turn on the player.
2.
3. Place a disc onto the disc tray.
4.
5. When a menu screen appears on the display, move the
navigation buttons or press the numeric buttons to select
a preferred track number, then press OK/ENTER button to
start playback.
GET STARTED
ADJUST THE VOLUME
Press the VOLUME+ button to increase or VOLUME- button
to reduce the volume.
Press OPEN button to open the disc tray.
Close the disc cover and the playback starts
automatically.
SKIP FORWARD OR BACKWARD
Press NEXT SKIP or PREV SKIP button once during play to
skip a chapter(DVD) or a track (CD) ahead or backward.
During playback, press and hold F.FWD button or F. BWD
button several times to scan the disc forward or backward at
X2, X4, X8, X20 normal speed.
Press PLAY button to resume normal play.
During playback, press PLAY/PAUSE button to pause; to
resume normal play, press PLAY/PAUSE button again.
Press STOP button during playback to stop playback; the
player activates its resume function when STOP is pressed
in STOP mode; press PLAY button again, playback resumes
at the point it stopped previously; open the disc tray or press
the STOP button one more time to clear the resume function.
Press and hold ZOOM/SLOW button on the remote control
for a moment during playback, the disc will be played at 1/ 2
normal speed at first, each time this button is pressed, the
play speed becomes slower (down to 1/7 normal speed.)
Press PLAY button, normal play will resume.
RAPID ADVANCE/ REVERSE
PLAY/PAUSE
SLOW-MOTION PLAY (DVD)
STOP PLAYBACK
Press and hold STOP button to make change between
USB/SD/MMC card and disc when Insert a USB/SD/MMC
card.
REPEAT BUTTON
Press REPEAT button during play, it will repeat play one
chapter/title or repeat all(for DVD disc), or repeat play a
track or all tracks (for CD), or repeat the the specified points
(A-B) .
Page 6

5
Example: Track 3, press "3"
Track 12, press "1" and then"2"
Track 21, press "2" and then "1"
3. To start programmed playback, select PLAY on the menu;
pressing PROGRAM button againto exit programming.
4. To clear all programmed items, select the <CLEAR> on the
menu, and then pressOK/ENTER button on remote control.
5. You can also cancel program mode by clearing all the
items in the program menu.
Press ZOOM/SLOW key continuously to zoom in the picture
by 2, 3, and 4 times, zoom out by 1/2, 1/3, 1/4 normal size.
Press this key once more when the picture is at 1/4 size to
return to the normal size display.
Scroll to view the enlarged picture using Navigation buttons.
ZOOM PLAY
ON SCREEN DISPLAY INFORMATION
CHANGING AUDIO SOUNDTRACK LANGUAGE(DVD)
When the player is in operation, press DISPLAY button
continuously on the remote control, the screen will
display parts of information(current disc type, title number,
chapter number, playtime, audio language, audio type,
subtitle language and multi angle, etc) in a sequence.
It is possible to change the audio soundtrack language to a
different language from the one selected at the initial
settings(This operation works only with discs on which
multiple audio soundtrack languages are recorded).
Press AUDIO button during DVD disc play, the sound
track language changes with the current sound track
number shown on the TV screen.
NOTE: When no soundtrack languages are recorded,
pressing this button willnot work.
MULTI-ANGLEVIEWING(DVD ONLY)
CHANGING SUBTITLE LANGUAGE (DVD ONLY)
Press and hold ANGLE button during playback to display
the number of angles being played and then select a
desired angle to view the scene.
Note: only the DVDs shot with multi-angle scenes have this
function.
Press SUBTITLE button during playback, the subtitle
language shown on the screen will change as a response to
each press;
When the desired language appears, release the button to
view the subtitle in that language.
Note: this function only works on the DVDs recorded with
multi-language subtitles.
During playback, press MENU button to return main
menu(DVD).
TITLE button: Play the title (DVD.
SEARCH FOR PREFERRED SCENE
PROGRAM PLAY(UP TO 16 MEMORIES)
1. Press SEARCH button during play and highlight the item
to be played (Title, Chapter, or Chapter time) by
navigation buttons
2. Input the desired number or time via the numeric buttons.
3. Press OK/ENTER button to confirm and the playback
from the located scene starts.
4. To exit search menu, press SEARCH button directly.
1. Press PROGRAM during playback to display the program
menu.
2. Select location(s) to be memorized via navigation buttons
and then enter desired Titles/Chapters numbers via
numeric buttons.
Note: Inputting leading zero is not necessary. If the
chapter/title/track number is behind the cardinal 10, press
the unit digit key first and then another unit digit. Some
figure inputs may be useless, because it 's greater figure
than total title/chapter/track numberon the disc.
MP3 PLAYBACK
1. Load the MP3 disc onto the disc tray and the TV screen
will show all its folders after a few seconds.
2. Select the folder you want by the navigation buttons and
then OK/ENTER button to confirm.
3. The files in this folder are displayed and select your
favourable song via navigation buttons and press
OK/ENTER button to start playback.
4.5.Press NEXT and PREV button to select track directly.
Press REPEAT button change play mode.
REPEAT 1- repeat one file.
REPEAT DIR- repeat all tracks in the current album
REPEAT ALL- repeat all tracks in current disc.
REPEAT OFF-cancel repeat modes.
REPEAT A-B- repeat the selected contents between A
and B.
Slide show of Kodak Picture CD after being loaded begins
automatically;
Folders of JPEG picture CD after being loaded are
displayed on the TV screen; use the navigation buttons to
select the desired folder and then press OK/ENTER button
to confirm.
The files in this folder are displayed and you can select your
favourable pictures using the up/down navigation buttons
and press OK/ENTER button to start playback.
Preview of the picture will be displayed while you scroll
across the filenames.
Press REPEAT button during play to change the play
modes.
REPEAT 1- repeat one file
REPEAT DIR- repeat all picture in the current album
REPEAT ALL- repeat all pictures in current disc.
REPEAT OFF- cancel repeat modes.
During playback, press STOP to enter preview mode.
Press NEXT button to skip to the next picture or PREV
button to the previous picture.
If no key is pressed for a few seconds, it will skip to next
picture automatically.
Press RIGHT and LEFT navigation buttons to rotate the
picture Clockwise and anti-clockwise respectively.
Press UP navigation button to flip the picture vertically.
Press DOWN navigation button to flip the picture
horizontally.
Press ZOOM/SLOW button continuously ,the picture zooms
in by 2, 3, 4 times or zooms out by 1/2, 1/3, 1/4 the original
size.
Press this button once more when the picture getting 1/4
size to return to the normal play.
If the picture is enlarged, you may use the navigation
buttons to view blocked parts of the picture.
KODAK PICTURE CD /JPEG CD PLAYBACK
KODAK PICTURE CD / JPEG CD OPERATIONS
1. PLAY MODES
SKIP TO NEXT/PREVIOUS PICTURE
PICTURE ROTATIONS
PICTURE FLIPS
PICTURE ZOOM IN/OUT
2.
3.
4.
5.
Page 7

6
1.SYSTEM SETUP
SYSTEM SETUPSYSTEM SETUP
TV SYSTEM
PASSWORD
RATING
DEFAULT
EXIT SETUP
TV TYPE
LCD MODE
6. SLIDE SHOW TRANSITION MODES
During slide show playback, press and hold
PROGRAM/ANGLE button cyclically to select one of the
following modes to play.
WIPE TOP
WIPE BOTTOM
WIPE LEFT
WIPE RIGHT
DIAGONAL WIPE LEFT TOP
DIAGONAL WIPE RIGHT TOP
DIAGONAL WIPE LEFT BOTTOM
DIAGONAL WIPE RIGHT BOTTOM
EXTEND FROM CENTER H
EXTEND FROM CENTER V
COMPRESS TO CENTER H
COMPRESS TO CENTER V
WINDOW H
WINDOW V
WIPE FROM EDGE TO CENTER
RANDOM
NONE
EXTERNAL MEMORY MEDIA OPERATION
(USB&SD/MMC CARD)
Prepare the player for External Memory media operation
1. Slide the POWER switch to ON position, Insert a USB
data traveller filled with music or video files into the USB
port or plug the SD/MMC card into the card slot, the USB
or the SD/MMC card is successfully detected and read
after a few seconds, at the same time, the screen will
show all its folders.
2. You may play the files stored in the storage media much
in the same way as you do the Mp3 disc.
Note: Press and hold STOP button to make change
between USB/SD/MMC card and disc.
1.1 TV SYSTEM
PAL/NTSC/AUTO
1.2 LCD MODE
- it is used to select the TV mode.
Options:
Please select this option as per your TV set.
- it is used to select LCD mode.
Options: 4:3 16:9
2. LANGUAGE SETUP
LANGUAGE SETUPLANGUAGE SETUP
OSD LANGUAGE
AUDIO LANG
SUBTITLE LANG
MENU LANG
EXIT SETUP
2.1 OSD LANGUAGE - It is used to select different On
Screen Display language for different user.
2.2 AUDIO LANG -
2.3 SUBTITLE LANG-
2.4 MENU LANG -
Select preferred audio language.
(DVD only, need disc software support)
Select preferred subtitle language.
(DVD only, need disc software support)
Select preferred disc menu language.
(DVD only, need disc software support)
1.3 TV TYPE-
4:3PS :
4:3LB :
16:9 :
1.4 PASSWORD
NOTE
1.5 RATING -
1KIDSAFE/2G/3PG/4PG13/5PG-R /
6R / 7 NC-17 / 8 ADULT
1.6 DEFAULT -
it is used to select the TV scan mode, please
set as per your TV set.
Options: Normal Pan & scan mode
normal Letter box mode
16:9 wide screen mode
- input password to unlock the system. The
steps are as follows:
1.4.1 Enter SYSTEM SETUP, select the PASSWORD item
by scrolling the down navigation button, and then
press the right navigation button to select the input box.
1.4.2 Input user's password "0000" to unlock it, in this case,
select the input box again to change the password by
inputting another new four numeric numbers and then
press OK button to confirm. When the password is
changed, you are needed to input the new one to
unlock the system.
1.4.3 Once you forget your own password, use the
supervisor's password "8200" to unlock it.
: If wrong password was input in unlock status, the
system will lock.
Set the rating of this player. If you want to
change the rating of parental lock, please input the
password to unlock first.
Options:
Reset to factory settings.
Options: RESTORE
COLOR AND BRIGHTNESS ADJUSTMENT(FOR THE
LCD SCREEN)
Press the SCREEN ON/OFF&BRI/COL button on the
remote control to adjust the colour intensity brightness
and contrast respectively. Press the button once to enter the
Colour adjustment mode, and press the Navigation
Left/Right buttons to adjust. Press the button twice enters
the Brightness adjustment mode; press the button thrice
enters the Contrast adjustment mode. Press and hold this
button for a moment to close the screen.
INITIAL SETTINGS
Initial settings page is for you to make your preferred
settings up for your player. Once the initial settings are
done they are retained in the CPU of the player until
otherwise modified.
1. Press SETUP button.
2. Use the navigation buttons to select the item you want
to modify, setting page with further setting items
displayed shows on the TV screen. Again use
navigation buttons to make changes. Press again
OK/ENTER button to confirm modifications.
3. Use navigation buttons to switch to another setting on
the main setting page.
4. Press SETUP button to exit main setting page.
COMMON PROCEDURES FOR INITIAL SETTINGS
Page 8
SPEAKER SETUPSPEAKER SETUP
DOWNMIX
EXIT SETUP
4. SPEAKER SETUP
4.1 DOWNMIX
Options: Left/Right mix mode
Select this option if you don't have a 5.1
channels amplifier.
LT/RT-
STEREO-
7
3.1 BRIGHTNESS-- to set the brightness for the display.
Options: 0/2/4/6/8/10/12
Options:
3.2 CONTRAST-- to set the contrast effect for display.
3.3 HUE-- to set the colour impression for display.
3.4 SATURATION-- to set the saturation level for display.
0/2/4/6/8/10/12
Options: -6/-4/-2/0/+2/+4/+6
Options: 0/2/4/6/8/10/12
3. VIDEO SETUP
VIDEO SETUPVIDEO SETUP
BRIGHTNESS
CONTRAST
HUE
SATURATION
EXIT SETUP
TROUBLESHOOTING
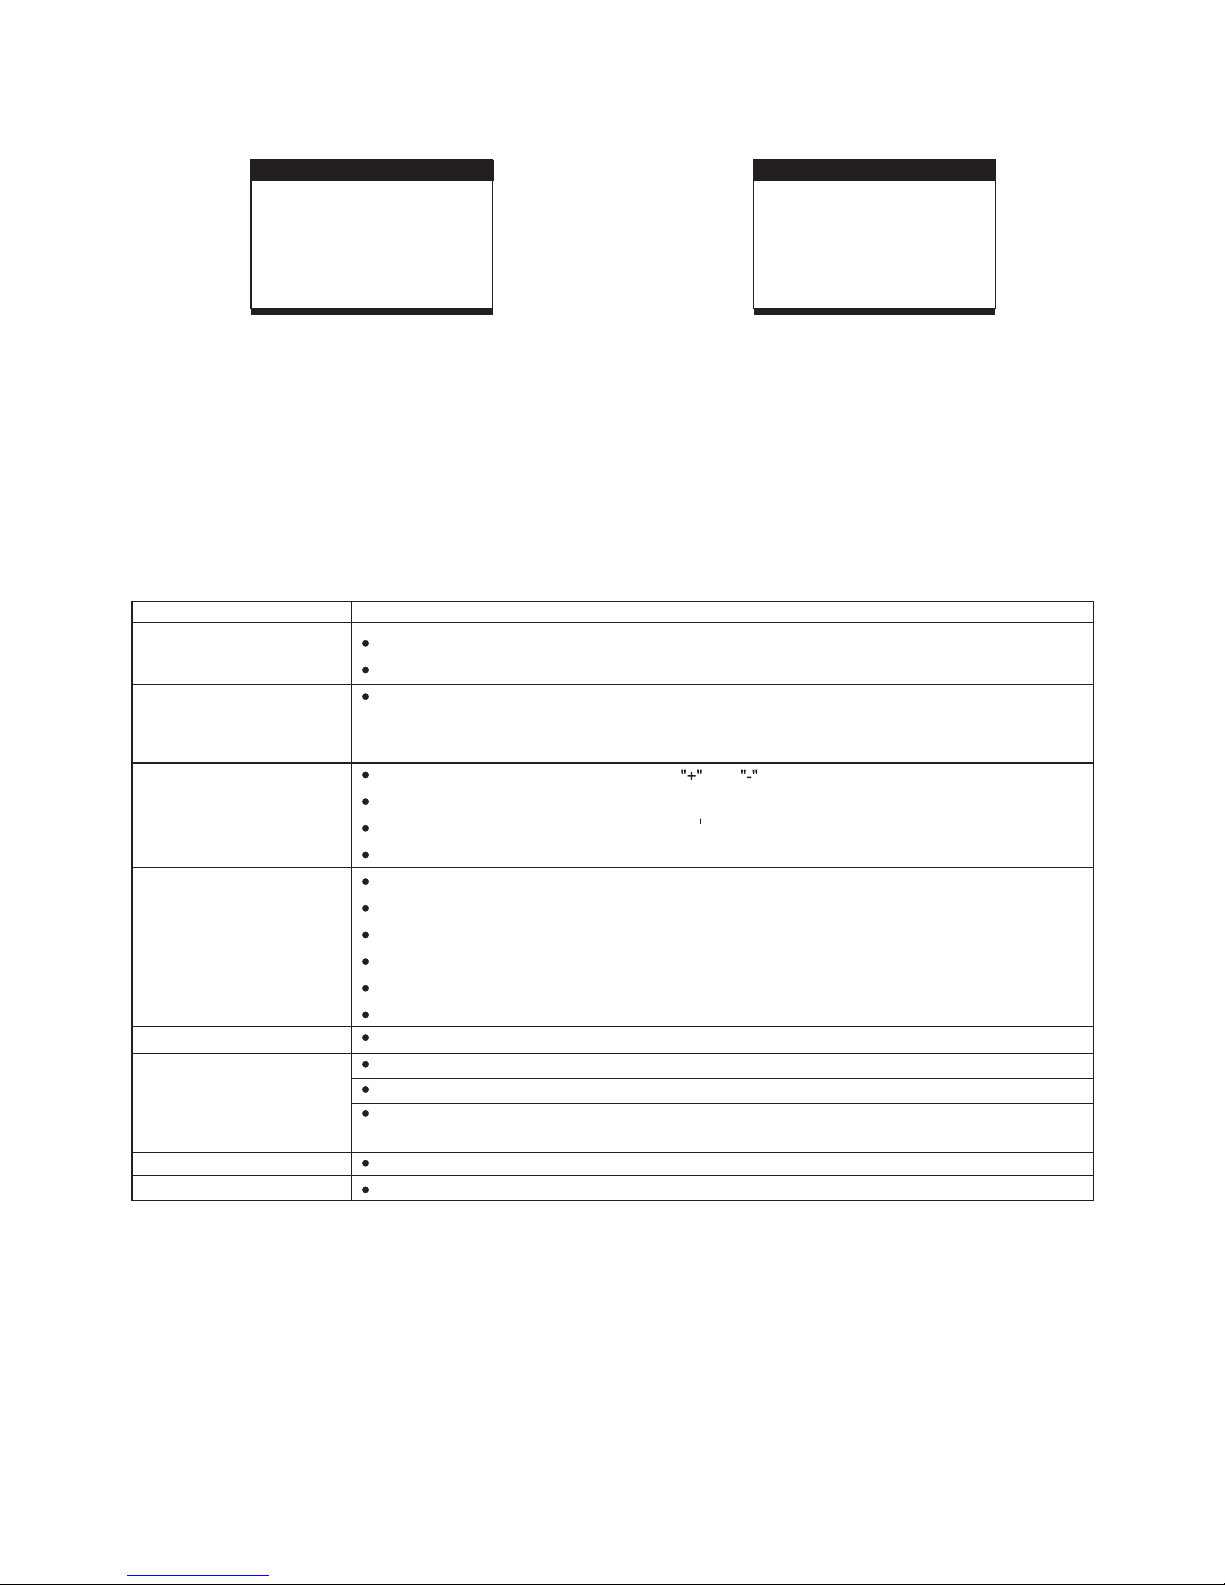
If your DVD player does not seem to be functioning properly, check the items below before you contact an authorized service center
Symptom Check
Make sure the AC adapter is securely plugged into an AC outlet.
Turn the power off and then back on.
Check that the battery pack is charged. If not, recharge it.
Check that the battery is inserted in the
and direction properly.
The battery may be flat. Replace it with a new one.
Check that the signal transmission is directed at the remote control sensor on the DVD player.
Remove the obstacle between the remote controller and remote control sensor.
Check that the A/V cables are securely connected.
Check that the disc is a DVD (region number 1 or all), DVD-RW or AUDIO CD.
Do not use a disc that has scratches or dirt.
Check that the label-side of the disc is facing up.
The pick-up lens of the DVD player may be dirty. Contact the service center for lens cleaning.
Check that the TV channel is set to VIDEO or AV if viewing with a TV.
Power does not turn on or
suddenly turns off.
Battery pack is in place but
the power does not turn on
or suddenly turns off
Remote control won't work
No picture or sound
Check that the LCD display is turned on.
Check that the display panel is open. If it is closed, audio will not be output to the speakers.
Check the volume setting. If set to zero, turn up volume level.
Check that the headphones are plugged into the PHONES socket.
Speakers cannot be used with the headphones.
Check that the battery is properly installed and AC Adapter is properly connected.
Use a disc without scratches or dents.
No picture
No sound
No picture and sound
Distorted video or sound
Page 9

8
Warranty
This Haier brand product, when shipped in its original
container, will be free from defective workmanship and
materials, and agrees that it will, at its option, either
repair the defect or replace the defective product with a
new or re-manufactured equivalent at no change to the
purchaser, for parts or labor for the periods set forth
below:
This warranty does not apply to the appearance of the
product or the exterior of the product, which has been
damaged or defaced, altered or modified in design or
construction. It does not apply to the additional
excluded items set forth below:
The warranty commences on the date the item was
purchased and the original purchase receipt must be
presented to the authorized service center before
warranty repairs are rendered.
The limited warranty described herein is in addition to
whatever implied warranties may be granted to
purchasers by law. ALL IMPLIED WARRANTIES
INCLUDING THE WARRANTIES OF MERCHANT
ABILITY AND FITNESS FOR USE ARE LIMITED TO
THE PERIOD(s) FROM THE DATE OF PURCHASE
SET FORTH BELOW. Some states do not allow
limitations on how long an implied warranty lasts, so the
above limitation may not apply to you.
Neither the sales personnel of the seller nor any other
person is authorized to make any warranties other than
those described herein, or to extend the duration of any
warranties beyond the time period described herein on
behalf of Haier.
The warranties described herein shall be the sole and
exclusive warranties granted by Haier and shall be the
sole and exclusive remedy available to the purchaser.
Correction of defects in the manner and for the period
of time described herein, shall constitute complete
fulfillment of all abilities and
Responsibility of Haier to the purchaser with respect to
the product, and shall
constitute full satisfaction of all claims, whether based
on contract, negligence, strict duality or otherwise. In no
event shall Haier be liable, or in any way responsible for
any damages or defects in the product which were
caused by repairs or attempted repairs performed by
anyone other than an authorized service center or
dealer; nor shall Haier be liable, or in any way
responsible for incidental or consequential economic or
property damage. Some states do not allow the
exclusion of incidental or consequential damages, so
that above exclusion may not apply to you.
THIS WARRANTY GIVES YOU SPECIFIC LEGAL
RIGHTS. YOU MAY ALSO HAVE OTHER RIGHTS
WHICH VARY FROM STATE TO STATE.
Warranty period for this product: 90 days for Labor, one
year for parts.
Additional items excluded from warranty coverage: nonrechargeable batteries.
Where to obtain service: For the location of the nearest
Haier authorized service center or to obtain product
literature, accessories, supplies or customer assistance,
please call 1-877-337-3639.
What to do to obtain service: ship or carry in your
product to an authorized service dealer or center .Be
sure to have proof of purchase.
If you ship the product, be sure it ispackaged carefully.
Haier America
New York, NY 10018
Page 10

Haier
PDVD9
 Loading...