

Page 1

LCD TV RECEIVER
USER MANUAL
MODEL:
LT32F6
LTF37F6
LTF42F6
Please read this manual carefully before
using your television and keep this manual
in a good place for future reference.
Page 2

CONTENTS
IMPORTANT SAFETY INSTRUCTIONS ....................................................... p.01
REMOTE CONTROL ..................................................................................... p.03
KNOW YOUR MACHINE ............................................................................... p.06
WALL MOUNTING ......................................................................................... p.08
ANTENNA CONNECTION ............................................................................. p.10
TUNING MENU OPTIONS ............................................................................. p.11
OTHER CONNECTIONS ............................................................................... p.14
BASIC OPERATION ...................................................................................... p.19
MENU OPERATION ....................................................................................... p.21
PHOTO VIEWING .......................................................................................... p.34
PVR RECORDING & VIEWING ..................................................................... p.36
TIME SHIFT FUNCTION ................................................................................ p.38
TELETEXT ..................................................................................................... p.40
COMMON INTERFACE MODULE ................................................................. p.41
OAD OPERATION ......................................................................................... p.42
TROUBLESHOOTING ................................................................................... p.43
SPECIFICATIONS .......................................................................................... p.44
APPENDIX ..................................................................................................... p.45
INFORMATION .............................................................................................. p.47
Notes.............................................................................................................. p.48
Page 3
p.01
Read all instruction before use and keep for future reference.
WARNING
Misuse or modication of this appliance may result in breakdown or injury.•
To reduce the risk of re or electric shock, do not expose this appliance to rain or moisture.•
IMPORTANT INFORMATION
The appliance is intended for household use only.•
The appliance should always be turned to OFF before plugging or unplugging from socket. Never •
yank cord to disconnect from socket; instead, grasp plug and pull to disconnect.
Check that the voltage on the rating plate of your product corresponds with your local electricity •
supply which must be A.C. (Alternating Current).
If the mains sockets in your home are not suitable for the plug supplied with this product, check with •
a qualied electrician for replacement.
FOR OPTIMUM PERFORMANCE
Do not use in environments which are extremely hot, cold, dusty or humid.•
Keep the unit free from dust and clean with a dry cloth.•
Do not use in areas exposed to direct sunlight or where it can become extremely hot.•
Keep away from sources of strong magnetism - such as speakers.•
Avoid placement where there is a lot of movement, vibration or on an unstable surface.•
To reduce the risk of re or electric shock, the equipment shall not be exposed to rain or moisture and •
objects lled with liquids, such as vases, shall be placed on the apparatus.
The equipment shall not be exposed to dripping or splashing.•
To avoid re, no naked ame source, such as lit candles, should be placed on or around the unit.•
For ventilation, leave at least 10 cm free all around the TV. Do not place the TV on a carpet.•
The ventilation holes must be kept clear from obstructions.•
In case of smoke, or unusual noises or smells coming from the unit, switch it off, unplug it from the •
wall socket and contact your dealer or service center.
Place the TV in such a position that the screen is not exposed to direct sunlight. It is best to have •
soft indirect lighting whilst watching TV. Avoid dark environments and screen reection as these may
cause eye fatigue.
When the TV has been moved from a cold place, it will need time for the moisture from inside to •
evaporate.
The appliance coupler is used as the disconnect device of this apparatus, the disconnect device shall •
remain readily operable.
IMPORTANT SAFETY INSTRUCTIONS
Page 4
p.02
Read all instruction before use and keep for future reference.
FOR SAFETY
DO NOT:
Attempt to disassemble this unit or carry out repairs.•
Attempt to modify the unit in any way.•
Make sure that foreign objects do not get inside the unit.•
Place naked ame sources - such as lit candles on or near the unit.•
Place objects lled with liquids - such as vases, on or next to the unit.•
Cover the unit - allow the unit to be well ventilated.•
Drop the unit or subject it to strong shocks.•
Attempt to service this product yourself as opening or removing covers may expose you to dangerous •
voltage or other hazards. Refer all servicing to qualied service personnel.
CHILDREN
Children do not always understand the dangers associated with operating electrical appliances. •
Never allow children to use this appliance.
LISTENING WITH EARPHONES
Listen at moderate volumes to avoid hearing damage.•
If you hear no sound during playback, do not turn the volume up as the music may suddenly begin at •
a high volume. Excessive sound pressure from earphones and headphones can cause hearing loss.
To avoid damaging your ears, adjust the volume to the lowest level before playback, and turn up to •
the desired level when playback has started.
CAUTION: TO REDUCE THE RISK OF ELECTRIC SHOCK DO NOT REMOVE
COVER (OR BACK), THERE ARE NO USER SERVICEABLE PARTS INSIDE, REFER
SERVICING TO QUALIFIED SERVICE PERSONNEL.
The equipment shall be used at maximum ambient temperature of 35°C.•
IMPORTANT SAFETY INSTRUCTIONS
Page 5
p.03
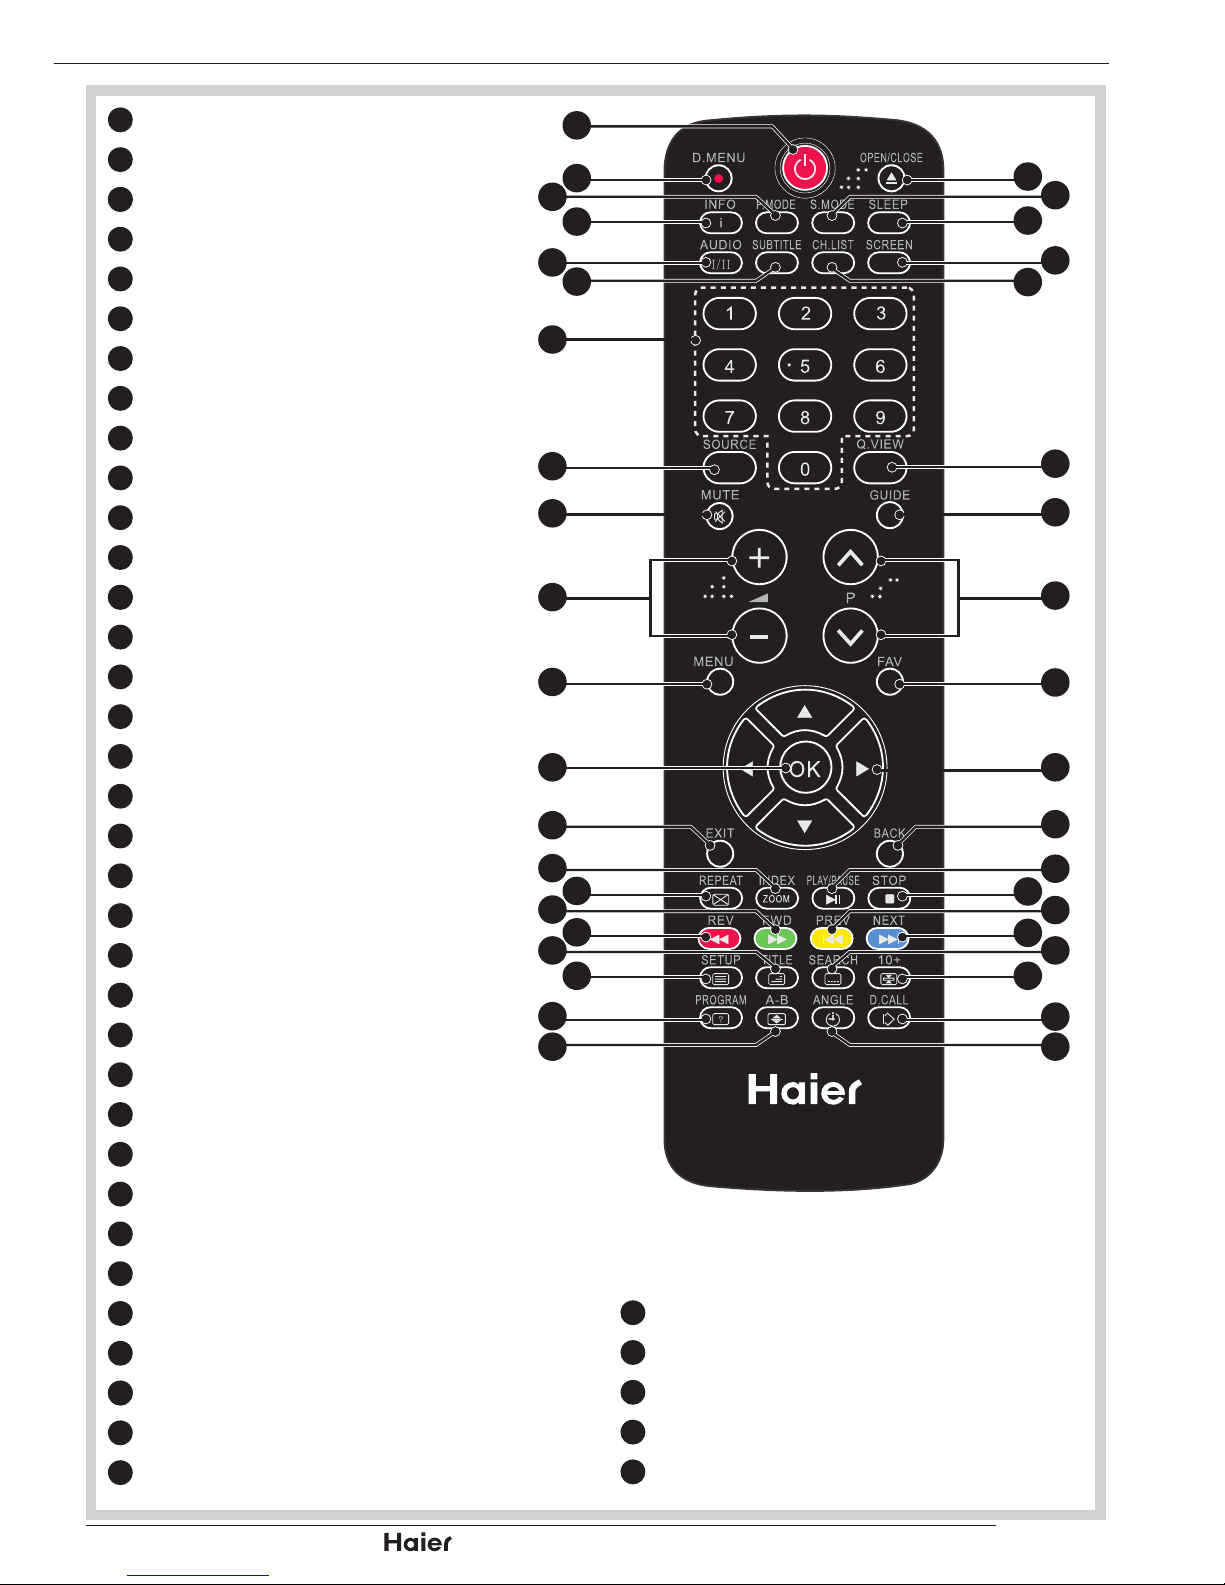
| HD Ready LCD TV | User Manual
1
Power
2
No function
3
Picture Mode
4
Display Information
5
DTV Audio/NICAM
6
Display or Close Subtitle
7
Numerical Keys
8
Source
9
Mute
10
Volume Selection
11
Menu
12
OK Button
13
Exit
14
Teletext Index
15
No function
16
Teletext Green Button
17
Teletext Red Button
18
Teletext Mix
19
Teletext Text
20
Teletext Reveal
21
Teletext Size
22
Teletext Time
23
Teletext Mode
24
Teletext Hold
25
Teletext Subcode
26
Teletext Blue Button
27
Teletext Yellow Button
28
No function
29
No function
30
Back Button
31
Cursor Mover Button
32
Favourite
33
Channel Selection
34
Electronic Programme Guide
35
Q.View
REMOTE CONTROL
36
Channel List
37
Screen Button
38
Sleep Button
39
Sound Mode
40
No function
Vol
1
40
38
36
28
26
24
39
37
35
34
33
32
31
30
29
27
25
23
22
2
4
6
15
17
19
3
5
7
8
9
10
11
12
13
14
16
18
20
21
Page 6
| HD Ready LCD TV | User Manual
p.04
NOTES:
-Please read the important safety
instructions before use.
REMOTE CONTROL
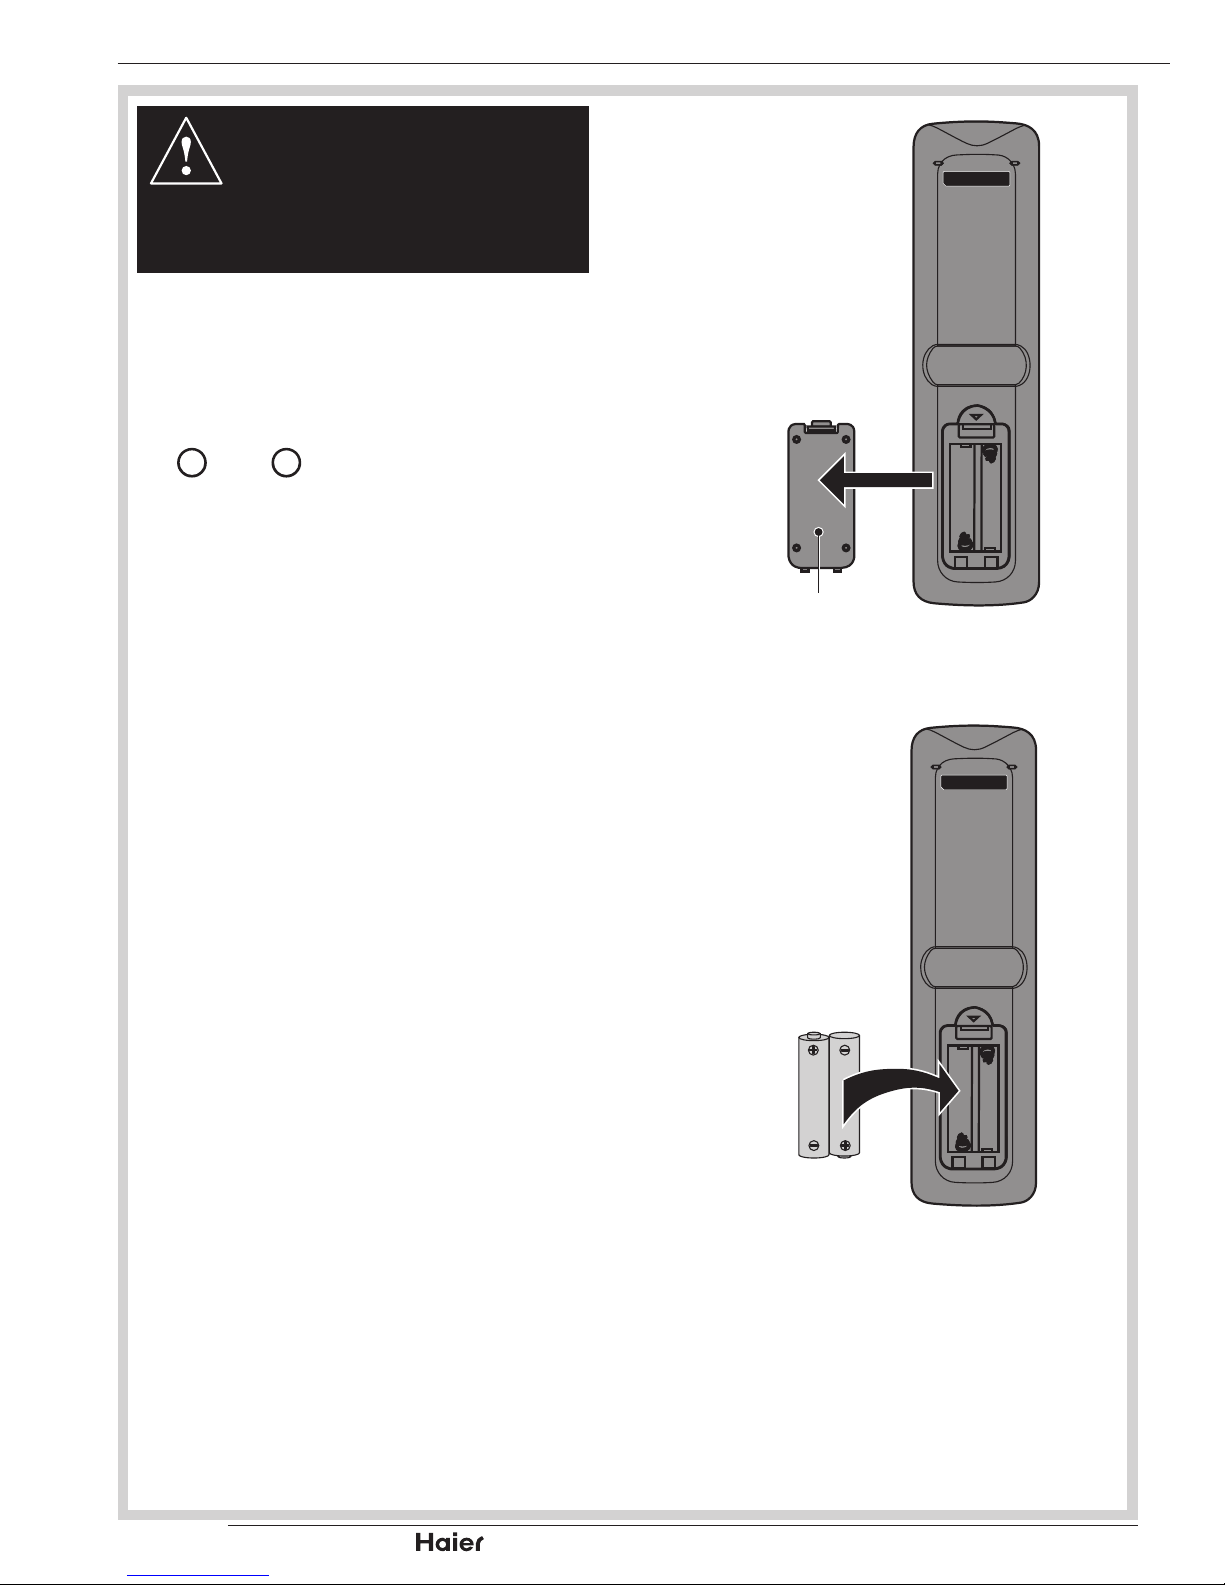
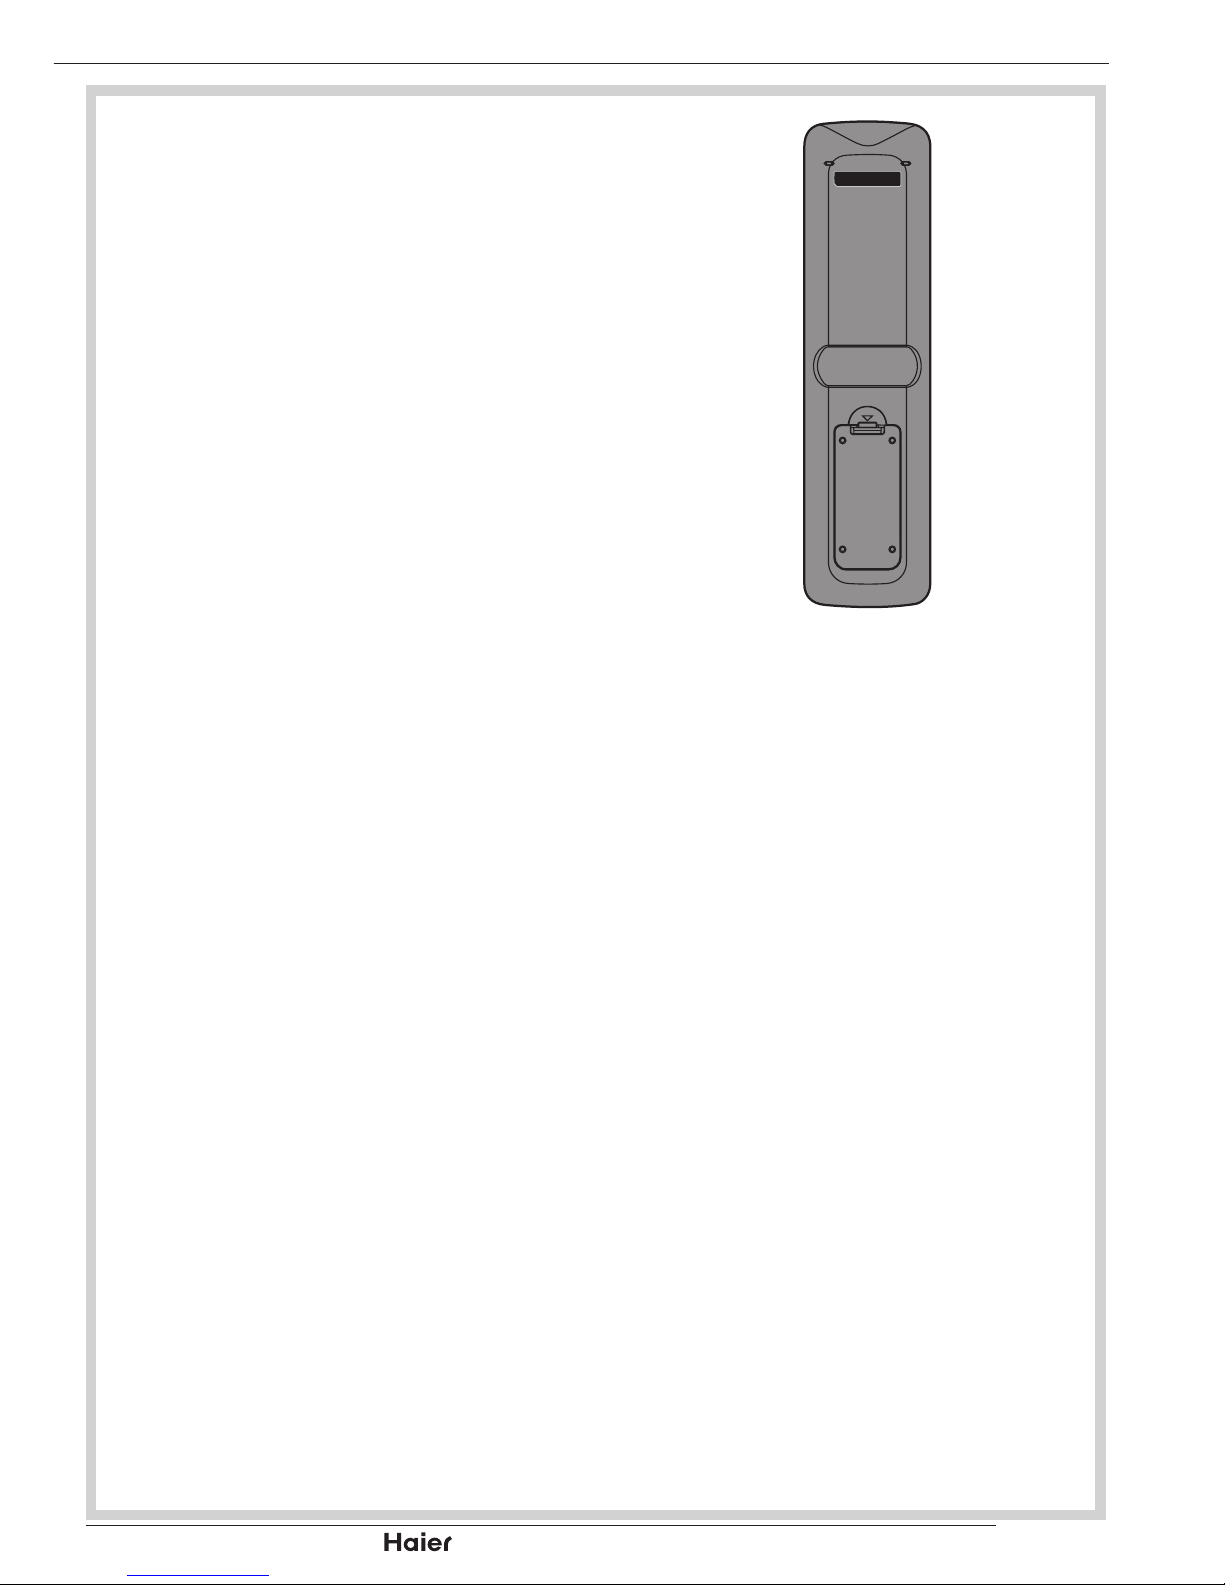
Unclip the Battery Cover from the Remote 1.
Control. See g. 1.
Insert two new 1.5V size AAA Batteries with the 2.
+
and – marks correctly aligned. See g. 2.
HANDLING THE REMOTE CONTROL
Do not use caustic cleaners (porcelain, stainless
steel, toilet, or oven cleaner etc.) on the remote, as
it may suffer damage:
Never mix used and new batteries in the device.•
Replace all the batteries in a device at the same •
time.
Remove the batteries if the remote control is not •
working.
To avoid possible failure, read the following •
instructions and handle the remote control.
Do not drop or cause impact to the remote •
control.
Do not spill water or any liquid on the remote •
control.
Do not place the remote control on a wet object.•
Do not place the remote control under the direct •
sunlight or near heat sources.
Remove the battery from remote control handset
when it is not to be used for a long period.
Otherwise it could cause corrosion or battery
leakage and may result in physical injury and/or
property damage including re.
HTR -D0 6A
Battery
Compartment
Cover
g.1
HTR -D06A
2 x AAA Battery
g. 2
REMOTE CONTROL
Page 7
p.05
| HD Ready LCD TV | User Manual
Carefully close the Battery Cover. 3. See g. 3.
PRECAUTIONS:
To obtain the best performance from your remote
control, please consider the following:
Ensure there is no obstruction between remote •
control and TV set.
Bright sunlight may affect the remote control •
performance.
Always ensure that both batteries are replaced •
at the same time.
HTR -D0 6A
g. 3
REMOTE CONTROL
Page 8
| HD Ready LCD TV | User Manual
p.06
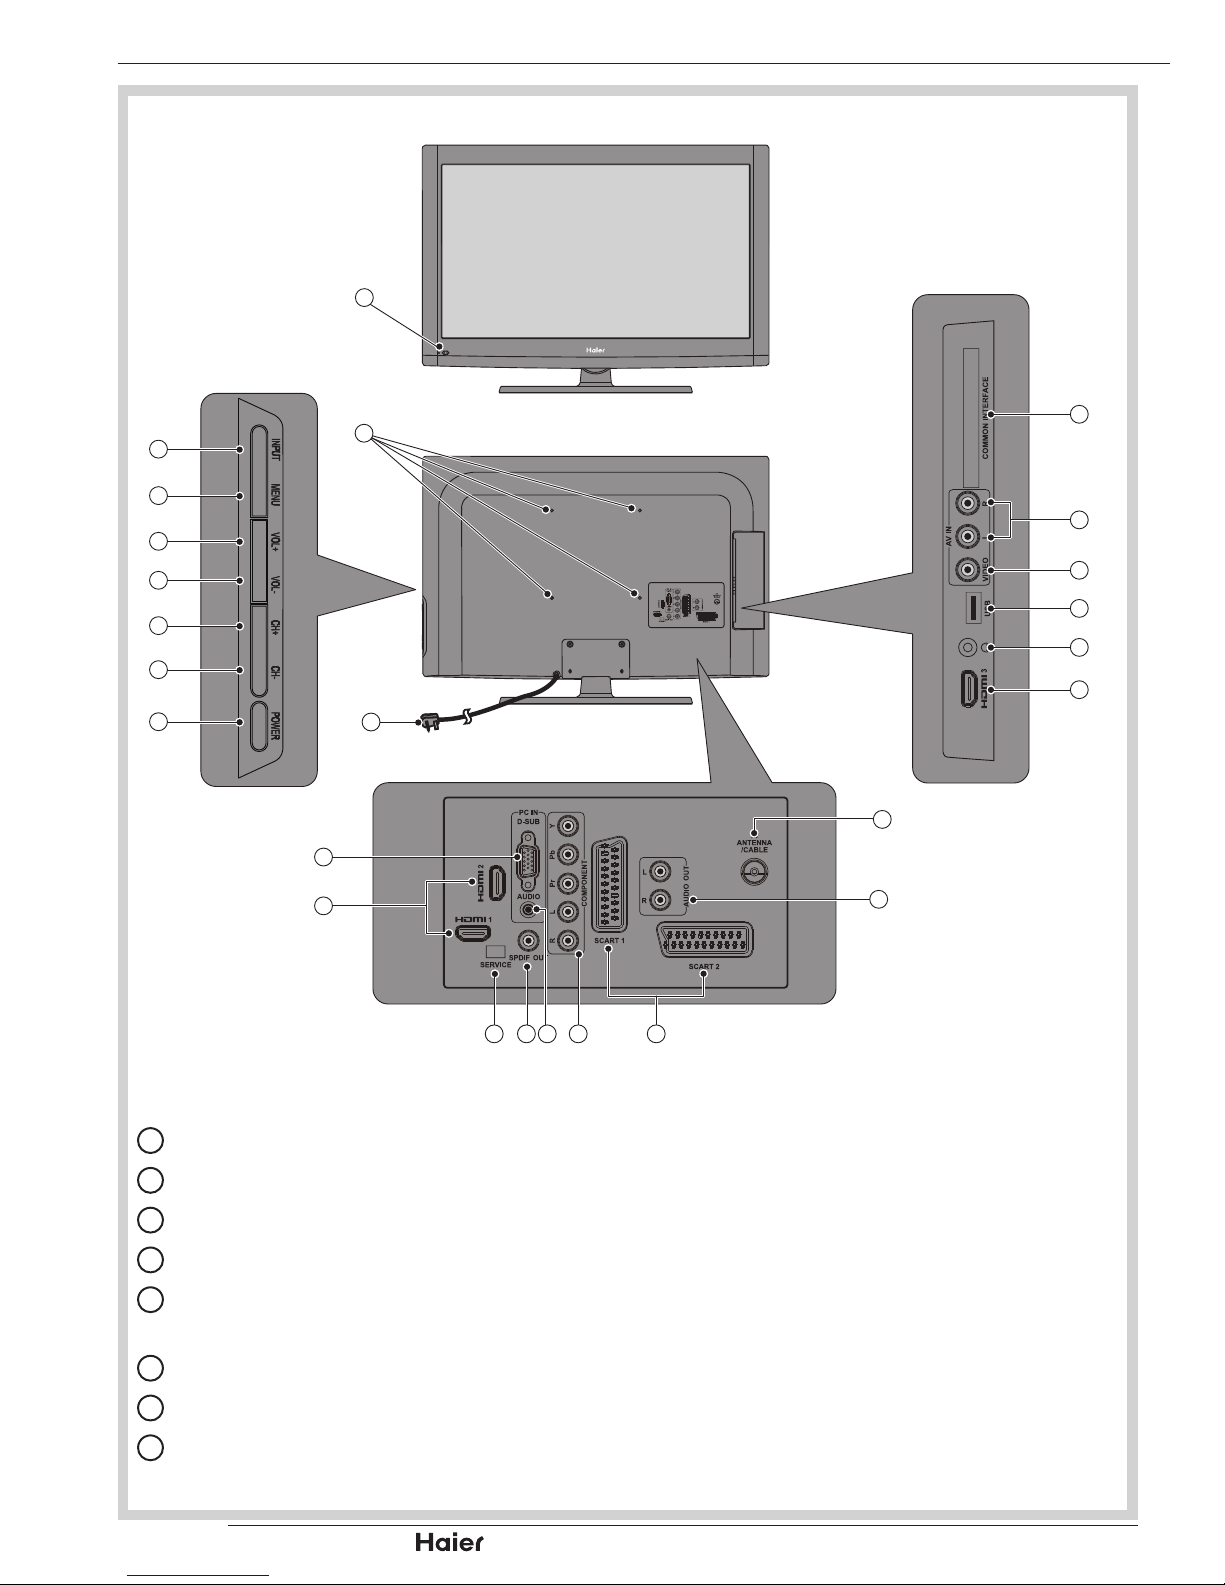
1 x LCD TV
Front View
Side Connections
Rear View
Control Panel
Rear Connections
1
3
4
5
6
7
8
9
10
12
13
14
15
2
17
1921 2022
24
16
25
11
18
23
1
Power LED: If the LED color is Blue, means the TV set is power on.
2
Wall Mount Hole: For wall mount use only.
3
INPUT: Use this button to toggle between video input sources.
4
MENU: Press to open the on-screen menu.
5
VOL +: Press to increase the volume. In Menu mode, functions as the right arrow to go
to the next menu or increase a setting.
6
VOL -: Press to decrease the volume. In Menu mode, press to decrease a setting.
7
CH +: Press to go to the next higher channel. In Menu mode, functions as the up arrow.
8
CH -: Press to go to the next lower channel. In Menu mode, functions as the down
arrow.
KNOW YOUR MACHINE
Page 9
p.07
| HD Ready LCD TV | User Manual
9
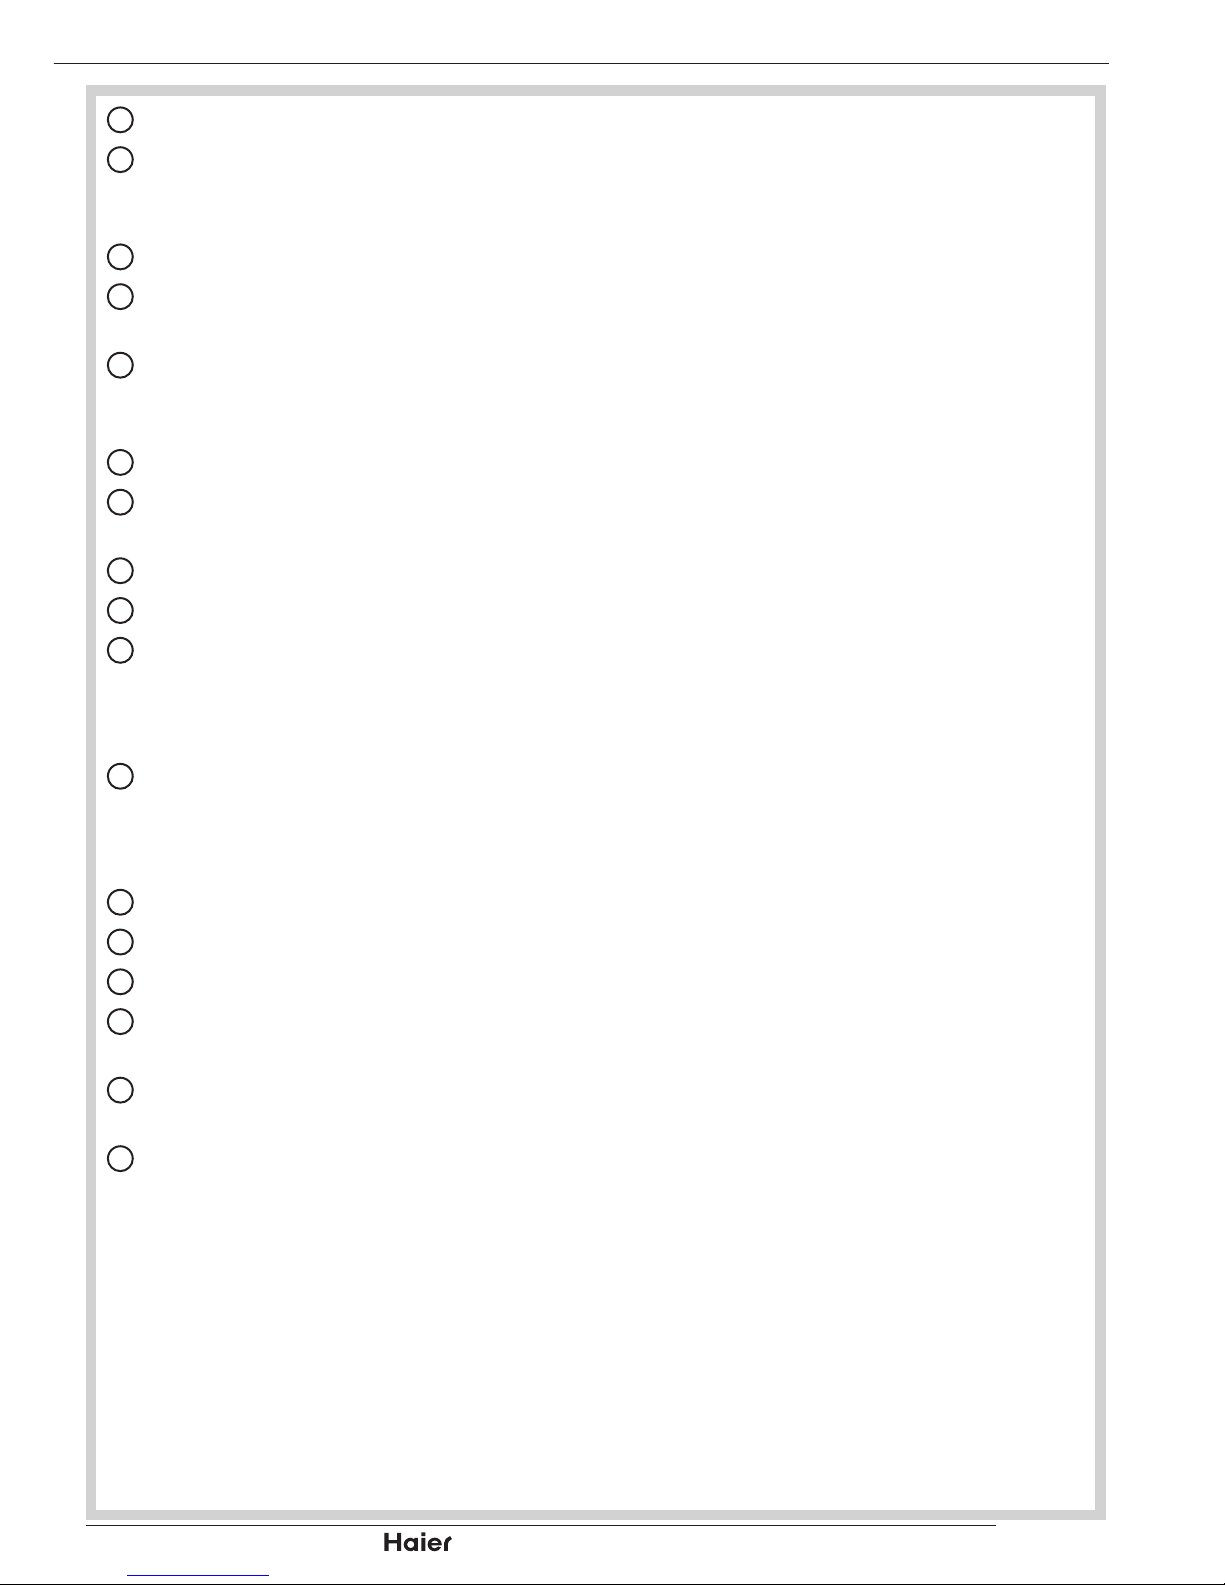
Power Button: Use this button to switch your LCD TV on/off.
10
Common Interface Slot: Function when PC Card or ExpressCard is in COMMON
INTERFACE slot of the set. Please refer to your plug-in card manual for detail
information.
11
Audio Input: For use when PC, Component or DVI device with standard audio output.
12
Video Input: For use when connecting an ATV/DTV video recorder with standard video
and standard audio input.
13
USB Input: Data input from USB device. Insert USB storage device to view JPEG
photos, listen to MP3 music, or to run the [Time Shift] function. (Please refer to pages
36~37 for more information.)
14
Headphone Output: Connect to headphones (16Ω or 32Ω).
15
HDMI Input: High Denition Multimedia Interface. Connect to devices with digital
signals and can be used with PC or HDTV video signals.
16
Antenna Input: Connects to TV RF signals (antenna/CATV).
17
Audio Output: Connect to external analogue sound system.
18
SCART:
SCART 1: Full SCART, which transmits RGB, S-Video and CVBS in, and CVBS tuner
out (Analogue only).
SCART 2: Half SCART, which transmits S-Video or CVBS in and CVBS monitor out.
19
Component Input: The YPbPr video signal can be used if connecting through the
component video port. For example Progressive Scan DVD payers, Hi-scale HDTV
Decoders, and satellite receivers, obtain video with maximum resolution using YPbPr
and L/R audio signals.
20
PC Audio Input: PC audio supports 3.5mm Jack.
21
SPDIF Output: SPDIF is highly recommended for high quality digital sound output.
22
SERVICE: For service use only.
23
HDMI Input: High Denition Multimedia Interface. Connect to devices with digital
signals and can be used with PC or HDTV video signals.
24
VGA Input: Connect to VGA analogue signals sources. PC audio supports 3.5mm
Jack.
25
AC Power Cord: Connect the power cord into the power outlet.
KNOW YOUR MACHINE
Page 10
| HD Ready LCD TV | User Manual
p.08
NOTES:
-Please read the important safety
instructions before use.
WALL MOUNTING (Optional)
IMPORTANT: When drilling into walls, always check that there are no hidden
wires or pipes etc. Make sure that the screws and wall plugs supplied are
suitable for supporting the unit. Consult a qualied trades person if you are
not sure.
NOTE: It would be useful to ask someone to help you at this stage.
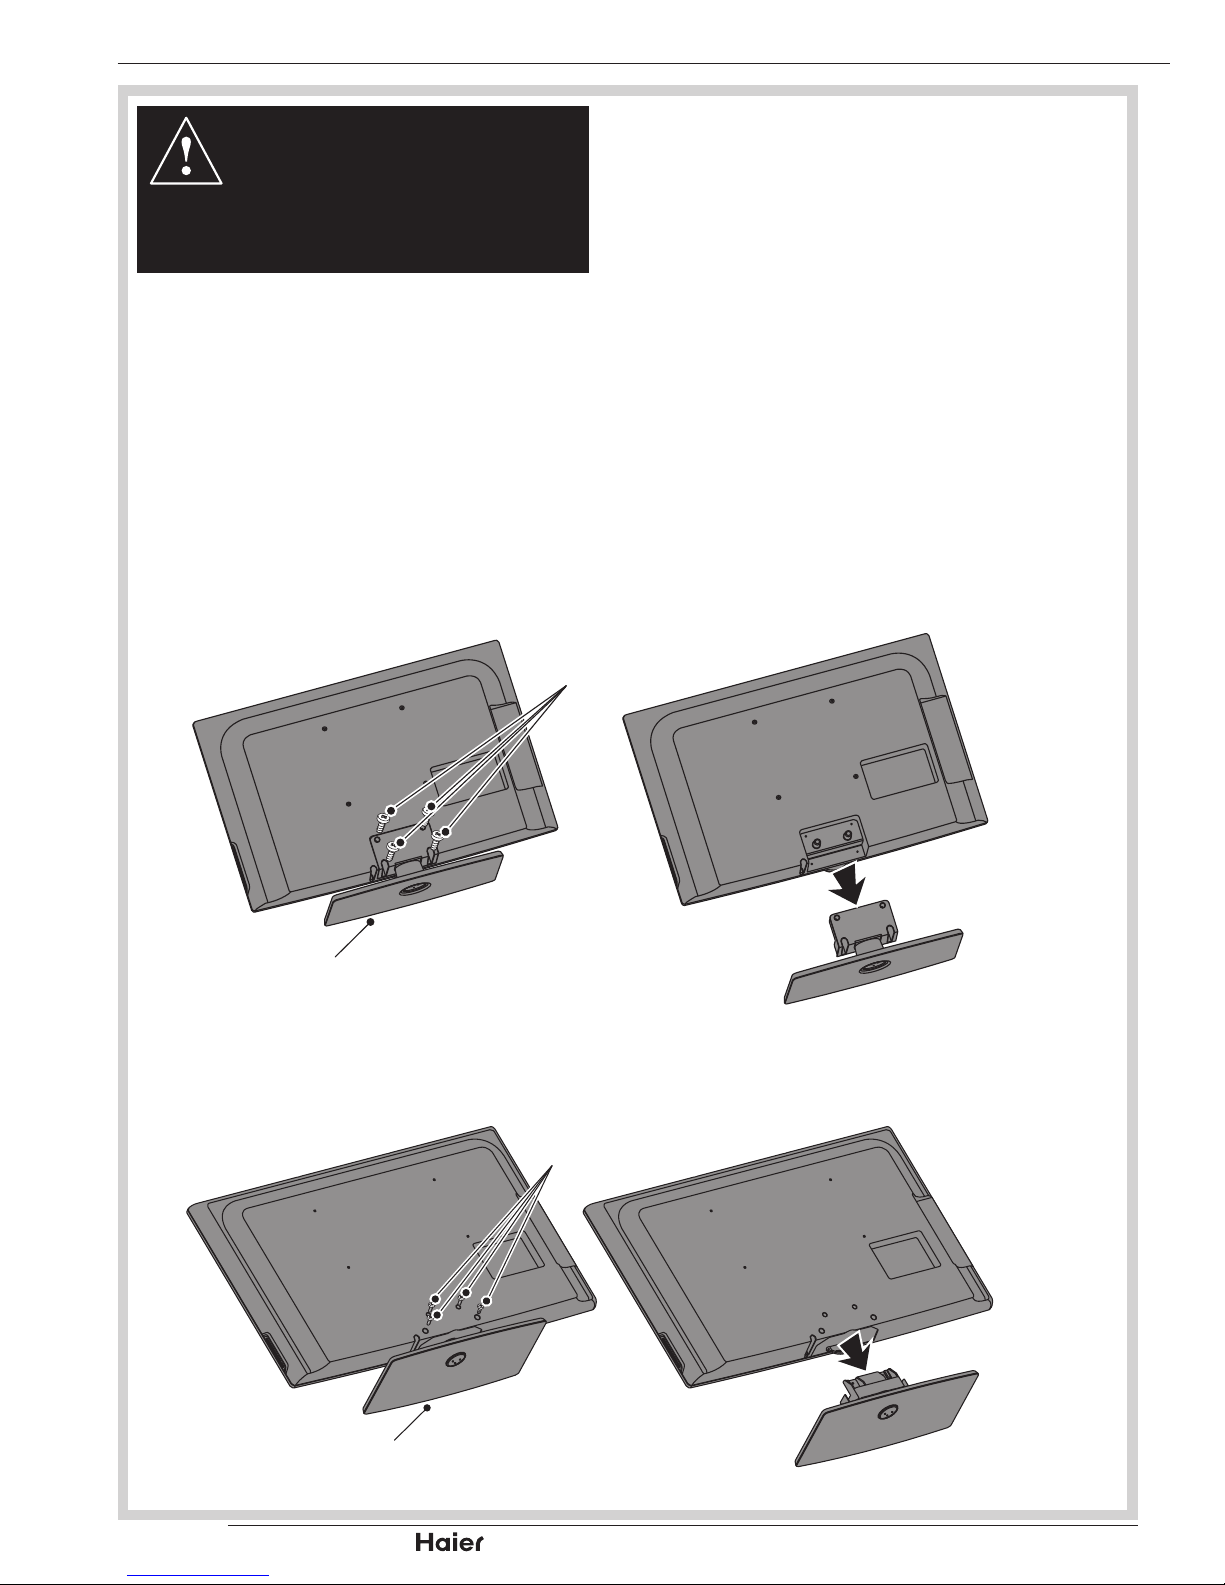
For LT32F6:
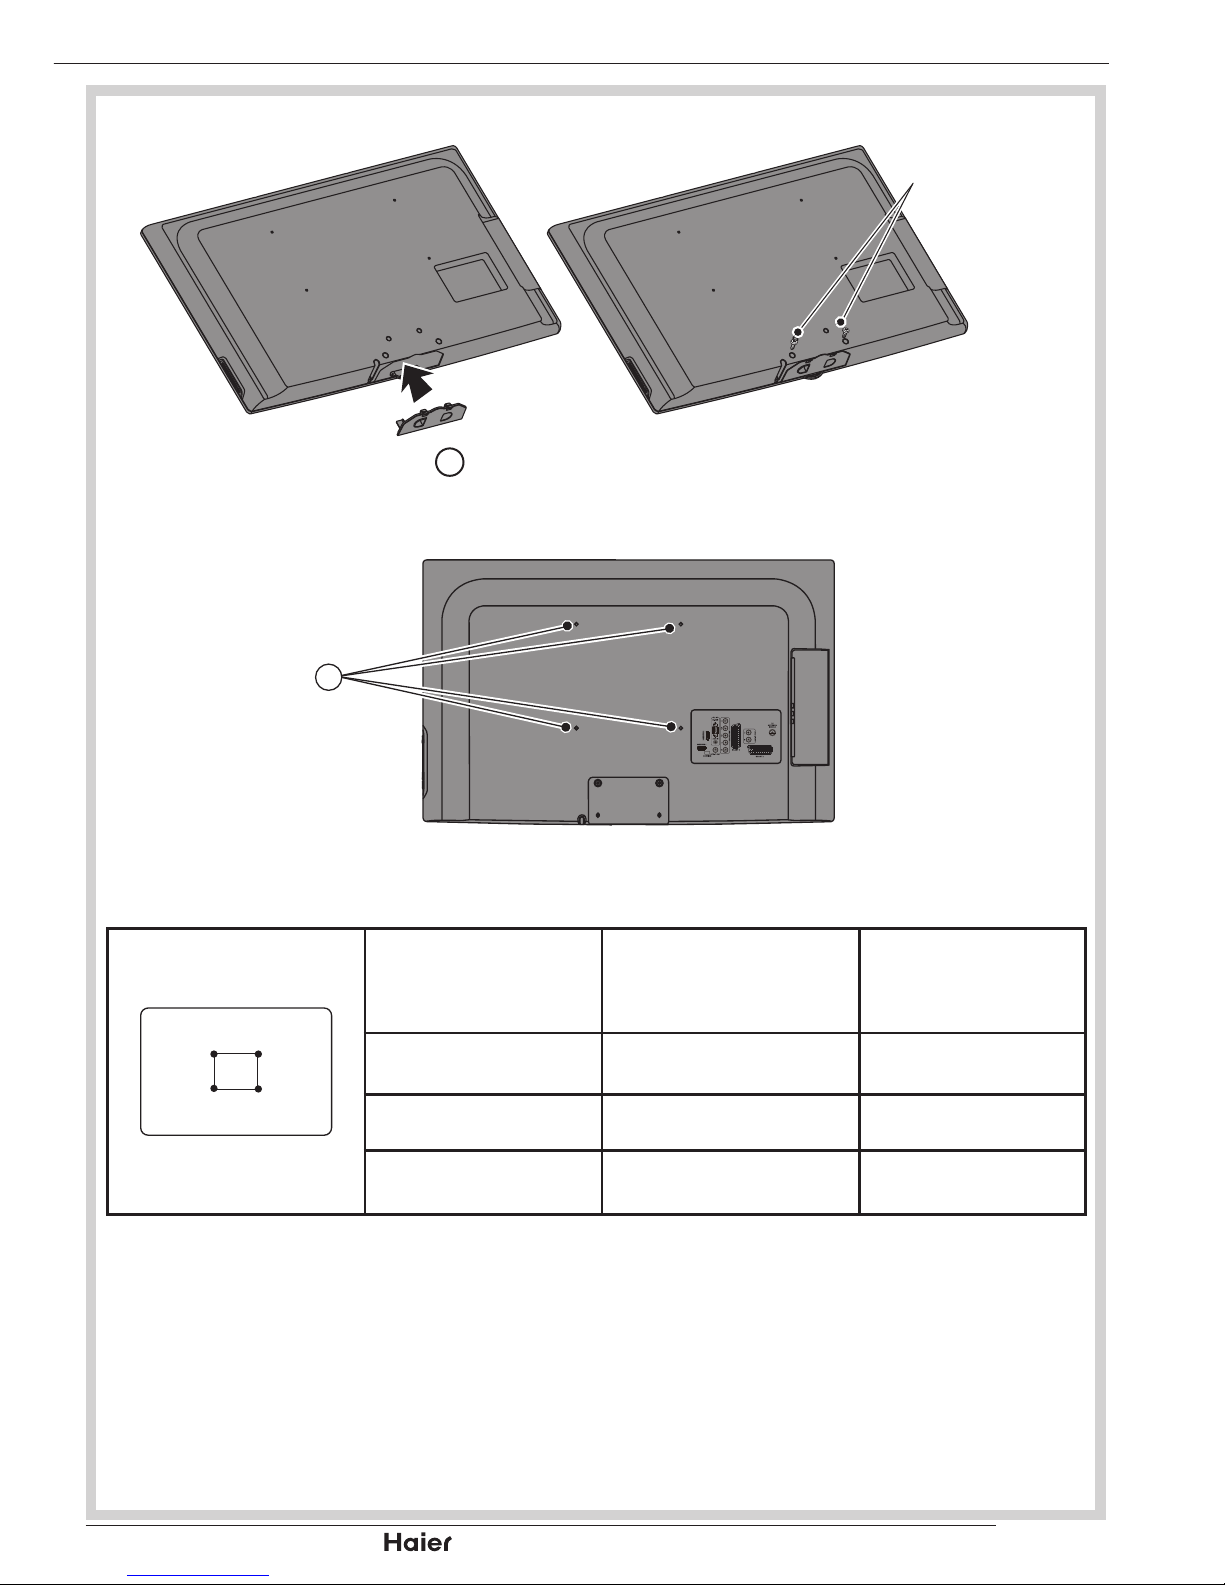
Put the unit face down on a safe, at surface that is covered by a smooth cloth. 1.
Remove the screws and pull out the stand. See g. 4-1.
Screws
Stand
g. 4-1
For LTF37F6 / LTF42F6:
Put the unit face down on a safe, at surface that is covered by a smooth cloth. 1.
Remove the screws and pull out the stand. See g. 4-2.
Screws
Stand
g. 4-2
WALL MOUNTING
Page 11
p.09
| HD Ready LCD TV | User Manual
Usie two screws to secure the cover back to the bottom of the TV. 2. See g. 4-3.
Screws
g. 4-3
Use 4 Wall Mount Holes 3.
2
and screws (not included) to mount the TV on the
bracket (not included).
See g. 5.
2
g. 5
For the Wall Bracket - Refer to the user instructions supplied with the wall 4.
bracket (not included).
W
H
TV Screen
Size (inches)
VESA-Compatible
Wall bracket
(W x H mm)
Screw Type
32” 200 x 200 mm Metric 6 x 10 mm
37” 200 x 200 mm Metric 6 x 10 mm
42” 400 x 200 mm Metric 6 x 10 mm
WALL MOUNTING
Page 12
| HD Ready LCD TV | User Manual
p.10
WARNING:
- Switch off the TV before
connecting any external device.
CONNECTING THE ANTENNA
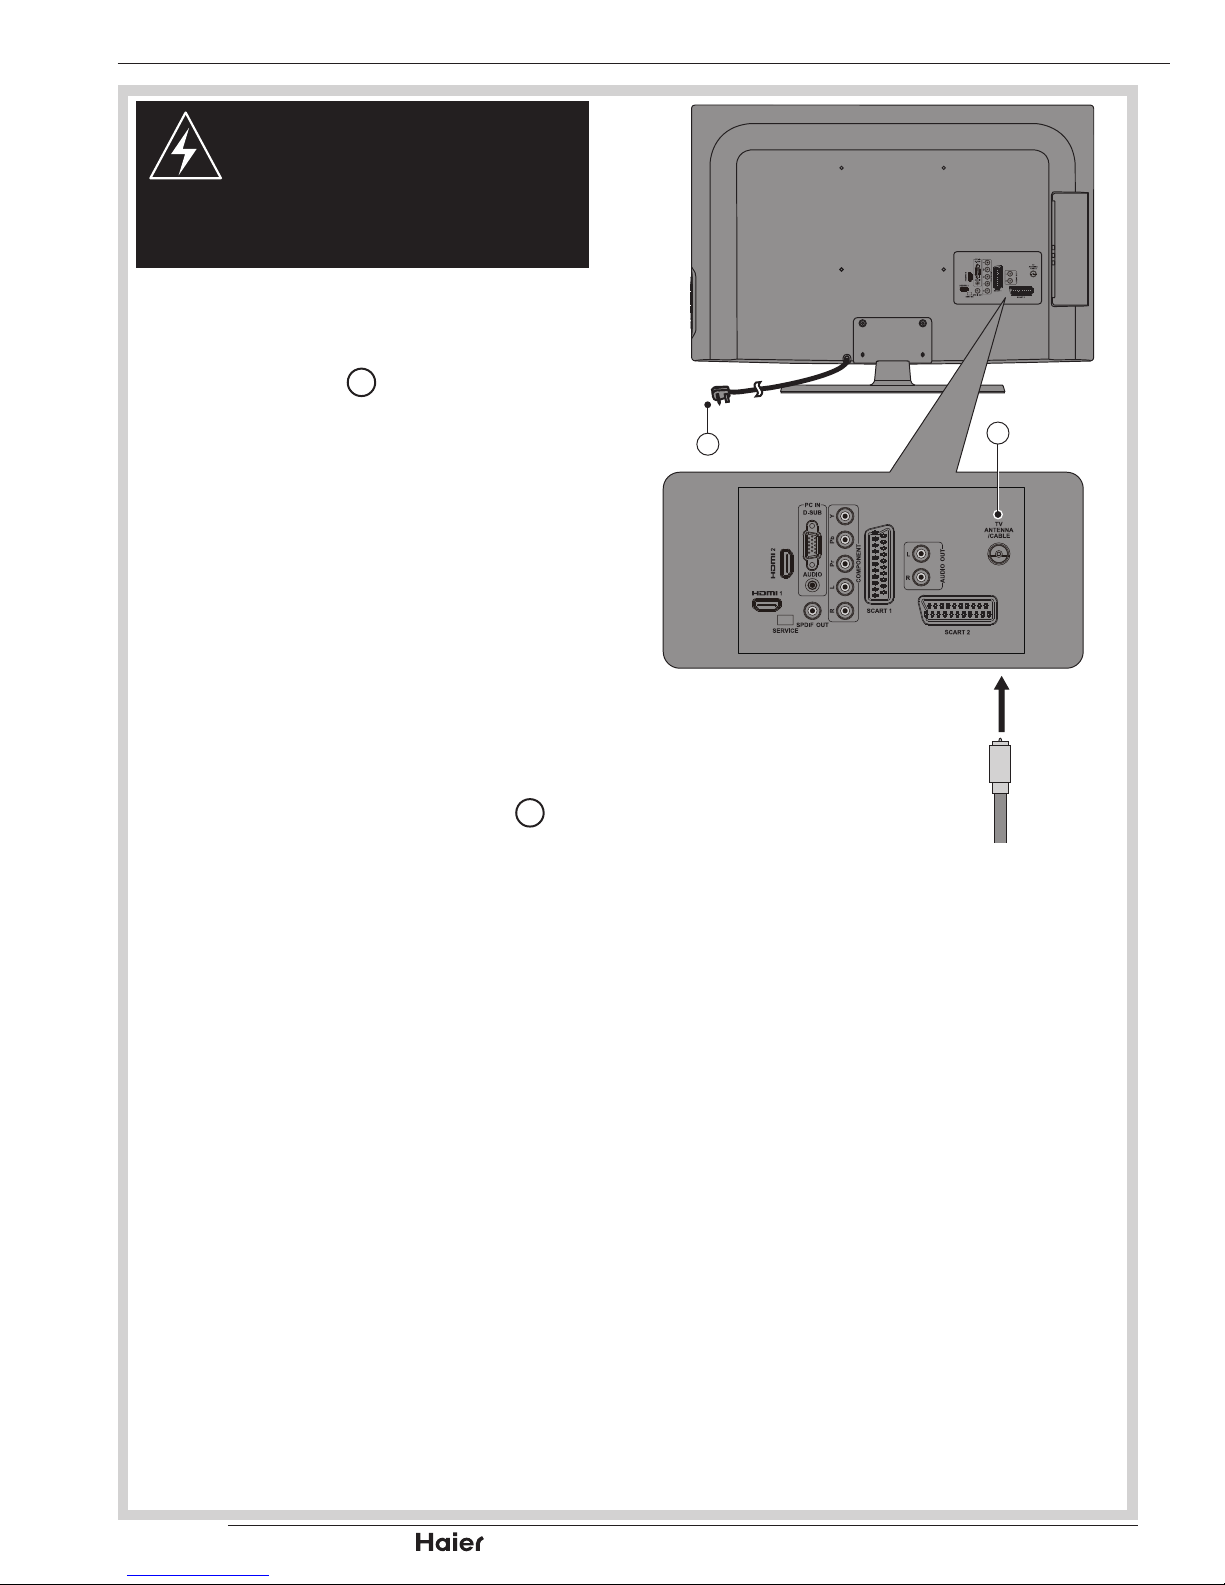
Connect the Antenna Plug to the 1.
Antenna Input 16 located at the rear of
the TV.
See g. 6.
For optimum picture quality, adjust 2.
antenna direction if needed.
To improve the picture quality in a 3.
poor signal area, you may use a signal
amplier (not included).
AC POWER CORD CONNECTION
NOTE: Make sure your local voltage is
230V/240V~, 50Hz.
Connect the AC Power Cord 1.
25
to the
mains socket.
See g. 6.
ANTENNA CONNECTION
Antenna Plug
25
16
g. 6
Page 13
p.11
| HD Ready LCD TV | User Manual
TURN ON THE LCD-TV
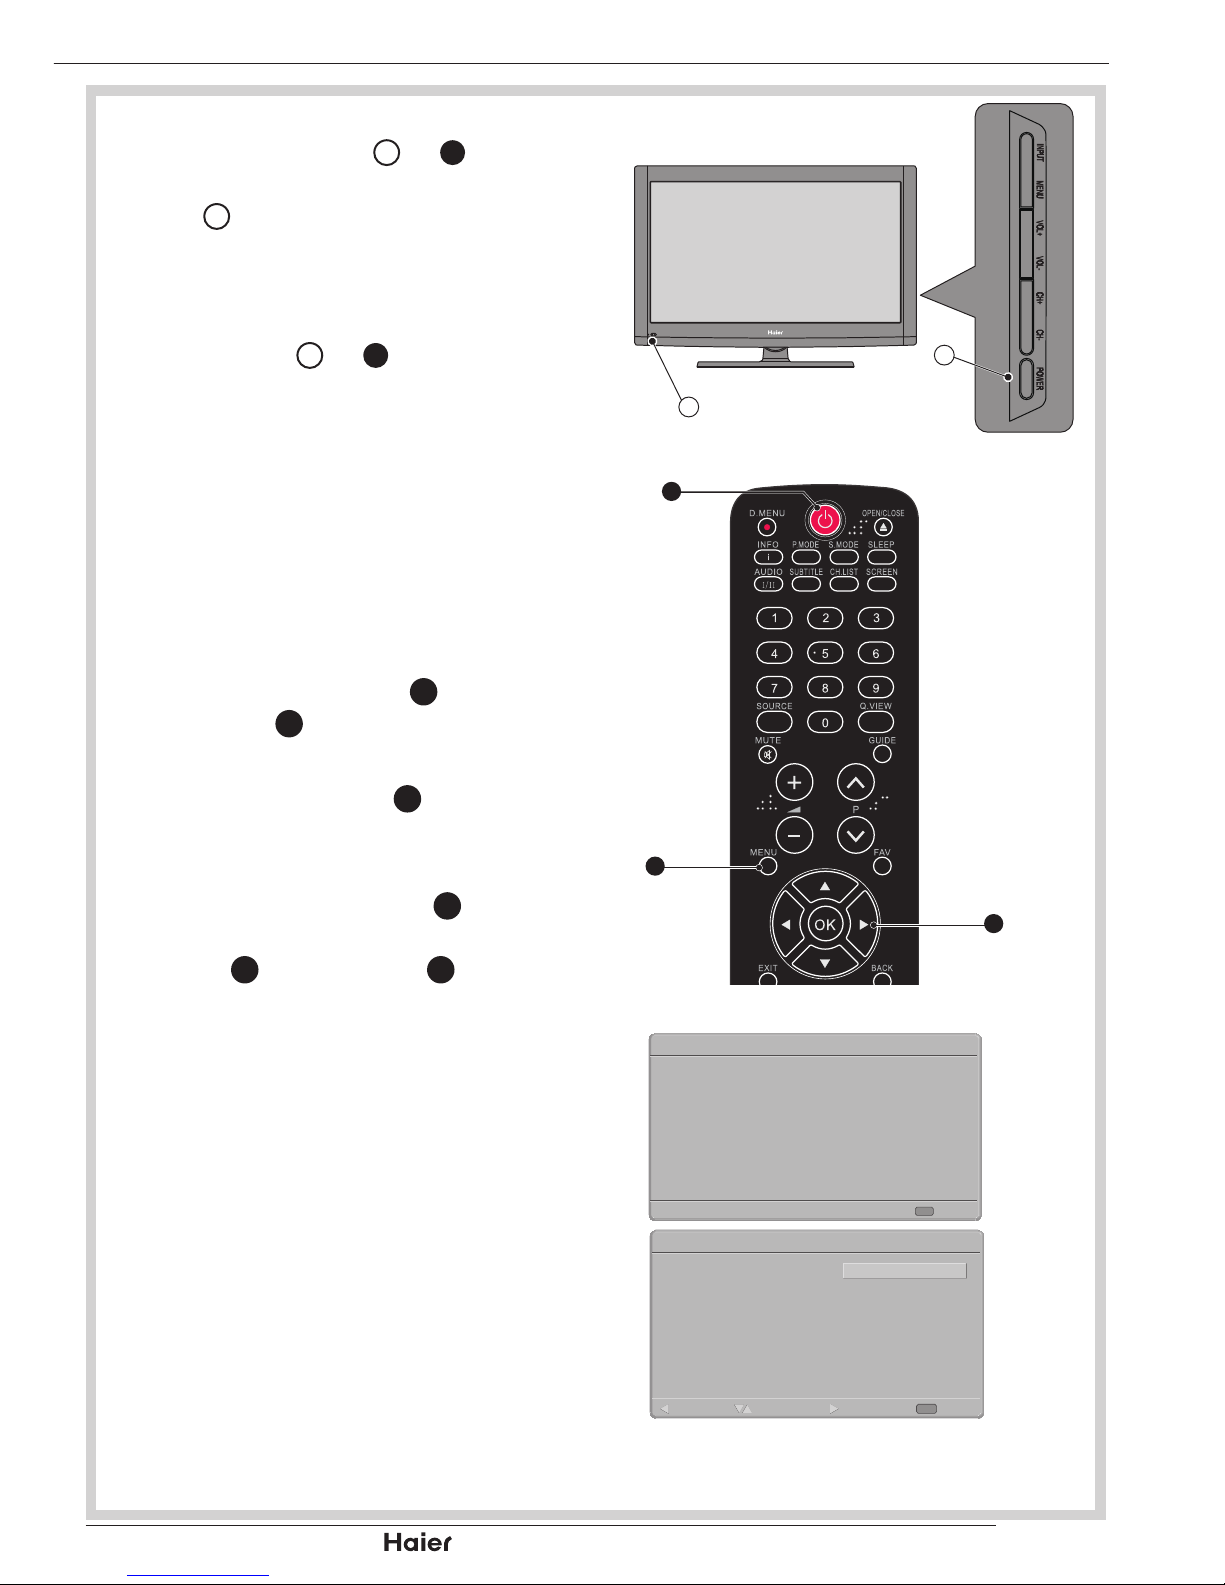
When the POWER 1.
9
or 1 is pressed,
the TV will be turned on and the Power
LED 1 on the front of the TV will turn
blue.
See g. 7.
When the TV is turned off by pressing 2.
the POWER 9 or 1, the TV will go
into standby mode.
See g. 8.
FIRST TIME INSTALLATION
This display will appear on the screen 1.
when the TV is turned on for the rst
time.
See g. 9.
NOTE: If you can not nd this screen,
you may press MENU 11. Then use
the Cursor 31 to select Reset Default in
Features menu.
Press the OK Button 2.
12
to proceed with
the installation.
See g. 8.
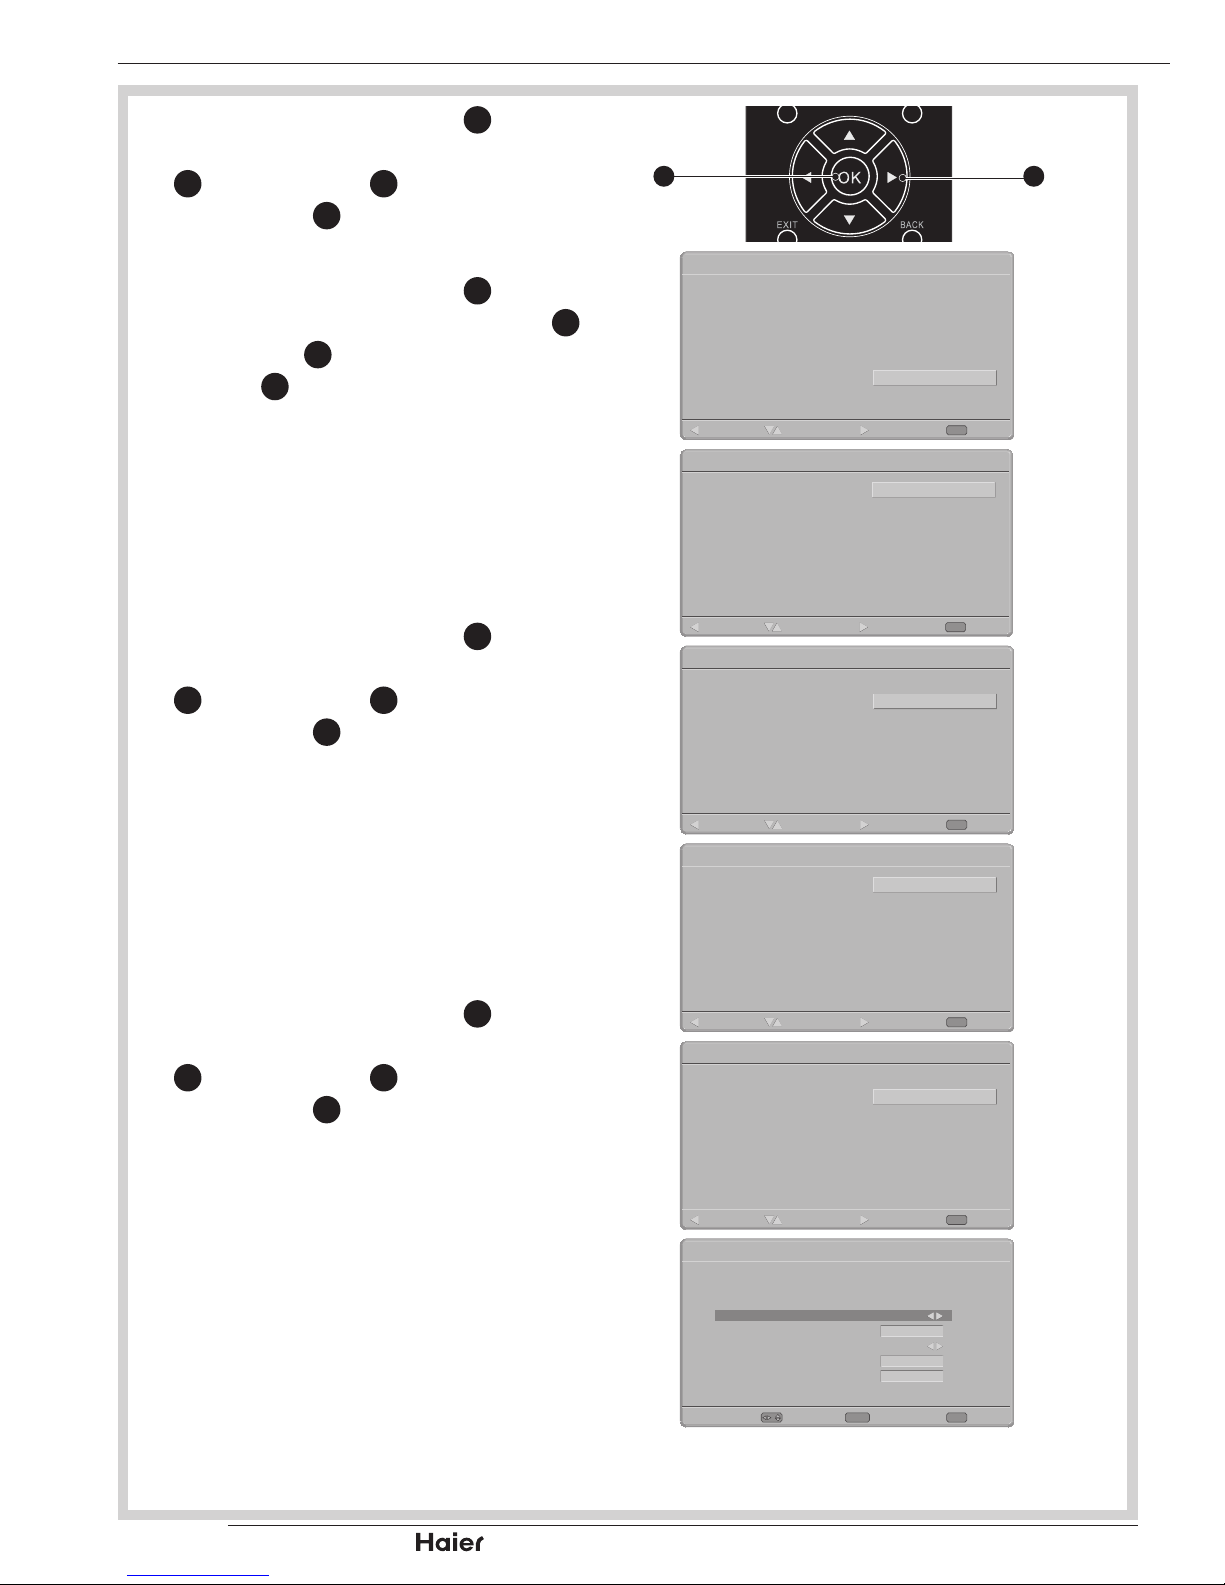
Use Up or Down Cursor 3.
31
to select
your language. Then press Right
Cursor 31 or OK Button 12 to continue.
See g. 10.
TUNING MENU OPTIONS
9
1
g. 7
Vol
1
31
11
g. 8
WELCOME!Initial Setup
Welcome to use the wizard for Initial
Setup !!
Please press [OK] to start the wizard.
Next
OK
g. 9
Language
English
Français
Deutsch
Español
Português
Nederlands
Italiano
Initial Setup
Please select your language:
ExitBack Select Next
EXIT
g. 10
Page 14
| HD Ready LCD TV | User Manual
p.12
Use Up or Down Cursor 4.
31
to select
your country. Then press Right Cursor
31
or OK Button 12 to continue or press
Left Cursor 31 to go back.
See g. 11, 12.
Use Up or Down Cursor 5.
31
to select
mode. Then press Right Cursor 31 or
OK Button 12 to continue or press Left
Cursor 31 to go back.
See g. 13.
When selecting • Home mode, go to
Step 6 to select the scan mode.
When selecting • SHOP mode,
a window pops out to ask your
conrmation.
Use Up or Down Cursor 6.
31
to select
Scan Mode. Then press Right Cursor
31
or OK Button 12 to continue or press
Left Cursor 31 to go back.
See g. 14.
When selecting • ATV only, go to
Step 8 to start channel scan.
When selecting • ATV and DTV, the
Tuner Mode screen will appear.
Select the Tuner mode.
See g. 14 and 15.
Use Up or Down Cursor 7.
31
to select
Tuner Mode. Then press Right Cursor
31
or OK Button 12 to continue or press
Left Cursor 31 to go back.
See g. 15.
When selecting • Antenna, go to
Step 8 to start channel scan.
When selecting • Cable, the Scan
Mode conguration screen will
appear.
See g. 16, 17.
TUNING MENU OPTIONS
Vol
31
12
g. 11
Country
Germany
Denmark
Greece
Finland
France
UK
Spain
Initial Setup
Please select your country:
ExitBack Select Next
EXIT
g. 12
Mode select
HOME
SHOP
Initial Setup
Please select your mode
ExitBack Select Next
EXIT
g. 13
Scan Mode
ATV only
ATV and DTV
Initial Setup
Please select your scan mode
ExitBack Select Next
EXIT
g. 14
Tuner Mode
Antenna
Cable
Initial Setup
Please select your tuner mode:
ExitBack Select Next
EXIT
g. 15
Tuner Mode
Antenna
Cable
Initial Setup
Please select your tuner mode:
ExitBack Select Next
EXIT
g. 16
/
Initial Setup
Please configre the cable info.
ExitSelect Next
EXIT
ENTER
Scan Mode
Frequency (KHz)
Modulation
Symbol Rate (Ksym/s)
Network ID
Full
474000
64QAM
6875
999
g. 17
Page 15
p.13
| HD Ready LCD TV | User Manual
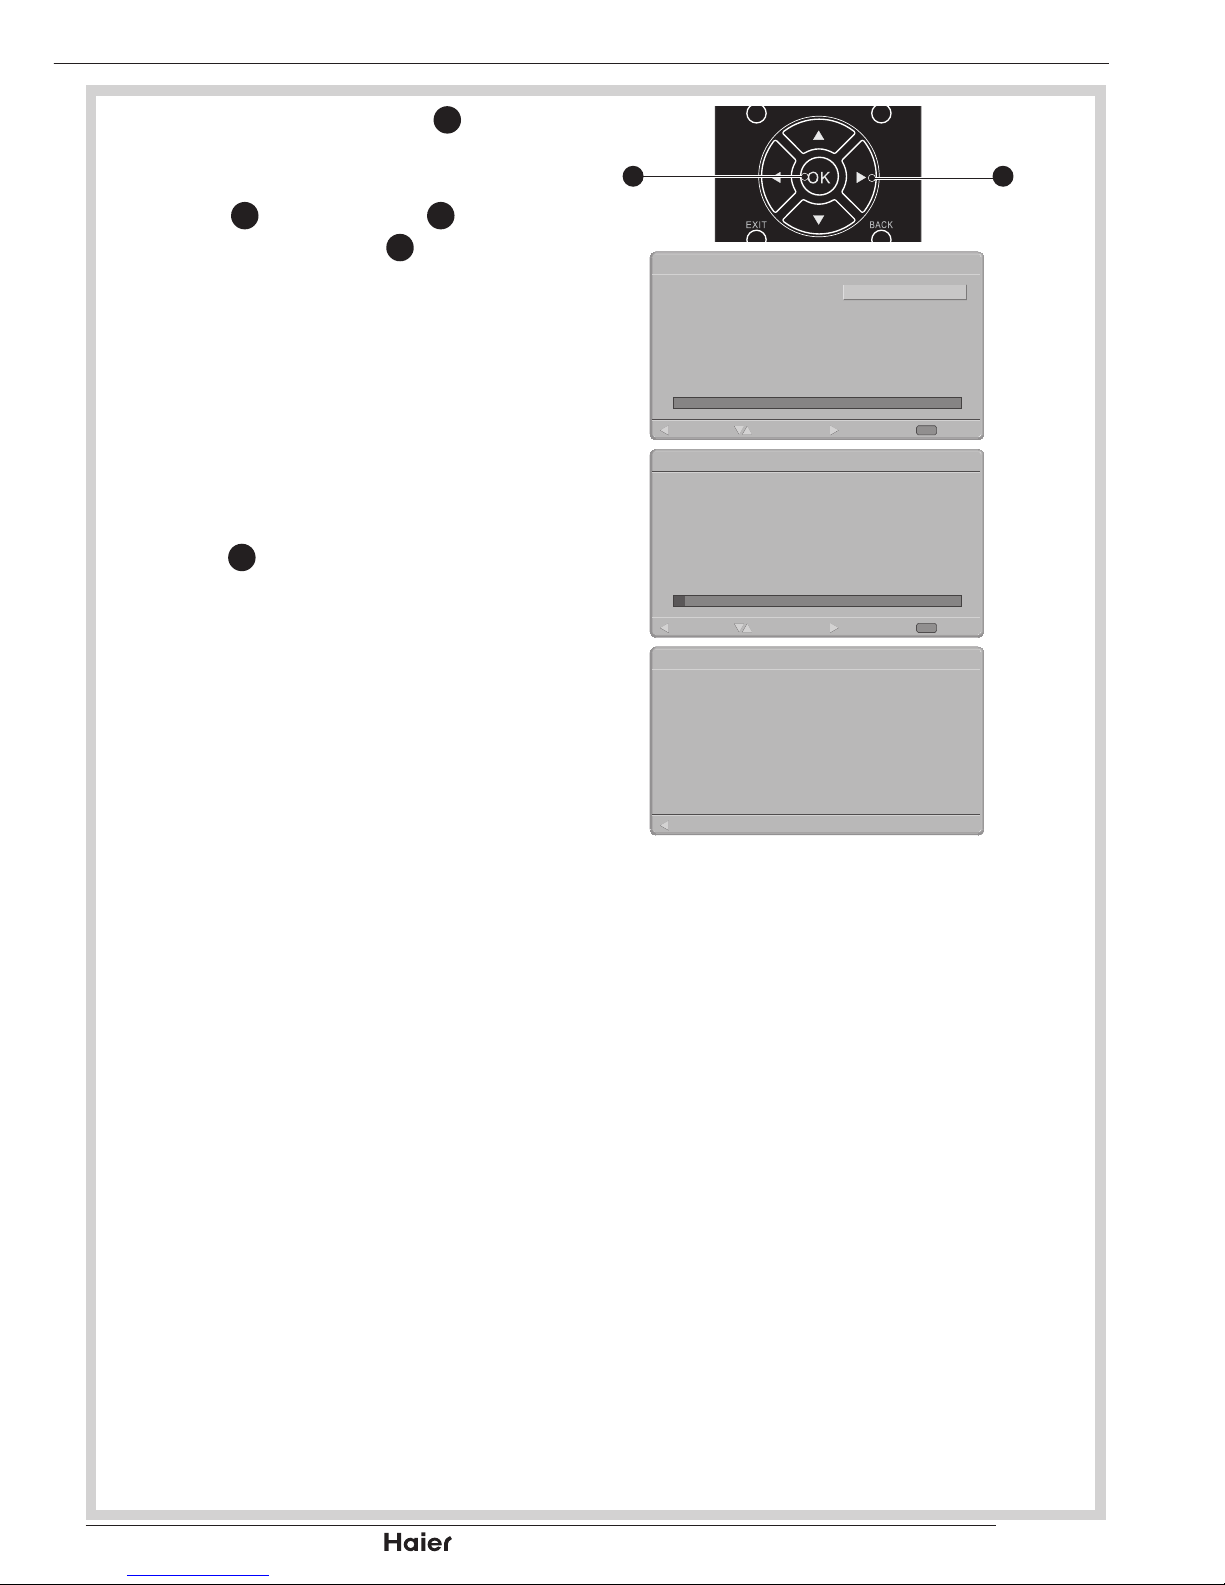
Use Up or Down Cursor 8.
31
to select
Scan to start scan or select Skip Scan
to skip this step. Then press Right
Cursor 31 or OK Button 12 to continue
or press Left Cursor 31 to go back.
See g. 18, 19.
NOTE: If you skip this step, the channel
scan could be performed in Menu.
System searching may take few 9.
minutes to complete.
See g. 20.
A message will be displayed when 10.
the search is complete. Press the OK
Button 12 to exit the initial setup wizard.
The TV will display the rst channel
found.
See g. 21.
Vol
31
12
g. 18
Channel Scan
Scan
Skip Scan
0%
Initial Setup
First, please connect antenna.
Start channel scan now?
If you skip this step, the channel scan
could be performaed in Menu.
ExitBack Select Next
EXIT
g. 19
Channel Scan
4%
Initial Setup
The channel scan may take a while to
complete.
Status: Scanning..
Analogue Channels: 0
ExitBack Select Next
EXIT
g. 20
CompletedInitial Setup
Congratulations !!
Completed Initial Setup.
Please press [OK] to exit the wizard.
Back
g. 21
TUNING MENU OPTIONS
Page 16
| HD Ready LCD TV | User Manual
p.14
WARNING:
- Switch off the TV before
connecting any external device.
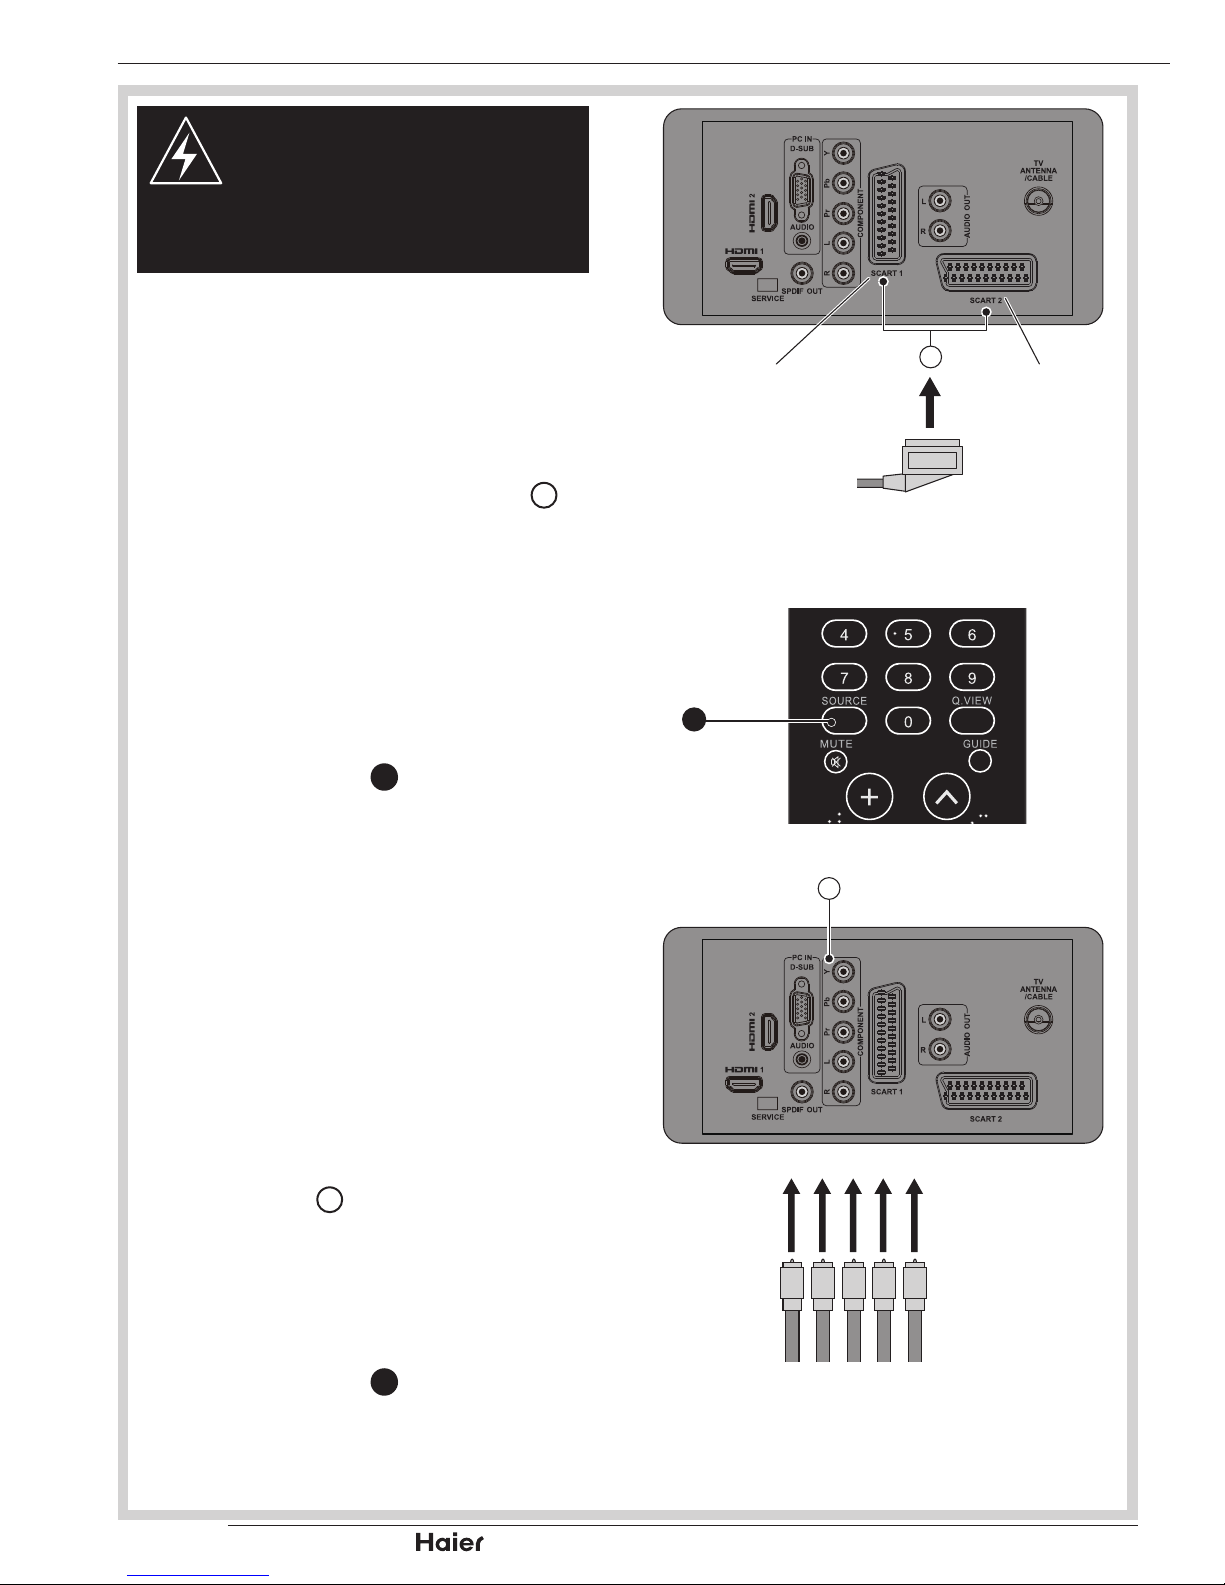
SCART INPUT
To connect external devices such as •
DVD players, set top boxes or game
consoles.
Plug the scart lead from the external 1.
device into TV SCART socket 18.
See g. 22.
SCART 1 - Full SCART, which •
transmits RGB, S-Video and CVBS
in and CVBS tuner out.
SCART 2 - Half SCART, which •
transmits S-Video or CVBS in and
CVBS monitor out.
Press SOURCE 2.
8
to select SCART 1
or SCART 2.
See g. 23.
YPbPr INPUT
For connecting devices such as video •
cameras.
Make sure that the power of the TV and 1.
the AV device are off.
Connect the (Y, Pb, Pr) cables and 2.
audio cables to the Component and
Audio Input 19 on the TV.
See g. 24.
Turn on the power of the TV rst 3.
and then turn on the power of the AV
device.
Press SOURCE 4.
8
to select the YPbPr
input.
See g. 23.
OTHER CONNECTIONS
SCART Lead
SCART 1 SCART 2
18
g. 22
Vol
8
g. 23
19
Y Pr L RPb
g. 24
Page 17
p.15
| HD Ready LCD TV | User Manual
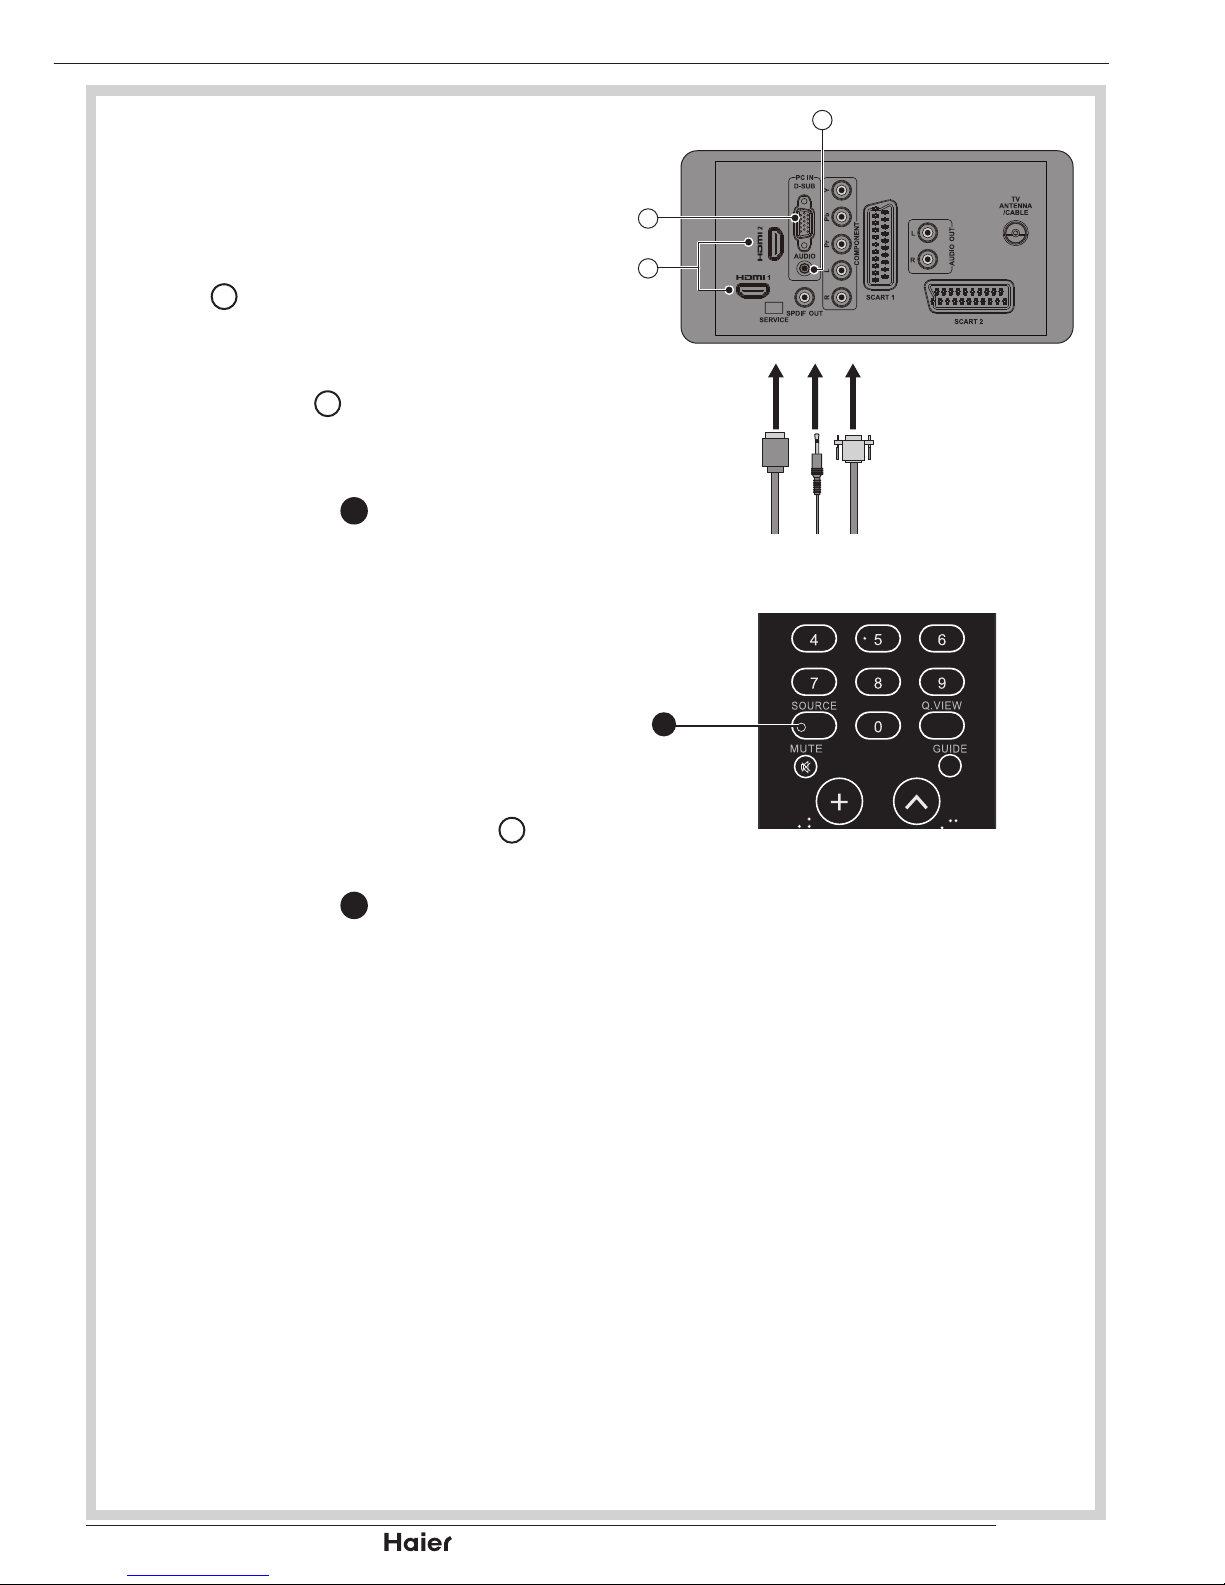
VGA INPUT
You can use your TV as a monitor for •
your personal computer.
Connect the D type 15-pin VGA 1.
interface cable (not supplied) to VGA
Input 24.
See g. 25.
Connect the audio cable (not supplied) 2.
to Audio Input 20 on the back of the TV
(if necessary).
See g. 25.
Press SOURCE 3.
8
to select the PC
input.
See g. 26.
HDMI INPUT
CAUTION: You must ensure both
devices are switched off before
connection.
Connect the cable from the HDMI 1.
devices to the TV HDMI Input 23.
See g. 25.
Press SOURCE 2.
8
to select the HDMI
input.
See g. 26.
Operate the corresponding external 3.
equipment. (Refer to external
equipment operating guide.)
OTHER CONNECTIONS
23
VGAHDMI
20
24
g. 25
Vol
8
g. 26
Page 18
| HD Ready LCD TV | User Manual
p.16
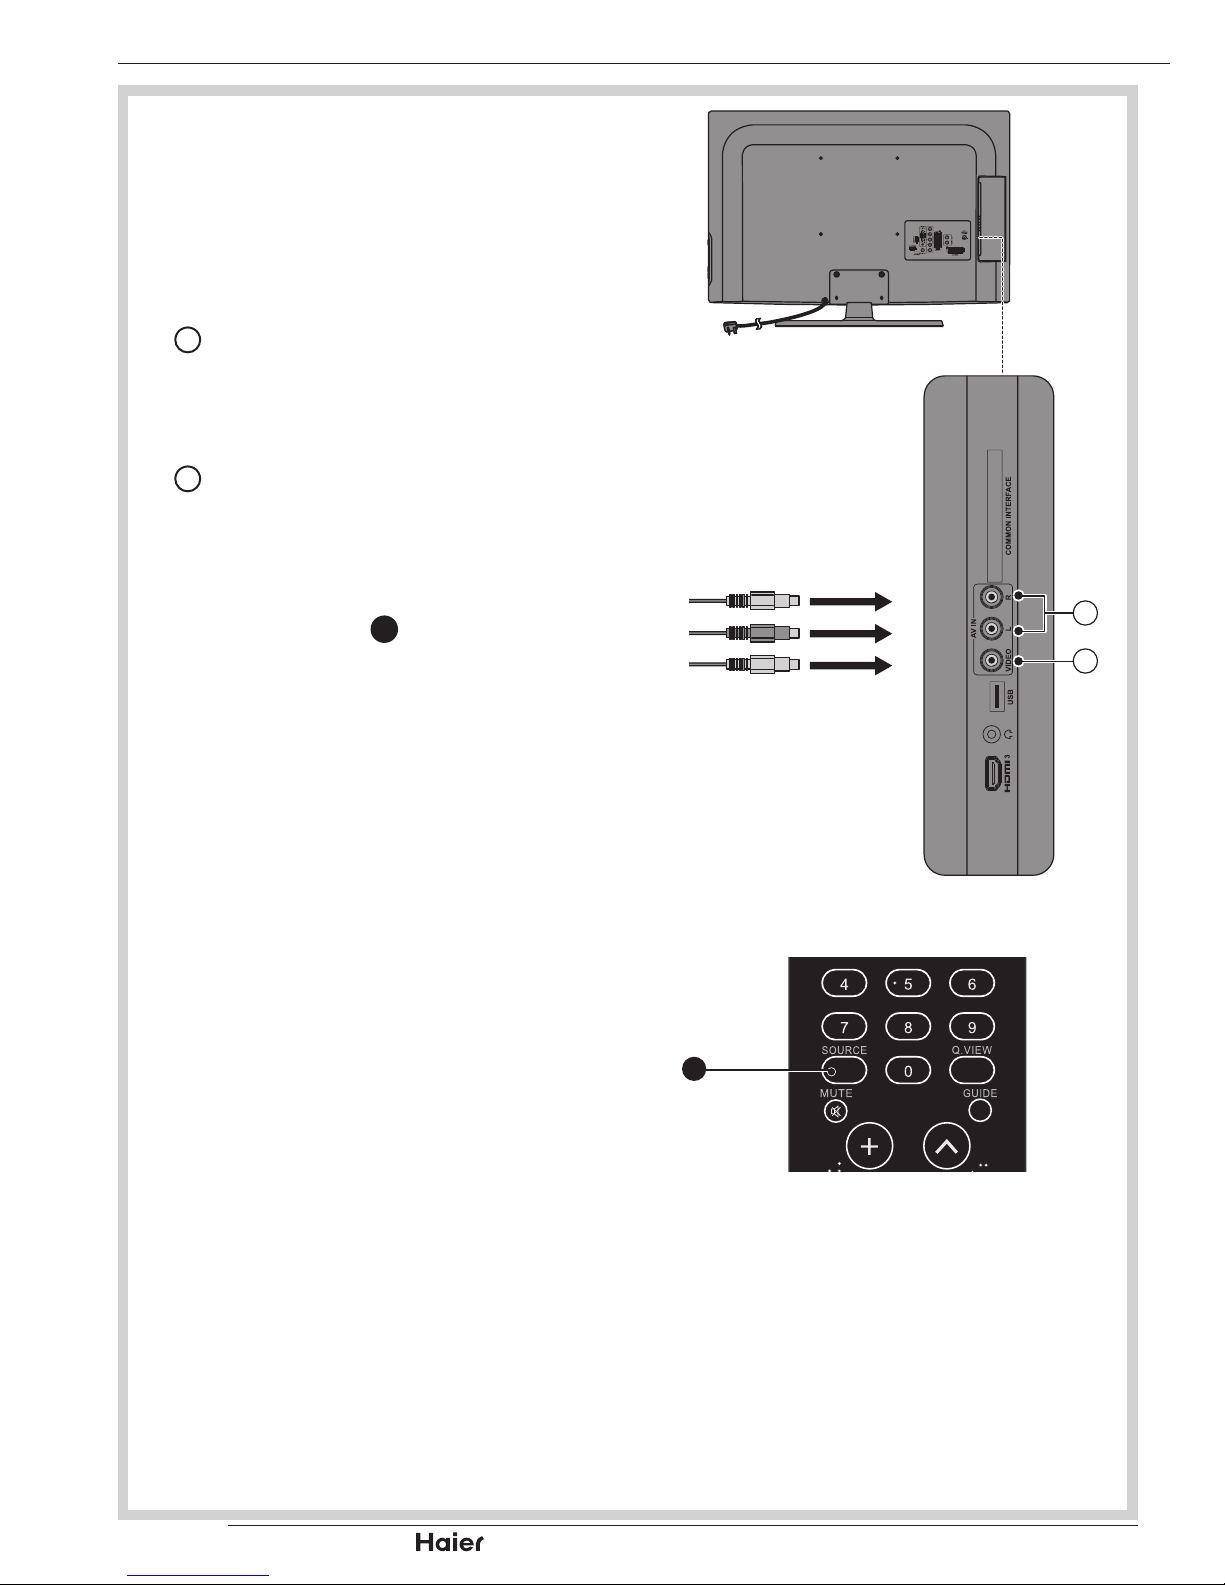
AV INPUT
For connecting an AV device.•
Make sure that the power of the TV and 1.
the AV device are off.
Connect the audio cables from the AV 2.
device’s output jacks to the Audio Input
11
.
See g. 27.
Connect the video cables from the AV 3.
device’s output jacks to the Video Input
12
.
See g. 27.
Turn on the TV rst, and then turn on 4.
the AV device.
Press SOURCE 5.
8
to select the AV
input.
See g. 28.
OTHER CONNECTIONS
12
11
g. 27
Vol
8
g. 28
Page 19
p.17
| HD Ready LCD TV | User Manual
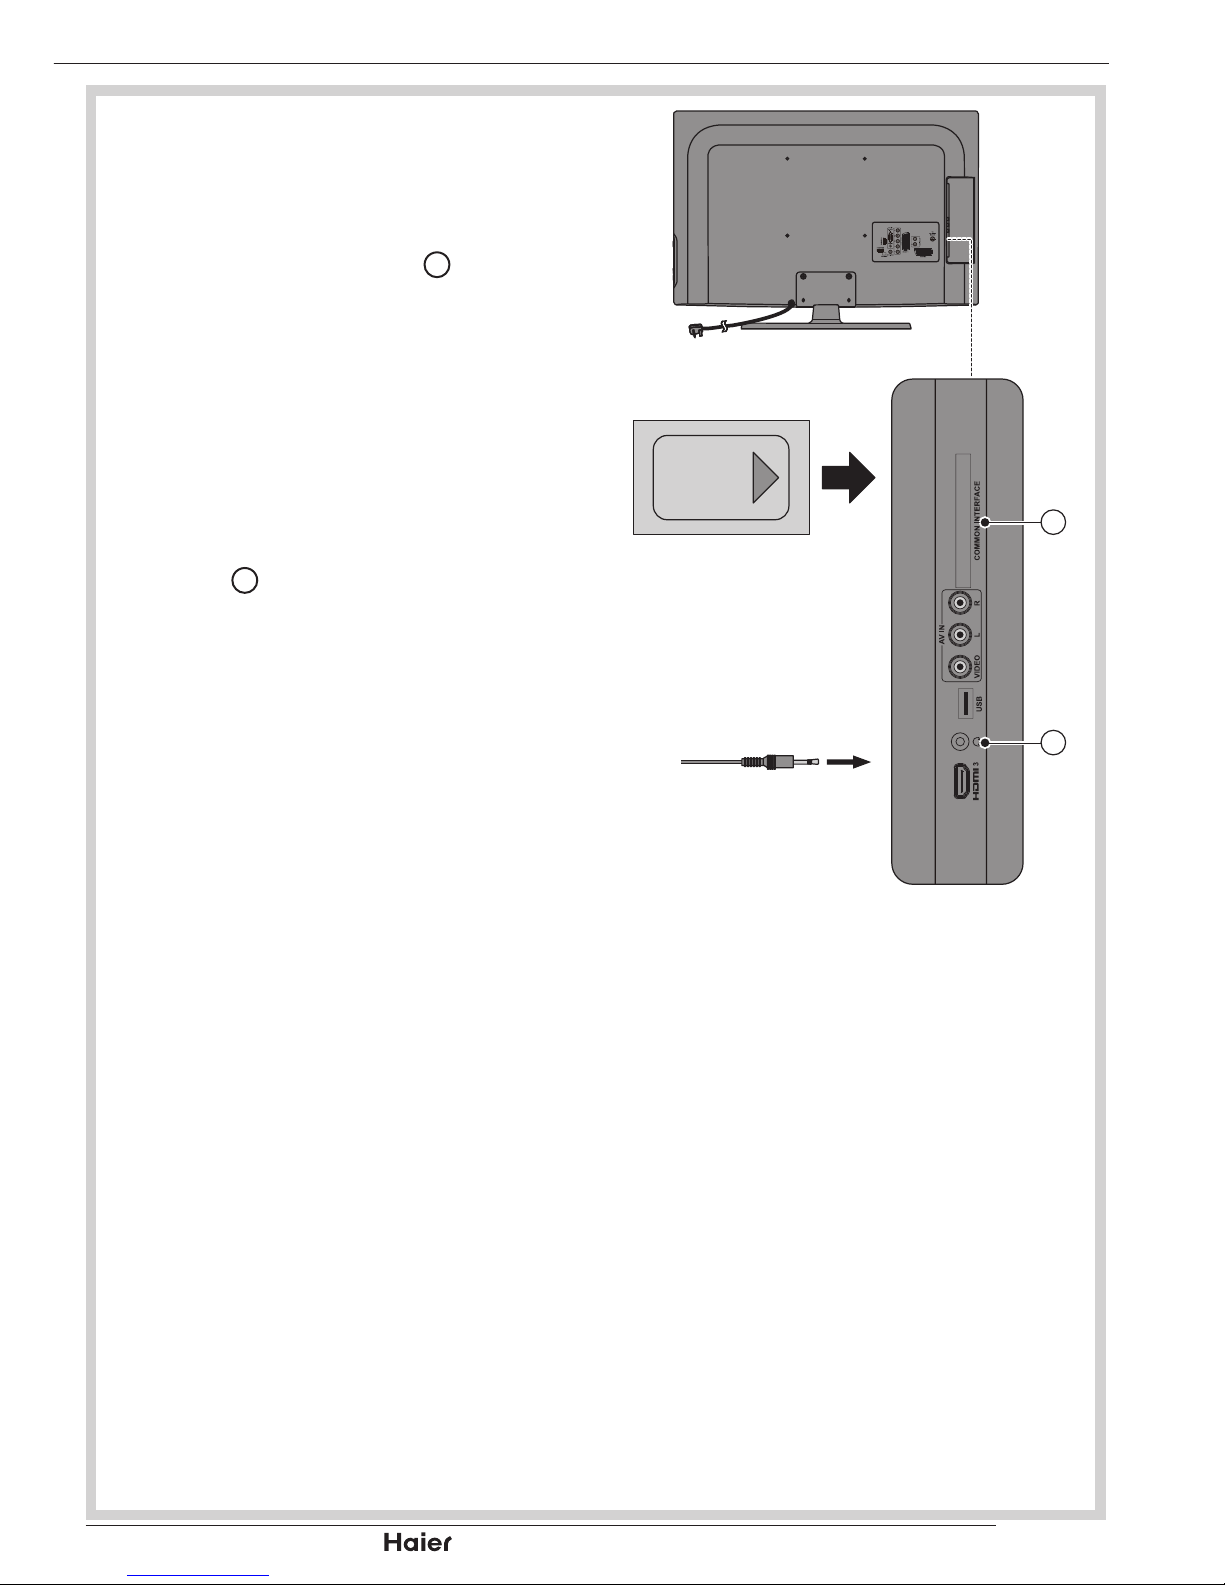
COMMON INTERFACE SLOT
You can use a Conditional Access •
Module (CAM) card to view a Pay TV.
Insert the CAM card (not included) in 1.
Common Interface Slot 10.
See g. 29.
Please refer to the COMMON 2.
INTERFACE section for more detailed
information.
HEADPHONE OUTPUT
Connect a set of stereo headphones 1.
(not included) to the Headphone
Output 14 for private listening. When
headphones are in use, the speakers
will be automatically muted.
See g. 29.
IMPORTANT: When using headphones,
always set the volume control to a low
level before you put the headphones
on; then put the headphones on and
gradually increase the volume to a
comfortable listening level.
OTHER CONNECTIONS
10
14
g. 29
Page 20
| HD Ready LCD TV | User Manual
p.18
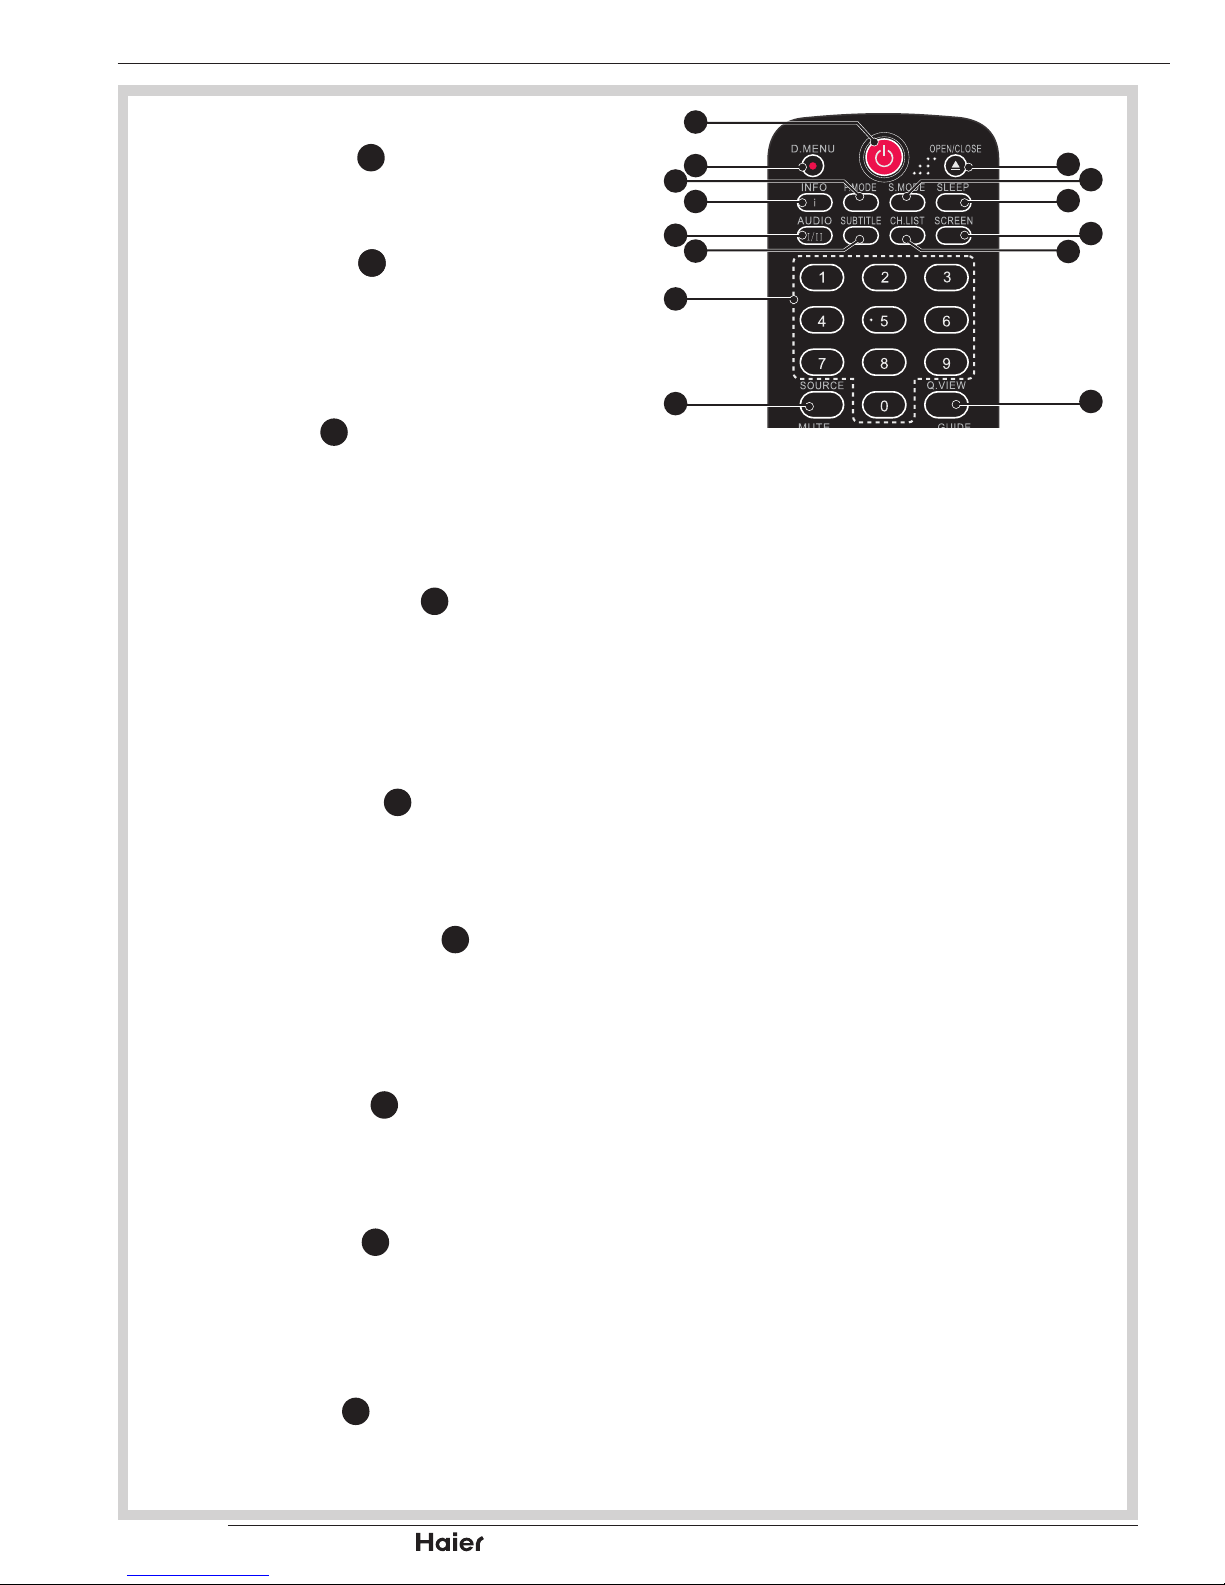
POWER
Press POWER •
1
to turn on the TV.
P.MODE
Press P.MODE •
3
to set the TV to a
predened picture setting.
Standard/Vivid/Movie/Eco/Personal.
INFO
Press INFO •
4
to display the current
signal status, including input source
and channel audio mode.
AUDIO I/II
Press the AUDIO I/II •
5
to select
MONO, STEREO, DUAL 1 and DUAL 2
for ATV channel. Select Audio language
for DTV channel.
SUBTITLE
Press SUBTITLE •
6
to turn the subtitle
On or Off.
Number Buttons
Use the Number Keys •
7
to select TV
channels directly. Enter the channel
number within 3 seconds.
SOURCE
Press SOURCE •
8
to select the
desired input source.
S.MODE
Press S.MODE •
39
to set the TV to a
predened sound setting.
Music/ Speech/ Personal.
SLEEP
Press SLEEP •
38
to turn the TV off after
a preset time.
OTHER CONNECTIONS
1
40
38
36
39
37
35
2
4
6
3
5
7
8
g. 30
Page 21
p.19
| HD Ready LCD TV | User Manual
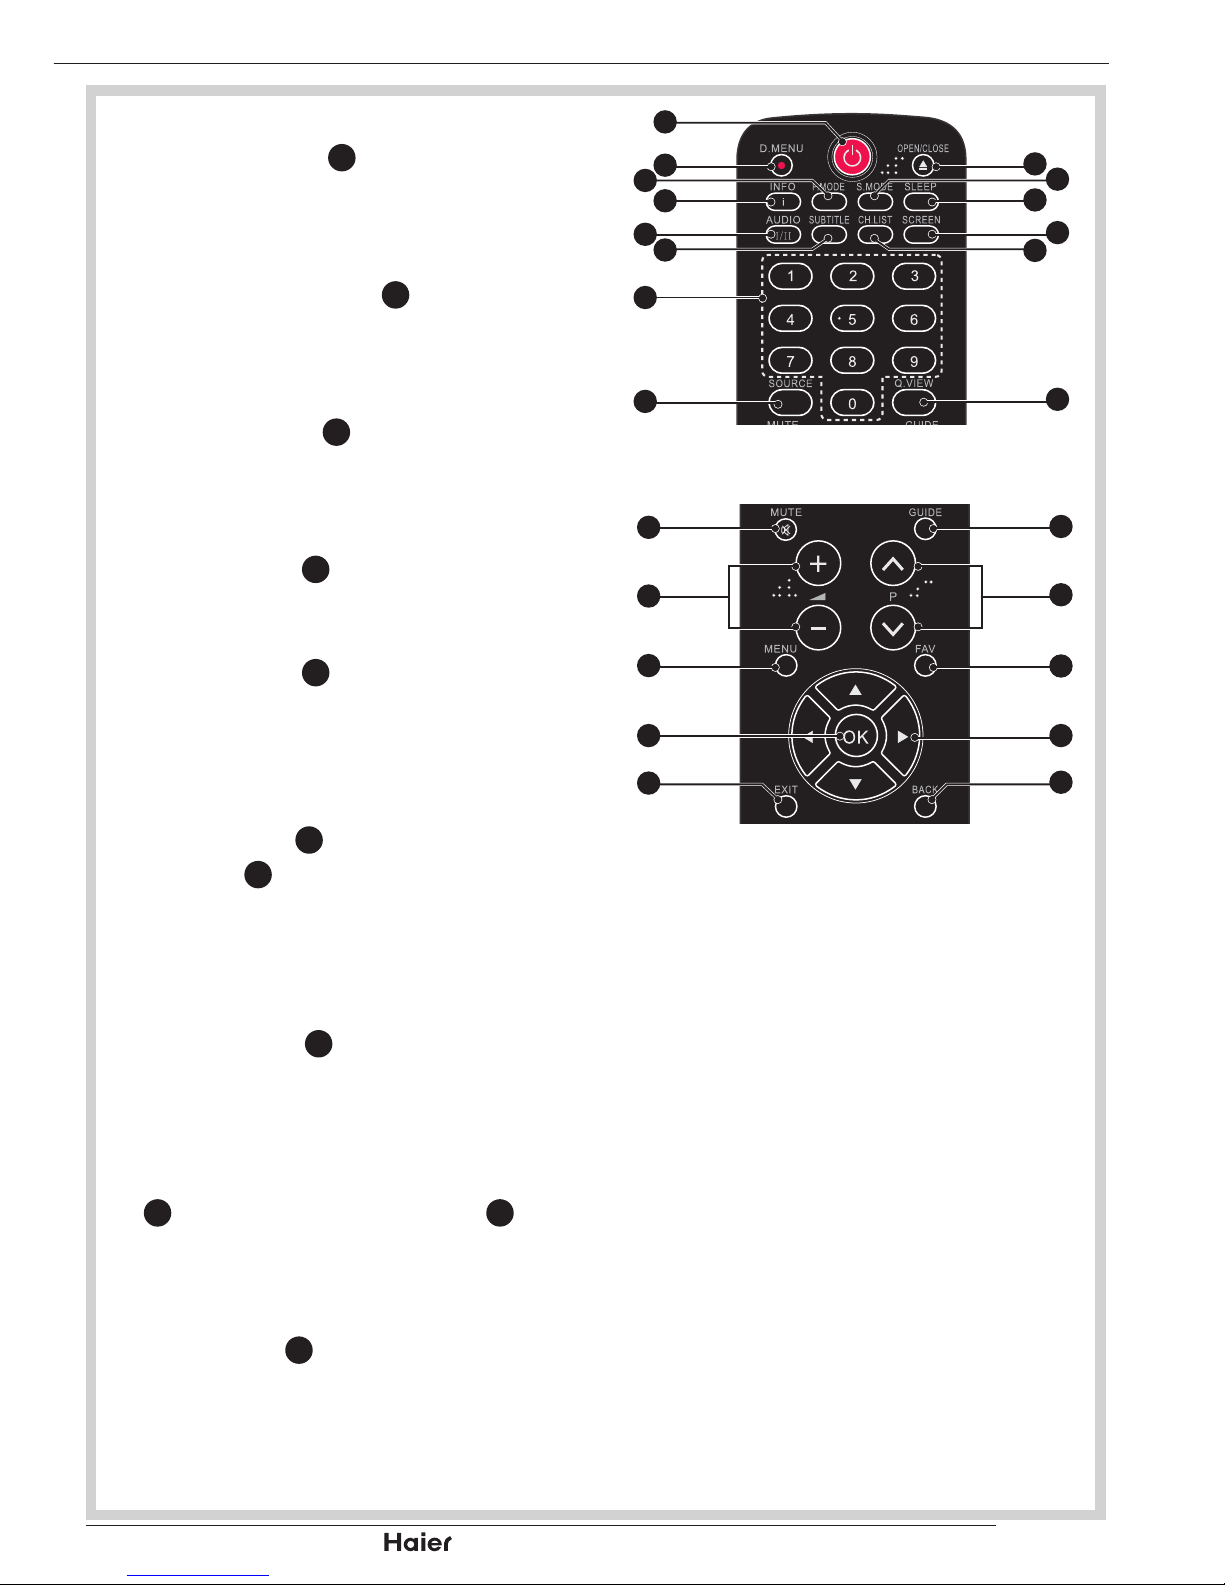
CH.LIST
Press CH.LIST •
36
to display the
channel list.
SCREEN
Press the SCREEN •
37
to select the
picture format.
Q.VIEW
Press Q.VIEW •
35
to return to last
channel or source.
MUTE
Press MUTE •
9
to mute the sound
temporarily. A mute icon will appear on
the screen.
Press MUTE •
9
again or VOL+/VOL-to
restore the sound.
The mute icon will disappear.
Volume Control
Press VOL+ •
10
to increase the volume
or VOL- 10 to decrease the volume. A
number will appear on screen indicating
the volume level.
MENU
Press MENU •
11
to display the on
screen display menu.
Up, Down, Left, Right Cursor, and OK
Press Up, Down, Left, or Right Cursor •
31
to navigate and press OK 12 to
conrm your selection.
EXIT
Press EXIT •
13
to exit the menu or
return to the previous layer.
BASIC OPERATION
1
40
38
36
39
37
35
2
4
6
3
5
7
8
g. 31
Vol
34
33
32
31
30
9
10
11
12
13
g. 32
Page 22
| HD Ready LCD TV | User Manual
p.20
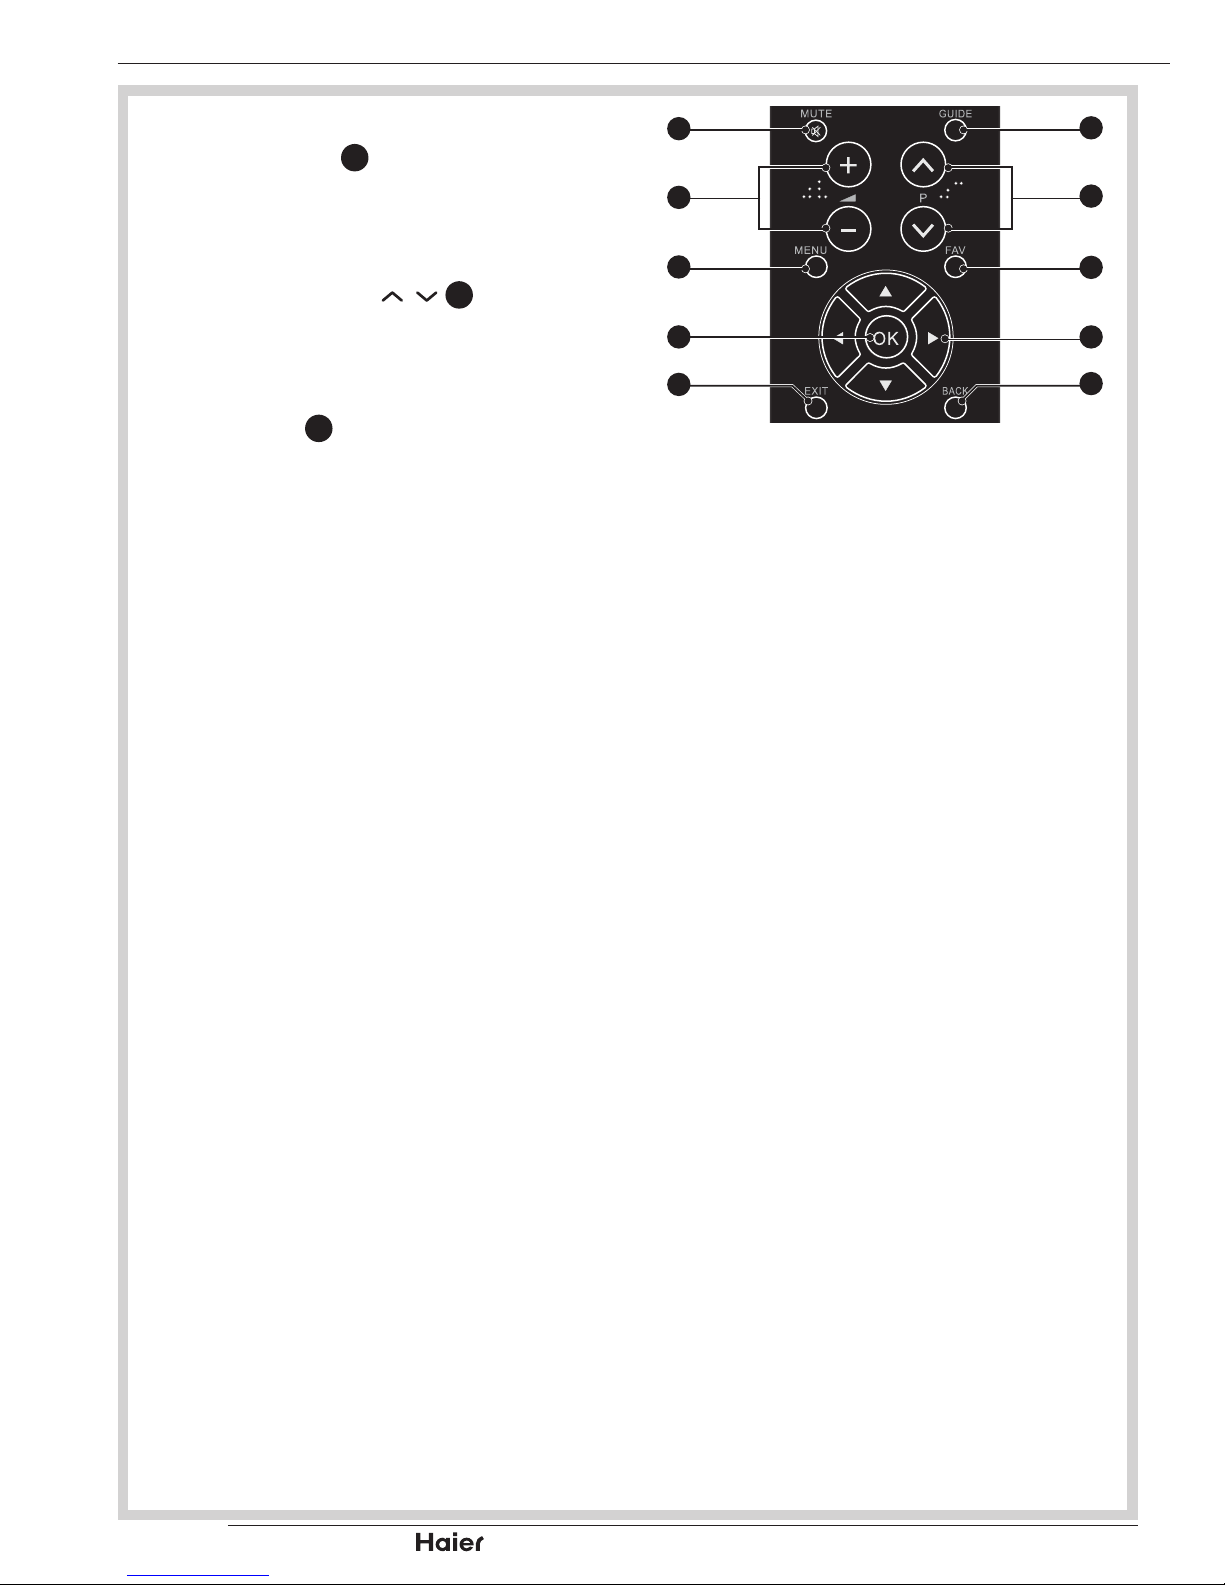
GUIDE
Press GUIDE •
34
to display electronic
programme guide in TV mode.
Select Programme
You may press P • 33 to select the
previous or next TV channel.
FAV
Press FAV •
32
to display the Favourite
list. You can save your favourite
channels in the Favourite List.
BACK
Back button for DVD/USB only.•
BASIC OPERATION
Vol
34
33
32
31
30
9
10
11
12
13
g. 33
Page 23
p.21
| HD Ready LCD TV | User Manual
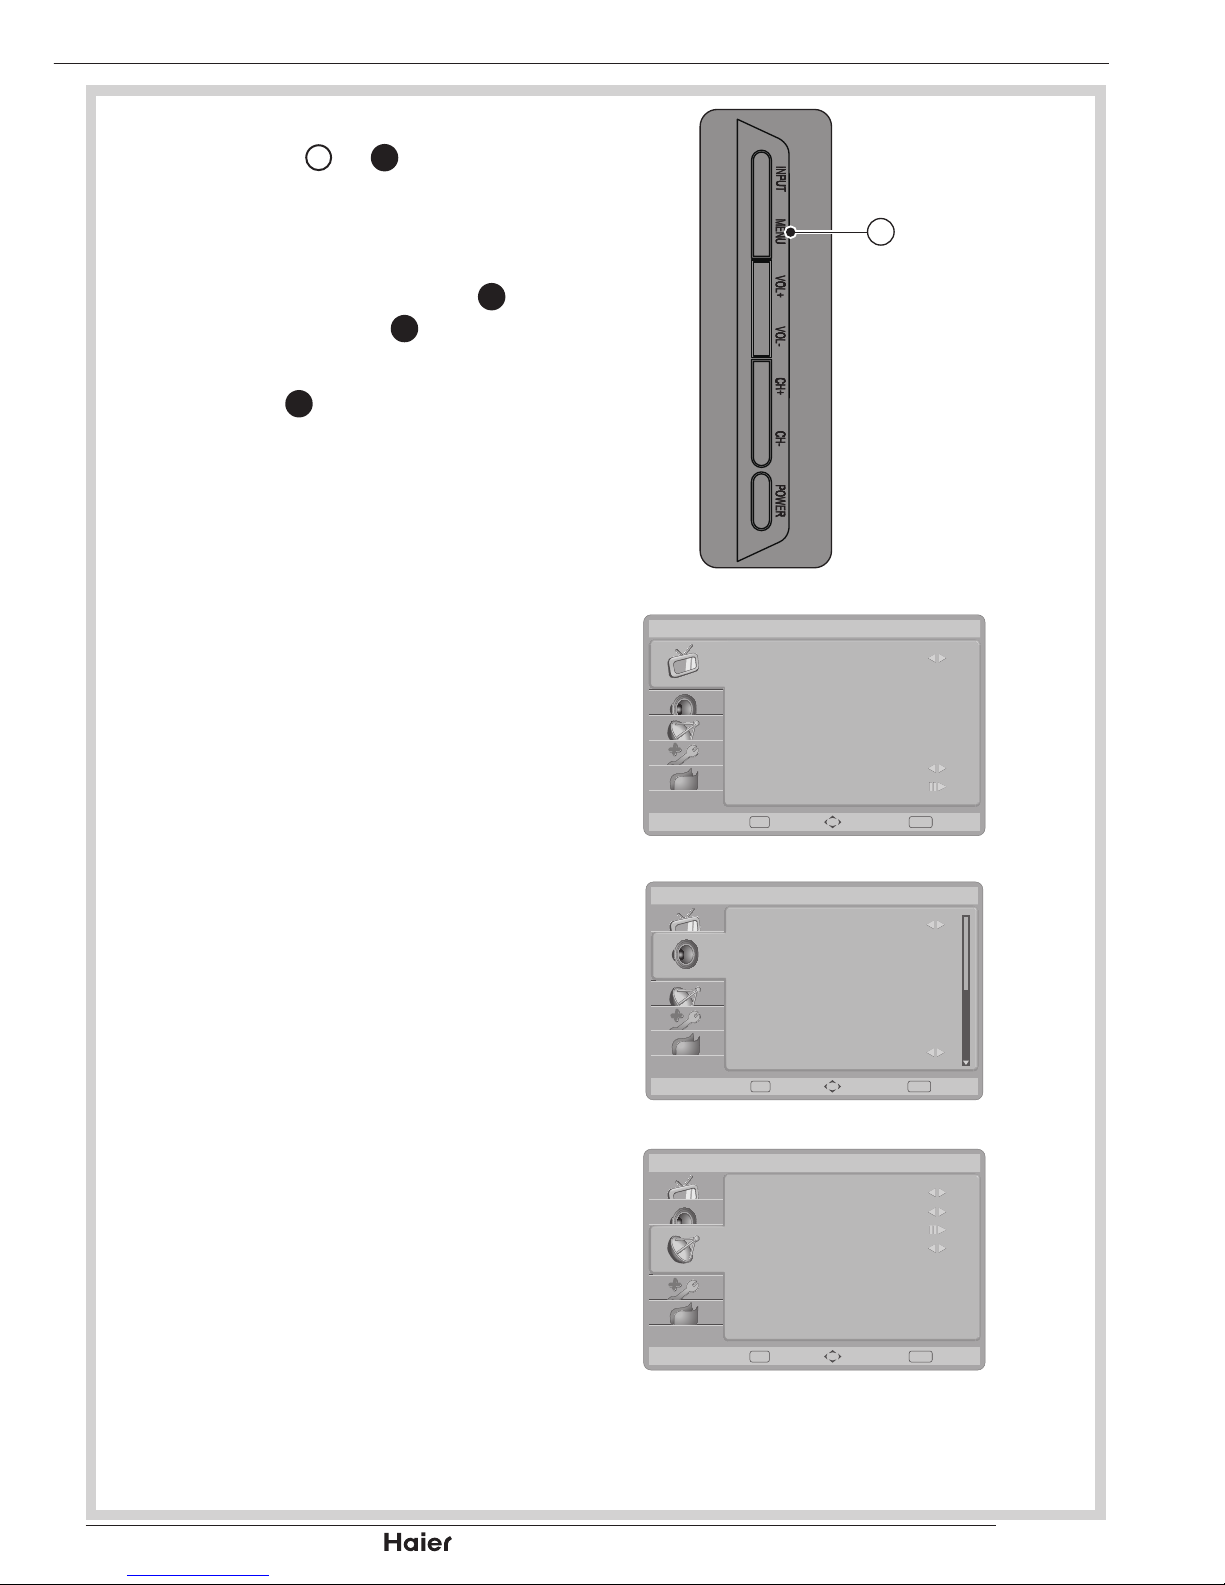
OSD SETTING
Press MENU 1.
4
or 11 to enter the OSD
setting. There are ve items in the list:
Picture, Sound, TV, Features and Eco.
See g. 35, 36, and 37.
Use the Up or Down Cursor 2.
31
to
select and press OK 12 to conrm your
choice.
Press EXIT 3.
13
to exit the screen.
Picture
Shows more picture modes and •
functions based on your favourite
channels and enables you to adjust the
colour and brightness setup.
See g. 35.
Sound
Provides more audio selections. •
You can also set the audio environment
of the TV.
See g. 36.
TV
Enables you to adjust special functions •
for country, audio language and the TV
channels.
See g. 37.
Features
Enables you to adjust settings of the •
TV channels and language and control
special functions for the TV channels.
Eco
Enables you to automatically reduce •
the backlight brightness in order to
decrease the power consumption and
increase the backlight life span.
MENU OPERATION
4
fig. 34
Picture
Smart Picture
Brightness
Contrast
Tint
Colour
50
52
53
0
5
Cool
Sharpness
Advanced Control
Colour Temperature
Standard
Enter
OK EXITSelect Exit
g. 35
Sound
Sound Mode
Equalizer 120Hz
Equalizer 500Hz
Equalizer 5KHz
Equalizer 1.5KHz
3
3
2
4
5
0
Off
Equalizer 10KHz
Virtual Surround
Balance
Personal
Enter
OK EXITSelect Exit
g. 36
TV
Tuner Mode
Country
Channels
On
Antenna
UK
Time Shifting Mode
EnterOK EXITSelect Exit
g. 37
Page 24
| HD Ready LCD TV | User Manual
p.22
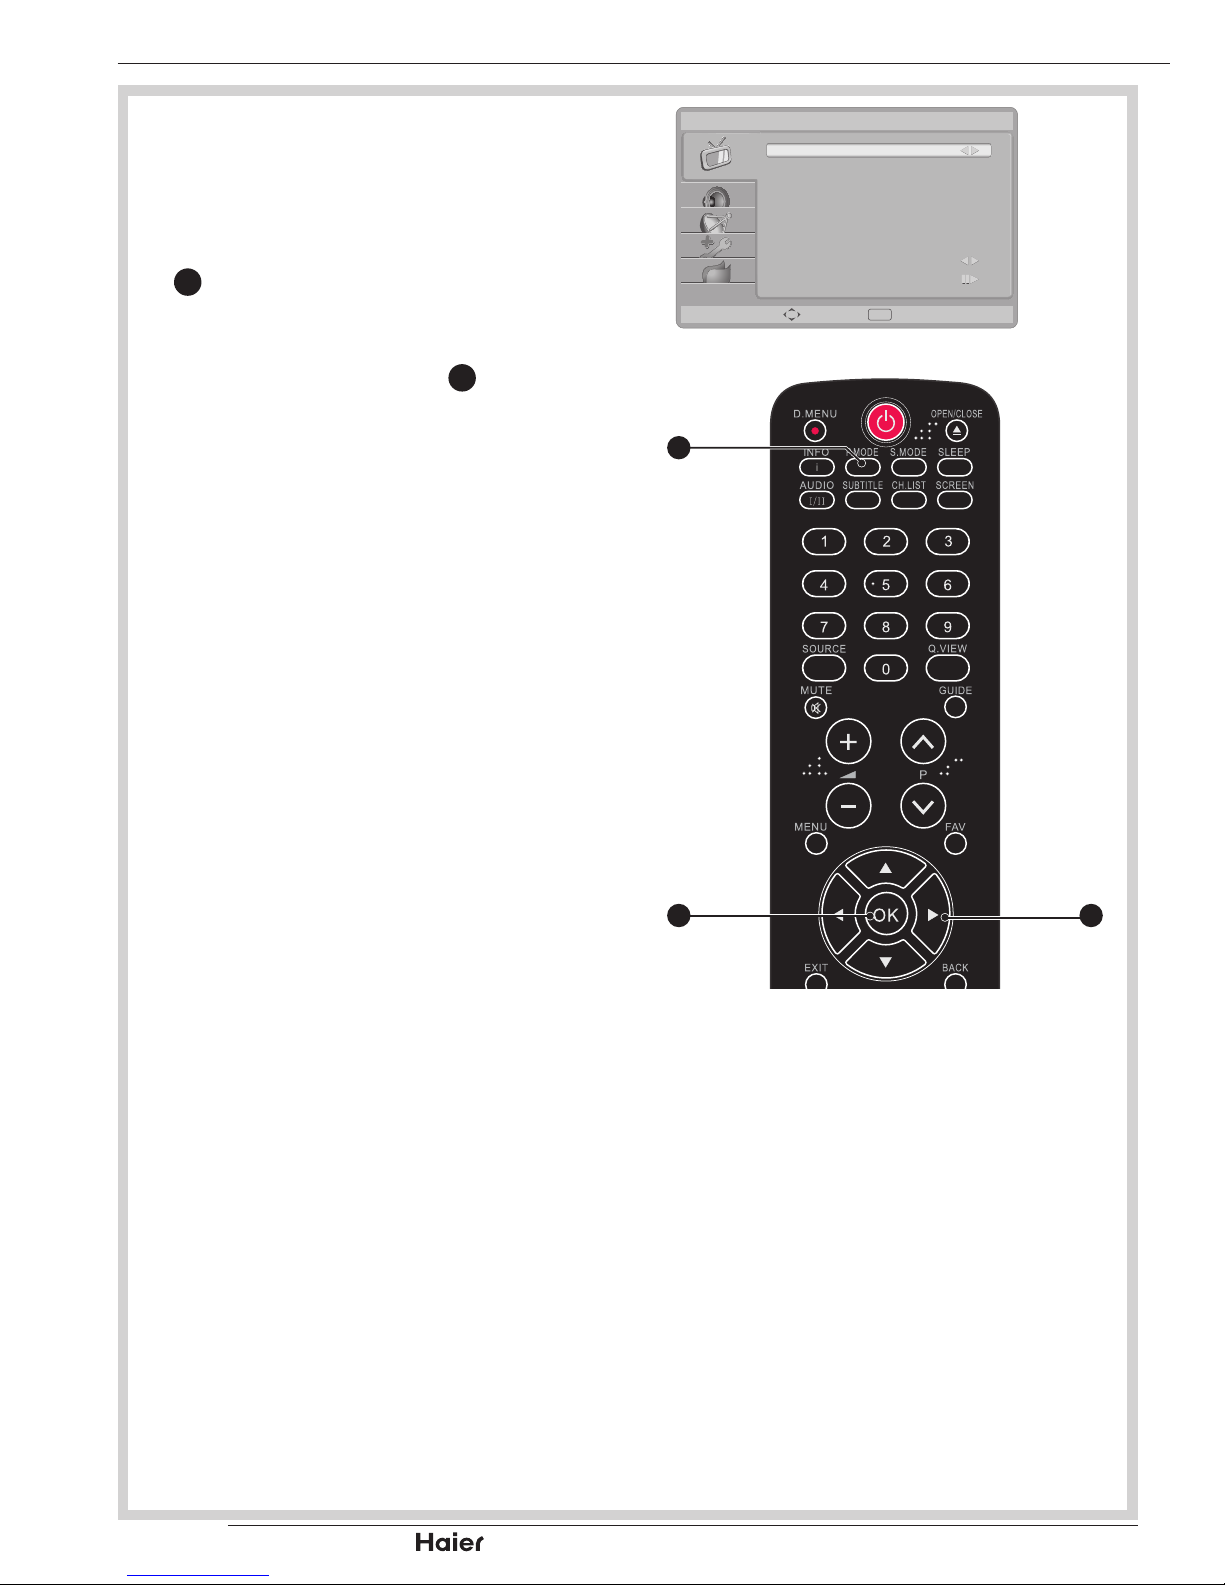
Picture
Smart Picture
To set the TV to a predened picture •
settings. Use the Left or Right Cursor
31
to select from Standard, Vivid,
Movie, Eco, or Personal.
See g. 38 and 39.
NOTE: Press P.MODE 3 on the
remote control to select the picture
mode without OSD on the screen.
Brightness
To brighten the dark parts of the •
picture.
Contrast
To sharpen the picture quality.•
Colour
To add or reduce colour.•
Tint
To adjust the picture tint.•
Sharpness
To improve detail.•
Colour temperature
To choose between Normal (neutral), •
Warm (redder), and Cool (bluer).
MENU OPERATION
Picture
Smart Picture
Brightness
Contrast
Tint
Colour
50
52
53
0
5
Cool
Sharpness
Advanced Control
Colour Temperature
Standard
EXITSelect Exit
g. 38
Vol
31
3
12
g. 39
Page 25
p.23
| HD Ready LCD TV | User Manual
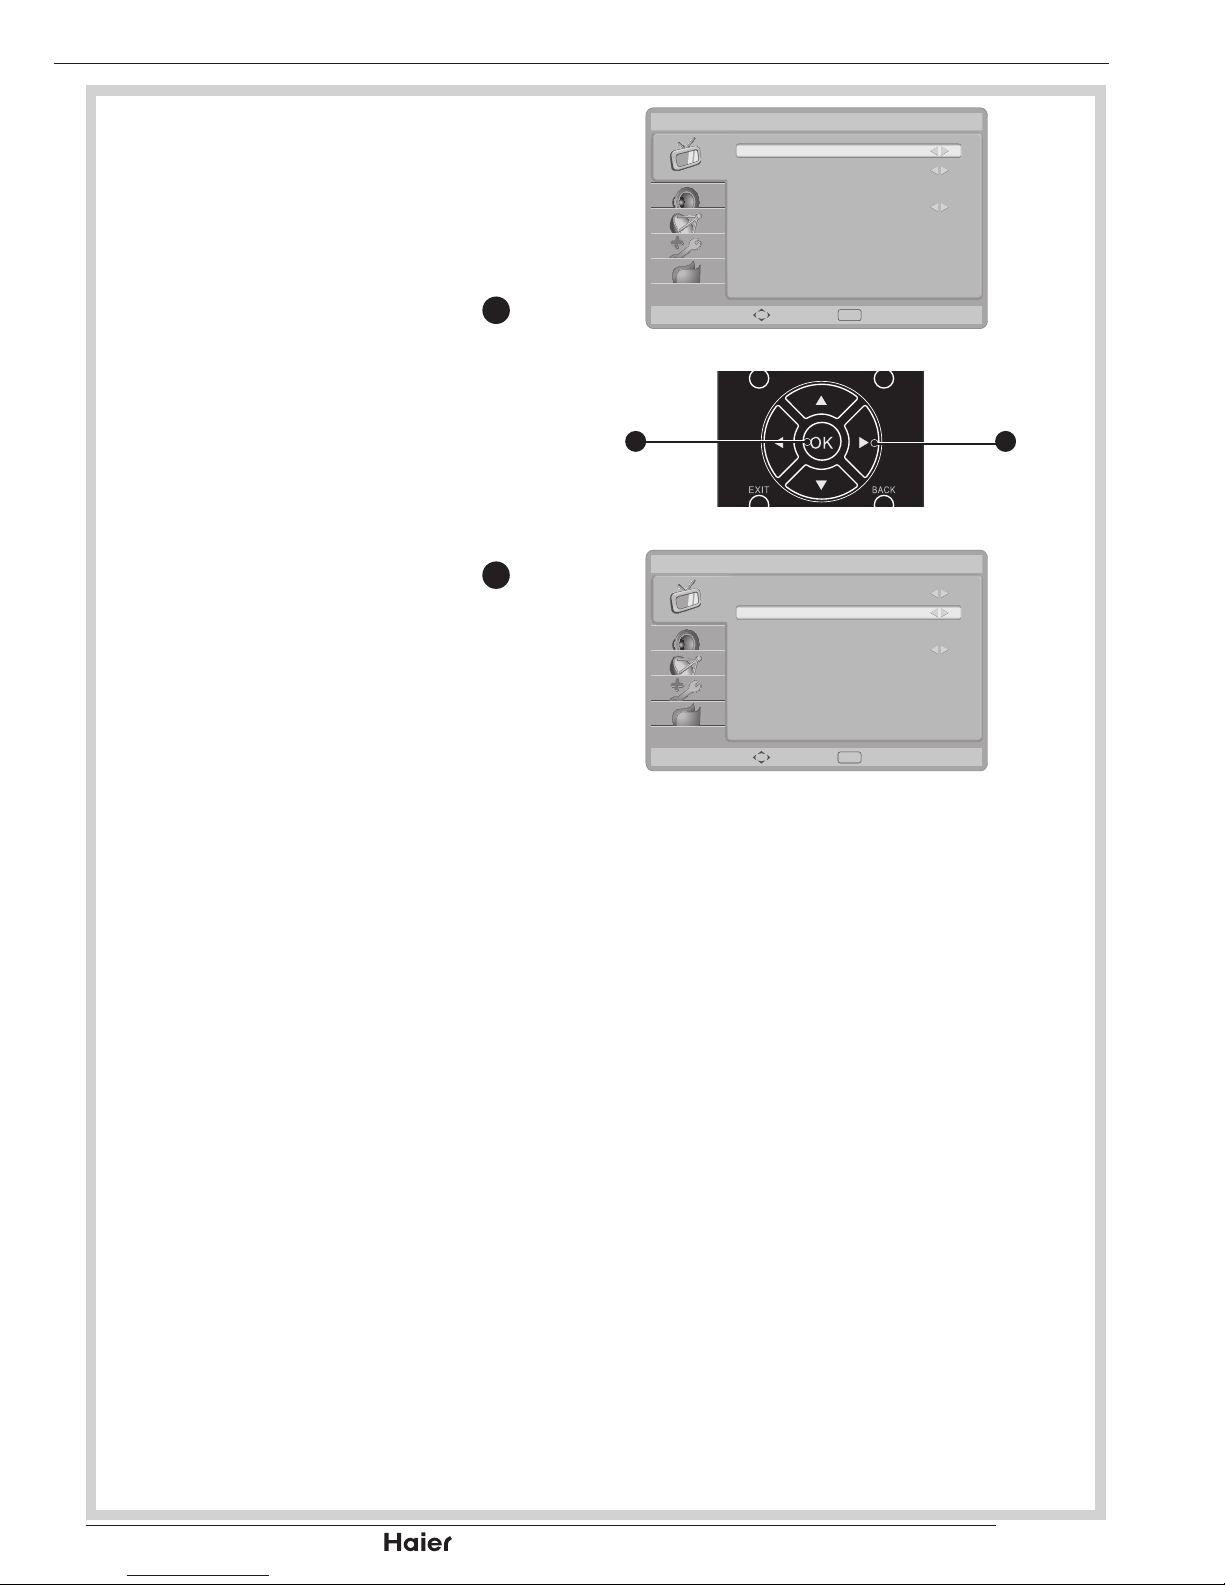
You can select Advanced Control for more
settings:
Noise reduction
To lter out and reduce the image noise •
and improve the picture quality.
Use the Left or Right Cursor 31 to
toggle between Off, Low, Medium,
High, and Auto.
See g. 40.
Flash Tone
You can adjust the skin colour to be •
more natural.
Use the Left or Right Cursor 31 to to set
to On or Off.
See g. 41 and 42.
Backlight
To make the background brighter or •
darker.
DCR
Dynamic Contrast Ratio (DCR) auto •
adjusts the brightness of the screen to
show more depths in the darker areas.
MENU OPERATION
Advanced Control
Noise Reduction
Flesh Tone
Backlight
DCR
On
90
Medium
On
EXITSelect Exit
g. 40
Vol
31
12
g.41
Advanced Control
Noise Reduction
Flesh Tone
Backlight
DCR
On
90
On
Medium
EXITSelect Exit
g. 42
Page 26
| HD Ready LCD TV | User Manual
p.24
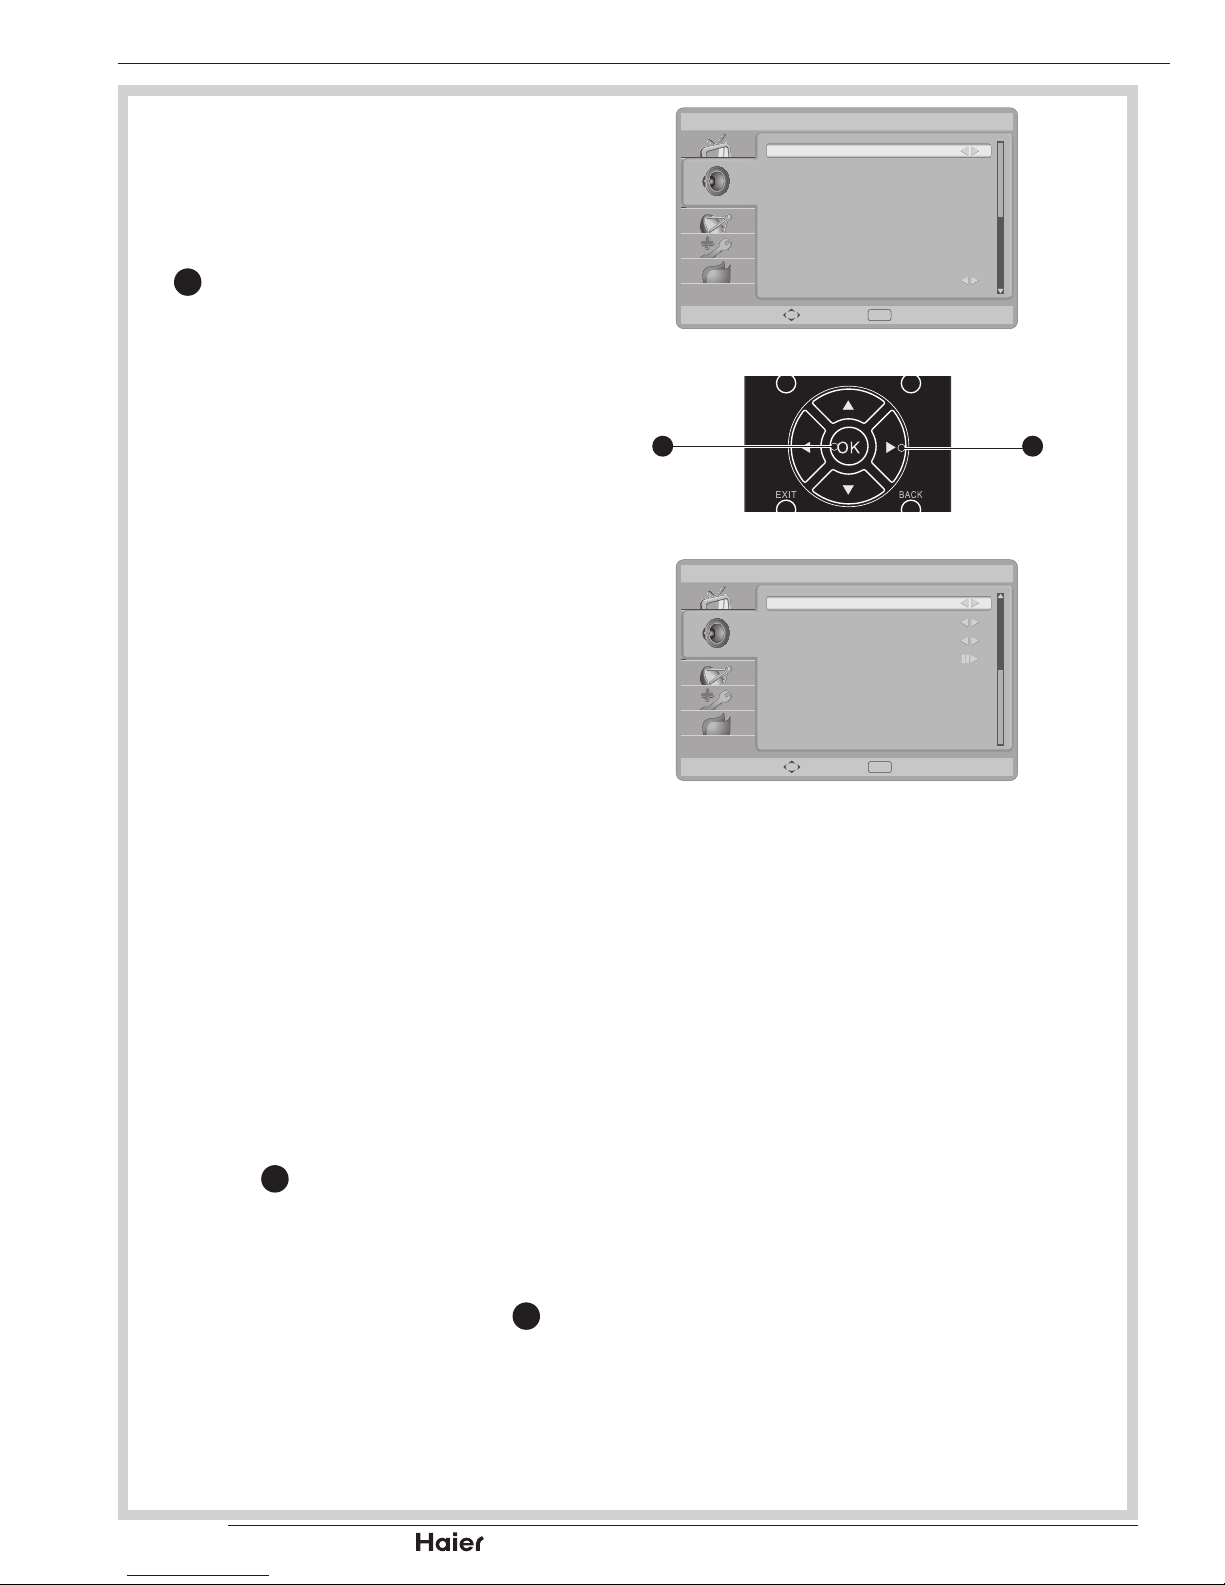
Sound
Sound mode
To set the TV to a predened sound •
setting. Use the Left or Right Cursor
31
to toggle between Personal, Music,
Speech.
See g. 43 and 44.
Equalizer 120Hz (Bass):
Adjusts the amount of bass.•
Equalizer 500Hz (tenor):
Adjusts the amount of tenor.•
Equalizer 1.5KHz (neutral):
Adjusts the amount of neutral.•
Equalizer 5KHz (treble):
Adjusts the amount of treble.•
Equalizer 10KHz (Descant):
Adjusts the amount of descant.•
Balance
To adjust the balance between left/right •
channels.
Virtual surround
To add greater depth and dimension •
to the TV sound. Use the Left or Right
Cursor 31 to toggle between On or Off.
Digital Audio Out
To select the Digital audio out. •
Use the Left or Right Cursor 31 to
toggle between Off, Dolby Digital and
PCM. See g. 45.
Tip: When Dolby Digital is selected,
make sure the amplier supports digital
audio.
MENU OPERATION
Sound
Sound Mode
Equalizer 120Hz
Equalizer 500Hz
Equalizer 5KHz
Equalizer 1.5KHz
3
3
2
4
5
0
Off
Equalizer 10KHz
Virtual Surround
Balance
Personal
EXITSelect Exit
g. 43
Vol
31
12
g. 44
Sound
Digital Audio Out
AVL
Type
Audio Description
Off
Normal
PCM
EXITSelect Exit
g. 45
Page 27
p.25
| HD Ready LCD TV | User Manual
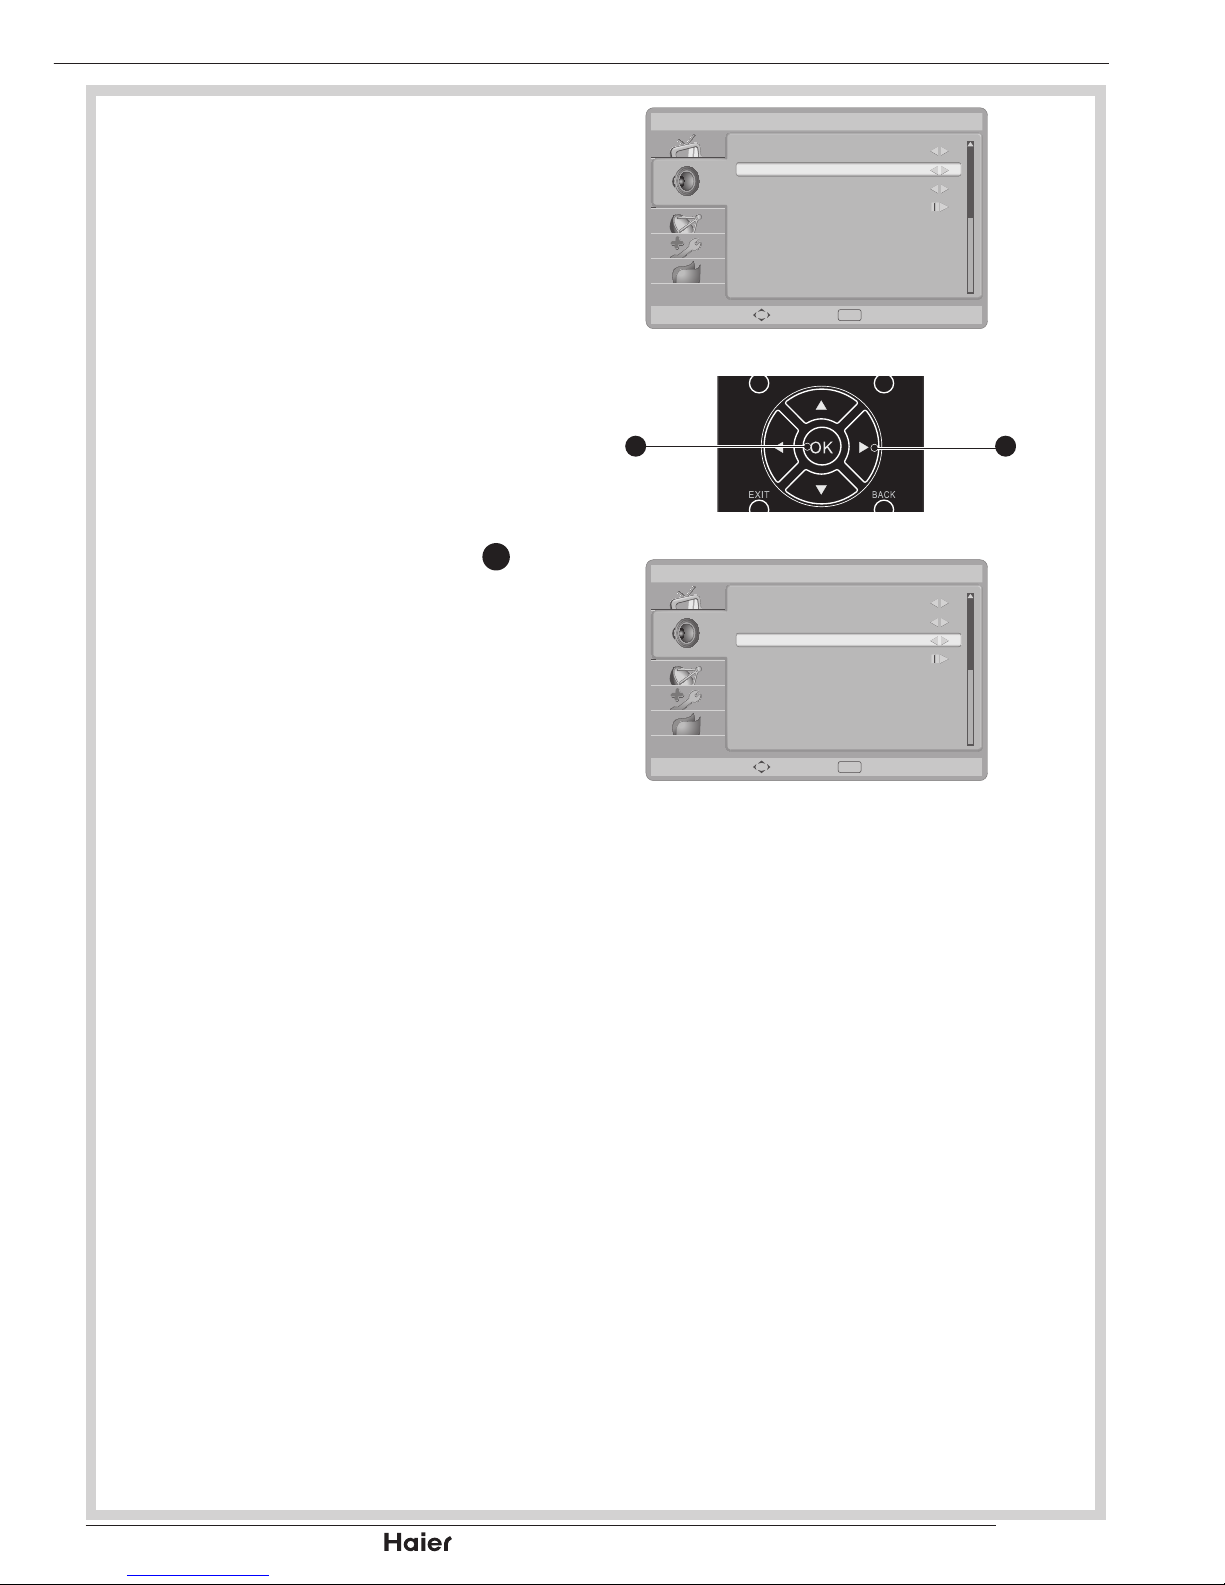
AVL
To eliminate the volume differences •
between channels and programs and
also reduce the dynamics of the sound.
See g. 46 and 47.
The following functions are only available
for digital channels with audio signals.
Type
This function enables you to choose •
the type of the additional narration
during the TV watching.
Use the Left or Right Cursor 31 to
toggle between Normal, Hard of
Hearing, or Audio Description.
See g. 47 and 48.
Hard of Hearing: • This function
provides narration to deaf and hard of
hearing viewers.
Audio Description
When the Type is set to “Audio •
Description”, you can adjust the volume
of the audio description.
MENU OPERATION
Sound
Digital Audio Out
AVL
Type
Audio Description
Off
Normal
PCM
EXITSelect Exit
g. 46
Vol
31
12
g.47
Sound
Digital Audio Out
AVL
Type
Audio Description
Off
Normal
PCM
EXITSelect Exit
g. 48
Page 28
| HD Ready LCD TV | User Manual
p.26
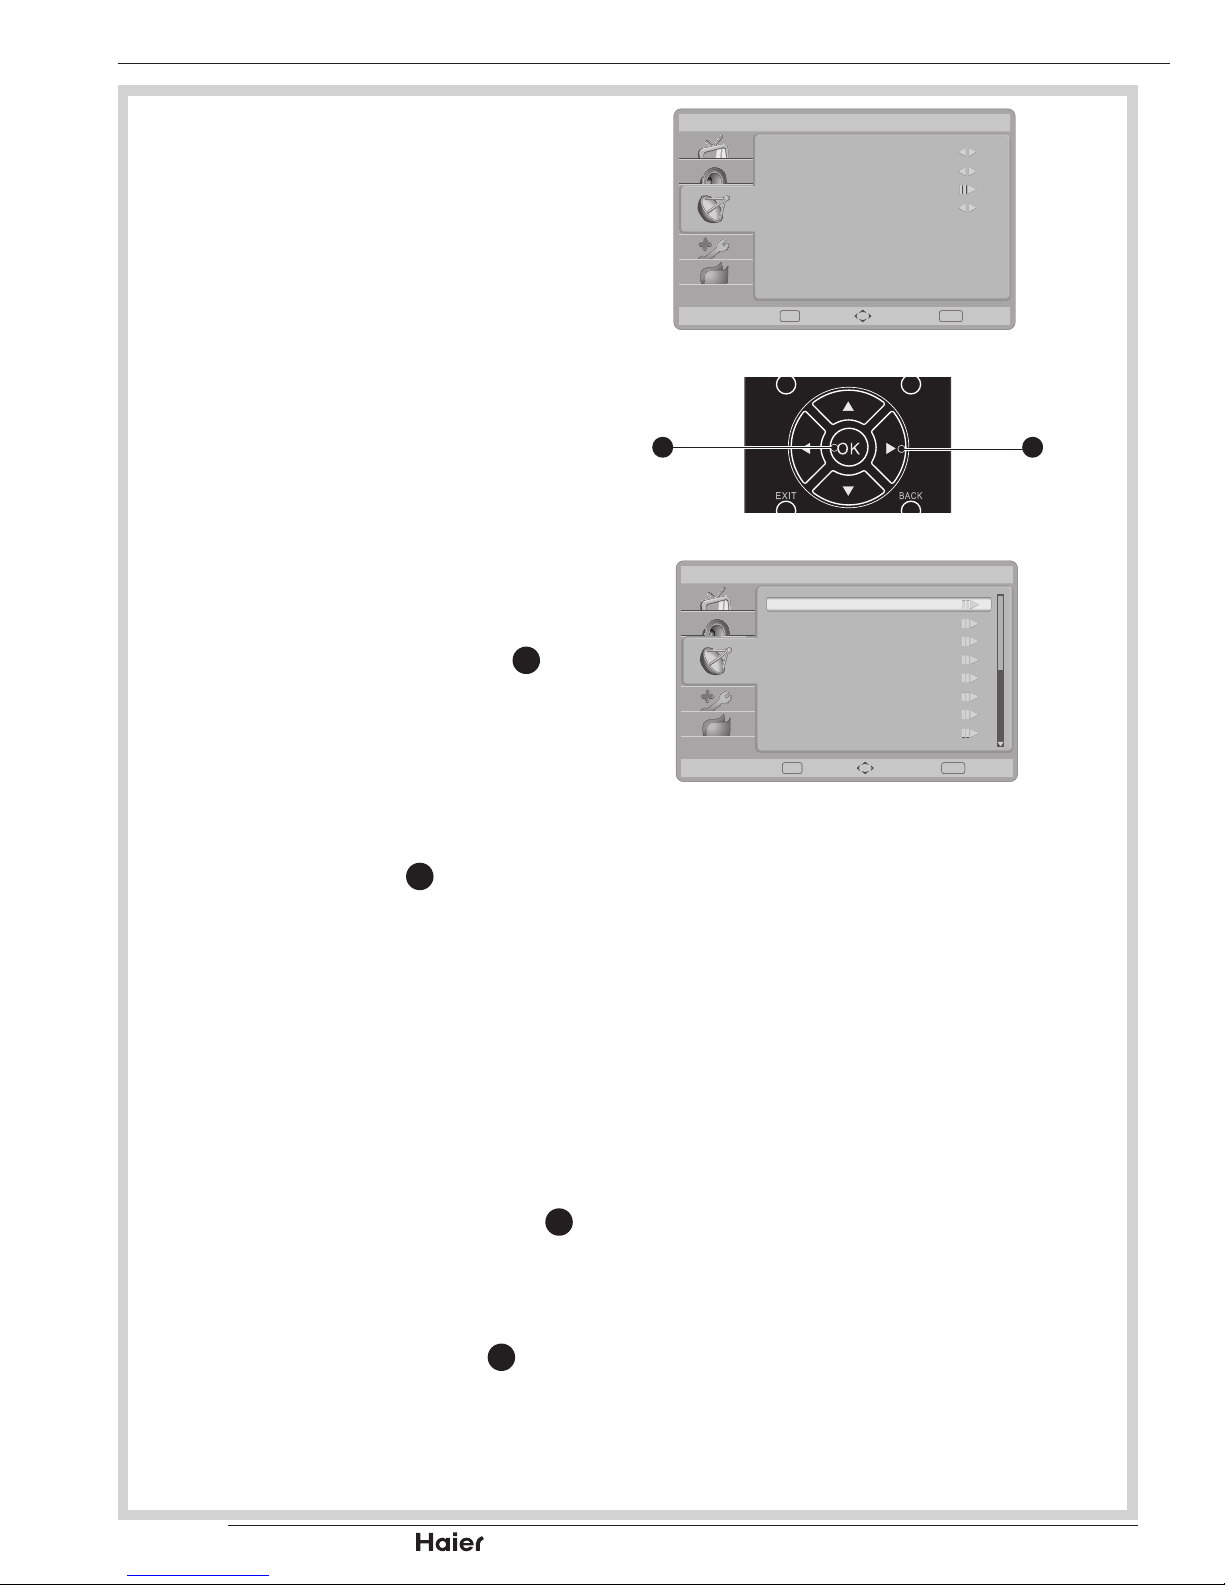
TV
Tuner Mode
Select Tuner Mode from Antenna or •
Cable.
See g. 49 and 50.
Country
To select the relevant country. •
This is the country you are in, or the
country whose channels you want to
receive if you live near its borders.
1
st
and 2
nd
Audio (Digital only)
Use this function when two or more •
audio languages are broadcast.
Use the Left or Right Cursor •
31
to
select audio language.
NOTE: If the 1st audio language is not
available, the 2nd will be played.
Channels
Press Right Cursor •
31
to enter the
channels submenu, and use Left
or Right Cursor to toggle between
Channel Scan, Update Scan, Single
RF Scan, Analogue Manual Scan,
Favourite Network Select, Channel
Skip, Channel Sort, Channel Edit,
Decoder, Analogue CH Fine Tune, and
Clean Channel List.
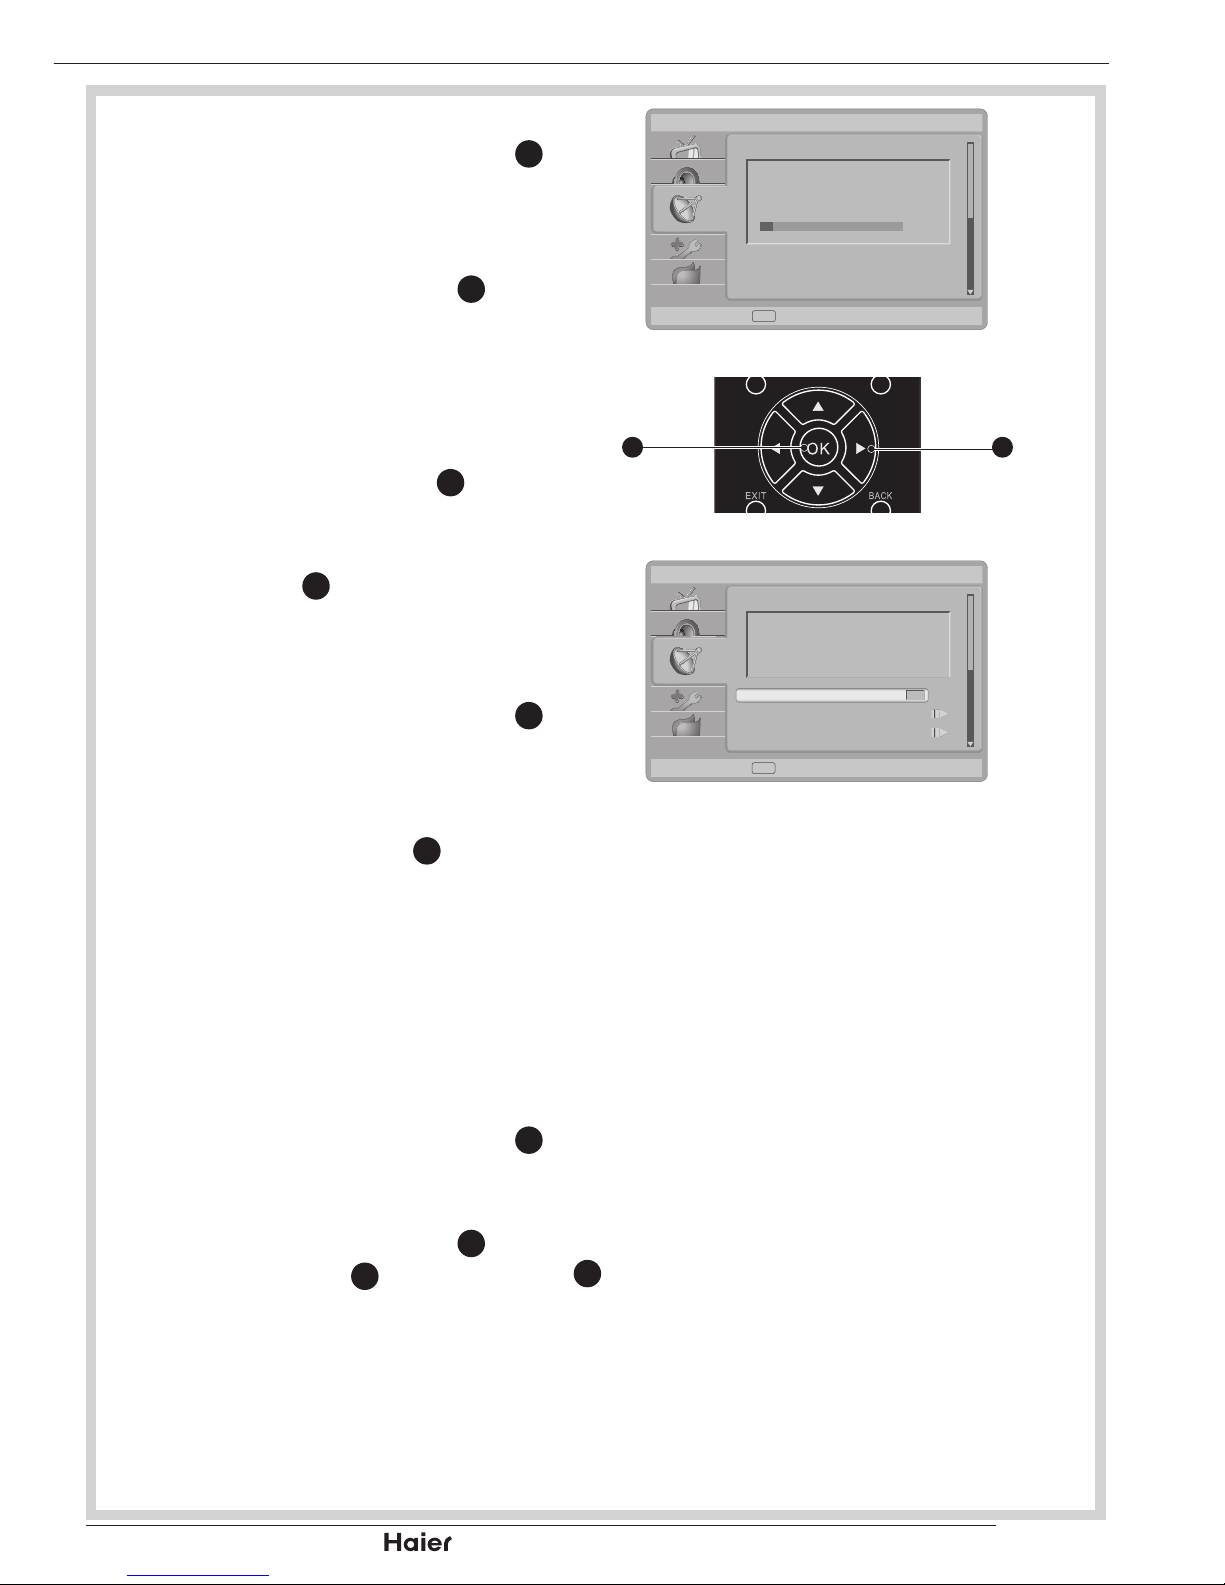
Channel scan
Use the Up or Down Cursor 1.
31
to select Channel Scan in the
Channels submenu.
See g. 50 and 51.
Press the Right Cursor 2.
31
to start
searching the local programme
automatically.
MENU OPERATION
TV
Tuner Mode
Country
Channels
On
Antenna
UK
Time Shifting Mode
EnterOK EXITSelect Exit
g. 49
Vol
31
12
g. 50
Channels
Channel Scan
Update Scan
Single RF Scan
Analogue Manual Scan
Favorite Network Select
Channel Skip
Channel Edit
Channel Sort
Enter
OK EXITSelect Exit
g. 51
Page 29
p.27
| HD Ready LCD TV | User Manual
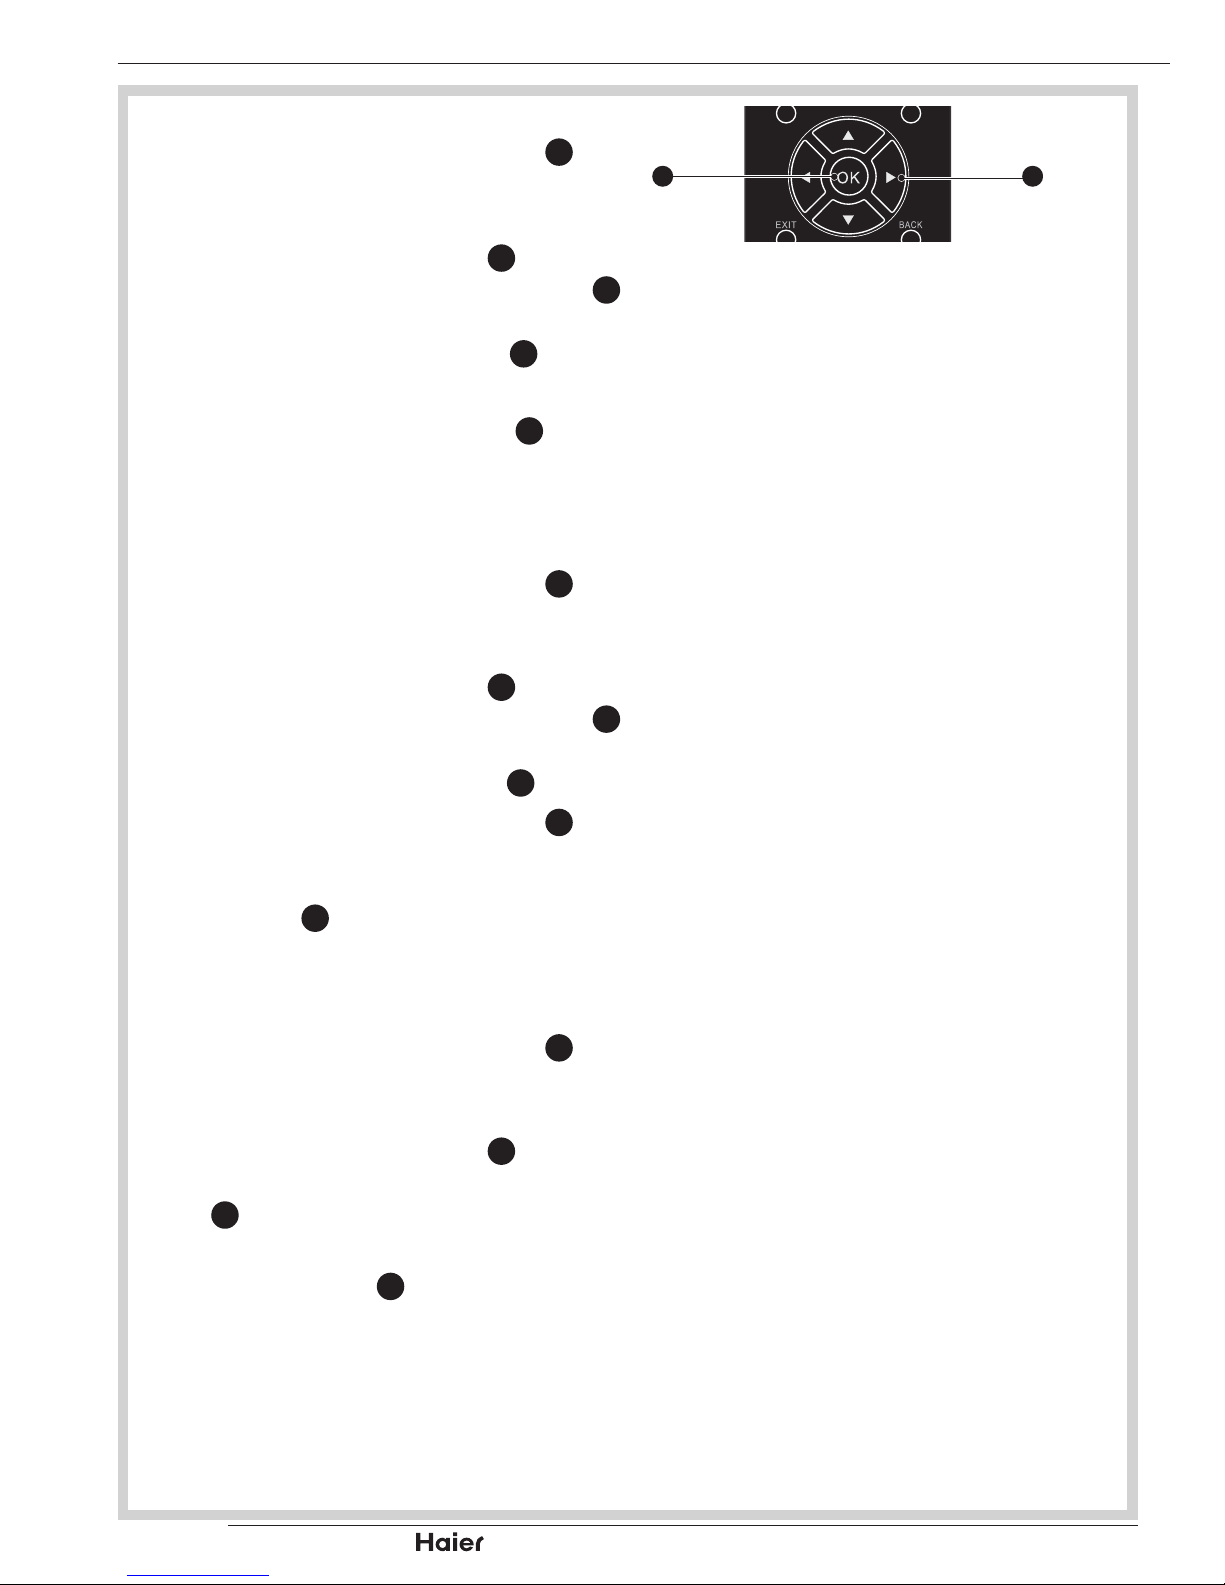
Update Scan (Antenna mode only)
Use the Up or Down Cursor 1.
31
to
select Update Scan in the Channels
submenu.
See g. 52.
Press the Right Cursor 2.
31
to start
searching the local programme
automatically.
See g. 53.
Single RF Scan (digital only)
Use the Right Cursor 1.
31
to enter
single RF Scan in the channels
submenu.
Press OK 2.
12
to start scan digital
channel.
Analogue Manual Scan
Use the Up or Down Cursor 1.
31
to
select Analog Manual Scan in the
Channels submenu.
See g. 53.
Press Right Cursor 2.
31
to enter.
Using number buttons 0~9 to enter
the Start Frequency. Use Up or
Down to select Scan Up or Scan
Down and press Right Cursor to
start scan.
See g. 53 and 54.
Favourite Network Select
Use the Up or Down Cursor 1.
31
to
select Favourite Network Select in
the Channels submenu.
Press the Right Cursor 2.
31
to enter it
and press OK 12 or Right Cursor 31
to enter the channel list.
MENU OPERATION
EXIT Cancel
Update Scan
Status: Scanning.
Analogue Channels: 0
Digital Channels: 0
19%
g. 52
Vol
31
12
g. 53
Analogue Manual Scan
Search for analogue channels
Start Frequency (MHz) 45.
Scan Down
Scan Up
EXIT Exit
g. 54
Page 30
| HD Ready LCD TV | User Manual
p.28
Channel Skip
Use the Up or Down Cursor 1.
31
to
select Channel Skip in the Channels
menu. See g. 55.
Press the Right Cursor 2.
31
to enter it
and use the Up or Down Cursor 31
to highlight the programme you want
to skip and press the OK 12 to set.
Tip: The skipped programme may not
be found by pressing P Λ / V 33 but
can be accessed by pressing number
buttons directly.
Channel Sort
Use the Up or Down Cursor 1.
31
to
select Channel Sort in the Channels
menu.
Press the Right Cursor 2.
31
to enter it
and use the Up or Down Cursor 31
to highlight a programme you want
to sort and press the OK 12 to set.
Use the Up or Down Cursor 3.
31
to
highlight the second programme you
want to exchange with and press
the OK 12 to switch the channel
position.
Channel Edit
Use the Up or Down Cursor 1.
31
to
select Channel Edit in the Channels
menu. See g. 56.
Press the Right Cursor 2.
31
to enter
it and press the Up or Down Cursor
31
to highlight the programme you
want to edit.
Press the OK 3.
12
to start editing
programme name.
Change the Channel Number by 4.
using the number buttons 0~9.
Change the Channel Name by
pressing the number buttons 0~9 to
enter numbers and letters.
MENU OPERATION
Vol
31
12
g. 55
Page 31
p.29
| HD Ready LCD TV | User Manual
Decoder (Analog only)
Channel Decode support the Canal+
(paid television channel); however,
the channel also broadcast some un-
encrypted programs. These programs
without encryption can be viewed free
of charge
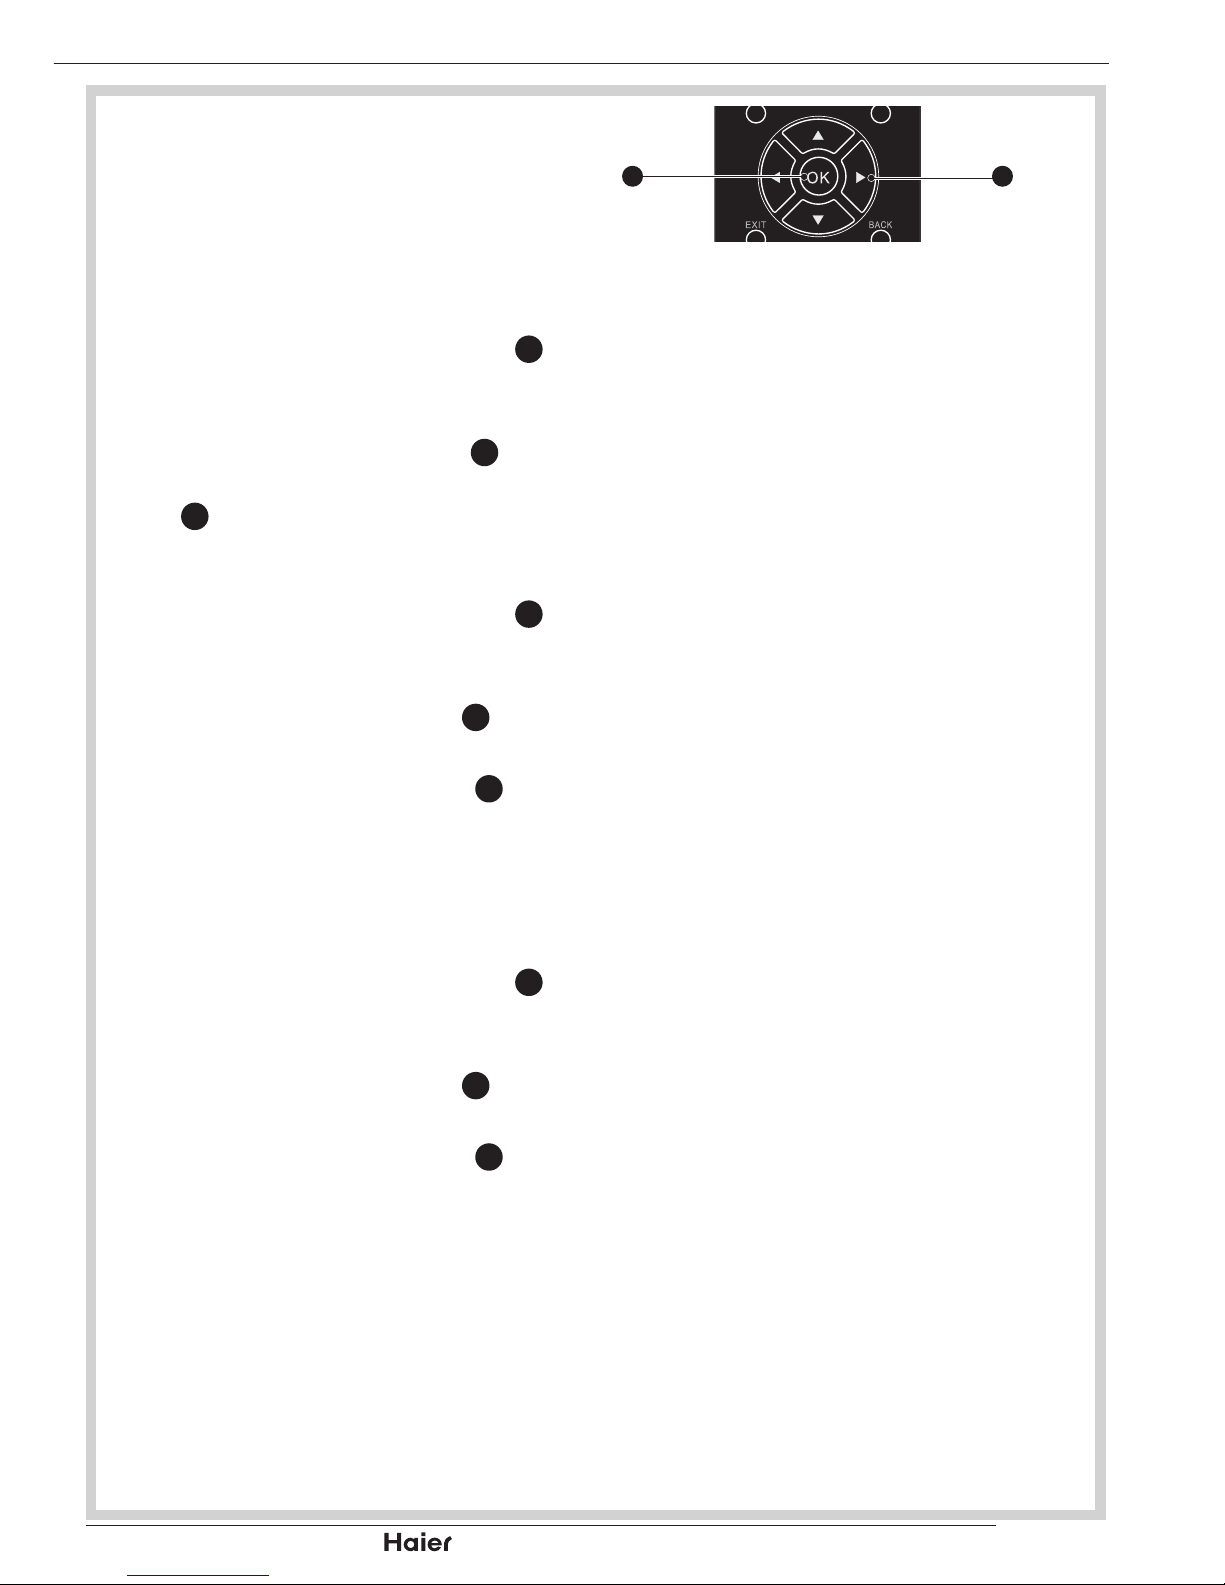
Use the Up or Down Cursor 1.
31
to
select Decoder in the Channels
submenu.
Use Up or Down Cursor 2.
31
to
highlight the channel and press OK
12
to set.
Analogue CH Fine Tune
Use the Up or Down Cursor 1.
31
to
select Analog CH Fine Tune in the
Channels submenu.
Highlight and press OK 2.
12
to select
the channel.
Use Left or Right Cursor 3.
31
to
adjust the frequency. Press Left to
decrease and Right to increase the
frequency.
Clean Channel List
Use the Up or Down Cursor 1.
31
to
select Clean Channel List in the
Channels submenu.
Highlight and press OK 2.
12
to select
the channel.
Use Left or Right Cursor 3.
31
to
adjust the frequency. Press Left to
decrease and Right to increase the
frequency.
MENU OPERATION
Vol
31
12
g. 56
Page 32
| HD Ready LCD TV | User Manual
p.30
Features
Menu Language
To select the on-screen display menu •
language.
See g. 57.
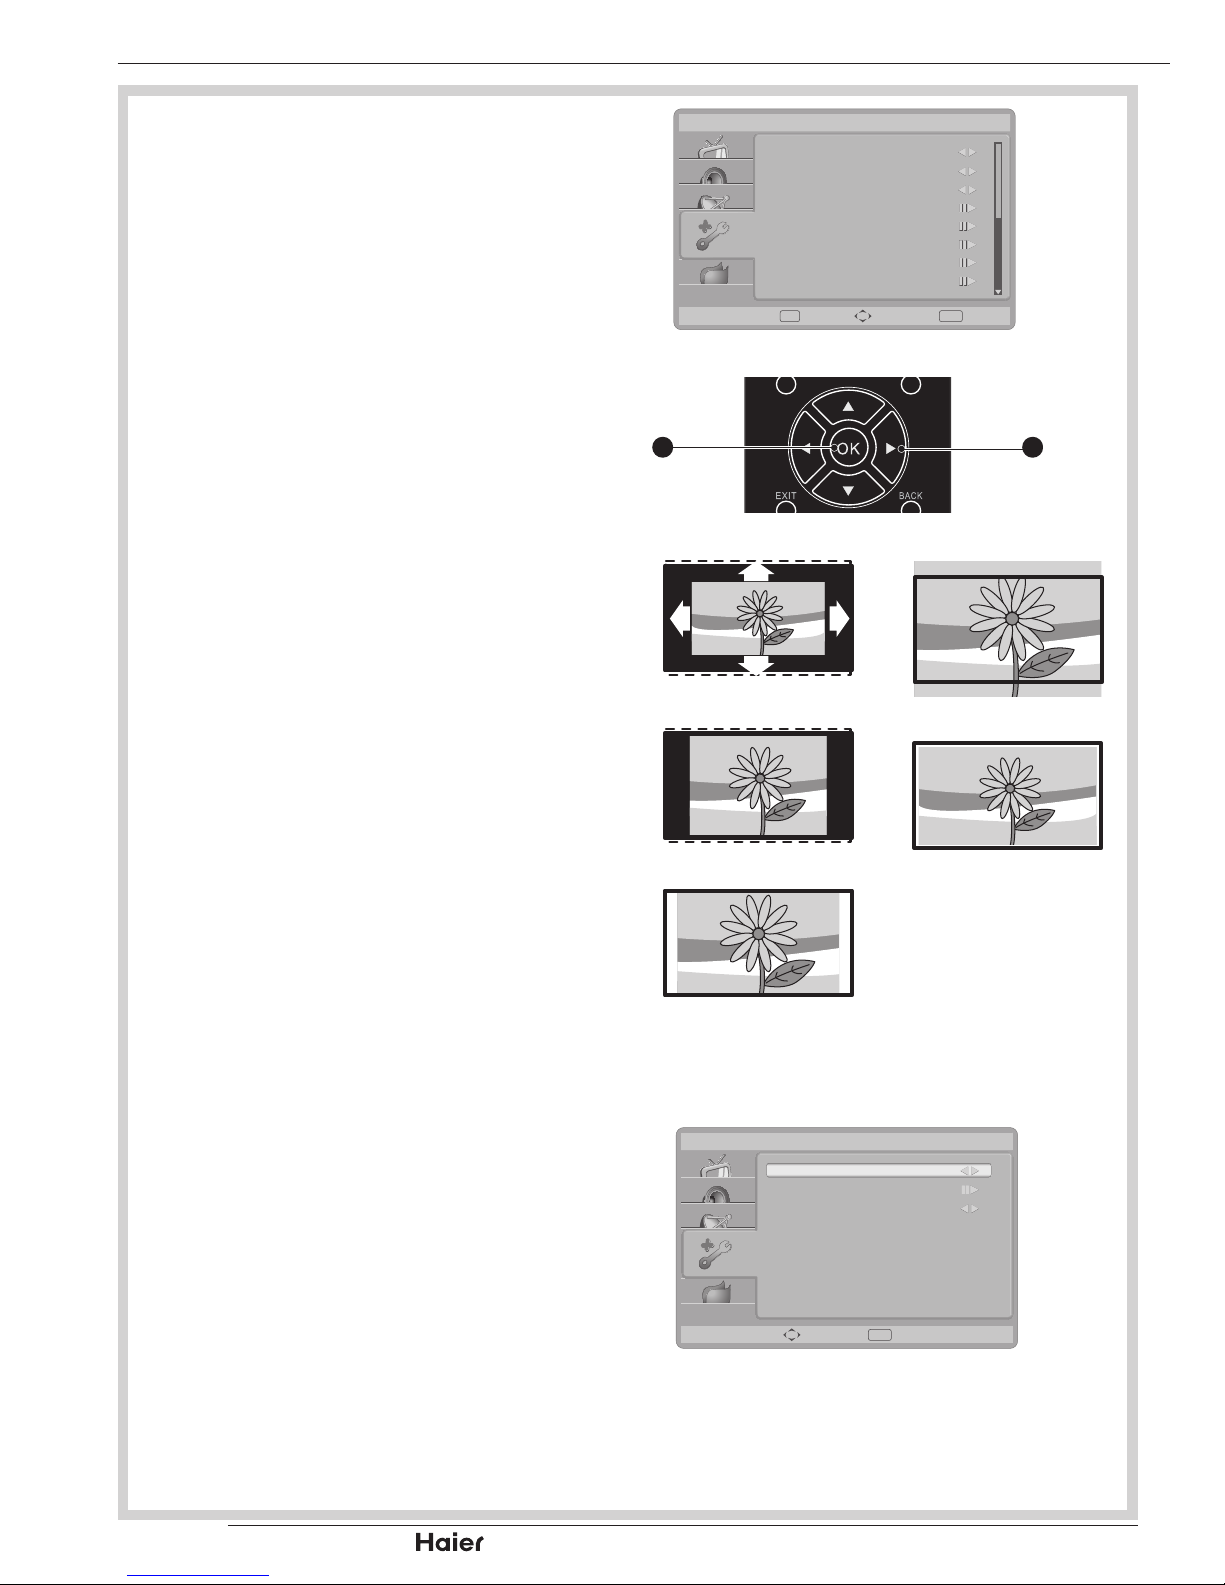
4:3 mode
Select aspect ratio behavior for Auto •
mode. When 4:3 is selected, the picture
size will follow WSS or Scart Pin8
Spec. If 16:9 is selected, the picture
format will change to wide screen.
Picture Format
Auto: • DTV and HDMI input will
automatically display the correct format,
while ATV and SCART will need to be
set.
See g. 59.
Nomal:• Displays the classic 4:3 format.
ZOOM 2:• Scales the classic 4:3 format
to 16:9.
Wide screen: • Stretches the classic 4:3
format to 16:9.
ZOOM 1: • Scales the classic 4:3 format
to 14:9.
Native (only in HDMI mode):•
Performed all content without
underscan.
Time
Time zone:• To select the time zone you
are in.
See g. 60.
Time:• To set the time and date or
select auto synchronisation.
Tip: Before setting the time and
date manually, make sure Auto
synchronisation is Off.
MENU OPERATION
Features
Menu Languate
4:3 Mode
Picture Format
Time
16:9
Auto
English
Subtitle
Teletext Language
Manual OAD download
Common Interface
Enter
OK EXITSelect Exit
g. 57
Vol
31
12
g. 58
Auto
Zoom 1
Zoom 2
Nomal
Wide
g. 59
Time
Time Zone
Time
Sleep Timer
Off
As Broadcaster
EXITSelect Exit
g. 60
Page 33
p.31
| HD Ready LCD TV | User Manual
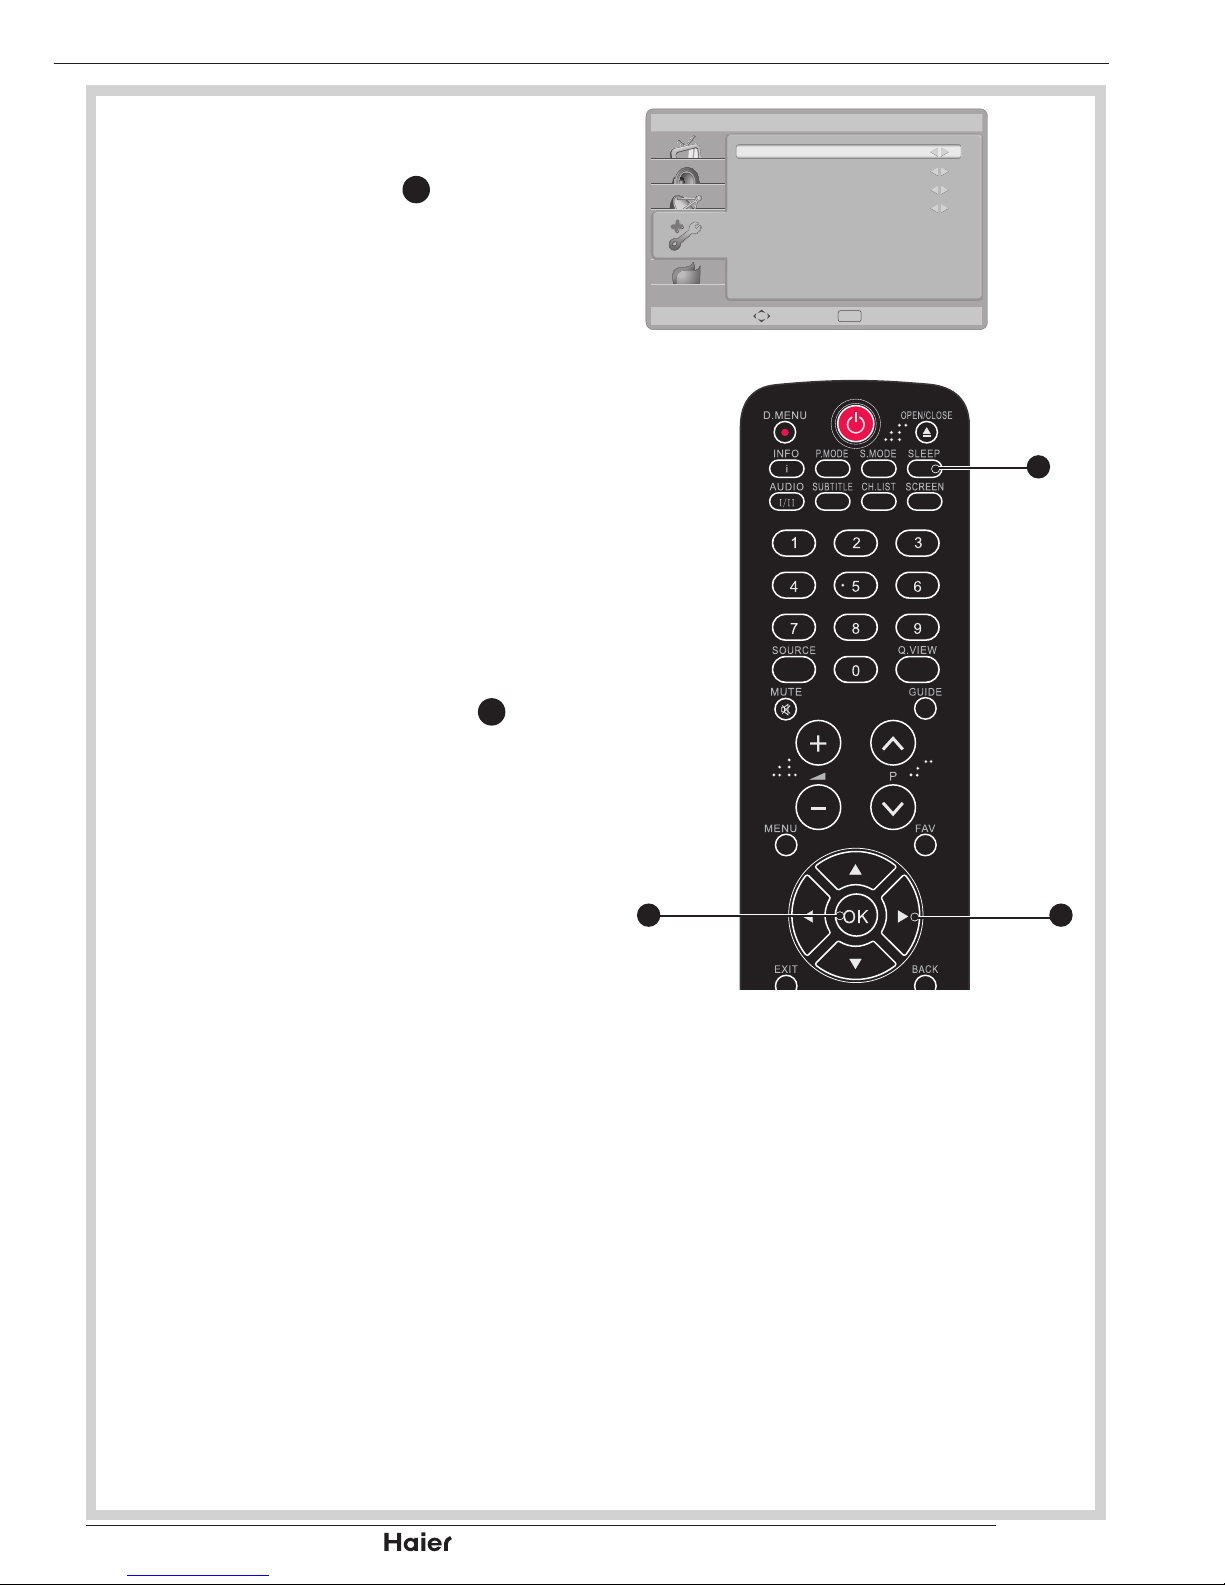
Sleep timer:• To set the TV to turn itself
off after a set period of time.
NOTE: Press SLEEP 38 to set the
timer without OSD on the screen.
SCART
The specic type of signal going into •
SCART on the back of the television.
Please refer to the manufacturers
instructions for the connected
equipment. Check the signal output of
the DVD or compatible device, please
select the correct setting for “SCART”
input.
NOTE: This option will not display
when the video source is not SCART.
Subtitle
Use the Up or Down Cursor •
31
to
toggle between:
See g. 61 and 62.
Analogue subtitle: 1. To display the
transmitted subtitle on the screen.
This text can either be permanently
displayed (assuming that the service
is available with the broadcast) or
only when mute is active.
12.
st
and 2nd subtitle: Use the Digital
Subtitle function when two or more
subtitle languages are broadcast. If
subtitle data in a selected language
is not broadcast, the default
language subtitle will be displayed.
Subtitle type: 3. To choose the normal
type or hearing impaired type of
subtitle.
MENU OPERATION
Subitile
Analogue Subtitle
1st Subtitle
2nd subtitle
Subtitle Type
Off
English
Normal
Off
EXITSelect Exit
g. 61
Vol
38
31
12
g. 62
Page 34
| HD Ready LCD TV | User Manual
p.32
Teletext Language
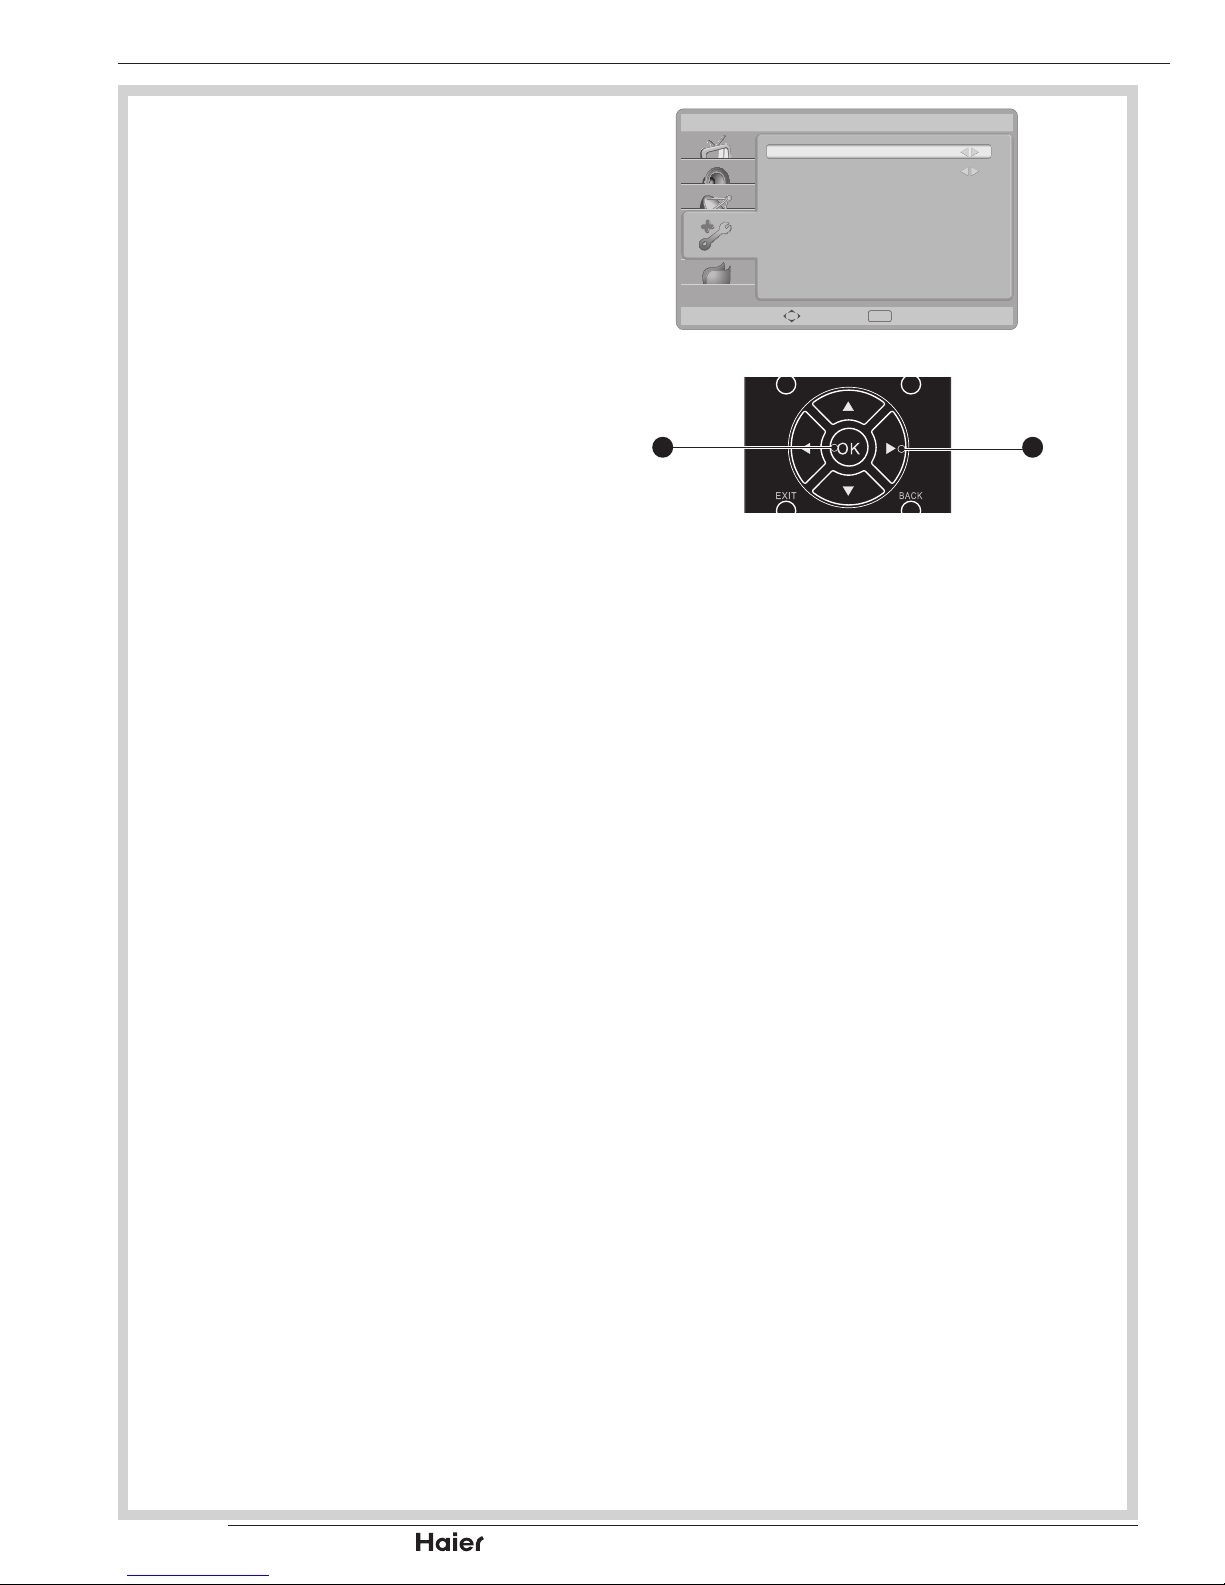
Digital teletext language:• To select
the teletext language.
See g. 63 and 64.
Decoding page language:• To set
the teletext language to the regional
location.
Common Interface
The common interface is for a •
Conditional Access Module (CAM).
This function displays your TV software
information.
See page 37.
HDMI Scan Info (HDMI only):
When you use HDMI mode, you can
choose the following mode.
Automatic: • Set to underscan or
overscan automatically when the video
signal is detected.
Underscan: • When the video signal is
detected, all active pixels and lines are
displayed with or without border.
Overscan: • When the video signal is
detected, some active pixels and lines
at the edges are not displayed.
OAD
When you get the software updating •
news from the retailer or internet, you
can update the operation software
using the OAD (Over Air Download)
Download. The updated software data
will be transferred through the TV
signal.
See page 38 for details.
MENU OPERATION
Teletext Language
Digital Teletext Lang.
Decode Page lang.
WEST EUR
English
EXITSelect Exit
g. 63
Vol
31
12
g. 64
Page 35
p.33
| HD Ready LCD TV | User Manual
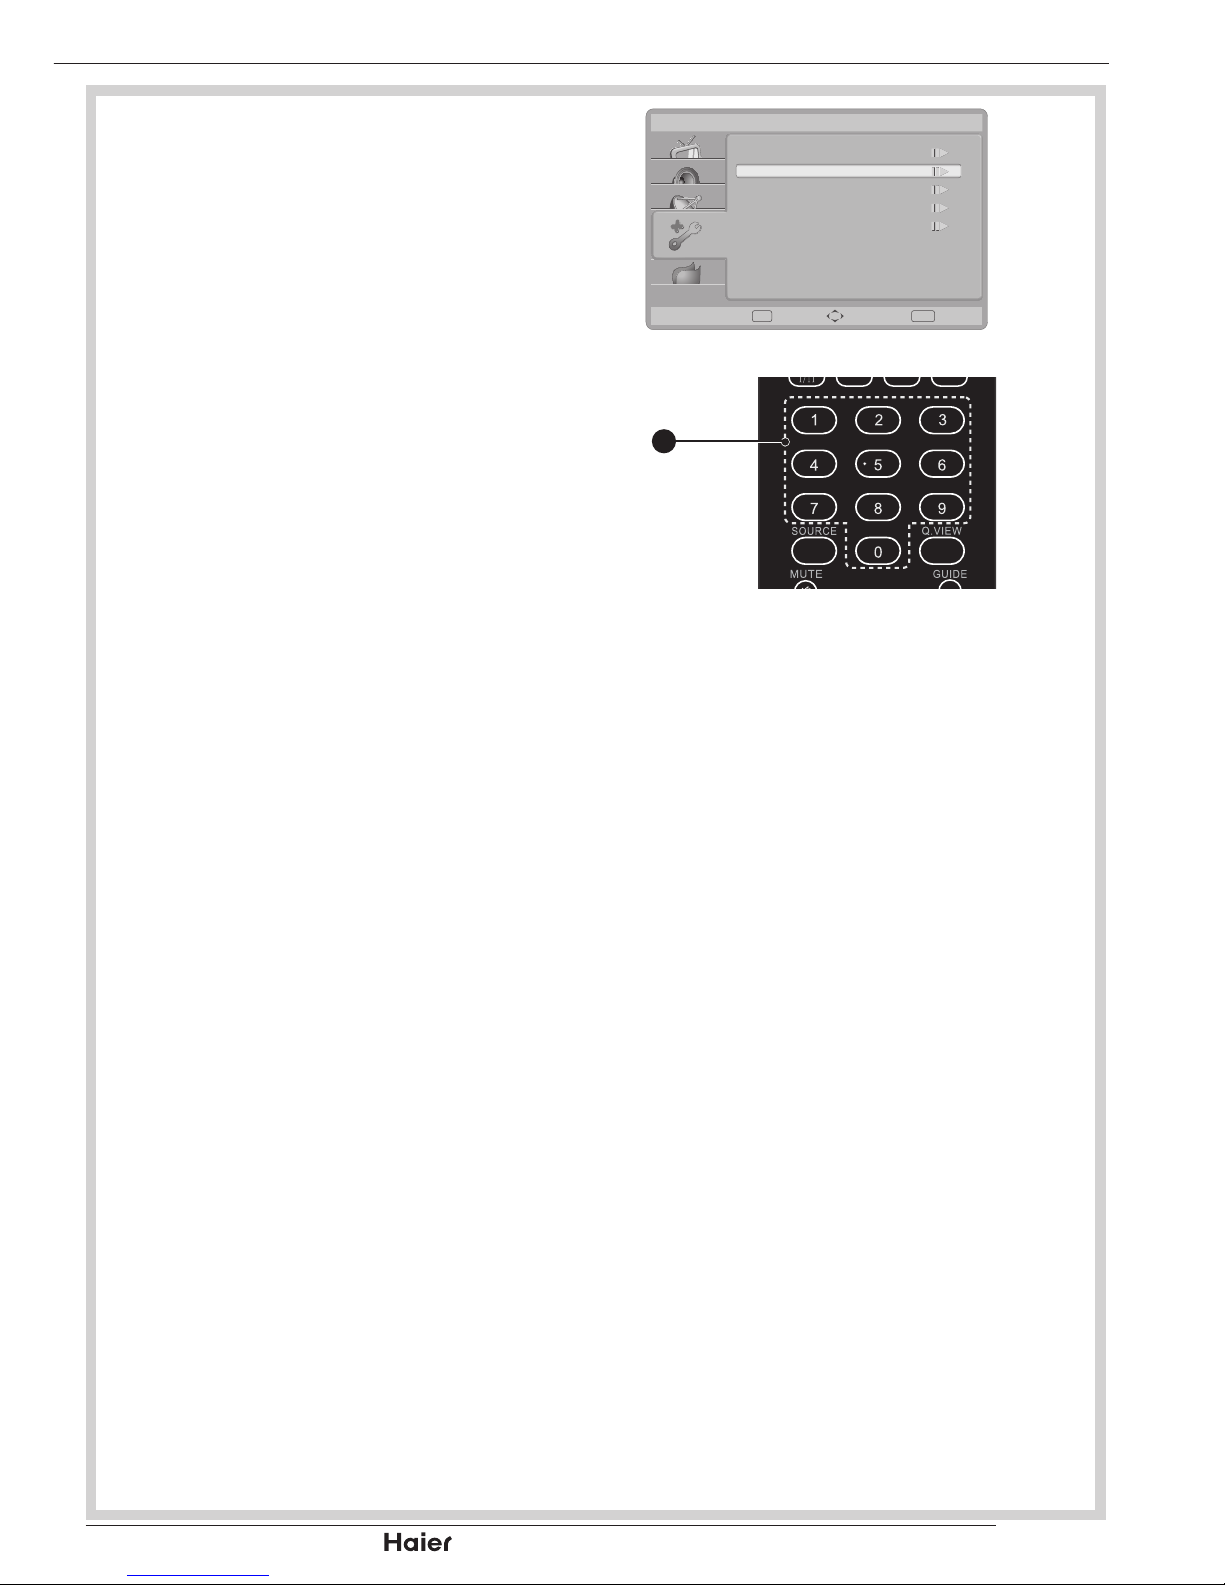
Parental
Lock TV channels or connected devices
with a four digit code to prevent children
from watching unauthorized content.
A password is required to gain access to
this function. The factory default password
is “5351”.
Channel Block
To block certain channels to prevent •
children from watching.
Parental Guidance
To control access to programmes •
based on their age ratings. All
settings apply to digital channels.
See g. 65.
NOTE: This operates according to
information from the broadcasting
station. If the signal has no
information, it does not operate.
Input Block
To disable the specic external input •
signals. See g. 66.
Set Password
To set or change your password. All •
number combinations from 0000 to
9999 are valid.
Tip: The 5351 is the default code.
If you forgot your access code, you
can always enter the default code.
Clear All
To clear all the settings in the •
parental submenu.
Reset Default
To reset all TV settings to their original •
factory values.
SW Ver
Display the Software version.•
MENU OPERATION
Parental
Channel Block
Parental Guidance
Input Block
Set Password
Clear All
Enter
OK EXITSelect Exit
g. 65
7
g. 66
Page 36
| HD Ready LCD TV | User Manual
p.34
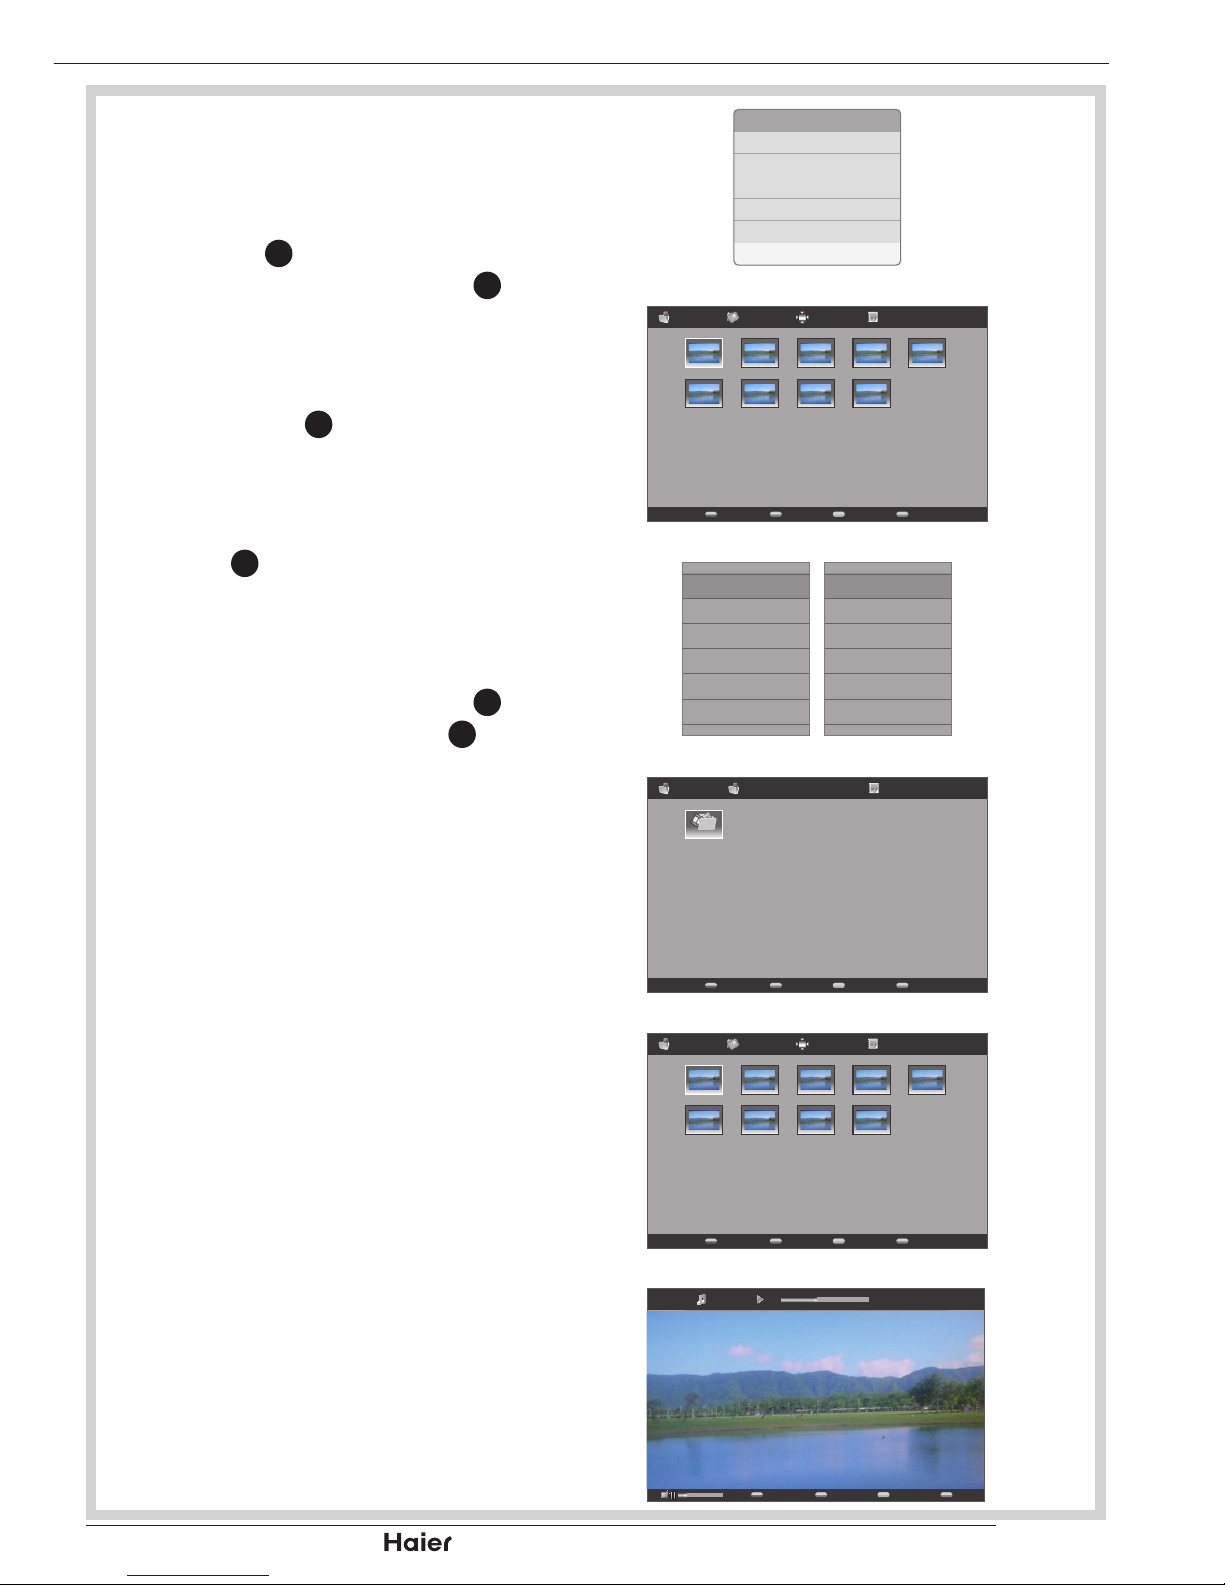
PHOTO VIEWING
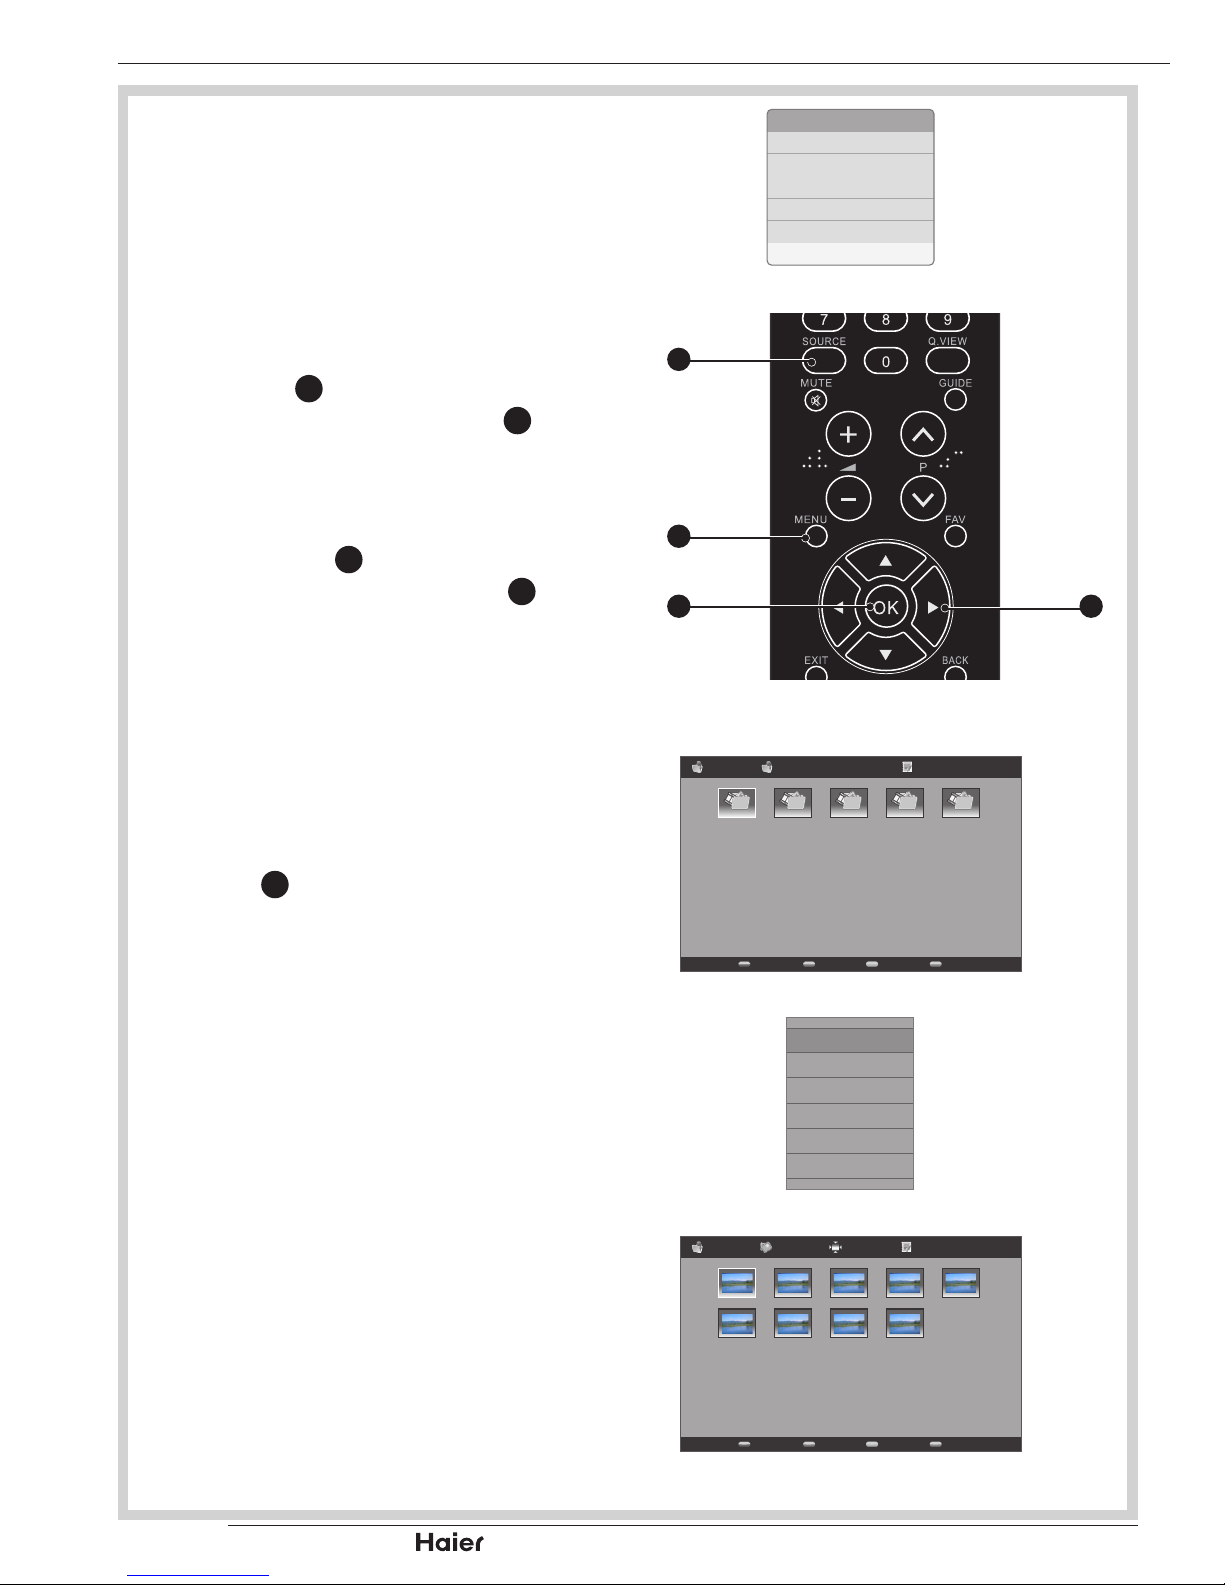
View photos from a USB storage device
This TV enables you to view photos from a
USB storage device.
NOTE: Some of the USB storage devices
may not be supported to this function.
Connect USB storage device to the 1.
USB port on the side of your TV. Press
SOURCE 8 to open the Input List, and
use the Up or Down Cursor 31 to select
USB input source. The USB thumbnail
browser displayed.
See g. 67, 68, and 69.
Press MENU 2.
11
to open the submenu.
Use the Up or Down Cursor 31 to
browse the les by the following
options:
Sort•
Media Type•
Thumbnail Size•
See g. 70.
Use the Up, Down, Left, or Right 3.
Cursor 31 to select le folder.
See g. 71.
Input List
SCART 2
PC
HDMI 1
HDMI 2
HDMI 3
USB
g.67
Vol
31
8
11
12
g. 68
PhotoFile name 1 01/01
File name 1 File name 2 File name 3 File name 4 File name 5
g.69
Sort
Media Type
Thumbnail Size
g.70
PhotoFile name (1) SizeFile name 1 01/01
File name (6) File name (7) File name (8) File name (9)
File name (1) File name (2) File name (3) File name (4) File name (5)
g.71
Page 37
p.35
| HD Ready LCD TV | User Manual
PHOTO VIEWING
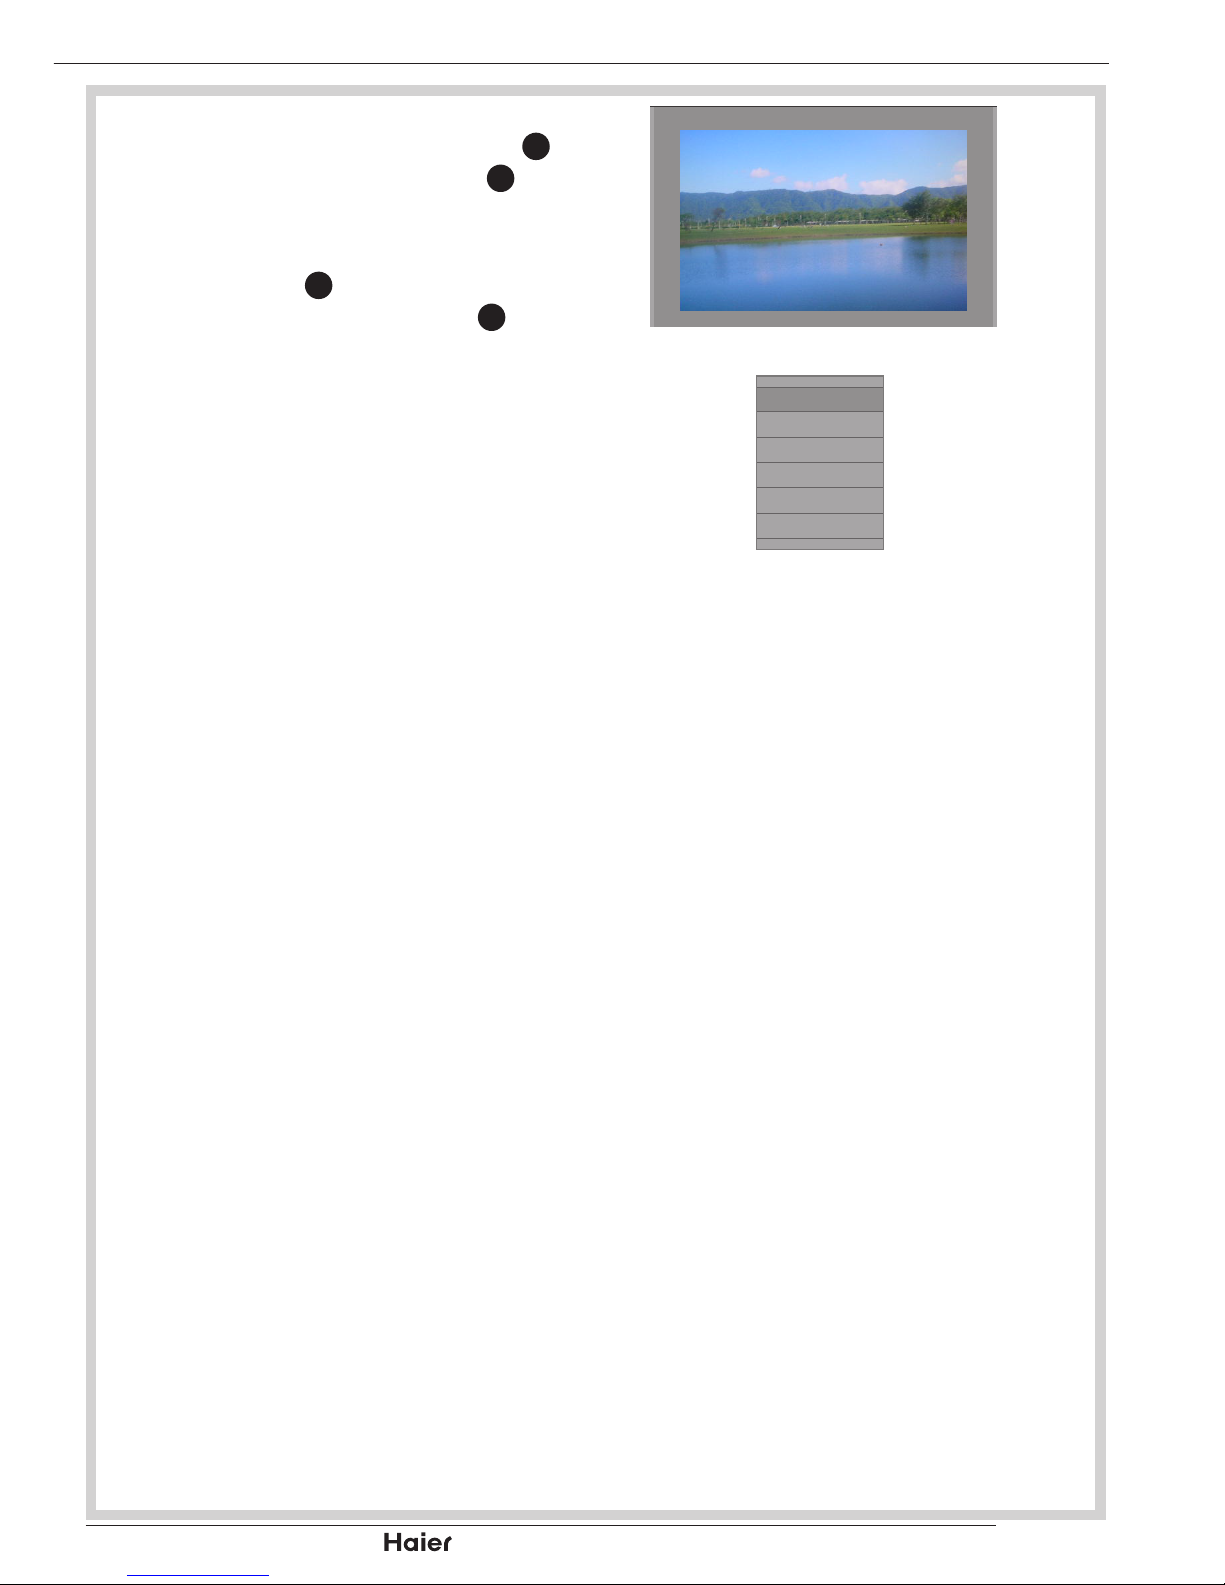
In the photo thumbnail browser, use the 4.
Up, Down, Left, or Right Cursor 31 to
select a photo and press OK 12 to view
a full screen image.
See g. 72.
Press MENU 5.
11
to open the submenu.
Use the Up or Down Cursor 31 to select
the options to display the photos:
Pause•
Repeat•
Shufe•
Duration•
Effect•
Show Info•
See g. 73.
g.72
Pause
Repeat
Shuffle
Duration
Effect
Show Info
g.73
Page 38
| HD Ready LCD TV | User Manual
p.36
PVR RECORDING & VIEWING
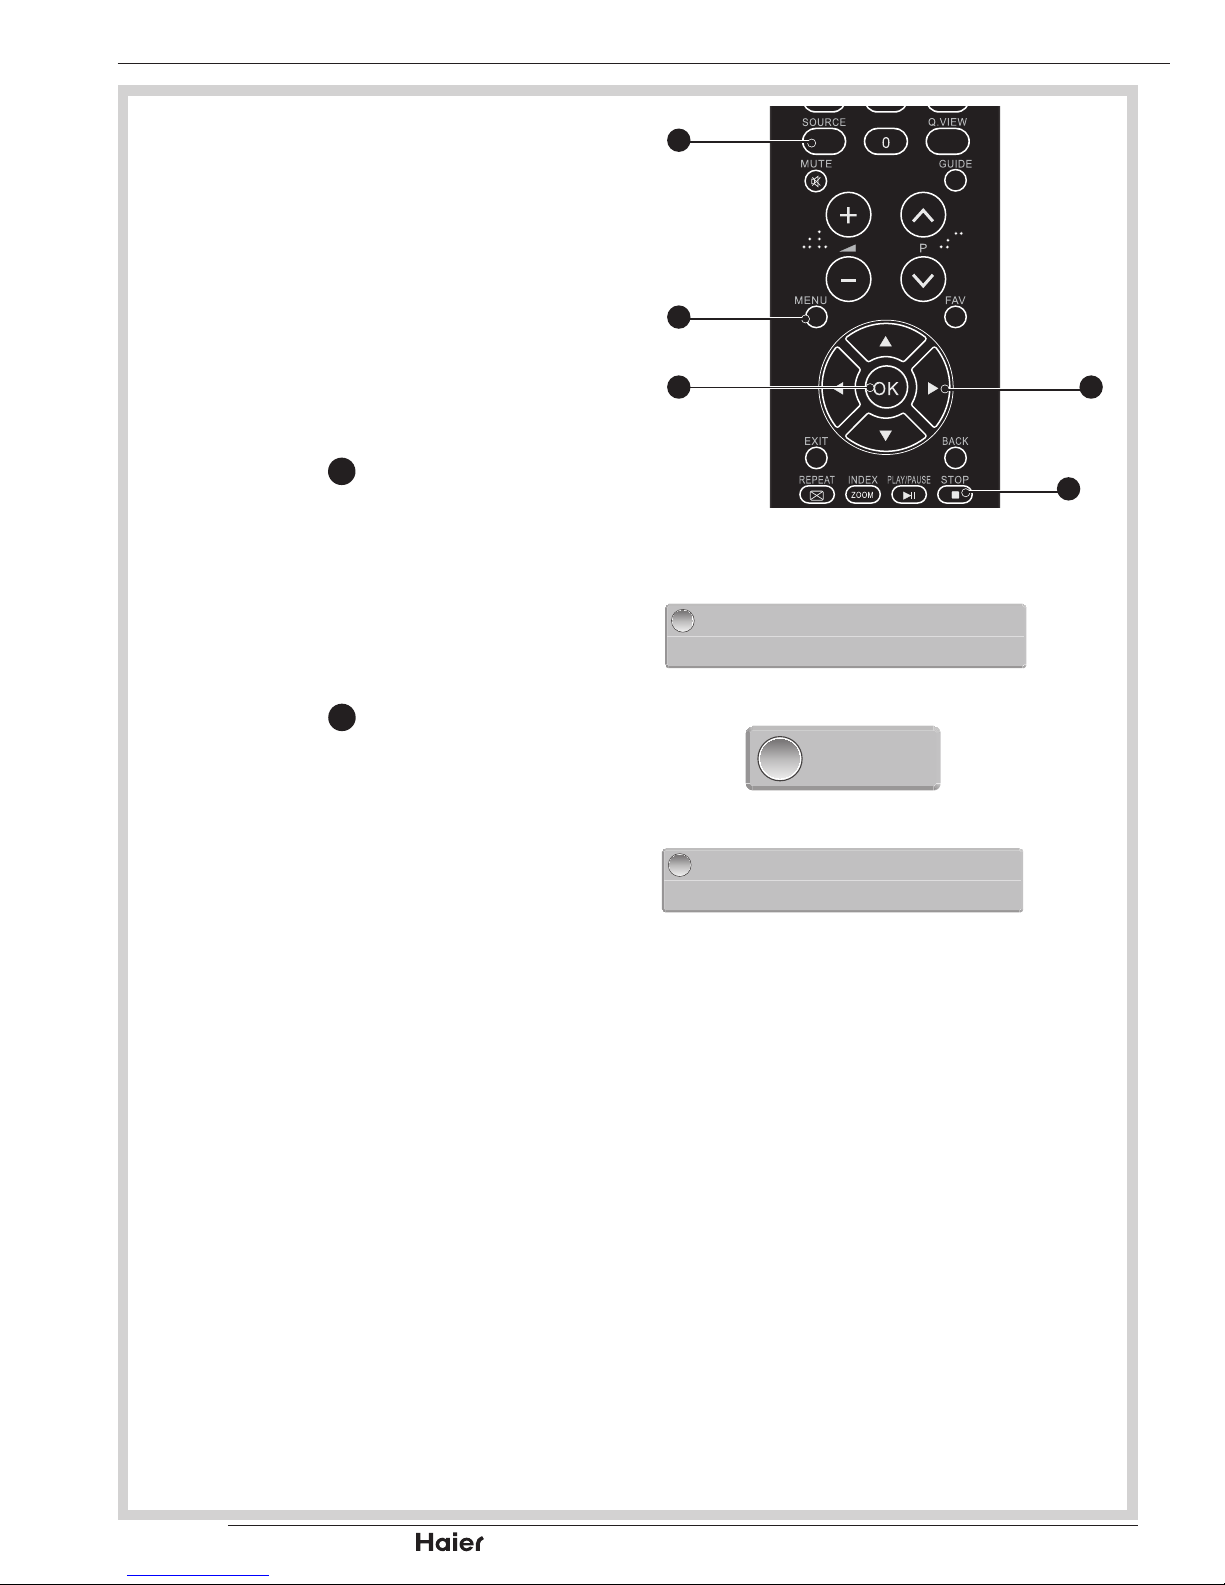
Record DTV programs to USB storage
device
This TV allows you to record digital TV
programs to a USB storage device.
NOTE: Some of the USB storage devices
may not be supported to this function.
While in the TV input source, insert 1.
USB storage device to the USB port on
the side of your TV.
Press STOP 2.
28
to enable PVR function.
and start recording program. TV will
pop out a window.
See g. 74 and 75.
The window for recording progress will 3.
be minimized during recording.
See g. 76.
Press STOP 4.
28
again to disable PVR
function and stop recording program.
See g. 77.
Vol
31
8
11
12
28
g. 74
[00:00:03] 18:50:57
1 TF1 Les flammes du passé
g.75
[00:00:16]
g.76
[00:00:00] 18:50:57
1 TF1 Les flammes du passé
g. 77
Page 39
p.37
| HD Ready LCD TV | User Manual
PVR RECORDING & VIEWING
View recorded DTV programs from USB
storage device--
Connect USB storage device to the 1.
USB port on the side of your TV. Press
SOURCE 8 to open the Input List, and
use the Up or Down Cursor 31 to select
USB input source. The USB thumbnail
browser displayed.
See g. 74, 78, and 79.
Press MENU 2.
11
to open the submenu.
Select Video in the Media Type.
See g. 80.
Use the Up, Down, Left, or Right 3.
Cursor 31 to select PVR folder.
See g. 81.
In the PVR directory, all recorded 4.
programs will be listed. Use the Up,
Down, Left, or Right Cursor 31 to select
a video le and press OK 12 to play the
recorded program.
See g. 82 and 83.
Input List
AV
SCART
PC
HDMI 1
HDMI 2
USB
g. 78
PhotoFile name (1) SizeFile name 1 01/01
File name (6) File name (7) File name (8) File name (9)
File name (1) File name (2) File name (3) File name (4) File name (5)
g. 79
Sort
Media Type
Thumbnail Size
Photo
Music
Video
g. 80
pvr 01/01
pvr
Video
g. 81
VideoFile name (1) SizeCH1 01/01
File name (6) File name (7) File name (8) File name (9)
File name (1) File name (2) File name (3) File name (4) File name (5)
g. 82
1/9 Filename (1)
g. 83
Page 40
| HD Ready LCD TV | User Manual
p.38
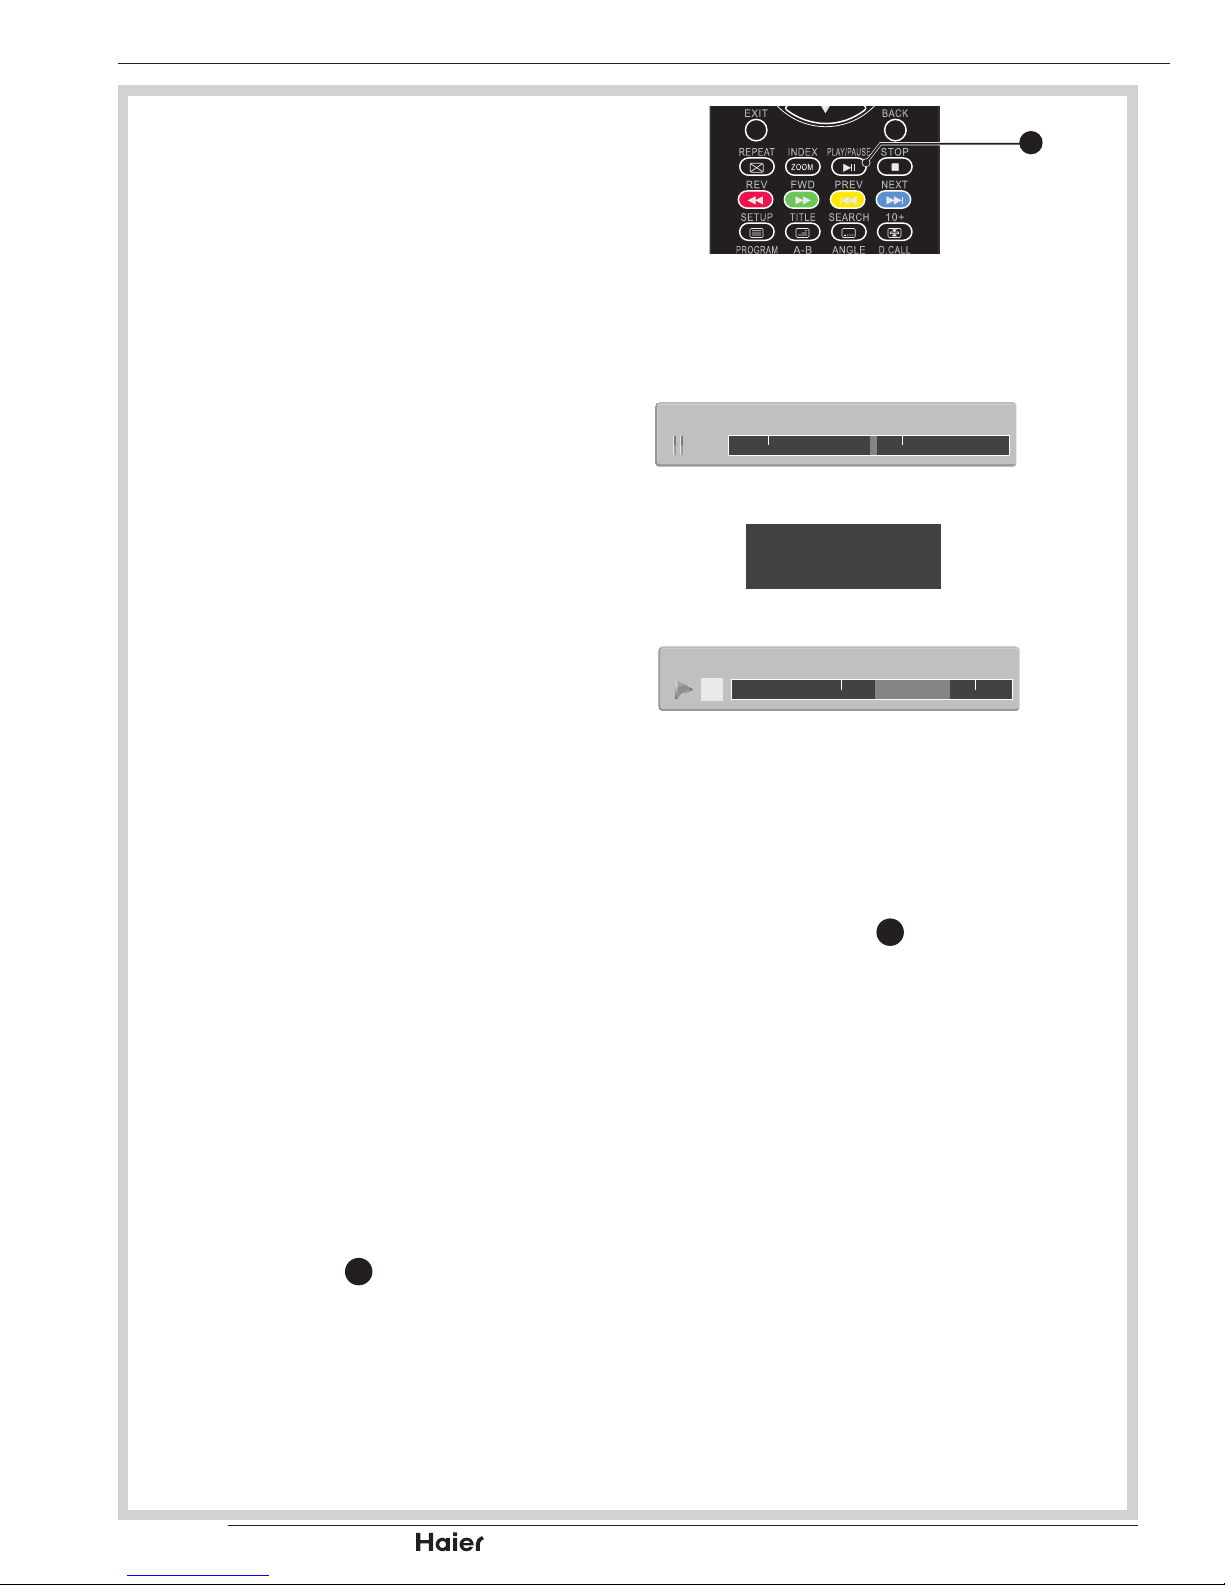
The window for recording progress 3.
will be minimized during recording.
See g. 86.
Press PAUSE 4.
29
again to stop
Time Shift function and stop
recording program. See g. 87.
NOTE:
Please do not unplug the USB •
storage device when the Time
Shift function is activated.
Approximately 4GB of memory •
buffers about offer 180 minutes
for 480i content or 30 minutes for
1080i content.
Once 4GB of data gets stored, •
the time shift function will delete
the stored data and restart the
buffering of content. This occurs
even for USB devices larger than
4GB.
TIME SHIFT FUNCTION
This TV allows you to pause and record
the currently watched digital program
(ATSC or QAM) to a USB storage device,
and to resume to the point where it was
paused.
NOTE:
Formatting a USB 2.0 storage device •
will be needed. Save your original data
before formatting. All the data stored
in the USB device will be erased after
formatting.
Sleep timer will be suspended if it had •
been set before activating the Time
Shift function.
USB Drive Storage Format
Select to format the USB device and
allocate the amount of space for the Time
Shift function.
NOTE:
The format process will take at least •
2 minutes. Please do not turn off the
power or remove the USB device
during formatting.
During formatting, a speed test will be •
done on the USB device. If it fails, it
means the USB device may not support
the Time Shift function.
Record a paused DTV program to USB
storage device
While in the TV input source, insert 1.
USB storage device to the USB port on
the side of your TV.
Press PAUSE 2.
29
to start Time Shift
function. The TV program paused. The
Time Shift OSD appears, and starts
recording.
See g. 84 and 85.
Vol
29
g. 84
-00:01:01 15:00 15:30
g. 85
-00:01:07
g.86
-00:17:11
1x
15:00 15:30
g.87
Page 41
p.39
| HD Ready LCD TV | User Manual
TIME SHIFT FUNCTION
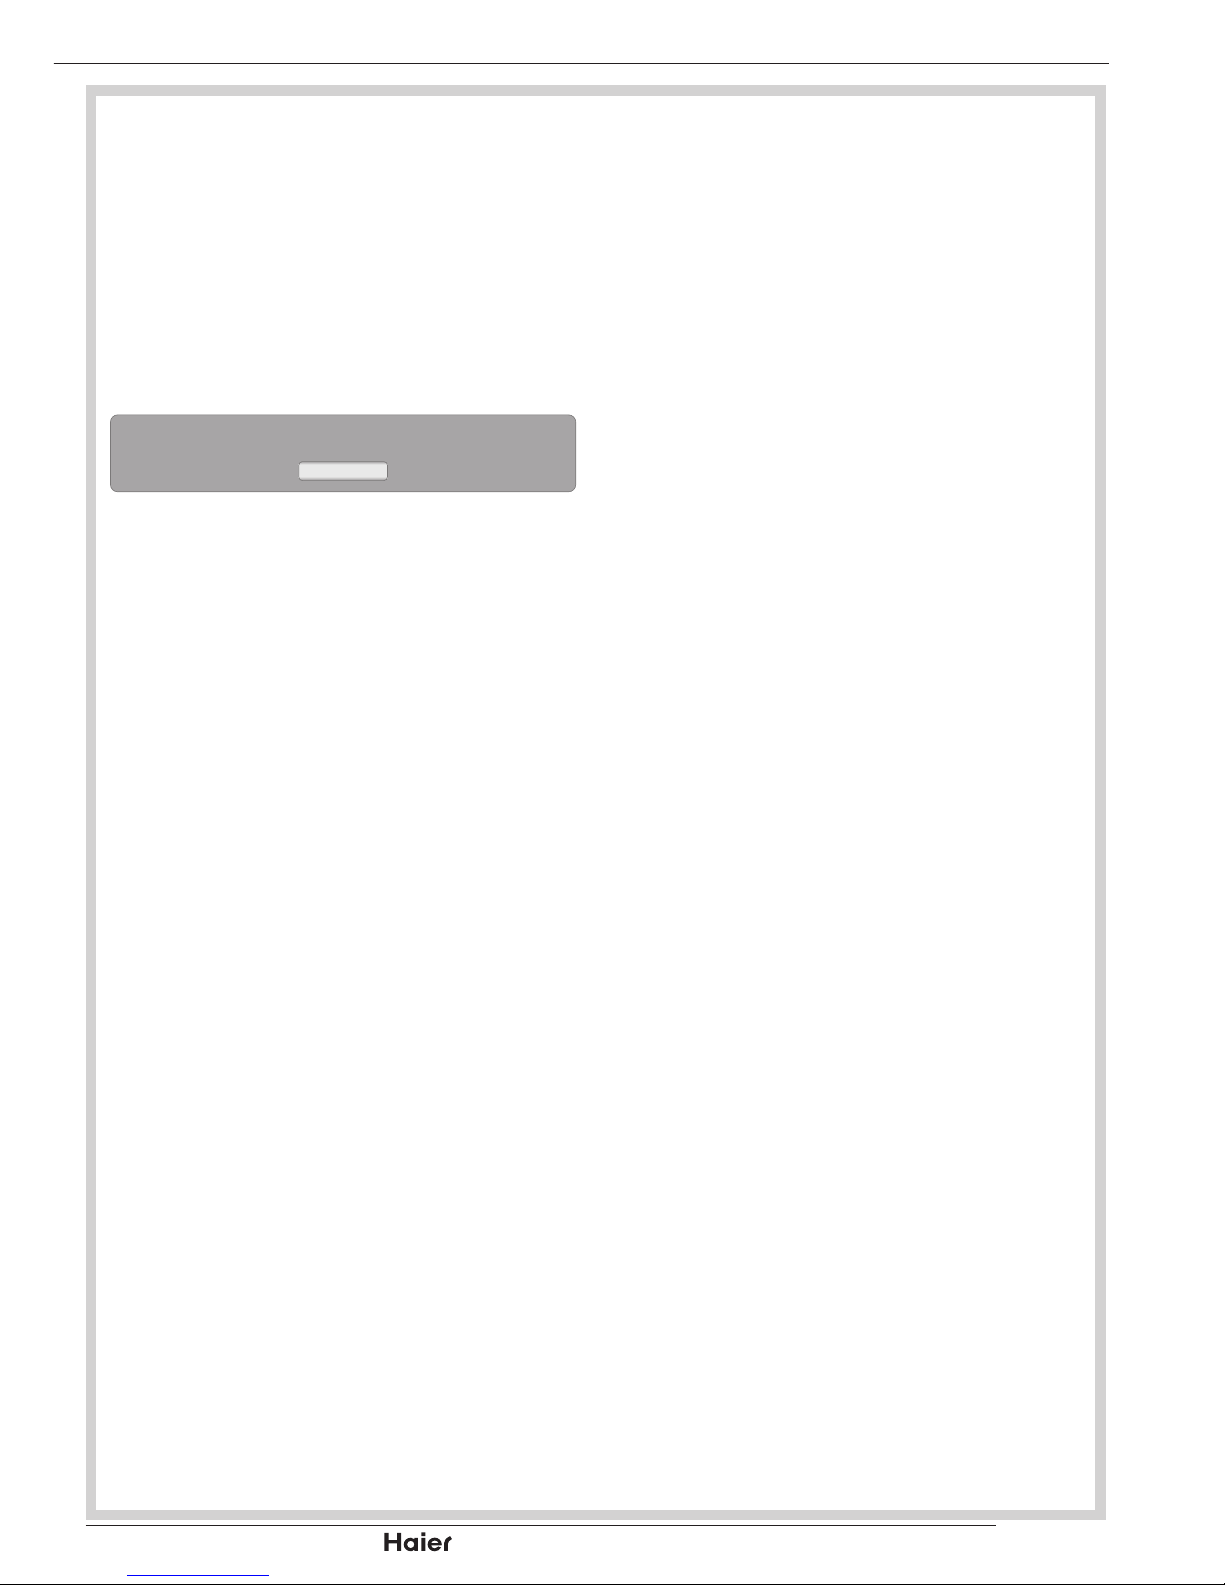
Time Shift limitations:
When the Time Shift feature is 1.
activated, only the PLAY/PAUSE/
STOP/FWD/REV/VOL+/VOL-/MUTE
keys and some basic operation keys
(ENTER/EXIT/navigation keys) are
available. When a key is pressed and
that function is unavailable, the dialog
box shown below will appear.
This Key Is Unavailable During Time Shift Operation !
OK
Video playback may not be smooth 2.
and skip if USB recording speed does
not meet the minimum requirements
(for certain 1080i/p signals).
Do Not remove USB disk or switch off 3.
the power during Time Shift operations.
It will abort once the signal is lost.
Do Not remove the signal source 4.
during Time Shift operations.
Do Not quickly and repeatedly change 5.
operations between PLAY/PAUSE/
FWD/REV.
Sleep timer will be terminated if it had 6.
been set before Time Shift.
The USB storage size needs to be the 7.
size of 4GB, 8GB or 16GB.
Video may become pixelated when 8.
Video bit rate is too low.
Close Caption setting is not available 9.
during Time Shift mode.
Not all USB devices are compatible. 10.
Below is a list of recommended USB
drvies. Models that are not listed may
be compatible, but it is not guaranteed
to work.
SanDisk Extreme•
®
Contour™
USB Flash Drive - 8GB
SDCZ8-8192-E75
SanDisk Extreme•
®
Contour™
USB Flash Drive - 16GB
SDCZ8-016G-A75
Kingston DataTraveler 410 •
USB 2.0 Flash Drive - 8GB
DT410/8GB
Kingston DataTraveler 410 •
USB 2.0 Flash Drive - 16GB
DT410/16GB
OCZ Technology Rally2 •
USB 2.0 Flash Drive - 4GB
OCZUSBR2DC-4GB
OCZ Technology ATV USB •
2.0 Flash Drive - 8GB
OCZUSBATV-8GB
OCZ Technology Rally2 •
USB 2.0 Flash Drive - 8GB
OCZUSBR2DC-8GB
This feature is not available for all 11.
digital TV, such as scrambled or
audio only channels.
Page 42

| HD Ready LCD TV | User Manual
p.40
TELETEXT
(Designed for Europe PAL/SECAM/DVB-T
systems only)
See g. 88.
Index
Press INDEX •
14
to return to page 100.
Mix
Press •
18
to active teletext with TV.
Text
Press Text •
19
to activate Teletext. Press
again to turn off Teletext.
Reveal
Press REVEAL •
20
to display hidden
information such as answers to a quiz
and MHEG CANCEL function.
Size
Press SIZE •
21
to change the screen
size: Full screen, Top half and Bottom
half.
Hold
Press HOLD •
24
to stop the scrolling of
pages, press again to continue.
Subcode
Press SUBCODE• 25 to select the
subpage when the current page
contains subpage(s).
Colour Buttons (R/G/Y/B)
Press Colour Buttons •
17, 16, 27
, and 26
to select from on screen options, which
have the same coloured text.
Vol
28
26
24
29
27
25
23
22
15
17
19
14
16
18
20
21
g. 88
TELETEXT
Page 43

p.41
| HD Ready LCD TV | User Manual
Common Interface Module
The Common Interface CI Slot •
10
, is
designed to accept the Conditional
Access CA Module coupled with a
Smart card, in order to view pay TV
programmes and additional services.
Contact your Common Interface service
provider for further information about
modules and subscription options.
Please note that CA modules and smart
cards are not included, or supplied as
optional extras by us.
See g. 89.
WARNING: Switch off your TV before
any module is inserted into the
Common Interface slot.
Correctly insert the CA Module and 1.
then the Smart Card into the CI slot
located at the side of the TV.
See g. 89.
Turn on the TV and press MENU 2.
11
and select the TV submenu.
“Common interface” will be displayed if
the CA module is detected. Wait for few
moments until the card is activated.
See g. 90.
Select Common Interface to view the 3.
menu options and information on the
inserted CI card.
See g. 91.
Press OK 4.
12
to access the card menu,
for more details refer to the module’s
instruction manual.
When module is removed, the 5.
“Common Interface” menu will
disappear from the screen.
CA Module
Smart Card
4
10
g. 89
Features
Menu Languate
4:3 Mode
Picture Format
Time
16:9
Auto
English
Subtitle
Teletext Language
Manual OAD download
Common Interface
Enter
OK EXITSelect Exit
g. 90
Features
Menu Languate
4:3 Mode
Picture Format
Time
16:9
Auto
English
Subtitle
Teletext Language
Common Interface
Manual OAD download
Enter
OK EXITSelect Exit
g. 91
COMMON INTERFACE MODULE
Page 44
| HD Ready LCD TV | User Manual
p.42
OAD for Software Update function
When you get the updating news from 1.
the TV shop’s web, you can update the
operation software using the Download
menu. The data for various units are
transferred consecutively on a special
receiving channel.
You need to search the channel with 2.
updating code stream.
NOTE: you can get information from
the TV shop or internet.
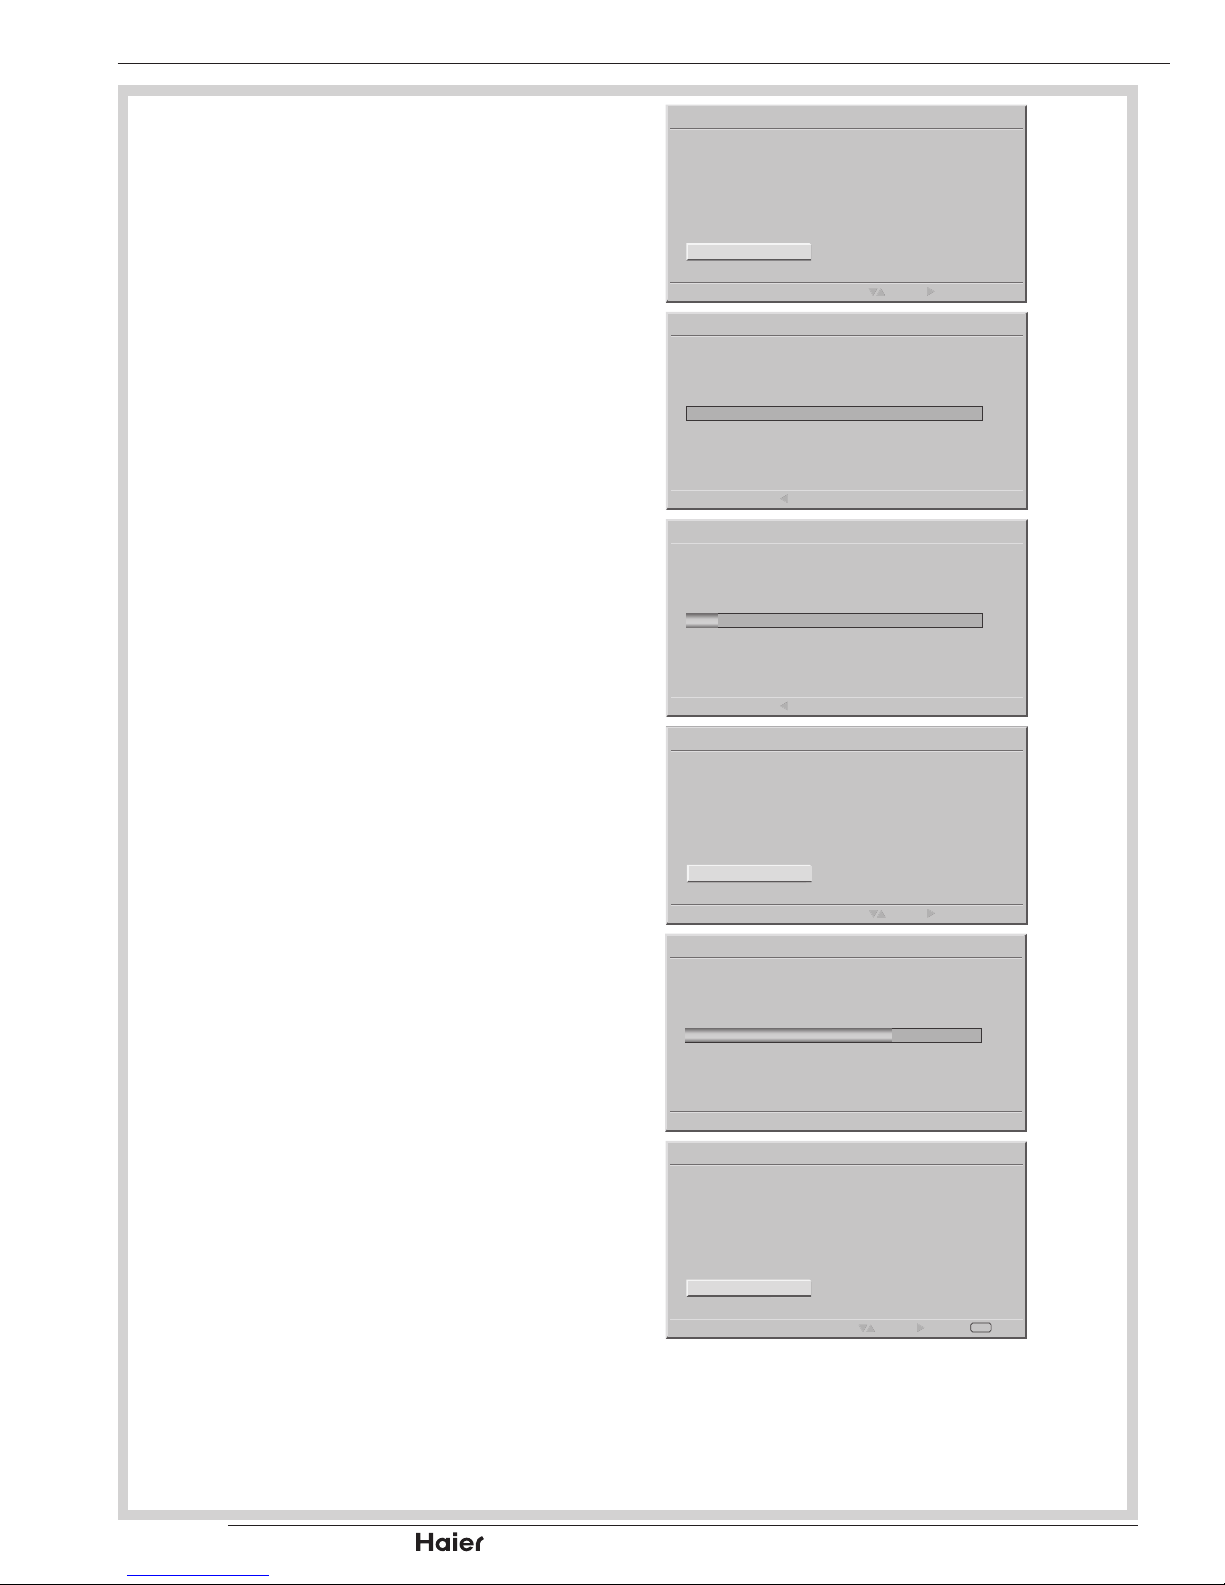
Operation
When you search the channel. You will 1.
get a information.
See g. 92.
Press ▲ ▼ to conrm if you would 2.
like to “Accept” this new software or
“Remind me Later” and use ► button
to action update new software.
See g. 92-96.
After the programming , please use ▲ 3.
▼ to conrm if you would like to restart
the TV. The software will be updated
completely after restart the TV.
See g. 97.
NOTE: You must not switch off the unit
during this process!
Software ID : XXXXXXXX
A New Version of software is detected.Do you want to upgrade
it?
Over Air Download
Select Next
Accept
Remind me Later
g. 92
Software ID : XXXXXXXX
Searching
0%
Over Air Download
Back
g. 93
Software ID : XXXXXXXX
Searching... This process may take up to 25 minutes
12%
Over Air Download
Back
g. 94
Software ID : XXXXXXXX
Seraching.
Over Air Download
Select Next
Accept
Reject
g. 95
Software ID : XXXXXXXX
Programming...
Warring : During the process. Please do not unplug the TV Set
power code as this lead to defective TV Set.
69%
Over Air Download
g. 96
Software ID : XXXXXXXX
Software upgrades successfully! Restart the TV now?
Over Air Download
Select Next
Accept
Reject
Exit
OK
g. 97
OAD OPERATION
Page 45
p.43
| HD Ready LCD TV | User Manual
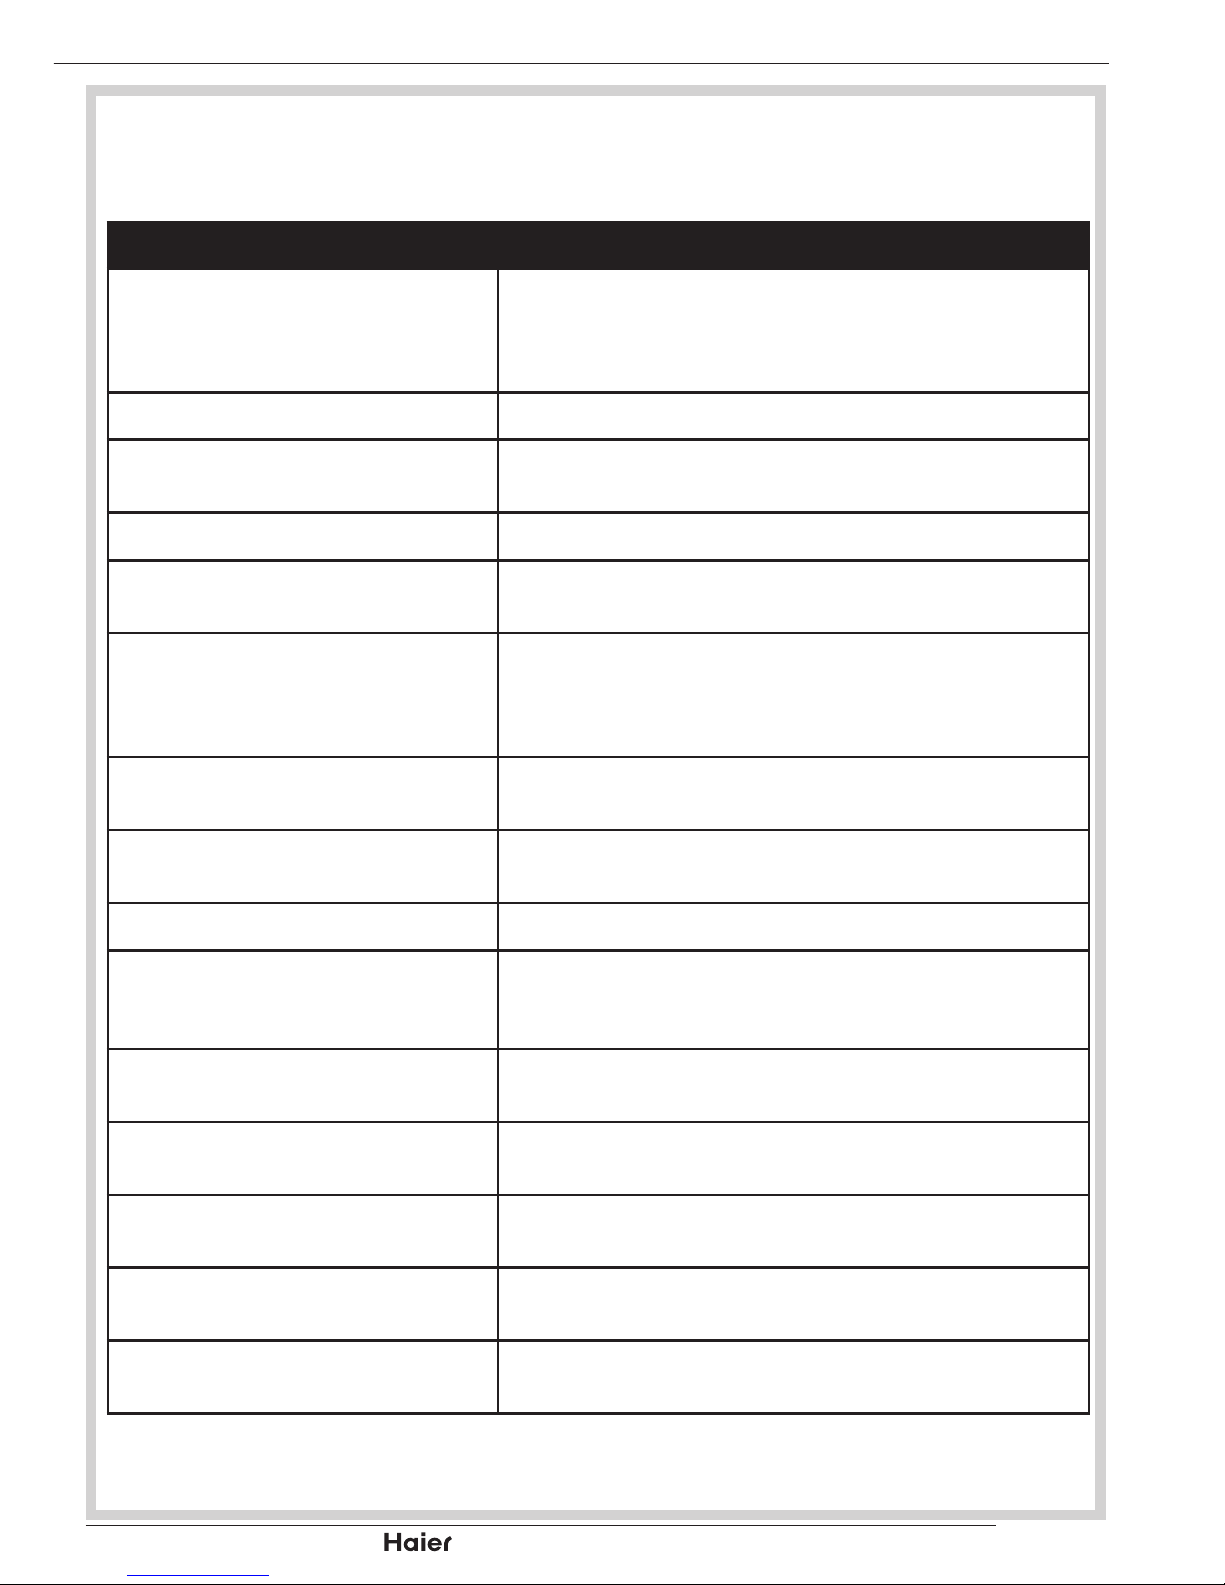
The following table contains common problems and the solutions to these
problems.
Please check this list before you contact technicians.
Problems Solutions
No picture 1. Connect power cord correctly.
2. Turn on power.
3. Connect signal cable correctly.
4. Press any button on the LCD TV.
Abnormal colours Connect signal cable correctly.
Twisted picture 1. Connect signal cable correctly.
2. Please use compatible signal.
Picture too dark Adjust brightness and contrast.
Audio only, no images 1. Please check if input signal is connected correctly.
2. TV-RF signal must not be lower than 50dB.
Picture only, no audio 1. Connect signal cable correctly.
2. Adjust volume to proper level.
3. Connect audio signal cable correctly.
4. TV-RF signal must not be lower than 50dB.
Cannot use remote control 1. Please change battery.
2. Turn off power for 10 seconds; and then restart power.
Cannot receive sufcient channels
through antenna
Please use the Channel scan function to increase the
number of channels not included in memory.
No colours Please adjust the picture setup.
Blinking picture accompanied by
ghost image
1. Check the connection of antenna/signal cable.
2. Check if channel is in play mode.
3. Press signal source and change input mode.
Broken lines or segments Adjust antenna. Keep the TV away from noise sources,
such as vehicles, neon lights, and hair dryers.
Certain TV channels are blocked
(Hope to acquire some channels)
Please use the Update scan method to add the channels
not included in memory.
Overlapping images or ghost images Please use multi-directional outdoor antenna. (If your TV is
subject to the inuence of nearby mountains or buildings).
Cannot use a function If the item you choose turns grey, that item cannot be
selected.
Cannot receive programs Please use the Update scan method to add the channels
not included in memory.
TROUBLESHOOTING
Page 46
| HD Ready LCD TV | User Manual
p.44
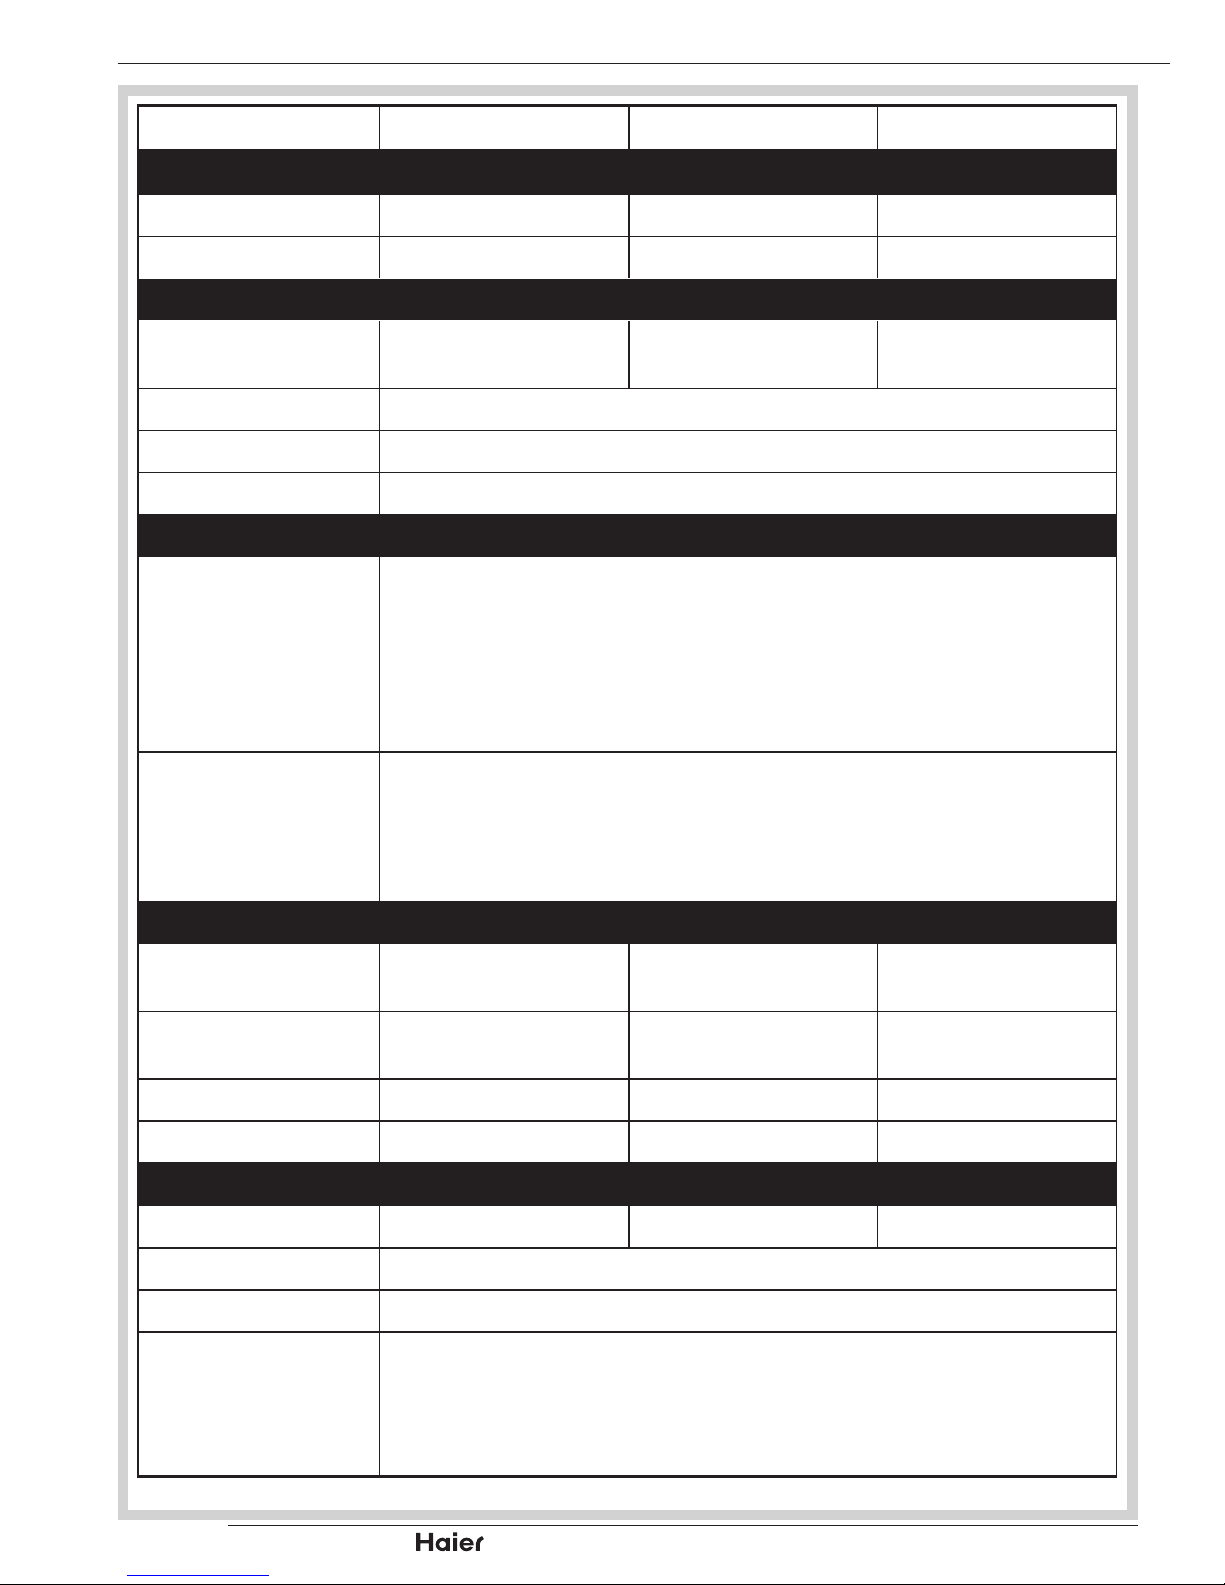
Model No. LT32F6 LTF37F6 LTF42F6
DISPLAY
Aspect Ratio 16:9 16:9 16:9
Resolution 1366 x 768 1920 x 1080 1920 x 1080
ENHANCEMENT
Sound Output
(RMS Watts)
2 x 5 W 2 x 10 W 2 x 10 W
Sound Mode Speech, Personal, Music
Picture Formats Auto, Normal, Wide, Zoom 1, Zoom 2, Native (only in HDMI mode)
Picture Mode Standard, Vivid, Movie, Eco, Personal
CONNECTIONS
Rear Connectors
Tuner input (75Ω)
SCART 1, SCART 2
PC IN: VGA and Audio cable
Component Video and L/R Audio input
SPDIF Output (Coaxial audio out)
HDMI 1, HDMI 2
SERCIVE
Side Connectors
Earphone Output
AV In (Composite Audio / Video)
HDMI 3
USB
CI Slot (Common Interface)
WEIGHT & DIMENSIOIN
Dimension with stand
(WxHxD) (mm)
789.08x566.53x230.17 912.4x636.9x257.4 1019.3x697.9x301.5
Dimension without
stand (WxHxD) (mm)
789.08x509.83x95 912.4x590.0x98 1019.3x643.3x98
Weight with stand 9.5 Kg 13.5 Kg 18 Kg
Weight without stand 7.7 Kg 11.6 Kg 15 Kg
POWER
Operation (Max.) 130 W 185 W 200 W
Standby < 1 W
Mains Power AC220-240V, 50-60Hz
Accessories
User Manual
Quick Setup Guide
Remote Control with Batteries
Mains Cord
Warranty Card
SPECIFICATIONS
Page 47
p.45
| HD Ready LCD TV | User Manual
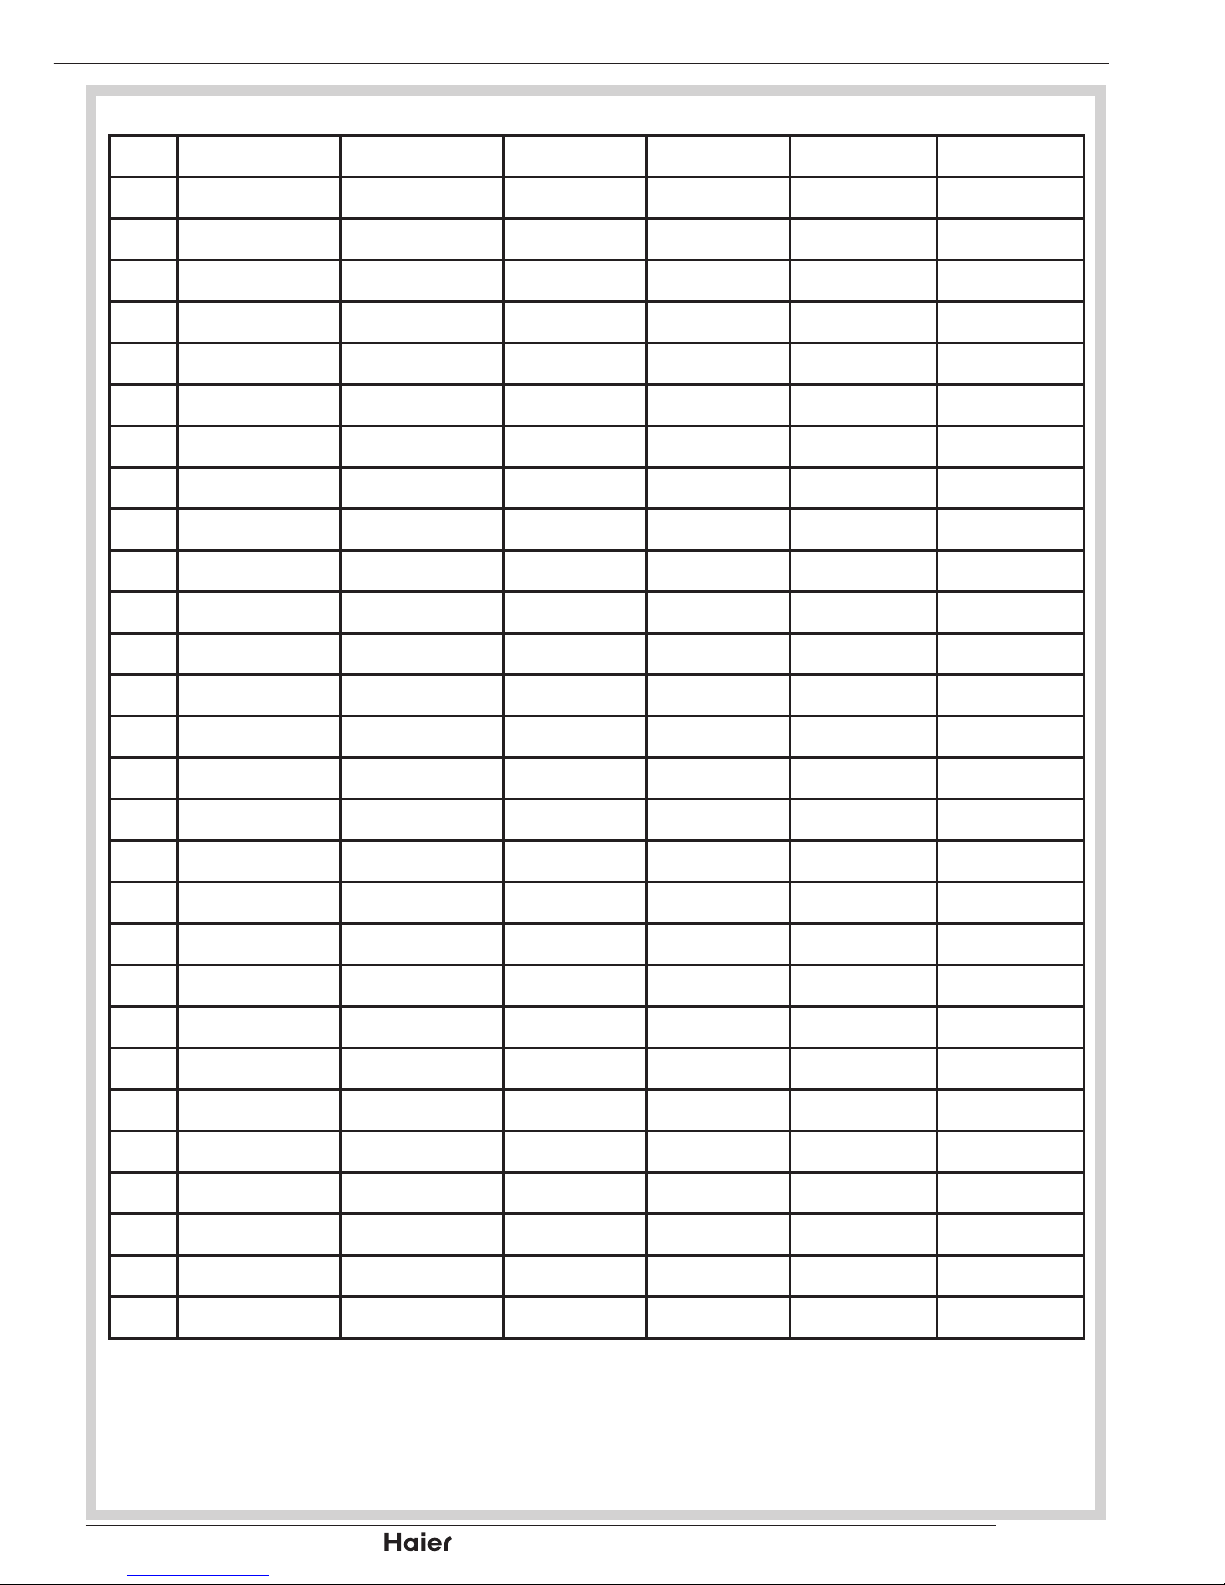
VGA support format
32” 37”/42”
Item H.Freq. (KHz) Mode Resolution V.Freq. (Hz) 1366x768 1920x1080
1 31.469 IBM VGA 640x350 70.086
2 31.469 IBM VGA 720x400 70.087
3 31.469 IBM VGA 640x480 59.94 V V
4 35 MACINTOSH 640x480 67
5 37.861 VESA 640x480 72.809
6 37.5 VESA 640x480 75
7 35.156 VESA 800x600 56.25 V V
8 37.879 VESA 800x600 60.317 V V
9 48.077 VESA 800x600 72.188
10 46.875 VESA 800x600 75
11 49.7 MACINTOSH 832x624 75
12 48.363 VESA 1024x768 60.004 V V
13 56.476 VESA 1024x768 70.069
14 60.023 VESA 1024x768 75.029
15 61.08 IBM XGA-2 1024x768 75.781
16 44.772 VESA CVT 1280x720 59.855 V V
17 47.776 VESA 1280 x768 59.87 V V
18 60.289 VESA 1280 x768 75
49.702 VESA 1280x800 59.81 V
19 47.72 VESA CVT 1360x768 59.799 V V
20 63.981 VESA 1280x1024 60.02 V
21 79.976 VESA 1280x1024 75.025
55.935 VESA 1440x900 59.887 V
70.635 VESA 1440x900 74.984
22 65.29 CVT1.76MW 1680x1050 59.954 V
23 64.674 CVT1.76MW-R 1680x1050 59.883 V
24 66.587 CVT 2.3MA-R 1920x1080 60 V
APPENDIX
Page 48
| HD Ready LCD TV | User Manual
p.46
HDMI (High Denition Multimedia Interface) support format
Support 480i /480p, 576i/576p, 720p, 1080i, 1080p format with HDCP1.
Digital interface with 4 channels TMDS signal2.
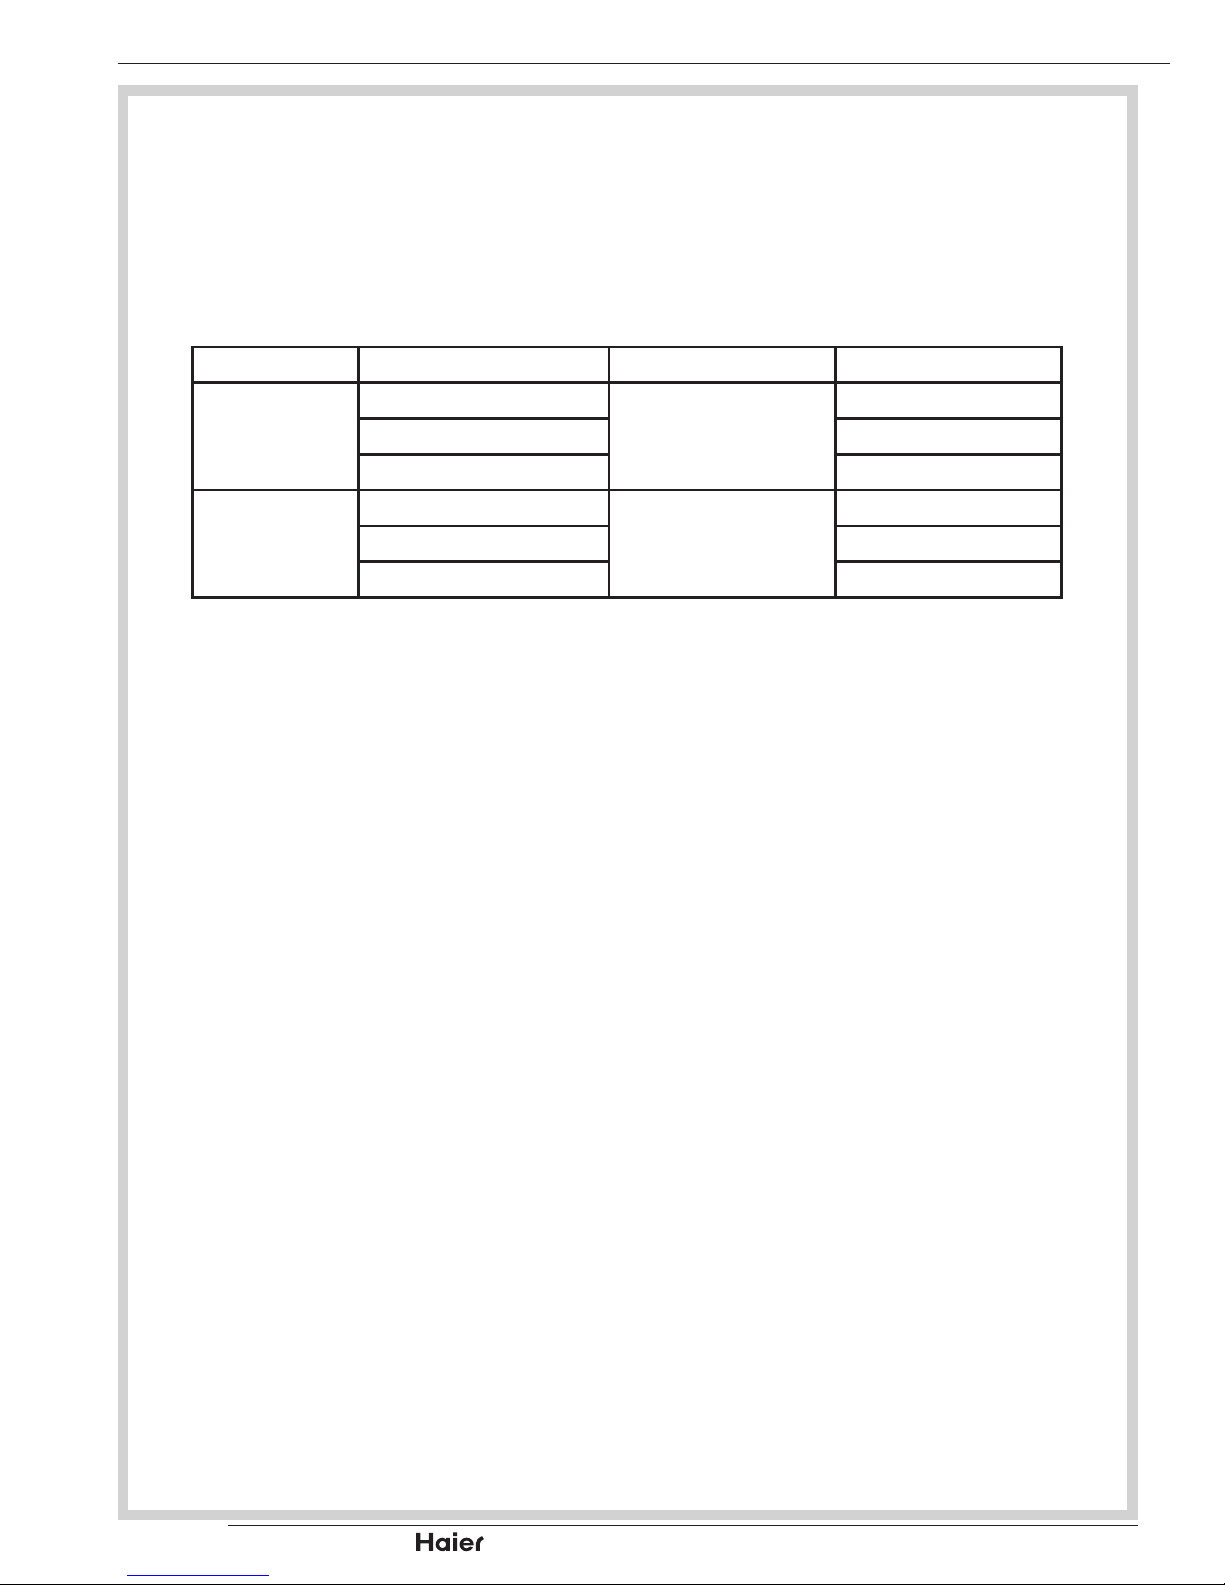
Scart input/output description
Scart 1: SCART input / output -Full SCART, includes RGB in , CVBS (audio L/R) in/ (TV out).1.
Scart 2: SCART input / output -Half SCART, includes S-Video in , CVBS (audio L/R) in/ (Monitor out)2.
TV Source Screen Display Source SCART 1 Out SCART 2 Out
ATV
ATV
ATV
ATV
CVBS/S-Video CVBS/S-Video
HDMI/VGA/Component --/--/Component
DTV
DTV
DTV
DTV
CVBS/S-Video CVBS/S-Video
HDMI/VGA/Component --/--/--
APPENDIX
Page 49
p.47
| HD Ready LCD TV | User Manual
Connecting to Power
Check that the voltage marked on the product corresponds with your supply
voltage.
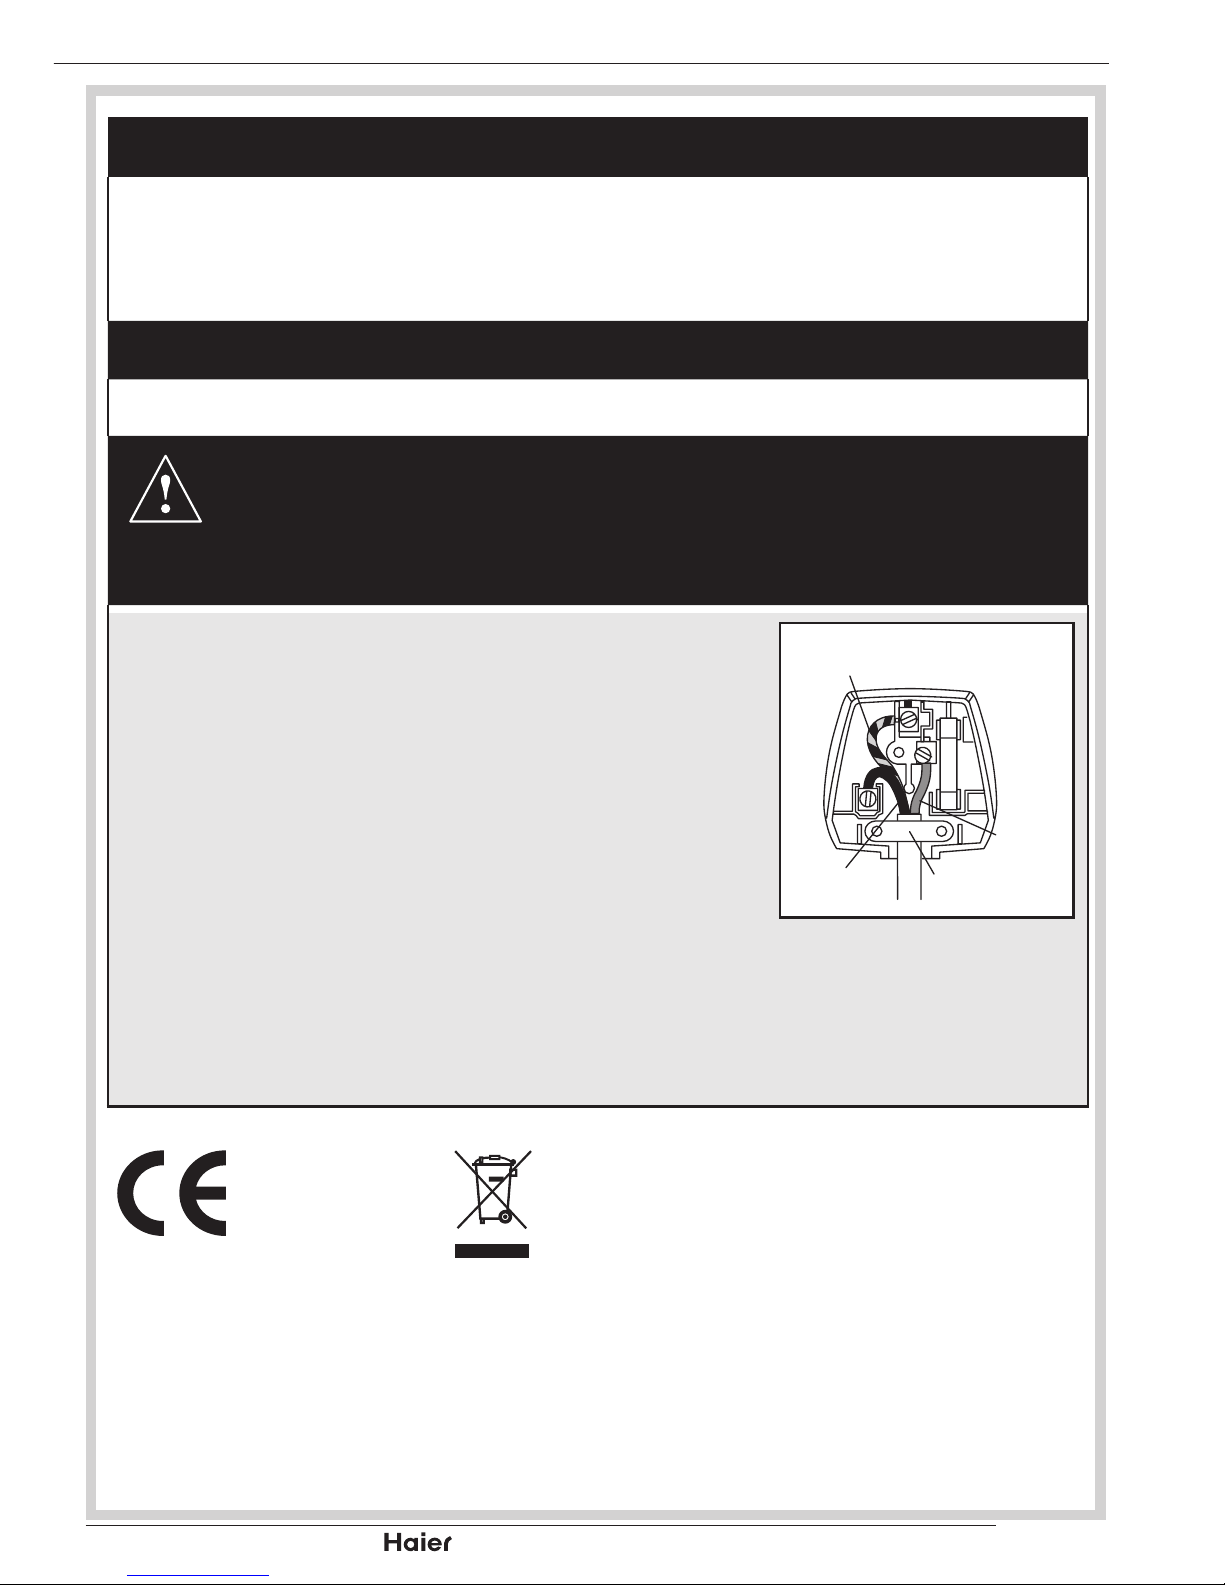
This product is tted with a 10A plug complying with BS1363. If this plug is
unsuitable or needs to be replaced, please note the following :
Plug Replacement
If you need to replace the tted plug, refer to the notes below:
WARNING :
Never connect live or neutral wires to the earth terminal of the plug.
Only t an approved 13 Amp BS1363/A plug and the correct rated fuse.
If in doubt, consult a qualied electrician.
IMPORTANT
The wires in this mains lead are coloured as follows:
Blue-Neutral
Brown-Live
As the colours of the wires in the mains lead of this
apparatus may not correspond with the coloured
markings identifying the terminals in your plug,
proceed as follows:
The wire which is coloured blue must be connected to
the terminal which is marked with N or coloured blue. The wire which is coloured
brown must be connected to the terminal which is marked L or coloured brown.
Always ensure that the plug cord grip is fastened correctly.
If a 13A (BS1363) fused plug is used it must be tted with a 3A fuse conforming
to BS1362 and be ASTA approved. If in doubt contact a qualied electrician.
The shipped version of this device compiles with
requirements of EEC directives 2004/108/CE
“Electomagnetic compatibility and 2006/95/EC “Low
voltage directive”.
TPV Technology Group
Lahnstrasse 86 A, 12055 Berlin, Germany
BROWN
(LIVE)
CABLE
GRIP
BLUE
(NEUTRAL)
YELLOW & GREEN
(EARTH)
INFORMATION
Page 50

| HD Ready LCD TV | User Manual
p.48
Notes
Page 51

p.49
| HD Ready LCD TV | User Manual
Notes
Page 52

 Loading...