

Page 1

LCD TV RECEIVER
USER'S MANUAL
MODEL:
L T19M1CW,LT19M2CW
L T22M1CW,LT26M2C
L T26M1C
Q41G2202672 2B
Please read this manual carefully before
using your television and keep this manual
In a good place for future reference.
Page 2

IMPORTANT SAFETY INSTRUCTIONS
Read all instruction before use and keep for future reference.
WARNING
• Misuse or modification of this appliance may result in breakdown or injury.
• To reduce the risk of fire or electric shock, do not expose this appliance to rain or moisture.
IMPORTANT INFORMATION
• The appliance is intended for household use only.
• The appliance should always be turned to OFF before plugging or unplugging from socket. Never
yank cord to disconnect from socket; instead, grasp plug and pull to disconnect.
• Check that the voltage on the rating plate of your product corresponds with your local electricity
supply which must be A.C. (Alternating Current).
• If the mains sockets in your home are not suitable for the plug supplied with this product, check
with a qualified electrician for replacement.
FOR OPTIMUM PERFORMANCE
• Do not use in environments which are extremely hot, cold, dusty or humid.
• Keep the unit free from dust and clean with a dry cloth.
• Do not use in areas exposed to direct sunlight or where it can become extremely hot.
• Keep away from sources of strong magnetism - such as speakers.
•
Avoid placement where there is a lot of movement, vibration or on an unstable surface.
• To reduce the risk of fire or electric shock, the equipment shall not be exposed to rain or moisture
and objects filled with liquids, such as vases, shall be placed on the apparatus.
• The equipment shall not be exposed to dripping or splashing.
To avoid fire, no naked flame source, such as lit candles, should be placed on or around the unit.
•
• FFor ventilation, leave at least 10 cm free all around the TV. Do not place the TV on a carpet.
• The ventilation holes must be kept clear from obstructions.
• In case of smoke, or unusual noises or smells coming from the unit, switch it off, unplug it from
the wall socket and contact your dealer or service center.
• Place the TV in such a position that the screen is not exposed to direct sunlight. It is best to have
soft indirect lighting whilst watching TV. Avoid dark environments and screen reflection as these
may cause eye fatigue.
• When the TV has been moved from a cold place, it will need time for the moisture from inside to
evaporate.
•
The appliance coupler is used as the disconnect device of this apparatus, the disconnect device
shall remain readily operable.
•
The apparatus must be connected to a mains socket outlet with a protected earthed connection.
Page 3

IMPORTANT SAFETY INSTRUCTIONS
Read all instruction before use and keep for future reference.
FOR SAFETY
DO NOT:
• Attempt to disassemble this unit or carry out repairs.
• Attempt to modify the unit in any way.
• Make sure that foreign objects do not get inside the unit.
• Place naked flame sources - such as lit candles on or near the unit.
• Place objects filled with liquids - such as vases, on or next to the unit.
• Cover the unit - allow the unit to be well ventilated.
• Drop the unit or subject it to strong shocks.
• Attempt to service this product yourself as opening or removing covers may expose you to
dangerous voltage or other hazards. Refer all servicing to qualified service personnel.
CHILDREN
• Children do not always understand the dangers associated with operating electrical appliances.
Never allow children to use this appliance.
POWER SUPPLY
• If the unit uses a mains supply, ensure that the plug is securely inserted into the mains socket,
and it is easily accessible.
• Protect the power lead from sharp objects, excessive heat and damp or wet locations. Check
the power lead periodically, and replace if damaged.
• If the unit uses batteries, please ensure that they are inserted correctly - observing the polarity
(+/-).
• Do not mix new and used batteries.
• Please make sure that used batteries are disposed of correctly. Do not burn or incinerate.
• Check that the voltage on the rating plate of your product corresponds with your local electricity
supply which must be A.C. (Alternating Current).
• Any repairs should only be carried out by a fully qualified electrician or an authorised service agent.
EN
LISTENING WITH EARPHONES
• Listen at moderate volumes to avoid hearing damage.
• If you hear no sound during playback, do not turn the volume up as the music may suddenly begin
at a high volume. Excessive sound pressure from earphones and headphones can cause hearing loss.
• To avoid damaging your ears, adjust the volume to the lowest level before playback, and turn up
to the desired level when playback has started.
CAUTION: TO REDUCE THE RISK OF ELECTRIC SHOCK DO NOT REMOVE COVER
(OR BACK), THERE ARE NO USER SERVICEABLE PARTS INSIDE, REFER SERVICING
TO QUALIFIED SERVICE PERSONNEL.
1
Page 4

CONTENTS
Know Your Machine ......................................................................................... 3
Remote Control ................................................................................................ 6
Wall Mounting.................................................................................................... 8
Antenna Connection ......................................................................................... 10
Tuning Menu Options ...................................................................................... 11
Other Connections ............................................................................................ 13
Basic Operation ................................................................................................ 18
Menu Operation ................................................................................................ 22
Teletext .............................................................................................................. 32
Common Interface Module ............................................................................... 34
Troubleshooting ............................................................................................... 36
Specifications .................................................................................................. 37
NOTE: This LCD cabinet drawing is a sample and may not depict
cabinet design.
2
HD Ready Digital LCDTV User Manual
your actual LCD
Page 5

KNOW YOUR MACHINE
A
POWER
B
VIDEO
C
SCART
D
TV
E
PC
F
Numerical Buttons
G
EPG
H
PRE PR
J
ASPECT
K
SOURCE
L
NICAM
M
SLEEP
N
PICTURE
O
PR LIST
P
SOUND
Q
VOL
R
MUTE
S
PR
T
DISPLAY
U
MENU
V
EXIT
X
OK
Y
Navigation Buttons
a
Green Button
b
Yellow Button
d
Blue Button
e
Red Button
f
MIX
g
TELETEXT
SIZE
h
SUBPAGE
k
INDEX
m
n
SUBTITLE
p
REVEL/Tick
q
HOLD/VIEW
A
B
C E
F
G
J
K
N
O
Q
T
U
X
a
e
f
g
m
n
1 x Remote Control
EN
D
H
L
M
P
R
S
V
Y
b
d
h
k
p
q
3
Page 6

KNOW YOUR MACHINE
A
Power LED
Wall Mount Hole
B
Volume Up
C
Volume Down
D
Channel Up
E
Channel Down
F
MENU Button
G
Source Button
H
Power Button
J
Common Interface Slot
K
L
Headphone Output
M
Video Input
N
Audio Input
O
S-Video Input
P
HDMI 2 Input
Q
Antenna Input
R
SCART Input
S
PC Audio Input
SPDIF Output
T
Component Input
U
HDMI 1 Input
V
X
Power Connector
VGA Input
Y
1 x LCD TV
A
Control Panel
B
C
D
E
F
G
H
J
Rear Connections
Y
X
4
HD Ready Digital LCDTV User Manual
V
Page 7

KNOW YOUR MACHINEKNOW YOUR MACHINE
Front View
Rear View
Z
Side Connections
1 x AC Power Cord
K
L
M
N
EN
O
P
a
2 x AAA Battery
V
U
QS RT
HD Ready Digital LCDTV User Manual
5
Page 8

REMOTE CONTROL
NOTES:
- Please read the important safety
instructions before use.
REMOTE CONTROL
1. Unclip the Battery Cover from the
Remote Control.
See fig. 1.
2. Insert two new 1.5V size AAA
Batteries with the and marks
correctly aligned.
See fig. 2.
NOTE ON BATTERIES:
• Do not mix different types of
batteries or an old battery with
a new one.
• To prevent the risk of leakage
or explosions, never recharge
the batteries, apply heat or take
them apart.
• When not using batteries,
remove them to prevent battery
drain.
• If liquid leaks from the batteries,
throw them away. Thoroughly
clean the battery compartment
with a dry cloth.
fig. 1
Battery
Compartment
Cover
fig. 2
6
HD Ready Digital LCDTV User Manual
Page 9

REMOTE CONTROL
3. Carefully close the Battery Cover.
See fig. 3.
EN
PRECAUTIONS:
To obtain the best performance
from your remote control, please
consider the following:
• Ensure there is no obstruction
between remote control and
TV set.
• Bright sunlight may affect the
remote control performance.
• Always ensure that both
batteries are replaced at the
same time.
fig. 3
HD Ready Digital LCDTV User Manual
7
Page 10

WALL MOUNTING
NOTES:
- Please read the important safety
instructions before use.
WALL MOUNTING (Optional)
IMPORTANT: When drilling into
walls always check that there
are no hidden wires or pipes etc.
Make sure that the screws and
wall plugs supplied are suitable
for supporting the unit. Consult
a qualified tradesperson if you
are not sure.
NOTE: It would be useful to ask
someone to help you at this
stage.
Stand
fig. 5
fig. 4
Screws
1. Put the unit face down on a safe,
flat surface that is covered by a
smooth cloth.
See fig. 4 and 5.
2. Unscrew the screws of the stand.
Then remove the Stand.
See fig. 4 - 6.
8
HD Ready Digital LCDTV User Manual
Stand
fig. 6
Page 11

WALL MOUNTING
3. Use 4 Wall Mount Holes B and
Screws (not included) to mount the
TV on the Bracket (not included).
See fig. 7.
EN
4. For the Wall Bracket - Refer to
the user instructions supplied
with the wall bracket (not
included).
See fig. 8.
W
H
TV Screen
Size (inches)
19"
22"
26"
VESA-Compatible
Wall bracket
(W x H mm)
100 x 100 mm
100 x 100 mm
200 x 100 mm
B
Screw Type
Metric 4 x 10 mm
Metric 4 x 10 mm
Metric 4 x 10 mm
fig. 7
fig. 8
HD Ready Digital LCDTV User Manual
9
Page 12

ANTENNA CONNECTION
WARNING:
- Switch off the TV before
connecting any external device.
CONNECTING THE ANTENNA
1. Connect the Antenna Plug to the
Antenna Input Q located at the
rear of the TV.
See fig. 9.
2. For optimum picture quality, adjust
the direction of the antenna.
3. To improve picture quality where
the signal is poor use a signal
amplifier (not included).
X
fig. 9
Q
AC POWER CORD CONNECTION
NOTE: Make sure your local
voltage is 230V/240V~, 50Hz.
1. Connect the AC Power Cord Z
to the Power Connector X .
See fig. 9.
2. Connect the AC Power Cord Z
to the mains socket.
See fig. 9.
10
HD Ready Digital LCDTV User Manual
Z
Mains Socket
Antenna Plug
Page 13
TUNING MENU OPTIONS
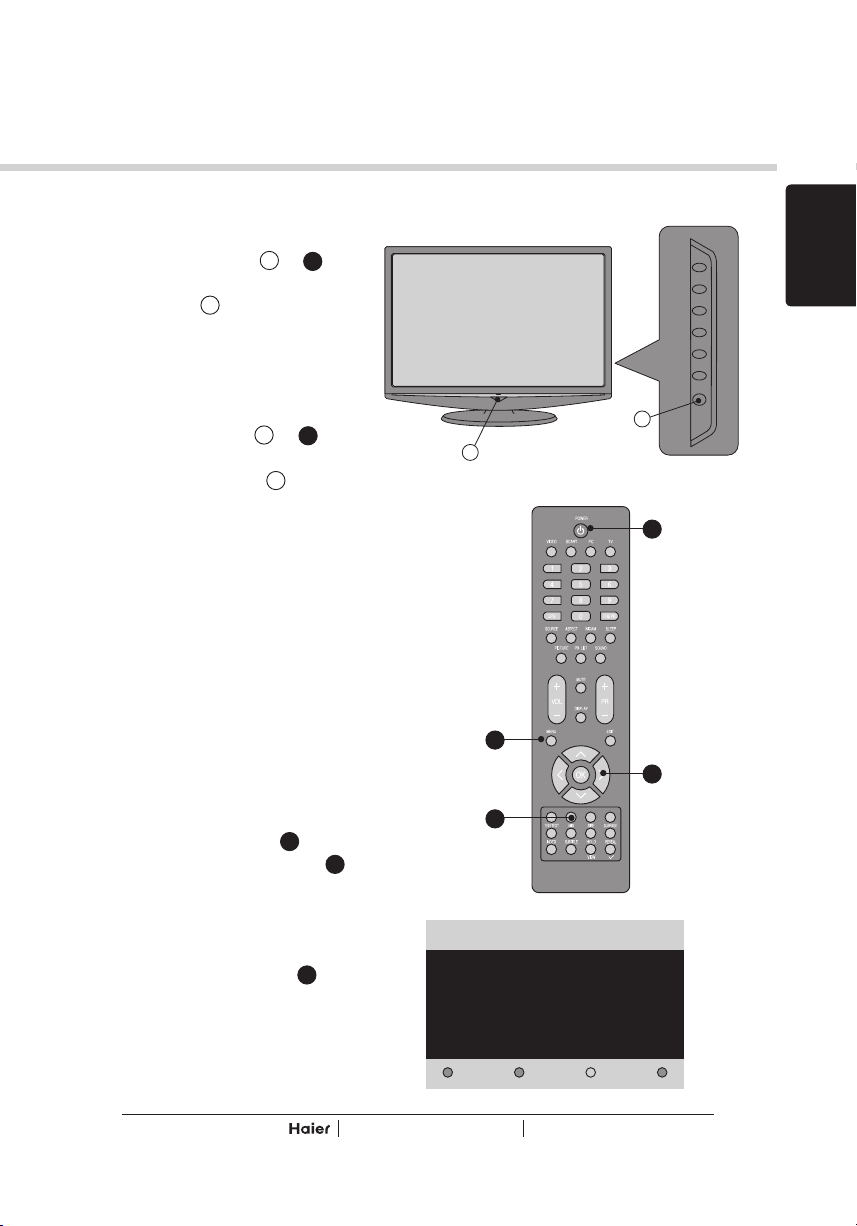
TURN ON THE LCD-TV
1. When the POWER J or A is
pressed the TV will turn on and the
Power LED A on the front of the
TV will change from red to blue
See fig. 10 and 11.
EN
2. When the LCD-TV is turned off
using the POWER J or A , the
LCD-TV will go into standby mode
and the Power LED A will turn
red.
See fig. 10 and 11.
FIRST TIME INSTALLATION
1. This display will appear on the
screen when the TV is turned on
for the first time.
See fig. 12.
NOTE: If you can not find this
screen press MENU U . Then
use the Natvigation Keys Y to
select the TV menu.
See fig. 11.
2. Press the Green Button a to
proceed with the installation.
See fig. 11.
fig. 10
A
fig. 11
U
a
Thank you for your purchase of this TV.
Please proceed with the following steps to set-up your TV.
J
A
Y
fig. 12
Next
HD Ready Digital LCDTV User Manual
11
Page 14

TUNING MENU OPTIONS
3. Use Navigation Keys Y to select
your language. Then press Green
Button a to continue.
See fig. 13 and 14.
4. Use Navigation Keys Y to select
your country. Then press Green
Button a to continue or press
Yellow b to go back.
See fig. 13 and 15.
5. System searching may take few
minutes to complete.
See fig. 16.
6. A message will be displayed when
the search is complete. Press Red
Button e to finish system
searching. The LCD TV will
automatically display the first
channel found automatically.
See fig. 13.
fig. 13
a
e
fig. 14
fig. 15
TV Installation
Language
TV Installation
Country
TV Installation
System searching. Please wait...
Analog channels found: 0
Digital channels found: 0
Y
b
English
Espanol
Français
Deutsch
Italiano
Nederlands
Svenska
Dansk
Next
Austria
Belgium
Czech Republic
Denmark
Finland
France
Gemary
Ireland
Next
1/3
Previous
2/3
Previous
3/3
12
fig. 16
Exit
Next
HD Ready Digital LCDTV User Manual
Page 15

OTHER CONNECTIONS
WARNING:
- Switch off the TV before
connecting any external device.
SCART INPUT
- To connect external devices
such as DVD players, set top
boxes or games consoles.
1. Plug the scart lead from the
external device into TV SCART
Socket R .
See fig. 17.
2. SCART 1 - Full SCART, which
transmits RGB, S-Video and CVBS
in and CVBS tuner out (Analog).
3. Press SCART C or SOURCE K
to select the SCART.
See fig. 18.
SCART Lead
C
SCART1
R
EN
fig. 17
K
HD Ready Digital LCDTV User Manual
fig. 18
13
Page 16

OTHER CONNECTIONS
YPbPr INPUT
- For connecting devices such as
video cameras.
1. Make sure that the power of the
LCD-TV and the AV device are
off.
2. Connect the (Y, Pb, Pr) cables
and audio cables to the
Component and Audio Input
the TV.
on
U
See fig. 19.
3. Turn on the power of the LCD-TV
first and then turn on the power
of the AV device.
4. Press VIDEO B or SOURCE K
to select the YPbPr input.
See fig. 20.
U
U
YPr Pb
Audio Cables
fig. 19
14
B
K
HD Ready Digital LCDTV User Manual
fig. 20
Page 17

OTHER CONNECTIONS
VGA INPUT
- You can use your LCD-TV as a
monitor for your personal computer.
1. Connect the D type 15-pin VGA
interface cable (not supplied) to
VGA Input Y on the LCD-TV.
See fig. 21.
2. Connect the audio cable (not
supplied) to Audio Input S on the
back of the LCD-TV (if necessary).
See fig. 21.
3. Press PC E or SOURCE K to
select the PC input.
See fig. 22.
HDMI 1 INPUT
HDMI
Cable
to PC
SV
fig. 21
EN
Y
CAUTION: You must ensure both
devices are switched off before
connection.
1. Connect the cable from the HDMI
devices to the TV HDMI Input V .
See fig. 21.
2. Press VIDEO B or SOURCE K
to select the HDMI input.
See fig. 22.
3. Operate the corresponding external
equipment. (Refer to external
equipment operating guide.)
HD Ready Digital LCDTV User Manual
B E
K
fig. 22
15
Page 18

OTHER CONNECTIONS
AV INPUT
- For connecting an AV device.
1. Make sure that the power of the
LCD-TV and the AV device are off.
2. Connect the cables from the
video
AV device's output jacks to the
Input M .
Video
See fig. 23.
3. Connect the cables from the
audio
AV device's output jacks to the
Audio
Input N .
See fig. 23.
4. Turn on the LCD-TV first ; and then
turn on the AV device.
5. Press VIDEO
B or SOURCE K
to select the AV input.
See fig. 24.
S-VIDEO INPUT
- For connecting video recorders.
1. Make sure that the power of the
LCD-TV and the AV device are off.
2. Connect the audio and S-Video
cables from the VCR's output jacks
to the S-Video Input O and Audio
Input .
N
See fig. 23.
3. Turn on the LCD-TV first and then
turn on the VCR.
4. Press VIDEO B or SOURCE K
to select the S-VIDEO input.
See fig. 24.
S-Video Cable
B
K
fig. 23
M
N
O
fig. 24
16
HD Ready Digital LCDTV User Manual
Page 19

OTHER CONNECTIONS
COMMON INTERFACE SLOT
- You can use a Conditional Access
Module (CAM) card to view Pay
TV.
1. Insert the CAM card (not included)
in Common Interface Slot K .
See fig. 25.
2. Please refer to the COMMON
INTERFACE section for more
detailed information.
HEADPHONE OUTPUT
1. Connect a set of stereo
headphones (not included) to the
Headphone Output L for private
listening. When headphones are
in use, the speakers will be
automatically disconnected.
See fig. 25.
fig. 25
EN
K
L
P
IMPORTANT: When using
headphones always set the
volume control to a low level
before you put the headphones
on, then put the headphones
on and gradually increase the
volume to a comfortable
listening level.
HDMI 2 INPUT
- Same as HDMI 1.
HD Ready Digital LCDTV User Manual
17
Page 20

BASIC OPERATION
SELECT SOURCE
1. Press POWER A to turn on the
LCD-TV. Then press TV D , PC
E , SCART C , VIDEO B or
SOURCE K to select the source.
See fig. 26.
AUDIO CONTROL
1. Press VOL+ Q to increase the
volume or VOL- Q to decrease
the volume. A number will
appear on screen indicating the
volume level.
See fig. 26.
MUTE
1. Press MUTE R to mute the
sound. A mute icon will appear
on the screen.
See fig. 26.
2. Press MUTE R again or
VOL+/VOL-to restore the sound.
The mute icon will disappear.
See fig. 26.
A
B
C
K
R
Q
D
E
L
NICAM
1. Press NICAM L to select MONO,
STEREO, DUAL 1 and DUAL 2
for ATV channel. Select Audio
language for DTV channel.
See fig. 26.
18
HD Ready Digital LCDTV User Manual
fig. 26
Page 21

BASIC OPERATION
SOUND
1. Press SOUND P to set the LCD
TV to a predefined sound setting.
Off / Rock / Pop / Live / Dance /
Techno / Classic / Soft.
See fig. 27.
EN
F
SELECT TV CHANNEL
1. You can use the Number Keys F
on the remote control to directly
select TV channels. Enter the
channel number you want to
watch, the keys must be pressed
within 3 seconds of each other.
See fig. 27.
2. Press PR +/- S to select the
previous or next TV channel.
See fig. 27.
3. Press PRE PR H to display the
TV channel previously selected.
See fig. 27.
PICTURE
1. Press PICTURE N to set the LCD
TV to a predefined picture setting.
User / Cinema / Sport / Vivid / Hibright.
See fig. 27.
H
N
P
S
fig. 27
HD Ready Digital LCDTV User Manual
19
Page 22

BASIC OPERATION
EPG
- Press EPG G to display electronic
program guide in TV mode.
See fig. 28.
PR LIST
- Press PR LIST O to display a
list of channels and input
sources.
See fig. 28.
DISPLAY
- Press DISPLAY T to display the
current signal status, including
input source/channel audio mode.
See fig. 28.
SLEEP
1. Press SLEEP M to turn the LCD
TV off after a preset time.
See fig. 28.
2. Use Navigation Keys Y to set the
time (5-180 minutes.)
See fig. 28.
G
M
O
T
X
Y
3. Press OK X to confirm.
See fig. 28.
20
fig. 28
HD Ready Digital LCDTV User Manual
Page 23

BASIC OPERATION
PICTURE FORMAT
1. Press ASPECT J on the remote
control to enter the picture format
menu.
See fig. 29.
2. Use the Navigation Keys Y to
select a picture format and press
OK X to confirm your choice.
See fig. 29.
- Automatic: DTV and HDMI
input will automatically display
the correct format, while ATV
and SCART will need to be set.
- Panorama: Removes the black
bars on the side of 4:3
broadcasts with minimal
distortion.
- 4:3: Displays the classic 4:3
format.
- Movie expand 14:9: Scales the
classic 4:3 format to 14:9.
- Movie expand 16:9: Scales the
classic 4:3 format to 16:9.
- 16:9 subtitle: Display 4:3
pictures using the full surface of
the screen leaving the subtitles
visible.
- Wide screen: Stretches the
classic 4:3 format to 16:9.
See fig. 30.
Automatic
Panorama
4:3
J
X
fig. 29
EN
Y
Movie expand 16:9
16:9 subtitle
Wide screen
fig. 30
Movie expand 14:9
HD Ready Digital LCDTV User Manual
21
Page 24

MENU OPERATION
OSD SETTING
1. Press MENU G or U to enter the
OSD setting. There are five items
in the list: Picture, Sound, TV,
Installation and Parental.
See fig. 31 and 32.
2. Use Navigation Keys Y to select
and press OK X to confirm your
choice.
See fig. 31 and 32.
3. Press EXIT V to exit the screen.
See fig. 31 and 32.
Picture
- Shows more picture modes and
functions based on your favourite
channels and enables you to
adjust the colour and brightness
setup.
Sound
- Provides more audio selections.
You can also set the audio
environment of the LCD TV.
TV
- Enables you to adjust special
functions for country, audio
language and the TV channels.
Installation
- Enables you to adjust settings
related to the installation of the TV
channels and language.
Parental
- Enables you to control special
functions for the TV channels.
fig. 31
G
U
X
Settings 5 Picture
Picture
Sound
TV
Installation
Parental
fig. 32
V
Y
9
Picture mode
Brightness
Contrast
Colour
Sharpness
Colour temperature
Noise Reduction
Back light
fig. 33
22
HD Ready Digital LCDTV User Manual
Page 25

MENU OPERATION
Picture
Picture mode
- To set the LCD TV to a predefined
picture settings. Use Navigation
Keys Y to toggle between User,
Cinema, Sport, Vivid, and Hi-bright.
See fig. 34 and 35.
Brightness
- To brighten the dark parts of the
picture.
Contrast
- To sharpen the picture quality.
Colour
- To add or reduce colour.
Sharpness
- To improve detail.
Colour temperature
- To choose between Normal
(neutral), Warm (redder), and Cool
(bluer).
Noise reduction
- To filter out and reduce the image
noise and improve picture quality.
Use Navigation Keys Y to toggle
between Off, Low, Medium, and
Strong.
Back light
- To make the background brighter
or darker.
Picture format
- To display a list of available display
formats. Use Navigation Keys Y
to toggle between Automatic,
Panorama, 4:3, Movie expand 14:
9, Movie expand16:9, 16:9 subtitle
and Wide screen.
HD Ready Digital LCDTV User Manual
Settings 5 Picture
Picture
Sound
TV
Installation
Parental
Picture mode
Brightness
Contrast
Colour
Sharpness
Colour temperature
Noise Reduction
Back light
9
fig. 34
fig. 35
Y
EN
23
Page 26

MENU OPERATION
Sound
Balance
- To adjust the balance between
left/right channels.
See fig. 36 and 37.
Bass
- To adjust the amount of bass.
Treble
- To adjust the amount of treble.
Virtual surround
- To add greater depth and
dimension to the TV sound. Use
Navigation Keys Y to toggle
between On or Off.
Sound mode
- To set the LCD TV to a
predefined sound setting. Use
Navigation Keys Y to toggle
between Off, Rock, Pop, Live,
Dance, Techno, Classic, and Soft.
AVL
- To eliminate the volume
differences between channels
and programs and also reduce
the dynamics of the sound.
Digital audio out
- To select the Digital audio out.
Use Navigation Keys Y to toggle
between Off, Bit stream and
PCM.
Tip: When Bit stream is
selected, make sure the
amplifier supports digital
audio.
Settings 5 Picture
Picture
Sound
TV
Installation
Parental
Balance
Bass
Treble
Virtual surround
Sound mode
AVL
Digital audio out
7
fig. 36
fig. 37
Y
24
HD Ready Digital LCDTV User Manual
Page 27

MENU OPERATION
- The following functions are only
available for digital channels with
audio signals.
Volume-visually impaired
- To increase or decrease the
volume for the visual impaired.
Use Navigation Keys Y to adjust
the volume.
Tip: Before you adjust the
volume, please make sure
Audio description is On.
See fig. 38 and 39.
Hearing impaired
- To transmit an audio-frequency
for the hearing impaired. Use
Navigation Keys Y to toggle
between On or Off.
Audio description
- To enable or disable the volumevisually impaired function. Use
Navigation Keys Y to toggle
between On or Off.
Settings 5 Picture
Picture
Sound
TV
Installation
Parental
Balance
Bass
Treble
Virtual surround
Sound mode
AVL
Digital audio out
fig. 39
7
fig. 38
EN
HD Ready Digital LCDTV User Manual
Y
25
Page 28

MENU OPERATION
TV
Country
- To select the relevant country.
This is the country you are in,
or the country whose channels
you want to receive if you live
near its borders.
See fig. 40 and 41.
Audio language (Digital TV only)
- To display a dialogue enabling
the preferred language to be set.
This is the language to be used
for all channels if it is available.
Channels
- Use the Navigation Keys Y to
toggle between Channel scan,
Update scan, Analog manual
store, Channel skip, Channel
sort and Channel name edit.
Channel scan
1. Use the Navigation Keys Y
to select Channel scan in the
Channels menu.
2. Press the Right Navigation
Key Y to enter it and press OK
X to start searching the local
program automatically.
Update scan
1. Use Navigation Keys Y to
select Channel scan in the
Channels menu.
2. Press the Right Navigation
Key Y to enter it and press OK
X to start searching the local
program automatically.
Settings 5TV
Picture
Sound
TV
Installation
Parental
Country
Audio Language
Channels
X
3
fig. 40
fig. 41
Y
26
HD Ready Digital LCDTV User Manual
Page 29

MENU OPERATION
Analog manual store
1. Use Navigation Keys Y to select
Channel scan in the Channels menu.
2. Press the Right Navigation Key
Y to enter it and press Navigation
Keys Y to toggle between Search
or Fine tune.
• Search: to start manual scanning
from the specified frequency.
• Fine tune: to fine tune the
program.
See fig. 42 and 43.
Channel skip
1. Use Navigation Keys Y to select
Channel skip in the Channels menu.
2. Press the Right Navigation Key
Y to enter it and use Navigation
Keys Y to highlight the program
you want to skip and press OK X
to confirm.
Tip: The skipped program may
not be found by pressing
Navigation Keys Y but can be
accessed by pressing number
buttons directly.
• Programs with this are active
• Programs with this are skipped
Channel sort
1. Use Navigation Keys Y to select
Channel sort in the Channels menu.
2. Press the Right Navigation Key
Y to enter it and use Navigation
Keys Y to highlight a program you
want to sort and press OK X to
select.
3. Use Navigation Keys Y to
highlight the second program you
want to exchange with and press
OK X to switch.
Settings TV
Channels
Channel scan
Update scan
Analogue manuals...
Channel skip
Channel sort
Channel name edit
X
5 Channel scan
Start
EN
fig. 42
fig. 43
Y
HD Ready Digital LCDTV User Manual
27
Page 30

MENU OPERATION
Channel name edit
1. Use Navigation Keys Y to
select Channel name edit in the
Channels menu.
2. Press the Right Navigation Key
Y to enter it and press Navigation
Keys Y to highlight the program
you want to edit.
3. Press the Red Button e to start
editing program name.
4. Use Navigation Keys Y to edit
name and use the Right
Navigation Keys Y to move to
the next character. Please refer
to the table below for available
characters.
5. Press the Green Button a to
confirm.
See fig. 44 and 45.
Tip: When functions attached
to the Colour Buttons are active
or selected, the Colour Buttons
are shown on screen.
X
Y
a
e
fig. 44
Available characters
_- . @01234
56789ABCDE
FGHI JKLMNO
PQRSTUVWXY
Zabc de f ghi
jklmnopqrs
tuvwxyz
28
Available characters
0. @0
1_-1
2ABCabc2
3DEFdef 3
4GHI gHi 4
5JKLj k l 5
6MNOmno6
7PQRSp qr s7
8TUVt u v8
9WXYZwxyz9
fig. 45
HD Ready Digital LCDTV User Manual
Page 31

MENU OPERATION
Installation
Language
- To select the interface language.
See fig. 46 and 47.
Source
- To identify the accessory devices
you have connected to the external
inputs/outputs.
Time setup
- Use Navigation Keys Y to toggle
between :
• Time zone: to select the time
zone you are in.
• Time: to set the time and date
or select auto synchronisation.
Tip: Before setting the time and
date manually, make sure Auto
synchronisation is Off.
• Sleep timer: to set the TV to turn
itself off after a set period of time.
Settings 5 Installation
Picture
Sound
TV
Installation
Parental
Language
Source
Time setup
Subtitle
Teletext
Current software info
Reset AV settings
fig. 47
7
fig. 46
EN
Subtitle
- Use Navigation Keys Y to toggle
between :
• Analog subtitle: to display the
transmitted subtitle on the screen.
This text can either be permanently
displayed (assuming that the
service is available with the
broadcast) or only when mute is
active.
• Digital subtitle language: to
select the teletext language.
• Subtitle type: to choose the
normal type or hearing impaired
type of subtitle.
HD Ready Digital LCDTV User Manual
Y
29
Page 32

MENU OPERATION
Teletext
- Use Navigation Keys Y to toggle
between :
• Digital teletext language: to
select the teletext language.
• Decoding page language: to set
the teletext language to the
regional location.
See fig. 48 and 49.
Current software info
- This menu appears with your TV
software information.
Reset AV settings
- To reset most of the picture and
sound settings to their default
factory levels.
Settings 5 Installation
Picture
Sound
TV
Installation
Parental
Language
Source
Time setup
Subtitle
Teletext
Current software info
Reset AV settings
7
fig. 48
fig. 49
30
Y
HD Ready Digital LCDTV User Manual
Page 33

MENU OPERATION
Parental
Channel lock
- To lock a certain TV channel or
external source completely.
See fig. 50.
Program lock
- To control access to programs
based on their age ratings. All
settings apply to digital channels.
Change PIN
- To change your access code. If
no PIN-code exists, the menu item
is set to Set PIN. Please follow
the instructions to set it. If a PINcode has been entered previously,
the menu item is set to Change
PIN. Please follow the instructions
to change it. All number
combinations from 0000 to 9999
are valid.
Tip: Remember that 0711 is the
default Change PIN code. If
your access code has been
changed or you have forgotten
the code, you can always get
in by entering the default code.
Settings 5 Parental
Picture
Sound
TV
Installation
Parental
Channel lock
Program lock
Change PIN
3
fig. 50
EN
HD Ready Digital LCDTV User Manual
31
Page 34

TELETEXT
TELETEXT
- (Designed for Europe
PAL/SECAM/DVB-T systems
only)
TELETEXT
- Press TELETEXT g to activate
Teletext. Press again to turn off
Teletext.
See fig. 51.
MIX
- Press MIX f to activate Teletext
overlaying the TV picture.
SIZE
- Press SIZE h to change the
screen size: Full screen, Top half
and Bottom half.
SUBPAGE
- Press SUBPAGE k to display the
sub page (when available)
INDEX
- Press INDEX m to return to page
100 or the index page; and then
press 0 to 9. The teletext page
will be numbered and added to
the page you select or the
secondary item.
SUBTITLE
- Press SUBTITLEn to select the
next page marked as a subtitle
page.
32
HD Ready Digital LCDTV User Manual
f
g
m
n
fig. 51
h
k
Page 35

TELETEXT
HOLD
- Press HOLD q to stop the
scrolling of pages, press again to
continue.
See fig. 52.
REVEAL
- Press REVEAL p to display
hidden information such as
answers to a quiz.
R/G/Y/B (Colour button)
- Press Colour Buttons a , e , b ,
and d to select from on screen
options, which have the same
coloured text.
EN
a
e
fig. 52
HD Ready Digital LCDTV User Manual
b
d
p
q
33
Page 36

COMMON INTERFACE MODULE
Common Interface Module
- The Common Interface CI Slot
K , is designed to accept the
Conditional Access CA Module
coupled with a Smart card, in
order to view pay TV programmes
and additional services. Contact
your Common Interface service
provider for further information
about modules and subscription
options. Please note that CA
modules and smart cards are not
included, or supplied as optional
extras by us.
See fig. 53.
WARNING: Switch off your TV
before any module is inserted
into the Common Interface slot.
1. Correctly insert the CA Module
and then the Smart Card into
the CI slot located at the side of
the TV.
See fig. 53.
Smart Card
fig. 55
U
fig. 53
K
CA Module
G
2. Turn on the TV and press MENU
G or U and select the TV sub-
menu. "Common interface" will
be displayed if the CA module is
detected. Wait for few moments
until the card is activated.
See fig. 54 - 56.
34
HD Ready Digital LCDTV User Manual
Settings 5TV
Picture
Sound
TV
Installation
Parental
Country
Audio Language
Channels
Common Interface
fig. 54
4
fig. 56
Page 37

COMMON INTERFACE MODULE
3. Select Common Interface to view
the menu options and information
on the inserted CI card.
See fig. 57.
4. Press OK X to access the card
menu, for more details refer to
the module's instruction manual.
See fig. 58 - 59.
5. When module is removed, the
"Common Interface" menu will
disappear from the screen.
See fig. 60.
Settings
TV 4 Common Interface
Country
Audio Language
Channels
Common Interface
Top Up TV
X
Main menu
Module information
Language
Software Download
Exit
Press OK to select, or Exit to quit
Settings 5TV
Picture
Sound
TV
Installation
Parental
OK
Cancel
Country
Audio Language
Channels
EN
fig. 57
fig. 58
fig. 59
4
HD Ready Digital LCDTV User Manual
fig. 60
35
Page 38

TROUBLESHOOTING
The following table contains common problems and the solutions to these problems.
Please check this list before you contact technicians.
Problems
No picture
Abnormal colours
Twisted picture
Picture too dark
Audio only, no images
Picture only, no audio
Cannot use remote control
Cannot receive sufficient
channels through antenna
No colours
Blinking picture accompanied by
ghost image
Broken lines or segments
Certain TV channels are blocked
(Hope to acquire some channels)
Overlapping images or ghost
images
Cannot use a function
Cannot receive programs
Sloutions
1. Connect power cord correctly.
2. Turn on power.
3. Connect signal cable correctly.
4. Press any button on the LCD TV.
Connect signal cable correctly.
1. Connect signal cable correctly.
2. Please use compatible signal.
Adjust brightness and contrast.
Audio only, no images
1. Please check if input signal is connected correctly.
2. TV-RF signal must not be lower than 50dB.
1. Connect signal cable correctly.
2. Adjust volume to proper level.
3. Connect audio signal cable correctly.
4. TV-RF signal must not be lower than 50dB.
1. Please change battery.
2. Turn off power for 10 seconds; and then restart power.
Please use the Channel scan function to increase the number
of channels not included in memory.
Please adjust the colour setup.
1. Check the connection of antenna/signal cable.
2. Check if channel is in play mode.
3. Press signal source and change input mode.
Adjust antenna.
Keep the TV away from noise sources, such as vehicles, neon
lights, and hair dryers.
Please use the Update scan method to add the channels not
included in memory.
Please use multi-directional outdoor antenna. (If your TV is
subject to the influence of nearby mountains or buildings).
If the item you choose turns grey, that item cannot be selected.
Please use the Update scan method to add the channels not
included in memory.
36
HD Ready Digital LCDTV User Manual
Page 39

SPECIFICATIONS
Screen Size
DISPLAY
Aspect Ratio 16:9 16:9 16:9
Resolution 1440 x 900 1680 x 1050 1366 x 768
OSD Language English, German, French, Italian, Spanish, Portuguese, Dutch,
ENHANCEMENT
Sound Output (RMS Watts) 3 W 3 W 5 W
Sound Mode Rock, Pop, Live, Dance, Techno, Classic, Soft
Picture Formats Automatic, Panorama, 4:3, Movie expand 14:9,
Picture Mode User, Cinema, Sport, Vivid, Hi-bright
CONNECTIONS
Rear Connectors Tuner input (75
Side Connectors
WEIGHT & DIMENSIOIN
Product Dimension
(WxDxH)
Net Weight 4.0 kg 5.0 kg 8.8 kg
POWER
Operation (Max.) < 50 W < 55 W < 110 W
Standby
Mains Power
19"
DISPLAY
Danish, Finnish, Swedish, Norwegian, Polish, Russian, Greek
ENHANCEMENT
Movie expand 16:9, 16:9 subtitle, Wide screen
CONNECTIONS
SCART 1
PC IN :VGA and Audio cable
Component Video and L/R Audio input
SPDIF Output (Digital audio out)
AV L/R Audio Output
HDMI 1
Earphone Output
AV In (Composite Audio/ Video)
S-Video
HDMI 2
Common Interface
WEIGHT & DIMENSION
446 mm
359 mm
145 mm
AC100-240V
1.5A
50-60Hz
)
POWER
22" 26"
512 mm
400 mm
145 mm
< 1W
AC100-240V
1.5A
50-60Hz
652 mm
480 mm
220 mm
AC100-240V
1.5A
50-60Hz
EN
HD Ready Digital LCDTV User Manual
37
Page 40

SPECIFICATIONS
Connecting to Power
Check that the voltage marked on the product corresponds with your supply voltage.
This product is fitted with a 16A plug (Or 10A Plug). If this plug is unsuitable
or needs to be replaced, please note the following :
Plug Replacement
If you need to replace the fitted plug.
WARNING :
Never connect live or neutral wires to the earth terminal of the plug.
Only fit an approved 16A plug .
IMPORTANT
The wires in this mains lead are coloured as follows:
Blue-Neutral
Brown-Live
As the colours of the wires in the mains lead of this
apparatus may not correspond with the coloured
markings identifying the terminals in your plug,
proceed as follows:
The wire which is coloured blue must
to the terminal which is marked with N or coloured blue. The wire
coloured brown must be connected to the terminal which is marked L
coloured brown. Always ensure that the plug cord grip is fastened correctly.
If in doubt, consult a qualified electrician.
be connected
which is
or
38
WASTE ELECTRICAL PRODUCTS SHOULD NOT BE
DISPOSED OF WITH HOUSEHOLD WASTE. PLEASE
RECYCLE WHERE FACILITIES EXIST. CHECK WITH
YOUR LOCAL AUTHORITY FOR RECYCLING ADVICE.
HD Ready Digital LCDTV User Manual
Page 41

Page 42

Page 43

LCD-FERNSEHGERÄT
G
L
L
L
C
des Fernsehers
auf
g
edienungsanleitung
ültig für die Modelle
T19M1CW, LT19M2CW
T22M1CW
T26M1C, LT26M2
Bitte vor Inbetriebnahme
merksam lesen und für späteres Nach-
schla
en in Ihren Unterlagen aufbewahren.
Page 44

G
t
.
g
.
WICHTIGE SICHERHEITSHINWEI
SE
ON
g
f
g
S
S
G
S
.
d
G
g
S
g
g
f
p
G
f
pp
g
g
Wird d
G
G
esen Sie die Anleitung vor der Inbetriebnahme aufmerksam
urch und heben Sie sie für künftiges Nachschlagen gut auf.
ZUR BEACHTUN
Unsachgemäße Bedienung oder Umbau des Geräts können zu Beschädigungen am Gerä
oder zu Verletzungen führen
•
Setzen Sie das Gerät weder Re
führen und ein Feuer oder einen Stromschlag verursachen
WICHTIGE INFORMATI
• Das Gerät ist nur für den Hausgebrauch vorgesehen.
• Das Gerät sollte stets aus
Stromnetz getrennt wird. Ziehen Sie den Netzstecker niemals am Kabel aus der Steckdose,
sondern grei
• Überprüfen Sie die elektrische Spannun
Verfügung gestellt wird – für dieses Gerät benötigen Sie Wechselstrom.
ollten die Steckdosen in Ihrem Haushalt nicht mit diesem Gerät kompatibel sein,
•
lassen
en Sie den Stecker fest und ziehen ihn dann aus der Steckdose.
ie sie von einem Fachmann austauschen.
ZUR OPTIMALEN GERÄTELEISTUN
• Setzen Sie das Gerät niemals extremer Hitze, Kälte, Staub oder Feuchtigkeit aus.
• Halten
• Setzen Sie es nicht der direkten Sonneneinstrahlung aus und vermeiden Sie
• Das
• Stellen Sie das Gerät nicht auf Flächen, die häufi
• Um Feuer oder einen
Feuchti
nicht darauf ab
• Es darf keine Flüssigkeit auf das Gerät tropfen oder spritzen.
• Um den Ausbruch eines Feuers zu vermeiden, dar
beis
neben dem
• Um eine ausreichende Lu
von mindestens 10 cm einzuhalten. Stellen Sie den Fernseher niemals auf einen Te
• Die Lüftungsschlitze dürfen nicht abgedeckt werden.
• Bei Rauch, un
den Netzstecker aus der Steckdose und wenden Sie sich an Ihren Händler oder den Kundendienst.
•
Ideal ist eine indirekte Beleuchtun
und Reflektionen auf dem Bildschirm, um eine Überanstrengung der Augen zu vermeiden.
•
bis die dadurch im
• Der Kupplungsstecker wird auch als Ausschaltvorrichtung verwendet, um das Gerät
vom Stromnetz zu trennen, deshalb sollte er immer frei zugänglich sein.
• Das
ie das Gerät frei von Staub und reinigen Sie es mit einem trockenen Tuch
en Kontakt mit Flächen, die sich erhitzen.
erät darf keinen starken Magnetfeldern ausgesetzt werden wie beispielsweise Lautsprechern.
tromschlag zu vermeiden, darf das Gerät nicht mit Regen oder
keit in Berührung kommen. Mit Flüssigkeiten gefüllte Objekte wie Vasen dürfen
estellt werden.
ielsweise von brennenden Kerzen, in Kontakt kommen. Diese dürfen weder auf noch
erät aufgestellt werden.
ewöhnlichen Geräuschen oder Gerüchen schalten Sie das Gerät aus, ziehen Sie
Stellen Sie den Fernseher so auf, dass keine direkte Sonneneinstrahlung auf den Bildschirm fällt.
er Fernseher aus einem kalten in einen warmen Raum gebracht, so dauert es eine Weile,
erät gebildete Feuchtigkeit getrocknet ist.
erät muss an eine ordnungsgemäße und geerdete Steckdose angeschlossen werden.
en noch Feuchtigkeit aus, dies könnte zu einem Kurzschluss
eschaltet sein, bevor es ans Stromnetz angeschlossen oder vom
, die Ihnen von Ihrem örtlichen Stromlieferanten zur
bewegt werden, vibrieren oder wackelig sind.
es niemals mit offenen Flammen,
tzirkulation zu gewährleisten, ist rund um das Fernsehgerät ein Abstand
ich.
während des Fernsehens. Vermeiden Sie verdunkelte Räume
Page 45

g
:
Ü
WICHTIGE SICHERHEITSHINWEI
SE
S
ZU
T
,
bleml
g
gef
B
JUS
Lesen Sie die Anleitung vor der Inbetriebnahme aufmerksam
durch und heben
IHRER SICHERHEI
BEACHTEN SIE
Zerlegen oder reparieren Sie das Gerät niemals selbst.
Versuchen Sie niemals, das Gerät in irgendeiner Form umzubauen.
Stellen Sie sicher, dass keinerlei Gegenstände in das Gehäuse hineingeraten.
Halten Sie Flammen – zum Beispiel Kerzenflammen – vom Gerät fern.
Stellen Sie niemals mit Flüssigkeiten gefüllte Behälter – zum Beispiel Vasen – auf oder neben das Gerät.
Bedecken Sie das Gerät nicht, sonst wird die Luftzirkulation behindert.
Lassen Sie das Gerät nicht fallen und vermeiden Sie starke Erschütterungen.
Öffnen Sie das Gerät zur Reparatur niemals selbst, es könnte zu einem Stromschlag oder anderen
Verletzungen kommen.
KINDER
Kinder können die Gefahren im Umgang mit strombetriebenen Geräten nicht einschätzen.
Erlauben Sie Kindern nicht
S
TROMVERSORGUNG
Vergewissern Sie sich bei Netzstrombetrieb, dass der Stecker fest in der Dose steckt und
pro
Schützen Sie das Stromkabel vor scharfkantigen Gegenständen, starker Hitze und Feuchtigkeit.
Überprüfen Sie das Kabel regelmäßig auf Beschädigungen und ersetzen Sie es gegebenenfalls.
Überprüfen Sie bei Batteriebetrieb, ob die Batterien entsprechend der Polarität (+/-)
richti
Verwenden Sie niemals gleichzeitig neue und gebrauchte Batterien.
Entfernen Sie gebrauchte Batterien sachgemäß. Bringen Sie sie niemals in Berührung mit Feuer.
Überprüfen Sie, ob die Spannungseinstellung am Gerät mit der vorhandenen Netzspannung
übereinstimmt. Für dieses Gerät benötigen Sie Wechselstrom.
Jegliche Reparaturarbeiten dürfen nur von qualifiziertem Fachpersonal oder dem
autorisierten Kundendienst durch
os zugänglich ist.
eingesetzt sind.
berlassen Sie alle Reparaturarbeiten dem fachmännischen Kundendienst.
ie sie für künftiges Nachschlagen gut auf.
dieses Gerät zu bedienen.
ührt werden.
DE
KOPFHÖRERBETRIE
Wählen Sie eine moderate Lautstärke, um Hörschäden zu vermeiden.
Wenn Sie keinen Ton hören, drehen Sie nicht die Lautstärke hoch, denn der Ton könnte plötzlich
mit einer erhöhten Lautstärke einsetzen. Übertriebene Klangstärke durch Ohrhörer oder Kopfhörer
kann zum Verlust des Gehörs führen.
Um Gehörschäden zu vermeiden, stellen Sie die Lautstärke zunächst auf die niedrigste Stellung ein
und re
eln Sie sie erst hoch, wenn der Ton eingesetzt hat.
ACHTUNG: UM DIE GEFAHR EINES STROMSCHLAGS AUSZUSCHLIESSEN,
RFEN DIE ABDECKUNGEN (ODER RÜCKSEITEN) NICHT ENTFERNT WERDEN.
BEFINDEN SICH KEINE
ÜRFEN NUR VON FACHPERSONAL DURCHGEFÜHRT WERDEN.
TIERBAREN TEILE DARUNTER. REPARATUREN
1
Page 46

3
6
8
.
1
.......................................................................................................
3
.................................................................................................
22
C
4
suche
36nische Date
.............................................................................................
NHALTSVERZEICHNI
S
ß
ernen Sie Ihr Gerät kennen .............................................................................
Fernbedienung ....................................................................................................
Wandhalterung ...................................................................................................
Antennenanschluss ......................................................................................... 10
Einstellung des Menüs ....................................................................................
Anschlüsse
Hauptfunktionen
Menüsteuerung
eletext
Kartensteckplatz (
r
BITTE BEACHTEN SIE: Die Gerätezeichnungen in dieser Anleitung dienen als
Muster und können äu
ommon-Interface-Steckplatz)
n
erlich von Ihrem Gerät abweichen.
1
1
18
32
3
37
2
HD Ready Digital LCD-TV
edienungsanleitung
Page 47

ERNEN SIE IHR GERÄT KENNEN
)
Vid
)
C
n
G)
(PRE PR)
A
)
(SOURCE)
)
)
)
)
)
)
)
)
)
)
)
Ta ste
(
)
)
)
)
)
V
)
A
)
g:
A
inschalttaste (POWER
B
eo
C
ART
D
ernseher (TV
E
P
F
Zifferntaste
G
lek. Programmzeitschrift (EP
H
J
nsicht (ASPECT
K
ingangssignal
L
tereo-Empfang (NICAM
M
leep-Modus (SLEEP
N
Bild (PICTURE
O
Programmliste (PR LIST
P
Klang (SOUND
Q
Lautstärke (VOL
R
tummschaltung (MUTE
S
enderauswahl (PR
T
Display
U
Menü aufrufen (MENU
V
Menü schließen (EXIT
X
Bestätigung (OK
Y
ursortasten
a
rüne Taste
b
elbe Taste
d
aue Taste
e
te
f
leichzeitiger Empfang von
TV und Teletext
g
text
h
röße (SIZE
k
nterseite (SUBPAGE
m
Inhaltsverzeichnis (INDEX
n
ntertitel (SUBTITLE
p
erborgenen Text anzeigen (REVEAL/Tick
q
nhalten/Durchblättern (HOLD/VIEW
MIX
A
B
C
F
G
J
K
N
O
Q
T
U
X
a
f
g
m
n
Fernbedienun
e
D
E
DE
H
L
M
P
R
S
V
Y
b
d
h
k
p
q
3
Page 48

ERNEN SIE IHR GERÄT KENNEN
A
V
k
l
l
h
ü
l
(C
)
V
Audio-Ei
A
g
V
X
Y
V
g
Betriebsanzeige
orrichtung für Wandhalterung
C
autstä
D
Lautstärke leiser
anal nach oben
ana
Men
Ein/Aus
Kartensteckplatz
Kopfhörer-Ausgan
ideo-Eingang
-Video-Eingan
P
DMI2-Eingang
ntenneneingang
R
CART-Eingan
PC-Audio-Eingang
PDIF-Ausgang
omponent-Video-Eingan
DMI1-Eingang
tromanschluss
GA-Eingan
e
aute
r
r
ac
n
unten
ngangssigna
ommon-Interface-Steckplatz
g
ngang
g
g
C
D
E
F
G
H
J
ernsehge
A
B
Y
X
4
HD Ready Digital LCD-TV
edienungsanleitung
V
Page 49

ERNEN SIE IHR GERÄT KENNEN
Vorderansic
ht
lstrom
DE
K
L
M
N
V
O
P
S RTU
Q
HD Ready Digital LCD-TV
edienungsanleitung
5
Page 50

U
G
G
g
y
k
f
)
1
Abdeck
2
G
V
S
w
-
d
-
.
W
ind,
w
FERNBEDIEN
N
ACHTUNG:
Lesen Sie vor Inbetriebnahme die
Sicherheitsanweisungen sorgfältig durch.
FERNBEDIENUN
1. Entfernen Sie die Batterieabdeckung
der Fernbedienun
. Setzen Sie 2 neue 1,5-Volt-Batterien
des T
Batterie
HINWEISE ZUM UMGAN
ps AAA entsprechend der
g
ennzeichneten Polarität in das
e
ach ein
Abb. 1).
Abb. 2
bb.
atteriefach-
ung
erwende
atterietypen oder alte und neue Batterien
leichzeitig.
Um ein Auslaufen oder Explodieren der
atterien zu verhindern, dürfen diese nicht
iederaufgeladen, großer Hitze ausgesetzt
er auseinandergenommen werden.
Wenn die Batterien nicht benutzt werden,
ollten sie aus dem Gerät herausgenom
m
en wer
ern
enn Batterien ausgelaufen
ie aus dem Gerät entfernt und entsorgt
erden. Reinigen Sie das Batteriefach
orgfältig mit einem trockenen Tuch.
6
n
ie niemals unterschiedlich
en, um ein Entladen zu verhin
HD Ready Digital LCD-TV
s
e
.
müssen
edienungsanleitung
Page 51

FERNBEDIENUN
G
it d
Abdeck
)
A
3
S
d
Hind
i
isch
der
.
.
.
. Schließen Sie das Batteriefach wieder
er
m
INWEI
m die Leistung der Fernbedienung nicht
zu beeinträchtigen, beachten Sie bitte die
olgenden Hinweise:
• Stellen Sie sicher, dass sich keine
störe
n
ernbedienung und dem Fernsehgerät
befinden
• Helles Sonnenlicht kann die Leistun
er Fernbedienung vermindern
• Die Batterien sollten immer paarweise
usgetauscht werden
ung
Abb. 3
e
n
e
rn
sse
zw
e
n
g
bb.
DE
HD Ready Digital LCD-TV
edienungsanleitung
7
Page 52

WANDHALTERUN
G
)
hend
ll
f
S
.
s
.
)
V
)
5
ACHTUNG:
Lesen Sie vor Inbetriebnahme
die Sicherheitsanweisungen
sorgfältig durch.
WANDHALTERUNG (OPTIONAL
ACHTUNG: Wenn Sie die
entsprec
ie Wand bohren, prüfen Sie
unbedingt vorher, ob dort
eventue
Rohre lau
Sie sich, dass die verwendeten
übel und
D
ewicht geeignet sind. Fragen
Sie einen Fachmann, wenn
ie sich nicht sicher sin
en Löcher in
Leitungen oder
en. Vergewissern
chraube
n für
das
d
HINWEIS:
Arbeit jemanden um Hilfe zu bitten
1. Legen Sie das Gerät mit der
orderseite auf eine feste, flache
berfläche, die mit einem weichen
uch abgedeckt ist
. Lösen Sie die Schrauben des
tandfußes und nehmen Sie
ihn ab
8
s wäre sinnvoll, für die
Abb. 4 und 5
Abb. 4 - 6
HD Ready Digital LCD-TV
edienungsanleitung
b
.
ß
Page 53

WANDHALTERUN
G
löch
G
S
g
)
)
)
)
yp
100
100
A
8
. Verwenden Sie die 4 Wandbefes-
gung
s
mit geeigneten
im Lieferumfan
n der Wandhalterung (nicht im
ieferumfang eingeschlossen)
zu befesti
. Weitere Hinweise zur Wandhalterung
nicht im Lieferumfang eingeschlossen)
finden Sie in der entsprechenden
ebrauchsanleitung
,
um das
er
chrauben (nicht
eingeschlossen)
g
en
Abb. 7
erät
Abb. 8
DE
Bildschirmgröße
in Zoll
HD Ready Digital LCD-TV
VESA-kompatible
Wandhalterung
Breite x Höhe in mm
x
mm Metrisch 4 x 10 mm
00 x 100 mm Metrisch 4 x 10 mm
x
mm Metrisch 4 x 10 mm
edienungsanleitung
chraubent
bb.
9
Page 54

ANTENNENAN
SC
SS
d
)
A
S
)
9
)
.
g
)
Z
X
HL
U
ACHTUNG:
Schalten Sie den Fernseher aus, bevor
Sie ein externes Gerät anschließen.
ANSCHLIESSEN DER ANTENNE
1. Stecken Sie den Antennenstecker
e
n den Antenneneingang
ückseite des Geräts
. Um ein optimales Bild zu
mpfangen, müssen Sie die
ntennenausrichtung eventuell
npassen.
. Um die Bildqualität in einem
mpfangsschwachen Gebiet zu
verbessern, können
Signalverstärker anschließen (nicht
im Lieferumfan
Abb. 9
ie einen
g
eingeschlossen
an
r
.
A
bb.
TROMKABEL (WECHSELSTROM
ACHTUNG: Prüfen Sie, ob Ihre
tromversorgung bei 230–240 Volt
und 50 Hz liegt
1. Stecken Sie das Stromkabel
in den Stromanschluss X des
eräts
Abb. 9).
HD Ready Digital LCD-TV
edienungsanleitung
Fernseh
. Stecken Sie das andere Ende des
tromkabels Z in die Steckdose
Abb. 9
10
Page 55

EINSTELLUNG DES MEN
ÜS
Di
B
iebsl
h
d
G
)
G
h
A
)
A
A
12
W
N
f
Bildschi
)
(
)
INSCHALTEN
1. Mit der Einschalttaste
A
schalten Sie Ihr Fernsehgerät
e
e
n.
V
orderseite des
o
n Rot zu Blau
v
2
. Wenn das
euc
tr
Abb. 10 und 11
erät ausgeschaltet
oder
te A an
eräts wechselt
wird, entweder mit der Einschalt-
A
, g
aste
oder mit
e
t es in
inen Standby-Modus und die
e
ebsleuchte
tri
o
t
Abb. 10 und 11
wechselt zu
ENN SIE DAS GERÄT ZUM
RSTEN MAL EINSCHALTE
1. Wenn Sie das Gerät zum ersten
al einschalten, erscheint das
unten abgebildete Display au
m
rm
Abb. 12
.
INWEIS: Wenn dieses Bild nicht
erscheint, drücken Sie die Taste
U
um das Menü aufzurufen.
Verwenden Sie die Cursortasten
um das TV-Menü auszuwählen
. Drücken Sie die grüne Taste
r Installation fortzufahren
a
Abb. 11
e
r
Y
,
Abb. 11).
, um mit
Abb.
DE
A
U
Y
a
bb.
HD Ready Digital LCD-TV
edienungsanleitung
11
Page 56

EINS
ÜS
m
f
)
16
S
)
5
4
)
)
3.
TELLUNG DES MEN
Verwenden Sie die Cursortasten
die gewünschte Sprache auszuwählen.
a
,
rücken Sie die grüne Taste
ortzufahren
Abb. 13 und 14
um
Y
,
u
Y
4
. Verwenden
ie die Cursortasten
Y
um das gewünschte Land auszuwählen.
rücken Sie die grüne Taste
a
, um mit
der Installation fortzufahren, oder die
gelbe Taste
zugehen
b
um einen Schritt zurück-
Abb. 13 und 15
.
. Der Systemaufbau kann einige Minuten
aue
rn
Abb. 16
6
. Auf dem Bildschirm erscheint eine
.
eldung, wenn der Systemaufbau
beendet ist. Drücken Sie die rote
e
aste
um den Systemaufbau
bzuschließen. Das Gerät zeigt
utomatisch den ersten gefundenen
anal an
Abb. 13
a
e
b
Abb. 1
Abb. 1
Abb.
12
HD Ready Digital LCD-TV
edienungsanleitung
Page 57

ANSCHL
Ü
G
-
S
SC
-
A
18
SSE
ACHTUNG:
Schalten Sie den Fernseher aus, bevor
Sie ein externes Gerät anschließen.
CART-EINGAN
zum Anschließen von externen Geräten
wie DVD-Player, Set-Top-Boxen oder
Spielekonsolen
1. Stecken Sie das SCART-Kabel
es externen Geräts in den TV
R
(
CART-Eingang
ART 1: Full SCART
2.
Abb. 17)
zum Anschließen von RGB-,
S-Video- und CVBS-Eingang und
VBS-Tuner-Ausgang (analog).
3.
Drücken
oder SOURCE
ie die Taste SCART
K
,
um den
C
ART
Eingang als Eingangssignal
uszuwähle
n
Abb. 18).
CART 1
C
DE
K
bb.
HD Ready Digital LCD-TV
edienungsanleitung
13
Page 58

ANSCHL
Ü
S
abe
i
di
beid
Audiokabel
A
)
h
d d
S
V
O
i
l
)
A
20
Audiokabel
SSE
YPbPr-EINGANG
zum Anschließen von Geräten
wie Videokamera etc.
1.
chalten Sie den Fernseher
und das anzuschließende
Gerät aus.
. Schließen Sie die mit Y, Pb
nd Pr bezeichneten K
e
e
so
w
m Component-Video-
udio-Eingang des Fernsehg
eräts an
. Schalten Sie zuerst das
ernse
ngeschlossene Gerät ein.
4
. Drücken
IDE
um den YPrPb-Eingang als
ngangss
Abb. 20
e
n
Abb. 19
g
erät un
ie die Taste
B
oder SOURCE
g
na
auszuwählen
und
ann das
l
Y
Pr
K
14
B
K
HD Ready Digital LCD-TV
bb.
edienungsanleitung
Page 59

ANSCHL
Ü
G
S
A
G
Y
)
)
)
ode
C
)
l
Y
22
abe
V
G
G
S
G
V
)
O
oder
C
d
HDMI-Ei
)
Anlei
SSE
VGA-EINGAN
ACHTUNG:
ie können diesen LCD-Fernseher
auch als Monitor für Ihren PC nutzen.
1.
chließen Sie ein 15-Pin-VGAnschlusskabel Typ D (nicht im
ieferumfang enthalten) am
V
A-Eingang
auf der
Rückseite des Fernsehgeräts
n
Abb. 21
2
. Schließen Sie das Audiokabel
nicht im Lieferumfang enthalten)
m Audio-Eingang
auf der
Rückseite des Fernsehgeräts an
falls notwendi
. Drücken Sie die Taste PC
U
R
g
Abb. 21
K
,
um den PC-Eingang
E
E
ls Eingangssignal auszuwählen
Abb. 22
.
DE
HDMI-
r
abe
PC-Anschluss-
k
l
DMI1-EINGAN
ACHTUNG: Unbedingt vor dem Anschließen
beide
1.
HDMI-
eräte ausschalten!
chließen Sie das Kabel des
eräts am HDMI-Eingang
uf der Rückseite des Fernsehgeräts
Abb. 21
. Drücken Sie die Taste VIDE
U
K
E
,
um
en
R
Eingangssignal auszuwählen
. Stellen Sie die entsprechenden externen
eräte anhand der jeweils beiliegenden
tung ein.
HD Ready Digital LCD-TV
B
ngang als
Abb. 22
B
K
edienungsanleitung
E
bb.
15
Page 60

ANSCHL
Ü
G
s
AV-G
ernsehers a
s
des Fernsehers a
)
n
O
ode
)
A
G
eßen eines
deorekorders
G
gäng
A
)
deorekorder a
O
AV-EINGAN
zum Anschließen eines AV-Gerät
1. Vergewissern Sie sich, dass das Fernseherät und das anzuschließende Gerät
usgeschaltet sind.
. Schließen Sie das Videokabel des
eräts am Video-Eingang
F
. Schließen Sie die Audiokabel des AV-Gerät
m Audio-Eingang
Abb. 23
. Schalten Sie zuerst den Fernseher und dan
das angeschlossene Gerät ein.
SSE
n
Abb. 23).
des
n
. Drücken Sie die Taste VIDE
RCE K um den AV-Eingang als
ingangssignal auszuwählen
-VIDEO-EINGAN
zum Anschli
1. Schalten Sie das Fernsehgerät und
das anzuschließende
. Schließen Sie die Audiokabel und das
S-Video-Kabel der Rekorderaus
m S-Video-Eingang
udio-Eingang
ernsehgeräts an
. Schalten Sie zuerst den Fernseher
nd dann den
. Drücken Sie die Taste VIDE
RCE K um den S-Video-Eingang
s Eingangssignal auszuwählen
Abb. 24).
16
Vi
erät aus.
und am
auf der Rückseite des
Abb. 23
Vi
HD Ready Digital LCD-TV
B
Abb. 24
n.
B
oder
r
e
B
K
edienungsanleitung
bb. 24
Page 61

ANSCHL
Ü
-
(
)
)
f
.
(
f
A
e
h
C
f
f
G
)
ARTENSTECKPLATZ (COMMON
SSE
ACHTUNG:
ie können mit diesem Fernseher
eine CAM-Card für Pay-TV nutzen.
1. Schieben Sie die CAM-Card
im Lieferumfan
ommon-Interface-Steckplatz
des Fernsehgeräts ein
2
. Weitere In
im Kapitel Kartensteckplatz auf
. 34
OPFHÖRERANSCHLUSS
1. Schließen Sie den Stereo-Kopfhörer
erumfang enthalten) am Kopfhörer-
im Lie
usgang
nur alleine anhören wollen. Wenn Kopfhör
angeschlossen sind, werden die Lautsprec
automatisch abgeschaltet (Abb. 25)
A
HTUNG: Wenn Sie einen Ko
regler immer erst auf ein niedriges Level, bevor
ie den Ko
en Lautstärkeregler schrittweise auf, bis Sie
eine für Sie angenehme Lautstärke erreicht
haben.
g
enthalten
ormationen finden Sie
""
an, wenn Sie eine Sendung
p
hörer aufsetzen. Drehen Sie dann
nicht
in den
Abb. 25
p
hörer
nicht
DE
DMI2-EINGAN
Genauso wie HDMI1-Eingang
S. 15
HD Ready Digital LCD-TV
edienungsanleitung
17
Page 62

HAU
N
N
i
l
S
d
C
)
N
VO
Auf
ff
)
G
G
f
S
)
D
S
S
auszuwähle
)
6
PTFUNKTIONE
EINGAN
1.D
GSSIG
NAL AUSWÄHLE
rücken Sie die Einschalttaste
A
m den Fernseher einzuschalten. Um
g
as gewünschte Eingangss
zuwählen, drücken
E
,
SCART
U
K
R
E
um das gewünschte
ie die Taste TV
C
, VIDEOB
ingangssignal auszuwählen
na
aus-
e
o
Abb. 26
AUTSTÄRKE EINSTELLE
Q
1. D
rücken Sie die Taste VOL+
,
m die Lautstärke zu erhöhen, oder
Q
L-
um die Lautstärke zu verringern.
dem Bildschirm erscheint eine
entsprechende Zi
r Lautstärke
er zur Anzeige
Abb. 26
TUMMSCHALTUN
1. Drücken Sie die Taste MUTE
um das
schalten. Au
erät zeitweise stumm zu
dem Monitor erscheint
in entsprechendes Zeichen.
R
(Abb. 26)
,
B
D
C
A
D
E
r
L
K
R
Q
.
1. D
einem ATV-Kanal Mono,
18
. Um den Ton wieder einzuschalten,
drücken
aste MUTE
asten VOL+/VOL-
ie entweder auf die
R
oder auf die
Abb. 26
as
.
eichen auf dem Monitor erlischt.
TEREO-EMPFANG (NICAM)
rücken
ie die Taste NICAM
L
um bei
tereo, Dual 1 oder
l 2
n. Bei einem DTV-Kanal wählen
ie Audio Language (Sendersprache) aus
HD Ready Digital LCD-TV
Abb. 26
edienungsanleitung
A
bb. 2
Page 63

HAUPTFUNKTIONE
N
(
)
N
l di
k
hl
lli
N
f
j
h
S
)
k
hl
)
)
Abb
7
1. D
rücken Sie die Taste SOUND
de
n Fernsehton auf eine vordefinierte
Soundqualität einzustellen: Off
P
um
Aus),
ock, Pop, Live, Dance, Techno, Classic,
oft
Abb. 27
V-KANAL AUSWÄHLE
1. Sie können die Zifferntasten Fauf der
Fernbedienung verwenden, um einen
ernsehkana
e
r
t anzuw
e
ä
n.
eben Sie die Nummer des Kanals
in, den Sie sehen wollen
g
ei mehrste
die au
einander folgenden Ziffern
en
ummern müssen
Abb. 27)
eweils innerhalb von 3 Sekunden
ngegeben werden.
2
. Um den nachfolgenden oder den
vor
ergehenden Kanal auszuwählen,
drücken
Abb. 27
ie die Taste PR+/-
.
S
. Mit der Taste PRE PRHkönnen Sie
inen fest einprogrammierten Kanal
r
e
auswä
t
e
n
Abb. 27
F
H
N
P
S
DE
rücken Sie die Taste PICTURE
1. D
N
,
um eine vordefinierte Bildeinstellung
auszuwählen: User (eigene Einstellung),
Cinema (Kino), Sport, Vivid, Hi-bright
Abb. 27
. 2
HD Ready Digital LCD-TV
edienungsanleitung
19
Page 64

HAU
N
)
d
)
)
Y
)
S
)
)
)
8
PTFUNKTIONE
ELEKTRONISCHE
PROGRAMMZEITSCHRIFT (EPG
G
rücken Sie die Taste EPG
u
m
elektronische Programmzeitschrift im
V-Modus anzuzeigen
Abb. 28
PROGRAMMLISTE (PR LIST
ie
rücken Sie die Taste PR LISTO
m die Liste der Kanäle und Eingangs-
signale anzuzeigen
(Abb. 28)
DISPLA
rücken Sie die Taste DISPLAY
T
m die aktuellen Signale anzuzeigen,
einschließlich der Eingangs- und
onsignale
Abb. 28
LEEP-MODU
1. Drücken Sie die Taste SLEEP
M
um den Fernseher nach einer vorprogrammierten Zeit auszuschalten
Abb. 28
.
. Verwenden Sie die Cursor-
Y
aste
t
5-180 Minuten)
um die Zeit einzustellen
n
Abb. 28
. Drücken Sie zur Bestätigung die
aste OKXAbb. 28
G
M
O
T
X
Y
A
bb. 2
20
HD Ready Digital LCD-TV
edienungsanleitung
Page 65

HAUPTFUNKTIONE
N
T
)
)
A
hl
)
)
A
-
(
A
29
)
ILDFORMA
1. Drücken Sie die Taste ASPECT
uf der Fernbedienung, um das Menü
für die Einstellung des Bildformats
ufzurufen
2
. Verwenden Sie die Cursortasten
um ein Bildformat auszuwählen, und
drücken Sie zur Bestätigung die
T
aste OKXAbb. 29
Folgende Bildformate stehen zur
uswa
A
-
utomatic (Automatisch
Der DTV- und der HDMI-Eingang
übertragen automatisch das
richtige Format, während der
TV- und der SCART-Eingang ein
g
estellt werden müssen .
anorama: Entfernt die schwarzen
-
B
alken an der Seite im 4:3-Format
mit minimaler Verzerrung.
4
:3:
-
Zeigt das klassische 4:3-Format.
F
ilmformat (Movie expand) 14:9
-
Skaliert das klassische 4:3-Format
a
uf das Format 14:9.
F
ilmformat (Movie expand) 16:9:
-
kaliert das klassische 4:3-Format
a
uf das Format 16:9.
16:9 Untertitel
-
as 4:3-Format unter größtmöglicher
usnutzung der Bildschirmfläche,
wobei die Untertitel sichtbar bleiben.
B
reitwandformat (Wide screen):
-
treckt das klassische 4:3-Format
a
uf das Format 16:9.
Abb. 29
Abb. 30
Abb. 29
subtitle):Verwendet
J
J
Y
X
M
ovie expand 14:9
DE
Y
HD Ready Digital LCD-TV
edienungsanleitung
21
Page 66

EN
Ü
S
)
die A
)
f
eße
)
:
g
lligkei
S
:
Verf
TV:
f
S
Installation:
A
(
g
A
A
32
A
33
STEU
SD-EINSTELLUNG
ERUN
G
1. Drücken
ie die Taste MENU
oder
um die OSD-Einstellung aufzurufen. Die
iste umfasst fünf Bereiche: Bild, Ton,
V, Installation und Kindersicherung
(Abb. 31 und 32
.
. Verwenden Sie die Cursortasten
zum Auswählen und drücken Sie die
X
,
aste OK
bestätigen
um
uswahl zu
Abb. 31 und 32
Drücken Sie die Taste EXITV um
das Menü au
hli
dem Bildschirm zu
(Abb. 31 und 32
n
Bild (Picture)
-
eigt auf der Basis Ihrer bevorzugten
ender weitere Bildeinstellungs-
lichkeiten und Funktionen an,
mö
nstellung von Farbe und He
Ton (
ound)
-
Stellt weitere Audioeinstellungen zur
ügung, auch auf die Audioum-
gebung des Fernsehgeräts bezogen.
-
nstellung besonderer Funktionen
p
ür Land,
rache und TV-Kanäle.
-
npassung der Einstellungen zur
rogrammierung der Fernsehsender
und zur Sprache.
Kindersicherung
-
Steuerun
für Kanäle und Prog
Parental):
besonderer Funktionen
ramme.
U
Y
G
U
X
bb. 31
bb.
V
Y
t.
Settings 5 Picture
Picture
Sound
TV
Installation
Parental
Picture mode
Brightness
Contrast
Colour
Sharpness
Colour temperature
Noise Reduction
Back light
9
bb.
22
HD Ready Digital LCD-TV
edienungsanleitung
Page 67

EN
Ü
G
)
)
A
)
lligkeit d
-
)
V
V
C
A
)
-
f
)
Ausf
Verb
Bild
Off (
g (
)
Auf
A
f
(
A
3
STEU
ERUN
Bild (Picture
ildmodus (Picture Mode
-
uswählen eine
r vordefinierten
Bildeinstellung. Verwenden Sie die
Y
,
ursortasten
um zwischen
ser (eigene Einstellung), Cinema
Kino), Sport, Vivid und Hi-bright
zu wechseln
-
elligkeit (Brightness)
egulierung der He
Abb. 34 und 35
es
Fernsehbildes
ontrast (Contrast
nstellung der Kontraste
arbe (Colour)
-
erstärkung oder Abschwächung der Farbe
chärfe (Sharpness)
-
erbesserung der Detailschärfe.
arbtemperatur
(
olour temperature
uswahl zwischen Normal (neutral), Warm (mehr
R
R
ausch
otanteil
und Cool (Kalt, mehr Blauanteil .
ilter (Noise reduction
ilterung und Reduzierung von Störungen
zur
esserung der
ie die Cursortasten
qualität. Verwenden
Y
, um zwischen
Low (Niedrig), Medium (Mittel) und
Stron
Stark) zu wechseln.
intergrundbeleuchtung (Back light
-
hellung oder Verdunkelung des
schirmhintergrunds
eitenverhältnis (Picture format)
-
uflistung der zur Verfügung stehenden Bild-
:
ormate. Verwenden Sie die Cursortasten
um zwischen Automatic, Panorama, 4:3,
ovie expand (Filmformat) 14:9, Movie expand
Filmformat) 16:9, 16:9 subtitle (Untertitel) und
Wide screen
Breitwandformat) zu wechseln.
Settings 5 Picture
Picture
Sound
TV
Installation
Parental
)
Aus),
:
Y
Picture mode
Brightness
Contrast
Colour
Sharpness
Colour temperature
Noise Reduction
Back light
9
bb. 34
bb.
Y
DE
5
HD Ready Digital LCD-TV
edienungsanleitung
23
Page 68

EN
Ü
)
-
)
)
Off (
-
A
f
-
AVL
A
g
)
A
V
m
S
-
A
37
Ton
alance
-
öhen (Treble
-
aumklang (Virtual surround
-
tasten
lang-Modus (Sound mode)
STEU
instellung der Balance zwischen
em rechten und linken Lautsprecher
Abb. 36 und 37
instellung der Tiefen
nstellung der Höhen
rzeugung einer größeren Klangfülle des
ernsehtons. Verwenden Sie die Cursor-
Y
, um zwischen On (Einschalten)
nd
Ausschalten) zu wechseln.
uswahl einer vordefinierten Klangqualität
ür den Fernsehton. Verwenden Sie die
ursortasten
ock, Pop, Live, Dance, Techno, Classic
nd Soft zu wechseln.
ERUN
Y
, um zwischen Off (Aus),
G
bb. 36
:
b.
igitaler Audio-Ausgang
Digital audio out
-
24
ngleichung der Lautstärke in den
v
erschiedenen Kanälen und Pro
eduzierung der Klangdynamik.
uswahl des digitalen Audio-Ausgangs.
erwenden Sie die Cursortasten
zwischen Off (Aus), Bit stream und PCM
zu wechseln.
HINWEI
Wenn Sie Bit stream auswählen, muss
auch der Verstärker das digitale Audio
ignal unterstützen.
:
HD Ready Digital LCD-TV
rammen,
Y
, u
Y
edienungsanleitung
Page 69

EN
Ü
G
f
Verf
-
)
V
di
L
k
i
ll
S
i
i
-
Off (
)
Audio description (Spezialtonspur
V
A
39
-
STEU
ie folgenden Funktionen stehen nur
ür digitale Kanäle mit Audiosignal zur
ügung.
autstärkeregelung der Tonspur
ür Sehbehinderte (Volume-visually
mpaired
Lautstärke für Sehbehinderte.
u
m
HINWEI
einstellen, vergewissern Sie sich,
eingeschaltet ist.
:
rhöhung oder Verringerung der
erwenden Sie die Cursortasten Y,
e
autstä
ass die Funktion Audio descr
ERUN
e e
r
nzust
: Bevor Sie die Lautstärke
DE
e
e
n.
p
t
on
bb. 38
örgeschädigte (Hearing impaired)
bertragung von Audiofrequenzen für
H
örgeschädigte. Verwenden Sie die
ursortasten Y um zwischen On
Einschalten) und
zu wechseln.
für Sehbehinderte):
-
erwenden Sie die Cursortasten
um zwischen On (Einschalten) und
Off (Ausschalten) zu wechseln.
Ausschalten
HD Ready Digital LCD-TV
b.
Y
Y
edienungsanleitung
25
Page 70

EN
Ü
)
S
G
)
)
Aufruf
f
-
V
m
(
S
(
)
m
auszuwähle
ß
O
•
S
ß
O
A
0
1
TV
-
Land sein, in dem Sie sich befinden,
oder das Land, aus dem
empfangen möchten, wenn Sie nahe
der
-
(
Audio language, nur für Digital-TV
Ihnen bevorzugte Sprache einstellen können.
so
STEU
and (Country
instellung des Landes. Das kann das
renze wohnen
endersprache
en eines Dialogfeldes, in dem Sie die von
iese Sprache wird für alle Sender verwendet,
ern sie verfügbar ist.
ERUN
G
ie Sender
Abb. 40 und 41
.
bb. 4
anäle und Sender (Channels)
erwenden Sie die Cursortasten
zwischen Sendersuche (Channel scan),
Neue Sendersuche
m
anueller
ender überspringen (Channel skip), Sender
sortieren
hannel name edit) zu wechseln.
endersuche (Channel scan
•
1. Verwenden Sie die Cursortasten
m Menü Channels den Unterpunkt Channel
n
. Drücken Sie dann zur Aktivierung die rechte
ursortaste
Taste
egionalen Sender automatisch beginnt.
Neue
1. Verwenden Sie die Cursortasten Y, um im
Menü Channels den Unterpunkt Channel scan
auszuwählen.
. Drücken Sie dann zur Aktivierung die rechte
ursortaste
Taste
egionalen Sender automatisch beginnt.
26
peicher (Analog manual store),
Channel sort) und Senderbezeichnung
KX wodurch die Suche nach dem
endersuche (Update scan):
KX wodurch die Suche nach dem
Update scan), Analoger
n.
Y
,
anschlie
Y
,
anschlie
HD Ready Digital LCD-TV
Y
,
u
Y
,
u
end drücken Sie die
end drücken Sie die
X
edienungsanleitung
bb. 4
Y
Page 71

Analoger manueller Speicher
S
)
e
)
i
S
X
.
i
S
g
S
EN
Ü
G
3
HINWEIS: Das übersprungene Programm wird
möglicherweise nicht über die Cursortasten
STEU
(Analog Manual Store)
. Verwenden Sie die Cursortasten
u
m im Menü Channels den Unterpunkt
hannel scan auszuwählen.
2. Drücken
rechte Cursortaste
ie die Cursortasten
earch (Suchen) und Fine tune
Feineinstellun
Search startet die manuelle Suche
ne tun
des Senders
Sender überspringen (Channel skip)
. Verwenden Sie die Cursortasten
Menü Channels den Unterpunkt Channel skip
zuwählen.
2. Drücken
ursortaste
tenY, um das Programm hervorzuheben,
das Sie überspringen möchten. Drücken Sie
zur Bestätigung die Taste OK
efunden, kann aber über die Zifferntasten
irekt angewählt werden.
o gekennzeichnete Programme sind aktiv
Nicht gekennzeichnete Programme sind nicht aktiv.
ender sortieren (Channel sort)
. Verwenden Sie die Cursortasten
Menü Channels den Unterpunkt Channel sort
zuwählen.
2. Drücken
ursortaste
Y
aste
n
das Sie umstellen möchten. Drücken Sie zur
Bestätigung die Taste OK
. Verwenden Sie die Cursortasten Y um das zweite
ramm hervorzuheben, das Sie mit dem anderen
Pro
austauschen möchten. Drücken Sie die Taste OK
u
m den
ERUN
Y
ie dann zur Aktivierung die
Y
und verwenden
Y
,
um zwischen
g
zu wechseln:
,
sorgt für die Feineinstellung
Abb. 42 und 43
Y
,
m
um
ie dann zur Aktivierung die rechte
Y
und verwenden Sie die Cursor-
X
Y
,
um
m
ie dann zur Aktivierung die rechte
Y
und verwenden Sie die Cursor-
, um das Programm hervorzuheben,
X
ortiervorgang zu starten.
DE
Abb
. 42
bb. 4
Y
X
X
Y
HD Ready Digital LCD-TV
edienungsanleitung
27
Page 72

EN
Ü
)
ß
S
S
aste
S
ächste
abe
abelle
Verf
d
)
5
Senderbezeichnung
Channel name edit
1. Verwenden Sie die Cursoraste
t
den Unterpunkt Channel name edit
auszuwählen.
. Drücken Sie zur Aktivierung
die rechte Cursortaste
anschlie
die Cursortasten
rogramm hervorzuheben,
das
. Drücken Sie die rote Taste
m die Namenseingabe zu starten.
4. Verwenden
t
g
eben. Mit der rechten Cursortaste gelangen
n
nten auf dieser Seite gibt die zur
ügung stehenden Buchstaben
e
wi
. Drücken Sie die grüne Taste
zur Bestätigung
STEU
Y
, um im Menü Channels
n
end verwenden Sie
ie umbenennen möchten.
Y
n
, um den Namen einzu-
Y
n Buchst
e
r.
ERUN
Y
Y
, um das
ie die Cursor-
ie jeweils zum
n. Die T
Abb. 44 und 45
G
e
a
X
a
e
Y
44
HINWEIS: Wenn die mit den
arbigen Tasten verbundenen
Funktionen aktiviert werden,
erscheinen die farbigen Tasten
auch auf dem Bildschirm.
A
bb. 4
28
HD Ready Digital LCD-TV
edienungsanleitung
Page 73

-
A
)
-
)
d
hl
-
)
V
isch
•
)
)
-
)
-
V
isch
Analoge Untertitel (Analog Subtitle)
(
gung g
Sp
•
)
dig
EN
Ü
G
47
STEU
nstallation
ERUN
prache (Language)
uswahl der Menüsprache
(Abb. 46 und 47
Eingang
a
ang
folgenden Einstellmöglichkeiten zu wechseln:
•
•
folgenden Einstellmöglichkeiten zu wechseln:
•
•
ssignal (Source
rkennung der zusätzlichen Geräte, die
en externen Ein- und Ausgängen
n
ossen sind.
esc
eiteinstellung (Time setup
erwenden Sie die Cursortasten
eitzone (Time zone) Auswahl der Zeitzone,
n der Sie sich befinden.
Zeit (Time
der Sie wählen die Funktion Auto Synchronisation
automatische Synchronisierun
INWEIS: Bevor Sie D
instellen, vergewissern Sie sich, dass die Funk
tion Auto Synchronisation ausgeschaltet ist.
leep-Modus (Sleep timer
ach der sich der Fernseher automatisch abschaltet.
ubtitle (Untertitel)
erwenden Sie die Cursortasten
bertragenen Untertitel auf dem Bildschirm. Diese
unktion kann entweder permanent zugeschaltet
werden
Sendeanstalt zur Verfü
Stummschaltung des Tons.
en Teletext.
Untertitel-Typ (Subtitle type
ntertitel oder der speziellen Untertitel für Hörge-
chä
Einstellung von Datum und Uhrzeit,
vorausgesetzt dieser Dienst wird von der
tal subtitle language
te.
:
:
Y
g
atum und U
:
Einstellung der Zeit,
Y
estellt) oder nur bei
: Auswahl der
Auswahl der normalen
,
um zw
.
hrzeit manuell
,
um zw
: Anzeige der
en
en
rache für
A
bb. 46
DE
.
Y
HD Ready Digital LCD-TV
edienungsanleitung
29
Page 74

EN
Ü
-
V
)
•
A
•
A
-
Aktuelle Software-Hinweise
)
-
Bild
A
8
9
eletext
erwenden Sie die Cursortasten
um zwischen folgenden Einstell-
Abb. 48 und 49
Digital teletext language
a
Current software info)
Abb. 48 und 49
Zurücksetzen der AV-Einstellungen
Reset AV settings)
urücksetzen der meisten
und Toneinstellungen auf den
werksseitigen Stand.
STEU
öglichkeiten zu wechseln
uswahl der Teletext-Sprache
ecoding page language
npassung der Teletext-Sprache
n Ihre Sprachregion
eses Menü erscheint zusammen
it Ihrer TV-Software-Information
ERUN
.
G
Y
bb. 4
b. 4
-
30
HD Ready Digital LCD-TV
Y
edienungsanleitung
Page 75

-
)
-
-
Änderung der PIN-Nummer
)
Ä
PIN-N
C
A
,
-
PIN-N
EN
Ü
G
STEU
indersicherung
endersperre (Channel lock
Komplette Sperre eines bestimmten
enders oder externen Eingangs-
ignals (Abb. 50).
Programmsperre (Program lock)
Zugangssteuerung zu Programmen
it Altersbeschränkung. Alle Ein-
tellungen beziehen sich auf digitale
ender.
hange PIN
nderung des Zugangscodes.
enn keine
autet der Menüpunkt Set PIN
(Eingabe einer PIN-Nummer). Bitte
g
fol
en Sie den Hinweisen, um eine
PIN-Nummer einzugeben. Wenn
cho
n vorher eine PIN-Nummer ein-
egeben wurde, wechselt das Display
zu
hange PIN. Bitte folgen Sie den
nweisungen, um Ihre PIN-Nummer
zu ändern. Alle Ziffernkombinationen
zwischen 0000 und 9999 sind möglich.
ERUN
ummer existiert,
A
bb. 50
DE
HINWEIS: Denken Sie daran
dass 0711 die voreingestellte
PIN-Nummer ist. Wenn Ihr Zugangs
code sich geändert hat oder wenn
ie Ihre PIN-Nummer vergessen
h
aben, können Sie immer die
voreingestellte
verwenden.
ummer
HD Ready Digital LCD-TV
edienungsanleitung
31
Page 76

L
ETEXT
T
)
)
ff
)
S
A
1
T
TELETEX
Ausgelegt ausschließlich auf europäische
PAL/SECAM/DVB-T-Systeme)
TELETEX
f
um
h
,
um
e
rntasten
g
,
k
g
m
n
Drücken Sie die Taste TELETEXT
m Teletext/Videotext zu aktivieren.
um Ausschalten drücken Sie die Taste
noch einmal (
Abb. 51
ÜBERLAGERUNG (MIX)
Drücken Sie die Taste MIX
eletext/Videotext bei laufendem
V-Bild zu aktivieren.
G
RÖSSE (SIZE
Drücken Sie die Taste SIZE
g
die Fenster
röße für Teletext/Videotext
zu verändern: Vollbild (Full screen),
bere Hälfte (Top half) oder
(
Untere Hälfte
Bottom half).
UNTERGEORDNETE SEITEN
(
SUBPAGE)
Drücken Sie die Taste SUBPAGE
m weitere Unterseiten anzuzeigen
falls vorhanden).
INHALTSVERZEICHNIS (INDEX)
Drücken Sie die Taste INDEXm,
m zur Seite 100 oder zur Index-Seite
zurückzukehren. Mit den Zi
g
eben Sie anschließend die drei-
0-9
tellige Nummer der gewünschten
eletext/Videotext-Seite ein.
f
bb. 5
h
k
UNTERTITEL (SUBTITLE
Drücken Sie die Taste
als Untertitel-Seite gekennzeichnet ist.
32
U
BTITLE
n
m die nächste Seite auszuwählen, die
HD Ready Digital LCD-TV
edienungsanleitun
g
Page 77

L
ETEXT
f
S
T
h
i
l
)
Bildschi
Bildschi
ili
A
2
ANHALTEN (HOLD):
rücken Sie die Taste HOLD
um das Durchlau
en der Seiten anzu-
q
,
halten, zum Weiterscrollen drücken
eselbe
aste noc
e
a
nm
Abb. 52
VERBORGENEN TEXT ZEIGEN
REVEAL):
rücken Sie die Taste REVEAL
p
um verborgene Informationen wie
etwa die Antwort in einem Quiz auf
em
rm zu zeigen.
ARBIGE TASTEN:
rücken Sie die farbigen Tasten a
e
,boder d, um aus verschiedenen
öglichkeiten auszuwählen, die auf
em
rm in der jewe
gen
Farbe gezeigt werden.
ie
.
DE
a
e
b
d
p
q
bb. 5
HD Ready Digital LCD-TV
edienungsanleitun
g
33
Page 78

KARTENSTECKPLATZ
)
A
S
S
)
S
ode
und wähle
C
l
k
d
W
arte a
Abb
4
53
5
A
56
(
COMMON-INTERFACE-STECKPLATZ
KARTENSTECKPLATZ (COMMON INTERFACE MODULE
er Kartensteckplatz
)
ist dafür
ausgelegt, das mit einer Smart
ard gekoppelte CAM-Modul
Conditional Access Module)
aufzunehmen, um Pay-TV-Programme und ähnliche Dienste
empfangen zu können
W
enden Sie sich an Ihren Kartenservice-Provider
Informationen
übe
Abb. 53
,
um weitere
odule und
r M
.
bonnement-Optionen zu er-
h
alten. Bitte beachten
ie, dass
CAM-Cards nicht im Lieferumfang
eingeschlossen sind und auch
n
icht über uns bezogen werden
nnen.
ACHTUNG: Schalten Sie das
Fernsehgerät aus, bevor Sie
as Modul in den Steckplatz
U
einschieben.
)
bb.
1.
chieben Sie das CAM-Modul
mit der Smart Card sorgfältig in
en dafür vorgesehenen Stecklatz ein, der sich an der Seite
es Geräts befindet
. Schalten Sie den Fernseher
ein,
drücken
G
MENU
ie das Untermenü TV aus.
Der Punkt
ommon Interface
wird angezeigt, wenn das
odu
er
a
nnt wur
ie einen Moment, bis die
K
ktiviert ist (Abb. 54–56)
34
Abb. 53
ie die Taste
U
r
e
.
HD Ready Digital LCD-TV
arte
. 5
bb. 5
A
n
bb.
n
edienungsanleitung
Page 79

)
A
S
e
(
)
)
A
59
A
60
KARTENSTECKPLATZ
(
COMMON-INTERFACE-STECKPLATZ
. Wählen Sie den Unterpunkt
ommon Interface aus,
amit die Menüoptionen
nd Informationen zu der
etreffenden Karte ange-
zeigt werden
4. Drücken Sie die Taste OKX,
das Kartenmenü aufzu
m
ufen. Weitere Informationen
finden
eitung der entsprechenden
Kart
Abb. 57
X
-
ie in der Betriebsan-
Abb. 58 und 59
)
bb. 57
DE
A
bb. 58
bb.
. Wenn das Modul herausge-
ommen wird, verschwindet
as Menü Common Interface
om Bildschirm
Abb. 60
.
HD Ready Digital LCD-TV
edienungsanleitung
bb.
35
Page 80

F
SUC
S
?
?
?
Verze
d
gang
d zu dunke
gang
g
Bild, kein T
,
ied
A
eine Farbe
Bild mi
i
.
p
g
S
f
).
hlb
e
p
S
g
V
EHLER
n der fol
I
enden Tabelle finden Sie einige möglicherweise auftretende Fehler und die entsprechenden
orschläge zu deren Behebung. Bitte gehen Sie diese Liste durch, bevor Sie sich an einen Kunden-
ienst wenden.
HE
PROBLEME LÖSUNGEN
1. Ist das
Kein Bild
nnatürliche Farben Ist das Kabel für das Eingangssignal richtig angeschlossen?
rrtes Bil
Bil
ur Ton, kein Bild
ur
ernbedienung
funktioniert nicht
s werden zu wenig
Sender empfangen
K
mmerndes
Schattenbildung
Schwarze Linien oder
alken
Bestimmte Sender sind
esperrt
berlappende oder
hattierte Bilder
unktionen nicht
auswä
in
K
rogrammempfang
l Stellen Sie Helligkeit und Kontrast ein.
on
ar
2. Haben Sie die Einschalttaste (Power) gedrückt
. Ist das Kabel für das Eingangssignal richtig angeschlossen
4. Drücken Sie irgendeine Taste am Fernsehgerät.
1. Ist das Kabel für das Eingangssignal richtig angeschlossen?
2. Ist das Ein
1. Ist das Kabel für das Ein
2. Das TV-RF-Si
1. Ist das Kabel für das Eingangssignal richtig angeschlossen?
2. Ist die Lautstärke richtig eingestellt?
. Ist das Kabel für das Audiosignal richtig angeschlossen?
4. Das TV-RF-Signal darf nicht weniger als 50 dB betragen.
1. Sind die Batterien noch ausreichend leistungsfähig?
.
Verwenden Sie die Funktion Channel scan im Menü Channels, um die
nzahl der gespeicherten Sender zu erhöhen.
tellen Sie die Farbe neu ein.
S
1. Ist das Antennen- oder Signalkabel richtig angeschlossen?
2. Liegt auf dem ausgewählten Kanal ein Eingangssignal an?
t
. Drücken Sie die Taste SOURCE und wechseln Sie
Stellen Sie die Antenne richtig ein.
Stellen Sie den Fernseher nicht in der Nähe von Störungsquellen auf,
w
Verwenden Sie die Funktion U
nicht
Verwenden
rät im Ein
Wenn der Unterpunkt, den Sie ausgewählt haben, grau ist und nicht
schwarz, kann diese Funktion nicht genutzt werden.
Verwenden Sie die Funktion U
um noch nicht gespeicherte
tromkabel richtig angeschlossen
ssignal mit dem Gerät kompatibel?
nal darf nicht weniger als 50 dB betragen.
Schalten Sie das Gerät für 10 Sekunden aus
w
er ein.
as Eingangssignal.
e z.B. Autos, Neonlampen oder Haartrockner
espeicherte Sender der Liste hinzuzufügen.
ie eine multidirektionale Außenantenne (falls Ihr Fernsehge-
lussbereich nahe gelegener Berge oder hoher Gebäude steht
ssignal richtig angeschlossen?
dann schalten Sie es
date scan im Menü Channels, um noch
date scan im Menü Channels,
ender der Liste hinzuzufügen.
36
HD Ready Digital LCD-TV
edienungsanleitung
Page 81

TECHNI
SC
N
9"
9:9:9
A
900
050
68
-
G
W
A
f
(
), C
1
)
A
1
h
A
o
2
A
fe
e
400
m
m
m
g
g
g
f
W
55 W< 110 W
W
g
A
A
A
HE DATE
Bildschirmgröße 1
DISPLAY
eitenverhältnis 16:
uflösung 1440 x
OS
D
Sprachauswahl
ound Output
ound-Modus Rock, Pop, Live, Dance, Techno, Classic, Soft
Bildformat
Bild-Modus User
ückseite
eitlic
bmessungen:
reite
ie
Höh
ewicht
Leistungsau
im Betrieb (max.)
Stromverbrauch
tandby
rforderliche
Netzspannun
nahme
g
En
lisch, Deutsch, Französisch, Italienisch, Spanisch, Portugiesisch,
N
iederländisch, Dänisch, Finnisch, Schwedisch, Norwegisch, Polnisch,
,
Russisch
W
utomatisch, Panorama, 4:3, Kinoformat 14:9, Kinoformat 16:9,
16:9 Untertitel, Breitwand
uner-Eingang (75 Ω
SCART
C-Eingang: VGA und Audiokabel
omponent-Video-Eingang und L/R Audio-Eingan
SPDIF-Ausgang (Digitaler Audio-Ausgan
V L/R Audio-Ausgang
HDMI
Kopfhörer-Ausgang
V-Eingang (Composite-Audio/Video-Eingan
S-Vide
HDMI
Kartensteckplatz (Common Interface
4
46 mm
59 mm
145 mm
4
,0 k
< 50
00-240V Wechselstrom
riechisch
VERSTÄRKER
Eigene Einstellun
MASSE UND GEWICHTE
STROMVERSORGUNG
2,
4
–60 Hz
g
ANSCHLÜSSE
)
ormat
512 mm
145
5,0 k
<
00-240V Wechselstrom
22"
x 1
W
inema, Sport, Vivid, Hi-bright
)
mm
mm
< 1
2,4
–60 Hz
"
x 7
DE
DE
5
g
g
g)
652 m
480 m
220 m
8
,8 k
00-240V Wechselstrom
2,4
–60 Hz
HD Ready Digital LCD-TV
edienungsanleitung
37
Page 82

ECHNI
SC
V
WIC
S
asse
W
d
d
d
b
,
HE DATEN
STROMANSCHLUSS
ergewissern Sie sich, dass die für dieses Gerät erforderliche Stromspannung
it der bei Ihnen zur Verfügung stehenden Spannung übereinstimmt. Dieses
erät ist mit einem 16-Ampere-Stecker (oder 10-Ampere-Stecker) ausgestat-
et. Falls der Stecker nicht passt oder ausgetauscht werden muss, beachten
Sie bitte den folgenden Hinweis.
AUSTAUSCHEN DES STECKERS
enn der Stecker ausgetauscht oder ersetzt werden muss.
ACHTUNG: Schließen Sie das Massekabel oder den Null-Leiter
niemals an die Erdung an. Verwenden Sie einen handelsüblichen
16-Ampere-Stecker. Falls Sie sich nicht sicher sind, wenden Sie sich
an einen Fachmann.
HTIGER HINWEI
Die Adern des Stromkabels sind farblich folgendermaßen belegt:
ue: Null-Leiter
raun: M
enn die Farben der einzelnen Adern des Stromanschlusses
icht mit den Farbkennzeichnungen in Ihrem Stecker
bereinstimmen, gehen Sie folgendermaßen vor:
Die bl
gekennzeichneten Seite angeschlossen. Die braune Ader
wird an der mit L markierten oder braun gekennzeichneten
eite angeschlossen. Vergewissern Sie sich, dass die
abelführung fest verschraubt ist.
aue
e
r wir
A
e
r mit N markierten
an
ode
r
lau
DEFEKTE ELEKTROGERÄTE DÜRFEN NICHT MIT DEM HAUSMÜLL ENTSORGT WERDEN, SONDERN SOLLTEN RECYCELT
WERDEN. FRAGEN SIE BEI IHRER REGIONALEN ABFALLBEWIRTSCHAFTUNG NACH
ICHEREN ENTSORGUNG IN IHRER REGION BESTEHEN.
38
HD Ready Digital LCD-TV
WELCHE MÖGLICHKEITEN ZUR
edienungsanleitung
Page 83

Page 84

Page 85

MANUEL D’UTILISATION
TELEVISEUR/RECEPTEUR LCD
MODELE:
LT19 M1CW,LT1 9M 2CW
LT22M1C W ,LT26 M2C
LT26 M1C
Veuillez attentivement lire ce manuel avant
d’utiliser votre téléviseur puis conservez précieusement
ce manuel pour pouvoir vous y référer ultérieurement.
Page 86

CONSIGNES DE SECURITE IMPORTANTES
Lisez toutes les instructions avant d’utiliser l’appareil et
conservez-les pour pouvoir vous y référer ultérieurement.
AVERTISSEMENT
Toute utilisation incorrecte ou modification de l’appareil peut se résulter par des •
dommages ou des blessures corporelles.
Afin de réduire les risques d’incendie et d’électrocution, n’exposez pas cet appareil à la •
pluie ou l’humidité.
INFORMATIONS IMPORTANTES
L’appareil est destiné à une utilisation ménagère seulement.•
Eteignez toujours l’appareil avant de le mettre sous tension/hors tension. Ne tirez jamais sur le •
cordon pour débrancher l’appareil, empoignez plutôt la fiche du cordon et tirez.
Vérifiez que la tension figurant sur la plaque signalétique du produit correspond à celle de •
votre installation secteur, celle-ci doit être de type CA. (Tension alternative).
Si la prise de courant murale de votre domicile n’est pas compatible avec la fiche du produit, •
faites appel à un électricien pour procéder à un remplacement.
POUR DES PERFORMANCES OPTIMALES
Nettoyez la poussière présente sur l’appareil et nettoyez l’appareil avec un chiffon sec.•
N’utilisez pas l’appareil dans des endroits exposés aux rayonnements du soleil ou dans des •
endroits où l’appareil pourrait devenir extrêmement chaude.
Maintenez l’appareil à l’écart des sources de champs magnétiques- comme les haut-parleurs.•
N’installez pas l’appareil dans un endroit instable ou soumis à des vibrations.•
Afin de réduire les risques d’incendie et d’électrocution, n’exposez pas l’appareil à la pluie et •
l’humidité, aucun objet rempli de liquide, comme un vase, ne doit être posé sur l’appareil.
Afin de prévenir tout incendie, aucune source de flammes nues, comme une bougie allumée •
ne doit être posée sur ou près de l’appareil.
Afin de permettre une ventilation adéquate, laissez au moins 10 cm d’espace autour du •
téléviseur. N’installez pas le téléviseur sur un tapis.
Les orifices de ventilation ne doivent pas être obstrués.•
En cas de fumée, bruit ou odeurs inhabituels provenant de l’appareil, éteignez l’appareil, •
débranchez-le de la prise de courant puis contactez votre revendeur ou notre service clients.
Installez le téléviseur de manière à ce que l’écran ne soit pas exposé aux rayonnements •
directs du soleil. Une lumière douce et indirecte est idéale pour visionner la télévision. Evitez
les environnements sombres et les réflexions de l’écran car ceux-ci peuvent entrainer une
fatigue oculaire.
Lorsque l’appareil est déplacé depuis un endroit frais, laissez tout d’abord la condensation •
interne s’évaporer avant de réutiliser l’appareil.
le coupleur de l’appareil permet de mettre l’appareil hors tension, celui-ci doit donc rester •
facilement accessible.
N’exposez pas l’appareil à des éclaboussures et égouttements.•
L’appareil doit être raccordé à une prise de courant mise à la terre.•
Page 87

CONSIGNES DE SECURITE IMPORTANTES
Lisez toutes les instructions avant d’utiliser l’appareil et
conservez-les pour pouvoir vous y référer ultérieurement.
POUR ASSURER LA SECURITE
NE PAS:
Tenter de désassembler cet appareil ou d’effectuer des réparations.•
Tenter de modifier l’appareil.•
S’assurer qu’aucun objet étranger ne pénètre à l’intérieur de l’appareil.•
Placer une source de flammes nue – comme une bougie allumée, sur ou près de l’appareil.•
Placer des objets remplis de liquides – comme des vases, sur ou près de l’appareil.•
Couvrir l’appareil – ne gênez pas la ventilation de l’appareil.•
Faire tomber l’appareil ou la soumettre à de grands chocs.•
Tenter de réparer l’appareil vous-même en ouvrant ou retirant le boitier, ceci pourrait vous exposer à •
une dangereuse tension ou autres risques. Confiez l’entretien de l’appareil à du personnel qualifié.
ENFANTS
Les enfants ne comprennent pas toujours les dangers relatifs à l’utilisation d’équipements •
électriques. Ne laissez jamais un enfant utiliser cet appareil.
ALIMENTATION
Si l’appareil fonctionne sur secteur, assurez-vous que la fiche du cordon est fermement •
raccordée à la prise de courant murale et que celle-ci est facilement accessible.
Protégez le cordon d’alimentation des objets pointus, la chaleur excessive, l’humidité et les •
endroits humides. Vérifiez régulièrement l’état du cordon d’alimentation, remplacez-le si celuici est endommagé.
Si l’appareil fonctionne avec des piles, assurez-vous que celles-ci sont correctement installées •
– observez la polarité (+/-).
Ne mélangez pas des piles neuves et usagées.•
Veuillez vous assurer de correctement disposer les piles usagées. Ne les jetez pas dans le feu.•
Vérifiez que la tension figurant sur la plaque signalétique du produit correspond à celle de •
votre installation secteur, celle-ci doit être de type CA. (Tension alternative).
Les réparations doivent être effectuées par un électricien qualifié ou un agent de service agréé.•
FR
UTILISATION D’ECOUTEURS
Afin de prévenir tout dommage à votre ouïe, écoutez la musique à des niveaux de volume modérés.•
Si vous n’entendez aucun son en cours de lecture, n’augmentez pas le volume, car la musique •
pourrait soudainement démarrer à un haut niveau de volume. Une pression sonore excessive
des écouteurs/casque d’écoute peut entrainer la perte de l’ouïe.
Afin de ne pas endommager votre ouïe, réglez le volume au minimum avant de démarrer la •
lecture, augmentez le volume une fois la lecture lancée.
ATTENTION: AFIN DE REDUIRE LES RISQUES D’ELECTROCUTION, NE
RETIREZ PAS LE COUVERCLE (OU PANNEAU ARRIERE), AUCUN COMPOSANT
REPARABLE PAR L’UTILISATEUR NE SE TROUVE DANS L’APPEREIL, CONFIEZ L’
ENTRETIEN DE L’APPEREIL A DU PERSONNEL QUALIFIE.
1
Page 88

SOMMAIRE
Familiarisez-vous avec l’appareil ..................................................... 3
Télécommande ..................................................................................6
Montage mural. ................................................................................... 8
Raccordement d’une antenne ......................................................... 10
Options du menu Réglages ............................................................ 11
Autres raccordements ....................................................................13
Fonctionnement basique ................................................................. 18
Fonctionnement du menu ................................................................ 22
Télétexte ........................................................................................... 33
Interface commune Module ............................................................ 34
Dépannage ........................................................................................ 36
Spécifications ................................................................................... 37
Remarque: la representation de ce boîtier LCD est un exemple et peut différer de
votre boîtier LCD.
2
HD Ready Digital LCDTV
Manuel D’utilisation
Page 89

FAMILIARISEZ-VOUS AVEC L’APPAREIL
Touche POWER
1 télécommande
Touche VIDEO
Touche PERITEL
Touche TV
Touche PC
Touche numériques
Touche EPG
Touche PRE PR
Touche ASPECT
Touche SOURCE
Touche NICAM
Touche SLEEP
Touche PICTURE
Touche PR LIST
Touche SOUND
Touche VOL
Touche MUTE
Touche PR
Touche DISPLAY
Touche MENU
Touche EXIT
Touche OK
Touches directionnelles
Touche Verte
Touche Jaune
Touche Bleue
Touche Rouge
Touche MIX
Touche TELETEXT
Touche SIZE
Touche SUBPAGE
Touche INDEX
Touche SUBTITLE
Touche REVEL/Tick
Touche HOLD/VIEW
FR
3
Page 90

FAMILIARISEZ-VOUS AVEC L’APPAREIL
Témoin lumineux
Orifices de montage au mur
Touche Volume haut
Touche Volume bas
Touche Channel haut
Touche Channel bas
Touche MENU
Touche Source
Touche Power
Emplacement pour cartes générique
Connecteur de sortie Ecouteurs
Connecteur d’entrée Vidéo
Connecteur d’entrée Audio
Connecteur d’entrée S-Vidéo
Connecteur d’entrée HDMI 2
Connecteur d’entrée Antenne
Connecteur d’entrée PERITEL
Connecteur d’entrée PC Audio
Connecteur de sortie SPDIF
Connecteur d’entrée composant
Connecteur d’entrée HDMI 1
Connecteur Alimentation
Connecteur d’entrée VGA
C
D
E
F
G
H
J
Control Panel
1 x LCD TV
A
B
Rear Connections
Y
X
4
HD Ready Digital LCDTV
Manuel D’utilisation
V
Page 91

FAMILIARISEZ-VOUS AVEC L’APPAREIL
Vue de face
1 cordon d'alimentation CA
Z
K
L
M
N
FR
O
P
a
2 piles AAA
V
S RTU
Q
HD Ready Digital LCDTV
Manuel D’utilisation
5
Page 92

TELECOMMANDE
REMARQUE :
Veuillez lire les consignes de
sécurité importantes avant
d’utiliser l’appareil.
TELECOMMANDE
Détachez le couvercle du compartiment
1.
à piles de la télécommande.
Voir l’
image 1.
Insérez deux piles neuves 1.5V de 2.
taille AAA Assurez-vous de respecter la
polarité.
Voir l’image 2.
REMARQUE CONCERNANT LES
PILES:
Ne mélangez pas différents types •
de piles, ne mélangez pas des piles
neuves et usagées.
Afin de prévenir tout risque d’•
incendie et d’explosion, ne tentez
jamais de recharger les piles,
de les faire chauffer ou de les
désassembler.
Lorsque vous n’utilisez pas les •
piles, retirez-les de l’appareil afin de
prévenir toute fuite de combustible.
En cas de fuite de combustible, •
disposez des piles. Nettoyez
entièrement le compartiment à piles
avec un chiffon sec.
l’image 1
Couvercle du
compartiment
à piles
l’image 2
REMARQUES:
- Veuillez lire les consignes de sécurité
importantes
6
HD Ready Digital LCDTV
Manuel D’utilisation
Page 93

TELECOMMANDE
Refermez délicatement le couvercle du 3.
compartiment à piles.
Voir l’image 3.
PRECAUTIONS:
Pour obtenir les meilleures
performances de votre
télécommande, veuillez prendre note
des points suivants:
Assurez-vous qu’aucun obstacle •
ne se trouve entre le téléviseur et la
télécommande.
Les sources de lumière vive peuvent •
affecter les performances de la
télécommande.
Assurez-vous de toujours remplacer l’•
ensemble des piles.
l’image 3
FR
HD Ready Digital LCDTV
Manuel D’utilisation
7
Page 94

MONTAGE AU MUR
REMARQUES
Veuillez lire les consignes de
sécurité importantes avant
d’utiliser l’appareil.
MONTAGE AU MUR (optionnel)
IMPORTANT: lorsque vous
percez un mur, vérifiez
toujours qu’aucun câble ou
tuyau (etc.) ne se trouve à l’
endroit que vous percez.
Assurez-vous que les vis
et supports permettent
de supporter l’appareil.
Consultez un installateur en
cas de doutes.
REMARQUE: à cette étape, il est
recommandé de faire appel à
une deuxième personne.
Posez l’appareil sur une surface
1.
solide et plate, couverte par un tissu
moelleux.
Voir l’image 4 et 5.
Retirez les vis du support.2.
Retirez ensuite le support.
Voir l’image 4 - 6.
Support
l’image 5
l’image 6
l’image 4
Vis
Support
8
HD Ready Digital LCDTV
Manuel D’utilisation
Page 95

MONTAGE AU MUR
Utilisez les 4 orifices de montage au 3.
mur
et les vis (non fournies) pour
monter le téléviseur sur le support (non
fourni).
Voir l’image 7.
Pour l’adaptateur mural – référez-4.
vous aux instructions fournies avec
l’adaptateur mural (non fourni).
Voir l’image 8.
Taille de l’écran du
téléviseur (pouces)
W
H
19" 100 x 100 mm Métrique 4 x 10 mm
22" 100 x 100 mm Métrique 4 x 10 mm
26" 200 x 100 mm Métrique 4 x 10 mm
Adaptateur mural
compatible VESA
(W x H mm)
B
Type de vis
l’image 7
FR
HD Ready Digital LCDTV
Manuel D’utilisation
9
Page 96

RACCORDEMENT DE L’ANTENNE
AVERTISSEMENT:
- Eteignez le téléviseur avant
de raccorder un équipement
externe.
RACCORDEMENT DE L’
ANTENNE
1.
Raccordez la fiche du cordon de l’
antenne au connecteur d’entrée Antenne
Q
situé à l’arrière du téléviseur.
Voir l’image 9.
l’image 9
Pour une qualité d’image optimale, 2.
ajustez la direction de l’antenne.
Pour améliorer la qualité d’image dans 3.
un endroit à faible signal, vous pouvez
alors utiliser un amplificateur de signal
(non fourni).
RACCORDEMENT DU CORDON
D’ALIMENTATION CA
REMARQUE: assurez-vous que la
tension de votre installation est de
230V/240V~, 50Hz.
Raccordez le cordon d’alimentation CA
1.
au connecteur Alimentation .
Voir l’image 9.
Raccordez le cordon d’alimentation CA
2.
à une prise de courant.
Voir l’image 9.
10
HD Ready Digital LCDTV
QX
Fiche du câble Antenne
Prise de courant
Z
Manuel D’utilisation
Page 97

OPTIONS DU MENU REGLAGE
MISE EN MARCHE DU TELEVISEUR LCD
Lorsque vous appuyez sur la touche
1.
POWER
se met en marche et le Témoin
de fonctionnement
panneau avant du téléviseur ne
s’allume plus en rouge mais en bleu.
Voir l’image 10 et 11.
Lorsque vous éteignez le téléviseur 2.
LCD en utilisant la touche POWER
ou , le téléviseur LCD bascule
en mode Attente et le Témoin de
fonctionnement
rouge.
Voir l’image 10 et 11.
ou , le téléviseur
situé sur le
s’allume en
A
l’image 10
J
FR
PREMIERE INSTALLATION
Cette interface s’affiche lorsque vous
1.
mettez en marche le téléviseur pour
la première fois.
Voir l’image 12.
REMARQUE: si cette interface ne s’
affiche pas, vous pouvez appuyer
sur la touche MENU
ensuite les touches directionnelles
pour sélectionner le menu TV.
Voir l’image 11.
Appuyez sur la touche Verte 2.
démarrer l’installation.
Voir l’image 11.
. Utilisez
pour
HD Ready Digital LCDTV
l’image 12
l’image 11
U
a
Thank you for your purchase of this TV.
Please proceed with the following steps to set-up your TV.
Next
Manuel D’utilisation
A
Y
11
Page 98

OPTIONS DU MENU REGLAGES
l’image 13
Utilisez les touches directionnelles 3.
Appuyez ensuite sur la touche Verte
pour continuer.
Voir l’image 13 et 14.
Utilisez les touches directionnelles 4.
pour sélectionner votre pays. Appuyez
ensuite sur la touche Verte
pour
continuer ou appuyez sur la touche
Jaune
pour revenir.
Voir l’image 13 et 15.
La recherche peut nécessiter quelques 5.
minutes pour se terminer.
Voir l’image 16.
Un message s’affiche lorsque la 6.
recherche est terminée. Appuyez sur
la touche rouge
pour terminer la
recherche. Le téléviseur LCD affiche
automatiquement la première chaîne
trouvée.
Voir l’image 13.
l’image 14
l’image 15
l’image 16
a
e
TV Installation
Language
TV Installation
Country
TV Installation
System searching. Please wait...
Analog channels found: 0
Digital channels found: 0
English
Espanol
Français
Deutsch
Italiano
Nederlands
Svenska
Dansk
Next
Austria
Belgium
Czech Republic
Denmark
Finland
France
Gemary
Ireland
Next
1/3
Previous
2/3
Previous
3/3
12
HD Ready Digital LCDTV
Exit
Next
Manuel D’utilisation
Page 99

AUTRES RACCORDEMENTS
AVERTISSEMENT:
- Eteignez le téléviseur
avant de raccorder un
équipement externe.
ENTREE PERITEL
Permet de raccorder des –
équipements externes comme
un lecteur DVD, décodeur ou
console de jeux.
Raccordez le câble péritel de l’1.
équipement au connecteur TV
PERITEL
Voir l’image 17.
PERITEL 1 – PERITEL plein, 2.
transmet les données RGB,
S-Vidéo, tuner CVBS entrée et
CVBS sortie (Analogique).
PERITEL 2 - Demi PERITEL 3.
transmet les données S-Vidéo ou
moniteur CVBS entrée et sortie
CVBS.
.
R
Câble PERITEL
C
Connecteur PERITEL1
R
l’image 17
FR
Appuyez sur la touche SCART 4.
ou SOURCE
PERITEL.
Voir l’image 18.
pour sélectionner
HD Ready Digital LCDTV
K
Manuel D’utilisation
l’image 18
13
Page 100

AUTRES RACCORDEMENTS
ENTREE YPbPr
Permet de raccorder des –
équipements comme une caméra
vidéo.
Assurez-vous que le téléviseur 1.
LCD et que l’équipement AV sont
éteints.
U
Raccordez les câbles (Y, Pb, Pr) 2.
et audio au connecteur d’entrée
Composant et Audio du téléviseur.
U
Voir l’image 19.
Mettez en marche le téléviseur 3.
LCD puis mettez en marche l’
équipement AV.
Appuyez sur la touche VIDEO 4.
ou SOURCE
pour sélectionner
l’entrée YPbPr.
Voir l’image 20.
l’image 19
bPrPY
Câbles Audio
B
14
K
HD Ready Digital LCDTV
l’image 20
Manuel D’utilisation
 Loading...