

Page 1

DIGITAL LCD TELEVISION
INSTRUCTION MANUAL
MODEL:LT26K3/R3A
LY26K3/R3A
LTF32K3/R3A
LY32K3/R3A
LTF42K3/R3A
Please read this manual carefully before
operating the unit, and keep it for future reference.
Page 2

Page 3
Contents
01 Safety Warnings
Welcome
Important information
Safety notice
Electrical connections
02 About your LCD TV
Get to know your TV
Get to know your remote control
Connecting your TV
Preparation of your remote control
03 Getting Started
Setting up
Tuning your TV
Common interface
Using your TV
Adjusting picture settings
Adjusting sound settings
Function settings
Time settings
Lock menu settings
Shortcut menu display
04 Using the features
Teletext function
USB mode
Using External USB Disk For Recording
Using your DVD player(certain models only)
P.02
P.03
P.04
P.05
P.06
P.08
P.09
P.11
P.12
P.13
P.16
P.18
P.19
P.20
P.21
P.23
P.25
P.27
P.29
P.31
P. 3 8
P.
4
0
05 Reference Sections
Troubleshooting
Specification
P. 4 4
P. 4 5
Page 4

01 Safety Warnings
WELCOME
Thanks for buying this 26"/32"/42" HD Ready Digital LCD TV.
This guide will help you set up and begin using your TV.
First, check the contents of your box with the parts checklist below:
26"/32"/42"HD Ready Digital LCD TV
Remote control
AAA battery x2
Instruction Manual
Quick Start Guide
Now you can get started!
Page 5

IMPORTANT INFORMATION
WARNING
RISK OF ELECTRIC SHOCK
DO NOT OPEN
WARNING
TO REDUCE THE RISK OF ELECTRIC SHOCK DO NOT REMOVE COVER (OR BACK). NO
USER SERVICEABLE PARTS INSIDE. REFER TO QUALIFIED SERVICE PERSONNEL.
*To avoid electric hazards, it is strongly suggested that the back cover not be opened, as
there is no any accessory inside the casing.
*If necessary, please contact authorized after-sales services.
*A lighting flash mark in a triangle: A potentially hazardous situation, which, if not avoided,
could result in serious injury by high voltage.
*An exclamation mark in a triangle: Major part or accessory of which technical specifications
must be followed if it is to be replaced.
Warning:
To avoid fire or electric hazards, never place your television receiver in an area
with heavy moisture. Attention should be paid to avoid accidental scratches or
impacts onto the screen.
Caution:
Please read this manual carefully before using your television and keep this
manual in a good place for future reference.
To achieve the best performance of your television, read this User's Manual
carefully and properly store it for future reference.
Information of screen displays and figures in the User's Manual may vary due
to technical innovations.
Caution:
Unauthorized disassembly of this product is prohibited.
Page 6
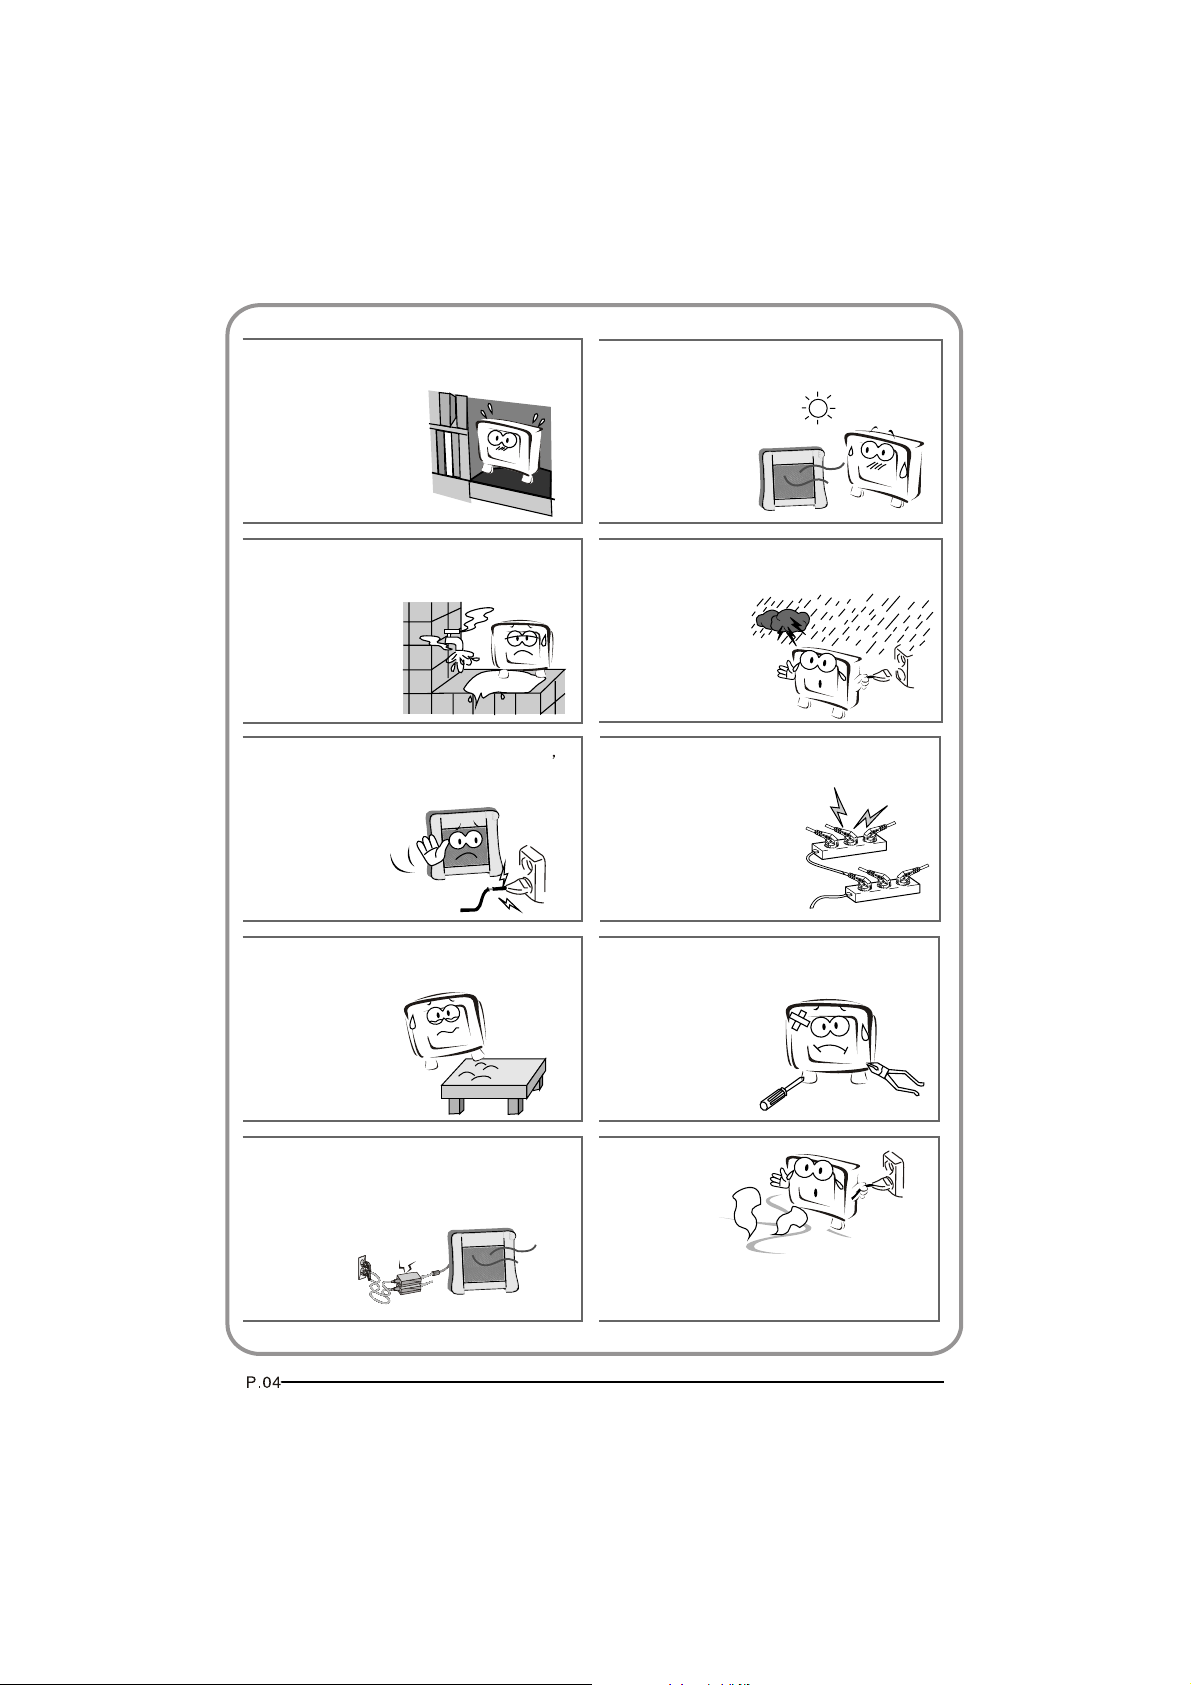
The product should be tightly fixed to avoid
drop damages and even fire.
To avoid fire hazards, do not use this
product under direct sunlight or closely
to heat sources.
Do not locate the product close to water
or oil, which may cause fire hazards.
Do not use damaged or worn electric plugs
and keep electric cord away from heat sources
to avoid electric shocks or fire hazards.
The product must be placed on a solid and
stable surface to avoid collapse.
Unplug the power supply and antenna of
the product when there is a rainstorm,
especially
Thunderstorm.
Do not connect excessive sockets in parallel
or share the same socket by multiple plugs
to avoid fire hazards.
Unauthorized disassembly of the television
is prohibited to avoid electric shocks or fire
hazards. Contact
authorized after-sales
service if technical
service is needed.
Keep the product away from a transformer
or heat source to avoid fire hazards.
Disconnect the product from power supply
and contact authorized after-sales service
if abnormal sound is heard in the product.
Page 7

Don't use or store inflammable materials
near the product to avoid explosion or fire
hazards.
Don't place the product in a humid area to
avoid fire hazards.
The antenna of the product should be away
from electric cable to avoid
electric shocks.
Always make sure that the televisionis well
plugged as poor electric
connection might cause fire.
Unplug the television, use soft fabric, never
chemicals, if you are going to make
cleaning of the product.
Make sure that no
water drops in the
product.
Never touch the plug when your hand is wet
as this might cause electric shocks.
When antenna is used, measures should be
taken to prevent water
from flowing down
along the cable into
the television.
The plug and electric cable must be kept
clean to avoid electric
shocks or fire
hazards.
Disconnect the television from power supply
and antenna when there is a
rainstorm or thunderstorm
to avoid electric shocks
or fire hazards.
Disconnect the television from power supply
to avoid electric shocks or fire
hazards in a long
vocation.
Page 8

About your LCD TV
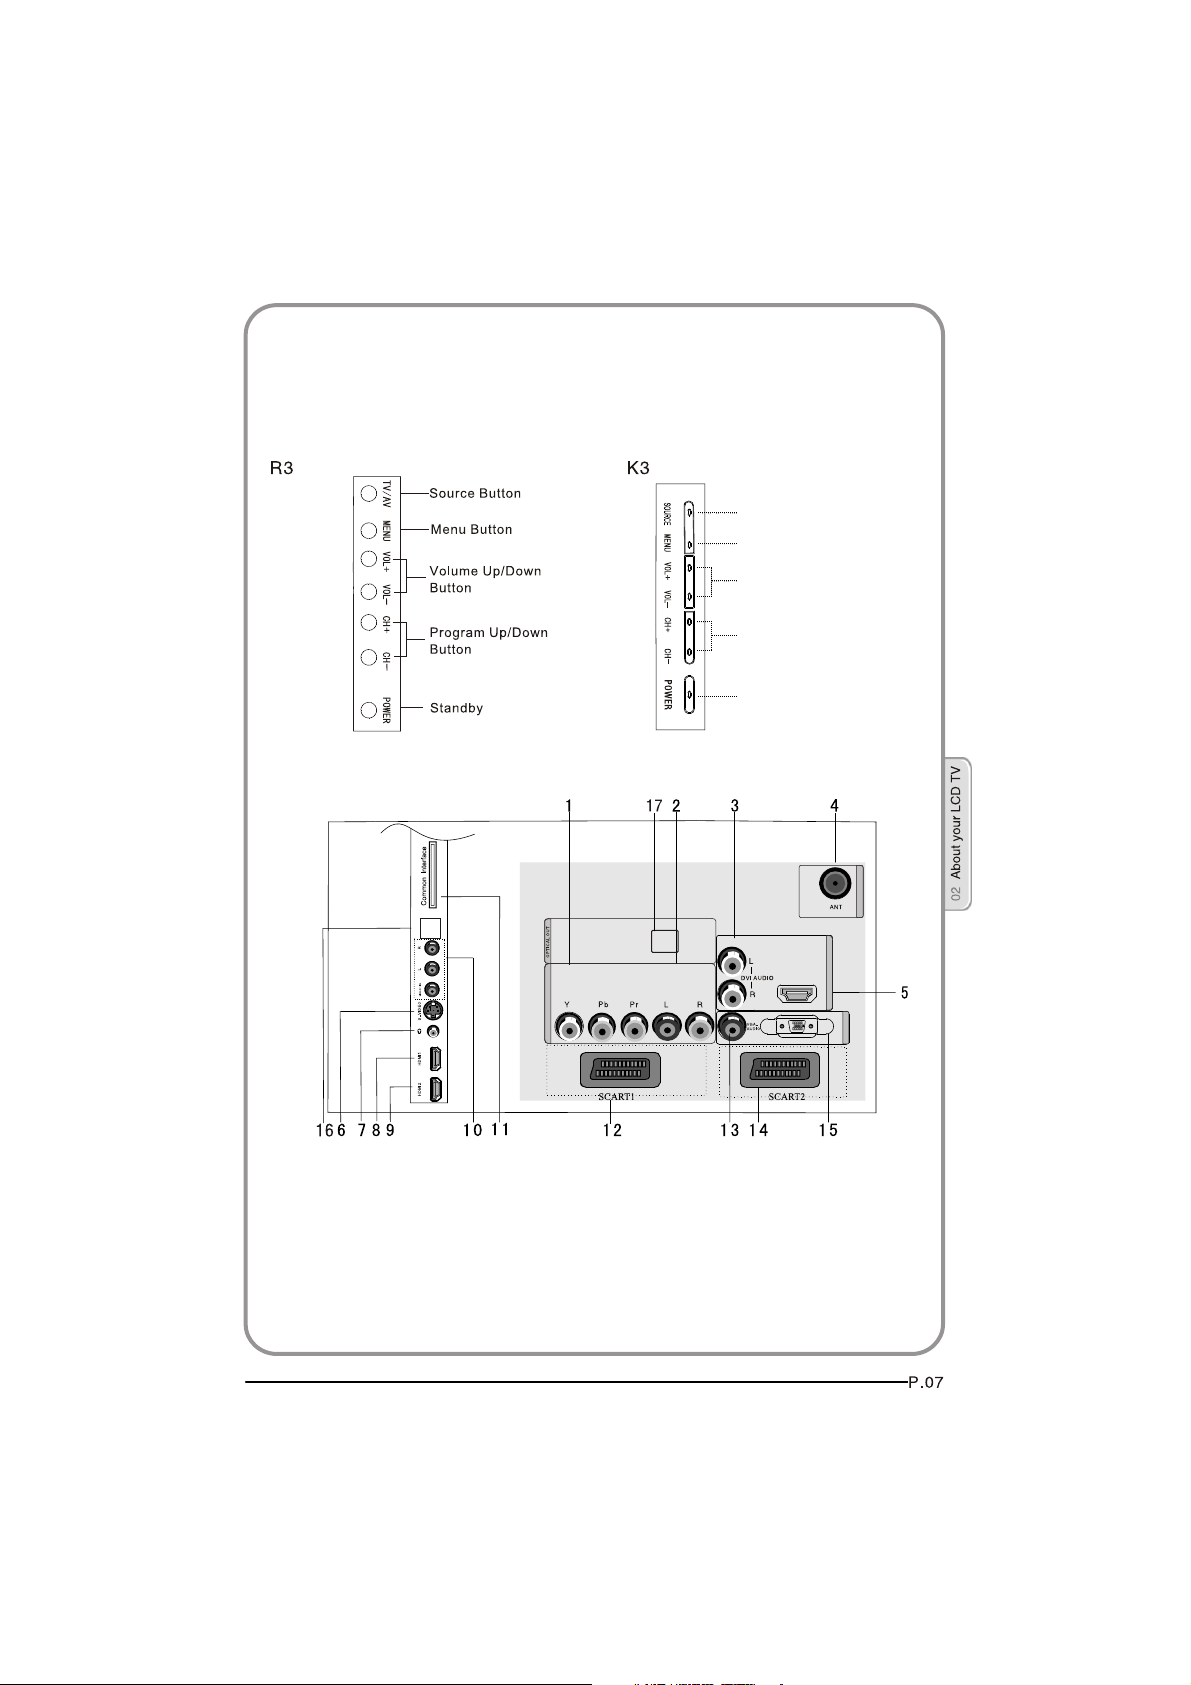
GET TO KNOW YOUR TV
Front control panel
Rear Terminals Control
Source button
Menu button
Volume up/down button
Program up/down button
Power button
2
1REC
USB
1. YPbPr input
2. YPbPr AUDIO input
3. DVI AUDIO input
4. ANTENNA input
5. HDMI3 input
6. S-VIDEO input
7. EARPHONE output
8. HDMI1 input
COMPONENT IN
9. HDMI2 input
10. AV-VIDEO input
11. Common Interface
12. SCART1 input
13. VGA AUDIO input
14. SCART2 input
15. VGA input
16. USB
ANT IN
HDMI3
VGA IN
17.OPTICAL
Page 9
GET TO KNOW YOUR TV WITH DVD
Front control panel
Source button
Menu button
Volume up/down
button
Program up/down
button
Power button
Rear Terminals Control
2
1REC
USB
1. YPbPr input
2. YPbPr AUDIO input
3. DVI AUDIO input
4. ANTENNA input
5. HDMI3 input
6. S-VIDEO input
7. EARPHONE output
8. HDMI1 input
COMPONENT IN
9. HDMI2 input
10.AV-VIDEO input
11. Common Interface
12.SCART1 input
13.VGA AUDIO input
14.SCART2 input
15.VGA input
16.USB
ANT IN
HDMI3
VGA IN
17.OPTICAL
Page 10

SCREEN
STOP
.
GET TO KNOW YOUR REMOTE CONTROL
When using the remote control, aim it
towards the remote sensor on the TV
SCREEN
NOTE:RED button ,GREEN button
BLUE button and YELLOW button are fast
text button in analog signal .Function
button in DVBT (just reference the OSD)
Stand By
DVD Menu / REC
DVD open / close
Picture Mode
Sound Mode
Call Screen Display
Sleep button
DTV Audio / NICAM / DVD Audio
Aspect Ratio Control button
Channel list button
Subtitle button
Program Number Channel selection
Source Exchange
Q.VIEW / Swap Channel
V+/V- : Volume selection
P+/P-: Channel selection
Mute
Menu button
GUIDE button (only for DTV)
Favourite list button
OK button
Cursor Mover button
Back button (only for USB)
Exit Screen Display
(only for DVD , USB , REC & Timeshift) /
REPEAT
CANCEL button
Zoom (only for DVD &USB)/
TV) / REC index
Play / Pause button (only for DVD &USB) / Timeshift
Stop (only for DVD, USB, REC & Timeshift)
Fast Reverse (only for DVD, USB, REC & Timeshift)
Fast Forward (only for DVD, USB, REC & Timeshift)
Previous (only for DVD, USB, REC & Timeshift)
Next (only for DVD, USB, REC & Timeshift)
DVD Set up / Text
DVD Title / Teletext Mix
DVD Search / Teletext Subcode
DVD 10+ / Teletext Hold
DVD Program / Teletext Reveal
DVD A-B Repeat / Teletext Size
DVD Call / Teletext Mode
DVD Angle /Teletext Time
Teletext index(only for
Page 11

CONNECTING YOUR TV
ANTENNA CONNECTION
Connect your aerial to the side of the TV into the ANTENNA IN socket.
IMPROVE YOUR SIGNAL
To improve picture quality in a poor signal area, use a signal amplifier
(not supplied).
CONNECT YOUR PC TO THE TV
You can use your TV as a monitor for your personal computer by connecting it
with a VGA cable (not supplied).
1.Read your computer user guide and check it has a VGA connector.
2.Turn the power off on your TV and PC.
3.Connect a D type 15-pin VGA interface cable to the VGA video interface
connector on the PC. Connect the other end of the cable to the PC interface
connector on the TV. Tighten the screws on the VGA connectors and connect
the audio cable (not supplied) to the audio input socket on the back of the TV.
4.Turn on the power of the TV firstly and then the PC.
5.Press the button on the TV or TV remote control to set the video input mode
to VGA.
6. Once the image shows, if there is noise present, change the VGA mode to
another resolution, change the refresh rate to another rate or adjust the
brightness and contrast on the menu until the picture is clear.
LR YPbPr
DVD
CONNECT A DVD PLAYER TO YOUR TV
Connect the DVD video outputs (Y, Pb, Pr) to the
COMPONENT (Y, Pb, Pr)
IN socket on your TV.
1 . Turn on the DVD player and insert a DVD.
2 . Press the button to select .
3 . Refer to the DVD player user guide for operating
instructions.
Page 12

CONNECT A DVD PLAYER OR VCR TO YOUR TV
There are two ways in which you can connect a DVD player or VCR to your TV.
Make sure that both the TV and DVD player or VCR are switched off before you
connect them.
Connection Option 1
1.Connect the audio and S-VIDEO cables from the VCR output jacks to the TV
input jacks.
2.Insert a video tape into the VCR and press PLAY on the VCR.
3.Turn on the power of the TV first, then the VCR.
4.Press the SOURCE button on the TV to set the video input mode to S-VIDEO.
Connection Option 2
1.Connect the AV DVD/VCR outputs to the AV IN socket on your TV.
2.Press the SOURCE button on the TV to set the video input mode to AV.
SCART INPUT
1.Connect the scart lead from the external device (DVD player, Set-top box
or games console) to the TV scart socket.
2.Press the SOURCE button to select SCART mode.
3.Press the PLAY button on the external device.
HDMI INPUT
1.Connect the cable from the HDMI device to the TV HDMI socket.
2.Press the SOURCE button to select HDMI mode.
3.Refer to the HDMI device user guide for how to operate.
MOUNT YOUR TV ONTO THE WALL
You can mount your TV onto the wall by using a wall bracket (not supplied).
Use M4/M6 machine screws (4 pcs) to screw the TV onto the bracket (not
supplied).
Page 13

PREPARATION OF YOUR REMOTE CONTROL
BATTERY INSTALLATION
1.Place the remote control face down, then open
the cover of the battery compartment.
2.Install two AAA batteries. (The + and- symbol
of the battery must match with the marks on the
remote).
3.Close the cover of the battery compartment.
BATTERY CAUTION
Confirm there is no object between the remote
control and the remote sensor of the TV set.
Sunshine or other strong light will interfere with
the signal sent by the remote control. In this
situation turn the TV set to avoid the direct light
source.
Do not put the remote control in direct heat or in
a damp place as you may damage the remote.
Please use two AAA 1.5V batteries. Do not mix
battery types. Install the batteries at the correct
polarities. Do not use rechargeable batteries.
If your TV is to be stored for a period of time,
remove the batteries from the remote control.
Page 14

03 Getting Started
Setting up
LOCATION
You will need to place your TV near your plug socket (so the power cable can comfortably
reach) and within reach of your aerial socket or extension lead.
CONNECTION
1. Insert your TV aerial lead into the Antenna input at the side of the TV.
2. Insert the batteries into the remote control. Make sure they are inserted the right
way around, matching the polarity as indicated inside the battery compartment.
SWITCHING YOUR TV ON
1.Press the STANDBY button on the right side of the TV once. A red flashing light will
appear in the corner of the screen.
2.Press STANDBY on the remote control. The TV will turn on and the red light will turn
blue. This may take a few moments.
3.Select your chosen language when prompted from the list that will appear on
screen. Use the button to scroll to the language you want and press to confirm.
Page 15

TUNING YOUR TV
Input Source
TV
AV
SCART1
SCART2
S-Video
Component1
Component2
PC
HDMI1
HDMI2
HDMI3
USB
Input Source
TV
AV
SCART1
SCART2
S-Video
DVD
Component
PC
HDMI1
HDMI2
HDMI3
USB
EXIT
OK
MENU
SWITCHING TO AN EXTERNAL SOURCE OTHER THAT TV
If you have attached a DVD player or similar external device
to the TV, you will need to tell the TV to display the content
from it. Simply press SOURCE which will bring up the source
menu in the left corner of the screen, Use the and button
to highlight the required source and press OK select.
For details of how to plug in other equipment see GET TO KNOW
YOUR TV on page 6.
TV
AV
SCART1
SCART2
S-Video
Component1
Component2
PC
HDMI1
HDMI2
HDMI3
USB
TV
AV
SCART1
SCART2
S-Video
DVD
Component
PC
HDMI1
HDMI2
HDMI3
USB
AUTO SEARCH
1. Press MENU button.
2. Press button to select Tuning menu, press button to enter.
3. Press button to select Country item.
Press button to select you needed.
4. Press button to select Auto Search item, press OK button to
enter.
Press button to select the OK option, and press OK button
to start searching.
Press the MENU button ,you can choose to skip the TV /DTV
Search or not.
5. Press EXIT button to stop auto search during searching.
Note: It may take a few moments to complete the Auto
Search.
DIGITAL MANUAL SEARCH
1. Press MENU button.
2. Press button to select Tuning menu, press button to enter.
3. Press button to select Digital Manual Search item,
press button to enter.
4. Press button to select the Channel.
Press OK button to start searching.
5. Once a channel is located, you can press OK button to save it.
Press EXIT button to exit.
Menu
Menu
Menu
OK
OK
OK
OK
OK
OK
OK
OK
OK
OK
OK
OK
OK
OK
OK
OK
CANCEL
OK
OK
OK
OK
OK
OK
OK
OK
OK
OK
OK
UHF CH 26
Page 16

EXIT
SAVE
TUNING YOUR TV
Analog Manual Search
Follow the below steps when you need to have a manual search.
1. Press MENU button.
2. Press button to select Tuning menu, press button to enter.
3. Press button to select Analog Manual Search item,
Press button to enter.
4. Press button to select Search item, press button is used
to select the higher frequency channel.
Press button is used to select the lower frequency channel.
5. And then select Storage To, press button to select the position
number you want the channel on. Once a channel is located,
you can press red button to save it. Press EXIT button to exit.
Sound System
Press button to select "Sound System", then press
button to select the correct sound system.
Current CH
Press button to select the channel number to edit.
Storage To
Press button to select the program number you
want to storage to.
Fine tune
If the picture and/or sound are poor, try using the FINE
TUNE feature. Do not use this feature unless reception
is poor.
1 Repeat above steps 1-3, then press button to select
the Fine Tune item.
2 Press button repeatedly to carry out fine tune, till the
best picture and sound are obtained, then loosen the button.
Menu
OK
OK
OK
OK
OK
OK
OK
Page 17

TUNING YOUR TV
Channel Edit
Using this function ,you can rename, move, set favorite
channel and skip the channel in the analogue mode.
1.Press MENU button.
2.Press button to select TUNING menu, press button
to enter.
3.Press button to select CHANNEL EDIT item,
Press button to enter the sub-menu.You can press red,
green , yellow or blue button to enter the menu you need.
RENAME
1.Press button to select the channel , and press green
button to rename.
2.Press button to select the number position of channel
name, Press button to select number.
3.You can press the EXIT button to cancel the changes
at anytime.
Menu
OK
OK
OK
OK
OK
OK
OK
NOTES:The RENAME function is only available in ATV program.
NAME
MOVE
FAV
SKIP
MOVE
1.Press button to select the channel any press yellow button to select the position.
2.Press button to select the number position you want to remove to, press
yellow button to confirm.
3.You can press the EXIT button to cancel the changes at anytime.
Setting favourite channel
1.Press button to select the channel ,press Red button to set your favourite channel.
2.You can press the Red button to cancel the changes at anytime.
3.Press FAV button on the remote control and Favourite List will be displayed.
4.Press button to select the channel , and press OK button to enter.
SKIP
1.Press button to select the channel and press blue button to skip the current channel.
2.You can press the blue button to cancel the changes at anytime.
GUIDE (Electronic Program Guide)
Using this function ,you can access the DTV program
information
1.Press MENU button.
2.Press button to select TUNING menu. press
button to enter.
3.Press button to select the guide item.
Press OK button to enter the submenu, the electronic
Menu
OK
OK
OK
OK
OK
OK
OK
program guide is displayed.
You can quickly call up Guide menu by GUIDE
button on the remote control.
BBC ONE Wales
Notes: Only DTV mode.
Record
INFO
Schedule
DATE REMIND
OK
Page 18

COMMON INTERFACE
The common interface (CI) slot is designed to
Menu
accept the Conditional Access (CA) Module and
Smart card in order to view the pay TV programmes
and additional services. Contact your Common
Interface service provider to get more information
about the modules and subscription. Please noted
that CA modules and smart cards are neither
supplied nor optional accessories from us.
Warning: switch off your TV before any module is inserted in the
Common Interface slot.
CI Module Insert
1 Insert the CAM correctly, then Smart Card to the
CI slot that is located at the side of the TV.
Main Menu
Module information
Smart card information
Language
Software Download
Press OK to select,or Exit toquit
2 Turn on the TV and it will display the below
message if the CA module is detected. Wait
for few moments until the card is activated.
3 Press the MENUbutton to display the Main
CI module removed
Menu and use the and button to highlight
the "Common Interface" line and press
the "OK" button.
OK
OK
OK
OK
OK
OK
OK
4 Detailed information on the CI card in use is displayed.
5 Press OK button to access the card menu. Refer to the module
instruction manual for setting details
6 When module is removed, the following message will appear on
the screen.
Page 19

Software Update function
When you get the updating news from the TV shop's web,
you can update the operating software using the Download
menu. The data for various units are transferred consecutively
on a special receiving channel.
You need to search the channel with updating code stream.
Note: You can get information from the TV shop or internet.
Operation
1 Press MENU button.
2 Press button to select TUNING menu,
press button to enter.
3 Press button to select Software Upgrade item.
4 Press button to set it as On. The default is Off
5 If the updating code stream of the channel is suitable for
your set, Do System Update option can be selected. Otherwise
the Do System Update option is grey and cannot be selected.
6 Press button to select the System Update option and
use OK button to enter. Then the TV will restart and search
the upgrade information.
NOTES: If the upgrade information is received, the TV will begin
to upgrade. Or else, the TV will be back the DTV source.
Menu
Menu
OK
OK
OK
OK
OK
OK
OK
OK
OK
OK
OK
OK
OK
Are you sure?
OK
Load the receiver identification. This process may also take
7
several minutes.
you can press EXIT button to cancel the download
and your TV set will be standby.
8 After the download has finished, your TV set will enter burning
state and the indicator light is shining. The menu 4 of right appears.
The set will be standby when the update is completed.
Page 20

USING YOUR TV
How to select the TV program
1.Using Program number button Enter the channel number with the number keypad on
the remote control.
2.Using P+/P- button
Press the P+/P- button to select a channel number.
HOW to adjust volume
Press V+/V- button on the remote control or the side of the TV to adjust the volume level.
CH.LIST function
Press CH.LIST button on the remote control will display Channel List menu, and then
press button to enter.
Press button to select the channel, and then press OK button to enter.
Page 21

ADJUSTING PICTURE SETTINGS
Changing the Picture Setting
1. Press MENU button.
2. Press button to select Picture menu,
press button to enter.
3. Press button to select the item requires adjusting.
4. Press button to adjust the selection item.
When you are satisfied with your choice, press the EXIT
5.
button to return to normal viewing or press MENU button to
return to the previous menu.
Contrast
This will adjust the intensity of bright parts in the picture but keep
the dark parts unchanged.
Brightness
This will adjust the light output of the complete picture, which will
mainly affect the darker areas of the picture.
Colour
This will adjust the saturation level of the colours to suit your personal
preference.
Sharpness
This will adjust the sharpness of fine details in the picture.
Tint
Allows you to select the colour mix (Tint) of the picture.
Note: The Tint function is only available in NTSC mode.
Mode
This will select the picture mode. Select Standard/Mild/User/Vivid according to the program.
You can quickly select the desired mode by P.MODE button on the remote control.
Menu
OK
Colour temperature
This will increase or decrease Warm (red) and Cool (blue) colours to suit
personal preferences.
Select Cool to give the white colour a blue tint, Normal to give the white
colour a neutral tint, Warm to give the white colour a red tint.
Noise Reduction
Automatically filters out and reduces the image noise and improves picture
quality when receiving weak video signals.
Select Off/Low/Standard/High according to the image noise.
Reset
To recover to the default value.
Page 22

ADJUSTING SOUND SETTINGS
Changing the Sound Setting
1. Press MENU button.
2. Press button to select Sound menu,
3. Press button to select the item requires adjusting.
4. Press button to adjust the selection item.
5.
When you are satisfied with your choice, press the EXIT
button to return to normal viewing or press MENU button to
return to the previous menu.
Balance
This will adjust the output of the right and left speakers to obtain the best
stereo reproduction for your listening position.
Mode
This will select the sound mode.
Press button to select Standard/Music/Theater/User according to the program.
You can quickly select the desired mode by S.MODE button on the remote control.
AVL (Automatic volume control)
This will reduces the differences in volume level among broadcasters.
SRS TS XT
This will control the Woofer output.
Press button to select SRS TS XT.
Press button to set SRS TS XT as OFF, ON.
Digital Audio Output
This will control the Digital Audio Output.
Press button to select Digital Audio Output.,
Press button to set Digital Audio Output. as OFF,
PCM,RAW.
press button to enter.
Menu
Balance
Mode
AVL
SRS TS XT
Digital Audio Output
Equalizer
Audio Languages
Reset
Picture
Menu
Sound
<
<
<
<
<
OK
OK
OK
Tuning
Standard
Off
Off
Off
English
Function
0
>
>
>
>
>
Lock
Time
Equalizer
This sound setting can be adjusted to suit your personal
preference.
Audio Languages
Press button to select Primary/Secondary item, and then
press button to select the languages you needed.
Press button to select Close item, Press OK button to close it.
Note: The Audio Language function is only available
in DTV mode.
Reset
To recover to the default menu setting.
Menu
Balance
Mode
AVL
SRS TS XT
Digital Audio Output
Equalizer
Audio Languages
Reset
Picture
Sound
<
<
<
<
<
OK
OK
OK
Tuning
Standard
Off
Off
Off
English
Function
0
>
>
>
>
>
Lock
Time
Page 23

FUNCTION SETTINGS
1. Press MENU button.
2. Press button to select Sound menu,
3. Press button to select the item requires adjusting.
4. Press button to adjust the selection item.
5.
When you are satisfied with your choice, press the EXIT
button to return to normal viewing or press MENU button
to return to the previous menu.
press button to enter.
Menu
OK
OK
OK
Language
To select the menu language.
Menu
OK
Subtitle Language
To select the Subtitle language.
OK
Display Mode
To set the picture proportion, press button to select 4:3/Zoom1/Zoom2/Wide/16:9/Auto.
You can quickly select the desired mode by ARC button on the remote control.
4:3 mode
Choose 4:3 when you want to view a picture with an original 4:3 aspect ratio, with gray
bars appearing at both the left and right sides.
16:9 mode
Choose 16:9 when you want to adjust the picture horizontally, in a linear proportion to
fill the entire screen.
Zoom1
Choose Zoom1 when you want to view the picture without any alteration. However, the
top and bottom portions of the picture will be cropped.
Zoom2
Choose Zoom2 when you want the picture to be altered, both vertically extended and
cropped. The picture taking a halfway trade off between alteration and screen coverage.
Wide
Choose Wide when you want to adjust the picture in a non-linear proportion, that is, more
enlarged at top sides and no alteration, at bottom side.
Blue Screen
This will select the character background colour.
Note: The Blue Screen function is only available for ATV mode.
Recorder
To recorder the DTV program.
Details of Recorder are described in the page of 38.
SCART Input
When you use the SCART2 input ,make sure
the input source is AV or S-VIDEO,and set the SCART INPUT option.
Page 24

FUNCTION SETTINGS
Time Out
OSD
To s
et how long you want the menus to appear on-screen.
Each press of button repeatedly to select the number of
preset minutes, the Time will be set in sequence: off,10sec,15sec,
30sec,45sec,60sec.
OSD T
ransparency
To set the transparency background of OSD,thetransparency
Off,25%,50%,75%,100%.
Reset
To recover to the default value.
Menu
will be set in sequence:
OK
OK
OK
Page 25
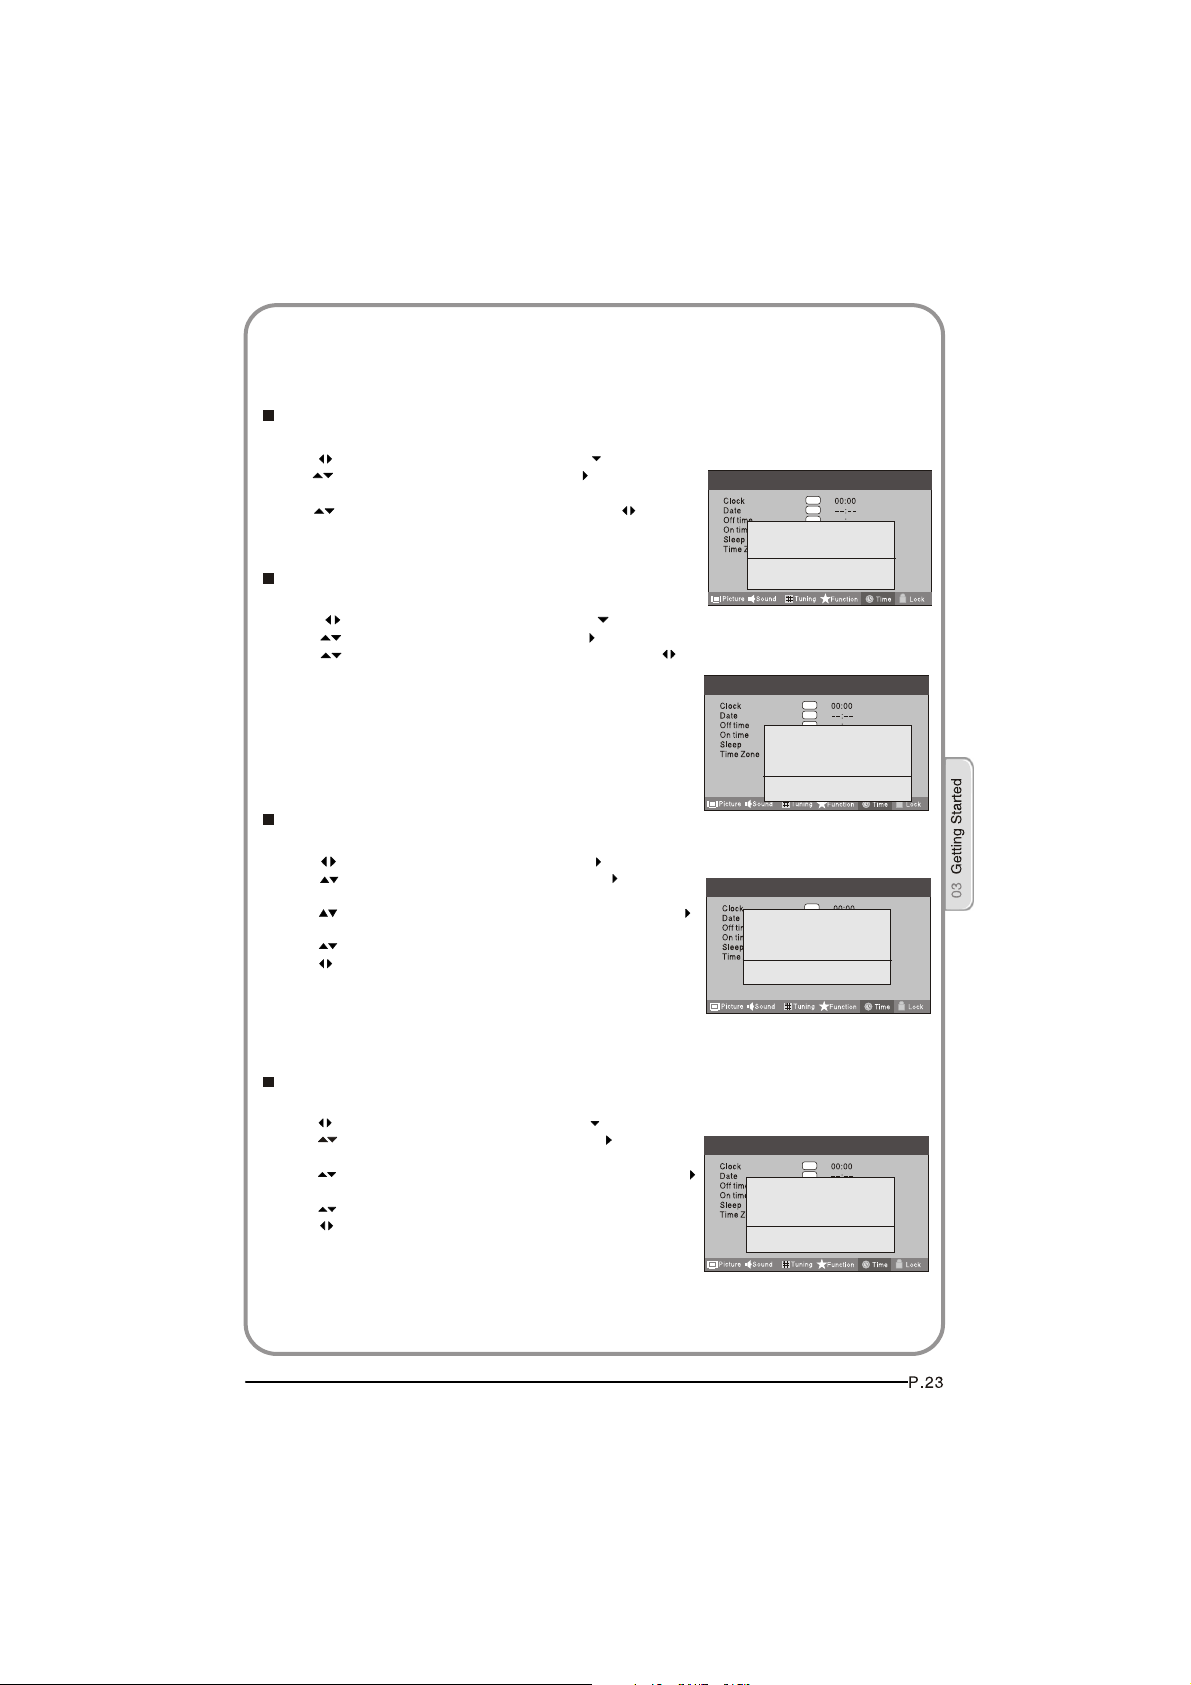
TIME SETTINGS
Clock
1 Press MENU button.
2 Press button to select Time menu, press button to enter.
3 Press button to select Clock item, press button to enter
setting.
Press button to select hour or minute, press button
to adjust the value.
Date
1 Press MENU button.
2 Press button to select Time menu, press button to enter.
3 Press button to select Date item, press button to enter setting.
Press button to select the option, and then press button to
adjust value.
NOTE: In DTV mode, because the time information is
from the signal,the Clock and Date are not able to be
changed.
If you want to change the time, turn off the TV in ATV
mode,then turn on the TV.
Off Time
1 Press MENU button.
2 Press button to select Time menu, press button to enter.
3 Press button to select Off Time item, press button to
enter setting.
Press button to select Repeat option, and then press
button to set it on.
Press button to select hour or minute,
Press button to adjust the value.
Menu
Menu
Menu
OK
OK
OK
OK
OK
Hour < 02 >
OK
OK
Minute < 03 >
Close
OK
OK
OK
OK
OK
Date < 02 >
OK
Month < 3 >
OK
Year < 2009 >
Close
OK
OK
Repeat < Off >
OK
Hour < 00 >
OK
Minute < 00 >
Close
When the off time has arrived, the TV set will enter into standby mode.
On Time
1 Press MENU button.
2 Press button to select Time menu, press button to enter.
3 Press button to select On Time item, press button to
enter setting.
Press button to select activate option, and then press
button to set it On.
Press button to select hour or minute,
Press button to adjust the value.
Menu
Activate < Off >
Hour < 00 >
Minute < 00 >
Close
When the on time has arrived, the TV set will switch on automatically.
OK
OK
OK
OK
OK
OK
OK
Page 26

Sleep
The sleep timer automatically shuts off the TV after a preset time
(from 5 to 240 minutes).
1 Press the MENU button and then use button to select the Time menu.
2 Press the button and then use button to select the Sleep.
3 Press the button and then use button to select the
number of minutes.Select Off, 5Min, 10Min, 15Min, 30Min,
45Min,60Min,90Min, 120Min, 180Min, 240Min
4 When you are satisfied with your choice, press MENU
button to return to the previous menu or press the EXIT
button to return to TV viewing. And the time begins to
count down from the number of minutes selected.
Menu
OK
OK
OK
OK
Time Zone
1 Press MENU button.
2 Press button to select Time menu, press button to enter.
3 Press button to select Time Zone item.
4 Press button to select the correct time zone.
MENU
5 Press button to save and exit.
Menu
OK
OK
OK
OK
Page 27

LOCK MENU SETTING
Using this function can control the tuner, program,
source volume and so on. Pressing MENU on the remote
control, press button to select Lock menu, press
button to enter the sub-menu, and you will be required to
enter the password. The initial password of the television
is 0000. If you forget your password, you can always
input 9443 to regain control.
CHANGE PASSWORD
1.Press button to select Change Password item.
Press button to enter the submenu.
2.When you have inputted the four digits you will be
prompted to enter it again.
Your new password will then be automatically saved.
CHILD LOCK
Press button to select Child Lock.
Press button to setOn or Off mode. If lock on mode is set, Child Lock is in
activated automatically. In such case, if Child Lock button (button on the television)
is pressed, the screen will display Child Lock, which can be erased by press of
MENU button. 5 seconds later after the latest press, the screen display will disappear
automatically. The Child Lock mode can be resumed by entering Lock Set menu,
set Child LockOn or Off.
Tuning Lock
Press to select Tuner Lock and to set On/Off. (To set On, some operation
such as search will be not available. When enter the Tuning menu, Tuner Lock will be on
the screen. If you want to operate Tuning menu, you need to enter the Lock menu to set
Tuner Lock Off or operate unlock.)
Menu
Menu
OK
OK
OK
OK
OK
Channel NO.
Channel NO. is opted for setting up preset channel.
Press button to select preset Channel. Press button to select channel number.
Source set
Channel set is opted for setting up start source.
Press button to select Off, DTV, TV, AV,SCART1,SCART2,S-Video,Component1,Component2,
PC, HDMI1,HDMI2,HDMI3,USB in turn. DVD is available for some model.
Page 28

Source Lock
Source Lock will control the On or Off of hinder external input
modes.
Press button to set as on or off.
When the source lock is set as on, TV source will display, at
this time, when press SOURCE button, the TV can switch to
correspondingsource and will display the Source is locked.
Menu
OK
OK
Max Volume
Press button to select Max Volume. Press button for adjustment between 0-100. If a certain
Value is set, when volume is being adjusted, the sound value can not exceed maximum volume
value. If current volume is over Max Volume, when lock set menu is set, current volume will
become set maximum volume, if current volume is below maximum volume, customer set volume
will stay unchanged.
Initial Volume
The TV will remember it after your setting,that will be the volume when turn on the
TV next time.
Parental Lock
Press button to select parental lock. Press button to select OFF or 4-18 to limit
the age of children who will watch TV.
Clear Lock
Press button to select Unlock mode. Press button to unlock all set modes,
setting all lock options to off, and the maximum volume returns to 100.
Page 29

SHORTCUT MENU DISPLAY
Subtitle Function
1. Press SUBTITLE button on the remote control will display
Subtitle languages menu, press button to enter.
2. Press button to select the item and press OK button to
enter. You can press the EXIT button to cancel the changes
at anytime.
Notes: press SUBTITLE button on the remote, it will display
subtitle languages menu only in the DTV mode.
CH.LIST Function
1. Press CH.LIST button on the remote control, will display
Channel List menu.
2. Press button to select the channel and press OK button
to enter. You can press the EXIT button to cancel the changes
at anytime.
GUIDE Function
Press GUIDE button on the remote control, will display
Program Guide menu, press button to select
the program.
You can press the EXIT button to cancel the changes at anytime.
Notes: Available only in the DTV mode.
FAV Function
Press FAV button on the remote control, will display
Favourite List menu.
Press button to select program and press OK button to enter.
You can press the EXIT button to cancel the changes at anytime.
Subtitle Languages
off
English
Record
INFO
Schedule
OK
Channel List
DATE REMIND
BBC ONE Wales
OK
INFO
Press INFO button on the remote control, will display the current
channel information.
You can press the EXIT button to cancel the changes at anytime.
AUDIO
Press AUDIO button on the remote control, will display
Audio Languages menu.
Press button to select the desired settings and press
OK button to enter.
You can press the EXIT button to cancel the changes
at anytime.
Notes: Press AUDIO button on the remote, it will display
Audio Languages menu only in the DTV mode.
OK
Page 30
SHORTCUT MENU DISPLAY
Eliminate Sound
When you need to pay attention to surrounded sounds, or there is a telephone calling you
or there are some guests visiting you, the sound elimination (mute) function is very convenient.
1 Press the MUTE button on the remote control and "Mute" type face will display on the lower part
of the screen. At this Time, the sound of the TV set is turned off.
2 If you want to recover the sound, press the MUTE button again or directly press V+ button.
Quick program view
This function enables quick swap to the last watched program. Press
Q.view button, and the TV will be back to the TV source, expect in
the USB and DVD source.
1 Suppose the channel number you used just now is 8 and the
channel number you are using is 18 (as shown in the figure).
2
If you want to return to the last watched program channel 8, you
can simply press the Q.View button.
3
If you want to return to channel 18, press the button again. Use
this function, you can easily change between the channel you are
using and the channel you used last Timer.
Page 31

Using the features
Teletext functions
Teletext is an information system, broadcast by certain channels, which can be read like a
newspaper . It also provides subtitles for people with hearing difficulties or those who are
unfamiliar with the language in which a particular program is being broadcast (cable networks,
satellite channels, etc.).
Note: The teletext buttons could be working even if there is no teletext signal, but there
is no teletext display.
Teletext
Teletext functions
To select teletext press the button on the handset. To
switch off teletext, press the button again. Note all menu
functions are not available in teletext mode . Only a few direct
button control functions are available in teletext mode, they are:
Volume adjustment
Mute function
Page up/down
Use the P+/P- buttons to browse next or previous page.
Page number entering
To select a Teletext page, enter the page number using
the numeric key pad on the remote control, or use the
P+ or P- buttons, or the coloured Fast text buttons.
Mix mode
To view the TV picture while in Text mode press the
button, this will superimpose the Teletext data on top
of the TV picture. Press this button again to return to
Full text.
INDEX
Press the INDEX button to go to the index page of teletext.
Page 32

Teletext
Teletext functions
Language change
Pressing the button will change the Teletext characters
between Eastern and Western.
Hold
Pressing the button will stop the teletext page automatically updating. This feature is very useful where there are
several teletext pages or data on the same page number.
Size
Pressing the button changes between full screen top
half bottom half full screen. This feature is very useful as it
magnifies the image making the characters easier to read.
Reveal
Pressing the button will reveal hidden text. This feature
is used to reveal information such as answers to Teletext
on-line interactive puzzles.
Time
While in normal TV mode only, pressing the button will
display the teletext time in the top right hand corner for a
few seconds.
Fast text coloured buttons
Fast text automatically displays the four most commonly
used pages that the broadcaster thinks that you may want
to choose next. Press the same coloured button on the
remote control as the coloured link at the bottom of the
teletext page to go directly to that page.
Subcode
Pressing the button by entering its 4-digit number to
enter a secondary page
Page 33

USB MODE
Note : The diagrams in the following section are schematic and only for your
reference. Please see the actual product if necessary.
TO USE THE USB DEVICE
1.Supported file formats:
1)Photo: *.jpg
2)Music: *.mp3 files
3)Movie: *.avi files;
4)TEXT:*.txt;
Note: Due to the particularity of file cording, some files may be unable to read.
2.Supported equipment:
Support the equipment that supports Mass Storage Protocol and whose file system is
FAT32,such as some USB disks, mobile harddisks,and MP3 player . If USB equipment
could not be identified due to unsupported file system, please format the equipment to
the above-mentioned file system.
3.To achieve smooth playing, ensure the following:
1) The file code rate should be lower than 300KB/S;
2) Due to the limitation of USB signal transmission distance, it is recommended not
to use USB patch cord, in case of using the cord ,make sure that its length is not
over 1m;
3) Use high-speed USB equipment in conformity with USB2.0 full speed Interface
Standard;If USB equipment in conformity with USB1.1 full speed Interface Standard
is used ,the playing may be unsmooth.
Page 34

USB MODE
When connecting/removing the USB device
1. Press SOURCE on the remote control unit to select USB option.
2.Insert USB equipment into corresponding USB interface 2s after starting the system.
3. After entering the system menu, press on the remote control unit to select the
require USB files press “OK” button to confirm the selection and enter the file list relative to
the selection.
4. Press on the remote control unit to select the required file, press OK button
to enter the selected file.
5. To exit the streaming media playing system and watch a TV program, you must press
“BACK”button to return to the streaming media main menu at first(to protect equipment),
and then press SOURCE to select TV to return to the TV mode.
Notes:
1. B ,
Under source of US , when press button MENU screen goes black, except when
images or movies are being played.
2.While playing the USB ,press “BACK”button repeatly , the screen picture will return
to USB main interface, and only at this time you can switch corresponding signal
sources by pressing “SOURCE” again.
3.
Please do not unplug the USB device when the connected USB storage device is
working . When such device is suddenly separated or unplugged, the stored files
or the USB storage device may be damaged.
/
/
Page 35

USB MODE
Operating the USB device
1. Press to scroll through main menu or submenu and select your desired
option.
2.Press “OK” to confirm your selection.
3.Press “ ” to achieve the FWD (fast forward) and REV (fast back) of
option being played.
4. Press "PLAY/PAUSE" to play and press it again to pause playing.
5. Press “ZOOM” to magnify pictures; when the picture is enlarged, press “ ” and
6.Press “ STOP ” to stop playing ,or return to the previous menu, and press “BACK”
repeatedly to return to the main menu.
NOTE: You can choose the photos or music in different files to play together.
/
/
/
to move the picture.
the
/
Page 36

USB MODE
Playing a Picture
1.After entering USB main interface, press
2.Press OK to confirm the selection and
enter the picture file list.
3. Press to select the picture you
want to play press OK to confirm, and
then press “PLAY/PAUSE” button to play the pictures.
4. If you want to pause the picture which is being palyed, press the PALY/PAUSE button again.
5.To exit playing, just press BACK repeatedly.
to select “PHOTO” item.
/
/
Press ZOOM to magnify the picture. When the picture is enlarged, press “ and
Press PREV/NEXT ” to select the last or next picture.
Press to rotate the picture.
Press “STOP ” to stop the picture being played.
NOTE: The menu display varies with the photo name and pixel in your equipment.
to move the picture.
/
/
OK
/
Page 37

USB MODE
Playing Music
1. After entering USB main interface,
press to select “MUSIC”.
2. Press OK to confirm the selection
and enter the music file list.
/
OK
3. Press and “OK” button to select the music you want to play then press
Press “ ” to achieve the REV (fast back) and FWD (fast forward) of musicbeing
played.
Press PREV/NEXT ” to select the last or next music.
Press “STOP ” to stop the music being played,when the current interface is the music
being played.
4. To return to the main menu just press BACK repeatedly.
NOTE: You can enjoy the music and the picture at the same time.
/
/
to play the music.PLAY/PAUSE button
the
Page 38

USB MODE
Playing a Movie
1. After entering USB main interface, press
2. Press OK to confirm the selection
and enter the movie file list.
3. Press and “OK” button to select the movie you want to play and then press
Press ZOOM to magnify the picture
Press PREV/NEXT ” to select the last or next movie.
Press “STOP ” to stop the movie being played.
4. To exit playing, just press BACK repeatedly.
to select “Movie”.
/
PLAY/PAUSE button to play the movie.
/
OK
Page 39

USB MODE
Text
1. After entering USB main interface,
press to select Text .
2. Press OK to confirm the selection
and enter the text file list.
/
OK
3. Press and OK” buttonto
select the text you want to play and
then press PLAY/PAUSE button to play the text .
Press PREV/NEXT ” to select the last or next text.
4. To exit the Text mode just press BACK repeatedly.
NOTE: You can enjoy the music and the text at the same time.
/
Page 40

Using External USB Disk For Recording
1. Insert the USB device with FAT32 format into the USB1
connector. Then, press MENU button.
Note: Only USB1 is available for recording.
2.Press button to select FUNCTION menu,
press button to enter .
3.Press button to select Recorder. Press OK
button to enter the submenu.
4.Press button to Select Disk and press
or OK button to enter. Press button to
select disk if your device has several disks.
5.Press button to select Format and press to
enter. Press button to select the size you want
to format .Press OK button to format the USB Disk.
Menu
Select Disk USB1 C:
Check File System start
USB Disk
Format
Time Shift Size
Speed
File System Size
File System Size All
SD 27Min HD7Min
Ok
Ok
Ok
NOTES: The system will format the whole device and
OK CANCEL
if your device size is bigger than 1GB, you can set
the size which is used for time shift.
6.Format may take several minutes and the time is
Format
Do not unplug USB device
Formating.....
depending on the memory size. Press button
to select the Time Shift Disk Size. The max device size
Time Shift Size
for Time Shift is 8GB.Then, press OK button to save.
NOTES: If you select all the size format for time shift,
you can not do any recording.
Time Shift Size All
SD 14Min HD4Min
OK CANCEL
7.Waiting for the system checking. And you can see the speed
data after the success checking.
NOTES:
1. Only have to format when you use the device for record for the first time.
2. The minimum device size for record is 1GB. Provide device formatting function
is up to 2TB. The max Multi-Partition is 16 partitions and one is active at a time.
3. Bit rate:
Device bit-rate>4.5MB/s REC is safe at HD stream
Device bit-rate>1.5MB/s REC is safe at SD stream
Device bit-rate<600KB/s REC is bad for REC
4. The system can not work normally if the USB device have the listing problem
below:
The device has bug.
The device has error block.
The device reports the unfaithful size.
IMPORTANT : USB device should be format as FAT32 format by
your PC before insert to the USB connector.
Page 41

TIME SHIFT
Time Shift function is only available in DTV
mode. Press PLAY/PAUSE to pause the
program, and press PLAY/PAUSE again, the
time shift program will be played. If you want to
stop time shift function, press the STOP button.
You can stop the time shift program being
played by pressing the EXIT button.
RECORDING
1.Press D.MENU button to record the program being
played, and press D.MENU or EXIT button to make
the recording interface minimum.
[-00:00:12/00:10:00]
A B
[-00:00:12/00:10:00]
Time Shift
Time Shift
14:51
14:51
REC
2.Press STOP button to stop the program
[00:00:00]
5 five
The streets of SAN francisco
15:06
(384MB)
recording being played.
Recording
3.For Playback the recorded program. Press
INDEX button to open the recorded list.
Press button to select the content you
recorded.
Press the button to display the program
Recorded List
Record
Play
DELETE
Gold workshopwit...
Gold workshopwit...
INDEX
[DATE] 2004/03/01
[TIME] 14:56:09
[DURATION]0000:00:00
[CHANNE NAME] 16QVC
[PROGRAM NAME]
Gold workshop with jan Springer
information.
Press button to cancel.
Press OK or PLAY/PAUSE button to play
the program recorded and press STOP
button to stop it.
A
B
5 FIVE
PLAYBACK
[00:00:12/00:10:00]
Gold workshop with jan Springer
14:51
NOTE:
1.Changing the channel will not influence the recording in the same
frequency, but will influence the time shift. When the recorded program is being
played, you can not delete it.
2.Press the INDEX button repeatedly , the program will be displayed in the order
of program name , channel name, program time , file name and file length.
Page 42

USING YOUR DVD PLAYER (certain models only)
PLAYING A DVD
1.Press the SOURCE button on the remote control to
enter DVD mode.
2.Place the DVD in the disc slot with the DVD label
facing away from you and the screen. The disc slot
will only take standard-sized DVD.
3.The DVD will automatically load; most begin with
a disc menu.
4.Use the , , and buttons to navigate around
the DVD menu to highlight the play option and then
press PLAY/PAUSE.
PAUSING A DVD
1.Press PLAY/PAUSE to pause playback. The sound
will also be muted.
2.Press PLAY/PAUSE to resume normal playback.
STOPPING A DVD
1.Press the button to stop playback of a DVD. The
TV screen will show the DVD start-up logo.
2.Some discs will remember the moment at which the
DVD was stopped, so press PLAY/PAUSE to recall the
moment and continue playback.
3.Press the button twice to stop completely and
clear the memory.
USING FAST FORWARD OR REWIND
1.To move forward through a disc more quickly, press
the button.
To rewind through the disc, press the button.
2.Press the or button repeatedly to cycle through
the available speeds, which appear in the top left
corner of the screen: 2X, 4X, 8X, 16X, 32X and normal
playback speed.
3.Press PLAY/PAUSE to resume normal playback.
SKIP TO THE NEXT OR PREVIOUS SCENE
During playback press the button to skip to the next
scene on the disc, or press to skip to the previous one.
PASSWORD
Parental control can be activated by setting the Password
Mode to On. The default password is 0000. If you forget
the password, you can always input 1369 to regain control.
Page 43

USING THE ZOOM FUNCTION
1.Press the ZOOM button to zoom into the image on screen. You can press it repeatedly
to further enlarge the picture.
2.In zoom mode use the , , and buttons to display a different section of the
enlarged picture on the screen.
SWITCHING ON SUBTITLES
1.Press the SUBTITLE button during playback.
2.The available languages will appear in the top left corner of the screen.
Press repeatedly until your desired subtitle language is shown.
3.Press SUBTITLE repeatedly until SUBTITLE OFF is shown to switch the subtitles off.
USING REPEAT MODE
Press REPEAT once to repeat the chapter on a DVD, twice to repeat the
currently playing title or three times to repeat the whole contents of the disc.
CHANGING THE CAMERA ANGLE
Some DVD have multiple camera angles for some or all scenes. Press the ANGLE
button to change the camera angle. Different camera angles may include: front, side,
whole view or exterior.
Page 44

ADDITIONAL DVD FUNCTIONS
D.MENU
Press this button to return to the previous menu item.
AUDIO
Many DVD have multiple soundtracks. To change between them press the AUDIO
button. Wait three seconds before pressing the button again, to cycle through the options.
TITLE
Press this button to return to the title menu on some DVD . Use the , ,
and buttons to navigate around the menu.
SEARCH
Press SEARCH and use the numerical keys to enter the chapter number you wish to
go to and press PLAY/PAUSE.
PROGRAM
During playback press PROGRAM to move directly to a section or programme on the
DVD. Press the digit buttons to select the programme number that you want. When
finished, move the cursor to select START. The DVD will jump directly to that section
and begin to play. If you want to cancel this function, press PROGRAM and move to
STOP, then press PLAY/PAUSE.
A-B
Use A-B to set a section of a DVD to repeat. Press A-B to mark the start point and again
to mark the end. The section will begin to be repeated immediately.
Press A-B to cancel the repetition.
ANGLE
When enjoying sports, concert or theatre, press this key to watch same actions in
different angles.(Valid for discs possessing this function. Using a disc recorded in
multi-angle you can view the scene from different angles, for example, front, side, whole
view and exterior scene.)
D.CALL
When pressing theD.CALL button repeatedlydifferent OSD indicator will be displayed for
different types of disc DVD, CD etc
Page 45

PLAYING A JPEG CD
1.Insert a JPEG CD in the same way as you would a DVD or Audio CD, with the label
facing away from you.
2.The CD will load and a menu of the disc's contents will appear on screen.
3.Use the and buttons to highlight the folder and picture you wish to view and press
PLAY/PAUSE. Each image on the disc will show consecutively, like a slide show.
4.Press PLAY/PAUSE during the slide show to pause on one image.
5.Press the or button to skip to the next image or return to the previous one.
PLAYING AN AUDIO CD
1.Insert a CD in the same way as you would a DVD, with the label facing away from you.
2.The CD will load and a menu of the disc's contents will appear on screen.
3.Use the and buttons to highlight the track you wish to play and press PLAY/PAUSE,
or just press PLAY/PAUSE to listen to the whole CD from the beginning.
You can stop, pause, fast forward or fast rewind a CD in the same way as a DVD.
You can also use the REPEAT button to repeat a track, folder album or the contents of
the whole disc. Press repeatedly to select what you would like to repeat. You can also
use the A-B function to repeat a certain section of a track or CD.
Page 46

TROUBLESHOOTING
To assist in location of possible faults use the help guide below:
No picture, no sound
Blank screen
No sound
Poor sound
No picture in some
channel
No color for some channel
program (black and white)
Spots with some or
all pictures
Television out of control
Verify if the television is properly plugged in.
Verify if the television has a proper supplied power source.
Verify if electricity is available.
Verify if correct signals are input.
Operate the remote to change signal input to correct input.
Restart the television if power supply is interrupted.
Press MUTE button and verify if Mute mode is set.
Switch to other channel and verify if the same problem
happens.
Press VOL+ button to see if the problem can be solved.
Verify if sound system is correct. Refer to user's manual
for adjustment.
Verify if correct channel is selected.
Adjust the antenna.
Verify if the same problem exists in other channels.
Check out of picture and sound systems.
Refer to relative instructions in the Manual for color
adjustment.
Verify if the antenna is correctly connected.
Verify if the antenna is in good condition.
Make fine adjustment of channel.
Disconnect the television from power supply and 10
seconds later, connect the television to the power supply.
If the problem still exists, contact authorized after-sales
service for technical assistance.
Note:
1.If the fault can not be repaired using the above guide consult with your local authorized
service centre.
2.The TV set must only be repaired by a qualified registered service person. Never attempt to
remove the back cover as the TV set has dangerous voltages in side that may cause a
fatally or fire.
Page 47

Specification
SCREEN SECTION
Type A-si TFT active matrix
Viewable angle 160(H) 150 (V) (S626/S626D)
176 (H) 176 (V) (S632F/S632D /S642F)
Colour system PAL, SECAM, NTSC (AV)
TV/VIDEO SECTION
Sound system BG, DK, I, L
Video input SCART, S-VIDEO, YPb/Pr, YCb/Cr, AV,VGA,
HDMI,USB
GENERAL SECTION
DTV Y/Pb/Pr Composite: 480i/p, 576i, 720p, 1080i, 1080p
Power See rating plate
Power consumption See rating plate
Dimensions (W x D x H) cm
63.3 x 20.0 x 49.7 (including base) ( )
63.3 x 20.0 x 49.7 (including base) ( )
79.8 x 23.0 x 57.5 (including base) ( )
79.8 x 23.0 x 57.5 (including base) ( )
102.2 x 28.9 x 70.4 (including base) ( )
66.2 x 20.0 x 50.0 (including base) ( )
66.2 x 20.0 x 50.0 (including base) ( )
79.6 x 23.0 x 59.0 (including base) ( )
79.6 x 23.0 x 59.0 (including base) ( )
102.0 x 29.0 x 72.4 (including base) ( )
LT26K3
LY26K3
LTF32K3
LY32K3
LTF42K3
LT26R3
LY26R3
LTF32R3
LY32R3
LTF42R3
Environment conditions Working temperature: +5 C - +35 C
Working humidity: 20% - 80%
Storage temperature: -15 C - +45 C
Storage humidity: 5% - 90%
Accessory User manual
Remote control
Base cover (Only for S642F )
Battery (x2)
The part specifications of this TV set provided here are for reference only.
Differences may occur as product technology is updated.
Design and specifications are subject to change without notice.
Page 48

Page 49

MANUEL D'UTILISATION
TELEVISION NUMERIQUE
ECRAN LCD
MODELE: LT26K3/R3
LY26K3
LTF32K3
LY32K3
LTF42K3
/R3
/R3
/R3
/R3
Lire attentivement ce manuel avant d'utiliser la télévision.
Le conserver en vue d'une utilisation ultérieure.
Page 50

Page 51

Sommaire
01 Consignes de sécurité
Bienvenue............................................................................
Informations importantes......................................................
02 A propos de la télévision à écran LCD
Se familiariser avec la télévision........................................
Se familiariser avec la télécommande................................
Brancher la télévision.........................................................
Préparation de la télécommande.......................................
03 Mise en route
Configuration......................................................................
Régler la télévision.............................................................
Interface commune.............................................................
Utiliser la télévision.............................................................
Régler les Paramètres de l'image.......................................
Régler les Paramètres du son.............................................
Paramètres des fonctions...................................................
Paramètres de l'heure.........................................................
Paramètres du menu verrouillage.......................................
Affichage du menu contextuel.............................................
04 Utiliser les fonctions
Fonctions Télétexte.............................................................
Mode USB...........................................................................
Utiliser un disque externe USB pour l'enregistrement.........
Utiliser un lecteur DVD (certains modèles uniquement)......
02
03
05
07
08
10
11
12
15
17
18
19
20
22
24
26
28
30
37
40
05 Sections des références
Dépannage...........................................................................
Caractéristiques techniques.................................................
44
46
1
Page 52

01 Consignes de sécurité
BIENVENUE
Merci d'avoir acheté cette télévision numérique à écran LCD HD Ready
26"/32"/42" (66 cm/81 cm/106 cm). Ce guide permet de configurer et de
commencer à utiliser la télévision.
Tout d'abord, vérifier le contenu du carton à l'aide de la liste de pièces
ci-dessous :
Télévision numérique à écran LCD HD Ready 26"/32"/42"
(66 cm/81 cm/106 cm)
Télécommande
Pile AAA x 2
Manuel d'utilisation
Guide de démarrage rapide
A présent, vous pouvez commencer !
2
Page 53

INFORMATIONS IMPORTANTES
AVERTISSEMENT
RISQUE DE CHOC ELECTRIQUE,
NE PAS OUVRIR
AVERTISSEMENT
AFIN DE RÉDUIRE LE RISQUE DE CHOC ÉLECTRIQUE, NE PAS RETIRER LE CAPOT
ARRIÈRE. AUCUNE PIÈCE INTERNE NE PEUT ÊTRE REPAREE PAR L'UTILISATEUR.
APPELER UN CENTRE DE REPARATION AGREE.
*Afin d'éviter tout risque électrique, il est fortement recommandé de ne pas ouvrir le capot :
aucun accessoire ne se trouve à l'intérieur.
*Si nécessaire, contacter un service après-vente agréé.
*Un voyant clignotant dans un triangle : situation potentiellement dangereuse pouvant
entraîner de graves blessures dues à la haute tension.
*Un point d'exclamation dans un triangle : suivre les spécifications techniques des pièces ou
accessoires importants devant être remplacés.
Avertissement :
Afin d'éviter tout risque d'incendie ou électrique, ne jamais placer le poste de
télévision dans une zone très humide. Eviter toute éraflure ou choc sur l'écran.
01 Consignes de sécurité
Attention :
Lire attentivement ce manuel avant d'utiliser la télévision. Le conserver
en vue d'une utilisation ultérieure.
Pour une performance optimale de la télévision, lire attentivement ce
manuel d'utilisation et le conserver en vue d'une utilisation ultérieure.
Les informations concernant les affichages et chiffres contenus dans le
manuel d'utilisation peuvent varier en raison d'innovations techniques.
Attention :
Le démontage non autorisé de la télévision est interdit.
3
Page 54

La télévision doit être fermement fixée afin
d'éviter toute chute, voire tout incendie.
Afin d'éviter tout risque d'incendie, ne
pas utiliser la télévision à la lumière
directe du soleil ou près de
sources de chaleur.
Ne pas placer de liquide ou d'huile près
de la télévision afin d'éviter tout risque
d'incendie.
Ne pas utiliser de prises électriques
endommagées ou usées. Maintenir le cordon
électrique à l'écart de toute source de chaleur
afin d'éviter les chocs
électriques ou les
risques d'incendie.
La télévision doit être placée sur une surface
solide et stable afin d'éviter toute chute.
Débrancher l'alimentation et l'antenne de
la télévision en cas d'orage.
Ne pas brancher trop de prises en parallèle
ou ne pas partager la même prise avec
plusieurs fiches afin d'éviter
tout risque d'incendie.
Tout démontage non autorisé de la télévision
est interdit afin d'éviter tout choc électrique
ou risque d'incendie.
Contacter le service
après-vente agréé si
des réparations
techniques sont
nécessaires.
Tenir la télévision à l'écart de tout
transformateur ou source de chaleur afin
d'éviter tout risque d'incendie.
4
Débrancher la
télévision de
l'alimentation, puis contacter le service
après-vente agréé si la télévision émet un
son inhabituel.
Page 55

Ne pas utiliser ou stocker des matériaux
inflammables à proximité de la télévision afin
d'éviter tout risque
d'explosion ou
d'incendie.
Ne pas placer la télévision dans un endroit
humide afin d'éviter tout
risque d'incendie.
L'antenne de la télévision doit être tenue à
l'écart de tout câble
électrique afin d'éviter
tout choc électrique.
Toujours s'assurer que la télévision est
bien branchée car une mauvaise connexion
électrique peut provoquer
un incendie.
Pour nettoyer la télévision, la débrancher,
utiliser un chiffon doux et jamais de produits
chimiques. S'assurer qu'aucune goutte d'eau
ne tombe dans la
télévision.
Ne jamais toucher la prise avec les mains
mouillées car cela peut entraîner un choc
électrique.
Lorsque l'antenne est utilisée, s'assurer que
de l'eau ne puisse pas couler le long du câble
jusque dans la télévision.
01 Consignes de sécurité
La fiche et le câble électrique doivent rester
propres afin d'éviter tout choc électrique ou
risque d'incendie.
Débrancher la télévision de l'alimentation,
ainsi que l'antenne en cas d'orage afin
d'éviter tout choc
électrique ou risque
d'incendie.
En cas d'absence prolongée, débrancher la
télévision de l'alimentation afin d'éviter tout
choc électrique ou risque d'incendie.
5
Page 56

02 A propos de la télévision à écran LCD
SE FAMILIARISER AVEC LA TÉLÉVISION
Panneau de commande avant
TV/ AV
Bouton Source
Bouton Menu
Bouton Monter/Baisser volume
Bouton programme Suivant/Précédent
Veille
K3R3
Panneau de connexions arrière
2
1REC
USB
R
L
VIDEO 1 IN
S-VIDEO
HDMI1
HDMI2
OPTICALOUT
1
Pb
Y
COMPONENTIN
2
Pr L R
Bouton Source
Bouton Menu
Bouton Monter/Baisser volume
Bouton programme
Suivant/Précédent
Bouton de mise sous tension
ANTIN
ANT
L
DVIAUDIO
R
VGAAUDIO
HDMI3
VGAIN
6
1. Entrée
2. Entrée
3. Entrée
4. Entrée
5. Entrée
6. Entrée
7. Sortie
8. Entrée
YPbPr
AUDIO YPbPr
AUDIO DVI
ANTENNE
HDMI3
S-VIDEO
ECOUTEUR
HDMI1
9. Entrée
10. Entrée
11.
12. Entrée
13. Entrée
14. Entrée
15. Entrée
16.
HDMI2
AV-VIDEO
Interface commune
PERITEL1
VGA AUDIO
PERITEL2
VGA
USB
17.OPTIQUE
Page 57

SE FAMILIARISER AVEC LE COMBI TV-DVD
Panneau de commande avant
R3
TV/ AV
Bouton Source
Bouton Menu
Bouton Monter/Baisser volume
Bouton programme Suivant/
Précédent
Veille
Panneau de connexions arrière
2
1REC
USB
R
L
VIDEO 1 IN
S-VIDEO
HDMI1
HDMI2
OPTICALOUT
Y
COMPONENTIN
K3
Pb
Pr L R
Bouton Source
Bouton Menu
Bouton Monter/
Baisser volume
Bouton programme
Suivant/Précédent
Bouton de mise
sous tension
ANTIN
ANT
L
DVIAUDIO
R
VGAAUDIO
HDMI3
VGAIN
02 A propos de la télévision à écran LCD
1. Entrée
2. Entrée
3. Entrée
4. Entrée
5. Entrée
6. Entrée
7. Sortie
8. Entrée
YPbPr
AUDIO YPbPr
AUDIO DVI
ANTENNE
HDMI3
S-VIDEO
ECOUTEUR
HDMI1
9. Entrée
10. Entrée
11.
12. Entrée
13. Entrée
14. Entrée
15. Entrée
16.
HDMI2
AV-VIDEO
Interface commune
PERITEL1
VGA AUDIO
PERITEL2
VGA
USB
17.OPTIQUE
7
Page 58

SCR EEN
STOP
.
SE FAMILIARISER AVEC LA TÉLÉCOMMANDE
1
Pour utiliser la télécommande,
la diriger vers le capteur infrarouge
de la télévision.
1
2
4
6
8
11
13
17
15
18
22
24
26
25
30
29
34
33
2737
2738
REMARQUE : les boutons ROUGE,
VERT, BLEU et JAUNE sont des boutons
Fast text dans un signal analogique.
Bouton DVBT (consulter l'affichage
à l'écran).
3
5
7
9
10
14
19
20
21
23
27
27
28
2732
36
39
27
Veille
2
Menu DVD/ENREG.
3
Ouvrir /Fermerlecteur DVD
4
Mode Image
Mode Son
5
Affichage Ecran
6
7
Veilleauto
DTVAudio/ NICAM / DVDAudio
8
Format del'image
9
Liste deschaînes
10
Sous-titres
11
Sélection dunumérode chaîne
12
12
13
Changement desource
14
Q. VIEW(permetde revenir à ladernière chaîne visionnée) /
Changer dechaîne
15
V+/V-:Sélection du volume
16
P+/P- :Sélectionde la chaîne
17
Sourdine
18
Menu
GUIDE (seulementpourDTV)
19
16
Liste desfavoris
20
OK
21
Déplacement ducurseur
22
Retour (seulementpourUSB)
23
Quitter l'écran
24
REPETER (uniquementpourDVD, USB, ENREG.
25
et Programme)/Bouton ANNULER
26
Zoom (uniquementpourDVD et USB) /Télétex
(uniquement pourTV) / Index ENREG.
Lecture /Pause(uniquement pour DVD etUSB) / Programmation
27
Arrêt (uniquementpourDVD, USB, ENREG. etProgrammation)
28
2631
Retour arrière rapide(uniquementpourDVD, USB, ENREG.
29
35
et Programmation)
30
Avance rapide(uniquement pour DVD, USB,ENREG.
et Programmation)
40
27
Précédent (uniquementpourDVD, USB, ENREG.
31
et Programmation)
32
Suivant (uniquementpour DVD, USB, ENREG.et Programmation)
33
Configuration DVD/Texte
34
Titre DVD/ Teletext Mix (Télétexteavec comme fond d'imagela
chaîne sélectionnée)
35
Recherche DVD/Sous-code Télétexte
36
DVD 10+/Arrêter le défilementdes pages en modeTélétexte
37
Programme DVD/Affichage Télétexte
38
Répét. DVDA-B / Taille télétexte
39
Appel DVD/Mode Télétexte
Angle DVD/Heure Télétexte
40
8
Page 59

BRANCHER LA TÉLÉVISION
BRANCHER L'ANTENNE
Connecter l'antenne sur le côté de la télévision à la prise ANTENNA IN
AMELIORER LE SIGNAL
Afin d'améliorer la qualité d'image lorsque le signal est faible, utiliser un
amplificateur de signaux (non fourni).
CONNECTER UN PC A LA TELEVISION
Il est possible d'utiliser la télévision comme moniteur en le connectant grâce à un
câble VGA (non fourni).
1. Lire le guide d'utilisation de l'ordinateur et vérifier qu'il possède un connecteur
VGA.
2. Eteindre le PC et la télévision.
3. Brancher un câble d'interface VGA à 15 broches de type D au connecteur
d'interface vidéo VGA sur le PC. Brancher l'autre extrémité du câble au
connecteur d'interface du PC sur la télévision. Serrer les vis des connecteurs
VGA et brancher le câble audio (non fourni) à la prise d'entrée audio à l'arrière
de la télévision.
4. Allumer d'abord la télévision, puis le PC.
5. Appuyer sur le bouton de la télévision ou sur la télécommande de la télévision
pour sélectionner le mode VGA.
6. Une fois que l'image apparaît, s'il y a du bruit, changer la résolution du mode
VGA, changer le taux de rafraîchissement ou régler la luminosité/le contraste
dans le menu jusqu'à ce que l'image soit nette.
.
02 A propos de la télévision à écran LCD
LR YPbPr
DVD
CONNECTER UN LECTEUR DVD A
LA TELEVISION
Connecter les sorties vidéo DVD (Y, Pb, Pr) à la prise
COMPONENT IN (Y, Pb, Pr) sur la télévision.
1 .Allumer le lecteur DVD et insérer un DVD.
2. Appuyer sur le bouton pour sélectionner.
3. Consulter le manuel d'utilisation du lecteur
DVD pour connaître les instructions d'utilisation.
9
Page 60

CONNECTER UN LECTEUR DVD OU UN MAGNETOSCOPEA
LA TELEVISION
Il existe deux façons de connecter un lecteur DVD ou un magnétoscope à
la télévision. S'assurer que la télévision et le lecteur DVD ou le
magnétoscope sont éteints avant de les brancher.
Option de connexion 1
1. Connecter les câbles audio et S-VIDEO entre les connecteurs de sortie
du magnétoscope et les connecteurs d'entrée de la télévision.
2. Insérer une cassette vidéo dans le magnétoscope et appuyer sur le bouton
PLAY(Lecture) du magnétoscope.
3. Allumer la télévision en premier, puis le magnétoscope.
4. Appuyer sur SOURCE sur la télévision pour mettre le mode d'entrée
vidéo sur S-VIDEO.
Option de connexion 2
1. Connecter les sorties DVD/VCR (magnétoscope) à la fiche AV IN de
la télévision.
2. Appuyer sur SOURCE de la télévision pour sélectionner le mode AV.
ENTREE PERITEL
1. Connecter le câble Péritel du dispositif externe (lecteur DVD, boîtier
décodeur ou console de jeux) à la prise Péritel de la télévision.
2. Appuyer sur SOURCE pour sélectionner le mode SCART (Péritel).
3. Appuyer sur PLAY (Lecture) sur le dispositif externe.
ENTREE HDMI
1. Connecter le câble du dispositif HDMI à la prise HDMI de la télévision.
2. Appuyer sur SOURCE pour sélectionner le mode HDMI.
3. Consulter le manuel d'utilisation du dispositif HDMI pour savoir comment
l'utiliser.
FIXER LATELEVISION AU MUR
Il est possible de fixer la télévision au mur à l'aide d'un support mural
(non fourni). Utiliser des vis à métaux M4/M6 (x 4) pour visser la télévision
au support (non fourni).
10
Page 61

PRÉPARATION DE LA TÉLÉCOMMANDE
INSTALLATION DES PILES
1. Retourner la télécommande, puis ouvrir le
couvercle du compartiment à piles.
2. Installer deux piles AAA. (Les symboles + et
– de la pile doivent correspondre aux repères
figurant sur la télécommande).
3. Fermer le couvercle du compartiment à piles.
PRECAUTIONS D'UTILISATION DES PILES
S'assurer qu'aucun obstacle ne se trouve entre
la télécommande et le capteur infrarouge de
la télévision.
La lumière du soleil ou toute autre source
lumineuse intense interfère avec le signal
envoyé par la télécommande. Dans ce cas,
tourner la télévision afin d'éviter toute source
lumineuse directe.
Ne pas exposer la télécommande à une source
de chaleur directe ou l'utiliser dans un endroit
humide pour éviter de l'endommager.
Utiliser deux piles AAA de 1,5 V. Ne pas
mélanger les types de pile. Installer les piles
en respectant les polarités. Ne pas utiliser de
piles rechargeables. Si la télévision n'est pas
utilisée pendant un certain temps, retirer les
piles de la télécommande.
02 A propos de la télévision à écran LCD
11
Page 62

03 Mise en route
Configuration
EMPLACEMENT
Il faut placer la télévision près d'une prise (afin de pouvoir atteindre facilement le câble
d'alimentation) et à portée de la prise de l'antenne ou de la rallonge.
BRANCHEMENT
1. Insérer le câble de l'antenne de la télévision dans l'entrée Antenna (Antenne) sur le
côté de la télévision.
2. Insérer les piles dans la télécommande. S'assurer qu'elles sont correctement insérées,
en respectant la polarité indiquée dans le compartiment à piles.
ALLUMER LATELEVISION
1. Appuyer une fois sur (Veille) à droite de la télévision. Un voyant clignotant
rouge s'affiche dans un coin de l'écran.
2. Appuyer sur (Veille) sur la télécommande. La télévision s'allume et le voyant
rouge devient bleu. Cela peut prendre un certain temps.
3. Lorsqu'une invite s'affiche, sélectionner la langue dans la liste s'affichant à l'écran.
Utiliser le bouton pour faire défiler jusqu'à la langue souhaitée et appuyer pour
confirmer.
STANDBY
STANDBY
►
12
Page 63

REGLER LA TELEVISION
Input Sourc e
TV
AV
SCART1
SCART2
S-Video
Component1
Component2
PC
HDMI1
HDMI2
HDMI3
USB
Input Sourc e
TV
AV
SCART1
SCART2
S-Video
DVD
Component
PC
HDMI1
HDMI2
HDMI3
USB
EXIT
OK
MENU
BASCULER VERS UNE SOURCE EXTERNE
Si un lecteur DVD ou dispositif externe similaire est relié à la
télévision, il faut régler la télévision de manière à ce qu'elle en
affiche le contenu. Appuyer sur SOURCE pour afficher le menu
Source en haut à gauche de l'écran. Utiliser le bouton ou
pour mettre en surbrillance la source souhaitée, puis appuyer
sur OK.
Pour en savoir plus sur le branchement des autres équipements,
voir SE FAMILIARISER AVEC LA TELEVISION à la page 8.
▲▼
TV
AV
SCART1
SCART2
S-Video
Component1
Component2
PC
HDMI1
HDMI2
HDMI3
USB
TV
AV
SCART1
SCART2
S-Video
DVD
Component
PC
HDMI1
HDMI2
HDMI3
USB
RECHERCHE AUTOMATIQUE
1. Appuyer sur MENU.
2. Appuyer sur ou pour sélectionner le menu Tuning
(Réglage), puis sur pour entrer.
3. Appuyer sur ou pour sélectionner Country (Pays), puis
◄►
sur ou pour sélectionner le pays.
4. Appuyer sur ou pour sélectionner la recherche
◄►
▼
▲▼
▲▼
automatique (Auto Search), puis sur OK pour entrer.
Appuyer sur ou pour sélectionner l'option OK, puis sur
◄►
OK pour lancer la recherche. Appuyer sur MENU (il est
possible de ne pas lancer la recherche TV/DTV).
5. Appuyer sur EXIT (Quitter) pour arrêter la recherche
automatique.
Remarque : la recherche automatique peut prendre un
certain temps.
RECHERCHE MANUELLE NUMERIQUE
1. Appuyer sur MENU.
2. Appuyer sur ou pour sélectionner le menu Tuning
(Réglage), puis appuyer sur pour entrer.
3. Appuyer sur ou pour sélectionner la recherche manuelle
numérique (Digital Manual Search), appuyer sur pour entrer.
4. Appuyer sur ou pour sélectionner la chaîne (Channel), puis sur
OK pour lancer la recherche.
5. Lorsqu'une chaîne est trouvée, appuyer sur OK pour l'enregistrer.
Appuyer sur EXIT pour quitter.
◄►
▼
▲▼
►
◄►
(Without DVD)
Menu
Country
Auto Search
Digital Manual Search
Analog Manual Search
Channel Edit
Guide
CI Information
Software Upgrade
Start Upgrade
PictureOKSound
Menu
Country
Auto Search
Digital Manual Search
Analog Manual Search
Channel Edit
Guide
CI Information
Software Upgrade
Start Upgrade
PictureOKSound
Menu
Country
Auto Search
Digital Manual Search
Analog Manual Search
Channel Edit
Guide
CI Information
Software Upgrade
Start Upgrade
PictureOKSound
Tuning
Do you want to start Auto Search.
OK
Tuning
Tuning
Digital Manual Search
UHF C H 26
DTV 13
Radio 6
(With DVD)
<>UK
OK
OK
OK
OK
OK
< on >
OK
Function
<>UK
OK
OK
OK
OK
OK
OK
OK
OK
CANCEL
OK
< on >
OK
OK
Function
<>UK
OK
OK
OK
OK
OK
< on >
OK
Function
Lock
Time
Mise en route
Lock
Time
Lock
Time
13
Page 64

EXIT
SAVE
REGLER LA TELEVISION
Recherche manuelle analogique
Suivre les étapes ci-dessous pour effectuer une recherche manuelle.
1. Appuyer sur MENU.
2. Appuyer sur ou pour sélectionner le menu Tuning
(Réglage), puis sur pour entrer.
3. Appuyer sur ou pour sélectionner la recherche manuelle
analogique (Analog Manual Search), puis sur pour entrer.
4. Appuyer sur ou pour sélectionner la recherche (Search),
puis sur pour sélectionner la chaîne ayant la plus haute
fréquence. Appuyer sur pour sélectionner la chaîne ayant la
◄►
▼
▲▼
►
▲▼
►
◄
plus basse fréquence.
5. Sélectionner Storage To (Stocker dans), puis appuyer sur ou
pour sélectionner le numéro de position pour la chaîne. Lorsque
la chaîne est trouvée, appuyer sur le bouton rouge pour
l'enregistrer.Appuyer sur EXIT (Quitter) pour quitter.
Sound System (Système son)
■
Appuyer sur ou pour sélectionner , puis sur ou afin de sélectionner
▲▼
Sound System
le système son approprié.
Current CH (Chaîne actuelle)
■
Appuyer sur ou afin de sélectionner le numéro de chaîne à modifier.
Storage To (Stocker dans)
■
Appuyer sur ou afin de sélectionner le numéro de programme à stocker.
▲▼
◄►
Menu
Country
Auto Search
Digital Manual Search
Analog Manual Search
Channel Edit
Guide
CI Information
Software Upgrade
Start Upgrade
PictureOKSound
◄►
◄►
<>UK
OK
OK
OK
OK
OK
< on >
OK
Tuning
Function
Analog Manual Search
Colour System
Sound System
Current CH
Storage To
Search
Fine Tune
Frequency 487.25Mhz
PAL
< I >
< 909 >
< 909 >
< >
< >
Time
Lock
Fine Tune (Mise au point)
■
Si l'image et/ou le son est/sont mauvais, utiliser la fonction FINE TUNE (Mise au point).
Ne pas utiliser cette fonction si la réception est bonne.
1. Répéter les étapes 1 à 3 ci-dessus, puis appuyer sur ou afin de sélectionner
Tune
(Mise au point).
2. Appuyer sur ou plusieurs fois pour procéder à la mise au point, jusqu'à obtenir la
◄►
▲▼
meilleure image et le meilleur son possibles, puis relâcher le bouton.
14
Fine
Page 65

REGLER LA TELEVISION
Modification de chaîne
Il est possible de renommer, déplacer, paramétrer une
chaîne favorite et passer la chaîne en mode analogique.
1. Appuyer sur MENU.
2. Appuyer sur ou pour sélectionner le menu
TUNING (Réglage), puis sur pour entrer.
3. Appuyer sur ou afin de sélectionner CHANNELEDIT
◄►
▼
▲▼
(Modification chaîne).
Appuyer sur pour entrer dans le sous-menu. Il est
►
possible d'appuyer sur le bouton rouge, vert, jaune ou
bleu pour entrer dans le menu souhaité.
RENAME (Renommer)
1. Appuyer sur ou pour sélectionner la chaîne, puis surle bouton
vert pour larenommer.
2. Appuyer sur pour sélectionner le numéro du nomde la
chaîne, puis sur ou pour sélectionner ce numéro.
3. Il estpossible d'appuyer surEXIT (Quitter) pour annulerles
modifications à toutmoment.
REMARQUES : lafonction RENAME (Renommer)n'est disponible
que dans leprogramme ATV.
MOVE (Déplacer)
1. Appuyer sur ou pour sélectionner la chaîne, puis surle bouton jaunepour
sélectionner la position.
2. Appuyer sur ou pour sélectionner le numéro à déplacer, puissur le bouton jaune
pour confirmer.
3. Il estpossible d'appuyer surEXIT (Quitter) pour annulerles modifications àtout moment.
Paramétrer une chaînefavorite
1. Appuyer sur ou pour sélectionner la chaîne, puis surle bouton rougeafin de
paramétrer la chaînefavorite.
2. Il estpossible d'appuyer surle bouton rouge pour annuler les modifications à tout moment.
3. Appuyer sur lebouton FAV (Favorite)de la télécommande.La liste des favoris
« Favourite List» s'affiche.
4. Appuyer sur ou pour sélectionner la chaîne, puis surOK pour entrer.
SKIP (Ignorer)
1. Appuyer sur ou pour sélectionner la chaîne, puis
sur le boutonbleu pour ignorerla chaîne actuelle.
2. Il estpossible d'appuyer surle bouton bleu pour
annuler les modificationsà tout moment.
GUIDE (Guide duprogramme électronique)
Avec cette fonction,il est possible d'accéder aux
informations du programmeDTV.
1. Appuyer sur MENU.
2. Appuyer sur pour sélectionner lemenu
TUNING (Réglage), puissur pour entrer.
3. Appuyer sur ou pour sélectionner Guide.
Appuyer sur OKpour entrer dansle sous-menu, le
guide du programmeélectronique s'affiche. Il est
possible de rouvrirrapidement le menuGUIDE en
appuyant sur lebouton GUIDE dela télécommande.
▲▼
◄►
ou
▲▼
▲▼
▲▼
▲▼
▲▼
▲▼
◄►
ou
▲▼
▼
Remarques : uniquement en mode DTV.
Menu
Country
Auto Search
Digital Manual Search
Analog Manual Search
Channel Edit
Guide
CI Information
Software Upgrade
Start Upgrade
PictureOKSound
INFO
Menu
Country
Auto Search
Digital Manual Search
Analog Manual Search
Channel Edit
Guide
CI Information
Software Upgrade
Start Upgrade
PictureOKSound
Record
Schedule
Tuning
Tuning
Channel Edit
TV
TV
TV
TV
TV
TV
TV
TV
TV
TV
MOVE
NAME
<>UK
OK
OK
OK
OK
OK
< on >
OK
Function
DATE REMIND
<>UK
OK
OK
OK
OK
OK
< on >
OK
Function
904 S-04
905 S-05
906 S-06
907 S-07
908 S-08
909 S-09
910 S-10
911 S-11
912 S-12
913 S-13
SKIP
Time
BBC ON E Wales
Time
FAV
Lock
OK
Lock
Mise en route
15
Page 66

INTERFACE COMMUNE
La fente d'interface commune (IC) est conçue pour
recevoir le module d'accès conditionnel (AC) et la
carte à puce afin de visualiser les programmes
télévisuels payants et d'autres services. Il est
nécessaire de contacter le fournisseur de services
d'interface commune pour obtenir davantage
d'informations sur les modules et l'abonnement.
Menu
Country
Auto Search
Digital Manual Search
Analog Manual Search
Channel Edit
Guide
CI Information
Software Upgrade
Start Upgrade
PictureOKSound
Tuning
<>UK
OK
OK
OK
OK
OK
< on >
OK
Function
Time
Remarque : nous ne fournissons pas les modules
AC et les cartes à puce. Ils ne constituent pas des accessoires optionnels
Avertissement : éteindre la télévision avant d'insérer
tout module dans la fente d'interface commune.
1. Insérer le module AC correctement, puis la carte
à puce dans la fente IC située sur le côté de la
télévision.
2. Allumer la télévision. Le message ci-dessous
CI Module Insert
s'affiche si le module AC est détecté. Attendre
quelques instants jusqu'à ce que la carte soit
activée.
3. Appuyer sur MENU pour afficher le menu
principal (Main Menu), utiliser les boutons et
pour mettre en surbrillance la ligne « Common
Interface » (Interface commune), puis appuyer
▲▼
Main Menu
Module information
Smart card information
Language
Software Download
sur OK.
Press OK to select,or Exit toquit
4. Des informations détaillées sur la carte IC
EXIT OK
utilisée s'affichent.
Lock
.
5. Appuyer sur OK pour accéder au menu de la
carte. Consulter le manuel d'utilisation du module
pour connaître les détails de paramétrage.
6. Lorsque le module est retiré, le message suivant
s'affiche à l'écran.
16
CI module removed
Page 67

Fonction de mise à niveau du logiciel
Lorsque le site Internet du magasin de télévision envoie de
nouvelles mises à niveau, il est possible de mettre à niveau le
logiciel d'exploitation à l'aide du menu Download (Télécharger).
Les données de diverses unités sont transférées
consécutivement sur une chaîne de réception dédiée.
Il faut chercher la chaîne avec le code numérique de mise
à niveau.
Remarque : des informations sont disponibles dans le
magasin de télévisions ou sur Internet.
Menu
Country
Auto Search
Digital Manual Search
Analog Manual Search
Channel Edit
Guide
CI Information
Software Upgrade
Start Upgrade
PictureOKSound
Tuning
<>UK
OK
OK
OK
OK
OK
< on >
OK
Function
Lock
Time
Fonctionnement
1. Appuyer sur MENU.
2. Appuyer sur ou pour sélectionner le menu
TUNING (Réglage), puis sur pour entrer.
3. Appuyer sur ou afin de sélectionner Software Upgrade
◄►
▼
▲▼
Menu
Country
Auto Search
Digital Manual Search
Analog Manual Search
Channel Edit
Guide
CI Information
Software Upgrade
Start Upgrade
PictureOKSound
<>UK
OK
OK
OK
OK
OK
Are you sure?
< on >
OK
Tuning
Function
Lock
Time
(Mise à niveau du logiciel).
4. Appuyer sur ou pour l'activer. Le paramètre par défaut
◄►
est Off [Désactivé].
5. L'option Do System Upgrade (Lancer mise à niveau du système)
ne peut être sélectionnée que si le code numérique de mise à
niveau est approprié.
6. Appuyer sur ou pour sélectionner l'option System Upgrade
▲▼
(Mise à niveau du système), puis sur OK pour entrer. La télévision
redémarre et cherche les informations de mise à niveau.
REMARQUES : si des informations de mise à niveau sont
disponibles, la télévision commence la mise à niveau. Sinon,
la télévision repasse en source DTV.
7. Charger l'identification du récepteur. Ce processus peut également
prendre quelques minutes. Il est possible d'appuyer sur EXIT (Quitter) pour annuler le
téléchargement ; la télévision sera mise en veille.
8. Une fois le téléchargement terminé, la télévision passe en mode téléchargement et le voyant
s'allume. Le menu 4 de droite s'affiche.
La télévision passe en mode veille lorsque la mise à niveau se termine.
Mise en route
17
Page 68

UTILISER LA TELEVISION
Sélectionner une émission de télévision
1. A l'aide du bouton Program number (Numéro de programme), saisir le numéro de la
chaîne à l'aide du clavier numérique de la télécommande.
2. Utiliser la touche P+/PAppuyer sur P+/P- pour sélectionner un numéro de chaîne.
Régler le volume
Appuyer sur le bouton V+/V- de la télécommande ou sur le côté de la télévision pour
régler le volume.
Fonction CH.LIST (Liste chaînes)
Appuyer sur le bouton CH.LIST de la télécommande pour afficher le menu Channel
List (Liste des chaînes), puis sur pour entrer.
Appuyer sur ou pour sélectionner la chaîne, puis sur OK pour entrer.
▲▼
▼
18
Page 69

REGLER LES PARAMETRES DE L'IMAGE
Modifier les paramètres de l'image
1. Appuyer sur MENU.
2. Appuyer sur ou pour sélectionner le menu Picture
(Image), puis sur pour entrer.
3. Appuyer sur ou pour sélectionner l'élément à régler.
4. Appuyer sur ou afin de régler l'élément sélectionné.
5. Une fois le réglage effectué, appuyer sur (Quitter) pour
rétablir l'affichage normal ou sur pour retourner au
◄►
▼
▲▼
◄►
EXIT
MENU
menu précédent.
■
Contrast (Contraste)
Permet de régler l'intensité des zones lumineuses de l'image, mais ne modifie pas les zones
sombres.
Brightness (Luminosité)
■
Permet de régler le flux lumineux de l'image entière, ce qui affecte principalement les zones les
plus sombres de l'image.
Colour (Couleur)
■
Permet de régler le niveau de saturation des couleurs selon les préférences de l'utilisateur.
Sharpness (Netteté)
■
Permet de régler la netteté des détails fins de l'image.
Tint (Teinte)
■
Permet de sélectionner le mélange de couleurs (teinte) de l'image.
Remarque : la fonction Tint (Teinte) n'est disponible qu'en mode NTSC.
Menu
Contrast
Brightness
Colour
Sharpness
Tint
Mode
Colour Temperature
Noise Reduction
Reset
Picture
<
<
<
<
<
<
<
<
OK
TuningSound
Standard
Cool
standard
Function
>
50
>
50
>
50
>
50
>
0
>
>
>
Time
Lock
Mise en route
Mode
■
Permet de sélectionner le mode image. Sélectionner
Standard/Mild/User/Vivid
(Standard/Doux/Utilisateur/Intense) selon le programme. Il est possible de sélectionner le mode
souhaité grâce au bouton P.MODE de la télécommande.
Colour temperature (Température des couleurs)
■
Permet d'augmenter ou de réduire les couleurs chaudes ( ) (rouge) et froides ( ) (bleu)
Warm Cool
selon les préférences de l'utilisateur.
Sélectionner (Froid) pour donner au blanc une teinte bleutée, pour donner au
blanc une teinte neutre et pour donner au blanc une teinte rouge.
Noise Reduction (Réduction du bruit)
■
Cool Normal
Warm
Filtre/réduit automatiquement le bruit de l'image et améliore la qualité d'image lorsque des
signaux vidéo faibles sont reçus.
Sélectionner (Désactivé/Faible/Standard/Elevé) selon le bruit
Off/Low/Standard/High
de l'image.
Reset (Réinitialiser)
■
Pour rétablir les valeurs par défaut.
19
Page 70

REGLER LES PARAMETRES DU SON
Modifier les paramètres du son
1. Appuyer sur MENU.
2. Appuyer sur ou pour sélectionner le menu Sound
(Son), puis sur pour entrer.
3. Appuyer sur ou pour sélectionner l'élément à régler.
4. Appuyer sur ou afin de régler l'élément sélectionné.
5. Une fois le réglage effectué, appuyer sur (Quitter)
pour rétablir l'affichage normal ou sur pour
retourner au menu précédent.
■
Balance
Permet de régler la sortie des haut-parleurs droit et gauche afin d'obtenir la meilleure
reproduction stéréo pour l'écoute.
Mode
■
Permet de sélectionner le mode son.
Appuyer sur pour sélectionner
(Standard/Musique/Théâtre/Utilisateur) selon le programme. Il est possible de
sélectionner le mode souhaité avec le bouton S.MODE de la télécommande.
AVL
■
Réduit les différences de volume entre les diffuseurs.
SRS TS XT
■
Permet de contrôler la sortie du Woofer.
Appuyer sur ou pour sélectionner SRS TS XT.
Appuyer sur pour paramétrer SRS TS XT sur
OFF, ON
◄►
▼
▲▼
◄►
EXIT
MENU
◄►
ou
Standard/Music/Theater/User
(Contrôle automatique du volume)
▲▼
◄►
ou
(désactivé/activé).
Menu
Balance
Mode
AVL
SRS TS XT
Equalizer
Audio Languages
Reset
Picture Sound
Menu
100Hz
300Hz
1KHz
3KHz
10KHz
<
Standard
<
<
Off
Off
<
OK
OK
English
OK
Tuning
<
<
<
<
<
Function
Time
>
50
>
50
>
50
>
50
>
50
0
>
>
>
>
Lock
Equalizer (Egaliseur)
■
Ce paramètre peut être réglé selon les préférences
de l'utilisateur.
Audio Languages (Langues audio)
■
Appuyer sur ou pour sélectionner Primary/Secondary
(Primaire/Secondaire), puis sur pour sélectionner
▲▼
◄►
ou
les langues nécessaires.
Appuyer sur pour sélectionner Close (Fermer), puis sur
▼
OK pour fermer l'option.
Remarque : la fonction Audio Language n'est disponible
qu'en mode DTV.
Reset (Réinitialiser)
■
Pour rétablir les valeurs par défaut.
20
Picture
Sound
Menu
Balance
Mode
AVL
Primary < English >
SRS TS XT
Secondary < English >
Equalizer
Audio Languages
Reset
Picture
Sound
Tuning
<
<
Tuning
Close
Function
Standard
Function
Lock
Time
0
>
>
Lock
Time
Page 71

PARAMETRES DES FONCTIONS
1. Appuyer sur MENU.
2. Appuyer sur ou pour sélectionner le menu Sound
(Son), puis sur pour entrer.
3. Appuyer sur ou pour sélectionner l'élément à régler.
4. Appuyer sur ou afin de régler l'élément sélectionné.
5. Une fois le réglage effectué, appuyer sur (Quitter)
pour rétablir l'affichage normal ou sur pour
retourner au menu précédent.
■
Language (Langue)
Permet de sélectionner la langue des menus.
■
Subtitle Language (Langue des sous-titres)
Permet de sélectionner la langue des sous-titres.
■
Display Mode (Mode d'affichage)
Pour régler le format, appuyer sur ◄ ou ► pour sélectionner
4:3/Zoom1/Zoom2/Wide/16:9/Auto. Il est possible de
sélectionner rapidement le mode souhaité avec le bouton ARC de la
télécommande.
Mode 4:3
•
Choisir pour visualiser une image avec un format original de 4:3, avec des barres
grises à droite et à gauche.
Mode 16:9
•
Choisir pour régler l'image horizontalement, dans une proportion linéaire afin de
remplir tout l'écran.
Zoom1
•
Choisir pour visualiser l'image sans aucune altération. Cependant, les parties
supérieure et inférieure de l'image seront rognées.
Zoom2
•
Choisir pour altérer l'image, l'étendre verticalement et la rogner. L'image
adopte un compromis entre l'altération et le remplissage de l'écran.
Wide (Large)
•
Choisir Wide pour régler l'image dans une proportion non linéaire, c'est-à-dire plus
large en haut et sans altération en bas.
◄►
▲▼
◄►
4:3
16:9
Zoom1
Zoom2
▼
EXIT
MENU
Menu
Language
Subtitle
Language
Display Mode
Blue Screen
Recorder
SCART Input
OSD Tim e Out
OSD Transparency
Reset
Picture
Menu
Language
Language
Subtitle
Display Mode
Blue Screen
Primary < English >
Recorder
Secondary < English >
SCART Input
OSD Tim e Out
OSD Transparency
Reset
English
<
English
OK
16:9
<
Off
<
OK
AV
<
Off
<
Off
<
OK
TuningSound
Function
English
<
English
OK
16:9
Close
OK
TuningSoundPicture
Function
>
>
>
>
>
>
Lock
Time
>
>
>
>
>
>
Lock
Time
Mise en route
Blue Screen (Ecran bleu)
■
Permet de sélectionner la couleur de fond des caractères.
Remarque : la fonction Blue Screen n'est disponible qu'en mode ATV.
Recorder (Enregistreur)
■
Permet d'enregistrer le programme DTV.
Les détails de l'enregistreur sont décrits à la page 38.
SCART Input (Entrée Péritel)
■
Lorsque l'entrée SCART2 est utilisée, s'assurer que la source d'entrée est AV ou
S-VIDEO, puis régler l'option SCART INPUT.
21
Page 72

PARAMETRES DES FONCTIONS
■
OSD Time Out (Expiration de l'affichage à l'écran)
Etablir la durée pendant laquelle les menus doivent s'afficher à l'écran.
Appuyer plusieurs fois sur ou pour sélectionner le nombre de minutes préréglées.
La durée (Time) sera réglée en séquence : désactivé, 10 sec, 15 sec, 30 sec, 45 sec,
60 sec.
■
OSD Transparency (Transparence de l'affichage à l'écran)
Pour régler le fond en transparence de l'affichage à l'écran, la transparence sera
réglée en séquence : désactivé, 25 %, 50 %, 75 %, 100 %.
■
Reset (Réinitialiser)
Pour rétablir les valeurs par défaut.
◄►
Menu
Language
Language
Subtitle
Display Mode
Blue Screen
Recorder
SCART Input
OSD Ti me Out
OSD Transparency
Reset
Picture
English
<
English
OK
16:9
<
Off
<
OK
AV
<
Off
<
Off
<
OK
Function
Time
TuningSound
>
>
>
>
>
>
Lock
22
Page 73

PARAMETRES DE L'HEURE
■
Clock (Horloge)
1. Appuyer sur MENU.
2. Appuyer sur ou pour sélectionner le menu
(Heure), puis sur pour entrer.
3. Appuyer sur ou pour sélectionner Clock (Horloge),
puis sur pour confirmer le paramètre.
Appuyer sur ou pour sélectionner les heures ou les
minutes, puis sur ou pour régler la valeur.
■ Date
1. Appuyer sur MENU.
2. Appuyer sur pour sélectionner le menu
(Heure), puis sur pour entrer.
3. Appuyer sur pour sélectionner Date, puis sur
pour confirmer le paramètre.
Appuyer sur ou pour sélectionner l'option, puis sur
ou
◄►
REMARQUE : en mode DTV, l'heure et la date ne
peuvent être modifiées car les informations horaires
proviennent du signal.
Pour modifier l'heure, éteindre la télévision en mode
ATV, puis la rallumer.
■ Off Time (Heure de désactivation)
1. Appuyer sur MENU.
2. Appuyer sur ou pour sélectionner le menu
(Heure), puis sur pour entrer.
3. Appuyer sur ou pour sélectionner Off Time (Heure
de désactivation), puis sur pour confirmer le paramètre.
Appuyer sur ou pour sélectionner l'option Repeat
(Répéter), puis sur pour la régler.
Appuyer sur ou pour sélectionner les heures ou les
minutes.
Appuyer sur ou afin de régler la valeur.
◄►
▼
▲▼
►
▲▼
◄►
ou
◄►
▼
ou
◄► ►
▲▼
pour régler la valeur.
◄►
▼
▲▼
►
▲▼
►
▲▼
◄►
Time
Time
Time
Menu
Clock
Date
Off time
On time
Hour < 02 >
Sleep
Minute < 03 >
Time Zone
Picture
Menu
Clock
Date
Off time
On time
Dat e < 02 >
Sleep
Mon th < 3 >
Time Zone
Year < 2009 >
Picture
TuningSound
Menu
Clock
Date
Repeat < Off >
Off time
Hour < 00 >
On time
Sleep
Minute < 00 >
Time Zone
Picture
TuningSound
TuningSound
OK
OK
OK
OK
OK
OK
<
OK
<
<
<
Close
OK
OK
OK
OK
<
<
OK
OK
OK
OK
<
<
Close
00:00
--:--
--:-000
Off
London GMT
London GMT
Function
00:00
--:--
--:--
OK
000
OK
Off
OK
London GMT
<
London GMT
<
Close
Function
00:00
--:--
--:--
000
Off
London GMT
Function
>
>
>
>
>
>
Lock
Time
>
>
>
>
>
>
Lock
Time
Mise en route
>
>
>
Lock
Time
Lorsque l'heure de désactivation est atteinte, la télévision passe
en mode veille.
■ On Time (Heure d'activation)
1. Appuyer sur MENU.
2. Appuyer sur ou pour sélectionner le menu
(Heure), puis sur pour entrer.
3. Appuyer sur ou pour sélectionner On Time (Heure
d'activation), puis sur pour confirmer le paramètre.
Appuyer sur ou pour sélectionner l'option Activate
(Activer), puis sur pour la régler.
Appuyer sur ou pour sélectionner les heures ou les
◄►
▼
▲▼
►
▲▼
►
▲▼
Time
minutes.
Appuyer sur ou afin de régler la valeur.
◄►
Menu
Clock
Date
Off time
Act ivate < O ff >
On time
Hour < 00 >
Sleep
Time Zone
Minute < 00 >
Picture
TuningSound
OK
OK
OK
OK
<
<
Close
Lorsque l'heure d'activation est atteinte, la télévision s'allume automatiquement.
OK
OK
OK
London GMT
<
<
00:00
--:--
--:--
000
Off
London GMT
Function
>
>
>
>
>
>
Lock
Time
23
Page 74

PARAMETRES DE L'HEURE
■ Sleep (Veille auto.)
La veille éteint automatiquement la télévision après un certain temps préréglé (de 5 à
240 minutes).
1. Appuyer sur , puis sur ou pour sélectionner le menu (Heure).
2. Appuyer sur , puis sur ou pour sélectionner (Veille auto.).
3. Appuyer sur ou pour sélectionner le nombre de minutes.
Sélectionner
MENU Time
▼▲▼
◄►
Off, 5 min, 10 min, 15 min, 30 min, 45 min,
60 min, 90 min, 120 min, 180 min 240 min
4. Une fois le réglage effectué, appuyer sur (Quitter)
pour rétablir l'affichage de la télévision ou sur pour
retourner au menu précédent. Le décompte commence
◄►
ou .
EXIT
Sleep
MENU
Menu
Clock
Date
Off time
On time
Sleep
Time Zone
OK
OK
OK
OK
<
<
à partir du nombre de minutes sélectionné.
Tuning
Sound
Picture
■
Time Zone (Fuseau horaire)
1. Appuyer sur MENU.
◄►
2. Appuyer sur pour sélectionner le menu
(Heure), puis sur pour entrer.
3. Appuyer sur ou afin de sélectionner Time Zone
ou
▼
▲▼
Time
Menu
Clock
Date
Off time
On time
Sleep
Time Zone
OK
OK
OK
OK
<
<
(Fuseau horaire).
◄►
4. Appuyer sur afin de sélectionner le fuseau
horaire approprié.
ou
Picture
TuningSound
5. Appuyer sur MENU pour sauvegarder et quitter.
00:00
--:--
--:-000
Off
London GMT
Function
00:00
--:--
--:-000
Off
London GMT
Function
>
>
>
Lock
Time
>
>
>
Lock
Time
24
Page 75

PARAMETRES DU MENU VERROUILLAGE
Avec cette fonction, il est possible de contrôler
le syntoniseur, le programme, le volume de la source,
etc. Appuyer sur MENU sur la télécommande, sur ou
◄►
pour sélectionner le menu Lock (Verrouillage), puis sur
pour entrer dans le sous-menu. Le mot de passe initial
▼
de la télévision est 0000. En cas d'oubli, il est toujours
possible de saisir 9443 pour déverrouiller.
CHANGE PASSWORD (MODIFIER LE MOT DE PASSE)
■
1. Appuyer sur ou pour sélectionner
Password
▲▼
Change
(Modifier le mot de passe), puis sur
►
pour entrer dans le sous-menu.
2. Une fois les 4 chiffres saisis, il faudra les ressaisir une
deuxième fois.
Le nouveau mot de passe est alors automatiquement
enregistré.
CHILD LOCK (SECURITE ENFANTS)
■
Appuyer sur ou pour sélectionner Child Lock.
Appuyer sur ou pour régler le mode sur ou (activé ou désactivé). Si le mode
▲▼
◄►
On Off
de verrouillage est activé, le mode Child Lock est automatiquement désactivé. Si l'on
appuie sur Child Lock (sur la télévision), l'écran affiche , ce qui peut être effacé
en appuyant sur MENU. 5 secondes après avoir appuyé sur le bouton, l'écran s'affiche
automatiquement. Le mode Child Lock peut être repris en accédant au menu Lock Set
(Paramétrer verrouillage) et en paramétrant Child Lock sur ou .
Tuning Lock (Verrouillage du réglage)
■
Appuyer sur ou pour sélectionner Tuning Lock et choisir On ou Off. Remarque :
▲▼
certaines opérations, comme la recherche, ne seront pas disponibles lorsque cette
option est activée. En entrant dans le menu Tuning,Tuning Lock s'affiche à l'écran.
Pour utiliser le menu Tuning, il faut entrer dans le menu Lock afin de désactiver Tuning
Lock ou activer le déverrouillage.
Menu
Change Password
Child Lock
Tuning Lock
Sourcel Set
Channel No
Source Lock
Max Volume
Initial Volume
Parental Lock
Picture
Menu
Change Password
Child Lock
Tuning Lock
Sourcel Set
Channel No
Source Lock
Max Volume
Initial Volume
Parental Lock
Picture
Child Lock
On Off
OK
<
<
<
<
OK
<
<
<
TuningSound
Function
OK
<
<
<
<
<
<
Please Enter Password
<
OK
<
----
<
OK
<
<
TuningSound
Function
16:9
Off
Off
Off
100
Off
Off
Off
Off
Off
Off
100
Off
Off
>
>
>
>
9
>
>
>
Lock
Time
>
>
>
>
9
>
>
>
Lock
Time
Mise en route
Channel NO. (N° de chaîne)
■
Channel NO. est une option pour le paramétrage d'une chaîne préréglée.
Appuyer sur ou pour sélectionner la chaîne préréglée, puis sur ou pour
▲▼
◄►
sélectionner le numéro de chaîne.
Source set (Paramétrer la source)
■
Channel set est une option pour le paramétrage de la source de départ.
Appuyer sur ou pour sélectionner Off, DTV, TV,AV, SCART1, SCART2, S-Video,
◄►
Component1, Component2, PC, HDMI1, HDMI2, HDMI3, USB. Le DVD est disponible
avec certains modèles.
25
Page 76

■
Source Lock (Verrouillage de la source)
Source Lock permet de contrôler l'activation ou la
désactivation des modes d'entrée externes gênants.
Appuyer sur ◄ ou ► pour régler le mode sur On ou Off.
Lorsque le verrouillage de la source est activé, la source
de la télévision s'affiche. En appuyant sur SOURCE,
la télévision peut passer à la source correspondante
et affiche la source verrouillée.
■
Max Volume (Volume maximal)
Appuyer sur ou pour sélectionner le volume maximal. Appuyer sur ou pour régler
▲▼
Menu
Change Password
Child Lock
Tuning Lock
Sourcel Set
Channel No
Source Lock
Max Volume
Initial Volume
Parental Lock
Picture
OK
<
<
<
<
OK
<
<
<
TuningSound
Function
◄►
Off
Off
Off
100
Off
Off
>
>
>
>
9
>
>
>
Lock
Time
le volume entre 0 et 100. La valeur du son ne peut dépasser la valeur du volume maximal.
Si le volume actuel est supérieur au volume maximal lors du réglage du menu Lock set
(Paramétrer verrouillage), le volume actuel devient le volume maximal configuré. Si le
volume actuel est inférieur au volume maximal, le volume configuré par l'utilisateur reste
le même.
■
Initial Volume (Volume initial)
La télévision garde en mémoire le volume initial après la configuration et au prochain
allumage.
■
Parent Lock (Verrouillage parental)
Appuyer sur ou pour sélectionner le verrouillage parental, puis sur ou pour
▲▼
◄►
sélectionner OFF ou 4-18 afin de limiter l'âge des enfants regardant la télévision.
■
Clear Lock (Désactivation du verrouillage)
Appuyer sur ou pour sélectionner le mode de déverrouillage, puis sur ou pour
▲▼
◄►
déverrouiller tous les modes configurés. En réglant toutes les options verrouillées sur
OFF, le volume maximal est rétabli sur 100.
26
Page 77

AFFICHAGE DU MENU CONTEXTUEL
■
Fonction Subtitle (Sous-titres)
1. Appuyer sur le bouton SUBTITLE de la télécommande
pour afficher le menu de langues des sous-titres, puis sur
pour entrer.
2. Appuyer sur ou pour sélectionner l'élément, puis sur OK
▲▼
pour entrer. Il est possible d'appuyer sur EXIT (Quitter) pour
annuler les modifications à tout moment.
▼
Subtitle Languages
off
English
OK
Remarques : appuyer sur le bouton SUBTITLE de la
télécommande permet d'afficher le menu de langues des
sous-titres uniquement en mode DTV.
■
Fonction CH.LIST
1. Appuyer sur le bouton CH.LIST de la télécommande pour
afficher le menu Channel List (Liste des chaînes).
2. Appuyer sur ou pour sélectionner la chaîne, puis sur OK
▲▼
pour entrer. Il est possible d'appuyer sur EXIT (Quitter) pour
annuler les modifications à tout moment.
■
Fonction GUIDE
Appuyer sur le bouton GUIDE de la télécommande pour
afficher le menu du guide des programmes, puis sur
, , ou pour sélectionner le programme.
◄►
▲▼
Il est possible d'appuyer sur EXIT (Quitter) pour annuler
les modifications à tout moment.
Remarques : disponible en mode DTV uniquement.
■
Fonction FAV
Appuyer sur le bouton FAV de la télécommande pour afficher
le menu Favourite List (Liste des favoris).
Appuyer sur ou pour sélectionner le programme, puis sur
▲▼
OK pour entrer. Il est possible d'appuyer sur EXIT (Quitter)
pour annuler les modifications à tout moment.
■
INFO
Appuyer sur le bouton INFO de la télécommande pour
afficher les informations sur la chaîne actuelle.
Il est possible d'appuyer sur EXIT (Quitter) pour annuler les
modifications à tout moment.
Channel List
BBC ON E Wales
Record
INFO
Schedule
DATE REMIND
OK
Mise en route
■
AUDIO / I/II
Appuyer sur le bouton AUDIO de la télécommande pour afficher
le menuAudio Languages (Langues audio).
Appuyer sur ou pour sélectionner les paramètres souhaités,
▲▼
puis sur OK pour entrer.
Il est possible d'appuyer sur EXIT (Quitter) pour annuler les
modifications à tout moment.
Remarques : appuyer sur le bouton AUDIO de la télécommande
permet d'afficher le menu de langues audio uniquement en mode DTV.
OK
27
Page 78

AFFICHAGE DU MENU CONTEXTUEL
■ Couper le son
La fonction de coupure du son (sourdine) est très utile en cas d'appel téléphonique ou si des
invités vous rendent visite.
1. Appuyer sur le bouton MUTE (Sourdine) de la télécommande. Le message « Mute » s'affiche
en bas de l'écran et le son de la télévision est coupé.
2. Pour rétablir le son, appuyer sur MUTE de nouveau ou directement sur V+.
■ Affichage du programme rapide
Cette fonction permet de revenir rapidement au dernier programme
visionné. Appuyer sur Q.View pour que la télévision retourne à la
source TV, supposément la source USB ou DVD.
18
1. Supposons que le numéro de chaîne venant d'être utilisé est 8 et que le
numéro de chaîne actuel est 18 (comme indiqué sur la figure).
2. Pour revenir à la chaîne 8, il suffit d'appuyer sur Q.View.
3. Pour revenir à la chaîne 18, appuyer de nouveau sur le bouton.
Cette fonction permet de facilement passer de la chaîne actuelle à la chaîne
utilisée juste avant.
28
8
18
Page 79

04 Utiliser les fonctions
Fonctions Télétexte
Le télétexte est un système d'informations diffusé par certaines chaînes pouvant être lu
comme un journal. Il offre également des sous-titres pour malentendants ou les personnes
ne parlant pas la langue d'un programme particulier diffusé (réseaux câblés, chaînes satellite,
etc.).
Remarque : les boutons du télétexte fonctionnent même sans signal télétexte, mais il
n'y a aucun affichage.
Télétexte
Fonctions Télétexte
Pour sélectionner le télétexte, appuyer sur le bouton de la
télécommande. Pour éteindre le télétexte, appuyer de nouveau
sur ce bouton.
Remarque : toutes les fonctions ne sont pas disponibles en
mode télétexte. Seules quelques fonctions de commande
directe par bouton sont disponibles en mode télétexte, à savoir :
Réglage du volume
Fonction Mute (Sourdine)
Faire défiler vers le haut/le bas les pages
Utiliser les boutons pour passer à la page suivante
ou précédente.
Saisir le numéro de page
Pour sélectionner une page de télétexte, saisir le numéro
de page à l'aide du clavier numérique de la télécommande,
ou utiliser ou les boutons colorés Fast text.
Mode mixte
Pour voir l'image de la télévision tout en étant en mode Texte,
appuyer sur pour superposer les données de télétexte en
haut de l'image de la télévision. Appuyer de nouveau sur ce
bouton pour retourner en affichage texte intégral.
P+/P-
P+/P-
INDEX
Appuyer sur pour accéder à la page d'index du télétexte.
INDEX
29
Page 80

Télétexte
Fonctions Télétexte
Modification de la langue
Appuyer sur le bouton pour modifier les caractères du
télétexte entre Eastern (orientaux) et Western (occidentaux).
Pause
Appuyer sur pour arrêter la mise à jour automatique de la
page de télétexte. Cette fonction est très utile lorsqu'il y a
plusieurs pages de télétexte ou données sur le même nombre
de pages.
Taille
Appuyer sur pour passer de l'écran plein à la moitié
d'écran. Cette fonction est très utile car elle permet d'agrandir
l'image, rendant le texte facile à lire.
Révéler
Appuyer sur le bouton pour afficher le texte masqué.
Cette fonction est utilisée pour afficher des informations
telles que des réponses à des questions interactives en ligne
du télétexte.
Heure
En mode télévision normal uniquement, appuyer sur
permet d'afficher l'heure du télétexte en haut à droite pendant
quelques secondes.
Boutons colorés Fast text
Fast text affiche automatiquement les quatre pages les plus
fréquemment utilisées. Selon le diffuseur, ces pages peuvent
être choisies par l'utilisateur. Appuyer sur le bouton coloré
de la télécommande ayant la même couleur que le lien en
bas de la page de télétexte pour accéder directement à
cette page.
30
SEARCH
-----
Sous-code
Appuyer sur le bouton en saisissant le nombre à 4
chiffres pour accéder à une page secondaire.
-----
Page 81

MODE USB
Remarque : les schémas de la partie ci-dessous sont fournis à des fins de
référence uniquement. Voir la télévision si nécessaire.
UTILISER LE DISPOSITIF USB
1. Formats de fichiers pris en charge :
1) Photo : *.jpg
2) Musique : *fichiers .mp3
3) Film : *fichiers .avi
4) Texte : *.txt
Remarque : certains fichiers ne peuvent être lus selon la manière dont ils ont été
enregistrés.
2. Appareils pris en charge :
Prend en charge les appareils de stockage de masse dont le fichier système est FAT32,
tels que certains disques USB, disques durs externes et lecteurs MP3. Si un dispositif
USB ne peut être identifié en raison d'un fichier système incompatible, il faut le formater
sur le fichier système mentionné ci-dessus.
3. Pour obtenir une lecture régulière :
1) Le taux d'encodage du fichier doit être inférieur à 300 Ko/s ;
2) En raison de la distance limitée de transmission des signaux du dispositif USB,
il est recommandé de ne pas utiliser de cordon USB. En cas d'utilisation d'un tel
cordon, s'assurer que sa longueur ne dépasse pas 1 mètre ;
3) Utiliser un dispositif USB haute vitesse conforme à la norme USB 2.0 ; avec un
dispositif USB 1.1, la lecture peut être irrégulière.
Utiliser les fonctions
31
Page 82

MODE USB
Connecter/Retirer le dispositif USB
1. Appuyer sur le bouton SOURCE de la télécommande pour sélectionner l'option USB.
2. Insérer le dispositif USB dans l'interface USB correspondante 2 secondes après avoir lancé
le système.
3. Après être entré dans le menu du système, appuyer sur le bouton ou de la
télécommande pour sélectionner les fichiers USB requis. Appuyer sur OK pour confirmer la
sélection, puis entrer dans la liste de fichiers sélectionnée.
4. Appuyer sur le bouton ou de la télécommande pour sélectionner le fichier requis, puis
sur OK pour entrer dans le fichier sélectionné.
5. Pour quitter le système de lecture multimédia en continu et regarder une émission de
télévision, appuyer sur BACK (Retour) pour retourner au menu principal de la transmission
multimédia (afin de protéger l'appareil), puis sur SOURCE pour sélectionner TV (Télévision)
et retourner en mode TV.
Remarques :
1. En appuyant sur MENU lorsque le dispositif USB est sélectionné comme source, l'écran
devient noir sauf lorsque des images ou films sont lus.
2. Pendant la lecture de l'appareil USB, appuyer sur BACK (Retour) plusieurs fois pour
retourner à l'interface principale USB. Il est ensuite possible de passer aux sources de
signal souhaitées en appuyant de nouveau sur SOURCE.
3. Ne pas débrancher l'appareil USB en cours d'utilisation. Lorsque ce type d'appareil est
débranché inopinément, les fichiers stockés ou le dispositif de stockage USB peuvent être
endommagés.
▲▼
◄►
32
Page 83

MODE USB
Utiliser le dispositif USB
1. Appuyer sur le bouton ou pour faire défiler le menu principal ou le sous-menu,
puis sélectionner l'option souhaitée.
2. Appuyer sur OK pour confirmer la sélection.
3. Appuyer sur ou pour l'avance rapide (FWD) ou le retour en arrière rapide
(REV) de l'élément lu.
4. Appuyer sur PLAY/PAUSE pour lancer la lecture, puis de nouveau sur le bouton
pour interrompre la lecture.
5.Appuyer sur ZOOM pour agrandir les images, puis sur , , ou pour déplacer
l'image.
6. Appuyer sur STOP pour arrêter la lecture ou retourner au menu précédent, puis
sur BACK plusieurs fois pour retourner au menu principal.
REMARQUE : il est possible de choisir des photographies ou de la musique
dans différents fichiers afin de les lire en même temps.
◄◄ ►►
▲▼
■
◄►
▲▼
Utiliser les fonctions
33
Page 84

MODE USB
Lire une image
1. Après être entré dans l'interface
principale USB, appuyer ou
pour sélectionner PHOTO.
2. Appuyer sur OK pour confirmer la
sélection et entrer dans la liste de
fichiers d'images.
◄►
3. Appuyer sur ou pour sélectionner
l'image à lire, sur OK pour confirmer,
▲▼
OK
ENTER
puis sur PLAY/PAUSE (Lecture/Pause)
pour lire les images.
4. Pour faire un arrêt sur image, appuyer de nouveau sur PLAY/PAUSE.
Appuyer sur ZOOM pour agrandir l'image, puis sur , , ou pour déplacer l'image.
◄►
▲▼
Appuyer sur PREV/NEXT (Précédent/Suivant) pour sélectionner l'image précédente
ou suivante.
Appuyer sur ou pour faire pivoter l'image.
Appuyer sur STOP pour arrêter l'image en cours de lecture.
▲▼
■
5. Pour quitter la lecture, appuyer sur BACK (Retour) plusieurs fois. .
REMARQUE : l'affichage du menu varie selon le nom de la photographie et la définition
de votre appareil.
34
Page 85

MODE USB
Lire de la musique
1. Après être entré dans l'interface
principale USB, appuyer ou
◄►
pour sélectionner MUSIC (Musique).
2. Appuyer sur OK pour confirmer la
sélection et entrer dans la liste de
fichiers de musique.
3. Appuyer sur ou , sur OK pour sélectionner la musique à lire, puis sur PLAY/PAUSE
▲▼
OK
ENTER
(Lecture/Pause) pour lire la musique.
Appuyer sur ou pour l'avance rapide (FWD) ou le retour arrière rapide (REV)
◄◄ ►►
de la musique lue.
Appuyer sur PREV/NEXT (Précédent/Suivant) pour sélectionner le morceau de musique
précédent ou suivant.
Appuyer sur STOP pour arrêter le morceau de musique en cours de lecture lorsque
■
l'interface actuelle est la musique lue.
4. Pour retourner au menu principal, appuyer sur BACK (Retour) plusieurs fois.
REMARQUE : il est possible de lire de la musique et une image en même temps.
Utiliser les fonctions
35
Page 86

MODE USB
Lire un film
1. Après être entré dans l'interface
principale USB, appuyer ou
pour sélectionner Movie (Film).
2. Appuyer sur OK pour confirmer la
sélection et entrer dans la liste de fichiers
de films.
◄►
OK
ENTER
3. Appuyer sur ou , sur OK pour sélectionner le film à lire, puis sur PLAY/PAUSE
▲▼
(Lecture/Pause) pour lancer la lecture.
Appuyer sur ZOOM pour agrandir l'image.
Appuyer sur PREV/NEXT (Précédent/Suivant) pour sélectionner le film précédent ou suivant.
Appuyer sur STOP pour arrêter le film en cours de lecture.
■
4. Pour quitter la lecture, appuyer sur BACK (Retour) plusieurs fois.
36
Page 87

MODE USB
Texte
1. Après être entré dans l'interface principale
USB, appuyer pour sélectionner
◄ou►
Text (Texte).
2. Appuyer sur OK pour confirmer la
sélection et entrer dans la liste de fichiers
de textes.
3. Appuyer sur ou , sur OK pour sélectionner le texte à lire, puis sur PLAY/PAUSE
▲▼
OK
ENTER
(Lecture/Pause) pour lire ce texte.
Appuyer sur PREV/NEXT (Précédent/Suivant) pour sélectionner le texte précédent ou suivant.
4. Pour quitter le mode Text, appuyer sur BACK (Retour) plusieurs fois.
REMARQUE : il est possible de lire de la musique et un texte en même temps.
Utiliser les fonctions
37
Page 88

Utiliser un disque externe USB pour l'enregistrement
1. Insérer le dispositif USB au format FAT32 dans le connecteur USB1, puis appuyer
sur MENU.
Remarque : seule l'entrée USB1 est disponible
pour l'enregistrement.
2. Appuyer sur ou pour sélectionner le menu
FUNCTION (Fonction), puis sur pour entrer.
3. Appuyer sur le bouton ou pour sélectionner Recorder
◄►
▼
▲▼
(Enregistreur), puis sur OK pour entrer dans le sous-menu.
4. Appuyer sur le bouton ou pour sélectionner Disk
(Disque), puis sur le bouton ou OK pour entrer.Appuyer
sur le bouton pour sélectionner le disque si le
◄►
▲▼
►
ou
dispositif possède plusieurs disques.
5. Appuyer sur ou pour sélectionner Format, puis sur pour
entrer.Appuyer sur pour sélectionner la taille de
▲▼
◄►
ou
format souhaitée, puis sur OK pour formater le disque USB.
REMARQUE : le système formatera tout le dispositif. Si la
taille du dispositif est supérieure à 1 Go, il est possible de
régler la taille utilisée pour la programmation.
6. Le formatage peut prendre plusieurs minutes, en fonction de
la taille de la mémoire. Appuyer sur afin de sélectionner
◄►
ou
la taille du disque pour la programmation.
La taille maximale du dispositif pour Time Shift (Programmation)
est de 8 Go.Appuyer sur OK pour enregistrer.
REMARQUE : si l'utilisateur sélectionne la taille
maximale de programmation, il n'est pas possible de
procéder à un enregistrement.
7.Attendre que le système procède à une vérification. Les données de vitesse sont visibles
une fois la vérification réussie.
REMARQUES :
1. Le formatage n'est que requis lors du premier enregistrement.
2. La taille minimale du dispositif pour l'enregistrement est de 1 Go. La fonction de
formatage du dispositif prend jusqu'à 2 To. Le nombre maximal de partitions est
de 16 ; une seule est active à la fois.
3. Débit binaire :
Débit binaire du dispositif > 4,5 Mo/s ; l'enregistrement est sûr en flux HD ;
Débit binaire du dispositif > 1,5 Mo/s ; l'enregistrement est sûr en flux SD ;
Débit binaire du dispositif > 600 Ko/s ; l'enregistrement n'est pas sûr.
4. Le système ne peut fonctionner normalement si le dispositif USB présente l'un
des problèmes ci-dessous :
Le dispositif a un bug.
Le dispositif a un message d'erreur.
Le dispositif signale une taille infidèle.
IMPORTANT : le dispositif USB doit être formaté au format FAT32 par
un PC avant d'être inséré dans le connecteur USB.
Menu
Select Disk USB1 C:
Check File S ystem start
USB Disk
Format
Time Shift Size
Speed
File System Size
File Syste m Size All
►
SD 27Min HD7Min
OK CANCEL
Format
Do no t unplu g USB dev ice
Formating.....
Time Shift Size
Time Shift
SD 14Min HD4Min
OK CANCEL
Ok
Ok
Ok
Size All
38
Page 89

PROGRAMMATION
La fonction Time Shift (Programmation) n'est
disponible qu'en mode DTV. Appuyer sur
PLAY/PAUSE (Lecture/Pause) pour interrompre
le programme, puis de nouveau sur
PLAY/PAUSE pour que le programme
Time Shift soit lu. Pour arrêter la fonction
Time Shift, appuyer sur STOP (Arrêt).
Pour arrêter le programme Time Shift en
A B
cours de lecture, appuyer sur EXIT (Quitter).
ENREGISTREMENT
1. Appuyer sur D.MENU pour enregistrer le programme
en cours de lecture, puis sur D.MENU ou EXIT (Quitter)
pour réduire l'interface d'enregistrement.
Time Shift
[-00:00:12/00:10:00]
Time Shift
[-00:00:12/00:10:00]
14:51
14:51
REC
5 five
The streets of SAN francisco
Recorded List
Record
Play
DELETE
Gold workshop wit...
Gold workshop wit...
INDEX
[DATE] 2004/03/01
[TIME] 14:56:09
[DURATION]0000:00:00
[CHANNE NAME] 16QVC
[PROGRAM NAME]
PLAYBACK
Gold workshop with jan Springer
2. Appuyer sur STOP pour arrêter
l'enregistrement en cours.
3. Pour lire le programme enregistré, appuyer
sur INDEX pour ouvrir la liste enregistrée.
Appuyer sur le bouton ou pour sélectionner
▲▼
le contenu enregistré.
Appuyer sur pour afficher les informations
►
sur le programme.
Appuyer sur pour annuler.
◄
[00:00:00]
Appuyer sur OK ou PLAY/PAUSE
Recording
(Lecture/Pause) pour lire le programme
enregistré, puis sur STOP pour arrêter
la lecture.
A
B
[00:00:12/00:10:00]
5 FIVE
Gold workshop with jan Springer
REMARQUE :
1. Le fait de changer la chaîne n'aura aucune conséquence sur l'enregistrement
à la même fréquence, mais aura un impact sur la programmation. Le programme
enregistré ne peut être supprimé en cours de lecture.
2. Appuyer sur INDEX plusieurs fois. Le programme affiche cet ordre : nom du
programme, nom de la chaîne, heure du programme, nom du fichier et durée
du fichier.
15:06
(384MB)
Utiliser les fonctions
14:51
39
Page 90

UTILISER UN LECTEUR DVD
(certains modèles uniquement)
LIRE UN DVD
1. Appuyer sur le bouton SOURCE de la télécommande
pour accéder au mode DVD.
2. Placer le DVD dans la fente prévue à cet effet, face
imprimée vers l'extérieur. La fente n'accepte que les
DVD de taille standard.
3. Le DVD se lance automatiquement (la plupart des DVD
commencent avec un menu du disque).
4. Utiliser , , ou pour naviguer dans le menu du
INTERROMPRE LA LECTURE D'UN DVD
1. Appuyer sur PLAY/PAUSE (Lecture/Pause) pour
2. Appuyer sur PLAY/PAUSE (Lecture/Pause) pour reprendre
ARRÊTER LA LECTURE D'UN DVD
1. Appuyer sur pour arrêter la lecture d'un DVD. L'écran de
2. Certains disques mémorisent l'endroit où le DVD a été
3. Appuyer sur deux fois pour arrêter complètement et vider
UTILISER L'AVANCE RAPIDE OU LE RETOUR
ARRIERE RAPIDE
1. Pour faire avancer un disque plus rapidement, appuyer
2. Appuyer sur ou plusieurs fois pour passer aux
3. Appuyer sur PLAY/PAUSE (Lecture/Pause) pour reprendre
PASSERA LA SCENE SUIVANTE OU PRECEDENTE
Pendant la lecture, appuyer sur pour passer à la scène
suivante ou sur l pour repasser à la scène précédente.
MOT DE PASSE
Le contrôle parental peut être activé en configurant le mode
Password (Mot de passe) sur On. Le mot de passe par défaut
est . En cas d'oubli, il est toujours possible de saisir
1369
►◄▲ ▼
DVD et mettre en surbrillance l'option de lecture, puis
appuyer sur PLAY/PAUSE (Lecture/Pause).
interrompre la lecture. Le son est également mis en sourdine.
une lecture normale.
la télévision affiche le logo de démarrage du DVD.
arrêté. Appuyer sur PLAY/PAUSE (Lecture/Pause) pour
y revenir et poursuivre la lecture.
la mémoire du lecteur.
sur le bouton .
Pour retourner en arrière, appuyer sur le bouton .
différentes vitesses. Ces vitesses s'affichent en haut à
gauche de l'écran : 2X, 4X, 8X, 16X, 32X et vitesse de
lecture normale.
une lecture normale.
0000
pour déverrouiller cette fonction.
■
■
►►
►► ◄◄
◄◄
◄◄
►►l
40
Page 91

UTILISER LAFONCTION DE ZOOM
1.Appuyer sur ZOOM pour agrandir l'image ou l'écran.Appuyer sur ce bouton plusieurs
fois pour agrandir davantage l'image.
2. En mode ZOOM, utiliser le bouton pour afficher à l'écran une partie
►, ◄, ► ou ◄
différente de l'image agrandie.
PASSER EN SOUS-TITRES
1. Appuyer sur SUBTITLE (Sous-titre) pendant la lecture.
2. Les langues disponibles s'affichent en haut à gauche de l'écran. Appuyer plusieurs
fois jusqu'à ce que la langue de sous-titrage souhaitée s'affiche.
3. Appuyer plusieurs fois sur SUBTITLE jusqu'à ce que SUBTITLE OFF (Désactivation
sous-titre) s'affiche afin de désactiver les sous-titres.
UTILISER LE MODE REPETITION
Appuyer sur REPEAT (Répéter) une fois pour relire le chapitre d'un DVD, deux fois
pour relire le titre en cours de lecture ou trois fois pour relire tout le contenu du disque.
MODIFIER L'ANGLE DE LA CAMERA
Certains DVD offrent plusieurs angles de caméra pour certaines scènes, voire toutes.
Appuyer surANGLE pour modifier l'angle de la caméra. Il existe différents angles de
caméra : avant, latéral, vue d'ensemble ou extérieur.
Utiliser les fonctions
41
Page 92

AUTRES FONCTIONS POUR LE DVD
D.MENU
Appuyer sur ce bouton pour retourner au menu précédent.
AUDIO
De nombreux DVD possèdent plusieurs bandes sonores. Pour passer d'une bande à
l'autre, appuyer sur le boutonAUDIO.Attendre trois secondes avant d'appuyer de
nouveau sur le bouton afin de naviguer entre les options.
TITLE (Titre)
Appuyer sur ce bouton pour retourner au menu du titre sur certains DVD. Appuyer sur
▼, ▲, ► ou ◄
SEARCH (Recherche)
Appuyer sur SEARCH (Recherche). Utiliser les touches numériques pour saisir le numéro
du chapitre à lire, puis appuyer sur PLAY/PAUSE (Lecture/Pause).
PROGRAM (Programme)
Pendant la lecture, appuyer sur PROGRAM pour passer directement à une partie ou un
programme sur le DVD. Appuyer sur les boutons chiffrés pour sélectionner le numéro du
programme souhaité. Une fois terminé, déplacer le curseur pour sélectionner START
(Démarrer). Le DVD passe directement à cette partie et lance la lecture. Pour annuler
cette fonction, appuyer sur PROGRAM et se positionner sur STOP (Arrêt), puis appuyer
sur PLAY/PAUSE (Lecture/Pause).
A-B
Utiliser A-B pour configurer une partie d'un DVD à répéter.Appuyer surA-B pour marquer
le point de départ et appuyer une nouvelle fois pour marquer la fin. La répétition de cette
partie commence immédiatement.
Appuyer surA-B pour annuler la répétition.
ANGLE
Pour profiter au maximum de l'ambiance des programmes sportifs, concerts ou pièces
de théâtre, appuyer sur ce bouton pour regarder certaines actions avec des angles
différents (fonction disponible sur certains disques. En utilisant un disque enregistré
avec plusieurs angles, il est possible de visualiser la scène sous différents angles,
par exemple : avant, latéral, vue d'ensemble et extérieure).
pour naviguer dans le menu.
D.CALL
En appuyant plusieurs fois sur , un indicateur s'affiche à l'écran pour différents
types de disque DVD, CD, etc.
D.CALL
42
Page 93

LIRE UN CD D'IMAGES JPEG
1. Insérer un CD JPEG de la même façon qu'avec un DVD ou CD AUDIO, face imprimée
vers l'extérieur.
2. Le CD se charge et le menu du contenu s'affiche à l'écran.
3. Utiliser ou pour mettre en surbrillance le dossier et l'image à visualiser, puis
▼▲
appuyer sur PLAY/PAUSE (Lecture/Pause). Chaque image du disque s'affiche
consécutivement, comme un panorama.
4. Appuyer sur PLAY/PAUSE (Lecture/Pause) pendant le panorama afin de faire un
arrêt sur image.
5. Appuyer sur le bouton pour passer à l'image suivante ou retourner à
►► ou ◄◄
l'image précédente.
LIRE UN CD AUDIO
1. Insérer un CD de la même façon qu'avec un DVD, face imprimée vers l'extérieur.
2. Le CD se charge et le menu du contenu s'affiche à l'écran.
3. Utiliser ou pour mettre en surbrillance la piste à lire, puis appuyer sur
▲▼
PLAY/PAUSE (Lecture/Pause) pour écouter le CD en entier depuis le début. Il est
possible d'arrêter ou d'interrompre la lecture, d'avancer ou de retourner en arrière de
la même façon qu'avec un DVD. Il est également possible d'utiliser la fonction
REPEAT(Répéter) pour répéter une piste, un dossier ou le contenu entier du disque.
Appuyer plusieurs fois pour sélectionner l'élément à répéter. Il est également possible
d'utiliser la fonction A-B pour répéter une certaine partie d'une piste ou d'un CD.
Utiliser les fonctions
43
Page 94

05 Sections des références
DEPANNAGE
Le guide ci-dessous peut aider à résoudre certaines anomalies :
Pas d'image,
pas de son
Ecran noir
Pas de son
Son de mauvaise
qualité
Pas d'image sur
certaines chaînes
Pas de couleur sur
certaines émissions
(noir et blanc)
Parasites sur certaines
images ou toutes
Télévision hors
contrôle
Vérifier si la télévision est correctement branchée.
Vérifier si la télévision est branchée à une source
d'alimentation appropriée.
Vérifier s'il n'y a pas de coupure d'électricité.
Vérifier l'arrivée de signaux corrects.
Utiliser la télécommande pour modifier l'entrée des signaux
sur l'entrée appropriée.
Redémarrer la télévision si l'alimentation a été coupée.
Appuyer sur (Sourdine) et vérifier si ce mode est activé.
Passer à d'autres chaînes et vérifier s'il existe le même
problème.
Appuyer sur pour voir si le problème peut être résolu.
Vérifier si le système audio est correct. Consulter le manuel
d'utilisation pour le réglage.
Vérifier si la chaîne appropriée est sélectionnée.
Régler l'antenne.
Vérifier si le même problème existe sur d'autres chaînes.
Vérifier les systèmes d'image et de son.
Consulter les instructions appropriées dans le manuel pour le
réglage des couleurs.
Vérifier si l'antenne est correctement connectée.
Vérifier si l'antenne est en bon état.
Effectuer un réglage précis de la chaîne.
Débrancher la télévision de l'alimentation. Attendre 10
secondes, puis la rebrancher.
Si le problème persiste, contacter le service après-vente agréé
pour une assistance technique.
MUTE
VOL+
Remarques :
1. Si l'anomalie ne peut être corrigée à l'aide du guide ci-dessus, contacter un centre de
réparation agréé local.
2. La télévision doit uniquement être réparée par un service agréé. Ne jamais tenter de retirer
le capot arrière car la télévision contient des tensions dangereuses pouvant entraîner la
mort ou un incendie.
44
Page 95

Caractéristiques techniques
ECRAN
Type Matrice activeA-si TFT
Angle affichable 160(H) 150 (V) (S626/S626D)
176 (H) 176 (V) (S632F/S632D/S642F)
Système couleur PAL,SECAM, NTSC(AV)
TV/VIDEO
Système son BG, DK, I, L
Entrée vidéo PÉRITEL, S-VIDEO,YPb/Pr, YCb/Cr, AV,
VGA, HDMI, USB
GENERAL
DTV Y/Pb/Pr Composite: 480i/p, 576i, 720p, 1080i, 1080p
Alimentation Voir plaque signalétique
Consommation Voir plaque signalétique
électrique
Dimensions (Lx P x H)
en cm
63,3 x 20,0 x 49,7 (base comprise) (LT26K3)
63,3 x 20,0 x 49,7 ( ) (LY26K3)
79,8 x 23,0 x 57,5 ( ) (LTF32K3)
79,8 x 23,0 x 57,5 ( ) (LY32K3)
102,2 x 28,9 x 70,4 ( ) (LTF42K3)
66,2 x 20,0 x 50,0 ( ) (LT26R3)
66,2 x 20,0 x 50,0 ( ) (LY26R3)
79,6 x 23,0 x 59,0 ( ) (LTF32R3)
79,6 x 23,0 x 59,0 ( ) (LY32R3)
102,0 x 29,0 x 72,4 ( ) (LTF42R3)
base comprise
base comprise
base comprise
base comprise
base comprise
base comprise
base comprise
base comprise
base comprise
Sections des références
Conditions Température de fonctionnement : +5 à +35°C
environnementales
Accessoire Manuel d'utilisation
Les caractéristiques techniques de cette télévision sont fournies dans ce
manuel à des fins de référence uniquement. Des différences peuvent survenir
si la technologie du produit est mise à jour.
La conception et les caractéristiques techniques sont soumises à modification
sans préavis.
Humidité de fonctionnement : 20 à 80 %
Température de stockage : -15 à +45°C
Humidité de stockage : 5 à 90 %
Télécommande
Cache de la base (S642F uniquement)
Pile (x2)
45
Page 96

Page 97

DIGITAL LCD-TV
BEDIENUNGSANLEITUNG
MODELL:LT26K3/R3
LY26K3
LTF32K3
LY32K3
LTF42K3
/R3
/R3
/R3
/R3
Lesen Sie diese Bedienungsanleitung vor der ersten
Verwendung dieses Gerätes bitte sorgfältig durch und bewahren
Sie sie für zukünftiges Nachschlagen auf.
Page 98

Page 99

Inhalt
01 Sicherheitsinformationen
Herzlichen Glückwunsch.....................................................
Wichtige Informationen........................................................
02 Über Ihren LCD-TV
Lernen Sie Ihr TV-Gerät kennen.........................................
Lernen Sie Ihre Fernbedienung kennen..............................
Schließen Sie Ihr TV-Gerät an.............................................
Richten Sie Ihre Fernbedienung ein....................................
03 Inbetriebnahme
Aufstellung...........................................................................
Abstimmung Ihres TV-Gerätes............................................
Common Interface (CI)........................................................
Bedienung Ihres TV-Gerätes...............................................
Bildeinstellungen.................................................................
Toneinstellungen.................................................................
Funktionseinstellungen.......................................................
Zeiteinstellungen.................................................................
Einstellungen des Menüs „Sperren“....................................
Einstellung des Menüs „Direktwahl“....................................
04 Verwendung der Funktionen
Videotextfunktionen..............................................................
USB-Modus..........................................................................
Aufnahme auf ein externes USB-Speichermedium..............
Verwendung Ihres DVD-Players (nur bestimmte Modelle)...
02
03
06
08
09
11
12
13
16
18
19
20
21
23
25
27
29
31
38
40
05 Referenzteil
Fehlerbehebung...................................................................
Spezifikationen.....................................................................
44
45
S. 01
Page 100

01 Sicherheitsinformationen
Herzlichen Glückwunsch
Vielen Dank für den Kauf Ihres 26"/32"/42" HD-Ready Digital LCD TV.
Diese Anleitung unterstützt Sie bei der Einrichtung und Inbetriebnahme
Ihres TV-Gerätes
Überprüfen Sie zuerst den Kartoninhalt und vergleichen Sie den Inhalt
mit der nachfolgenden Checkliste:
26"/32"/42" HD-Ready Digital LCD-TV
Fernbedienung
AAA-Batterie (2x)
Bedienungsanleitung
Kurzanleitung
Jetzt können Sie beginnen!
.
S. 02
 Loading...