HAIER LT22R3CW User Manual [fr]

0 (0)
HAIER LT22R3CW User Manual

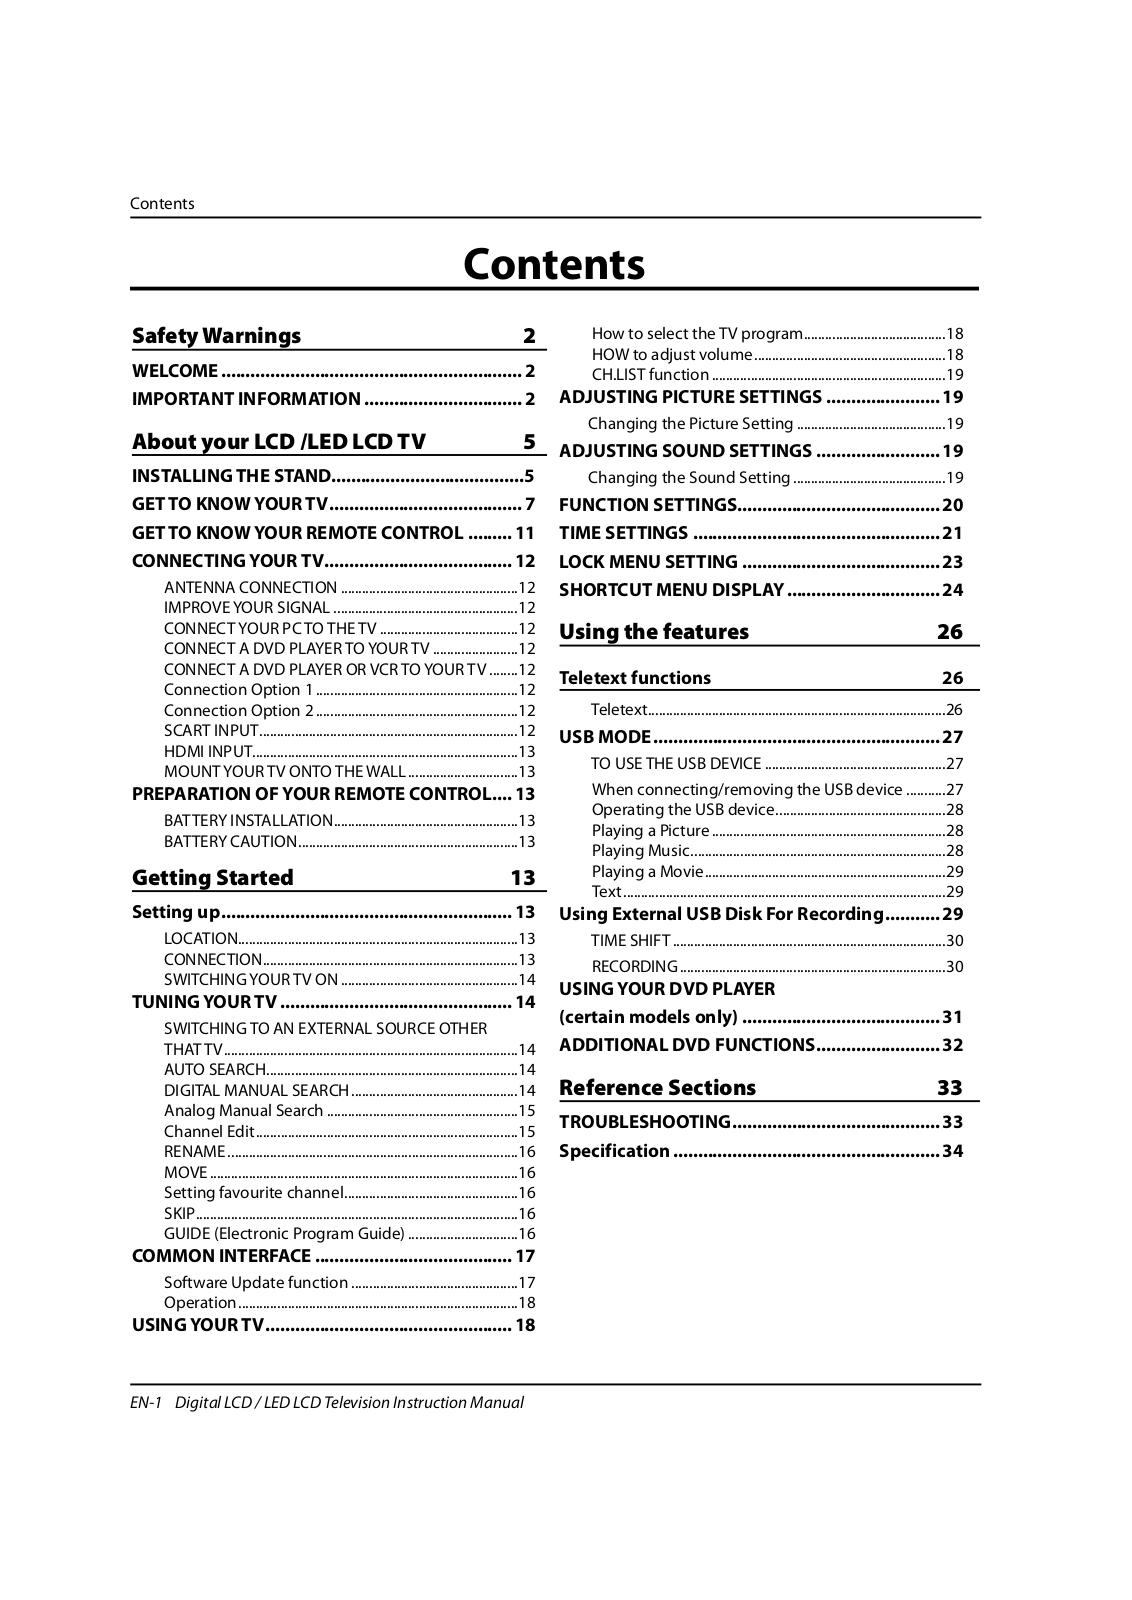
Contents

Contents

Safety Warnings

2

WELCOME .............................................................

2

IMPORTANT INFORMATION ................................

2

About your LCD /LED LCD TV

5

INSTALLING THE STAND.......................................

5

GET TO KNOW YOUR TV.......................................

7

GET TO KNOW YOUR REMOTE CONTROL .........

11

CONNECTING YOUR TV......................................

12

ANTENNA CONNECTION ..................................................

12

IMPROVE YOUR SIGNAL ....................................................

12

CONNECT YOUR PC TO THE TV .......................................

12

CONNECT A DVD PLAYER TO YOUR TV ........................

12

CONNECT A DVD PLAYER OR VCR TO YOUR TV ........

12

Connection Option 1 .........................................................

12

Connection Option 2 .........................................................

12

SCART INPUT.........................................................................

12

HDMI INPUT...........................................................................

13

MOUNT YOUR TV ONTO THE WALL...............................

13

PREPARATION OF YOUR REMOTE CONTROL....

13

BATTERY INSTALLATION....................................................

13

BATTERY CAUTION..............................................................

13

Getting Started

13

Setting up...........................................................

13

LOCATION...............................................................................

13

CONNECTION........................................................................

13

SWITCHING YOUR TV ON ..................................................

14

TUNING YOUR TV ...............................................

14

SWITCHING TO AN EXTERNAL SOURCE OTHER


THAT TV...................................................................................

14

AUTO SEARCH.......................................................................

14

DIGITAL MANUAL SEARCH...............................................

14

Analog Manual Search ......................................................

15

Channel Edit..........................................................................

15

RENAME..................................................................................

16

MOVE .......................................................................................

16

Setting favourite channel.................................................

16

SKIP...........................................................................................

16

GUIDE (Electronic Program Guide) ...............................

16

COMMON INTERFACE ........................................

17

Software Update function ...............................................

17

Operation...............................................................................

18

USING YOUR TV..................................................

18

How to select the TV program........................................

18

HOW to adjust volume......................................................

18

CH.LIST function ..................................................................

19

ADJUSTING PICTURE SETTINGS .......................

19

Changing the Picture Setting ..........................................

19

ADJUSTING SOUND SETTINGS .........................

19

Changing the Sound Setting ...........................................

19

FUNCTION SETTINGS.........................................

20

TIME SETTINGS ..................................................

21

LOCK MENU SETTING ........................................

23

SHORTCUT MENU DISPLAY ...............................

24

Using the features

26

Teletext functions

26

Teletext....................................................................................

26

USB MODE ..........................................................

27

TO USE THE USB DEVICE ...................................................

27

When connecting/removing the USB device ...........

27

Operating the USB device................................................

28

Playing a Picture ..................................................................

28

Playing Music........................................................................

28

Playing a Movie....................................................................

29

Text...........................................................................................

29

Using External USB Disk For Recording...........

29

TIME SHIFT .............................................................................

30

RECORDING ...........................................................................

30

USING YOUR DVD PLAYER


(certain models only) ........................................

31

ADDITIONAL DVD FUNCTIONS.........................

32

Reference Sections

33

TROUBLESHOOTING..........................................

33

Specification ......................................................

34

EN-1 Digital LCD / LED LCD Television Instruction Manual

Safety Warnings

WELCOME

Thanks for buying this 19"/22"/24"/32"/40" HD Ready Digital LCD/LED LCD TV. This guide will help you set up and begin using your TV.

First, check the contents of your box with the parts checklist below: t19"/22"/24"/32"/40" HD Ready Digital LCD/LED LCD TV

tRemote control tAAA battery ×2

tInstruction Manual tWarranty

tTV Stand

t5XScrews for TV stand(only for 32"/40" model)

tComponent adapter , Component audio adapter , SCART adapter (only for 32"/40" model) tCover bottom (only for 32"/40" model)

Now you can get started!

IMPORTANT INFORMATION

READ ALL INSTRUCTIONS BEFORE USE AND KEEP FOR FUTURE REFERENCE.

WARNING

RISK OF ELECTRIC SHOCK

DO NOT OPEN

WARNING

TO REDUCE THE RISK OF ELECTRIC SHOCK DO NOT REMOVE COVER (OR BACK). NO

USER SERVICEABLE PARTS INSIDE. REFER TO QUALIFIED SERVICE PERSONNEL.

*To avoid electric hazards, it is strongly suggested that the back cover not be opened, as there is no any accessory inside the casing.

*If necessary, please contact authorized after-sales services.

could result in serious injury by high voltage.

*An exclamation mark in a triangle: Major part or accessory of which technical must be followed if it is to be replaced.

WARNING: To avoid fire or electric hazards, never place your television receiver in an area with heavy moisture. Attention should be paid to avoid accidental scratches or impacts onto the screen.

CAUTION: SPlease read this manual carefully before using your television and keep this manual in a good place for future reference.

SSTo achieve the best performance of your television, read this User‘s Manual carefully and properly store it for future reference.

SSInformation of screen displays and figures in the User’s Manual may vary due to technical innovations.

CAUTION: SSUnauthorized disassembly of this product is prohibited.

TruSurround XT, SRS and the symbol are trademarks of SRS Labs, Inc. TruSurround XT technology is incorporated under license from SRS Labs, Inc.

TruSurround XT® creates a truly immersive surround sound experience with rich bass and clear dialog from only two speakers.

WARNING To prevent the spread of fire,keep candles or other open flames away from this product at all

times.

Digital LCD / LED LCD Television Instruction Manual EN-2

Safety Warnings

The product should be tightly fixed to avoid drop damages and even fire.

Do not locate the product close to water or oil, which may cause fire hazards.

Do not use damaged or worn electric plugs and keep electric cord away from heat sources to avoid electric shocks or fire hazards.

The product must be placed on a solid and stable surface to avoid collapse.

Keep the product away from a transformer or heat source to avoid fire hazards.

To avoid fire hazards, do not use this product under direct sunlight or closely to heat sources.

Unplug the power supply and antenna of the product when there is a rainstorm, especially

Thunderstorm.

Do not connect excessive sockets in parallel or share the same socket by multiple plugs to avoid fire hazards.

Unauthorized disassembly of the television is prohibited to avoid electric shocks or fire hazards. Contact

authorized after-sales service if technical service is needed.

Disconnect the product from power supply and contact authorized after-sales service if abnormal sound is heard in the product.

EN-3 Digital LCD / LED LCD Television Instruction Manual

Safety Warnings

Don‘t use or store inflammable materials near the product to avoid explosion or fire hazards.

The antenna of the product should be away from electric cable to avoid

electric shocks.

Always make sure that the televisionis well plugged as poor electric

connection might cause fire.

Unplug the television, use soft fabric, never chemicals, if you are going to make cleaning of the product.

Make sure that no water drops in the

product.

Disconnect the television from power supply and antenna when there is a

rainstorm or thunderstorm to avoid electric shocks

or fire hazards.

Don’t place the product in a humid area to avoid fire hazards.

Never touch the plug when your hand is wet as this might cause electric shocks.

When antenna is used, measures should be taken to prevent water

from flowing down along the cable into the television.

The plug and electric cable must be kept clean to avoid electric

shocks or fire hazards.

Disconnect the television from power supply to avoid electric shocks or fire

hazards in a long vocation.

Digital LCD / LED LCD Television Instruction Manual EN-4

About your LCD / LED LCD TV

Installing the Stand

Only 19"/22"/24" LED LCD Model

3FNPWFUIFTNBMMQJFDFPVUPGUIFCBTFTUBOE

1PTJUJPOUIFDPMVNOXJUIUIFCBTFTUBOE

0USH0THES46 ONTOHTHE BASE 2OTATEOTHETMACHINEBABOUTE DEGREESEACCORDINGCTO THE ARROW ONTTHE BASE STAND R

3FQMBDFUIFTNBMMQJFDFJOUIFCBTF

EN-5 Digital LCD / LED LCD Television Instruction Manual

About your LCD / LED LCD TV

Installing the Stand

Only 32"/40" LED LCD Model

1.Carefully place the TV screen face down on a table. We suggest that you place the wrapping material from the TV package on the table top to protect the screen from damage.

2.Position the stand with the bottom of the TV as shown below.

.

3.Push the stand onto the TV

4.Attach the screws from the bottom of the stand to the TV.

Digital LCD / LED LCD Television Instruction Manual EN-6

About your LCD / LED LCD TV

About your LCD/LED LCD TV

GET TO KNOW YOUR TV

Only 19"/22" LCD Model

Front control panel

POWER

108&3

1SFTTUPUVSOUIF57POBOEPò

4063$&

$BMMUIF*OQVU4PVSDFNFOV $POöSNCVUUPO

XIFOPQFSBUJOHNFOV


.&/6

1SFTTUPTFMFDUUIFNBJONFOV

70-

7PMVNFEPXO -FGUPSJFOUBUJPOUPBEKVTUUIF

JUFNJOUIF04%


70-

7PMVNFVQ 3JHIUPSJFOUBUJPOUPBEKVTUUIF

JUFN 1SFTTUPFOUFS


$)

57DIBOOFMEPXO UPTFMFDUUIFJUFNJOUIF

NFOV


$)

57DIBOOFMVQ UPTFMFDUUIFJUFNJOUIFNFOV

1PXFSJOEJDBUPS


3FNPUF4FOTPS


EN-7 Digital LCD / LED LCD Television Instruction Manual

About your LCD / LED LCD TV

Rear Terminals Control

1MFBTF SFGFS UP BDUVBM QSPEVDU PG UIF %7% TMPU BOE CVUUPOT

+VTU UBLF POF57 XJUI %7% GPS FYBNQMF QMFBTF TFF UIF SFBM

Digital LCD / LED LCD Television Instruction Manual EN-8

About your LCD / LED LCD TV

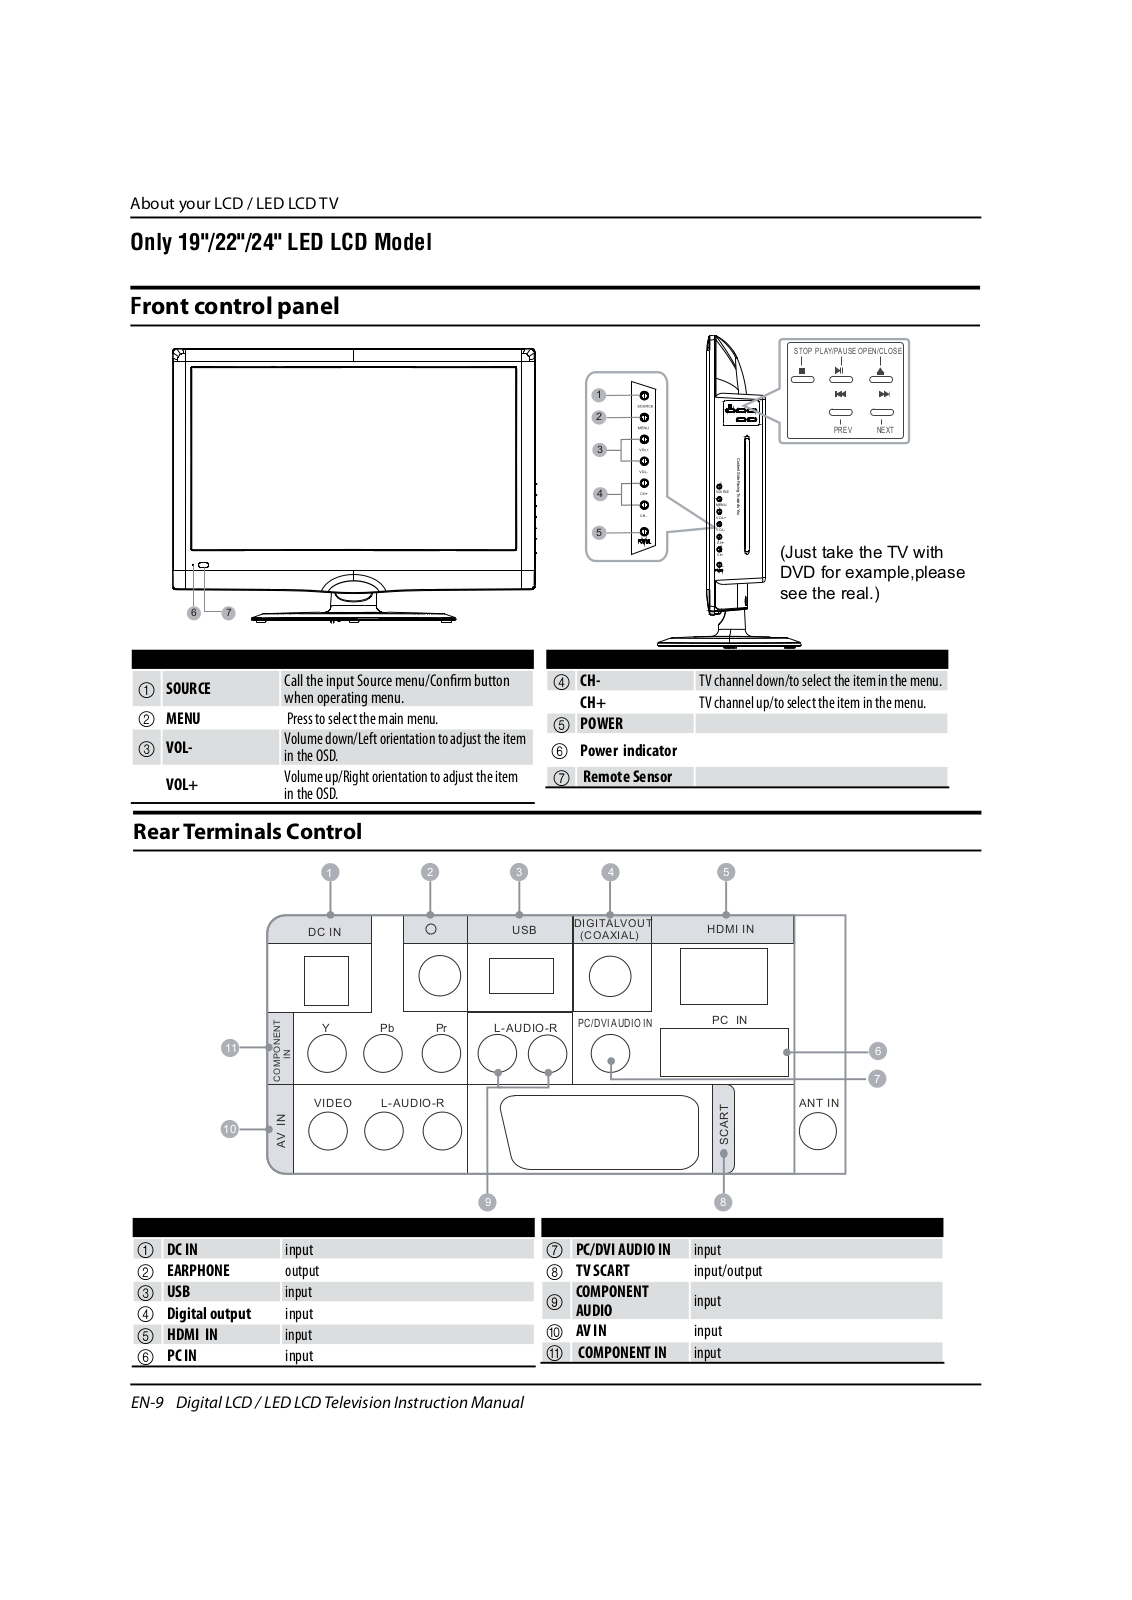
Only 19"/22"/24" LED LCD Model

Front control panel

1

2

3

4

5

67

1

SOURCE

Call the input Source menu/Confirm button

when operating menu.


2

MENU

Press to select the main menu.

3

VOL-

Volume down/Left orientation to adjust the item

in the OSD.


VOL+

Volume up/Right orientation to adjust the item


in the OSD.


4

CH-


CH+

5

POWER


Power indicator

6

7

Remote Sensor

STOP PLAY/PAUSE OPEN/CLOSE

PREV NEXT


edSi Content

SOURCE

Facing

MENU

dsowarT

VOL+

You


VOL-


CH+

(Just take the TV with

CH-


DVD for example,please


see the real.)

TV channel down/to select the item in the menu.

TV channel up/to select the item in the menu.

Rear Terminals Control

1

2

3

4

5

DC IN

USB

DIGITALVOUT

HDMI IN

(COAXIAL)


PONENT

IN

Y

Pb

Pr

L-AUDIO-R

PC/DVI AUDIO IN

PC IN


11


COM


VIDEO

L-AUDIO-R


SCART


10


INAV


9


8

1

DC IN


input


7 PC/DVI AUDIO IN

input

2

EARPHONE


output


8 TV SCART

input/output

3

USB


input


9

COMPONENT

input

4

Digital output


input


AUDIO


5

HDMI IN


input


> AV IN

input

6

PC IN


input


A COMPONENT IN

input

6

7

ANT IN

EN-9 Digital LCD / LED LCD Television Instruction Manual

About your LCD / LED LCD TV

Only 32"/40" LED LCD Model

Front control panel

SOURCE

MENU

VOL

CH

1

SOURCE

Toggles between all the available input

sources


2

MENU

Press to see an on-screen menu of your TV’s

features.


3

VOL-/+

Press to increase or decrease the volume .

4

CH-/+

Press to change channels.

5

POWER

Press to turn the TV on and off.

Rear Terminals Control


L

R

PC

PC/DVI AUDIO


Y

Pb Pr AUDIO


SCART

COMPONENT

IN


PC IN

HDMI 3 IN

HDMI 2 IN


HDMI 1 IN USB (OPTICAL ) ANT IN

DIGITAL AUDIO OUT

1

SCART

input

2

Component

input

3

Component Audio

input

4

PC

input

5

PC/DVI AUDIO

input

6

HDMI3 IN

input

7

HDMI2 IN

input

8

Common Interface


9

Earphone


0

ANTENNA

input

A Optical

output

B USB


C HDMI1 IN

input

Digital LCD / LED LCD Television Instruction Manual EN-10

About your LCD / LED LCD TV

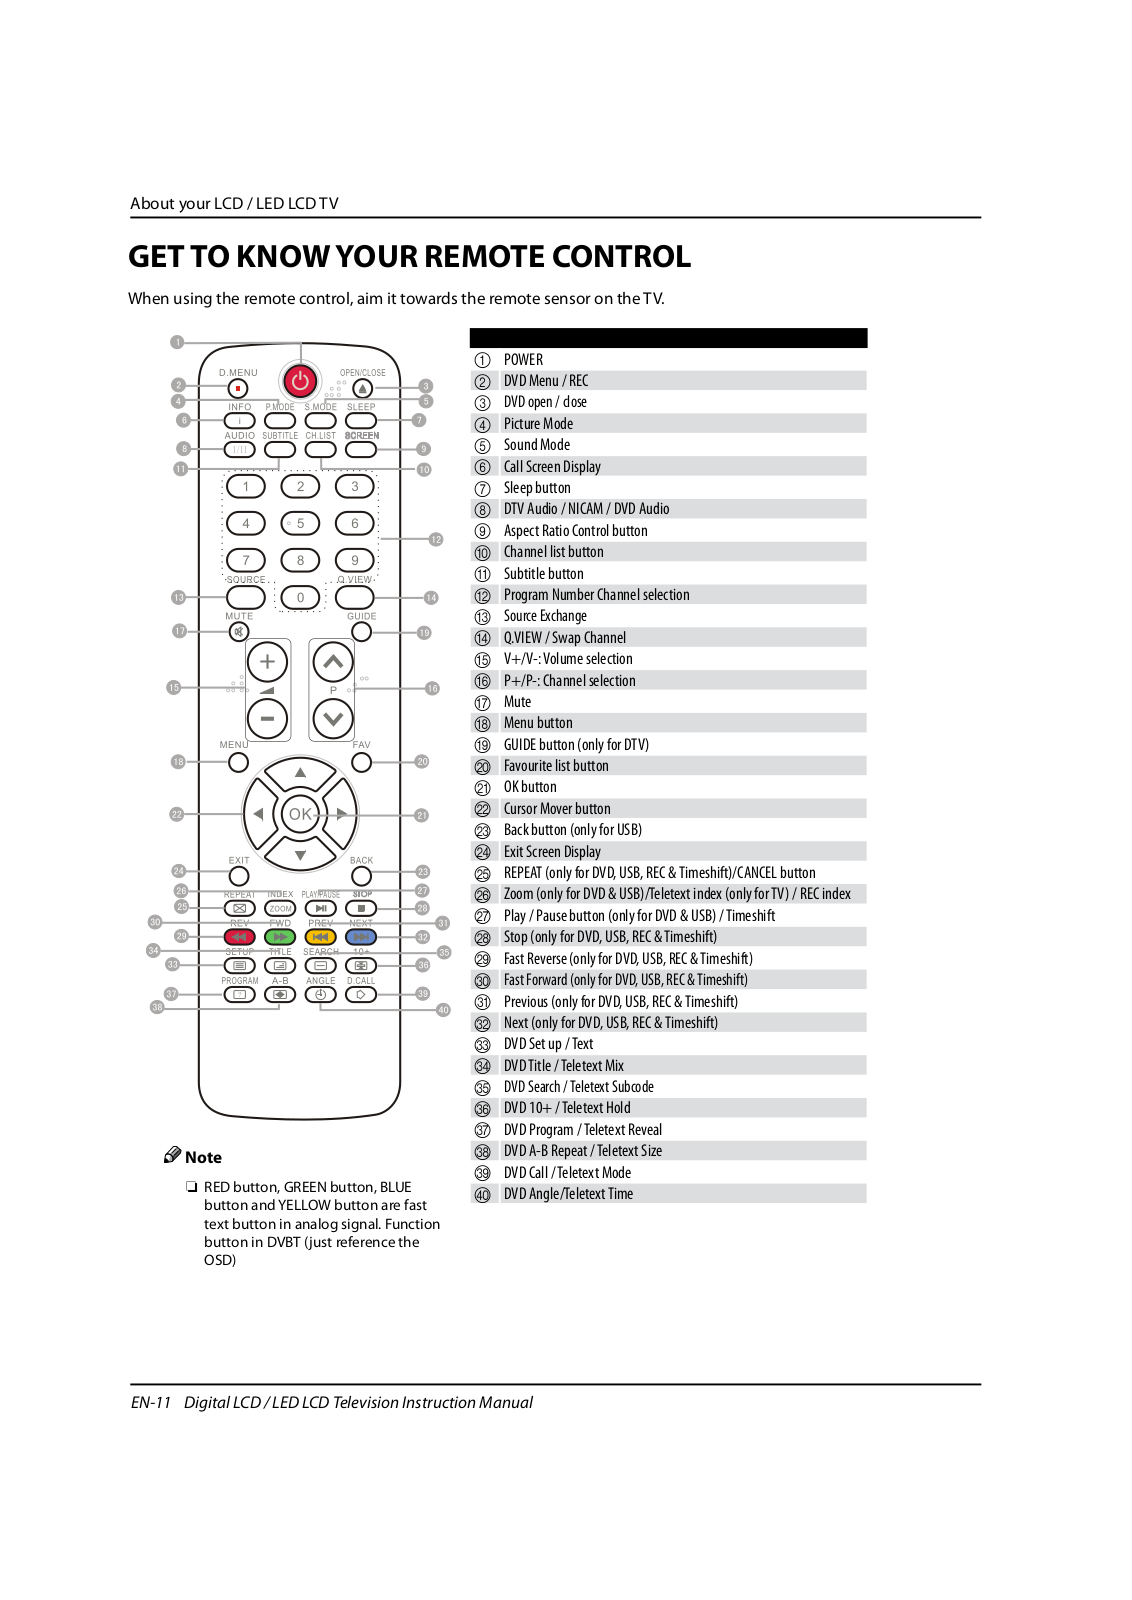
GET TO KNOW YOUR REMOTE CONTROL

When using the remote control, aim it towards the remote sensor on the TV.

Note

ORED button, GREEN button, BLUE button and YELLOW button are fast text button in analog signal. Function button in DVBT (just reference the OSD)

1

POWER

2

DVD Menu / REC

3

DVD open / close

4

Picture Mode

5

Sound Mode

6

Call Screen Display

7

Sleep button

8

DTV Audio / NICAM / DVD Audio

9

Aspect Ratio Control button

0

Channel list button

A Subtitle button

B Program Number Channel selection

C Source Exchange

D Q.VIEW / Swap Channel

E V+/V-: Volume selection

F P+/P-: Channel selection

G Mute

H Menu button

I GUIDE button (only for DTV)

J Favourite list button

K OK button

L Cursor Mover button

M Back button (only for USB)

N Exit Screen Display

O REPEAT (only for DVD, USB, REC & Timeshift)/CANCEL button

P Zoom (only for DVD & USB)/Teletext index (only for TV) / REC index

Q Play / Pause button (only for DVD & USB) / Timeshift

R Stop (only for DVD, USB, REC & Timeshift)

S Fast Reverse (only for DVD, USB, REC & Timeshift)

T Fast Forward (only for DVD, USB, REC & Timeshift)

U Previous (only for DVD, USB, REC & Timeshift)

V Next (only for DVD, USB, REC & Timeshift)

W DVD Set up / Text

X DVD Title / Teletext Mix

Y DVD Search / Teletext Subcode

Z DVD 10+ / Teletext Hold

[ DVD Program / Teletext Reveal

\ DVD A-B Repeat / Teletext Size

] DVD Call / Teletext Mode

` DVD Angle/Teletext Time

EN-11 Digital LCD / LED LCD Television Instruction Manual

About your LCD / LED LCD TV

CONNECTING YOUR

TV

ANTENNA CONNECTION

Connect your aerial to the back of the TV into the ANTENNA IN socket.

IMPROVE YOUR SIGNAL

To improve picture quality in a poor signal area, use a signal amplifier (not supplied).

CONNECT YOUR PC TO THE TV

You can use your TV as a monitor for your personal computer by connecting it with a VGA cable (not supplied).

ARead your computer user guide and check it has a VGA connector.

B Turn the power off on your TV and PC.

CConnect a D type 15-pin VGA interface cable to the VGA video interface connector on the PC. Connect the other end of the cable to the PC interface connector on the TV. Tighten the screws on the VGA connectors and connect the audio cable (not supplied) to the audio input socket on the back of the TV.

D Turn on the power of the TV firstly and then the PC.

EPress the button on the TV or TV remote control to set the video input mode to VGA.

FOnce the image shows, if there is noise present, change the VGA mode to another resolution, change the refresh rate to another rate or adjust the brightness and contrast on the menu until the picture is clear.

CONNECT A DVD PLAYER TO YOUR TV

Connect the DVD video outputs (Y, Pb, Pr) to the COMPONENT (Y, Pb, Pr) IN socket on your TV.

A Turn on the DVD player and insert a DVD.

B Press the button to select .

CRefer to the DVD player user guide for operating instructions.

DVD

CONNECT A DVD PLAYER OR VCR TO YOUR TV

There are two ways in which you can connect a DVD player or VCR to your TV. Make sure that both the TV and DVD player or VCR are switched off before you connect them.

Connection Option 1

AConnect the audio and S-VIDEO cables from the VCR output jacks to the TV input jacks.

BInsert a video tape into the VCR and press PLAY on the VCR.

C Turn on the power of the TV first, then the VCR.

DPress the SOURCE button on the TV to set the video input mode to S-VIDEO.

Connection Option 2

AConnect the AV DVD/VCR outputs to the AV IN socket on your TV.

BPress the SOURCE button on the TV to set the video input mode to AV.

SCART INPUT

AConnect the scart lead from the external device (DVD player, Set-top box or games console) to the TV scart socket.

Digital LCD / LED LCD Television Instruction Manual EN-12

AboutyourLCD//LEDLCDTV / Getting Started

B Press the SOURCE button to select SCART mode.

C Press the PLAY button on the external device.

HDMI INPUT

AConnect the cable from the HDMI device to the TV HDMI socket.

B Press the SOURCE button to select HDMI mode.

CRefer to the HDMI device user guide for how to operate.

MOUNT YOUR TV ONTO THE WALL

You can mount your TV onto the wall by using a wall bracket (not supplied). Use M4/M6 machine screws (4 pcs) to screw the TV onto the bracket (not supplied).

PREPARATION OF

YOUR REMOTE

CONTROL

BATTERY INSTALLATION

APlace the remote control face down, then open the cover of the battery compartment.

BInstall two AAA batteries. (The + and - symbol of the battery must match with the marks on the remote).

C Close the cover of the battery compartment.

BATTERY CAUTION

Confirm there is no object between the remote control and the remote sensor of the TV set.

Sunshine or other strong light will interfere with the signal sent by the remote control. In this situation turn the TV set to avoid the direct light source.

Do not put the remote control in direct heat or in a damp place as you may damage the remote.

Please use two AAA 1.5V batteries. Do not mix battery types. Install the batteries at the correct polarities. Do not use rechargeable batteries. If your TV is to be stored for a period of time, remove the batteries from the remote control.

03 Getting

Started

Setting up

LOCATION

You will need to place your TV near your plug socket (so the power cable can comfortably reach) and within reach of your aerial socket or extension lead.

CONNECTION

EN-13 Digital LCD / LED LCD Television Instruction Manual

Getting Started

AInsert your TV aerial lead into the Antenna input at the side of the TV.

BInsert the batteries into the remote control. Make sure they are inserted the right way around, matching the polarity as indicated inside the battery compartment.

SWITCHING YOUR TV ON

APress the POWER button on the right side of the TV once. A red flashing light will appear in the corner of the screen.

BPress POWER on the remote control. The TV will turn on and the red light will turn blue. This may take a few moments.

C Select your chosen language when prompted from the list that will appear on screen. Use the button to scroll to the language you want and press to confirm.

TUNING YOUR TV

SWITCHING TO AN EXTERNAL SOURCE OTHER THAT TV

If you have attached a DVD player or similar external device to the TV, you will need to tell the TV to display the content from it. Simply press SOURCE which will bring up the source menu in the left corner of the screen, use the and button to highlight the required source and press OK select.

For details of how to plug in other equipment see GET TO KNOW YOUR TV on page 5.

AUTO SEARCH

A Press MENU button.


B Press


button to select Tuning menu, press


button to enter.


C Press


button to select Country item.


Press


button to select you needed.


D Press


button to select Auto Search item, press


OK button to enter.


Press


button to select the OK option, and press


OK button to start searching.

Press the MENU button, you can choose to skip the TV /DTV Search or not.

EPress EXIT button to stop auto search during searching.

Note

OIt may take a few moments to complete the Auto Search.

DIGITAL MANUAL SEARCH

A Press MENU button.

Digital LCD / LED LCD Television Instruction Manual EN-14

Getting Started

B

Press

button to select Tuning menu, press


button to enter.

C

Press

button to select Digital Manual Search


item, press


button to enter.


D Press button to select the Channel. Press OK button to start searching.

EOnce a channel is located, you can press OK button to save it.

Press EXIT button to exit.

Analog Manual Search

Follow the below steps when you need to have a manual search.

A Press MENU button.

B


Press


button to select Tuning menu, press


button to enter.

C

Press


button to select Analog Manual Search


item, press button to enter.

D Press


button to select Search item, press

button is used to select the higher frequency

channel.


Press

button is used to select the lower frequency

channel.


E And then select Storage To, press

button to

select the position number you want the channel

on. Once a channel is located, you can press red

button to save it. Press EXIT button to exit.

VSound System


Press

button to select “Sound System”, then

press

button to select the correct sound system.

VCurrent CH


Press

button to select the channel number to

edit.


VStorage To


Press

button to select the program number you

want to storage to.


VFine tune

If the picture and/or sound are poor, try using the FINE TUNE feature. Do not use this feature unless reception is poor.

A

Repeat above steps A-C, then press

button to


select the Fine Tune item.


B

Press

button repeatedly to carry out fine

tune, till the best picture and sound are obtained, then loosen the button.

Channel Edit

Using this function, you can rename, move, set favorite channel and skip the channel in the analogue mode.

A Press MENU button.

EN-15 Digital LCD / LED LCD Television Instruction Manual

Getting Started

B


Press


button to select TUNING menu, press


button to enter.

C

Press


button to select CHANNEL EDIT item.


Press

button to enter the sub-menu. You can

press red, green, yellow or blue button to enter the menu you need.

RENAME

A Press button to select the channel, and press green button to rename.

B Press


button to select the number position of

channel name. Press


button to select number.

CYou can press the EXIT button to cancel the changes at anytime.

Note

OThe RENAME function is only available in ATV program.

MOVE

A Press button to select the channel and press yellow button to select the position.

B Press button to select the number position you want to remove to, press yellow button to confirm.

CYou can press the EXIT button to cancel the changes at anytime.

Setting favourite channel

A Press button to select the channel, press red button to set your favourite channel.

BYou can press the red button to cancel the changes at anytime.

CPress FAV button on the remote control and Favourite List will be displayed.

D Press button to select the channel, and press OK button to enter.

SKIP

A Press button to select the channel and press blue button to skip the current channel.

BYou can press the blue button to cancel the changes at anytime.

GUIDE (Electronic Program Guide)

Using this function, you can access the DTV program information.

A Press MENU button.


B Press


button to select TUNING menu.


Press

button to enter.

Digital LCD / LED LCD Television Instruction Manual EN-16

Getting Started

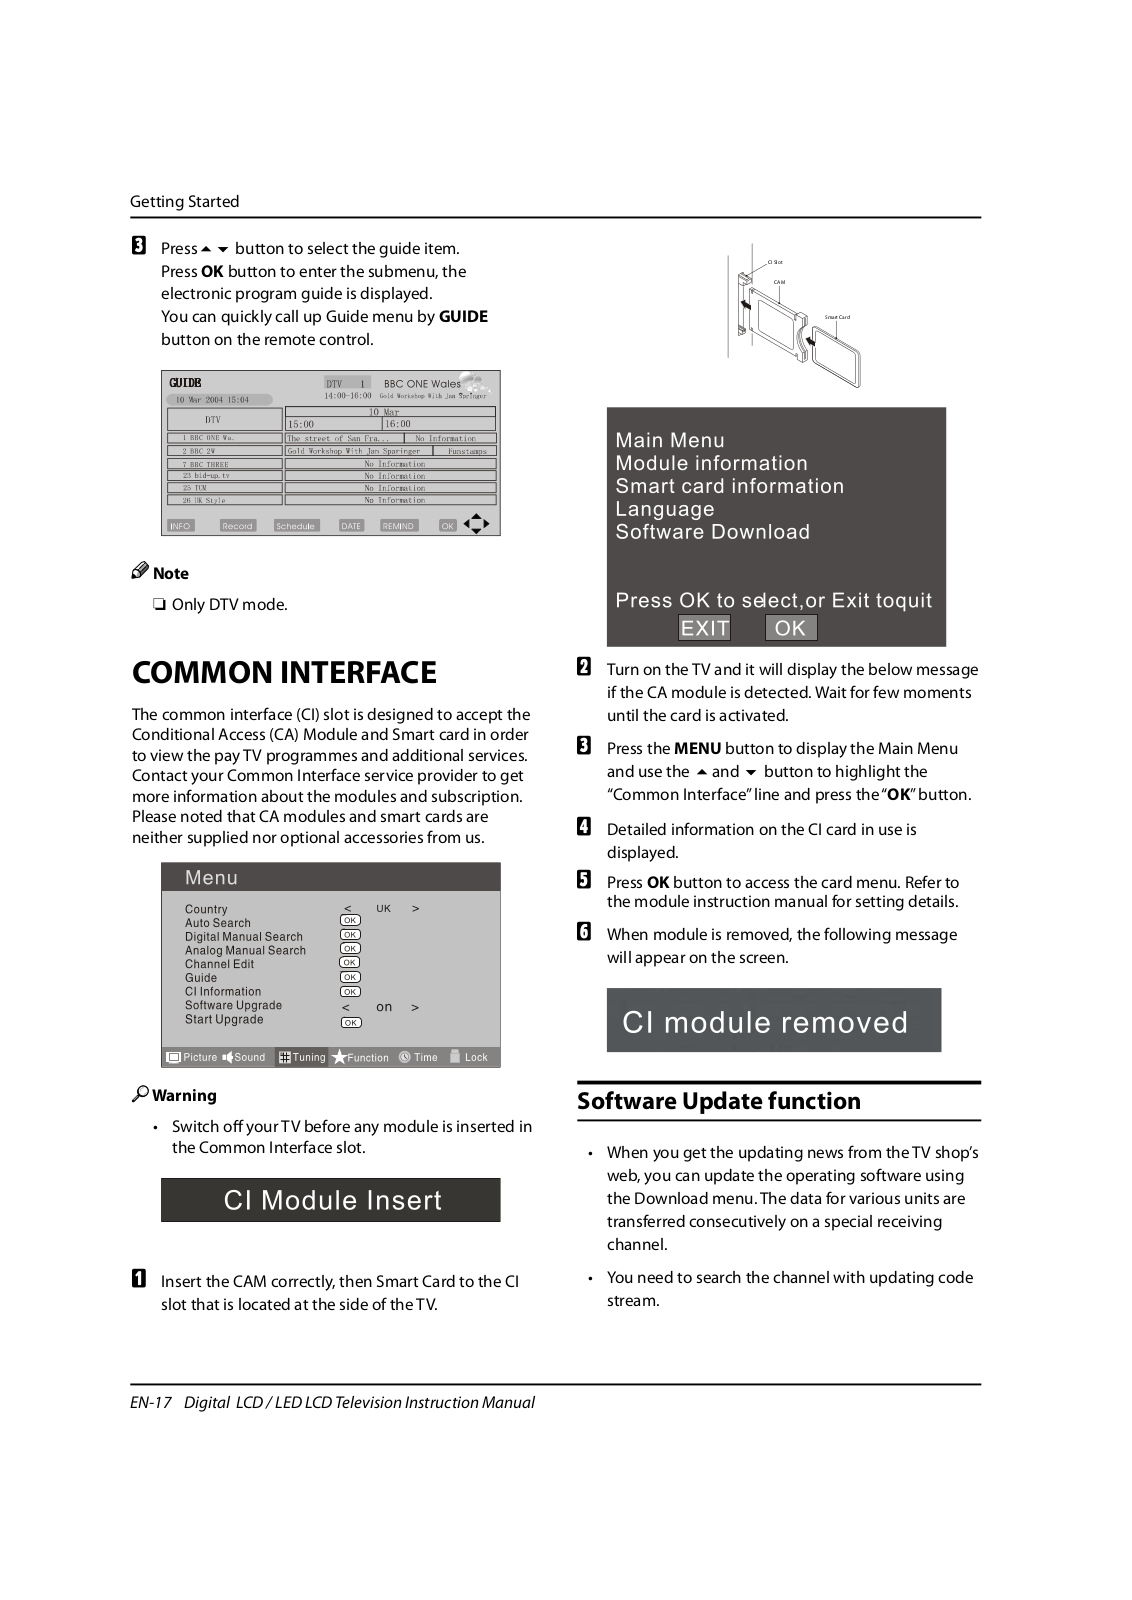
C Press button to select the guide item. Press OK button to enter the submenu, the electronic program guide is displayed.

You can quickly call up Guide menu by GUIDE button on the remote control.

Note

O Only DTV mode.

COMMON INTERFACE

The common interface (CI) slot is designed to accept the Conditional Access (CA) Module and Smart card in order to view the pay TV programmes and additional services. Contact your Common Interface service provider to get more information about the modules and subscription. Please noted that CA modules and smart cards are neither supplied nor optional accessories from us.

CI Slot

CAM

Smart Card

BTurn on the TV and it will display the below message if the CA module is detected. Wait for few moments until the card is activated.

C Press the MENU button to display the Main Menu and use the and button to highlight the “Common Interface” line and press the “OK” button.

DDetailed information on the CI card in use is displayed.

EPress OK button to access the card menu. Refer to the module instruction manual for setting details.

FWhen module is removed, the following message will appear on the screen.

Warning

Software Update function

tSwitch off your TV before any module is inserted in the Common Interface slot.

AInsert the CAM correctly, then Smart Card to the CI slot that is located at the side of the TV.

tWhen you get the updating news from the TV shop’s web, you can update the operating software using the Download menu. The data for various units are transferred consecutively on a special receiving channel.

tYou need to search the channel with updating code stream.

EN-17 Digital LCD / LED LCD Television Instruction Manual

Getting Started

Note

OYou can get information from the TV shop or internet.

Operation

A Press MENU button.


B Press


button to select TUNING menu, press


button to enter.

C

Press


button to select Software Upgrade item.

D

Press


button to set it as On. (The default is Off)

EThe Start Upgrade item can be selected.(The default is grey and cannot be selected).

13%

Press EXIT to cancel download

F Press button to select the Start Upgrade option and use OK button to enter. Then the TV will restart and search the upgrade information.

Note

OIf the upgrade information is received, the TV will begin to upgrade. Or else, the TV will be back the DTV source.

GLoad the receiver identification. This process may also take several minutes. You can press EXIT button to cancel the download and your TV set will be back the DTV source.

100%

Press EXIT to cancel download

Updating in progress - Do not turn off the TV

15%

HAfter the download has finished, your TV set will enter burning state and the indicator light is shining. The menu 4 of right appears.

The set will be back the DTV source when the update is completed.

USING YOUR TV

How to select the TV program

AUsing Program number button Enter the channel number with the number keypad on the remote control.

BUsing P+/P- button.

Press the P+/P- button to select a channel number.

HOW to adjust volume

Press V+/V- button on the remote control or the side of the TV to adjust the volume level.

Digital LCD / LED LCD Television Instruction Manual EN-18

Getting Started

CH.LIST function

VColour

This will adjust the saturation level of the colours to


Press CH.LIST button on the remote control will display

suit your personal preference.


Channel List menu, and then press button to enter.

VSharpness

Press

button to select the channel, and then press

This will adjust the sharpness of fine details in the

OK button to enter.

picture.


ADJUSTING PICTURE

VTint

Allows you to select the colour mix (Tint) of the

picture.

SETTINGS

Changing the Picture Setting

A Press MENU button.


B Press

button to select Picture menu, press


button to enter.

C

Press

button to select the item requires


adjusting.


D

Press

button to adjust the selection item.

EWhen you are satisfied with your choice, press the EXIT button to return to normal viewing or press MENU button to return to the previous menu.

VContrast

This will adjust the intensity of bright parts in the picture but keep the dark parts unchanged.

Note

O The Tint function is only available in NTSC mode.

VMode

This will select the picture mode. Select Standard/ Mild/User/Vivid according to the program. You can quickly select the desired mode by P.MODE button on the remote control.

VColour temperature

This will increase or decrease Warm (red) and Cool (blue) colours to suit personal preferences.

Select Cool to give the white colour a blue tint, Normal to give the white colour a neutral tint, Warm to give the white colour a red tint.

VNoise Reduction

Automatically filters out and reduces the image noise and improves picture quality when receiving weak video signals.

Select Off/Low/Standard/High according to the image noise.

VReset

To recover to the default value.

ADJUSTING SOUND

SETTINGS

VBrightness

This will adjust the light output of the complete picture, which will mainly affect the darker areas of the picture.

Changing the Sound Setting

A

Press MENU button.

B

Press

button to select Sound menu, press


button to enter.

EN-19 Digital LCD / LED LCD Television Instruction Manual

Getting Started

C

Press

button to select the item requires


adjusting.


D

Press

button to adjust the selection item.

EWhen you are satisfied with your choice, press the EXIT button to return to normal viewing or press MENU button to return to the previous menu.

VBalance

This will adjust the output of the right and left speakers to obtain the best stereo reproduction for your listening position.

VMode

This will select the sound mode.

Press button to select Standard/Music/ Theater/User according to the program. You can quickly select the desired mode by S.MODE button on the remote control.

VAVL (Automatic volume control)

This will reduces the differences in volume level among broadcasters.

VSRS TS XT

This will control the Woofer output.

Press

button to select SRS TS XT.

Press

button to set SRS TS XT as OFF, ON.

VDigital Audio Output

This will control the Digital Audio Output. Press button to select Digital Audio Output.,

Press button to set Digital Audio Output. as OFF,

PCM,RAW.

VEqualizer

This sound setting can be adjusted to suit your personal preference.

VAudio Languages

Press

button to select Primary/Secondary item,

and then press

button to select the languages

you needed.


Press

button to select Close item, press OK button

to close it.

Note

OThe Audio Language function is only available in DTV mode.

VReset

To recover to the default menu setting.

FUNCTION SETTINGS

A Press MENU button.

B Press button to select Sound menu, press button to enter.

Digital LCD / LED LCD Television Instruction Manual EN-20

Getting Started

at top sides and no alteration, at bottom side.

VBlue Screen

This will select the character background colour.

Note

O The Blue Screen function is only available for

ATV mode.

VRecorder

C Press

button to select the item requires adjusting.

D Press

button to adjust the selection item.

EWhen you are satisfied with your choice, press the EXIT button to return to normal viewing or press MENU button to return to the previous menu.

VLanguage

To select the menu language.

VSubtitle Language

To select the Subtitle language.

VDisplay Mode

To set the picture proportion, press button to select 4:3/Zoom1/Zoom2/Wide/16:9/Auto. You can quickly select the desired mode by SCREEN button on the remote control.

t4:3 mode

Choose 4:3 when you want to view a picture with an original 4:3 aspect ratio, with gray bars appearing at both the left and right sides.

t16:9 mode

Choose 16:9 when you want to adjust the picture horizontally, in a linear proportion to fill the entire screen.

tZoom1

Choose Zoom1 when you want to view the picture without any alteration. However, the top and bottom portions of the picture will be cropped.

tZoom2

Choose Zoom2 when you want the picture to be altered, both vertically extended and cropped. The picture taking a halfway trade off between alteration and screen coverage.

tWide

Choose Wide when you want to adjust the picture in a non-linear proportion, that is, more enlarged

To recorder the DTV program. Details of Recorder are described in the page of 29-31.

VSCART Input

The item is not able to be selected for 32"/40" model and does not display for 19"/22"/24" model.

VOSD Time Out

To set how long you want the menus to appear on-screen. Each press of button repeatedly to select the number of preset minutes, the Time will be set in sequence: off, 10sec, 15sec, 30sec, 45sec, 60sec.

VOSD Transparency

To set the transparency background of OSD, the transparency will be set in sequence: Off, 25%, 50%, 75%, 100%.

VReset

To recover to the default value.

TIME SETTINGS

VClock

A

Press MENU button.

B

Press

button to select Time menu, press


button to enter.

EN-21 Digital LCD / LED LCD Television Instruction Manual

Getting Started


C Press

button to select Clock item, press


button to enter setting.


Press

button to select hour or minute, press


button to adjust the value.

VDate

A

Press MENU button.

B

Press

button to select Time menu, press

button to enter.


C Press

button to select Date item, press


button to enter setting.


Press

button to select the option, and then


press

button to adjust value.

Note

OIn DTV mode, because the time information is from the signal, the Clock and Date are not able to be changed.

If you want to change the time, turn off the TV in ATV mode, then turn on the TV.

VOff Time

A Press MENU button.

B Press button to select Time menu, press button to enter.


C Press

button to select Off Time item, press


button to enter setting.


Press

button to select Repeat option, and


then press

button to set it on.


Press

button to select hour or minute, press


button to adjust the value.


When the off time has arrived, the TV set will enter into standby mode.

VOn Time

A

Press MENU button.

B

Press

button to select Time menu, press


button to enter.


C Press

button to select On Time item, press


button to enter setting.


Press

button to select activate option, and


then press

button to set it On.


Press

button to select hour or minute, press

button to adjust the value.

When the on time has arrived, the TV set will switch on automatically.

Note

O The On Time function is only for 19"/22" model.

VSleep

The sleep timer automatically shuts off the TV after a preset time (from 5 to 240 minutes).

A Press the MENU button and then use

button

to select the Time menu.


Digital LCD / LED LCD Television Instruction Manual EN-22

Getting Started


B

Press the

button and then use

button to


select the Sleep.


C

Press the

button and then use

button

to select the number of minutes. Select Off, 5Min,

10Min, 15Min, 30Min, 45Min, 60Min, 90Min, 120Min, 180Min, 240Min.

DWhen you are satisfied with your choice, press MENU button to return to the previous menu or press the EXIT button to return to TV viewing. And the time begins to count down from the number of minutes selected.

VTime Zone

A Press MENU button.


B Press

button to select Time menu, press


button to enter.

C Press

button to select Time Zone item.

D

Press

button to select the correct time zone.

E

Press MENU button to save and exit.

LOCK MENU SETTING

Using this function can control the tuner, program, source volume and so on. Pressing MENU on the remote control, press button to select Lock menu, press button to enter the sub-menu, and you will be required

to enter the password. The initial password of the television is 0000. If you forget your password, you can always input 9443 to regain control.

VCHANGE PASSWORD

A Press button to select Change Password item. Press button to enter the submenu.

BWhen you have inputted the four digits you will be prompted to enter it again.

Your new password will then be automatically saved.

VCHILD LOCK

Press button to select Child Lock.

Press button to set On or Off mode. If lock on mode is set, Child Lock is in activated automatically. In such case, if Child Lock button (button on the television) is pressed, the screen will display Child Lock, which can be erased by press of MENU button. 5 seconds later after the latest press, the screen display will disappear automatically. The Child Lock mode can be resumed by entering Lock Set menu, set Child Lock On or Off.

VTuning Lock

Press to select Tuner Lock and to set On/Off. (To set On, some operation such as search will be not available. When enter the Tuning menu, Tuner Lock will be on the screen. If you want to operate Tuning menu, you need to enter the Lock menu to set Tuner Lock Off or operate unlock.)

EN-23 Digital LCD / LED LCD Television Instruction Manual

Getting Started

VChannel NO.

Channel NO. is opted for setting up preset channel. Press button to select preset Channel. Press button to select channel number.

VSource set

Channel set is opted for setting up start source. Press button to select Off, DTV, TV, AV, SCART, S-Video, Component1, Component2, PC, HDMI1, HDMI2, HDMI3, USB in turn. DVD is available for some model.

VSource Lock

Source Lock will control the On or Off of hinder external input modes.

Press button to set as on or off.

When the source lock is set as on, TV source will display, at this time, when press SOURCE button, the TV can switch to corresponding source and will display the Source is locked.

VMax Volume

Press button to select Max Volume. Press button for adjustment between 0-100. If a certain Value is set, when volume is being adjusted, the sound value can not exceed maximum volume value. If current volume is over Max Volume, when lock set

menu is set, current volume will become set maximum volume, if current volume is below maximum volume, customer set volume will stay unchanged.

VInitial Volume

The TV will remember it after your setting, that will be the volume when turn on the TV next time.

VParental Lock

Press button to select parental lock. Press button to select OFF or 4-18 to limit the age of children who will watch TV.

VClear Lock

Press button to select Unlock mode. Press button to unlock all set modes, setting all lock options to off, and the maximum volume returns to 100.

SHORTCUT MENU

DISPLAY

VSubtitle Function

A Press SUBTITLE button on the remote control will display Subtitle languages menu, press button to enter.

B Press button to select the item and press OK button to enter. You can press the EXIT button to cancel the changes at anytime.

Note

OPress SUBTITLE button on the remote, it will display subtitle languages menu only in the DTV mode.

VCH.LIST Function

APress CH.LIST button on the remote control, will display Channel List menu.

B Press button to select the channel and press OK button to enter. You can press the EXIT button to cancel the changes at anytime.

VGUIDE Function

Press GUIDE button on the remote control, will display Program Guide menu, press button to select the program.

You can press the EXIT button to cancel the changes at anytime.

Digital LCD / LED LCD Television Instruction Manual EN-24

Getting Started

Note

O Available only in the DTV mode.

VFAV Function

Press FAV button on the remote control, will display Favourite List menu.

Press button to select program and press OK button to enter. You can press the EXIT button to cancel the changes at anytime.

VINFO

Press INFO button on the remote control, will display the current channel information.

You can press the EXIT button to cancel the changes at anytime.

VAUDIO/I/II

Press AUDIO button on the remote control, will display Audio Languages menu.

Press button to select the desired settings and press OK button to enter.

You can press the EXIT button to cancel the changes at anytime.

OPress AUDIO button on the remote, it will display Audio Languages menu only in the DTV mode.

VEliminate Sound

When you need to pay attention to surrounded sounds, or there is a telephone calling you

or there are some guests visiting you, the sound elimination (mute) function is very convenient.

APress the MUTE button on the remote control and “Mute” type face will display on the lower part of the screen. At this Time, the sound of the TV set is turned off.

BIf you want to recover the sound, press the MUTE button again or directly press V+ button.

VQuick program view

This function enables quick swap to the last watched program. Press Q.view button, and the TV will be back to the TV source, expect in the USB and DVD source.

ASuppose the channel number you used just now is 8 and the channel number you are using is 18 (as shown in the figure).

BIf you want to return to the last watched program channel 8, you can simply press the Q.View button.

CIf you want to return to channel 18, press the button again. Use this function, you can easily change between the channel you are using and the channel you used last Timer.

Note

EN-25 Digital LCD / LED LCD Television Instruction Manual

Using the features

Using the features

Teletext functions

Teletext is an information system, broadcast by certain channels, which can be read like a newspaper. It also provides subtitles for people with hearing difficulties or those who are unfamiliar with the language in which a particular program is being broadcast (cable networks, satellite channels, etc.).

Note

OThe teletext buttons could be working even if there is no teletext signal, but there is no teletext display.

Teletext

VTeletext functions

To select “teletext” press thebutton on the handset. To switch off teletext, press the button again. “Note all menu functions are not available in teletext mode”. Only a few direct button control functions are available in teletext mode, they are:

tVolume adjustment

tMute function

VPage up/down

Use the P+/P- buttons to browse next or previous page.

VPage number entering

To select a Teletext page, enter the page number using the numeric key pad on the remote control, or use the P+ or P- buttons, or the coloured Fast text buttons.

VMix mode

To view the TV picture while in Text mode press the button, this will superimpose the Teletext data on top of the TV picture. Press this button again to return to Full text.

VINDEX

Press the INDEX button to go to the index page of teletext.

VLanguage change

Pressing the button will change the Teletext characters between Eastern and Western.

VHold

Pressing thebutton will stop the teletext page automatically updating. This feature is very useful where there are several teletext pages or data on the same page number.

VSize

Pressing thebutton changes between full screen top half bottom half full screen. This feature is

very useful as it magnifies the image making the characters easier to read.

VReveal

Pressing thebutton will reveal hidden text. This feature is used to reveal information such as answers to Teletext on-line interactive puzzles.

Digital LCD / LED LCD Television Instruction Manual EN-26

Using the features

VTime

While in normal TV mode only, pressing the button

will display the teletext time in the top right hand corner for a few seconds.

BSupported equipment:

Support the equipment that supports Mass Storage Protocol and whose file system is FAT32, such

as some USB disks, mobile harddisks, and MP3 player. If USB equipment could not be identified due to unsupported file system, please format the equipment to the above-mentioned file system.

VFast text coloured buttons

Fast text automatically displays the four most commonly used pages that the broadcaster thinks that you may want to choose next. Press the same coloured button on the remote control as the coloured link at the bottom of the teletext page to go directly to that page.

VSubcode

Pressing the button by entering its 4-digit number to enter a secondary page.

USB MODE

Note

OThe diagrams in the following section are schematic and only for your reference. Please see the actual product if necessary.

OThe OSD of the USB function may be somewhat different from your product because it is just example to help the instruction.

TO USE THE USB DEVICE

ASupported file formats:

t Photo: *.jpg;

t Music: *.mp3 files; t Movie: *.avi files; t TEXT: *.txt

Note

ODue to the particularity of file cording, some files may be unable to read.

CTo achieve smooth playing, ensure the following:

t The file code rate should be lower than 300KB/S; t Due to the limitation of USB signal transmission

distance, it is recommended not to use USB patch cord, in case of using the cord, make sure that its length is not over 1m;

t Use high-speed USB equipment in conformity with USB2.0 full speed Interface Standard; If USB equipment in conformity with USB1.1 full speed Interface Standard is used, the playing may be unsmooth.

When connecting/removing the USB device

APress “SOURCE” on the remote control unit to select USB option.

BInsert USB equipment into corresponding USB interface 2s after starting the system.

C After entering the system menu, press “ / “ on the remote control unit to select the require USB files, press “OK” button to confirm the selection and enter the file list relative to the selection.

D Press“ / “ on the remote control unit to select the required file, press“OK” button to enter the selected file.

ETo exit the streaming media playing system and watch a TV program, you must press “BACK” button to return to the streaming media main menu at first (to protect equipment), and then press “SOURCE” to select “TV” to return to the TV mode.

Note

QUnder source of USB, when press button MENU, screen goes black, except when images or movies are being played.

QWhile playing the USB, press “BACK” button repeatly, the screen picture will return to USB main interface, and only at this time you can switch corresponding signal sources by pressing “SOURCE” again.

EN-27 Digital LCD / LED LCD Television Instruction Manual

Using the features

QPlease do not unplug the USB device when the connected USB storage device is working. When such device is suddenly separated or unplugged, the stored files or the USB storage device may be damaged.

Operating the USB device

A Press “ / “ to scroll through main menu or submenu and select your desired option.

B Press “OK” to confirm your selection.

C Press “ / “ to achieve the FWD (fast forward) and REV (fast back) of the option being played.

DPress “PLAY/PAUSE” to play, and press it again to pause playing.

EPress “ZOOM” to magnify pictures; when the picture is

enlarged, press “ / “ and “ / “ to move the picture.

FPress “STOP “ to stop playing, or return to the previous menu, and press “BACK” repeatedly to return to the main menu.

Note

OYou can choose the photos or music in different files to play together.

Playing a Picture

A After entering USB main interface, press “ / “ to select “PHOTO” item.

BPress ”OK“ to confirm the selection and enter the picture file list.

C Press “ / “ to select the picture you want to play, press ”OK“ to confirm, and then press “PLAY/PAUSE” button to play the pictures.

D If you want to pause the picture which is being palyed, press the PALY/PAUSE button again. Press ”ZOOM“ to magnify the picture. When the picture is enlarged, press “ / “ and “ / “ to move the picture.

Press “PREV/NEXT“ to select the last or next picture. Press “ / “ to rotate the picture.

Press “STOP ” to stop the picture being played.

E To exit playing, just press “BACK” repeatedly.

Note

OThe menu display varies with the photo name and pixel in your equipment.

Playing Music

A After entering USB main interface, press “ / “ to select “MUSIC”.

BPress ”OK“ to confirm the selection and enter the music file list.

C Press “ / “ and “OK” button to select the music you want to play, then press “PLAY/PAUSE“ button to play the music.

Press “ / “ to achieve the REV (fast back) and FWD (fast forward) of the music being played.

Press “PREV/NEXT “ to select the last or next music. Press “STOP “ to stop the music being played, when the current interface is the music being played.

DTo return to the main menu, just press “BACK” repeatedly.

Note

OYou can enjoy the music and the picture at the same time.

Digital LCD / LED LCD Television Instruction Manual EN-28

Using the features

D To exit the “Text” mode, just press “BACK” repeatedly.

Playing a Movie

A Atter entering USB main interface, press “ / “ to select “Movie”.

BPress “OK” to confirm the selection and enter the movie file list.

Note

OYou can enjoy the music and the text at the same time.

C Press “ / “ and “OK” button to select the movie you want to play, and then press “PLAY/PAUSE” button to play the movie.

Press “ZOOM” to magnify the picture.

Press “PREV/NEXT “ to select the last or next movie. Press “STOP “ to stop the movie being played.

D To exit playing, just press “BACK” repeatedly.

Text

A After entering USB main interface, press “ / “ to select “Text” .

BPress “OK” to confirm the selection and enter the text file list.

CPress “ / ” and “OK” button to select the text you want to play, and then press “PLAY/PAUSE” button to play the text.

Press “PREV/NEXT “ to select the last or next text.

Using External USB

Disk For Recording

AInsert the USB device with FAT32 format into the USB1 connector. Then, press MENU button.


Note


O Only USB1 is available for recording.


B Press

button to select FUNCTION menu, press


button to enter .


C Press

button to select Recorder. Press OK


button to enter the submenu.


D Press

button to Select Disk and press

or OK


button to enter. Press

button to select disk if


your device has several disks.


E Press

button to select Format and press

to


enter. Press

button to select the size you want

to format. Press OK button to format the USB Disk.

EN-29 Digital LCD / LED LCD Television Instruction Manual

Loading...
+ 150 hidden pages