

Page 1

Manual de Uso y Mantenimiento
Manual de Utilização e Manutenção
Use and Maintenance Manual
Manual d'Emploi et Entretien
Bedienungsanleitung und pilegehinweise
LP 800 S
Code: 0120504404
Page 2

Page 3
Safety Is a Good Habit to Get Into
NOTICE
Carefully read the instructions contained in this manual,as they
provide important information which is essential to safe and
proper installation, use and maintenace of the appliance.
This appliance complies with the following EEC
directives:
-73/23/EEC of 19/02/73(Low Voltage)and subsequent
modifications;
- 89/336/EEC of 03/05/89 (Electromagnetic
Compatibility) and subsequent modifications.
- Carefully dispose of the packing material.
- After removing the packing,check to make sure that the appli ance is not damaged.If in doubt,contact a qualified professional.
- The dishwasher must only be used by adults for the washing of
household dishes and cooking utensils.
- Fundamental rules to follow when using the appliance:
* Never touch the dishwasher when barefoot or with wet hands
or feet;
* We discourage the use of extension cords and multiple sockets;
* During installation,the power supply cord must not be exces sively or dangerously bent or flattened;
* If the appliance is not operating properly or maintenance must
be performed, disconnect the appliance from the power supply.
- The appliance is not intended for use by young children or
inform persons without supervision.
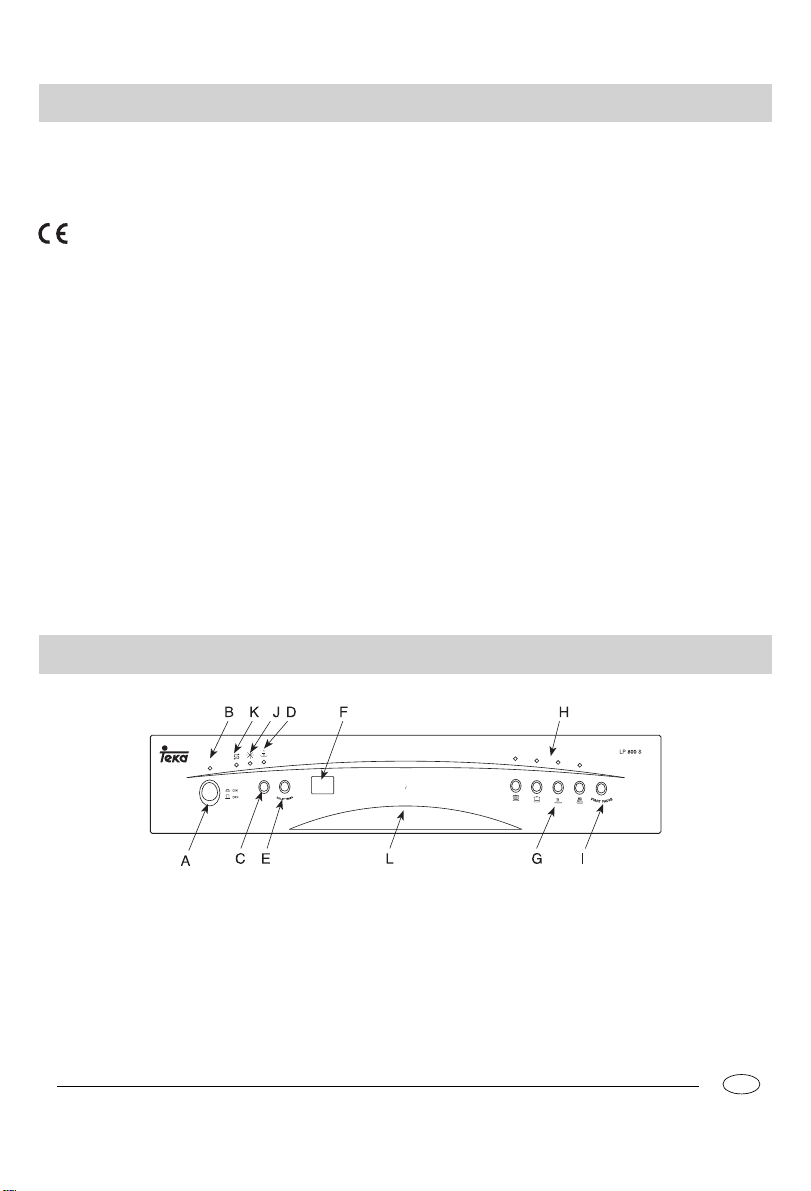
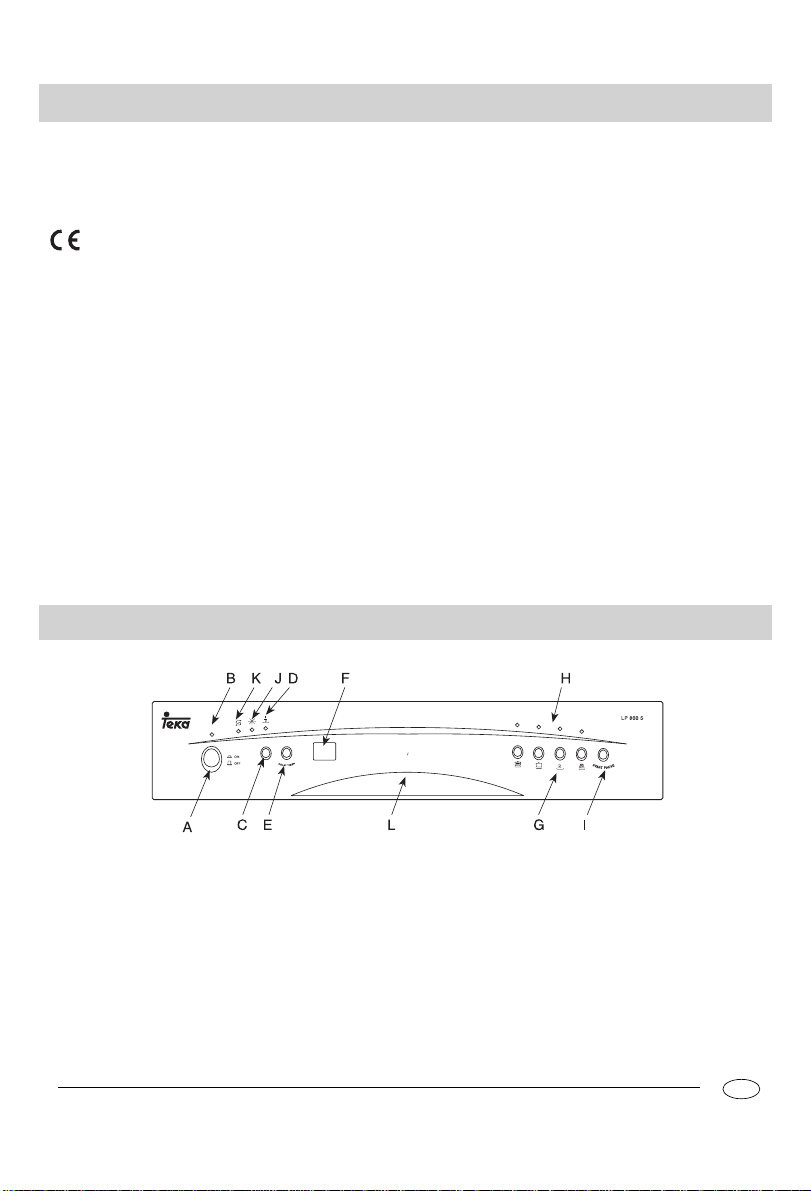
Close-up View (control panel)
- Young children should be supervised to ensure that they do not
play with the appliance.
- Keep detergents out of the reach of children,who must also be
kept away from the dishwasher when it is open.
- This appliance cannot be installed outdoors,not even if the area
in which it is installed is covered by a roof;it is also very dangerous
to leave it exposed to the rain and elements.
- Do not touch the heating element during or after a wash cycle.
- Do not lean or sit on the door when it is open ,as this could over
turn the dishwasher.
- If the appliance malfunctions,turn off water supply to the appli ance and disconnect the plug from the wall socket.Then,con sult the section entitled, "Troubleshooting".If you cannot solve
the problem,contact a service centre.
- Only specialised personnel are authorised to make repairs.
- Appliances which are no longer being used must be made inoperable
by cutting the power supply cord and removing the door lock.
- If the supply cord is damaged, it must be replaced by a special
cord or assembly available from the manufacturer or its service
agent.
- After installation, the power plug must be accessible.
To maintain the EFFICIENCY and SAFETY of this appliance,we
recommend:
- call only the Service Centers authorized by the manufacturer.
- always use original Spare Parts.
ON-OFF Button
A
ON-OFF Light
B
C
Half-load Button
D
Half-load indicator light
Delay select Button
E
Display delay time
F
Cycle select button
G
Cycle indicator light
H
Start/Pause button
I
Low Rinse Aid Indicator Light
J
Low Salt Indicator Light
K
Handle For Opening Door
L
.1.
GB
Page 4
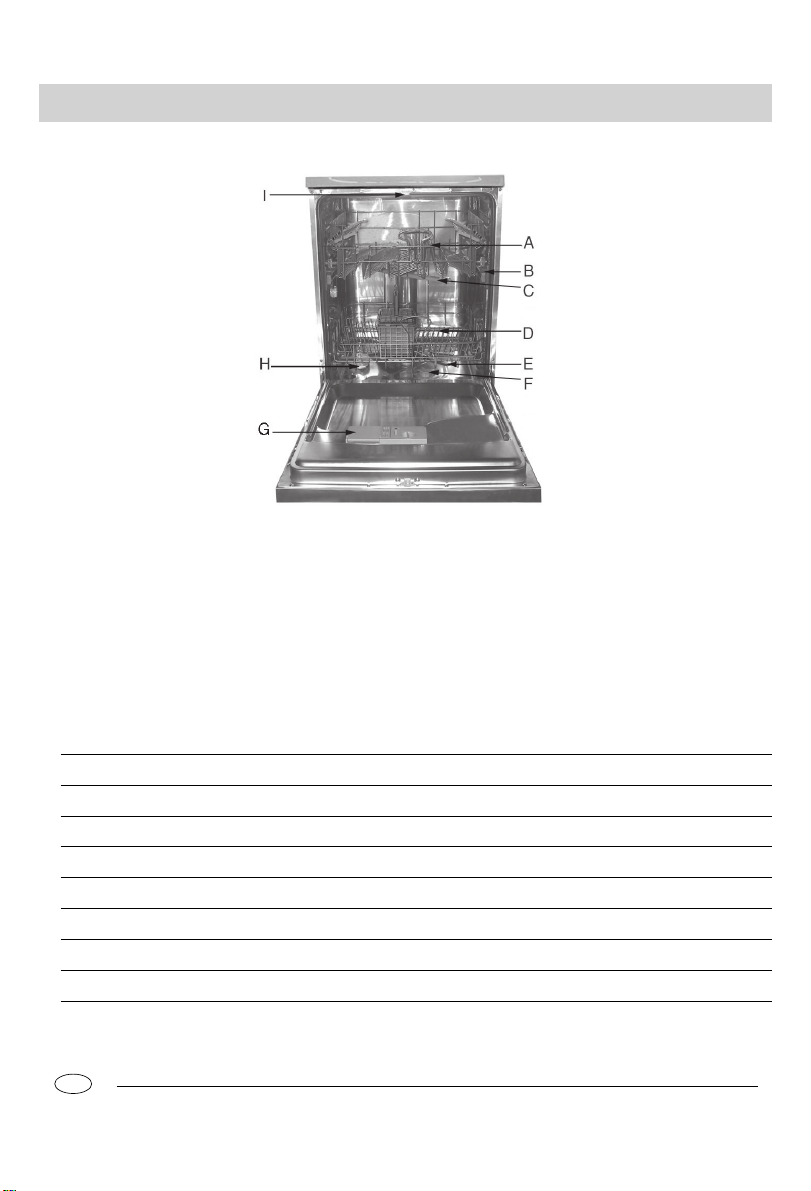
Close-up View (Interrior)
Upper Rack
A
Rack Height Adjustor
B
Top Spray Arm
C
Lower Rack
D
Technical characteristics
Width
Depth
Height
Capacity
Mains water pressure
Power voltage 220-240V~ 50Hz
Total absorber power
GB
.2.
Bottom Spray Arm
E
Washing Filter
F
Detergent and Rinse Aid Dispenser
G
Salt Container Cap
H
Third Sprayer
I
12 standard place settings
60cm
60cm
85cm
0.03-0.6MPa
2150W
Page 5
Salt
Salt
The hardness of the water varies from place to place. If hard
water is used in the dishwasher,deposits will form on the dishes
utensils.
The appliance is equipped with a special softener that uses a
salt specifically designed to eliminate lime and minerals from the
water.
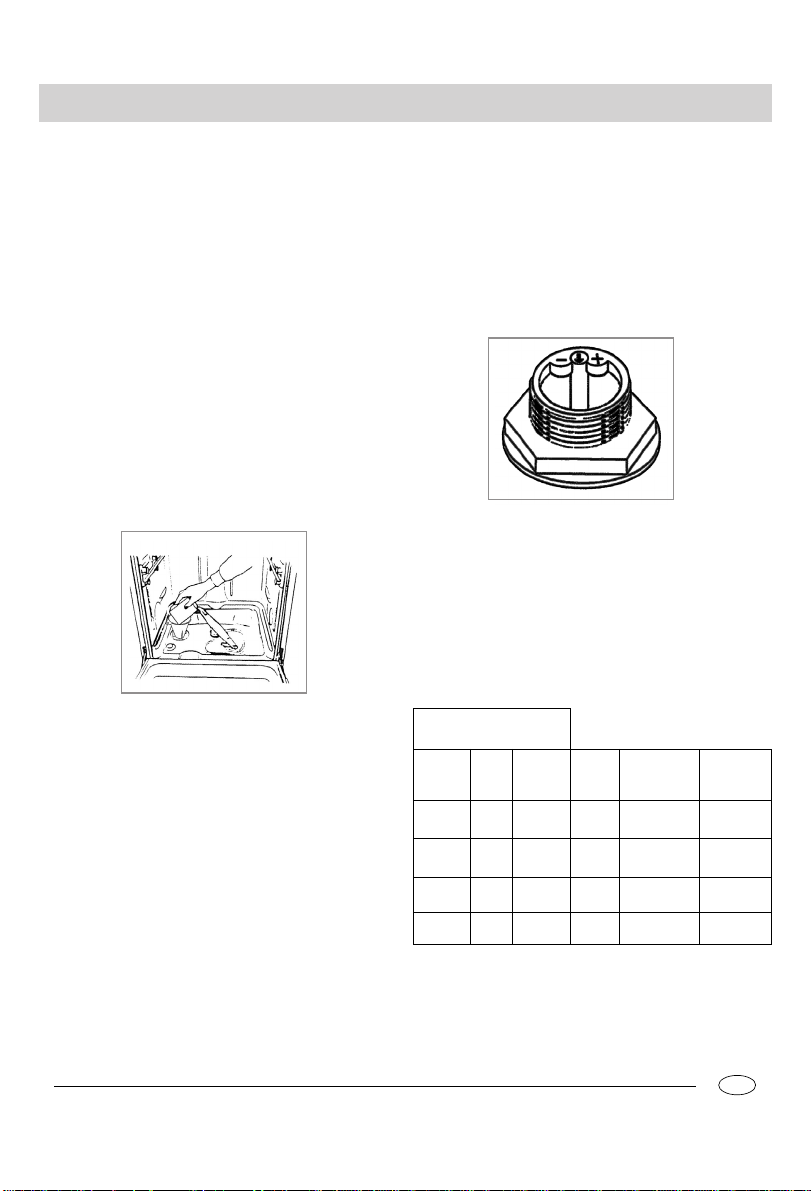
Loading the Salt into the Softener
Always use salt intended for use with dishwashers.
The salt container is located beneath the lower rack and should
be filled as follows:
- Remove the lower rack and then unscrew and remove the cap
from the salt container;
- If you are filling the container for the first time, fill it with water;
- Place the end of the funnel(supplied) into the hole and intro duce about 2 kg of salt.It is normal for a small amount of water
to come out of the salt container.
- Carefully screw the cap back on.
The salt container must be filled when the "low salt" indicator light (located on the control panel) comes on.
To prevent the formation of rust,load the salt just before beginning a wash cycle.
Adjusting Salt Consumption
The dishwasher is designed to allow for adjusting the amount of
salt consumed based on the hardness of the water used.This is
intened to optimize and customize the level of salt consumption
so that it remains at a minimum.Your local Water Board can supply the degree of hardness of the water in your area.
To adjust salt consumption,proceed as follows:
- Unscrew the cap from the salt container;
- There is a ring on the container with an arrow on it (see figure to
the side), If necessary, rotate the ring in the anticlockwise
direction from the "-" setting towards the "+" sign,based on the
hardness of the water being used.
It is recommended that adjustments be made in accordance with
the following scheme:
Water Hardness
Clarke
degree
014
NQPS
PSTN
[TN
dH
MNT
NUQQ
QRUV
[UV
mmol/l
MNIT
NIUQIQ
QIRUIV
[UIV
Selector
position
L
=?J?
jba
?H?
Salt
consumption
(Grams/cycle)
Autonomy
(cycles/2kg)
M
OM
QM
SM
L
SM
QM
OR
.3.
GB
Page 6
Detergent and Rinse Aid
Detergent
Detergent specifically intended for use with dishwashers must
be used.The dispenser must be refilled before the start of each
wash cycle following the instructions provided in the "Wash Cycle
Table". The detergent dispenser is located on the inside panel
the door.
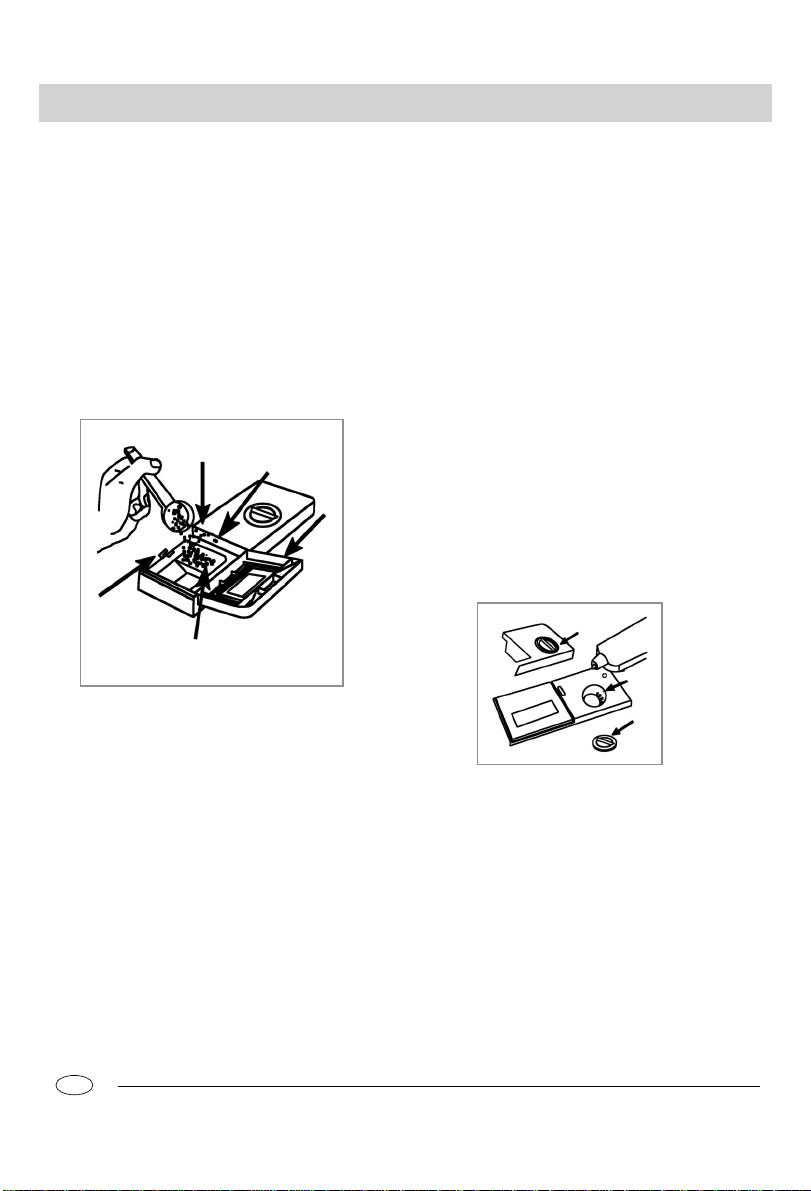
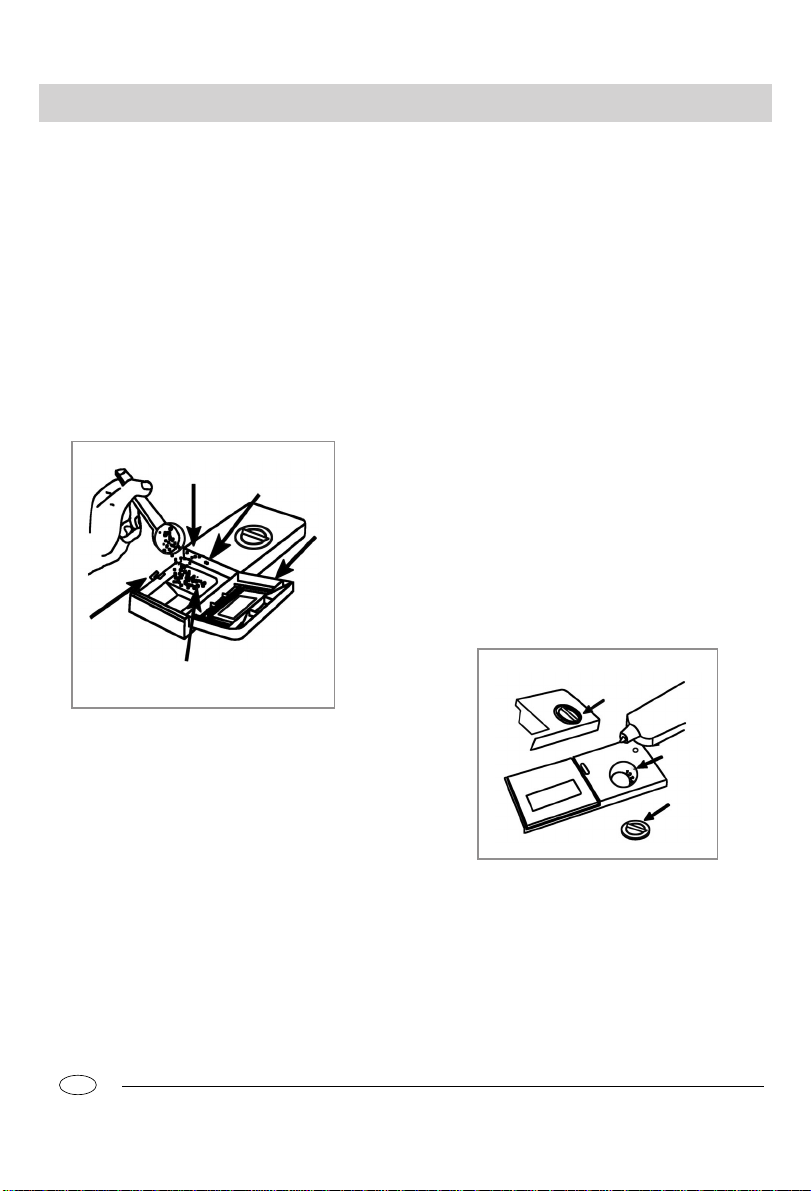
Loading the detergent
To open the "A" cover on the dispenser,press the "B" button.The
detergent for the wash cycle should be poured into the "C"
compartment.
After the detergent has been placed in the dispenser, close the
cover and press down until it clicks in place.
C
Pre-wash
A
B
Extended wash
Notice:To facilitate closing the cover, remove any excess
detergent on the edges of the dispenser.
Rinse Aid
This product makes dishes sparkle and helps them to dry without spotting.The dispenser is located on the inside panel of the
door and should be filled after every 80 wash cycle (or when the
rinse aid indicator light comes on for those models with this
feature).
Loading the Rinse Aid
To open the dispenser,turn the "C" cap in the anti-clockwise
dierction and then pour in the rinse aid,making sure not to overfill.
The amount of rinse aid used for each cycle can be regulated by
turning the "F" dose adjustor ,located beneath the "C" cap, with
a screwdriver.There are 6 different settings; the normal dosage
setting is 3.
Important
Proper dosage of the rinse aid improves drying.
If drops of water remain on the dishes or spotting occurs,the
dosage adjustor should be turned to a higher setting.
If the dishes have white streaks,turn the dosage adjustor to a
lower setting.
C
F
C
GB
.4.
Page 7
Loading the Dishwasher
Before placing the dishes in the dishwasher, remove the large
food particle to prevent the filter from becoming clogged,which
results in reduced performance.
If the pots and pans have baked-on food that is extremely hard
to remove, we recommend that they be allowed to soak before
they are washed.This will eliminate the need for extra wash
cycles.
Pull out the rack to facilitate loading the dishwasher.
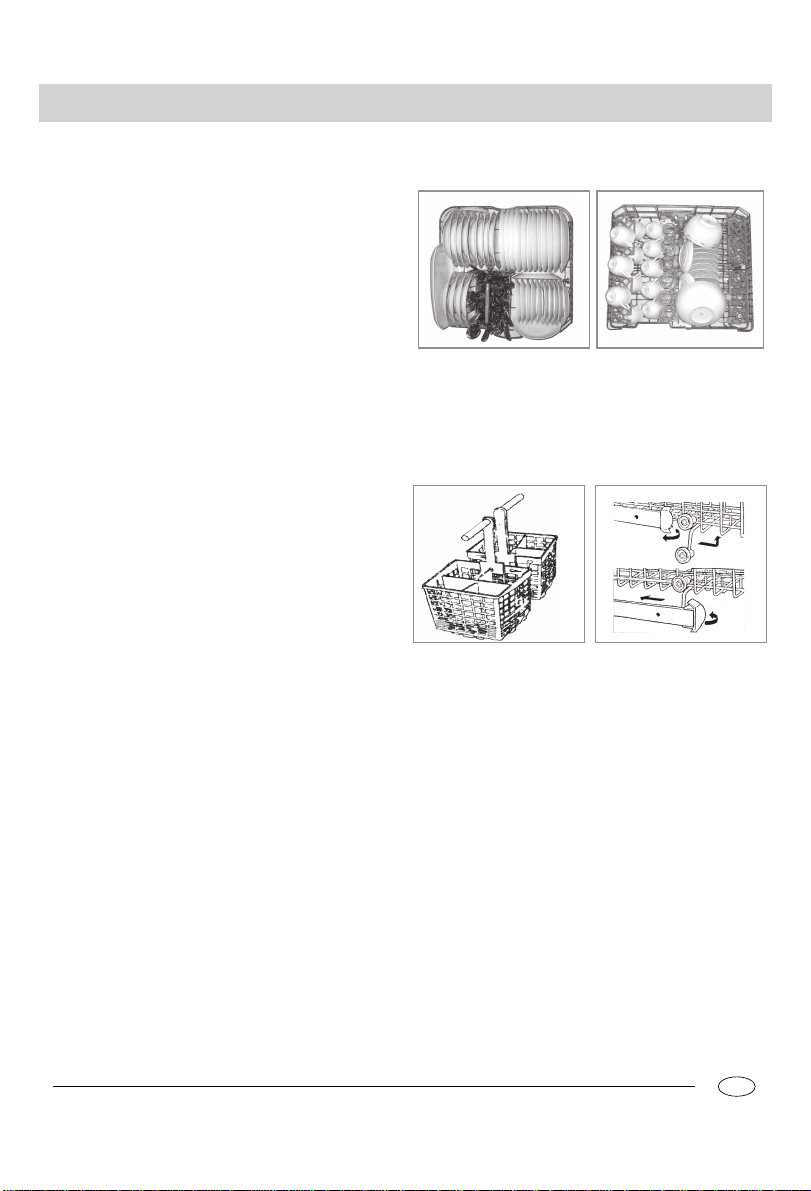
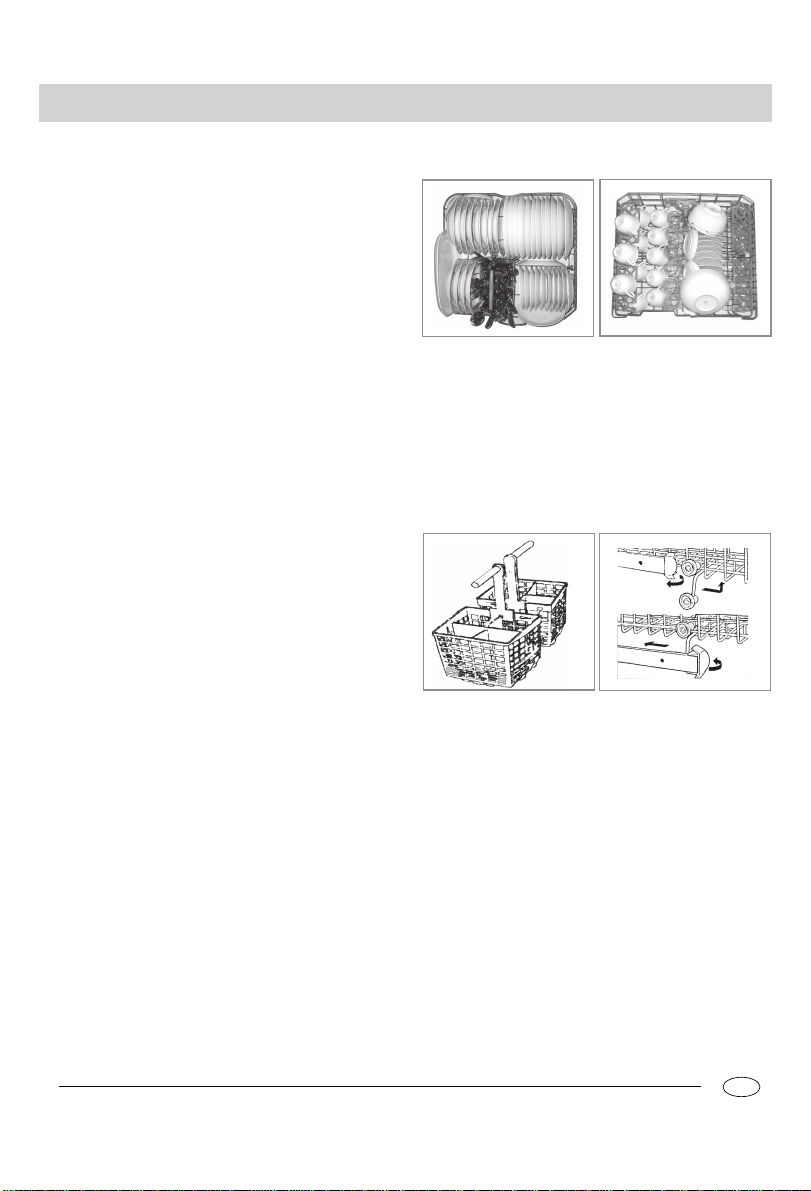
How to Use the Lower Rack
We recommend that you place the most difficult to clean items
on the lower rack:pots ,lids,serving dishes and bowls,as shown
in the figure on the right.
It is preferable to place serving dishes and lids on the sides of
the racks in order to avoid blocking the rotation of the top spray
arm.
- Pots,serving bowls,etc.must always be placed top down.
- Deep pots should be slanted to allow the water to flow out.
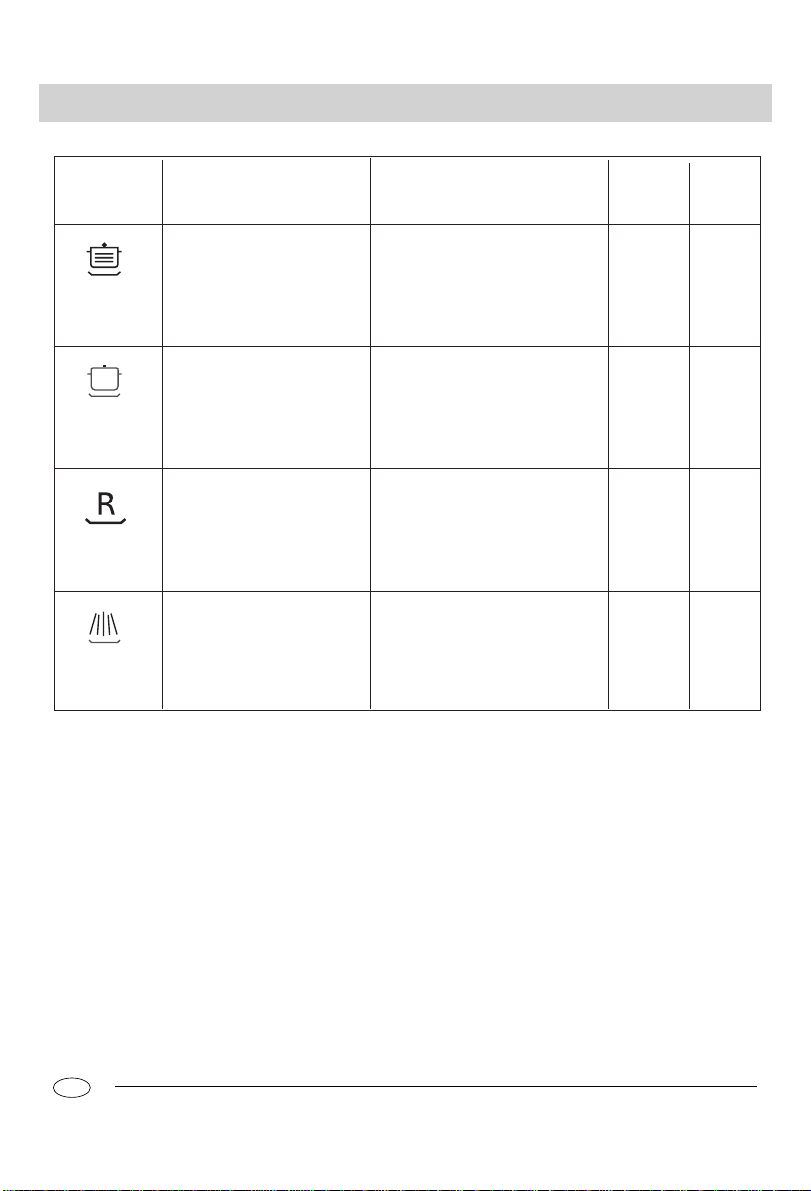
- The silverware basket can be doubled(see Fig.A) so that only
one section may be used when the silverware load is light. This
also makes space for additional pots and pans,and it can also
be placed in the upper rack.
- Silverware should be placed in the silverware basket with the
handles at the bottom;if the rack has side baskets,the spoons
should be located individually into the appropriate slots.
Especially long utensils should be placed in the horizontal
position at the front of the upper rack.
How to Use the Upper Rack
The upper rack is designed to hold more delicate and lighter
dishware,such as glasses,coffee and tea cups and saucers,as
well as plates,small bowls and shallow pans(as long as they are
not too dirty).
- Position the dishes and cookware so that they do not get moved
by the spray of water.
Lower Rack
Load for 12 Standard Settings
Fig.A
Upper Rack
1
3
2
4
Fig.B
The upper rack can be adjusted for height by using the knobs
located on the sides of the rack itself (see Fig.B).
.5.
GB
Page 8

Turning on the Appliance
Starting a wash cycle
After having completed all of the installation steps in the preceding paragraphs, turn on the water all the way and press the
ON-OFF button (A) located on the control pannel. The "B" indicator light will come on. At this point, the appliance is on but you
must wait a few seconds before programming the setting for the
cycle.
Setting and Starting a wash Cycle
Select the desired cycle by pressing the selector button (G). Each
time the button is pressed, one of the"H" cycle indicator lights
will come on in succession. Choose the wash cycle you feel is
most appropriate for the type of dishes that need washing (consult
the wash cycle table contained in this manual, especially when
first using the appliance).
Press the Start/Pause button(I), and after a few seconds a short
acoustic sound will indicate that the wash cycle has begun and
can no longer be changed. If necessary ,read the paragraph
entitled " Cancelling or modifying a cycle while underway..."
Cancelling or modifying a cycle while underway
Premise : A cycle that is underway can only be modified if it has
only been running for a short time.Otherwise, the detergent may
have already been used,and the appliance mayhave already
drained the wash water. If this is the case,the detergent dispenser must be refilled (see the paragraph entitled,"Loading the
Detergent").
To modify a cycle that is already underway, press the ON-OFF
button (A) ,then all of the settings will be cancelled.
If you forget to load some of the dishes
The wash cycle can be interrupted by pressing the Start/Pause
button.You can then load additional dishes and turn the appliance back on.The cycle will start where it left off.
Wash cycle Program Light
The wash cycle is running and the cycle indicator light (H) for
the cycle will begin to blink.
Setting the Wash Cycle with a Delayed Start Time
Premise: After selecting the wash cycle as indicated in the paragraph entitled ,"Setting and Starting a Wash Cycle..."the delay
time can be set.
By pressing the "E" button (see close-up view-'Control panel")
the start of wash cycle can be delayed for between 1 to 12 hours.
Each time the button is pressed,the display (F) will show the
number of hours for the delay period.Choose the amount of
time desired.When the appliance is started with "I" button,a short
acoustic signal will sound and the delay time on the display will
blink ,indicating that the countdown has begun.
After the time has elapsed,the cycle will start.
NOTE:
During the delay period ,it is preferable not to change any of the
settings.
a) If it is necessary ,all of the settings must be cancelled by pressing the ON-OFF button (A) to indicate that all of the settings
have been cancelled.
At this point,all of the steps for"Setting the Wash Cycle with a
delayed Start Time" and "setting and Starting a Wash Cycle"must
be repeated,following the instructions contained in the corresponding sections.
b)If the door is opened during the delay period, the indicator will
blink and acoustic signal will sound, and the countdown will stop.
It will begin again when the door is closed .
Wash Cycle adjustment Buttons
1/2 load Button
At the end of the wash cycle
Six acoustic signal will indicate that the wash cycle has finished
and the cycle indicator light (H) for the cycle will begin to die out.
Turn off the appliance using the ON-OFF button.Turn off the
water supply to the appliance and open the door. Wait a few
minutes before unloading the dishwasher to avoid handling the
dishes and utensils while they are still hot and more susceptible
to breakage. They will also dry better.
GB
This button(see "close-up View - Control Panel",letter"C") make
it possible to wash dishes using only the upper rack if there are
not enough dishes for a full load.This will allow you to save on
water and eletrical energy. It can be used before setting any of
the wash cycle, except for the intensive cycle ( if included in the
wash cycle table). Please keep in mind that the amount of detergent should also be cut in half.
.6.
Page 9

Energy Saving Tips
- It is important to try and run the dishwasher when it is fully loaded
to save on enery.In order to prevent odours from forming and
food from caking onto the dishes,you can run the soak cycle.
- Choose the right wash cycle: the choice of cycle depends on
the type of dishware, cookware and utensils being washed and
how dirty they are.
How to Keep Your Dishwasher in Shape
After Every Wash
After every wash, turn off the water supply to the appliance and
leave the door slightly ajar so that moisture and odours are not
trapped inside.
Remove the Plug
Before cleaning or performing maintenance, always remove the
plug from the socket.Do not run risks.
- Use the right amount of detergent: if you use too much detergent,
the result will not be cleaner dishes,but,rather,a greater nega
tive impact on the enviroment.
- There is no untility in rinsing dishes ,cookware and untensils before
placing them in the dishwasher.
Moving the Appliance
If the appliance must be moved,try to keep it in the vertical
position.If absolutely necessary,it can be positioned on its back.
Seals
One of the factors that cause odours to form in the dishwasher
is food that remains trapped in the seals.Periodic cleaning with
a sponge will prevent this from occuring.
No Solvents or Abrasive Cleaning Products
To clean the exterior and rubber parts of the dishwasher, do not
use solvents or abrasive cleaning products.Rather, use only a
cloth and warm soapy water.
To remove spots or stains from the surface of the interior, use a
cloth dampened with water and a little white vinegar,or a cleaning product made specifically for dishwasher.
When You Go on Holiday
When you go on holiday,it is recommended that you run a wash
cycle with the dishwasher empty and then remove the plug from
the socket ,turn off the water supply and leave the door of the
appliance slightly ajar.This will help the seals last longer and
prevent odours from forming within the appliance.
.7.
GB
Page 10
Wash Cycle Table
Cycle
Intensive
Wash
Normal wash
(IEC-EN50242)
Rapid Wash
Soak
Cycle Selection
Information
Very dirty dishes,pots and
pans.(not to be used with
delicate items)
Normally dirty dishes,pots
and pans without dried-on
residue
Economic,fast cycle to be
used on not very dirty dishes
right after they are used.No
drying cycle.
Pre-wash of dishes, pots and
pans while waiting for the load
to be complete after the subsequent meal
.
Description of Cycle
Pre-wash with cold water
Extended wash at 70K
Rinse with cold water.
Rinse with hot waterK
Drying.
Pre-wash with cold waterK
Extended wash at 50K
Rinse with cold waterK
Rinse with hot waterK
Drying.
Short wash at 40K
=Cold rinse .
Short cold wash to prevent food
residue from drying on the dishes K
Detergent Rinse Aid
30g
Pre-wash: 5g
Extended wash:
25g
15g
( 5 )
GB
.8.
Page 11
Cleaning and Special Maintenance
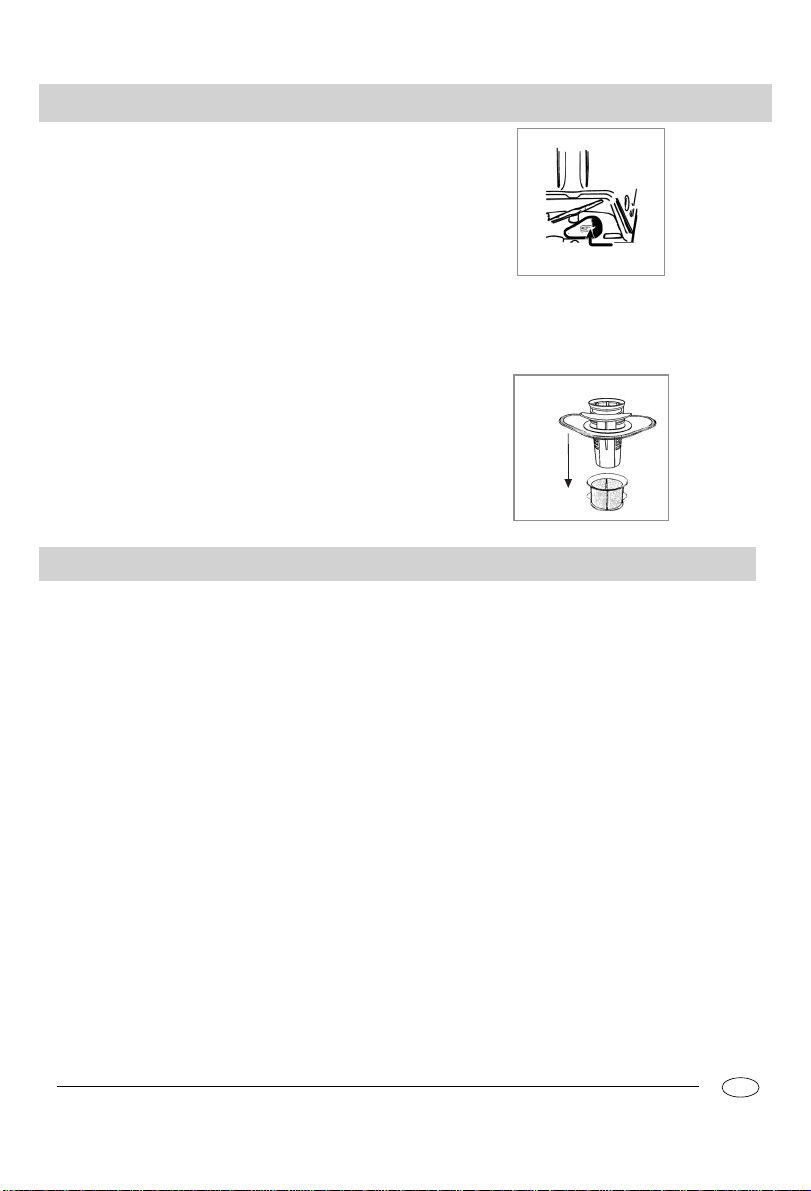
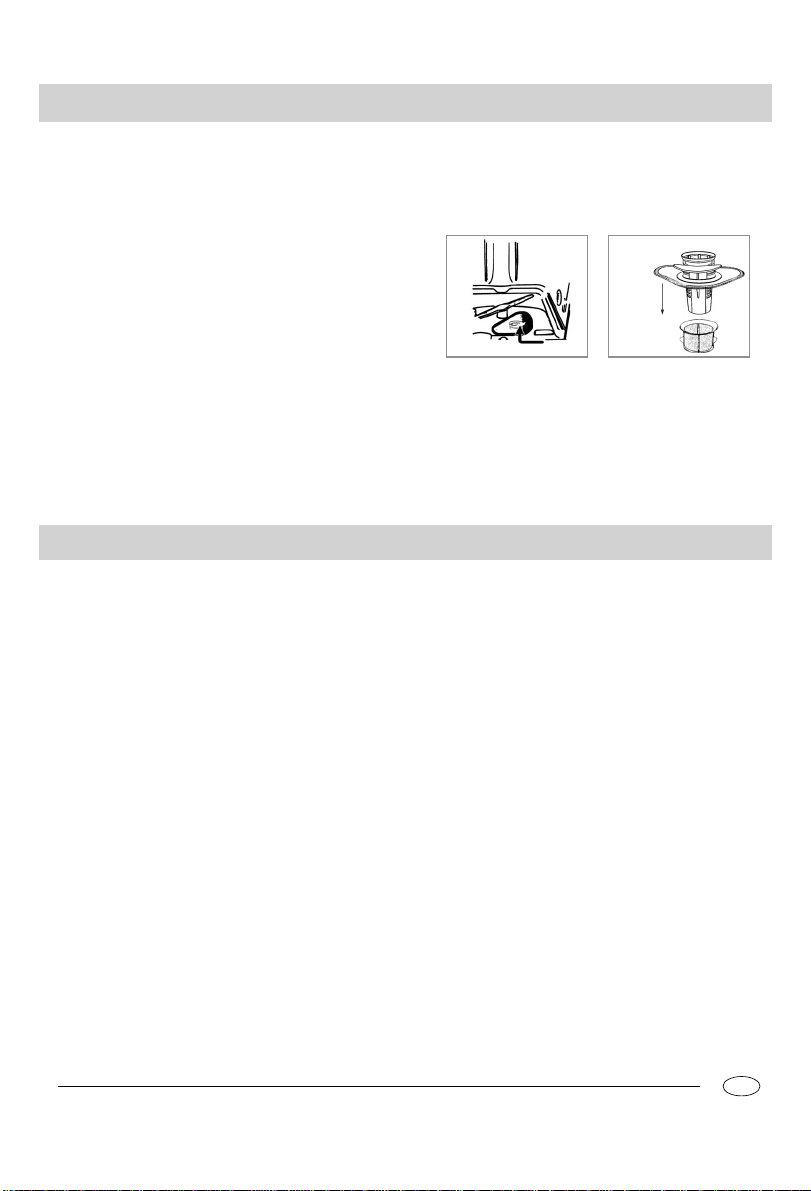
Filter Assembly
For best performance and results, the filter assembly must be
cleaned.
The filter efficiently removes food particles from the wash water,
allowing it to be recirculated during the cycle.For this reason ,it
is a good idea to remove the larger food particles trapped in the
filter after each wash cycle by rinsing the"A"semi-circular filter
and cup under running water.To remove the filter assembly,pull
on the cup handle in the upward direction. The entire filter assembly (made up of the "A" semicircular filter and the"B" fine
filter)should be cleaned at least once a month.To clean the filter
and the fine filter,use a cleaning brush .Then,reassemble the
filter parts as shown in the figures below and reinsert the entire
assembly in the dishwasher,positioning in its seat and pressing
downward.
The dishwasher must not be used without the filters.Improper
replacement of the filters may reduce level of the appliance and
damage dishes and utensils.
Troubleshooting
Cleaning the Spray Arms
It may happen that food particle become encrusted on the sprayer
arms and block the hole (see "Close up view [interior]",letters CF ).Check the sprayer arms periodically and clean them when
needed.
A
B
It may occur that the dishwasher does not function or does not
function properly.Before calling for assistance,Iet us see what
can be done first:have you forgotten to press one of the buttons
or to perfom an essential operation?
The Dishwasher Does Not Start
Have you checked whether:
- the plug is pushed into the socket correctly;
- the power is on in the house;
- the door is closed properly;
- the ON-OFF swith is on "ON";
- the water supply is turned on.
The Dishwasher Does Not Load Water
Have you checked whether:
- the water is turned on and the hose is connected properly;
- the water supply to the house on and has sufficient pressure;
- the water supply hose is crimped or bent;
- the filter for the water supply hose is clogged.
The Dishes Are Not Clean
Have you checked whether:
- the water is turned on and the hose is connected properly;
- the water supply to the house on and has sufficient pressure;
- the water supply hose is crimped or bent;
- the filter for the water supply hose is clogged.
The Dishwasher Does Not Drain
Have you checked whether:
- the drain hose is crimped or bent.
Lime Deposits or a White Film Form on the Dishes
Have you checked whether:
- the lid to the salt container is closed properly;
- the rinse aid dosage is correct.
If,despite all these checks,the dishwasher still does not function
and/or the problem persists,contact the nearest authorised service centre and provide them with the following information:
- the nature of the problem;
- the model type number (Mod...)and the serial number (S/N...),
which are indicated on the plate located on the side of the inner
part of the door.
Never call on unauthorised technicians and allow the
parts which are not original spare parts to be installed .
.9.
GB
Page 12

Installation
Positioning the Appliance
Position the appliance in the desired location.The back should
rest against the wall behind it,and the sides,along the adjacent
cabinets or wall.The dishwasher is equipped with water supply
and drain hoses that can be positioned on the right or the left to
facilitate proper installation.
Levelling the Appliance
Once the appliance is positioned,adjust the feet (screw them in
or out) to level the dishwasher.In any case,the appliance should
not be inclined more than 2. If the appliance is level,it will help
ensure proper performance.
Cold Water Connection
Connect the cold water supply hose to a threaded 3/4(gas) connector and make sure that it is fastened tightly in place (see Fig 1).
If the water pipes are new or have not been used for an extended period of time,let the water run to make sure that the
water is clear and free of impurities.If this precaution is not taken,
there is a risk that the water inlet can get blocked and damage
the appliance.
Hot Water Connection
The water supply to the appliance can also be connected to the
house's hot water line (centralised system,heating system),as
long as it does not exceed a temperature of 60.
In this case,the wash cycle time will be shortened by about 15
minutes and the wash efficiency slightly reduced.
The connection must be made to the hot water line following the
same procedures as those for the connection to the cold water
line.
Fig.1
Drain Hose Connection
Insert the drain hose into a drain pipe with a minimum diameter
of 4cm,or let it run into the sink,making sure to avoid bending or
crimping it.Use the speical plastic support that comes with the
appliance (see Fig.2).The free end of the hose must be at a
height between 40 and 100 cm and must not be immersed in
water.
Fig.2
Anti-Flooding Protection
The dishwasher is equipped with a system that stops the supply
of water in the event of a problem with the water supply hose,or
leaks within the unit,in order to prevent damage to your home.If
for any reason the box containing the electrical components happens to get damaged,remove the plug for the appliance from the
socket immediately.In order to guarantee that the anti-flooding
feature operates properly, the"A" box with water supply hose
must be attached to the water supply tap as shown in Fig .1.No
other type of connection is acceptable.The water supply hose
must not,under any circumstances,be cut,as it contains electrical parts which are live.If the length of the hose is not adequate
to make a proper connection,the hose must be replaced with
one which is long enough.This hose is available upon request
from specialised retailers and service centres.
GB
Attention:
The special plastic hose support must be solidly fastened to the
wall to prevent the drain hose from moving and allowing water to
spill outside the drain.
Electrical Connection
After making sure that the voltage and frequency values for the
current in the home correspond to those on the rating plate
(located on the stainless steel inner door of the appliance) and
that the electrical system is sized for the maximum voltage on
the rating plate,insert the plug into an electrical socket which is
earthed properly (the earthing of the appliance is a safety requirement mandated by law).
If the electrical socket to which the appliance must be connected
is not appropriate for the plug,replace the plug ,rather than using adpators or the like as they could cause overheating and
burns.
.10.
Page 13
La sécurité, une bonne habitude
ATTENTION
Lisez attentivement cette notice, son contenu vous fournira des
indications importantes concernant la sécurité d'installation,
d'utilisation et d'entretien de votre appareil.
Cet appareil est conforme aux Directives
Communautaires suivantes:
- 73/23/CEE du 19/12/73 (Basses Tensions) et modifications successives;
- 89/336/CEE du 03/05/89 (Compatibilité
Electromagnétique) et modifications successives.
- Eliminez avec soin le matériel d'emballage.
- Après avoir élevé l'emballage, vérifiez si l'appareil est en bon
état. En cas de doute, adressez-vous à un technicien qualifié.
- Le lave-vaisselle ne doit être utilisé que par des adultes et
uniquement pour le lavage de vaisselle à usage ménager.
- Quelques règles fondamentales à suivre:
* ne touchez jamais la machine pieds nus ou avec les mains
ou les pieds mouillés,
* nous déconseillons vivement l'utilisation de rallonges et de
prises multiples,
* pendant l'installation, le cable d'alimentation ne doit pas subir
de grosses pliures ou des compressions dangereuses,
Vue de près (tableau de bord)
* en cas de mauvais fonctionnement ou de travaux d'entretien,
débranchez l'appareil de la ligne électrique.
- Gardez les enfants loin des produits détergents de du lave vaiselle quand il est ouvert.
- La machine ne doit jamais être installée à l'extérieur, même
si l'endroit est réparé par un auvent, il est très dangereux de
la laisser exposé à la pluie et aux orages.
- Ne touchez jamais à la résistance pendant et tout de suite
après un cycle de lavage.
- Ne vous appuyez jamais à la porte ouverte et ne vous y asseyez
pas dessus, vous pourriez faire basculer le lavevaisselle.
- En cas de panne, fermez le robinet d'arrivée de l'eau et
débranchez la fiche de la prise murale. Consultez ensuite le
chapitre "Des problème: que faire?" et si vous ne trouvez
pas de solution, adressez-vous à votre service après-vente.
- Des réparations ne doivent être faites que par les techniciens
qualifiés.
- Les appareils hors d'usage doivent être inutilisables, coupez
par conséquent leur cable d'alimentation et enlevez le dispositif
de blocage de la porte.
Pour garantir l'efficacité et la sécurité de ce produit:
· adressez-vous exclusivement aux Centres d'assistance
technique agrées.
· demander toujours l'utilisation de pièces détachés originales.
Bouton allumé-éteint (ON-OFF)
A
Voyant allumé-éteint (ON-OFF)
B
Bouton "1/2 Charge"
C
Voyant "1/2 Charge"
D
Bouton séection départ différé
E
Voyant départ différé
F
Bouton sélection programmes
G
Indicateur lumineux phase programme
H
Bouton démarrage/remise àzero
I
Voyant manque de produit de rin?age
J
Voyant manque de produit de sel
K
Poignée ouverture porte
L
.11.
FR
Page 14

Vue de près (Intérieur)
Panier supérieur
A
Réglage hauteur panier
B
Gicleur supérieur
C
Panier inférieur
D
Caractéristiques techniques
Largeur
Profondeur
Hauteur
Capacité
Pression eau alimentation
Tension d'alimentation
Puissance totale absorbée
FR
.12.
Gicleur inférieur
E
Filtre lavage
F
Distributeur produits lavage et rinçage
G
Bouchon distributeur sel
H
Troisième gicleur
I
12 couverts standard
60 cm
60 cm
85 cm
0.03-0.6MPa
220-240V~ 50Hz
2150W
Page 15

Sel
Le sel
La quantité de sel dans l'eau varie en fonction du lieu. Plus le
contenu en sels est élevé plus l'eau est dure. Si de l'eau dure
entrait dans le lave-vaisselle, les sels formeraient des incrustations sur les couverts.
Un adoucisseur qui utilise du sel spécial lave-vaisselle permet
d'éliminer le calcaire présent dans l'eau.
Introduction du sel dans l'adoucisseur
Utilisez toujours du sel spécial pour lave-vaisselle.
Le réservoir à sel est situé sous le panier inférieur et doit être
rempli comme suit:
- Sortez le panier inférieur, dévissez et enlevez le bouchon du
réservoir.
- Si vous approvisionnez le réservoir pour la première fois,
remplissez le d'eau.
- A l'aide de l'entonnoir fourni introduisez environ 2 Kg de sel. Il
est normal qu'un peu d'eau déborde du réservoir.
- Revissez soigneusement le bouchon.
Le réservoir à sel doit être rempli dès que le voyant lumineux
"manque de sel" (se trouve sur le bandeau de commande)
s'allume.
Pour éviter toute formation de rouille, nous conseillons
d'approvisionner en sel juste avant de démarrer un cycle de
lavage.
Réglage de la consommation en sel
Ce lave-vaisselle prévoit un réglage modulable de la
consommation en sel selon la dureté de l'eau. Ceci permet
d'optimiser et de personnaliser la consommation en sel qui est
réduite à son niveau minimal indispensable.
Les Services Locaux de Distribution des eaux peuvent vous
préciser le degrée de dureté de votre eau.Pour le réglage,
procédez comme suit:
- Dévissez le bouchon du réservoir à sel;
- Une flèche est située sur le collier du réservoir ( voir fig.), si
nécessaire, tournez, dans le sens inverse des aigu illes d'une
montre, la flèche du signe "-", vers le signe "+" selon la dureté
de l'eau d'alimentation.
Nous conseillons de procéder au réglage suivant
Dureté de l'eau
Consomma-
Positi-on
ç
fH
010
NMOR
ORRM
[RM
ç
Çe
MNT
NUQQ
QRUV
[UV
mmo/l
MNIT
NIUQIQ
QIRUIV
[UIV
s
élect-eur
L
=?J?
jba
?H?
tion sel
(grammes/cycle)
Autono-mie
(cycles/2kg)
M
OM
QM
SM
L
SM
QM
OR
.13.
FR
Page 16

Produits lavage et rinçage
Le détergent
N'utilisez que du détergent spécial lave-vaisselle. II faut introduire
le détergent avant le démarrage de chaque cycle de lavage
suivant les indications fournies dans le "Tableau cycles de
lavage". Le distributeur à détergent se trouve à l'intérieur de la
prote.
Introduction du détergent
Pour ouvir le couvercle "A" appuyez sur la touché "B". Le
détergent pour le lavage doit être placé dans le bac "C". Après
avoir versé le détergent, fermez le couvercle en appuyant à fond
jusqu'au déclic.
C
Prélavage
A
B
Lavage prolongé
Attention: pour simplifier l'accrochage du couvercle,
éliminez, avant la fermeture, tous les résidus de détergent
sur les bords du bac.
Le produit de rinçage
Ce produit rend les couverts plus brilliants et améliore leur
séchage. Le réservoir à produit de rinçage est situé à l'intérieur
de la porte; il faut le remplir tous les 80 lavages environ (pour
les modèles dotés d'indicateur lumineux manque de produit de
rinçage, il faut le remplir quand le voyant correspond s'allume).
Inroduction du produit de rinçage.
Pour ouvrir le distributeur, tournez le bouchon "C" dans le sens
inverse des aiguilles d'une montre et évitez tout débordement.
Pour régler la quantité de produit débitée agissez avec un
tournevis sur le régulateur "F" situé sous le couvercle "C". 6
positions sont possibles, normalement il est taré sur 3.
Important:
Le réglage du débit du produit de rinçage permet d'améliorer le
é
chage.
s
S'il reste des gouttes d'eau ou des taches, il faut tourner le
é
gulateur vers les chiffres plus élevés. Si les couverts lavés
r
ont des rainures blanches, tournez le r
plus bas.
é
gulateur vers les chiffres
C
F
C
FR
.14.
Page 17

Rangement des couverts
Avant de ranger la vaisselle dans les panniers, éliminez les
déchets les plus gros pour éviter de boucher les filtre ce qui
réduirait l'efficacité du lavage.
Si vos casseroles et vos poêles sont très incrustées, nous vous
conseillons de les mettre tremper avant leur lavage.
Vous éviterez ainsi des lavages supplémentaires.
Sortez les panniers pour faciliter les opérations de rangement
de la vaisselle.
Comment utiliser le panier inférieur
Nous vous conseillons de ranger dans le panier inférieur la
vaisselle la plus difficille :
Casseroles, couvercles, assiettes plates et creuses comme
illustré dans les figures à droite.
Rangez les plats et les grands couvercles de préférence sur les
côtés du panier, en veillant à ne pas bloquer la rotation du gicleur
supérieur.
casseroles, saladiers etc. doivent toujours être rangés sens
dessus dessous.
- les pièces de vaisselle très creuses doivent être placées
en biais pour permettre à l'eau de s'écouler.
- le panier à couverts peut être séparé en deux (voir Fig. A)
afin de n'en utiliser qu'une partie quand il y a peu de couverts
à laver ; vous aurez ainsi plus de place pour vos casseroles et
vous pourrez aussi le placer dans panier supérieur.
- les couverts doivent être rangés, manches tournés vers le bas;
si le panier est doté de rangements latéraux, les petites cuillères
doivent être rangées une par une dans les fentes
correspondantes.
Les couverts très longs doivent être placés à plat à l'avant du
panier supérieur.
panier inférieur panier supérieur
Chargement 12 couvers standard
3
Fig.A
1
2
4
Fig.B
Comment utiliser le panier supérieur
Le panier supérieur est indiqué pour le rangement de la vaisselle
fragile et légère comme verres, tasses à thé et à café, soucoupes,
mais aussi assiettes, saladiers bas, poêles et casseroles basses
peu sales.
- Rangez les pièces de vaisselle légères de manière à ce qu'elles
ne puissent pas être déplacées par les jets d'eau. Il est
possible de régler le panier en hauteur à l'aide des dispositifs
placés sur les côtés mêmes du panier (voir Fig.B)
.15.
FR
Page 18

Mise en service
Pour démarrer un programme de lavage.....
Après avoir effectué toutes les opérations indiquées dans les
paragraphes précédents et après avoir complètement ouvert le
robinet de l'eau, appuyez sur le bouton ON-OFF 'A' situé sur le
bandeau ; le voyant 'B' s'allumera.La machine est à présent sous
tension mais il faut attendre quelques seconds avant de commencer à la programmer.
Mise en marche et programmation.
Sélectionnez le programme désiré en appuyant sur le bouton de
sélection des programmes 'G'. A chaque pression sur le bouton,
les voyants programmes 'H' s'allumeront les uns après les autres.
Choisissez le programme que vous estimez le plus approprié au
type de vaisselle que vous devez laver (consultez, surtout au
début, le tableau des programmes que vous trouverez dans ce
mode d'emploi).
Appuyez sur le bouton de Démarrange/Remise à zéro 'I'. Au
bout de quelques seconds, un bref signal sonore vous indiquera
que le cycle de lavage a démarré et que vous ne pouvez plus le
modifier. En cas de besoin, consultez le paragraphe 'Annulation
ou modification d'un programme en cours'.
Pour annuler ou modifier un programme en cours.....
Avis : un programme en cours ne peut être modifiéque s'il a
démarrédepuis peu car la machine risque d'avoir déjà prélevé
le détergent et d'avoir même évacué l'eau de lavage, dans ce
cas il faut rajouter du détergent (voir paragraphe 'chargement
du détergent').
Pour modifier un programme en cours, appuyez sur le bouton
ON-OFF 'A' et toutes les programmations ont été annulées.
Si vous avez oublié d'introduire de la vaisselle....
Vous pouvez interrompre le cycle de lavage en appuyant sur le
bouton ON-OFF. Introduisez la vaisselle et dès allumage de la
machine, le cycle repartira de l'endroit où il a été interrompu.
Programmation départ différé du lave-vaisselle
Avis : après avoir sélectionné le programme de lavage comme
indiqué dans le paragraphe 'Mise en marche et programmation...
' vous pouvez programmer le départ différé.
En appuyant sur le bouton 'E' (voir vue de près 'tableau de bord')
vous pouvez différer le démarrange d'un cycle de lavage de 1 à
12 heures. A chaque pression sur le bouton, l'écran 'F' affichera
successivement les heures de retard choisissez le temps préféré.
En branchant la machine à l'aide de la touche 'I', vous entendrez
un bref signal sonor et l'affichage des heures de retard
programmées pour indiquer que le compte à rebours du délai
d'attente a commencé.
Au bout du délai d'attente programmé, le cycle démarrera.
NOTE :
a) pendant le délai d'attente, il vaut mieux ne rien modifier. En
cas de besoin, annulez la programmation en appuyant sur la
touche ON-OFF 'A' : un bip signalera que toutes les
programmations ont été annulées.Rvpétez les opérations de
'programmation départ différé du lave-vaisselle' et de 'mise
en marche et programmation' en suivant les instructions
contenues dans les paragraphes correspondants.
b) Si, au cours du délai d'attente, vous ouvrez la porte, le comptre
à rebours s'interrompra et ne repartira que quand vous
fermerez la porte.
Voyants déroulement du cycle
Le lave-vaisselle est équipé de voyants 'H' qui s'allument au fur
et à mesure que la machine procède à la phase de lavage qu'ils
indiquent.
En fin de lavage...
La fin du cycle de lavage est signalée par un six bip et par
l'extinction du voyant 'H'. Coupez l'alimentation électrique de la
machine en appuyant sur le bouton ON-OFF ; fermez le robinet
de l'eau et ouvrez la porte. Attendez quelques minutes avant de
sortir votre vaisselle, vous éviterez ainsi de manipuler de la
vaisselle chaude qui casse plus facilement, et vous obtiendrez
un meilleur séchage.
FR
Boutons modificateurs de programme
Bouton '1/2 CHARGE'
Ce bouton (voir 'vue de près tableau de bord' à la lettre 'C') permet
de laver uniquement au niveau du panier supérieur s'il n'y a pas
suffisamment de vaisselle pour effectuer un chargement complet.
Vous ferez ainsi des économies d'eau et d'électricité. Il peut être
utilisé avant la programmation de n'importe que cycle de lavage,
exclusion faite du cycle de lavage intensif ou énergique (s'il est
prévu dans le tableau des programmes). Seule condition : réduire
de moitié la quantité de détergent prévue pour le programme
choisi.
.16.
Page 19

Quelques conseils pour faire des économies
- Faites travailler la machine à plein chargement si possible pour
optimiser la consommation d'eau et d'électricité ; pour éviter
qu'il se forme, entre-temps, de mauvaises odeurs et des
incrustations, vous pouvez utiliser le cycle trempage.
- Choisissez le programme approprié : le choix du programme
dépend du type de vaisselle et de son degré de salissure.
Comment garder votre lave-vaisselle en forme
Après chaque lavage
Après chaque lavage, fermez le robinet de l'eau et laissez la
pote entrebaillée pour éviter la formation d'humiditéet de
mauvaises odeurs.
Débranchez la fiche
Avant toute opération d'entretien ou de nettoyage, débranchez
la fiche de la prise : vous ne risquerez ainsi aucun danger.
Ni solvants ni abrasifs
Pour nettoyer l'extérieur et les parties en caoutchouc du lavevaisselle, n'utilisez ni solvants ni abrasifs mais uniquement un
chiffon imbibé d'eau tiède savonneuse.
Pour éliminer toute tache sur la surface de la cuve, utilisez un
chifffon imbibé d'eau et de vinaigre blanc ou un produit de
nettoyage spécial lave-vaisselle.
En cas de déménagement
En cas de déménagement, essayez de garder l'appareil le plus
possible à la verticale ; si nécessaire, inclinez-le vers l'arrière.
Les joints
L'un des facteurs responsables de la stagnation des mauvaises
odeurs à l'intérieur du lave-vaisselle est représenté par les
déchets d'aliments qui se nichent dans les joints. Il suffira de
nettoyer périodiquement ces derniers à l'aide d'une éponge
mouillée.
Si vous partez en vacances
Quand vous partez en vacances, il est counseillé d'effectuer un
lavage à vide, après quoi débranchez la fiche, fermez le robinet
de l'eau et laissez la porte entrebaillée : les joints dureront plus
longtemps et vous éviterez la formation de mauvaises odeurs.
- Utilisez une juste dose de détergent : si vous exagérez, non
seulement vous n'obtiendrez pas des couverts plus propres
mais vous polluerez un peu plus l'environnement.
- Inutile de rincer les couverts avant de les ranger dans la machine.
.17.
FR
Page 20

Tableau programmes
Programme
Lavage
intensif
Lavage Normal
(IEC-EN 50242)
Lavage
Rapide
Trempage
Indications pour le choix
des programmes
Vaisselle et casseroles
normalement sales.
(déconsillé pour la vaisselle
délicate).
Vaisselle et casseroles
normalement sales sans
résidus secs.
Cycle économique et
rapide à utiliser pour de
la vaisselle peu sale
immédiatement après
l'emploi. Sans séchage.
Lavage préliminaire de
casseroles et de couverts
dans l'attente de
compléter le chargement
au repas suivant.
Description du cycle
Prélavage eau froide.
Lavage prolongé à 70 °C.
Rinçage eau froide.
Rinçage chaud.
Séchage .
Prélavage eau froide.
Lavage prolongé à 50 °C.
Rinçage eau froide.
Rinçage chaud.
Séchage
Lavage bref à 40 °C.
Rinçage froid.
Lavage bref et froid pour
empêcher que les résidus
ne sèchent sur la
vaisselle.
Détergent
lavage
30g
Prélavage:5g
Lavage prolongé:
25g
15g
Produit de
rinçage
( 5 )
FR
.18.
Page 21

Nettoyage et entretiens particuliers
Le groupe filtrant
Pour toujours avoir de bons résultats de lavage, il faut nettoyer
le groupe filtrant.
L'eau de lavage grace au filtre est débarassée des déchets
d'aliments et remise en circulation parfaitement filtrée. Voilà
pourquoi, après chaque lavage, il faut enlever les déchets les
plus gros arrêtés par le gobelet et son filtre demi-circulaire 'A'
en rinçant ce dernier à l'eau courante ; pour sortir le groupe
filtrant tirez vers le haut l'anse du gobelet, il faut nettoyer
soigneusement, au moins une fois par mois, tout le groupe filtrant
comprenant le filtre demi-circulaire 'A' et le microfiltre 'B'. Pour
le nettoyage du filtre et du microfiltre, servez-vous d'une petite
brosse.
Assemblez ensuite les deux éléments comme illustré par
les figures sous-indiquées et remontez l'ensemble du groupe
filtrant dans le lave-vaisselle, en le positionnant à son emplacement et en le poussant vers le bas. Le lave-vaisselle ne doit pas
être utilisé sans filtres. Un mauvais remontage des filtres peut
réduire l'efficacité de lavage du lave-vaisselle ou l'endommager.
Des problèmes : que faire ?
A
B
Nettoyage des bras gicleurs
Il se peut que des déchets d'aliments qui restent collés sur
les bras gicleurs bouchent leurs orifices ; cointrôlez-les
périodiquement et nettoyez-les (voir Vue de près intérieur aux
lettres C-F)
Il peut arriver que le lave-vaisselle ne fonctionne pas du tout ou
pas bien. Avant d'appeler le service après-vente, voyons ensemble que faire : vous avez peut-être oublieé d'appuyer sur
une touche ou vous avez peut-être sauté, par distraction, une
manoeuvre indispensable à son fonctionnement.
Le lave-vaisselle ne démarre pas
Avez-vous contrôlé :
- si la fiche est bien enfoncée dans la prise ;
- s'il y a du courant ;
- si la porte est bien fermée ;
- si la touche marche-arrêt est sur la position 'ON' ;
- si le robinet est ouvert.
Le lave-vaisselle n'emmagasine pas d'eau
Avez-vous contrôlé :
- si le robinet est ouvert et bien raccordé au tuyau ;
- s'il y a une coupure d'eau ou bien s'il n'y a pas
suffisamment de pression ;
- si le tuyau est plié ;
- si le filtre du tuyau d'alimentation en eau est bouché.
La vaisselle n'est pas propre
Avez-vous contrôlé :
- si le robinet est ouvert et bien raccordé au tuyau ;
- s'il y a une coupure d'eau ou bien s'il n'y a pas suffisamment
de pression ;
- si le tuyau est plié ;
- si le filtre du tuyau d'alimentation en eau est bouché.
Le lave-vaisselle ne décharge pas l'eau
Avez-vous contrôlé :
- Si le tuyau d'évacuation est plié.
Sur les couverts il y a des dép?ts calcaires ou un film
blanc
Avez-vous contrôlé :
- si le bouchon du réservoir à sel est bien fermé, si le dosage de
produit de rinçage est bien réglé.
Si, malgré tous ces contrôles, le lave-vaisselle ne fonctionne
toujours pas et que l'inconvénient persiste, appelez le service
après-vente le plus proche en fournissant les renseignements
suivants.
- le type de panne
- le sigle du modèle (Mod...) et le numéro de série (S/N...)
reporté sur la plaquette signalétique appliquée sur le côté de la
contre-porte.
Ne faites jamais appel à des techniciens non agréés
et exigez toujours des pièces détachées originales.
.19.
FR
Page 22

Installation
Emplacement
Installez la machine à l'endroit voulu. Les côtés ou le dos de la
machine peuvent être installés contre des meubles ou contre le
mur. Le lave-vaisselle est doté de tuyaux pour l'alimentation et
l'évacuation de l'eau qui peuvent être orientés vers la droite ou
vers la gauche pour une meilleure installtion.
Nivellement
Une fois que la machine est positionnée, vissez ou dévissez les
pieds pour régler, si besoin est, l'hauteur de la machine et la
mettre à niveau pour qu'elle soit bien horizontale ; elle ne doit
absolument pas être inclinée de plus de 2° .Un bon nivellement
garantit un fonctionnement correct du lave-vaisselle.
Branchement à la prise d'eau froide.
Branchez le tuyau de chargement à une prise d'eau froide avec
embouchure filetée 3/4 gas et vissez-le bien au robinet (voir Fig.1).
Si la tuyauterie de l'eau est neuve ou est restée longtemps
inutilisée, avant de procéder au branchement, contrôlez en
faisant couler l'eau, que cette dermière soit bien limpide et
dépourvue d'impuretés. Cette précaution est indispensable pour
éviter que l'entrée de l'eau ne se bouche et endommage la
machine.
Branchement à la prise d'eau chaude
La machine peut être alimentée avec de l'eau chaude (installation
centralisée, radiateurs) qui ne doit pas dépasser 60°C.
Dans ce cas la durée de lavage sera abrégée de 15 minutes
environ et l'efficacité du lavage légèremernt réduite.Le
branchement à la prise d'eau chaude doit être effectué
exactement comme celui à la prise d'eau froide.
Sécurité contre les risques d'inondation
Un dispositif monté sur le lave-vaisselle bloque l'arrivée d'eau
quand le tuyau d'arrivée est endommangé ou en cas de fuites à
l'intérieur de la machine, évitant ainsi tout risque d'inondation.
Si pour quelque raison que ce soit le boîtier (contenant les parties électriques) était endommagé, déranchez immédiatement
la fiche de la ligne électrique. Pour que la fonction sécurité contre
les fuites soit garantie, le boîtier 'A' avec le tuyau d'entrée de
l'eau, ne doit être raccordé au robinet que dans la position illustrée
Fig.1. Le tuyau d'alimentation ne doit, en aucun cas, être coupé
car il contient des parties sous tension. Si le tuyau n'est pas
suffisamment long pour un raccordement correct, remplacez-le
par un autre de la longueur voulue. Le tuyau est disponible auprès
des revendeurs spécialisés ou du service apès-vente.
Fig.1
Branchement au tuyau d'évacuation
Introduisez le tuyau d'évacuation dans un conduit ayant au
moins 4cm de diamètre ou bien posez-le sur un évier, en évitant
des courbes ou des étranglements excessifs et en utilisant le
coude plastique spécial fourni avec l'appareil (voir Fig. 2).
L'extrémité libre doit se trouver entre 40 et 100cm de haut et ne
doit pas être plongée dans l'eau.
Fig. 2
Attention :
le coude spécial en plastique doit être solidenment fixé au
mur pour éviter que le tuyau d'évacuation ne se déplace et ne
déverse l'eau par terre.
Raccordement électrique
Introduisez la fiche dans une prise de courant munie d'une
mise à la terre efficace (la mise à la terre de l'installation est
une garantie de sécuritéprévue par la loi) après avoir vérifié
que les valeurs de la tension et de la fréquence de réseau
correspondent bien à celles qui sont indiquées sur la plaquette
signalétique située sur la contre-porte en inox de la machine
et que l'installation électrique à laquelle elle doit être raccordée
est bien dimensionnée pour le courant maximum indiqué sur
cette plaquette. Si la prise de courant à laquelle la machine
doit être raccodée ne correspond pas à la fiche, remplacez
cette dernière par une autre appropriée, plutôt que d'utiliser
des adaptateurs ou des dérivations qui pourraient causer des
surchauffes ou des brûlures.
FR
.20.
Page 23

Die Sicherheit-Eine gute Gewohnheit und unsere Verpflichtung
ACHTUNG
Lesen Sie bitte die Hinweise dieser Anleitung aufmerksam durch.
Sie enthalten wichtige Angaben über die Sicherheit bei der
Installation,Benutzung und Wartung des Gerätes.
Dieses Gerät entspricht den folgenden
EECRichtlinien:
-73/23/EEC vom 19.02.73(Niederspannung) und
nachfolgenden Änderungen;
- 89/336/EEC vom 03.05.89 (elektromagnetische
Verträglichkeit) und nachfolgenden Änderunggen
- Entfernen Sie sorgfältig das Verpackungsmaterial.
- Sollte das Gerät wider Erwarten auf dem Transport zu Ihnen
beschädigt worden sein, nehmen Sie es nicht in Betrieb, ohne
zuvor Rücksprache mit Ihrem Lieferanten gehalten zu haben.
- Der Geschirrspüler darf nur von Erwachsenen benutzt werden
und ist ausschließlich für Geschirr des privaten Hausgebrauchs.
- Befolgen Sie bitte die nachstehenden Grundregeln:
* Berühren oder bedienen Sie niemals das Gerät mit nassen
Händen oder barfuß, wenn Sie auf nassem Bodenbelag stehen;
* Vom Einsatz von Mehrfachsteckem,Adaptersteckem oder
Verlängerungen wird abgeraten;
* Achten Sie bei der Installtion darauf,daß das Speisekabel
nicht geknickt oder gefährlich eingeklemmt wird.
Aus der Nähe betrachtet (Schalterblende)
* Trennen Sie das Gerät im Fehlerfall, bei der warung und Reinigung
vom Stromnetz .
- Halten Sie Kinder von Reinigungsmitteln und vom geöffneten
Geschirrspüler fern.
- Das Gerät darf auf keinen Fall im Freien installiert werden,auch
dann nicht,wenn der Installationsraum überdeckt sein sollte,Es ist
gefährtich,das Gerät Regen und Gewittern auszusetzen.
- Berühren Sie während oder nach einem Spülgang nicht den
Elektrowiderstand.
- Stützen oder setzen Sie sich nicht auf die geöffnete Tür, der
Geschirrspüler könnte nach vorne kippen
- Sollten Störungen auftreten,schließen Sie bitte sofort den
Wasserzufuhrhah und ziehen Sie den Netzstecker aus der
Steckdose. Konsultieren Sie darauf hin den Abschnitt "Gibt's
ein Problem?".Sollten Sie die Lösung nicht finden,dann wenden
Sie sich bitte an die nächstgelegene Kundendienststelle.
- Reparatur des Gerätes nur durch autorisierte Fachleute.
- Vor der Entsorgung des Altgerätes ,schneiden Sie bitte das Kabel
durch und entfernen Sie das Schloß.
Um die Leistungsfähigkeit und Sicherheit dieses Gerätes zu
gewährleisten, bitte folgendes beachten:
- wenden Sie sich ausschließlich an unsere autorisierten
Service-Stellen
- verlangen Sie, daß nur Original-Ersatzteile verwendet
werden
AN-AUS -Taste
A
AN-AUS -Bertlebskontrolle
B
C
Taste 1/2 Füllung
D
KontrolleuchteTaste 1/2 Füllung
E
Taste Startverzögerung
F
Kontrolleuchte Startverzögerung
.21.
Programmwahlschalter
G
Kontrolleuchte Programmwahl
H
Taste Start/Rückstellen
I
Klarspülernachfüllanzeige
J
Salznachfüllanzeige
K
Türgriff
L
DE
Page 24

Aus der Nähe betrachtet (Innenraum)
Oberkorb
A
Höhenverstellung des Korbes
B
Oberer Sprüharm
C
Unterkorb
D
Unterer Sprüharm
E
Filtereinsatz
F
Reiniger-und Klarspülbehälter
G
Salzbehälterdeckel
H
Dritter Sprüharm
I
Technische Daten
Breite
Tiefe
Höhe
Fassungsvermogen
Anschluß-Wasserdruck
Betriebsspannung
Leistung
DE
60 cm
60 cm
85 cm
12 Maßgedecke
0.03-0.6MPa
220-240V~ 50Hz
2150W
.22.
Page 25

Salz
Salz
Der Gehalt an Salzen im Wasser variiert Je nach Ortschaft .
Würde hartes Wasser in den Geschirrspüler eingelassen, käme
es zu Verkrustungen auf dem Geschirr.
Dank des Entkalkers, in den das Geschirrspüler-Spezialsalz
eingefüllt werden muß, wird das Wasser vom Kalk befreit.
Einfüllen des Salzes in den Entkalker
Verwenden Sie bitte nur Spezialsalz für Geschirrspfüler.
Der Salzbehälter befindet sich unter dem Unteren Korb und wird
wie folgt gefüllt:
- Den Unterkorb herausnehmen und den Stöpsel des Behälters
abschrauben.
- Wird der Salzbehälter zum ersten Mal gefüllt,muß er zuerst
mit Wasser gefüllt werden.
- Unter Verwendung des Trichters ca.2 kg Salz einfüllen.Es ist
normal,daß hierbei etwas Wasser austritt.
- Den Stöpsel sorgfältig wieder aufschrauben.
Einstellen des Salzverbrauchs
Der Geschirrspüler ist für das Einstellen des Salzverbrauchs je
nach Härtebereich des Wassers vorbereitet,so daß der
Salzverbrauch auf ein notwendiges Mimimum optimiert und
individuell gestaltet werden kann.Auskunft über den Härtegrad
des Wassers in Ihrem Wohngebiet erhalten Sie jederzeit bei Ihren
Stadtwerken.
Zum Einstellen befolgen Sie bitte die folgenden Anleitungen:
- Schrauben Sie den Stöpsel des Salzvorratbehälters ab.
- Auf dem Rand des Behälters befindet sich ein Pfeil (siehe
nebenstehende Abbildung).Wenn nötig,drehen Sie den Pfeil
vom Zeichen"-"entgegen den Uhrzeigersinn auf das
Zeichen"+"je nach der Härte des zugeführten Wassers.
Der Salzbehälter muß neu aufgefüllt werden,sobald die auf der
Schalterblende befindliche Nachfüllanzeige aufleuchtet.
Um Rostbildung zu vermeiden,ist das Salz kurz vor einem
kompletten Spülgang einzufüllen.
.23.
Wasserhärte
ç
fH
010
NMOR
ORRM
[RM
ç
dH mmol/l
MNT
MNIT
NUQQ NIUQIQ
QIRUIV
QRUV
[UV [UIV
Positionswähler
L
?J?
jba
?H?
Salzverbrauch
(Gramm/pro
Spülgang)
OM
QM
SM
Reichweite
(spülgänge/
-2kg)
LM
SM
QM
OR
DE
Page 26
Reiniger-und Klarspüler
Wir empfehlen,das Einstellen nach dem folgenden Schema
vorzunehmen:
Reiniger
Der Einsatz spezifischer Reiniger für Geschirrspüler garantiert
bessere Reinigungsergebinsse. Füllen Sie den Reiniger vor
Beginn des Spülgangs gemäß den Anweisungen des
Abschnitts"Programm-Tabelle" ein.Der Reinigerbehälter befindet
sich im Innern der Tür.
Einfüllen des Reinigers
Die Taste "B" drücken,um den Deckel "A" zu öffnen.
Der Reiniger für den Spülgang ist in Mulde "C" einzufullen.
Nach Einfüllen des Reinigers drücken Sie bitte den Deckel so
zu,daß er einrastet.
C
Vorspülgangmit
A
B
Verllängerter Spülgang
Klarspüler
Die Verwendung des Klarspülers fördert das Trocknen und
verleiht lhrem Geschirr strahlenden Glanz.Der Klarspülerbehälter
befindet sich im Türinnern und muß nach ungefähr je 80
Spülgängen neu aufgefüllt werden;(bei den mit einer
Nachfüllanzeige bestückten Modellen wird der Klarspüler
eingefüllt,wenn die entsprechende Kontrolleuchte aufleuchtet).
Einfüllen des Klarspülers
Drehen Sie den Deckel"C"des Klarspülerbehälters nach links
ab; achten Sie beim Einfüllen darauf, daß kein Klarspüler
überlauft. Der Klarspüler kann durch Regulieren (mittles eines
Schraubenziehers) des unter dem Deckel "C" befindlichen
Reglers "F" dosiert werden. Es sind 6 verschiedene
Einstellungen möglich,normalerweise ist er auf Pos. 3
voreingestellt.
Wichtig:
Eine geeignete Klarspüler-Dosierung ermöglicht ein optimales
Trocknen.
Sollten auf dem gespülten Geschirr Wassertropfen oder- flecken
hinterleiben,muß der Dosierer auf höher Zahlenwerte gedreht
werden.
Sollten auf dem gespülten Geschirr weiße Streifen hinterbleiben,
muß der Dosierer auf niedrigere Zahlenwerte gedreht werden.
C
Achtung:Um das Einrasten des Deckels zu erleichtern
säubern Sie bitte die Kammerkanten vor dem Verschließen
von eventuellen Reinigerresten.
DE
F
C
.24.
Page 27
Einsortieren des Geschirrs
Entfernen Sie die gröbsten Speisereste,bevor Sie das Geschirr
in die Körbe einsortieren,damit die Filter nicht verstopfen,was
die Reinigungskraft herabsetzen würde.
Stark verschmutzte Töpfe und Pfannen mit angetrockneten
Speiseresten sollten vorher eingeweicht werden.Sie vermeiden
hierdurch,Spülgänge wiederholen zu müssen.Ziehen Sie die
Körbe ganz heraus,Sie erleichtern sich hierdurch das
Einsortieren des Geschirrs.
Was gehört in den Unterkorb
Es empfiehlt sich,die am schwersten zu reinigenden Geschirre
an den Unterkorb zu legen: Deckel ,Servierteller und Schüssel,
wie auf den Abbildung veranschaulicht .
Servierteller und grosse Deckel sollten ganz Seitlich einsortiert
werden,und zwar so,daß sich der obere Sprüharm ungehindert
drehen kann.
- Töpfe,Salatschüsseln usw. müssen immer umgedreht, d.h.
mit dem Boden nach oben einsortiert werden;
- Sehr hohes Geschirr sollte schräg einsortiert werden, damit
das Wasser besser ablaufen kann;
- Der Besteckkorb kann zweigeteilt werden(siehe Abb. A).
Bei geringer Anzahl an zu spülenden Besteckteilen kann somit
eine Korbhälfte entfernt werden.Sie gewinnen hierdurch Platz
für Ihre Töpfe; außerdem kann er so auch in den Oberkorb
eingestellt werden.
- Sortieren Sie das Besteck mit nach unten gerichteten Griffen
in den Besteckkorb.Ist der Besteckkorb seitlich mit Schlitzen
versehen,werden Kaffeelöffel einzeln in diese Schlitze
eingesteckt.Besonders langes Besteck muß vorne in den
Oberkorb eingelegt werden.
Was gehört in den Oberkorb
Sortieren Sie in den Obekorb das empfindliche und zarte Geschirr
wie Gläser,Tee-und Kaffeetassen,Untertassen, jedoch auch
Teeler, flache Schüsseln,leicht verschmutzte flache Töpfe und
Pfannen.
- Sortieren Sie zartes bzw, leichtes Geschirr so ein, daß es durch
den Wasserstrahl nicht umgeworfen wird.
Der Oberkorb ist höhenverstellbar (siehe Abb. B).
Unterkorb
12Maßgedecke
Abb. A
Oberkorb
1
3
2
4
Abb. B
.25.
DE
Page 28

Inbetriebnahme des Gerätes
Einstellen eines Spülprogramms
Nach Abschluß der in den vorigen Paragraphen beschrieben
Arbeitsschritte, und der Kontrolle, daß der Wasserhahn auch
vollständig aufgedreht wurde, drücken Sie die auf der
Schalterblende befindiche ON/OFF-Taste " A" ,die Kontrollampe
" B" leuchtet auf. Das Gerät ist nun eingeschaltet; warten Sie
einige Sekunden bevor Sie das Gerät programmieren.
Wahl und Start des Spülprogramms
Durch Drücken der Programmwählertaste " G " stellen Sie das
Programm ein. Bei jedem Druck auf diese Taste leuchtet
nacheinander eine der Programm-Kontrolleuchten "H" auf.
Wählen Sie das für das einsortierte Geschirr geeignete
Spülprogramm
( ziehen Sie hierzu, besonders zu Anfang , die in diesem
Handbuch enthaltene Programmtabelle zu Rate).
Drücken Sie nun die Start-/Rückstellungstaste " I " ; nach einigen
Sekunden ertönt ein kurzer Signlton,der anzeigt , daß das
eingestellte Spulprogramm läuft und somit nicht mehr geändert
werden kann.Sollte sich dennoch eine Änderung als notwendig
erweisen,dann ziehen Sie bitte den Äbschnitt" Löschen oder
Ändern eines bereits laufenden Programms"zu Rate.
Löschen oder Ändern eines bereits eingestellten
Spülprogramms
Anmerkung: Ein bereits laufendes Spülprogramm kann nur dann
geändert werden,wenn es nur kurz vorher in Gang gesetzt wurde.
Der Reiniger könnte sonst bereits eingespült worden,und die
Spüllauge bereits abgelaufen sein;der Reiniger muß in diesem
Fall erneut eingefüllt werden;(siehe Abschnitt "Einfüllen des
Reinigers").
Zur Änderung eines bereits laufenden Spülprogramms drücken
Sie die Start/Rückstellungstaste " I " ; sämtliche eingegebenen
Daten wurden gelöscht.
Wenn Sie nachträglich noch etwas einsortieren
möchten
Der Spülgang kann durch Drücken auf die ON/OFF-Taste
unterbrochen werden.Eventuell vergessenes Geschirr kann so
nachträglich einsortiert werden.Nach erneutem Druck derselben
Taste läuft das Programm da weiter,wo es unterbrochen wurde.
Kontrollampe 'Programmphase'
Das spülprogramm wird starten und die Kontrollampe
“Programmphase” (H) wird anfangen zu blinken.
Ende des Spülprogramms
Der Abschluß des Spülganges wird durch Signalton und durch
das Aufleuchten der Kontrolleucht "H" angezeigt.Schalten Sie
den Geschirrspüler mittels der ON/OFF-Taste aus,drehen Sie
den Wasserhahn ab und öffnen Sie die Geschirrspülertür. Warten
Sie einige MInuten, bevor Sie das heiße und somit
stoßempfindlichere Geschirr ausräumen. Es trocknet besser und
kühlt etwas ab.
DE
Start-Vorprogrammierung
Praambel: Nach Einstellen eines Spülprogrammes gemäß
Abschnitt "Wahl und Start eines Spülprogrammes"kann ein
verzögerter Start vorprgrammiert werden.
Durch Drücken der Taste"E"(siehe Aus der Nähe betrachtet
"Schalterblende")kann der Programmbeginn um 1 bis 12 Stunden
vorprogrammiert werden.Bei jedem Druck auf die Taste zeigt
das Display "F" nacheinander die möglichen Zeiten,um die der
Start verzögert werden kann,an;stellen Sie die gewunschte Zeit
dementsprechend ein.Bei Ingangsetzen des Geschirrspülers
durch Druck auf die Taste "I" ertönt ein kurzer Signalton,und
das Aufleuchten des neben der voreingestellten
Startverzögerungszeit befindlichen kleinen Punktes zeigt an,
daB die rückwärtige Zeitrechnung der Wartezeit läuft.
Nach Ablauf der eingestellten Startverzögerungszeit setzt sich
das Spulprogramm in Gang.
ANMERKUNG:
a)Während der Wartezeit sollte möglichst keine Änderung mehr
erfolgen;sollte sich dennoch irgendeine Änderung als notwendig
erweisen,müssen die Einstellungen durch Druck auf die ON/OFF
-Taste “A” gelöscht werden.
Wiederholen Sie nun sämtliche Eilstellungen zur"StartVorprogrammierung" und "Wahl und Start des Spülprogramms"
gemäß den Anweisungen der entsprechenden Abschnitte.
b)Sollte während der Wartezeit der Strom ausfallen,oder die Tür
geöffnet werden,wird die Zeitrechnung unterbrochen und setzt
erneut ein: entweder wenn die Stromversorgung
wiederhergestellt,oder die Tür wieder geschlossen wird.
Programmänderungstasten
Taste"1/2 Füllung"
Schalten Sie diese Taste ( siehe "Aus der Nähe betrachtetSchalterblende” ) Buchstabe C ein ,wenn lhr Gerät nur halbvoll
beladen ist. Sie sparen hierdurch Wasser und Energie.Diese
Taste kann vor Einstellen eines jeden Spülganges
hinzugeschaltet werden,mit Ausnahme jedoch des Intensiv
Programmes (falls in der Programmtabelle vorgesehen),unter
der Bedingung jedoch,daß auch die für den Spülgang
vorgeschriebene Reinigermenge halbiert wird.
.26.
Page 29

Energiespartips
- Schalten Sie den Geschirrspüler erst ein,wenn er voll beladen
ist.Sie sparen hierdurch wertvolle Energie.Schalten Sie evt.
das Einweichprogramm ein,um Geruchsbildung oder ein
Antrocknen der Speisereste zu vermeiden.
- Wählen Sie das geeignete Programm: Die Wahl des Programms
hängt von der Art des Geschirrs und dessen
Verschmutzungsgrad ab.
So halte ich das Gerät in Topform
Nach jedem Spülgang
Drehen Sie nach jedem Spülgang den Wasserhahn ab und
lassen Sie die Tür lhres Geschirrspülers etwas vorstehen um
die Bildung von Feuchtigkeit oder Gerüchen im Geräteinnern zu
vermeiden .
Netzstecker aus der Steckdose ziehen
Ziehen Sie vor jeder Reinigung bzw.Pflege den Netzstecker aus
der Steckdose.
- Dosieren Sie die richtige Reinigungsmittelmenge :
Durch Einfüllen von zu viel Reiniger wird Ihr Geschirr nicht
sauberer,Sie belasten hierdurch nur die Umwelt.
- Es ist nicht nötig,das Geschirr vor dem Einsortieren abzusp
Bei einem Umzug
Bei einem Umzug sollte das Gerät möglichst aufrecht
transportiert werden,im Notfall ist es schräg nach hinten zu
halten.
Dichtungen
Zu den verantwortlichen Faktoren für die Bildung schlechter
Gerüche im Innern des Geschirrspülers gehören zurückbleibende
Speisereste in den Dichtungen .Letztere sollten demnach
regelmäßig mit einem feuchten Schwamm gereinigt werden.
ülen.
Keine Lösungs-oder Scheuermittel verwenden
Reinigen Sie die äußeren Gehäuseteile des Gerätes weder mit
Lösungs- noch mit Scheuermitteln,sondern mit einer lauwarmen,
milden Seifenlauge.
Eventuelle Flecken auf den inneren Gehäuseteilen sind mit einem
mit Wasser und etwas Essig angefeuchteten Tuch,oder mit einem
Spezialreiniger für Geschirrspüler zu entfernen.
Vor den Ferien
Bei längerer Abwesenheit, z.B. vor Ihren Ferien,empfehlen wir
einen Spülgang bei leerem Gerät durchlaufen zu lassen; den
Netzstecker aus der Steckdose zu ziehen und den Wasserhahn
abzudrehen.Lassen Sie die Gerätetür etwas vorstehen.Sie
schonen hierdurch nicht nur die Dichtungen,sondern vermeiden
die Bildung schlechter Gerüchen.
.27.
DE
Page 30

Programmtabelle
Programm
Starkspülpro
Programm
Normalspül
programm
(IEC-EN 50242)
KurzProgramm
Einweichen
Hinweise zur Wahl des
Programmes
Stark verschmutztes Geschirr,
sowie Pfannen und Töpfe.
Programm für den täglichen
Abwasch
Normal verschmutztes Geschir und
Töpfe ohne angetrocknete
Speisereste.
Kurzes Sparprogram für leicht
verschmutztes,sofort nach dem
Gebrauch zu reinigendes Geschirr.
Kein Trocknen.
Kurzes Abspülen des Geschirrs und
der Töpfe,die später gereinigt werden
sollen.
Beschreibung des Spülgangs
Vorspülgang mit kaltem Wasser.
Verlängerter Spülgang bei 70K
Nachspülen mit kaltem Wasser.
Nachspülen mit heißemWasserK
Trocknen.
Vorspülgangmit kaltem Wasser.
Verllängerter Spülgang bei 50K
Nachspülen mit kaltem Wasser.
Nachspülen mit heißem Wasser.
Trocknen.
Kurzspülgang bei 40
h~äíJk~ÅÜëéüäÉåK
Kurzes Kalt-Abspülen,um
Antrocknen=озе=pйЙблЙкЙлнЙе= тм
оЙкгЙбЗЙеK
KK
K
KK
Spüler
30g
Vorspülgangmit:5g
Verllängerter
Spülgang:25g
15g
Klarspüler
( 5 )
DE
.28.
Page 31
Reinigung und Pflege
Filter
Um optimale Spülergebnisse zu gewährleisten, ist die Filtereinheit regelmäßig zu reinigen.
Die Spüllauge wird dank des Filter von Speiseresten befreit,das
Wasser wird gereinigt wieder in Umlauf gebracht. Aus diesem
Grunde sollten die im Filtereinsatz und im halbrunden Filter "A"
zurückgehaltenen groben Speisereste nach jedem
Spülprogramm unter fileßendem Wasser gereinigt werden;
ziehen Sie den Filtereinsatz am Griff nach oben heraus,
Mindestens einmal monatlich die gesamte Filtereinheit,
bestehenf aus dem halbrunden Filter "A" und dem Mikrofilter
"B" gründich zu reinigen.
Reinigen Sie Ietztere mit Hilfe eines Bürstchens.Setzen Sie nun
die beiden Teile,gemäß untenstehender Abbildungen wieder
zusammen,und setzen Sie daraufhin die gesamte Filtereinheit
durch leichtes Andrücken wieder in den Geschirrspüler ein.
Gibt's ein Problem?
Bevor Sie bei einer eventuellen Störung oder schlechten Betriebsweise
des Gerätes den Kundendienst anfordern,Kontrollieren Sie bitte,ob Sie
bei Einschalten des Gerätes auch nichts vergessen haben.
Der Geschirrspüler startet nicht
Bitte kontrollieren Sie,ob :
- der Netzstecker korrekt in die Steckdose eingesteckt wurde;
- kein Stromausfall besteht;
- die Tür richtig geschlossen wurde;
- die ON/OFF -Taste auf "ON" steht;
- der Wasserhahn auf ist.
Der Geschirrspüler lädt kein Wasser
Bitte kontrollieren Sie,ob :
- der Wasserhahn aufgedreht und korrekt am Schlauch angeschlossen
wurde;
- die Wasserzufuhr unterbrochen bzw.der Druck zu niedrig ist;
- der Schlauch eingeklemmt ist;
- der Zufuhrschlauch-Filter verstopft ist.
Das Geschirr ist nicht sauber
Bitte kontrollieren Sie,ob :
- der Wasserhahn aufgedreht und korrekt am Schlauch angeschlossen
wurde;
- die Wasserzufuhr unterbrochen wurde bzw.der Druck zu niedrig ist;
- der Schlauch eingeklemmt ist;
- der Zufuhrschlauch-Filter verstopft ist.
Der Geschirrspüler darf nicht ohne Filter gebraucht werden.Ein
unsachgemäßes bzw.nicht korrektes Einsetzen der Filter kann
das Reinigungsergebnis beeinträchtigen oder sogar das Gerät
beschädigen.
A
B
Reinigung der Sprüharme
Die Löcher bzw .Schlitze der Sprüharme könnten durch
Speisereste verstopft werden,kontrollieren und reinigen Sie auch
diese regelmäßig (siehe Abschnitt"Aus der Nähe betrachtet"
(Innenteile)Buchstabe C-F).
Das Wasser läuft nicht ab
Bitte kontrollieren Sie,ob :
- der Ablaufschlauch eingeklemmt ist.
Das Geschirr ist unklar bzw.weist Kalkreste auf
Bitte kontrollieren Sie,ob :
- der Stöpsel des Salzbehälters richtig geschlosssen wurde,
- der Dosierer des Klarspülers korrekt reguliert wurde.
Sollte lhr Geschirrspüler trotz aller Kontrollen nicht funktioneren,oder
sollten Sie den Fehler nicht beheben können,dann fordern Sie bitte,unter
Angabe nachfolgender Daten,den nächstgelegenen,autorisierten
Kundendienst an:
- Art der Störung
- Kennnummer des Modells(Mod...)Seriennummer (S/N...), ersichtlich
auf dem seitlich an der Gegentür angebrachten Typenschild.
Lassen Sie die Fehler niemals durch nicht autorisiertes Personal beheben und verweigern Sie die Installation von
Ersatzteilen,wenn es sich nicht um Originalteile handelt.
.29.
DE
Page 32

Installation
Aufstellen
Stellen Sie das Gerät an der gewünschten Stelle auf.Das Gerät
kann mit den Seitenteilen, oder mit der Rückseite an angrenzende
Möbelteile oder an die Wand angelehnt werden.Der
Geschirrspüler ist mit Zufuhr- und Ablaufschläuchen bestückt ,
die,je nach den Installationsgegebenheiten,sowohl nach rechts
als auch nach links geleitet werden können .
Nivellieren
Richten Sie das Gerät mittels der Stellfüße eben waagerecht aus,
verstellen Sie durch Anziehen oder Lösen der Stellfüße evtl. die
Höhe des Gerätes, das Gertäe, darf auf keinen Fall einen Neigung
von mehr als 2
gewährleistet eine korrekte Betriebsweise des Gerätes .
0
aufweisen.Eine korrekte Nivellierung
Anschluß an die Kaltwasserleitung
Schließen Sie den Zufuhrschlauch mittels einer 3/4 GasGewindeverbindung an die Kaltwasserleitung an ,achten Sie
darauf, daß er fest am Wasserhahn angedreht wird (siehe Abb.
1).
Sollte es sich um neue Leitungen handeln,oder um Leitungen,
die für längere Zeit nicht benutzt wurden,dann lassen Sie das
Wasser so lange laufen,bis es ganz klar ist.Durch diese
Vorsichtsmaßnahme vermeiden Sie, daß eventuelle
Schmutzreste zu Verstopfung der Zufuhrleitung und zu Schäden
an der Maschine führer.
Anschluß an die Warmwasserleitung
Das Gerät kann auch an die Warmwasserleitung (heizanlagen),
die eine Temperatur von 60 c nicht überschreitet,
angeschlossen werden.
In einem solchen Fall wird das Spülprogramm um ca.15 Minuten
verkürzt und die Reinigungswirkung etwas verringert.
Der Anschluß an die Warmwasserleitung erfolgt auf dieselbe
Weise wieder an die Kaltwasserleitung.
Überschwemmungsschutz
Der Geschirrspüler ist mit einem System aussgestattet,dank
dessen bei einem eventullen Schaden am Wasserzulaufschlauch
oder bei Leckstellen im lnnern des Gerätes sofort die
Wasserzufuhr unterbrochen wird,wodurch Schäden an lhrer
Wohnung vermieden werden.Sollte das Gehäuse (das
stromführende Teile enthält ) aus irgendwelchen Gründen
beschädigt werden,ist der Netzstecker sofort aus der Steckdose
zu ziehen.Um eine ordnungsgemäße Funktionsweise des
Abb. 1
Überschwemmungsschutzes zu garantieren,muß das
Gehäuse"A"mit dem Wasserzufuhrschlauch ausschließlich in der
Stellung wie in Abb.1 veranschlauchlicht,angeschlossen werden.
Der Zulaufschlauch darf auf keinen Fall durchgeschnitten werden,
da er stromführende Teile enthält.Sollte sich der Schlauch für
einen korrekten Anschluß als nicht lang genug erweisen, dann
muß mit einem der passenden Länge ausgetauscht werden. Der
Schlauch ist bei einem Fachhändler oder bei hrer
Kundendienststelle anzufordern.
Anschluß an das Ablaufrohr
Stecken Sie den Ablaufschlauch in eine Ablaufleitung mit einem
Durchmesser von mindestens 4 cm,oder legen Sie ihn in das
Spülbecken; verwenden Sie die mittgelieferte Spezial Krümmung
aus Plastik(siehe Abb. 2),um Drosselstellen oderzu enge
Klümmungen zu vermeiden.Das Schlauchende muß in einer
Höhe 40 und 100 cm liegt ,auslaufen und darf nicht im Wasser
eingetaucht sein.
Abb. 2
Achtung:
Die Spezialkrümmung aus Plastik muß fest an der Mauer befestigt
werden ,um zu vermeiden,daß der Ablaufaschlauch abrutscht,
und so das Wasser außerhalb des Ablaufrohres abläuft.
Elektroanschluß
Stecken Sie den Netzstecker in eine mit einer leistungsfähigen
Erdung versehene Steckdose (die Gewährleistung der Sicherheit
durch eine Erdung der Anlage ist gesetzlich vorgeschrieben),
nachdem Sie sich vergewissert haben,daß die Spannungs- und
Frequenzwerte der Netzleitung mit den auf dem Typenschild
befindlich auf der Gegentür aus Inox angegebenen Werten
übereinstimmt und daß die Leistung der Elektroanlage, an die
das Gerät angeschlossen wird,der auf dem Typenschild
angegebenen Strom-Bedarfsspitze des Gerätes entspricht.
Sollte sich die Steckdose,an die das Gerät angeschlossen werden
soll,für den an dem Gerät befindenden Netzstecker nicht eignen,
Sollte Letzterer mit einen geeigneten Netztecker ersetzt werden,
anstatt auf Adapterstecker oder Abzweigungen überzugreifen die
durchbrennen oder sich Überhitzen könnten.
DE
.30.
Page 33

A segurança
Atenção:
Leia atentamente as advertências deste manual pois fornecem
importantes indicações referentes à segurança da instalação,
utilização e manutenção.
Este equipamento está conforme as seguintes
Directivas Comunitárias:
-73/23/EEC de 19/02/73 (Baixas Tensões) e sucessivas
modificações.
-89/336/EEC de 03/05/89 (Compatibilidade
Electromagnética) e sucessivas modificações.
- Retire com cuidado o material da embalagem.
- Depois de retirar embalagem, verifique o estado do aparelho.
Em caso de d
- A m
por adultos e
- Regras fundamentais a serem seguidas na utiliza
* n
ãos ou pés molhados.
m
* N
* Durante a instala
dobrado ou sofrer grandes press
* Em caso de funcionamento irregular ou de operações de
manutenção, desligar o aparelho da rede eléctrica.
Pormenor do painel de comandos
úvida, contacte os técnicos profissionais qualificados.
áquina de lavar louça deve ser utilizada exclusivamente
é destinada a uso doméstico.
ção:
ão toque na máquina com os pés descalçados ou com as
ão utilize cabo de extensão e fichas múltiplas.
ção o cabo de alimentação não deve ser
ões.
- As crianças devem ser mantidas longe dos detergentes e da
máquina de lavar louça quando a mesma estiver aberta.
- O aparelho nunca deve ser instalado ao ar livre, mesmo que o
espaço esteja protegido por um telhado.É perigoso deixála
exposto às chuvas e outros elementos.
- Não toque em peças quentes durante,ou logo após o ciclo de
lavagem.
- Não apoiar-se nem sentar-se na porta aberta, pois a máquina
de lavar louça pode tombar.
- Em caso de avaria, fechar a torneira da entrada de água e
remover a ficha da tomada. Em seguida deve consultar o capítulo
"Detecção de avarias?" e se não encontrar uma solução
contacte um centro de assistência técnica.
- Só técnicos qualificados estão autorizados a fazer reparações.
- Se aparelho não for mais utilizado, deve cortar o chbo de
alimentação e retirar o sistema de fecho da porta.
Para garantir a eficiência e a segurança deste
electrodoméstico:
- Dirija-se exclusivamente a centros de assistência
técnica autorizados.
- Solicite sempre a utilização de peças sobresselentes
originais.
Botão ON-OFF
A
Piloto indicador ON-OFF
B
Botão " Media Carga"
C
Piloto indicador "Meia-Carga"
D
Selector temporizador
E
Piloto indicador do temporizador
F
.31.
Selector de programas
G
Piloto indicador do selector de programas
H
I
Tecla "Iniciar / Parar"
J
Piloto indicador de falta de abrilhantador
K
Piloto indicador de falta de sal
L
Puxador da porta
PT
Page 34

Pormenor do interior
Cesto superior
A
Regulador da altura do cesto
B
Braço irrigador superior
C
Cesto inferior
D
Braço irrigador inferior
E
Filtro de lavagem
F
Recipiente de detergente e abrilhantador
G
Tampa do recipiente de sal
H
Terceiro braço irrigador
I
Características Técnicas
Largura
Profundidade
Altura
Capacitdade
Pressão de água alimentação
Tensão de alimentação
Potência total máxima
PT
60cm
60cm
85cm
12 talheres standard
0.03-0.6MPa
220-240V~ 50Hz
2150W
.32.
Page 35

SAL
O Sal
A dureza da água varia de região para a região. Se a máquina
de lavar louça for abastecida com água dura, podem formar-se
manchas na louças. Devido a um descalcificador que utiliza um
sal específico para a máquina de lavar louça, o calcário de água
é eliminado.
Introdução do Sal no Descalcificador
Utilize sempre sal específico para máquina de lavar louça. O
recipiente do sal está por baixo do cesto inferior e deve ser
cheio da seguinte maneira:
- Extraia o cesto inferior, desenrosque e retire a tampa do
recipiente.
- A primeira vez que colocar sal no recipiente, encha-o de água.
- Coloque o funil fornecido na abertura e coloque cerca de 2 Kg
de sal. É normal que um pouco de água vaze do recipiente.
- Enrosque novamente a tampa com cuidado.
Regulação do Sal
A máquina de lavar louça possui um dispositivo de regulação
de consumo de sal de acordo com a dureza da água utilizada
de modo a optimizar e personalizar o consumo de sal no nível
mínimo necessário.
Informe-se junto da Entidade Fornecedora da água da sua zona
sobre o grau de dureza da mesma.
Para a regulação obedeça às seguintes instruções:
- Desenroscar a tampa do recipiente do sal.
- No aro do recipiente está situada uma seta ( veja a fig. do
lado), rode se necessário, a seta com o sinal "-", no sentido dos
ponteiros do relógio, na direcção do sinal "
da água fornecida.
É aconselhável efectuar regulação, segundo a seguinte tabela:
Dureza da Água
H " segundo a dureza
É preciso encher o recipiente de sal quando acender-se o
indicador luminoso "Falta de Fal" no painel de comandos.
Para evitar corrosão, é aconselhável colocar o sal pouco antes
de iniciar o ciclo de lavagem.
.33.
ç
fHçdH
010
NMOR
ORRM
[RM
MNT
NUQQ
QRUV
[UV [UIV
Mmol/l
MNIT
NIUQIQ
QIRUIV
Posição
selector
L
=?J?
jba
?H?
Consumo sal
( gramas /ciclo)
M
OM
QM
SM
Autonomia
(ciclos/2 Kg)
L
SM
QM
OR
PT
Page 36

Detergente e Abrilhantador
O Detergente
Utilizar apenas detergente específico para a máquina de lavar
louça. O detergente deve ser colocado antes do início de cada
ciclo de lavagem com base nas indicações fornecidas na "Tabela
dos Ciclos de Lavagem". O distribuidor do detergente encontrase
no interior da porta.
Colocação do Detergente
Para abrir a tampa "A" pressionar o botão "B". O detergente de
lavagem deve ser colocado no distribuidor "C".
Depois de colocar o detergente, fechar a tampa apertando bem
até sentir o "click" do fecho.
C
Pré-lavagem
A
B
Lavagem prolongada
Atenção: para facilitar o fecho da tampa, remover, antes de
fechar, eventuais resíduos de detergente caidos nos bordos
do distribuidor.
O Abrilhantador
Este produto torna a louça mais brilhante e enxuga-a
melhor. O recipiente para o abrilantador está situado no interior
da porta; deve ser cheio aproximadamente a cada 80 lavagens
( nos modelos com piloto indicador de falta de abrilhantador,
deve ser cheio quando acender o respectivo piloto)
Colocação do Abrilhantador
Para abrir o recipiente é necessário rodar no sentido contrário
aos ponteiros do de relógioa tampa "C" e quando deitar o
abrilhantador evitar que o mesmo derrame. É possível regular
a quantidade de produto distribuída, utilizando uma chave de
fendas no regulador "F" situado por baixo da tampa "C". Há 6
posições, mas normalmente é regulada na 3.
Importante:
A regulação do abrilhantador permite uma melhor secagem. Se
na louça lavada houver gotas de água ou manchas, é necessário
rodar o regulador para uma posição mais elevada. Se a louça
lavada tiver listras brancas, rodar o regulador para números mais
baixos.
C
F
C
PT
.34.
Page 37

Colocação da Louça
Antes de distribuir a louça nos cestos, remover os resíduos
maiores de comida para evitar obstruir os filtros e consequentemente a redução da eficiência de lavagem.
Se as panelas ou frigideiras tiverem muitas crpstas,é
aconselhável deixá-las de molho a aguardar a lavagem.
Desta maneira evitam-se posteriores lavagens.
Retire os cestos para facilitar a colocação de louça.
Como utilizar o cesto inferior
É aconselhável colocar os utensílios mais díficeis a lavar no
cesto inferior: panelas, pratos rasos e de sopa, da maneira
ilustrada na figura ao lado.
As travessas e as tampas maiores devem ser acomodadas
preferencialmente nos lados do cesto, mas sem bloquear a
rotação do braço distribuidor superior.
- panelas, saladeiras etc. devem sempre estar viradas para baixo
- utensílios muito profundos devem ser colocados de modo a
facilmente serem atingidas pelo fluxo das água.
- o cesto para talheres é desdobrável (ver Fig. A) para poder
ser utilizado apenas com uma pequena quantidade de talheres;
deste modo poupa-se espaço para panelas no cesto inferior
- os talheres devem ser colocados com os cabos virados para baixo;
Se o cesto tiver compartimentos laterais, as colheres pequenas
devem ser colocadas uma por uma nas apropriadas aberturas.
Os talheres muito compridos devem ser colocados em
horizontalmente na parte frontal do cesto superior.
Como utilizar o cesto superior
O cesto superior é ideal para lavar peças delicadas e leves tais
como copos, chavénas de chá e de café, pires e também pratos,
saladeiras baixas, frigideiras e panelas baixas pouco sujas.
-Colocar os utensílios leves de maneira a que não sejam
deslocados pelos jactos de água.
É possível regular a altura do cesto mediante os botões situados
nos lados do próprio cesto (ver Fig.B).
Cesto inferior
Cesto superior
Carregamento normal da louças para 12 pessoas
1
3
Fig.A
2
4
Fig.B
.35.
PT
Page 38

Como colocar a máquina em funcionamento
Como iniciar um programa de lavagem ...
Depois de ter efectuado todas as operações indicadas nos
capítulos anteriores e ter ligado a torneira de água, pressione a
tecla ON-OFF (A) situada no painel de comandos o piloto
indicador "B" acende-se. A máquina entra em funcionamento,
no entanto é necessário aguardar alguns segundos antes de
iniciar a programação.
Iniciar o funcionamento e programação
Seleccione o programa desejado utilizando a tecla de selecção
de programas (G). Sempre que esta tecla é ressionada, acendese em sequência um dos indicadores luminosos dos programas
(H). Escolha o programa que considere mais adequado ao tipo
de louça a ser lavada (consulte, principalmente nas primeiras
vezes, a tabela de programas apresentada neste manual) .
Pressione a tecla de Iniciar/Parar (I), e após alguns segundos
um breve sinal acústico indica que o ciclo de lavagem já iniciou
e não é possível modificá-lo. Se necessário, leia o parágrafo
"Anular ou Modificar um programa em curso".
Anular ou Modificar um programa em curso ...
Premissa: um programa em curso só pode ser modificado apenas
se tiver iniciado à pouco tempo; caso contrário, o detergente pode
já ter passado para a cuba e a máquina pode já ter carregado
água para a lavagem; neste caso será preciso
colocar novamente detergente ( ver o parágrafo "colocar
detergente").
Para modificar um programa em curso é necessário pressionar a
tecla ON-OFF (A), todas as programações serão canceladas.
Caso se tenha esquecido de colocar louça ...
Pode interromper o ciclo de lavagem através da tecla Iniciar/
Parar, em seguida coloque a louça esquecida e quando a
máquina for novamente ligada, o ciclo reiniciará no ponto em
que foi interrompido.
Indicadores luminosos de avanço do ciclo de lavagem
Quando a máquina está a funcionar, o indicador de programa
correspondente (H) a este ciclo começa a piscar.
No Final da Lavagem ...
O final do ciclo de lavagem termina com seis (6) sinais cústicos,
e o indicador luminoso (H) do programa eleccionado apagarseá. Para desligar a alimentação léctrica, utilize a tecla ON-OFF,
fechando a torneira de água e abrindo a porta. Aguardar alguns
minutos antes de retirar a louça, deste modo evita-se o
manuseamento de louça quente, a qual é mais sensível a partir
e a louça seca melhor.
Programação com temporizador para funcionamento
da máquina
Premissa: Depois de ter seleccionado o programa de lavagem
do modo indicado no parágrafo "Iniciar o funcionamento e
programação", é possível programar o ínicio do funcionamento
da máquina de lavar louça.
Ao pressionar a tecla "E" (ver "pormenor do painel de comandos"
é possível adiar o ínicio de um ciclo de lavagem entre 1 a 12 horas.
Cada vez que esta tecla for pressionada, visualizará um "F" com o
valor da hora temporizada, de seguida seleccionar o tempo
desejado. Ao ligar o aparelho através da tecla (I), ouve-se um breve
sinal acústico e pisca o valor da hora programada, indicando que
inicia a contagem.
Quando chegar à hora anteriormente programada, o ciclo iniciará.
a) Durante o tempo de espera é melhor não alterar nada, mas se
for preciso, tem de cancelar todos os programas; se pressionar a
tecla (A), todos os programas serão cancelados.
Nesta altura, repita, por favor, as operações de "programação para
ínicio de temporização do ciclo de lavagem" e de "iniciar o
funcionamento e programação" segundo as instruções dos
respectivos parágrafos.
b) Durante o período de funcionamento temporizado se a porta for
aberta, o indicador piscará e ouvem-se sinais acústicos, a contagem
pára; quando a porta for fechada, recomeça o funcio-namento
novamente.
Atenção:
Botões para regular o programa
Tecla "1/2 Carga"
Esta tecla ( ver "pormenor painel de comandos, letra "C") permite
lavar apenas no cesto superior, caso não haja louça suficiente
para completar a capacidade. Deste modo pode economizar-se
água e energia eléctrica. Pode utilizar-se antes de programar
qualquer ciclo de lavagem, com exepção do programa intensivo
( se incluído na tabela de programas). Neste caso utilizar metade
da quantidade do detergente recomendado para o programa
seleccionado.
PT
.36.
Page 39

Conselhos para Economizar Energia
- É importante utilizar a máquina de lavar louça com a carga
completa para optimizar os consumos; para evitar que entretanto
se formem odores desagradáveis e crostas, pode utilizar-se o
ciclo de Pré-lavagem..
- Seleccionar o programa adequado: a escolha do programa
depende do tipo de louça a ser lavada e do seu nível de sujidade.
Manutenção
Após cada lavagem
Depois de cada lavagem, fechar a torneira de água e deixar a
porta entreaberta de maneira a que não acumule humidade, nem
maus cheiros.
Remover a ficha
Antes de efectuar qualquer operação de limpeza ou anutenção,
remover sempre a ficha da tomada para não correr nenhum risco.
Não utilizar solventes nem abrasivos
Para limpar o exterior e as partes de borracha do aparelho não
utilizar solventes nem abrasivos, mas apenas um pano molhado
em água tépida e sabão.
Para eliminar eventuais manchas na superfície interior, utilizar
um pano molhado em água e um pouco de vinagre ou outro
produto específico para limpeza.
- Dosear a quantidade adequada de detergente: um excesso de
detergente não faz proporciona uma melhor lavagem, mas provoca
um maior impacto no ambiente.
- Não é necessário enxaguar a louça antes de a colocar na máquina.
Em caso de deslocar o aparelho
Em caso de deslocar a máquina, deve-a manter, se possível,na
posição vertical; se necessário, incliná-la sobre a parte traseira.
As juntas
Um dos factores responsáveis pelos cheiros no interior do
aparelho é a acumulação de resíduos de comida que
permanecem nas juntas. Basta limpá-las periodicamente com
uma esponja húmida.
Ir de férias
Quando for de férias, é aconselhável realizar um lavagem sem
louça, em seguida retirar a ficha, fechar a torneira da água e
deixar a porta entreaberta: as juntas duraram mais e no interior
não se formam cheiros desagradáveis.
.37.
PT
Page 40

Programas
Programas
Lavagem
Intensiva
Lavagem
Quotidiana
(IEC-EN50242)
Lavagem
Rápida
Pré-lavagem
Informação de selecção
de programa
Para louça e panelas muito
sujas ( não deve ser
utilizado para peças
delicadas)
Para louça e panelas
normalmente sujas sem
resíduos secos
Ciclo económico e rápido,
para louça pouco suja, logo
após ser utilizada, sem
secar.
Lavagem preliminar de
panelas e louça enquanto
aguarda a carga completa.
Descrição de programas
Pré-lavagem com água fria.
Lavagem prolongada a 70
o
C.
Enxagua com água fria.
Enxagua com água quente.
Secagem.
Pré-lavagem com água fria.
Lavagem prolongada a 50
o
C.
Enxagua com água fria.
Enxagua com água quente.
Secagem.
Lavagem breve a 40
o
C.
Enxaguar a frio.
Lavagem breve com água fria
para impedir que resíduos de
comida sequem na louça
Detergente
30g
Pré-lavagem:5g
Lavagem
prolongada:25g
15g
Abrilhantador
( 5 )
PT
.38.
Page 41

Limpeza e Manutenção Especial
O grupo de filtros
Para obter bons resultados na lavagem, é necessário limpar o
grupo de filtros.
Podem eficientemente eliminar-se os resíduos de comida nos
filtros com uma lavagem e colocá-los novamente em perfeitas
condições de utilização.
Para tal, depois de cada lavagem é aconselhável remover os
resíduos maiores, acumulados no recipiente e no filtro semi-circular "A", enxaguá-lo com água corrente; para extrair o grupo
de filtros deve puxar a alça do recipiente para cima. Pelo menos
uma vez por mês é necessário limpar cuidosamente todo o grupo
de filtragem constituido pelo filtro semi-circular "A" e pelo micro-
-filtro "B". Para a limpeza do filtro e do micro filtro deve utilizar
uma escovinha. De seguid,a juntar os três elementos da maneira
ilustrada nas figuras abaixo e inserir novamente o grupo de filtros
no aparelho, colocando-o no posição correcta pressionando para
baixo.
A máquina de lavar louça não deve ser utilizada sem filtros. Uma
colocação incorrecta dos filtros pode causar reduções da
eficiência da lavagem ou danos no aparelho.
Detecção de avarias
Pode acontecer que o aparelho não funcione ou não funcione
bem. Antes de chamar a assistência técnica, vejamos o que se
pode fazer, possivelmente que se tenha esquecido de pressionar
alguna botão ou não se tenha feito, por distracção, uma operação
necessária para a máquina funcionar.
A máquina não inicia o funcionamento
Verifique se:
- A ficha está correctamente inserida na tomada,
- Há energia eléctrica em casa,
- A porta da máquina está bem fechada
- O botão ON/OFF está na posição ON
- A torneira está aberta.
A máquina não carrega água
Verifique se:
- A torneira está aberta e bem co-ligada com tubo,
- Falta água em casa ou não chega com suficiente pressão
- O tubo está dobrado, o filtro do tubo de alimentação da água
está entupido.
A louça não é limpa
Verifique se:
- A torneira está aberta e corectamente ligada ao tubo
- falta água em casa ou não chega com suficiente pressão
- o tubo está dobrado,
- o filtro do tubo de alimentação da água está entupido.
A
B
Limpeza dos braços distribuidores
Pode acontecer que resíduos de comida concentram nos braços
distribuidores, obstruindo os furos (ver Vista de Perto (interior),
letras F-I). Examiná-los periodicamente e limpá-los quando
necessário.
A máquina não descarrega água
Verifique se:
O tubo de descarga está dobrado.
Na louça permanece resíduos de calcário ou uma
camada branca
Verifique se:
- A tampa do recipiente do sal está fechada,
- A dosagem do abrilhantador está correctamente regulada.
Se, apesar de todas as veririfcações, a máquina não funcionar
e a irregularidade observada continuar, chame o centro de
assistência técnica autorizado mais próximo e comunique as
seguintes informações:
- Descrição dos problemas
- Informações de modelo (Mod. ) e do número de série ( S/N)
apresentados na etiqueta situada ao lado da parte interior da
porta .
Nunca chamar técnicos não autorizados e nem utilizar
as peças não-originais.
.39.
PT
Page 42

Instalação
Colocação do Aparelho
Colocar a máquina no local previamente escolhido. A máquina
pode ser encostada junto ás laterais ou ao fundo dos móveis
adjacentes ou junto à parede. A máquina possui tubos para
alimentação de água e de descarga que podem ser localizados
à direita ou à esquerda, permitindo uma instalação adequada.
Nivelar a máquina
Depois de colocar a máquina, aparafusar ou desaparafusar os
pés, se necessário para regular a altura da máquina e a nivelar
de modo que fique na horizontal; no entanto, não deve estar
inclinada mais de 2o. Um bom nivelamento garantirá o correcto
funcionamento da máquina.
Ligação à torneira de água fria
Ligar o tubo de entrada a uma torneira de água fria com bocal
de rosca de 3/4, tendo o cuidado de a enroscar correctamente
à torneira (ver Fig. 1)
Se os tubos da água forem novos ou tiverem permanecido muito
tempo sem ser utilizados, antes de efectuar a ligação, certifiquese, deixando correr a água um pouco, até que esta saia limpa e
sem impurezas. Sem esta precaução, há o risco de o tubo de
entrada da água se entupir e danificar a máquina.
Ligação à torneira de água quente
A máquina pode ser alimentada com água quente da rede
(sistema central, aquecedores) a uma temperatura máxima de
o
C.
60
Neste caso o tempo de lavagem será cerca de 15 minutos mais
curto e a eficiência da lavagem ligeramente reduzida. A ligação
deve ser efectuada à torneira de água quente, da mesma
maneira descrita para a ligação à torneira de água fria.
Sistema de segurança contra inundações
A máquina é dotada de um sistema que interrompe a entrada
de água no caso de avaria dos tubos de entrada ou de descarga
no interior da máquina. Deste modo, evitar-se danos em casa.
Se, por uma razão qualquer, a caixa (que contém os
componentes eléctricos) ficar danificada, retirar imediatamente
a ficha de ligação à rede eléctrica. Para garantir o funcionamento
do sistema de segurança contra inundações, a caixa "A" com o
tubo de entrada de água, deve estar ligada à torneira apenas
na posição ilustrada na Fig.1. Outros tipos de ligação não são
aceitáveis. O tubo de alimentação de água não deve, ser cortado
porque pertence a peças sob tensão. Se o comprimento do tubo
não for suficiente para a ligação correcta, é preciso substitui-lo
com outro de comprimento adequado. O tubo pode ser pedido
em lojas especializadas ou no serviço de assistência técnica.
Fig.1
Ligação ao tubo de descarga
Inserir o tubo de descarga numa conduta de escoamento com
diametro mínimo de 4 cm, ou apoiá-lo no lavatório, evitando
apertos ou curvas excessivas e utilizando o cotovelo especial
plástico fornecido (ver Fig.2). A extremidade livre deve estar a
uma altura entre 40 e 100 cm, e não deve estar imersa na água.
Fig.2
Atenção:
O cotovelo especial plástico deve estar correctamente fixo à
parede para evitar que o tubo de descarga se mova e derrame
água.
Ligação Eléctrica
Depois de ter verificado se a tensão e a frequência da rede de
alimentação em casa correspondem às exigências indicadas na
etiqueta (situada na porta interior de aço inoxidável do aparelho)
e que a instalação eléctrica à qual for ligada tem capacidade para
a corrente máxima indicada na etiqueta. Inserir a ficha numa
tomada dotada de uma eficiente ligação à terra ( a ligação à terra
da instalação, é uma garantia de segurança exigida pela lei).
Se a tomada de alimentação à qual for ligada o aparelho não
corresponder à ficha, substitua-a por uma ficha adequada, em
vez de utilizar adaptadores pois estes podem causar
sobreaquecimentos ou queimaduras.
PT
.40.
Page 43
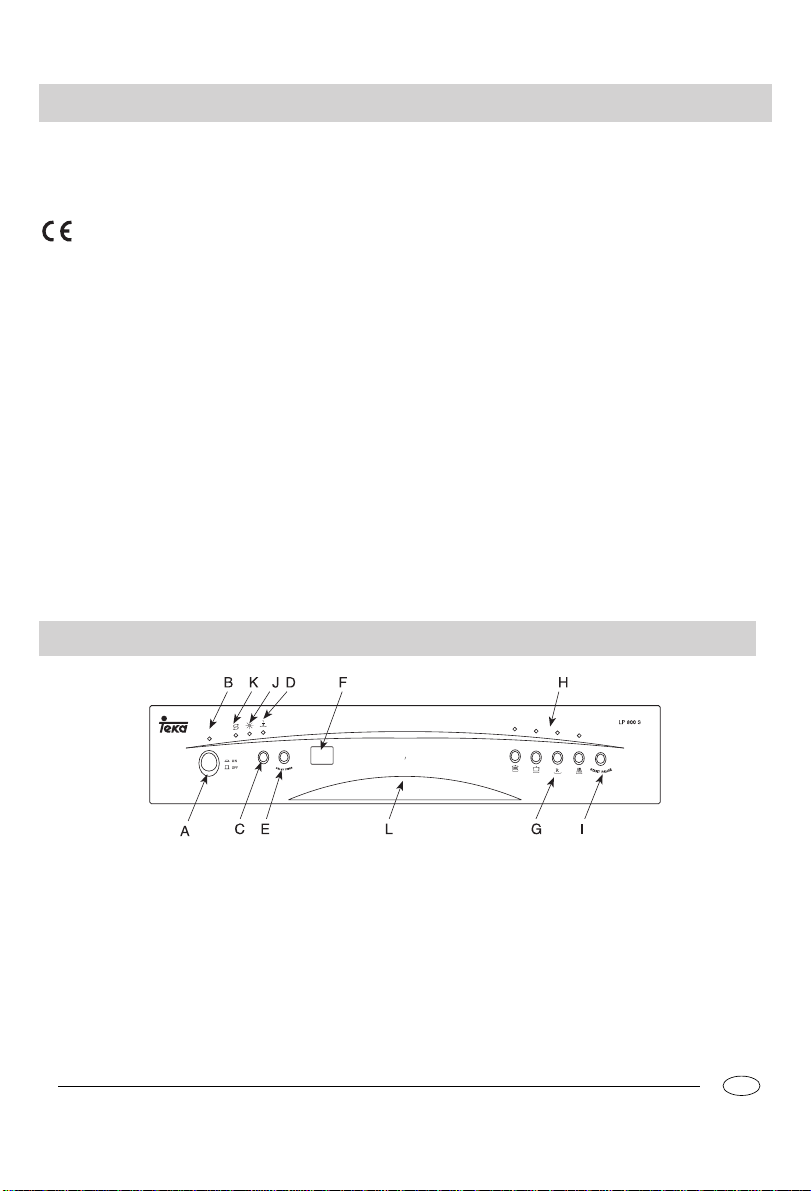
La seguridad, una buena costumbre
ATENCIÓN
Leer atentamente las advertencias contenidas en el presente
manual ya que suministran importantes indicaciones referidas
a la seguridad de instalación, de uso y de mantenimiento.
Este aparato es conforme a las siguientes
Normas
comunitarias:
- 73/23/CEE del 19/02/73 (Bajas Tensiones) y sucesivas
modificaciones;
- 89/336/CEE del 03/05/89 (Compatibilidad
Electromagnética) y sucesivas modificaciones.
- Elimine con cuidado el material del embalaje.
- Después de haber quitado el embalaje, verifique la integridad
del aparato. En caso de dudas, dirigirse a personal
profesionalmente cualificado.
- El lavavajillas debe ser usado exclusivamente por adultos y para
el lavado de vajilla de uso doméstico.
- Reglas fundamentales a seguir en el uso:
* no toque la máquina descalzo o con las manos o pies mojados;
* no se aconseja recurrir a extensiones y tomas múltiples;
* durante la instalación, el cable de alimentación no debe
sufrir plegaduras o compresiones relevantes y peligrosas;
Vista de cerca (cuadro de mandos)
* en caso de funcionamiento anómalo o de trabajos de mantenimiento
desconecte el aparato de la red eléctrica.
- Los niños deben mantenerse alejados de los detergents y del
lavavajillas cuando está abierto.
- La máquina no se debe instalar nunca al aire libre, ni tampoco
si el lugar está bajo un cobertizo, ya que es muy peligroso
dejarla expuesta a la lluvia y a los temporales.
- No toque la resistencia durante o inmediatamente después de
un ciclo de lavado.
- No se apoye ni se siente sobre la puerta abierta, se podría volcar
el lavavajillas.
- En caso de avería, cierre el grifo de entrada de agua y extraiga
el enchufe de la toma de la pared. Luego consulte el capítulo
«Algunos problemas» y si no encuentra una solución, llame a
un centro de asistencia.
- Sólo personal especializado pueden repararla.
- Los aparatos fuera de uso se deben inutilizar cortando el cable
de alimentación y dañando el bloqueo de la puerta.
Para garantizar la eficacia y seguridad de este
electrodoméstico:
Diríjase exclusivamente al Servicio Técnico Oficial del
Fabricante.
Solicite siempre la utilización de recambios originales.
Pulsador ON-OFF
A
Lámpara testigo ON-OFF
B
Pulsador "1/2 Carga"
C
Lámpara indicadora "1/2 Carga"
D
Pulsador selección delay
E
Lámpara testigo delay
F
Botón de selección de programas
G
Lámpara testigo programas
H
Pulsador Arranque/Pausa
I
Lámpara indicadora de falta de abrillantador
J
Lámpara indicadora de falta de sal
K
Maneta apertura puerta
L
.41.
ES
Page 44

Vista de cerca (Interior)
Canasto superior
A
Regulación de la altura del canasto
B
Rociador superior
C
D
Canasto inferior
Rociador inferior
E
Filtro de lavado
F
Recipiente del detergente y del abrillantador
G
Tapa del depósito de sal
H
Tercer rociador
I
Características técnicas
Largo
Profundidad
Altura
Capacidad
Presión agua alimentación
Tensión de alimentación
Potencia total absorbida
ES
60 cm
60 cm
85 cm
12 cubiertos normales
0.03-0.6 MPa
220-240V~ 50Hz
2150W
.42.
Page 45

Sal
La sal
La dureza del agua varía según la localidad. Si en el lavavajillas
entrara agua dura, se formarían incrustaciones sobre la vajilla.
Gracias a un descalcificador que utiliza una sal específica para
lavavajillas, se eliminan las sales de cal del agua.
Carga de la sal en el descalcificador
Utilice siempre sal específica para lavavajillas.
El depósito de sal está debajo del canasto inferior y se llena de
la siguiente manera:
- Extraiga el canasto inferior, desenrosque y quite la tapa del
depósito.
- Si está carganado el depósito por primera vez, llénelo de
agua.
- Coloque el embudo suministrado en el equipo base, en el orificio,
e introduzca 2 kg de sal aproximadamente. Es normal que se
derrame un poco de agua del depósito.
- Enrosque nuevamente la tapa con cuidado.
El depósito de sal se debe llenar cuando se ilumina la luz
indicadora de "falta de sal" presente en el tablero.
Para evitar la formación de herrumbre, aconsejamos cargar la
sal poco antes de comenzar un ciclo de lavado.
Regulación del consumo de sal
El lavavajillas ofrece la posibilidad de regular el consumo de sal
en función de la dureza del agua que se utiliza, para poder, de
este modo; optimizar y personalizar el consumo de sal llevándolo
al nivel mínimo necesario.
Puede preguntar el grado de dureza de su agua a la Sociedad
suministradora de su zona.
Para la regulación seguir las siguientes instrucciones:
- Aflojar el tapón del depósito de sal.
- En el collar del depósito se ha colocado una flecha (ver fig.
al lado); si es necesario, girar la flecha desde el signo "-", en
sentido antihorario, hacia el signo "+" según la dureza del
agua de alimentación.
Es aconsejable efectuar la regulación según el siguiente
esquema:
Dureza del agua
ç
fH
010
NMOR
ORRM
[RM
ç
dH
MNT
NUQQ
QRUV
[UV [UIV
Mmol/l
MNIT
NIUQIQ
QIRUIV
Posici
selector
L
=?J?
jba
?H?
Consumo sal
ón
(gramos/ciclo)
Autonomia
(ciclos/2kg)
M
OM
QM
SM
L
SM
QM
OR
.43.
ES
Page 46

Detergente y abrillantador
El detergente
Usar solamente detergente específico para lavavajillas. El
distribuidor de detergente se encuentra en la parte interna de la
puerta.
Carga del detergente
Para abrir la tapa "A" presione el pulsador "B".El detergente
para el lavado se introduce en la cubeta "C".
Después de verter el detergente, cierre la tapa presionando hasta
que haga "click".
C
Prelavado
A
B
Lavado prolongado
Atención: para facilitar el enganche de la tapa, antes del
cierre, elimine eventuales residuos de detergente caidos en
los bordes de la cubeta.
El abrillantador
Este producto devuelve la vajilla más brillante y mejora el secado.
El depósíto del abrillantador está ubicado en el interior de la
puerta; se debe llenar cada 80 lavados aproximadamente (en
los modelos con luz indicadora de falta de abrillantador, se debe
llenar cuando se enciende la correspondiente lámpara testigo).
Carga del abrillantador
Para abrir el recipiente es necesario girar en sentido antihorario
la tapa=«`» y cuando vierta el abrillantador evite que se derrame.
Se puede regular la cantidad de producto suministrada,
accionando, con un destornillador, el regulador «c» colocado
debajo de la tapa "C". Hay 6 posiciones posibles, normalmente
está colocado en la 3.
Importante:
La regulación del suministro del abrillantador permite mejorar el
secado.Si sobre la vajilla lavada quedan gotas de agua o
manchas, es necesario girar el regulador hacia los números más
altos.Si la vajilla lavada presenta estriaciones blancas, girar el
regulador hacia los números más bajos.
C
F
C
ES
.44.
Page 47

Carga de la vajilla
Antes de colocar la vajilla en los canastos, remueva los residuos
de comida más grandes para evitar obstruir los filtros con la
consiguiente reducción de la eficacia del lavado.
En el caso de que las ollas y sartenes tuvieran muchas
incrustaciones, le aconsejamos colocarlas en remojo hasta que
se realice el lavado.
De este modo evitará posteriores lavados.
Extraer los canastos para facilitar la operación de carga de la
vajilla.
Cómo utilizar el canasto inferior
Le aconsejamos colocar la vajilla más dificil de limpiar en el
canasto inferior:
ollas, tapas, platos llanos y hondos, como se indica en las figuras
del costado.
Las fuentes y las tapas grandes se colocan preferentemente a
los lados del canasto, cuidando de no bloquear la rotación del
rociador superior:
- Ollas, ensaladeras, etc. deben estar siempre boca abajo.
- Vajillas muy hondas, ollas grandes y sartenes de gran tamaño.
- El canasto para los cubiertos es divisible (ver la Fig. A) para
poder utilizar solamente una parte cuando se tiene una
reducida carga de cubiertos; de este modo se ahorra espacio
para las ollas y además permite la alternativa de colocarlo
en el canasto superior.
- Los cubiertos se colocan con los mangos dirigidos hacia abajo;
si el canasto está dotado de inserciones laterales las
cucharitas se colocan individualmente en las correspondientes
ranuras. Los cubiertos particularmente largos se ubican en
posición horizontal en la parte anterior del canasto superior.
Canasto inferior Canasto superior
Carga de 12 cubiertos estándar
1
3
Fig.A
2
4
Fig.B
Cómo utilizar el canasto superior
El canasto superior es adecuado para contener vajilla delicada
y poco pesada como vasos, tazas de té y café, platitos, pero
también platos, ensaladeras bajas, sartenes y cazuelas bajas,
poco sucias.
- Colocar la vajilla poco pesada de modo que no sea desplazada
por l
os chorros de agua.
Se puede regular la altura del canasto accionando los botones
colocados a los costados del mismo (ver la Fig.B)
.45.
ES
Page 48

Funcionamiento de la máquina
Cómo iniciar un programa de lavado
Después de haber efectuado todas las operaciones indicadas
en los capítulos precedentes y de haber abierto completamente
el grifo de agua, presionar el botón ON-OFF "A" ubicado en el
cuadro de mandos; la luz testigo "B" se iluminará. A partir de
ese momento, la máquina está bajo tensión pero es necesario
esperar algunos segundos antes de comenzar a programarla.
Puesta en marcha y selección de un programa.
Seleccione el programa deseado presionando el botón de
selección de programas (G). A cada presión del botón le
corresponderá el sucesivo encendido de una de las lámparas
testigo de programas "H".
Elija el programa que considere más indicado para el tipo de
vajilla que debe lavar (sobre todo al principio, consulte la tabla
de programas incluida en este manual).
Presione el botón de Arranque/Pausa "I" y después de algunos
segundos escuchará una breve señal acústica que indica que
ha comenzado el ciclo de lavado y que no se puede volver a
modificar. Si es necesario lea el párrafo "Anular o modificar un
programa en curso".
Anular o modificar un programa en curso
Nota: se puede modificar un programa en curso sólo si hace
poco tiempo que ha comenzado, de lo contrario ya pudo haber
sido extraído el detergente y la máquina ya pudo haber
descargado el agua de lavado; en ese caso es necesario cargar
de Nuevo el detergente (ver párrafo "carga del detergente").
Para modificar un programa en curso es necesario presionar el
botón de ON-OFF (A), y todas las selecciones se anularán.
Caso en el que se haya olvidado de introducir una
vajilla
Es posible interrumpir el ciclo de lavado pulsando el botón
Arranque/Pausa, luego introduzca la vajilla y al encender
nuevamente la máquina el ciclo recomenzará desde donde había
sido interrupmido.
Lámparas indicadoras de programas del ciclo
Cuando el ciclo se ponga en funcionamiento,las lámparas
indicadoras del ciclo (H) parpadearán.
Al finalizar el lavado
El final del ciclo de lavado estará señalado por seis señales
acústicas y por el centelleo de la lámpara testigo "H".Desconecte
la máquina accionando el botón ON-OFF; cierre el grifo de agua
y abra la puerta. Espere algunos minutos antes de extraer la
vajilla, de este modo evitará manipular la vajilla caliente más
sensible a los golpes y obtendrá un mejor secado.
Programación de la puesta en marcha del lavavajillas
en tiempos sucesivos.
Nota: después de haber seleccionado el programa de lavado,
como se indica en el p
un programa de lavado?se puede seleccionar el retardo del
comienzo.
Pulsando el botón "E" (ver vista de cerca "cuadro de mandos")
se puede postergar el comienzo de un ciclo de lavado desde 1 a
12 horas. Cada vez que se presione el botón, el display "F"
visualizará sucesivamente las horas de retardo; elija el tiempo
preferido. Al encender la máquina con el botón "I" se escuchará
una breve señal acústica y un puntito que centellea al lado de
las horas de retardo seleccionadas, indicará que ha
comenzado la cuenta regresiva del tiempo de espera.
Terminado el tiempo de espera comenzará el ciclo.
a) Durante el tiempo de espera es preferible no modificar nada,
pero si fuera necesario hay que anular todas las programaciones
presionando el botón (A) de ON-OFF y todas las selecciones se
anularán.
Repita las operaciones de "programación del retardo del
arranque del lavavajillas" y de "puesta en marcha y selección
de un programa de lavado" siguiendo las instrucciones
contenidas en los párrafos correspondientes.
b) Si durante el tiempo de espera se interrumpiera la
alimentación o se abriera la puerta, el tiempo se detendría y se
reanudaría: con el retorno de la alimentación o cerrando la
puerta.
á
rrafo "Puesta en marcha y selección de
NOTA:
Pulsadores modificadores de programa
Botón "1/2 CARGA"
Este botón (ver vista de cerca "cuadro de mandos", letra "C")
permite lavar solamente en el canasto superior cuando no haya
vajilla suficiente para efectuar una carga completa; permitirá de
este modo ahorrar agua y energía eléctrica. Se puede utilizar
antes de seleccionar cualquier ciclo de lavado, con excepción
del lavado enérgico (si está previsto en la tabla de programas),
con la única advertencia de reducir a la mitad la cantidad de
detergente prevista para el programa elegido.
ES
.46.
Page 49

Consejos para ahorrar
- Si es posible, es importante hacer funcionar el lavavajillas a
plena carga para optimizar los consumos; para evitar que
mientras tanto se formen malos olores e incrustaciones, se
puede utilizar el ciclo de remojo.
- Elija el programa adecuado: la elección del programa depende
del tipo de vajilla que se debe lavar y de su grado de suciedad.
- Dosificar la cantidad justa de detergente: si se excede la
cantidad de detergente no se obtendrá una vajilla más limpia,
sino solamente un mayor impacto ambiental.
- Es inútil enjuagar la vajilla antes de colocarla en la máquina.
Cómo mantener en buenas condiciones el lavavajillas
Después de cada lavado
Después de cada lavado, cierre el grifo de agua y deje
entreabierta la puerta de modo que no restañen ni la humedad
ni los malos olores.
Desconectar el aparato
Antes de realizar cualquier limpieza o mantenimiento,
desconecte siempre el aparato de la toma: no se corre ningún
peligro.
Nada de disolventes ni sustancias abrasivas
Para limpiar el exterior y las partes de goma del lavavajillas no
es necesario usar ni disolventes ni sustancias abrasivas, sino
solamente un paño empapado en agua tibia y jabón.
Para eliminar eventuales manchas sobre la superficie de la cuba,
utilizar un paño empapado en agua y un poco de vinagre blanco
o un producto especifico para la limpieza del lavavajillas
En caso de traslado
En caso de traslado, mientras sea posible, mantenga el aparato
en posición vertical; si fuera necesario, inclínelo sobre la parte
posterior.
Las juntas
Uno de los factores responsables del restaño de olores en el
interior del lavavajillas son los residuos de comida que
permanecen en las juntas. Será suficiente limpiarlas
periódicamente con una esponja humedecida.
Si se va de vacaciones
Cuando se va de vacaciones, es aconsejable hacer un lavado
con el lavavajillas vacío, luego desconectar el aparato, cerrar el
grifo de entrada de agua y dejar entreabierta la puerta las juntas
durarán más tiempo y en su interior no se formarán olores
desagradables.
.47.
ES
Page 50

Tabla de programas
Programa
Lavado
Intensivo
Lavado Normal
(IEC-EN 50242)
Lavado
Rápido
Remojo
Indicaciones
para la elección
de los programas
Vajilla y ollas muy sucias
(no utilizar para piezas
delicadas)
Vajilla y ollas normalmente
sucias sin residuos secos.
Ciclo económico y veloz
para vajilla poco sucia, a
utilizar inmediatamente
después del uso.
Sin secado
Lavado preliminar de
ollas y vajilla a la espera de
completar la carga después
de la comida.
Descripción del ciclo
Prelavado con agua fría.
Lavado prolongado a 70.
Enjuague con agua fría.
Enjuague caliente.
Secado.
Prelavado con agua fría.
Lavado prolongado a 50.
Enjuague con agua fría.
Enjuague caliente a.
Secado.
Breve lavado a 40.
Enjuague frío.
Breve lavado frío para
impedir que los residuos
de comida se sequen
sobre la vajilla.
Detergente
lavado
30g
Prelavado:5g
Lavado
prolongado:25g
15g
Abrillantador
( 5 )
ES
.48.
Page 51

Limpieza y mantenimientos particulares
El grupo filtrante
Para lograr siempre buenos resultados de lavado, es necesario
limpiar el grupo filtrante. Gracias al filtro, se eliminan del agua
de lavado los residuos de comida y la misma se recicla
perfectamente filtrada. Por ello, después de cada lavado es
importante quitar los residuos más grandes retenidos en el
recipiente y en el filtro semicircular "A" enjuagándolos debajo
del agua corriente; para extraer el grupo filtrante tirar el mango
de dicho recipiente hacia
arriba. Al menos una vez por mes es necesario limpiar
cuidadosamente todo el grupo filtrante consitituido por el filtro
semicircular "A" y por el microfiltro "B". Para la limpieza del filtro
y del microfiltro ayudarse con un cepillo. Juntar luego los dos
elementos como se indica en las figuras de más abajo e introducir
nuevamente todo el grupo filtrante en el lavavajillas colocándolo
en su lugar y haciendo presión hacia abajo.
El lavavajillas no se debe usar sin filtros. Una reubicación errónea
de los filtros puede llevar a una reducción de la eficacia de lavado
o a provocar daños en el lavavajillas.
Algunos problemas
A
B
Limpieza de los brazos rociadores
Puede suceder que algunos residuos de comida se peguen en
los brazos rociadores obstruyendo los orificios; controlarlos
periódicamente y limpiarlos(ver vista de cerca [interior] letras
C-F).
Puede suceder que el lavavajillas no funcione o no funcione
bien. Antes de llamar a la asistencia, veamos juntos qué se puede
hacer: es posible que se haya olvidado de presionar alguna tecla
o no haya hecho, por distracción, una maniobra necesaria para
que la máquina funcione.
El lavavajillas no arranca
Controlar si:
- el enchufe está bien introducido en la toma;
- hay corriente en la casa;
- la puerta está bien cerrada;
- el pulsador de "ON-OFF" está en la posición "ON";
- el grifo está abierto.
El lavavajillas no carga agua
Controlar si:
- el grifo está abierto y bien conectado al tubo;
- falta agua en la casa o no llega con suficiente presión;
- el tubo está plegado;
- el filtro del tubo de alimentación de agua está obstruido.
La vajilla no está limpia
Controlar si:
- el grifo está abierto y bien conectado al tubo;
- falta agua en la casa o no llega con suficiente presión;
- el tubo está plegado;
- el filtro del tubo de alimentación de agua está obstruido.
El lavavajillas no descarga
Controlar si:
- el tubo de descarga está plegado.
Sobre la vajilla quedan depósitos calcáreos o una
patina blanca
Controlar si:
- la tapa del depósito de sal está bien cerrada;
- la dosificación de abrillantador está bien regulada.Si a pesar
de todos los controles, el lavavajillas no funciona y el
inconveniente por Ud. encontrado, permanece, llame al centro
de asistencia autorizado más cercano, comunicando la siguiente
información.
- el tipo de avería
- la sigla del modelo (Mod) y el número de serie (S/N)
indicados en la chapa aplicada en la parte lateral de la
contrapuerta.
No recurra nunca a técnicos no autorizados y rechace
siempre la instalación de repuestos no originales.
.49.
ES
Page 52

Instalación
Ubicación
Ubicar la máquina en el lugar previamente elegido. La máquina
se puede hacer adherir, con los costados o con la parte posterior,
a los muebles adyacentes o a la pared. El lavavajillas posee
tubos para la alimentación y para la descarga de agua que se
pueden orientar hacia la derecha o hacia la izquierta para permitir
una adecuada instalación.
Nivelación
Una vez colocada la máquina accionar los pies atornillándolos
y desatornillándolos a fín de regular, si es necesario, la altura
de la máquina y nivelarla de modo que se encuentre horizontal;
de todos modos, nunca debe estar inclinada más de 2. Una
buena nivelación asegurará el correcto funcionamiento del
lavavajillas.
Conexión a la toma de agua fría
Conectar el tubo de carga a un toma de agua fría con boca
roscada de 3/4 gas cuidando de enroscarlo fuertemente al grifo
(ver la Fig. 1).
Si la tubería de agua es nueva o ha permanecido por mucho
tiempo inactiva, antes de realizar la conexión, verificar, haciendo
correr el agua, que sea limpia y sin impurezas. Si no se toma
esta precaución existe el peligro de que el tubo de entrada de
agua se obstruya dañando la máquina.
Conexión a la toma de agua caliente
La máquina puede ser alimentada con agua caliente de la red
(instalación central, termosifones) que no supere los 60 de
temperatura.
En este caso el tiempo de lavado disminuirá unos 15 minutos
aproximadamente y la eficacia del lavado se reducirá levemente.
La conexión se debe realizar a la toma de agua caliente de la
misma manera descrita para la conexión a la toma de agua fría.
Seguridad contra anegación
El lavavajillas está dotado de un sistema que interrumpe el
ingreso del agua en el caso de una avería del tubo de entrada o
de pérdidas dentro de la máquina, evitando de este modo causar
daños en su casa. Si por cualquier motivo, la caja (que contiene
partes eléctricas) sufriera algún daño, desconectar
inmediatamente la máquina de la red eléctrica. Para garantizar
el funcionamiento de la seguridad contra anegación, la caja "A"
con el tubo de entrada de agua, debe estar conectada al grifo
sólo en la posición representada en la Fig.1. El tubo de
alimentación no se debe cortar nunca ya que contiene partes
cargadas eléctricamente. Si la longitud del tubo no es suficiente
para una correcta conexión, se debe sustituir el tubo con uno
de la longitud necesaria. El tubo se puede solicitar a vendedores
especializados o al servicio de asistencia.
Fig.1
Conexión al tubo de descarga
Introducir el tubo de descarga en una tubería de descarga con
un diámetro mínimo de 4cm. O bien apoyarlo en el fregadero,
evitando estrangulaciones o curvas excesivas y utilizando el
especial codo de plástico suministrado en el equipo base (ver la
Fig.2). El extremo libre debe estar a una altura comprendida
entre 40 y 100cm. Y no debe estar sumergido en agua.
Fig.2
Atención:
El especial codo de plástico se debe fijar firmemente a la pared
para evitar que el tobo de descarga se mueva y vierta el agua
fuera de la descarga.
Conexión eléctrica
Introducir el enchufe en una toma de corriente que posea una
eficiente conexión a tierra (la puesta a tierra de la instalación es
una garantía de seguridad prevista por la ley), después de haber
verificado que los valores de tensión y de frecuencia de la red
correspondan a aquellos indicados en la chapa situada en la
contrapuerta inoxidable de la máquina, y que la instalación
eléctrica a la cual la misma se conecta sea compatible con la
corriente máxima indicada en dicha chapa. Si la toma de
corriente al cual se conecta la máquina no se corresponde con
el enchufe, sustituirlo con uno adecuado, antes que utilizar
adaptadores o derivados ya que los mismos podrían provocar
calentamientos ó quemaduras.
ES
.50.
Page 53

Page 54

Page 55

Page 56

 Loading...