

Page 1
LED
LE22C2380
LE24C2380
Page 2

Contents
Safety and warnings................. ... ... ... ... ... ... ... ............................... ... ... ... ... ... ... 2-3
Introduction....................... ... ... ... ... ... ... .................................. ... ... ... ... ... ... .....4
Base stand assembly
................................ ... ... ... ... ... ... .................................. .. 5
Installation....................... ... ... ... ... ... ... .................................. ... ... ... ... ... ... ...... 6-9
Remote Control....................... ... ... ... ... ... ... .................................. ... ... ... ... ... ... 10
Operation....................... ... ... ... ... ... ... ... ............................... ... ... ... ... ... ... ........ 11-1 5
Troub les hooting........................... ... ... ... ... ... ... .................................. ... ... ... ... 16
Warranty..... ... ... ... ... ... ... .................................. ... ... ... ... ... ... ............................17
-1-
Page 3
IMPORTANT SAFETY INSTRUCTION
1) Read th es e instr uc ti ons.
2) Keep th es e instr uc ti ons.
3) Heed al l wa rning s.
4) Follo w al l instr uc ti ons.
5) Do not us e th is Tele vi si on near w at er.
6) Clean o nl y with dr y cl ot h.
7) Do not bl oc k any ven ti la tion op en in gs, ins ta ll in
accord an ce with the i ns truct io ns .
8) Do not in st all near an y he at sour ce s such as
radiat io ns, heat re gi sters , st oves, or ot he r Telev is io n
(inclu di ng amplif ie rs) tha t pr od uce hea t.
9) Do not de fe at the safe ty p urpos e of t he polari ze d
plug. If t he p rovid ed p lu g does no t fi t in to your
outlet , co nsult an el ec trici an f or r eplac em ent of the
obsole te o utlet.
10) Prot ec ted the pow er c ord fro m be in g walke d on
or pinch ed p articul ar ly at plu gs , co nveni en ce
recept ac les, and th e po int whe re t he y exit fr om t he
Tele vision.
11) Onl y us e attac hm en ts/ac ce ssories s pe cifie d by
the manu fa cturer.
12) Unpl ug t his Tel ev is ion dur in g lightin g st orms or
when unu se d for lon g pe ri ods of ti me .
13) Refe r al l servici ng t o quali fi ed s ervic e pe rsonnel .
Servic in g is requ ir ed w hen the Tel evision h as b een
damage d in a ny way, such as; p ow er-s upply c or d or
plug is da ma ged, liqu id h as been s pi ll ed or obj ec ts
have fal le n into the Tele visio n, t he Televi si on has
been exp os ed to rain or m oi sture , do es n ot oper at e
normal ly, o r ha s be en drop pe d.
14) Main s pl ug is use d as t he d iscon ne ct device , th e
discon ne ct devi ce s ha ll rema in r ea dily op er able.
15) The ventil at ion sho ul d no t be impe de d by
coveri ng t he ventil at ion ope ni ng s with it em s, such as
newspa pe rs, tab le -c loth, c ur tains, et c.
16) No nak ed f lame so ur ce s, such a s li ghted can dl es,
should b e pl aced on the Tel evisi on .
17) Atten ti on s hould b e dr awn to the en vi ronme nt al
aspect s of b atter y di sp osal.
18) The use of Tel ev ision i n mo derate cl im ate.
19) The Tele vi si on shal l no t be expose d to d rippi ng
or splas hi ng and th at n o ob jects f il le d with li qu ids,
such as va se s, shal l be p la ced on th e Televisio n.
CAUT ION
RISK OF ELECTRIC SHOCK
DO NOT OPEN!
TO REDUCE THE RISK OF ELECTRIC SHOCK, DO
NOT REMOVE COVER (OR BACK).NO USER
SERVICEABLE PARTS INSIDE. REFER SERVICING
TO QUALIFIED SERVICE PERSONNEL.
CAUTION
SA FET Y AND WAR N IN G S
The symbol indicates that dangerous
voltages constituting a risk of electric shock
are present within this unit.
The symbol indicates that there are
important operating and maintenance
instructions in the literaturaccompanying this
unit.
WARNING:
To red uce the r isk of fi re or ele ctric s hock, d o
not ex po se th is Te le vi sion to r ain or mo istur e.
WARNING:
The ba tt eri es s hall no t be expo sed to
exce ss ive h ea t such as s unshi ne, fir e or the
like .
WARNING:
The ex ce ssi ve s oun d pr essur e from ea rphon es
and he ad pho ne s can cau se hear ing los s.
This symbol indica tes that this product
incorporates doubl e insulation between
hazardous mains vo ltage and user accessi ble
parts. When servicing use only
identical replacement parts.
This m ar kin g in dicat es that t his pro duct sh ould
not be d is pos ed w ith o th er hous ehold w astes
thro ug hou t th e EU. To pr event p ossib le harm t o
the en vi ron me nt or hum an heal th from
unco nt rol le d was te d ispos al, rec ycle it
resp on sib ly t o pro mo te the su stain able re use of
mate ri al re so urces . To retu rn your u sed dev ice,
plea se u se th e re turn an d colle ction s ystem s or
cont ac t the r et ailer w here th e produ ct was
purc ha sed . They c an take t his pro duct fo r
envi ro nme nt al safe r ecycl ing.
Haie r is c omm it ted to sa fely re cycli ng
elec tr oni c pr oduct s and pro duct ma teria ls.
Plea se c hec k fo r a local r ecycl ing loc ation i n
the Un it ed St at es at: 18 00REC YCLIN G.COM
or cal l 1. 800 .R ECY CL ING.
-2-
Page 4
High voltages are used in the operation of this television
receiver. Do not the cabinet.
Refer servicing to qualified service personnel.
open
SA FET Y AND WAR N ING S
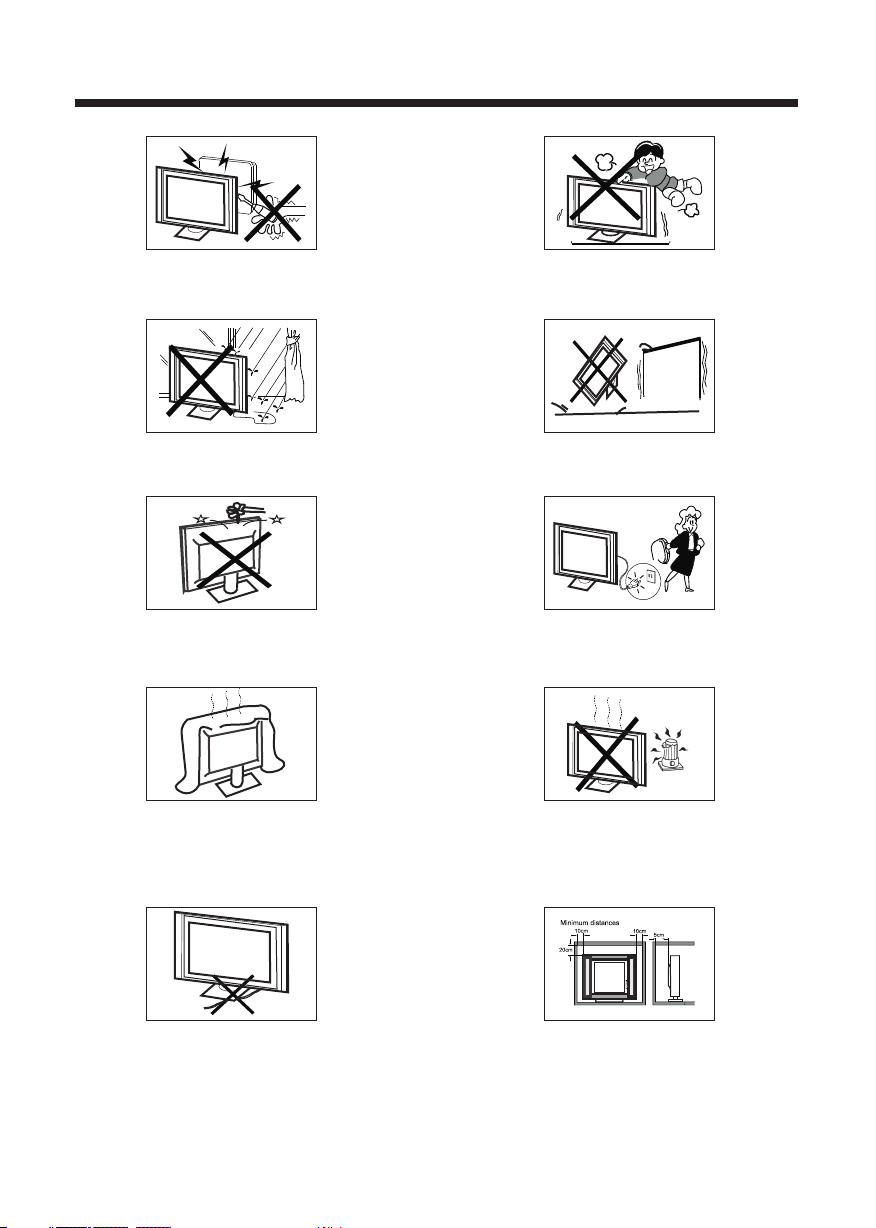
Never stand on, lean on, or suddenly push the television or
its stand. You should pay special attention to children.
Serious injury may result if it falls.
To prevent fire or electrical shock hazard, do not expose
the television receiver to rain or moisture.
Do not drop or push objects into the television cabinet
slots or openings. Never spill any kind of liquid on the
television receiver.
Do not block the ventilation holes on the back cover .
Adequate ventilation is essential to prevent failure of
electrical components.
of the TV
Do not place your television on an unstable cart, stand,
shelf or table. Serious injury to an individual and damage
to the television may result if it falls.
/or
When the telev is io n re ce iv er i s not used f or an
extended per io d of t im e, i t is a dv isable to dis co nn ec t
the AC power cord fro m th e AC ou tl et .
Avoid exposing the television receiver to direct sunlight
and other sources of heat. Do not stand the television
receiver directly on other products which give off heat,
e.g. video cassette players and audio amplifiers. Do not
place naked flame sources, such as lighted candles on
the television. or near
Do not trap the power supply cord under the television
receiver s .' stand
If the television is to be built into a compartment or similar
enclosure, the minimum distances must be maintained. Heat
build-up can reduce the life of your television, and can also
be dangerous.
-3-
Dim:515*320mm(不包 括底座)
Page 5
Main features
■ Integrated ATSC TV tuner for HD TV bro ad ca st reception
■ High bri ghtness pro vi de s a viv id and brilli an t picture
■ Deeper blacks an d bri gh te r white s with high contras t
■ Wide Scr ee n as pect rati o (1 6: 9) f or a co mp le te h om e
thea te r expe ri en ce
■ HDMI in pu t for true digit al conn ec ti on
■ VGA port for co nn ec ti on to PC
■ Built-in ste re o spe ak er system
■ Full-funct io n Re mo te Control
Main parameter
INTRODUCTION
Accessories
Accessories
Power cable. .. .. .. .. .. .. ......... .. .. .. .. .. .. .
Infrared Rem ot e Co nt ro l. .. ......... .. .. .. ..
User’s M anual ..... .. .. .. .. .. .. ......... .. .. .. .
Battery(AA A) .. .. .. .. .. ......... .. .. .. .. .. .. .... 2
1
1
1
Viewing Picture Size (diagonal)
Resolution:
Power supply
Power consum pt io n
Audio Output Power (THD 7%):
Aspect Ratio:
TV System:
Video Signal System:
Receiving Channel:
High-Definition Multimedia Interface (HDMI) Input
Component (Y Pb Pr) Input
Composite Video Input
Analog RGB (VGA) Input
Audio Input x 2
Headphone Output
Coaxial Output
USB Input
Horizontal definition (TV line) Composite Video Input >=350
HDMI, the HDMI l og o an d Hi gh -D ef inition Mul ti me di a In te rf ace are tradema rk s or r eg is te re d
trademarks o f HD MI L ic en si ng L LC.
22 inches
1920 x 1080
AC 100-240V 50/60Hz
38W
2x3W
16:9
ATSC Digital system and NTSC Analog system
NTSC
Cable :1-135/ Air: 2-69 (ATV&DTV)
x 2
x 1
x 1
x 1
x 1
x 1
x 1
Video Input >=400
YCb(Pb)Cr(Pr) >=400
24 inches
1920 x 1080
40W
-4-
Page 6
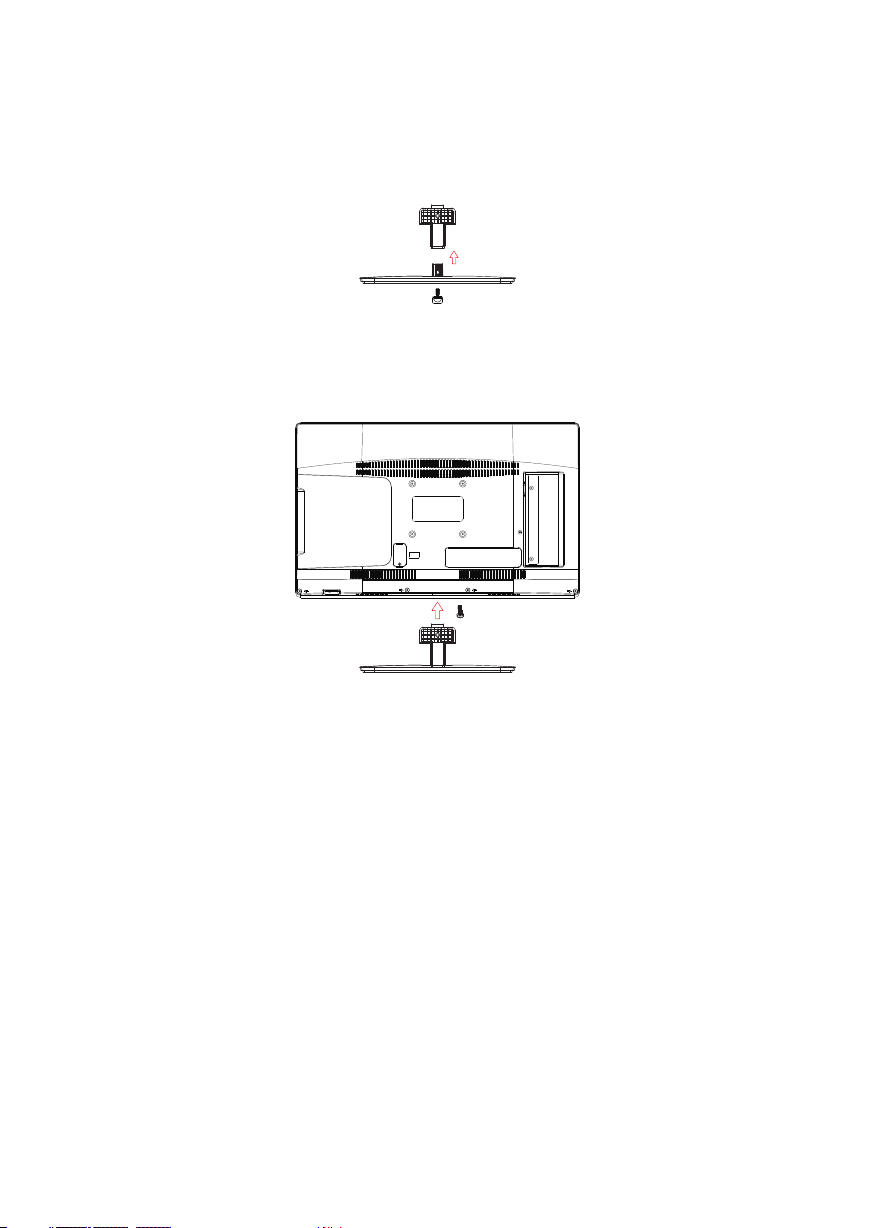
Base Stand Assembly Instruction
1. Atta ch t he ba se s tand to t he stan d neck by f irmly t ighte ning th e suppl ied scr ew.
2. Pla ce t he TV wi th the di splay s ide dow n on a flat s urfac e. Use a cl oth to pr otect .
Posi ti on th e ne ck of the s tand in to the bo ttom of t he TV se t and att ach usi ng the su pplie d screw.
the di sp lay
-5-
Page 7
INSTALLATION
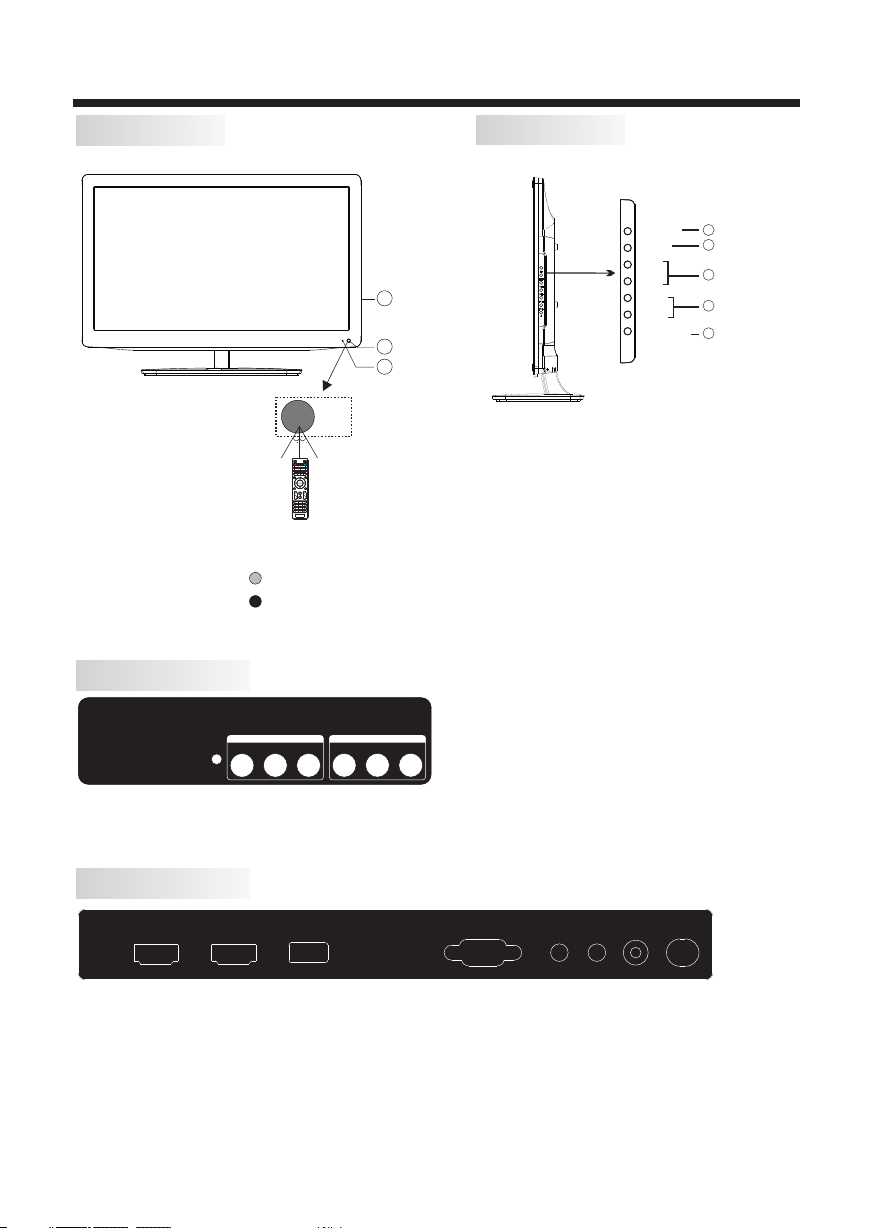
Front panel
30 30
1: Remote cont ro l se ns or.
2: Indicator L ED : BL UE P OW ER O N.
RED STAN DB Y.
3: Side panel key s
REAR Connections
Side panel
SOUR CE
MENU
CH+
CH-
3
VOL+
VOL-
1
2
1. SOURCE: Display the input source menu.
2. MENU: Display main MENU.
3. CH+/CH-: In TV mode, press "CH+" or "CH-" to
change the channel up and down. In MENU mode, press
"CH+" or "CH-" to select items in standby mode, press
"CH+" or "CH-" to turn on the TV.
4. VOL+/VOL-: Adjust sound level. In MENU mode,
press "VOL+ " or "VOL- " to adjust the item that you
selected.
5. STANDBY: Press this button to turn the unit ON
from STANDBY mode. Press it again to turn the set
back to STANDBY.
STAND BY
1
2
3
4
5
VIDEO
Pr
COMPO NENT
Pb
Y
COMPO SITE
R L
All the terminals are (from left to right):
AUDIO INPUT, VIDEO, YPbPr INPUT
Note: AV and Component(YPbPr) share the R and L audio inputs.
SIDE Connections
VGA
HDMI 1 HDMI2
USB
All the terminals are (from left to right):
HDMI1, HDMI2, USB, VGA, HEADPHONE, PC AUDIO, COAXIAL, RF.
Note: 1. When HDMI1 has an input signal coming from a DVI source then the audio input signal must be
connected to the PC audio input.
2. When HDMI2 has an input signal coming from a DVI source then the audio input signal must be
connected to the YPbPr/AV audio input.
-6-
HEAD PHONERFPC AUDI O CO AXIAL
Page 8
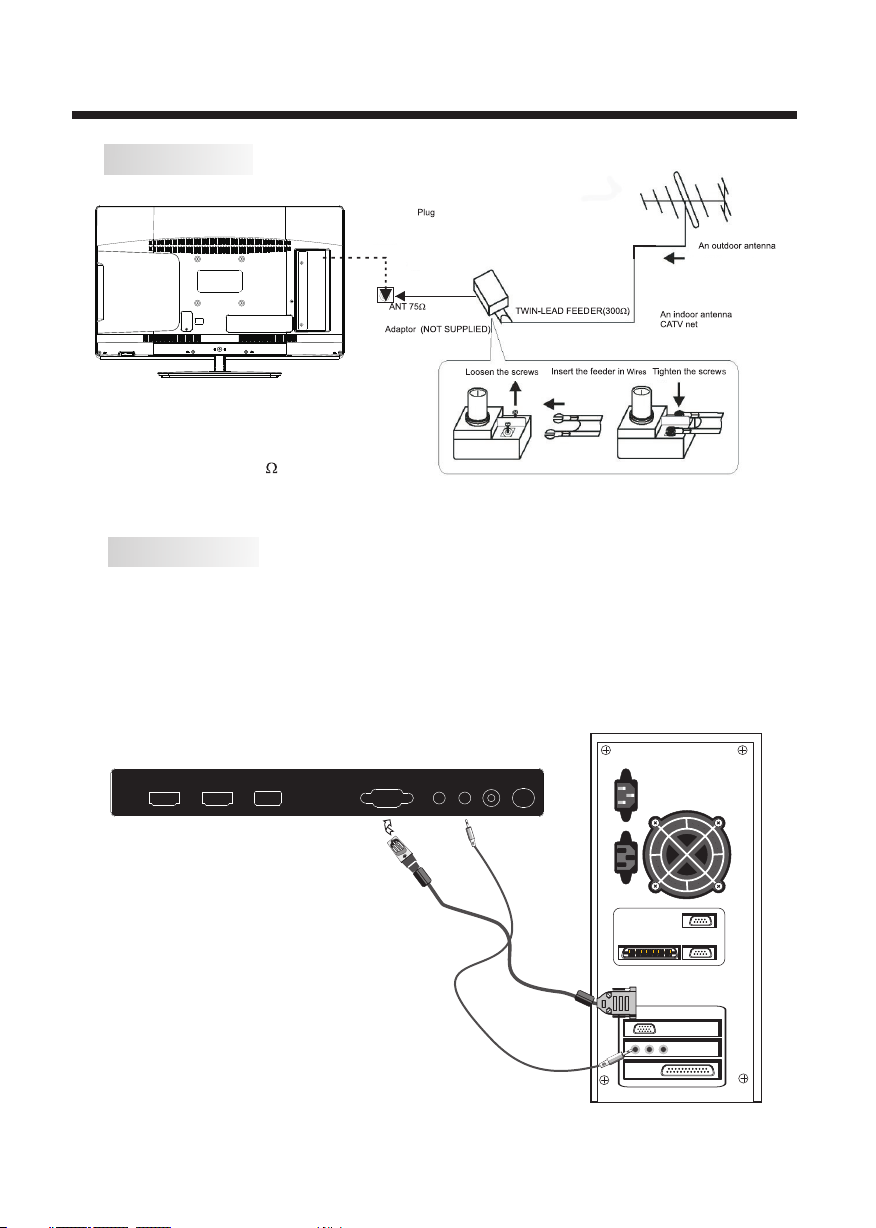
ANTENNA
Note :
Aeri al c onn ec tions : IEC (fe male) .
Inpu t im pen da nce:7 5 unbal anced .
PC
STEPS:
Be sur e bo th th e TV and com puter a re
powe re d off.
1.Co nn ect a VGA and au dio cab le.
2.Co nn ect t he p ower co rd.
3.Tur n on the TV, swi tch t o PC m ode .
4.Tur n on the PC .
INSTALLATION
HDMI1 HDMI2
VGA
USB
HEADP HONERFPC AUDIO COAX IAL
-7-
Page 9
PC
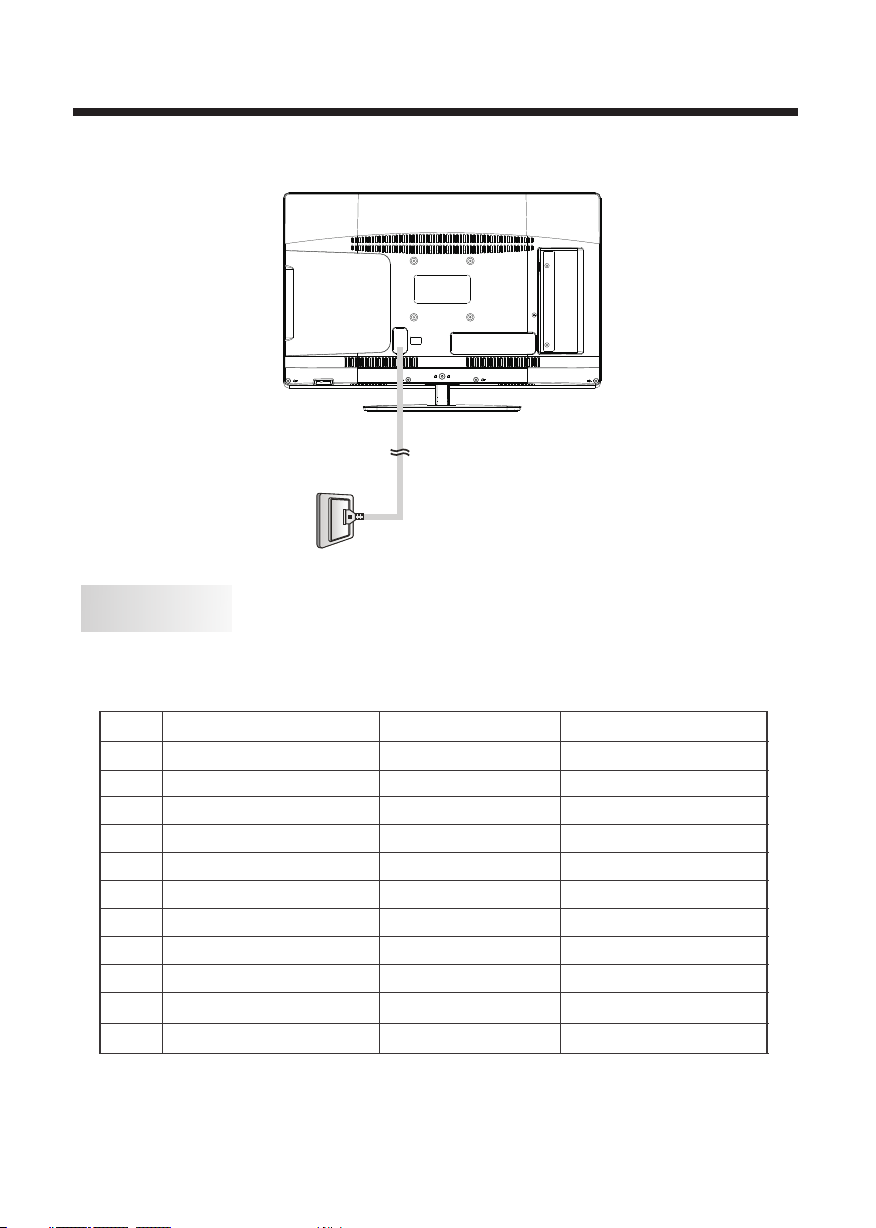
PRESET MODE
RESOLUTION
1
2
3
4
5
6
7
8
9
10
11
720*400
640*480
640*480
800*600
800*600
1024*768
1024*768
1024*768
1280*1024
1280*1024
1920*1080
INSTALLATION
V.Freq.(Hz) H.Freq.(KHz)
70
60
75
60
75
60
70
75
60
75
60
31.47
31.47
37.50
37.88
46.88
48.36
56.48
60.02
63.98
80.00
67.50
-8-
Page 10
INSTALLATION
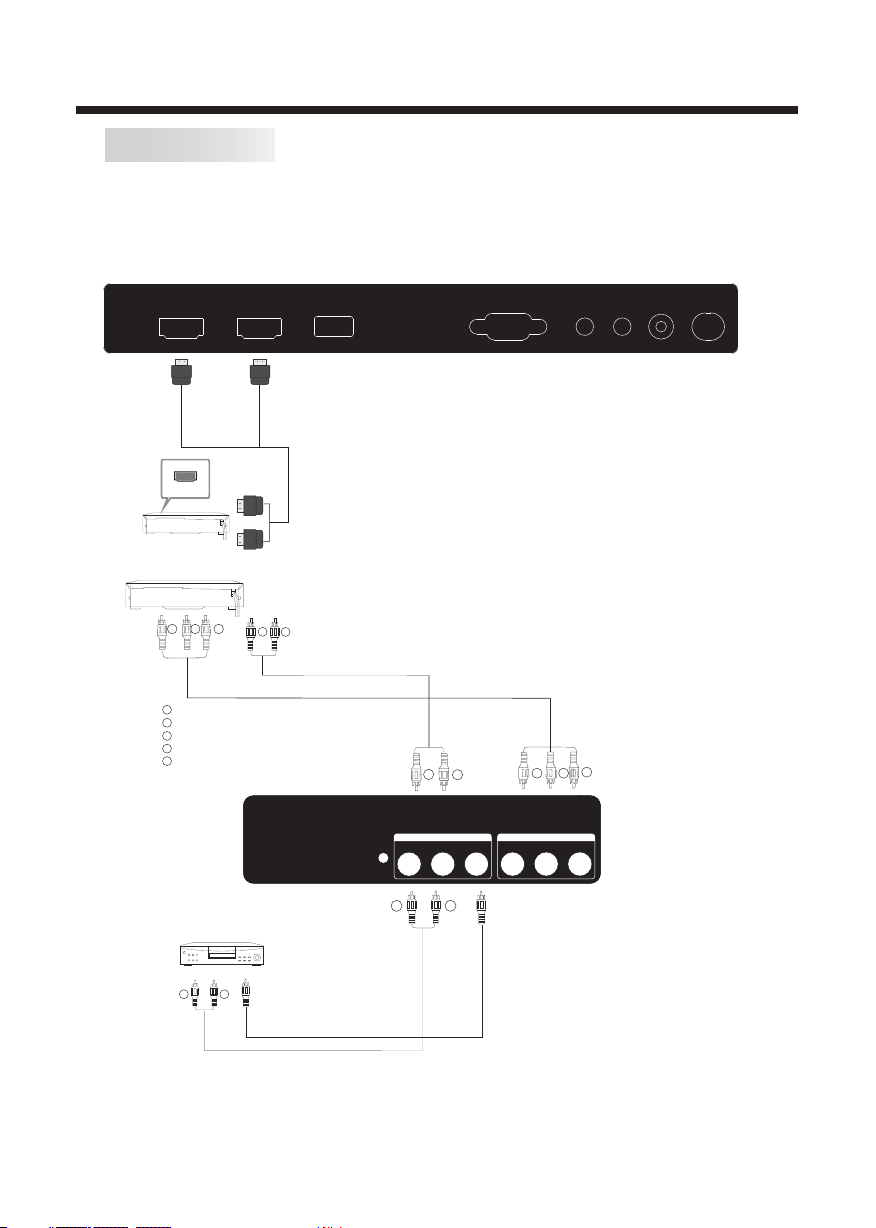
AV EQUIPMENT
There are two HDMI ports located on the back of your TV. You can connect a Blu-ray player, DVD player,
or other video equipment through these ports.
There is one component (Y, Pb, Pr) and one composite (AV) video input located on the back of your TV.
You can connect a VCR, cable box, or other video equipment to these jacks.
Please see the diagram below. You may also need to refer to the owner's manual of the device that you are
trying to connect.
VGA
HDMI 1 HDMI2
HDMI
VIDEO EQUIPMENT with YPbPr
G
R
B
USB
W
R
HEAD PHONERFPC AUDI O CO AXIAL
Y
Yellow (video)
W
White(audio L)
R
Red(audio R or Pr)
B
Blue(Pb)
G
Green(Y)
TO AUD IO OUTPU TS
VIDE O EQUIP MENT
W R
TO VID EO
OUTP UTS
R
COMPO SITE
R L
W
VIDEO
Pr
WR
R
COMPO NENT
Pb
G
B
Y
The te le vis io n's i np uts can b e conne cted to t he foll owing t ypes of e quipm ent: VCR, m ulti di sc play er,
DVD, c am cor de r, vid eo game o r stere o syste m, etc. ....
YPbP r ca n sup po rt th es e vid eo f ormat s:480 i,576 i,480 p,576 p,720 p,108 0i.
-9-
Page 11
YPb Pr
DTV
STRE NGTH
CH LI ST
VOL
CC MTS VGA
TV AV HDM I
EPG
FAV
S.M
P.M
REMOTE CONTROL
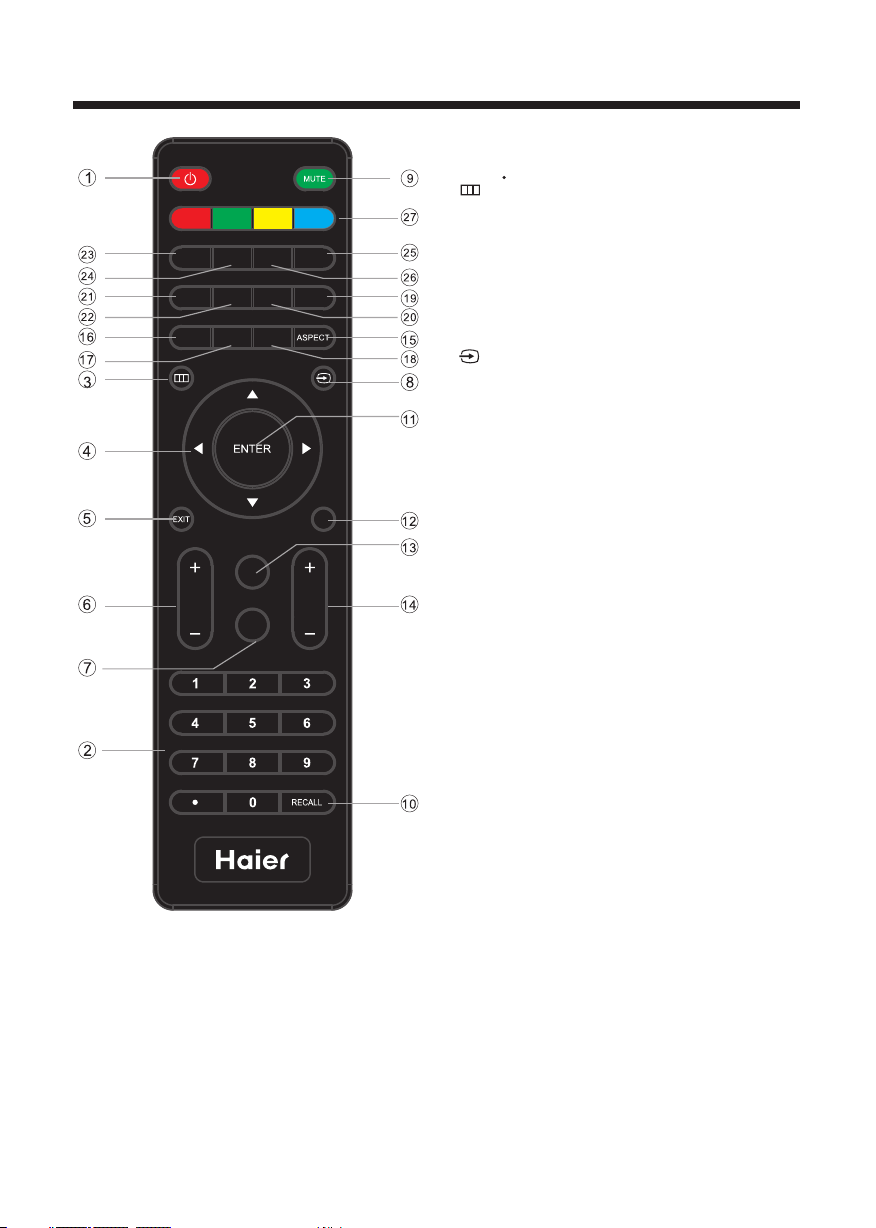
1: PO WER
Pre ss to pow er ON/O FF (sta ndby) t he TV.
2: NU MBER KE Y
Pre ss to ent er the TV chan nel num ber and s elect a c hanne l
(Pr ess " " to ch oose th e sub-c hanne l).
3:
Pre ss to dis play th e on scre en disp lay (OS D) menu o r
ret urn to th e previ ous men u.
4: CU RSOR
Whe n th e OS D menu is d ispla yed on- scree n, use th ese
but tons as t he up, do wn, lef t, righ t and ENT ER butt ons to
adj ust the v ariou s optio ns in the O SD menu .
5: EX IT
Pre ss to exi t the OSD m enu.
6: VOL+/ Pre ss VOL+ o r VOL - to adju st the vo lume.
7: P. M
Pre ss repe atedl y to sele ct a pict ure mod e.
8:
Pre ss to dis play or e xit the T V inp ut sour ce menu .
9: MU TE
Pre ss to swi tch the s ound ON /OFF.
10: R ECALL
Pre ss to swi tch bet ween th e curre nt and pr eviou sly
vie wed cha nnel.
11: ENTE R
Pre ss to con firm a se lecti on.
12: T V DI SPLAY
Pre ss to sho w the inf ormat ion abo ut the cu rrent i nput so urce.
13: S .M
TV
DISPLAY
CH
Pre ss repe atedl y to swit ch audi o modes .
14: C H+/CH Pre ss CH+ or C H- to bro wse thr ough th e TV c ha nn els.
15: A SPECT
Pre ss to cha nge the p ictur e aspec t ratio .
16: C H LIST
To dis pl ay the ch annel l ist. Pr ess to di splay t he chan nel lis t.
In DV D mode, p ress to e ject th e disc.
17: E PG
Pr ess to di splay t he DTV El ec tr onic Pr ogram G uide.
In DV D mode, p ress to g o to the pr eviou s chapt er.
18: FAV
Press t o displ ay the fa vorit e chann els lis t. In DVD m ode,
pre ss to go to t he next c hapte r.
19: H DMI
Press t o go dire ctly to t he HDMI i nput so urce.
20: AV
Pre ss to go di rectl y to the AV input s ource .
21: D TV STRENGTH
Pre ss to dis play th e DTV sig na l st ren gth.
22: T V
Pre ss to go di rectl y to the TV inpu t sourc e.
23: Y PbPr
Pre ss hot ke y to go dir ectly t o the Com ponen t (YPbP r) inpu t sourc e.
24: C C
Pre ss to tur n on or off t he c lo sed cap tions .
25: V GA
Pre ss hot ke y to go dir ectly t o the VGA in pu t sourc e.
26: M TS
Pre ss to act ivate t he NTSC T V sou nds, su ch as Ste reo,
SAP or Mon o tone, a nd audi o langu ages of D TV.
27: C OLOR KE YS
Res erved k eys
-10-
Page 12
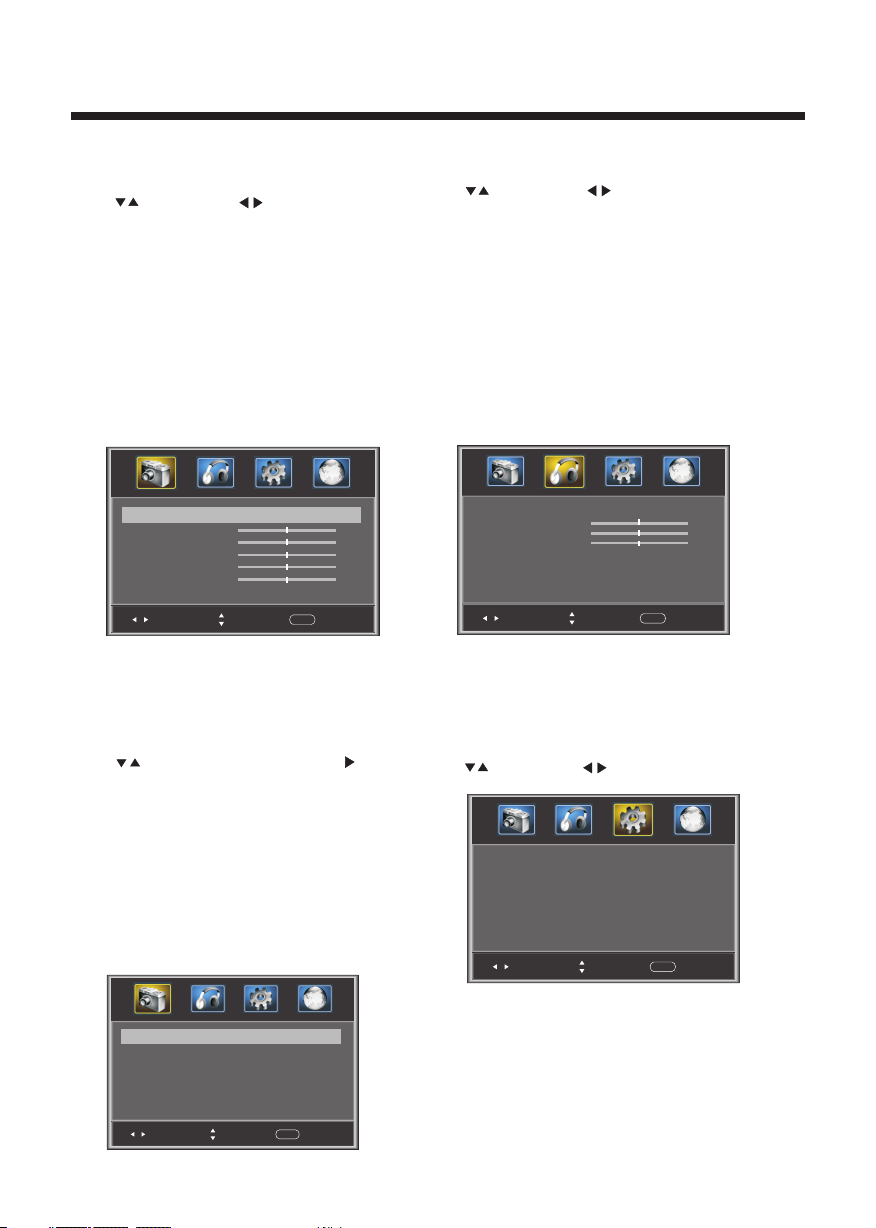
1. PICTURE MENU
The first item of the MENU is PICTURE MENU.
This menu provides several video adjustment options
for fine tuning the video display.
Press to select, press to adjust, press MENU
to exit.
Picture Mode: Select the user picture mode (Standard,
1).
Sports, Movie, Custom, Vivid).
2). Brightness:
complete picture. This will mainly affect the darker
areas of the picture.
3). Contrast: This will adjust the intensity of bright parts
in the picture but keep the dark parts unchanged.
4). Color: This will adjust the saturation level of the
colors to suit your personal preference.
5). Tint: Allows you to select color mix (tint) of the
picture.
6). Sharpness: This will adjust sharpness of fine details
in the picture.
Note:
If you want to adjust contrast, brightness, color,
and sharpness, the picture mode must to
"Custom".
select other options, the power consumption may
change.
This will adjust the light output of the
Pict ure Mod e
Cont rast
Brig htnes s
Colo r
Tint
Shar pness
Adva nced Vi deo
Adju st
Standard mode is the default setting, if you
the
Stan dard
< >
>
Sele ct
Menu
50
50
50
0
50
Exit
be set
Advanced Vid eo :
Press to selec t Adv an ce d Video, pres s , an d
the screen sho wn b el ow w il l be d is played.
1). Color Temp :
and Cool (blue ) co lo rs t o su it y ou r personal pr ef er en ce .
Select Cool to g iv e th e wh it e co lo rs a blue tint, N or ma l
to give the whit e co lo rs a n eu tr al t int, Warm to give t he
white colors a r ed t in t.
2). As pe ct : Th is w il l va ry t he s iz e of the image on t he TV
screen. The re are four mod es w hi ch c an b e se le cted
(Wide , Zo om , Ci ne ma a nd N or mal).
3). Noise Red uc ti on : Adj us t to r ed uce the appea ra nc e of
noise in the pic tu re ( do ts ). T he re a re f iv e mo des to
choose from (S tr on g, Au to , Of f, Wea k an d Mi dd le ).
This will incr ea se o r de cr ea se War m (red)
Colo r Temp. Norm al
Aspe ct Wide
Nois e Reduc tion Mi ddle
< >
< >
< >
OPERATION
2. AUDIO menu
The second item of the MENU is the AUDIO MENU.
You can adjust sound options here.
Press to select, press to adjust, press MENU
to exit.
1). Sound Mode: Select the user sound mode (Standard, News,
Music, Theater, Sports, Custom).
2). Bass: Adjust to increase or decrease lower-pitched sounds.
3). Treble: Adjust to increase or decrease higher-pitched sounds.
4). Balance: Adjust to emphasize left or right speaker balance.
5). Surround: Turn on or off the simulated surround sound
feature.
6). AVL: Auto Volume ,
volume level during commercials or when changing the channel.
7). Digital Output: Select the digital sound signal that will be
output from the coaxial audio output.
8). Audio Language: Select the audio language (English,
French, Spanish).
Soun d Mode Stan dard
Bass
Treb le
Bala nce
Surr ound
AVL
Digi tal Out put PCM
Audi o Langu age Engl ish
Adju st
Note:
The Audio language is available for ATSC (DTV)
programs.
Leveler This will reduce the differences in
< >
< >
< >
< >
< >
Sele ct
50
50
Menu
0
Exit
Off
Off
option only
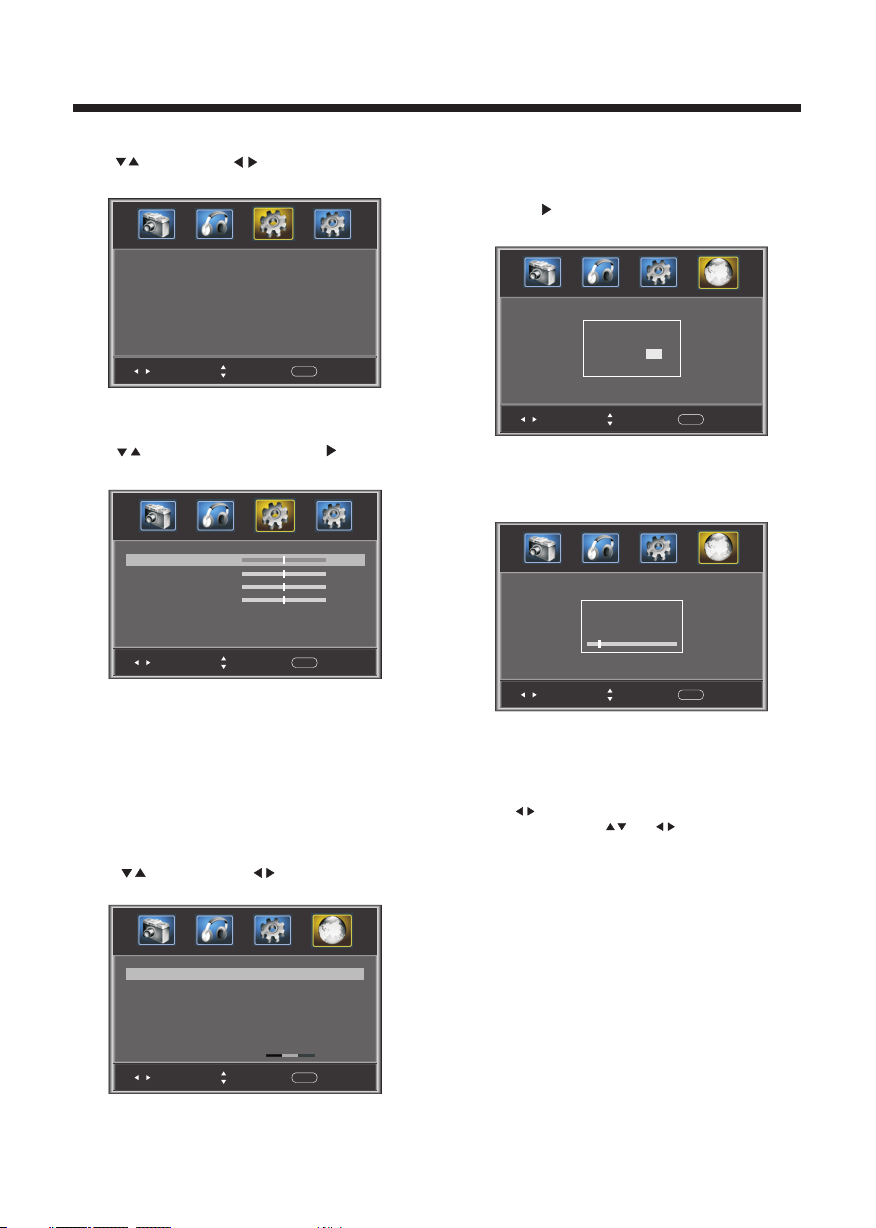
3. SETUP MENU
The third item of the MENU is the SETUP MENU.
set system settings
You can here.
Press to select, press to adjust, press MENU to exit.
Pare ntal Co ntrol s
Time r
Clos ed Capt ion
Menu S ettin gs
VGA Set tings
Rest ore Def ault
Adju st
Note:
Restore Defa ul t: R es et a ll s et tings to the fa ct or y
default valu e.
Channel name s th at h av e be en c ha nged throug h th e op ti on
in the Channel M en u ar e no t re se t wh en a restore de fa ul t is
initiated.
>
>
>
>
>
>
Menu
Sele ct
Exit
Adju st
Sele ct
Menu
Exit
-11-
Page 13
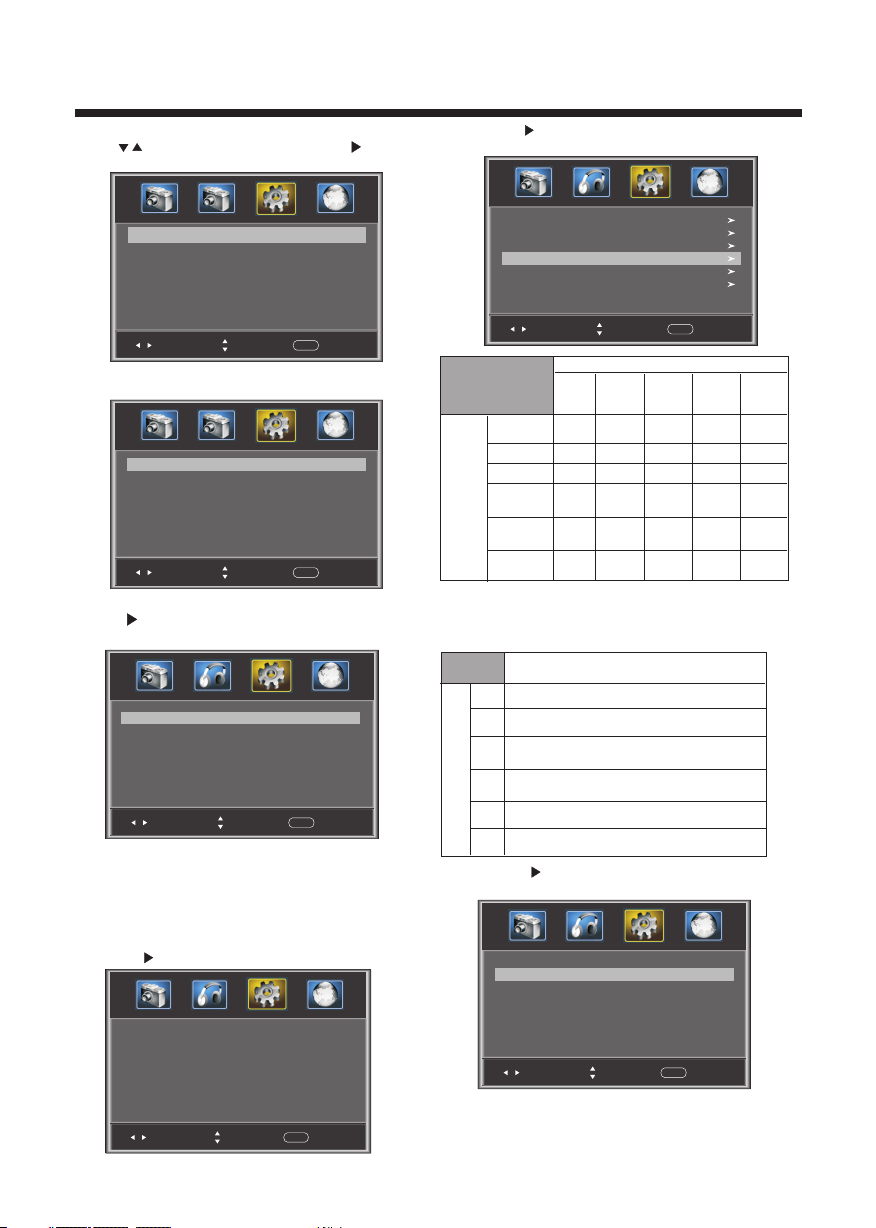
3.1. Pare nt al Control s:
Press to selec t , pr es s , an d th e
shown below wi ll b e di sp la ye d.
screen
Ente r Passw ord --- -
Parental Con tr ol s
OPERATION
1): TV: Pres s , an d th e sc re en shown below wi ll b e
displayed.
ALL
FV
V
S
L
D
Adju st
Input the pass wo rd , an d yo u wi ll
menu. The f ac tory defaul t pa ss wo rd i s 00 00.
Control
Chan ge pass word
P.G switch
US
Cana da
RRT se tting
Rese t RRT
Adju st
Menu
Sele ct
Exit
enter the Pare nt al
>
Off
< >
< >
< >
< >
< >
Menu
Sele ct
Exit
Change Passw or d:
Press , and the sc re en shown below wi ll b e
displayed.
Old pa sswor d
New pa sswor d
Conf irm pas sword
Adju st
Sele ct
----
----
----
Menu
Exit
1). Old passwo rd : In pu t th e ol d pa ssword
2). New passwo rd : In pu t th e ne w pa ssword
3). Confirm pa ss wo rd : In pu t th e new passwor d ag ai n
P.G swi tc h:
When the is ON, the optio ns
below
Parental Con tr ol s ho wn
can be adj us te d.
US: Press , and the screen shown below will be displayed.
Rat ing Con tent
Sug geste d
age
Adju st
TV-Y (Al l
chil dren)
TV-Y7( Direc t to
orde r child ren)
TV-G(G enera l
audi ence)
TV-PG( Paren tal
Guid ance
sugg ested )
TV-14( Paren ts
stro ngly
caut ioned )
TV-MA( Matur e
audi ence on ly)
FV
(Fa ntasy
vio lence )
X
V
(Viol ence)
Sele ct
X
X
X
Con tent
S
(Se xual
sit uatio n)
X
X
X
Menu
Exit
L
(Ad ult
lan guage )
X
X
X
D
(Se xuall y
sug gesti ve
dia log)
Press the ENTE R ke y to l oc k/ un lo ck .Parental Con tr ol s
2). MPAA: sw it ch t he m ov ie -r ating contr ol leve l: N/A,
G, PG, PG-13, R, N C- 17, X.
Rat ing
G Gen eral au dienc es, All Age s admit ted
Par ental G uidan ce sugg ested . Some ma teria l may not b e
PG
Sui table f or chil dren.
Par ents st rongl y cauti oned. S ome mat erial . may be
PG- 13
Age
Canada: Pres s , an d th e sc re en shown below wi ll b e
displayed.
Ina pprop riate f or chil dren un der 13.
Res trict . Under 1 7 requi res acc ompan ying pa rent or a dult
R
gua rdian ( age var ies in so me juri sdict ions) .
NC- 17
No on e 17 and un der adm itted .
X is an o lder ra ting th at is uni fied wi th NC-1 7 but may b e
X
enc oded in t he data o f older m ovies .
Cana da Engl ish
Cana da Fren ch
Des cript ion
EXEM PT
< >
EXEM PT
< >
X
X
TV
MPAA N/A
Adju st
>
< >
Sele ct
Menu
Adju st
1): Canada Eng li sh : sw it ch t he E nglish-ra ti ng contro l le ve l:
EXEMPT, C, C 8+ , G, P G, 14+, 18+.
Exit
-12-
Sele ct
Menu
Exit
Page 14

OPERATION
Rat ing
E Exe mpt: In clude s news, s ports , docum ents an d other i nform ation
pro gramm ing: ta lk show s, musi c video s, and va riety p rogra mming .
C Chi ldren : Inten ded for y ounge r child ren und er the ag e of 8 year s.
Pay s caref ul atte ntion t o theme s that co uld thr eaten t heir se nse of
sec urity and wel l-bei ng.
C8+ C hildr en over 8 y ears ol d: Cont ains no p ortra yal of vi olenc e as the
pre ferre d, acce ptabl e, or onl y way to re solve c onfli ct; nor e ncour age
chi ldren t o imita te dang erous a cts whi ch they m ay see on t he scre en .
G Gen eral: C onsid ered ac cepta ble for a ll age gr oups, Ap propr iate
vie wing fo r the ent ire fam ily, cont ains ve ry litt le viol ence, p hysic al,
ver bal or em otion al.
PG Pa renta l Guida nce: In tende d for a gen eral au dienc e, but ma y not be
Age
sui table f or youn ger chi ldren ( under t he age of 8 ) becau se it cou ld
con tain co ntrov ersia l theme s or issu es.
14+ O ver 14 Years : Could c ontai n theme s where v iolen ce is one o f the
dom inant e lemen ts of the s toryl ine, bu t it must b e integ ral to th e
dev elopm ent of pl ot or cha racte r. Langu age usa ge coul d be prof ane
and n udity, p resen t withi n the con text of th e theme .
18+ Ad ults: I ntend ed for v iewer s 18 year s and old er and mi ght con tain
depic tions o f viole nce, wh ich whi le rela ted to th e devel opmen t of
p lot, ch aract er or the mes, ar e inten ded for a dult vi ewing . Could
conta in grap hic lan guage a nd port rayal s of nudi ty.
2).Canada Fr en ch : sw it ch t he F rench-rat in g co nt ro l
level: E, G,8A NS +, 13 AN S+ ,1 6A NS +,18ANS+.
Rat ing
E Exe mpt pro gramm ing
G Gen eral: Al l ages an d child ren, co ntain s minim al dire ct viol ence,
but m ay be int egrat ed into t he plot i n a humor ous or un reali stic
man ner .
8an s+ Gene ral but i nadvi sable f or youn g child ren: Ma y be view ed by a
wid e publi c audie nce, bu t could c ontai n scene s distu rbing t o
Age
chi ldren u nder 8 wh o canno t disti nguis h betwe en imag inary a nd
rea l situa tions . Recom mende d for vie wing wi th pare n . tal g uidan ce
13a ns+ Ove r 13 year s: Coul d conta in scen es of fre quent v iolen t scene s
and i ntens e viole nce.
16a ns+ Ove r 16 year s: Coul d conta in freq uent vi olent s cenes a nd viol ence.
18a ns+ Ove r 18 year s: Only f or adul t viewi ng. Cou ld cont ain fre quent
vio lent sc enes an d extre me viol ence.
Des cript ion
Des cript ion
3.2 Timer
You can adjust the sleep timer and time related settings
here.
Press to select, press to adjust, press MENU
to exit.
Slee p timer
Time z one
DST
Cloc k
Adju st
Off
< >
Paci fic
< >
Off
< >
1999 /12/3 1 04:03 PM
Menu
Sele ct
Exit
Sleep Timer: You can s et t he s le ep t imer.
Note:
Tim e zo ne , DS T and Cl oc k ar e avai la bl e in ATSC ,
and the Clock ca n' t be a dj us t .
ed
mode
3.3 Closed Caption: switch t he closed caption mode.
Press to selec t Cl os ed C ap ti on , press , and the
screen sho wn b el ow will be displa ye d.
CC Mod e
Basi c Selec tion
Adva nced Se lecti on
Opti on
Adju st
Off
< >
CC1
< >
Serv ice 1
< >
>
Menu
Sele ct
Exit
RRT se tt in g: i n ATSC di gi ta l TV mode, this op ti on c an
be adjusted
Reset RRT: Press , and the s cr ee n
displayed.
Pres s ENTER K ey To Selec t
Adju st
Are yo u sure?
NO
Sele ct
shown below wi ll b e
YES
Menu
Exit
1): Advanced sele ct io n: o nl y ATSC mo de .available in
2): Option: You can e di t th e cl osed caption op ti on s.
Press , and the sc re en shown below wi ll b e di sp la ye d.
Mode
Font s tyle
Font s ize Defa ult
Font E dge sty le Defa ult
Font E dge col or Defaul t
FG col or Defa ult
BG col or D efaul t
FG opa city Default
BG opa city Defa ult
Adju st
Cust om
< >
Defa ult
< >
< >
< >
< >
< >
< >
< >
Menu
Sele ct
Exit
NOTE: Only ava il ab le i n ATSC mo de .
-13-
Page 15
3.4 Menu Settings
You can adjust Menu Settings here.
Press to select, press to adjust, press MENU
to exit.
OPERATION
1). Air/Cable: Select Air TV signal or Cable TV signal.
2). Auto Scan:
should perform a full channel scan in order to capture
and store all available channels.
Press the to confirm shown below
will be displayed.
If it's the first time using the TV, you
, and the screen
Menu L angua ge Engl ish
Adju st
3.5 VGA Settin gs : O
mode.
Press to selec t VGA Settings, p re ss , a nd t he s cr ee n
H-po s
V-pos
Cloc k
Phas e
Auto
Adju st
1). H-Pos: Adjust t he h or iz on ta l po sition of the s cr ee n.
2). V-Pos : Adj ust the verti ca l po si ti on o f th e screen.
3). Clock: Fin e tu ne t he s cr ee n wi dth.
4). Phase: Fin e tu ne t he p ha se o f th e sc re en. Usually
you need to opti on
don' t adjust this it em .
5). Auto: Auto adjust to f it t he s cr ee n.
< >
Menu
Sele ct
Exit
nly availabl e in VGA (PC input)
sho wn b el ow will be displa ye d.
50
50
50
50
>
Menu
Sele ct
Exit
4. Channel MENU
Here you add/s ki p TV ch an nels and cust om iz e di sp la ye d
channel info .
Press to selec t, p re ss t o ad ju st .
Are yo u sure?
YES
NO
Pres s ENTER K ey To Selec t
Adju st
Select "YES" and
and the screen
shown below will be displayed,
which indicates that the auto search is progressing.
press the ENTER to confirm,
R F CH: 4
Foun d: 4
Anal og: 1
Digi tal: 3
Adju st
Sele ct
Sele ct
Menu
Menu
Exit
Exit
3). Favorite: Press ENTER to add/delete favorite channels.
4). Show/Hide: Press the ENTER button to display or
hide channels.
5). Channel NO . : Display the current channel number.
Press to change the channel.
6). Channel label: Press and to edit the current
channel name.
7). DTV signal: Display DTV signal strength.
Signal strength indicator is for reference only, it
cannot be selected or adjusted.
Air/ cable
Auto S can
Favo rite
Show /Hide
Chan nel NO.
Chan nel Lab le.
DTV si gnal: G ood
Adju st
Air
< >
>
>
>
2-1
< >
>
Menu
Sele ct
Exit
-14-
Page 16
OPERATION
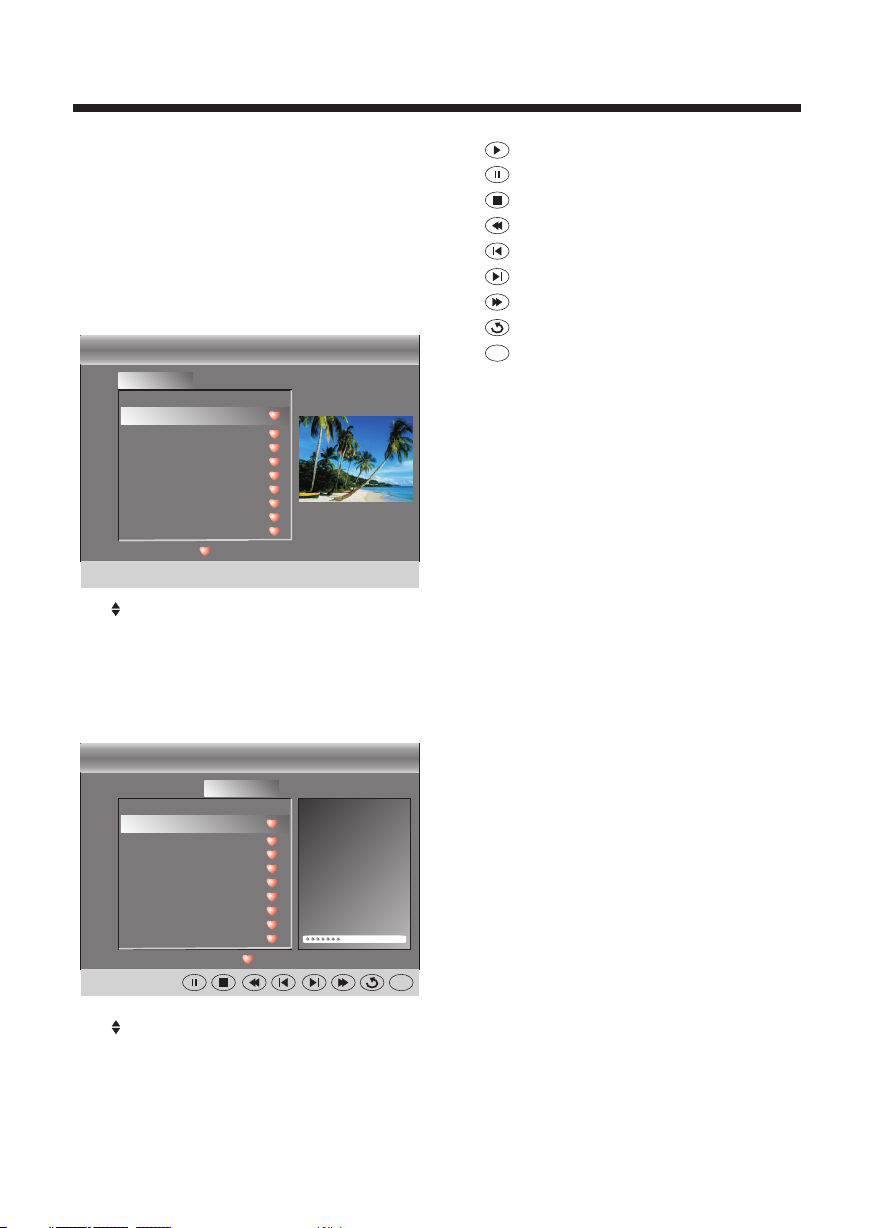
5. Multimedia MENU
With an ext er na l st or ag e de vice attach ed t o th e US B in pu t,
you can use the Mu lt im ed ia M en u to d isplay JPEG p ic tu re s
and play MP3 mus ic .
Before start in g op er at io n, v erify that th e US B st or ag e de vi ce
is using the FAT32 f il e sy st em format. Thi s televisio n do es
not support NT FS o r ot he r fo rm at s. Please use a h ig h- sp ee d
USB 2.0 device w it h a ma xi mu m ca pa city of 50GB.
1. Select a Phot o
The s cr ee n sh own below wil l be d is pl ay ed .
USB
Photo Music
..
C:
011. jpg
200 81222 21788 78787 .jpg
200 81.jp g
200 87.jp g
202 87.jp g
207 87.jp g
200 87.jp g
207 87.jp g
200 87.jp g
Total s ize:3 .7 GB 102 4 x 768 372 .72KB
Unu sed siz e: 3.7 GB 2 006:0 7:14 15 :37:4 2
Use select the .jpg files or folders,
to display the photo or open the folder, EXIT to
stop playing or go to the menu.
2. Select Music
The screen shown below will be displayed.
:17 0 01/01 8
previous
C:\ photo \
011. jpg
press ENTER
press
: play
: pause
: stop
: fast backward
: previous
: next
: fast forward
: repeat all
: random play
Ran dom
USB
Photo Musi c
..
C:
Eve rythi ng I do.m p3
Sea led Wit h A Kis s.mp3
.mp 3
.mp 3
.mp 3
.mp 3
.mp 3
.mp 3
.mp 3
Total s ize:3 .7 GB
Unu sed siz e: 3.7 GB
Use select the .mp3 files or folders, to
play or open the folder, EXIT to go to menu.
:17 0 01/01 8
press the previous
C:\ laoge \
Eve rythi ng I do.mp 3
Titl e:
Arti st:
Alb um:
Year:
Bit R ate: 128 kbps
Pla y
05: 49 06:33
press ENTER
Ran dom
-15-
Page 17

TR OUB LE SH OOT ING
micr ow ave ,
Component (Y Pb Pr) connections
The LCD TV panel is built with very high precision technology giving you fine picture details
in vibrant color. Occasionally, a few non-active pixels may appear on the screen as a fixed
point of red, green, blue, black or white. Please note this does not affect the performance of
the product.
-16-
Page 18

WARRANTY
90 da ys labo r, 1 year pa rts.
-17-
Page 19

5
6-9
10
11-15
16
-1-
Page 20

-2-
Page 21

Dim:515*320mm(不包 括底座)
-3-
Page 22

Cons om mat io n d' éne rg ie
USB
22
1920 x 1080
24
1920 x 1080
CA 100- 24 0V 50 /6 0H z
38W
40W
2x3W
NTSC
-4-
Page 23

1.
Fixe z la pl aqu e de ba se du s upp ort d u pôl e STAN D BY ferm eme nt se rre r les v is fo urn ies
pour ê tre u n sta nd re mpl i.
2. Pl ac ez le télévise ur avec le côté d'affic ha ge ver s le bas sur une su rf ac e pl an e. Uti li se z un
chi ffon pour protéger l'écran. Positionnement du stand achevée dans le tro u sur le téléviseur.
-5-
Page 24

SOUR CE
MENU
CH+
CH-
3
VOL+
VOL-
1
STAND BY
1
2
3
4
5
2
30 30
VIDEO
Pr
COMPO NENT
COMPO SITE
R L
AUDIO INP UT, INP UT VI DEO YPb Pr
HDMI 1 HDMI2
USB
Pb
Y
VGA
HEAD PHONERFPC AUDI O COAX IAL
-6-
Page 25

HDMI1 HDMI2
VGA
USB
HEADP HONERFPC AUDIO COAX IAL
-7-
Page 26

11
1920*1080
60
-8-
67.50
Page 27

HDMI 1 HDMI2
HDMI
G
R
B
VGA
USB
W
R
R
W
HEAD PHONERFPC AUDI O CO AXIAL
G
R
B
W R
COMPO SITE
R L
-9-
Pr
COMPO NENT
Pb
Y
VIDEO
WR
Page 28

YPb Pr
DTV
STRE NGTH
CH LI ST
VOL
CC MTS VGA
TV AV HDM I
EPG
FAV
S.M
P.M
1: ALIMENTATION
Permet de met tr e en m ar ch e le t él év is eu r/ ac ti ve r le m od e Att en te .
2: TOUCHES NUMERIQUES
Permet de directeme nt s ai sir un numéro de chaîne.
3:
Perm et d 'a ff ic her le me nu p ri nci pa l.
4: TO UCHES D IR EC TIONN EL LE S
Perm et d e se d éplac er d an s les men us .
5: Qui tt er
Perm et d e qu itter l e me nu .
6: Aug me nt er/Di mi nu er le vol um e
Perm et d e ré gler le v ol um e.
7: P.M
Perm et d e mo difie r le m od e d'affic ha ge .
8:
Appu ye z su r cette t ou ch e pour sé le ct ionne r un e so urc e
d'en tr ée d ispon ib le .
9: MUE T
Perm et d 'a ctive r/ dé sacti ve r le s on.
10: RA PP EL
Perm et d e di recte me nt a ccéde r à la d er nière c ha în e
visu al is ée.
11: EN TREE
Perm et d e co nfirm er v ot re séle ct io n.
12: AF FI CH AGE TV
TV
DISPLAY
CH
Perm et d 'a ff ic her/m as qu er le s in fo rm ati on s de l a ch aîn e de
télé vi si on séle ct io nnée.
13: M. A.
Perm et d e mo difie r le m od e audio .
14: Ch aî ne s uivan te /C haîne p ré cé dente
Perm et d 'a ccéde r à la c ha îne de té lé vi sion
préc éd en te/su iv an te.
15: FO RM AT D' AF FI CHAGE
Perm et d e mo difie r le f or mat d'a ff ic ha ge .
16: LI ST E DE S CHAIN ES
Perm et d 'a ff ic her la li st e de s cha în es d e té lév is io n.
17: GC E
Perm et d 'a ff ic her les i nf or mat io ns d es p rog ra mm es T NT.
18: FAVORIS
En mod e TNT, per me t d' affi che r la l is te des ch aî ne s
favo ri te s.
19: HD MI
Touche d e ra cc ourci p er me ttant d e di re cteme nt a ct iver la
sour ce d 'e ntrée H DM I.
20: AV
Touche d e ra cc ourci p er me ttant d e di re cteme nt a ct iver la
sour ce d 'e ntrée AV.
21: PU IS SA NCE DU SI GN AL T NT
Perm et d 'a ff ic her les i nf or mat io ns l ié es au s ig na l TN T re çu .
22: Té lé vi sion
Touche d e ra cc ourci p er me ttant d e di re cteme nt a ct iver la
sour ce d 'e ntrée Tél év is io n.
23: YP bP r
Touche d e ra cc ourci p er me ttant d e di re cteme nt a ct iver la
sour ce d 'e ntrée v id éo Y Pb Pr.
24: CC
Perm et d 'a ctive r/ dé sacti ve r la f oncti on S ou s-tit ra ge p our
male nt en dants .
25: VG A
Touche d e ra cc ourci p er me ttant d e di re cteme nt a ct iver la
sour ce d 'e ntrée V GA .
26: MT S
Perm et d 'a ctive r le m od e Stéré o.
27: TOUCHE S DE C OU LEUR
Touche s sp éc iales
-10-
Page 29

Pict ure Mod e
Cont rast
Brig htnes s
Colo r
Tint
Shar pness
Adva nced Vi deo
Adju st
Stan dard
< >
>
Sele ct
Menu
50
50
50
0
50
Exit
Pare ntal Co ntrol s
Time r
Clos ed Capt ion
Menu S ettin gs
VGA Set tings
Rest ore Def ault
Adju st
Ente r Passw ord --- -
Sele ct
>
>
>
>
>
>
Menu
Exit
Colo r Temp. Nor mal
Aspe ct Wide
Nois e Reduc tion Mi ddle
Adju st
Soun d Mode Stan dard
Bass
Treb le
Bala nce
Surr ound
AVL
Digi tal Out put PCM
Audi o Langu age Engl ish
Adju st
< >
< >
< >
Sele ct
< >
Off
< >
Off
< >
< >
< >
Sele ct
Menu
Menu
Adju st
Exit
Sele ct
Menu
Exit
0000
Chan ge pass word
P.G switch
US
Cana da
RRT se tting
50
50
0
Exit
Rese t RRT
Adju st
-11-
>
Off
< >
< >
< >
< >
< >
Menu
Sele ct
Exit
Page 30

Old pa sswor d
New pa sswor d
Conf irm pas sword
Adju st
Sele ct
----
----
----
Menu
X
X
X
X
Exit
X
X
X
X
X
X
X
X
TV
MPAA N/A
Adju st
ALL
FV
V
S
L
D
Adju st
>
< >
Sele ct
Sele ct
Menu
Menu
Exit
Cana da Engl ish
Cana da Fren ch
Exit
Adju st
EXEM PT
< >
EXEM PT
< >
Menu
Sele ct
Exit
-12-
Page 31

Slee p timer
Time z one
DST
Cloc k
Off
< >
Paci fic
< >
Off
< >
1999 /12/3 1 04:03 PM
Pres s ENTER K ey To Selec t
Adju st
Are yo u sure?
NO
Sele ct
Adju st
CC Mod e
Basi c Selec tion
Adva nced Se lecti on
Opti on
Adju st
Mode
Font s tyle
Font s ize Defa ult
Font E dge sty le Defa ult
Font E dge col or Defaul t
FG col or Defa ult
BG col or D efaul t
YES
Menu
Exit
FG opa city Def ault
BG opa city Defa ult
Adju st
Menu
Off
CC1
Serv ice 1
Cust om
Defa ult
Menu
Menu
Exit
Exit
Exit
Sele ct
< >
< >
< >
>
Sele ct
< >
< >
< >
< >
< >
< >
< >
< >
Sele ct
-13-
Page 32

Menu L angua ge Engl ish
Adju st
< >
Sele ct
Menu
Are yo u sure?
YES
NO
Exit
Pres s ENTER K ey To Selec t
Adju st
Sele ct
Menu
Exit
Air
2-1
Menu
Menu
50
50
50
50
Exit
Exit
H-po s
V-pos
Cloc k
Phas e
Auto
Adju st
Air/ cable
Auto S can
Favo rite
Show /Hide
Chan nel NO.
Chan nel Lab le.
DTV si gnal: G ood
Adju st
>
Sele ct
< >
>
>
>
< >
>
Sele ct
-14-
Adju st
R F CH: 4
Foun d: 4
Anal og: 1
Digi tal: 3
Sele ct
Menu
Exit
Page 33

USB
Photo Music
..
C:
011. jpg
200 81222 21788 78787 .jpg
200 81.jp g
200 87.jp g
202 87.jp g
207 87.jp g
200 87.jp g
207 87.jp g
200 87.jp g
:17 0 01/01 8
Total s ize:3 .7 GB 102 4 x 768 372 .72KB
Unu sed siz e: 3.7 GB 2 006:0 7:14 15 :37:4 2
C:\ photo \
011. jpg
USB
Photo Musi c
..
C:
Eve rythi ng I do.m p3
Sea led Wit h A Kis s.mp3
.mp 3
.mp 3
.mp 3
.mp 3
.mp 3
.mp 3
.mp 3
:17 0 01/01 8
Total s ize:3 .7 GB
Unu sed siz e: 3.7 GB
C:\ laoge \
Eve rythin g I do.mp 3
Titl e:
Arti st:
Alb um:
Year:
Bit R ate: 128 kbps
Pla y
05: 49 06:33
Ran dom
Ran dom
-15-
Page 34

-16-
Page 35

LE22C2 38 0 / LE24C 23 80
-17-
Page 36

6-9
10
11-15
16
-1-
Page 37

-2-
Page 38

Dim:515*320mm(不包 括底座)
-3-
Page 39

Cable
Tensión de alimentación
Video
USB
22
1920 x 1080
24
1920 x 1080
100-240V ca 50/60Hz
38WConsumo de energía
40W
2x3W
NTSC
x 2
-4-
Page 40

1. Fij e la pl aca b ase d e sop ort e par a el po lo de p ie co n fir mez a apr eta ndo e l tor nil lo qu e se
sumi nis tra u n sop ort e com ple to.
2. Col oqu e el te lev iso r con e l lad o de la p ant all a hac ia ab ajo s obr e una s upe rfi cie p lan a.
Util ice u n pañ o par a pro teg er la p ant all a.
Colo cac ión d el so por te co mpl eta do en e l agu jer o en el t ele vis or.
-5-
Page 41

SOUR CE
MENU
CH+
CH-
3
1
VOL+
VOL-
STAND BY
1
2
3
4
5
2
30 30
HDMI 1 HDMI2
COMPO SITE
R L
VIDE O,
VIDEO
USB
Pr
COMPO NENT
Pb
Y
VGA
HEAD PHONERFPC AUDI O CO AXIAL
-6-
Page 42

HDMI1 HDMI2
VGA
USB
HEADP HONERFPC AUDIO COAX IAL
-7-
Page 43

11
60
-8-
67.501920*1080
Page 44

HDMI 1 HDMI2
HDMI
USB
VGA
HEAD PHONERFPC AUDI O CO AXIAL
GBR
W R
W
R
G
R
Pr
COMPO NENT
Pb
B
Y
R
COMPO SITE
R L
W
VIDEO
WR
-9-
Page 45

YPb Pr
DTV
STRE NGTH
CH LI ST
VOL
CC MTS VGA
TV AV HDM I
EPG
FAV
S.M
P.M
1: POWER
Para encende r el TV o pon er lo en modo de rep os o.
2: TECLAS N UMÉRICAS
Para acceder d ir ec ta me nt e a un p rograma.
3:
Muestra el men ú pr in ci pa l en l a pa ntalla.
4: CURSOR
Para moverse d en tr o de l me nú .
5: EXIT
Se utiliza par a sa li r de l me nú .
6: VOL+/-
Ajusta el nive l de s on id o.
7: P.M
Para conmuta r el m od o de l a im ag en .
8:
Presiónelo p ar a mo st ra r y se le ccionar las f ue nt es d e vi de o
disponible s.
9: MUTE
Habilita o inh ab il it a el s on id o.
10: RECUPERAR
Para acceder a l pr og ra ma q ue s e es taba viendo
anteriorme nt e.
11: ENTER
TV
DISPLAY
CH
Confirma la se le cc ió n.
12: VISUALIZACIÓN DE TV
Muestra o quit a la i nf or ma ci ón d e la programa ci ón
13: S.M
Para conmuta r el m od o de s on id o.
14: CH+/CH
Para acceder a l Pr og ra ma p ró xi mo o al anterio r.
15: ASPECT
Cambia el aspe ct o de l a im ag en .
16: CH LIST
Usado para vis ua li za r la l is ta d e canales.
17: EPG
Muestra toda l a in fo rm ac ió n de l os programa s DT V.
18: FAV
Utilizado pa ra a cc ed er a s us c an ales favori to s en e l mo do d e
TV di gi ta l.
19: HDMI
Tecl a ca li en te para ir direct am en te a l a fu en te H DMI.
20: AV
Tecl a ca li en te para ir a la fuent e de AV.
21: DTV STR ENGTH
Muestra la int en si da d de l a se ña l DTV.
22: TV
Tecl a ca li en te para ir a la fuent e de TV.
23: YPbPr
Tecl a ca li en te para ir direct am en te a l a fu en te YPbPr.
24: CC
Habilita o inh ab il it a la f un ci ón CC.
25: VGA
Tecl a ca li en te para ir a la fuent e VGA.
26: MTS
Conmuta el son id o es té re o.
27: TECLAS DE COLOR
Tecl as r es er vadas
-10-
Page 46

Pict ure Mod e
Cont rast
Brig htnes s
Colo r
Tint
Shar pness
Adva nced Vi deo
Adju st
Stan dard
< >
>
Sele ct
Menu
50
50
50
0
50
Exit
Pare ntal Co ntrol s
Time r
Clos ed Capt ion
Menu S ettin gs
VGA Set tings
Rest ore Def ault
Adju st
>
>
>
>
>
>
Menu
Sele ct
Exit
Colo r Temp. Nor mal
Aspe ct Wide
Nois e Reduc tion Mi ddle
Adju st
Soun d Mode Stan dard
Bass
Treb le
Bala nce
Surr ound
AVL
Digi tal Out put PCM
Audi o Langu age Engl ish
Adju st
< >
< >
< >
Sele ct
< >
Off
< >
Off
< >
< >
< >
Sele ct
Menu
Menu
Ente r Passw ord --- -
Exit
Adju st
Sele ct
Menu
Exit
0000
50
50
0
Exit
-11-
Chan ge pass word
P.G switch
US
Cana da
RRT se tting
Rese t RRT
Adju st
>
Off
< >
< >
< >
< >
< >
Menu
Sele ct
Exit
Page 47

Old pa sswor d
New pa sswor d
Conf irm pas sword
Adju st
Sele ct
----
----
----
Menu
X
X
X
X
X
X
X
X
X
X
X
Exit
X
TV
MPAA N/A
Adju st
ALL
FV
V
S
L
D
Adju st
>
< >
Sele ct
Sele ct
Menu
Menu
Exit
Cana da Engl ish
Cana da Fren ch
Exit
Adju st
EXEM PT
< >
EXEM PT
< >
Menu
Sele ct
Exit
-12-
Page 48

Slee p timer
Time z one
DST
Cloc k
Off
< >
Paci fic
< >
Off
< >
1999 /12/3 1 04:03 PM
Pres s ENTER K ey To Selec t
Adju st
Are yo u sure?
NO
Sele ct
Adju st
CC Mod e
Basi c Selec tion
Adva nced Se lecti on
Opti on
Adju st
Mode
Font s tyle
Font s ize Defa ult
Font E dge sty le Defa ult
Font E dge col or Defaul t
FG col or Defa ult
BG col or D efaul t
YES
Menu
Exit
FG opa city Def ault
BG opa city Defa ult
Adju st
Menu
Off
CC1
Serv ice 1
Cust om
Defa ult
Menu
Menu
Exit
Exit
Exit
Sele ct
< >
< >
< >
>
Sele ct
< >
< >
< >
< >
< >
< >
< >
< >
Sele ct
-13-
Page 49

Menu L angua ge Engl ish
Adju st
< >
Sele ct
Menu
Are yo u sure?
YES
NO
Exit
Pres s ENTER K ey To Selec t
Adju st
Sele ct
Menu
Exit
H-po s
V-pos
Cloc k
Phas e
Auto
Adju st
Air/ cable
Auto S can
Favo rite
Show /Hide
Chan nel NO.
Chan nel Lab le.
DTV si gnal: G ood
Adju st
>
Sele ct
< >
>
>
>
< >
>
Sele ct
50
50
50
50
Menu
Exit
Air
2-1
Menu
Exit
-14-
Adju st
R F CH: 4
Foun d: 4
Anal og: 1
Digi tal: 3
Sele ct
Menu
Exit
Page 50

USB
Photo Music
..
C:
011. jpg
200 81222 21788 78787 .jpg
200 81.jp g
200 87.jp g
202 87.jp g
207 87.jp g
200 87.jp g
207 87.jp g
200 87.jp g
:17 0 01/01 8
Total s ize:3 .7 GB 102 4 x 768 372 .72KB
Unu sed siz e: 3.7 GB 2 006:0 7:14 15 :37:4 2
C:\ photo \
011. jpg
USB
Photo Musi c
..
C:
Eve rythi ng I do.m p3
Sea led Wit h A Kis s.mp3
.mp 3
.mp 3
.mp 3
.mp 3
.mp 3
.mp 3
.mp 3
:17 0 01/01 8
Total s ize:3 .7 GB
Unu sed siz e: 3.7 GB
C:\ laoge \
Eve rythin g I do.mp 3
Titl e:
Arti st:
Alb um:
Year:
Bit R ate: 128 kbps
Pla y
05: 49 06:33
Ran dom
Ran dom
-15-
Page 51

-16-
Page 52

LE22C2 38 0 / LE24C 23 80
-17-
Page 53

Model s:
LE22C 23 80
LE24C 23 80
Iss ue d: 2 01 2. 03
 Loading...