

Haier LC32F2120 User Manual
LC32F2120
LCD

Contents
Safety and warnings.......................................................................................2-3
Introduction..................................................................................................4
Stand installation guide................................................................................. 5
Installation................................................................................................... 6-9
Remote Control............................................................................................10
Operation..................................................................................................... 11-15
Trouble Shooting.......................................................................................... .16
DVD Operation............................................................................................. 17-20
DVD Trouble Shooting...................................................................................21
Warranty...................................................................................................... . 2 2
SA FET Y AN D WARNI NGS
IMPORTANT SAFETY INSTRUCTION
TO REDUCE THE RISK OF ELECTRIC SHOCK, DO
NOT REMOVE COVER (OR BACK).NO USER
SERVICEABLE PARTS INSIDE. REFER SERVICING
TO QUALIFIED SERVICE PERSONNEL.
RISK OF ELECTRIC SHOCK
DO NOT OPEN!
CAU TION
CAUTION
The symbol indicates that dangerous
voltages constituting a risk of electric shock
are present within this unit.
The symbol indicates that there are
important operating and maintenance
instructions in the literaturaccompanying this
unit.
To reduce the risk of fire or electric shock, do
not expose this Televisi on to rain or moisture.
WARNING:
1) Read these instructions.
2) Keep these instructions.
3) Heed all warnings.
4) Follow all instructions.
5) Do not use this Television n ear water.
6) Clean only with dry cloth.
7) Do not block any ventilation o penings, install in
accordance with the instruc tions.
8) Do not install near any heat sou rces such as
radiations, heat register s, stoves, or other Television
(including amplifiers) th at produce heat.
9) Do not defeat the safety purpo se of the polarized
plug. If the provided plug does n ot fit into your
outlet, consult an electric ian for replacement o f the
obsolete outlet.
10) Protected the power cord fr om being walked on
or pinched particularly at pl ugs, convenience
receptacles, and the point wh ere they exit from the
Television.
11) Only use attachments /accessories specified by
the manufacturer.
12) Unplug this Televisio n during lighting sto rms or
when unused for long periods of t ime.
13) Refer all servicing to qual ified service perso nnel.
Servicing is required when th e Television has be en
damaged in any way, such as; power-supply cord o r
plug is damaged, liquid has bee n spilled or objects
have fallen into the Television, the Televis ion has
been exposed to rain or moistur e, does not operate
normally, or has be en dropped.
14) Mains plug is used as the disco nnect device, the
disconnect device shall rem ain readily operabl e.
15) The ventilat ion should not be imped ed by
covering the ventilation op enings with items, su ch as
newspapers, table-cloth , curtains, etc.
16) No naked flame sources, suc h as lighted candles,
should be placed on the Telev ision.
17) Attenti on should be drawn to the e nvironmental
aspects of battery disposal .
18) The use of Television in moderate c limate.
19) The Television shall not be expos ed to dripping
or splashing and that no object s filled with liquids ,
such as vases, shall be placed on t he Television.
This symbol indicates that this product
incorporates double insulation between
hazardous mains voltage and user accessible
parts. When servicing use only
identical replacement parts.
This marking indicates that this product should
not be disposed with other household wastes
throughout the EU. To prevent possible harm to
the environment or human health from
uncontrolled waste disposal, recycle it
responsibly to promote the sustainable reuse of
material resources. To return your used device,
please use the return and collection systems or
contact the retailer where the product was
purchased. They can take this product for
environmental safe recycling.
The batteries shall not be exposed to
excessive heat such as sunshine, fire or the
like.
WARNING:
The excessive sound pressure from earphones
and headphones can cause hearing loss.
WARNING:
Haier is committed to safely recycling
electronic products and product materials.
Please check for a local recycling location in
the United States at: 1800RECYCLING.COM
or call 1.800.RECYCLING.
When t he televisi on receiver i s not us ed for an
exte nded period o f time, it is adv isable to dis connect
the AC p ower cord fro m the AC outlet .
Dim:515*320m m(不包括 底座)
Input Power Voltage:
AC 100-240V 50/60Hz
Infrared Remote Control....................
1
User’s M anual .................................
1
Battery(AAA)................................... 2
Power Cable.....................................
1
■ Integrated ATSC TV tuner f or HDTV broadcast reception
■ High brightness provides a vivid and br il li an t picture
■ Deeper blacks and brighter whites with high contrast
■ Wide Screen aspect ratio (16:9) for a complete h om e
theater experience
■ HDMI input for true digital connection
■ VGA port for connection to PC
■ Built-in stereo speaker system
■ Full-function Remote Con tr ol
HDMI, the HDMI logo and High-Definition Multimedia Interface are trademarks or registered
trademarks of HDMI Licensing LLC.
120W
Stan d
TV
Plac e the Stand on th e TV
2. Pla ce the Stand on t he TV as shown be low.
3
1
2
1
2
3
4
5
6
7
8
9
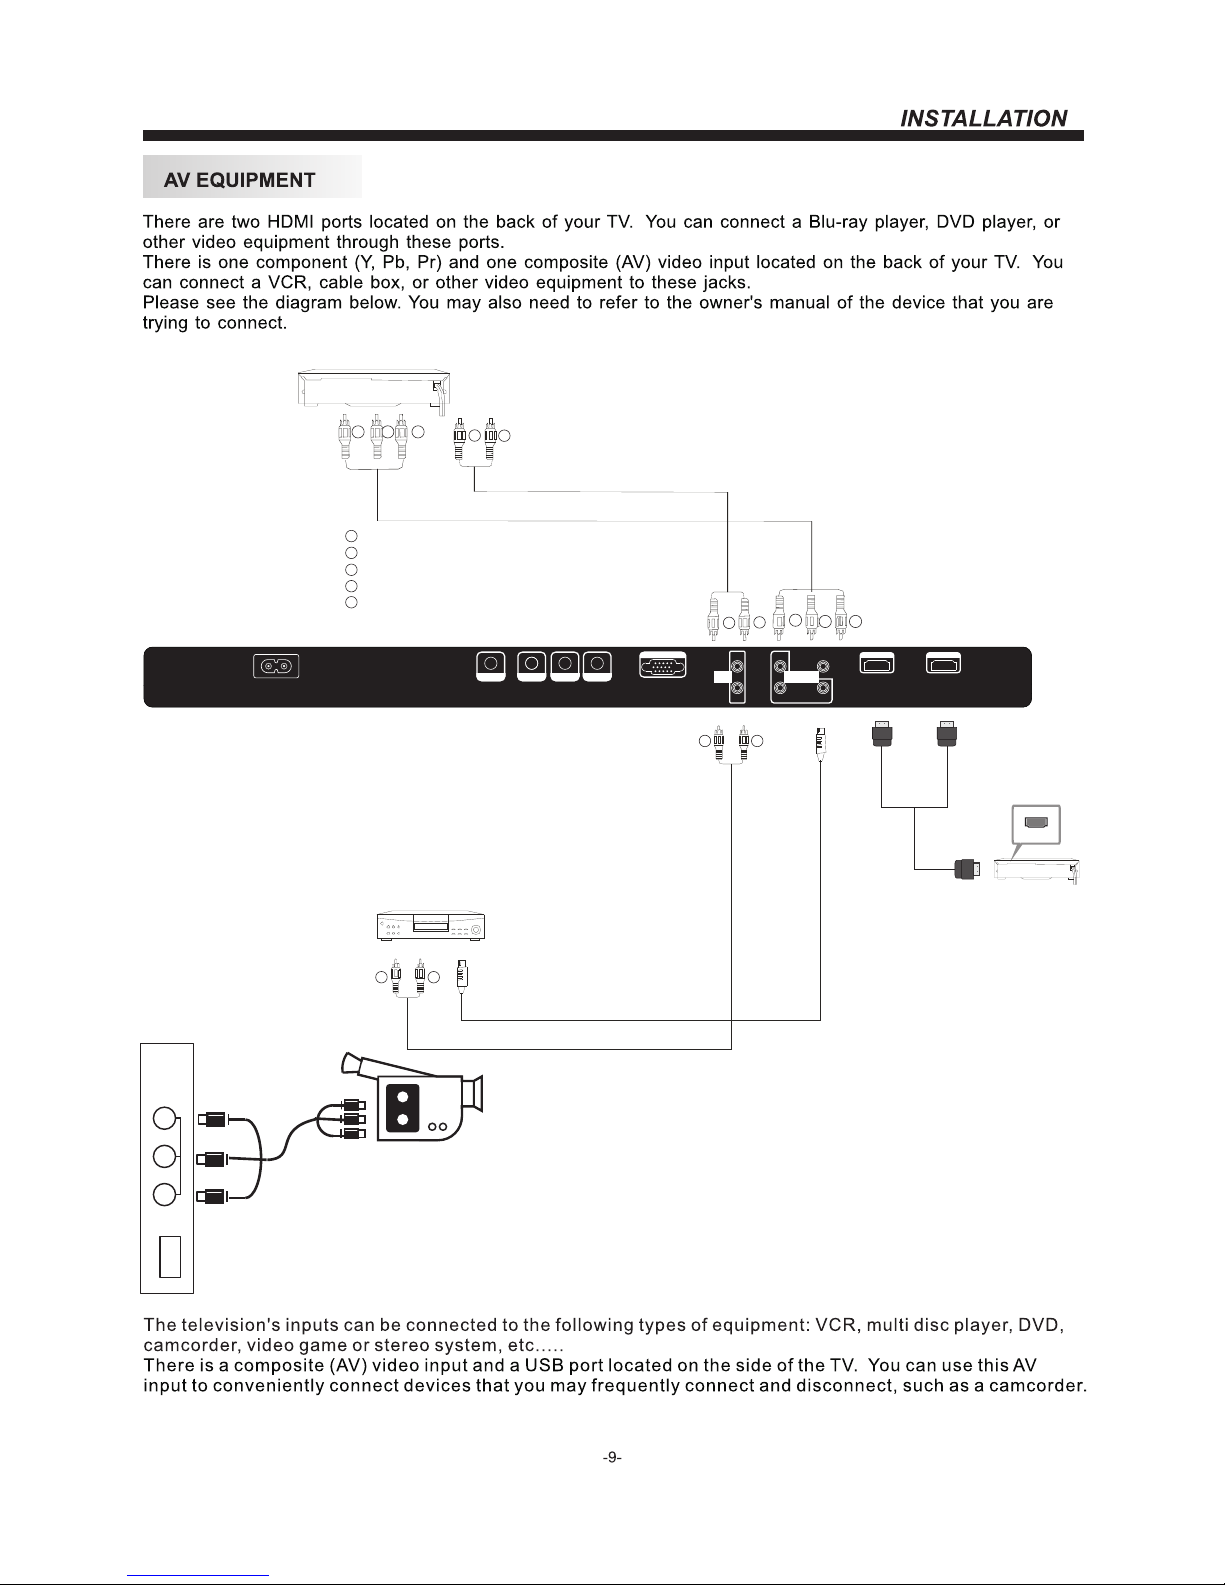
VIDEO
L
R
AV2
USB
7. Component Video (YPbPr) Input
8. Composite Video Input
9. HDMI2 Input
10. HDMI1 Input
11. AC Power Socket
1. Antenna Socket
2. Coaxial
3. PC Audio Input
4. Headphone Output
5. VGA Port (PC Input)
6. Audio Input
1 2
3
4 5
6
7
9
1011
8
VGA INPU T
RLY
Pb
Pr
AV1
HDMI1 IN PUTHDMI2 IN PUT
COMPONENT
INPUT
RF IN PUT
HEADPHONE
COAXIA L
PC AUDIO
INPUT
AC INPU T
100-2 40V~5 0/60H z
AUDIO
INPUT
Note: 1. Composite video input and component video input share the audio input.
2. When HDMI1 has an input signal coming from a DVI source then the audio input signal
must be connected to the PC audio input.
3. When HDMI2 has an input signal coming from a DVI source then the audio input signal
must be connected to the YPbPr/AV audio input.
BLUE
1
2
3
4
5
6
7
8
9
10
720*400
640*480
640*480
800*600
800*600
1024*768
1024*768
1024*768
1280*1024
1280*1024
70
60
75
60
75
60
70
75
60
75
31.47
31.47
37.50
37.88
46.88
48.36
56.48
60.02
63.98
80.00
RESOLUTION
V.Freq.(Hz) H.Freq.(KHz)
PRESET MODE
VGA INPUT
RLY
Pb
Pr
AV1
HDMI1 INPU THDMI2 INPU T
COMPONENT
INPUT
RF INPU T
HEADPHONE
COAXIAL
PC AUDIO
INPUT
AC INPUT
100-240 V~50/ 60Hz
AUDIO
INPUT
VIDEO
L
R
AV2
USB
Yellow (video)
White(audio L)
Red(audio R or Pr)
Y
W
R
W
R
To audio outputs
VIDEO EQUIPMENT
TO VIDEO
output
W R
W R
G
B
R
G
R
B
Blue(Pb)
Green(Y)
B
G
VIDEO EQUIPMENT with YPbPr
W
R
HDMI
VGA INPU T
RLY
Pb
Pr
AV1
HDMI1 IN PUTHDMI2 IN PUT
COMPONENT
INPUT
RF IN PUT
HEADPHONE
COAXI AL
PC AUDIO
INPUT
AC INPU T
100-2 40V~5 0/60H z
AUDIO
INPUT
-10-
1 2
3
4
5
6
7
8
9 0
+
CH
_
+
_
VOL
SLEE P P.G
P.M
EXIT
S.M
TV DIS PLAY
SOUR CE
MENU
MTS/ SAP
MUTE
POWE R
ASPE CT
RECA LL
CH LIS T FAVEPG
RETU RN
DISP LAY SUBT ITLE
AUDIO
REPE AT
CC
GOTO
MENU
SETU P
PAGE UP
PAGE DO WN
EPG
ENT ER
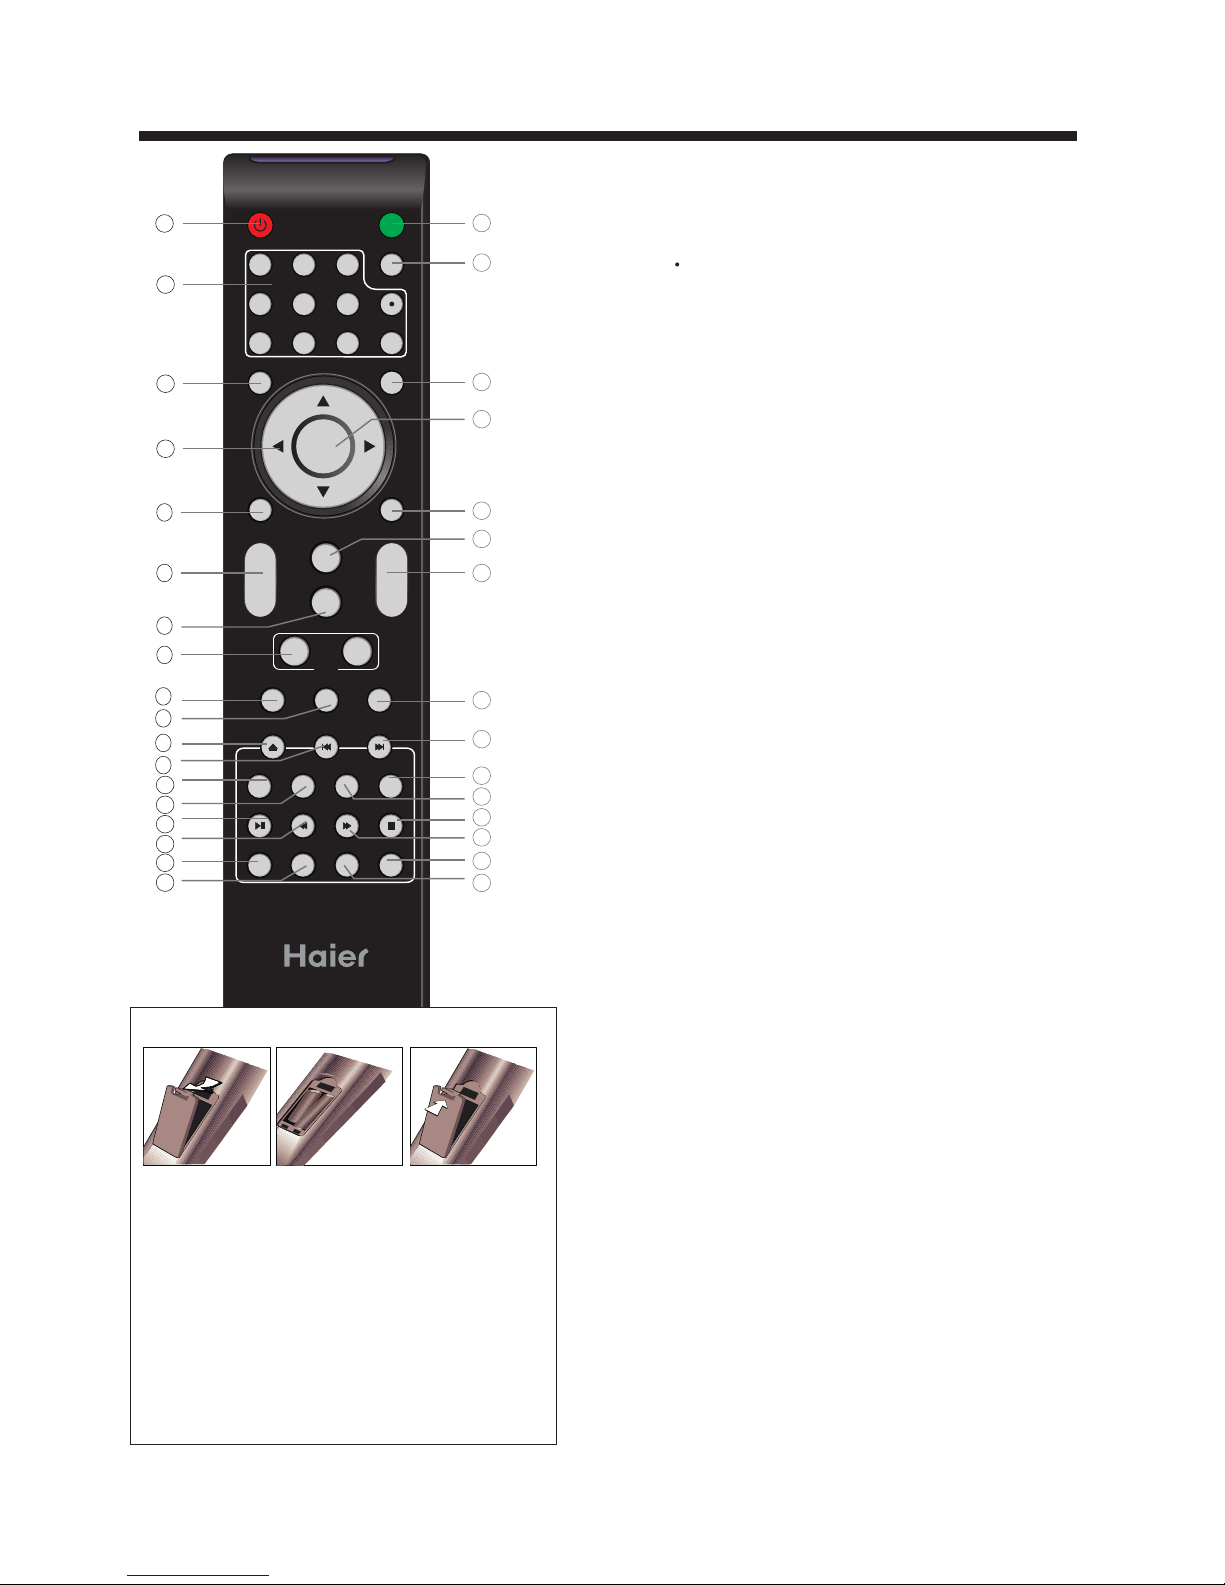
REMOTE CONTROL
1
2
3
4
5
6
7
8
9
10
19
20
24
25
26
27
28
29
11
12
13
14
15
16
17
18
32
21
22
23
30
31
33
1:POWER
Press to power ON/OFF (standby) the TV.
2:NUMBER KEY:
Press to enter the TV channel number and select a channel
(Press " " to choose the sub-channel).
3:MENU
Press to display the on screen display (OSD) menu or
return to the previous menu.
4:CURSOR
When the OSD menu is displayed on-screen, use these
buttons as the up, down, left, right and ENTER buttons to
adjust the various options in the OSD menu.
5:EXIT
Press to exit the OSD menu.
6: VOL+/-
Press VOL+ or VOL - to a dj us t the volume.
7: P.M
Press repeatedly to select a picture mode.
8: PAG E DO WN /PAGE UP
In EPG mode, use this key to page up/down the EPG
information.
9: SLEEP
Press repeatedly to set the sleep timer. The TV will automatically
turn off after the selected amount of time passes.
10:P.G
Press to go the Parental Control settings menu.
11:MU TE
Press to switch the sound ON/OFF.
12:RECALL
Press to switch between the current and previously viewed
channel.
13:SOURCE
Press to display or exit the TV input source menu.
14:ENTER
Press to confirm a selection.
15:TV DISPLAY
Press to show the information about the current input source.
16:S.M
Press repeatedly to switch audio modes.
17:CH+/CH-
Press CH+ or CH- to browse through the TV channels.
18:ASPECT
Press to change the picture aspect ratio.
19:CH LIST:
Press to display the channel list. In DVD mode, press to eject
the disc.
20:EPG:
Press to display the DTV Electronic Program Guide.
In DVD mode, press to go to the previous chapter.
21:FAV:
Press to display the favorite channels list. In DVD mode,
press to go to the next chapter.
27:CC
Press to turn on or off the closed captions.
31:MTS/SAP
Press to activate the NTSC TV sounds, such as Stereo,
SAP or Mono tone, and audio languages of DTV.
Insert Batteries Into the Remote Control
1 2
3
Remark:
1. Remove the battery cover.
2. Inserting the 2 AAA 1.5V batteries making sure the
polarity (+ or -) of the batteries matches the polarity
marks inside the unit.
3. Mount the battery cover.
Replace with new batteries when the TV set begins
to show the following symptoms:
Operation is unsteady or erratic. Sometimes the TV
set does not function with Remote Control Unit.
1) Alkaline Battery Recommended.
2) Remove batteries when they are exhausted or if the
remote control is not to be used for long time.
NOTE:
For the function of DVD button,please refer to the
DVD part at the back of this instruction book.
OPERATION
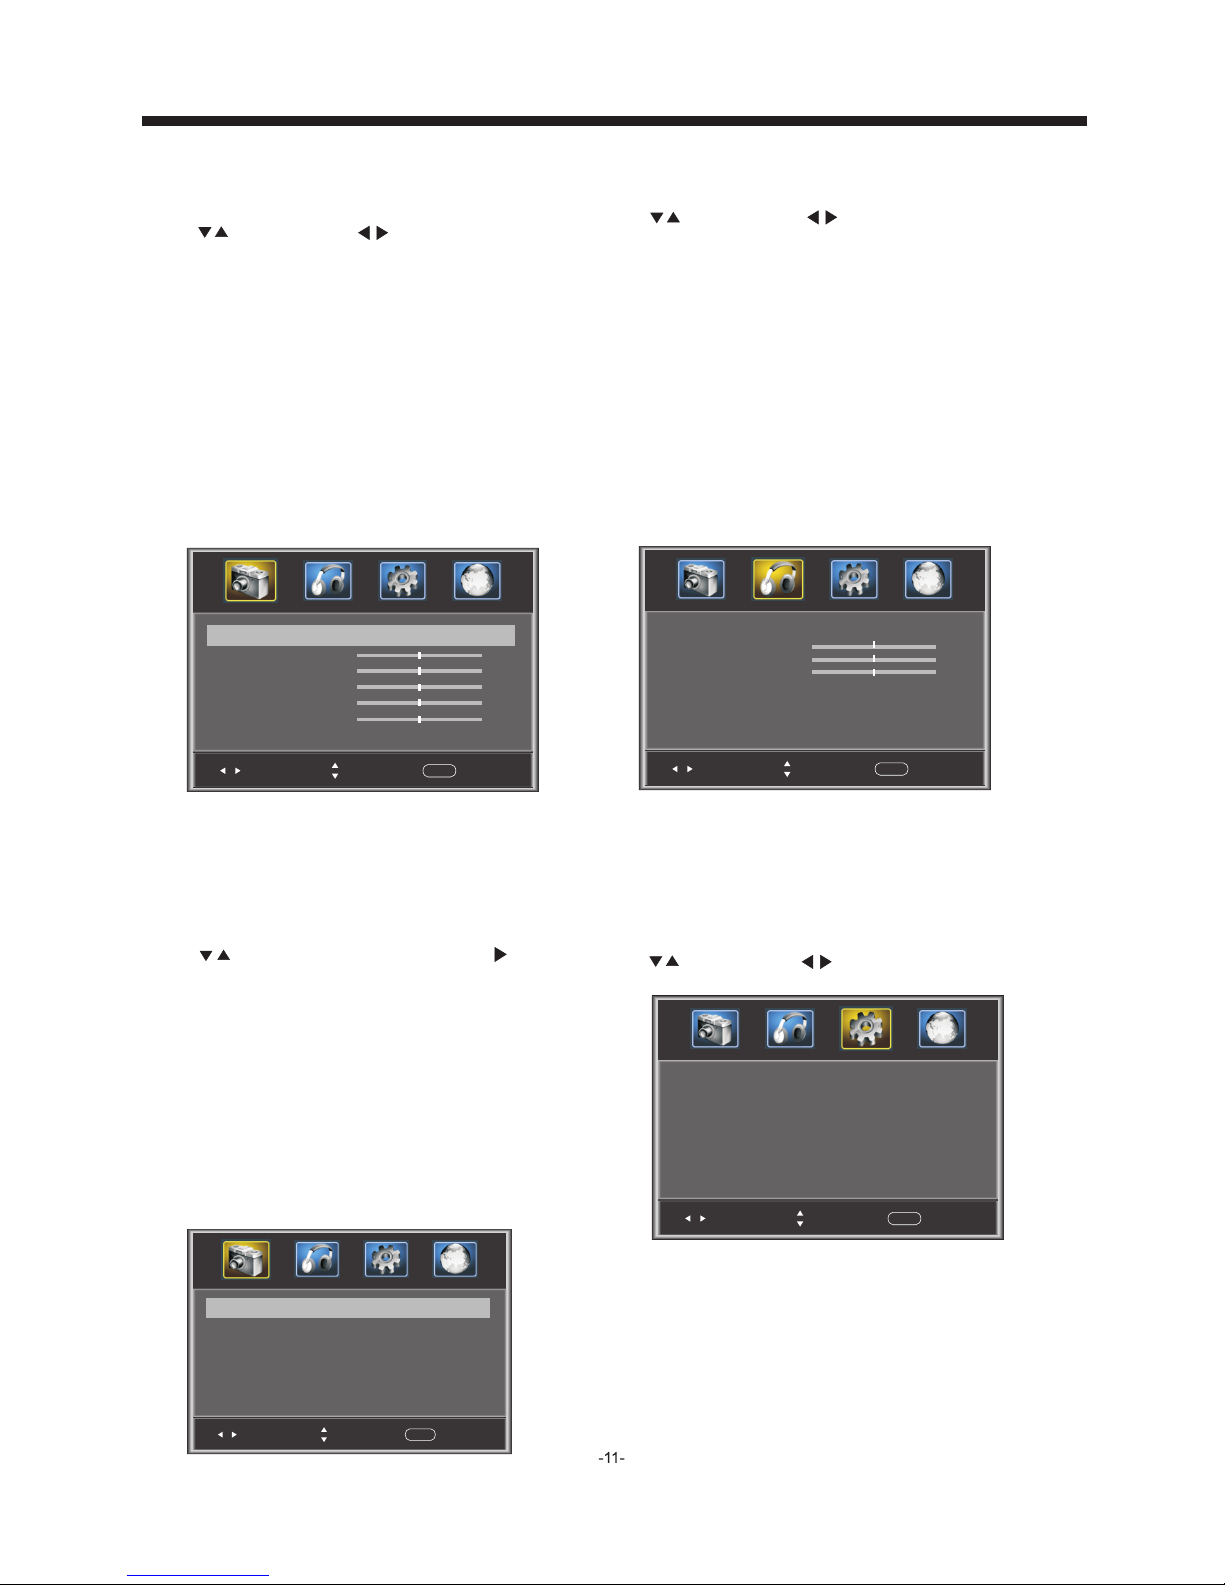
The first item of the MENU is the PICTURE MENU.
This menu provides several video adjustment options
for fine tuning the video display.
Press to select, press to adjust, press MENU
to exit.
1). Picture Mode: Select the user picture mode (Standard,
Sports, Movie, Custom, Vivid).
2). Brightness: This will adjust the light output of the
complete picture. This will mainly affect the darker
areas of the picture.
3). Contrast: This will adjust the intensity of bright parts
in the picture but keep the dark parts unchanged.
4). Color: This will adjust the saturation level of the
colors to suit your personal preference.
5). Tint: Allows you to select color mix (tint) of the
picture.
6). Sharpness: This will adjust sharpness of fine details
in the picture.
1. PICTURE MENU
Note:
The Audio language is available for ATSC (DTV)
programs.
option only
3. SET UP MENU
The third item of the MENU is the SETUP MENU.
You can here.
Press to select, press to adjust, press MENU to exit.
set system settings
Note:
Restore Default: Reset all settings to the factory
default value.
Channel names that have been changed through the option
in the Channel Menu are not reset when a restore default is
initiated.
Sel ect
Adj ust
Men u
Exi t
Par ental C ontro ls
Time r
Clo sed Cap tion
Men u Setti ngs
VGA Se tting s
Res tore De fault
>
>
>
>
>
>
Pic ture Mo de
Sta ndard
Con trast
50
Bri ghtne ss
50
Col or
50
Tint
0
Sha rpnes s
Adv anced V ideo
50
Sel ect
Adj ust
Men u
Exi t
< >
>
2. AUDIO menu
The second item of the MENU is the AUDIO MENU.
You can adjust sound options here.
Press to select, press to adjust, press MENU
to exit.
1). Sound Mode: Select the user sound mode (Standard, News,
Music, Theater, Sports, Custom).
2). Bass: Adjust to increase or decrease lower-pitched sounds.
3). Treble: Adjust to increase or decrease higher-pitched sounds.
4). Balance: Adjust to emphasize left or right speaker balance.
5). Surround: Turn on or off the simulated surround sound
feature.
6). AVL: Auto Volume Leveler, This will reduce the differences in
volume level during commercials or when changing the channel.
7). Digital Output: Select the digital sound signal that will be
output from the coaxial audio output.
8). Audio Language: Select the audio language (English,
French, Spanish).
Col or Temp. Nor mal
Sel ect
Adj ust
Men u
Exi t
< >
Asp ect Wide
Noi se Redu ction M iddle
< >
< >
Press to select Advanced Vide o, p re ss , a nd
the screen shown below will be displayed.
1). Color Temp: This will increase or decrease Warm (red)
and Cool (blue) colors to suit your personal preference.
Select Cool to give the white colors a blue tint, Normal
to give the white colors a neutral tint, Warm to give the
white colors a red tint.
2). As pe ct : This will vary the size of the image on the TV
screen. There are four modes which can be selected
(Wide, Zoom, Cinema and Normal).
3). Noise Reduction: Adjust to reduce the appearance of
noise in the picture (dots). There are five modes to
choose from (Strong, Auto, Off, Weak and Middle).
Advanced Vid eo :
Note:
If you want to adjust contrast, brightness, color,
and sharpness, the picture mode must to
"Custom".
be set
Standard mode is the default setting, if you
select other options, the power consumption may
change.
Sel ect
Adj ust
Men u
Exi t
Sou nd Mode Sta ndard
Bas s
50
Treb le
50
Bal ance
0
Sur round
AVL
Dig ital Ou tput PCM
Off
Off
< >
< >
< >
< >
Aud io Lang uage Eng lish
< >
OPERATION
Change Password:
Press , and the screen
shown below will be
displayed.
2). New password: Input the new password
Sel ect
Adj ust
Men u
Exi t
New p asswo rd
Con firm pa sswor d
----
----
Old p asswo rd
----
1). Old password: Input the old password
P.G switch:
When the is ON, the options
can be adjusted.
Parental Control shown
below
US: Press , and the screen shown below will be display ed .
Sel ect
Adj ust
Men u
Exi t
TV
MPAA N/A
>
< >
Sel ect
Adj ust
Men u
Exi t
Ent er Pass word -- --
Input the password, and you will
menu. The factory default password is 0000.
enter the Parental
Control
Sel ect
Adj ust
Men u
Exi t
Cha nge pas sword
P.G switch
Off
US
Can ada
RRT se tting
Res et RRT
< >
< >
< >
< >
< >
>
3). Confirm password: Input the new password again
1): TV: Press , and the screen
shown below will be
displayed.
Sel ect
Adj ust
Men u
Exi t
ALL
FV
V
S
L
D
Press the ENTER key to lock/unlock .Parental Controls
Rat ing Con tent
FV
(Fa ntasy
vio lence )
V
(Vio lence )
S
(Se xual
sit uatio n)
L
(Ad ult
lan guage )
D
(Se xuall y
sug gesti ve
dia log)
Sug geste d
age
TV-Y (Al l
chi ldren )
TV-Y7 (Dire ct to
ord er chil dren)
TV-G( Gener al
aud ience )
TV-PG (Pare ntal
Gui dance
sug geste d)
TV-14 (Pare nts
str ongly
cau tione d)
TV-MA (Matu re
aud ience o nly)
X
X
X
X
X
X
X
X
X
X
X
X
Con tent
2). MPAA: switch the movie-rating control level: N/A,
G, PG, PG-13, R, NC-17, X.
Rat ing
Des cript ion
Age
G Gen eral au dienc es, All Age s adm itted
PG
Par ental G uidan ce sugg ested . Some ma teria l may not b e
Sui table f or chil dren.
PG- 13
Par ents st rongl y cauti oned. S ome mat erial . may be
Ina pprop riate f or chil dren un der 13.
R
NC- 17
X
Res trict . Under 1 7 requi res acc ompan ying pa rent or a dult
gua rdian ( age var ies in so me juri sdict ions) .
No on e 17 and un der adm itted .
X is an o lder ra ting th at is uni fied wi th NC-1 7 but may b e
enc oded in t he data o f older m ovies .
Canada: Press , and the screen
shown below will be
displayed.
1): Canada English: switch the English-rating control level:
EXEMPT, C, C8+, G, PG, 14+, 1 8+ .
Sel ect
Adj ust
Men u
Exi t
Can ada Eng lish
Can ada Fre nch
EXE MPT
< >
EXE MPT
< >
3.1. Parental Control s:
Press to select , press , and the
screen
Parental Controls
shown below will be displayed.
OPERATION
Rat ing
Des cript ion
Age
E Exe mpt: In clude s news, s ports , docum ents an d other i nform ation
pro gramm ing: ta lk show s, musi c video s, and va riety p rogra mming .
C Chi ldren : Inten ded for y ounge r child ren und er the ag e of 8 year s.
Pay s caref ul atte ntion t o theme s that co uld thr eaten t heir se nse o f
sec urity and wel l-bei ng.
C8+ C hildr en over 8 y ears ol d: Cont ains no p ortra yal of vi olenc e as the
pre ferre d, acce ptabl e, or onl y way to re solve c onfli ct; nor e ncour age
chi ldren t o imita te dang erous a cts whi ch they m ay see on t he scre en .
G Gen eral: C onsid ered ac cepta ble for a ll age gr oups, Ap pro priat e
vie wing fo r the ent ire fam ily, con tai ns ve ry litt le viol ence, p hysic al,
ver bal or em otion al.
PG Pa renta l Guida nce: In tende d for a gen eral au dienc e, but ma y not be
sui table f or youn ger chi ldren ( under t he age of 8 ) becau se it cou ld
con tain co ntrov ersia l theme s or issu es.
14+ O ver 14 Years: Co uld c ont ain t hemes w here vi olenc e is one of t he
dom inant e lemen ts of the s toryl ine, bu t it must b e integ ral to th e
dev elopm ent of pl ot or cha racte r. Langu age u sage co uld be pr ofane
and n udity, p res ent wit hin t he co nte xt of the t hem e.
18+ Ad ults: I nte nde d f or vi ewe rs 18 y ears an d older a nd migh t conta in
dep ictio ns of vio lence , which w hil e rel ate d to the de vel opm ent o f
plo t, ch ara cte r or them es, are i ntend ed for ad ult vie wing. C ould
conta in grap hic lan guage a nd port rayal s of nudi ty.
2).Canada French: switch the French-rating control
level: E, G,8ANS+,13 ANS+,16ANS+,18ANS+.
Rat ing
Des cript ion
Age
E Exe mpt pro gramm ing
G Gen eral: Al l ages an d chi ldr en, c ontai ns mi nim al di rect viole nce ,
but m ay be int egrat ed into t he plot i n a humor ous or un reali stic
man ner .
8an s+ Gene ral but i nadvi sable f or youn g child ren: Ma y be view ed by a
wid e publi c audie nce, bu t could c ontai n scene s distu rbing t o
chi ldren u nder 8 wh o canno t disti nguis h betwe en imag inary a nd
rea l situa tions . Recom mende d for vie wing wi th pare n . tal g uidan ce
13a ns+ Ove r 13 year s: Coul d conta in scen es of fre quent v iolen t scene s
and i ntens e viole nce.
16a ns+ Ove r 16 year s: Coul d conta in freq uent vi olent s cenes a nd viol ence.
18a ns+ Ove r 18 year s: Only f or adul t viewi ng. Cou ld cont ain fre quent
vio lent sc enes an d extre me viol ence.
Reset RRT: Press , and the screen
shown below will be
displayed.
RRT se tt in g: i n ATSC digital TV mode, this option
could can be adjusted
Sel ect
Adj ust
Men u
Exi t
Are y ou sure ?
NO
YES
Pre ss ENTE R Key To Sele ct
3.2 Tim er
You can adjust the sleep timer and time related settings here.
Press to select, press to adjust, press MENU
to exit.
Sleep Timer: You can set the sleep timer.
Note:
Tim e zo ne , DS T and Clock are available in ATSC ,
and the Clock can't be adjust .
mode
ed
Sel ect
Adj ust
Men u
Exi t
Sle ep time r
Time z one
DST
Clo ck
199 9/12/ 31 04:0 3PM
Pac ific
Off
Off
< >
< >
< >
2): Option: You can edit the closed caption options.
Press , and the screen shown below will be displayed.
NOTE: Only available in AT SC m od e.
1): Advanced selection: only ATSC mode.available in
3.3 Closed Caption: switch the closed caption mode.
Press to select Closed Caption, press , and the
screen shown below will be displayed.
Sel ect
Adj ust
Men u
Exi t
CC Mo de
Bas ic Sele ction
Adv anced S elect ion
Opt ion
Off
CC1
Ser vice 1
< >
< >
< >
>
Sel ect
Adj ust
Men u
Exi t
Mod e
Fon t style
Cus tom
Def ault
Fon t size Def ault
Fon t Edge st yle Def ault
Fon t Edge co lor Defau lt
FG co lor Def ault
BG co lor Defa ult
FG op acity Defau lt
BG op acity Def ault
< >
< >
< >
< >
< >
< >
< >
< >

OPERATION
1). Air/Cable: Select Air TV signal or Cable TV signal.
2). Auto Scan:
, and the screen
If it's the first time using the TV, you
should perform a full channel scan in order to capture
and store all available channels.
Press the to confirm shown below
will be displayed.
Select "YES" and
and the screen
press the ENTER to confirm,
shown below will be displayed,
which indicates that the auto search is progressing.
Men u Langu age Eng lish
Sel ect
Adj ust
Men u
Exi t
< >
3.5 VGA Settings: O
nly available in VGA (PC input)
mode.
1). H-Pos: Adjust the horizontal position of the screen.
2). V-Pos: Adjust the vertical position of the screen.
3). Clock: Fine tune the screen width.
4). Phase: Fine tune the phase of the screen. Usually
don't adjust this item .
5). Auto: Auto adjust to fit the screen.
you ne ed t o option
Press to select VGA Settings, press , and the screen
shown below will be displayed.
Sel ect
Adj ust
Men u
Exi t
H-p os
V-po s
Clo ck
Pha se
50
Aut o
50
50
50
>
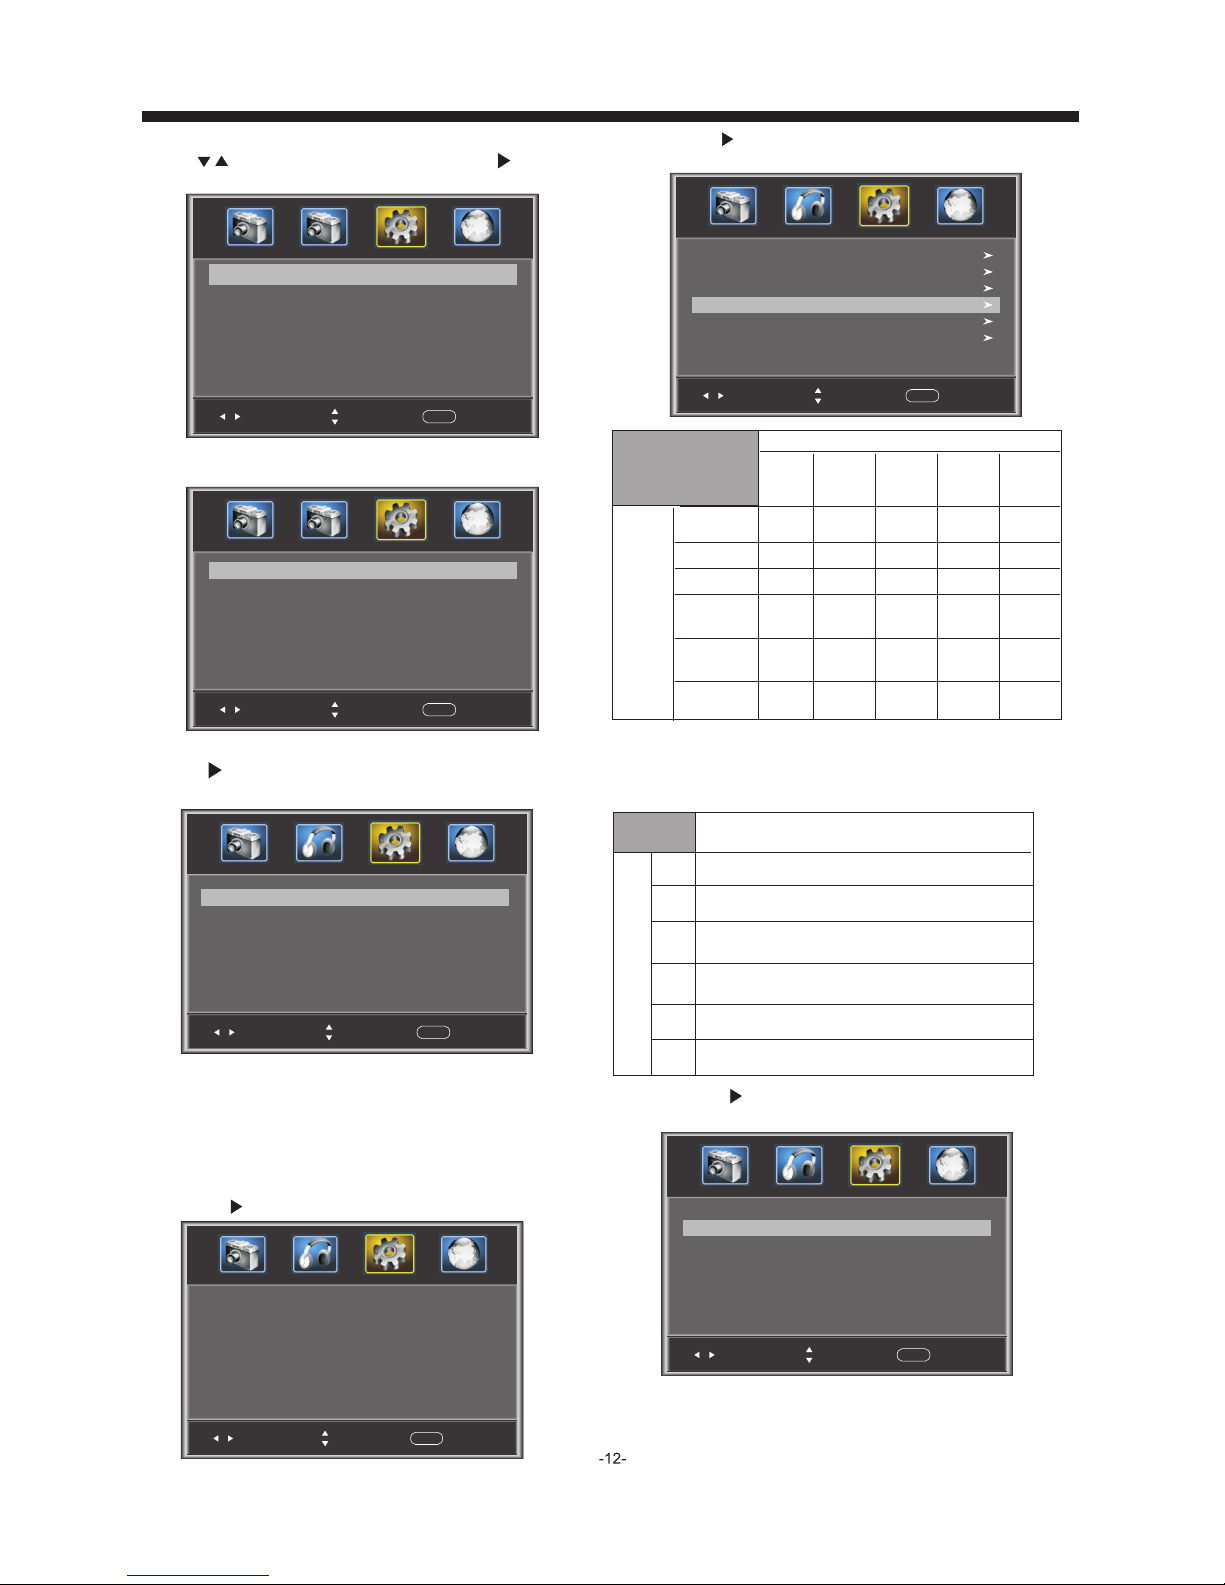
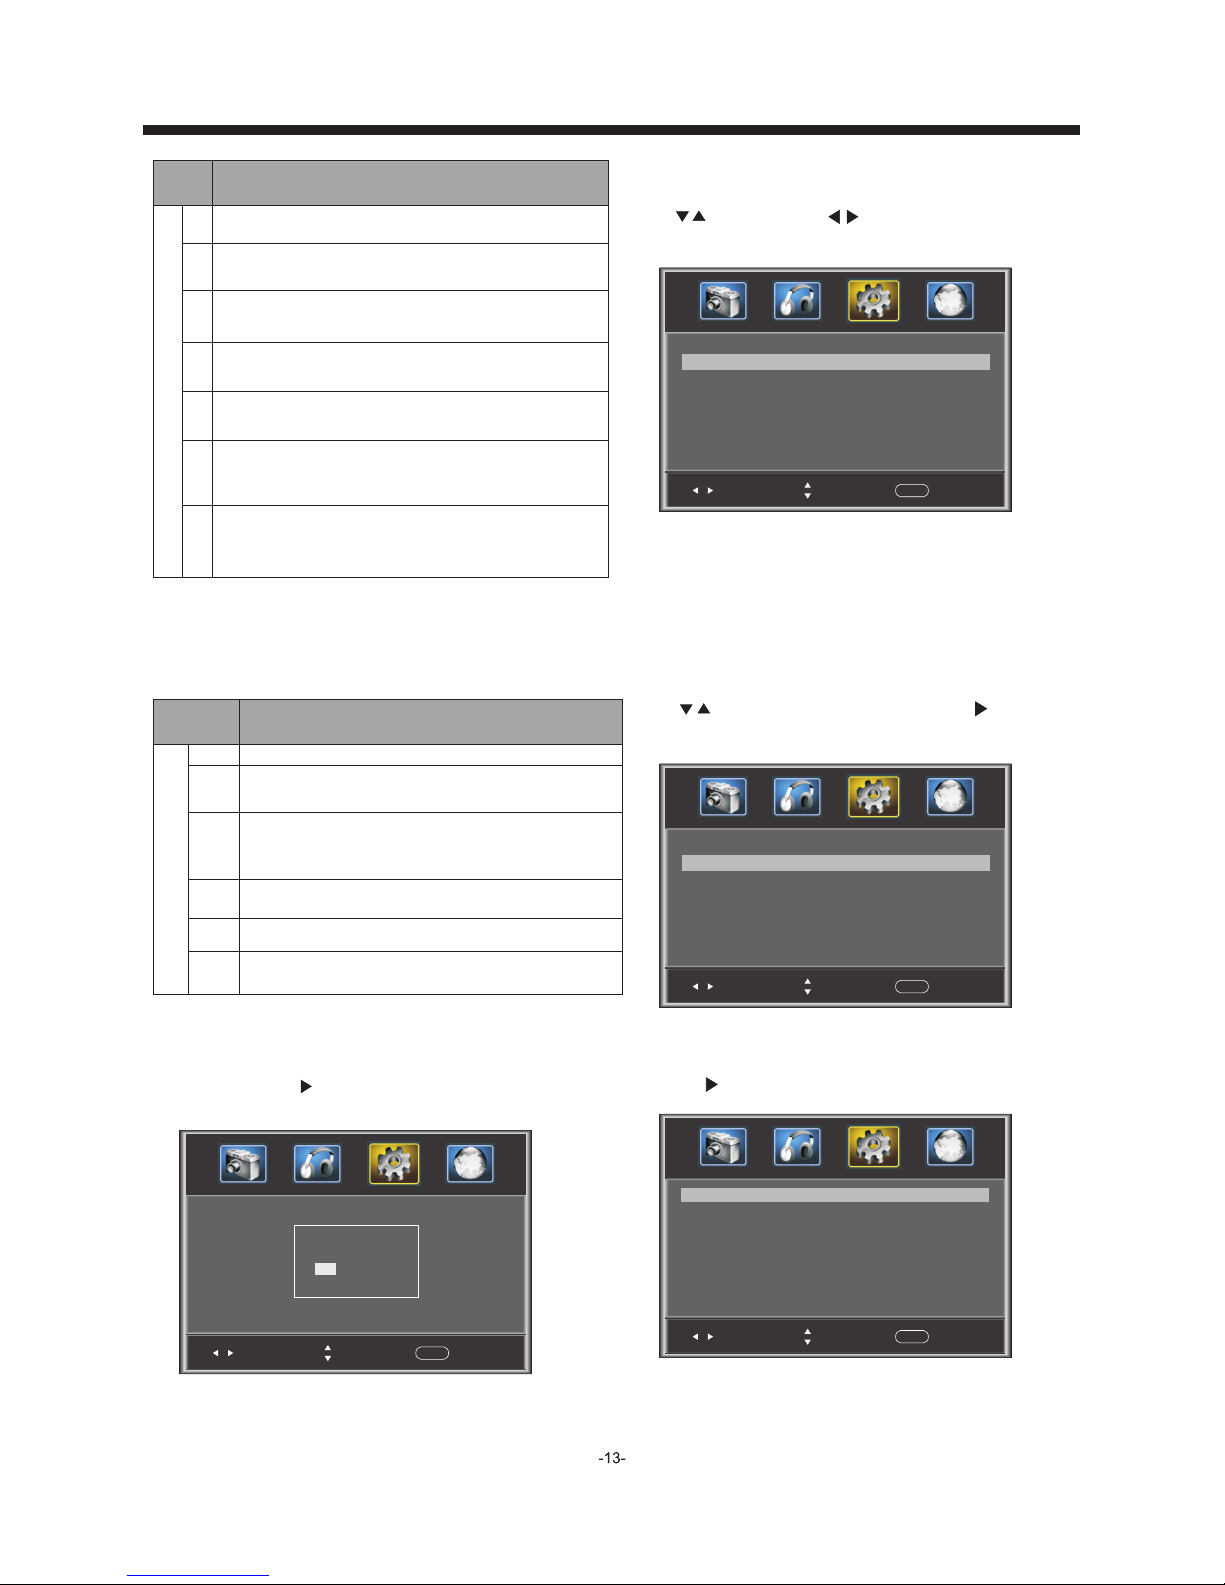
4. Cha nnel MENU
Here you add/skip TV channels and customize displayed
channel info.
Press to select, press to adjust.
Sel ect
Adj ust
Men u
Exi t
Air /cabl e
Aut o Scan
Air
Fav orite
Sho w/Hid e
Cha nnel NO.
Cha nnel La ble.
DTV s ignal : Good
2-1
< >
< >
>
>
>
>
Sel ect
Adj ust
Men u
Exi t
Are y ou sure ?
NO
YES
Pre ss ENTE R Key To Sele ct
Sel ect
Adj ust
Men u
Exi t
R F CH : 4
Fou nd: 4
Ana log: 1
Dig ital: 3
3.4 Menu Settings
You can adjust Menu Settings here.
Press to select, press to adjust, press MENU
to exit.
3). Favorite: Press ENTER to add/delete favorite channels.
4). Show/Hide: Press the ENTER button to display or
hide channels.
5). Channel NO . : Display the current channel number.
Press to change the channel.
6). Channel label: Press and to edit the current
channel name.
7). DTV signal: Display DTV signal strength.
Signal strength indicator is for reference only, it
cannot be selected or adjusted.
OPERATION
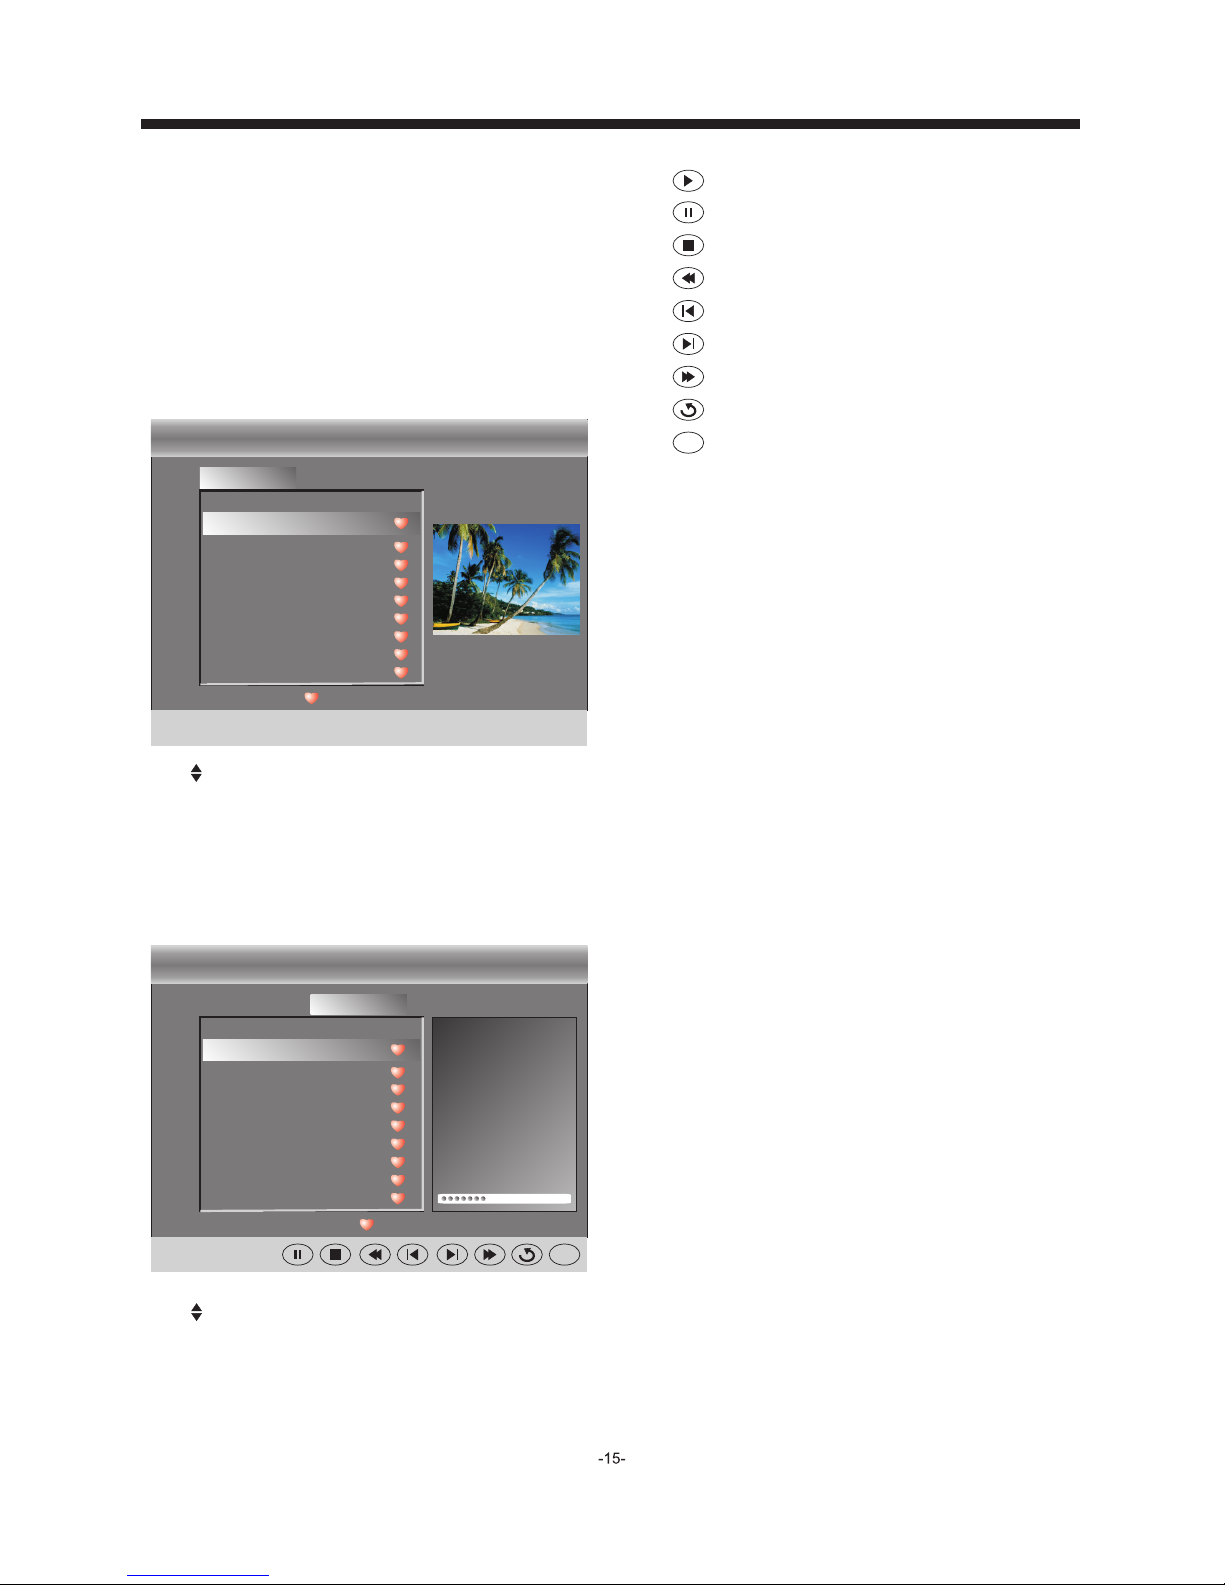
5. Mul timedia M ENU
With an external storage device attached to the USB input,
you can use the Multimedia Menu to display JPEG pictures
and play MP3 music.
Before starting operation, verify that the USB storage device
is using the FAT32 f il e sy st em f or ma t. This television does
not support NTFS or other formats. Please use a high-speed
USB 2.0 device with a maximum capacity of 50GB.
1. Select a Photo
The screen shown below will be displayed.
: pause
: stop
: fast backward
: previous
: next
: fast forward
: repeat all
: random play
Ran dom
2. Select Music
The screen shown below will be displayed.
USB
C:
Photo Music
..
Every thing I d o.mp3
C:\la oge\
:17 001 /018
Total s ize:3 .7 GB
Unu sed siz e: 3.7 GB
Seale d With A Kiss .mp3
.mp3
.mp3
.mp3
.mp3
.mp3
.mp3
.mp3
Eve rythi ng I do.m p3
Tit le:
Art ist:
Alb um:
Year :
Bit R ate: 12 8kbps
Pla y
05: 49 06:3 3
Ran dom
Use select the .jpg files or folders,
to display the photo or open the folder, EXIT to
stop playing or go to the menu.
press ENTER
press
previous
Use select the .mp3 files or folders, to
play or open the folder, EXIT to go to menu.
press ENTER
press the previous
USB
C:
Photo Music
..
011. jp g
20081 22221 78878 787.j pg
20081 .jpg
20087 .jpg
20287 .jpg
20787 .jpg
20087 .jpg
20787 .jpg
20087 .jpg
C:\ph oto\
:17 001 /018
Total siz e:3.7 G B 102 4 x 76 8 372 .7 2KB
Unuse d size: 3 .7 GB 200 6:0 7: 14 15 :3 7:4 2
011. jp g
: play
The LCD TV panel is built with very high precision technology giving you fine picture details
in vibrant color. Occasionally, a few non-active pixels may appear on the screen as a fixed
point of red, green, blue, black or white. Please note this does not affect the performance of
the product.
micr owave,
Component (Y Pb Pr) connections
-17-
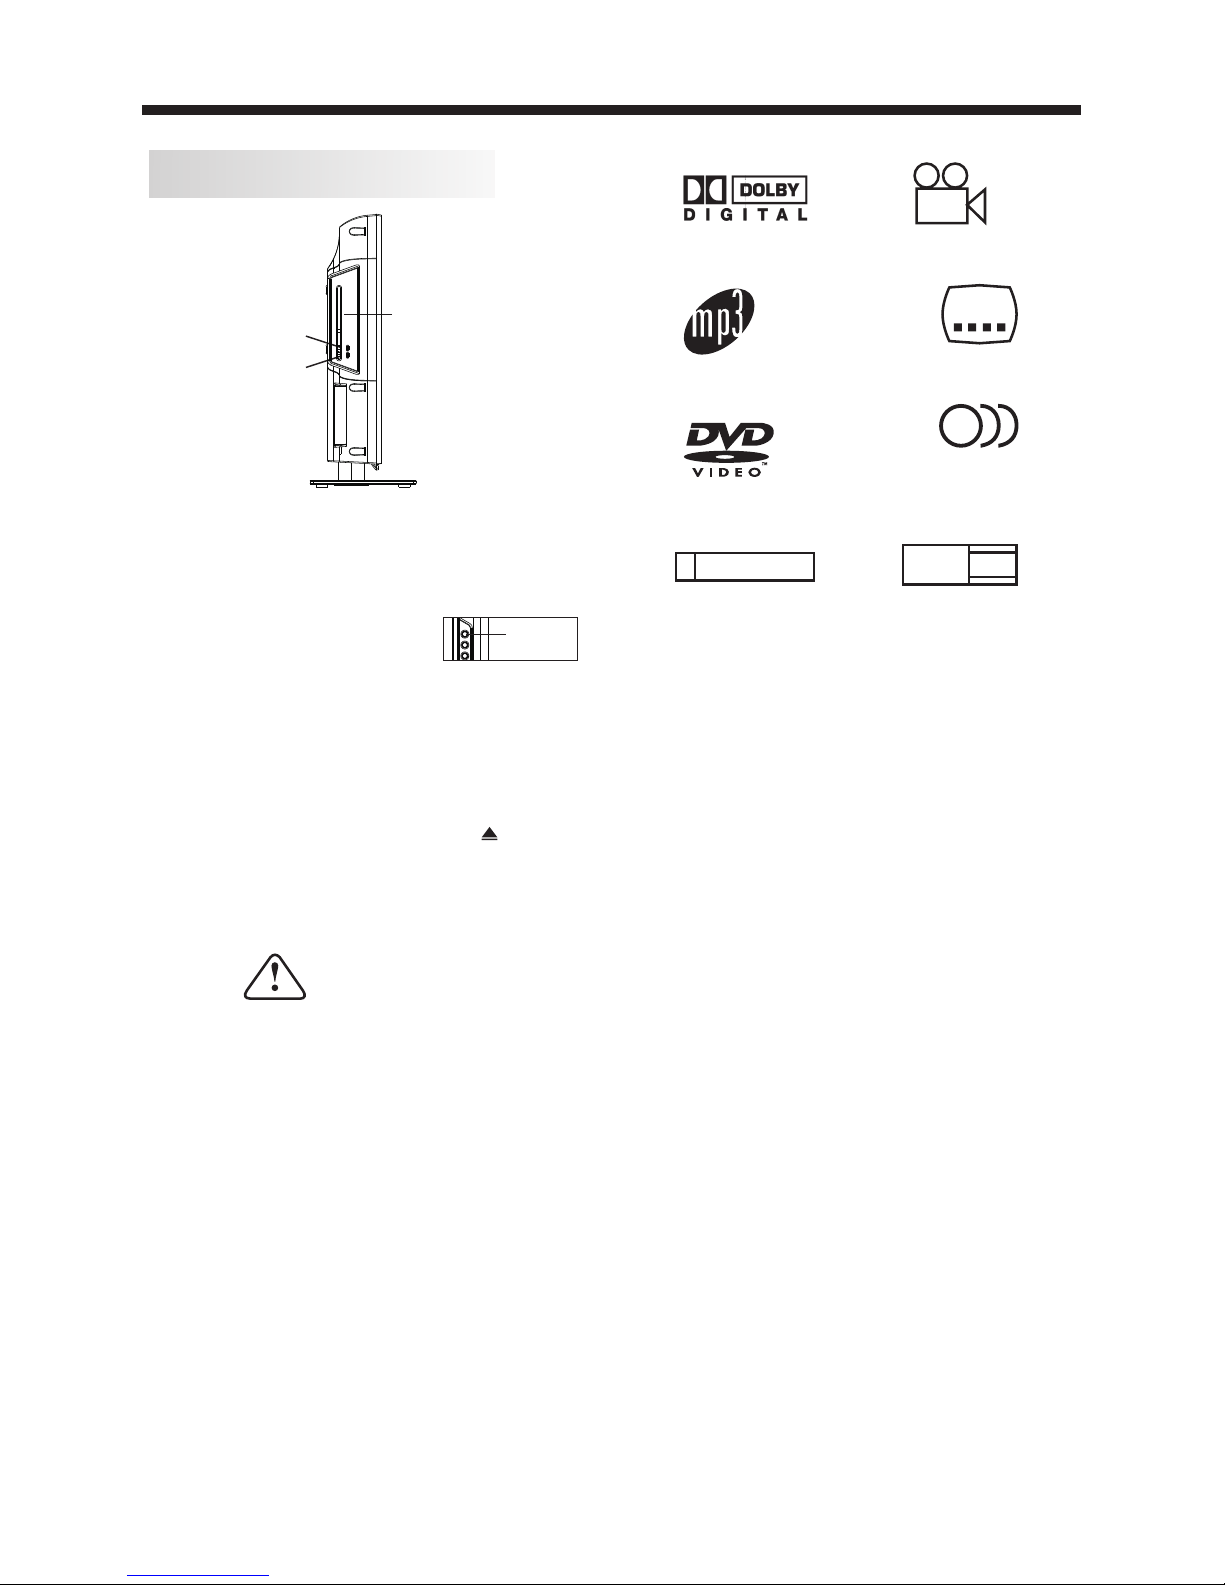
Dolby Digital
32
Subtitle choi ce s
8
Audio choices
MP3 files on
CD-R/CD-RW
16:9
LB
TV Asp ec t
Ratio modes
DVD video
R
RESTRICTED
Parental Lock
This product incorporates copyright
protection technology that is protected
by method claims of certain
U.S.patents and other intellectual
property rights owned by Macro vision
Corporation and other rights owners.
Use of this copyright protection
technology must be authorized by
Macro vision Corporation, and is
intended for home and other limited
viewing uses only. Unless otherwise
authorized by Macro vision Corporation.
Reverse engineering or disassembly is
prohibited.
Manufactured under license from Dolby
Laboratories."Dolby" and the double-D
symbol are trademarks of Dolby
Laboratories. Confidential Unpublished
Works. 1992-1997 Dolby Laboratories, Inc.
All rights reserved.
9
Multi-a ng le
DVD OPERATION
Caution
This DVD Player has a Class 1 laser which may
be harmful to your eyes. Do not attempt to
disassemble the cabinet or make any adjustments.
Refer all servicing to a qualified professional.
Features
Disc formats supported by this player:
CH LIST/
How to play a DVD disc
1. Change the TV input source to "DVD" mode by pressing
the SOURCE button on the remote or
on the side of the TV.
2. Place the DVD disc in the slot with the content side
(shiny side) facing the front of the unit.
3. The DVD disc will automatically be loaded in to the player
and begin to play.
4. To eject the DVD disc, press the button on
remote or the OPEN/CLOSE button on the side of the unit.
SOU RCE
OPE N/CLO SE
PLAY/PAUS E
Disc wi th its co ntent s ide
(shin y side) f acing t he fr on t
of the un it, ins ert ver tic al ly
into th e disc tr ay
DVD SIDE PANEL
-18-
MENU OPERATION
Press the SETUP button on the remote control, the
SETUP MENU will be displayed. After accessing the
setup menu, press to select an item, and press
to select the SUBMENU item. Then press the
ENTER/OK button to confirm. Press to return to
the previous menu. To exit the setup, press the
SETUP button again. In the SETUP MENU, you may
choose adjust any of the following options.
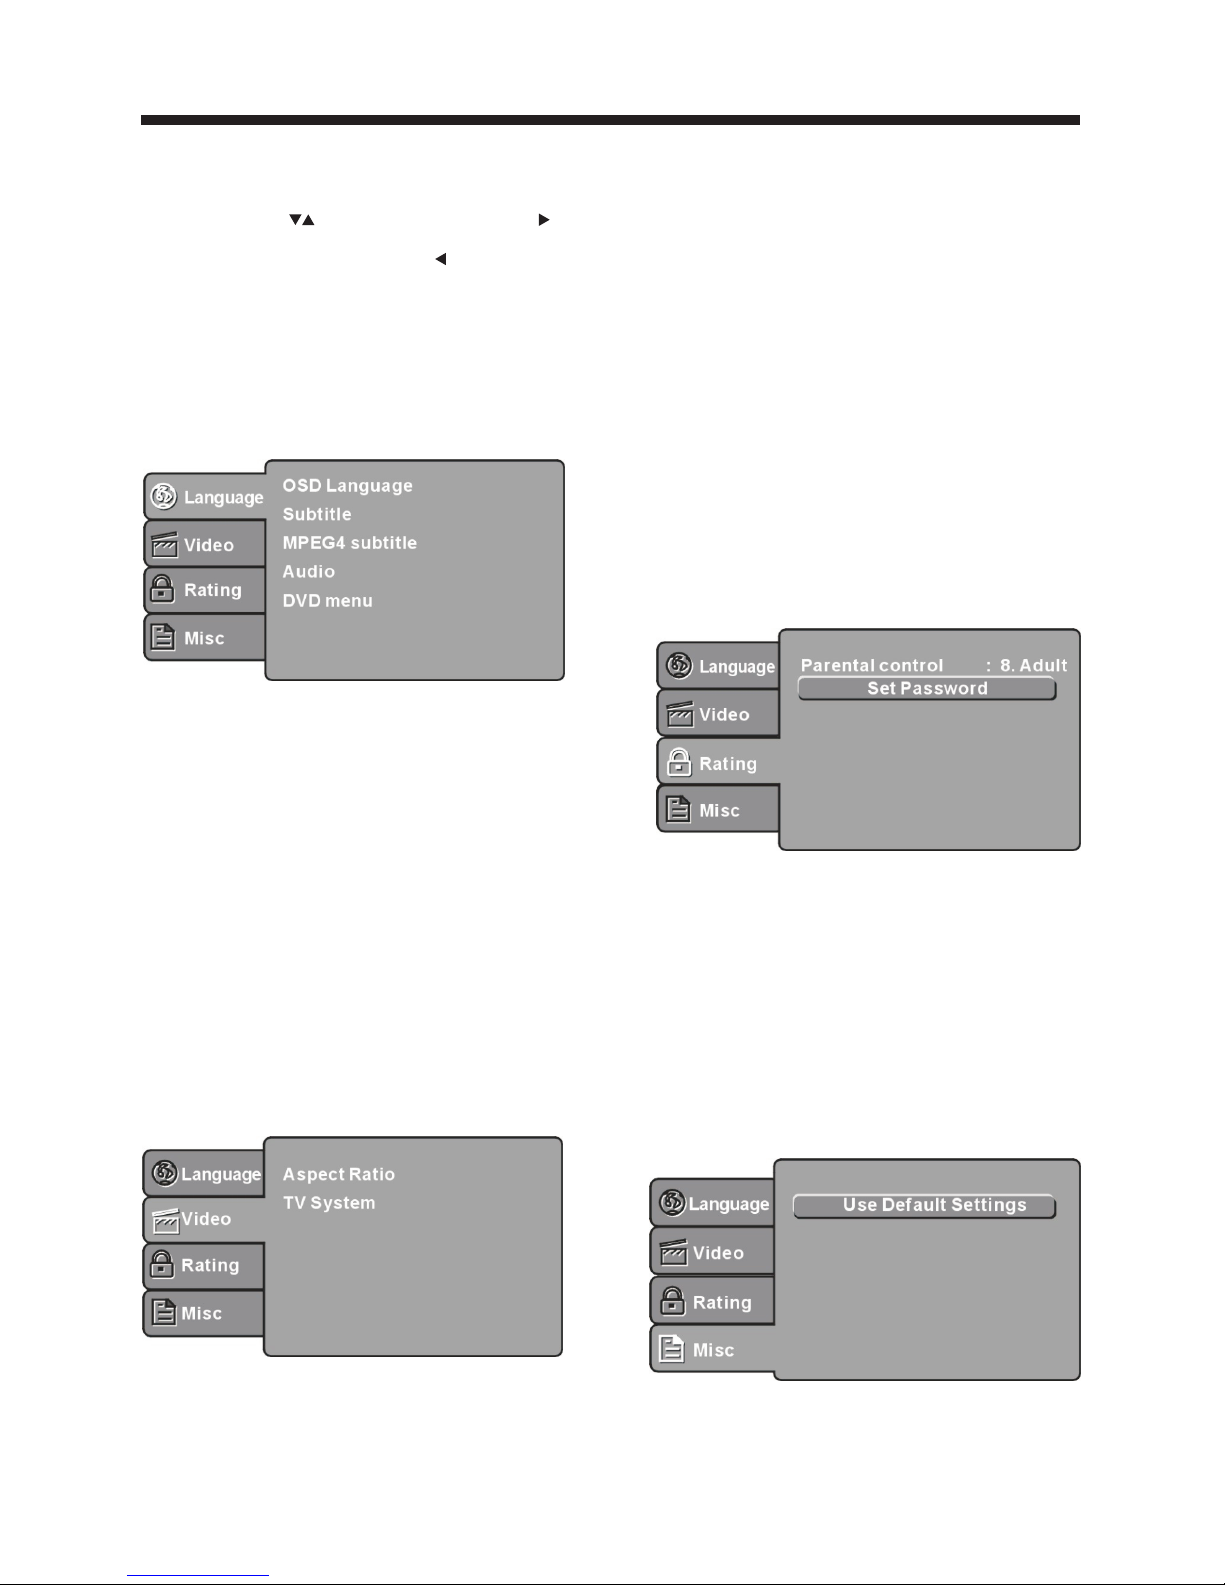
LANGUAGE SETUP
Select Language in the setup menu, and display the
Language submenu:
OSD Language
Use this item to select the language for the
setup menu and screen display.
Subtitle
This option provides the preset subtitle language.
Audio
Select the built-in disc dubbing language options.
DVD Menu
This option provides the film's menu language
options.
VIDEO SETUP
Select Vi de o in the setup menu, and display the
Vid eo submenu:
desired
SYSTEM SETUP
Aspect Ratio
Select the aspect ratio.
No te s:
TV System
Select the TV system.
For more information on output format,
refer to the instructions or your TV set.
RATING SETU P
Select Rating in the setup menu, and display
the Rating submenu:
The image display ratio is related to the recorded disc
format. Somes discs can not display images in the
aspect ratio you choose. If you play a disc recorded in
4:3 format on a wide screen TV, black bars will
appear on the left and right side of the screen. You
must adjust the screen setting depending on the type
of the television you have.
Note: The DVD player setting should be matched to
your TV set .
Parental Contro l
Set the parental control feature of the player
No te : Th e password is needed to set up the Parental
Control.
Set Password
Input four digits (password), then press ENTER /Ok
to confirm.
No te : If you forget your password, please use the
universal password 6666 to unlock.
MISC SETUP
Select MISC in the setup menu, and display
the submenu:
Use De fault Set tings
Reset setup data to factory default value.
DVD OPERATION
-19-
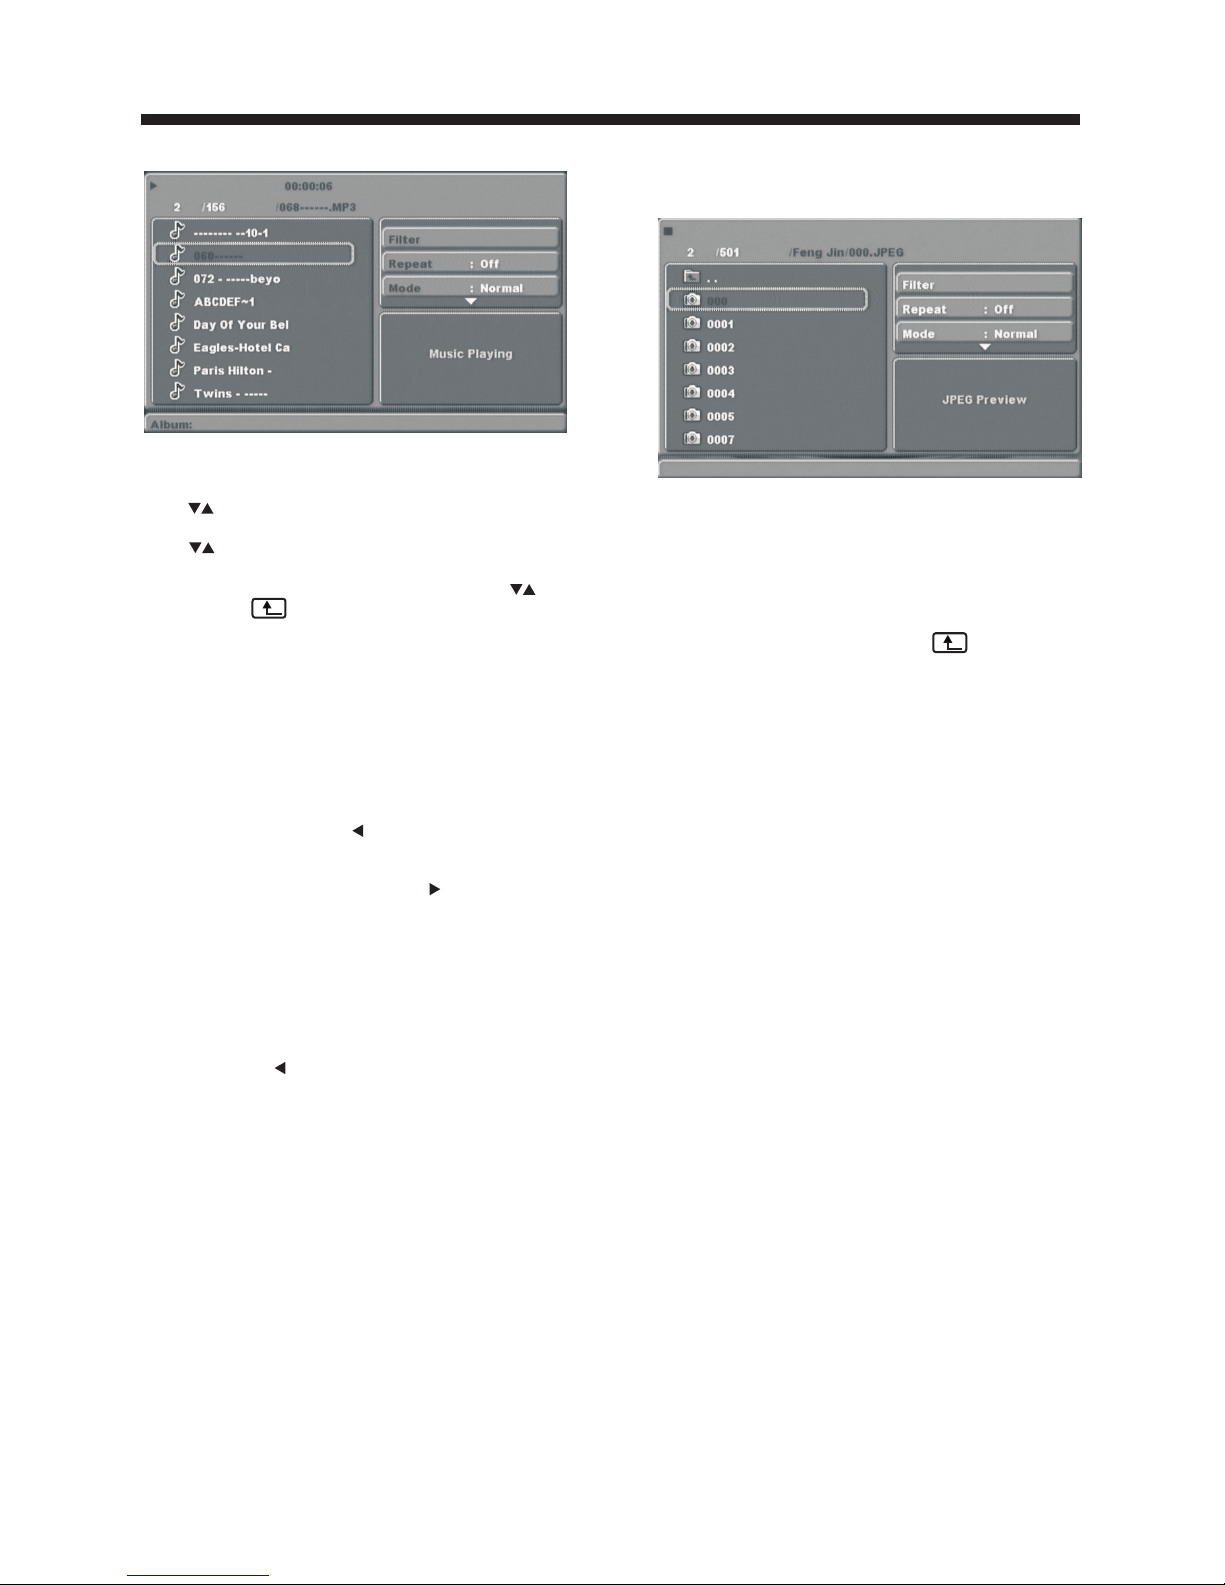
MP3/JPEG PLAYBACK
PICT URE CD PLAYBACK
The PICTURE CD disc has such a directory structure
structure as shown in the following picture.
Press Direction key to choose the root
directory and then press ENTER/OK button to
enter into the sub directory. Press Direction
key to choose the desired picture and then
press ENTER/O K or PLAY to enjoy the
picture. If you want to return to the upper menu,
press Direction key to choose the icon and
press ENTER/O K button.
Imag e rotation
In picture play state, press Direction key to
rotate the picture.
The MP3 disc has a directory structure as shown
picture above.
Press to choose the root directory and then press
ENTER/OK button to enter into the sub directory.
Press to choose the desired track and then press
ENTER/OK or PLAY to enjoy the music or movie. If
you want to return to the previous menu, press
to choose the icon and press the ENTER/OK
button.
Filter: Select the categories of files that are
displayed in the browser list.
Repeat: Change the repeat playing mode
Mode: Select different play modes:
Normal: Play chapters/tracks in normal order.
Shuffle: Play tracks/chapters in a random order until
all tracks/chapters have been played.
Edit Mode: Program tracks/chapters to play. Wh en
you select the mode, press to directory and press
ENTER/OK to choose the desired track. Select Add
to program. Select Prog ra m vi ew and select Ed it
mode to cancel the edit mode. Press to display the
programmed tracks and press ENTER/OK to start
playback.
Program view: Display the programmed tracks.
Browser vie w: D is pl ay the track directory.
Add to program: Choose the track select Add to
program to add the track to the program play list.
Clear pro gr am : In the complete stop state (press the
STOP button twice), select Edit mode to enable the
edit mode. Press to program track and press
ENTER/OK to cancel the desired track. Select Clear
program to delete all tracks in the program play list.
DVD OPERATION

INSERT/EJECT
Press this button to insert/eject the disc.
SUBTITLE
Press this button to select different subtitles
subtitles (This function must be supported
on the disc)
GOTO
For DVD discs, press this button to jump to a
selected title time and chapter time.For
Super VCD,VCD,CD discs, press this button
to search the desired disc time and track time
and choose the desired track.
Note: During VCD playback, the PBC mode
must be set to OFF.
0-9 keys
These buttons are used to input the time, as
well as title, chapter and track
numbers.When a numeric item is displayed
on the screen, press the 0-9 keys to select the
desired entry, and press ENTER/OK to
confirm.
When a VCD is playing(with PBC off), press
the 0-9 keys to select a track directly.
MENU
During DVD playback, press MENU to
display the disc menu of the current title.
During VCD/SVCD playback, press MENU
to control PBC ON/OFF.
SETUP
Press this button to enter the system setting
menu. Press the button again to exit the
menu.
RETURN
When a DVD/SVCD/VCD is playing, press
the RETURN button to return to the
menu(PBC ON only).
DISPLAY
Press this button to show the information
of the current disc.
ENTER
Press the button to confirm your choice on
the screen.
REV
During DVD, CD MP3 or VCD playback,
press REV to scan in reverse.
Press PLAY/PAUSE to resume normal
playback.
FWD
During DVD, CD,MP3, or VCD playback,
press FWD to scan forward. Press
PLAY/PAUSE to resume normal playback.
PREV
During DVD, CD,MP3, or VCD playback,
press PREV to play the previous chapter,
title or track.
NEXT
During DVD,CD,MP3, or VCD playback,
press NEXT to play the next chapter, title
or track.
STOP
Press the button once and the player will be
in the memory stop state. Press this button
twice and the player will be in the complete
stop state.
Play/Pause
Press this button to play/pause the disc.
REPEAT
Press to select between different
repeat modes — Repeat Chapter / Repeat
Title / Repeat Off(for DVD discs),
Repeat Single/ Repeat Folder/All/ Repeat
Off(for VCD/CD/MP3 discs)
AUDIO
Changes the audio language or audio
channel.
Function Buttons
DVD OPERATION
-20-
 Loading...