

Page 1
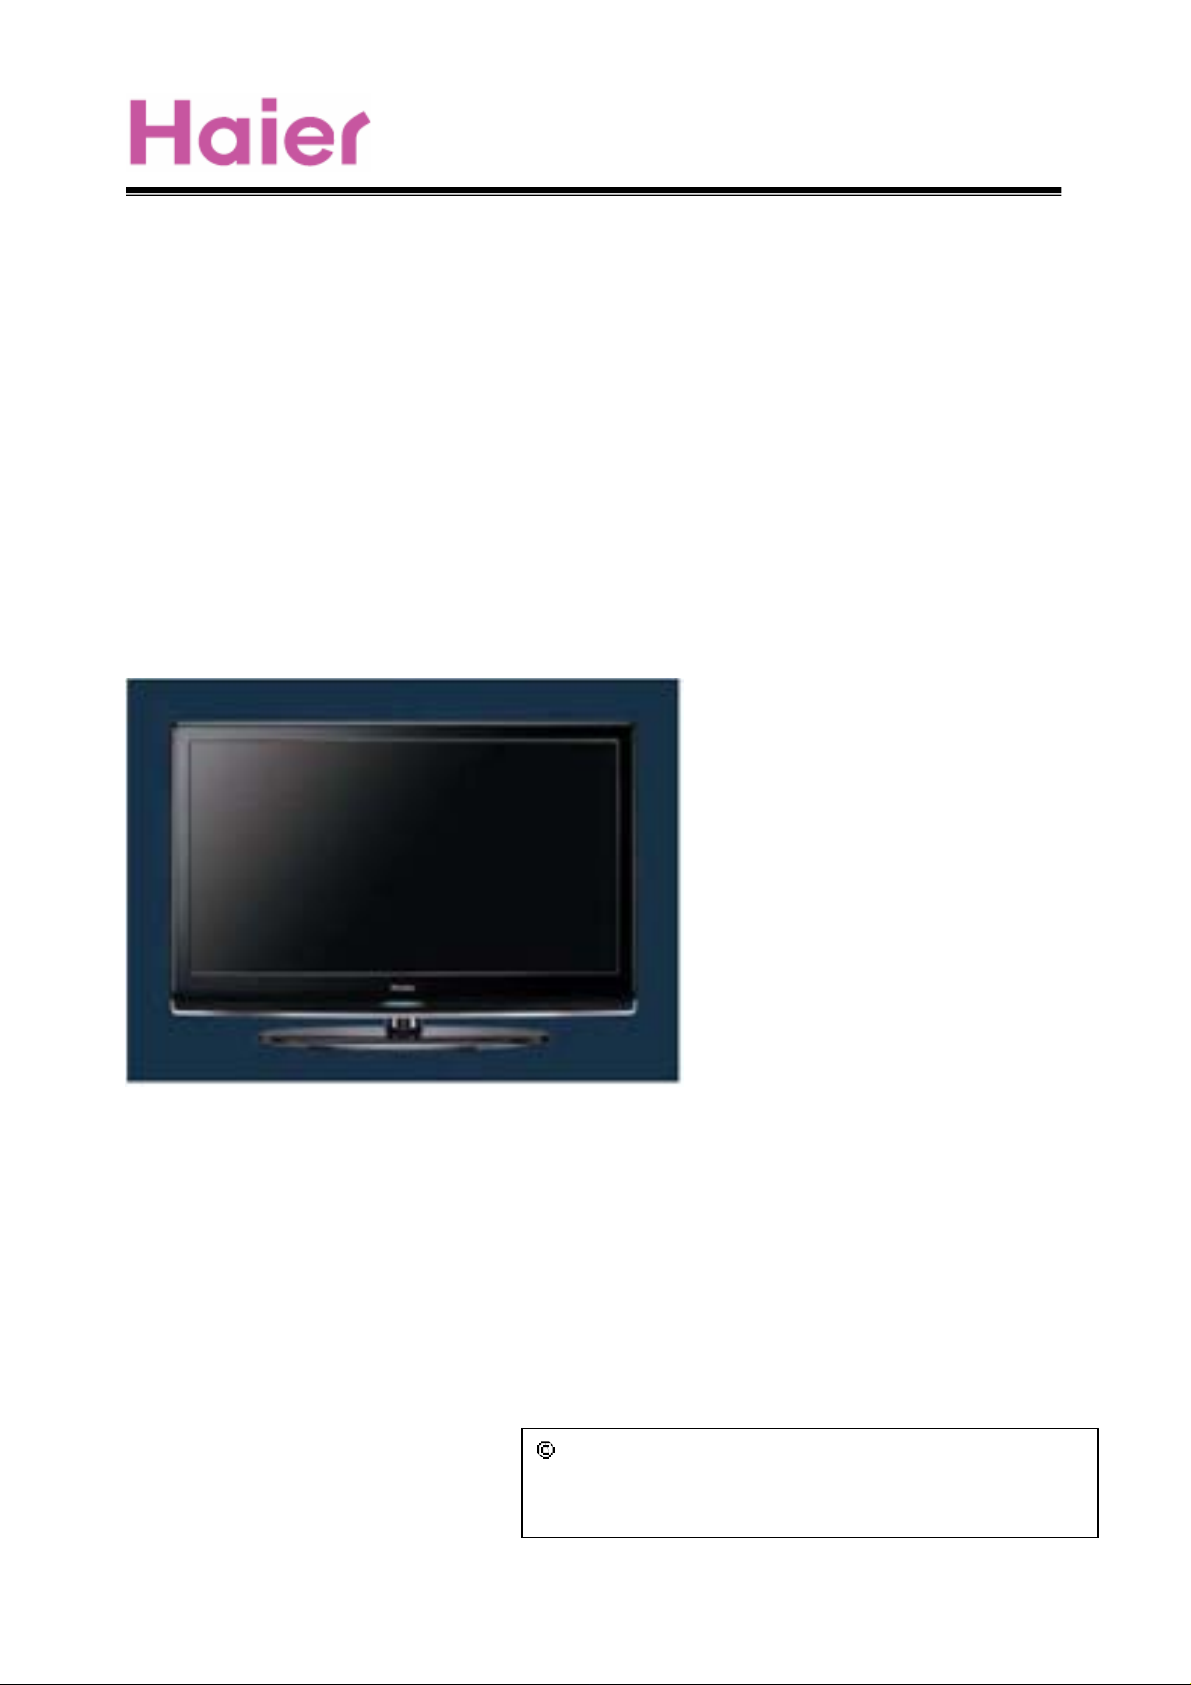
SERVICE MANUAL
Order No.: TV0906S013V1
Customer Model: LC22KW1
Service Model:HLC22KW1b
CHASSIS:
MTK5380LC
WARNING
This service information is designed for experienced repair technicians only and is not designed for use by the general public. It does
not contain warnings or cautions to advise non-technical individuals of potential dangers in attempting to service a product. Products
powered b electricity should be serviced or repaired only by experienced professional technicians. Any attempt to service or repair the
product deal with in this service information by anyone else could result in serious injury or death.
2009 (Qingdao Electronics
All rights reserved. Unauthorized copying and di stribution is a violation of
law.
1
limited company
)
Page 2

CONTENTS
Table of contents
1. General Information
1-1. General Guidelines...…………………………………………………..3
1-2. Important notice………………………………………………………...3
1-3. How to read this Service Manual……………………………………..4
………………..................…………………………….2
…………...............…………………………..3
2. Specifications……………………………………………....................6
3. Location of Controls and Components
3-1.Board Location…………………………………………………………..7
3-2. Main Board & AV Board………………………………………………..7
3-3. Power Board…………………………………………………………….9
3-4. LCD Panel………………………………………………………………10
...........................7
4. Disassemble and assemble…………………...........………….11
4-1 Remove the Pedestal ……………………………………………….…12
4-2 Remove the Back Cover…………………...…………………………..12
4-3 Remove the adhesive tape…….........…………………………………12
4-4 Remove the Terminal Bracket……………....…………………………12
4-5 Remove the power module……….......……………………………….13
4-6 Remove the Main board……………....……………………………….13
4-7 Remove the small power board……………………….………………13
4-8 Remove the speaker …....……………………………………………..13
4-9 Remove the remote control board …….....…………………………..13
5. Installation Instructions ………..................………………..…..14
5-1 External Equipment Connections …………………………..........…..14
5-2 HDMI Connections ..………………………….............................…...16
6. Operation Instructions …………………………........................19
6-1 Front Panel Controls …………………………………………….........19
6-2 Back Panel Controls ……………...……………………………..........19
6-3 Universal Remote Controller...........................................................19
7. Electrical parts ............................................................................21
7-1. Block diagram ...............................................................................21
7-2. Circuit Diagram..............................................................................21
7-3 .Wiring Connection Diagram...........................................................36
8. Measurements and Adjustments .......................................37
8-1. Service Mode ..................................................................................37
2
Page 3

8-1-1.How to enter into Service Mode ......................................................37
8-1-2.How to exit ..................................................................................37
8-2. Measurements and Adjustments ..................................................37
9. Trouble shooting ......................................................................43
9-1. Simple check ...............................................................................43
9-2. Power Supply Board failure check ..............................................44
9-3. Main board failure check ..............................................................45
9-4. Pannel failure ...............................................................................47
3
Page 4

1. General Information
1-1 General Guidelines
When servicing, observe the original lead dress. If a short circuit is found, replace all parts which
have been overheated or damaged by the short circuit.
After servicing, see to it that all the protective devices such as insulation barriers, insulation papers
shields are properly installed.
After servicing, make the following leakage current checks to prevent the customer from being
exposed to shock hazards.
1) Leakage Current Cold Check
2) Leakage Current Hot Check
3)Prevention of Electro Static Discharge(ESD)to Electrostatically Sensitive
1-2 Important notice
1-2-1. Follow the regulations and warnings
Most important thing is to list up the potential hazard or risk for the service personnel to open the
units and disassemble the units. For example, we need to describe properly how to avoid the
possibility to get electrical shock from the live power supply or charged electrical parts (even the
power is off).
This symbol indicates that high voltage is present inside. It is dangerous to
make any king of contact with any inside part of this product.
This symbol indicates that there are important operating and maintenance
instructions in the literture accompanying the appliance
1-2-2. Be careful to the electrical shock
To prevent damage which might result in electric shock or fire, do not expose this TV set to rain or
excessive moisture. This TV must not be exposed to dripping or splashing water, and objects
Filled with liquid, such as vases, must not be place on top of or above the TV
1-2-3. Electro static discharge (ESD)
Some semiconductor (solid state) devices can be damaged easily by static electricity. Such
Components commonly are called Electrostatically Sensitive (ES) Devices. The following
tech-niquesshouldbeusedtohelpreducetheincidenceofcomponentdamagecausedbyelectro
Static discharge (ESD).
1-2-4. About lead free solder (PbF)
This product is manufactured using lead-free solder as a part of a movement within the consum-er
products industry at large to be environmentally responsible. Lead-free solder must be used in the
servicing and repair of this product.
1-2-5. Use the genewing parts (specified parts)
Special parts which have purposes of fire retardant (resistors),high-quality sound (capacitors), low
noise(resistors), etc. are used.
When replacing any of components, be sure to use only manufacture's specified parts shown in
the parts list.
Safety Component
● Components identified by mark have special characteristics important for safety.
4
Page 5

1-2-6. Take Care to Deal With The Cathode-Ray Tube
In the condition that an explosion-proof cathoderay tube is set in this equipment, safety is se-cured
against implosion. However, when removing it or serving from backward, it is dangerous to give a
shock. Take enough care to deal with it.
1-2-7. Safety Check after Repairment
Confirm that the screws ,parts and wiring which were removed in order to service are put in the
original positions, or whether there are the portions which are deteriorated around the serviced
places serviced or not. Check the insulation between the antenna terminal or external metal and
the AC cord plug blades. And be sure the safety of that.
Insuration Test
1. Unplug the plug from the AC outlet.
2. Remove the antenna terminal on TV and turn on the TV.
3. Insulation resistance between the cord plug terminals and the eternal exposure metal
should be more than M ohm by using the 500V insulation resistance meter
4. If the insulation resistance is less than M ohm, the inspection repair should be required.
If you have not the 500V insulation resistance meter, use a Tester.
External exposure metal: Antenna terminal Headphone jack
1-2-8. Ordering Spare Parts
Please include the following informations when you order parts. (Particularly the Version
letter)
1. Model number and Version letter
The model number can be found on the back of each product and the Version letter can
be found at the end of the serial number.
2. Part No. and Description
You can find them in your service manual.
1-2-9. Photo used in this manual
The illustration and photos used in this Manual may not base on the final design of products, which
may differ from your products in some way.
1-3. How to read this Service Manual
1-4-1. Using Icons
Icons are used to attract the attention of the reader to specific information. The meaning of each icon is
described in the table below:
Note:
A “note” provides information that is not indispensable, but may nevertheless be valuable to the
reader, such as tips and tricks.
Caution:
A “caution” is used when there is danger that the reader, through incorrect manipulation,
5
Page 6
may damage equipment, loose data, get an unexpected result or has to restart(part of)
a procedure.
Warning:
A “warning” is used when there is danger of personal injury.
Reference:
A “reference” guides the reader to other places in this binder or in this manual, where he/she will
find additional information on a specific topic.
2. Specification
Model
Screen size
Aspect ratio
Resolution
Contrast Ratio
Angel of view
Color display
OSD language
Color system
Color Temperature
Audio output power(Built-in)(W)
Power Consmption(in Standby)
Total power input(W)
HLC22K1/HLC22KW1
21.6inch
16:9
1366×768
1000:1
H:170/V:160
16.7M
English
ATSC/NTSC
Cold/Standard/Warm
3W×2
1W
60W
Voltage range(V)
Power frequency(Hz)
Time of sleep timer(MINS)
Net weight(KG)
Gross weight(KG)
Net dimension(MM)
Packaged dimension(MM)
120V±10% V
60HZ
240Min
7
9.25
600/216/485
605/240/530
3. LOCATION OF CONTROLS AND COMPONENTS
6
Page 7
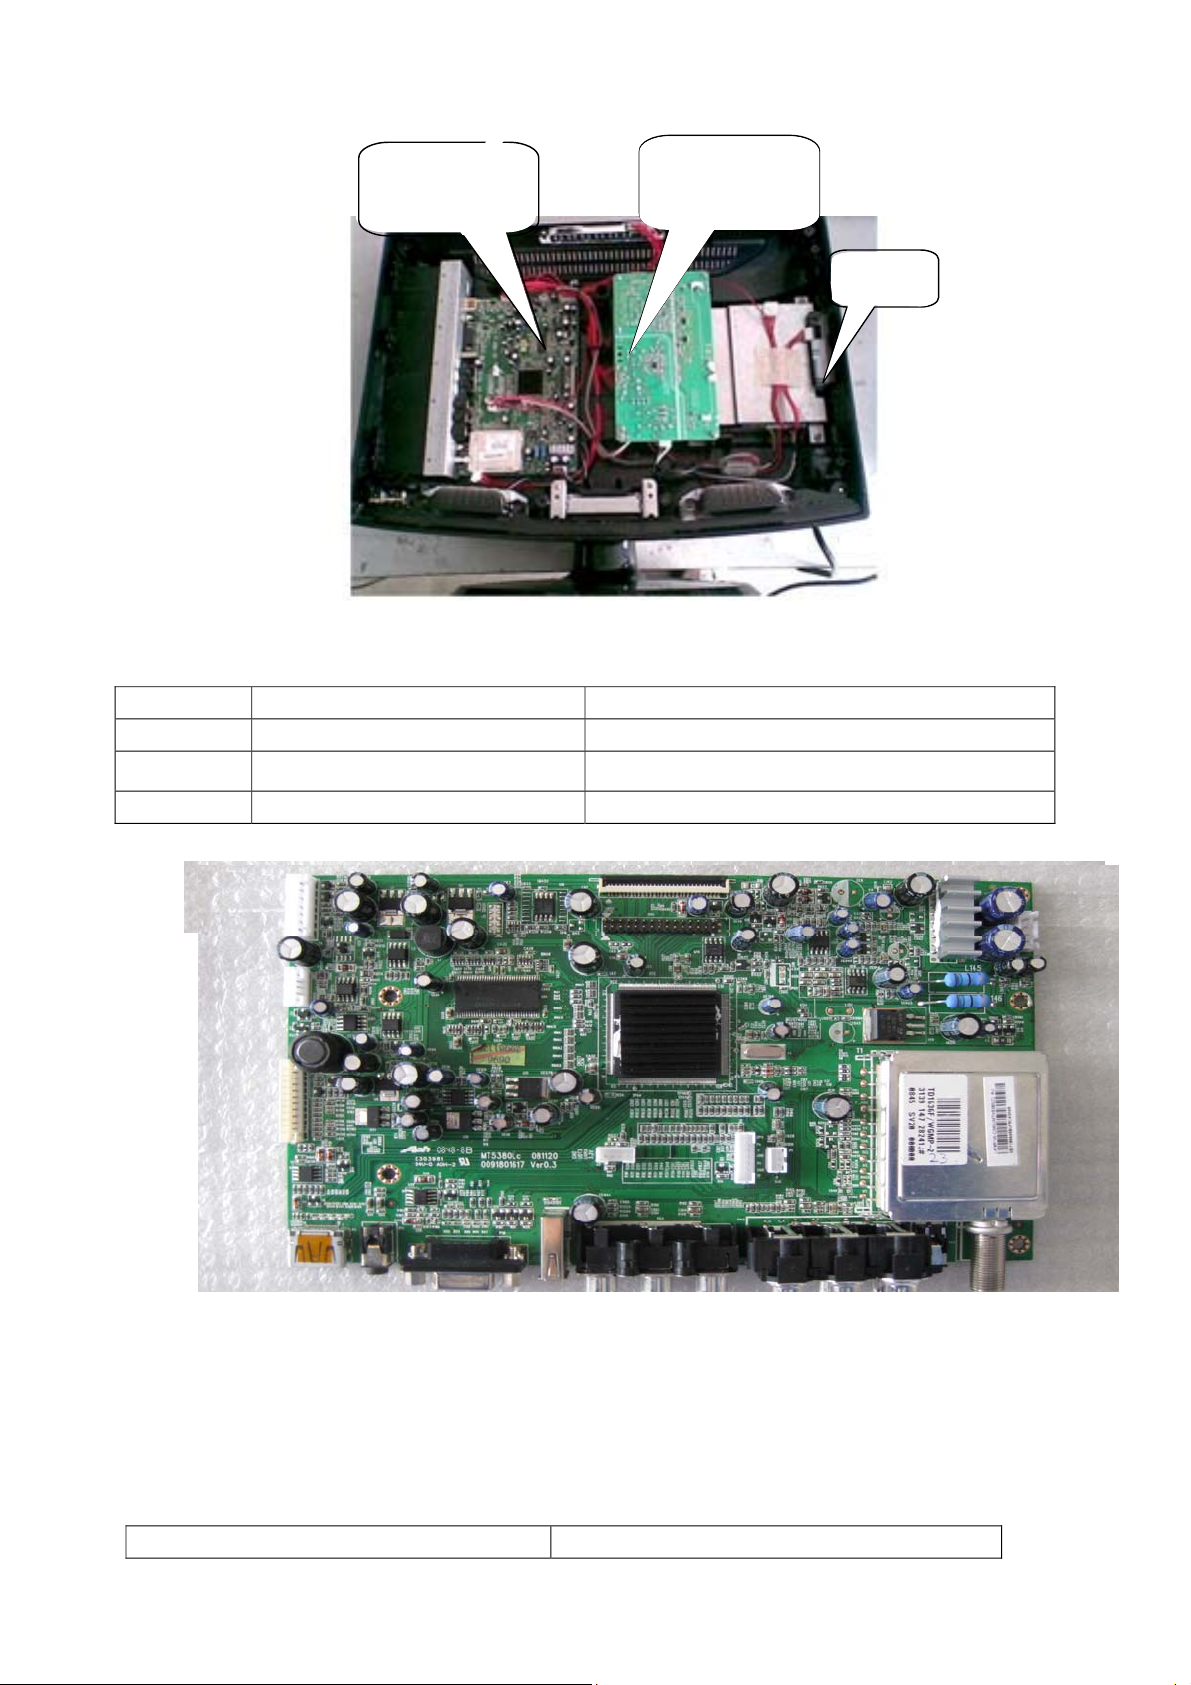
3-1 Board Location
A Board
Board
B
C
No. Parts number Description
A Board
B Board 0094001224B Power Board
C
3-2 Main Board & AV Board
DC1490E0200M
DC1490E0200D
Main Board
DVD player
:
3-2-1 Function Description:
Main Board
Process signal which incept from exterior equipment
display.
3-2-2 Connector definition
Main board connector
Power connectors (CN3, CN5)
CN3 CN5
7
Page 8
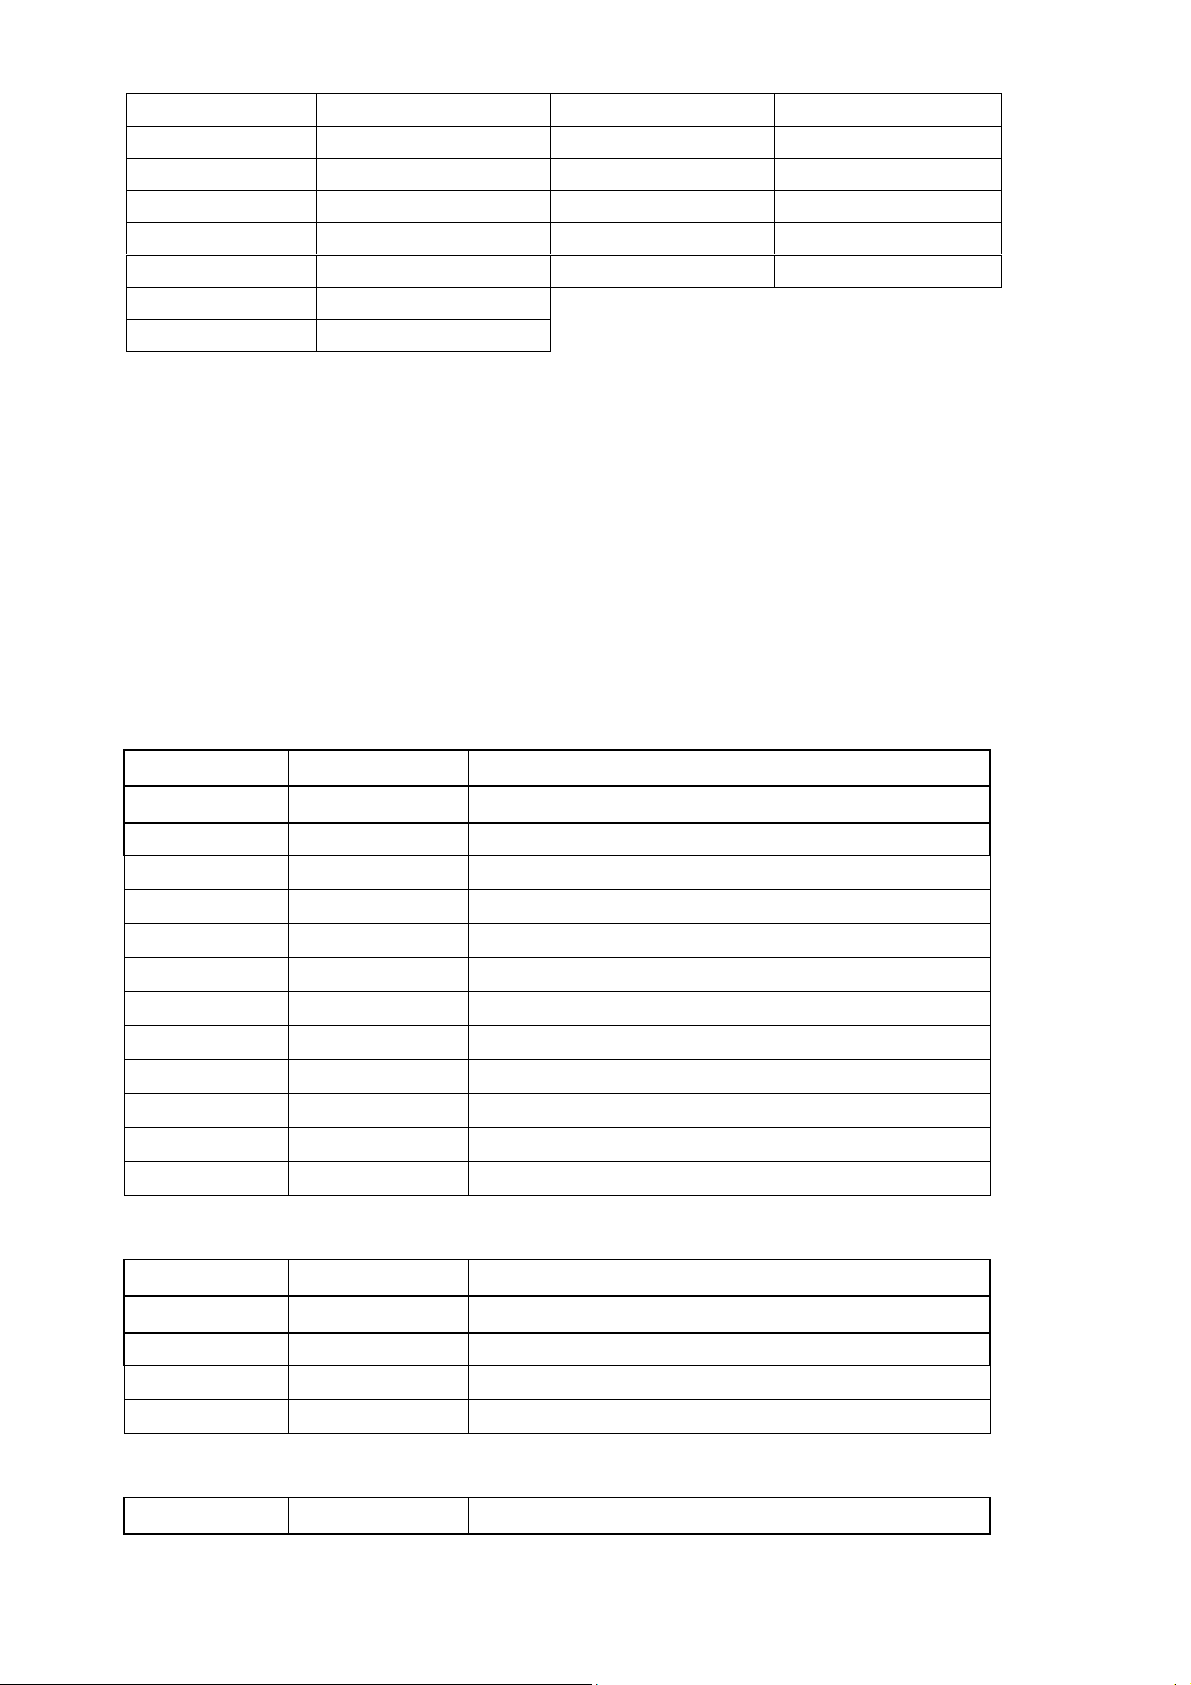
Pin number Signal name Pin number Signal name
1 +12V 1 +12V
2 +12V 2 GND
3 BL 3 GND
4 DIM 4 +5V
5 GND 5 STB
6 GND
7 SW
Notes:
CN3-Pin 3: Backlight on/off:
The system can turn on or turn off the backlight of TFT LCD Panel through the power supply unit
path.
CN3-Pin 7: System power on / standby
System board will use this pin to control system power.
CN3-Pin 4: Control the luminance of backlight
The system can generate the PWN signal to control the strength of TFT LCD Panel’s backlight
through this connector.
Keypad and remote connector (CN2)
Pin number Signal name Description
1 IR_IN IR
2 CPU5V 5V
3 LED_G LAMP GREEN
4 GND GND
5 LED_R LAMPRED
6 K7 POWER
7 K6 MENU
8 K5 P_
9 K4 P+
10 K3 V_
11 K2 V+
12 K1 SOURCE
Speaker connector (CN1)
Pin number Signal name Description
1 LSPK LSPK
2 GND GND
3 GND GND
4 RSPK RSPK
DVD VIDEO Connector: CN6
Pin number Signal name Description
8
Page 9
1 GPIO GPIO
2 PB_IN PB1 IN
3 Y_IN Y1_IN
4 GND GND
5 PR_IN PR1 IN
6 GND GND
7 IR DVD IR
DVD AUDIO Connector: P1
Pin number Signal name Description
1 LI YPBPR1L_IN
2 RI YPBPR1R_IN
3 GND GND
Other connectors:
CN19 to Upgrade the program of MTK5380LC (U13) AND FLASH (U17)
J3
+3V3SB
U0RX
U0TX
1
2
3
4
4x1 W/HOUSING
DIP4/W/H/P2.0
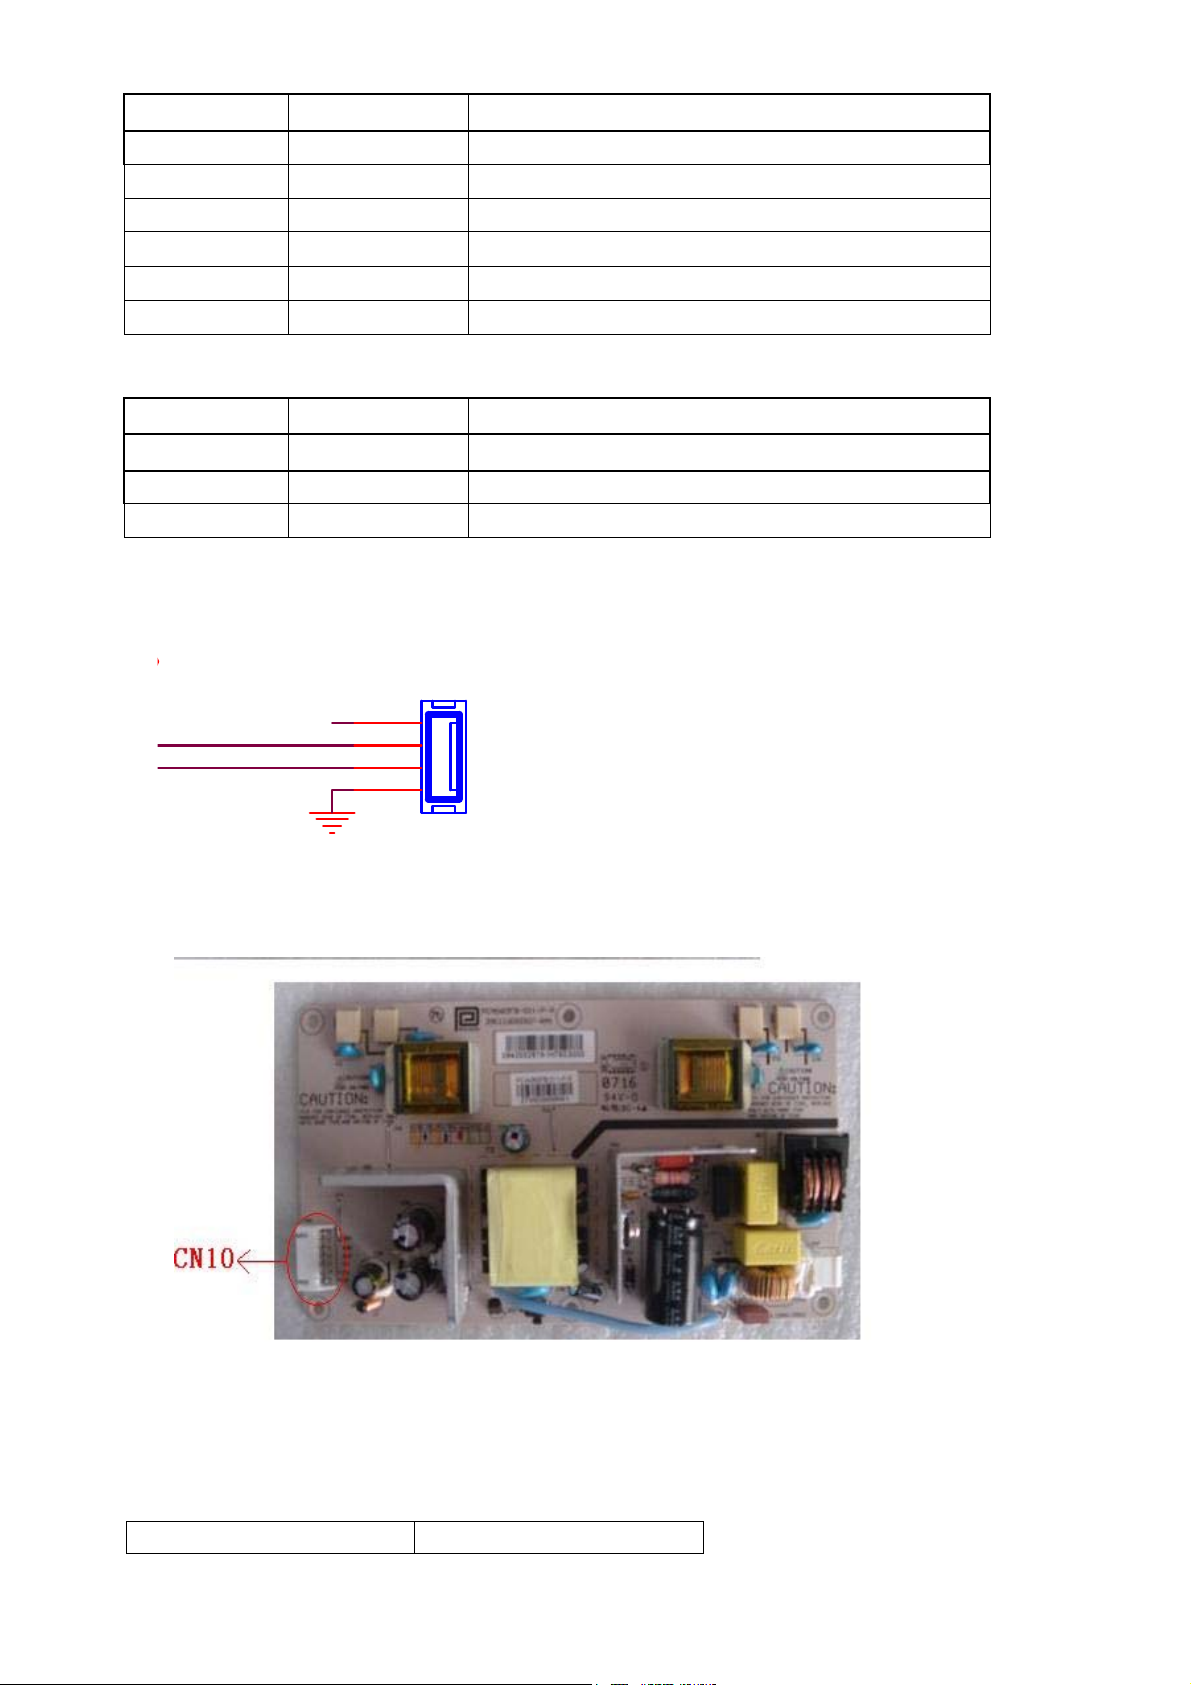
3-3. Power Board
3-3-1 Function Description:
Supply power for Main board, Panel.
3-3-2Connectordefinition
111INPUT CONNECTOR (CN10)
CN10 Signal name
9
Page 10
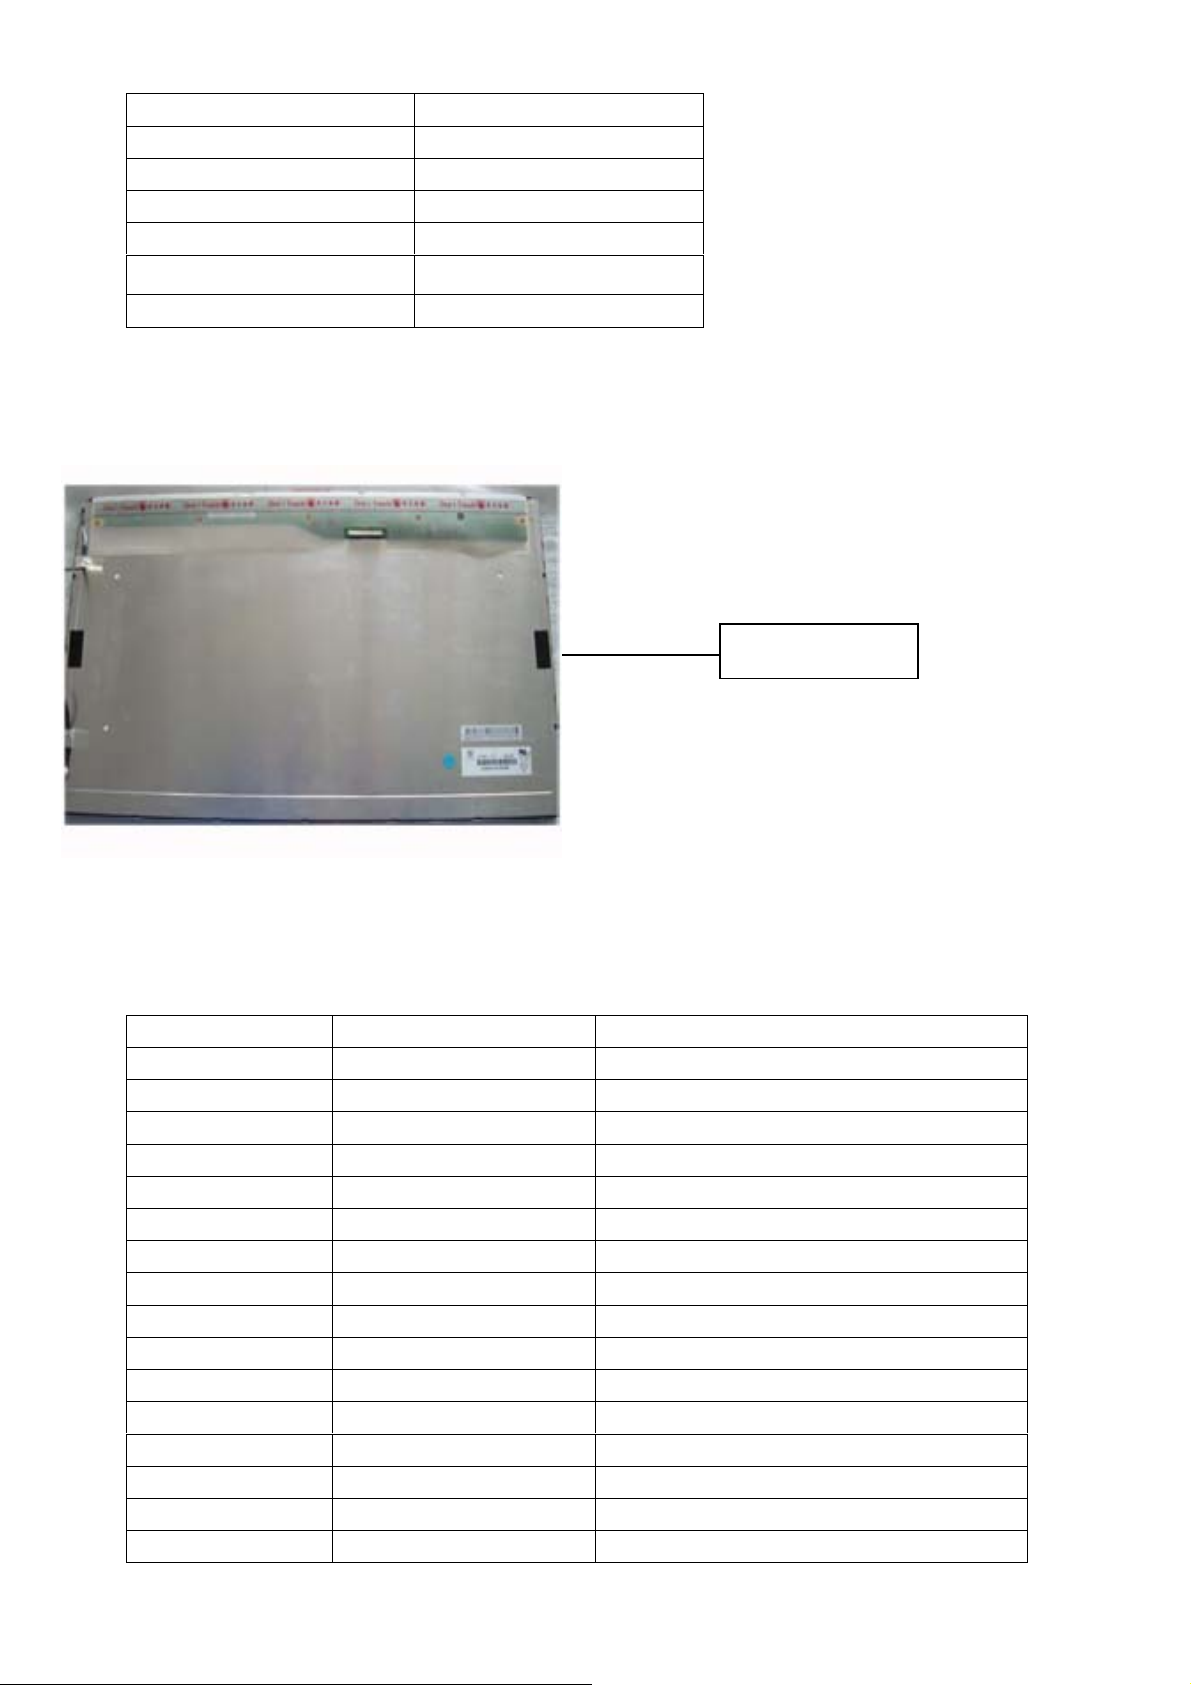
1 N
2 GND
3 GND
4 DIM
5 EN
6 +12V
7 +12V
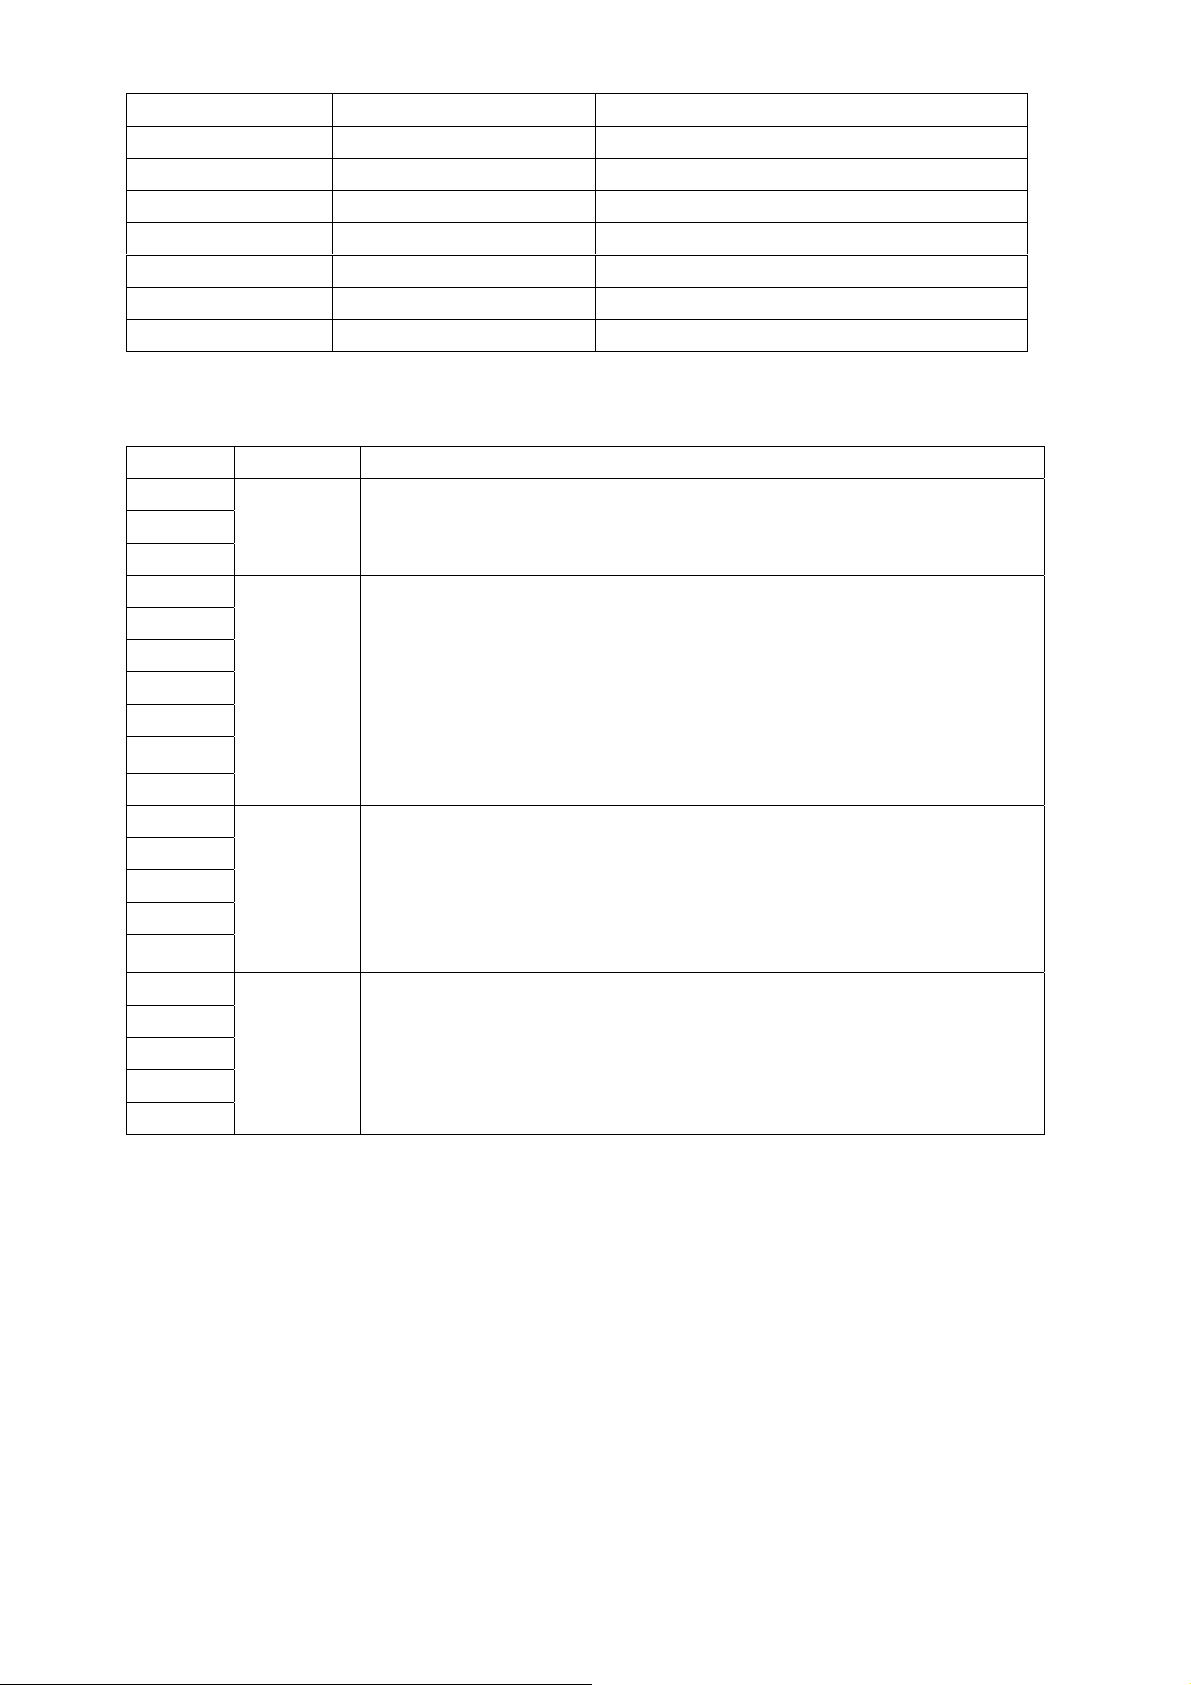
3-4. LCD Panel
C M O(V 2 1 6 B 1- L 01)/CLAAWA01
3-4-1 Function Description:
3-4-2 Connector definition
Pin number Signal name Description
1-3 LVDSVDD Power for panel
4-6 GND Ground
7 A0N LVDS EVEN 0 - Signal
8 A0P LVDS EVEN 0 + Signal
9 A1N LVDS EVEN 1 - Signal
10 A1P LVDS EVEN 1 + Signal
11 A2N LVDS EVEN 2 - Signal
12 A2P LVDS EVEN 2 + Signal
13,14 GND Ground
15 CK1N LVDS EVEN Clock - Signal
16 CK1P LVDS EVEN Clock + Signal
17 A3N LVDS EVEN 3 - Signal
18 A3P LVDS EVEN 3 + Signal
19 A4N LVDS ODD 0 - Signal
20 A4P LVDS ODD 0 + Signal
21 A5N LVDS ODD 1 - Signal
Display the signal.
10
Page 11
22 A5P LVDS ODD 1 + Signal
23 A6N LVDS ODD 2 - Signal
24 A6P LVDS ODD 2 + Signal
25,26 GND Ground
27 CK2N LVDS ODD Clock - Signal
28 CK2P LVDS ODD Clock + Signal
29 A7N LVDS ODD 3 - Signal
30 A7P LVDS ODD 3+ Signal
CN1 (Header):S14B-PH-SM4-TB (D)(LF)(JST) or equivalent.
Pin No. Symnbol Description
1
2
3
4
5
6
13
14
25
VBL
GND
+5.0V Power input
Ground
26
7-12
15
16
17
18
19-24
27
28
29
30
LVDS EVEN LVDS EVEN Signal
LVDS ODD
LVDS ODD Signal
4. Disassemble and assemble
11
Page 12
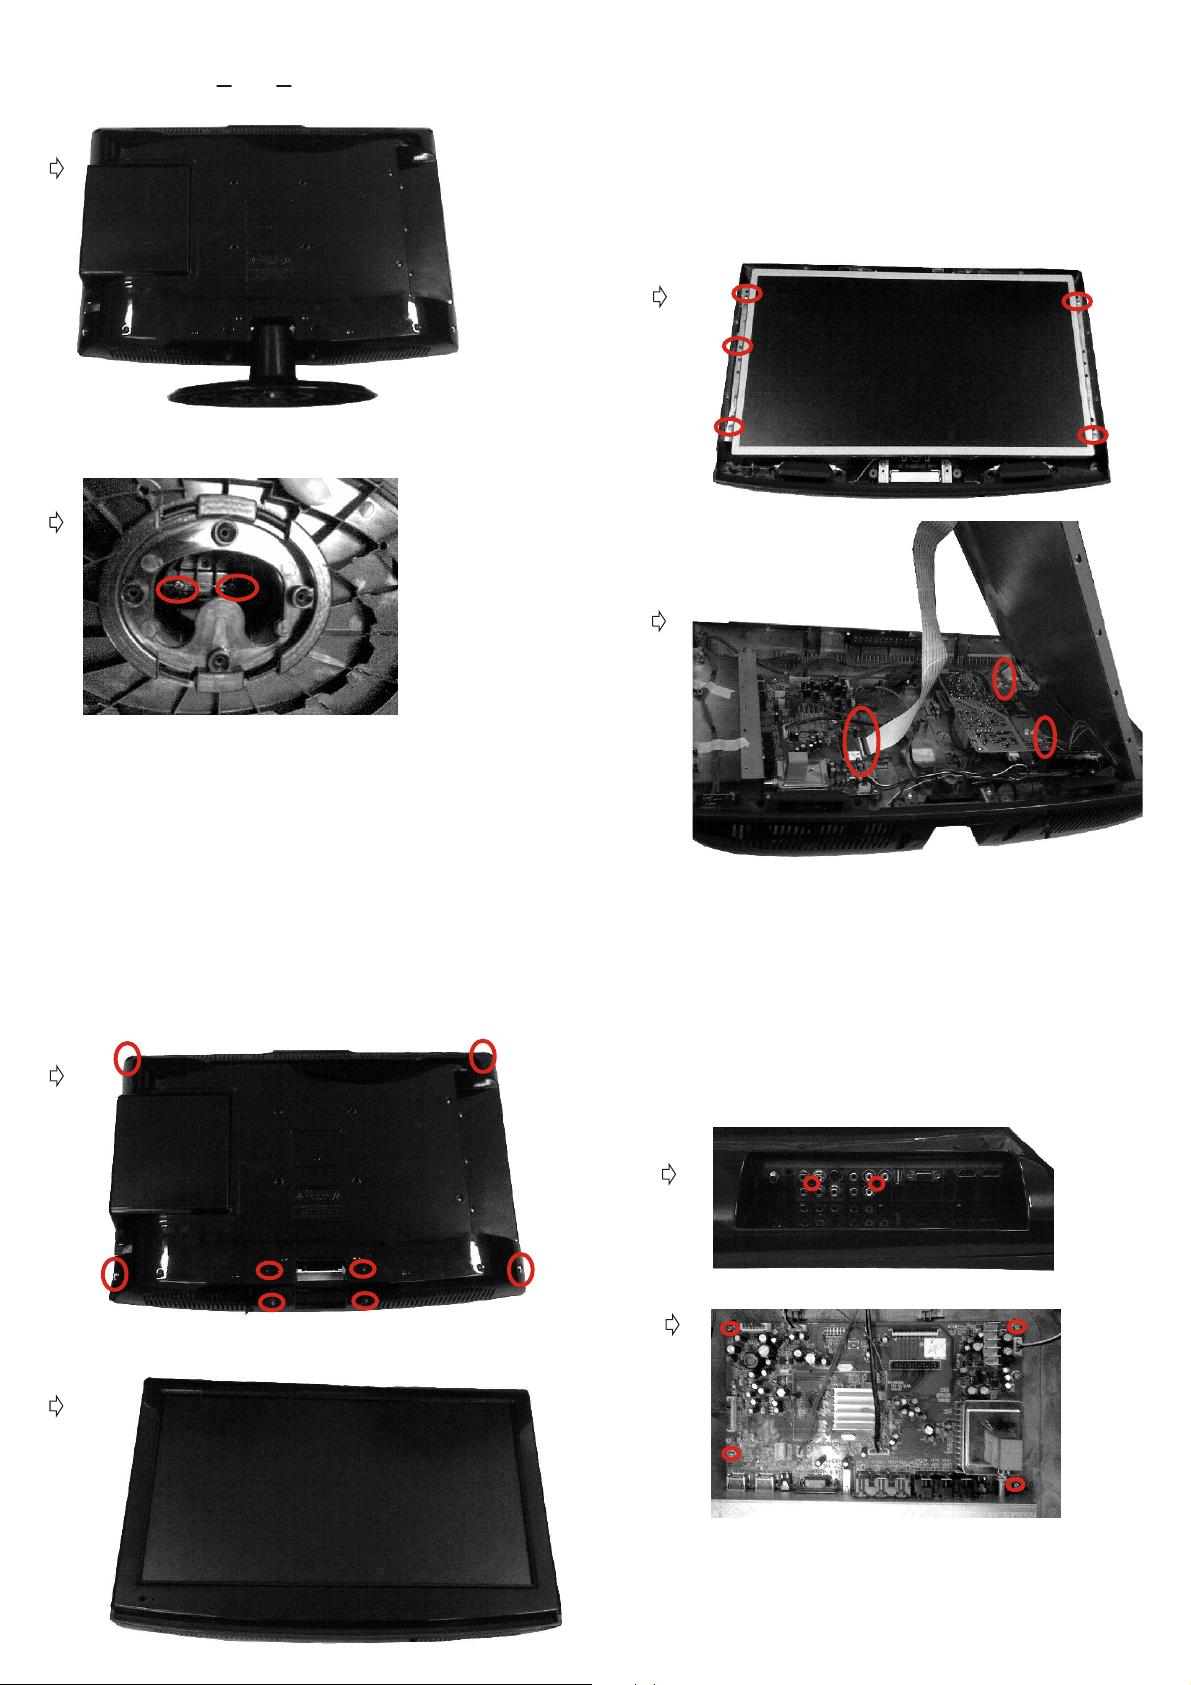
4 1 Remove th e Pedesta l.
①
②
Remover the eight screw indicated with ○.
①
Turn to front cover upwards
② .
Then remove the front cover from the unit.
③
4.3Remove the LCD panel
①
① Lay down the unit so that rear cover
downward.
② Remove the two screw from the
pedestal indicated with
Then remove the pedestal .
③
○.
4 2Remove the Front Co ver.
①
②
①Remover the five screw indicated with ○.
②Remover the pin indicated with ○.
③Then remove the panel.
4.4Remove the Main Board
①
②
②
①Remover the two screw indicated with ○.
②Remover the four screw indicated with ○.
③Then remove the Main Board.
Page 13
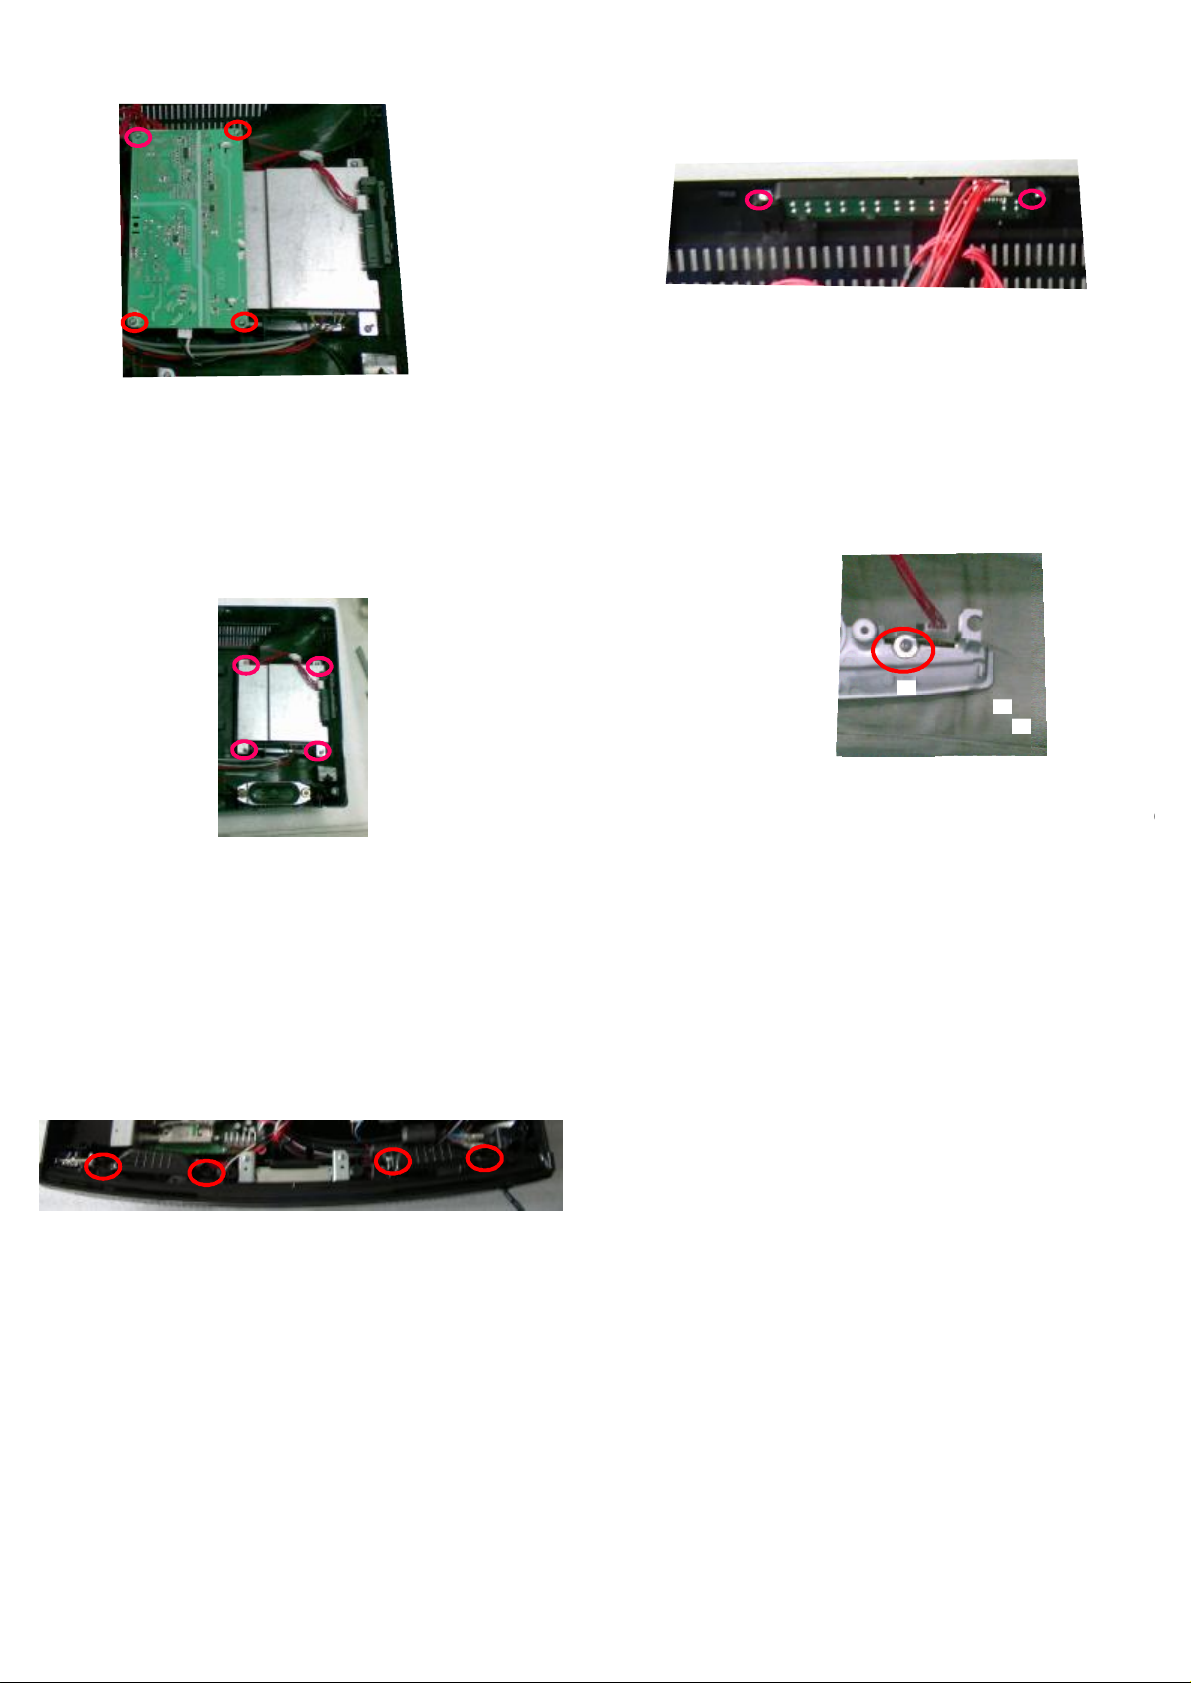
4RemovethePowerBoard.5
○.
VD
○.
.
①
Removerthefourscrewindicatedwith
②
ThenremovethePowerBoard.
.
4
RemovetheD
6 Keypad
AssemblyandDVD
○.
4RemovetheKeypad
.8
Assembly
①
Removerthetwoscrewindicatedwith
②
ThenremovetheKeypadAssembly
4RemovetheRemote
. 9
ControlBoard
.
Removerthefourscrewindicatedwith
①
Thenremovethe
②
ThenremovetheDVDKeypadAssembly
③ .
ThenremovetheDVD
④ .
ShieldShelf
.
○.
4RemovetheSpeaker. 7
Removerthefourscrewindicatedwith
Remover
Thenremovethe
Spongepiece
Speaker
.
○.
①
Removertheonescrewindicatedwith
②
ThenremovetheRemoteControlBoard
13
Page 14
5. Installation Instructions
5-1 External Equipment Connections
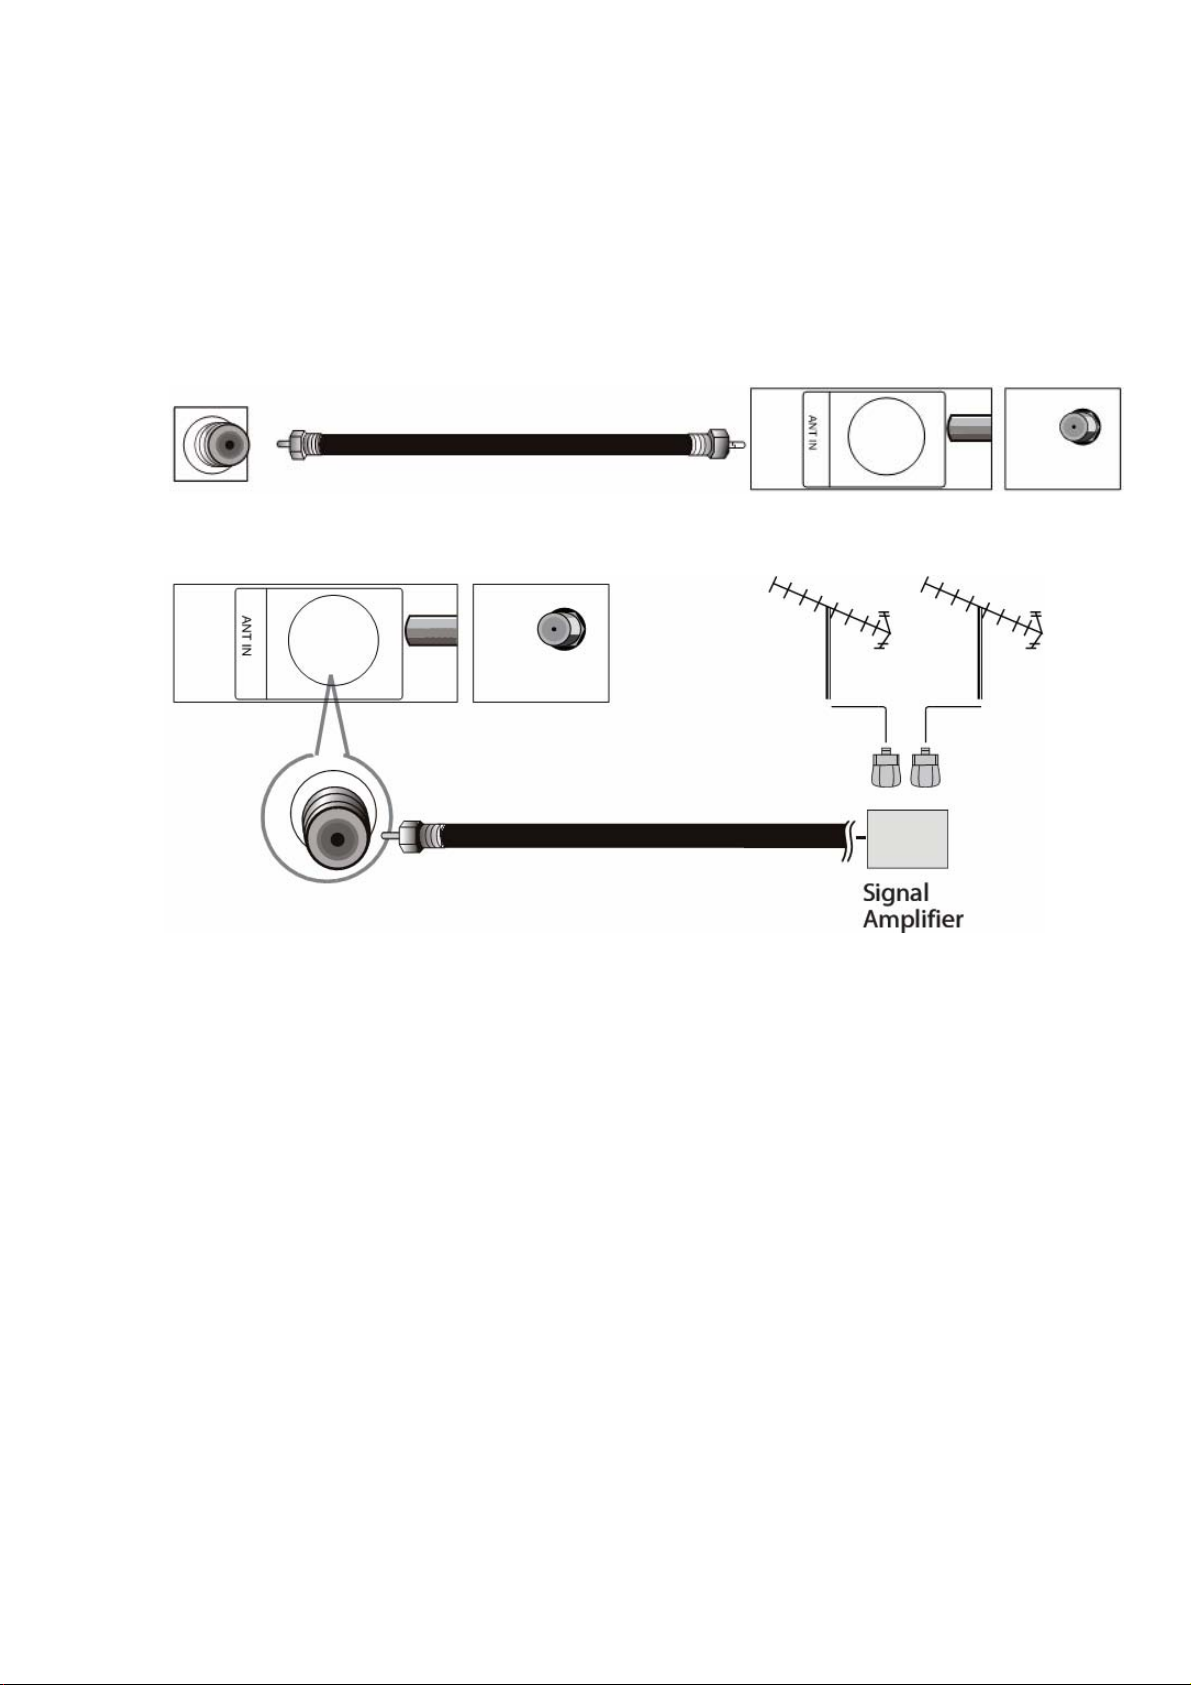
Antenna Connection
Connect one end of a coaxial cable (not included) to the ANT IN jack on the back of your TV/DVD
combo, then connect the other end of the cable into the antenna or cable TV wall outlet.
To improve picture quality from an antenna in a poor signal area, install a signal amplifier.
If you need to split the antenna signal to connect two TVs, install a two-way splitter.
Choose Your Connection
There are several ways to connect your television, depending on the components you want to
connect
and the quality of the signal you want to achieve. The following are examples of some different
ways to connect your TV with different input sources. Choose the connection which is best for you.
14
Page 15
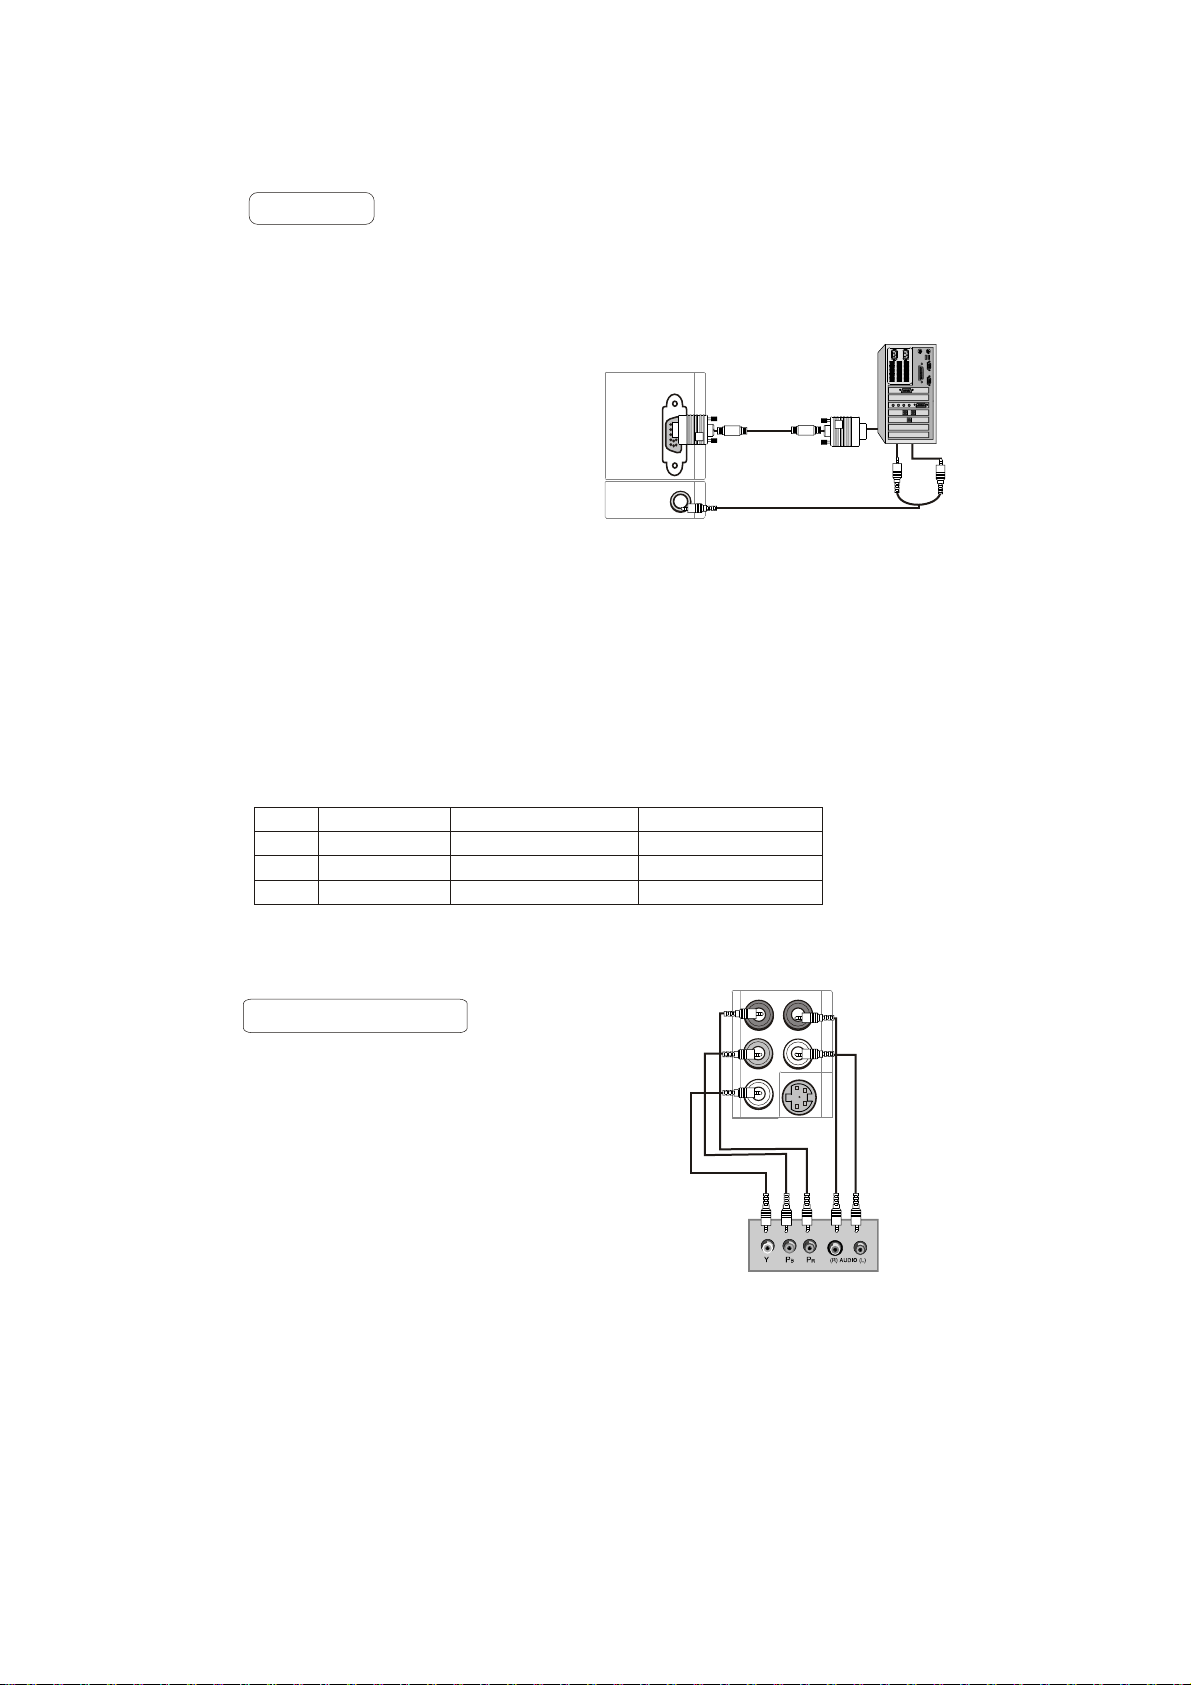
VGA Setup
You can use your LCD-TV as a monitor for your personal computer using a VGA
cable (not supplied).
Connection and use steps:
1.Read the user guide supplied with
your computer and ensure that it has
a VGA connector;
2.Make sure that the power of the LCD
-TV and the PC are off;
3.Connect a D type 15-pin PC interface
cable ( not supplied ) to the PC video
interface connector on the PC. Then
connect the other end to the PC video
interface connector on the back of the
LCD-TV.Tighten the screws on the PC
connectors once they are firmly
connected;
4.Turn on the power of the LCD-TV first ,
and then turn on the power of the PC;
5.Press INPUT button to set the video input mode of the LCD-TV to PC;
Once the input for PC is selected and if you see no image press function
F8 on you pc.
6.Check the image on your TV. There may be noise associated with the resolution,
vertical pattern, contrast or brightness in PC mode. If noise is present, change
the PC mode to another resolution, change the refresh rate to another rate or
adjust the brightness and contrast on the menu until the picture is clear. If the
refresh rate of the PC graphic card can not be changed, change the PC graphic
card or consult the manufacturer of the PC graphic card.
Resolution
Mode
VGA
SVGA
XGA
Resolution
640x480
800x600
1024x768
Line frequency(KHz)
31.5
37.9
48.4
VGA IN
PC AUDIO IN
Frame frequency(Hz)
60
60
60
Note: All above listed are subject to VESA criteria.
Component Setup
How to connect
Connect the DVD video outputs (Y, PB, PR)
to the Component(Y, Pb, Pr) IN jacks on
the TV and connect the DVD audio outputs
to the AUDIO IN jacks on the TV, as shown
in the figure.
NOTE: If your DVD player does not have
component video output,use S-Video.
How to use
1. Turn on the DVD player, insert a DVD.
2. Use button on the remote
INPUT
control to select the proper input.
Pr Pb Y
COMPONENT IN
R-AUDIO-L
S-VIDEO IN
15
Page 16
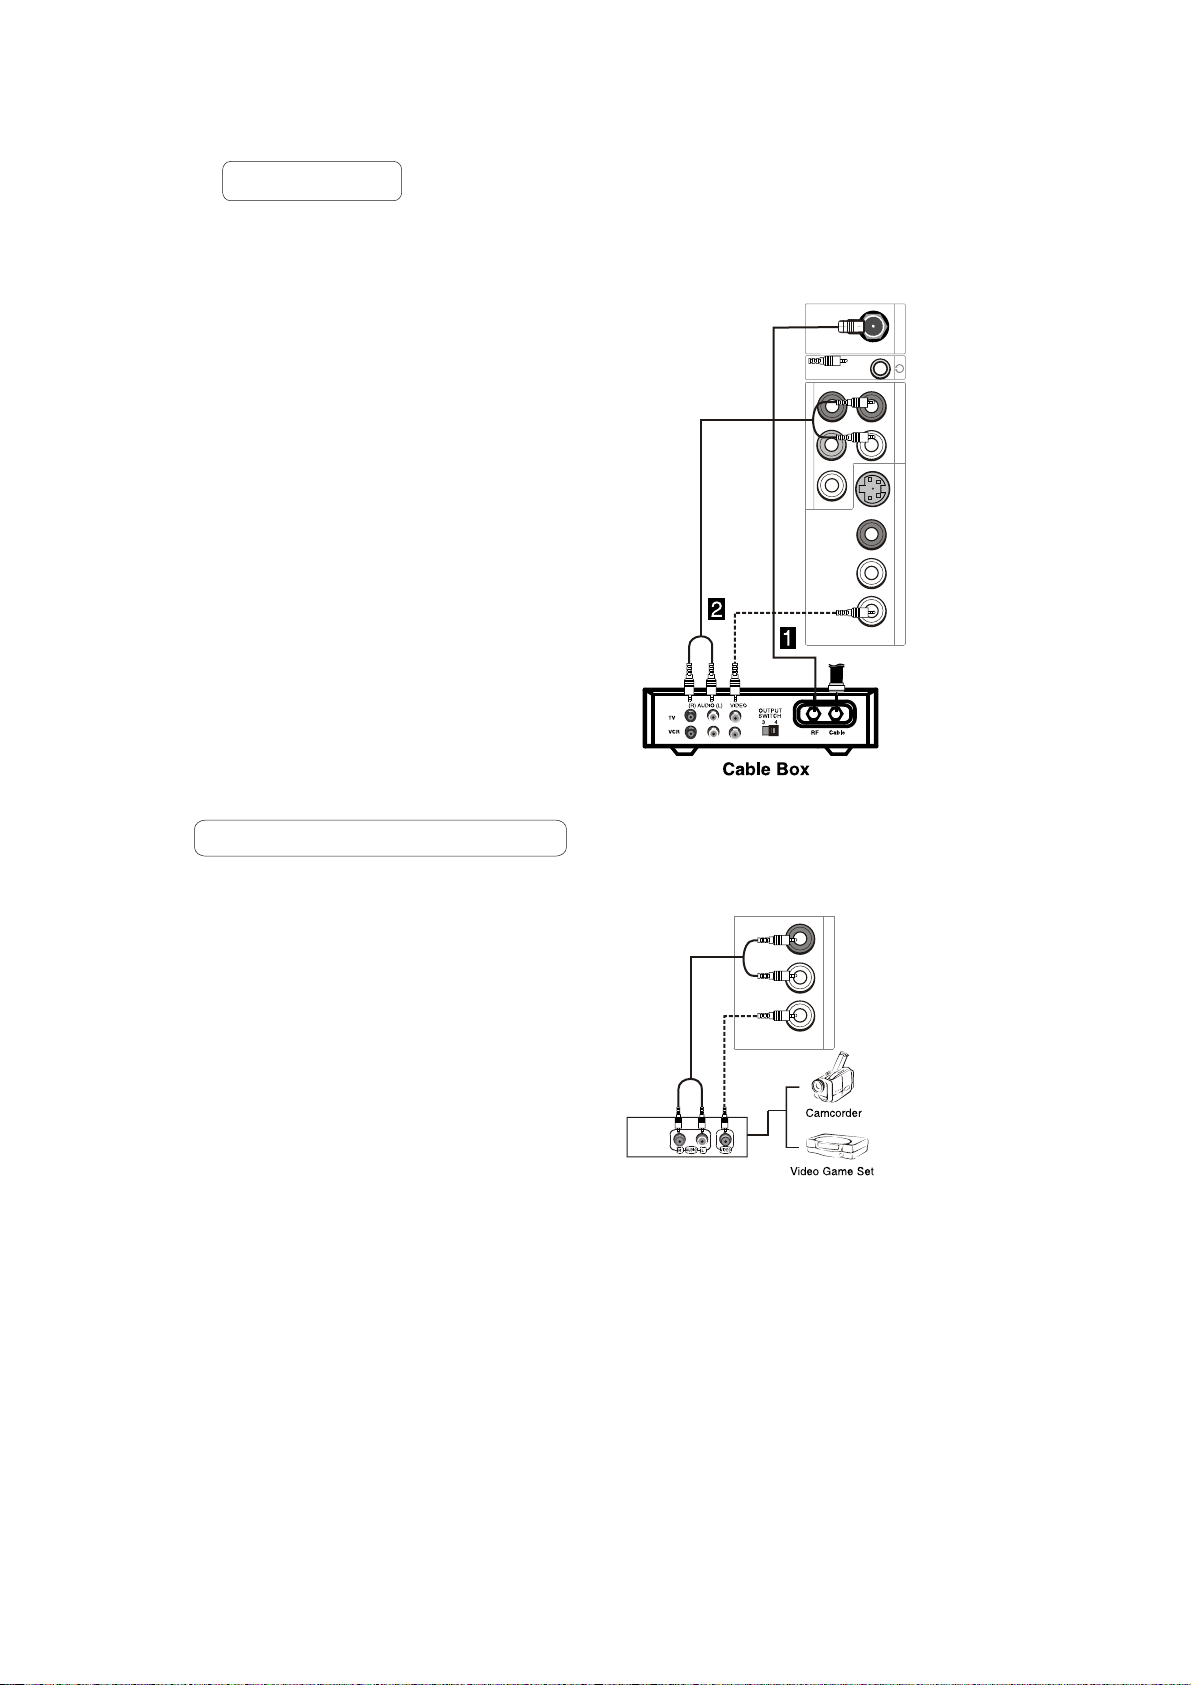
Cable TV Setup
After subscribing to a cable TV service from a local provider you can watch cable
TV programming. The TV cannot display TV programming unless a TV tuner
device or cable TV converter box is connected to the TV.
For further information regarding cable TV service, contact your local cable TV
service provider(s).
Connection Option 1
1. Select 3 or 4 with channel switch on cable
box.
2. Tune the TV channel to the same selected
output channel on cable box.
3. Select channels at the cable box or with
the cable box remote control.
Connection Option 2
1. Connect the audio and video cables from
the Cable Box's output jacks to the TV
input jacks, as shown in the figure.When
connecting the TV to a Cable Box, match
the jack colors
(Video = yellow, Audio Left = white, and
Audio Right = red).
2. Select the input source by using the
button on the remote control.
INPUT
3. Select your desired channel with the
remote control for cable box.
ATN IN R-AUDIO-L R-AUDIO IN-L
Pr Pb Y
COMPONENT IN
S-VIDEO IN
VIDEO
External Component Source Setup
How to connect
Connect the audio and video cables from
the external equipment's output jacks to the
TV input jacks, as shown in the figure.
When connecting the TV to external equipment, match the jack colors (Video = yellow,
Audio Left = white, and Audio Right = red).
How to use
1. Select the input source by using the
button on the remote control.
2. Operate the corresponding external equi pment. Refer to external equipment ope rating guide.
INPUT
R-AUDIO IN-L VIDEO
5-2 HDMI Connections
When the source device(DVD player or Set Top Box) supports HDM
How To Connect
1. Connect the source device to HDMI port of this TV with an HDMI cable(not supplied with this
product).
2. No separated audio connection is necessary.
16
Page 17
How To Use
If the source device supports Auto HDMI function, the output resolution of the source device will be
automatically
set to 1280x720p.
If the source device does not support Auto HDMI, you need to set the output resolution
appropriately.
To get the best picture quality, adjust the output resolution of the source device to 1280x720p.
Select HDMI input source in input source option of Select Main source menu.
When the source device(DVD player or Set Top Box) supports DVI
How To Connect
1. Connect the source device to HDMI port of this TV with a HDMI-to-DVI cable(not supplied with
this product).
2. A separated audio connection is necessary.
3. If the source device has an analog audio output connector, connect the source device audio
output to DVI Audio
In port located on the
left side of HDMI port.
How To Use
If the source device supports Auto DVI function, the output resolution of the source device will be
automatically
set to 1280x720p.
If the source device does not support Auto DVI, you need to set the output resolution appropriately.
To get the best picture quality, adjust the output resolution of the source device to 1280x720p.
Press the INPUT button to select HDMI input source in input source option of Select Main source
menu.
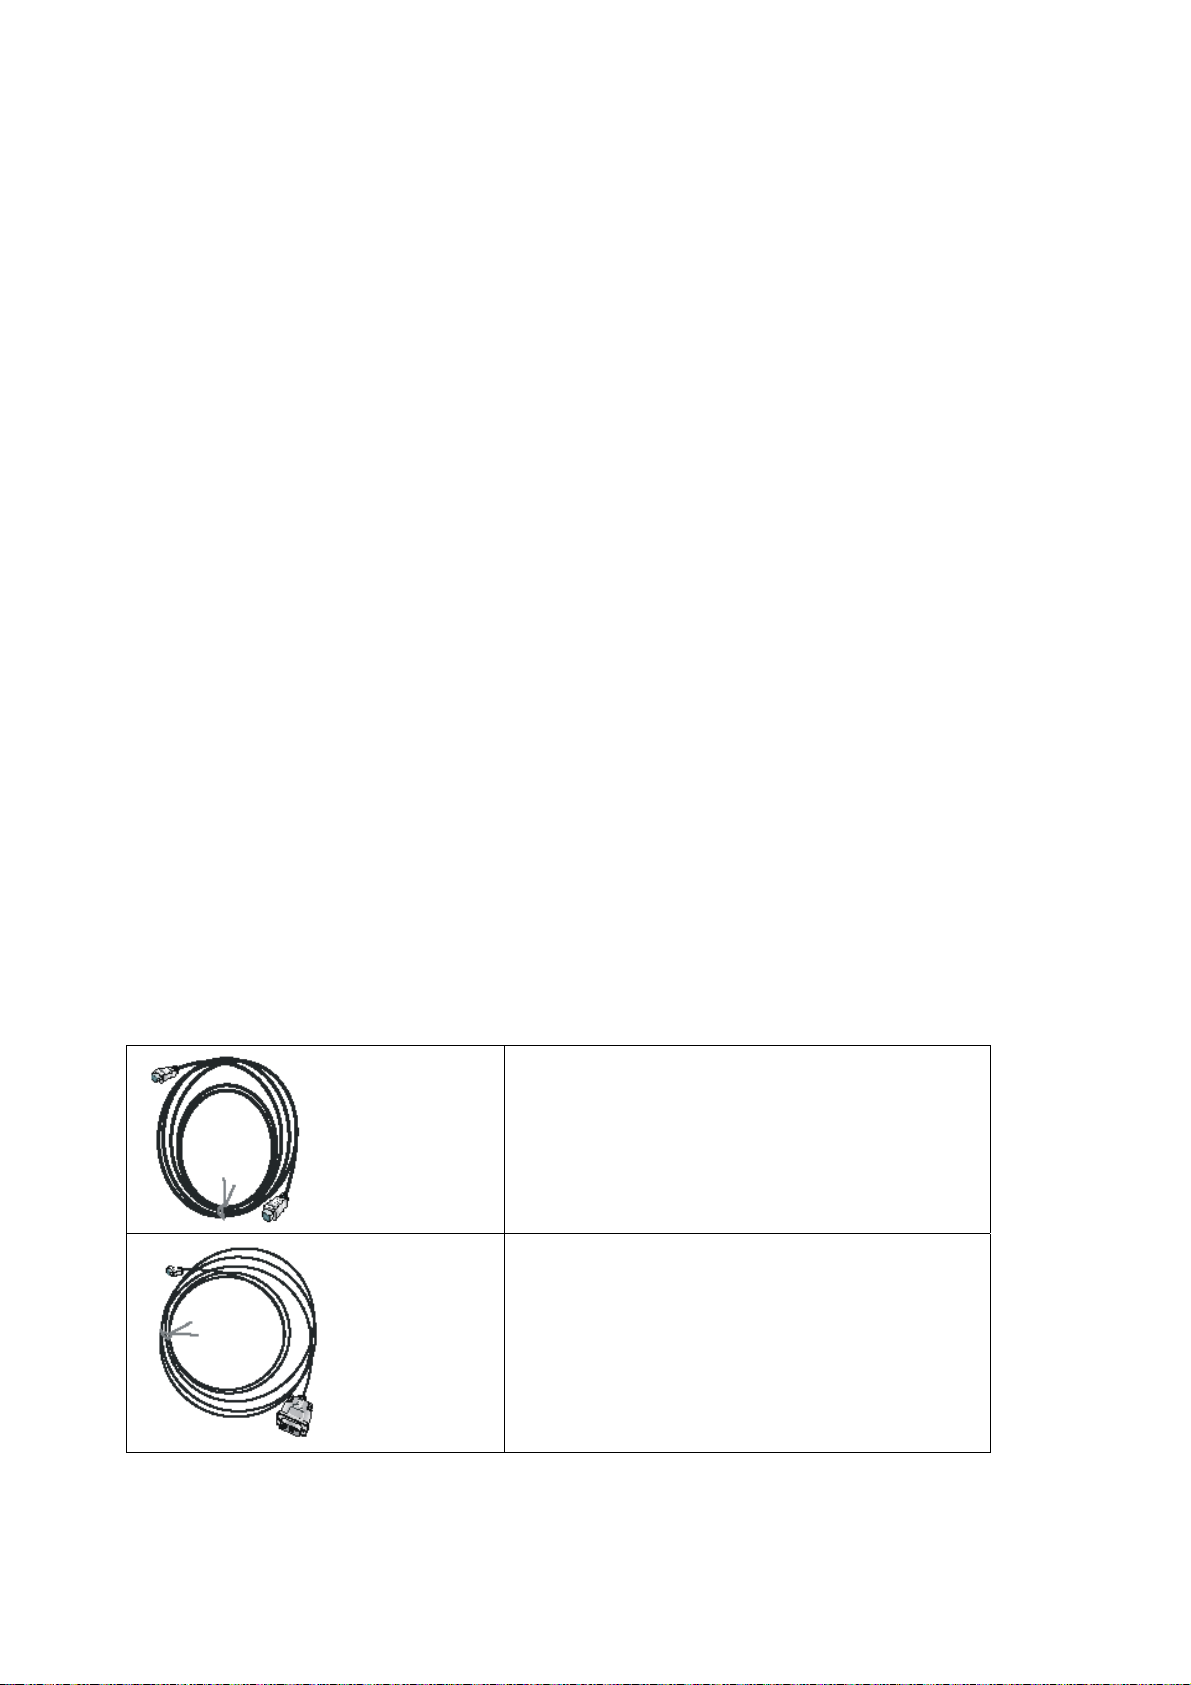
Installation
Cable sample
HDMI Cable
(not supplied with the product)
HDMI to DVI Cable
( not supplied with the product)
17
Page 18
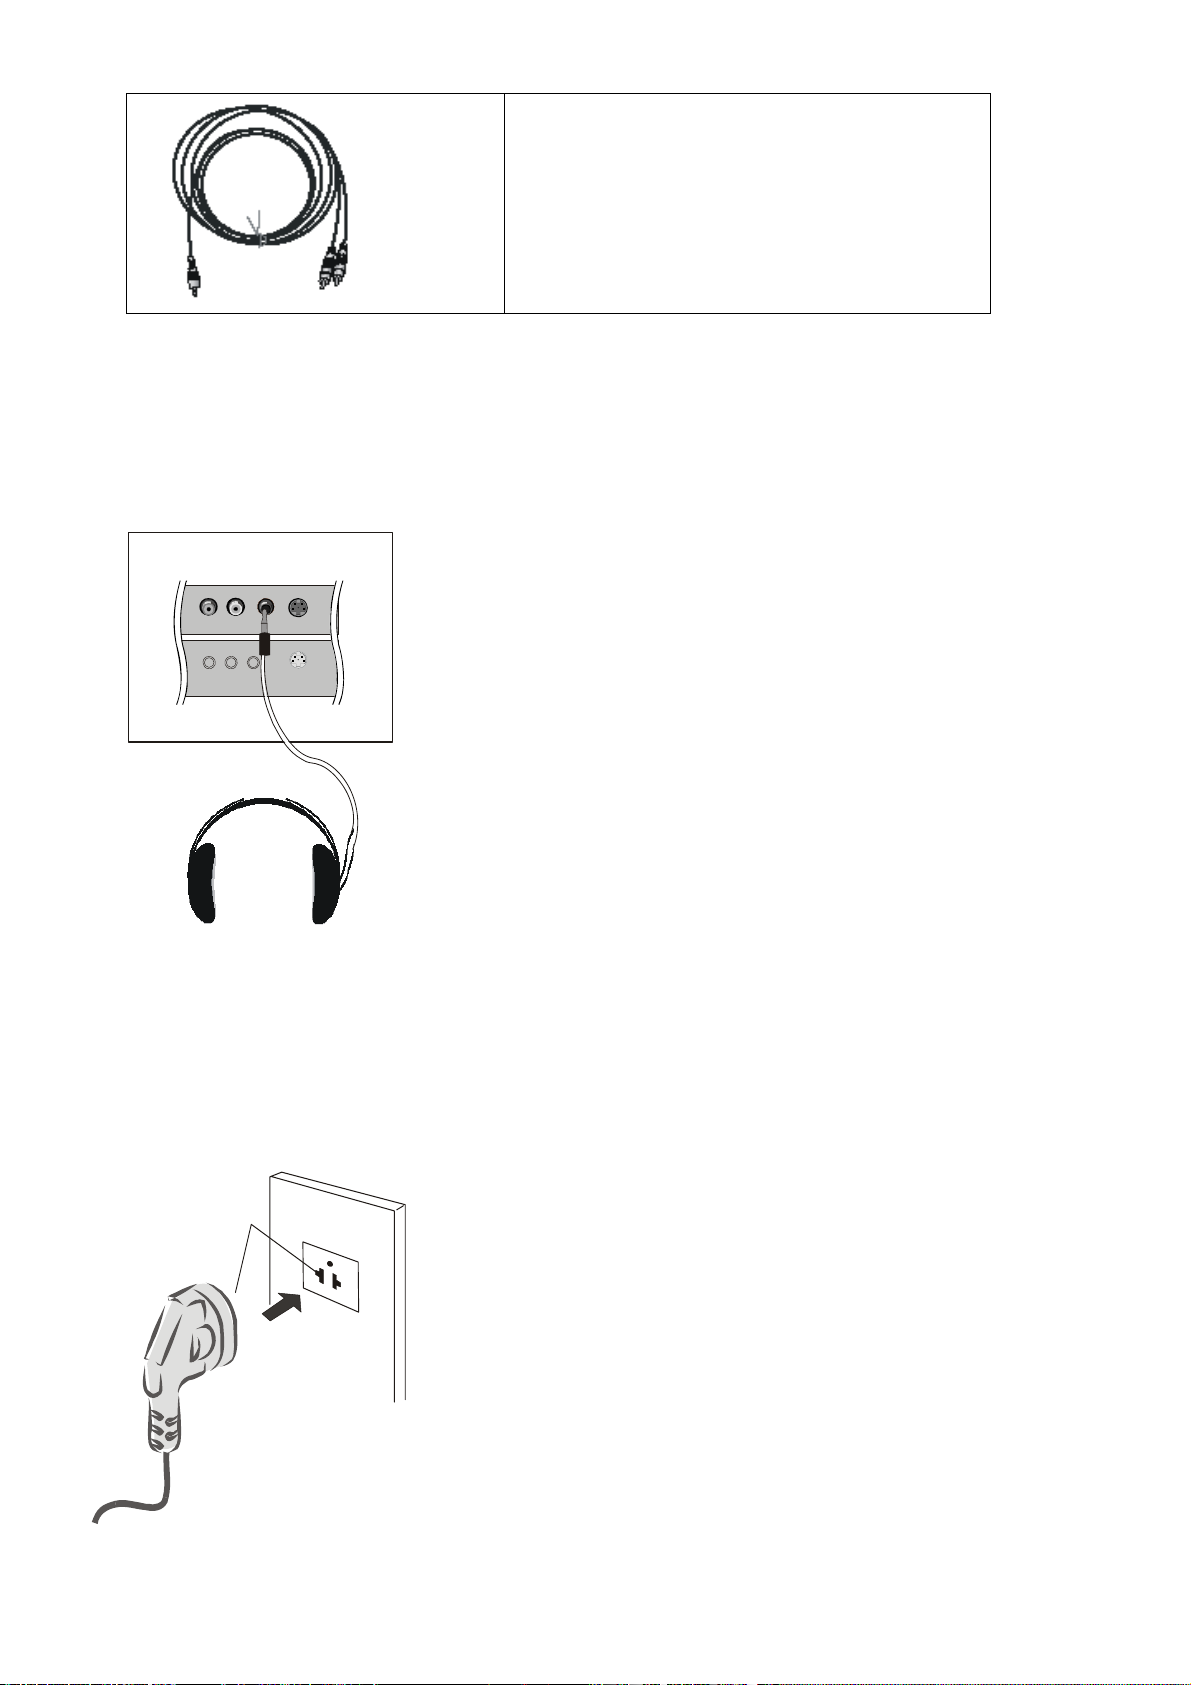
Analog Audio Cable
(Stereo to RCA type)
(not supplied with the product)
Connecting Headphones
You can connect a set of headphones to your set if you wish to watch a
TV programmer without disturbing the other people in the room.
Plug a set of headphones into the 3.5mm
mini-jack socket on the rear panel of the set.
LR
YPbPr
Audio In
Headphone
out
S-VID EO
Note:
■ Prolonged use of headphones at a high volume
may damage your hearing.
■ You will not receive sound from the speakers
when you connect headphones to the system.
Power source
TO USE AC POWER SOURCE
Wider Hole
and Blade
AC O utlet
Use the AC polarized line cord provided for operation on AC.
Insert the AC cord plug into a standard polarized AC outlet.
NOTES:
■ Never connect the AC line cord plug to other than the specified voltage.
Use the attached power cord only.
■ If the polarized AC cord does not fit into a non-polarized AC outlet,
do not attempt to file or cut the blade. It is the user`s responsibility to have an
electrician replace the obsolete outlet.
■ If you cause a static discharge when touching the unit and the unit fails to
function, simply unplug the unit from the AC outlet and plug it back in. The unit
should return to normal operation.
Polarized AC Cord Plug
18
Page 19
6. Operation Instructions
Basal information
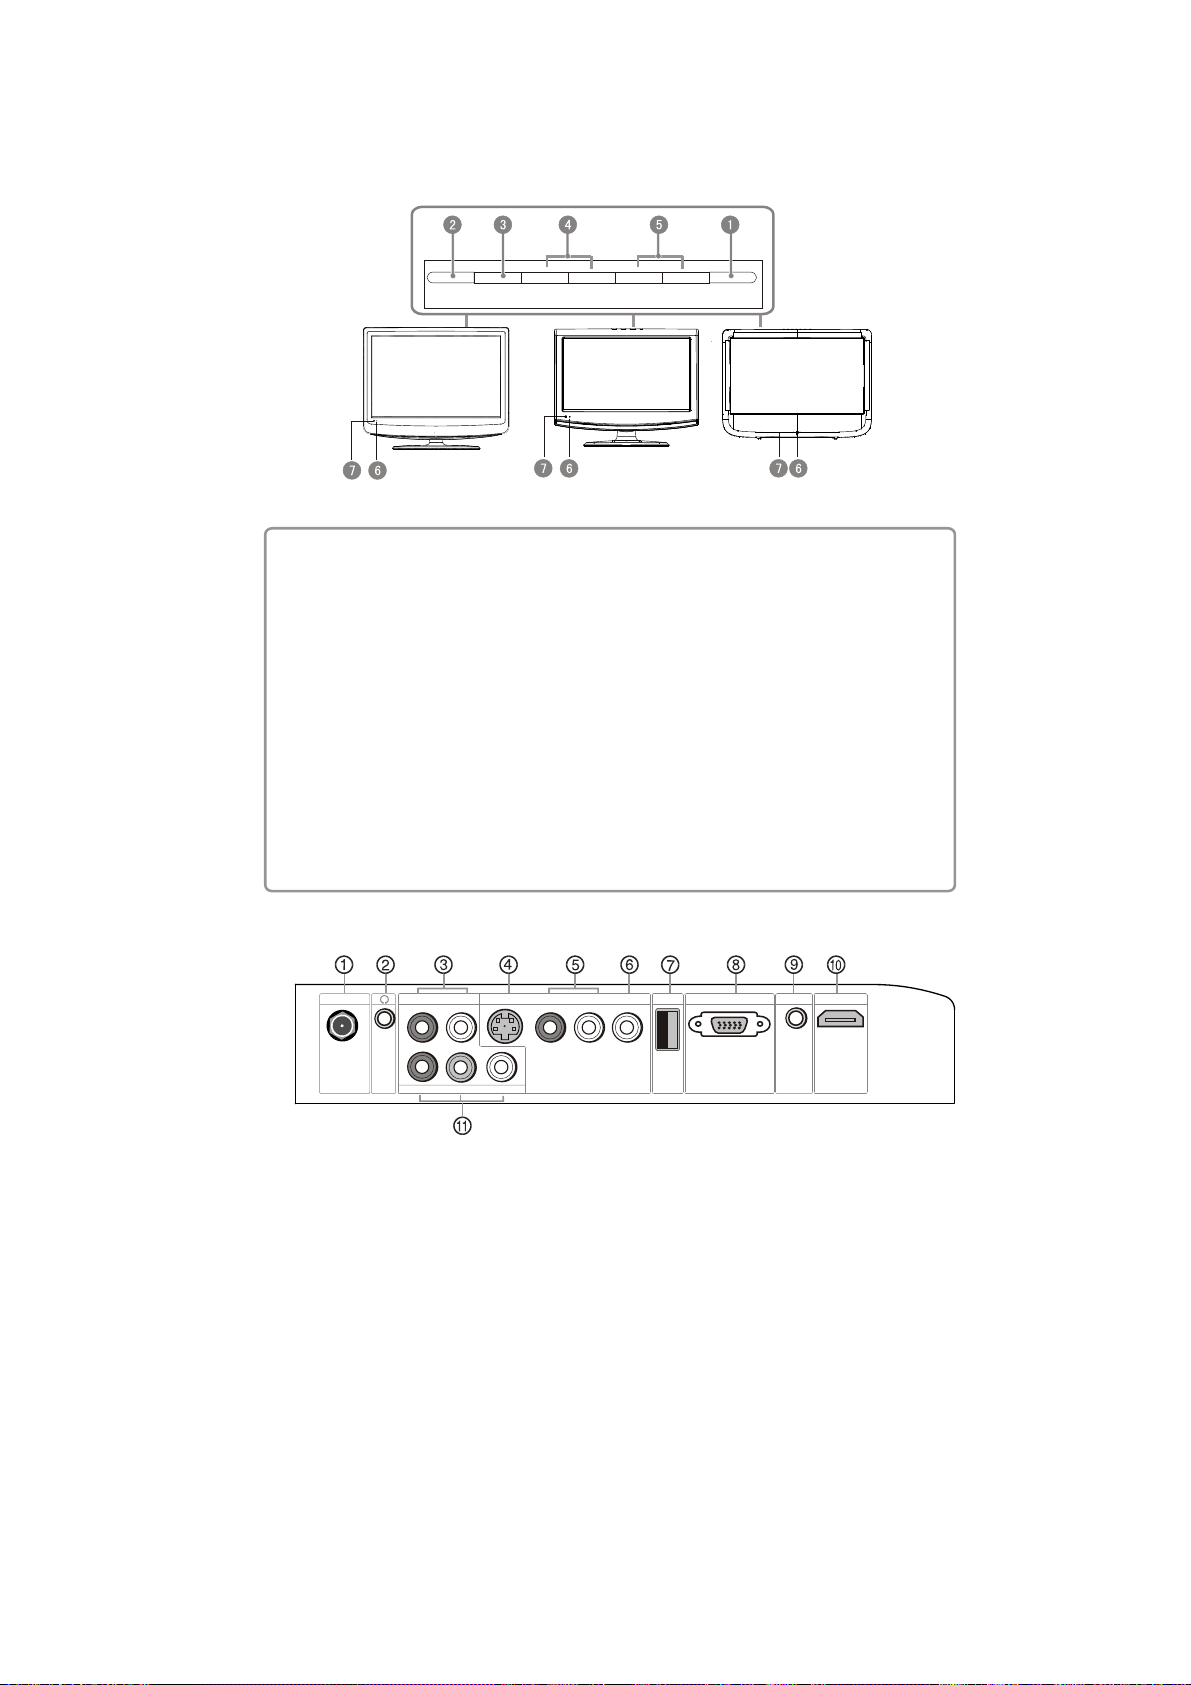
6-1 Front panel controls
INPUT MENU VOL- VOL+ CH- CH+ POWER
R1 series series F series K1 1
Control Panel Function
1. POWER Press to turn on and off the TV.
2. INPUT Selects the input signals.
3. MENU Menu display. Press to access the on-screen menu display.
4. VOL- Volume down / Left button to adjust the item in the OSD.
VOL+ Volume up / Right button to adjust the item in the OSD
/Press to enter.
5. CH- TV channel down / to select the item in the menu.
CH+ TV channel up / to select the item in the menu.
6. Power indicator
7. Remote Sensor Receivers IR signals from the remote control.
Do not put anything near the sensor ,which may
block the remote control signal.
6-2 Back panel controls
ATN IN R-AUDIO-L R-AUDIO IN-L
1.ANT IN(Antenna Input) Connect cable or antenna signals to the TV, either
directly or through your cable box.
2.Headphone jack : Headphone audio output terminal.
3.Audio in Connect audio output from an external device to these jacks.
4.S-VIDEO Connect S-Video out from an S-Video device to the jacks.
5.Audio in Connect audio output from an external device to these jacks.
6.Video in Connect video output from an external device to this jack.
7.USB input Connect a USB flash drive to view JPEG images or listen to MP3
songs.
8.VGA Connect to the VGA 15PIN analog output connector of a PC
graphics card to use set as a PC display.
9.PC audio in Connect the audio output from the pc to the PC audio input port.
10. HDMI: Connect a HDMI device to receive digital audio and uncompressed
digital video.
11. Component Input Connect a component video device to these jacks.
Pr Pb Y
S-VIDEO IN
COMPONENT IN
6-3 Setting Up Your Remote Control
VIDEO
VGA INUSB HDMI
PC AUDIO IN
After it has been set up properly, your remote control can operate in six different modes:
TV, VCR, CABLE, DVD, SETBOX or AUDIO. Pressing the corresponding button on the remote
control
19
Page 20
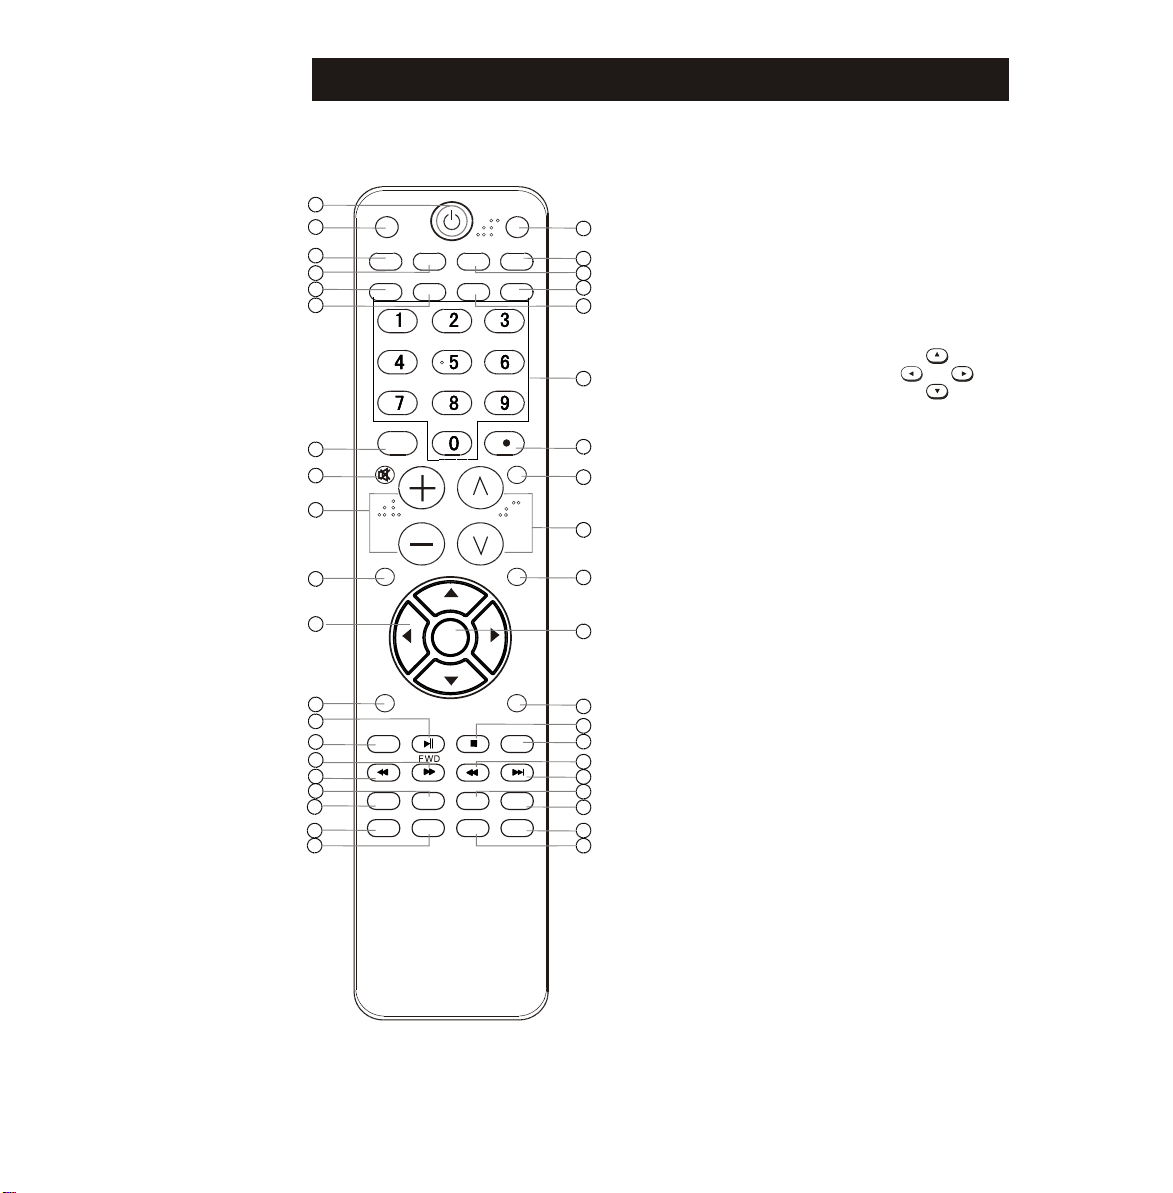
Remote Control Key Functions
When using the remote control, aim it
towards the remote sensor on the TV
1
USB
2
GUIDE
3
4
PICTURE AUDIO ARC FAVORITE
5
6
7
8
9
10
11
12
13
14
15
16
17
18
19
20
INPUT
MUTE
VOL CH
MENU
SLEEP DISPLAY
OPEN/CLOSE
PLAY/PAUSE
REV
D.MENU
D.CALL
SEARCH
ANGLE
(For TV with DVD)
CCD MTS/SAP CH.LIST
ENTER
DVD
RECALL
EXIT
STOP REPEAT
PREV NEXT
D.AUDIO
SETUP
SUBTITLE
PROGRAM
1.Press to turn on and off the TV
2.Press to switch input source to USB in
3.Display the guide when you are watching analog or
digital channels
21
4.Select a closed caption
22
5.Press repeatedly to cycle through the available picture
23
modes
24
25
6.Press to cycle through different sound settings
7.Show the input source
8.Switches the video sound on or off
9.Press to adjust the volume
26
10.Press to open the on-screen menu
11.Thumbstick(Up/Down/Left/Right)
Allows you to navigate the on-screen menus
and adjust the system settings to your preference.
27
12.Press to display the sleep timer option
28
13.DVD PLAY/PAUSE
14.DVD Open/close
15.DVD FAST FORWARD
29
16.DVD FAST REVERSE
17.DVD CALL
30
18.DVD MENU
19.DVD SEARCH
20.DVD ANGLE
31
21.Press to switch input source to DVD in
22.Open the channel list in TV
23.Select MONO, STEREO, SAP in NTSC system
24.Open the favourite channel list in TV
32
25.Press to change the aspect ratio
33
26.Press to change a channel
34
27.Press to select digital channels. For example, to enter
35
“54-3”, press “54”, “ ” and “3”
36
37
28.Press to jump back and forth between two channels
38
29.Press to scan through channels. To scan quickly
39
between the last two channels, press and hold down
40
either +/- .
30.Exit On Screen Display
31.Accesses the highlighted item in the on-screen menu
32.Press to display the TV status information on the top
of the TV screen
33.DVD STOP
34.DVD REPEAT
35.DVD Previous Chapter
36.DVD Next Chapter
37.DVD AUDIO Mode
38.DVD SETUP
39.DVD PROGRAM
40.DVD SUBTITLE
LEFT
UP
RIGHT
DOWN
20
Page 21
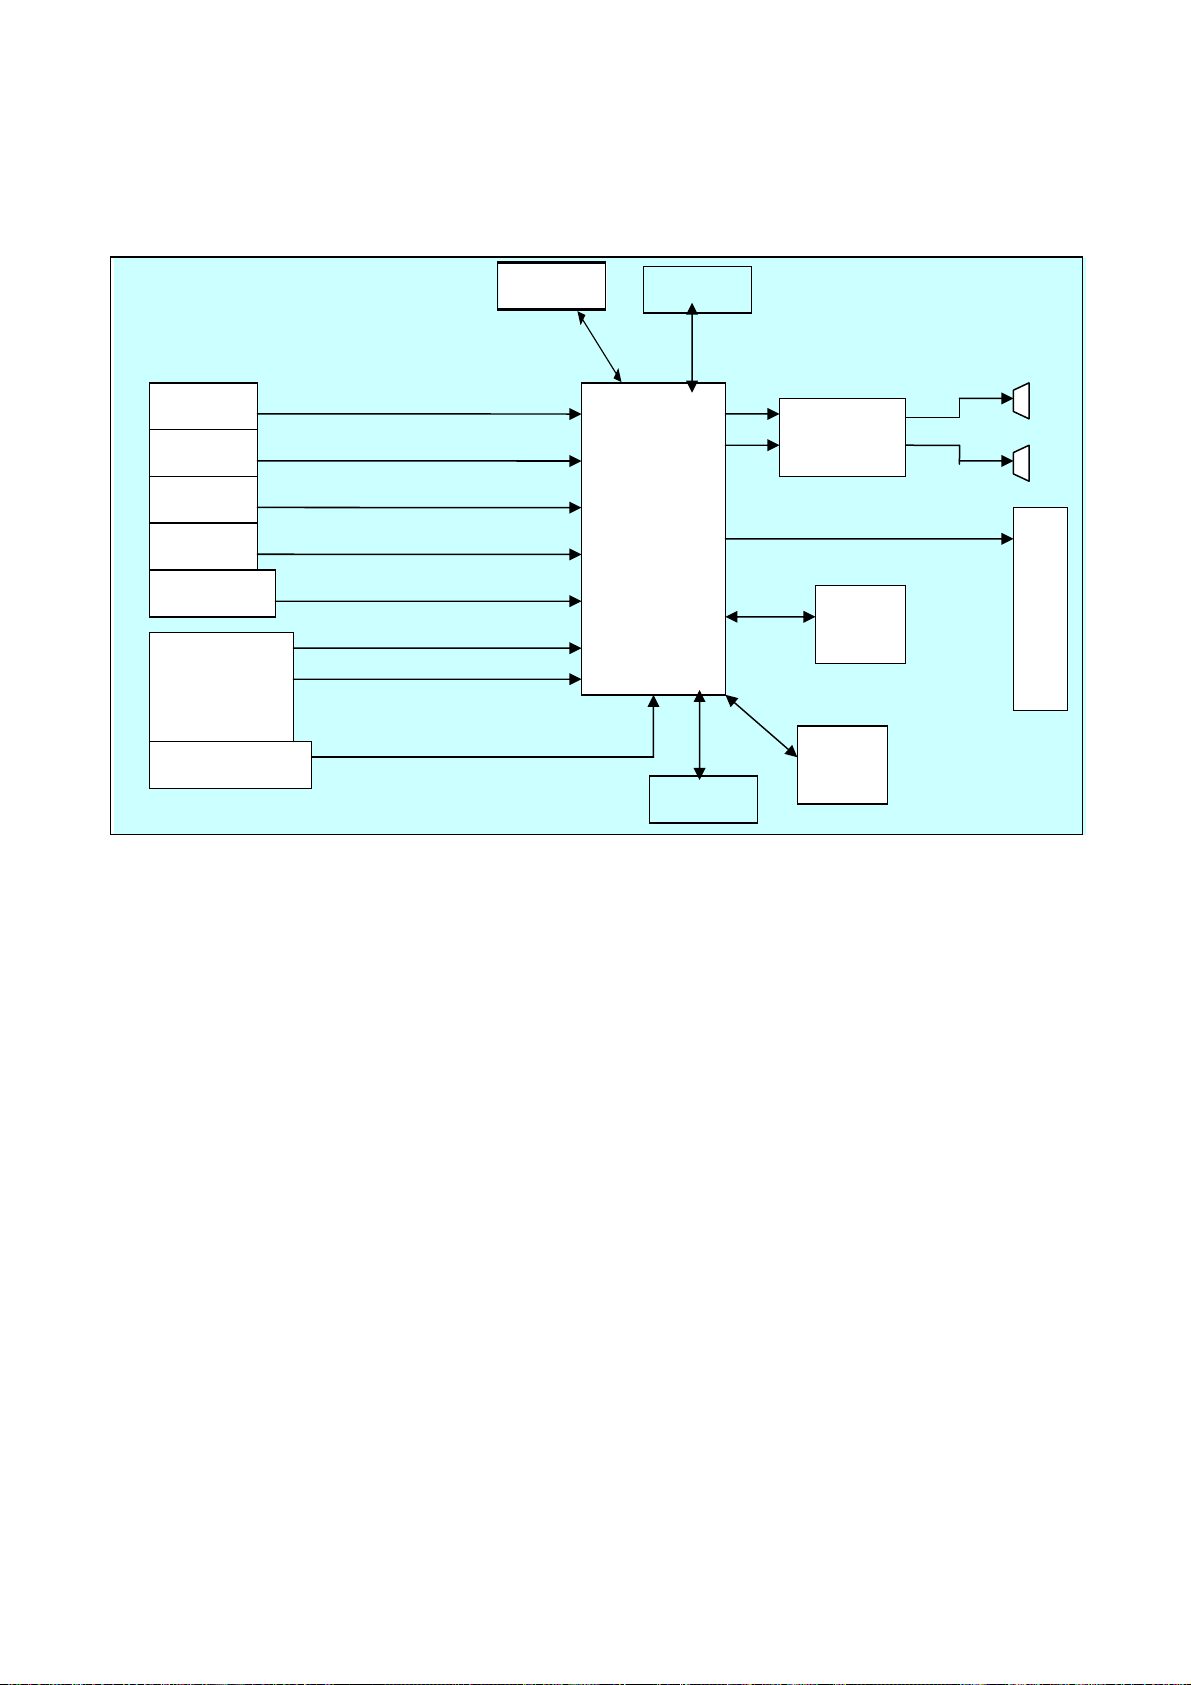
7. Electrical parts
7-1. Block diagram
HDMI1
USB
YPbPr
S-Video
tuner
Composite
YPbPr
Composite
L/R
VGA(P11)L/R
VGA
MT 5 3 8 0
LC
Main IC
I2C Bus
EEPROM
TDA1517
LVDS
DDR
Flash
P
A
N
E
L
7-2. Circuit Diagram
21
Page 22
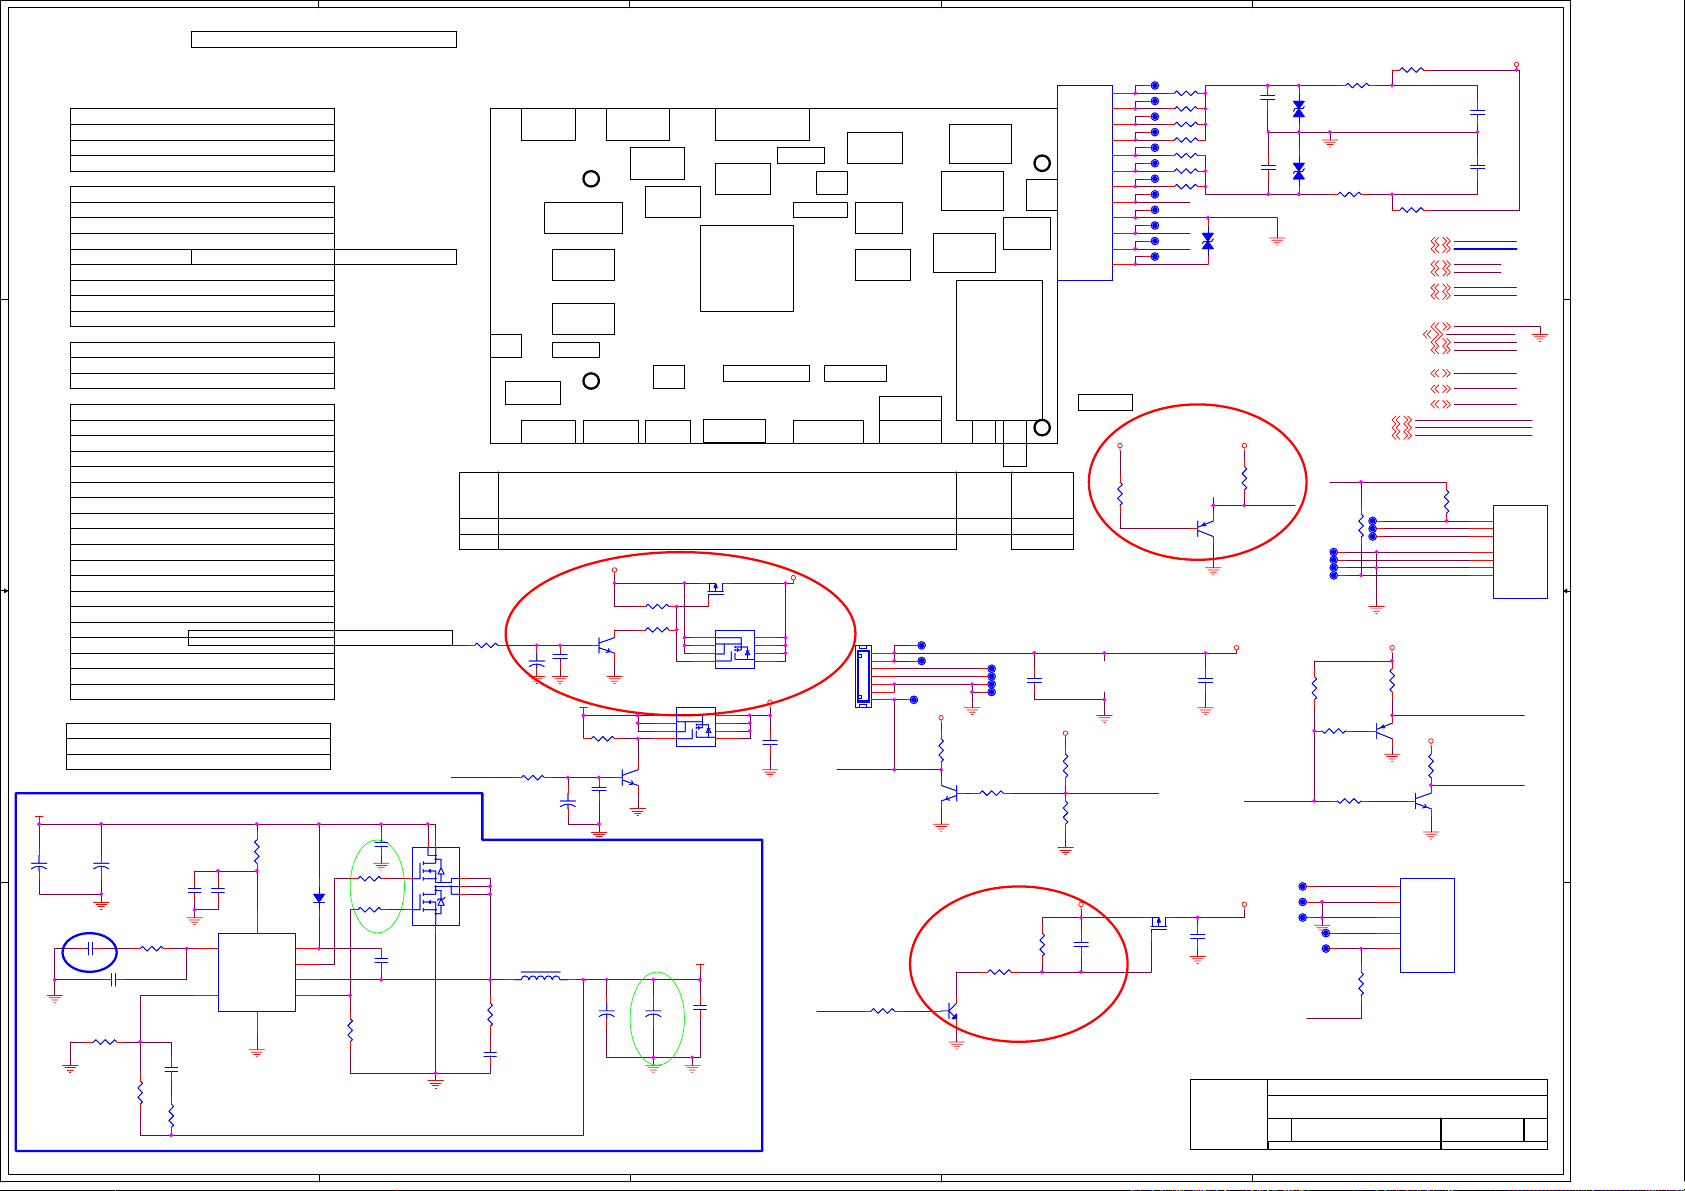
A
B
C
D
E
MT5380 (DDR1)
MODEL NAME: MT5380P1-V2
1
2
3
4 5
U49
U49
1
2
3
4 5
FDS9435
FDS9435
SOP8/SMD
SOP8/SMD
+5VSB
1 2
Main PWR
LVDS
J7
MT5380
LQFP
U13
YPbPr1,LR_IN
VGA
Q66
Q66
23
AO3401
AO3401
1
SOT23/SMD
SOT23/SMD
U50
U50
8
7
6
FDS9435
FDS9435
SOP8/SMD
SOP8/SMD
8
7
6
C682
C682
0.1uF
0.1uF
+5V
U46,uP
JMP,J17
+12V
CB989
CB989
0.1uF
0.1uF
C
AV1
UR2
J4
GPIO_3
AV_out
L,R
SIP_7P_2.5
SIP_7P_2.5
SW_POWER
LDO,U7
LDO,U41
LDO,U10
YPbPr0
S _L _R
CN3
CN3
1
2
3
4
5
6
7
2N3904
2N3904
SOT23/SMD
SOT23/SMD
R23
R23
10K
10K
T50T50
T51T51
BL_ON/OFF
DIMMING
T56T56
Q53
Q53
LDO,U9
+5VSB
3 2
1
Speaker
U2
MT8292
U16
HP
R17121KR1712
1K
1
3
Q5
Q5
2N3904
2N3904
SOT23
SOT23
2
Tuner
Note
T52T52
T53T53
T54T54
T55T55
R1768
R1768
10K
10K
R161KR16
1K
Vcore PWR
U3
DDR1
UA1
DDR PWR
U4,U11
LDO,U6
HDMI
1
C671
C671
0.1uF/NC
0.1uF/NC
+5VSB
R1621
R1621
20k
20k
+
+
0.1uF/NC
0.1uF/NC
+
+
INVR PWR
LDO,U1
DC+12V
R1618
R1618
20K->10k
20K->10k
R16172kR1617
2k
Q44
Q44
2N3904
2N3904
3 2
1
C672
C672
3 2
E10
E10
220uF/16V
220uF/16V
Flash
U17,U18
UR1
J3
LR/VGA
History
Q45
Q45
2N3904
2N3904
+
E11
+
E11
220uF/16V
220uF/16V
01. INDEX
02. DIGITAL POWER
4 4
3 3
2 2
1 1
03. ANALOG POWER
04. PERIPHERAL
05. ANALOG PLL/USB2.0/TUNER
06. DDR1 MEMORY
07. FLASH/JTAG/UART/IR/TRAP
08. HDMI/SPEAKER
09. LVDS/MUTE
10. YPBPR/L/R
11. VGA IN/LR
12. AV IN/L/R/CVBSO
13. LINE OUT/HP
14. BACK LIGHT /MAIN POWER
GPIO_0
GPIO_1
GPIO_3
GPIO_4
GPIO_5
GPIO_6
GPIO_7
GPIO_8
GPIO_9
GPIO_10
GPIO_11
GPIO_12
GPIO_13
OPCTRL0
OPCTRL1
OPCTRL2
OPCTRL3
OPCTRL4
OPCTRL5
AIN1,2,4
OPWM0(GPIO 40)
VCXO(GPIO 67)
RF_AGC(GPIO 62)
AIN3_L(GPIO 74)
AIN3_R(GPIO 75)
DC+12V
+
E8
+
E8
+
E9
+
C677 22nF
C677 22nF
C0603/SMD
C0603/SMD
C679 100pFC679 100pF
47uF/16V
47uF/16V
12
R2018
R2018
470_1%
470_1%
2.49K_1%
2.49K_1%
E9
R2019
R2019
R2015 1KR2015 1K
12
C330UF25V/D8H14
C330UF25V/D8H14
470uF/16V
470uF/16V
GPIO Definition
System EEPROM Write Protect
Unused
Unused
Headphone Detect
Audio Mute Control
HDMI EEPROM Write Protect
HDMI HDP
Speaker Mute
LVDS Power Control
LVDS Panel Control(Reserve)
LVDS Panel Control(Reserve)
U2RX
U2TX
CEC Function
VGA EEPROM Write Protect
Back Light Control
Unused
Trap
Trap
Unused
Unused
Unused
GPIO Definition
Unused
Unused
Unused
R2035
R2035
10R
10R
R0805/SMD
R0805/SMD
1N4148
C695
C695
1uF
1uF
1 2
U152
U152
7
6
C684
C684
10nF
10nF
1 2
0.8 x (1+2.49K/470) = 5.04V
R20201KR2020
1K
A
1N4148
C675
C675
0.1uF
0.1uF
1 2
U152
U152
5
VCC
BST
COMP
TG
PHASE
BG
FB
GND
3
NCP1579
NCP1579
D196
D196
SW_POWER
R1619 47KR1619 47K
SW_POWER
8
1 2
2 1
4
U151
U151
NTMD4840
NTMD4840
C678
C678
0.1uF
0.1uF
1 2
7
3
SW_NODE
C0603/SMD
C0603/SMD
R0805/SMD
R0805/SMD
C683
C683
3.3nF
3.3nF
C696
C696
0.1uF
0.1uF
R2013 4.7RR2013 4.7R
12
R2014 4.7RR2014 4.7R
1
2
8
4
R2017
R2017
NC/15K
NC/15K
JATG,J2
IR
IR1
USB
P1
USB
Rev
INITIAL VERSION
V1
1.Change Vcore Voltage. 2.Add FB for DV33 and AV33 Reserve
V2
3. Add R49, R50 for A version IC. 4. Change C20, C21 for crystal capacitors.
5.Add DRAM Serial resistors. 6.Add CEC uP. 7. Add U16 MT8292
+
CE4
+
CE4
10uF/16v
10uF/16v
R1622 47KR1622 47K
CE846
CE846
10uF/16v
10uF/16v
5A SYNC BUCK DC/DC
6
5
L151 10uH/5A_6A
L151 10uH/5A_6A
L5-9
L5-9
R2016
R2016
10R
10R
1 2
B
HP
P44
Q16
DATE
2007/04/09
2007/06/11
2007/06/11
CN2
CN2
LED_R
GND
LED_G
CPU_5V
IR_IN
KEY
KEY
C646
C646
0.1uF
0.1uF
+3V3SB
R1767NCR1767
NC
R38
R38
47K
47K
+5V +5V_DVD
R18
R18
C3
4.7K
4.7K
10nFC310nF
D
1
K0
2
K1
3
K2
4
K3
5
K4
6
K5
7
K6
8
9
10
11
12
R13
R13
4.7K
4.7K
OIRI
OPWRSB
T33T33
R1703 75R1703 75
T34T34
R1704 2K_1%R1704 2K_1%
T35T35
R1705 5.6KR1705 5.6K
T36T36
R1706 18KR1706 18K
T37T37
R1707 5.6KR1707 5.6K
T38T38
R1708 2K_1%R1708 2K_1% C630
T39T39
R1709 75R1709 75
T40T40
LED_RED#
T41T41
T42T42
LED_GRE#
T43T43
+5VSB
T44T44
OIRI
1
2N3906
2N3906
SOT23/SMD
SOT23/SMD
Q3
Q3
23
AO3401
AO3401
1
SOT23/SMD
SOT23/SMD
D165
D165
ESD_0402_10pF
ESD_0402_10pF
C0402/SMD
C0402/SMD
1 2
+3V3SB+3V3SB
32
Q2
Q2
DC+12V
C647
C647
0.1uF
0.1uF
C2
0.1uFC20.1uF
C628
C628
0.1uF
0.1uF
C630
0.1uF
0.1uF
D161
D161
ESD_0402_10pF
ESD_0402_10pF
C0402/SMD
C0402/SMD
1 2
D162
D162
ESD_0402_10pF
ESD_0402_10pF
C0402/SMD
C0402/SMD
1 2
R1710 10R1710 10
R151KR15
1K
DVD_IR
T79T79
T78T78
T77T77
T76T76
R36
R36
10K
10K
R1697 4.7KR1697 4.7K
OPCTRL3
T49T49
T48T48
T47T47
T46T46
T45T45
GPIO_10
MediaTek Inc.
MediaTek Inc.
MediaTek Inc.
Title
Title
Title
INDEX/MAIN POWER
INDEX/MAIN POWER
INDEX/MAIN POWER
Document Number
Document Number
Document Number
Size
Size
Size
MT5380P1-V2
MT5380P1-V2
MT5380P1-V2
C
C
C
Date: Sheet
Date: Sheet
Date: Sheet
R1701 10K_1%R1701 10K_1%
T82T82
T81T81
T80T80
2N3906
2N3906
+5V_DVD
GND2,3,4,5,6,7,8,9,10,11,12,13,14
+5VSB2,8,9,11
+12V2,5,9,13,14
1
R20RR2
0R
ADIN1
ADIN2
R1711 10K_1%R1711 10K_1%
GPIO_34
GPIO_[5..11]4,8,9,13
OIRI7
OPCTRL34
ADIN14
ADIN24
+3V3SB2,4,7,8,9
OPWRSB4
BL_ON/OFF9
DIMMING9
PB1_IN
Y1_IN
PR1_IN
DVD_IR
+3V3SB
R16951kR1695
1k
32
Q51
Q51
1
OR
CN5
CN5
5
STB
4
+5V
3
GND
2
GND
1
+12V
5PIN_2.0
5PIN_2.0
R1702 10R1702 10
Y1_IN10
PB1_IN10
PR1_IN10
GPIO_11
R46NCR46
NC
SOT23/SMD
SOT23/SMD
R1700 4.7KR1700 4.7K
+12V
DVD POWER SUPPLY
NUSTC_5380P1_V2
NUSTC_5380P1_V2
NUSTC_5380P1_V2
No.1-2, Innovation Rd 1, SBIP, Hsin-Chu City 300
No.1-2, Innovation Rd 1, SBIP, Hsin-Chu City 300
No.1-2, Innovation Rd 1, SBIP, Hsin-Chu City 300
TEL:(03)567-0766 FAX:(03)578-7610
TEL:(03)567-0766 FAX:(03)578-7610
TEL:(03)567-0766 FAX:(03)578-7610
E
Y1_IN
PB1_IN
PR1_IN
R40RR4
0R
+5VSB
3 2
R16981kR1698
1k
Q52
Q52
2N3904
2N3904
SOT23/SMD
SOT23/SMD
Drawn
Drawn
Drawn
GPIO_3
GPIO_[5..11]
OPCTRL3
ADIN1
ADIN2
+3V3SB
+5VSB
+12V
OPWRSB
BL_ON/OFF
DIMMING
LED_RED#
OIRI
GND
7
6
5
4
3
2
1
LED_GRE#
115Friday, December 05, 2008
115Friday, December 05, 2008
115Friday, December 05, 2008
C629
C629
1nF
1nF
C645
C645
1nF
1nF
CN6CN6
GPIO
PB_IN
Y_IN
GND
PR_IN
GND
IR
+3V3SB
of
of
of
Rev
Rev
Rev
V1
V1
V1
Page 23
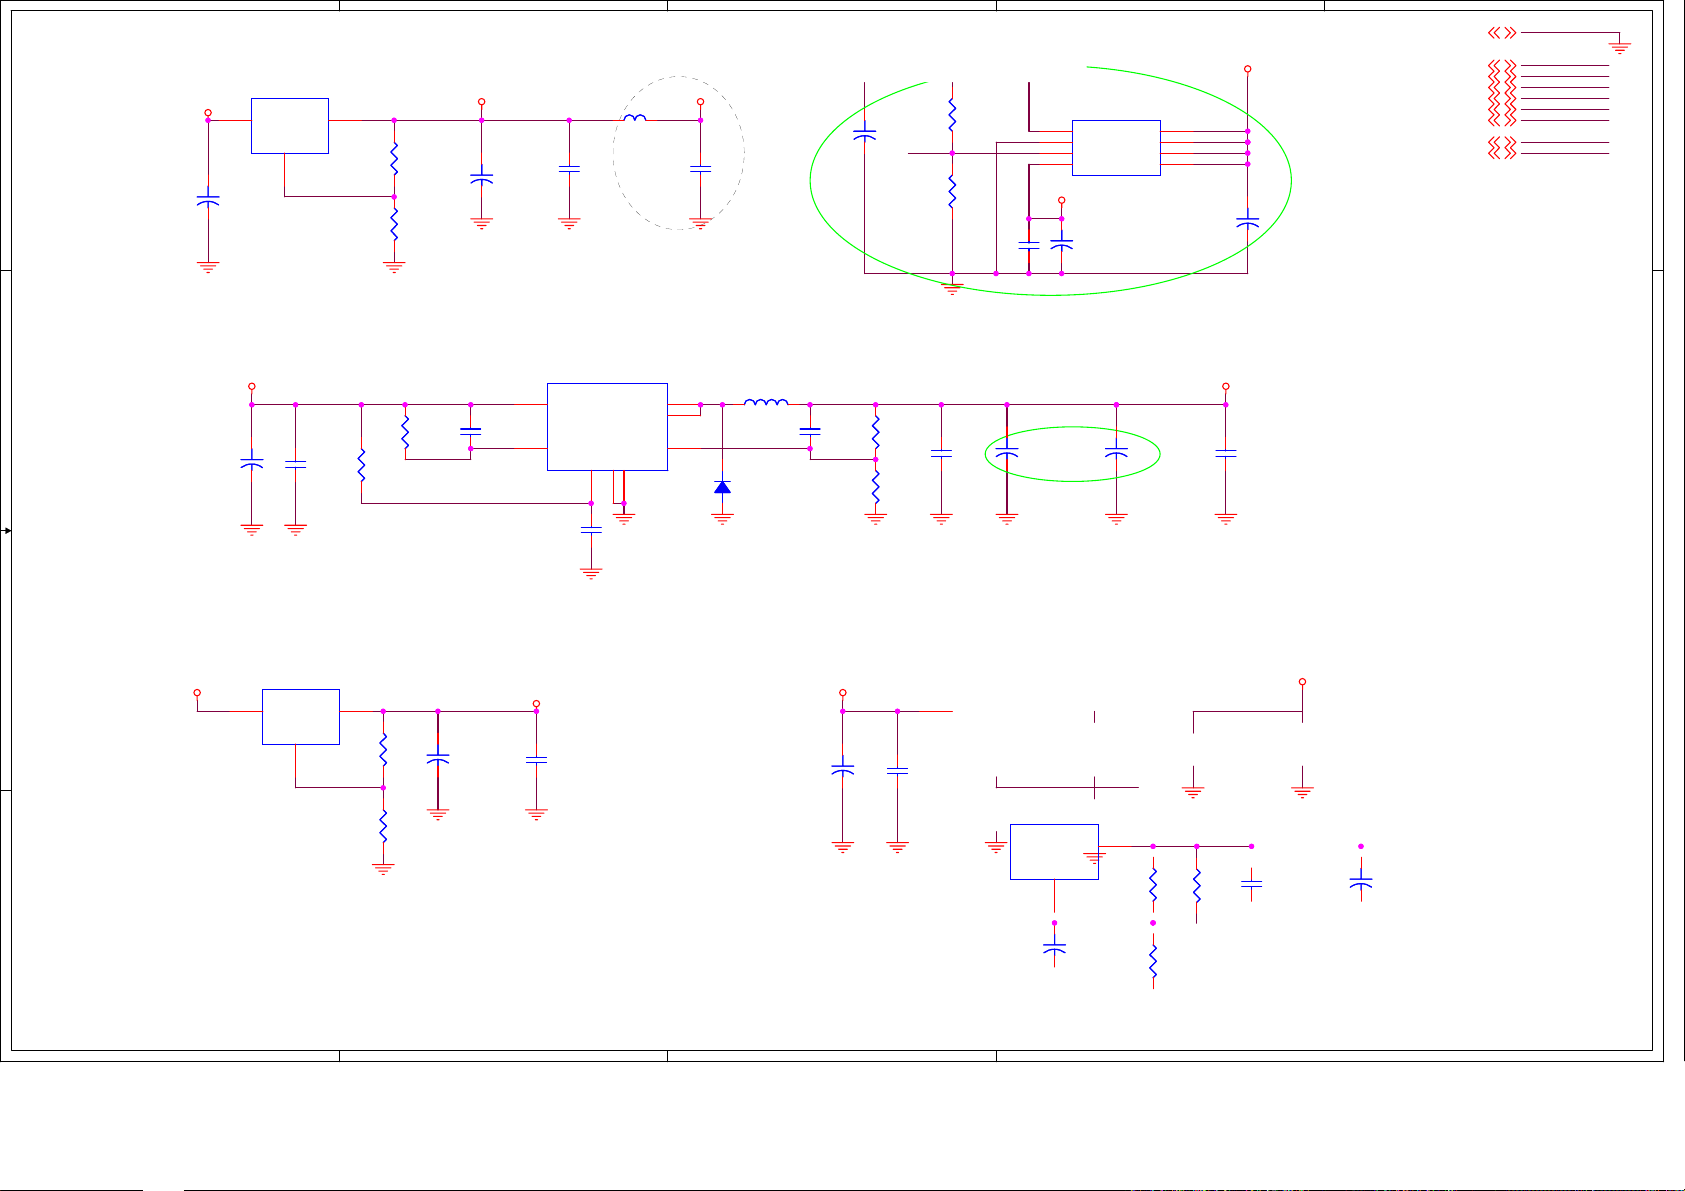
A
U1 AZ1117/adjU1 AZ1117/adj
+5V
3
IN
4 4
CE2
CE2
+
+
100uF/16v
100uF/16v
2
OUT
ADJ/GND
1
R1
110_1%R1110_1%
R3
180_1%R3180_1%
B
DV33
CE1
CE1
+
+
100uF/16v
100uF/16v
CB33
CB33
0.1uF
0.1uF
L134NCL134
NC
1.25 x (1+180/110) = 3.3V
AV33
CB37
CB37
0.1uF_DNS
0.1uF_DNS
C
R2030
R2030
100K 1%
+
+
CE10
CE10
47uF/16v
47uF/16v
100K 1%
MEM_VREF
R47
R47
100K 1%
100K 1%
CB10
CB10
0.1uF
0.1uF
VTT
U4
1
VIN
2
GND
3
REFEN
VOUT4VCNTL
RT9199U4RT9199
CE11
CE11
220uF/16v
220uF/16v
+
+
VCNTL
VCNTL
VCNTL
D
GND1,3,4,5,6,7,8,9,10,11,12,13,14
DV33DDRV
8
7
6
5
CE7
CE7
+
+
47uF/16v
47uF/16v
+5VSB1,8,9,11
+3V3SB1,4,7,8,9
DV107
MEM_VREF6
VTT6
DDRV6,7
AV333,5,8,9,13
+12V1,5,9,13,14
E
GND
+5VSB
+3V3SB
DV10
MEM_VREF
VTT
DDRV
AV33
+12V
VTT FOR DDR TERMINATOR
MEM_VREF FOR DDR AND MT5381 VREF
U3
U3
AP1534/SOP-8
+12V DV10
3 3
CE593
CE593
470uF/16v
470uF/16v
C330UF25V/D8H14
C330UF25V/D8H14
CB6
CB6
+
+
0.1uF
0.1uF
R519
R519
100K
100K
R5183KR518
3K
C301
C301
0.1uF
0.1uF
AP1534/SOP-8
SOP8/SMD
SOP8/SMD
4
Vcc
3
OCSET
L2 27uH/POWER CHOKEL2 27uH/POWER CHOKE
6
O/P
5
O/P
1
FB
EN
Vss7Vss
2
8
CB64
CB64
0.1uF
0.1uF
D95
D95
SCHOTTKY DIODE/B340A
SCHOTTKY DIODE/B340A
C302NCC302
NC
R5
1K_1%R51K_1%
R7
2K_1%R72K_1%
CB5
CB5
0.1uF
0.1uF
CE33
CE33
+
+
470uF/16V
470uF/16V
C330UF25V/D8H14
C330UF25V/D8H14
CE9
CE9
+
+
470uF/16V
470uF/16V
C330UF25V/D8H14
C330UF25V/D8H14
CB42
CB42
10nF
10nF
0.8 x (1+1K/2K) = 1.2V
Low ESR
2
1
+5VSB
A
U6 AZ1117/adjU6 AZ1117/adj
3
OUT
IN
ADJ/GND
1
100uF/16v
100uF/16v
CE17
CE17
+5V
C
CB574
+
+
CB574
0.1uF
0.1uF
U11
U11
3
IN
2
OUT
ADJ/GND
LT1084 TO-252-3
LT1084 TO-252-3
1
CE611
CE611
+
+
22uF/16v
22uF/16v
R956
R956
150_1%
150_1%
R958
R958
162_1%
162_1%
D
CB573
CB573
R43
R43
0.1uF
0.1uF
1.5K
1.5K
1.25 x (1+162/150) = 2.6V
DDRV
CE579
CE579
+
+
470uF/16v
470uF/16v
C330UF25V/D8H14
C330UF25V/D8H14
2
R10
R10
110_1%
110_1%
R11
R11
180_1%
180_1%
+
+
CE15
CE15
100uF/16v
100uF/16v
+3V3SB
CB12
CB12
0.1uF
0.1uF
1.25 x (1+180/110) = 3.3V
B
Page 24
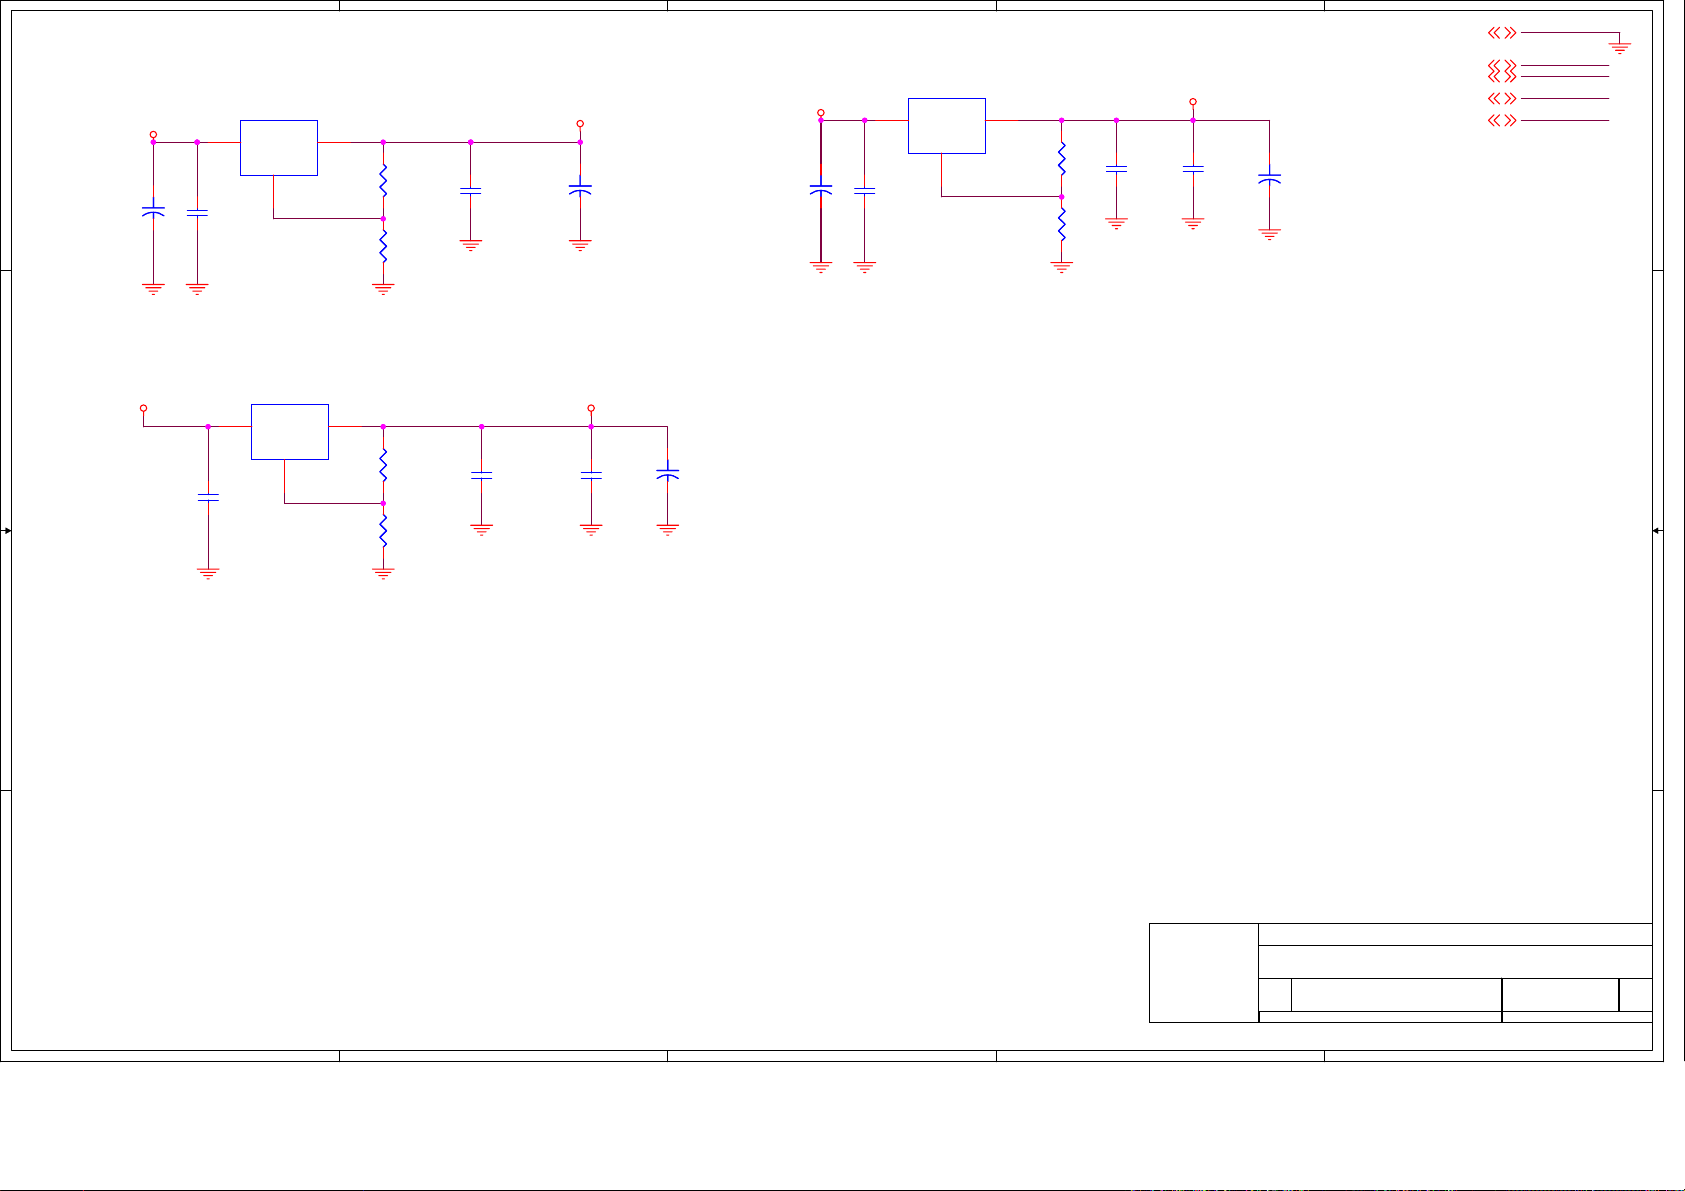
A
U7
U7
CE22
CE22
100uF/16v
100uF/16v
+5V
+
+
4 4
3 3
CB18
CB18
0.1uF
0.1uF
CB229
CB229
0.1uF
0.1uF
3
3
AZ1117/adj
AZ1117/adj
2
OUT
IN
ADJ/GND
1
U41
U41
OUT
IN
ADJ/GND
1
AZ1117/adj
AZ1117/adj
2
R12
R12
110_1%
110_1%
R14
R14
180_1%
180_1%
R71
R71
110_1%
110_1%
R70
R70
110_1%
110_1%
B
AV33
CE19
C573
C573
1uF
1uF
CE19
+
+
470uF/16V
470uF/16V
C330UF25V/D8H14
C330UF25V/D8H14
1.25 x (1+180/110) = 3.3V
AV25+5V
CB228
C572
C572
1uF
1uF
CB228
0.1uF
0.1uF
+
+
CE592
CE592
100uF/16v
100uF/16v
CE30
CE30
100uF/16v
100uF/16v
AV25
C
U10
U10
3
IN
CB32
CB32
+
+
0.1uF
0.1uF
OUT
ADJ/GND
1
AZ1117/adj
AZ1117/adj
2
R17
R17
110_1%
110_1%
R190RR19
0R
C575
C575
1uF
1uF
D
GND1,2,4,5,6,7,8,9,10,11,12,13,14
AV332,5,8,9,13
AV12
CB23
CB23
0.1uF
0.1uF
+
+
CE28
CE28
100uF/16v
100uF/16v
AV125,8,10
AV255,12
+12V1,2,5,9,13,14
E
GND
AV33
AV12
AV25
+12V
1.25 x (1+0/100) = 1.25V
10% tolerance
1.25 x
(1+100/100) =
2.5V
2 2
NUSTC_5380P1_V2
NUSTC_5380P1_V2
1 1
A
B
C
D
MediaTek Inc.
MediaTek Inc.
MediaTek Inc.
Title
Title
Title
ANALOG POWER
ANALOG POWER
ANALOG POWER
Document Number
Document Number
Document Number
Size
Size
Size
Date: Sheet
Date: Sheet
Date: Sheet
B
B
B
MT5380P1-V2
MT5380P1-V2
MT5380P1-V2
NUSTC_5380P1_V2
No.1-2, Innovation Rd 1, SBIP, Hsin-Chu City 300
No.1-2, Innovation Rd 1, SBIP, Hsin-Chu City 300
No.1-2, Innovation Rd 1, SBIP, Hsin-Chu City 300
TEL:(03)567-0766 FAX:(03)578-7610
TEL:(03)567-0766 FAX:(03)578-7610
TEL:(03)567-0766 FAX:(03)578-7610
Drawn
Drawn
Drawn
315Thursday, December 04, 2008
315Thursday, December 04, 2008
315Thursday, December 04, 2008
E
Rev
Rev
Rev
V1
V1
V1
of
of
of
Page 25
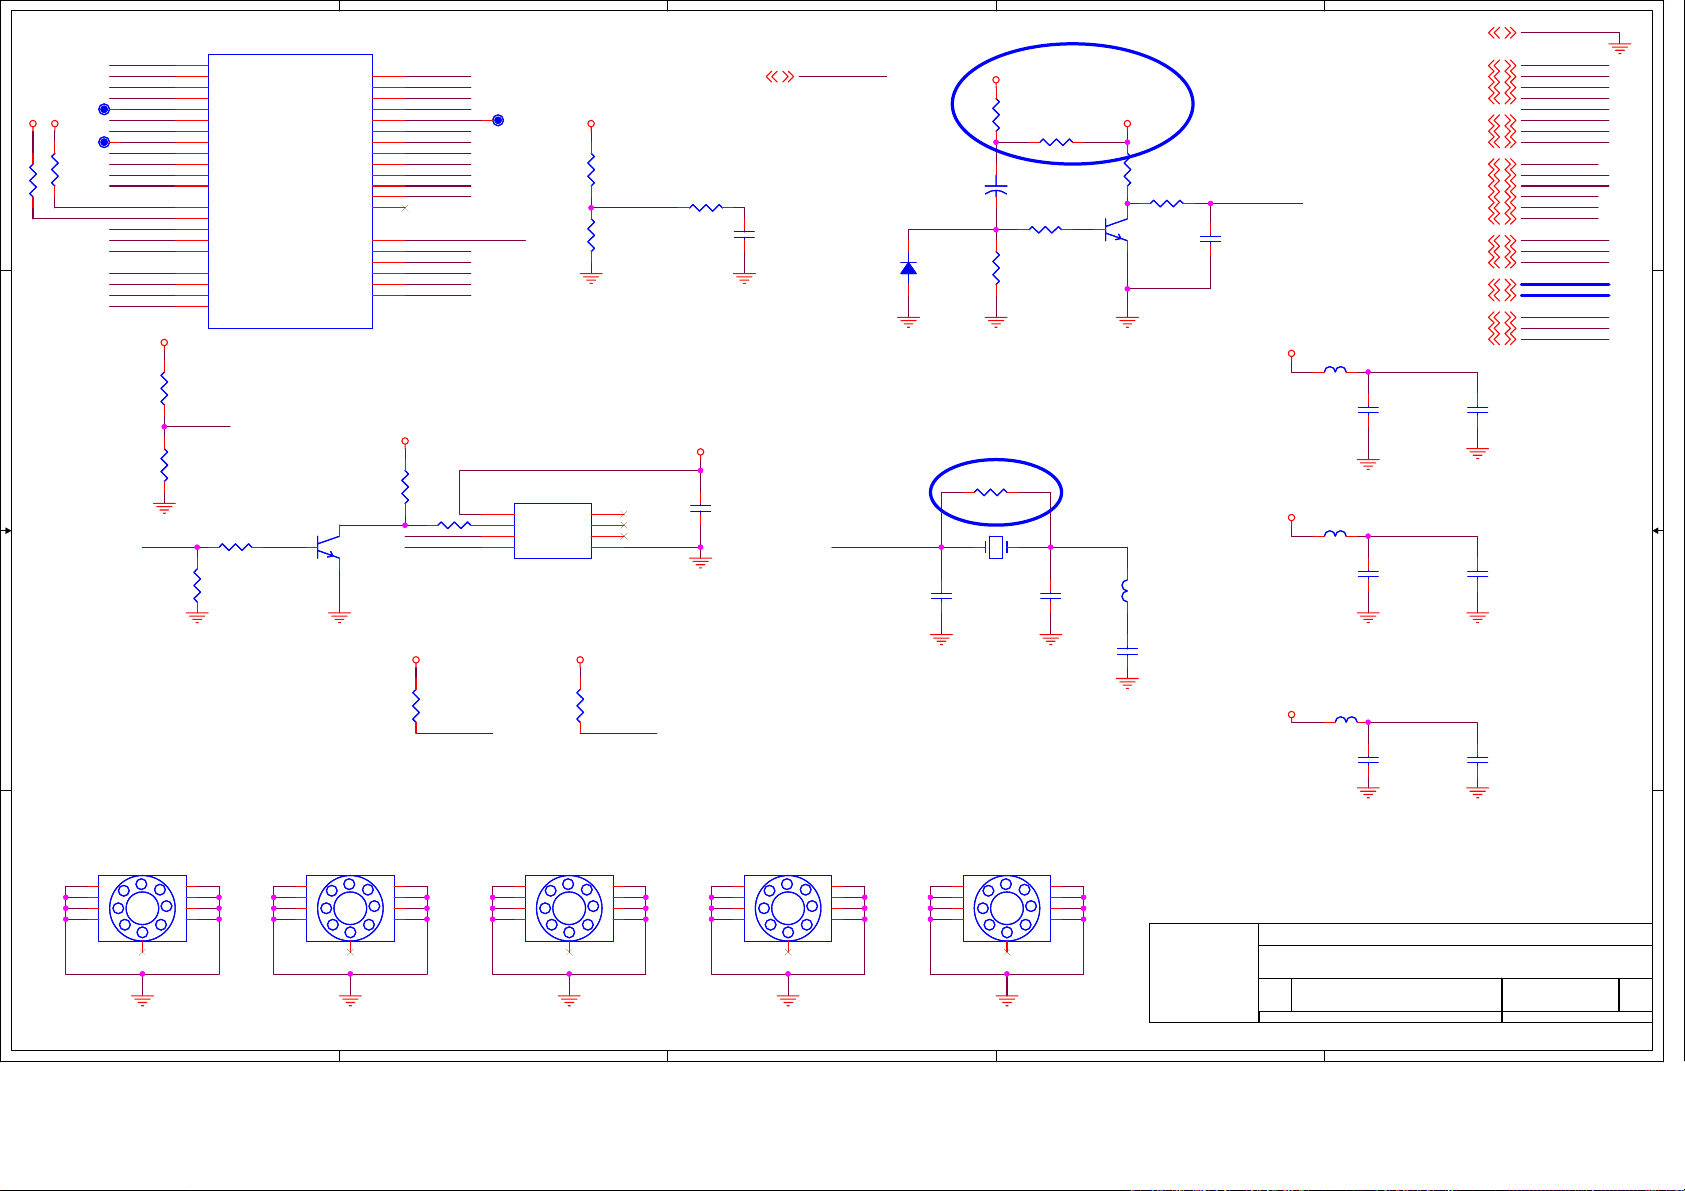
5
U13B
U13B
OSDA0
OSCL0
OSDA1
OSCL1
TP34TP34
OPWM1
OPWM2
R2008
R2008
10K
10K
TP35TP35
OXTALO
OXTALI
AVCC_SRV
AVDD33_XTAL
ADIN3
ADIN2
ADIN1
PWRDET
AVDD33_REG
C_XREG
ORESET#
OPWRSB
NC
D D
R2009
R2009
10K
10K
C C
R25
R25
390
390
R35NCR35
DV33
GPIO_0
R199NCR199
NC
206
207
63
62
193
204
205
148
145
146
149
147
154
153
152
151
150
88
87
71
72
PWRDET
OSDA0
OSCL0
OSDA1
OSCL1
OPWM0
OPWM1
OPWM2
VCXO
XTALO
XTALI
AVDD33_SRV
AVDD33_XTAL
ADIN4
ADIN3
ADIN2
ADIN1
ADIN0
AVDD33_REG
C_XREG
ORESET_
OPWRSB
MT5380 SMD LQFP
MT5380 SMD LQFP
R19810K R19810K
1
GPIO_0
GPIO_1
GPIO_3
GPIO_4
GPIO_5
GPIO_6
GPIO_7
GPIO_8
GPIO_9
GPIO_10
GPIO_11
GPIO_12
GPIO_13
OPCTRL0
OPCTRL1
OPCTRL2
OPCTRL3
OPCTRL4
OPCTRL5
3 2
Q37
Q37
2N3904
2N3904
绿色标示
245
USBPWRERR
246
209
USBPWREN
210
211
59
60
212
213
214
216
217
218
OPCTRL0 CEC
92
OPCTRL1
91
OPCTRL2
76
OPCTRL3
75
OPCTRL4
90
OPCTRL5
89
DV33
R28
R28
10K
10K
OSCL0
OSDA0
GPIO_0
GPIO_3
GPIO_5
GPIO_6
GPIO_7
GPIO_8
GPIO_9
GPIO_10
GPIO_11
GPIO_12
GPIO
R3033 R3033
4
口,与
5380L
TP36TP36
8
VCC
7
WP
6
SCL
5
SDA
EEPROM 24C16
EEPROM 24C16
IIC ADDRESS "A0"
公版功能不一样
+3V3SBDV33DV33
R51
R51
150
150
C_XREG
R52NCR52
NC
U14
U14
1
NC
2
NC
3
NC
4
GND
GPIO_31
R27 1R27 1
DV33
CB70
CB70
0.1uF
0.1uF
C25
C25
4.7uF
4.7uF
3
GPIO_3
OXTALI
D1
1N4148D11N4148
C20
C20
5pF
5pF
+5V
RE-RESET CPU WHEN
+5V SUPPLYS.
R2021
R2021
0R/NC
0R/NC
R20220RR2022
0R
CE37
CE37
+
+
220uF/16v
220uF/16v
R21
R21
220
220
R22
R22
47K
47K
R311MR31
1M
Y1
60MHzY160MHz
TXC
OXTALO
C21
C21
5pF->20pF
5pF->20pF
2
GND1,2,3,5,6,7,8,9,10,11,12,13,14
+3V3SB1,2,7,8,9
OSDA18
OSCL18
+3V3SB
R201KR20
1K
R29
R29
100->0R
100->0R
Q1
1
2N3904Q12N3904
3 2
L36
L36
820nH
820nH
ORESET#
CB1002
CB1002
0.1uF
0.1uF
+3V3SB
FB16 FBFB16 FB
+3V3SB
FB17 FBFB17 FB
OPWRSB1
OPCTRL29
CEC8
DV102,7
OPCTRL111
OPCTRL47,11
OPCTRL57
USBPWREN5
USBPWRERR5
OPWM[1..2]7,9
GPIO_[5..11]1,8,9,13
ADIN11
ADIN21
OPCTRL31
AVCC_SRV
C18
C18
1uF
1uF
AVDD33_REG
C22
C22
1uF
1uF
1
GND
+3V3SB
OSDA1
OSCL1
OPWRSB
ADIN3
OPCTRL2
CEC
DV10
OPCTRL1
OPCTRL4
OPCTRL5
CB71
CB71
0.1uF
0.1uF
CB72
CB72
0.1uF
0.1uF
OSCL0
OSDA0
GPIO_0
USBPWREN
USBPWRERR
GPIO_12
OPWM[1..2]
GPIO_[5..11]
ADIN1
ADIN2
OPCTRL3
OSCL08
OSDA08
GPIO_07
GPIO_1213
B B
HOLE/GND
HOLE/GND
H3
H3
9
9
8
8
7
7
6
A A
6
2
2
3
3
4
4
5
5
1
1
5
H4
H4
9
9
8
8
7
7
6
6
DV33 DV33
R39
R39
4.7K
4.7K
OSDA0 OSCL0
HOLE/GND
HOLE/GND
2
2
3
3
4
4
5
5
1
1
R40
R40
4.7K
4.7K
HOLE/GND
HOLE/GND
H2
H2
9
9
8
8
7
7
6
6
4
2
2
3
3
4
4
5
5
1
1
9
8
7
6
HOLE/GND
HOLE/GND
H1
H1
9
8
7
6
2
2
3
3
4
4
5
5
1
1
3
9
8
7
6
HOLE/GND
HOLE/GND
H5
H5
9
8
7
6
2
2
3
3
4
4
5
5
1
1
C532
C532
1nF
1nF
+3V3SB
FB18 FBFB18 FB
MediaTek Inc.
MediaTek Inc.
MediaTek Inc.
Title
Title
Title
PERIPHERAL
PERIPHERAL
PERIPHERAL
Document Number
Document Number
Document Number
Size
Size
Size
Date: Sheet
Date: Sheet
Date: Sheet
2
B
B
B
MT5380P1-V2
MT5380P1-V2
MT5380P1-V2
AVDD33_XTAL
C27
C27
1uF
1uF
NUSTC_5380P1_V2
NUSTC_5380P1_V2
NUSTC_5380P1_V2
No.1-2, Innovation Rd 1, SBIP, Hsin-Chu City 300
No.1-2, Innovation Rd 1, SBIP, Hsin-Chu City 300
No.1-2, Innovation Rd 1, SBIP, Hsin-Chu City 300
TEL:(03)567-0766 FAX:(03)578-7610
TEL:(03)567-0766 FAX:(03)578-7610
TEL:(03)567-0766 FAX:(03)578-7610
1
CB73
CB73
0.1uF
0.1uF
Drawn
Drawn
Drawn
Rev
Rev
Rev
V1
V1
V1
415Friday, December 05, 2008
415Friday, December 05, 2008
415Friday, December 05, 2008
of
of
of
Page 26
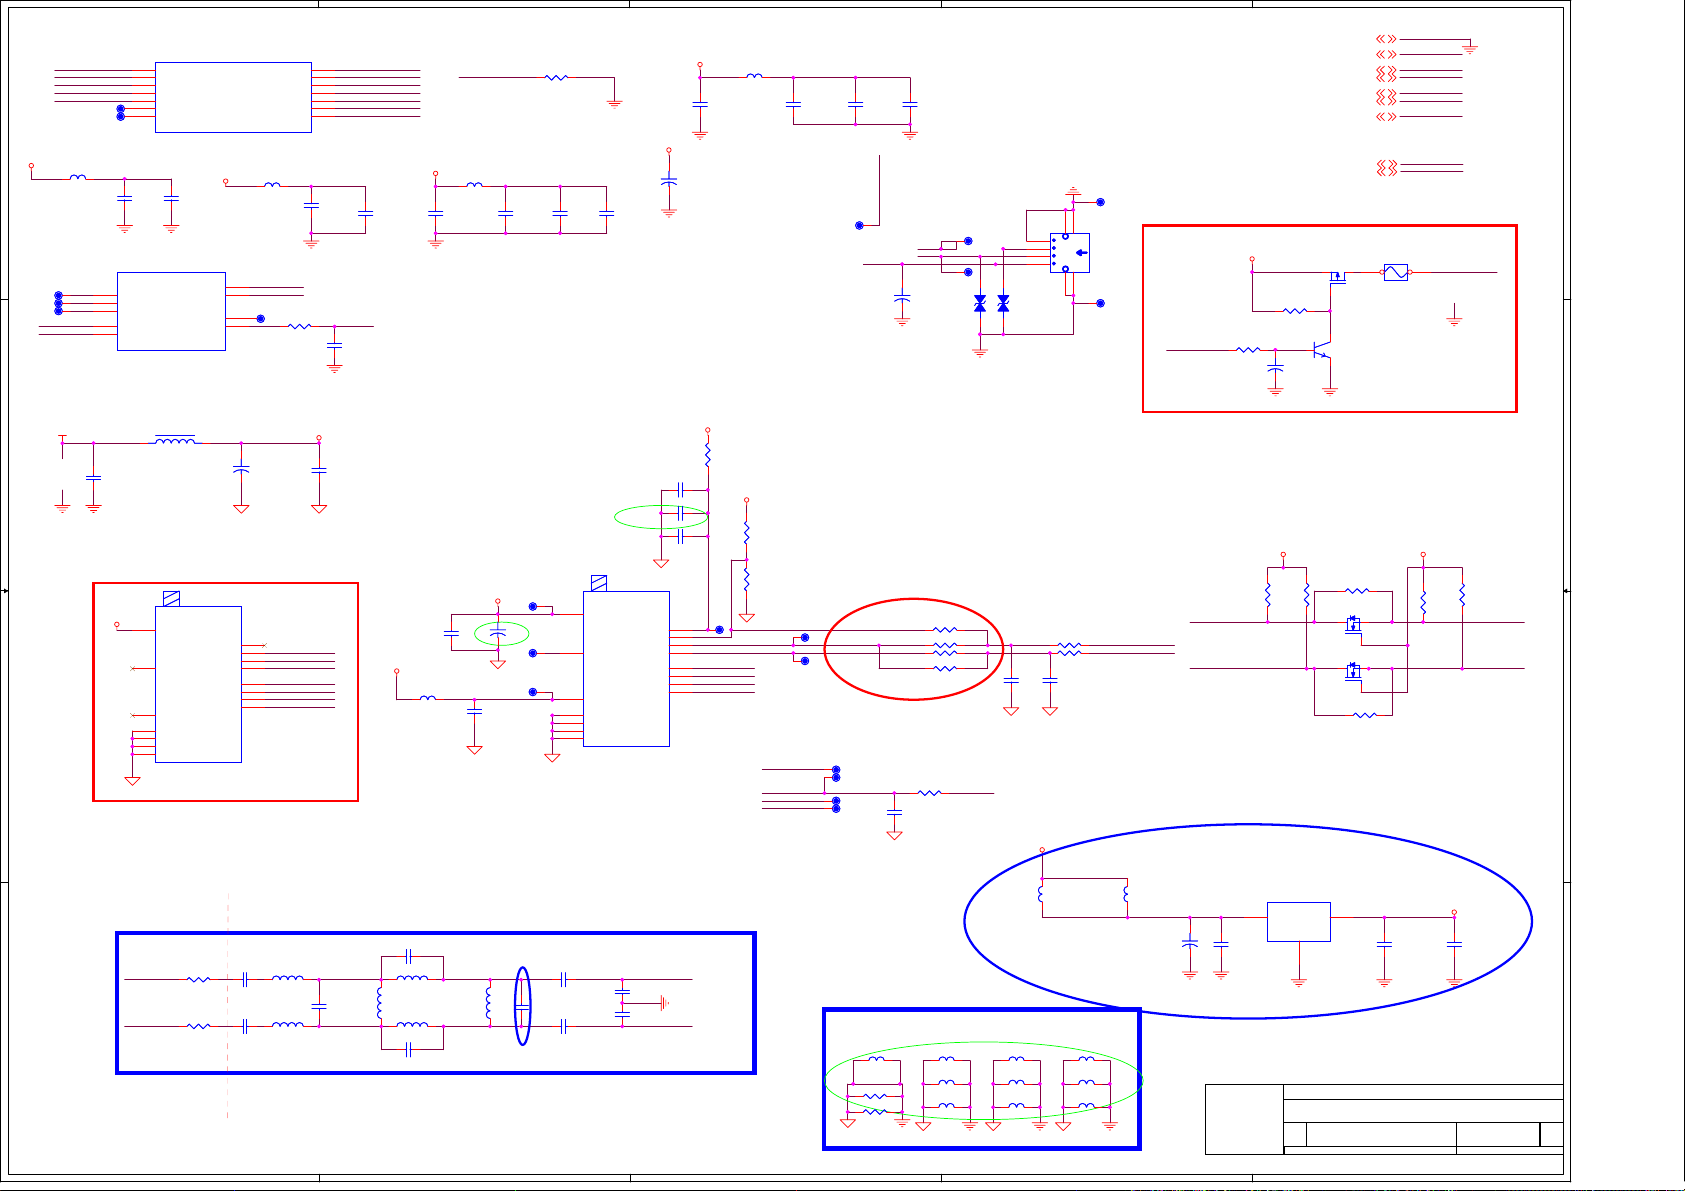
5
U13D
TP42TP42
TP43TP43
AVDD33_USB
68
65
66
67
69
159
160
C57
C57
4.7uF
4.7uF
U13H
U13H
SIFP
SIFN
AF
TUNER_DATA
TUNER_CLK
MT5380 SMD LQFP
MT5380 SMD LQFP
U13D
USB_VRT
USB_DM
USB_DP
AVDD33_USB
AVDD12_USB
TP0
TN0
CB87
CB87
0.1uF
0.1uF
AVDD25_SADC
AVSS25_SADC
MT5380 SMD LQFP
MT5380 SMD LQFP
AV12
165
167
195
RF_AGC
194
IF_AGC
AVDD12_ADCPLL
AVDD12_TVDPLL
AVDD12_HDMIPLL
AVDD12_SYSPLL
AVDD12_DTDPLL
FB27 FBFB27 FB
AVDD25_SADC
AVSS25_SADC
TP59TP59
R1593 10KR1593 10K
AVDD12_APLL
AVDD12_DMPLL
Near chip
USB_VRT
USB_DM
USB_DP
AVDD33_USB
AVDD12_USB
D D
AV33
FB28 FBFB28 FB
TP61TP61
166
TP62TP62
168
TP60TP60
169
TUNER_DATA
197
TUNER_CLK
196
162
157
155
163
161
158
156
AVDD12_USB
C54
C54
4.7uF
4.7uF
C568
C568
47nF
47nF
AVDD12_PLL
AVDD12_PLL
AVDD12_PLL
AVDD12_PLL
AVDD12_PLL
AVDD12_PLL
AVDD12_PLL
IF_AGC
CB85
CB85
0.1uF
0.1uF
4
AV12
+
+
AV12
CE38
CE38
100uF/16v
100uF/16v
FB19 FBFB19 FB
C41
C41
1uF
1uF
USB_VRT AV25
AV25
FB34 FBFB34 FB
C72
C72
1uF
1uF
AVSS25_SADC
R34 5.1K 1%R34 5.1K 1%
AVDD25_SADC
C73
C73
4.7uF
4.7uF
CB137
CB137
C44
C44
0.1uF
0.1uF
10nF
10nF
use this POLYSWITCH PTC
to avoid over current.
tyco nanoSMDC110F
:
3
AVDD12_PLL
C31
C31
4.7uF
4.7uF
TP64TP64
2
GND1,2,3,4,6,7,8,9,10,11,12,13,14
AV123,8,10
AV332,3,8,9,13
AV253,12
USBPWREN4
C42
C42
CB78
CB78
10nF
10nF
0.1uF
0.1uF
USBPWRERR
+
+
USB_DP
USB_DM
USB+5V
CE844
CE844
470uF/16v
470uF/16v
D194
D194
T57T57
T58T58
12
D195
D195
12
USB_V_S
USB_V_S
C0402/SMD
C0402/SMD
ESD_0402_0.15pF
ESD_0402_0.15pF
C0402/SMD
C0402/SMD
ESD_0402_0.15pF
ESD_0402_0.15pF
1
2
3
4
T60T60
USB_A
USB_A
56785
P16
P16
1:GND
1:GND
2:D+
2:D+
4
4
3
3
2
2
3:D-
3:D4:VCC
4:VCC
1
1
T59T59
USBPWREN
+5V
R2037 47KR2037 47K
CE847
CE847
10uF/16v
10uF/16v
R2036
R2036
20K
20K
+
+
USBPWRERR4
+12V1,2,9,13,14
VIP_ATV12
VIN_ATV12
Q69
Q69
1
SOT23/SMD
SOT23/SMD
1
3 2
AO3401
AO3401
Q70
Q70
2N3904
2N3904
23
1
AV12
AV33
USBPWREN
USBPWRERR
+12V
VIP_ATV
VIN_ATV
F2
F2
Little-1206L110-C
Little-1206L110-C
POLYFUSE1206/SMD
POLYFUSE1206/SMD
GND
USB+5V
Ihold=0.8A
L152
L152
NC/33uH/2A
NC/33uH/2A
12
L6-3-5
C C
C687
C687
NC/0.1uF
NC/0.1uF
+5V_TUNER
B B
L6-3-5
POWER SUPPLY +5V FOR TUNER
7
+5V IF
1
NC
IF AGC
2
NC
12
GND
13
GND
14
GND
15
GND
TV1
TV1
DVT-8ADC1-T41F0HS/NC
DVT-8ADC1-T41F0HS/NC
DVT-8ADC1-T41F0HS
DVT-8ADC1-T41F0HS
AS_IF
SCL
SDA
+
+
NC/220uF/16V
NC/220uF/16V
NC
NC
DIF
DIF
CE845
CE845
3
4
5
6
8
9
10
11
DVT_SCL
DVT_SDA
NXP_SDA
AS_IF
T_IF_AGC
DFAT_INDFAT_IN+
+5V_TUNER+5V
C685
C685
NC/0.1uF
NC/0.1uF
+5V_TUNER
FB48FBFB48
FB
Itrip=1.6A @60°C
T16T16
+5V_TUNER
+
+
CE31
CE31
CB1004
CB1004
470uF/16v
470uF/16v
0.1uF
0.1uF
T22T22
T21T21
CB86
CB86
0.1uF
0.1uF
C0402/SMD
C0402/SMD
7
+5V IF
1
ANT POWER
2
VT
12
GND
13
GND
14
GND
15
GND
T1
T1
TD1636F/WGMP-2
TD1636F/WGMP-2
C117
C117
NC/1uF
NC/1uF
C217
C217
4.7uF/10V/NC
4.7uF/10V/NC
C108
C108
NC/330nF
NC/330nF
RF_AGC
AS_IF
IF AGC
+5V_TUNER
R188
R188
0R/NC
0R/NC
+5V_TUNER
R168
R168
NC/10K
NC/10K
R173
R173
NC/10K
NC/10K
T20T20
3
4
AS
5
SCL
6
SDA
AS_IF
8
T_IF_AGC
9
DFAT_IN-
10
DIF
DFAT_IN+
11
DIF
DVT AND NXP OPTION.
DVT_SCL
NXP_SCL
T18T18
NXP_SDA
T17T17
DVT_SDA
R2038
R2038
0R/NC
0R/NC
R2041
R2041
0R/NC
0R/NC
R20390RR2039
0R
R20400RR2040
0R
C689
C689
330pF
330pF
C690
C690
330pF
330pF
R2028
R2028
560R
560R
R2029
R2029
560R
560R
TUNER_SCL
TUNER_SDA
TUNER_SCL
TUNER_SDA
I2C LEVEL SHIFTER
AS_IF
T_IF_AGC
DFAT_INDFAT_IN+
T15T15
T14T14
T13T13
T12T12
R141
R141
68K
68K
C688
C688
680pF
680pF
C0603/SMD
C0603/SMD
IF_AGC
+12V
R2023
R2023
10K
10K
R2024
R2024
10K
10K
R2033 0RR2033 0R
R2034 0RR2034 0R
32
Q67
Q67
NC/2N7002
NC/2N7002
1
32
Q68
Q68
NC/2N7002
NC/2N7002
1
DV33+5V_TUNER
R2025
R2025
R2026
R2026
NC/4.7K
NC/4.7K
NC/4.7K
NC/4.7K
TUNER_CLK
TUNER_DATA
U56
L146
L145
L145
15R-2W
15R-2W
RCF-1
Near Tuner Near MT538X
C37
C37
R20110RR2011
33pF
33pF
0R
R20120RR2012
0R
A A
DFAT_IN-
5
C38
C38
33pF
33pF
L12 390nHL12 390nH
L8 390nHL8 390nH
C142
C142
33pF
33pF
C147 27pFC147 27pF
L23 220nHL23 220nH
L21
L21
390nH
390nH
L25
L25
220nH
220nH
C207 27pFC207 27pF
L24NCL24
NC
Use muRata Inductor and TDK Capacitor
C209 10nFC209 10nF
C208
C208
4.7pF
4.7pF
C0402/SMD
C0402/SMD
C148 10nFC148 10nF
C210
C210
100pF_DNS
100pF_DNS
C211
C211
100pF_DNS
100pF_DNS
muRata: LQM18NNR22K00 和 LQM18NNR39K00
4
VIP_ATVDFAT_IN+
VIN_ATV
GND dividing
FB22 NS/FBFB22 NS/FB
R6 0RR6 0R
R8 0RR8 0R
3
FB58 FBFB58 FB
FB33 NS/FBFB33 NS/FB
FB36 NS/FBFB36 NS/FB
RCF-1
FB39 NS/FBFB39 NS/FB
FB59 NS/FBFB59 NS/FB FB1 NS/FBFB1 NS/FB
FB38 FBFB38 FB
FB61 NS/FBFB61 NS/FB
FB60 NS/FBFB60 NS/FB
L146
15R-2W
15R-2W
RCF-1
RCF-1
CE224
CE224
470uF/16v
470uF/16v
2
U56
1
+
+
IN
CB197
CB197
0.1uF
0.1uF
POWER SUPPLY +5V FOR TUNER
Title
Title
Title
Size
Size
Size
Date: Sheet
Date: Sheet
Date: Sheet
7805
7805
3
OUT
GND
TO-263-3/SMD
TO-263-3/SMD
2
MediaTek Inc.
MediaTek Inc.
MediaTek Inc.
Analog PLL / USB2.0/TUNER
Analog PLL / USB2.0/TUNER
Analog PLL / USB2.0/TUNER
Document Number
Document Number
Document Number
MT5380P1-V2
MT5380P1-V2
MT5380P1-V2
C
C
C
+5V_TUNER
C574
C574
1uF
1uF
NUSTC_5380P1_V2
NUSTC_5380P1_V2
NUSTC_5380P1_V2
No.1-2, Innovation Rd 1, SBIP, Hsin-Chu City 300
No.1-2, Innovation Rd 1, SBIP, Hsin-Chu City 300
No.1-2, Innovation Rd 1, SBIP, Hsin-Chu City 300
TEL:(03)567-0766 FAX:(03)578-7610
TEL:(03)567-0766 FAX:(03)578-7610
TEL:(03)567-0766 FAX:(03)578-7610
CB398
CB398
0.1uF
0.1uF
Drawn
Drawn
Drawn
515Thursday, December 04, 2008
515Thursday, December 04, 2008
515Thursday, December 04, 2008
1
Rev
Rev
Rev
V1
V1
V1
of
of
of
Page 27
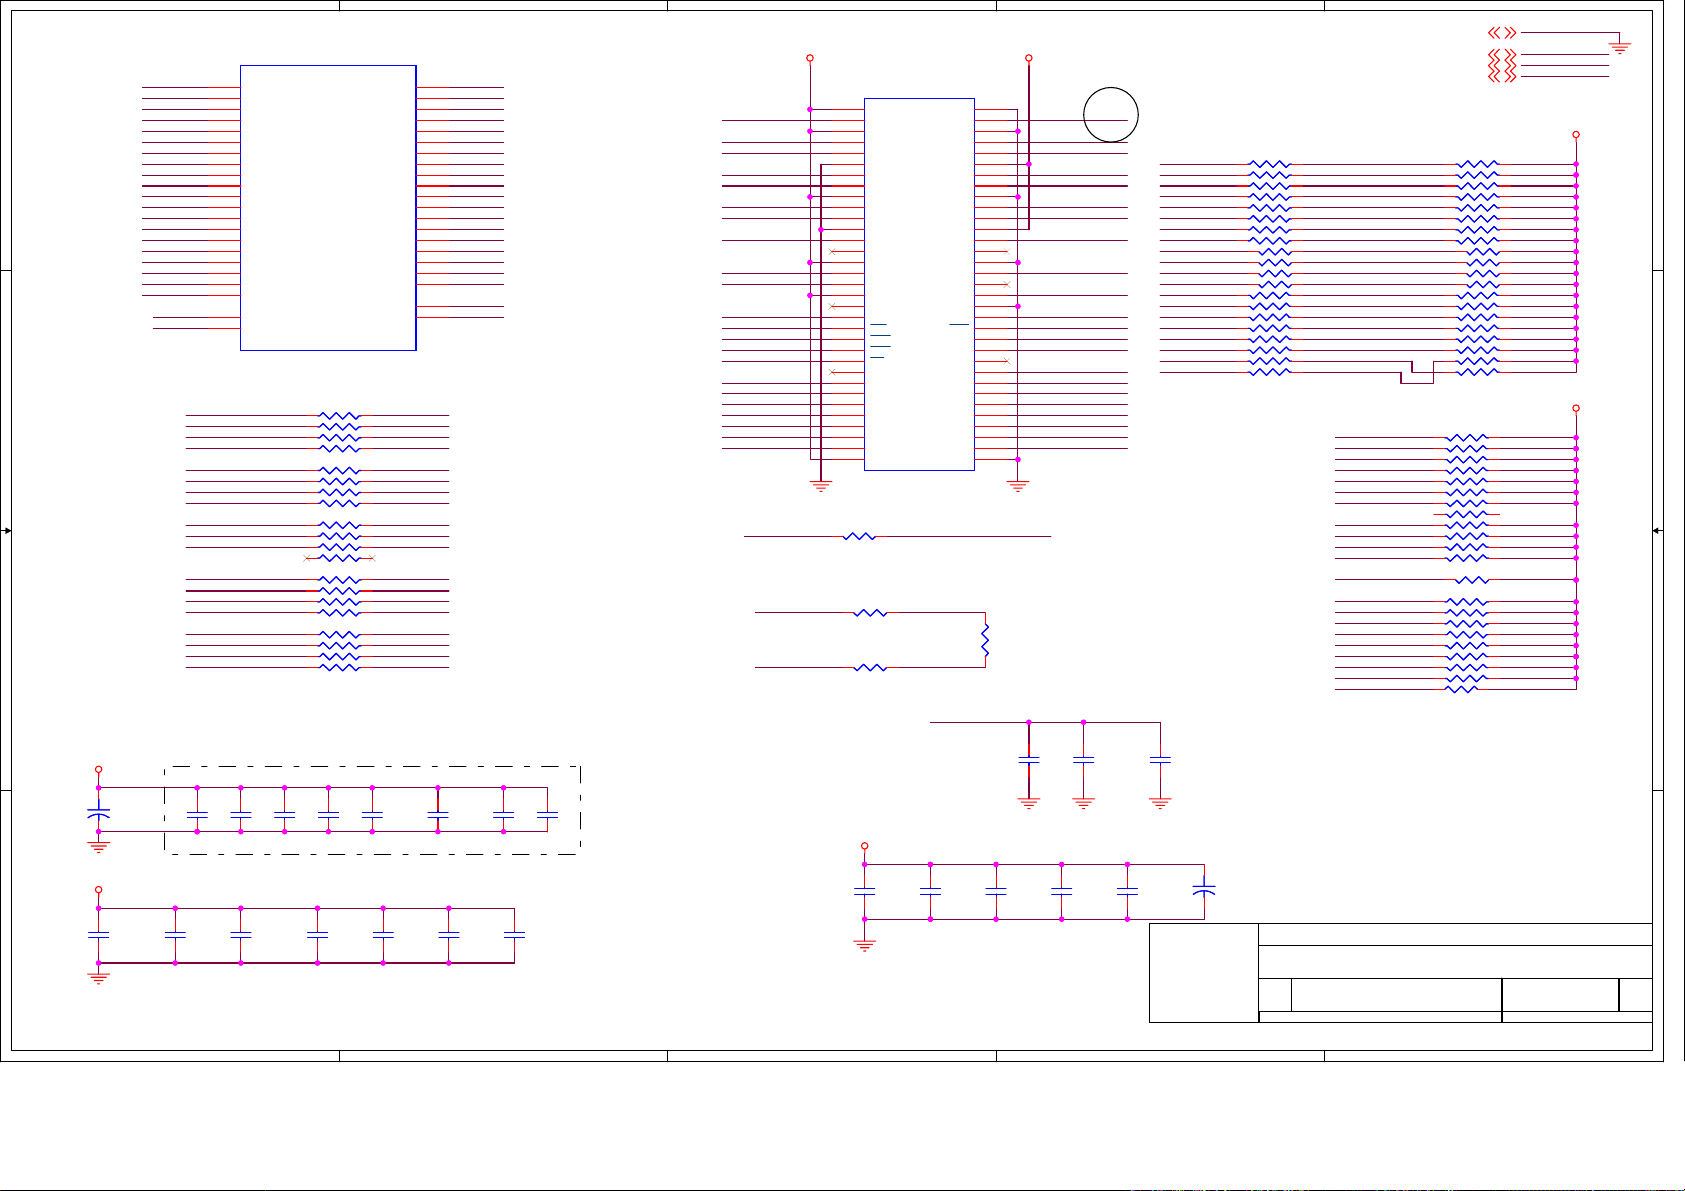
5
U13A
U13A
RDQS0
RDQM0
RDQ0
RDQ1
RDQ2
D D
C C
B B
DDRV
RDQ3
RDQ4
RDQ5
RDQ6
RDQ7
RDQS1
RDQM1
RDQ8
RDQ9
RDQ10
RDQ11
RDQ12
RDQ13
RDQ14
RDQ15
MEM_VREF RCLK0
RCS#
11
RDQS0
13
RDQM0
9
RDQ0
8
RDQ1
7
RDQ2
6
RDQ3
5
RDQ4
4
RDQ5
3
RDQ6
2
RDQ7
17
RDQS1
15
RDQM1
19
RDQ8
20
RDQ9
21
RDQ10
22
RDQ11
23
RDQ12
24
RDQ13
25
RDQ14
26
RDQ15
53
RVREF0
46
RCS_
MT5380 SMD LQFP
MT5380 SMD LQFP
MEM_ADDR12
MEM_ADDR11
MEM_ADDR8
MEM_ADDR7
MEM_ADDR6
MEM_ADDR5
MEM_ADDR4
MEM_CAS#
MEM_CS#
MEM_BA0
MEM_BA1
MEM_ADDR10
MEM_ADDR0 RA0
MEM_ADDR1
MEM_ADDR2
MEM_ADDR3
RNA147x4/0402 RNA147x4/0402
RNA247x4/0402 RNA247x4/0402
RNA347x4/0402 RNA347x4/0402
RNA447x4/0402 RNA447x4/0402
RNA547x4/0402 RNA547x4/0402
RWE_
RBA0
RBA1
RRAS_
RA10
RCAS_
RA12
RCKE
RA11
RCLK0_
RCLK0
78
56
34
12
78
56
34
12
78
56
34
12
78
56
34
12
78
56
34
12
RA0
RA7
RA6
RA5
RA8
RA4
RA9
RA3
RA1
RA2
47
36
40
43
37
44
38
42
35
45
39
41
32
31
33
34
51
49
50
28
29
RA12
RA11
RA9MEM_ADDR9
RA8
RA7
RA6
RA5
RA4
RWE#MEM_WE#
RCAS#
RRAS#MEM_RAS#
RCS#
RBA0
RBA1
RA10
RA1
RA2
RA3
RA0
RA7
RWE#
RBA0
RA6
RBA1
RA5
RRAS#
RA8
RA10
RA4
RCAS#
RA12
RCKE
RA11
RA9
RA3
RA1
RA2
RCLK0#
4
MEM_DQ0
MEM_DQ1 MEM_DQ15
MEM_DQ2
MEM_DQ3
MEM_DQ4
MEM_DQ5
MEM_DQ6
MEM_DQ7
MEM_DQS0
MEM_ADDR13
MEM_DQM0
MEM_WE#
MEM_CAS#
MEM_RAS#
MEM_CS#
MEM_BA0
MEM_BA1
MEM_ADDR10
MEM_ADDR0
MEM_ADDR1
MEM_ADDR2
MEM_ADDR3
RCKE MEM_CLKEN
RCLK0
RCLK0#
3
DDRV DDRV
UA1
UA1
1
VDD
2
DQ0
3
VDDQ
4
DQ1
5
DQ2
6
VSSQ
7
DQ3
8
DQ4
9
VDDQ
10
DQ5
11
DQ6
12
VSSQ
13
DQ7
14
NC
15
VDDQ
16
LDQS
17
NC
18
VDD
19
NC
20
LDM
21
WE
22
CAS
23
RAS
24
CS
25
NC
26
BS0
27
BS1
28
A10/AP
29
A0
30
A1
31
A2
32
A3
33
VDD
16M x 16 DDR TSOP-66
16M x 16 DDR TSOP-66
RA11 22RA11 22
RA12 22RA12 22
RA13 22RA13 22
DDR#1
MEM_CLK0
MEM_CLK0#
VSS
DQ15
VSSQ
DQ14
DQ13
VDDQ
DQ12
DQ11
VSSQ
DQ10
DQ9
VDDQ
DQ8
NC
VSSQ
UDQS
NC
VREF
VSS
UDM
CLK
CLK
CKE
NC
A12
A11
A9
A8
A7
A6
A5
A4
VSS
MEM_VREF
66
65
64
63
62
61
60
59
58
57
56
55
54
53
52
51
50
49
48
47
46
45
44
43
42
41
40
39
38
37
36
35
34
CA32
CA32
0.1uF
0.1uF
RA14
RA14
100
100
MEM_DQ14
MEM_DQ13
MEM_DQ12
MEM_DQ11
MEM_DQ10
MEM_DQ9
MEM_DQ8
MEM_DQS1
MEM_VREF
MEM_DQM1
MEM_CLK0#
MEM_CLK0
MEM_CLKEN
MEM_ADDR12
MEM_ADDR11
MEM_ADDR9
MEM_ADDR8
MEM_ADDR7
MEM_ADDR6
MEM_ADDR5
MEM_ADDR4
CA34
CA34
0.1uF
0.1uF
2
Swap for layout
RDQ0
RDQ1
RDQ2
RDQ3
RDQ4
RDQ5
RDQ6
RDQ7
RDQS0
RDQM0
RDQM1
RDQS1
RDQ8
RDQ9
RDQ10
RDQ11
RDQ12
RDQ13
RDQ14
RDQ15
CA33
CA33
4.7uF
4.7uF
RNA647x4/0402 RNA647x4/0402
78
56
34
12
RNA7 47x4/0402RNA7 47x4/0402
78
56
34
RA1 47RA1 47
RA2 47RA2 47
RA3 47RA3 47
RA4 47RA4 47
7 8
5 6
3 4
1 2
RN0402/SMD
RN0402/SMD
12
RNA8
RNA8
12
34
56
78
RNA10 47x4/0402
RNA10 47x4/0402
47x4/0402
47x4/0402
MEM_DQ14
MEM_DQ15
MEM_DQ0
MEM_DQ1
MEM_DQ2
MEM_DQ3
MEM_DQ4
MEM_DQ5
MEM_DQ6
MEM_DQ7
MEM_DQS0
MEM_DQM0
MEM_DQM1
MEM_DQS1
MEM_DQ8
MEM_DQ9
MEM_DQ10
MEM_DQ11
MEM_DQ12
MEM_DQ13
MEM_WE#
MEM_CAS#
MEM_RAS#
MEM_CS#
MEM_BA0
MEM_BA1
MEM_ADDR10
MEM_ADDR4
MEM_ADDR5
MEM_ADDR6
MEM_ADDR7
MEM_CLKEN
MEM_ADDR12
MEM_ADDR11
MEM_ADDR9
MEM_ADDR8
MEM_ADDR0
MEM_ADDR1
MEM_ADDR2
MEM_ADDR3
MEM_ADDR13
GND1,2,3,4,5,7,8,9,10,11,12,13,14
MEM_VREF2
DDRV2,7
VTT2
RNA9 75x4RNA9 75x4
7 8
5 6
3 4
1 2
RNA11 75x4RNA11 75x4
7 8
5 6
3 4
1 2
RA5 75RA5 75
RA6 75RA6 75
RA7 75RA7 75
RA8 75RA8 75
RN35 75x4RN35 75x4
7 8
5 6
3 4
1 2
RNA12 75x4RNA12 75x4
7 8
5 6
3 4
1 2
RNA13 75x4RNA13 75x4
7 8
5 6
3 4
1 2
RNA14 75x4RNA14 75x4
7 8
5 6
3 4
1 2
RNA15 75x4RNA15 75x4
7 8
5 6
3 4
1 2
RA9 NS/75RA9 NS/75
RNA16 75x4RNA16 75x4
1 2
3 4
5 6
7 8
7 8
5 6
3 4
1 2
RNA17 75x4RNA17 75x4
1
GND
MEM_VREF
DDRV
VTT
VTT
VTT
RA10NS/75 RA10NS/75
CA3
CA19
CA19
0.1uF
0.1uF
CA1
CA1
0.1uF
0.1uF
CA3
0.1uF
0.1uF
CA20
CA20
0.1uF
0.1uF
CEA1
CEA1
+
+
100uF/16v
100uF/16v
VTT
A A
CA17
CA17
0.1uF
0.1uF
5
CA4
CA4
0.1uF
0.1uF
CA5
CA5
0.1uF
0.1uF
CA21
CA21
0.1uF
0.1uF
CA6
CA6
0.1uF
0.1uF
Near DRAM
CA22
CA22
0.1uF
0.1uF
CA7
CA7
0.1uF
0.1uF
CA28
CA28
0.1uF
0.1uF
CA43
CA43
1uF
1uF
4
CA23
CA23
4.7uF
4.7uF
CA35
CA35
4.7uF
4.7uF
VTT
CA27
CA24
CA24
0.1uF
0.1uF
3
CA25
CA25
0.1uF
0.1uF
CA26
CA26
0.1uF
0.1uF
CA27
0.1uF
0.1uF
CA30
CA30
4.7uF
4.7uF
CEA4
CEA4
+
+
22uF/16v
22uF/16v
NUSTC_5380P1_V2
NUSTC_5380P1_V2
NUSTC_5380P1_V2
No.1-2, Innovation Rd 1, SBIP, Hsin-Chu City 300
No.1-2, Innovation Rd 1, SBIP, Hsin-Chu City 300
MediaTek Inc.
MediaTek Inc.
MediaTek Inc.
Title
Title
Title
DDR1 MEMORY
DDR1 MEMORY
DDR1 MEMORY
Document Number
Document Number
Document Number
Size
Size
Size
Date: Sheet
Date: Sheet
Date: Sheet
2
B
B
B
MT5380P1-V2
MT5380P1-V2
MT5380P1-V2
No.1-2, Innovation Rd 1, SBIP, Hsin-Chu City 300
TEL:(03)567-0766 FAX:(03)578-7610
TEL:(03)567-0766 FAX:(03)578-7610
TEL:(03)567-0766 FAX:(03)578-7610
Drawn
Drawn
Drawn
615Thursday, December 04, 2008
615Thursday, December 04, 2008
615Thursday, December 04, 2008
of
of
of
1
Rev
Rev
Rev
V1
V1
V1
Page 28
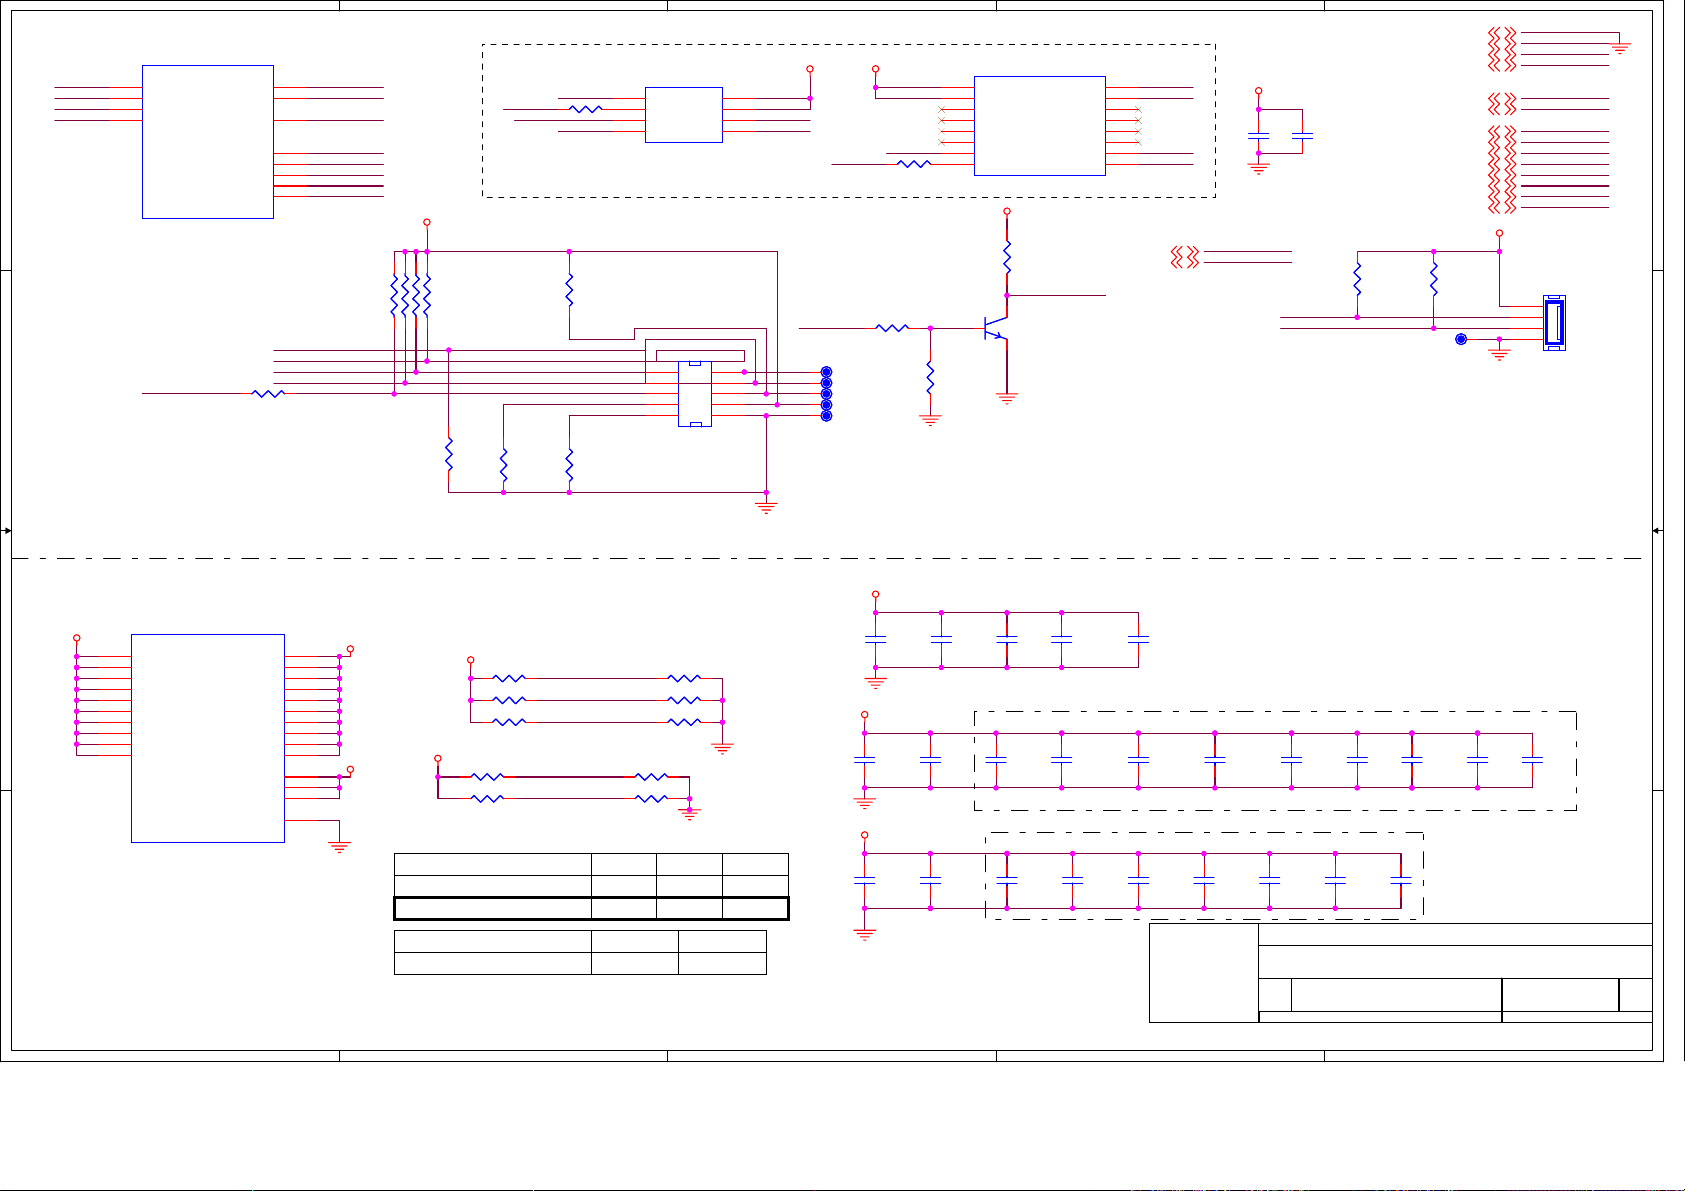
5
U13J
U13J
POCE0#
POOE#
PDD0
PDD1 OIRI
D D
C C
252
251
250
249
POCE0_
POOE_
PDD0
PDD1
MT5380 SMD LQFP
MT5380 SMD LQFP
JTDO
U0RX
U0TX
OIRI
JTMS
JTRST_
JTCK
JTDO
JTDI
R56 33R56 33
95
94
93
253
1
256
255
254
JTRST#
JTDI
JTMS
JTCK
U0RX
U0TX
JTMS
JTRST#
JTCK
JTDO
JTDI
DV33
RN5
RN5
10Kx4
10Kx4
1 2
3 4
5 6
7 8
R53
R53
10K
10K
4
PDD0
R58
R58
10K
10K
FRESET#
POCE0#
R1208 0RR1208 0R
GND
R54
R54
10K
10K
TVTREF#1
JTAG_DBGRQ
JTAG_DBGACK
R59
R59
10K
10K
U17
U17
1
S_
2
Q
3
W_/VPP
VSS4D
M25L3205D
M25L3205D
DUAL LAYOUT
1
3
5
7
9
8
VCC
7
HOLD_
6
C
5
J2
J2
2
4
6
8
10
NC/P5X2/2.0MM
NC/P5X2/2.0MM
DIP5X2/P2.0
DIP5X2/P2.0
POOE#
PDD1
GPIO_0
3
PDD0
2MB
R197 NS/10KR197 NS/10K
T11T11
T10T10
T9T9
T8T8
T7T7
DV33DV33
POCE0# GND
R1209 0RR1209 0R
MX25L1605/S25FL016A/NC
MX25L1605/S25FL016A/NC
R200NCR200
NC
U18
U18
1
HOLD#
2
VCC
3
NC
4
PO2
5
PO1
6
PO0
7
CS#
SO/PO78WP#/ACC
DV33
R45
R45
4.7K
4.7K
FRESET#
Q43
Q43
1
NS/2N3904
NS/2N3904
3 2
SCLK
PO6
PO5
PO4
PO3
GND
16
15
SI
14
13
12
11
10
9
U0RX11
U0TX11
2
POOE#
PDD1
FRESET#
DV33
CB451
CB451
CB452
CB452
0.1uF
0.1uF
0.1uF
0.1uF
U0RX
U0TX
U0RX
U0TX
FOR CODE DOWNLOAD AND DEBUGGING
R60
R60
10K
10K
1
GND1,2,3,4,5,6,8,9,10,11,12,13,14
OIRI1
+5VSB1,2,8,9,11
+3V3SB1,2,4,8,9
OSDA14,8
OSCL14,8
DV102
DDRV2,6
OPWM24
AOBCK13
AOLRCK13
OPCTRL44,11
OPCTRL54
GPIO_04
R61
R61
10K
10K
+3V3SB
T23T23
GND
OIRI
+5VSB
+3V3SB
OSDA1
OSCL1
DV10
DDRV
OPWM2
AOBCK
AOLRCK
OPCTRL4
OPCTRL5
GPIO_0
J3
J3
1
2
3
4
4x1 W/HOUSING
4x1 W/HOUSING
DIP4/W/H/P2.0
DIP4/W/H/P2.0
DV33
U13I
164
215
208
247
14
48
57
58
61
70
U13I
VCCK
VCCK
VCCK
VCCK
VCCK
DVDD10
DVDD10
VCCK
VCCK
VCCK
MT5380 SMD LQFP
MT5380 SMD LQFP
5
VCC2IO
VCC2IO
VCC2IO
VCC2IO
VCC2IO
VCC2IO
VCC2IO
VCC2IO
VCC2IO
VCC2IO
VCC3IO_3
VCC3IO_3
VCC3IO_3
E-PAD
10
12
16
18
27
30
52
54
55
56
64
199
248
257
DDRV
DV33
DV33
R1252 NS/4.7KR1252 NS/4.7K
R1229 NS/4.7KR1229 NS/4.7K
R1251 4.7KR1251 4.7K
+3V3SB
R1221 4.7KR1221 4.7K
R1228 4.7KR1228 4.7K
OPWM2
AOBCK
AOLRCK
OPCTRL4
OPCTRL5
Trap Mode
Normal mode
ICE mode
000
0
Trap Mode OPCTRL4OPCTRL5
Core Reset 1 us
4
R12564.7K R12564.7K
R12554.7K R12554.7K
R1257NS/4.7K R1257NS/4.7K
R1226NS/4.7K R1226NS/4.7K
R1227NS/4.7K R1227NS/4.7K
AOLRCKAOBCKOPWM2
01
11
CB34
CB34
DV10
C74
C74
4.7uF
4.7uF
DDRV
CA36
CA36
4.7uF
4.7uF
3
0.1uF
0.1uF
CB35
CB35
C47
C47
1uF
1uF
C46
C46
1uF
1uF
0.1uF
0.1uF
CB36
CB36
0.1uF
0.1uF
I / O BYPASS
CB51
CB51
0.1uF
0.1uF
CA37
CA37
0.1uF
0.1uF
CB52
CB52
C76
C76
4.7uF
4.7uF
0.1uF
0.1uF
CA38
CA38
0.1uF
0.1uF
C45
C45
1uF
1uF
CB53
CB53
0.1uF
0.1uF
CORE BYPASS Near IC
CA39
CA39
CA40
CA40
0.1uF
0.1uF
DDR BYPASS Near IC
2
CB55
CB54
CB54
0.1uF
0.1uF
0.1uF
0.1uF
CB55
CA41
CA41
0.1uF
0.1uF
MediaTek Inc.
MediaTek Inc.
MediaTek Inc.
Title
Title
Title
Document Number
Document Number
Document Number
Size
Size
Size
B
B
B
Date: Sheet
Date: Sheet
Date: Sheet
CB56
CB56
CB59
CB59
0.1uF
0.1uF
FLASH/JTAG/UART/IR/TRAP
FLASH/JTAG/UART/IR/TRAP
FLASH/JTAG/UART/IR/TRAP
0.1uF
0.1uF
CA42
CA42
0.1uF
0.1uF
MT5380P1-V2
MT5380P1-V2
MT5380P1-V2
CA44
CA44
0.1uF
0.1uF
CB57
CB57
CB58
CB58
0.1uF
0.1uF
0.1uF
NUSTC_5380P1_V2
NUSTC_5380P1_V2
NUSTC_5380P1_V2
No.1-2, Innovation Rd 1, SBIP, Hsin-Chu City 300
No.1-2, Innovation Rd 1, SBIP, Hsin-Chu City 300
No.1-2, Innovation Rd 1, SBIP, Hsin-Chu City 300
TEL:(03)567-0766 FAX:(03)578-7610
TEL:(03)567-0766 FAX:(03)578-7610
TEL:(03)567-0766 FAX:(03)578-7610
0.1uF
0.1uF
1
Drawn
Drawn
Drawn
0.1uF
715Thursday, December 04, 2008
715Thursday, December 04, 2008
715Thursday, December 04, 2008
of
of
of
Rev
Rev
Rev
V1
V1
V1
DV10
B B
A A
Page 29
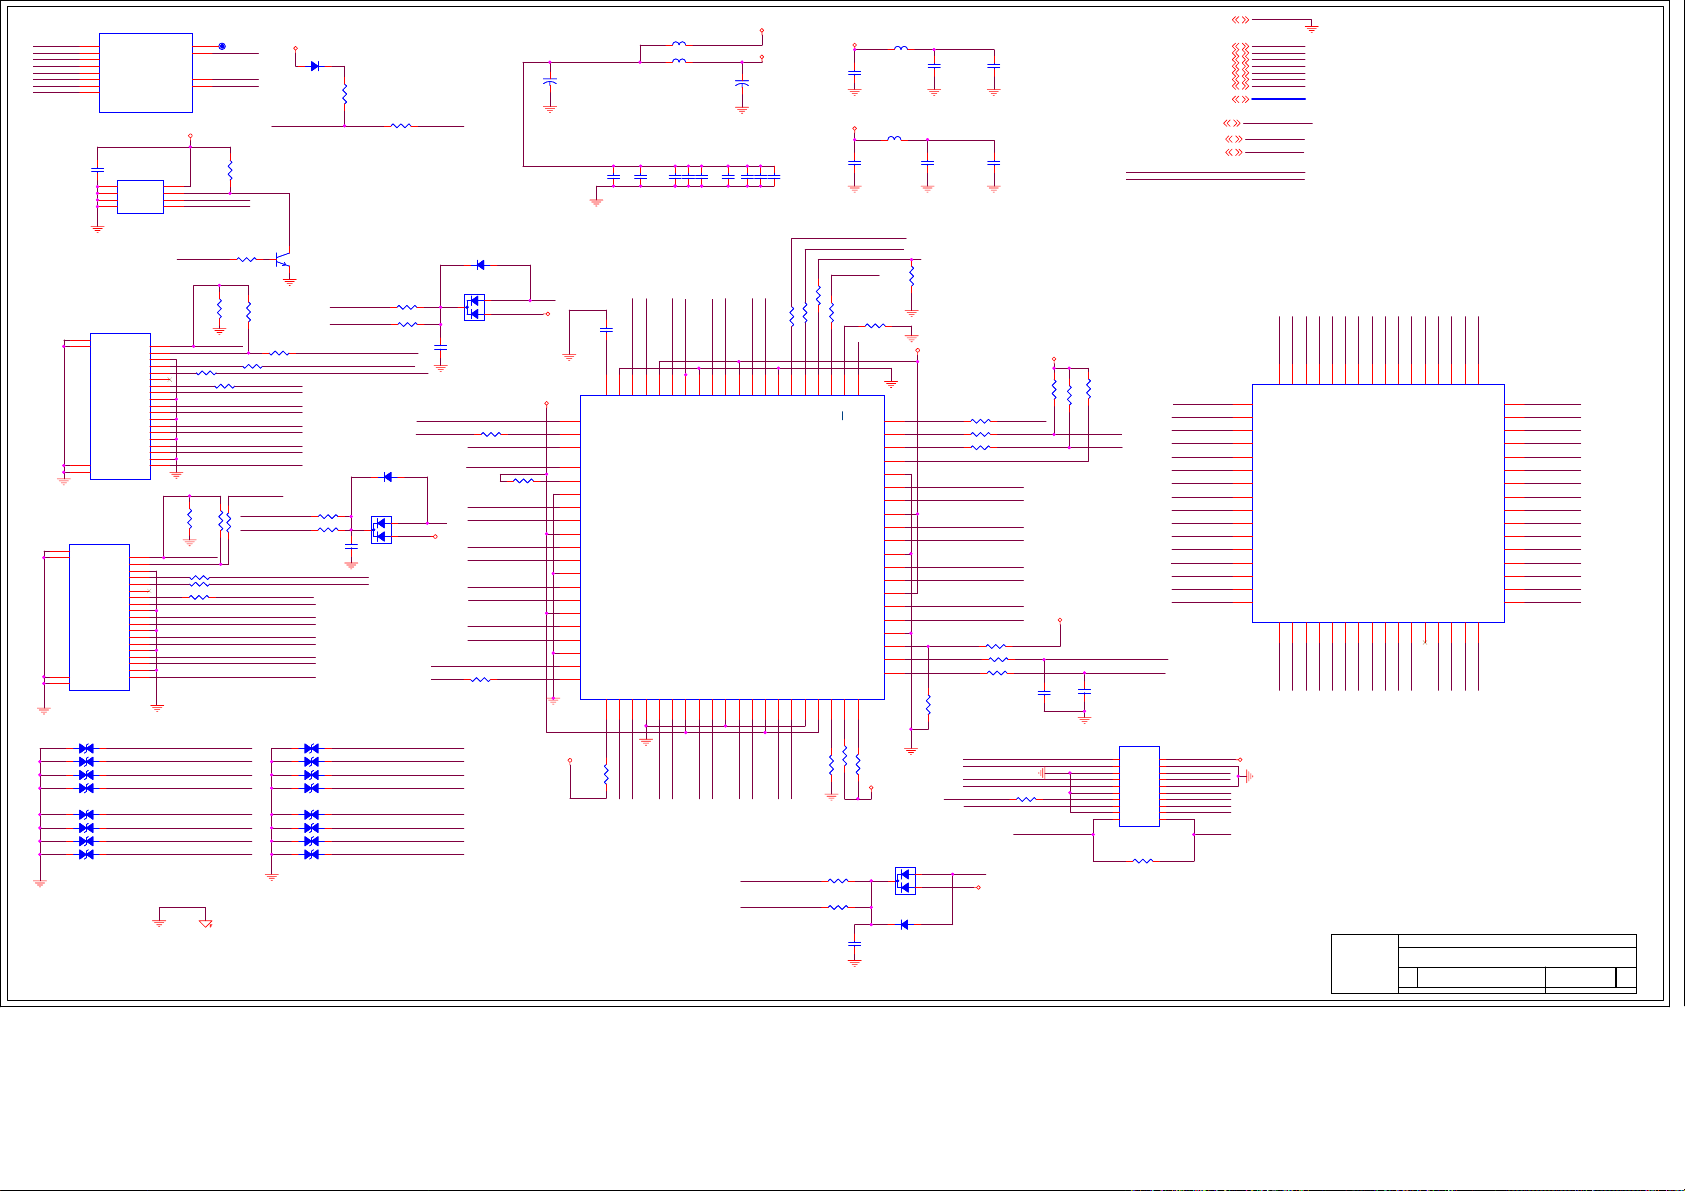
A
C721
C721
53
GND
HDMI2_RX0-
100nF
100nF
C0402/SMD
C0402/SMD
HDMI3_RX0-
HDMI3_RX0+
52
HDMI2_RX0+
10uF/16V
10uF/16V
C0402/SMD
C0402/SMD
100nF
100nF
C723
C723
C0402/SMD
C0402/SMD
50
B3251A32
VCC
HDMI2_RX1-
+3V3SB
AV33
+
+
C711
C711
100nF
100nF
100nF
100nF
C725
C725
C727
C727
C726
C726
R2124
R2124
68R
68R
HDMI3_RXC-
HDMI3_RXC+
49
B3148A31
HDMI2_RX1+
RX5V3_DDC_SDA
RX5V3_DDC_SCL
100nF
100nF
C0402/SMD
C0402/SMD
HDMISCL_1
47
46
GND
SCL3
HDMI2_RX2-
HDMI2_RX2+
R2123
R2123
68R
68R
HPD3
HDMISDA_1
45
44
SDA3
R2094
R2094
500%1
500%1
R0603/SMD
R0603/SMD
R2125 47KR2125 47K
R2126 47KR2126 47K
AV33
AV12
RX5V3_DDC_SCL
RX5V3_DDC_SDA
HDMI3_5VIN
R21191KR2119
1K
R2122
R2122
37K
37K
R2075 4.7KR2075 4.7K
POW1
42
43
HPD3
POW3
OE/STB
I2C_CTL_EN
S3/I2C_ADDR
S2/SCL_CTL
S1/SDA_CTL
REXT
R2095
R2095
4.7K/NC
4.7K/NC
R0603/SMD
R0603/SMD
A
OPWR0_5V
41
HPD_SINK
POW_SINK
SDA_SINK
SCL_SINK
SPQFP80/SMD
SPQFP80/SMD
20
PC1
R2092
R2092
100/NC
100/NC
R0603/SMD
R0603/SMD
AV33_HDMI
FB35 FBFB35 FB
C79
C79
1uF
1uF
FB20 FBFB20 FB
C24
C24
1uF
1uF
RX3_HOTPLUG#
R2120
R2120
100K
100K
40
39
38
37
36
GND
35
Z1
34
Y1
33
VCC
32
Z2
31
Y2
30
GND
29
Z3
28
Y3
27
VCC
26
Z4
25
Y4
24
GND
23
22
21
D217
D217
3
BAV70
BAV70
D8
D8
C176
C176
1uF
1uF
D/SMA/SMD
D/SMA/SMD
C0402/SMD
C0402/SMD
AVDD33_H
CB145
C77
C77
4.7uF
4.7uF
AVDD12_CVCC
C17
C17
4.7uF
4.7uF
AV33_HDMI
HPD_SINK1
SDA_SINK
SCL_SINK
S3/I1C_ADDR
S2/SCL_CTL OSCL0
S1/SDA_CTL
R2121
R2121
R0603/SMD
R0603/SMD
10K
10K
HDMI3_5VIN
1
2
NC/SCHOTTKY DIODE/B340A
NC/SCHOTTKY DIODE/B340A
CB145
0.1uF
0.1uF
CB146
CB146
0.1uF
0.1uF
AV33_HDMI
R2079
R2079
R2080
R2080
47K
47K
47K
47K
R0603/SMD
R0603/SMD
R0603/SMD
R0603/SMD
R2081 100
R2081 100
R2083 0
R2083 0
R2084 0
R2084 0
CEC_H
GPIO_7
R0603/SMD
R0603/SMD
OSDA1
R0603/SMD
R0603/SMD
R0603/SMD
R0603/SMD
RX0_CB
RX0_C
RX0_0B
RX0_0
RX0_1B
RX0_1
RX0_2B
RX0_2
R2087 4.7K/NC
R2087 4.7K/NC
R2089 100
R2089 100
R2090
R2090
HDMI3_RX2+
HDMI3_RX2-
HDMI3_RX0+ HDMI3_RX1HDMI3_RX0-
+5VSB
R0603/SMD
R0603/SMD
R0603/SMD
R0603/SMD
100
100
R0603/SMD
R0603/SMD
R21120R2112
RX5V3_DDC_SCL
RX3_HOTPLUG#
0
AV33_HDMI
C161
C161
10PF/NC
10PF/NC
C0402/SMD
C0402/SMD
R2078
R2078
4.7K
4.7K
R0603/SMD
R0603/SMD
OSCL1
C160
C160
10PF/NC
10PF/NC
C0402/SMD
C0402/SMD
OSDA0
20
16
14
12
10
8
6
4
2
CN9
CN9
10X2 2mm
10X2 2mm
R2114
R2114
1K/NS
1K/NS
U13K
RX0_CB
RX0_C
RX0_0B
RX0_0
RX0_1B
RX0_1
RX0_2B
RX0_2
A A
HDMI2 INPUT
U13K
79
RX0_CB
80
RX0_C
81
RX0_0B
82
RX0_0
83
RX0_1B
84
RX0_1
85
RX0_2B
AVDD12_CVCC
86
RX0_2
MT5380 SMD LQFP
MT5380 SMD LQFP
CB141
CB141
0.1uF
0.1uF
C0402/SMD
C0402/SMD
1
NC
2
NC
3
NC
GND4SDA
EEPROM 24C02
EEPROM 24C02
SOP8/SMD
SOP8/SMD
HDMI1 INPUT
P5
P5
21
SHELL2
23
HP DET
SHELL4
+5V
GND
DDC DATA
DDC CLK
NC
CE Remote
CK-
CK Shield
CK+
D0-
D0 Shield
D0+
D1-
D1 Shield
D1+
D2-
D2 Shield
22
D2+
SHELL3
20
SHELL1
HDMI/HAIER
HDMI/HAIER
HDMI/SMD/CON/A
HDMI/SMD/CON/A
P6
P6
21
SHELL2
23
SHELL4
22
SHELL3
20
SHELL1
HDMI/HAIER
HDMI/HAIER
HDMI/SMD/CON/A
HDMI/SMD/CON/A
D197D197
1 2
D198D198
1 2
D199D199
1 2
D200D200
1 2
D201D201
1 2
D202D202
1 2
D203D203
1 2
D204D204
1 2
HP DET
DDC DATA
DDC CLK
CE Remote
CK Shield
D0 Shield
D1 Shield
D2 Shield
19
18
+5V
17
GND
16
15
14
NC
13
12
CK-
11
10
CK+
9
D0-
8
7
D0+
6
D1-
5
4
D1+
3
D2-
2
1
D2+
EXT_RES
OPWR0_5V
AVDD33_HDMI
AV33_HDMI
U8
U8
8
VCC
7
WP
6
SCL
5
19
18
17
16
15
14
13
12
11
10
9
8
7
6
5
4
3
2
1
R2045
R2045
100K
100K
RX2_HOTPLUG#
HDMI1_RXCHDMI1_RXC+
HDMI1_RX0HDMI1_RX0+
HDMI1_RX1HDMI1_RX1+
HDMI1_RX2HDMI1_RX2+
77
73
78
74
HDMIDDCWP0
HDMIDDCSCL_0
HDMIDDCSDA_0
GPIO_6
R2027
R2027
100K
100K
RX1_HOTPLUG#
R2049 68RR2049 68R
R20440R2044
R2066
R2066
1K/NS
1K/NS
HDMI2_5VIN
R2048 68R
R2048 68R
R2047 68RR2047 68R
R20500R2050
TP44TP44
OPWR0_5V
AVDD33_H
AVDD12_CVCC
R103
R103
4.7K
4.7K
R0603/SMD
R0603/SMD
R2065
R2065
1K/NS
1K/NS
HDMI1_5VIN
R2046 68RR2046 68R
0
R2086
R2086
37K
37K
R0603/SMD
R0603/SMD
0
R86
R86
10K
10K
R0603/SMD
R0603/SMD
HDMI1_RXCHDMI1_RXC+
HDMI1_RX0HDMI1_RX0+
HDMI1_RX1HDMI1_RX1+
HDMI1_RX2HDMI1_RX2+
POW0
RX5V2_DDC_SDA
RX5V2_DDC_SCL
CEC_H
HDMI2_RXC-
HDMI2_RXC+
HDMI2_RX0-
HDMI2_RX0+
HDMI2_RX1-
HDMI2_RX1+
HDMI2_RX2-
1
R2077
R2077
CEC_H
HDMI2_RX2+
+3V3SB
D153
D153
RB520S-30
RB520S-30
1 2
1N4148/SMD
1N4148/SMD
CEC_H
Q46
Q46
2N3904
2N3904
SOT23/SMD
SOT23/SMD
3 2
37K
37K
R2099 47K
R2099 47K
R0603/SMD
R0603/SMD
R2100 47K
R2100 47K
R0603/SMD
R0603/SMD
RX5V2_DDC_SDA
RX5V2_DDC_SCL
D205D205
1 2
D206D206
1 2
D207D207
1 2
D208D208
1 2
D209D209
1 2
D210D210
1 2
D211D211
1 2
D212D212
1 2
R1605
R1605
27K
27K
R0603/SMD
R0603/SMD
RX5V1_DDC_SDA
R2097 47K
R2097 47K
RX5V1_DDC_SCL
R2098 47K
R2098 47K
POW2
RX5V1_DDC_SDA
RX5V1_DDC_SCL
D6
D6
NC/SCHOTTKY DIODE/B340A
NC/SCHOTTKY DIODE/B340A
1N4148/SMD
1N4148/SMD
D216
D216
3
C7
C7
1uF
1uF
C0402/SMD
C0402/SMD
R1606
R1606
0R
0R
R0603/SMD
R0603/SMD
1
2
BAV70
BAV70
HDMI2_RXCHDMI2_RXC+
HDMI2_RX0HDMI2_RX0+
HDMI2_RX1HDMI2_RX1+
HDMI2_RX2HDMI2_RX2+
HDMI2_5VIN
CEC
R0603/SMD
R0603/SMD
3
R0603/SMD
R0603/SMD
C4
C4
1uF
1uF
C0402/SMD
C0402/SMD
POW2
+5VSB
POW0
RX2_HOTPLUG#
D7
D7
NC/SCHOTTKY DIODE/B340A
NC/SCHOTTKY DIODE/B340A
1N4148/SMD
1N4148/SMD
HDMI1_5VIN
1
2
BAV70
BAV70
D215
D215
R2082
R2082
R0603/SMD
R0603/SMD
RX5V1_DDC_SDA
RX5V1_DDC_SCL
HDMI1_RXCHDMI1_RXC+
HDMI1_RX0HDMI1_RX0+
HDMI1_RX1HDMI1_RX1+
HDMI1_RX2HDMI1_RX2+
R2091
R2091
1K
1K
R0603/SMD
R0603/SMD
1K
1K
R2085
R2085
47K
47K
R0603/SMD
R0603/SMD
+
+
C710
C710
10uF/16V
10uF/16V
AV33_HDMI
+5VSB
CB1008
CB1008
2.2uF/10v
2.2uF/10v
C0805/SMD
C0805/SMD
U24
U24
AV33_HDMI
61
POW2
HPD2RX1_HOTPLUG#
62
HPD2
63
SDA2
64
SCL2
65
EDID_BRG_EN
66
GND
67
B21
68
A21
69
VCC
70
B22
71
A22
72
GND
73
B23
74
A23
75
VCC
76
B24
77
A24
78
GND
79
80
AV33_HDMI
POW1
HPD1
R2093
R2093
100/NC
100/NC
R0603/SMD
R0603/SMD
HPD1
FB9 NC
FB9 NC
BEAD/SMD/0603
BEAD/SMD/0603
FB79 FB
FB79 FB
BEAD/SMD/0603
BEAD/SMD/0603
C0402/SMD
C0402/SMD
C0402/SMD
C0402/SMD
100nF
100nF
C715
C715
C0402/SMD
C0402/SMD
CEXT
60
59
CEXT
PC0/I2C_RST1SDA12SCL13GND4B115A116VCC7B128A129GND10B1311A1312VCC13B1414A1415GND16VCC17REXT18NC19PC1/POWDN
I2_RST
RX5V2_DDC_SDA
HDMI3_RX2+
58
GND
RX5V2_DDC_SCL
100nF
100nF
C716
C716
C0402/SMD
C0402/SMD
HDMI3_RX2-
B3457A34
56
HDMI2_RXC-
100nF
100nF
100nF
100nF
C719
C719
C720
C720
C0402/SMD
C0402/SMD
HDMI3_RX1-
HDMI3_RX1+
55
B3354A33
VCC
PS321
PS321
HDMI2_RXC+
GND1,2,3,4,5,6,7,9,10,11,12,13,14
AV332,3,5,9,13
AV123,5,10
OSDA14
OSCL14
CEC4
+3V3SB1,2,4,7,9
+12V1,2,5,9,13,14
GPIO_[5..11]1,4,9,13
+5VSB1,2,9,11
OSCL04
OSDA04
HDMIDDCSDA_0 OSDA1
HDMIDDCSCL_0 OSCL1
HPD2
RX5V1_DDC_SDA
RX5V1_DDC_SCL
HDMI1_RXCHDMI1_RXC+
POW2
HDMI1_RX0-
HDMI1_RX0+
GND
HDMI1_RX1HDMI1_RX1+
AV33_HDMI
HDMI1_RX2-
HDMI1_RX2+
POW0
HPD1
171918
HDMI3_RX1+
15
13
11
HDMI3_RXC+
9
HDMI3_RXC-
7
AV33_HDMI
5
RX5V3_DDC_SDA
3
1
HDMI3_5VIN
GND
AV33
AV12
OSDA1
OSCL1
CEC
+3V3SB
+12V
GPIO_[5..11]
+5VSB
OSCL0
OSDA0
CEXT
HDMI3_RX1+
HDMI3_RX2-
AV33_HDMI
HDMI3_RX2+
10
11
12
13
14
15
16
+5VSB
U4
1
HPD2
2
SDA2
3
SCL2
4
B21
5
A21
6
POW2
7
B22
8
A22
9
GND
B23
A23
VCC
B24
A24
POW1
HPD1
60
63
64
61
B3462A34
VCC
CEXT
I2_RST17SDA118SCL119B1120A1121VCC22B1223A1224GND25B1326A1327NC
HDMI2_RXC-
HDMI2_RXC+
I2_RST
RX5V2_DDC_SDA
RX5V2_DDC_SCL
GND
POW1
HDMI3_RXC-
HDMI3_RXC+
HDMI3_RX0-
HDMI3_RX1-
HDMI3_RX0+
54
57
55
58
B3359A33
GND
B3153A31
B3256A32
POW3
PS331U4PS331
28
AV33_HDMI
HDMI2_RX1+
HDMI2_RX0-
HDMI2_RX0+
GND
HDMI2_RX1-
MediaTek Inc.
MediaTek Inc.
MediaTek Inc.
Title
Title
Title
HDMI/SPEAKER
HDMI/SPEAKER
HDMI/SPEAKER
Document Number
Document Number
Document Number
Size
Size
Size
Custom
Custom
Custom
MT5380P1-V2
MT5380P1-V2
MT5380P1-V2
Date: Sheet
Date: Sheet
Date: Sheet
HPD3
HDMISCL_1
HDMISDA_1
52
51
50
SCL3
SDA3
HPD3
B1429A1430REXT31POWDN
HDMI2_RX2-
HDMI2_RX2+
REXT
OPWR0_5V
49
SDA_SINK
SCL_SINK
HPD_SINK
I2C_ADDR
SCL_CTL
SDA_CTL
32
PC1
POW_SINK
Z1
Y1
Z2
Y2
GND
Z3
Y3
VCC
Z4
Y4
NUSTC_5380P1_V2
NUSTC_5380P1_V2
NUSTC_5380P1_V2
No.1-2, Innovation Rd 1, SBIP, Hsin-Chu City 300
No.1-2, Innovation Rd 1, SBIP, Hsin-Chu City 300
No.1-2, Innovation Rd 1, SBIP, Hsin-Chu City 300
TEL:(03)567-0766 FAX:(03)578-7610
TEL:(03)567-0766 FAX:(03)578-7610
TEL:(03)567-0766 FAX:(03)578-7610
RX0_CB
46
RX0_C
45
HPD_SINK1
44
RX0_0B
43
RX0_0
42
GND
41
RX0_1B
40
RX0_1
39
AV33_HDMI
38
RX0_2B
37
RX0_2
36
S3/I1C_ADDR
35
S2/SCL_CTL
34
S1/SDA_CTL
33
Drawn
Drawn
Drawn
SDA_SINK
48
SCL_SINK
47
Rev
Rev
Rev
V1
V1
V1
815Tuesday, December 09, 2008
815Tuesday, December 09, 2008
815Tuesday, December 09, 2008
of
of
of
Page 30
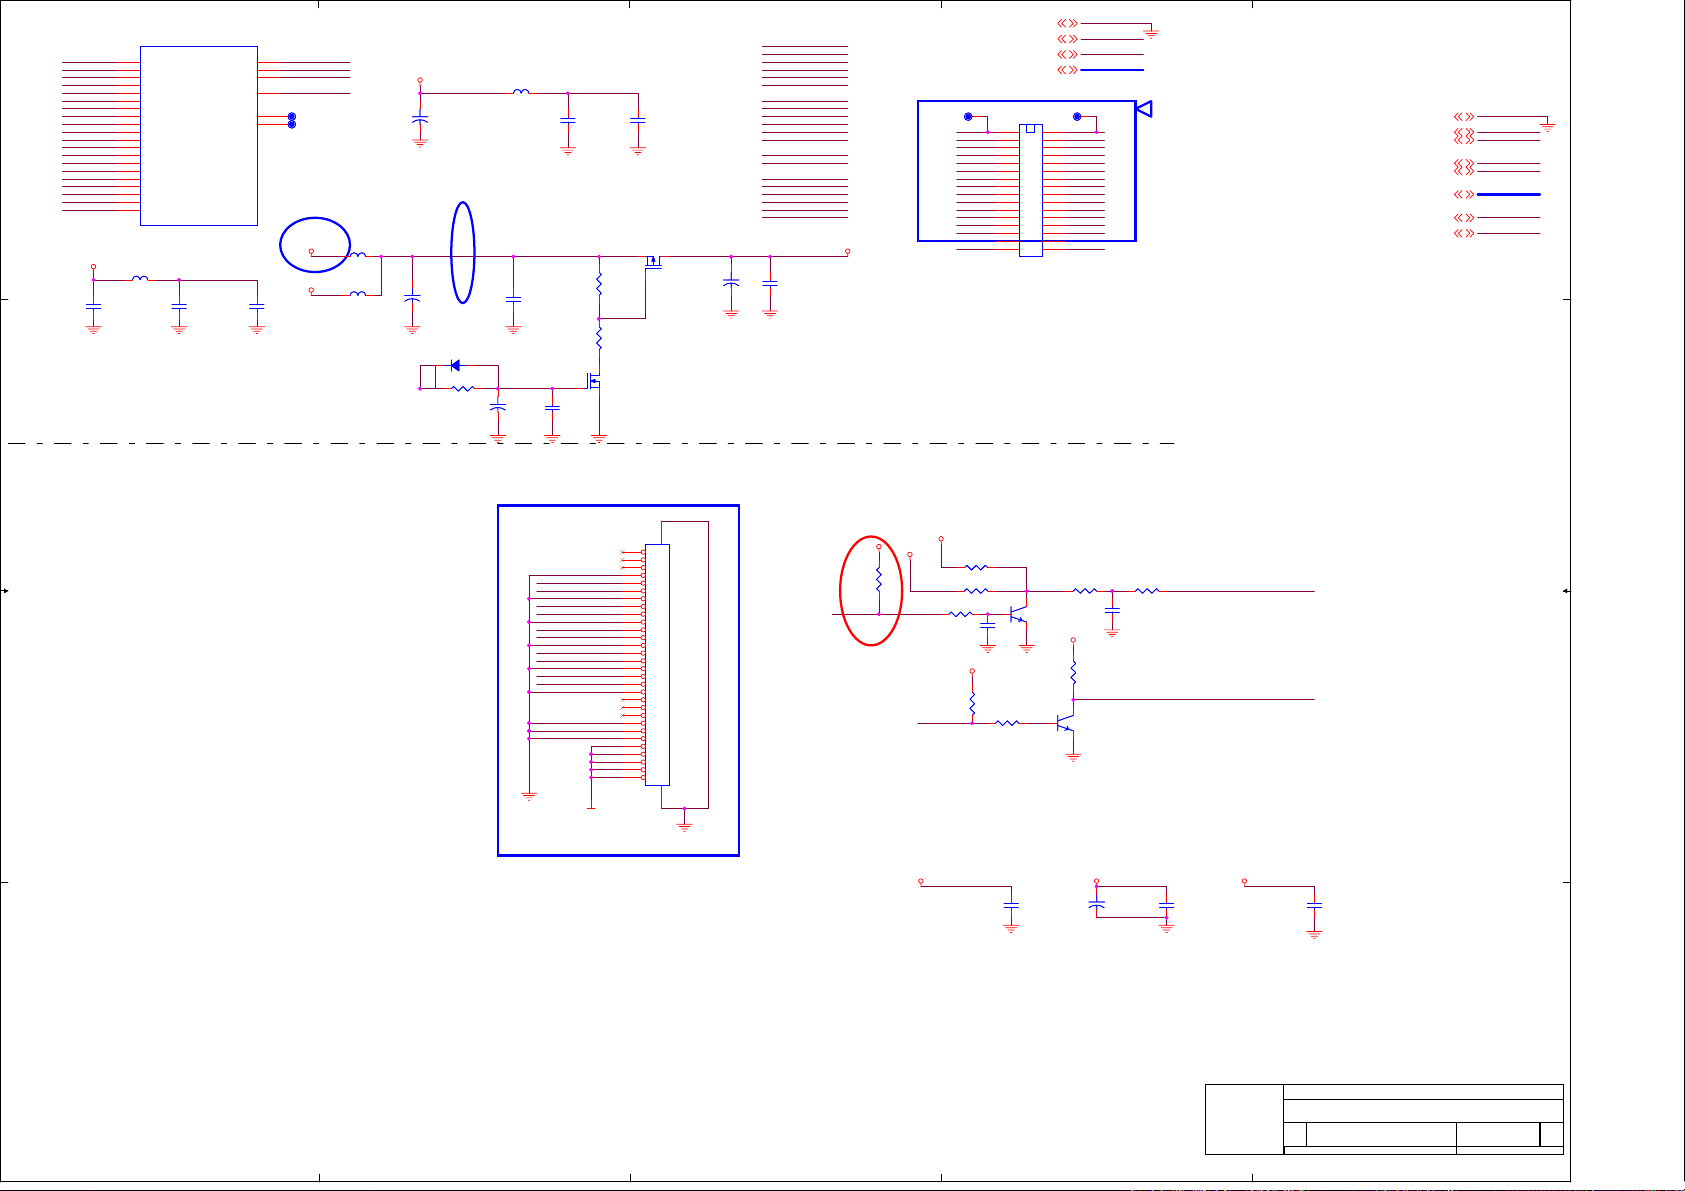
A
U13C
U13C
A0N
244
A0N
A0P
243
A1N
242
A1P
241
A2N
239
A2P
238
CK1N
237
CK1P
236
A3N
235
A3P
234
A4N
233
A4P
232
A5N
4 4
3 3
A5P
A6N
A6P
CK2N
CK2P
A7N
A7P
AV33
230
229
228
227
226
225
224
223
FB37 FBFB37 FB
C85
C85
1uF
1uF
A0P
A1N
A1P
A2N
A2P
CK1N
CK1P
A3N
A3P
A4N
A4P
A5N
A5P
A6N
A6P
CK2N
CK2P
A7N
A7P
MT5380 SMD LQFP
MT5380 SMD LQFP
AVDD33_LVDSA
AVDD33_LVDSB
AVDD33_LVDSC
AVDD33_VPLL
AVDD33_LVDS
C86
C86
4.7uF
4.7uF
AVDD33_LVDS
222
AVDD33_LVDS
231
AVDD33_LVDS
240
AVDD33_VPLL
219
TP45TP45
220
TP2
TP46TP46
221
TN2
For +5V
+5V
+12V
CB155
CB155
0.1uF
0.1uF
HI = > LVDS POWER ON
LO = > LVDS POWER OFF
JP10
JP10
FB 1206
FB 1206
JP11NCJP11
NC
For +12V
AV33
100uF/16v
100uF/16v
REMOVE INDUCTOR
GPIO_9
+
CE580
+
CE580
+
+
CE49
CE49
220uF/16v
220uF/16v
D2 1N4148D2 1N4148
R125 10kR125 10k
B
FB55 FBFB55 FB
C
A0N
A0P
A1N
A1P
A2N
AVDD33_VPLL
C106
C106
1uF
1uF
R123
R123
100K
100K
CB154
CB154
0.1uF
0.1uF
+
+
CE50
CE50
47uF/16v
47uF/16v
1
CB455
CB455
0.1uF_DNS
0.1uF_DNS
3 2
R1241KR124
1K
Q9
2N7002Q92N7002
CB192
CB192
0.1uF
0.1uF
SOT23/SMD
SOT23/SMD
AO3401
AO3401
Q62
Q62
1
23
CE52
CE52
470uF/16V
470uF/16V
C330UF25V/D8H14
C330UF25V/D8H14
A2P
CK1N
CK1P
A3N
A3P
A4N
A4P
A5N
A5P
A6N
A6P
CK2N
CK2P
A7N
A7P
CB152
CB152
0.1uF
0.1uF
LVDSVDD
LVDSVDD
+
+
practicaly use:HDR2X15\2MM\SA 2×15pin
T6T6
GND1,2,3,4,5,6,7,8,10,11,12,13,14
+12V1,2,5,13,14
AV332,3,5,8,13
GPIO_[5..11]1,4,8,13
CN4
CN4
LVDSVDD
LVDSVDD
GND
A0N
A1N
A2N
GND
CK1N
A3N
A4N
20 19
A5N
22
A6N
GND
CK2N
A7N
GND GND
A2006WV0-16X2
A2006WV0-16X2
HDR2X16\2MM\SA
HDR2X16\2MM\SA
D
GND
+12V
AV33
GPIO_[5..11]
T5T5
LVDSVDD
12
GND
34
GND
56
A0P
78
A1P
910
A2P
1112
GND
1314
CK1P
1516
A3P
1718
A4P
A5P
21
2324
GND
2526
CK2P
2728
A7P
2930
3132
E
GND1,2,3,4,5,6,7,8,10,11,12,13,14
+5VSB1,2,8,11
+12V1,2,5,13,14
OPCTRL24
+3V3SB1,2,4,7,8
OPWM[1..2]4,7
BL_ON/OFF1
DIMMING1
GND
+5VSB
+12V
OPCTRL2
+3V3SB
OPWM[1..2]
BL_ON/OFFA6P
DIMMING
R397
R397
10K
10K
+5V
+12V
DV33
R391 NCR391 NC
R392 1kR392 1k
R396
R396
4.7k
4.7k
+3V3SB
OPCTRL2
R401
R401
10K
10K
CB992
CB992
1uF
1uF
R394 10kR394 10k
R395 0RR395 0R
Q26
Q26
1
2N3904
2N3904
3 2
+5V
R4001kR400
1k
R404
R404
4.7k
4.7k
CB216
CB216
0.1uF
0.1uF
BL_ON/OFF
Back Light circuit
Q28
Q28
1
2N3904
2N3904
3 2
+5V
+
CE72
+
CE72
470uF/16v
470uF/16v
C330UF25V/D8H14
C330UF25V/D8H14
D
CB213
CB213
1uF
1uF
CB217
CB217
0.1uF
0.1uF
Dimming
+5VSB
CB218
CB218
0.1uF
0.1uF
MediaTek Inc.
MediaTek Inc.
MediaTek Inc.
Title
Title
Title
LVDS/MUTE
LVDS/MUTE
LVDS/MUTE
Document Number
Document Number
Document Number
Size
Size
Size
C
C
C
MT5380P1-V2
MT5380P1-V2
MT5380P1-V2
Date: Sheet
Date: Sheet
Date: Sheet
NUSTC_5380P1_V2
NUSTC_5380P1_V2
NUSTC_5380P1_V2
No.1-2, Innovation Rd 1, SBIP, Hsin-Chu City 300
No.1-2, Innovation Rd 1, SBIP, Hsin-Chu City 300
No.1-2, Innovation Rd 1, SBIP, Hsin-Chu City 300
TEL:(03)567-0766 FAX:(03)578-7610
TEL:(03)567-0766 FAX:(03)578-7610
TEL:(03)567-0766 FAX:(03)578-7610
Drawn
Drawn
Drawn
915Wednesday, December 31, 2008
915Wednesday, December 31, 2008
915Wednesday, December 31, 2008
E
Rev
Rev
Rev
V1
V1
V1
of
of
of
32
1
32
2
3
A0N
A0P
A1N
A1P
A2N
A2P
CK1N
CK1P
A3N
A3P
2 2
LVDSVDD
4
5
6
7
8
9
10
11
12
13
14
15
16
17
18
19
20
21
22
23
24
25
26
27
28
29
30
31
31
CN7
CN7
HEADER 30 SMD1.0mm TOP
HEADER 30 SMD1.0mm TOP
+3V3SB
OPWM1
use for 21.6 inch panel with TCON CMO
1 1
A
B
C
Page 31
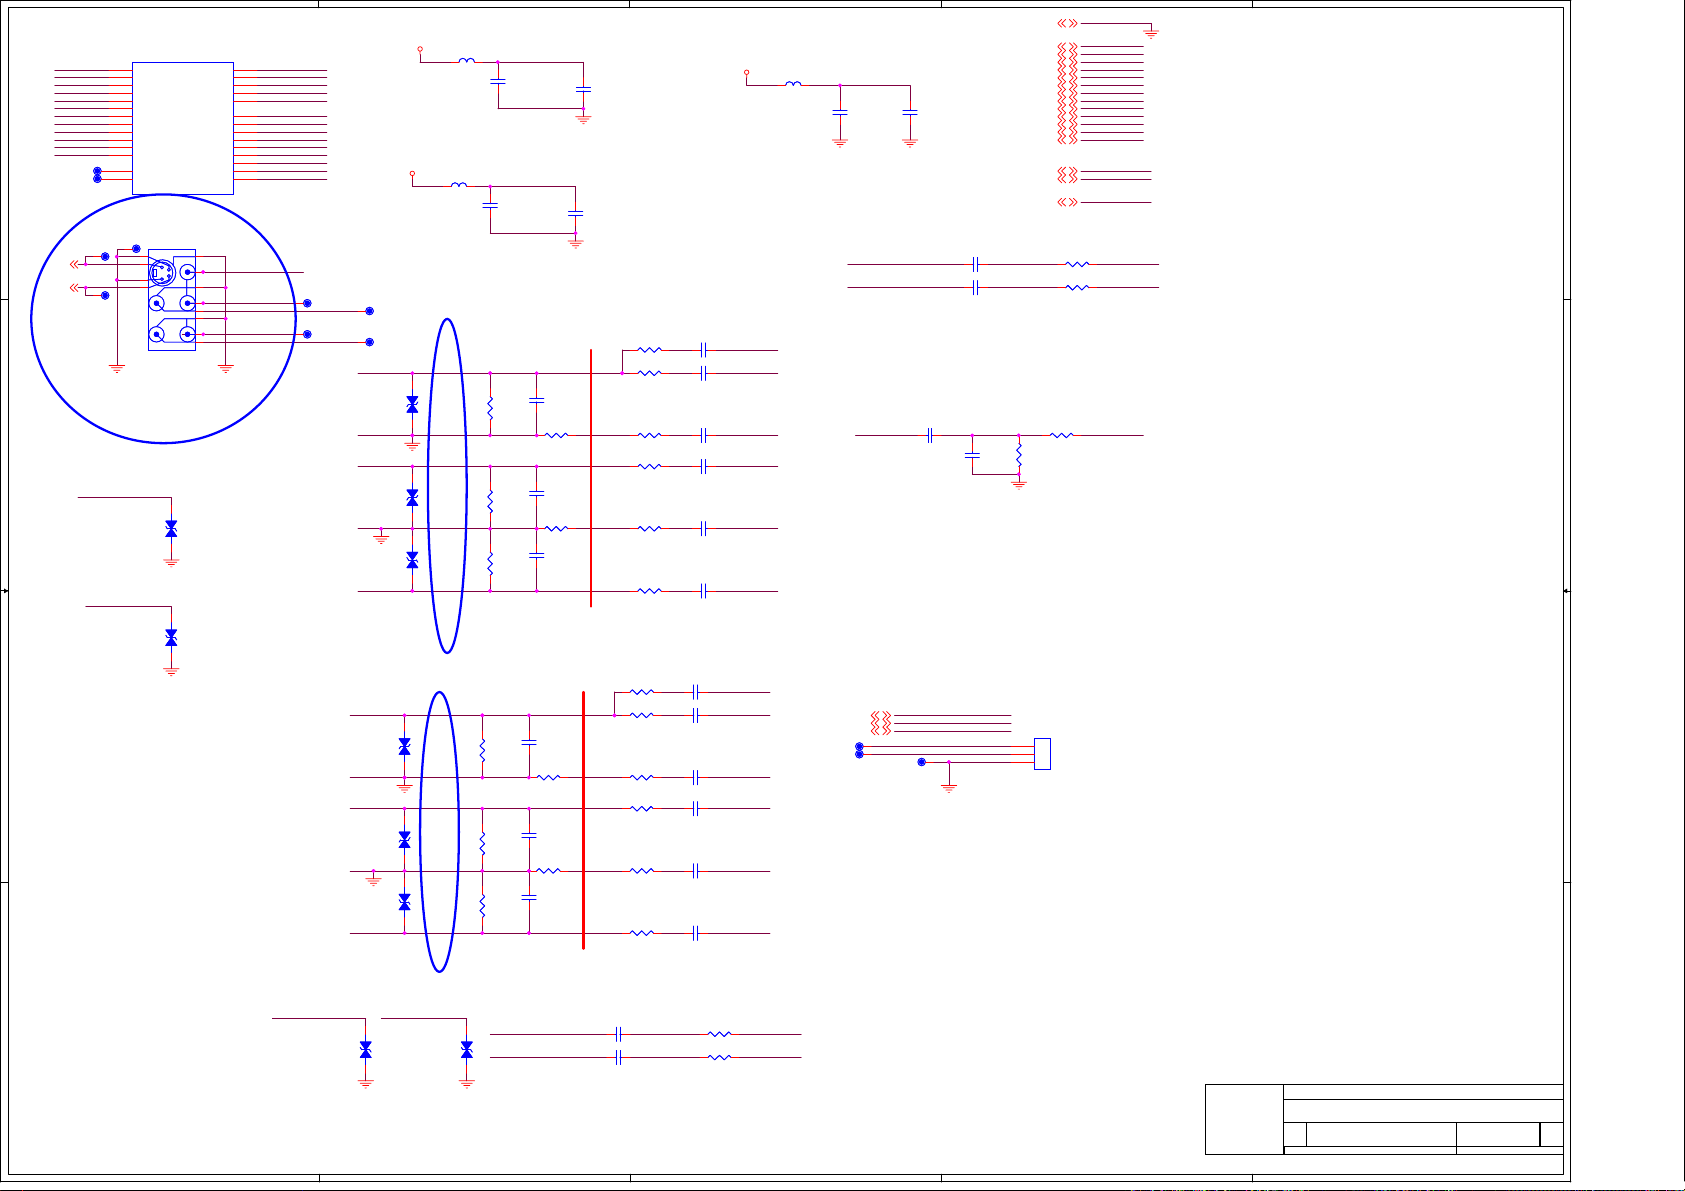
5
U13E
TP47TP47
TP48TP48
107
108
109
114
115
116
118
119
120
121
122
123
112
111
T64T64
T65T65
YPBPR0L_IN
ESD_0402_10pF
ESD_0402_10pF
C0402/SMD
C0402/SMD
YPBPR0R_IN
ESD_0402_10pF
ESD_0402_10pF
C0402/SMD
C0402/SMD
U13E
SOY0
Y0P
Y0N
PB0P
PBR0N
PR0P
SOY1
Y1P
Y1N
PB1P
PBR1N
PR1P
TN1
TP1
MT5380 SMD LQFP
MT5380 SMD LQFP
P69
P69
T75T75
11
12
9
8
RCA2X3
RCA2X3
AV-SV
AV-SV
D107
D107
D105
D105
DVDD12_VGA
AVSS12_RGBADC
AVDD12_RGBADC
AVSS12_RGBFE
AVDD12_RGBFE
VSYNC
HSYNC
10
C
C
7
Y
Y
4
6
5
1
3
2
12
12
DVDD12_VGA
117
AVSS12_RGBADC
113
AVDD12_RGBADC
110
AVSS12_RGBFE
105
101
104
RP
106
RN
98
BP
99
BN
102
GP
103
GN
96
97
100
SOG
Y0_IN
PB0_IN
PR0_IN
RP
RN
BP
BN
GP
GN
VSYNC
HSYNC
SOG
T68T68
YPBPR0L_IN
T70T70
YPBPR0R_IN
SOY0
Y0P
Y0N
PB0P
PBR0N AVDD12_RGBFE
PR0P
SOY1
Y1P
Y1N
PB1P
PBR1N
D D
C C
B B
PR1P
SC1_IN12
SY1_IN12
AV12
AV12
REMOVE INDUCTOR
T67T67
T69T69
NEARLY YPBPR CONNECTOR
Y0_IN
12
Y_GND
PB0_IN
12
PB_GND
1 2
PR0_IN
REMOVE INDUCTOR
NEARLY YPBPR CONNECTOR
12
D156
D156
ESD_0402_10pF
ESD_0402_10pF
12
D157
D157
ESD_0402_10pF
ESD_0402_10pF
PB_GND PBR1N
ESD_0402_10pF
ESD_0402_10pF
D158
D158
1 2
PR1_IN
FB40 FBFB40 FB
FB42 FBFB42 FB
D110
D110
ESD_0402_10pF
ESD_0402_10pF
D112
D112
ESD_0402_10pF
ESD_0402_10pF
ESD_0402_10pF
ESD_0402_10pF
D131
D131
4
AVDD12_RGBADC
C119
C119
1uF
R163375R1633
75
R163775R1637
75
R164075R1640
75
R118775R1187
75
R119575R1195
75
R120375R1203
75
1uF
AVSS12_RGBADC
AVDD12_RGBFE
C115
C115
1uF
1uF
AVSS12_RGBFE
C594
C594
18pF
18pF
R16340RR1634
C597
C597
18pF
18pF
R16380RR1638
C599
C599
18pF
18pF
C353
C353
18pF
18pF
R11900RR1190
C359
C359
18pF
18pF
R11910RR1191
C365
C365
18pF
18pF
CB158
CB158
0.1uF
0.1uF
CB160
CB160
0.1uF
0.1uF
NEARLY MT5380
C349 4.7nFC349 4.7nF
R12070RR1207
0R
C351 10nFC351 10nF
R118468R1184
68
R1189 100R1189 100
0R
R1192 68R1192 68
R1197 100R1197 100
0R
R1200 68R1200 68
R1635 100R1635 100
0R
R1636 68R1636 68
R1639 100R1639 100
0R
R1641 68R1641 68
R16310RR1631
R163268R1632
C355 10nFC355 10nF
C357 10nFC357 10nF
C361 10nFC361 10nF
C363 10nFC363 10nF
NEARLY MT5380
C592 4.7nF
C592 4.7nF
0R
C593 10nFC593 10nF
68
C595 10nFC595 10nF
C596 10nFC596 10nF
C598 10nFC598 10nF
C600 10nFC600 10nF
C0603/SMD
C0603/SMD
AV12
SOY0
Y0P
Y0N
PB0P
PBR0N
PR0P
SOY1
Y1PY1_IN
Y1NY_GND
PB1PPB1_IN
PR1P
3
FB41 FBFB41 FB
Y1_IN1
PB1_IN1
PR1_IN1
T24T24
T25T25
DVDD12_VGA
C116
C116
1uF
1uF
YPBPR0R_IN
Y1_IN
PB1_IN
PR1_IN
T26T26
CB159
CB159
0.1uF
0.1uF
C500 0.1uFC500 0.1uF
YPBPR1L_IN
YPBPR1R_IN
NEARLY IC
C657
C657
C658
C658
COAXIAL
10uF/10v
10uF/10v
C0805/SMD
C0805/SMD
10uF/10v
10uF/10v
C0805/SMD
C0805/SMD
C501
C501
33pF
33pF
GND1,2,3,4,5,6,7,8,9,11,12,13,14
AV123,5,8
HSYNC11
VSYNC11
BP11
BN11
SOG11
GP11
GN11
RP11
RN11
AIN1_L13
AIN1_R13
ASPDIF13
AIN3_L13
AIN3_R13
SPDIF14
R152 20KR152 20K
R153 20KR153 20K
R1455 100R1455 100
R1456
R1456
100
100
P1
P1
3
2
1
3x1 W/HOUSING
3x1 W/HOUSING
2
SPDIF
AV12
HSYNC
VSYNC
BP
BN
SOG
GP
GN
RP
RN
AIN1_L
AIN1_R
ASPDIF
AIN3_L
AIN3_R
ASPDIFSPDIF
GND
AIN1_LYPBPR0L_IN
AIN1_R
1
A A
5
YPBPR1L_IN YPBPR1R_IN
ESD_0402_10pF
ESD_0402_10pF
C0402/SMD
C0402/SMD
D159
D159
12
ESD_0402_10pF
ESD_0402_10pF
C0402/SMD
C0402/SMD
12
YPBPR1L_IN AIN3_L
D160
D160
YPBPR1R_IN
4
NEARLY IC
10uF/10v
10uF/10v
C659
C659
10uF/10v
10uF/10v
C660
C660
C0805/SMD
C0805/SMD
C0805/SMD
C0805/SMD
R1642 20KR1642 20K
R1643 20KR1643 20K
AIN3_R
NUSTC_5380P1_V2
NUSTC_5380P1_V2
NUSTC_5380P1_V2
No.1-2, Innovation Rd 1, SBIP, Hsin-Chu City 300
No.1-2, Innovation Rd 1, SBIP, Hsin-Chu City 300
MediaTek Inc.
MediaTek Inc.
MediaTek Inc.
Title
Title
Title
YPbPr/LR
YPbPr/LR
YPbPr/LR
Document Number
Document Number
Document Number
Size
Size
Size
MT5380P1-V2
MT5380P1-V2
MT5380P1-V2
C
C
C
Date: Sheet
Date: Sheet
Date: Sheet
3
2
No.1-2, Innovation Rd 1, SBIP, Hsin-Chu City 300
TEL:(03)567-0766 FAX:(03)578-7610
TEL:(03)567-0766 FAX:(03)578-7610
TEL:(03)567-0766 FAX:(03)578-7610
Drawn
Drawn
Drawn
of
of
of
10 15Thursday, December 04, 2008
10 15Thursday, December 04, 2008
10 15Thursday, December 04, 2008
1
Rev
Rev
Rev
V1
V1
V1
Page 32
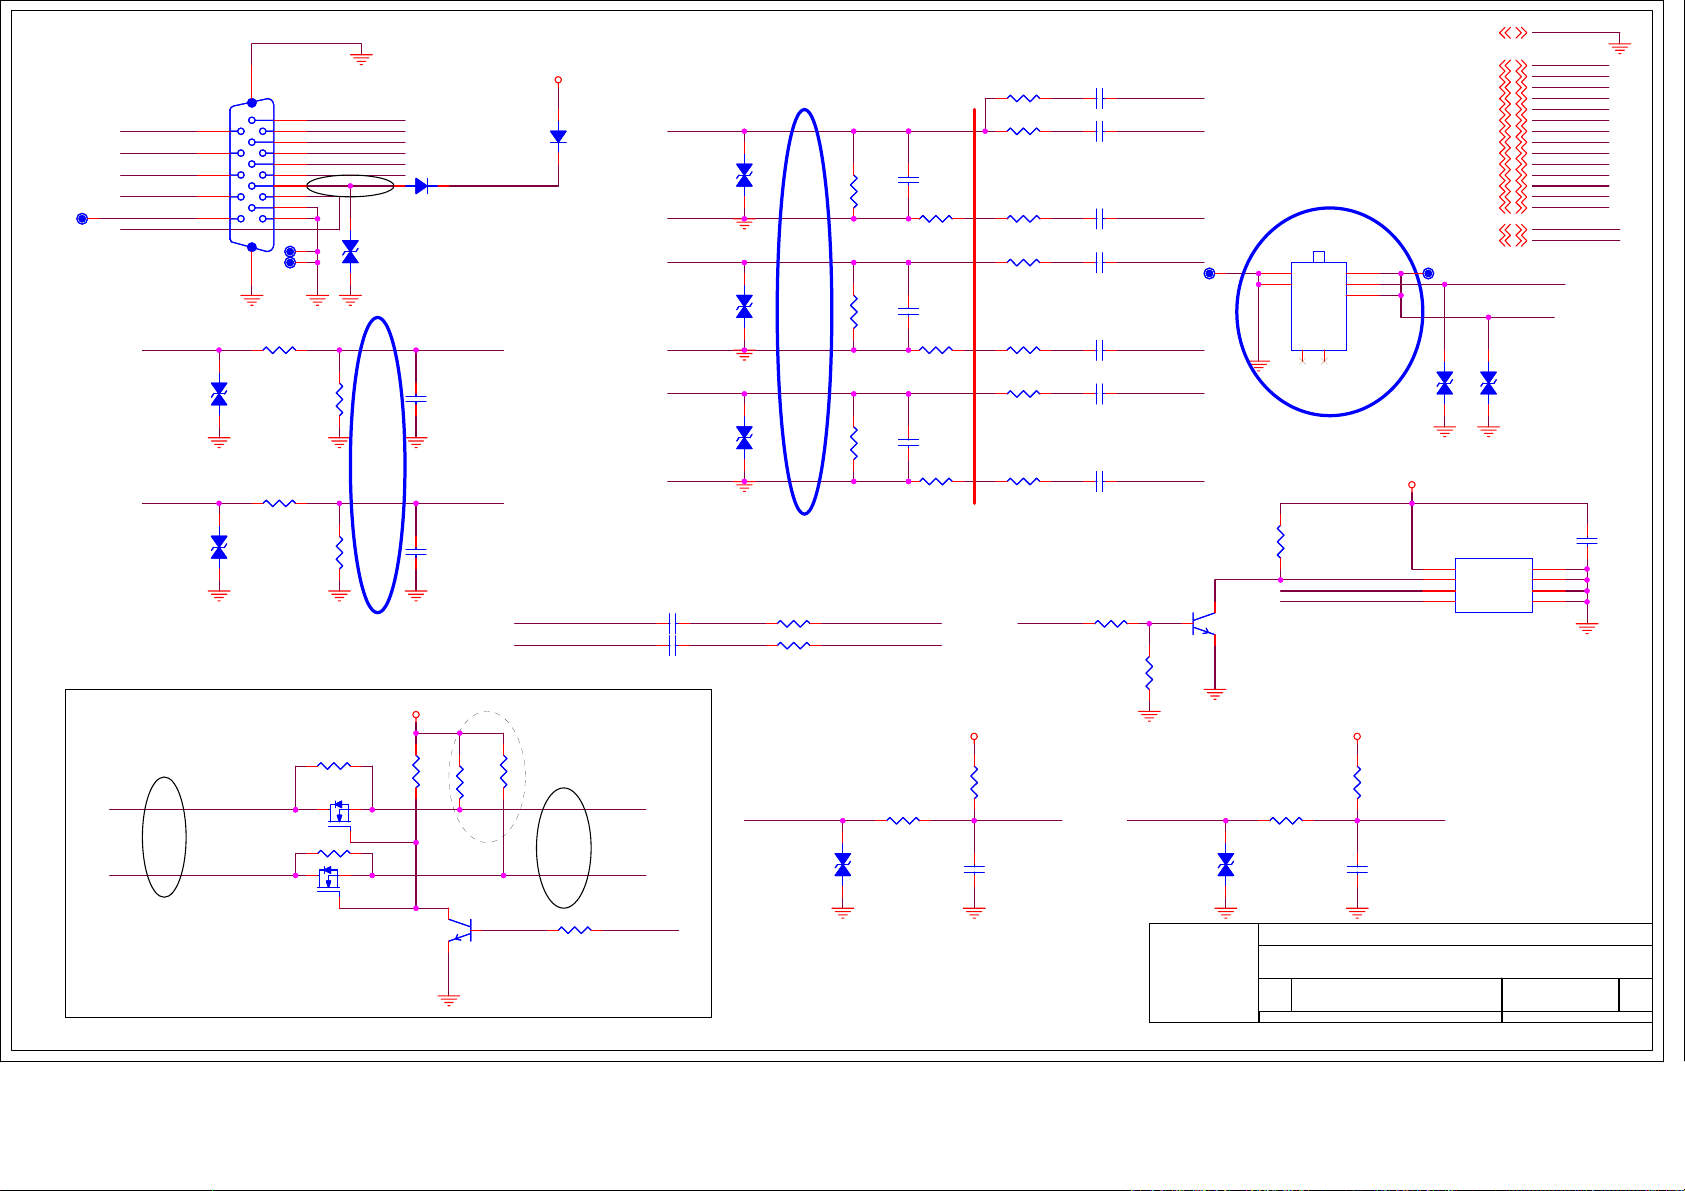
A
VGAR_IN
VGAL_IN
12
D34
D34
ESD_0402_10pF
ESD_0402_10pF
ESD_0402_10pF
ESD_0402_10pF
U29
U29
NC
NC
NC
GND
Drawn
Drawn
Drawn
1
2
3
4
GND
+5VSB
SOG
GP
GN
BP
BN
RP
RN
VSYNC
HSYNC
AIN2_L
AIN2_R
OPCTRL1
OPCTRL4
U0RX
U0TX
11 15Thursday, December 04, 2008
11 15Thursday, December 04, 2008
11 15Thursday, December 04, 2008
CB161
CB161
0.1uF
0.1uF
Rev
Rev
Rev
V1
V1
V1
of
of
of
GND1,2,3,4,5,6,7,8,9,10,12,13,14
P10
P10
D-SUB15 FEMALE
D-SUB15 FEMALE
1617
SVGA
SVGA
RED_GND
6
TXD
VGASDA_IN
HSYNC#
VSYNC#
T32T32
A A
VGASCL_IN
RXD
HSYNC#
VSYNC#
11
12
13
14
15
T31T31
T30T30
R160 0RR160 0R R1810R R1810R
12
D23
D23
ESD_0402_10pF
ESD_0402_10pF
R167 0RR167 0R
12
D25
D25
ESD_0402_10pF
ESD_0402_10pF
RED
1
GRN_GND
7
GRN
2
BLU_GND
8
BLU
3
9
4
10
5
D29 1N4148D29 1N4148
12
D30
D30
ESD_0402_10pF
ESD_0402_10pF
R1642KR164
2K
R1702KR170
2K
C133
C133
5pF
5pF
C137
C137
5pF
5pF
VGA_PLUGPWRVGA_5V
HSYNC
VSYNC
REMOVE INDUCTOR
+5VSB
R101
R101
R24
10K
10K
R24
10K
10K
Q10
Q10
2N3904
2N3904
1
3 2
U0TX
UPDATA LEVEL
SHIFTER
R106 ncR106 nc
QF5
QF5
R107 ncR107 nc
QF6
QF6
1
32
2N7002SOT23/SMD
2N7002SOT23/SMD
1
32
2N7002SOT23/SMD
2N7002SOT23/SMD
+5VSB
VGAL_IN
VGAR_IN
R26
R26
10K
10K
R105 10KR105 10K
TXD
RXDU0RX
D28
D28
1N4148
1N4148
10uF/10v
10uF/10v
10uF/10v C0805/SMD
10uF/10v C0805/SMD
C661
C661
C662
C662
OPCTRL4
GRN
GRN_GND
BLU
RED
RED_GND
12
D24
D24
ESD_0402_10pF
ESD_0402_10pF
12
D26
D26
ESD_0402_10pF
ESD_0402_10pF
12
D27
D27
ESD_0402_10pF
ESD_0402_10pF
REMOVE INDUCTOR
C0805/SMD
C0805/SMD
R178 20KR178 20K
R177 20KR177 20K
VGASCL_IN VGASCL VGASDAVGASDA_IN
NEARLY VGA CON.
C134
C134
5pF
R16575R165
75
R17175R171
75
R17575R175
75
AIN2_L
AIN2_R
R186 100R186 100
12
D31
D31
ESD_0402_10pF
ESD_0402_10pF
5pF
C138
C138
5pF
5pF
C141
C141
5pF
5pF
VGA_PLUGPWR VGA_PLUGPWR
R1790R R1790R
R1960R R1960R
R182
R182
10K
10K
C145
C145
NS/0.1uF
NS/0.1uF
NEARLY IC
R1610R R1610R
R16368 R16368
R166100 R166100
R16968 R16968
R172100 R172100
R17468 R17468
R180100 R180100
H : WP ENABLE
L : WP DISABLE
OPCTRL1
R194 10KR194 10K
C1314.7nF
C1314.7nF
C0603/SMD
C0603/SMD
C13210nF C13210nF
C13510nF C13510nF
C13610nF C13610nF
C13910nF C13910nF
C14010nF C14010nF
C14410nF C14410nF
R195NCR195
NC
SOG
GP
GN
BP
BNBLU_GND
RP
RN
P11
T71T71
1
3 2
P11
1
2
SLIM_phonejack
SLIM_phonejack
R176
R176
10K
10K
VGASCL
VGASDA
Q41
Q41
2N3904
2N3904
12
D32
D32
ESD_0402_10pF
ESD_0402_10pF
MediaTek Inc.
MediaTek Inc.
MediaTek Inc.
Title
Title
Title
Document Number
Document Number
Document Number
Size
Size
Size
B
B
B
Date: Sheet
Date: Sheet
Date: Sheet
HP
GND
NC3NC
4
R187100 R187100
VGA IN/LR
VGA IN/LR
VGA IN/LR
MT5380P1-V2
MT5380P1-V2
MT5380P1-V2
5
L
6
R
7
L
VGA_PLUGPWR
VGAROMWP
R185
R185
10K
10K
C146
C146
NS/0.1uF
NS/0.1uF
+5VSB1,2,8,9
SOG10
GP10
GN10
BP10
BN10
RP10
RN10
VSYNC10
HSYNC10
AIN2_L13
AIN2_R13
OPCTRL14
OPCTRL44,7
U0RX7
U0TX7
T72T72
12
D33
D33
VGA_PLUGPWR
8
VCC
7
WP
6
SCL
5
SDA
EEPROM 24C02
EEPROM 24C02
NUSTC_5380P1_V2
NUSTC_5380P1_V2
NUSTC_5380P1_V2
No.1-2, Innovation Rd 1, SBIP, Hsin-Chu City 300
No.1-2, Innovation Rd 1, SBIP, Hsin-Chu City 300
No.1-2, Innovation Rd 1, SBIP, Hsin-Chu City 300
TEL:(03)567-0766 FAX:(03)578-7610
TEL:(03)567-0766 FAX:(03)578-7610
TEL:(03)567-0766 FAX:(03)578-7610
A
Page 33
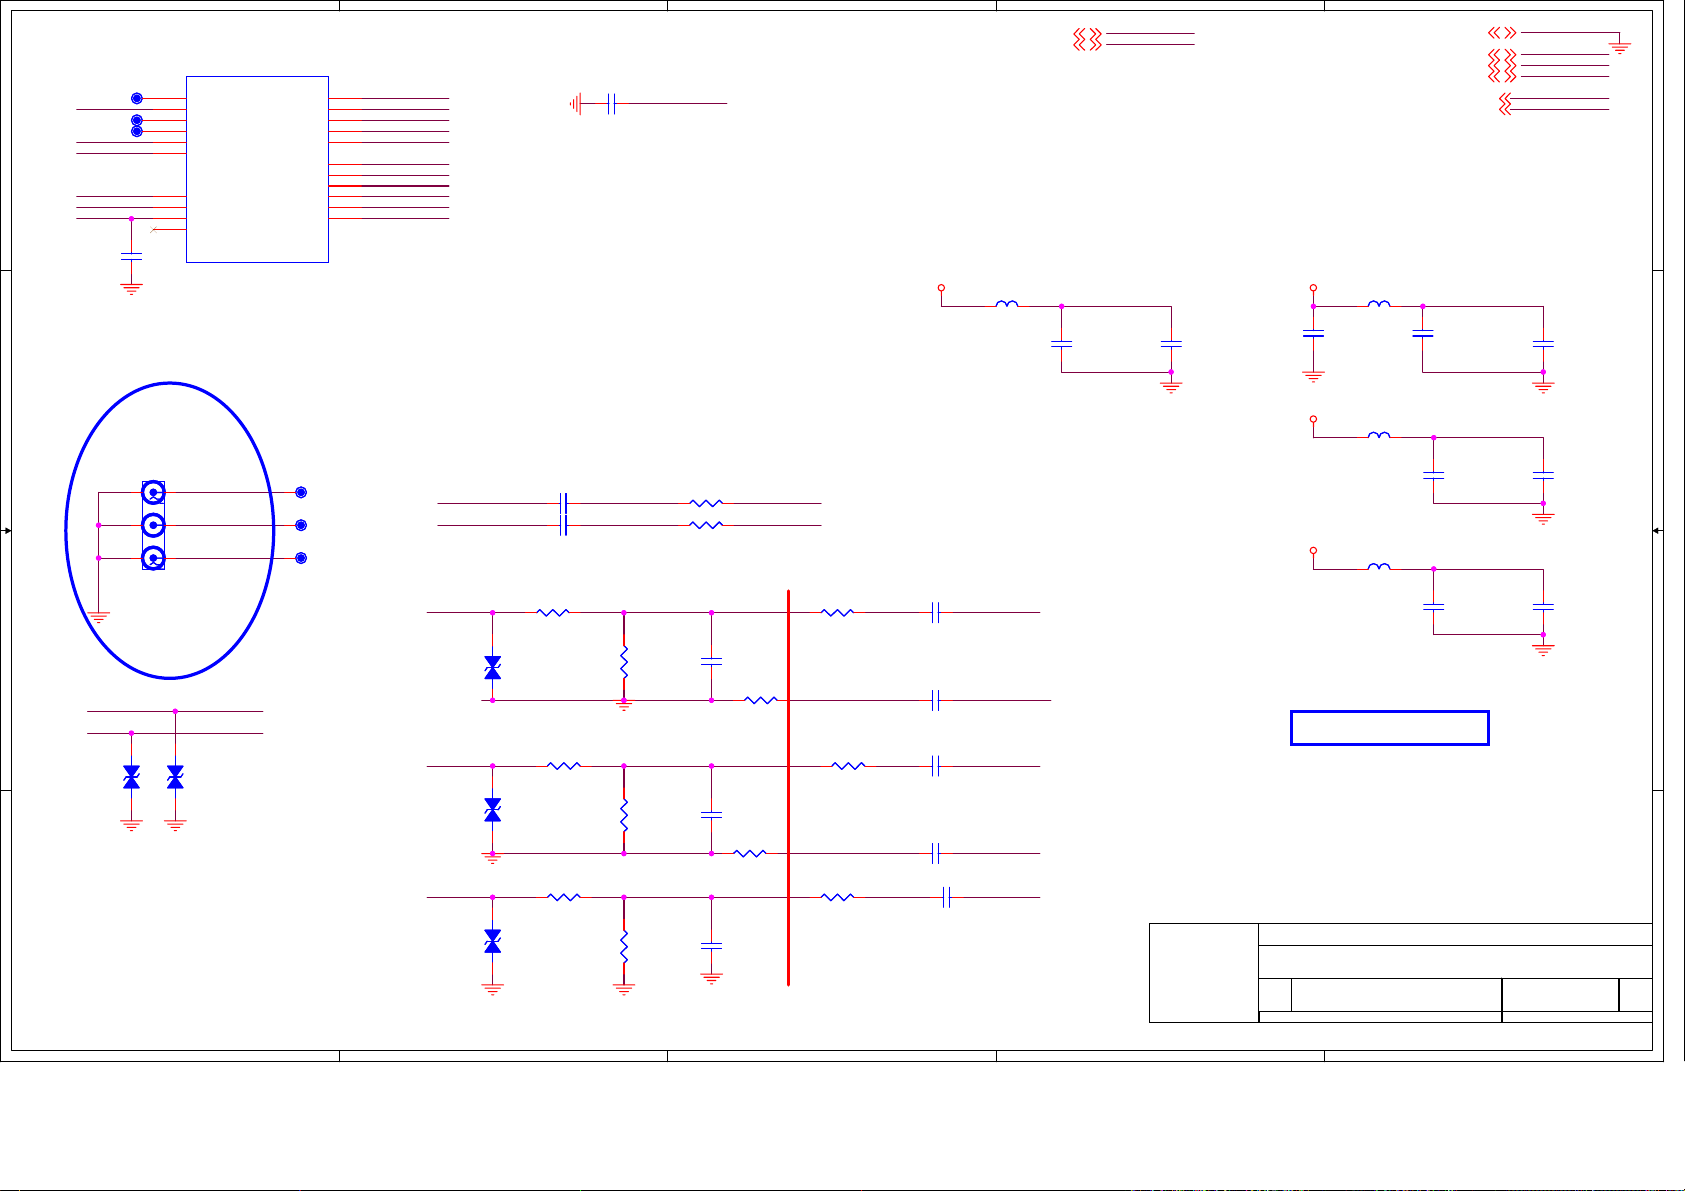
5
U13F
U13F
TP63TP63
CVBS1
TP51TP51
TP52TP52
D D
SY1
SC1
VIP_ATV
VIN_ATV
VINDC
131
129
128
127
126
125
135
133
134
138
CB979
CB979
0.1uF
0.1uF
Near chip
CVBS0
CVBS1
SY0
SC0
SY1
SC1
VIP_ATV
VIN_ATV
VINDC
D2SA
MT5380 SMD LQFP
MT5380 SMD LQFP
DVDD25_VADC
DVSS25_VADC
GND_TUNER
GD_CVBS
GND_SV
AVDD25_VADC
AVSS25_VADC
AVDD25_REF
AVSS25_REF
AVDD25_VFE
AVSS25_VFE
141
142
132
130
124
143
144
139
140
137
136
DVDD25_VADC
DVSS25_VADC
GND_TUNER
GND_CVBS
GND_SV
AVDD25_VADC
AVSS25_VADC
AVDD25_REF
AVSS25_REF
AVDD25_VFE
AVSS25_VFE
4
Near IC
C569
C569
GND_TUNER
1uF
1uF
3
VIP_ATV5 GND1,2,3,4,5,6,7,8,9,10,11,13,14
VIN_ATV5
FB43 FBFB43 FB
DVDD25_VADC
C149
C149
1uF
1uF
DVSS25_VADC
VIP_ATV
VIN_ATV
2
AV253,5
AIN0_L13
AV25AV25
FB44 FBFB44 FB
C152
C152
4.7uF
CB162
CB162
0.1uF
0.1uF
4.7uF
AIN0_R13
SC1_IN10
SY1_IN10
AVDD25_VADC
C582
C582
1uF
1uF
AVSS25_VADC
1
GND
AV25
AIN0_L
AIN0_R
SC1_IN
SY1_IN
CB163
CB163
0.1uF
0.1uF
C C
P64
P64
RCA3X1
RCA3X1
AV3-05-3
AV3-05-3
AV1_IN
1
AV1L_IN
AV1R_IN
AV1L_IN
AV1R_IN
12
D104
D104
ESD_0402_10pF
ESD_0402_10pF
2
4563
redyw
redyw
B B
12
D148
D148
ESD_0402_10pF
ESD_0402_10pF
A A
T61T61
T62T62
T63T63
AV1L_IN
AV1R_IN
AV1_IN CVBS1
SY1_IN SY1
SC1_IN
Near Connector
C663
C663
C0805/SMD
C0805/SMD
C664
C664
C0805/SMD
C0805/SMD
12
D146
D146
ESD_0402_10pF
ESD_0402_10pF
R1597 27R1597 27
12
D145
D145
ESD_0402_10pF
ESD_0402_10pF
R1598 27
R1598 27
12
R0603/SMD
R0603/SMD
D147
D147
ESD_0402_10pF
ESD_0402_10pF
10uF/10v
10uF/10v
10uF/10v
10uF/10v
R190 20KR190 20K
R192 20KR192 20K
R152547R1525
47
R156247R1562
47
R159147R1591
47
C460
C460
47pF
47pF
R1215 0RR1215 0R
C459
C459
47pF
47pF
R1230 0RR1230 0R
C565
C565
47pF
47pF
AIN0_L
AIN0_R
NEARLY MT5380
R1587 100R1587 100R1594 27R1594 27
R1560 100R1560 100
R1592 100R1592 100
C535 47nFC535 47nF
C570 1uFC570 1uF
C534 47nFC534 47nF
C571 1uFC571 1uF
C561 47nFC561 47nF
GND_CVBS
GND_SV
SC1
AV25
FB46 FBFB46 FB
AV25
FB45 FBFB45 FB
AVDD25_REF
C151
C151
1uF
1uF
AVSS25_REF
AVDD25_VFE
C150
C150
1uF
1uF
AVSS25_VFE
NO VIDEO OUTPUT
NUSTC_5380P1_V2
NUSTC_5380P1_V2
NUSTC_5380P1_V2
No.1-2, Innovation Rd 1, SBIP, Hsin-Chu City 300
No.1-2, Innovation Rd 1, SBIP, Hsin-Chu City 300
MediaTek Inc.
MediaTek Inc.
MediaTek Inc.
Title
Title
Title
AV IN/L/R/CVBSO
AV IN/L/R/CVBSO
AV IN/L/R/CVBSO
Document Number
Document Number
Document Number
Size
Size
Size
Date: Sheet
Date: Sheet
Date: Sheet
B
B
B
MT5380P1-V2
MT5380P1-V2
MT5380P1-V2
No.1-2, Innovation Rd 1, SBIP, Hsin-Chu City 300
TEL:(03)567-0766 FAX:(03)578-7610
TEL:(03)567-0766 FAX:(03)578-7610
TEL:(03)567-0766 FAX:(03)578-7610
Drawn
Drawn
Drawn
12 15Thursday, December 04, 2008
12 15Thursday, December 04, 2008
12 15Thursday, December 04, 2008
CB165
CB165
0.1uF
0.1uF
CB164
CB164
0.1uF
0.1uF
Rev
Rev
Rev
V1
V1
V1
of
of
of
5
4
3
2
1
Page 34
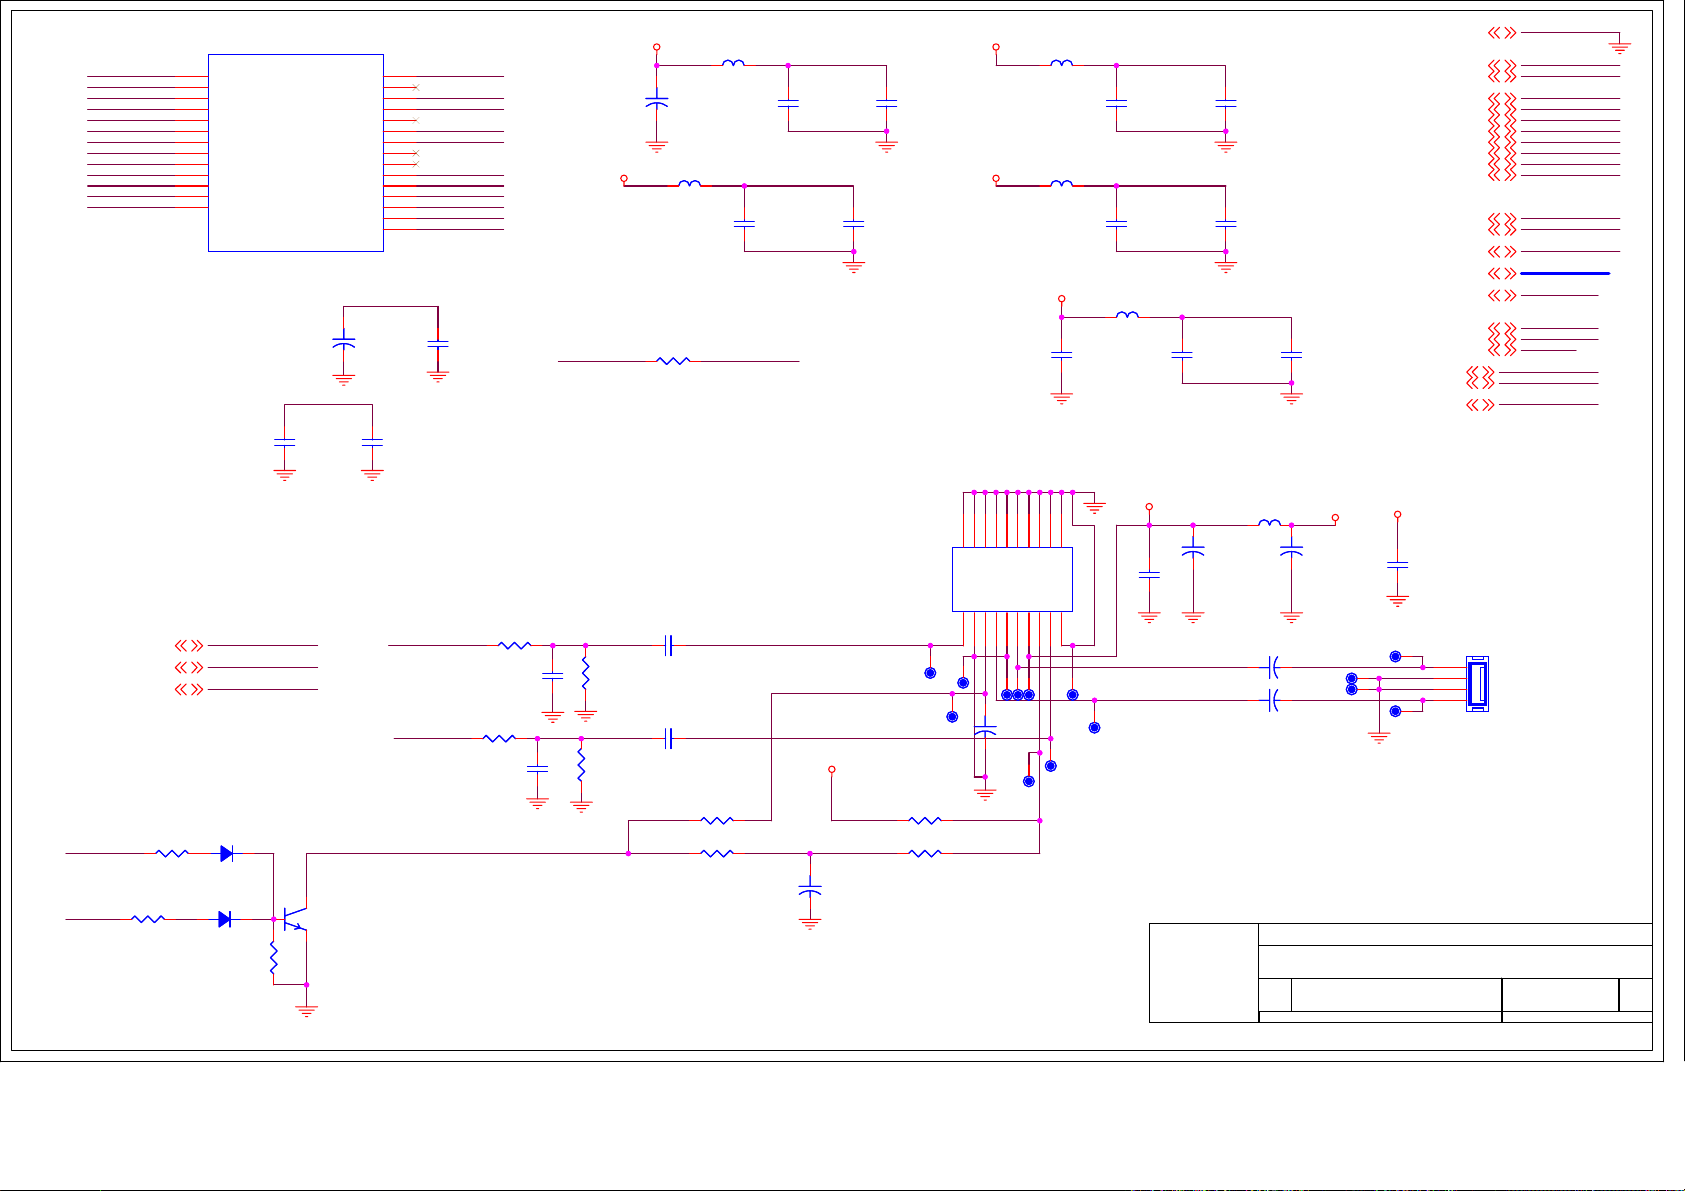
A
GPIO_[5..11]
+3V3SB
OPCTRL1
CEC
HPDET#
AIN3_L
AIN3_R
GPIO_12
GND
+12V
AV33
AIN0_LAIN1_L
AIN0_R
AIN1_L
AIN1_R
AIN2_L
AIN2_R
AL1
AR1
ASPDIF
AOBCK
AOLRCK
AIN0_L
AIN0_R
AIN1_R
AIN2_L
AIN2_R
AIN3_L
AIN3_R
AVDD33_AADC
AVSS33_AADC
VIMD_AADC
REFP_AADC
REFN_AADC
179
178
177
176
175
174
173
172
171
183
181
182
180
U13G
U13G
AIN0_L
AIN0_R
AIN1_L
AIN1_R
AIN2_L
AIN2_R
AIN3_L
AIN3_R
AVDD33_AADC
AVSS33_AADC
VMID_AADC
REFP_AADC
REFN_AADC
MT5380 SMD LQFP
MT5380 SMD LQFP
ASPDIF
AOMCLK
AOLRCK
AOBCK
AOSDATA0
AL1
AR1
AL2
AR2
AVDD33_ADAC0
AVDD33_ADAC1
AVSS33_ADAC0
AVSS33_ADAC1
ADAC_VCM
AVDD33_DIG
Need fine tune timing
ADAC_VCM
CE198
CE198
+
+
10uF/16v
10uF/16v
VIMD_AADC
C195
C195
4.7uF
4.7uF
203
200
201
202
198
188
187
191
189
192
184
190
186
185
170
CB166
CB166
0.1uF
0.1uF
ASPDIF
AOLRCK
AOBCK
AL1
AR1
AVDD33_ADAC0
AVDD33_ADAC1
AVSS33_ADAC0
AVSS33_ADAC1
ADAC_VCM
AVDD33_DIG
CB168
CB168
0.1uF
0.1uF
HPDET#
CE55
CE55
100uF/16v
100uF/16v
AV33
AV33
+
+
FB52 FBFB52 FB
R324 0RR324 0R
FB50 FBFB50 FB
GPIO_12
REFP_AADC
C204
C204
1uF
1uF
REFN_AADC
AVDD33_AADC
C201
C201
1uF
1uF
AVSS33_AADC
CB174
CB174
0.1uF
0.1uF
CB170
CB170
0.1uF
0.1uF
AV33
AV33
FB51 FBFB51 FB
FB53 FBFB53 FB
AV33
C329
C329
4.7uF
4.7uF
AVDD33_ADAC0
C202
C202
1uF
1uF
AVSS33_ADAC0
AVDD33_ADAC1
C203
C203
1uF
1uF
AVSS33_ADAC1
FB62 FBFB62 FB
AVDD33_DIG
C330
C330
1uF
1uF
AVSS33_DIG
COAXIAL
CB171
CB171
0.1uF
0.1uF
CB175
CB175
0.1uF
0.1uF
CB234
CB234
0.1uF
0.1uF
GND1,2,3,4,5,6,7,8,9,10,11,12,14
+12V1,2,5,9,14
AV332,3,5,8,9
AIN0_L12
AIN0_R12
AIN1_L10
AIN1_R10
AIN2_L11
AIN2_R11
AL114
AR114
ASPDIF10
AOBCK7
AOLRCK7
GPIO_[5..11]1,4,8,9
+3V3SB1,2,4,7,8,9
OPCTRL14,11
CEC4,8
HPDET#14
AIN3_L10
AIN3_R10
GPIO_124
Po=3W
+12VAMP
A A
TPA1517/TDA1517P
TPA1517/TDA1517P
C655
AVR1_OUT/AMP14
AVL1_OUT/AMP14
MUTE
GPIO_8
MUTE14
6.8K
6.8K
R525
R525
R625 4.7KR625 4.7K
AVR1_OUT/AMP
AVL1_OUT/AMP
MUTE
D151
D151
1N4148
1N4148
D152
D152
1N4148
1N4148
R623
R623
10K
10K
AVL1_OUT/AMP
AVR1_OUT/AMP
VOL_MUTE
Q42
Q42
1
2N3904
2N3904
3 2
R33 1KR33 1K
R528 1KR528 1K
C80
C80
1nF
1nF
1nF
1nF
C81
C81
R530
R530
10K
10K
R529
R529
10K
10K
C655
10uF/10v
10uF/10v
C0805/SMD
C0805/SMD
C656
C656
10uF/10v
10uF/10v
C0805/SMD
C0805/SMD
R37 1KR37 1K
R42 5.6K/NCR42 5.6K/NC
+12V
E7
E7
+
+
47uF/16V/NC
47uF/16V/NC
L_1517
R_1517
R41
R41
R531 1.2K/NCR531 1.2K/NC
U2
U2
T92T92
T90T90
10K
10K
T91T91
20
IN11SGND2SVRR3OUT14GND5OUT26VPP7MUTE8IN29GND
T88T88
T86T86
T87T87
E4
E4
+
+
47uF/16V
47uF/16V
T84T84
T85T85
10
T83T83
+
+
C330UF25V/D8H14
C330UF25V/D8H14
C603
GND11GND12GND13GND14GND15GND16GND17GND18GND19GND
T89T89
C603
0.1uF
0.1uF
L142FBL142
FB
E1
E1
470uF/16V
470uF/16V
+
+
E2 1000uF/16V
E2 1000uF/16V
+
+
E3 1000uF/16V
E3 1000uF/16V
+12V
+
+
CE8
CE8
470uF/16V/NC
470uF/16V/NC
C330UF25V/D8H14
C330UF25V/D8H14
T2T2
T3T3
T101T101
T4T4
+12V
CB139
CB139
Audio AMP
NUSTC_5380P1_V2
NUSTC_5380P1_V2
NUSTC_5380P1_V2
MediaTek Inc.
MediaTek Inc.
MediaTek Inc.
Title
Title
Title
Size
Size
Size
B
B
B
Date: Sheet
Date: Sheet
Date: Sheet
LINE OUT/CEC
LINE OUT/CEC
LINE OUT/CEC
Document Number
Document Number
Document Number
MT5380P1-V2
MT5380P1-V2
MT5380P1-V2
0.1uF
0.1uF
CN1
CN1
1
2
3
4
4PIN_2.54
4PIN_2.54
SIP_4P_2.5
SIP_4P_2.5
No.1-2, Innovation Rd 1, SBIP, Hsin-Chu City 300
No.1-2, Innovation Rd 1, SBIP, Hsin-Chu City 300
No.1-2, Innovation Rd 1, SBIP, Hsin-Chu City 300
TEL:(03)567-0766 FAX:(03)578-7610
TEL:(03)567-0766 FAX:(03)578-7610
TEL:(03)567-0766 FAX:(03)578-7610
Drawn
Drawn
Drawn
13 15Thursday, December 04, 2008
13 15Thursday, December 04, 2008
13 15Thursday, December 04, 2008
Rev
Rev
Rev
V1
V1
V1
of
of
of
A
Page 35
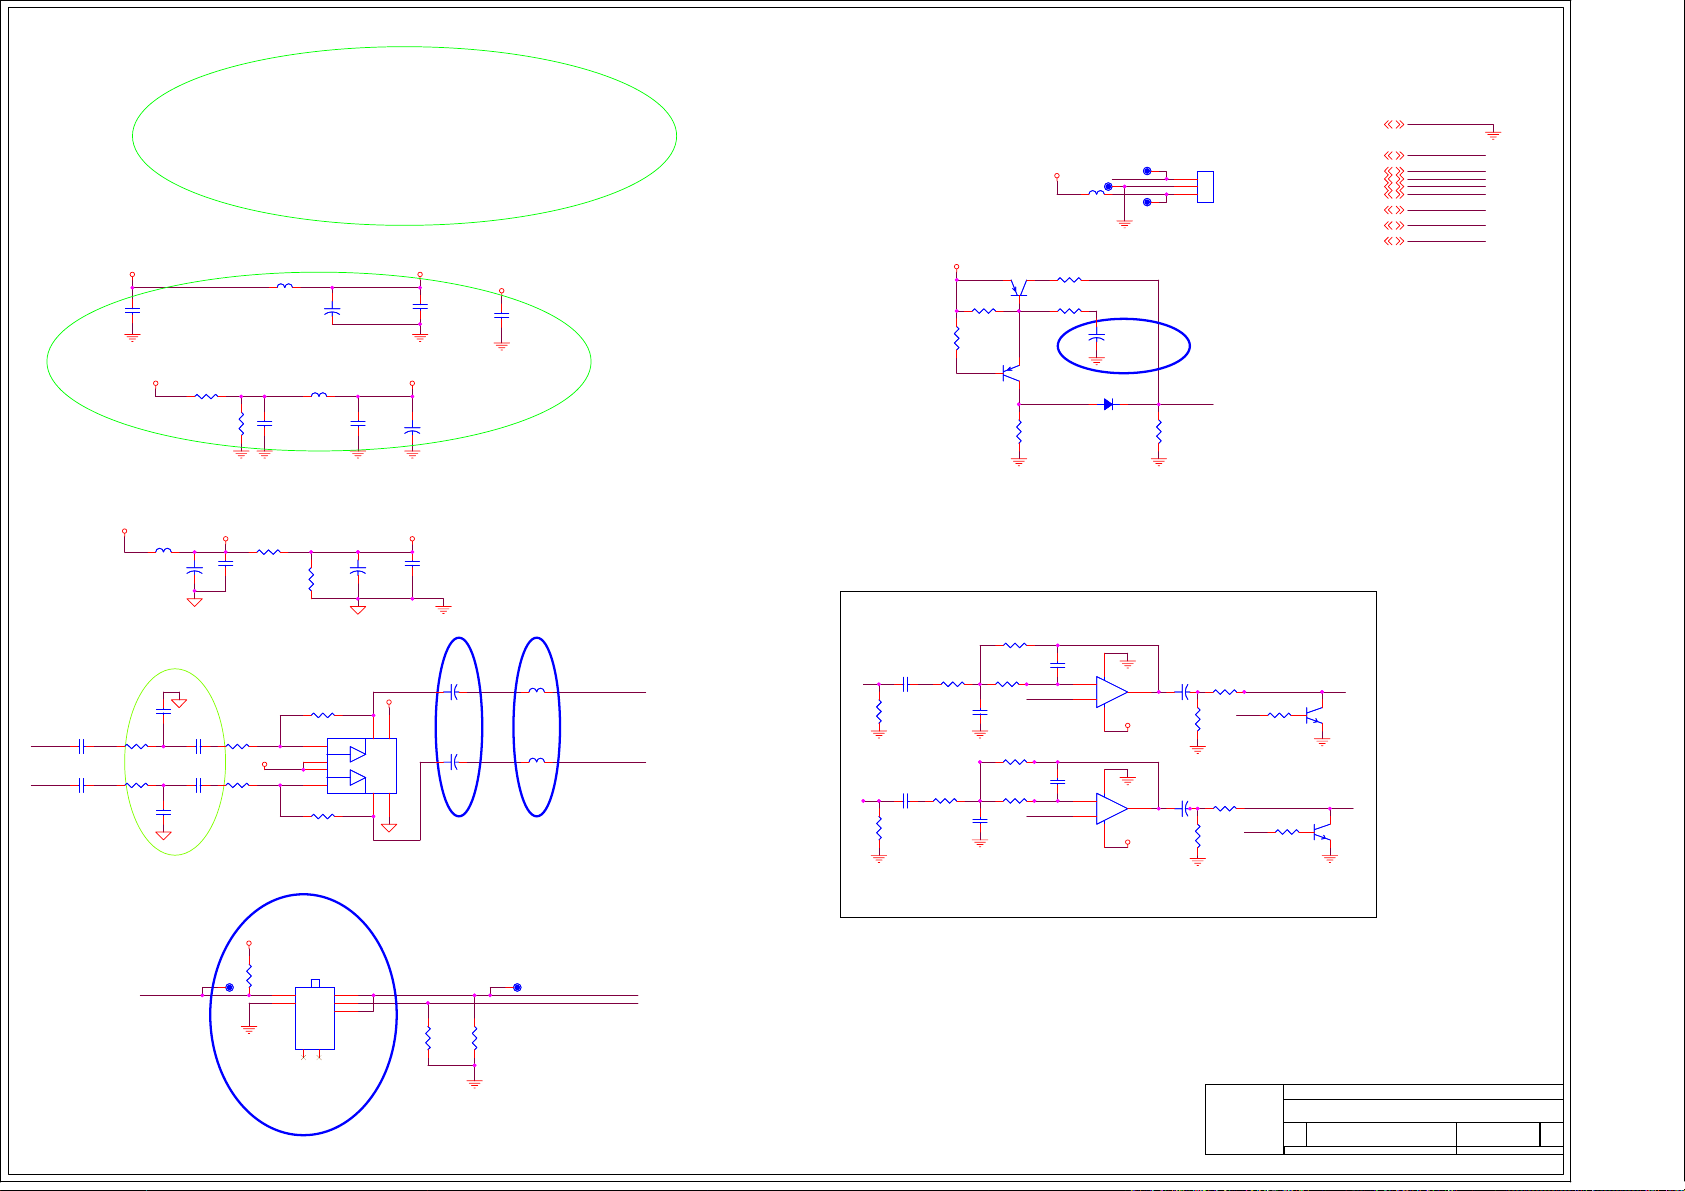
A
+12V
AL1
AR1
HPDET#
MUTE
SPDIF
AVR1_OUT/AMP
AVL1_OUT/AMP
GND
AUDIO_OUTPUT
22uF/16v
22uF/16v
22uF/16v
22uF/16v
MUTE
R307
R307
100K
100K
CE640
CE640
CE642
CE642
CN8CN8
1
2
3
R1756 22R1756 22
+
+
R1763 22R1763 22
+
+
R1758
R1758
NS/10K
NS/10K
R1765
R1765
NS/10K
NS/10K
MUTE
MUTE
AVL1_OUT/AMP
R1759 10KR1759 10K
AVR1_OUT/AMP
R1766 10KR1766 10K
T28T28
L1
FB/NCL1FB/NC
D15 1N4148D15 1N4148
C641
C641
120pF
120pF
C0603/SMD
C0603/SMD
2
3
C643
C643
120pF
120pF
C0603/SMD
C0603/SMD
6
5
T29T29
SPDIF
T27T27
+
+
CE25
CE25
470uF/16V
470uF/16V
C330UF25V/D8H14
C330UF25V/D8H14
U55A
U55A
-
-
1
+
+
8 4
OPAV120
U55B
U55B
-
-
7
+
+
8 4
OPAV120
+5V
+12V
Q8
R1754
R1754
10K
10K
R1761
R1761
10K
10K
R298 5.1KR298 5.1K
R302
R302
4.7K
4.7K
1
R1755 5.1KR1755 5.1K
2N3906Q82N3906
3 2
1
32
R1753 33KR1753 33K
C642
C642
820pF
820pF
C0603/SMD
C0603/SMD
R1760 33KR1760 33K
R1762 5.1KR1762 5.1K
C644
C644
820pF
820pF
C0603/SMD
C0603/SMD
R299 1KR299 1K
R303 2KR303 2K
Q11
Q11
2N3906
2N3906
OFF_MUTE
R300
R300
100K
100K
OPAVREF
NJM4558 OPA
NJM4558 OPA
OPAVREF
NJM4558 OPA
NJM4558 OPA
OPAVREF
+
+
CE645
CE645
C635
C635
1uF
1uF
22uF/16v
22uF/16v
CB996
CB996
0.1uF
0.1uF
OPAV120
OPAVREF
+
CE629
+
CE629
22uF/16v
22uF/16v
VREF_PT2308
C650
C650
0.1uF
0.1uF
OPAV120
CB997
CB997
0.1uF/NC
0.1uF/NC
+12V
CB994
CB994
0.1uF
0.1uF
OPAV120
R1728
R1728
R1729
R1729
47K
47K
47K
47K
+5V
FB
220uF/16v
220uF/16v
C220UF10V/D6H11
A A
C220UF10V/D6H11
CE644
CE644
VC5
L148FBL148
+
+
FB70FBFB70
FB
AUDIO INTERNAL DAC AV R/L OUT
FB71 FBFB71 FB
CB998
CB998
0.1uF
0.1uF
R1775 47KR1775 47K
CB999
CB999
0.1uF
0.1uF
R1776
R1776
47K
47K
+
+
CE3
CE3
47uF/16v
47uF/16v
REMOVE INDUCTOR
C667
CE631
CE631
+
8
VDD
4
+
100uF/16v
100uF/16v
CE635
CE635
+
+
100uF/16v
100uF/16v
Change to 100uF to
improve low
frequency
feature.(old=22uF)
U59
U59
I/L
VREF
VREF
I/R
PT2308
PT2308
VC5
1
-
-
O/L
+
+
+
+
-
-
O/R7GND
VREF_PT2308
R146 3.9kR146 3.9k
2
3
5
6
R1783 3.9kR1783 3.9k
C691
C691
2.2nF
2.2nF
C693
C692
C692
2.2nF
2.2nF
C693
10uF/10v
10uF/10v
C0805/SMD
C0805/SMD
C694
C694
R1778 3.9kR1778 3.9k
10uF/10v
10uF/10v
C0805/SMD
C0805/SMD
R1777 3.9kR1777 3.9k
C669
C669
R2031 470R2031 470
10uF/10v
10uF/10v
AL1
C0805/SMD
C0805/SMD
C670
C670
R2032 470R2032 470
10uF/10v
10uF/10v
AR1
C0805/SMD
C0805/SMD
L149FBL149
HPOUTL
FB
L150FBL150
HPOUTR
FB
C667
10uF/10v
10uF/10v
AL1
C0805/SMD
C0805/SMD
R1757
R1757
NS/10K
NS/10K
C668
C668
10uF/10v
10uF/10v
AR1
C0805/SMD
C0805/SMD
R1764
R1764
NS/10K
NS/10K
GND1,2,3,4,5,6,7,8,9,10,11,12,13
+12V1,2,5,9,13
AL113
AR113
HPDET#13
MUTE13
SPDIF10
AVR1_OUT/AMP13
AVL1_OUT/AMP13
Q60
Q60
2N3904
2N3904
1
SOT23/SMD
SOT23/SMD
3 2
Q61
Q61
2N3904
2N3904
1
SOT23/SMD
SOT23/SMD
3 2
NO PLUG: HPDET#
PLUG: HPDET#
HPDET#
=
=
HIGH
GND
DV33
R1644
R1644
10k
10k
P44
T73T73
P44
1
HP
2
GND
SLIM_phonejack
SLIM_phonejack
HEAD PHONE OUTPUT
NC3NC
5
L
6
R
7
L
4
R16161KR1616
R16151KR1615
1K
1K
T74T74
HPOUTL
HPOUTR
NUSTC_5380P1_V2
NUSTC_5380P1_V2
NUSTC_5380P1_V2
No.1-2, Innovation Rd 1, SBIP, Hsin-Chu City 300
No.1-2, Innovation Rd 1, SBIP, Hsin-Chu City 300
MediaTek Inc.
MediaTek Inc.
MediaTek Inc.
Title
Title
Title
LINE OUT
LINE OUT
LINE OUT
Document Number
Document Number
Document Number
Size
Size
Size
C
C
C
MT5380P1-V2
MT5380P1-V2
MT5380P1-V2
Date: Sheet
Date: Sheet
Date: Sheet
A
No.1-2, Innovation Rd 1, SBIP, Hsin-Chu City 300
TEL:(03)567-0766 FAX:(03)578-7610
TEL:(03)567-0766 FAX:(03)578-7610
TEL:(03)567-0766 FAX:(03)578-7610
Drawn
Drawn
Drawn
of
of
of
14 15Thursday, December 04, 2008
14 15Thursday, December 04, 2008
14 15Thursday, December 04, 2008
Rev
Rev
Rev
V1
V1
V1
Page 36
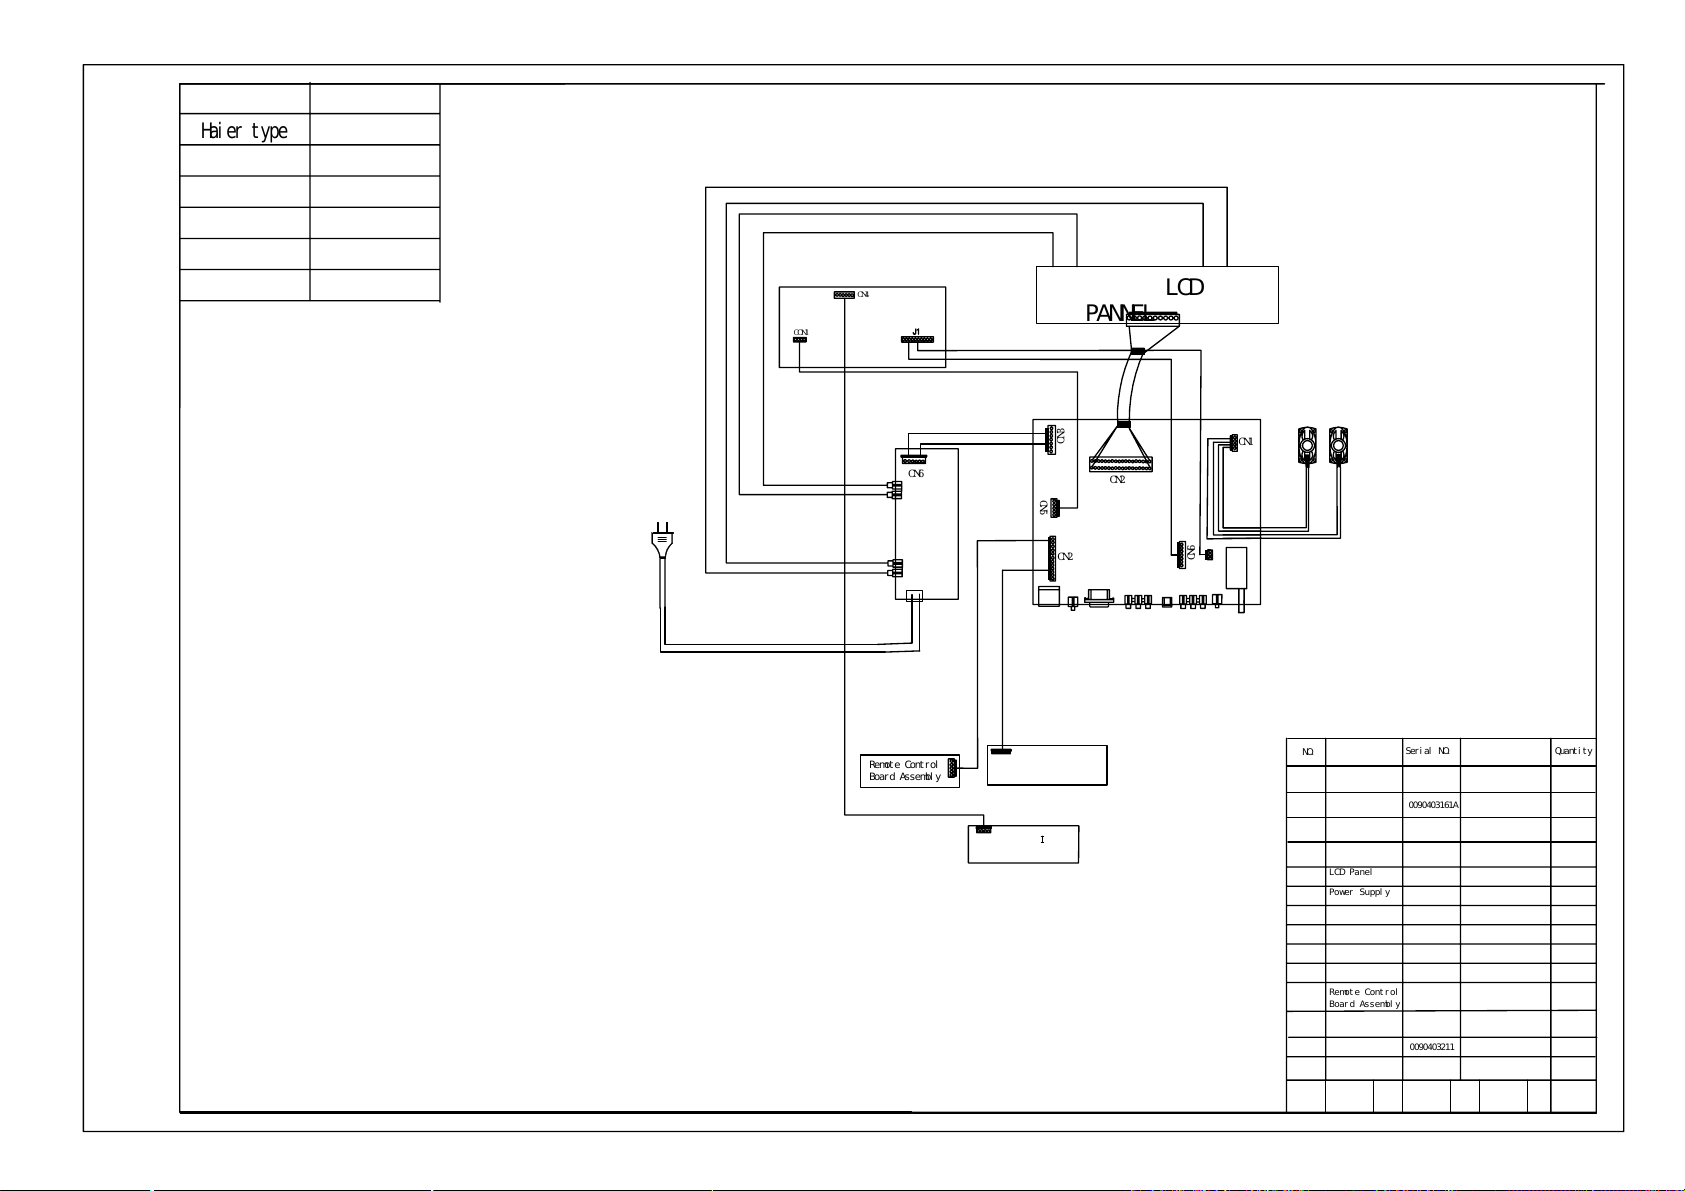
customer type
Haier typ
e
special number
special technique
document number
export country
customer
brand
HLC22K1
LX22K3W
DC1490E0100
AT08SR1101US07
AMERICA
HAC
Haier
5
LCD
3
CN4
DVD
CON
1
PANNE
L
2
7
1
9
CN6
POWER
3
N
C
CN2
C
6
N
5
4
CN2
CN1
8
6
N
TUNER
1
C
P
13
10
11
Remote Control
Board Assembl
y
DVD Keypad Autonserted Board Assembly
12
Keypad Assembly
14
NO.
DVD signal
1
connection wire
2
DVD Power wire
DVD
3
Main board
4
LCD Panel
5
Power Suppl
6
LVDS wire
7
8
Speaker wire
Speaker
9
10
Combination Wire
Remote Control
11
Board Assembl
Keypad Assembly
12
Power cord
13
DVD Keypad
14
Assembly
Workout
NAME
(0090810121A)
(0090719615)
Auditing
Serial NO
0090402064
0090403161A
DC1490E0100D
DC1490E0100M
0094001227CA
y
0094001224B
0090402338
0090402199A
0094001218
0090402388A
y
0090719244
0090701136
009040321
0090719333
.
1
Standardization
Spec
Approve
Quantit
y
Page 37
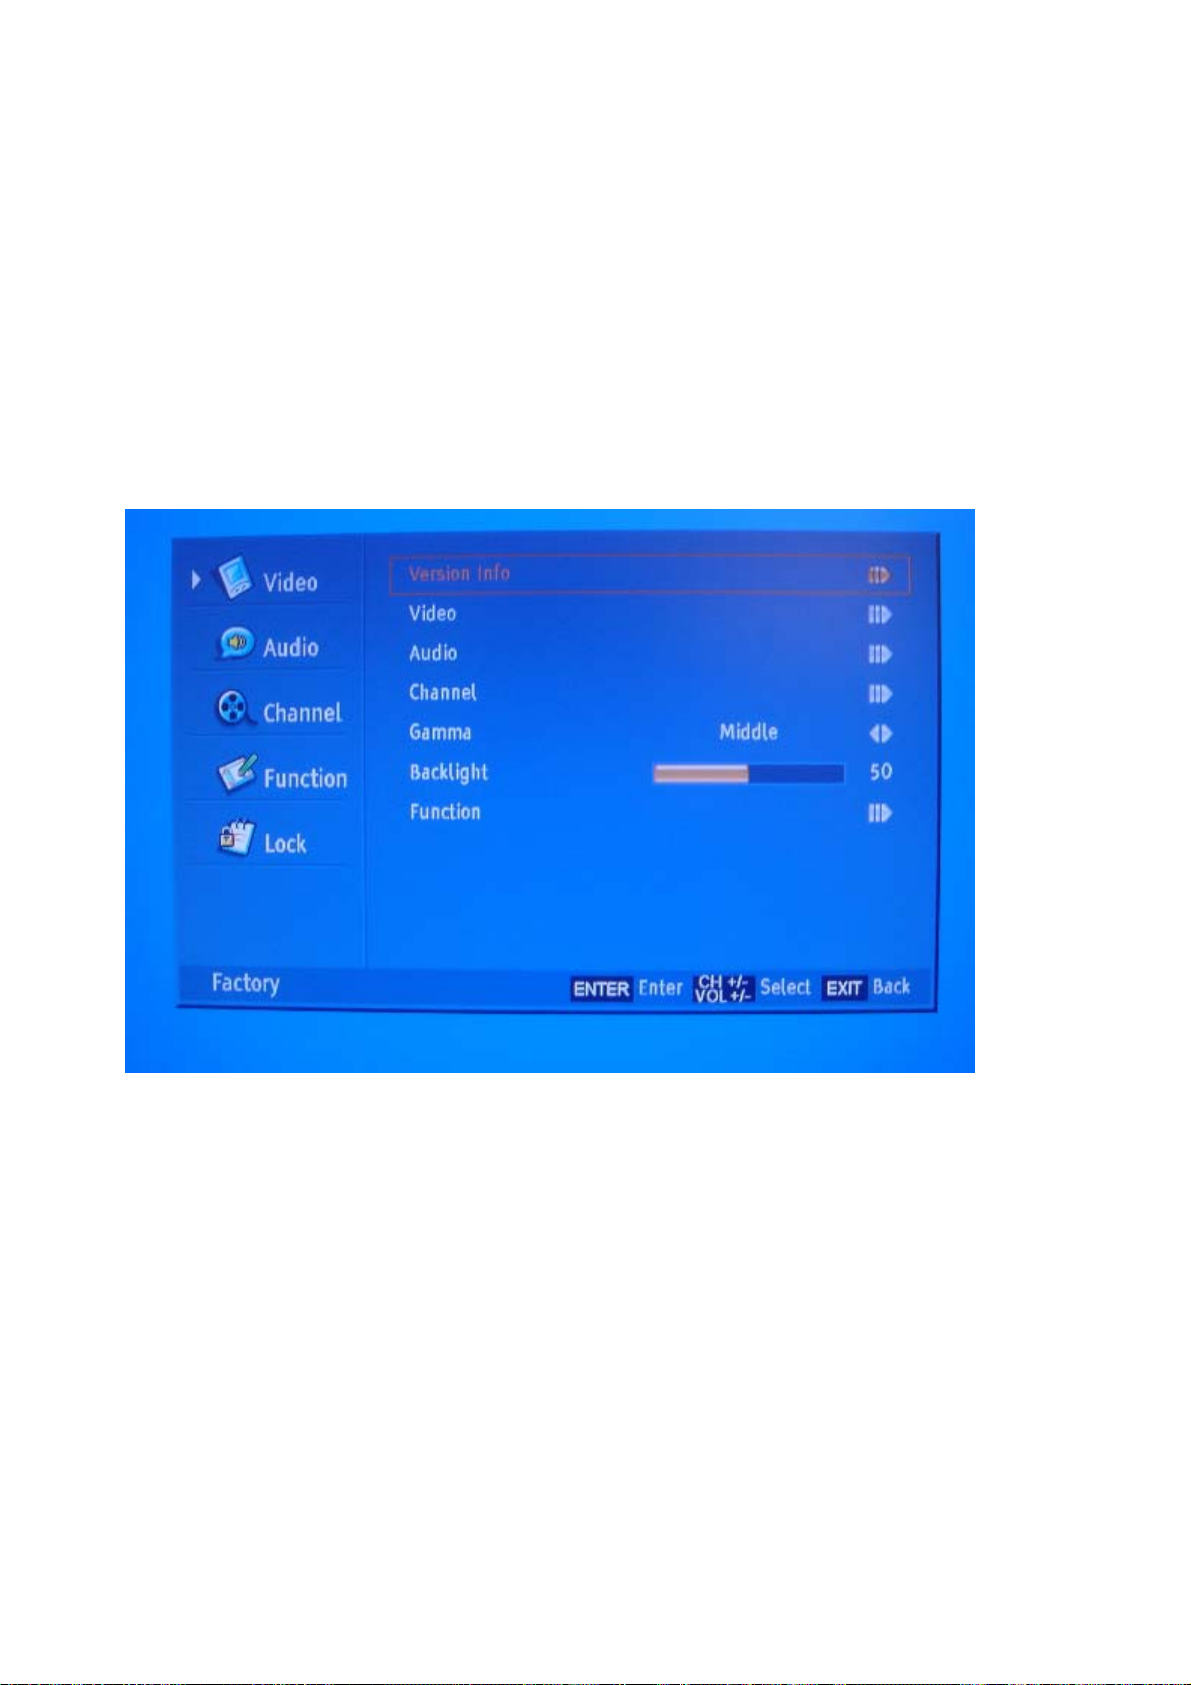
8. Measurements and Adjustments
8-1. Service Mode
8-1-1.How to enter into Service Mode
The way to the factory mode menu:
1st, press menu,
2en, input 8893,
rd
, press “ok”
3
Finished these operations , system will be into the factory mode menu.
8-1-2.How to exit
IF want to exit this factory menu,please press the botton”Exit” in the remoter.
8-2 Measurements and Adjustments
8-2-1 Version ,S/N, Panel Resoution
Version:The first line is the model Name and the second line is current software version.
37
Page 38
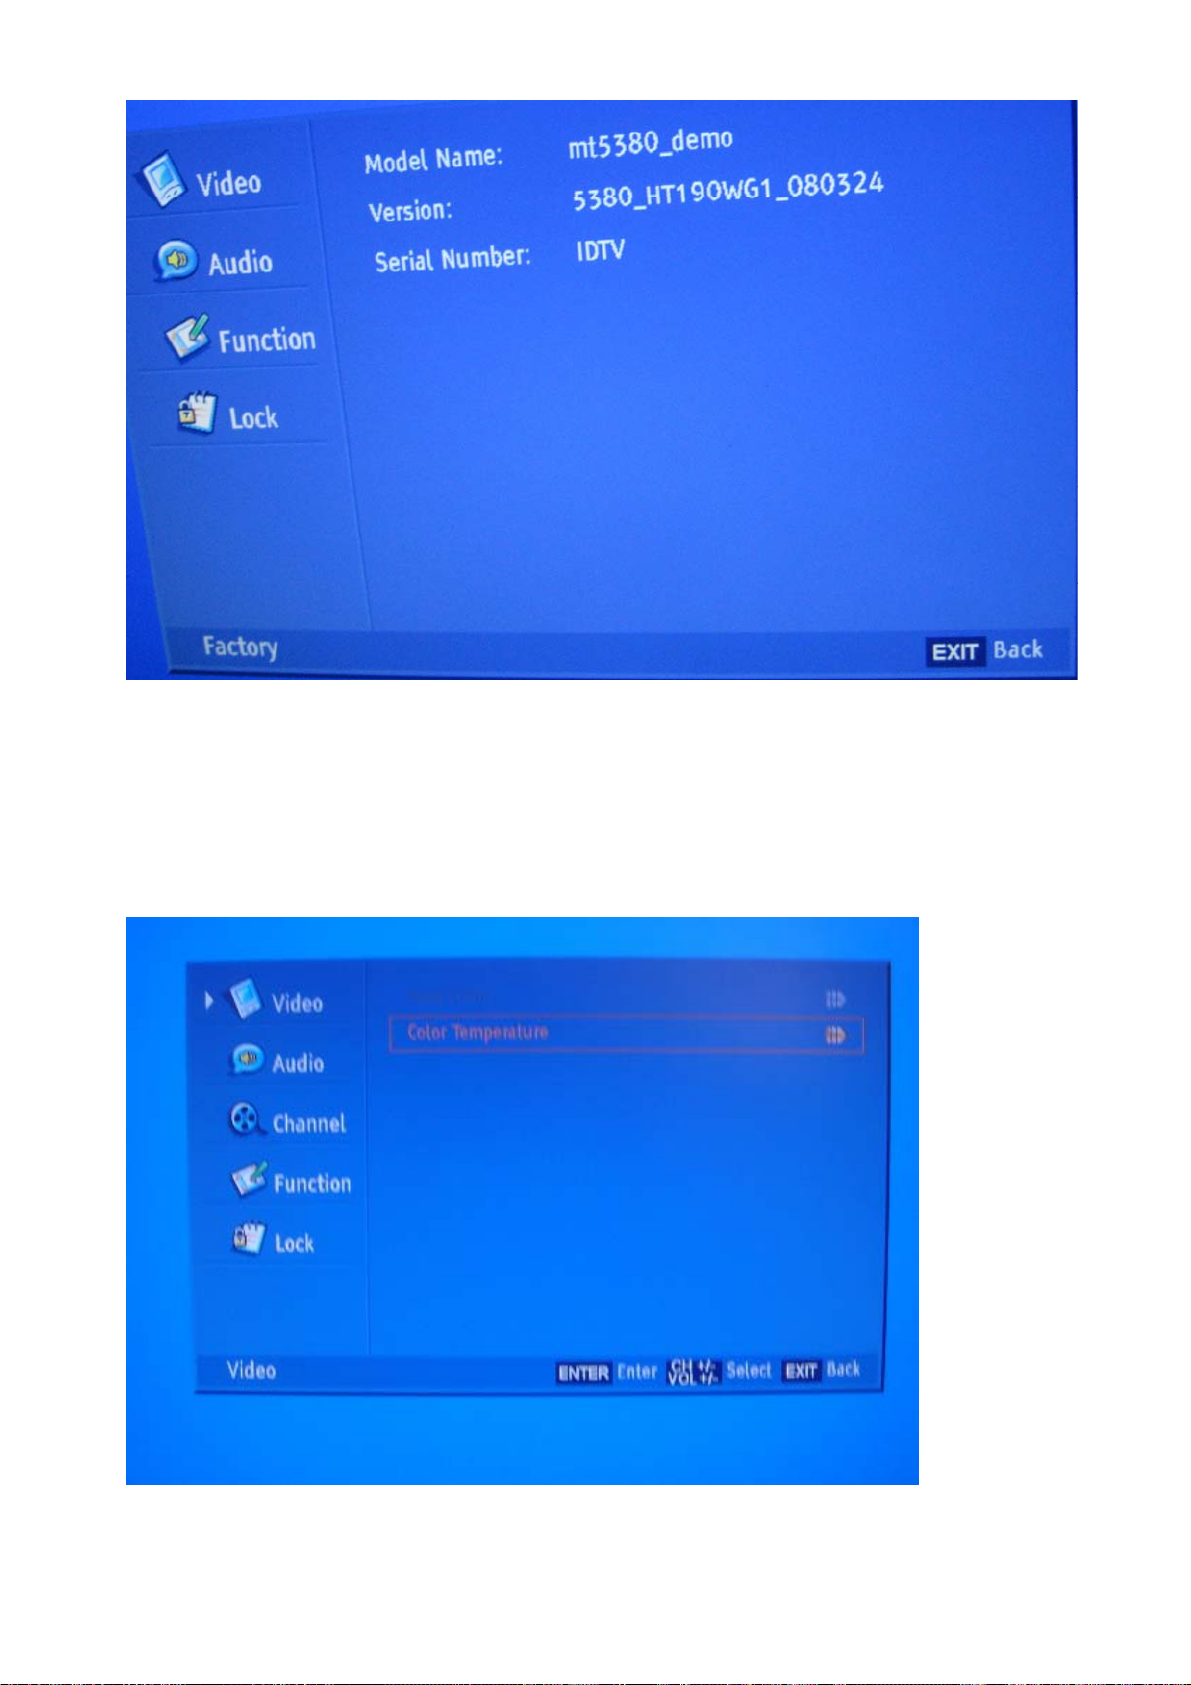
8-2-2 Video
Auto Color
The option could only be used in the VGA and Component model. When we found the color in the
two
models was abnormal. Then we can use the function to adjust it automatically.
Color Temperature
The function could adjust the Color Temperature., used when debugging.
8-2-3 Audio
Dolby Banner: When turn it “ON”, the model will be in Dolby authentication state.
38
Page 39
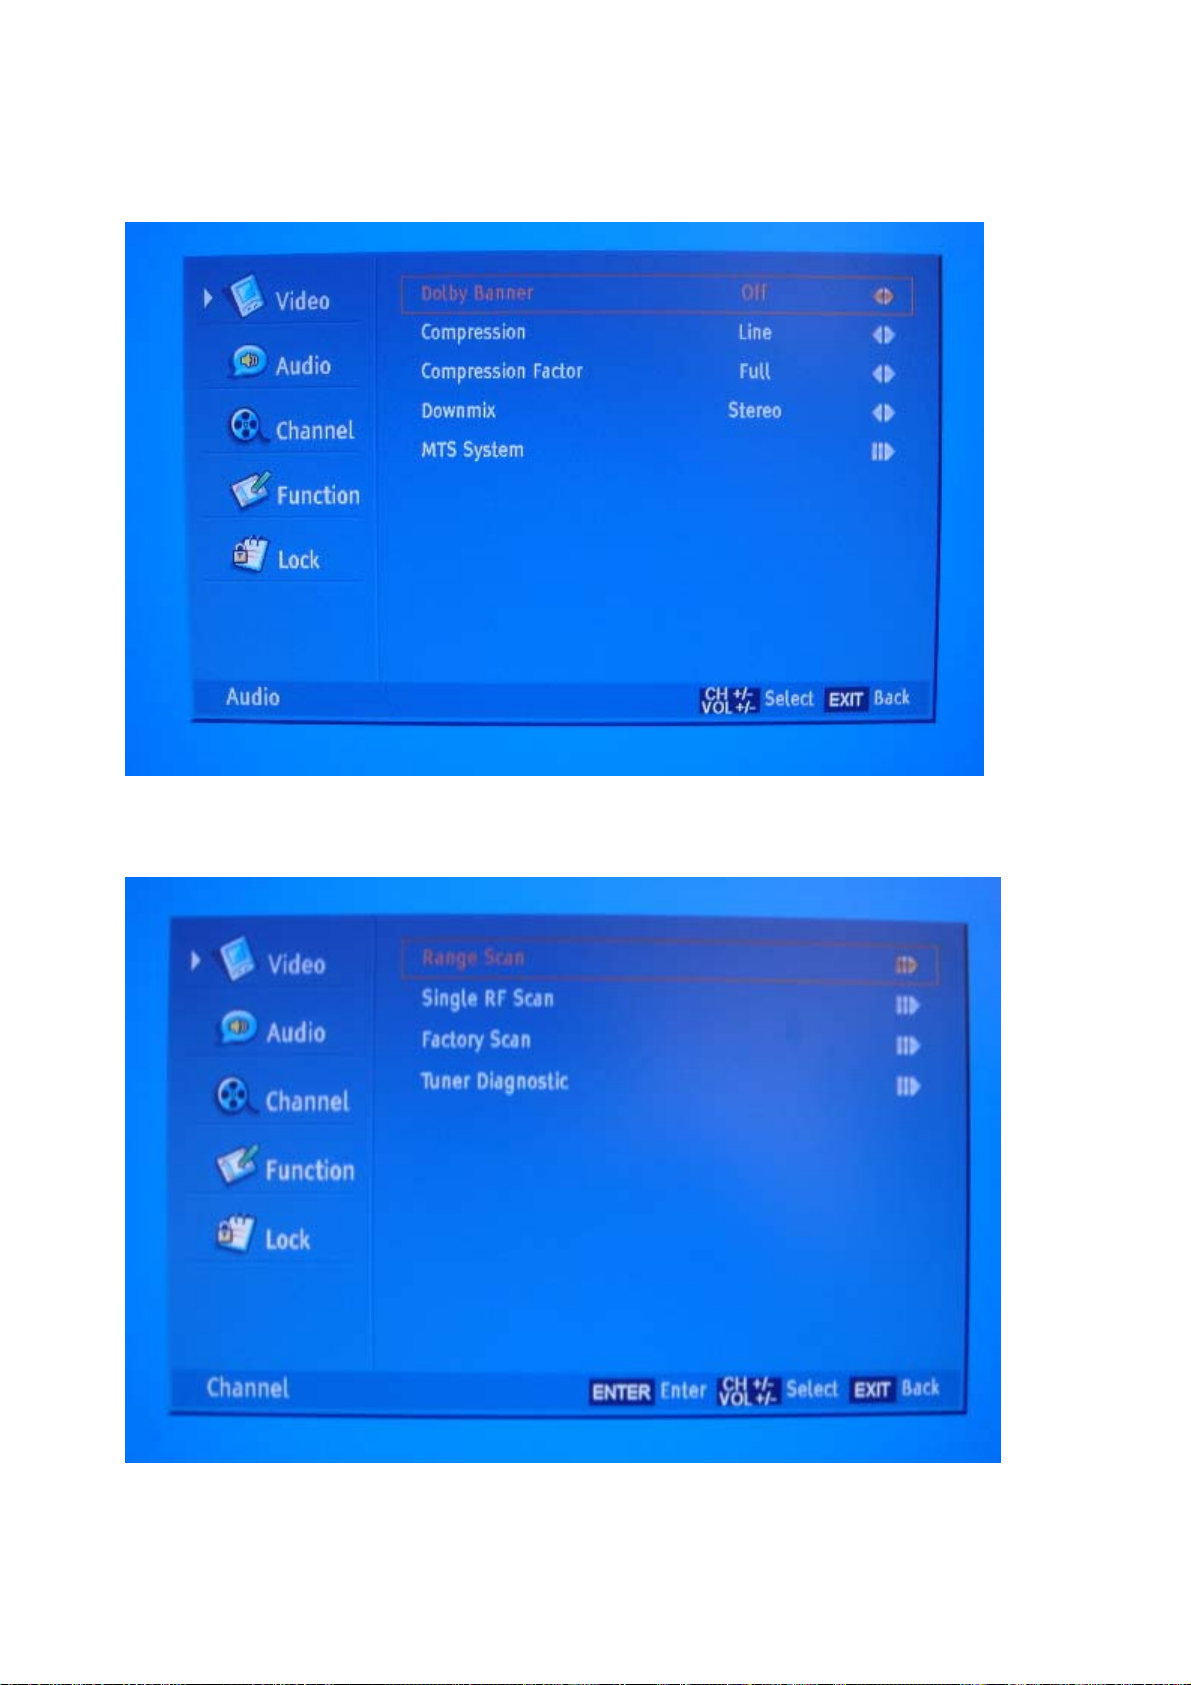
Compression: Compression style. RF: atv line:AV/S-Video/YPbPr/VGA
Compression Factor: Compression state.
Downmix: output model. MTS System: used when debugging. The parameters only used when
debugging, no need to be modified.
8-2-4 Channel
Range Scan: The function could make it to search the channels by differentiation the analog and
digital channels.
Single RF Scan: Search channels in the frequency scope set in advance.
39
Page 40
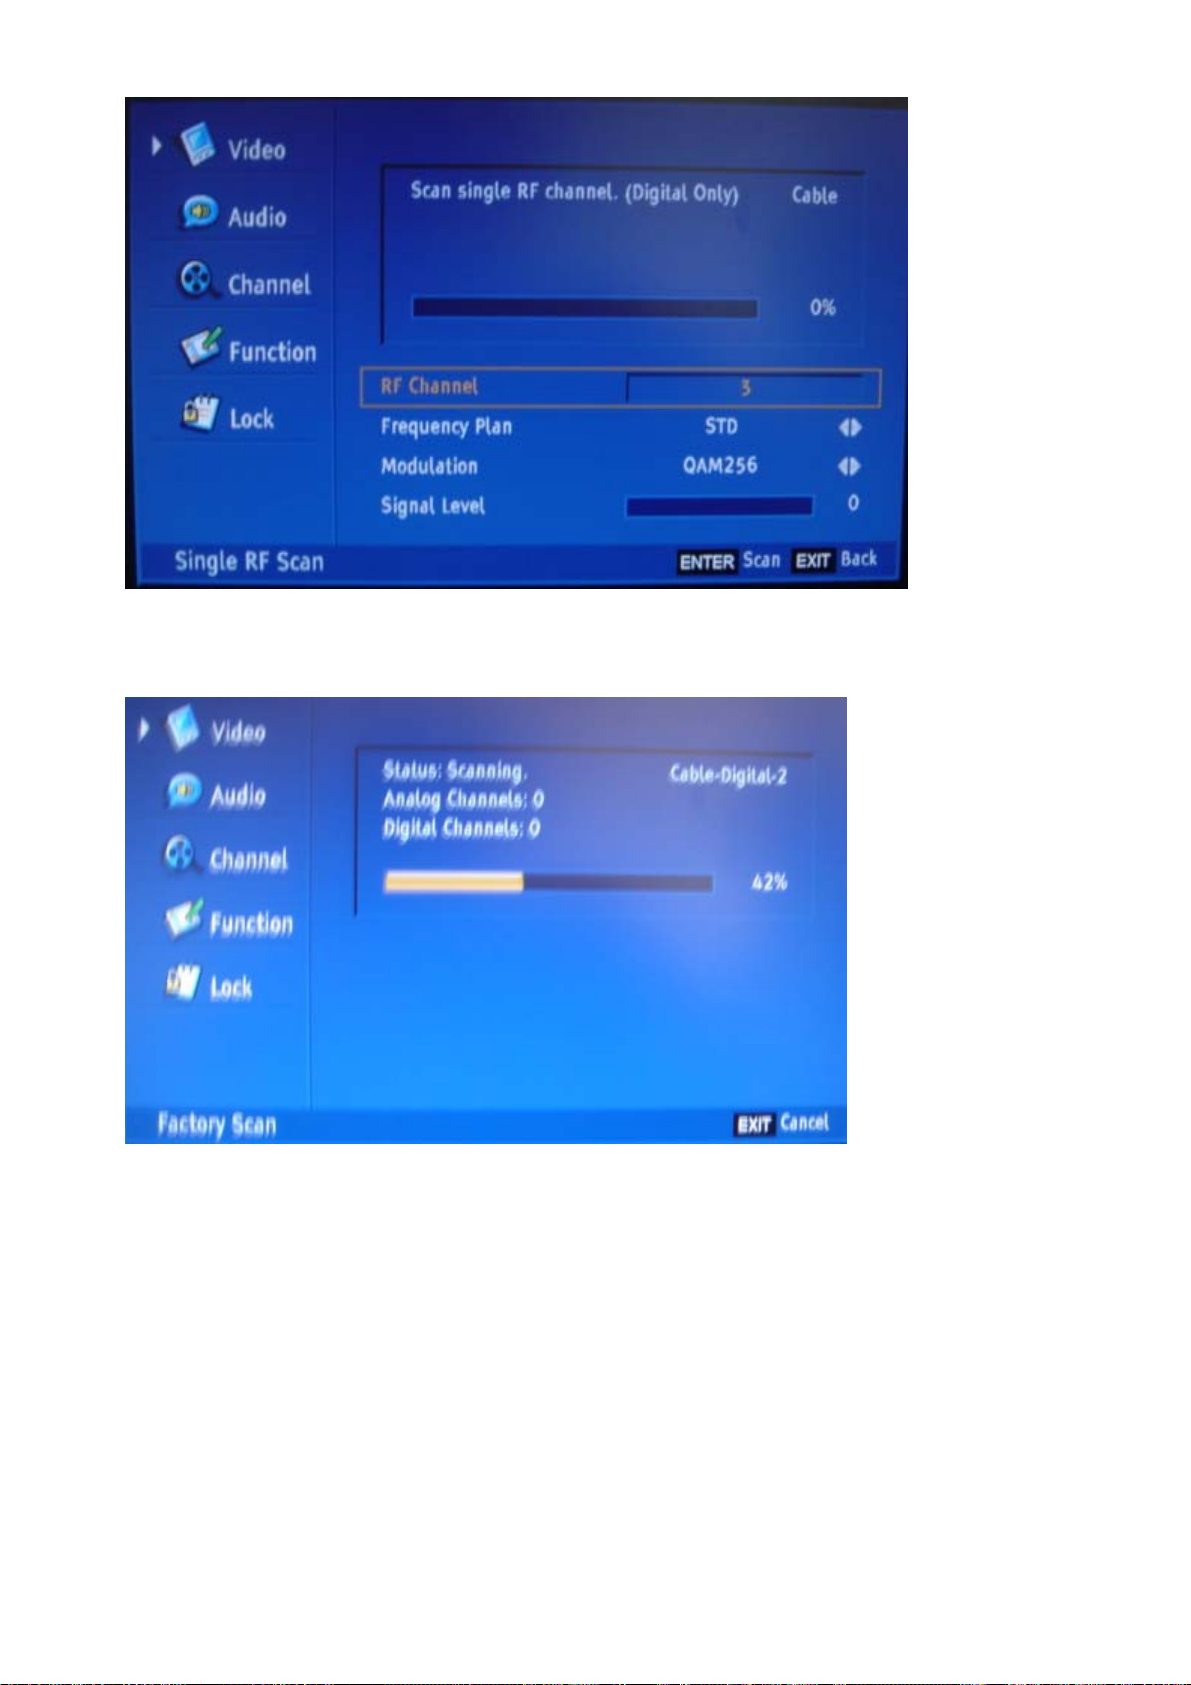
Factory Scan: According to ANTENNA-ANALOG---〉ANTENNA-DIGITAL---〉CABLE-
ANALOG---〉CABLE- DIGITAL to search channels, used only in project debugging.
Tuner Diagnostic: Project debugging setting, used to inspect the audio function.
8-2-5Gamma
Gamma:
Bright:GAMMA0.8 Middle:default settings in the program Dark:GAMMA1.2
40
Page 41
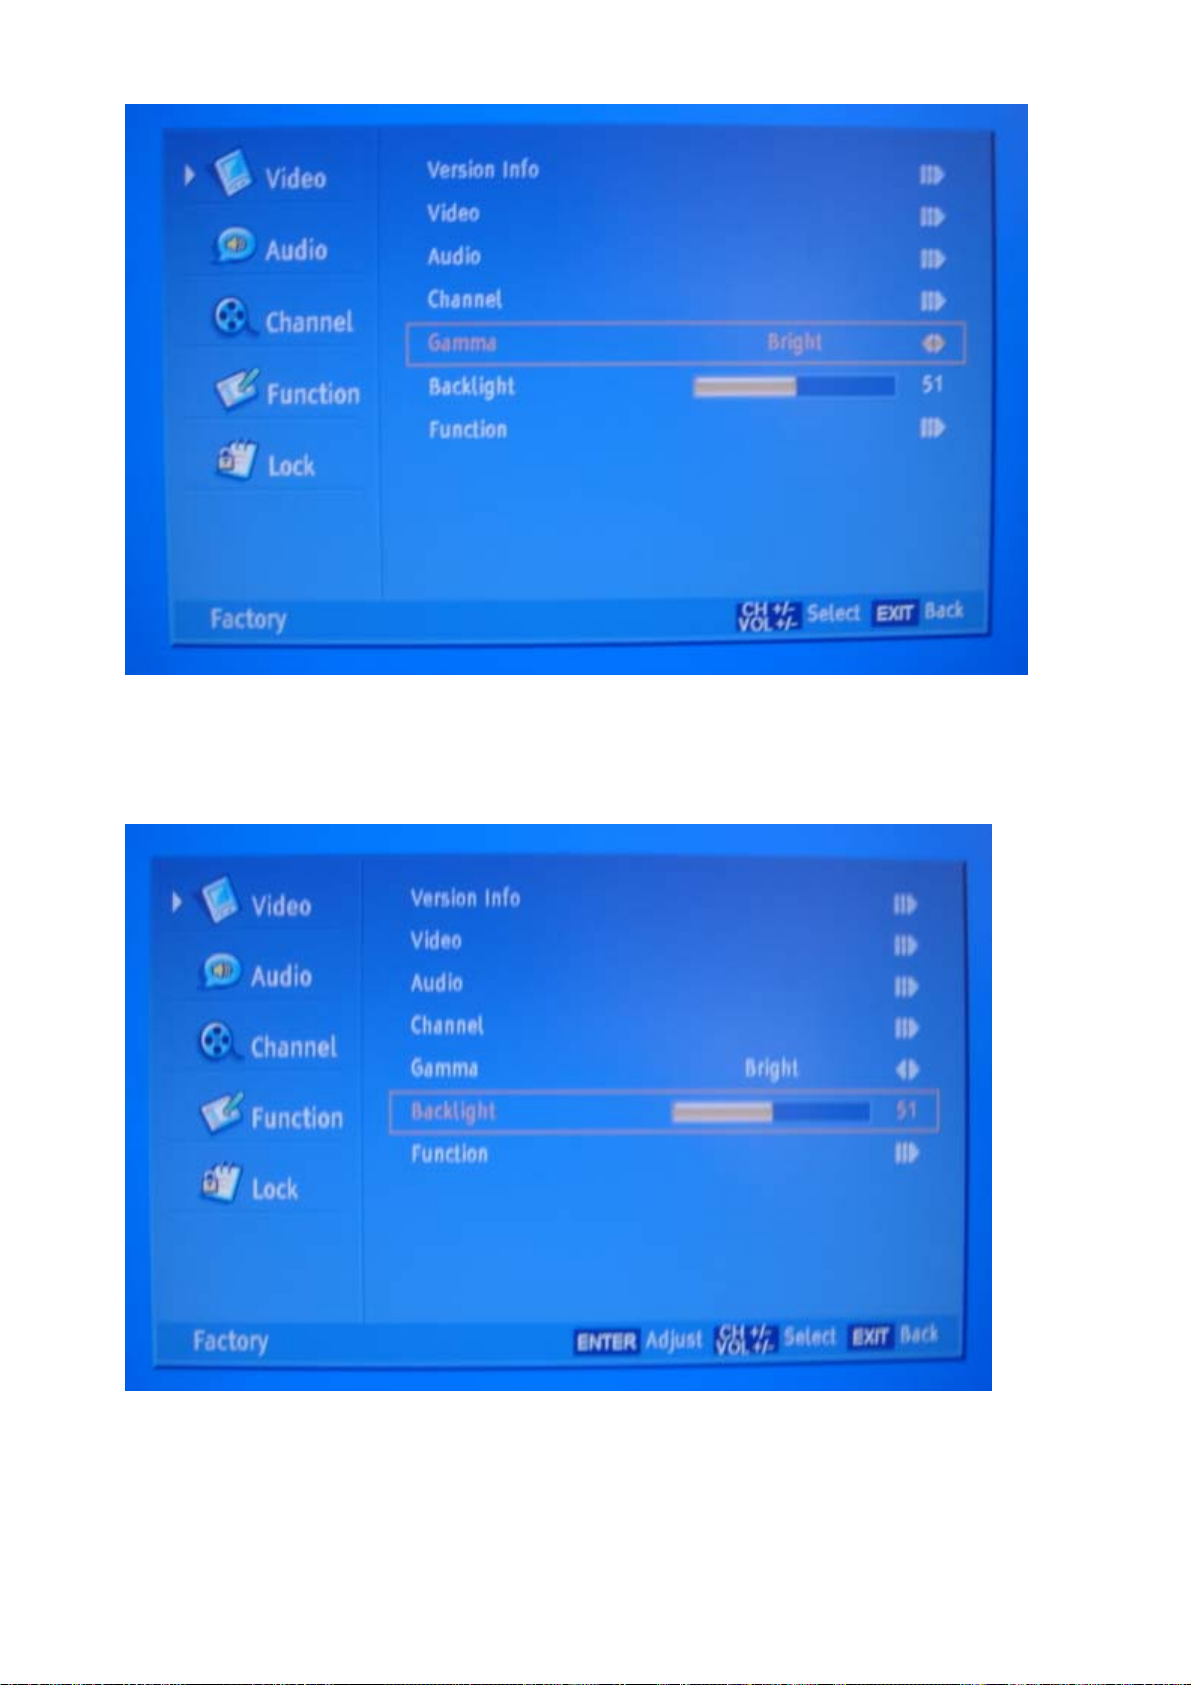
8-2-6 Backlight
Backlight: adjust the backlight.
8-2-7 Function
Burning Mode:
Turn it “ON” to enter the aging model, This is for factory run-in testing. The screen would display
red, green, blue and black screen repeatedly. Each color screen could be exam at that time.
41
Page 42
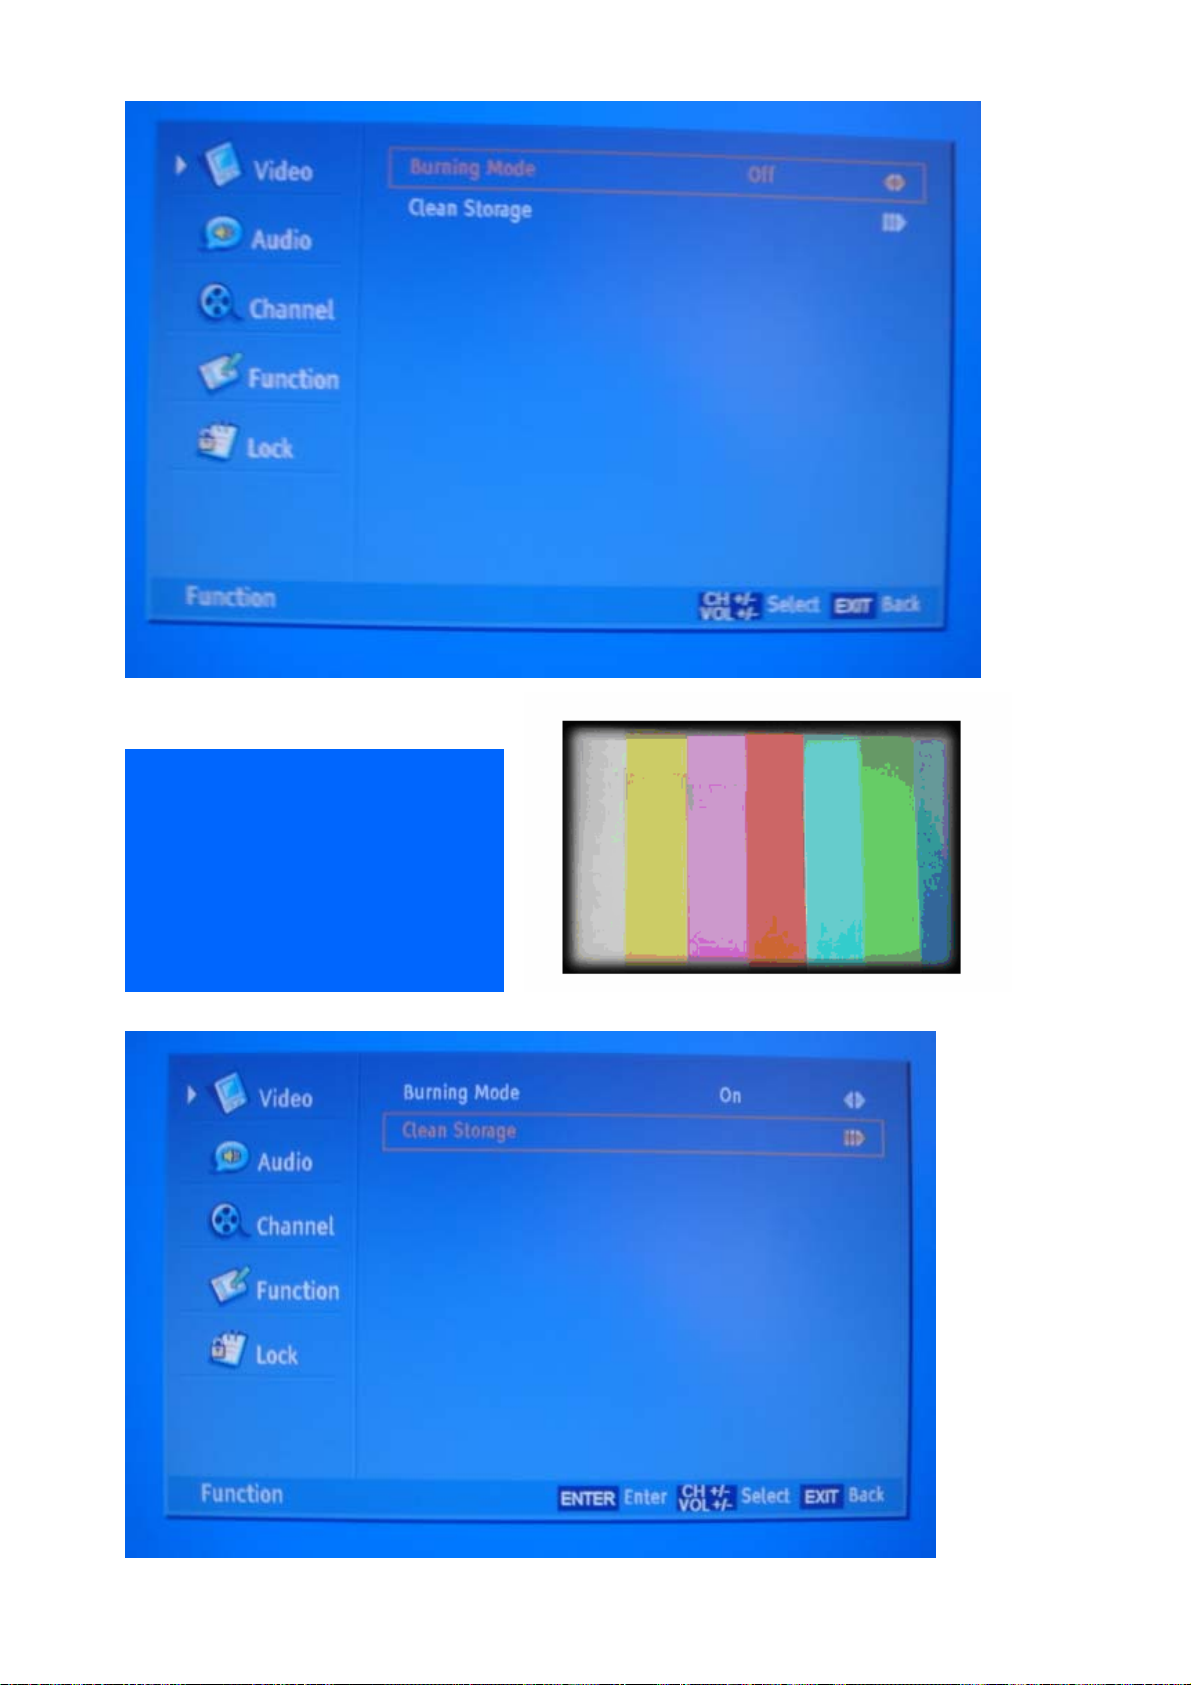
Clean Storage:The function could make the model turn back to the factory default setting.
42
Page 43
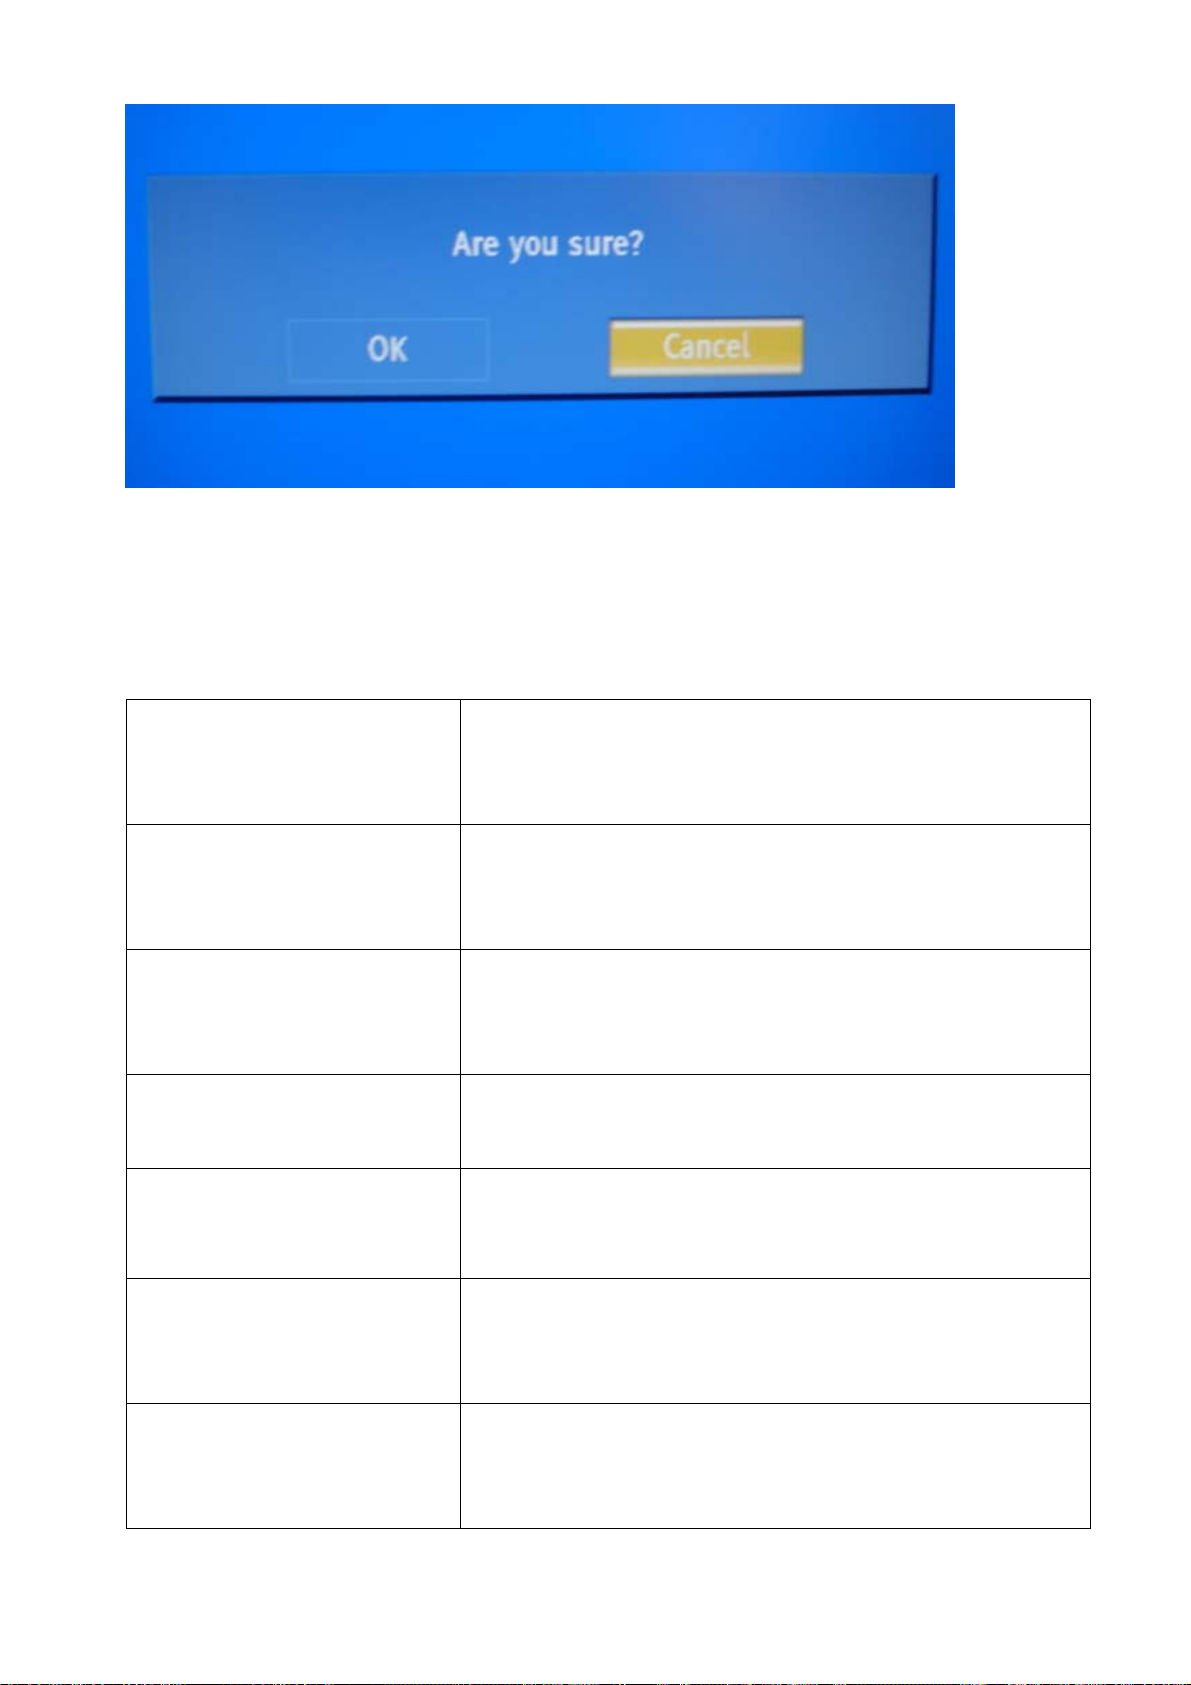
Remark:
The date of the chart only is a example, please don’t adjust the factory mode base on it.
9. Trouble shooting
9-1. Simple check
No Picture,no sound
Blank screen
No sound
Poor sound
No picture in some channel
No color for some channel
program(black and white)
Verify if the television is properly plugged
Verify if the television is properly supplied power
Verify if electricity is available
Verify if correct signals are input
Press INPUT button to change signal input to TV input
Restart the television of power supply is interrupted
Press Mute button and verify if Mute mode is set.
Switch to otger channel and verify if the same problem
happens.
Press VOL+ button to see of he problem can be solved.
Verufy if sound system is correct .Refer to some chapter for
adjust.
Verify if correct channel is selected.
Adjust the antenna.
Make adjustments by Fine Tune and MANUAL Scan.
Verify if the same problem exists in other channels.
check out of picture and sound system.
Refer to relative instructions in the Manual for color adjust.
Spots with some or all pictures
Verify if the antennal is correctly connected.
Verify if the antennal is in good condition.
Make fine adjustment of channel.
43
Page 44
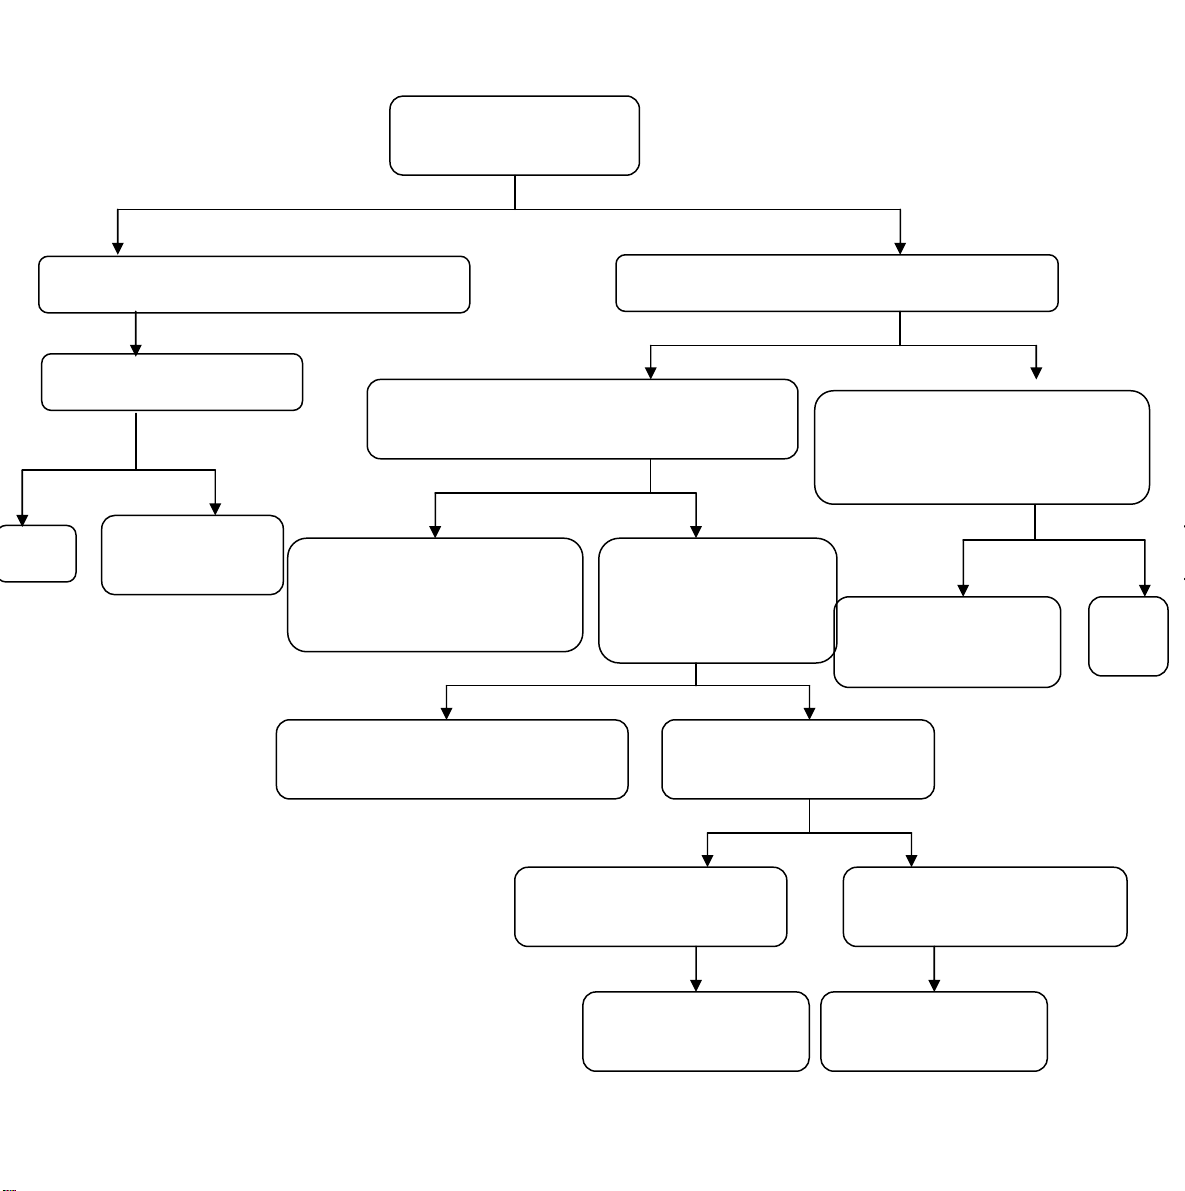
9-2. Power Supply Board failure check.
Check (F1/3A) for 12V?
N
Check F1 and peripheral power supply
F1 is damaged?
NY
Check power
OK
supply net
follow F1
1:Power supply(U7、U9))
2:Reset signal
3:Crystal
Change U1/MP1410ES-LF or
Check U6/MCU
D17/SK34A-SMA
Check E33/470μF/16V for 5V
N
Turn on the TV-set(By button or
remote control)
N
Y
Check U1 for 5V
output
Check L9/47μH
Y
Y
Were those
LDO(U10,U13,U16,U18,U19,
etc.)worked normal?
LDO was damaged
or the loader is in
YN
short circuit
YN
OK
It’s normal but the
voltage is high
Check Pin No.4 of
U1/MP1410-ES or
change U1
It’s normal but the
voltage is Low
E33 was damaged
or the loader is in
short circuit
Page 45
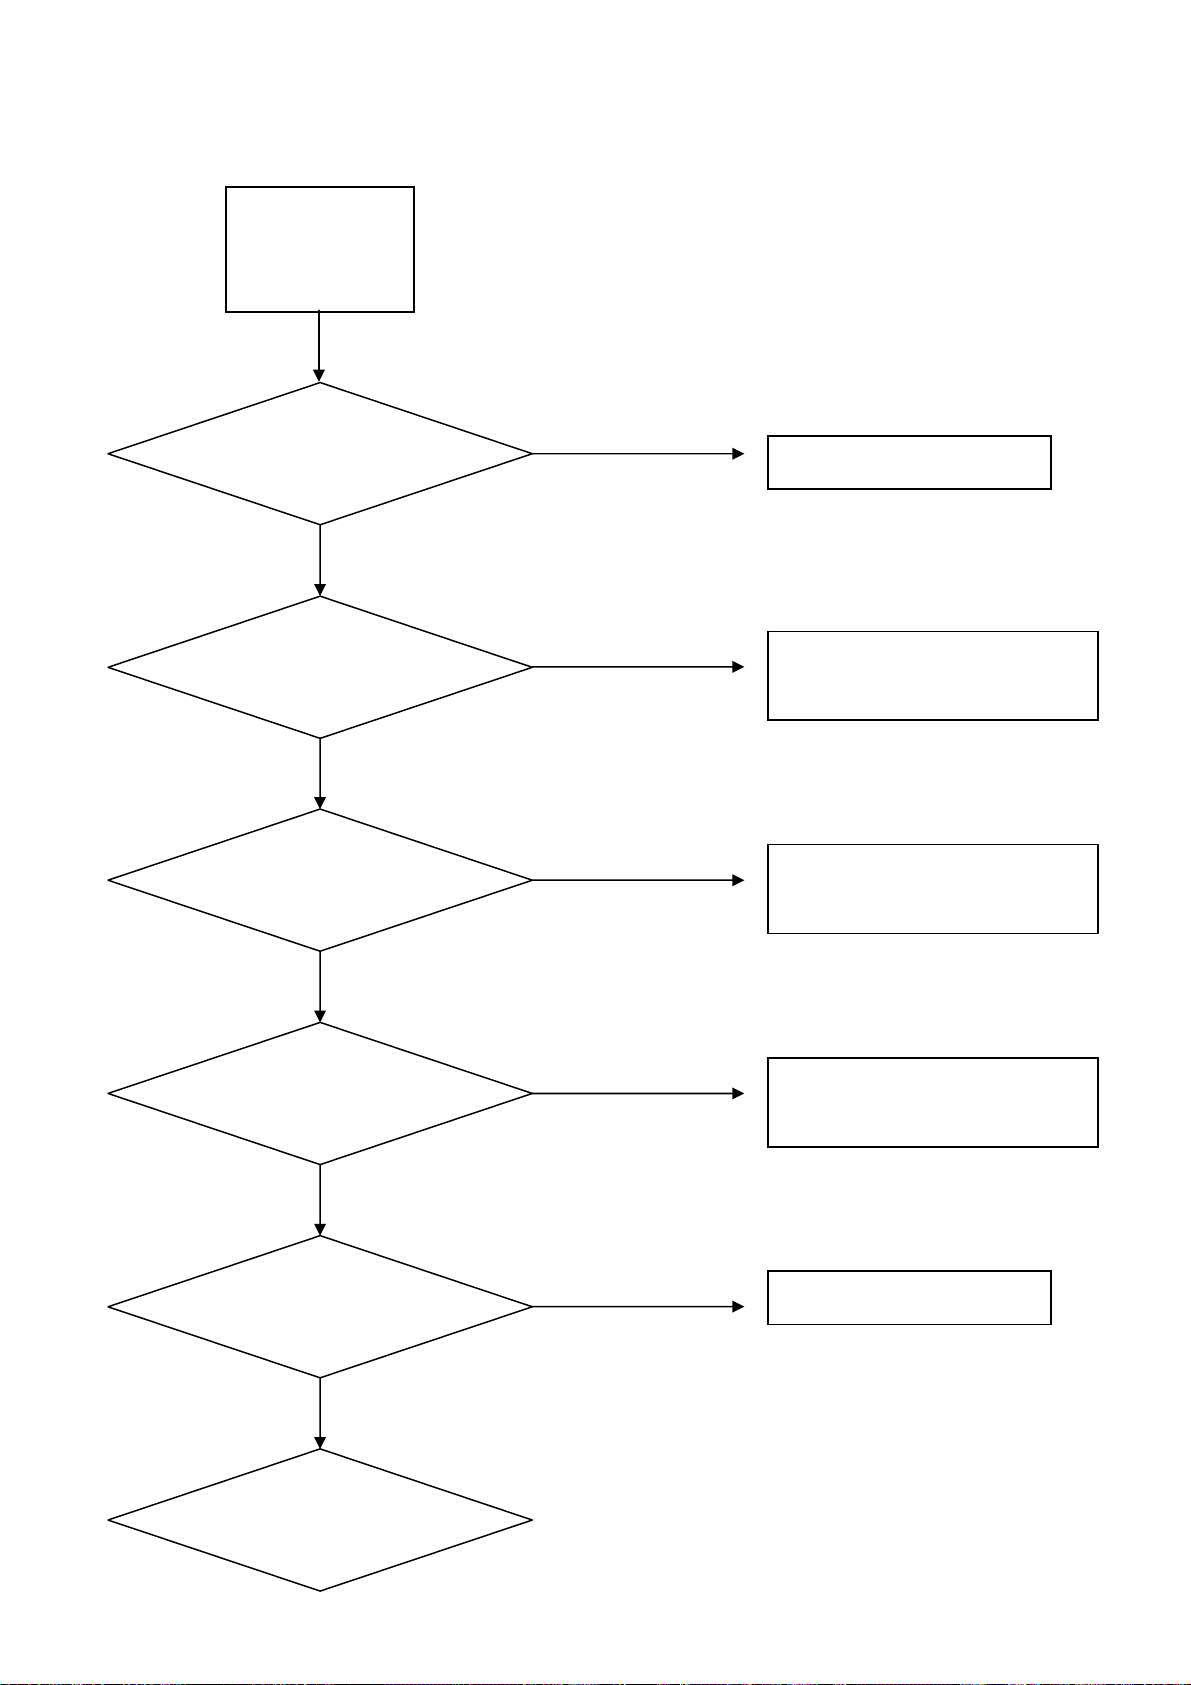
9-3. Main board failure check
State: No Sound
Pass
Pass
Pass
Pass
Pass
No Sound
(All Mode)
Check the input
Source
Check the input/output
Of IC U13 of Main B/D
Check the input/output
Of IC U55 of Main B/D
Check the input/output
Of IC U2 of Main B/D
Check the Speaker
Check the Sperker
wire
Fail
Fail
Fail
Fail
Fail
Change Source input
Re-soldering or change
IC U13
Re-soldering or change
IC U55
Re-soldering or change
IC U2
Change the Speaker
45
Page 46
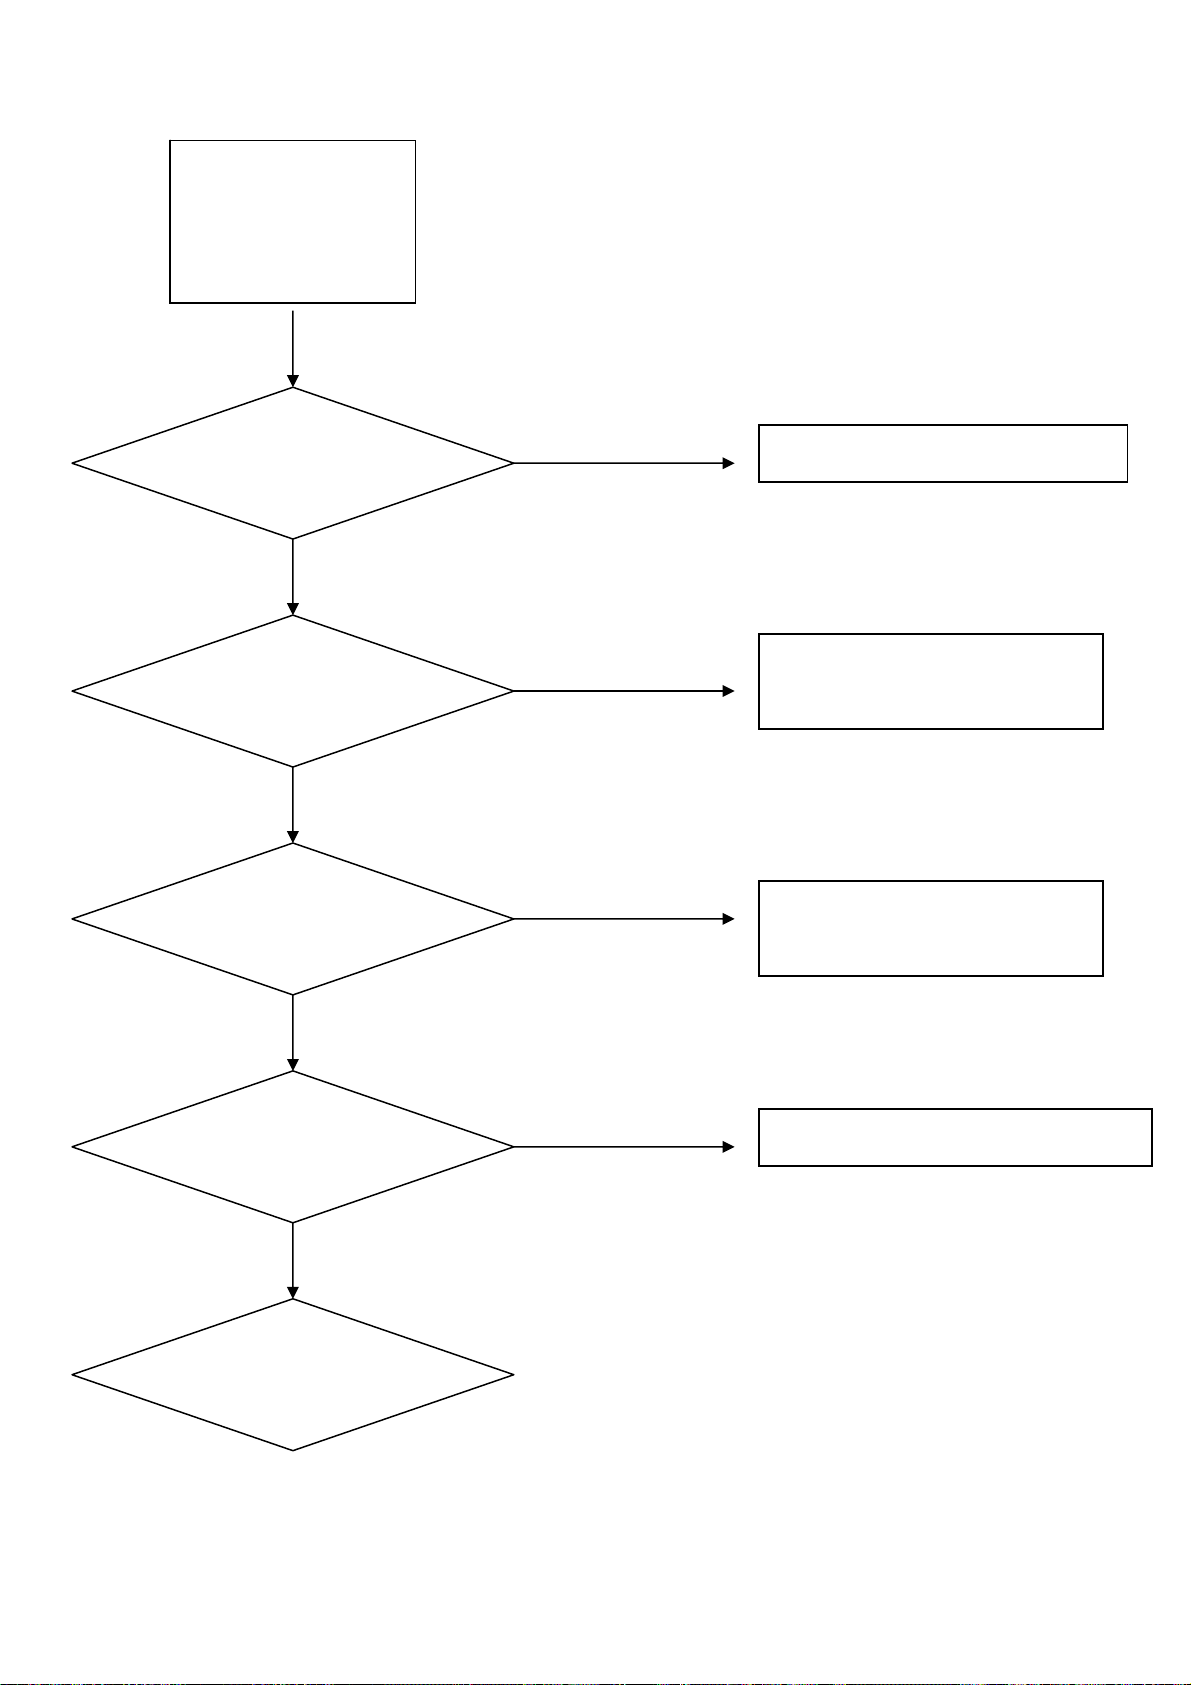
State:No picture
No Raster on Panel
Pass
Pass
Pass
Check the backlight B/D
Pass
Check the input/output of
jack CN3 of Main B/D
Check the input/output of
Jack CN4 of Main B/D
Check the Panel wire
Change the panel
Fail
Fail
Fail
Fail
Change the backlight B/D
Re-soldering or change
IC UA1 and RNA1-17
Re-soldering or change
IC U13
Change the Panel wire
46
Page 47
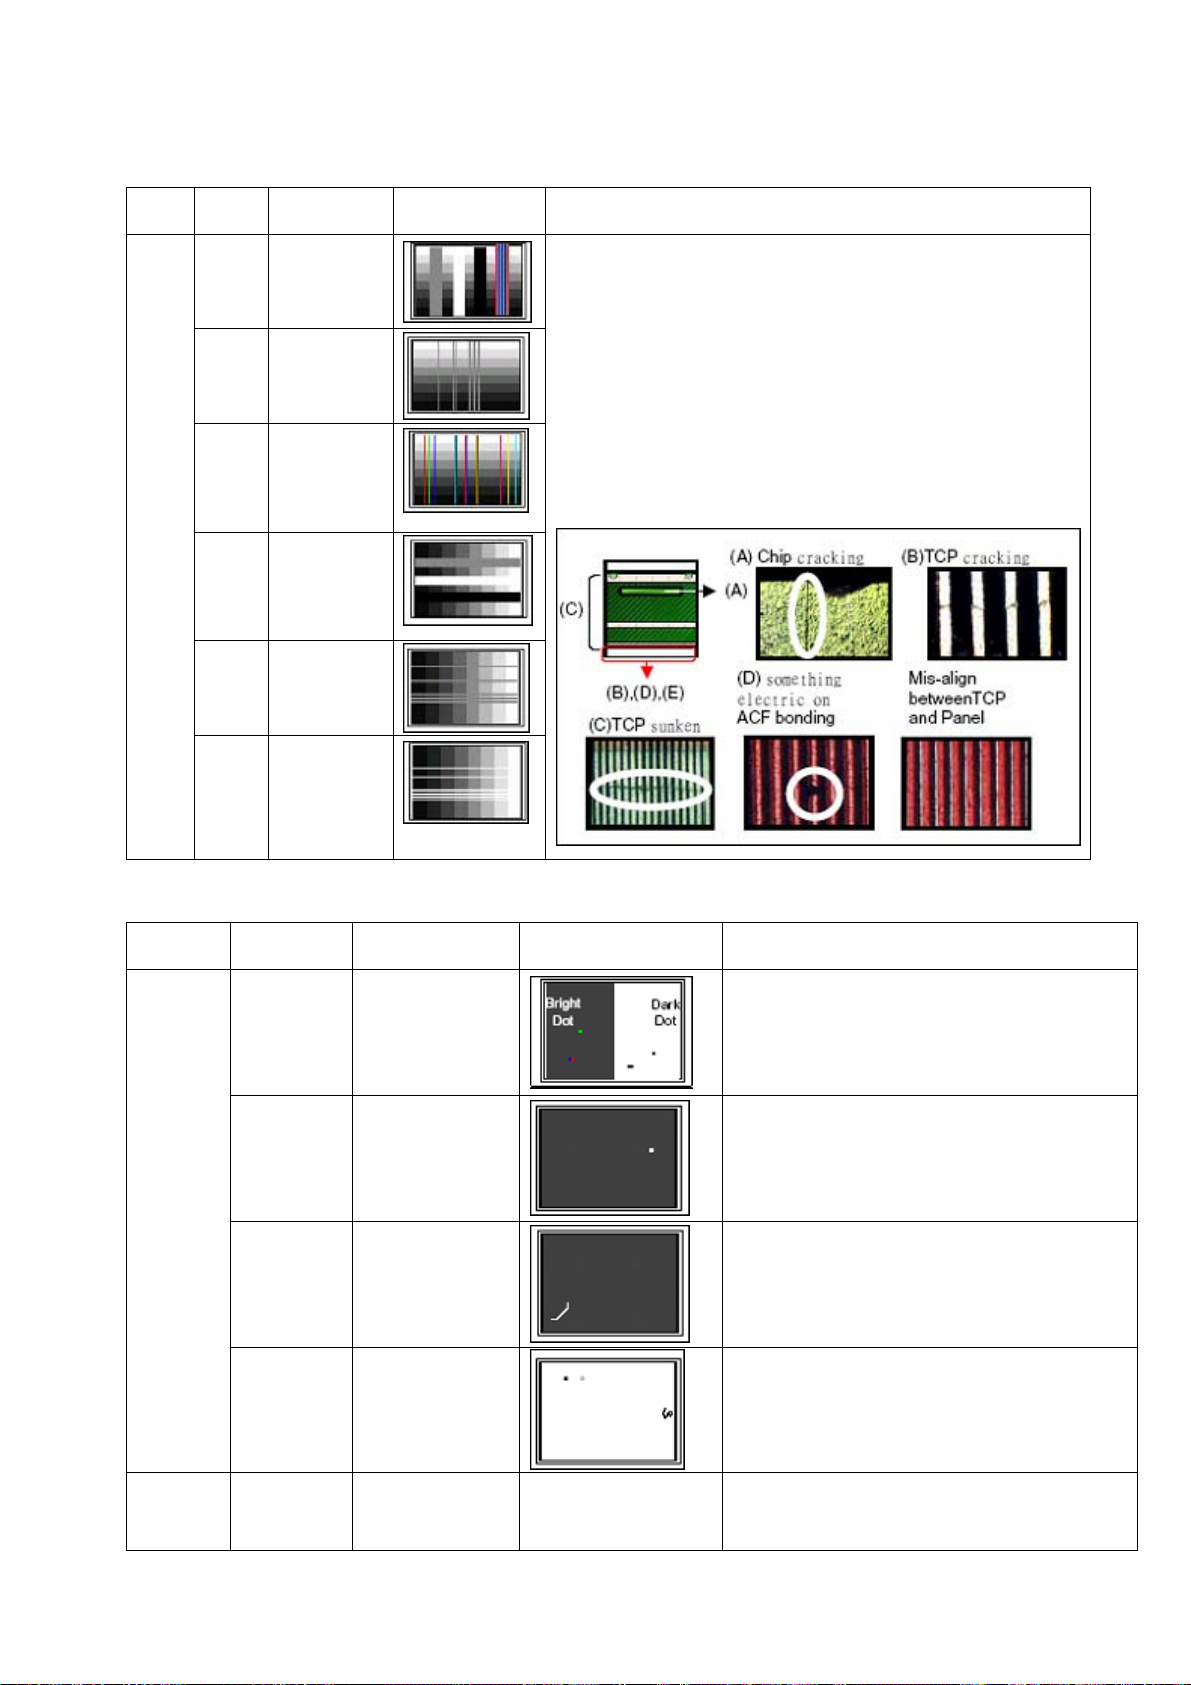
9-4. Pannel failure
Failure Mode
Part Name Description Phenomena Failure cause
Block Defect :TCP cracking or cracking
Dim or L/D :TCP Sunken
:TCP lead cracking
:ACF bonding short
:Awful environment and something electric enter into
LCD
:Mis-align between TCP and Panel
:Panel failure
:TCP failure
TCP
V B/D Vertical bar
V Dim
V L/D
H B/D
H Dim
Vertal gray
line
Vertical color
line(light or
dark forever)
Horizontal
bar
Horizontal
gary line
Horizontal
H L/D
line(light or
dark forever)
Failure Mode
Part Name Description Phenomena Failure cause
Bright dot dark
dot in pannel
Bladder in
Polarizer
Polarizer Scratch
Incoming Inspection Standard
Bladder between Polarizer and top glass
Tine or rigidity arose
Panel or
Polarlzer
Dot Defect
Polarizer
Bubble
Polarizer
Scratch
Circuit
F/M inside
Polarizer
Abnormal
Display
Eyewinker inside
Polarizer
Abnormal Display
Eyewinker inside Polarizer
1. Chip lose action
2. IC ahort or jointiog bad
47
Page 48
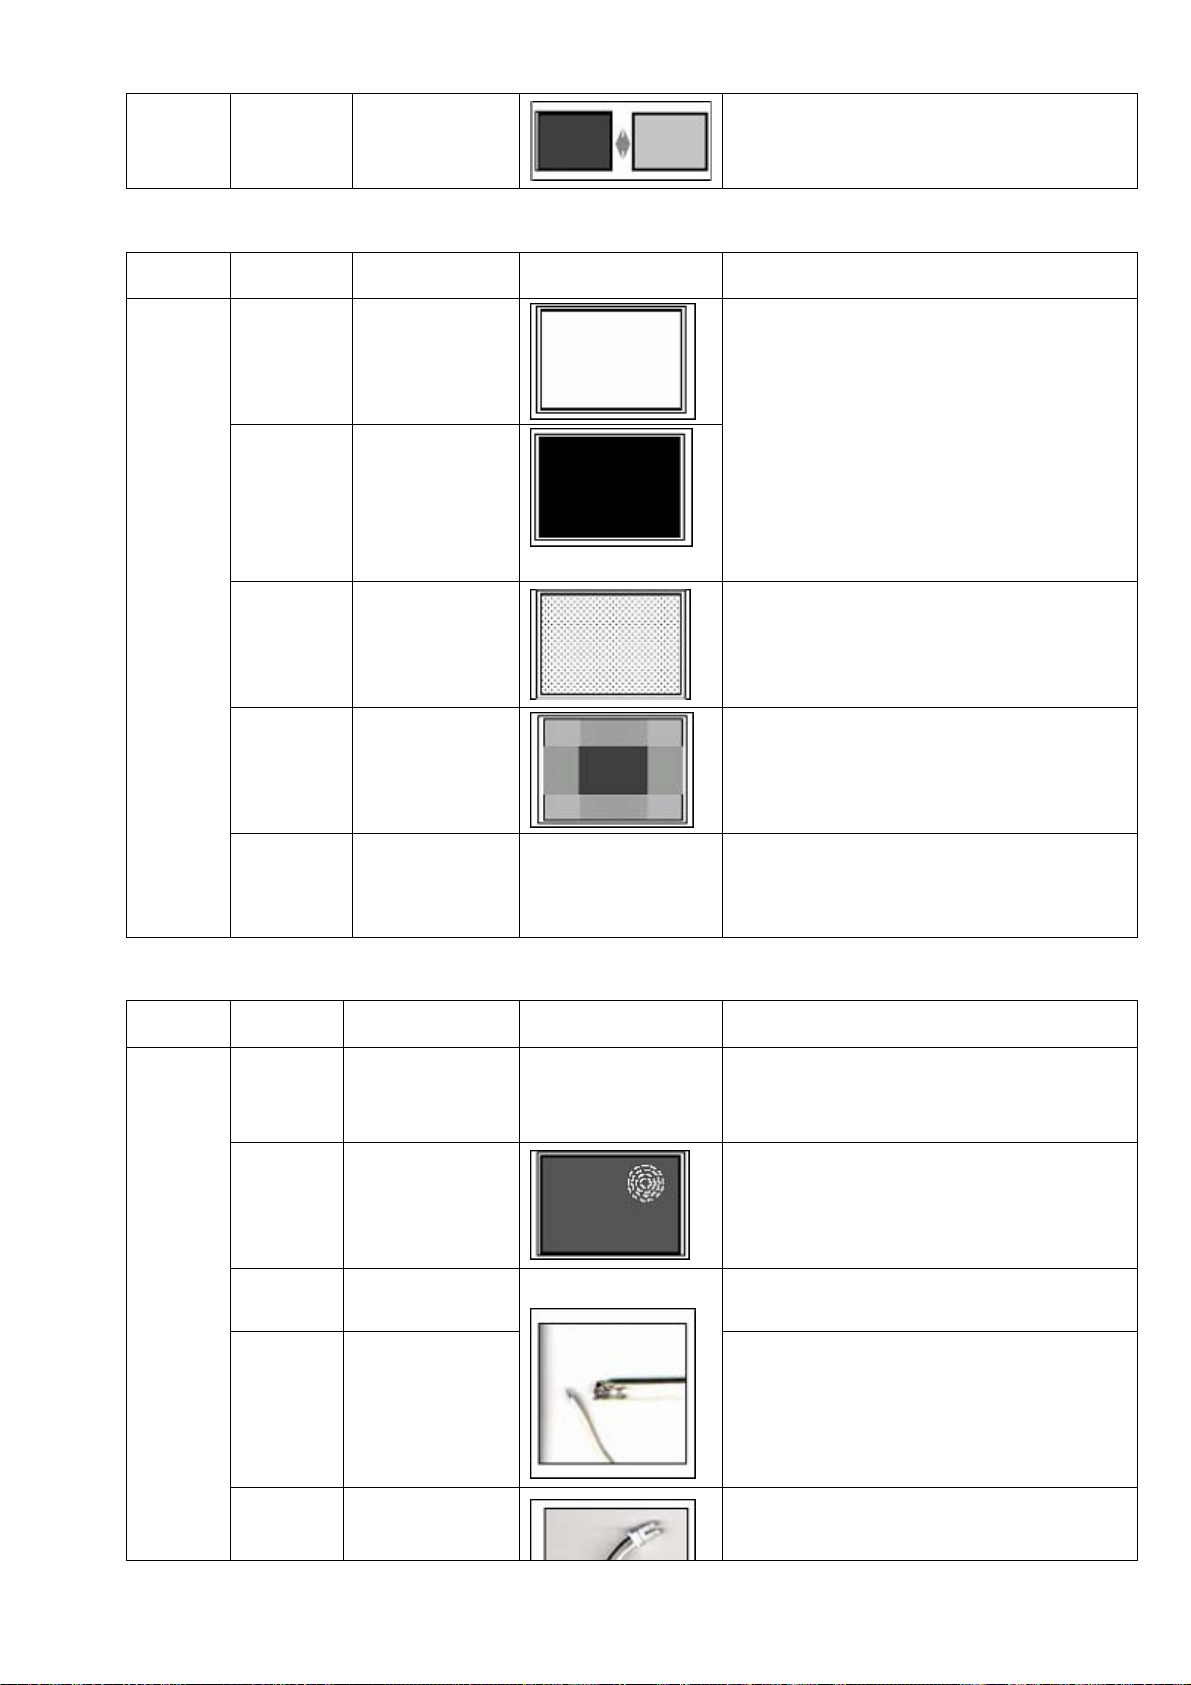
3. Pannel and vsc connect bad
Flashing
Bright and dark
display alternately
Failure Mode
Part Name Description Phenomena Failure cause
Circuit
White
Screen
Black
Screen
FIIcker Crosstalk
Abnormal
Color
Abnormal
Color
B/L normal, only
white screen
display
B/L normal, only
Black screen
display
Only color
abormal
Only color
abnormal
Maybe caused by surge current and EDS
LCD Vcom imbalance
Capacitance improper bring crosstalk inside LCD
pannel
1. Chip lose action
2. IC short or jointion bad
3. Pannel and vsc connect bad
Failure Mode
Part Name Description Phenomena Failure cause
Mechanlcal
Nolse
Ripple Connectric circle
B/L off B/L lose action
B/L dark
B/L wire
damaged
When turn
panel,appear
cacophony
B/L brightness
darker than normal
B/L wire damaged
Caused by Mechanica noise of backlight
unit
Causeed by between mechanism and
pannel
*Connect badness between wire and
electrode
*Connect badness
Short between wire and electrode
Operation abnormal or systemic noise
48
Page 49
B/L wire
open
B/L shut
down
F/M
Without backlight Operation abnormal or systemic noise
B/L shutdown in
sometime
F/M in
B/L ,white,balck
Rotundity or
wirelike
Short bitween lamp housing and wire, Because
consume power too much
F/M in B/L unit
Failure Mode
Part Name Description Phenomena Failure cause
Brightness at
Light
leakage
bottom of LCM
brighter than
normal
B/L unit badness
Mechanlcal
or B/L
Uniformity
Mount hole
B/L brightness
asymmetric
Lack screw or
screw damage
Sheet in B/L unit is uneven
*Lack screw
Screw damage
49
Page 50

Sincere Forever
50
 Loading...