

Haier LC-1958P User Manual

Please read this manual carefully
before using this TV set and keep it
for future reference.
LCD TV
USER MANUAL
LC-1958P
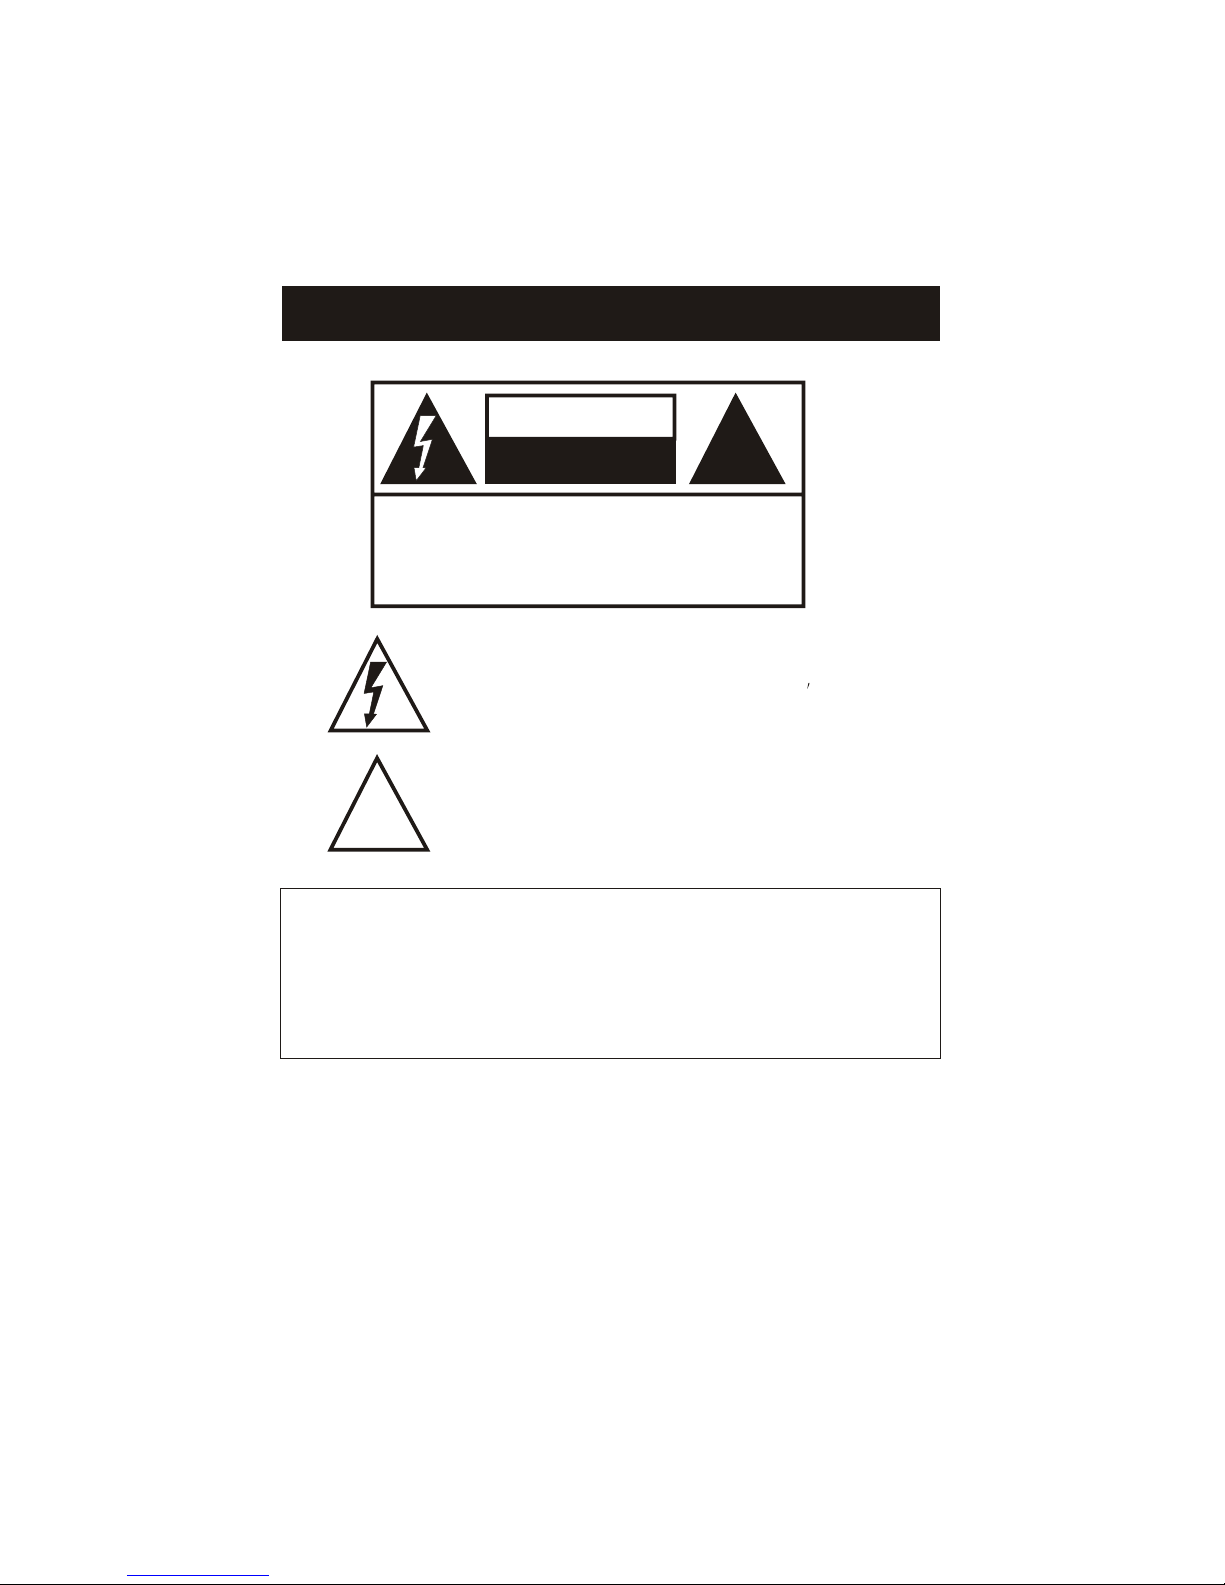
WARNING AND CAUTION
RISK ELECTRIC SHOCK
DO NOT OPEN
CAUTION
!
CAUTION: TO REDUCE THE RISK OF ELECTRIC SHOCK,
DO NOT REMOVE COVER (OR BACK).
NO USER SERVICEABLE PARTS INSIDE.
REFER SERVICING TO QUALIFIED SERVICE
PERSONNEL.
The lightning flash with arrowhead symbol, within an equilateral
triangle is intended to alert the user to the presence of
uninsulated dangerous voltage within the product s
enclosure that may be of sufficient magnitude to constitute a
risk of electric shock.
The exclamation point within an equilateral triangle is intended
to alert the user to the presence of important operating and
maintenance (servicing) instructions in the literature
accompanying the appliance.
!
WARNING: TO PREVENT FIRE OR SHOCK HAZARD, DO NOT
EXPOSE THIS APPLIANCE TO RAIN OR MOISTURE.
CAUTION: TO PREVENT ELECTRIC SHOCK DO NOT USE THIS
POLARIZED PLUG WITH AN EXTENSION CORD,
RECEPTACLE OR OTHER OUTLET UNLESS THE
BLADES CAN BE FULLY INSERTED TO PREVENT
BLADE EXPOSURE.
CAUTION: These servicing instructions are for use by qualified service
personnel only. To reduce the risk of electric shock, do not perform any
servicing other than that contained in the operating instructions unless
you are qualified to do so.

IMPORTANT SAFETY INSTRUCTIONS
Important Safety Instructions
1) Read these instructions.
2) Keep these instructions.
3) Heed all warnings.
4) Follow all instructions.
5) Do not use this apparatus near water.
6) Clean only with dry cloth.
7) Do not block any ventilation openings. Install in accordance with the
manufacturer's instructions.
8) Do not install near any heat sources such as radiators, heat registers, stoves,
or other apparatus (including amplifiers) that produce heat.
9) Do not defeat the safety purpose of the polarized or grounding-type plug. A
polarized plug has two blades with one wider than the other. A grounding type
plug has two blades and a third grounding prong. The wide blade or the third
prong are provided for your safety. If the provided plug does not fit into your
outlet, consult an electrician for replacement of the obsolete outlet.
10) Protect the power cord from being walked on or pinched particularly at plugs,
convenience receptacles, and the point where they exit from the apparatus.
11) Only use attachments/accessories specified by the manufacturer.
12) Use only with the cart, stand, tripod, bracket, or table specified by the
manufacturer, or sold with the apparatus. When a cart is used, use caution when
moving the cart/apparatus combination to avoid injury from tip-over.
13) Unplug this apparatus during lightning storms or when unused for long
periods of time.
14) Refer all servicing to qualified service personnel. Servicing is required when
the apparatus has been damaged in any way, such as power-supply cord or plug
is damaged, liquid has been spilled or objects have fallen into the apparatus, the
apparatus has been exposed to rain or moisture, does not operate normally, or
has been dropped.
15)The apparatus shall not be exposed to dripping or splashing and that no
objects filled with liquids, such as vases, shall be placed on the apparatus.
16)The mains plug or appliance inlet is used as the disconnect device, remain it
readily operable during the apparatus normal use.

CONTENT
Safety Notice Items...................................................................................
Front Panel Controls..................................................................................
Connection Options...................................................................................
Remote Control ........................................................................................
Remote Control Key Functions .............................................................
Connection Instructions.............................................................................
Grounding..............................................................................................
External equipment Connections..............................................................
Antenna Connection.............................................................................
VGA Setup.............................................................................................
Component Setup................................................................................
VCR Setup...........................................................................................
HDMI Input.........................................................................................
Cable TV Setup....................................................................................
External Component Source Setup.......................................................
Basic Operating Instructions.......................................................................
Switch On/Off the TV set..........................................................................
Choose the input source..........................................................................
Audio Control..........................................................................................
Mute......................................................................................................
INFO.....................................................................................................
Select the TV Channel You Want.............................................................
Picture Mode...........................................................................................
Audio Mode............................................................................................
Sleep.....................................................................................................
GUIDE...................................................................................................
ARC button.............................................................................................
-button...................................................................................................
CH.LIST button.......................................................................................
FAV.LIST button......................................................................................
Menu Operations.......................................................................................
Video Menu Options...............................................................................
Video Menu Options Continued...............................................................
Audio Menu Options................................................................................
Audio Menu Options Continued................................................................
Channel Menu Options.............................................................................
Channel Menu Options Continued..............................................................
Function Menu Options.............................................................................
Function Menu Options Continued..............................................................
Lock Menu Options ..................................................................................
Lock Menu Options Continued..................................................................
PC Menu Options....................................................................................
PC Menu Options Continued....................................................................
Troubleshooting Guide...............................................................................
Specifications...........................................................................................
Warranty ..................................................................................................
1
2
3
4
5
6
6
6
6
7
7
8
8
9
9
10
10
10
10
10
10
11
11
11
11
11
11
12
12
12
13
13
14
15
16
17
18
19
20
22
24
27
28
29
30
31

Safety Notice Items
Incorrect usage may cause fire or electric shock.
ensure
Please keep this manual for later use;
Please comply strictly with the warning instructions on the machine and
in this book;
Before operation, please make sure that the operating voltage of your unit is
correct;
Do not remove the back cover. If service is needed, please contact an
Authorized service technician.
To prevent this, please do as
required when you are installing, using and cleaning this machine. To
your safety and extend the life-span of LCD-TV, please read the following items
carefully before using:
Please read and understand all the instructions before operation;
Please comply with the instructions provided;
Please do not use additional devices that are not recommended by
manufacturer:
Do not place the unit on unstable, dusty and humid places;
Never put the unit in direct sunlight or near heat sources;
Allow enough space for proper ventilation;
Please keep water away from the LCD-TV . If water comes in contact with the
LCD-TV, disconnect the power cord from the power source, then wipe the set
with a dry soft cloth;
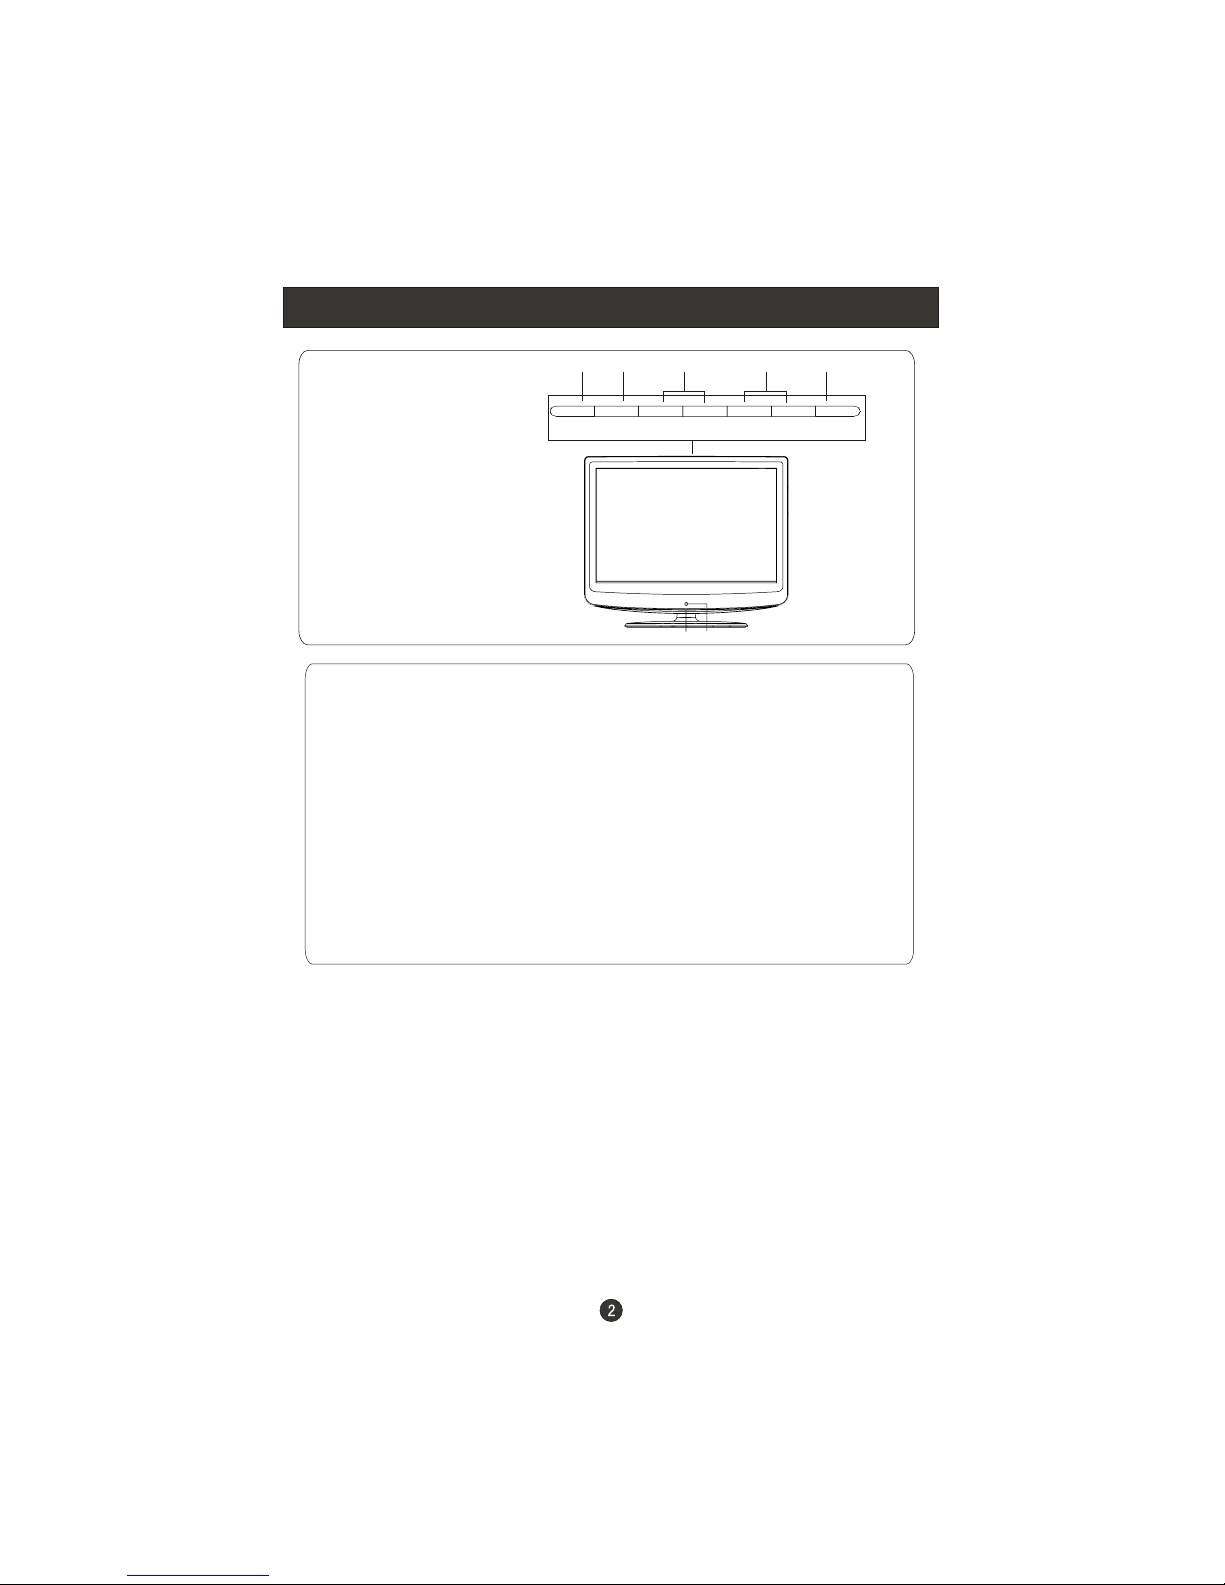
Front Panel Controls
Control Panel Function
1. Power Press to turn on and off the TV.
2. TV/AV
3. MENU Press to select the main menu
4. VOL- Volume down / Left button to adjust the item in the OSD
VOL+ Volume up / Right button to adjust the item in the OSD
/Press to enter
5. CH- TV channel down / to select the item in the menu
CH+ TV channel up / to select the item in the menu
6. Power indicator
7. Remote Sensor
Selects the input signals.
.
.
.
Receives the signals from the remote control.
TV/AV MENU VOL- VOL+ CH- CH+ POWER
2 3 4 5 1
67

Connection Options
Pr
Pb
Y
AUDIO
R
L
S-VIDEO
R AUDIO IN L
VIDEO IN
ANT IN
VGA IN
COMPONENT IN
PC AUDIO IN HDMI
ANT IN(Antenna Input)
Connect cable or
antenna signals to
the TV, either
directly or through
your cable box.
Headphone
Connect audio
output from an
external device
to these jacks
Audio in
Video in
Connect video
output from an
external device
to this jack
S-VIDEO
Connect S-Video
out from an S-Video
device to the jacks.
Component Input
Connect a component
video device to these
jacks
Connect audio
output from an
external device
to these jacks
Audio in
VGA
Connect to the VGA
15PIN analog output
connector of a PC
graphics card to use
set as a PC display
PC audio in
Connect the audio
output from the pc
to the PC audio
input port
HDMI
Connect to HDMI
output of other
equipment
Pr
Pb
Y
AUDIO
R
L
S-VIDEO
RAUDIOINL
VIDEOIN
ANTIN
VGAIN PCAUDIOIN HDMI

Remote Control
Installing Batteries
Precautions
Make sure that there is no
obstacle between the remote
controller and television set.
As strong light may interfere with the
signals, change your position to
operate the remote control if
the television cannot be turned
on or off as expected.
Keep the remote control
away from heat sources or
humid areas to ensure
effective performance of
the remote.
Make sure that two AA 1.5V or AAA
depending up the model alkaline
batteries are loaded. The batteries
must be of the same type, must be
inserted properly, and must not be
rechargeable.
Insert two size AAA batteries matching
the +/-polarities of the battery to the +/marks inside the battery compartment.
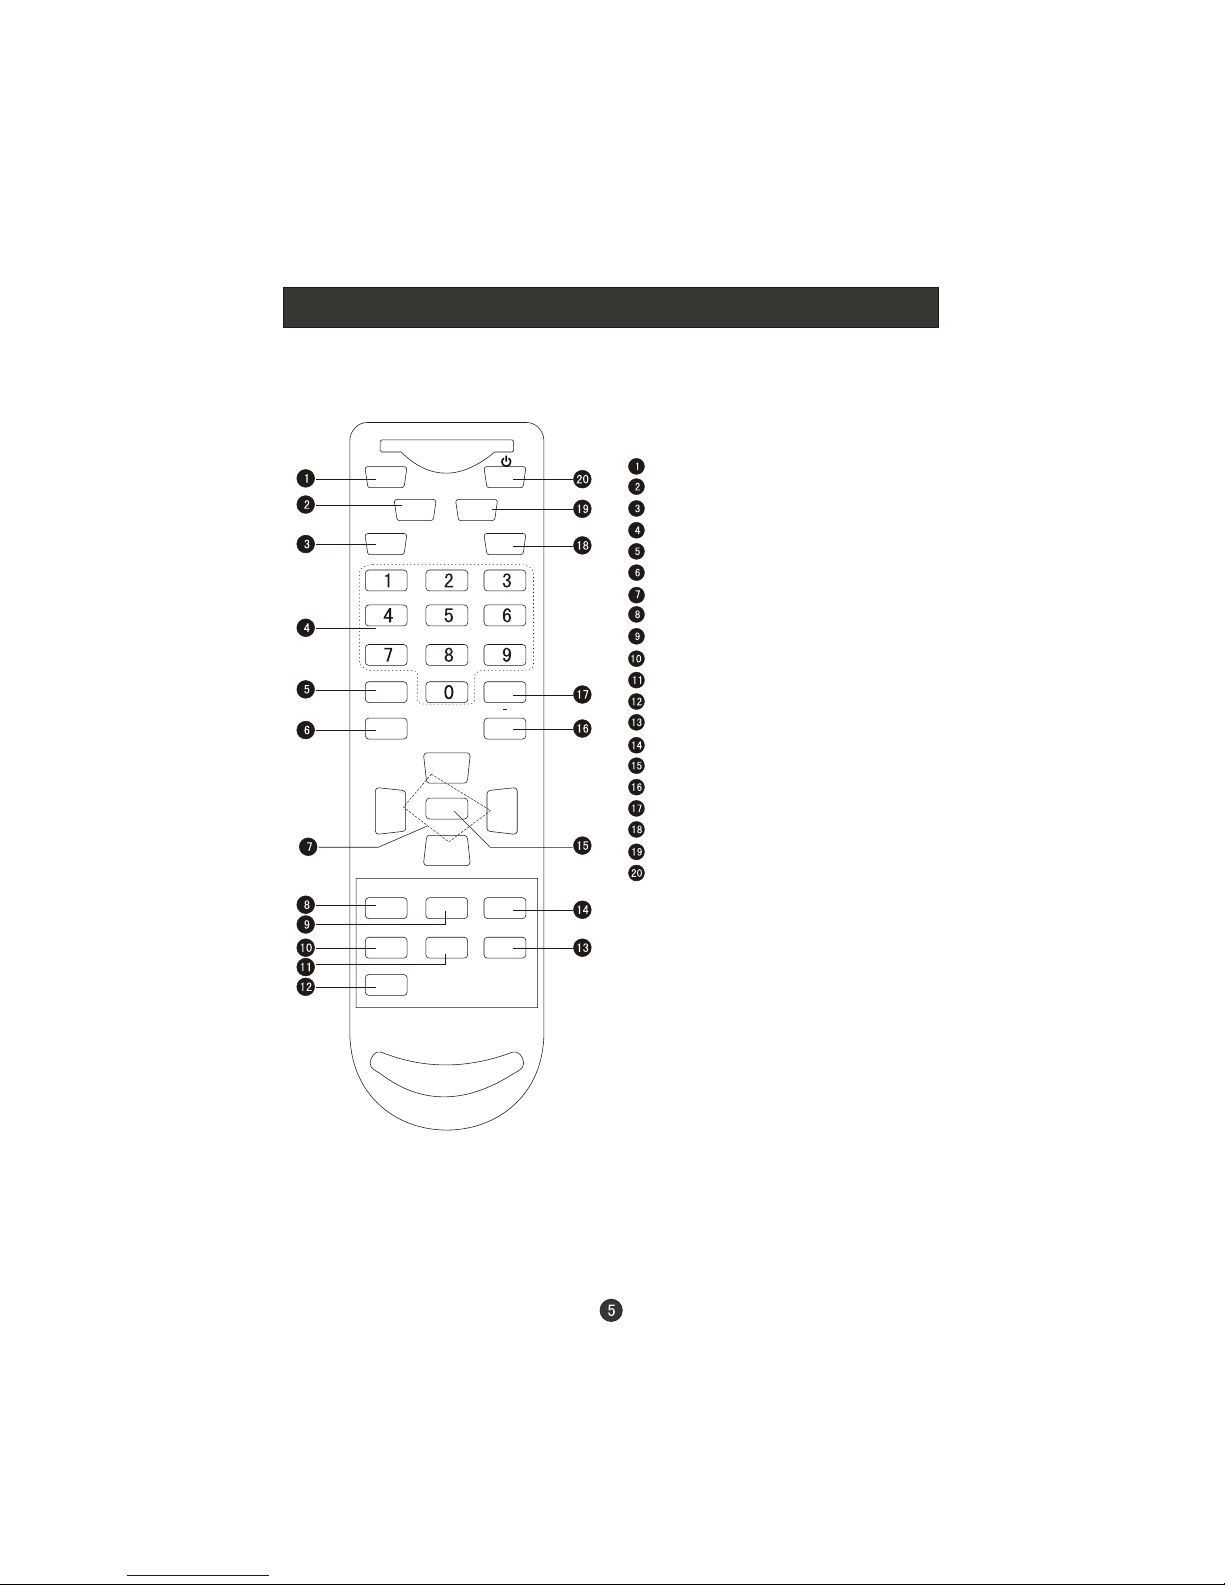
Remote Control Key Functions
When using the remote control, aim it
towards the remote sensor on the TV
Mute
Return to previous channel in TV mode
Input selection
Program Number
Select MONO, STEREO, SAP in NTSC system
Confirm button
Volume/Channel Selection
CC ( closed caption) On / Off
TV Sleep button
Shows program schedule in TV
Select the aspect ratio
Open the favorite channel list in TV
Open the channel list in TV
Adjust sound mode
MENU
Select additional channels
Adjust Picture Mode
Exit On Screen Display
Program Infromation
Power
Buttons on the remote control
MUTE
Q.VIEW INFO
INPUT EXIT
SAP P.MODE
CC
CH+
CH-
VOL
-
VOL
+
MENU
SLEEP S.MODE
GUIDE ARC CH.LIST
FAV.LIST
OK
Connection Instructions
Ensure that you connect the grounding / earth wire to prevent possible
electric shock. If grounding methods are not possible, have a qualified
electrician install a separate circuit breaker. Do not try to ground the
unit by connecting it to telephone wires, lightening rods, or gas pipes.
Grounding
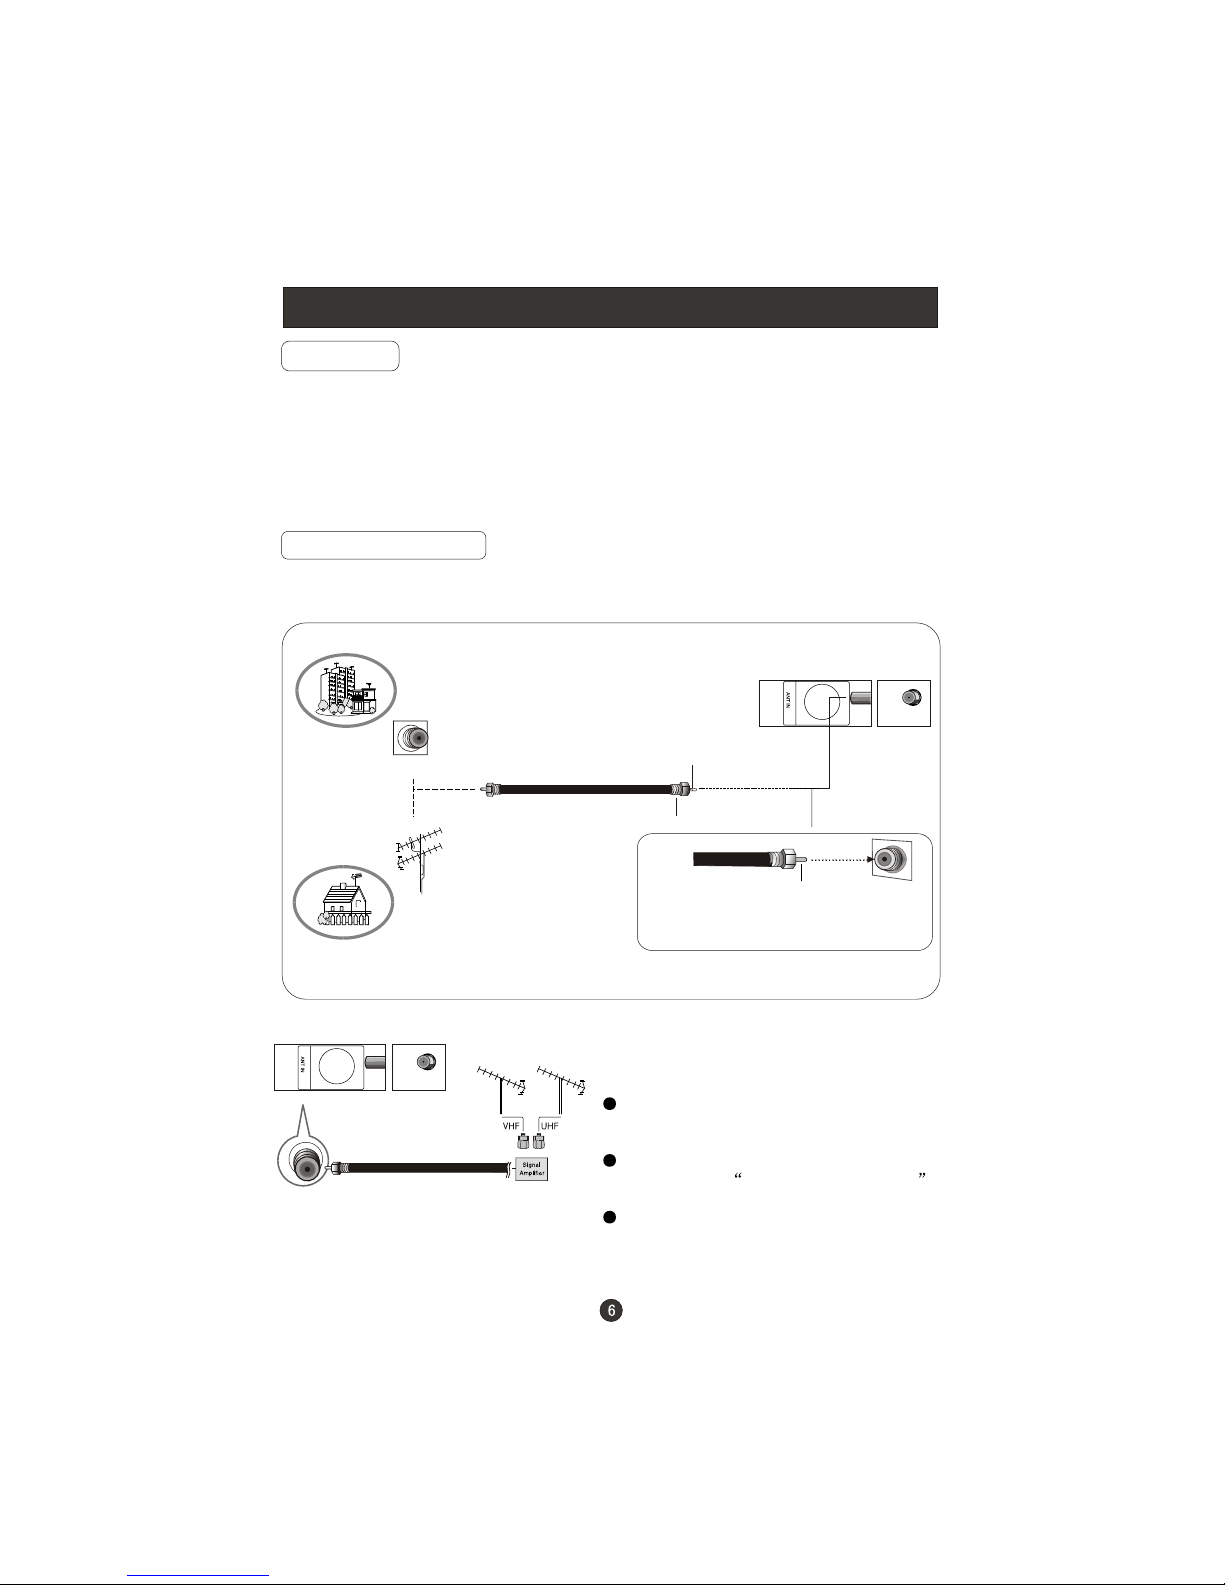
External Equipment Connections
Antenna Connection
- Antenna or Cable Service with a Cable Box Connections
- For optimum picture quality, adjust antenna direction if needed.
Multi-family Dwellings/Apartments
(Connect to wall antenna socket)
wall antenna
socket
VHF antenna
UHF antenna
outdoor
antenna
Single-family Dwellings /Houses
(Connect to wall jack for outdoor antenna)
Bronze Wire
Be careful not to bend the bronze
wire when connecting the antenna.
Bronze Wire
Turn clockwise to tighten.
RF coaxial wire (75 ohm)
To improve picture quality in a poor
signal area, purchase and install a
signal amplifier.
If the antenna needs to be split for two
Tvs, install a 2-Way Signal Splitter
in the connections.
If the antenna is not installed properly,
contact your dealer for assistance.
NOTE: Cables shown are not included with the TV
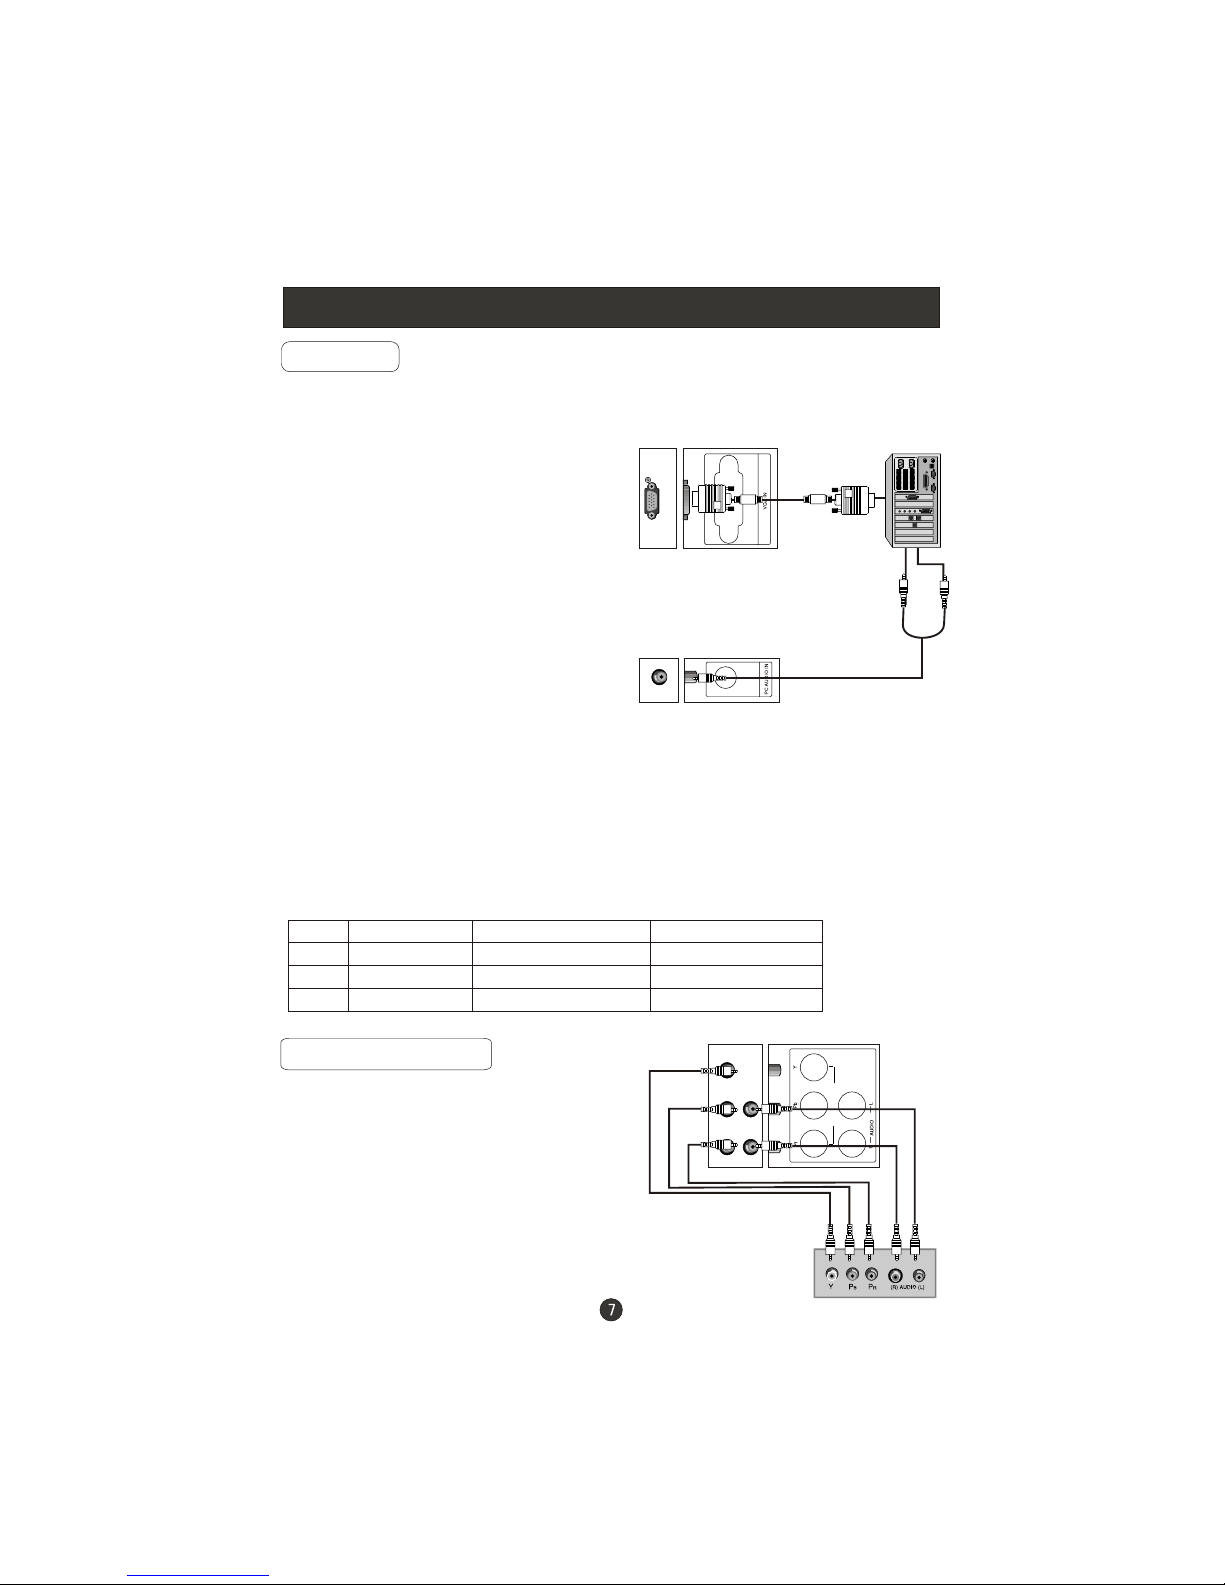
Connection Instructions
You can use your LCD-TV as a monitor for your personal computer using a VGA
cable (not supplied).
VGA Setup
Connection and use steps:
1.Read the user guide supplied with
your computer and ensure that it has
a VGA connector;
2.Make sure that the power of the LCD
-TV and the PC are off;
3.Connect a D type 15-pin PC interface
cable ( not supplied ) to the PC video
interface connector on the PC. Then
connect the other end to the PC video
interface connector on the back of the
LCD-TV.Tighten the screws on the PC
connectors once they are firmly
connected;
4.Turn on the power of the LCD-TV first ,
and then turn on the power of the PC;
5.Press the INPUT button to set the video input mode of the LCD-TV to PC;
Once the input for PC is selected and if you see no image press function
F8 on you pc.
6.Check the image on your TV. There may be noise associated with the resolution,
vertical pattern, contrast or brightness in PC mode. If noise is present, change
the PC mode to another resolution, change the refresh rate to another rate or
adjust the brightness and contrast on the menu until the picture is clear. If the
refresh rate of the PC graphic card can not be changed, change the PC graphic
card or consult the manufacturer of the PC graphic card.
Component Setup
How to connect
Connect the DVD video outputs (Y, PB, PR)
to the Component(Y, Pb, Pr) IN jacks on
the TV and connect the DVD audio outputs
to the AUDIO IN jacks on the TV, as shown
in the figure.
NOTE: If your DVD player does not have
component video output, use S-Video.
How to use
1. Turn on the DVD player, insert a DVD.
2. Use the button on the remote
control to select the proper input.
INPUT
Resolution
Mode
VGA
SVGA
XGA
Resolution
640x480
800x600
1024x768
Line frequency(KHz)
31.5
37.9
48.4
Frame frequency(Hz)
60
60
60
Note: All above listed are subject to VESA criteria.
COMPONENTIN
 Loading...