

Haier L19A11W-A User Manual

LCD TV RECEIVER
USER'S MANUAL
Please read this manual carefully before
using your television and keep this manual
In a good place for future reference.
MODEL:
L1510A-A, L15A10A, L1910A-A,
L19A10A, L1510B-A, L15B10A,
L1910B-A, L19B10A, L1911W-A,
L19A11W, L2011W-A, L20A11W

To users:
Thank you for using our LCD-TV.
Before connecting the LCD-TV and turning the power on, please
read this book carefully. Please keep this book for later use. When it
was loss of function by electrostatic shock, please switch the on/off
button for restoring the function.
CONTENT
Safety Notice Items...................................................................................
Front Panel Controls..................................................................................
Connection Options...................................................................................
Remote Control Key Functions...................................................................
Remote Control ..................................................................................
Installing Batteries..................................................................................
Connection Instructions.............................................................................
Grounding..............................................................................................
External equipment Connections..............................................................
Antenna Connection.............................................................................
PC Setup.............................................................................................
VCR Setup...........................................................................................
Cable TV Setup....................................................................................
External AV Source Setup......................................................................
Basic Operating Instructions.......................................................................
Turn on the LCD-TV.................................................................................
Audio Control..........................................................................................
Mute......................................................................................................
Select the TV Channel You Want...............................................................
Picture Mode...........................................................................................
Menu Operations.......................................................................................
Picture Menu Options...............................................................................
Picture Menu Options Continued...............................................................
Audio Menu Options................................................................................
Audio Menu Options Continued................................................................
Function Menu Options.............................................................................
Function Menu Options Continued.............................................................
Adjust Menu Options................................................................................
Tuning Menu Options..............................................................................
Tuning Menu Options Continued..............................................................
TELE TEXT...............................................................................................
Troubleshooting Guide...............................................................................
Specifications...........................................................................................
1
2
3
4
5
5
6
6
6
6
7
8
9
9
10
10
10
10
11
11
12
12
13
13
14
15
16
16
17
18
19
21
22

Safety Notice Items
Incorrect usage will cause fire or electric shock. To prevent this, please do
as required when you are installing, using and cleaning this machine. To insure
your safety and extend the life-span of LCD-TV, please read the following items
carefully before using:
l Please read and understand all the instructions before operation;
l Please keep the book for later use;
l Please comply with the warning instructions on the machine and in this book
strictly;
l Please comply with the instructions provided;
l Please do not use additional devices that are not recommended by
manufacturer:
l Before operation, please make sure that the operating voltage of your unit is
normal;
l Do not place the unit on unstable, dusty and humid places;
l Never put the unit in direct sunlight or near heat sources;
l Allow enough space for proper ventilation;
l Please keep water away from the LCD-TV . If water comes in contact with the
LCD-TV, disconnect the power cord from the power source, then wipe the set
with a dry soft cloth;
l Do not remove the back cover. If services were need, please refer to qualified
Personnel
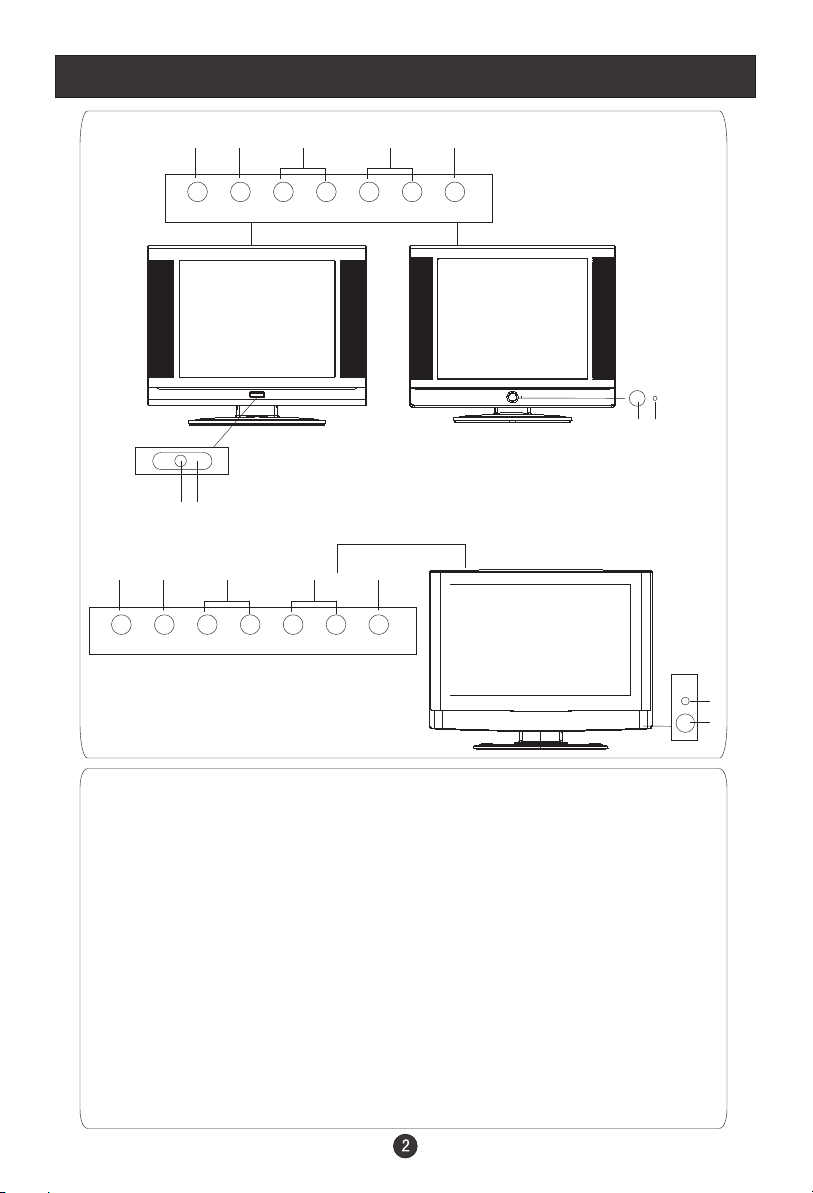
Front Panel Controls
L1510A-A, L15A10A,L1910A-A
L19A10A
2 3 4 5 1
TV/AV MENU VOL- VOL+ CH- CH+ POWER
2 3 4 5
TV/AV MENU VOL- VOL+ CH- CH+ POWER
7
6
1
L2011W-A, L20A11WL1911W-A,L19A11W
L1510B-A,L15A10B.
L1910B-A, L19A10B
7
6
6
7
Control Panel Function
1. Power supply switch
2.TV/AV Select the input signals: SCART/DVD/PC/AV/SV/TV
3. MENU Press to select the main menu
4. VOL- Volume down / Left orientation to adjust the item in the OSD
VOL+ Volume up / Right orientation to adjust the item/Press to enter
5. CH- TV channel down / to select the item in the menu
CH+ TV channel up / to select the item in the menu
6. Power indicator
Illuminates red in standby mode, illuminates green when the display is
turned on
7.Remote Sensor Receiving remote control sends the infrared remote
signal.
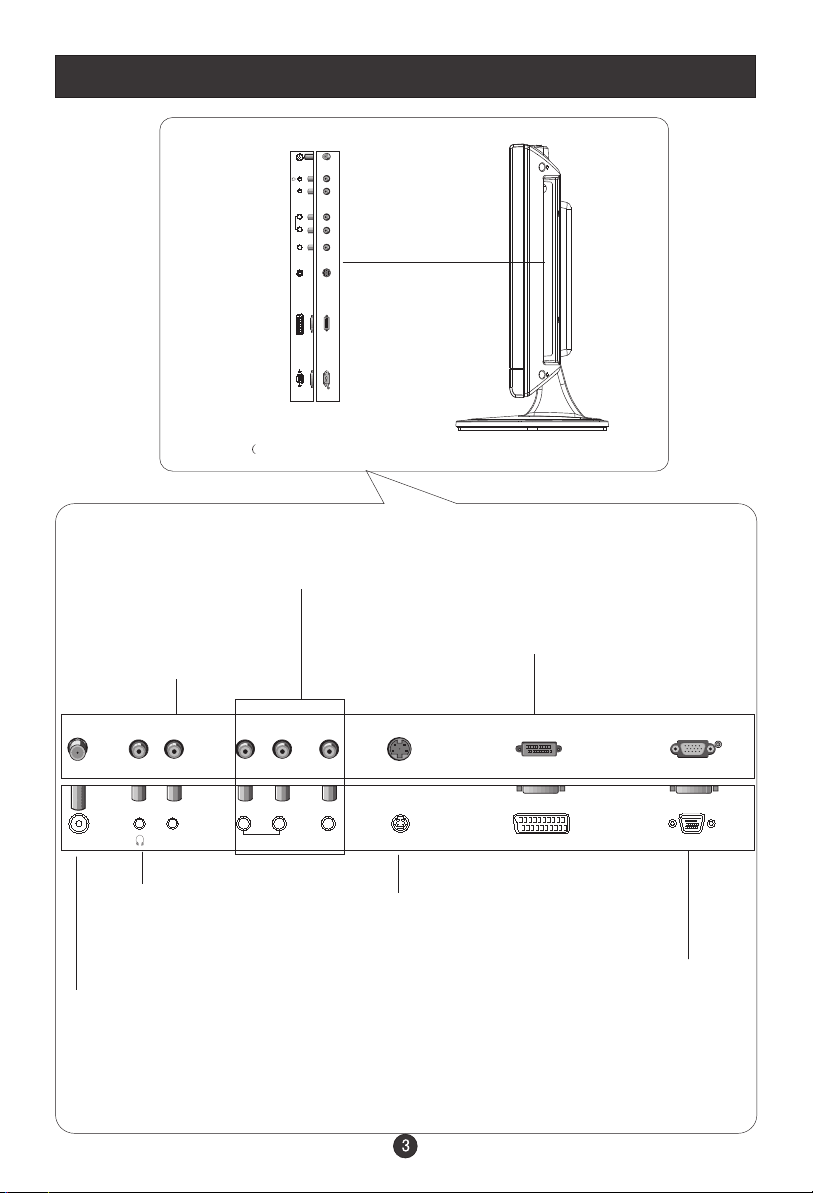
Connection Options
ANT IN
PC AUDIO IN
R
AUDIO
L
VIDEO IN S-VIDEO
SCART VGA IN
The figure is just for reference, please see the real.
And the AC power supply switch is on the back of the set)
AV Input
Connect audio/video
output from an external
device to these jacks
PC Audio Input
Connect the PC output
connector from a PC to
the audio input port
SCART
Connect to the DVD/
VCR/broadcasting
receiver or other
equipment
ANT IN
PC AUDIO IN
Earphone port
Antenna Input
Connect cable or
antenna signals to
the TV, either directly or through your
cable box.
R
AUDIO IN
L
V
VIDEO IN S-VIDEO
TV SCART VGA IN
S-Video Input
Connect S-Video out
from an S-Video device
to the jacks.
VGA Input
Connect to the VGA
15PIN analog output
connector of the PC
display card for PC
display purpose
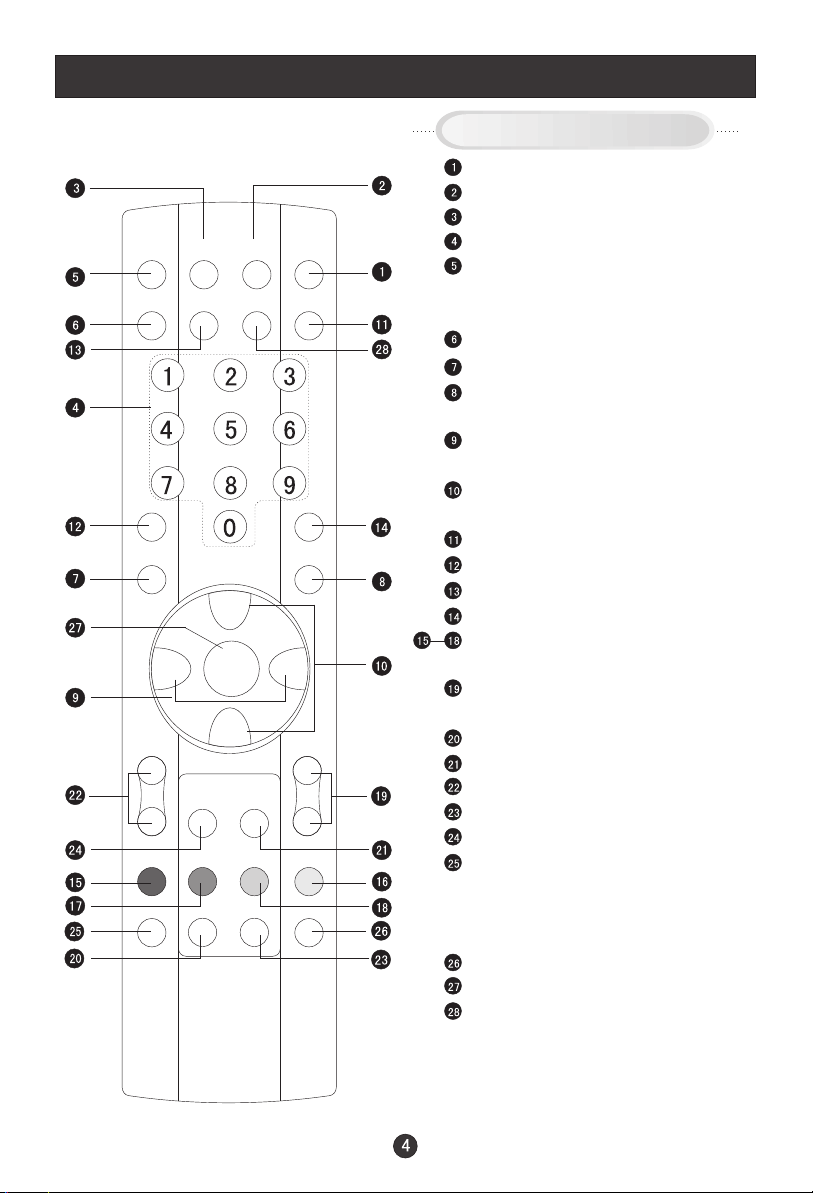
Remote Control Key Functions
When using the remote control, aim it
towards the remote sensor on the TV
SLEEP DISPLAY MUTE POWER
NICAM PC AUTO AD TV/AV
PSM
OK Q.VIEW
P+
V- V+
MENU
INDEX TEXT
TIME HOLD SIZE REVEAL
P-
SUBCODE MIX
SM
S
Buttons on the remote control
Stand By
MUTE
Display current input signal information
TV channel number select
Set time to change the TV into the
standby status after a period of preset
time.(time is 240/180/120/90/60/45/30/15/ )
NICAM/A2 Stereo select
EXIT
Quick TV channel switch(return to the
last channel)
Volume down/up Left/right orientation to
adjust the item in the OSD
TV channel up/down or select the item
of the menu
Select SCART/PC/AV/SV/TV
Select picture mode
PC system select
Select sound mode
Correspond to the differently colored
subjects
Switch to the Teletext with text mode/turn
off Teletext and switch to TV mode
Hold on or off for current page display
Switch to the Teletext with mix mode
Request index page
Change display size
Sub coded page access
While in normal TV mode only, pressing
the button TIME will display the teletext
time in the top right corner for a few
seconds.(only available in teletext mode)
Reveal or hidden the hidden words
Press to select the main menu
Auto adjust (PC mode)
off
Remote Control
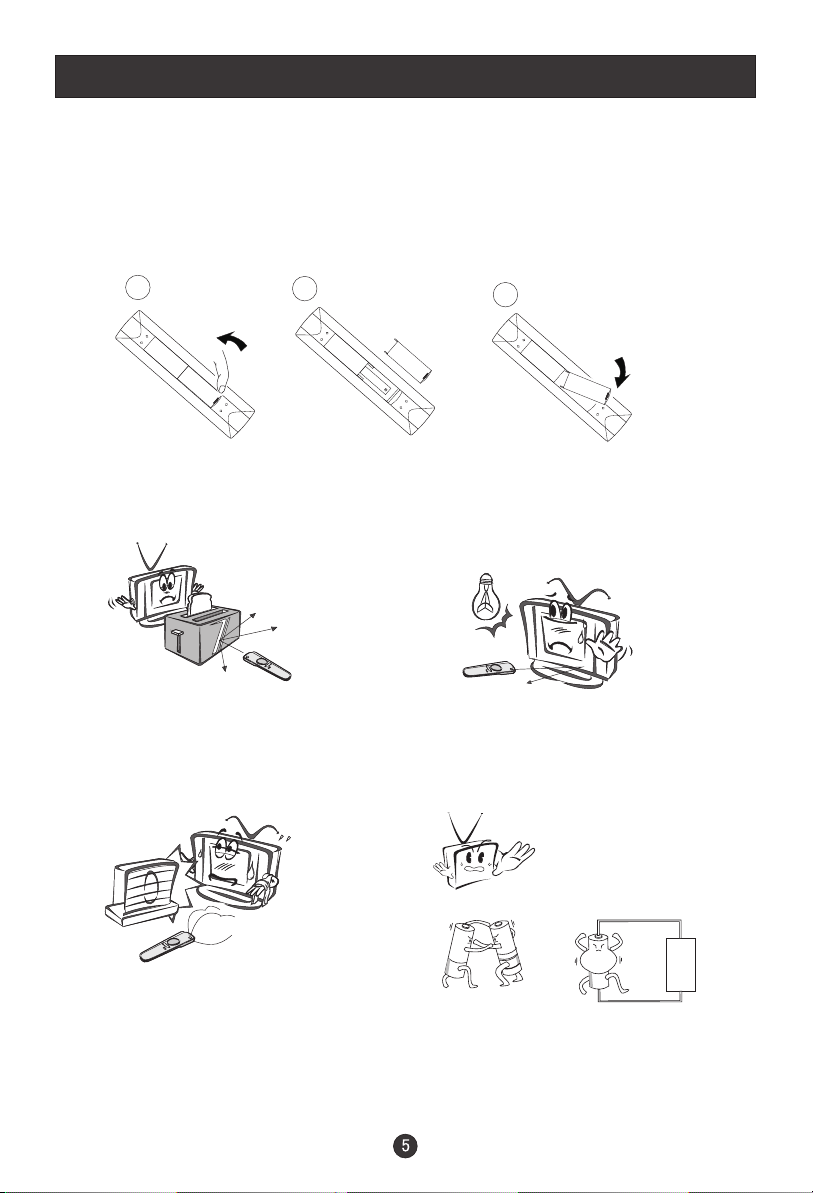
Installing Batteries
1.Slide open the cover of the battery compartment on the back of the remote
control.
2.Load two 5# alkaline batteries in the compartment. (plus and minus poles to
respective mark)
3.Replace the cover of the battery compartment.
1
2
Precautions
Make sure that there is no
obstacle between the remote
controller and television set.
Keep the remote controller
away from heat source or
humid area to ensure
effective performance of
the remote controller.
3
As strong light may interfere the
signals, change your position to
operate the remote controller if
the television cannot be turned
on or off as you expect.
Make sure that two 5# 1.5V alkaline
batteries are loaded. The batteries
must be of the same type. The batteries
must be located properly. The batteries
are not rechargeable.
Connection Instructions
Grounding
Ensure that you connect the grounding / earth wire to prevent possible
electric shock. If grounding methods are not possible, have a qualified
electrician install a separate circuit breaker. Do not try to ground the
unit by connecting it to telephone wires, lightening rods, or gas pipes.
External Equipment Connections
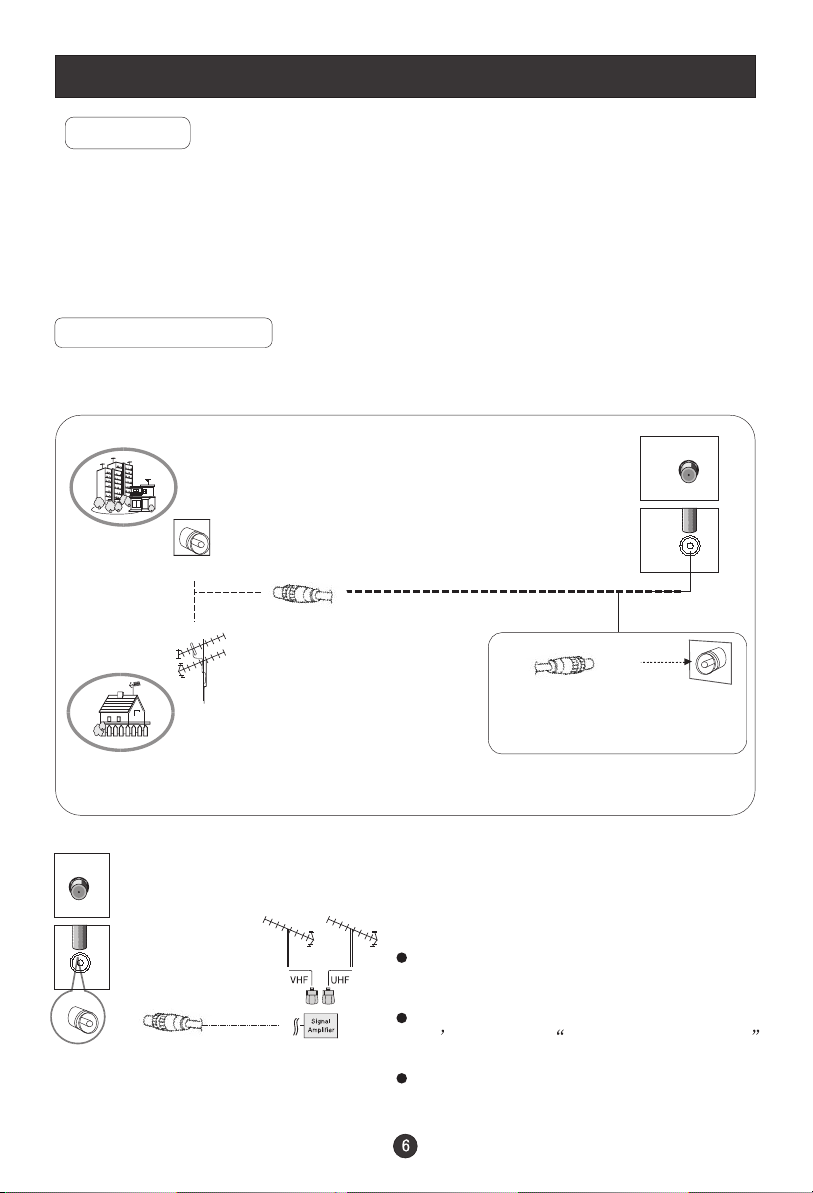
Antenna Connection
- Antenna or Cable Service with a Cable Box Connections
- For optimum picture quality, adjust antenna direction if needed.
Multi-family Dwellings/Apartments
(Connect to wall antenna socket)
wall antenna
socket
RF coaxial wire (75 ohm)
VHF antenna
UHF antenna
ANT IN
outdoor
antenna
Single-family Dwellings /Houses
(Connect to wall jack for outdoor antenna)
ANT IN
To improve picture quality in a poor
signal area, purchase and install a
signal amplifier.
If the antenna needs to be split for two
TV s, install a 2-Way Signal Splitter
in the connections.
If the antenna is not installed properly,
contact your dealer for assistance.
NOTE: All cables shown are not included with the TV
Be careful not to bend the bronze
wire when connecting the antenna.
 Loading...