

Page 1

Certificate of Quality
checker:
Pharmaceutical Refrigerator
Operation Manual
Model:
HYC-1378
Haier Medical and Laboratory Products Co., Ltd.
Address: Haier Industrial Park, Economic Technology Development
Zone. Qingdao 266510.P.R.China
Web:www.haiermedical.com
Version:1st,2017
Dedicated code:0270501006
V13026
0270501006
Read the Operation Manual carefully before using your appliance.
Keep the Operation Manual in a safe place.
Appearance , color and layout of the door may vary.
Translation of the original instruction.
The scope of the Product Application: Pharmaceuticals and other related products
which need a storage environment of 2
℃-8℃。
Page 2

EC Declaration of Conformity
according to the Machinery Directive 2006/42/EC
For the following equipment :
Product : Pharmaceutical Refrigerator
Type Designation/Trademark:
Manufactures Name : Haier Medical and Laboratory Products Co.,Ltd.
Manufactures Address : Haier Industrial Park, Economic Technology
Development Zone. Qingdao 266510.P.R.China
Refer to in this declaration confirms with the following directive(s)/standards:
2006/42/EC, EN60335-1, EN60335-2-89 EN62233
HYC-1378
Haier
Page 3
Global Warming Potential
Model
HYC-1378 220~240 50 0.701
HYC-1378 220~240 60 0.701
HYC-1378 115 60 0.701
into the atmosphere.
Rated voltage
(
Refrigerant type GWP
R134a 1430
)
VAC
GWP=global warming potential
Rated frequency
(Hz)
CO
equivalent
2
(Tonnes)
The product is applicable to pharmacies, pharmaceutical factories, quarantine stations, health
centers and hospitals, used to store biological products and those need to be stored at a
temperature between 2~8℃.
Temperature
control
Safety
system
Computer control, digital display of temperature, temperature display
accuracy as 0.1℃ and temperature range as 2℃~8℃.
Multi-fault alarm (high and low temperature alarm, power failure
alarm, sensor fault alarm and door opening alarm)
Two alarm methods (buzzing alarm, flashing alarm)
All independent components are safely grounded
Refrigeration
system
User-friendly
design
We apologize that the Haier pharmaceutical refrigerator provided for you may be a little
different from the figure in the manual due to product improvement. The manual may be
subject to changes without further notice.
Refrigeration system with depth optimization, expoted compressor
and main components and better refrigeration performance
User-friendly design, computer control, smart and carefree, adjust-
ment not required
High-performance thermal insulation layer, with excellent insulation
effect
Glass door with electric heat, multiple anti-condensation technologies
Automatic evaporation of condensate water, safety door latch
28
1
Page 4
Packing List
Content:
Product Feature........................................................
Content.....................................................................
Safety Precautions...................................................
Precautions for Use..................................................
Product Installation ...................................................
Component Names Control Panel...........................
1
2
3
6
7
12
Model
Operation Manual
Plastic bag
Key
Handle kits
Screw 2
Note: Technical information may vary from the appliance that you have just purchased due to
technical improvements.
HYC-1378
1
1
4
2
Application method ...................................................
Alarm........................................................................
Cleaning and Maintenance.......................................
FAQ..........................................................................
Refrigeration Schematic & Circuit Diagram..............
Specification.............................................................
14
18
21
23
24
26
2
27
Page 5

Specification
Specification
Name
Model
Pharmaceutical Refrigerator
HYC-1378
Safety Precautions
Dear users:
Thanks for your choice of Haier pharmaceutical refrigerator; please make sure you have carefully
read and observed the contents with following signs in the manual, for better understanding of this
manual and better use of this product, so as to prevent personal injuries and refrigerator damage.
Outside Dimensions
(W×D×H)
(mm)
Inside Dimensions
(W×D×H)
(mm)
Effective Volume
Testing hole
Door
Foaming Material
Compressor
Shelf
The loading of each shelf
Refrigerating Method
Outer Plate /Inner Plate
Condenser/Evaporimeter
Temperature Controller
Lamp
Net Weight
Temperature of Monitoring Bottle
Rated Power Supply
Rated Power/Current
Refrigerant
Noise Level
Foaming Agent
Climate Type
Type of Electric-shock Safeguard
Power connection type
Alarm Equipment
Duration of Outage Alarm
Rechargeable Battery
1440×910×1980
1320×700×1500
1378L
2
Glass door with electric heat
Rigid polyurethane foam (fluoride-free)
Fully enclosed compressor
12
Max:30kg/m²
Force-air cooling circulation
Cold-rolled steel with power cover
Finned pipes / Finned pipes
Computer control system
LED 5W
310kg
2℃~8℃
220V-240V~/50Hz
800W/4.2A
R134a 490g
High & low temperature alarm, sensor fault alarm,
power failure alarm, Low battery alram, door opening alarm
48 h (when the battery is fully charged)
DC 12V rechargeable battery
220V-240V~/60Hz
800W/4.2A
R134a 490g
43dB(A)
CP/IP
4
I
Y
115V~/60Hz
950W/11A
R134a 490g
48dB(A)
Ignoring this warning may result in
death or serious injury
Ignoring this warning may result in
death or serious injury,and/or damage
to the refrigerator and property
In case of flammable gas leakage such as coal gas, shut off the valve of leaked gas, open
windows for ventilation and exhaust; do not plug in or pull out the power plug of refrigerator
to prevent explosion and fire.
The refrigerator shall be installed by professional technical staffs or after-sale maintenance
staffs to prevent electric shock or fire.
Place the refrigerator on solid and flat ground in a stable manner. The refrigerator will be
tipped over or personal injuries will be caused if the refrigerator is placed on improper
ground or place.
Apply the dedicated power supply marked on the nameplate of refrigerator to prevent fire
or electric shock.
If the voltage being used is 10% higher or lower than rated voltage , automatic voltage
regulator above 4000W and appropriate for motor load shall be installed.
If the power line needs to be extended, the extended line shall be no smaller than 2mm² in
sectional area and no longer than 3m in length. Otherwise, fire or electric shock may be
caused.
The power line for this refrigerator is provided with a standard three wire (grounding) plug,
which complies with 16A. Do not remove or dismantle the grounding pin of power line in
any case. Make sure the power plug is securely and reliably plugged into the socket to
prevent fire.
Apply socket with ground wire to prevent electric shock.If the socket fails to be grounded,
ground wires must be installed by professional technical staffs.
The refrigerator shall not conduct outdoor service. Electrical leakage or shock may be
caused if wet by rainwater.
Do not place the refrigerator in humid places or places where the refrigerator may suffer
splashing water, to prevent electric leakage or shock due to deterioration of insulation.
Actions or operations
which are prohibited
Actions or operations
which must be followed
Note: Climate Type 4 means the temperature is +30℃,the relative humidity is 55%.
26
Do not pour water on the refrigerator to prevent electric shock or short circuit.
3
Page 6

Do not place containers with water or heavy stuffs on the refrigerator. Personal injuries
may be caused by falling articles and electrical leakage or shock may be caused by out
flowed water due to deterioration of insulation.
Do not ground the refrigerator through gas pipes, water supply pipes, telephone lines or
lightning conductors as electric shock or other dangers may be caused.
Do not touch electrical parts such as power plug or switches with wet hands to prevent
electric shock.
Hold the power plug rather than the wire when pulling the plug from the socket as electric
shock or fire due to short circuit may be caused.
Pull out the power plug when the refrigerator is under abnormal performance as electric
shock or fire may be caused.
Users are not allowed to dismantle, repair or refit the refrigerator by themselves as fire
or personal injuries may be caused due to improper operation.
Disconnect the refrigerator when repairs or maintenance are performed on the refrigerator
to prevent electric shock or personal injuries.
Make sure medicines or airborne particles inside or around the refrigerator will be not be
inhaled during maintenance as health hazard may be caused.
The refrigerator shall be used in safe regions when toxic, harmful or radioactive articles
are stored inside, as improper use may pose danger to human health or environment.
Pull out the power plug if the refrigerator has been out of service for long time to prevent
electric shock, leakage or fire caused by aging power lines.
Circuit diagram
Defrosting heating strip
GND
+12V
N
L
LED drive model
Lamp switch
Connection to electric
Heating strip at the cabinet outlet
control cabinet enclosure
Heating strip of center sill
Door heating strip 2
Door heating transformer
Door heating strip 1
t
t
L
C
H
thermostat
prevention
High temperature
Door heating transformer
Wiring terminal 2
Double-throw switch
Filter
Wiring terminal 1
L
N
2
1
L
N
Power line terminal box
control cabinet enclosure
Connection to electric
If the refrigerator is left unused in areas where supervision is unavailable for a long time,
make sure children will not get close to the refrigerator and the door can not be
completely closed.
End-of-life disposal shall be performed by competent staffs. Remove the door to prevent
accidents such as suffocation.
Do not store explosive substances such as aerosol cans with a flammbale propellant in
this appliance.
Do not store corrosive articles such as acid or alkali in the refrigerator to prevent damage
to internal components or electrical parts.
Do not place packaging plastic bags within the reach of children to prevent suffocation
accidents.
Do not climb on or place articles on the refrigerator as personal injuries or refrigerator
damage may be caused due to turnover of refrigerator.
Do not plug metal articles such as iron nails or wires into the holes and gaps or vents
for internal air circulation, to prevent electric shock or personal injuries due to contact
of articles above with moving parts.
USB port
CN2
NC
COM
NC
HTR
FAN
L
N
NO
K3
NO
K2
COM
Power panel
CN2
N
L
J5
USB drive panel
CN1
CN1
GND
16V
CN3
Internal fan
CN11
GND
16V
CN2
CN1
Main control panel
Reserved network interface
NC
NO
COM
CN5
CN6
Display panel
CN2
Remote alarm port
NC
NO
COM
CN1
BAT-
BAT+
CN3
Sensor
CN7
door
BT1
Battery switch
Wiring terminal 3
Alarm
Defrosting
Control
VCC
GND
Door switch
Lower temperature
Upper temperature
Condensate fan
L
1
2
L
Compressor
N
L
E
N
N
Terminal connected to the
Power line
Press wiring terminal box
refrigerator’s upper board
4
25
Page 7

Refrigeration Schematic & Circuit Diagram
Schematic diagram
Check refrigerator settings when restarting the refrigerator after power failure or the
power is shut off. Changes of settings may damage the articles stored.
Condenser
Dry filter
Capillary tube
Muffler
pipe
Exhaust
Compressor
The refrigerator shall be reconnected after more than 5 minutes once it is shut off, to
prevent damage to compressor or system.
Wear gloves when performing maintenance to prevent personal injuries due to sharp
edges or corners.
Hold the knob when closing the door to prevent finger pinching.
The angle of inclination shall not be greater than 45°when handling the refrigerator.
Be careful not to be tripped up by the refrigerator during handling, to prevent
refrigerator damage or personal injuries.
Do not lift or handle equipment with door knob to prevent refrigerator damage or
personal injuries.
Do not damage refrigerating circuit.
Do not use electrical appliances inside the food storage compartments of the appliance,
unless they are of the type recommended by the manufacturer.
The appliance must be positioned so that the plug is accessible.
The appliance must be placed on a solid and flat surface, or excessive vibration and
noise may be produced when the appliance in operation.
The appliance can be used by children aged from 8 years and above and persons with
reduced physical, sensory or mental capacibilities or lack of experience and knowledge
if they have been given supervision or instruction concerning use of the appliance in a
safe way and understand the hazards involved. Children shall not play with the appliance.
Cleaning and user maintenance shall not be made by children without supervision.
24
Evaporimeter
If the supply cord is damaged, it must be replaced by the manufacturer, its service agent
or similarly qualified persons in order to avoid a hazard.
Keep ventilation openings, in the appliance enclosure or in the built-in structure, clear of
obstruction.
If your cabinet is to be discard, you must remove the door and leave the shelves in
place. This will reduce the posibility of danger to children. And the flammable foaming
needs to be disposed by professional persons.
CP/IP foaming materials are flammable, need professional processing.
5
Page 8

Precautions for Use
FAQ
The refrigerator battery may be low when the refrigerator is restarted after it has been out-of-service
for a long time; make sure the battery switch is set at “ON” and charge the storage battery, which
will be full after continuous running of refrigerator for one week.
Make sure the temperature inside the refrigerator has reached the set value and put articles in the
refrigerator by batch. Volumes accounted by articles shall not be greater than 1/3 of refrigerator to
prevent rise of temperature.
The temperature display value of refrigerator refers to the temperature value at the temperature
sensing probe inside the refrigerator. Though the temperature displayed is different from the actual
one at the center of refrigerator, it will approach to the real temperature gradually.
Clean the refrigerator with neutral detergent diluted. Brushes, acids, gasoline, soap powders,
polishing powders or hot water are prohibited to clean refrigerator as these materials may damage
the painting surface and plastic & rubber components and parts. Never wipe the plastic & rubber
components and parts with volatile solvent such as gasoline.
Shut off the power as well as the battery switch if the refrigerator will be out-of-service for a long
time.
Reduce the time of keeping door open when storing or taking articles each time, to prevent great
fluctuation to the temperature and humidity inside the refrigerator.
The refrigerator will see a sharp temperature increase in a short time when the door is opened,
Do you have questions during using? Do you doubt that the refrigerator breaks
down? Please read description here. This chapter is to give answers in respect
of potential fault phenomenon as well as respective solutions.If your question is
still unresolved after operation, please contact Haier after-sales service.Do not
maintain and dismantle the refrigerator by yourself!
Fault
The refrigerator does not work
Refrigeration effects are not
apparent, temperature
exceeds the standard
Troubleshooting
Whether the input power meets the requirements
Whether the plug and socket are in loose contact
Whether the input line and control line break down
Whether the voltage is too low
Whether too much or too hot articles are stored
Whether there is certain clearance among stored articles
Whether the refrigerator is exposed to direct sunlight or radiation of other heat sources
Whether the door is opened too often
which is normal, and the temperature will resume 1h after the door is closed.
The refrigerator shall operate with ambient temperature as 10~32℃ and humidity less than 85%;
condensation will occur on the glass door in high temperature and high humidity condition, which
is normal and will not affect the storage temperature inside the refrigerator; in the event of
condensation, please improve ventilation conditions as soon as possible and reduce ambient
temperature simultaneously.
The maintenance should be supplied by professional after-sales service people once the
equipment is faulty.
Meaning of crossed –out wheeled dustbin:
Do not dispose of electrical appliances as unsorted municipal waste, use separate collection
facilities.Contact you local government for information regarding the collection systems available.
If electrical appliances are disposed of in landfills or dumps, hazardous substances can leak into
the groundwater and get into the food chain, damaging your health and well-being.When replacing
old appliances with new ones, the retailer is legally obligated to take back your old appliance for
disposals at least free of charge.
Noise is too significant
Alarm light flashes,
the buzzer alarms
Whether the ambient temperature is too high
Whether the air duct is blocked
Whether the refrigerator is placed steadily
Whether part of the refrigerator contact external objects or wall
The noise noted in technical data is average data measured in standard laboratory
without noise when the refrigerator with no stored articles is put on a rubber blanket
and operates steadily after the door is closed, and data measured during startup &
shutdown and at 1 m above the surface is not included. It is normal that actual noise
differs from stated value because of loaded articles, environmental noise, no door
closing, startup & shutdown of the compressor during using.
Whether the articles are newly put in the refrigerator and the temperature is not
stabilized at 3~7℃. The fault will be eliminated automatically after refrigeration for a
while.
Whether the door is not closed completely, which triggers alarm of door opening
Whether the power fails, the refrigerator returns to normal condition after starting up
for a while
Whether the temperature exceeds the standard
6
23
Page 9

Product Installation
Battery maintenance
When the refrigerator works continuously, please test battery charge level every 15 days (please
refer to “Alarm Test” on Page 18 for test method). In case of low battery charge level, make sure
that battery switch is on and battery is charged. When the battery has been charged for consecutive
7 days, please retest battery charge level. In normal conditions, battery charge should be full. If low
battery charge level remains, it is recommended to replace the rechargeable battery.The battery of
power failure alarm is a consumable item with 3-year service life. If it has been used for more than 3
years, power failure alarm may not act when alarm conditions occur. It is recommended to replace
the battery earlier. Please contact a Haier after-sales service technician for battery replacement.
Rechargeable battery recycling
The refrigerator has a built-in rechargeable battery. The battery is recyclable; when its service life
expires, please ask a local relevant battery recycling organization for check or discard it properly.
a.Battery location
The built-in battery of the refrigerator-freezer is used for power failure alarm and located in electric
cabinet.
There are high-voltage electrical components in electric cabinet.
To avoid electric shock, the cover of electric cabinet must be opened by a
qualified engineer or maintener only.
Installation environment
Ambient temperature: 10℃ to 32℃, 18℃ to 25℃ are optimal and air conditioning system is
required as necessary.
Ambient humidity: below 85%RH.
Avoid excessive dust.
Avoid mechanical swing or vibration.
The refrigerator shall operate at an altitude lower than 2000m.
Input voltage: no greater than ±10% of rated voltage.
Normal operation will be impossible for refrigerator if it is installed in
environments other than those described above as it is sensitive to ambient
temperature. Start operation after the environment is improved.
It is prohibited to install the refrigerator outdoor. Electric leakage or shock may
be caused if the refrigerator gets wet by rainwater.
Installation site
The installation site shall meet following requirements for normal operation and best performance of
refrigerator:
Do not install the refrigerator in a narrow and confined space and the door of the installation space
may not be smaller or lower than the refrigerator, to ensure smooth entry and exit of the refrigerator
as well as to prevent damage to the stored articles due to not timely repair of refrigerator as the
installation site is not easy to be accessed.
b.Battery removal
1)Pull out the plug from the power socket.
2)Screw off screws on the cover of electric cabinet with a screwdriver.
3)Pull out the battery's connecting plug.
4)Remove the battery's fixing clip and take out the battery.
5)Recycle or properly dispose the battery as required.
Prohibition
When replacing the battery, make sure that red wire is connected to the battery's positive pole
and black wire to the battery's negative pole. Do not misconnect otherwise the charging circuit of
computer board would be burned out easily and thus the battery cannot be charged.
22
The ground at the installation site shall be solid and flat.
It is well ventilated and free from direct sunshine.
Do not share one socket with plugs of other equipment and the plug shall be securely plugged into
the socket.
Do not twist or compress the power line.
If the power line needs to be extended, the extended line shall be no smaller than 3mm² in
sectional area and no longer than 3m.
Check the operating voltage before operation and voltage regulator appropriate for motor load may
be applied in regions with unstable voltage.Ensure the normal input voltage stands at rated
voltage ± 10% and the power of voltage regulator is greater than 4000W.
The refrigerator shall be grounded in a reliable manner.
If the socket is provided with grounding wire, check if it is well grounded before operation.
If the socket is not provided with grounding wire, a new one shall be installed by professional
engineers.
Do not ground the refrigerator through gas pipes, water supply pipes, telephone
lines or lightning conductors as electric shock may be caused.
The power plug can be accessed after installation to ensure the power line can
be pulled out in a timely manner in emergency cases. The air vent shall free from
barriers.
7
Page 10

Cleaning and Maintenance
Preparation before use
1. Remove the packaging materials and strings
Remove all packaging materials and strings
for transport.
For safe transportation, equipment of this
series is fixed on wooden base by metal flat.
Please unscrew the screws and rotate the
metal flat to be hidden at the bottom of
equipment before using(Fig.1).
Forklift or chartered buses are recommended
for moving the refrigerator before unpacking.
For forklift, the refrigerator shall be accessed
from the bottom of the wood bracket of the
refrigerator box side.
> 10cm from
the back
Fig.1
> 300cm from the top
Component Cleaning
To avoid electric shock or staff injuries, please switch off power of the
refrigerator before conducting any repairment or maintenance.
Make sure no drug or aerosol around the refrigerator is inhaled during
maintenance, otherwise your health will be threatened.
Refrigerator cleaning
Clean the refrigerator once a month. Regular cleaning keeps appearance of the refrigerator new.
Wipe off dust in enclosure, inner chamber and all accessories of the refrigerator with dry cloth. If
the refrigerator is dirty, sweep away dirt with cleaning cloth which has been immersed in neutral
detergent and wipe off residual detergent with wet cloth, then with dry cloth.
Do not dump water on enclosure or inner chamber of the refrigerator, otherwise electrical
apparatus insulation may be damaged, causing occurrence of faults.
The compressor and other mechanical parts are completely sealed. No lubrication is required.
For chartered buses, the refrigerator shall be
accessed from the bottom of the wood bracket,
and it can be clipped up from both sides of the
box only.
Casters are recommended for moving the
refrigerator after unpacking.
The maximum tilt angle of the refrigerator shall
be no more than 45° during the course of movement.
2. Count refrigerator accessories accompanied
Check the articles inside the refrigerator against
the packing list; if any difference, contact the
after-sale service.
3. Placing conditions
Leave a gap of 10cm in minimum around the
refrigerator for ventilation and heat dissipation
(Fig.2).
> 10cm from
the left
Fig.2
> 10cm
from the
right
Lamp replacement
The refrigerator is equipped with a LED lamp. The lamp has low energy consumption and long
service life. Any doubt, please contact the after-sales service personnel for changing it.
Clean the back evaporating box
Evaporating box is installed on the back of the refrigerator.
Remove 2 screws on the bottom, loosen the upper 2 screws
(no need to remove them), lift the evaporating box and take
it out.
The upper screw
Evaporating Box
The bottom screw
Clean the evaporating box.
Reinstall the evaporating box, screw 4 screws firmly.
Clean the box every month. If the refrigerator is used in high
temperature and high humidity environment, do the cleaning
at least 3 times per month.
4. Adjust bracing foot
Rotate the leveling feet with wrench in clockwise
direction to extend them outward and support on
the ground. Make sure the refrigerator will not
move during operation(Fig.3).
Downward
Supporting foot
Fig.3
upward
218
Page 11

In case of power failure, a fully charged backup battery enables the alarm
function to keep working for 48 hours. The initial operation requires the
refrigerator to run at least 2days in a row, while the backup battery needs to be
charged for the initial operation or after a long time of power failure.
The buzzer beeps 3 times in 1Hz continuous sounds for every press on the
“Alarm Test ” key, with the alarm indicator flashing 3 times, if under non-remote
hardware alarm conditions, remote alarm relay disconnect after connecting 3s
alternatively, then alarm action may triggered depending on actual requirements.
This shows the alarm system is under normal condition.
When chargeable battery is closed or with too low a power, press once the alarm
testing key, E6 is expected to flash 3 times on the display window at the
simultaneously.
The refrigerator shall be charged by special personnel that inspects and records
its operating conditions every day, if too high or low a temperature is observed,
the articles in it shall be transferred to others until it is again under normal
conditions.
5. Standing
Do not switch on the power after the refrigerator is placed, leveled and cleaned. Switch on the
power after it is put on standing for more than 24h, to ensure normal performance of refrigerator.
6.Installation Rack and Price Card
Take out the rack, price card and rack fastener from the
refrigerator. Fix the rack fastener on the rack at the
appropriate distance and height. After mounting the rack
and price card, place them on the rack fastener and ensure
the rack is placed flatly and firmly.
7. Installation of the Handle
Handle installation of products shall be conducted
in the following steps:
①. Orient the handle with the hole downwards;
1
Fig.4
2
Automatic Alarm Recovery
This series of refrigerators has the automatic alarm recovery function:
In case of an alarm, you can press the key “Silence” on the display panel to stop the alarm.
(The remote alarm will not be stopped.)
If the alarm condition still exists, the buzzer will make an alarm again automatically 30min. later.
Remote Alarm Terminals
Remote alarm terminals are installed on the
refrigerator and the alarm signal behind the
compartment is output by the terminals. The
bearing capacity of the terminals is DC 30V, 2A.
Terminal output:
Remote alarm terminals include NO, NC and COM.
COM
NO
NC
②. Align the handle and handle guide on door;
③. Uphold the handle after the handle is locked with the
handle guide;
④. Use bolt to fix the handle from bottom after tight
installation of the handle.
3
4
Fig.5
The user can choose “NO” or “NC” if needed.
It is necessary for the user to install remote alarm device to the remote alarm
switch by himself
20
9
Page 12

Initial Power-on
Observe the rules below for initial start-up and continuous operation:
When the refrigerator is empty, connect the power line to the appropriate dedicated socket and
make sure the power is rated voltage and frequency.
After the power is switched on, switch on the battery switch, which may enable the audible alarm
and is normal. Press the buzzer to stop alarming. The audible alarm continues to operate until the
temperature of sensor reaches 5℃±3℃.
The refrigerator has been preset to operate at 2~8℃ in the factory and it is not required to set
temperature
NO.
3
4
Alarming
Events
Sensor
failure
alarm
Door
opening
ALarm
Alarming Conditions
The failure code for short
circuit or open circuit of the
defrosting sensor is E4
The failure code for short
circuit or open circuit of the
alarm sensor is E5
After opening the door
(including a slight opening),
door opening alarm is
triggered
Beeping
1Hz
Continuous
beeping
After time
delayed for
2minutes
(settable
by the user
at dAt for
1-12
minutes),
1Hz
Flashing
Alarm
light
flashing
Alarm
light
flashing
Display
Requirements
It is displayed on the
display board that the
upper and lower sensor
temperature alternates
with E4, which indicates
2s, while the
temperature shows 6s.
It is displayed on the
display board that the
upper and lower sensor
temperature alternates
with E5, which indicates
2s, while the
temperature shows 6s.
Temperature
displayed
Remarks
Remote alarm startup
when“beeping cancelled”
is pressed down, both
remove alarm and
beeping are cancelled.
But if it remains alarming
when after a period of Fd
(settable by the user, the
default value is 30 mins),
then beeping and remote
alarm are restarted
Remote alarm functions
are not started.
The temperature of refrigerator will stay at the preset temperature in a stable manner after hours
of operation; once the temperature gets stable, check if the monitoring bottle temperature is the
same with the set point.
Turn on the light switch and ensure the light inside the freezer operates properly.
After operation status of refrigerator is checked thoroughly, put articles into the refrigerator.
Extra-high
5
6
Temp.
Alarm
Remote
Alarm
When the inside temperature
of the reefer inspected by
high temperature
control≥12℃, the lower
sensor must be inspected in a
state of over temeprature
(1) Either of the upper or
lower sensor is over
temperature
(2) Any of the upper, lower,
control, defrosting, alarm
sensor failed;
(3) Power supply
AC220V/110V failed, under
any of the above conditions,
remote alarm shall be started.
As
over-tem
perature
alarm
Coupled
with 1Hz
continuous
beeping
As
over-tem
perature
alarm
Take
corres-
ponding
measures
according
to item
1,2 and 3.
Temperature
displayed
Take
corresponding
measures
according
to item
1,2 and 3.
As
over-tem
perature
alarm
Take corresponding
measures according to
item 1,2 and 3. Remote
alarm has normal open
or normal close functions.
When power failure
occurs, it can be started
no matter power is on or
off.
10
19
Page 13

Alarm
The refrigerator possesses the alarming, safety and self-diagnosis functions listed in the table below.
NO.
Over-temp
1
2
3
Alarming
Events
rature
Alarm
(high,low)
Power
Failure
Alarm
Sensor
failure
alarm
Alarming Conditions
When any of upper or lower
temperature displayed ≥ALH
(Alarm Limit High settable by
the user),high temperature
alarming is triggered, while
when any of upper or lower
temperature shown ≤ALL
(Aalrm LImit Low, settable
by the user), low temperature
alarming is triggered.
When power failure or power
supply (AC220V/110V) switch
is closed, power failure alarm
is triggered; the power is
supplied by backup battery
when power failure occurred.
The failure code for short
circuit or open circuit of the
upper sensor is E1
The failure code for short
circuit or open circuit of the
lower sensor is E2
The failure code for short
circuit or open circuit of the
control sensor is E3
Beeping
1Hz
Continuous
beeping
1Hz
Continuous
beeping
1Hz
Continuous
beeping
Flashing
Alarm
light
flashing
Both
alarm
light
and
power
indicator
flashing
Alarm
light
flashing
The temperature of the
upper and the lower
sensors on average
displayed is 5s(if only
the upper or the lower
sensor temperature is
shown before power
failure, then the same is
displayed), then the
screen goes black for
30s at intervals.
It is displayed on the
display board that the
lower sensor temp.
alternates with E1,
which indicates 2s,
while the temp. shows
6s.
It is displayed on the
display board that the
upper sensor temp.
alternates with E2,
which indicates 2s,
while the temp. shows
6s.
It is displayed on the
display board that the
upper and lower sensor
temp.alternates with E3,
which indicates 2s,
while the temp. shows
6s.
Display
Requirements
Temperature
displayed
Remarks
Remote alarm startup
when“beeping cancelled”
is pressed down, both
remove alarm and
beeping are cancelled.
But if it remains alarming
when after a period of Fd
(settable by the user, the
default value is 30 mins),
then beeping and remote
alarm are restarted
Remote alarm startup
when“beeping cancelled”
is pressed down, both
remove alarm and
beeping are cancelled.
But if it remains alarming
when after a period of Fd
(settable by the user, the
default value is 30 mins),
then beeping and remote
alarm are restarted until
the power is resupplied.
Remote alarm startup
when“beeping cancelled”
is pressed down, both
remove alarm and
beeping are cancelled.
But if it remains alarming
when after a period of Fd
(settable by the user, the
default value is 30 mins),
then beeping and remote
alarm are restarted
This product shall be managed by specially-assigned person and checked for operating
conditions every day with appropriate records. For too high or too low temperature in the
refrigerator, articles shall be transferred to other storages. No articles shall be stored in the
refrigerator unless troubles are shot.
This product is pharmaceutical refrigerator with temperature ranging from 2~8℃ inside.
Please make sure articles to be stored conform to environment inside to avoid damages
of articles and economic loss.
Because of refrigeration inertia, display temperature of the product may differ from actual
temperature and humidity inside, which is normal.
All refrigerators are refrigerator equipments. Relatively too hot articles must not be put in
the refrigerator by one time. Otherwise the compressor will not stop for a long time, no
temperature fall may be apt to burn the compressor. Therefore, articles shall be put in
batches and cooling shall be conducted in batch until required temperature is reached!
Do not damage refrigerating circuit.
Do not use electrical apparatus without production permit in the refrigerator.
Operation after Outage
The refrigerator is capable of memorizing set value. When power restores after outage, the
refrigerator will continue operating according to set parameter before last outage.
The refrigerator shall be reconnected after more than 5 minutes once it is shut
off, to prevent damage to compressor or system.
Pull out the power plug and shut down battery switch if the refrigerator has been
out of service for long time to prevent electric shock, leakage or fire caused by
aging power lines.
If the refrigerator is left unused in areas where supervision is unavailable for a
long time, make sure children will not get close to the refrigerator and the door
can not be completely closed.
18
11
Page 14
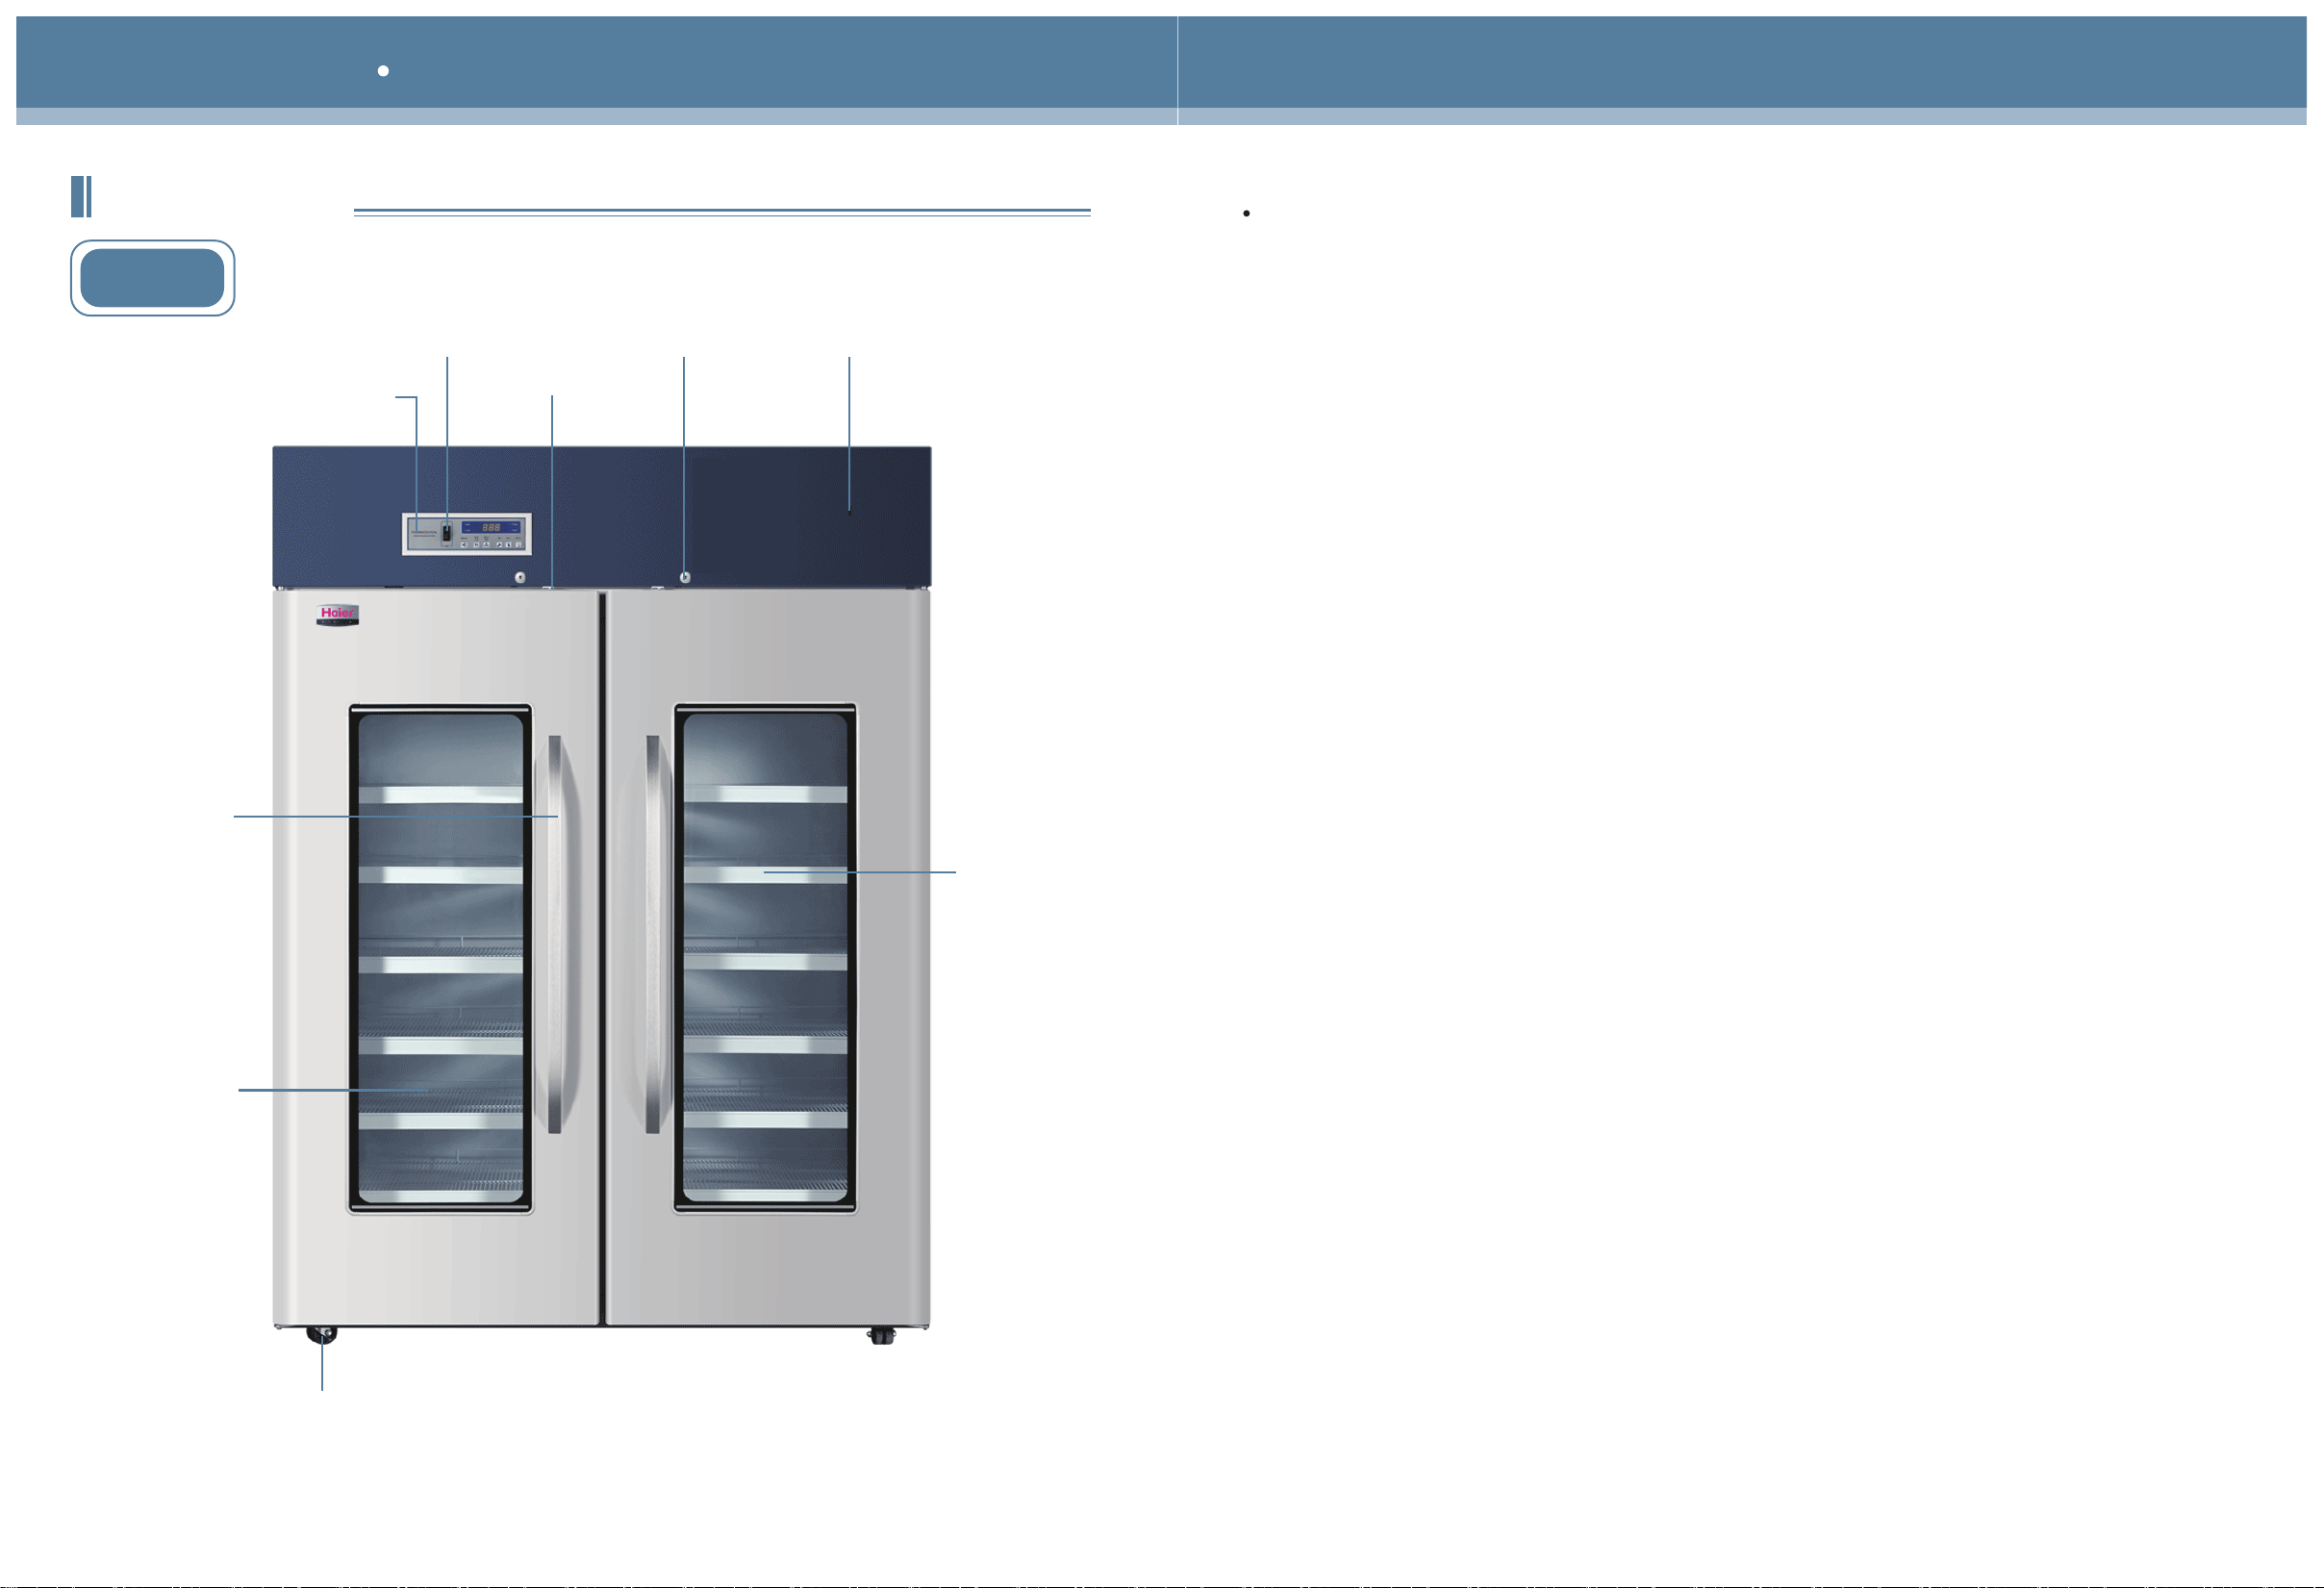
Component Names Control Panel
Component Names
HYC-1378
Control panel
Light switch
Door alarm switch
Door lock
USB Connector
Note
During setting process of 1P-5P, the parameters that need to be adjusted may be adjusted
selectively by “ Minus ” button or “ Plus ” button. For example, if the inside temperature display
area currently shows 1P(Year) and there is need to adjust Year(1P) or Month(2P) but date(3P),
press “ Plus ” button to select Date(3P) and press “ Set ” button ,then the inside temperature
display area flashes Date, press “ Minus ” button or “ Plus ” button to adjust the current date, and
the press “ Set ” button to save and confirm. Thereafter, the inside temperature display area
shows Hour(4P). if necessary, press “ Set ” button to adjust, if not, press “ Plus ” button to
Minute(5P) for minute adjustment, after completing settings, press “ Set ” for 5s to save and exit,
then the inside temperature display area nirmally shows the inside temperature. During setting
process of 1P-5P, after completing all parameter settings, and there are no other parameters
needing to be adjusted, press “ Set ” button for 5s or there is no any operation for 10s to
automatically save and exit.
Handle
Glass door
Shelf
12
Casters
17
Page 15

USB function
USB interface functions:
Control Panel
As featured with USB output function, the computer board is capable of exporting such test data as
temperature within the recent 10 years via a U disk. After the U disk is plugged in ,the computer
board begins to automatically recognize and import data to the U disk. During data export process,
press “Minus” button, the display panel flashes “USB” , indicating the data export is being in
progress and not completed yet; after 5 seconds of flashing, it exits and shows the actual inside
temperature. If the display panel steadily shows “ALL” , indicating the data export is completed , after
5s, it exits and shows the actual inside temperture. Then, remove the U disk from the USB interface
and plug it into a computer’s USB port to read the data.
U disk interface data recording time setting
Press “ Minus ” button for 10s, the inside temperature display area steadily shows “1P” ; press
“ Set ” button, the inside temperature display area flashes Year(factory default : 10), press
“ Minus ” button or “ Plus ” button, select Year from 10-99 (recycling display), e.g., to set 2013,
select 13, press “ Set ” button to save and confirm. Thereafter, the inside temperature display
area steadily shows “2P”, press “ Set ” button, the inside temperature display area flashes Month
(factory default: 01), press “ Minus ” button or “ Plus ” button, select Month from 01-12 (recycling
display) , after selecting the current month, press “ Set ” button to save and confirm. Thereafter,
HYC-1378
the inside temperature display area steadily shows “3P”, press “ Set ” button, the inside temperature
display area flashes Date(factory default: 01), press “ Minus ” button or “ Plus ” button, select Date
from 01-31( recycling display), after selecting the current date, press “ Set ” button to save and
confirm. Thereafter, the inside temperature display area steadily shows “4P” ; press “ Set ” button,
the inside temperature display area flashes Hour(factory default: 01), press “ Minus ” button or
“ Plus ” button ,select Hour from 00-23 (recycling display) , after selecting the current hour, press
“ Set ” button to save and confirm. Thereafter, the inside temperature display area steadily shows
“5P”; press “ Minus ” button or “Increase” button, select Minute form 00-99 (recycling display), after
selecting the current minute, press “ Set ” button to save and confirm. Then the inside temperature
display area again shows “1P”, indicating it is possible to reset 1P-5P. After completing settings,
press “ Set ” button for 5s or there is no any operation for 10s to automatically save and exit.
Thereafter, the inside temperature display area normally shows the inside temperature.
16
13
Page 16

Application method
Temperature Display
The refrigerator can automatically reach the temperature set before ex-factory.
Temperature Display
Operation
1
Plug and power on
2
3
Switching key
Switching
Operating key
Normal model
Temperature on Average
upper Tem.
Tem. of the upper Tem. Box
upper Tem.
Tem. of the lower Tem. Box
upper Tem.
lower Tem.
lower Tem.
lower Tem.
Light on
Implications
Temperature
on Average
Temperature of the
upper temperature
measuring box
Temperature of the
lower temperature
measuring box
Light off
Parameter adjustment
Enter the setting mode by pressing the “Set” button 5s, and parameters are as follows:
Parameter
Ts
ALH
ALL
t1
Fd
dAt
Description
Temperature Set
Alarm Limit High
Alarm Limit Low 4
The initial delay of
the voltage unit
Restart intervals after
beeping cancellation
Delayed Alarm Time
Minimum Value
2
5
1
0
10
1
Maximum Value
8
10
10
99
12
Step/Unit
0.1/℃
0.1/℃
0.1/℃
1/min
1/min
1/min
Default
value
5
8
2
0
30
2
4
5
The temperature shown indicates both the upper and lower temperature of the refrigerator measured
respectively. And the temperature of the sensors indicates the temperature of the refrigerator on
average.
Swtiching
Repeat the operation
from the second key
Temperature on Average
upper Tem.
lower Tem.
Temperature
on Average
0
LC
The above parameters are subject to the user’s modifications, after entering the parameter table,
when “Ts” is displayed , press “Plus” or “Minus” for your own parameter; and then press “Set” to
enter the parameter to be set, when current value is flashing, then press “Plus” or “Minus” to adjust
parameter value. After setting , press “Set” to go back and choose other parameters for the same
token. With all values set, press “Set” button 5s exit and return to the normal display mode.
Light Control
(Light not controlled
by the computer panel)
(Light controlled by
the computer panel)
1
Null
0
14
15
 Loading...