

Haier HWS10XC1, HWS08XC1, HWC08XC1 Owner’s Manual

Haier
What The World Comes Home To ''_
RoomA_rC_di#_ey
Control
Centre1
0010545033
B
Reedie_tre_tiensbeforeiestellieg.
@fl F87Z-33Z_3639fer qne#ieeseepertseM _ereices
tiretesin_tre_tien_eventdepreceder_ FieeteRetiee.
Peerteete_qeeetioae_eecereeetleepi#cesst Pee#etiee,cempeeezie _-877o337o3_3_o
Lee_ee_ne_re_deneeantesdeine_e_ere_eperete
t_hmeee_el _°8Z7-337o3_39eitieeeptege_te__ebrerepue#eeoees

Thank You for buying a dependabb, energy saving and easy to operate
HALERroom air condifionen This manual contains usefuJinformation for
you to maintain, operate, in4aH and safely use your room air conditioner.
Your air conditioner deans, cools and dehumidifies the air in your room to
provide you with the ultimate Jevd of comfort.
Please read instructions carefuJJybefore using the producL AJso, do not
Forget to fiJl out and maiUthe Product Registration Card
Record Your Mo(JeJand $eriaJ Number.
For aHyour service calls during the warranty period the foJlowing
information will be needed_ Attach the sales receipt to this guide and keep
for future reference. This information can be obtained from the serial pJate,
which is on your air conditioner. This is either on the cabinet (side or back)
or you may have to remove the front grille to bcate iL
Modal Number: ..............................................................
Serial Number: ...............................................................
Date of Purchase: ...........................................................
Dealer's Name: ..............................................................
Dealer's Address: ............................................................
Dealer's Phone Number: ...................................................
?AOLE
RECEPTACLE ANO FUSE TYPES
RATEDVOLTS 125/60 250/60
AMPS 1S 2.0 15 20 30
WALL OUTLET
_USE S(ZE ) 5 20 _ _ 5 20 _ 30
r_mMEDE_Y FUSE
(c_ ¢it_u_ br_k_r) Pmug P|ug pmug

1)
Air conditioner must be connected to proper dectricaJ outlet with the
correct dectricaJ supply. (see table)
Proper grounding must be ensured to reduce the risk of shock and fire.
DO NOT CUT OR REMOVE THE GROUNDING PRONG. Jfyou do
not have a three-prong electric receptacle outlet in the wall, have a
certified dectrician install the proper receptacle. The wdJ receptacle
MUST be properly grounded.
Do not use if power cord is frayed or otherwise damaged_
Also avoid using it if there are cracks or abrasion damage
along the lengfh, plug or connector.
DO NOT USE AN ADAPTER OR AN EXTENSION CORD.
When installing your air conditioner in a window, make sure the window
is strong enough to hdd the wright of the air conditioner.
You also want to secure and correctly install your air conditioner properly
to prevent it from falling. Extra brackets and or support may be required
depending on your window.
6) Do not block airflow inside or outside the air conditioner with blinds,
drapes, protective covers, shrubs or bushes_
7) Be careful of sharp edges on the front and rear fins of the unit that could
cut and cause serious injury.
8) Be careful when lifting the air conditioner to install or remove the uniL
Always usetwo or more people for this.
9) Always unplug the dr conditioner before servicing it or moqng it.
2

English
PAGE
A Word Fro_ Haier 1
Product Reglstratlon 1
$afe_y Precautions 2
Warnings 4
£UectrlcaU Safety 4
Tips 5
Energy $avlng Gulde 5
Features 6
Operatlng Gulde 7-8
Normal Operating Sounds 7
Operating Instructions 7o8
Uns_Hations 9o! 9
PartsSupplied 10
TooJs 1 1
Stepsfor installation 19
CUean and Care Guide 20
TroubUeshootlng _:1o22
Warranty Jnf@rmati@n :23
i ¸¸¸%¸¸
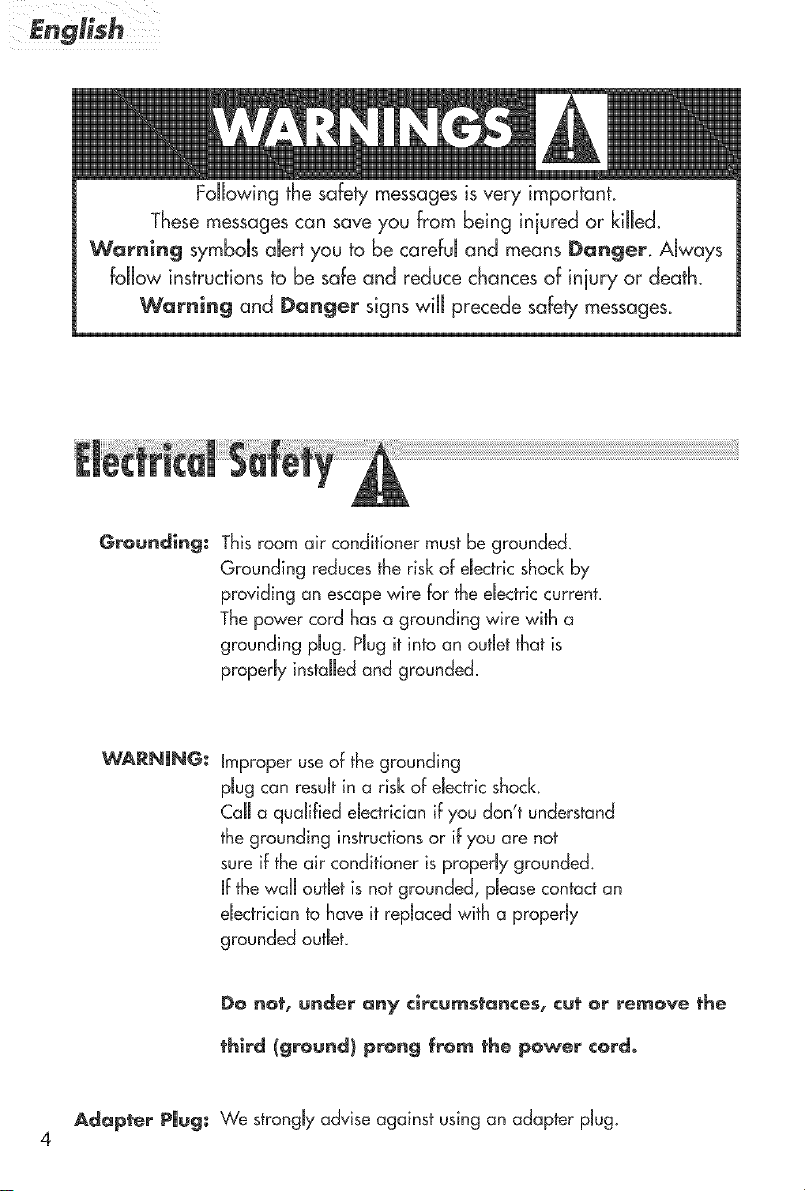
FoJJowingthe safety messages is very important.
These messages can save you from being injured or kiJJed.
Warning symboJsaJert you to be carefuJ and means Danger. AJways
foJJowinstructions to be safe and reduce chances of iniury or deatk
Warning and Danger signs wiJJprecede safety messages.
Grounding: Thisroom air conditioner must be grounded.
Grounding reducesthe risk of dectric shock by
providing an escapewire for the eJectriccurrent.
Thepower cord has a grounding wire with a
grounding pJug.PJugit into an outJetthat is
properJyinstdJedand grounded_
WARNUNG:
Adapter PUug: We strongJyadvise againstusing an adapter pJug.
4
improperuseof thegrounding
pJugcan resuJtin a risk of eJectricshock.
CaJJa qualified dectridan if you don't understand
thegrounding instructionsor if you are not
sureif theair conditioner is properJygrounded.
Jfthe waJJoutbt is not grounded, pJeasecontactan
eJectridanto haveit repJacedwith a properJy
grounded outJet.
Do not, under any circumstances, cut or remove the
third (ground) prong from the power ¢@rdo

eAirConditionersaredesignedforuseinadoublehungwindowor
throughthewallinstallationonly_(Asapplicableinyourmodel)
• Whileinstallingunitbesure to flit air conditioner 1/4 degree ouhvard to
have the water drip outside the house_
o Install the unit on the north side as normalmythat is the shaded side. This
will enhance _heoperation of your unit.
_e Window has to be strong for installation_ Extra brackets and or support
may be required depending on your window. (Brackets and Supports
not induded in all models)
o Measure the window before installing, if the window is bo big for the
unit you may require professional installation,
_e Usecorrect electric voltage and proper ampere for the unit to run
effectively.
_® Only let a certified electrician do any modifications to your electrical
outlet,
Use a dedicated line for the operation of your air conditioner to avoid
the possibiJih/of an electrical surge,
e When installing your air conditioner make sure to seal all areas where
there is a possibilib, of air bakage,
Airflow should not be blocked inside either by curtains, drapes or
furniture or outside by shrubs or bushes_
• Do not needbssly use on ebctrical light or other appliances that
produce heat,
Keep the vent dosed on the air conditioner when in the coomingfunction.
Keep the blinds and the drapes drawn on all the other windows.
While cooking use an exhaust fan in the kitchen to remove the excess
heat produced_
Always usethe correct BTU size air conditioner to cool the room to
affain optimum efficiency.
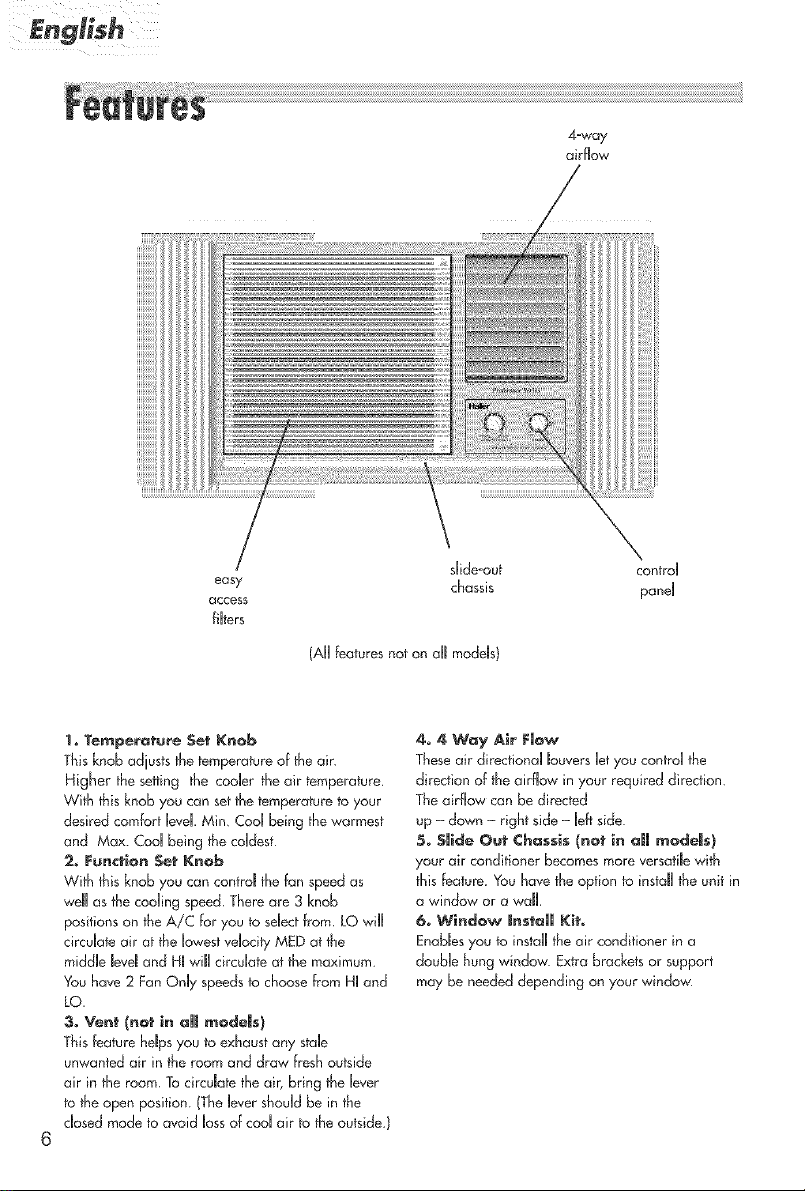
4-way
airflow
iiiJiiii_i
iiiJiiiiiiiii
iiiJiiiiiiiii
easy
access
filters
(AH features not on ohmmodels)
1° Temperature Set Knob
This knob adjusts the temperatureof the ain
Higher thesetting the coobr the air temperature.
with this knob you can setthe temperature to your
desired comfort bveL Min, Cod being the warmest
and Max. Cod being the cddest
2. Functlor_ S_e_Knob
with this knob you can cantrd the fan speedas
well as the cooling speed,There are 3 knob
positionson the A!C for you to selectfrom. LO will
circulate air at the lowestvelocity MEDat the
middle levd and HJwill circulate at themaximum.
You have 2 FanOnly speedsto choosefrom HI and
LO.
_iiiiiiii_
_iiiiiiii_
sHide°out
chassis
4° 4 Way A_r Fmow
Theseair directional buvers let you control the
direction of theairflow in your required direction
Theairflow can be directed
up - down - right side - left side
control
pand
5.smldoOotChossis(ootiooJmmodoJ0)
your air conditioner becomesmore versatiJewith
this feature You have the option to insiaJlthe unit in
a window or a wall.
6. Window |nstaJJ Kito
Enabbsyou to installthe air conditioner in a
doubb hung window Extra brackets or support
may be needed depending on your window
This feature heJpsyouto exhaustany stale
unwanted air in the room and draw fresh outside
air in the room. To cirdate the air, bring thelever
to theopen position. (Thelever should be in the
closed mode to avoid lossof cool air to theoutside.)

English
©pe o tiHg B@ ds
FoJJowingsoundsare normaJJyheard during the operation of an air conditioner.
* Thermostatclicks.As the thermostatcycleson/off you will
hear this sound.
Cod airflow movementas dictated by the set fan speed
®Water sounds. This is normaJsinceyour air conditioner actsas a
dehumidifier aJso.Thusyou wiJJhear water soundsfrom water drops
falling on the condensen
o As the refrigerant flows through the inner seaJedtubing a
rushing noise may be heard.
RattJingor vibrating noisesmay be heard due to poor waJJ
or window instoJJation.
High pitch compressor sound may be hear&
LO
A/C
OFF MED
HR HI
FAN A/C
FUNCTmON SET
fig, # 1
5 6
4
2
1
MIN COOL
TEMPERATURE SET 7
A/C
10
MAX COOL

E e/i h
After instaJJingyour air conditioner, pJugit into the proper
dectricd outRetin the wall
1) SelectMed. A/C on the FunctionSetknob_
2) Set the Temperature Set knob at the mid JeveJsetting. ThiswiJJturn on
3) Youcan setthe thermostatfrom Min Cod to Max Cool Min Cod being
4) Your air conditioner has 1 or 2 Fan speedsdepending on your modal
5) If your air conditioner has a Ventcontrol make sure that it is on dose.
6) Letyour air conditioner run for a few minutes before adiusting to the
7) Remember the compressor of your air conditioner wiH riot work
8) AJsowhen you shut off the air conditioner wait for 3 minutesbefore
9) If you haveany trouble in operating your air conditioner please refer to
your air con@ionen
thewarmest Max Cod being the cddest_
purchased and 3 A/C settings_
Leaveit open onJyif you need to recycle the stale room dn By Jeavingit
dosed you will retain the cod air in the room_
desired settings.
when the temperature goes bdow 65°F.
turning it on again. This is the compressorcycle time_
theTrouble Shooting section_
Before you install your air conditioner check the following:
The unit is free of aJJobstructions inside and outside the room e.g. drapes,
curtains, furniture, pJants,shrubs,bushes,trees,other structuresJikebuiJding,
garage etc.Air conditioner musthave dear unobstructed airflow through the
condenserto remove the heat.
2) The window is strong enough to hdd the weight of the air con@ionen
Extra brackets or supportsmay be needed depending on your windows,
(Bracketsor Supports not provided in dJ modds)
3) The window siJJand track are strong enough to hoJdthe weight of the
air conditionen
4) The waJJis strong enough to hdd the unit. Extra brackets or supports may be
needed depending on the waR[ (Bracketsor Supports not provided in aHmodds)_
5)
There is adequate and proper power suppJynear the air conditionen
DO NOT useadapter pJugs_
DO NOT useextension cords.
A 7)
As}
DO NOT cut or removethe ground prong_
Ag)
DO NOT modify the pJugor thedectricd waJJoutJetin any way.
if pJugdoes not fit the dectrical outbt have a certified dectrician do the
necessarychange_
A10) DO NOT connect eJectricalpower to the unit before instaHatiom
A11) DO NOT use if power cord is worn out, frayed or otherwise damaged.
Avoid using if there are cracks or abrasion damage along the bngth,
pJugor connection.
12) DO NOT instaJJinto any existing cabinet or sbeve which does not haveside
and top air vents_

PartsSupplid
curtain
affachment
screws 13/32"
basepan angb
]IWSOSXC 4 IIWSO!_X(A lIVe] 05X( 1_]IW( 08X( ]
top raiU
PartsSupplied
- vdndow sash
w_ndow sed _ gasket
/// gasket /_
_ , raiJ curtain sash screws C,_ar_3rnwent
curtain 31/32" _s_rance screw,"
_:_c"afion bracket [MC;;_,iHWSlOXCA'HWSl2XCA'ocknu,
drain tube (Jeffand right)
Parts Supplied
.< window sash
gasket
_- _ _ top rall Casement to
curtain
_ gasket curtain sash screws window
tion
(Jeffand right) ModeJ:HWSI4XCA,HWS8VCA,HWS20VCA
;cd'
YouwillneedtohavetheFollowingtoolsto help you in the in4aHafion of
your air condifioner_
®Scissors
_PhillipsScrewdriver
oStandard Screwdriver
oPJiers
_Wrench
•DriJJand DriHBits
oTapeMeasure
oGJoves
oLeveJ
_Sockets
11
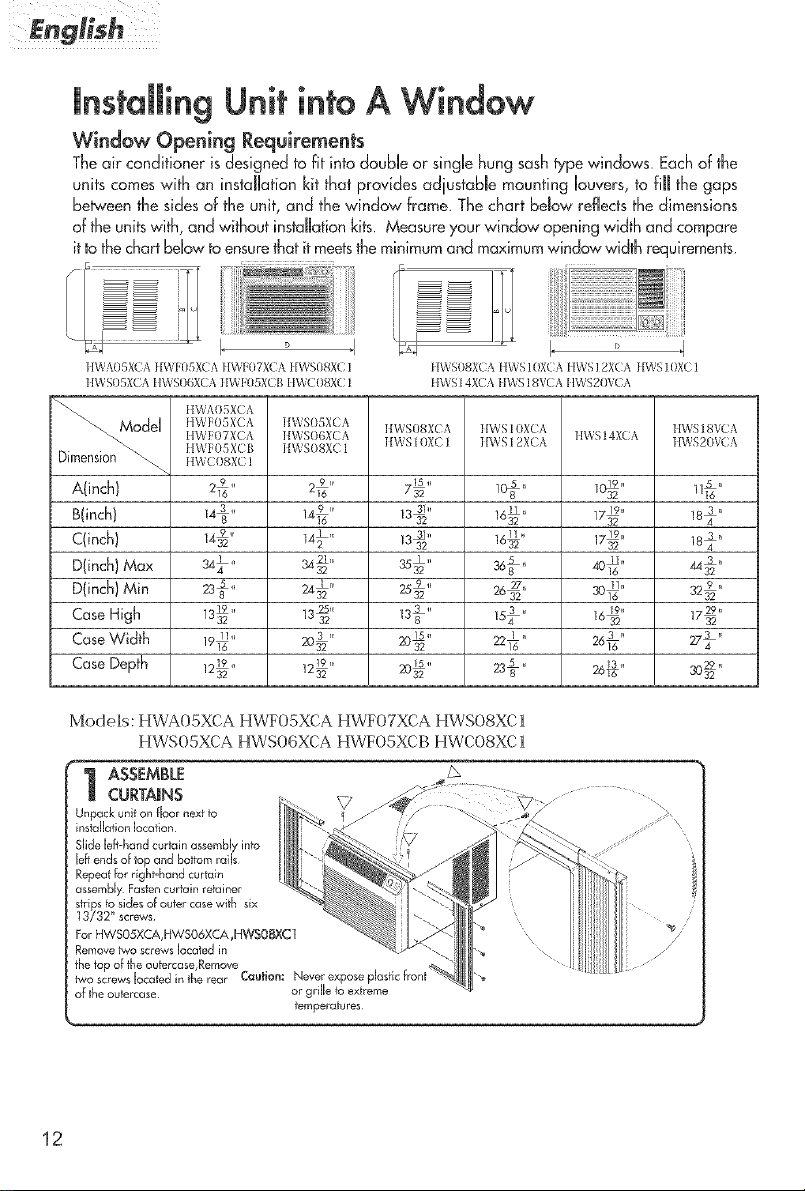
in#rimingUnit intoA Window
Window Opening Requirements
Theair conditioner isdesigned to fit into doubUeor singb hung sashtype windows. Eachof the
units comes with an installation kit that provides adiustable mounting louvers, to fill the gaps
between the sidesof the unit, and the window frame. Thechart below reflectsthe dimensions
of theunitswith, and without installation kits. Measureyourwindow openingwidth and compare
it to the chart below to ensure that it meetsthe minimum and maximum window width requirements.
i i _i ili
t[WA05XCA }{WFO5XC & ] [WFOTXC,\ IIWS08XC 1 HWS08XCA t{WS 10XC,\ t{WS ] 2X(A }{WS ]0XC 1
HWSnSXCA HWSOGX(A HWF05X( B HWCOSX( l HWR[ 4XCA lJWSI 8V(.A IIWREOOCA
I, ° d °
"_.M tlW?,05XCA
Dimension Ilwcogxc 1
odd m_'i_0s×ca HWROSXCA I[WS08XCA I[WS H)XCA I[&_SISVCA
HWIq)7X( A IJV\ ROgX( A I[\_ S [(}XCI IJWR12XCA IJWSI4XCi_ IJWS2OVCA
II\_ H)5XCB IJWROSX( [
a(inch) I@" It@' 11s6'
B(inch) 143'' 13332l'' 16@" lzl_" 18 3"
C(inch) 14@" 14_" 13i]" 16yi' 1;']_" 184"
DOn&)Max 344_" 3432]" 35312" ssss" 4o,12"
D(inch) Min 24312" 25392" 263_" 301_" 3292 '
Case High 13_" 132s'' 13_" IS4;" 14_" lz_"
Case Depth J232,,19 20_25" 23 5 " 261163. 303229.
Mode]s: HWA05XCA HWF05XCA HWF07XCA HWB08XC ]L
HWS05XCA HWS06XCA HWF05XCB HWC08XC]L
I SSEMBLE z_
CURTAINS
Unpack unit on floor next to
instaIIaRon location
Slide Je£-hand curtain assembly inb
Jeffends of top and bottom raJs
Repeat Forright°hand curtain
assembJy Fasten curtain retainer
strips to sides of outer case with six
13732 _'screws
For HWSO5XCA,HWSO6XCA ,HWSOBXC 1
Remove two screws Jocaied in
the top of the autercase,Remove .
two screws Jocated in the rear Cautuom -_
of lhe ou_ercase or griJJe to extreme
temperatures
12

APPLYWmNDOW
SASHGASKET
Raiseh_doorsash Measurewidth
of window sash Cut window sash
gasketta Jengthand appJyto
bottom ofwindow sash
Cutwindow siJJgaskettoJength
and appJyto top of thewindow siJJ
PREPARE
WINDOW FOR
iNSTALLATION
inspectwindow track, sash, and sill
for its abiUilyto support the weight of
air conditionen
Measure width between window
mddings to ensure Unsl_ntMount
will fit window frame instant Mount
modds are designed for windows
(the detail see page 12)
instant Mount kit suppUiedwith unit
is designed for mounting in most
doubb4tung windows w_@out
slorm w_dows. For installation in
window frame with storm window,
modify sill by adding wood stripsto
inner and outer sills Thisraises
unit and eUiminatesinterference of
storm window frame
"A_ iNSTALLUNiT JN
WINDOW
P)aceunit in window Lower sash
until it restsbehind front flange of top
rail. Bottomrail mustrest behind
window sill With a bveJadjust unit
to a 1/2 bubble slope to the rear for
proper water drainage
_Wind ..... h L_@ @ @
S_rm wk_dow kts_Hat_on
if storm window frame does not allow
adequate clearance below sill(]/2"
required), removestorm window
frame or create clearance by adding
a wood strip (at least 1 1/2" wide)
along entire width of si)J Fasten
wood slrip to sill with at least three
countersunk wood screws (not
supplied with kit). Thisprovides a
smooth surface for mounting air
conditioner v2"
_Level
MJlkT_U _
Back front atlachment screw out
severaJturns and slip Basepan Angle
over"screw head Snugscrew with
angle restingon window ledge
UnstallIwo 31/32" screwsthrough
angle into window ledge Repeat for
opposite side
Mobib home window instamatiorl
Add wood strip (at least I 1/2" wide)
along entire width of window silJ
Thicknessof ,.rood strip should match
height of front lip on window frame
Fastenwood strip to sillwith a
minimum of threecountersunk wood
screws (not supplied with kit) This
provides a smooth surface for
mounting air conditioner
Must be a minimum
of 1/2" to dear
botJom ralJ onuni_
i
N
[3
m
o
iNSTALL
BASEPANANGLE
Curtain assembJy cut
away for clarity
@
31/s2'
screws
Basepa_
angle
13

English
SECURESiDECURTAmNS
AND TOPMOUNTING RAiL
iNSTALLSEAL
GASKET
Cut window seal gasket to w@h of
window Stuff window sod gasket
between outdoor window gUass
and top of indoor sash This ",,viH
stop air bakage which reduces
efficiency.
Models: HWS08XCA HWS10XCA HWS12XCA HWS10XCl
HWS 14XCA HWS 18VCA HWS20VCA
I REPAREUNiT
FOR
iNSTALLATiON
Unpack unit on floor next to
installation bcation
Remove front aitachrnent screw
Remove two side attachment screw
{HWSI 4XCA,HWSl 8VCA,HWSgOVCA)
Separate the outercase from the front
with a putty knife at the catch points
designated by the arrows
Remove one screw securing
basepan locking bracket Remove
two screws located in the rear of the
outercase, securing k,asepan to
outercase Using the basepan handle,
slowly and evenly pull chassis out
from outer case
Hate: Cover putty knife blade with
masking tape to guard against
damage of the units finish The filter
is removed in this illustration for
clarity only
14
Cautior_: Never expose plastic
front or grille to extreme
temperatures

ASSEMBLE
CURTAiNS/TOP
RAiL
Removepaper backing from toRrail gaske_
and adhere to bottom of top raiJ
Unstdltop raiJwith four 13/32 _'screws
(threefL/rHWSOSX(A,HWS 10X( A.HWS12XC/
HWS 10X(1).
SlideJeft-handcurtab assembJyinto Jeftend of
top and bottom raiJs Repeat for right-hand
curtainassembJyFastencurtain retainer strips
to sidesof outer"casewith eight 13/32" screws
(sixfor HWSOSJK A,HVv'S1gX( A,HVv'S12X( A,HVv'S10X(1).
PREPARE
WINDOW FOR
_NSTALLATION
inspectwindow track, sash,and dl
for its ability to support the ,#eight of
air conditioner
Measure width between window
moJdings to ensure Unstant Mount
wiJJ fit window frame Instant Mount
modds are designed for windows
wide (the detaiJ see page 12)
instantMount kit supphedwith unit
isdesigned for mounting in most
doubb=hung windows wllbout
stormwindows. For instajJationin
window frame with storm window,
modify siJJby adding wood stripsto
inner and outer siJJsThisraises
unit and diminates interferenceof
stormwindow frame
APPLYWINDOW
SASHGASKET
Raiseindoor sash Measurewidth
of window sash,including portion
inside window track Cutwindow
sashgasket tobngth and appJy to
bottomof window sash
Storm window inst_llatlon
if storm window frame does not aJiow
adequate cJearancebeJowsiJJ(1/2"
required), remove stormwindow
frame or create clearanceby adding a
wood strip (at Bast 1 1/2" wide) aJong
entire width of siJJFastenwood strip
to siJJwith at Jeastthree countersunk
wood screws(not supphedwith kit)
Thisprovides a smoothsurface for
mounting air conditioner
1/2"
Minimum
1/2"
WooJ
S_arn _ : R
Plnme
Moblb home w_ndow instQBlafion
Add wood strip (at Jeast1 1/2" wide)
dang entire width of window siJJ
Thicknessofwoad strip shouJdmatch
height of front hp on window frame
Fastenwood strip to siJJwith a
minimum of three countersunkwood
screws{not supplid with kit) This
provides a smooth surfacefor
mounting air condifionen
Must be a minimum
of 1/2" to dear
bottom rd ot_ unit
I I/2'_ _:: Wi_dow
15

iNSTALLOUTER
CASEiN WINDOW
Place outer case in window Lower
sash untiUit restsbehMd FrontfUange
of top raiJ, Bottomrail must rest
behind window sill With a bvel
adjust unit to a 1/2 bubbb slope to Leve,
he rear for proper water drainage _
Wind...... h I ® ® ®
Expand bolh curtains to contact the
window _rame Install tv,,o31/32"
_JL, CurtalnassembJycut
_.,...._,, _; away forclarity
Use lwo casementto window securance screws(1"}
to fix the case to windows sash
Install Uefl& right installation bracket and as shown
in fig Install bdt(2 1/2 _bng fUathead b@and U
Iocknut) to the installation bracket and adjust them _,._
to proper length ,th..... 4 (19/32 '_)...... to fix _
the bracket on thecase _ 19/32_'Io_gs e /_
Left _ f_. o,,,_,o_k,,__',w _1.-"
screws One in each upper right and
bft corner of the curtains
Unstallthree 31/32" top mounting rail
screws
NOTE: To make screws easier to
drive, drill a pilot hob into sash
through clearance hob in curtains
INSTALL BASEPAN ANGLE
Unstalllwo 31/32" screws
through angle into window ledge
Repeat Foropposite side.
16
_/_ _ MARK
L°cknut\_\ l_ _j ,/ Right

iNSTALL SEALGASKET
Cut window seaJ gasket ta width of
window Stuff',,vk_dow seaJ strip
between outdoor window gJessand
top of indoor sash This wiJJ stop air
bakage which reduces efficiency
iMPORTANT: Stay dear of gJass Be
carefuJ not tc_damage the function
of the window
iNSTALL
DRAIN TUBE
ModeI:!_B_SO8XC.a.,HWSI OXCA,
Adjust the direction o[ the drain tube(drain eUbow)
to make it be in line with the hob
in the rear of unit; Unsertthe drain
tabe (drain dbow)inta the hob and mist 90 _'
HWS12XCA,HWS10XC1
RETURN
CHASSISTO
OUTERCASE
Find someone to hdp you
replace chassis in outer case
Unstdlbasepan clip Replace front
_oand,and grilb(instdl bovoscrews
r HWS 14XCA, HWS 18VCA,
HWS20VCA) Where possible install
fvvo screws in rear of outercase,
removed in stepone
iMPORTANT: Becausewindow
sashhelps keep unit in window,
make certain window sash contacts
outer casebefore reinstalling
chassis
.......
17

ngllsh
Wall installations: slideooutchassisonly
Note: Removethe ] or 2 shipping screwson the rear of the air conditioner
that hold thechassisto the outer shallcasing_Once removed,
these do not haveto be re-installed. Toensurethatyour air
conditioner is properly installed in thewall, it is
recommendedthat it be installed by a certified technician who is
familiar with throughthe wall installations.
1) Using wood, 1_'or more in thickness,build a wooden frame to fit the
casing/cabinet dimensionsof the unit which you havepurchased_
2) Measure the outside width and the height of the frame to determine the
cutout dimensionsnecessaryfor the opening in thewall Thedepth of the
frame will depend on the depth of thewall The finished frame mustbe set
in the inside wall Theframe hasto be squared and levded. Rememberthe
frame has to be nailed securelyto the wall studs. (Seefig. # 11)
wdm
18
fig. # 11
3) Now to install, insert the casing into the wall opening_ (Removethe
chassisout first following steps1 - 6 in SJideooutchassissection)_
Make sure that the cabinet isat least 1/2" inch inside the room_Also the
side JouversshouJdnot be bJocked.This is to have proper air cirdation in
and around the compressor.(Seefig. # 12)

fig. # 12
typlcaU casing
ou_ard tip
level
casing
4) The casing shouJdbe tilted 1/4" outside so as to drain the excess
dehumidified water.
5) ProperRyinsulate any opening between the casing and the frame_
6) Usethe screw hobs on the sides of the unit which are for the window
mounting kit and the screw holes in the top mounting kit rail to attach
the casing to thewood frame, using the 5/8" screws.
7) With the help of another person lift and put the chassisof the
air conditioner in to the casing_
8) Screw the security screw into place and snap on the grille.
9) If the fiJterwas removed during this process,reinsert the filtec
]O)Screw the two side screwsthat hoJdthe grille to the casing_(not in
all models)
11) UseexternaJwall brackets if needed.
_ CAUTION: If, after completing thesesteps,the unit appears to be loose
or if you are unsurethe unit is properly installed,
contact a qualified installer.
19

fop-air
_ouve_s
x x x x h x k
fig_# 13 fig_# 14
o Always unplug your air conditioner before cleaning.
• Air fiJterneedsto be cleaned at bast once a month for your unit to
operate at optimum efficiency_ThefiJtercan be did out from the side by
pulling on the tab Jocatedon the middJeright sideof the front mask
(See fig°# 13) Or the fiRtermay be accessed by pressingdown on
the top and bottom tabs Jocatedon the right side of the front mask.
(See fig,# 14) Thefilter may be washed or vacuumed_Removethe
excesswater from the fiJterby gentJyshaking the fiJtenThiswiJJremove
dust and particles trapped in the fiJtenAfter cleaning, rdnstaJJthe fiJten
DO NOT use your air conditioner without the air filter in place.
Todean the front pands or the cabinet DO NOT useharsh chemicals,
abrasives, ammonia, chlorine, bbach, concentrated detergents, sdvents
or metal scouring pads_Someof thesechemicals may dissdve, damage
and/or discoRoryour air condifionen
side-air
IOUVe_'S
2O
ARwaysusea softcloth dampened with water or miRdsoap and water
sdution to wipe the front of the cabinet. Wipe dry with a soft cloth.

• Tosbre your air conditioner, after the season, remove the unit from the
window as per the installation guide. Repackthe unit in its original box
and store away. If your unit is installed in a wall or you do not intend to
remove it from the window then cover the outsidewith a winter cover.
Thiscan be purchased from the retaibr where you purchased your
air conditioner or from your Rocalhardware store_
®Before putting away your unit make sure any water bft in the pan is
removed and drained away. Water left in the pan could lead to Rusting
or damage to the electrical connections.
Jf air ¢@ndlti@ner d@es not operate:
Check if unit is pbgged in. ThepJugmay have come bose.
Check if the dectricaJ wall receptacJeis of proper voJtage.
Check if the circuit breaker needsto be resetor if the fuse needs
to be repJaced.
* Check if the unit is in "Off" mode.
Thefan controJmay be in "Off" position.
Air from alr ¢ondltlorler 15war_:
TheA!C setting may need to be raised.
Thetemperature outside the room is bdow 65°F. The compressorwiJJ
not cycle on if the temperature outside is bdow 65°E
ke forrnc_tlon on cooJlng ¢olJs:
®Outside temperature too coJd_Setthe unit on fan onJy
settingto defrost ice.
Lowertemperature setting. Temperaturesetting may be too coJd_
Unit BTUmay be too high for the room.
21

.elish
Air conditioner working but room not cooUlng:
• Room may have appJiancesthat produce heat_Usean exhaustfan b
remove excessheat_
Ventmay be in theopen position. Vent has to be closed for
optimum cooRing_
• Redirectthe airflow. Removeany obstacles.
• AHdoors and windows need to be dosed so cooJair does
not escape the room.
o Air fiJfermay need cleaning.
Unit BTUmay be too low for the required cooling area_
On extreme hot & humid days air conditioners may take
a Rifflelonger to cool.
A_r ¢ondltloner is maklng nalse when caoUlng:
Youmay hear soundsof air movement,water, compressorcJickingon and
off or window vibrafions_PJeaseread Operating Guide I NormaJ
Operating Sounds_
Water in the air condltloner ¢ablnet:
This is normaJas your air conditioner not only cools but aJsodehumidifies
theair. If there is water dripping inside the room, check the installation of
the uniL The unit may need to be reinstalled. TiJtthe unit ]/4" outsideto
drain the excesswater produced.
22
 Loading...