

Page 1

Haier
What The World Comes Home To '_
ReomAirConditioner
I:lectronicControl
00]0546532
Readinstructionsbeforeinstalling.
Call 1-877-337-3639 for questionsonparts and services
Page 2
Thank You for buying a dependable, energy saving and easy to operate
HALERroom air conditioner. This manual contains useful information for
you to maintain, operate, install and safely useyour room air conditioner.
Your air conditioner cleans, cools and dehumidifies the air in your room to
provide you with the ultimate level of comfort.
Pleaseread instructionscarefully before using the producL Also, do not
forget to fill out and mail the Product Registration Card
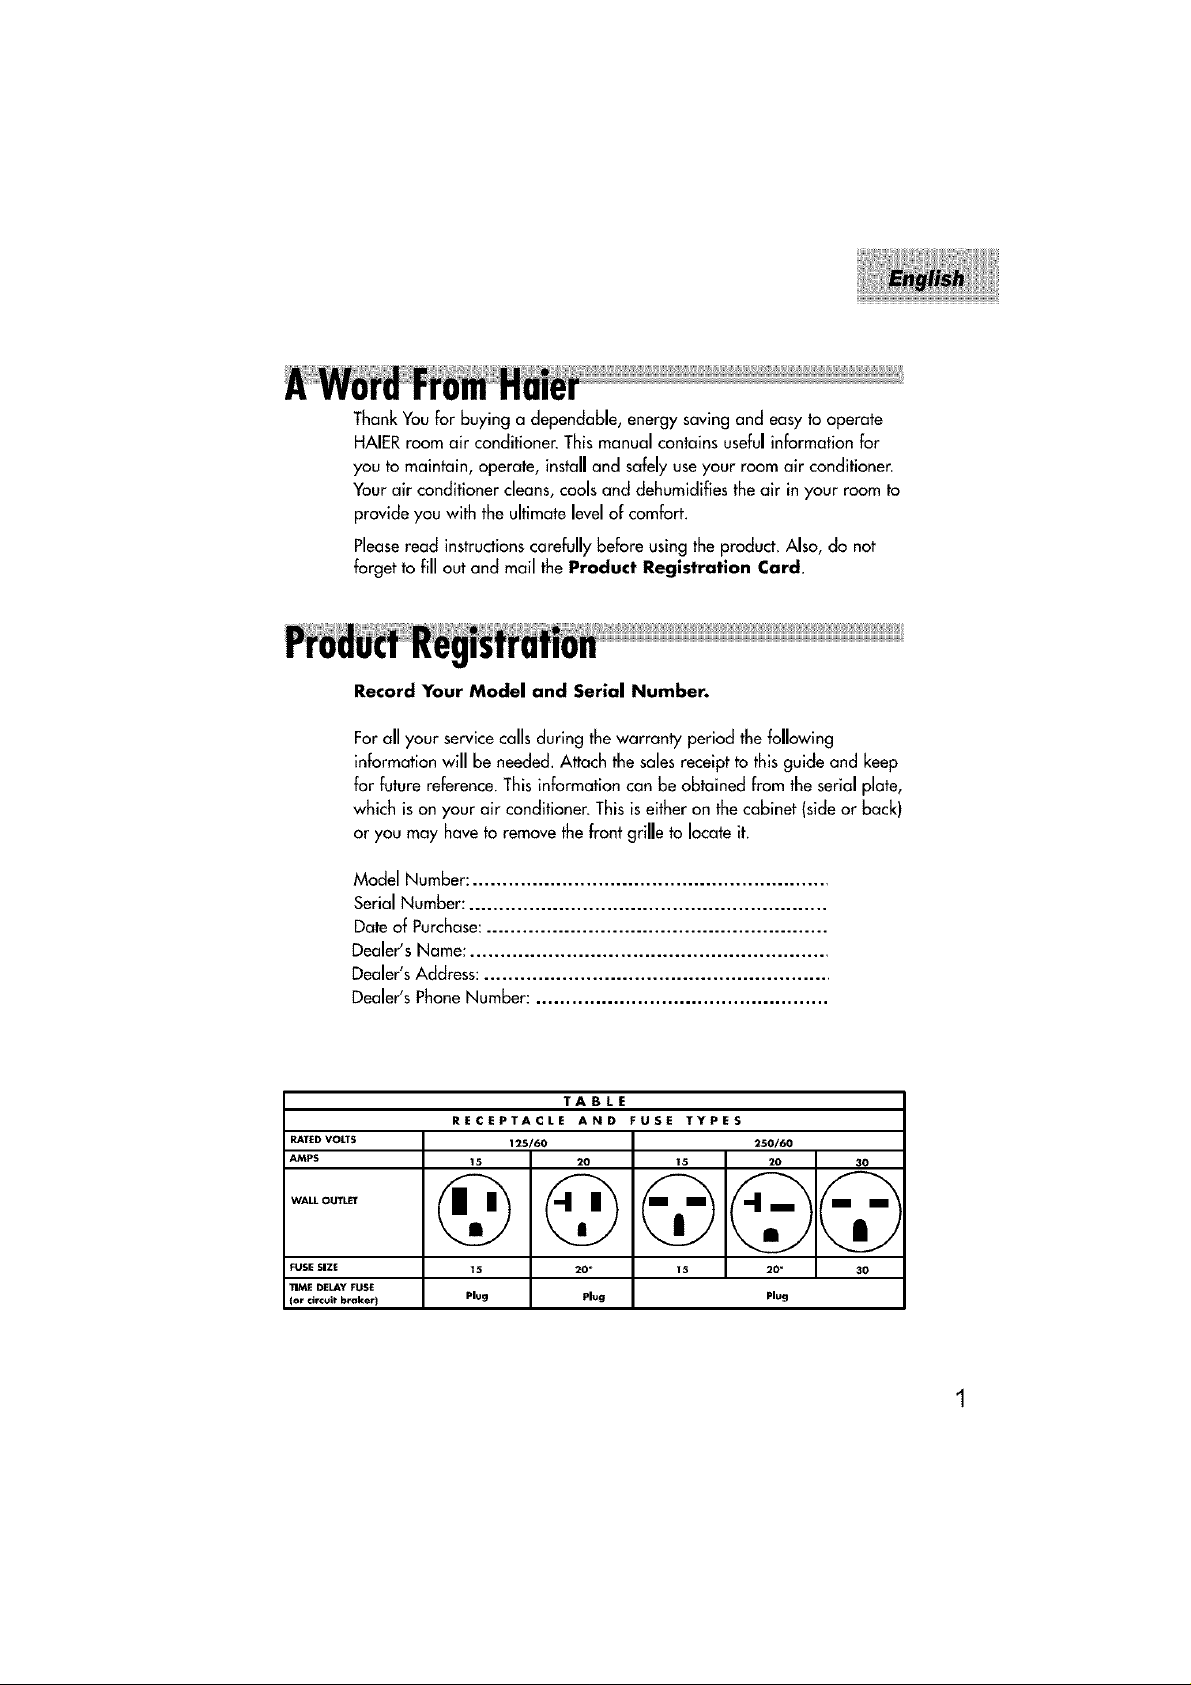
Record Your Model and Serial Number.
For all your service calls during thewarranty period the following
information will be needed. Attach the sales receipt to this guide and keep
for future reference. This information can be obtained from the serial plate,
which is on your air conditioner. This is either on the cabinet (side or back)
or you may haveto remove the front grille to locate it.
Model Number: ............................................................
Serial Number: ............................................................
Date of Purchase:.........................................................
Dealer's Name: ............................................................
Dealer's Address: ..........................................................
Dealer's Phone Number: .................................................
RECEPTACLE AND FUSE TYPES
RATED VOLTS 125/60 250/60
AMPS I S 20 15 20 30
FUSE SIZE 15 20" 15 20" 30
_ilME DELAY FUSE
{or circuit braker) Plug Plug Plug
TABLE
Page 3
SAFETYPRECAUTIONS
WARNING: Following these basic precautions will reduce the
risk of fire, electrical shock, injury or death
when using your air conditioner.
1) Air conditioner mustbeconnectedto proper electrical outlet with the
correctelectrical supply. (seetable)
2) Proper grounding mustbe ensuredto reducethe risk of shockand fire.
DO NOT CUTOR REMOVETHEGROUNDING PRONG. Ifyou do
not have a three-prong electric receptacleoutlet in the wall, have o certified
electrician install the proper receptacle.Thewall receptacleMUSTbe
properly grounded.
_, 3) Do not useif power cord isfrayed or otherwise damaged_Also avoid
using it ifthere are cracks or abrasion damage along the length, plug or
connector.
__ 4) DO NOT USEAN ADAPTEROR AN EXTENSIONCORD.
5) When installing your air conditioner in a window, make surethe window
is strong enough to hold the weight of the air conditioner. Youalso want to
secureand correctly installyour air conditioner properly to prevent it from
falling. Extra bracketsand or support may be required depending
on your window.
6) Do not block airflow insideor outside the air conditioner with blinds,
drapes, protective covers, shrubsor bushes.
7) Becareful of sharp edges on the front and rear fins of the unit that could
cut and cause seriousinjury.
8) Becareful when lifting the air conditioner to install or remove the unit.
Always use_o or more people for this.
9) Always unplug the air conditioner before servicing it or moving it.
Page 4
PAGE
A Word From Haler 1
Product Registration 1
Safety Precautions 2
Warnings 4
Electrical Safety 4
Tips 5
Energy Saving Guide 5
Features 6-7
Operating Guide 8-14
Normal Operating Sounds 8
Operating Instructions 8=14
Installations 15=24
Parts 16
Tools 17
Installing Unit intoA Window 18=25
Clean and Care Guide 26-27
Troubleshooting 27-28
Warranty Information 29
Page 5
Following the safetymessagesisvery important.
Thesemessagescan saveyou from being injured or killed.
Warning symbolsalert you to be careful and meansDanger. Always
follow instructions to be safe and reduce chances of injury or death,
Warning and Danger signswill precede safety messages.
Grounding: This room air conditioner must be grounded.
Grounding reduces the risk of electric shock by
providing an escapewire for the electric current.
The power cord has a grounding wire with a
grounding plug. Plug it into an outlet that is
properly installed and grounded.
WARNING:
Adapter Plug: We strongly advise against using an adapter plug.
Improper use of the grounding
plug can result in a riskof electric shock.
Call a qualified electrician if you don't understand
the grounding instructions or if you are not
sure if the air conditioner is properly grounded.
If the wall electrical outlet is not grounded, please contact an
electrician to have it replaced with a properly
grounded outlet.
Do not, under any circumstances, cut or remove the
third (ground) prong from the power cord.
Page 6
• AirConditionersaredesignedforuseinadoublehungwindowor
throughthewallinstallationonly.(Asapplicableinyourmodel)
• Whileinstallingunitbesuretotiltairconditioner_/4inchoutwardto
havethewaterdripoutsidethehouse.
_• Installtheunitonthenorth side as normally that is the shaded side. This
will enhance the operation of your unit.
• Window has to be strong Forinstallation. Extra brackets and or support
may be required depending on your window.
• Measure the window before installing, if the window is too big for the
unit you may require professional installation.
_.L• Use correct electric voltage and proper ampere for the unit to run
effectively.
-_ • Only let a certified electrician do any modifications to your electrical
outlet.
• When installing your air conditioner make sure to seal all areas where
there is a possibilily of air leakage.
• Airflow should not be blocked inside either by curtains, drapes or
furniture or outside by shrubs or bushes.
• Do not needlesslyuse an electrical light or other appliances that
produce heat.
• Keep the vent closed on the air conditioner when in the cooling function.
• Keep the blinds and the drapes drawn on all the other windows.
• While cooking usean exhaust fan in the kitchen to remove the excess
heat produced.
• Always usethe correct BTUsize air conditioner to cool the room to
attain optimum efficiency.
Page 7
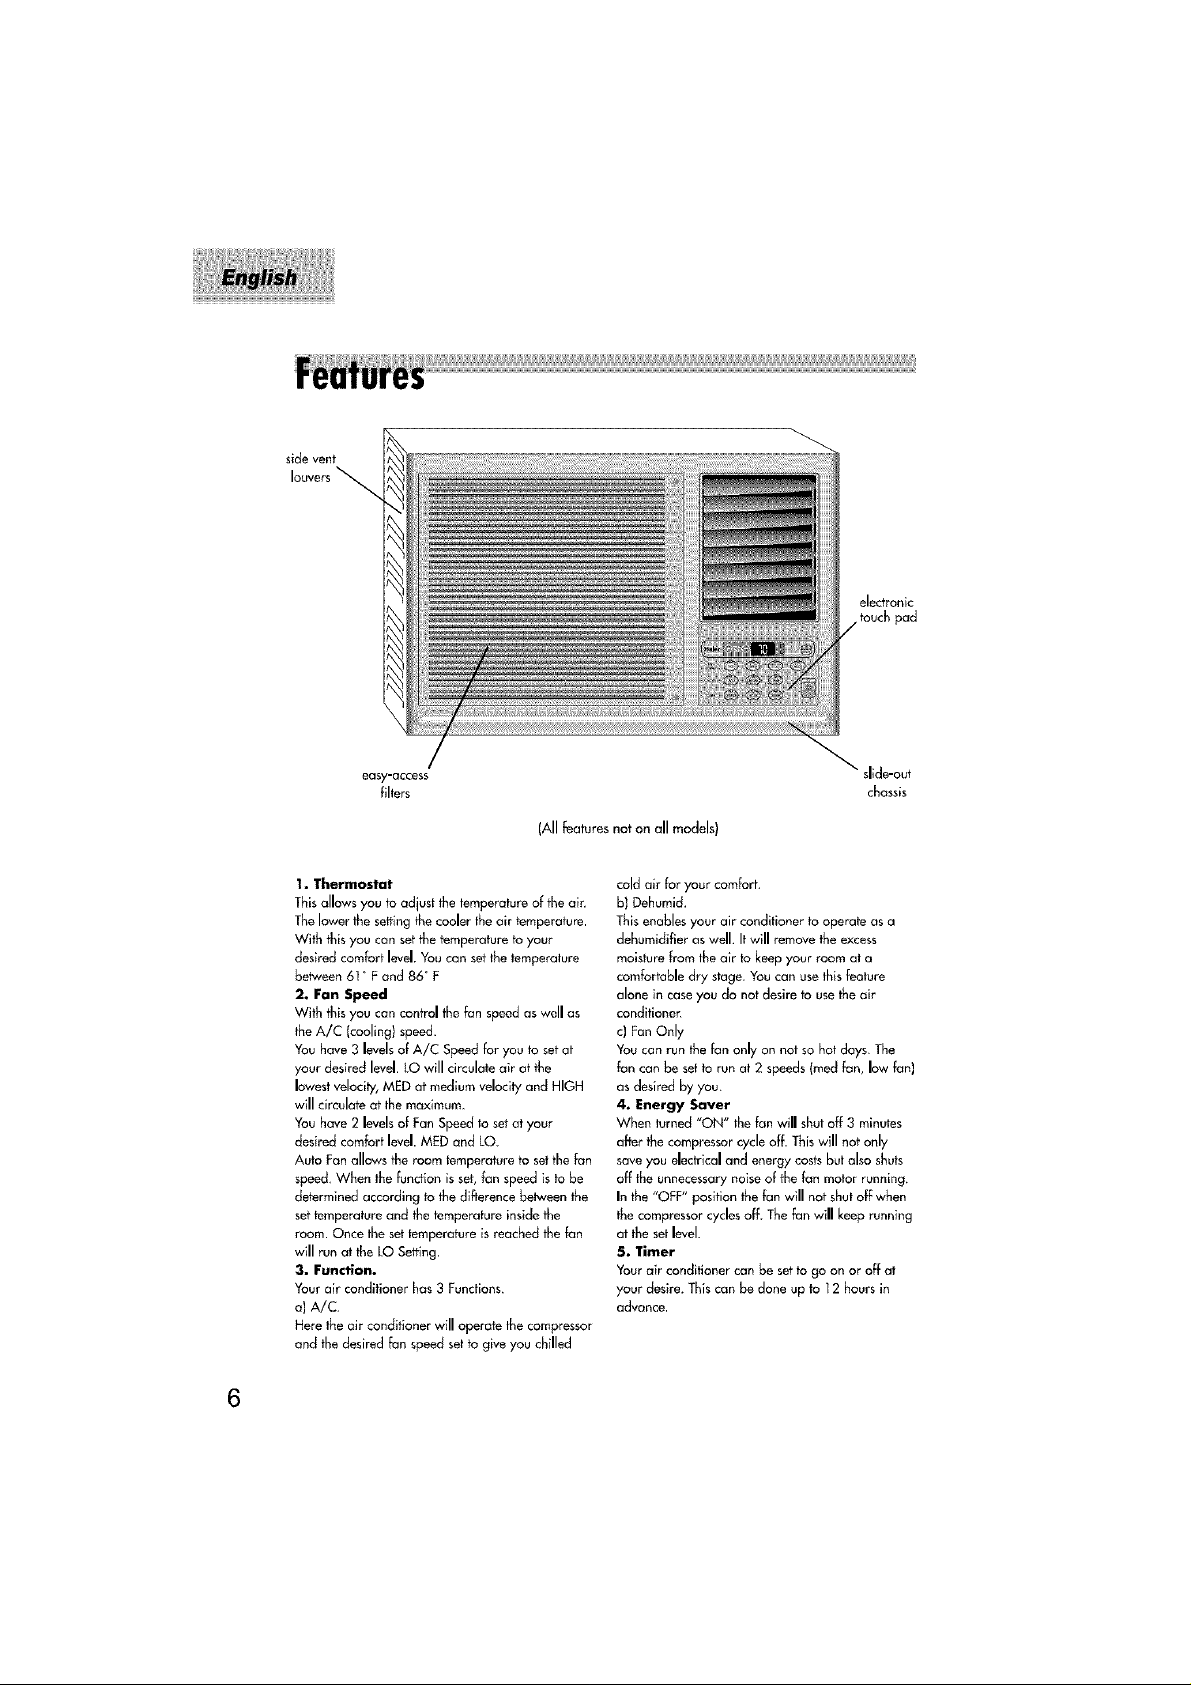
side vent
eledronic
touchpad
easy-access
filters
(All featuresnot on all models)
1. Thermostat
This allows you b adjust the temperature of the air.
The lower the setting the cooler the air temperature.
With thisyou can set the temperature to your
desired comfort level. You can setthe temperature
bef,,veen 6] ° F and 86 _F
2. Fan Speed
withthi_youconcontrolthefansp_ as_ellas
the A/C (cooling) speed.
You have 3 levels of A/C Speed for you to setat
your desired level. LO will circulate air at the
lowest velocity, MED at medium velocity and HIGH
will circulate at the maximum.
You have 2 levels of Fan Speed to set at your
desired comfort level. MED and LO.
Auto Fan allows the room temperature to setthe fan
speed. When the function is set, fan speed is to be
determined according to the difference belween the
settemperature and the temperature inside the
room. Once the settemperature is reached the fan
will run at the LO SeCflng.
3. Function.
Your air conditioner has 3 Functions.
al A/C.
Here the air conditioner will operate the compressor
and the desired fan speed set to give you chilled
slide-out
chassis
cold air for your comfort.
b) Dehumid.
This enables your air conditioner to operate as a
dehumidifier as well. It will remove the excess
moisture from the air to keep your room at a
comfortable dry stage. You can use this feature
alone in case you do not desire to use the air
conditioner.
c) Fan Only
You can run the fan only on not so hot days. The
fan can be set to run at 2 speeds (reed fan, low fan)
as desired by you.
4. Energy Saver
When lurned "ON" the fcm will shut off 3 minutes
after the compressor cycle off. This will not only
save you electrical and energy costs but also shuts
off the unnecessary noise of the fan motor running.
In the "OFF" position the fan will not shut off when
the compressor cycles ofF. The fan will keep running
at the setlevel.
5. Timer
Your air conditioner can be setto go on or off at
your desire. This can be done up to ] 2 hours in
advcll'_ce,
Page 8
6. Vent (not in all models)
This feature helpsyou to exhaust any stole
unwanted air kom the room and draw fresh outside
air in the room. To circulate the air, bring the lever
to the open position (right). To retain thecool it is best
to keep this in the closed mode(leFt)
7. 4 Way Air Flow
These air directional louvers let you control the
direction of the a_rflow in your required direction
The airflow can be directed
up - down - right side - left side.
8. Slide Out Chassis (not on all models)
Your Air Conditioner becomes more versatile with
this feature_ You have the option to install the unit in
a window or the wall.
9. Window Install Kit
Enables you to install the air conditioner in a
double hung window. Extra brackets or supgort
may be needed depending on your window.
10. Remote Control
This fell functionalwireless remote allows you to
operate your air conditioner From a dis_nce You
need not have to get up to change the settings, the
functions or to turn the unit on or off.
11. LED Display Electronic Control Panel
The 4 function LEDdisplays Room Temperature,
Temperature Setting, Timer Setting and Time
Remaining to Stop / Start the unit Electronic
Control Panel lets you set the temperature to the
Exact Temperature you desire.
12. Sleep
When activated, this feature automatically setsan 8
hour shut off timer The unit will shut off in 8 hours
Page 9
Normal Operating Sounds
The following sounds are normally heard during the operation of an air conditioner.
• Coolairflow movement asdictated by the set [an speed.
• Water sounds. This is normal as your air conditioner actsas a
dehumidifier also, Thusyou will hear water sounds from water drops
falling on the condenser.
• As the refrigerant flows through the innersealed tubing a rushing noise
may be heard.
• Rattling or vibrating noises may be heard due to poor wall
or window installation.
• High pitch compressor sound may be heard.
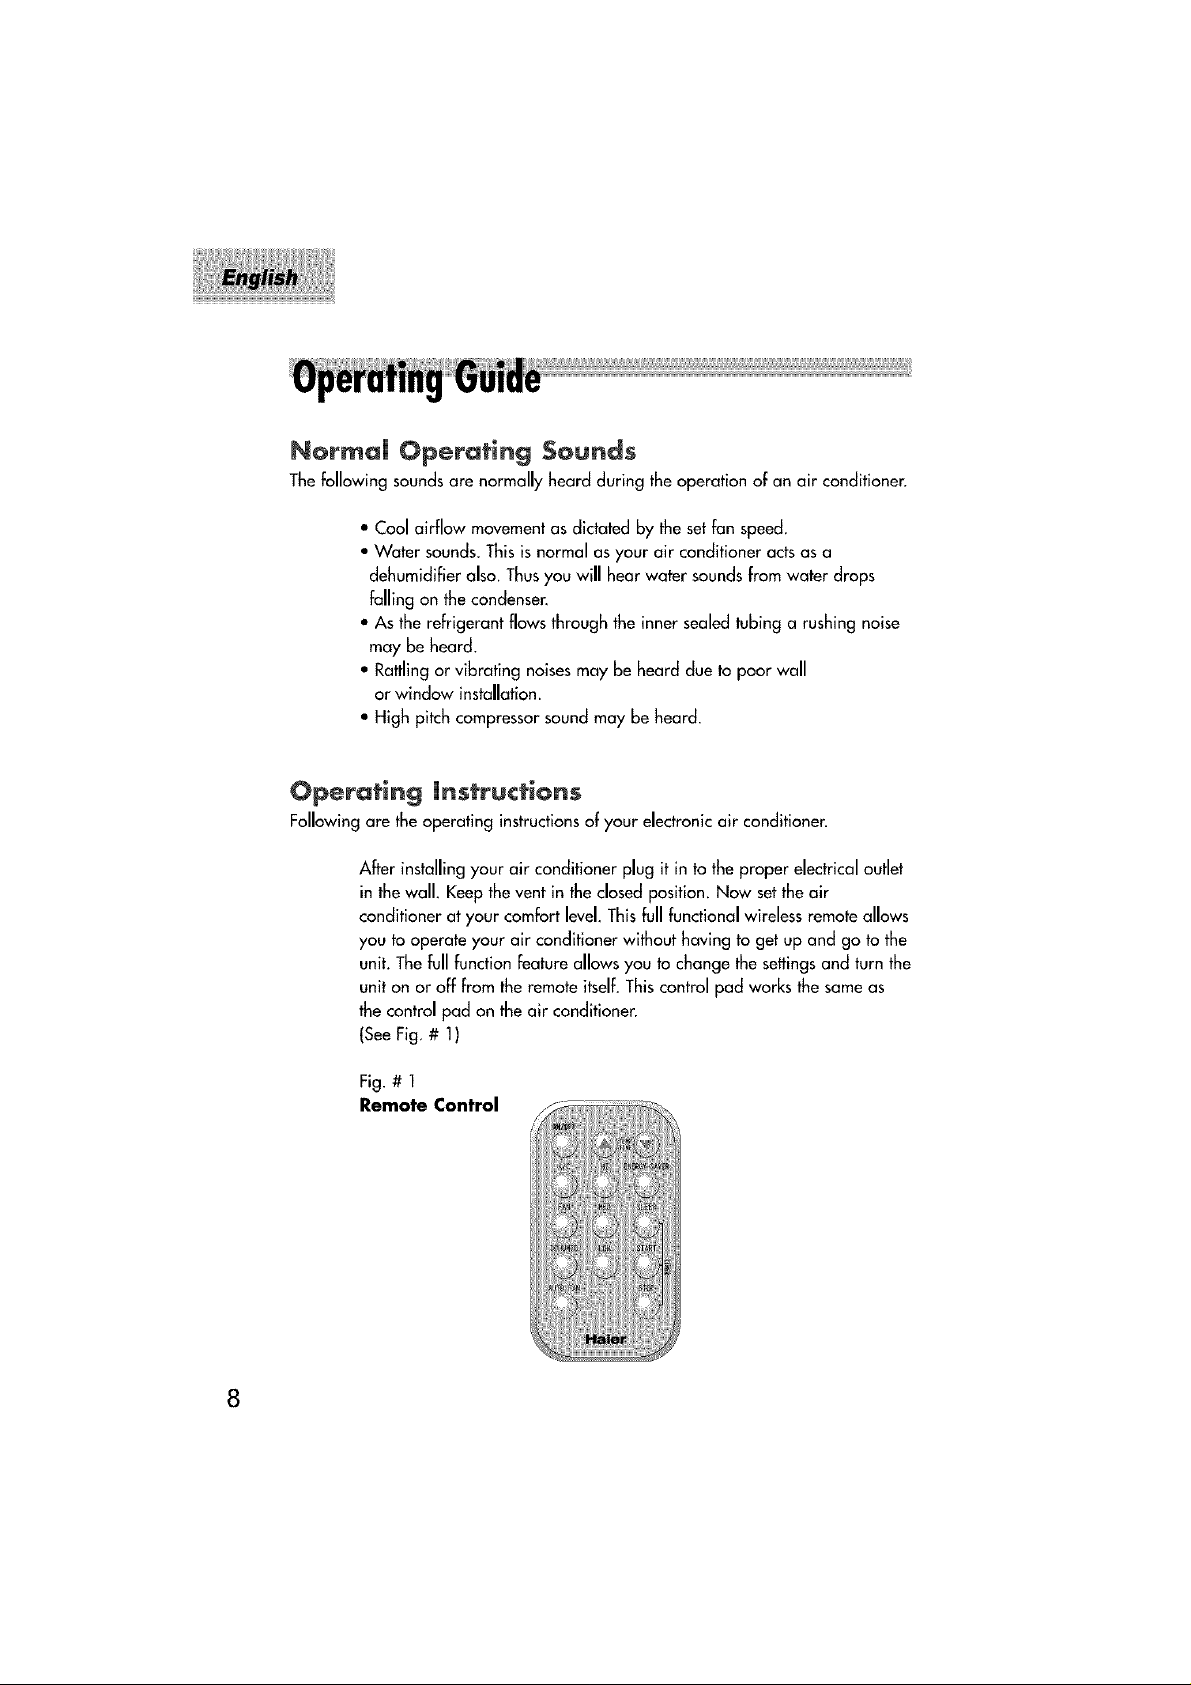
Operating instructions
Following are the operating instructionsof your electronic air conditioner.
After installing your air conditioner plug it in to the proper electrical outlet
in the wall, Keep the vent in the closed position. Now set the air
conditioner at your comfort level, This full functional wireless remote allows
you to operate your air conditioner without having to get up and go to the
unit. The full function feature allows you to change the settings and turn the
unit on or off from the remote itself,This control pad works the same as
the control pad on the air conditioner.
(See Fig, # 1)
Fig.# 1
Remote Control
iii_i_ _ii_i_iiiiiiiiiiiii_
i_ _ii_i_,,Ji_"
_,_ iiiiiiiiiiiiiiiiiiiiiiiii!iiiii_g_
,,,,,,,,,,,,,,,,!_iiiii!ili!iiiiii_ili,i¸
Page 10
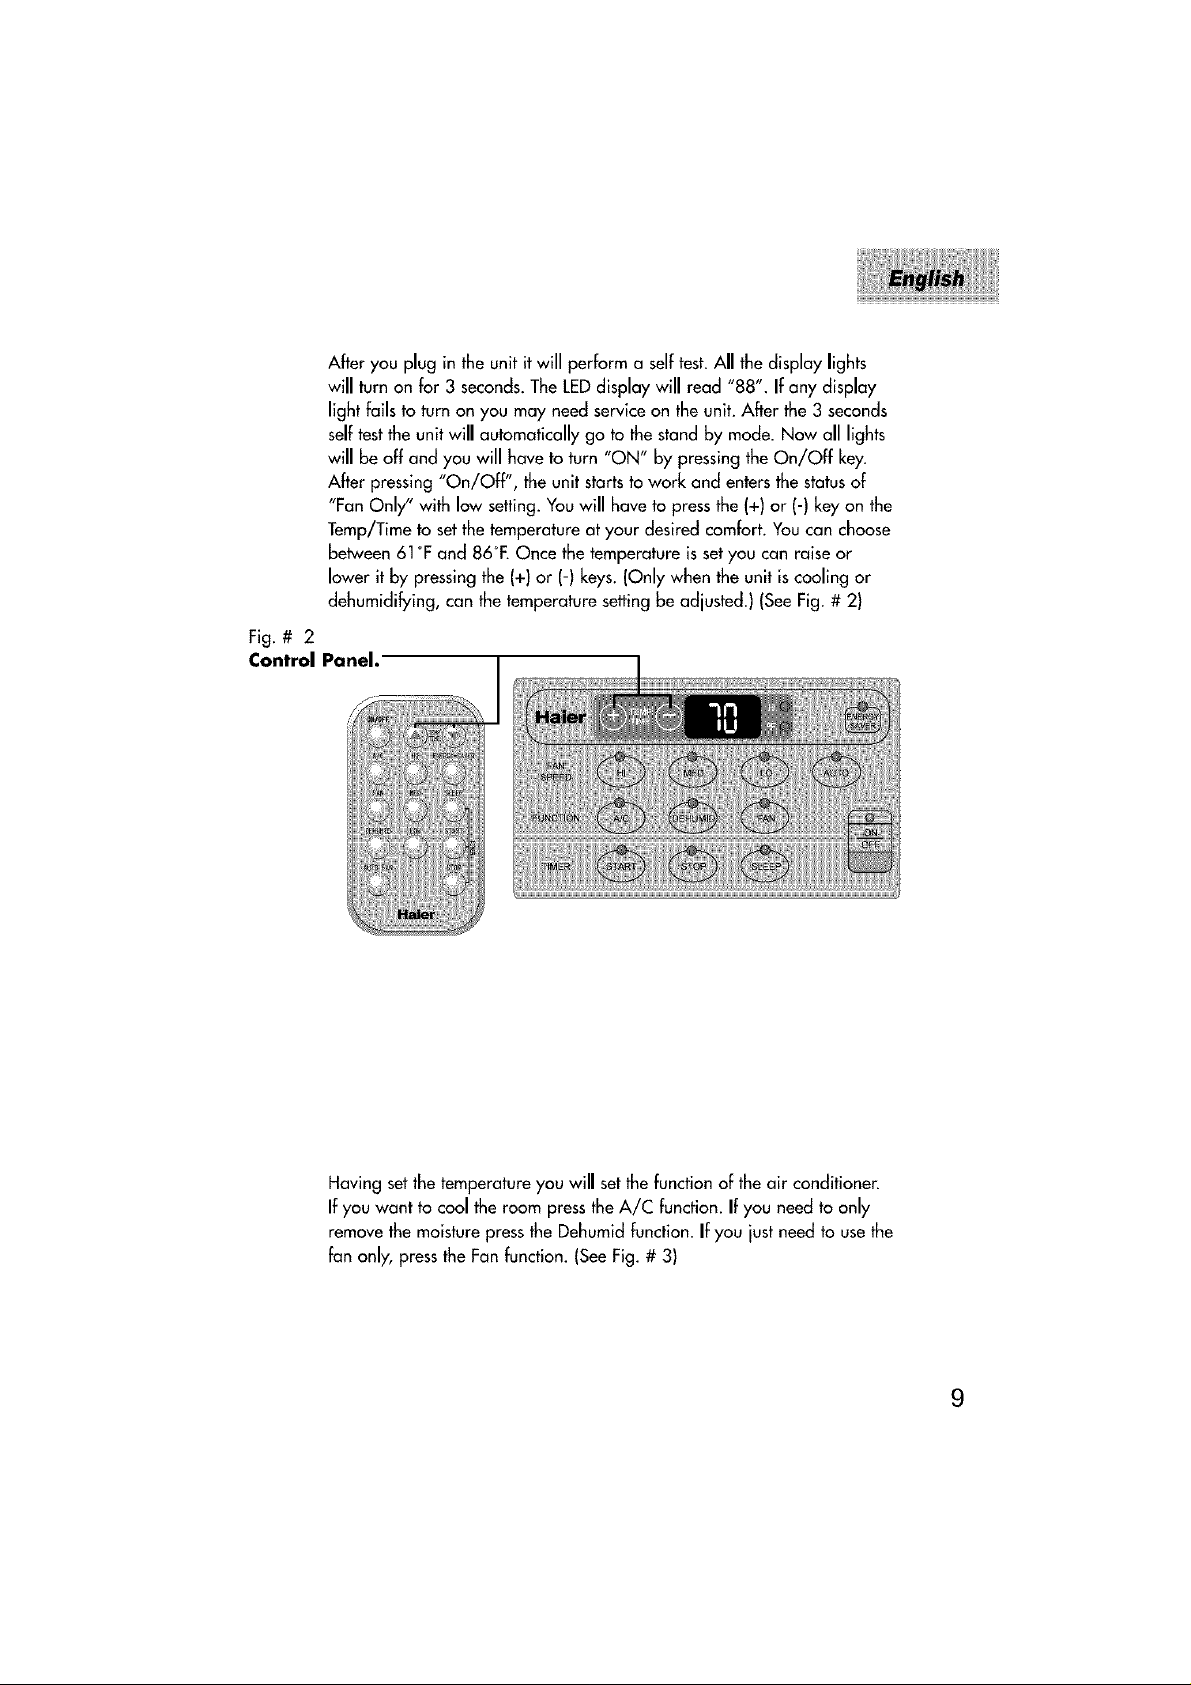
Fig. # 2
Control
After you plug in the unit it will perform a self test. All the display lights
will turn on for 3 seconds. The LEDdisplay will read "88". If any display
light fails to turn on you may need service on the unit. After the 3 seconds
selftest the unit will automatically go to the stand by mode. Now all lights
will be off and you will have to turn "ON" by pressing the On/Off key.
After pressing "On/Off", the unit starts to work and enters the status of
"Fan Only" with low setting. Youwill have to press the (+) or (-) key on the
Temp/Time to setthe temperature at your desired comfort. You can choose
between 61°F and 86°F.Once the temperature is setyou can raise or
lower it by pressing the (+) or (-) keys. (Only when the unit is cooling or
dehumidifying, can the temperature setting be adjusted.) (See Fig. # 2)
Panel.
Having set the temperature you will set the function of the air conditioner.
If you want to cool the room press the A/C function. If you need to only
remove the moisture press the Dehumid function. If you just need to use the
fan only, press the Fan function. (See Fig. # 3)
Page 11

Fig.#3
Control Panel.
Once the Functionmode isdecided you will have to set the fan speed.If
you choose the A/C modeyou can runthe fan in one of the 3 speedsHi,
Med., Lo or in the Auto speed. In theAuto speedthe fan will start at High,
Mealor Loas the temperaturevaries in the room.
Tr:temperature insidethe room.
Ts:the set temperature.
When Tr>Ts+2°F,the Hi is to be automatically. When Tr<Ts,theLois to be
set.When Ts<Tr<Ts+2°F,the Med is to be set.Once the settemperature in
the room is reachedthe Auto fan settingwill havethe fan running on Lo.
Ittakes 3 minutesto switch the fan speed. (SeeFig. # 4)
Fig.# 4
Control
Panel.
10
Page 12

If you choose to use the Dehumid function. This will remove excessmoisture
from the air on excessively humid days.
Tr:temperature inside the room.
Ts:the set temperature.
1) When Tr>Ts÷3°F,the compressor will run continuously the fan at the
selected speed.
2)When Ts-1°F<Tr<Ts+3°Fthe compressor will cycle for 10 minutes on
and 6 minutes off_
3)When Tr<Ts-1°F,the compressorwill shutoff.
Thedehumidification processtakes place between the set temperature -1
and 3°F above the set temperature. (SeeFig. # 5)
Fig. # 5
Control Panel.
For cool days you may want to run the "Fan Only" function. Here the fan
runs only at one of 2 speeds, Med. or Lo.Thefan will not run at the High
speed. (See Fig. # 6)
Fig. # 6
Control Panel.
11
Page 13

Fig. # 7
Control
Timer start or Timer stop mode is used to pre-start or shut off your unit in
advance. You can program this up to 12 hours in advance. You can use
the Timer in 3 functions i.e. A/C, Dehumid. or Fan Only.
•Timer Start. (SeeFig. # 7)
Unit must be on to setthe timer. Unit will shutdown automatically after it
acceptsthe settingsin 5 seconds.Usethismode to pre-set the start time of
the unit 12 hours in advance.
a) PressStart, LEDdisplay will show "XX" (timesetlasttime)when power
is connectedfirst time, LEDdisplay will show"01" .
b) Setdesired number of hours by pressingthe(+) pad of the Temp/Time
buttons,one [or each hour. Ifyou passedthe desiredtime use the (-) pad
keyto lower the selection.
•Timer Stop (SeeFig. # 7)
Unit must be running to setthe timer off. Usethis to presetthe time you
would like the unit to shutoff.
a) PressStop, LEDdisplay will show "XX" (timesetlast time)when power
is connectedfirst time, LEDdisplay will show"01".
b) Setdesired number by pressing the (+) pad of the Temp/Timebuttons.
One for eachhour. If you passedthe desiredtime, usethe (-) pad key to
lower the selection.
When usingthetimer the unit will use/revert to the last A/C and fan
settingswhen activated. Thetimer mustbe resetevery timeyou chooseto
useit.
PaneJ
12
Pressingthe mode onetime, the settingof Timerstart, Timerstop and sleep
can be done. Pressingthe mode for a second time, thesettingiscancelled.
Page 14

Sleepletsyou presetthe unit to shutoff in 8 hours. Sleepworks in the A/C
function only. After pre-setting the temperature to a setdegree,
the temperature raisesby 2 degree in the 1st hour and another 2 degree
in the 2nd hour and then remains constant in the next 6 hours. As your
body does not give out as much heat in the night and as nights generally
becomecooler this feature letsyou sleepcomfortably throughout the night
without having to wake up to change the temperature settings,
(SeeFig_# 8)
Fig. # 8
Control Panel
Energy Saver: Bypressing this keyyou will activate the unit to go in the
energy saver mode. The fan will be off 3 minutes after the compressor
cycle off, By deactivating it the fan keepsrunning at the set speed even if
the compressor shutsoff. (SeeFig. # 9) (This function is available in the
cooling function only)
13
Page 15

Fig.# 9
Control Panel
i¸ _ii_i .................................
[
N ,_u
When unitis in "On" mode the LEDdisplay will show room temperature.
Pressthe(+) key to get settemperature. When unit is in "Timer Stop" func-
tion, LEDdisplay will show the time left for the unit to shutoff.
TocancelTimer Stop pressthe main Off key.
"H" light is on thetime is shown.
"°F"light is on the temperatureis shown.
14
Page 16

Beforeyou install your air conditioner check the following:
1) The unit is free of all obstructions inside and outside the room e.g. drapes,
curtains, furniture, plants, shrubs, bushes,trees, other structureslike building,
garage etc. Air conditioner must have clear unobstructed airflow through the
condenser to remove the heat.
2) The window is strong enough to hold theweight of the air conditioner.
Extra brackets or supports may be needed depending on your windows.
3) The window sill and track are strong enough to hold the weight of the
air conditioner.
4) The wall is strong enough to hold the uniL Extra brackets or supports may be
needed depending on the wall.
5) There is adequate and proper power supply near the air conditioner_
-_.6) DO NOT useadapter plugs.
__7) DO NOT use extension cords.
-_8) DO NOT cut or remove the ground prong.
__ 9) DO NOT modify the plug or the electrical wall outlet in any way.
If plug does not fit the electrical outlet havea certified electrician do the
necessary change.
-_10) DO NOT connect electrical power to the unit before installation.
__11 ) DO NOT use if power cord is worn out, frayed or otherwise damaged.
Avoid using if thereare cracks or abrasion damage along the length,
plug or connection.
15
Page 17

Parts
Par_s Supplied
window seal
gaskel
curtain
attachmenl
screws 13/32 _'
curtain sash
screws
31/32"
Model: HWROSXC3-T
RemoJ¢
contro
basep
0
"CR2025" battery
_ _ affachment
Parts Supplied
4_ _ altachmenl
curtain
&_ screws 13/32 _'
seal
curtain
cuff an sash screws Casemen to
3//32" window
"CR2025" _attery
Remote
control Model: HWRIOXC3 T
curtan sasl screws Casement to
31/32" window
"CR2025" batter},
Remote
control Mood HWR 2'/,(3-T
securance screw I"
s@ct_onc@ scr@w 1_'
left and right
side curtains
left and Hgh
side curtains
16
Page 18

Tooms
You will need to have the following toolsto help you in the installation of
your air conditioner.
*Scissors
*PhillipsScrewdriver
*Standard Screwdriver
*Pliers
eWrench
"Drill and Drill Bits
.Tape Measure
*Gloves
•Level
•Sockets
17
Page 19

Installing Unit into A Window
Window Opening Requirements
The air conditioner is designed to fit into double or single hung sash type windows. Each of he
units comes with an installation kit that provides adjustable mounting louvers, to fill the gaps
between the sides of the unit, and the window frame. The chart below reflects the dimensions of
the unils wilh, and wilhoul insiallafion kits. Measure your window opening width and compare
it Rolhe chart below to ensure fhal it meets lhe minimum and maximum window widlh requirements.
HWROSXC3-T HWR10XC3-T,HWR12XC3-T
A(inch)
B(inch)
C(inch)
D{inch) Max
D(inch) Min
Case High
Case Width
Case Depth
Model HWR08XC3-T
: WROSXC3-T
29" 71@,
34_-"
12_-"
HWRIOXC3-T HWR 2XC3-T
16_'
16_'
36_-'
3T
20 32
15,
15_-'
18
Page 20

PREPARE Storm window installation Mobile home window installation
WINDOW FOR adeauate clearance below sill /2" dang entre wldh of window sll
I sorm wndow frame does not allow Add wood strip (a_least 1 /2" wide}
INSTALLATION _eq_U_d),remove star rl window Th ekness of wood strip should mmch
Ins_oecl window track, sash, and sll frame o create clearer ce by adding height of +.ant lip on window frame
for its ability to support the weight of a wood strip {ai leasI J l/2" wide} Fasten wood grp 1o sill with a
air condiiionen along entire width of sill Fasten n-in mum of hree countersunk wood
Measwe width between window countersunk wood screws (not pray des a smoolh surface for
mold ngs to ensure Ins a ii Maul4 supplier with kit). This provides a mounting air cond tlonen
wll fit window frame. Ir stan Moun_ Mu_ beo.io,_,_
models are designed for windows car dlloner _ of/2"io cl_e_
is designed f........ tipgi ...... t ....ii_, '_'1
double hung wnd .... itho_ _ ][
Instant Mount kit supplied wifi_ unit ___ v,_,_ _, , F.......
storm windows.For installaion in I J Sqlr / Q
modify sill by adding wood slrips{noi _ _/ D 1
included) oinne and dUCat sills Tnis raises o d
unit and ellminates inter[erence of o
w ndow f....... iths ...... ndow. __ i A i_ i
storm window frame i_ o
wood str_ o sill wi_ a_ leasI _rae screws (not sup_lled with kit/ This
INSTALL UNIT IN
WINDOW
Bol'om rail
_ C,Jr_a _ assernbl! cut
awa_ fo Janly.
o
INSTALL
BASEPAN ANGLE
_ack +rorll attachment screw out
several lures and sllp Bosepa _Argle
over screw head.._nup screw with
angle esfing on wirdow ledge
Insall Two 31/32' screws througl _
angle q_o windpwledge Repea or
opposl e side.
_boul
angle "
lg
Page 21

INSTALLSEAL
GASKET
efficiency.
Models HWRIOXC3-T HWRI 2XC3-T
I PREPAREUNIT
FOR
INSTALLATION
Unpack unit on floor next to
installation location,
Remove front attachment screw
Separate _heoutercase from the front
with a putty knife atthe catch paints
designated by the arrows.
Remove one screw securing
basepan locking bracket, Remove
two screws located in the rear of the
outercase, securing basepan to
outercase Using the bcssepanhandle,
slowly and evenly pull chassis out
from outer case.
No_e: Cover puffy knife blade wlth
masking tape to guard against
damage of Ihe units finish. The filter
is removed in shis illustration br Caution: Never expose plastic
clarity only. front or grille to extreme
temparateres,
2O
Page 22

ASSEMBLE
CURTAINS/TOP
RAIL
Install lop rail wiih ihree _3/32"scraws
Slide left-hand curtain assembly
in-o left end of top and bottom
rails Repeat for righ-hand cur:ain
assembly. Fasten cur aln retainer
strps to sides of outer case witft
six 13/32' screws
PREPARE
WINDOW FOR
INSTALLATION
Inspec window t_ack, sash, and sill
for its nbility to supoori the weigh of
ar conditioner
Measurr_ width r*etween window
mold ,-gs 1o ensure Instant Moun
will fi window frame Instant Mount
models are designed for windows
wide (the delail see page i8)
Insianl Mouni kil supplied witl unit
is designed for moun ing n most
double-hung windows without
storm windows.For installat on in
window frame wi_h slam w ndow,
modify sill by adding wood strips
(not included) to nner and outer sills
[his rases unit and eliminates
i interference of storm window frame
Storm window installation
If storm window frame does not allow
adequaie clearance below sill (I/2 _'
raqu _ed), remove slorm wir,dow
frame or create clearance b/ adding a
wood st_i_ (ai least I I/2" wide) along
enti_e width of sill Fasten wooc strip
to sll wit7 at least tTree countersunk
wood screws (not suppled with ki!)
_his p ovides a smooff_ surface for
mount ng ar cond tionec
Minimu
R
51o_ \Vi rdow j/
Mi,irlu , of I/2 to clea
Mobile home window installation
Add wood strip (at I_ast I 1/2' wide /
along ente widlh of window sill
[hickness of wood strip sf,ould macl
height of ftont lip on wndow irame
Fasten wood strip to sill wilh a
minimum of lhree countersunk wood
screws (no su#plied with klt}. Ths
provides a smooth surface for
mounting air cond[ tar er
/2'
Mustbe 0 mMimun_
J I/2_ Windrow
o ©
21
Page 23

INSTALL OUTER
CASE IN WINDOW
Place ouer case in window_ Lower
sasl untl i_ _esls behind front flange
of _op rail. Boitom _all musi _os
behnd window slL
awat' fo_ cladv
_J ooO°
Expand bah curia ns o coniac[ Ihe
wndaw flame. InsJall twa 31/32'
saews. One in each upper right and
left corner of the curtains
Install _hee 31i32' _op mouniir'g ,ail
screws
NO't'E: Tomake screws easier to
drive, drill a pilo _ole i_lo sash
through clearance hole in o _alns
Use _vo casemer, t to window securance screws(1 ")
to fix tie case Jo windows sasl
5 INSTALL BASEPAN ANGLE
fl_rough angle nto window ledge _-_
Repea1 for opposite side.
22
sorews _ _
Basep_n_ L
angle
Page 24

INSTALLSEALGASKET
Cutwindow seal gasket to width of
window. Stuffwindow seal strip
belween outdoor window glassand
top of indoor sash.Thiswill stop air
leakagewhich reducesefficiency.
IMPORTANT: Stay clear of glass, Be
careful notto damage the function
ofthe window.
INSTALL
DRAINELBOW
Adjust the direction d the drain ube(dra n elbow)
to make it be in line with the hole
in the rear o_ unit; Insert the drain ¢ubeIdra n elbow)
into the hole and twist 90°.
RETURN
CHASSISTO
OUTERCASE
Findsomeone to help you
replace chassisin outer case.
Installbasepan clip. Replace front
panel, and grille.
Where possible install two screws
in rear of outercase, removed in
step one.
IMPORTANT: Becausewindow
sash helps keep unit in window,
make certain window sashcontacts
outer case before reinstalling
chassis.
23
Page 25

Wall Installations: slide-out chassis only
Note: Remove the 1 or 2 shipping screws on the rear of the air conditioner
that hold thechassisto the outer shell casing. Once removed,
thesedo not have to be re-installed. Toensure that your air
conditioner is properly installed in thewall, it is recommended
that it be installed by a certified technician who is familiar with
through the wall installations.
1) Using wood, 1" or more in thickness, build a wooden frame to fit the
casing/cabinet dimensions of the unit which you have purchased.
2) Measure theoutside width and the height of the frame to determine the
cutout dimensions necessaryfor the opening in the wall. The depth of the
frame will depend on the depth of the walL Thefinished frame must be set
in the inside wall. The frame has to be squared and leveled. Rememberthe
Framehas to be nailed securelyto the wall studs. (SeeFig. # 19)
wall
stud
_ _J[ t_ f......
,--_-5_...._-._-_-=.-,..-_ -"_"'_ _._ . back-up
24
-- _i strip
/[
'iI
.... \, -
3) Now to install, insert the casing into the wall opening. (Remove the
chassisout first following steps 1- 6 in Slide-out chassis section).
Make sure that the cabinet is at least 1/2" inch inside the room. Also the
side louvers should not be blocked. This is to have proper air circulation in
and around the compressor. (See Fig. # 20)
typical wood
framing
Fig. # 19
Page 26

wall_
Fig. # 20
typical casing
outward tip
casing
4) The casingshouldbe tilted 1/4" outsideso as to drain theexcess
dehumidifiedwater.
5) Properlyinsulateany opening betweenthe casing and the frame.
6) Usingthescrewholeson thesidesof the unit,which are for thewindow
mountingkit andthe screwholesin the top mounting kit rail, attachthe
casingto thewood Frame.
7) With the helpof anotherpersonlift and put thechassisof the
air conditioner in tothe casing.
8) Screwthe securityscrewintoplaceand snapon thegrille.
9) If thefilter was removedduring thisprocess,reinsertthe filter.
25
Page 27

lop-air
IouveYs
fig. # 21 fig. # 22
• Always unplug your air conditioner before cleaning.
• Air filter needs to be cleaned at least once a mouth for your
unit to operate at optimum efficiency. Thefilter can be slid out
from the side by pulling on the tab located on the middle right side of the
front mask. (See fig.# 21 ) Or the filter may be accessed by pressing
down on the top and bottom tabs located on the right side of the front mask.
(See flg.# 22) The filter may be washed or vacuumed. Remove the
excesswater from the filter by gently shaking the filter. This will remove
dust and particles trapped in the filter. After cleaning, reinstall the filter.
DO NOT use your air conditioner without the air filter in place.
side-a_r
louvers
26
• To clean the front panels or the cabinet DO NOT use harsh
chemicals, abrasives, ammonia, chlorine, bleach, concentrated
detergents, solvents or metal scouring pads. Someofthesechemicals
may dissolve,damageand/or discoloryour air conditioner.
• Always use a soft cloth dampened with water or mild soap
and water solution to wipe the front if the cabinet.
Wipe dry with a softcloth.
Page 28

Tostoreyour air conditioner, after the season, remove the unit from the
window as per the installation guide. Repack the unit in its original box
and store away. Ifyour unit is installedin a wall or you do not intendto
remove itfrom the window then cover the outside with a winter cover.
This can be purchased from the retailer where you purchased your
air conditioner or from your local hardware store.
Before putting away your unit make sure any water left in the pan is
removed and drained away. Water left in the pan could lead to Rusting
or damage to the electrical connections.
If air conditioner does not operate:
• Check if unit isplugged in. Theplug may have come loose.
• Check if the unit is in "Off" mode.
Air from air conditioner is warm:
• TheA/C setting may need to be raised.
Ice formation on cooling coils:
• Outside temperature too cold. Setthe unit on fan only
setting to defrost ice.
• Lower temperature setting. Temperaturesetting may be too cold,
• Unit BTUmay be too high for the room.
27
Page 29

Air conditioner working but room not cooling:
• Room may have appliances that produce heat. Use an exhaust fan to
remove excessheat.
• Redirect the airflow. Removeany obstacles.
• All doors and windows need to be closed so cool air does
not escape the room.
• Air filter may need cleaning.
• Unit BTUmay be too low for the required cooling area.
• On extreme hot & humid days air conditioners may take
a little longer to cool.
Air conditioner is making noise when cooling:
You may hear sounds of air movement, water, compressor clicking on and
off or window vibrations. Read Operating Guide - Normal Operating
Sounds_(Seepage 8)
Water in the air conditioner cabinet:
This is normal as your air conditioner notonly cools but also dehumidifies
the air. Ifthere is water dripping inside the room, check the installation of
the unit. The unit may need to be reinstalled. (Seepage 19,22)
28
Page 30

This warranty covers all defects
in workmanship or materials
for:
1. The mechanical and electrical parts (including
labor costs)containedin this Hater product, for a
period of 12 months,from the date of purchase,
(commercial or rental application,the warranty is
90 days).
2. The sealed systemand compressor contained
in this Hater product is br a period of 5 years,
from the date of purchase (excluding labor costs
after the initial 12 month period). Incommercial
or rental use, the additional limited compressor
warranty is for 1year and 9 months, (excluding
labor costsafter the initial 90 days period).
You must keep and be able to provide
your original sales receipt as proof of
the date of purchase.
Who is covered?
The original retail purchaser of this Haier product.
What will be done?
Hater will repair or replace, in your home, any
mechanical,electrical part or the compressor,
which provesdefective in normal household,
usefor a period of 12 months. Hater willrepair
or replace (excluding labor costs)the sealed
systemand compressor (parts only) for an
additional 4 year period.
How can you get service?
1. Contact your nearest Haler authorized Service
Depot. For thename of the Service Depot nearest
you, contact Hater at (877) 337-3639_
2. All service must be performed, by an
authorized Hater Service Depot.
THIS WARRANTY COVERS UNITS
WITHIN THE CONTINENTAL
UNITED STATES, CANADA
AND PUERTO RICO AND
DOES NOT COVER:
• Damages from improper installation
• Damages in shipping
• Damages from misuse,abuse, accident,
alteration, lack of proper care and
maintenance
" Damages from service, by other than
an authorized dealer or service center
• Labor, service, transportation and
shipping charges for the removal of
defective parts and installation of a
replacementpart, beyond the initial
12 month period.
THISLIMITEDWARRANTY IS GIVEN
IN LIEUOF ALL OTHERWARRANTIES, EXPRESSOR
IMPLIED,INCLUDING THEWARRANTIESOF
MERCHANTABILITYAND FITNESSFORA
PARTICULARPURPOSE.
The remedy provided in this warranty is
exclusive and is granted in lieu of all other
remedies. Thiswarran b,does not cover
incidental or consequential damages. Some
statesdo not allow theexclusion of incidental
or consequential damages, so this limitation
may not apply to you. Somestates do not
allow limitations on how long an implied
warran b, lasts, so this limitation may not
apply to you. Thiswarranty givesyou specific
legal rights, and you may also have other
rights, which vary from state to state.
2g
Page 31

IMPORTANT
Do Not Return This Product To The Store
If you have a problem with this product, please contact the "Haler Customer
Satisfaction Center" at 1-877-337-3639.
DATED PROOF OF PURCHASE REQUIRED FOR WARRANTY SERVICE
eca/c-03
Issued: Oc-03
REFER TO ELECTRICAL RATING NAMEPLATE ON YOUR UNIT
FOR SPECIFIC ELECTRICAL RATING,
Made in China
Haier
What The World Comes Home To N
Haler America
New York, NY 10018
Printed in China
 Loading...