

Haier HWR06XC3, HWR05XC3 Owner’s Manual

m
What The World Comes Home To
Io_m Air (®_lilio_÷r
o
ClimatiSGtiOHde ?i@÷
CommandeEJectronique
Ac®_@i®_@rle Aire
COOL FAN
0010546378
Read ;ns_uc_;ons before installng.
Call 1-877-337-3639 for questions on parts and _ervices
Life les instruction_ avant de procter _ Pins_a!latian.
Pour tortes queshbnsconcemant les pi_ceset I'en_retien,camposez te t-877-337-3639.
Lealos tnstrucdones ante5 de ins_alar elapara_
tl_menos al 1-877-337-3639 sl tlene pregun_s sobre repues_os o servicio_

Thank You Forbuying a dependable, energy saving and easy to operate
HAJERroom air conditioner This manuaJcontains useful information for
you to maintain, operate, install and safely useyour room air condifianer_
Your air conditioner deans, coals and dehumidifies the air in your room to
provide you with the ultimate bvel of comfort.
Pleaseread instructions carefully before using the producL Also, do not
forget to fiHout and mail the Product Registration Card.
Record Your ModeUand SeHaUNumber°
For all your service calls during the warranty period the bHowing
information will be needed. Affach the sales receipt to this guide and keep
for future reference. This information can be obtained from the serial pJate,
which is on your air conditioner: Thisis either on the cabinet (side or back)
or you may have to remove the front grille to Jocateit.

1) Air conditioner mustbeconnectedto proper electrical outlet with the
correct electrical supply. (see tabJe)
_. 2) Proper grounding mustbe ensuredto reducethe risk of shockand fire.
DO NOT CUTOR REMOVETHEGROUNDING PRONG. If you do
not have a three-prong electricreceptacleoutlet in thewall, have a certified
electrician install the proper receptacle. Thewall receptacleMUSTbe
properly grounded.
3) Do not use if power cord isfrayed or otherwise damaged. Also avoid
using it if there are cracks or abrasion damage along the length, plug or
connector.
4) DO NOT USEAN ADAPTEROR AN EXTENSIONCORD.
5) When installing your air conditioner in a window, make surethewindow
is strong enough to hold the weight of the air conditioner. Youalso want to
secureand correctly install your air conditioner properly to prevent it from
falling. Extra brackets and or support may be required depending
on your window.
6) Do not block airflow inside or outside the air conditioner with blinds,
drapes, protective covers,shrubs or bushes.
7) Becareful of sharp edges on thefront and rear finsof the unit that could
cut and cause seriousinjury.
8) Becareful when lifting the air conditioner to install or removethe unit.
Always usetwo or more peoplefor this.
9) Always unplug the air conditioner before servicing it or moving it.

PAGE
A Word From Haler 1
P_duct Registration 1
Safely/Precautions 2
Warnings 4
ElectricaJSafely/ 4
Tips 5
Energy Saving Guide 5
FeQtures 6- 7
@peratlng Gulde 8-13
Normal Operating Sounds 8
Operating instructions 8-13
JnstaJJatians 14-18
Parts 15
Tools 1g
Installing Unit into A Window 1(3-18
Clean and Care Guide 19-20
TroubUeshaoting 20- 21
Warran_ Jnfarmatian 22
3
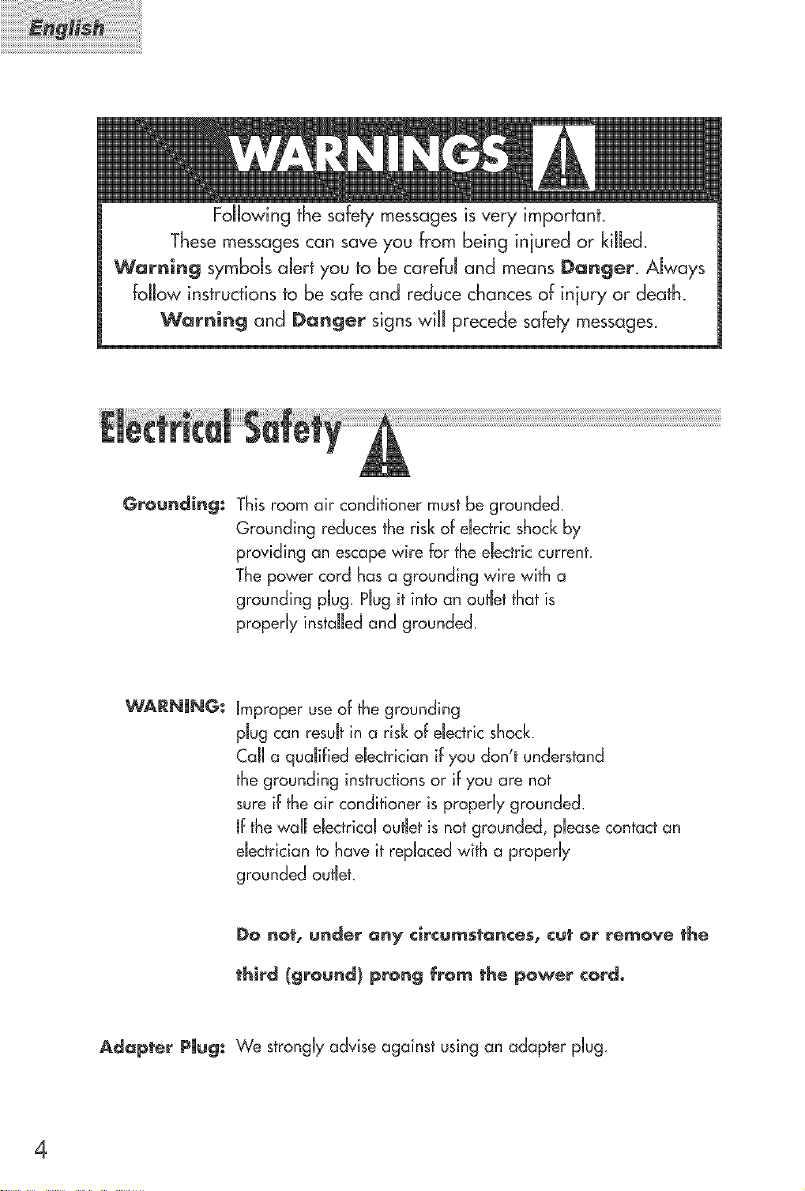
Following the safety messagesis very important.
Thesemessagescan save you from being iniured or killed.
Warning symbols alert you to be carefd and means Danger. Always
follow instructions to be safe and reduce chances of iniury or death.
Warning and Danger signswill precede safety messages.
Grounding: This room air conditioner must be grounded.
Grounding reduces the risk of enectricshock by
providing an escape wire for the eJectriccurrent,
The power cord has a grounding wire with a
grounding pJug PJugit into an outJetthat is
propernyinstaJJedand grounded.
WARNHNG: Improperuseof the grounding
pJugcan resuJtin a risk of dectric shock.
CaJJa qualified eJectrician if you don't understand
the grounding instructions or ifyou are not
sureif theair conditioner is properly grounded.
ifthe waJJdectrid outJetis not grounded, please contact an
eJectridan to have it repJacedwith a properly
grounded outJet.
DO nOtr Under Qny ¢_rcu_$t_n¢esr CUt or re_ove t_e
thlrd (gr@und) prong from the power cord.
Adapter PUug: We strongly advise against using an adapter plug,
4

o This Air Conditioner isdesigned for use in a douUe hung window.
Whine installing unit be sureto flit air conditioner _/4 inch oubvard to
havethe water drip outside the house,
s_k '_mnstalJthe unit on the north side as normally that is the shaded side. This
will enhance the operation of your unit.
Window has to be strong for installation. Extra brackets and or support
may be required depending on your window.
Measure the window before installing, if the window is too big for the
unit you may require professional installation,
s_k _ Usecorrect eJectricvoltage and proper ampere for the unit to run
effectively
_ Only Jeta certified eJectrician do any modifications to your eJectrical
outJet,
When installing your air conditioner make sure to seal aHareas where
there is a possibiJih/of air Jeakage.
Airflow should not be bbcked inside either by curtains, drapes or
furniture or outside by shrubs or bushes
Do not needJessJyuse an dectricd Jightor other appliances that
produce heat
Keep the vent dosed on the air conditioner when in the cooling function,
Keep the blinds and the drapes drawn on aJlthe other windows.
o While cooking usean exhaust fan in the kitchen to remove the excess
heat produced.
Always usethe correct BTUsizeair conditioner to cool the room to
attain optimum efficiency.
5
iii[iiiiiiiii
iii[iiiiiiiii
iii[iiiiiiiii
iii[iiiiiiiii
iiiiiiiiiiiii
iiiiiiiiiiiii
/
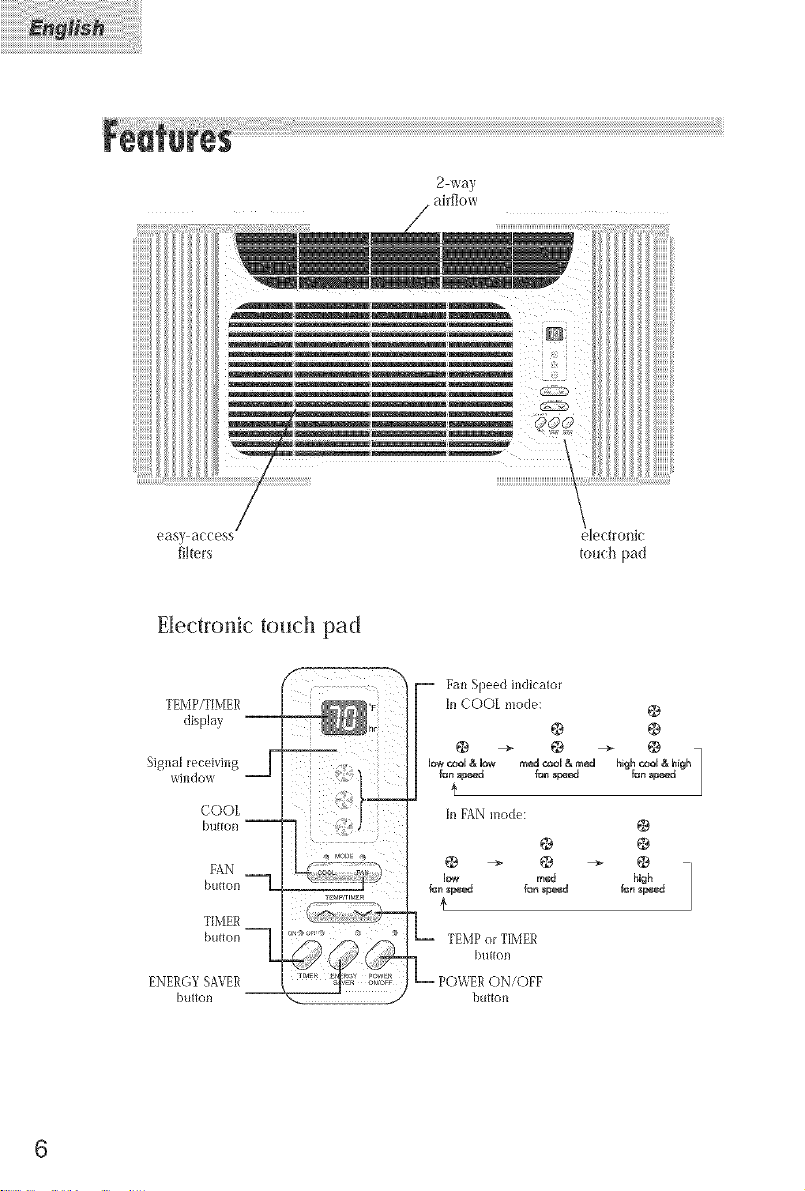
easy access
filters
Electronic touch pad
TEMP/T[MER
displa}
Signal receiving j
window
COOL
button --
FAN
button
TIMER
button
ENERGY SAVER
btdton
@ ÷ @ .--
low m_
@r_a_ _n sp_d
€,
L TEMPor TIMER
button
-- POWERON/OFF
button
@
electro_ic
touch pad
f_n a_d
@
@
@
high
6
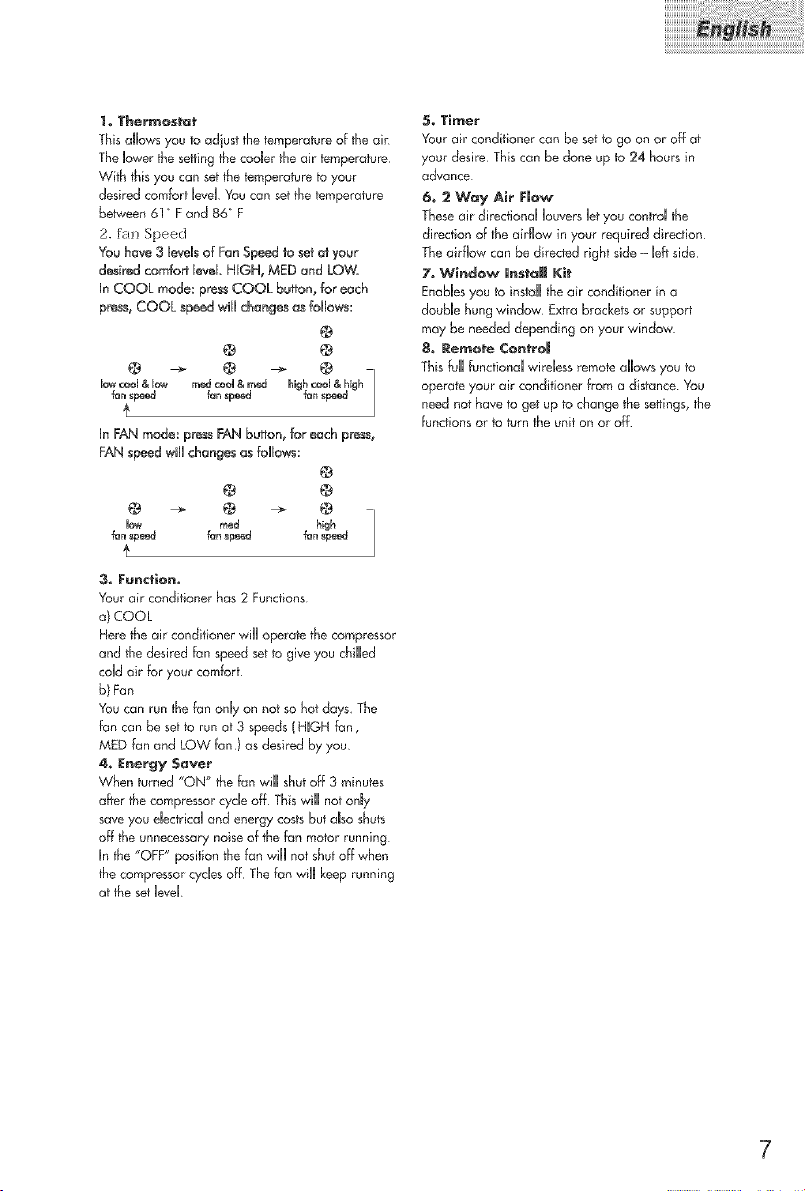
t oThermostat
This amlowsyou to adiust the temperature of the air
The lower the setting the cooler the air temperature
w_th this you can set the temperature to your
desired comfort level You can set _e temperature
between 61 _F and 86" F
2. fall Speed
You hove 3 lards of Fen Speed to set e_your
d_fr_d comfort level. HIGH, MED and LOW.
In COOL mode: press COOL buffon, for each
press, COOL speed will changes as f_llows:
@
@ ÷ @ ÷ @
@ @
_n sp_ fanspeed
lowcod & low r_edceoU& mad f_n s_ed
In FAN mode: press FAN button, br each press,
FAN speed will changes as follows:
@ _ @ -'* @
l¢_v mad high
_n _p_ _n _peed _n _pe_
,3. Fund'ion.
Your air conditioner has 2 Functions
a) COOL
Here the air conditioner will operate the compressor
and the desired fan speed set to give you chilled
cold air for your comfort
b} Fen
You can run the fan only on not so hot days. The
fen con be set to run at 3 speeds (HUGH fan,
MED fan end LOW fen ) as desired by you
4, Energy Saver
When turned "ON" the fan will shut off 3 minutes
after the compressor cycle off This will not onJy
save you electrical and energy costs but aRsoshuts
off the unnecessary noise of the fan motor running
In the "OFF" position the fen will not shut off when
the compressor cycles off The fan wilJ keep running
at the set level
@ @
highcool&high
@
5. Ti_er
Your air conditioner con be set to go on or off at
your desire This can be done up to 24 hours in
advance
6, 2 Wc_y Air FJ_w
These air directional louvers let you control the
direction of the airflow in your required direction
The airflow can be directed right side - left side
7. Window mnstaJ| Kit
Enables you to install the air conditioner in a
double hung window Extra brackets or support
may be needed depending on your window
8_ Re_@te ¢@n_ro|
This full functional wireless remote allows you to
operate your air conditioner from a distance You
need not have to get up to change the settings, the
functions or to turn the unit on or off

ll@r l @!e " tlHg 5@ Hds
The folowing sounds are normally heard during the operation of an air conditioner.
®Cool airflow movementas didated by theset fan spee&
Water sounds. This is normal as your air conditioner acts as a
dehumidifier aJso.Thus you wil hear water sounds from water drops
faling on the condenser
oAs the refrigerant tows through the inner seaJedtubing a rushing noise
may be heard.
Raffling or vibrating noises may be heard due to poor wal
or window instalafion.
High pitch compressor sound may be heard.
@pe ethsg Ins tru¢lieHs
Folowing are the operating instructions of your electronic air conditioner.
After instaling your air conditioner pJug it in to the proper dedricaJ outJet
in the wal Keepthe vent in the closed position. Now set the air
conditioner at your comfort bye[ This ful functional wireJessremote alows
you to operate your air conditioner without having to get up and go to the
unit. The ful function feature alows you to change thesettings and turn the
unit on or off from the remote itseJf.This controJpad works thesame as
the control pad on the air conditioner.
(See Fig # ])
Fig. # 1
Remote ¢@ntr@J
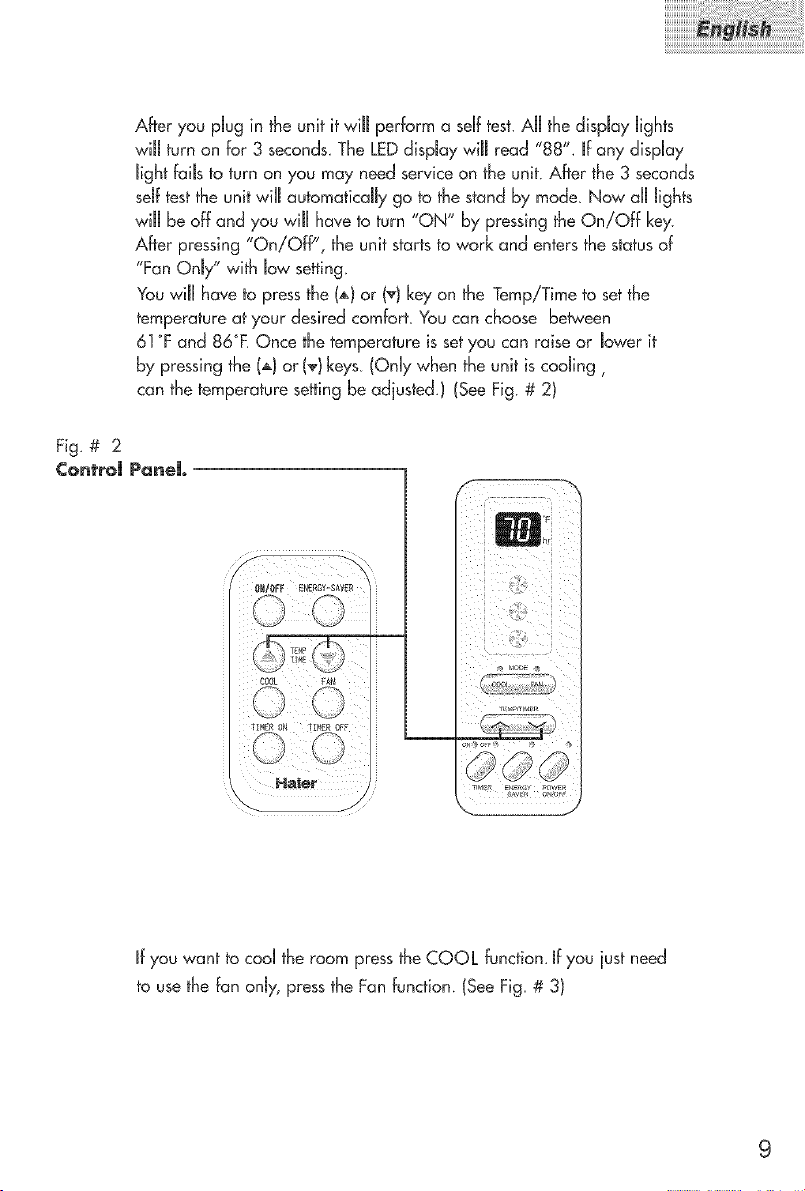
After you pJug in the unit itwill perbrm a senttest. All the display Jights
will turn on for 3 seconds The LEDdisplay will read "88". If any dispnay
Jight fails to turn on you may need service on the unit. After the 3 seconds
seJftest the unit winJautomatically go to the stand by mode. Now aUJJights
will be off and you wiJnhave to turn "ON" by pressing the On/Off key
After pressing "On/Oft/', the unit starts to work and enters the status of
"Fan OnJy" with low setting.
You wiJnhave to press the (,_)or (_) key on the TempiTime to set the
temperature at your desired comfort. You can choose between
61°F and 86°F. Once the temperature is set you can raise or Jower it
by pressing the (,_)or (T)keys (Only when the unit is cooJing,
can the temperature setting be adjusted.) (See Fig. # 2)
Fig. # 2
¢ontroU PameU.
ff you want to cool the room press the COOL function. If you just need
to use the fan onJy, press the Fan function. (See Fig.# 3)

Fig.#3
¢on_roJ Panel
Once the function mode is decided you wdl hove to set the fan speed. If
you choose the COOL mode you con run the Fan in one of fhe 3 speeds
HmGH,MED and LOW. (See Fig. # 4)
Fig, # 4
¢ontroj Panel _
low cod & low
fan speed
@
@
reed cool & rned
fan speed
10
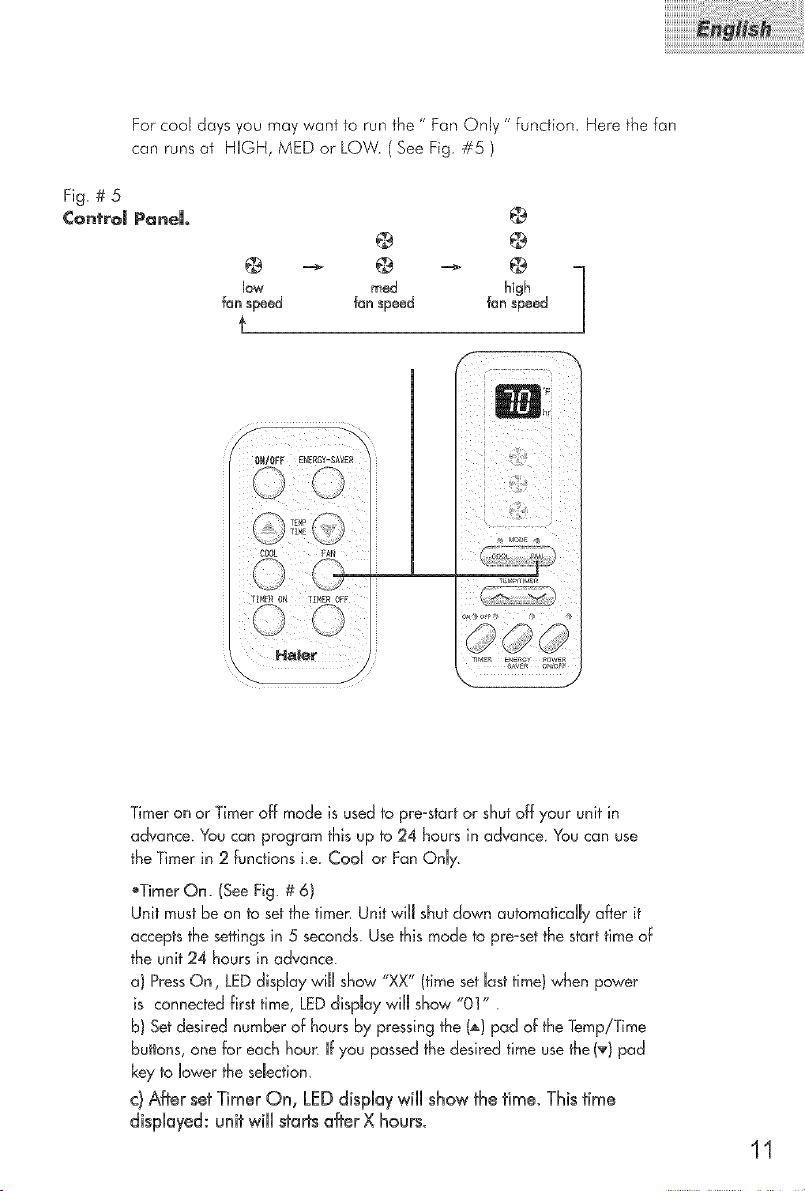
For cool days you may want to run the " Fan Only " funcfion_ Here the fan
can runsat HGH, MED or LOW. ( See Fig. #5 )
Fig. # 5
Control Panel
@
@ @
low rned high
Timeron or Timeroff mode is used to pre_startor shutoff your unit in
advance.You can program this up to 24 hoursin advance. Youcan use
the Timer in 2 functions ke Cod or FanOnly.
_TimerOn. (SeeFig.# 6)
Unit mustbe on to setthe timer: Unit wiUJshutdown automaticdJyafter it
acceptsthe settingsin 5 seconds.Usethismode to presserthestart time of
the unit 24 hours in advance.
a) PressOn, LEDdlsplay wiJUshow"XX" (timeset Uasttime)when power
is connectedfirst time, LEDdispJaywilJ show "01" .
b) Setdesired number of hours by pressingthe (A) pad of theTemp/Time
buttons,one for eachhoun Ifyou passedthe desired time usethe(_r)pad
key to lower the seJection.
c} After set Timer On, LED display will show the time° This time
displayed: unit will starts after X hours.
11
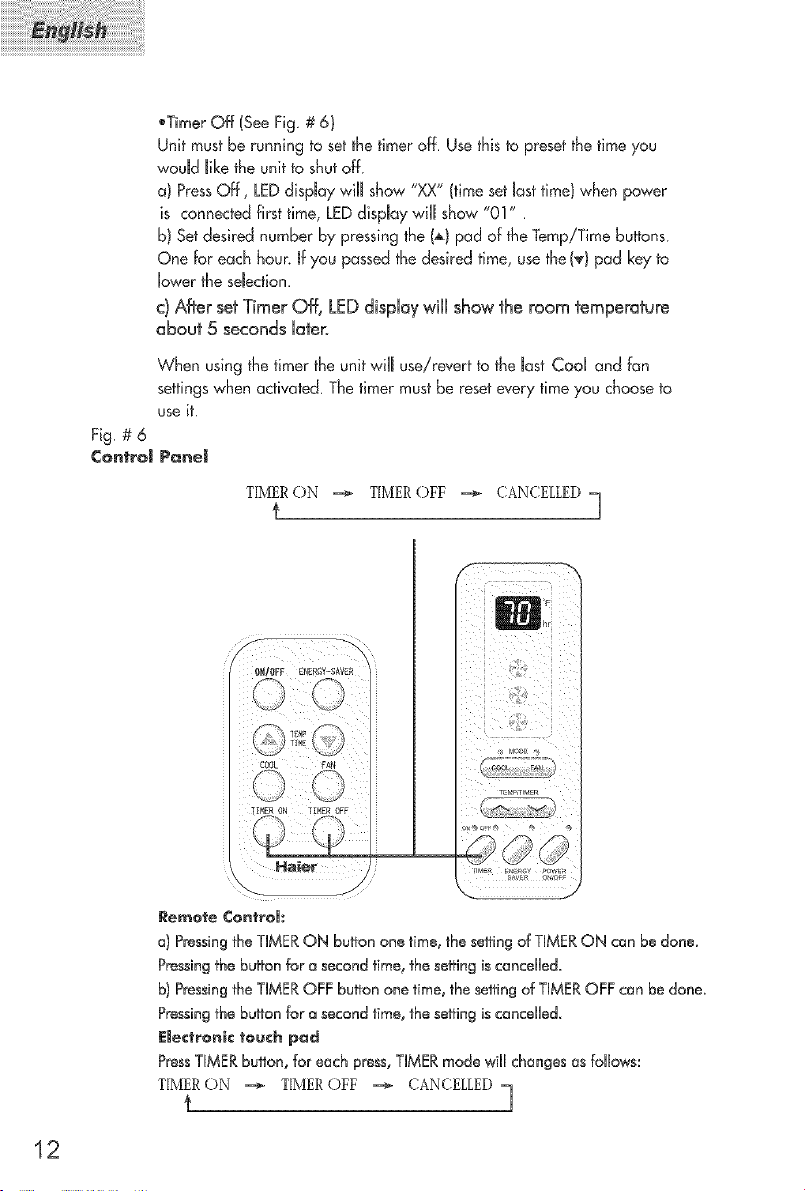
Fig. # 6
¢ontro_
_TimerOff (See Fig.# 6}
Unit must be running to setthe timer off. Usethis to presetthe time you
would like the unit to shutoff
a) PressOff, LEDdisplaywiHIshow "XX" (time setlost time)when power
is connectedfirst time, LEDdispJaywiHIshow "01" .
b) Setdesired number by pressingthe (A)pad oFtheTemp!Time buttons
One Foreach hour.mfyou passedthe desired time, usethe(_) pad key to
lower the seJecflon.
c) After set Timer Off, LED dispHaywiHHshow the room temperature
about 5 seconds Ha_er_
When using the timer the unit wiHIuse!revert to the last Cod and fan
settings when activated. The timer must be reset every time you choose to
use it.
P_ne_
T[M[ERON -=_ TIMEROFF -=_ CANCELLED
12
Re_o_e Con_rom:
a) Pressing the TIMER ON buffon one time, the seffing of TIMER ON can be done.
Pressingthe buffon for e second time, the seffing is cancdHed.
b) Pressing the TIMEROFF buffon one time, the seffing of TIMER OFF can be done.
Pressingthe burton for e second time, the se_ing is cancelled.
E|ectrgnlc _ogch pad
PressTIMERbunion, for each press, THMERmode will changes as foHIows:
T[M[ERON -=_ T[M[ER()FF -=_ (ANCELLED
t ]
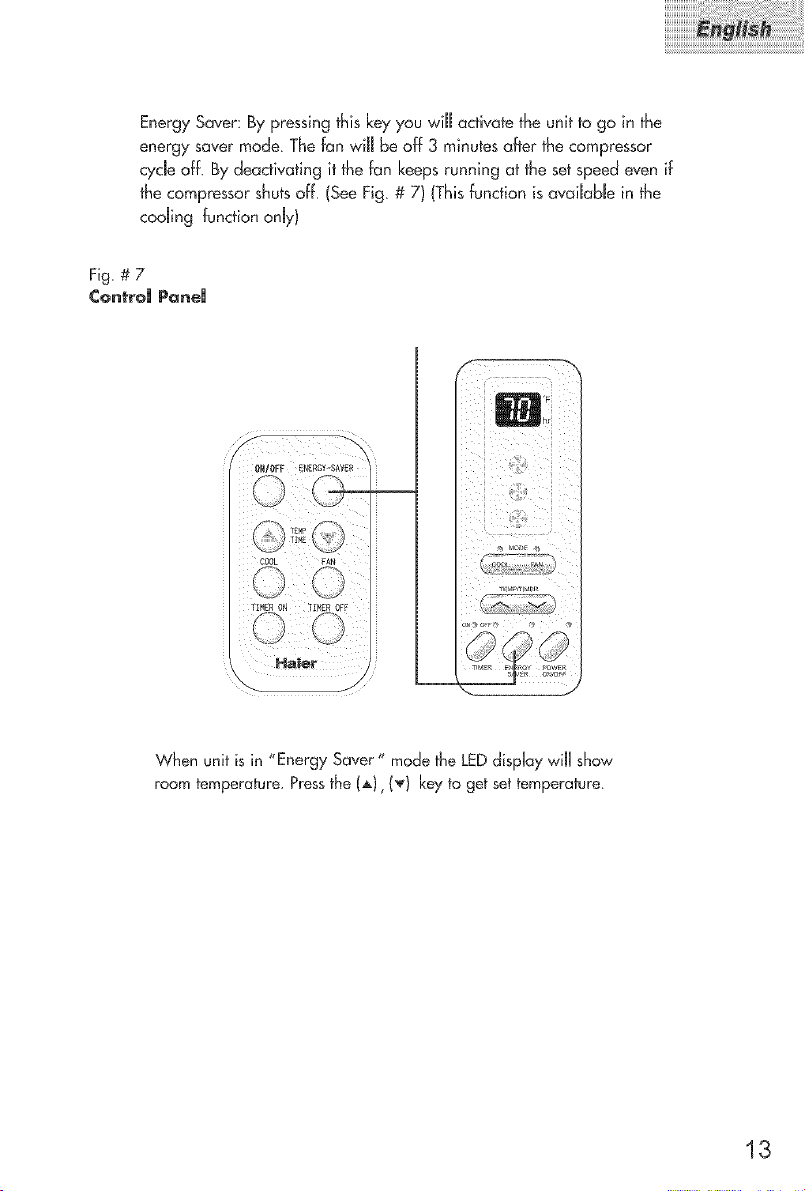
EnergySaver: By pressing this keyyou will activate the unit to go in the
energy saver mode. The fan will be off 3 minutes after the compressor
cycle off By deactivating it the fan keepsrunning at the set speedeven if
the compressor shutsoff. (SeeFig # 7) (Thisfunction isavaiJabJein the
coding function only)
Fig. # 7
¢ontroJ PaneJ
i
When unit is in "Energy Saver" mode the LEDdisplay wiJl show
room temperature, Pressthe (A), (_) keyto get set temperature.
13

Beforeyou install your air conditioner check the fdbwing:
1) The unit is free of aHobstructions inside and outside the room e.g. drapes,
curtains, furniture, plants, shrubs, bushes,trees, other structureslike building,
garage etc.Air conditioner must have dear unobstructed airflow through the
condenser to removethe heat
2) The window is strong enough to hold the weight of the air condifionen
Extra brackets or supports may be needed depending on your windows
3) The window siJland track are strong enough to hoJdthe weight of the
air conditioner.
4) The wdJ is strong enough to hdd the unit Extra brackets or supports may be
needed depending on the wall
5) There is adequate and proper power suppJynear the air conditioner.
_j_6) DO NOT use adapter pJugs.
_j_7) DO NOT use extension cords_
_.8) DO NOT cut or remove the ground prong.
_j_ 9) DO NOT modify the pJug or the eJectricdwdJ outbt in any way_
mfpJugdoes not fit thedectricd outJethave a certified eJectriciando the
necessarychange.
_10) DO NOT connect eJectricd power to the unit before installation
_11 ) DO NOT use if power cord is worn out, frayed or otherwise damaged.
Avoid using if there are cracks or abrasion damage dang the bngth,
pJugor connection.
14

Parts SuppUied
short scre_s 13/32"
basepan angle
wood sclews 31/32"
window sea[ gasket
"_'_z_. Remote side curt ....
r,_
top rail
"CR2025" bat ery lef_ and right
control
You will need to have the following rods to hdp you in the installation of
your air conditioner_
_Sdssors
•PhiHipsScrewdriver
_Standard Screwdriver
®Pliers
_Wrench
oDrill and Drill Bits
•TapeMeasure
oGIoves
®Level
_Sockets
15
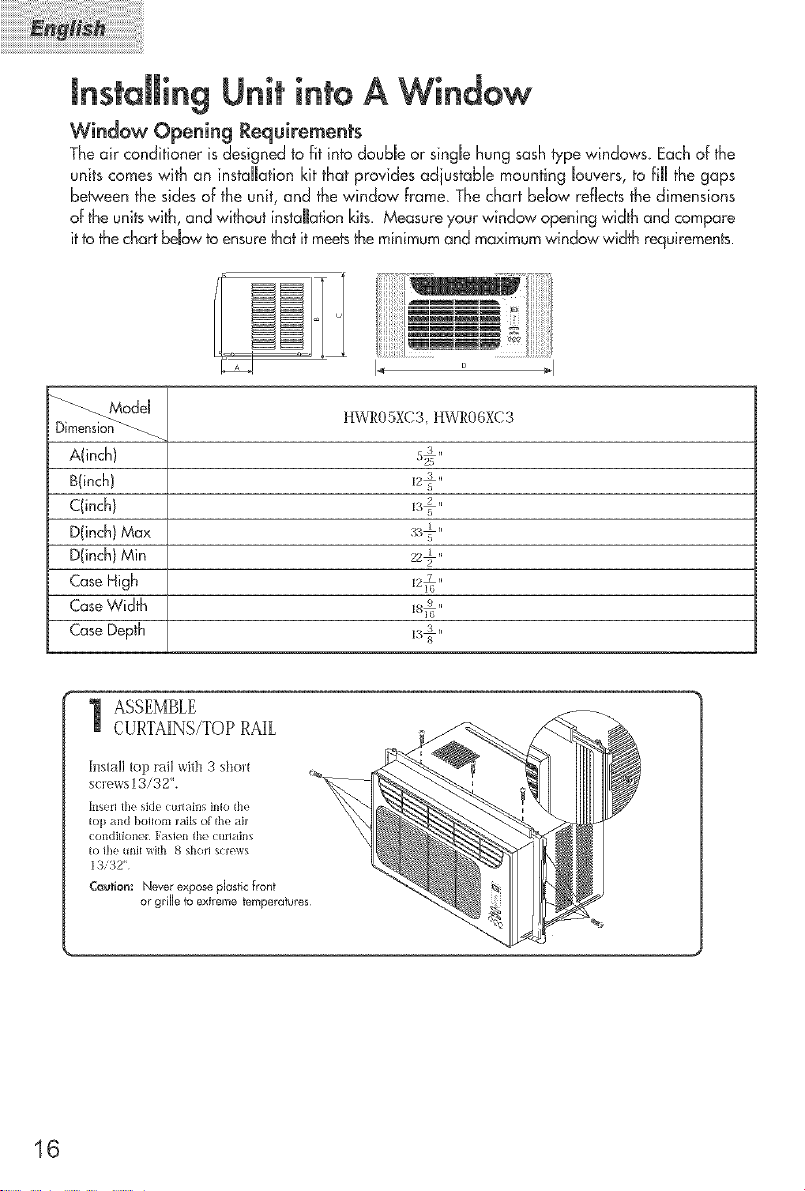
nstdJing Unit intoA Window
Window Opening Requirements
Theair conditioner is designed to fit into double or single hung sashtypewindows Eachof the
units comeswith an installation kitthat providesadjustabb mounting louvers, to filUthe gaps
between the sidesof the unit, and the window Frame,Thechart below reflectsthe dimensions
of theunitswith, and without installation kits. Measureyour window opening width and compare
itto thechartbebw to ensurethatit meetsthe minimumand maximumwindowwidth requirements.
1"4 D _1
HWR05XC3,HWROGXC,3
Afinch)
B(inch)
C(inch}
Dfinch)Max
D(inch)Min
CaseHigh
Casewidth
CaseDepth
16
ASSEMBLE
CURTAINS/TOPRAIL
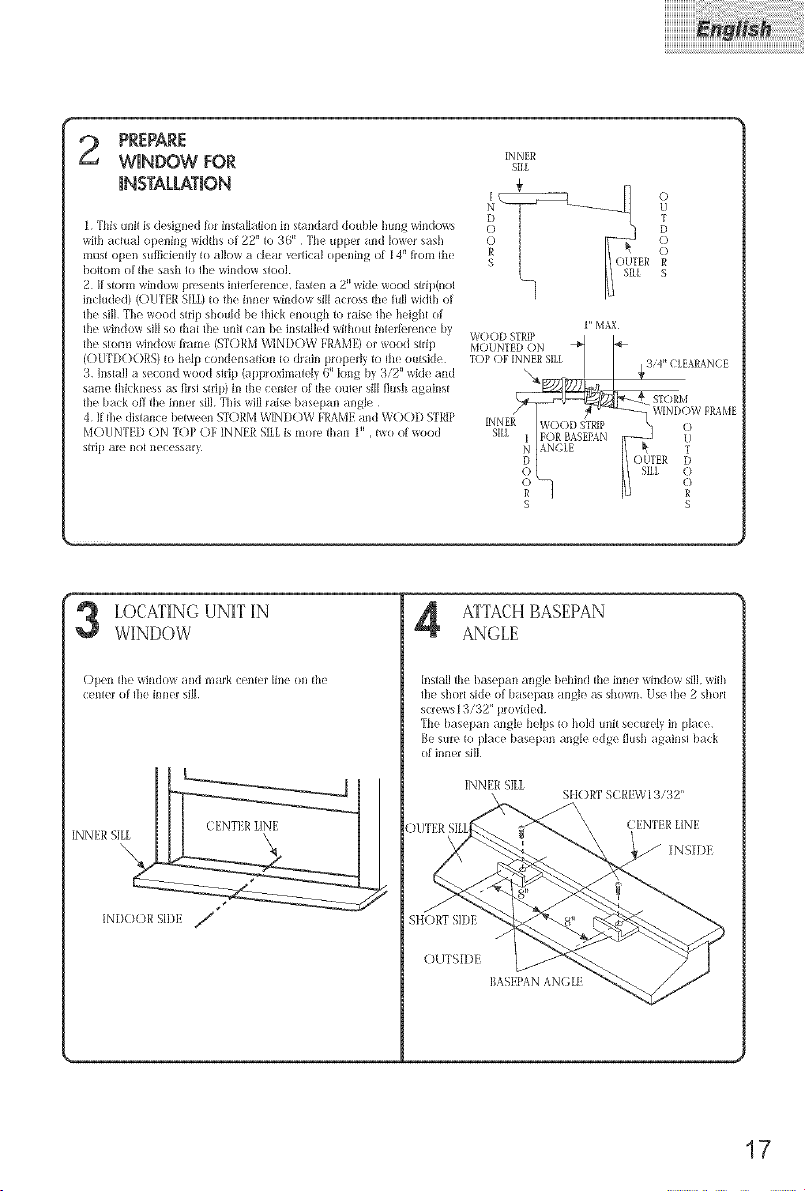
PREPARE
WINDOW FOR
iNSTALLATiON
I This Imi_ is design_ d _r inslal[alkm ill slandaM double hun_._x_indo_a
_h actual opening _dt[ls of 22" Io 30" • The upper and lower sash
m_ls[ opell stll_cien_[y [(i allow a (?[ea__!rl]c_t] (ip_ll[n 2 (if 1'4.1from [lie
bofl(ll_l of [lie s_t_[l kl IlK! w]nd(iw sRio]
2 If slorm window presents i_l_erlemnce, _s_en a 2" wide wood strill01ol
i_lcluded) (()lITER SIK) _o lhe inner _ndow sill across I[le l_l[l wklfil of
file sill¸ The wood s_rip shoukt be Ihick enot@l _o raise file hei2[ll of
lhe window _,ill_,(i IhaI file unil can be insiaHed _Ihou_ i!lle_!r_mce by
file smnn window flame (ST©RM WINDOW FRAME) or wood strip
(()L3T])()()RS) I(_help condensalion _(_dlain properly l(_ I[le outskle
3 hlslall a second wood s_rip (a[l_lr(_xiI_la_e[y 6" lon 2 by 3/2" _de and
same fl_ickness as firs_ s_rip) ill Ihe cen_er of I[le ot_lel ¸sill flush againsl
file back oil file inner sill¸ This will raise basepan allgle •
4 If Ihe distance I/e_en STORM WINDOW H_AME and WO()D ST_P
M()_JNTED ON TOP OF INNER SILLis more fllan 1" . _o of wood
s[rip ar_ i1o[ necessary
INNER
SIIt
WORK) STRIP
S S
P'MAX
o
u
T
D
O
O
R
S
LOCATINGUNITIN
WINDOW
()jKn ilk willdo_ alld mtFk c_ ll{er lill( Oll {h(
(:_!nK!r (if I]le ii111(!1' si[]
INNER%ILL
ATTACHBASEPAN
ANGLE
lnsiMl file basep m angle behind file ironer x_indow sill. _dfll
file shor_ side of basepan angle as s[lown Use file 2 shorl
screwsl 3/32" prodded
The basepan aligle helps _o hold unit securely in place¸
l_e sure l(_ place basepan angle edge flush agains_ back
of inner sill¸
INNERSILl_
S[tORT SCREVvq 3/32'
CENTER LINE
[NS[DI
SHORT SI])E
()UTS[I)II
BASEPANANGLE
17

_5 INSTALLTHEAIRCONDITIONER
IN THEWINDOW
Carefully lill file air / ondi{ionei uld slide i{ il_lo the opell
window¸ M_tk_ 5tlr_ IJl(!bo_lom _llide (if _he ai_ c(lildi_ioller
drops [I1{(¸1I]1_ _(llches of Ih_ b_tsel)a_l a11_[e
While s_ea@ing _he air clmditioner carehllly bring _he
_ndow sash down be[lind the upper guide of Ihe air
condil_onel
INSTALLTHESEALCASKET
ANDSASHLOCK
Exlend the sid{ curlai_ls I(} fill die
31/32 _'_o secure Ihem
Cu_ _he seal gaskel Io Ihe wi_ldow
mdlh SItiff die sash seal belween the
glass a_d lhe window Io p_ew_n_ air
all(] [IIS_CIS[Iota _{_!llill_]II[(i [he _l_ll
Fallen Ihe basepan angle, using a
shorl screw 13/32",
BASEPAN :\N(;LI!
S| [()RT SCRE\_ 13/32"
ABOUT l,'M _'
_INI)()W SEAl_(;ASKET
18
TABAIRFILTER
] r
@
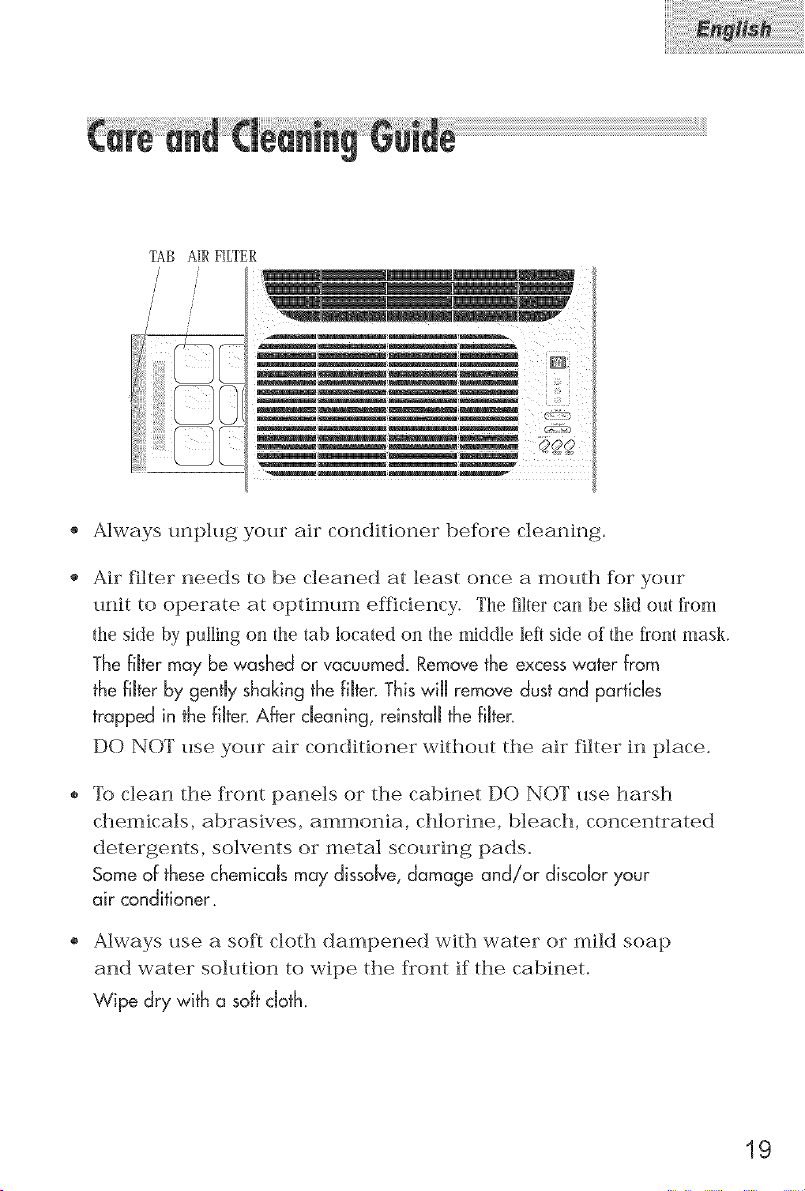
Always unplug your air conditioner befk)re cleaning,
@
Air filter needs to be cleaned at least once a mouth fi.)r your
unit to operate at optimum efficiency. The filter can be slid out from
the side by pulling on the tab located on the middle left side of the lmnl mask.
The filter may be washed or vacuumed. Remove the excess water [rom
the fiJter by gentJy shaking the fiJter. This wiJ[ remove dust and particles
trapped in the filter. After cleaning, reinstall the filter.
DO NOT use yore" air conditioner without the air filter in place.
To clean the fl'ont panels or the cabinet DO NOT use harsh
chemicals, abrasives, ammonia, chlorine, bleach, concentrated
detergents, solvents or metal scouring pads.
Someo[ thesechemicals may dissolve, damage and!or discolor your
air conditioner.
Always use a soft cloth dampened with water or mild soap
and water solution to wipe the fl'ont if the cabinet.
Wipe dry with a soft cloth.
19

Tostore your air conditioner, after the season, remove the unit from the
window as per the instdJation guide. Repack the unit in itsoriginal box
and store away. if your unit is instdJed in a wahlor you do not intend to
remove it from the window then cover the outside with a winter cover,
This can be purchased from the retaiJerwhere you purchased your
air conditioner or from your JocaJhardware store.
Before putting away your unit make sure any water Jeffin the pan is
removed and drained away. Water Heftin the pan couHdHeadto Rusting
or damage to the dectricd connections.
Hfa_r conditioner does not operate:
Check if unit is pJuggedin. The pHugmay have come Hoose.
Check if the unit is in "Off" mode.
Air fro_ air conditioner is warm:
TheA/C setting may need to be raised
Joe formation @n co@UingcolJs:
o Outside temperature too coJd.Set the unit on fan only
setting to defrost ice.
bwer temperature setting. Temperature setting may be too cold.
Unit BTUmay be too high for the room.
20
 Loading...