

Page 1
Washing Machine
USE & CARE GUIDE
Page 2

TABLE OF CONTENTS
PAGE
IMPORTANT SAFETY INSTRUCTIONS.............2, 3
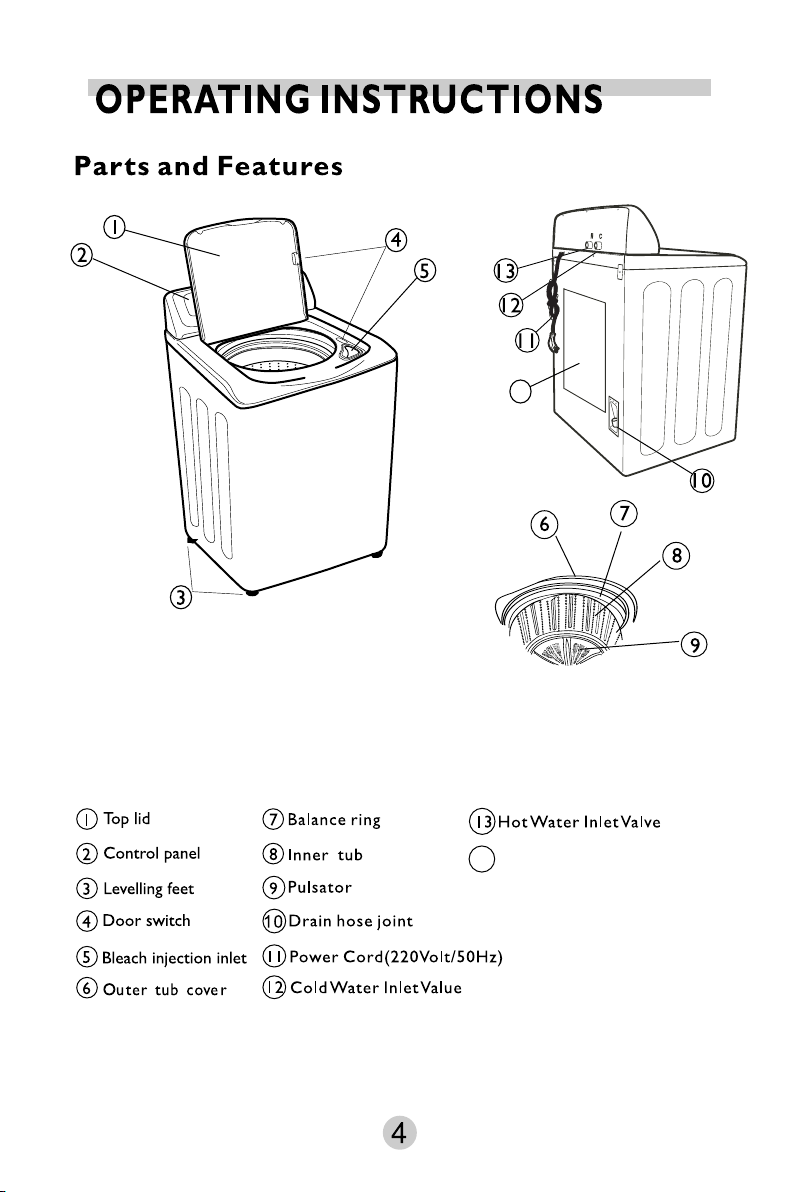
OPERATING INSTR
Parts and Features...........................................................................4
Operat ing instructions....................................................................5
CARE AND CLEANING GUIDE.......................................7
Cleani ng and Maintenance ..............................................................7
Moving & Vacationing .......................................... .. .. ... ........8
TROUBL E SHOOTING..................... ............................. 8
INSTALLATION INSTRUCTIONS.................... ..... ..... ....10
Tools and Materials Required.........................................................10
Unpacking Your Washer..................................................................11
Levelling Your Washer.....................................................................11
Steps for Installation......................................................................12
ELECTRICAL REQUIREMENTS.................................... 14
Power Interruptions.......................................................................14
SPECIFICATION S............................................Back Cover
UCTIONS................ ......... ...........4
1
Page 3

Page 4
Page 5
14
14
Access Panel
Page 6

Page 7

Temp: Hot/Cold; Program Select: Normal; Load Size:Super;
Soli Level: Normal
Energy Label Program
Page 8

Note: Please only use a low-sudsing or high-efficiency type detergent.
Bleach use and dispenser :
*
Bleaching of clothes can help remove stain s, heavy soiling and kill
bacteria.
*
Bleach should not be used o n silk, wool, rayo n or drip dry clothes.
*
Bleach dispenser is located o n the front corner under the lid.
*
Fill the dispenser with the manufacturer's rec ommended dosage
during the first water fill.
*
Be careful not to spill un dilu ted bleach onto the washer cabinet or
your clothes.
Note: Use only liquid bleach in dispenser.
CARE AND CLEANING GUIDE
Warning: A lways unplug you r washer to avoid electric shock before
cleaning. Ignorin g this w arning may result in injury. Before using cleaning
products , always read and foll ow manufacturer warnings to avoid
personal Injury or product damage.
Cleaning and Maintenance
* Use only a damp or sudsy cloth for cleaning the control pane l.
* To avoid any ki nd of damage to cabinet finish, wipe washer cabinet as
needed. If you spill liquid/powdered softener bleach or detergent on the
cabinet, wipe cabinet imm ediately .
* Do not use any abrasive , harsh chemicals, ammonia, chlorine bleach,
concentrated detergent, solvents or metal scouring pad s. These
chemicals may disso lve , damage and/or discolor your washer.
* Leave lid open after washing to al low inside of washer to d r y and assist
in preventing unwelcomed ba d odours.
7
Page 9

Moving & Vacationing
* Turn off water supply at the faucet and disconnect hoses. Drai n wate r
from all hos es.
* Disconnect electrical plu g.
* Dr y i nner w ash tub. If moving washer disconnect dra in hose .
* Turn the leveling legs clockwise all the way in.
* Move and store your washer in upright posit ion only.
* To prevent mol d or mil dew, leave lid open so moisture inside mach ine
can evapor ate.
* Insert transporting bolts if you are relocating the washer. Ensure
removal prior to usage .
TROUBLE SHOOTING
If washer does not operate:
* Check the unit is plugged in. The plug may have come loose.
* Check if the electrical wall receptacle is of proper voltag e .
* Check if the circuit breaker ne eds to be reset or if the fuse needs
replacing.
* Check if the washer is overloaded :load may n eed to be re-arrange d or
redistributed evenly.
* Check if the lid is open. You may have to close the lid properly.
* Th e washer pauses in some cycles. This is normal in delicate or handwash cycles which has shor t peri od of time. You will not hear washer
operation for a short period of time. When the soak time is over, it will
start automatically.
Problems with water :
* Not enough water coming o ut: Water fauce t may need to be
completely turned on. Hoses may be tangled or kinke d. Straighten out
hoses. Che ck water level selection, it may n eed to be readjusted.
8
Page 10

* Water temperature is incorrect: Check your water heater
temperature. Hot wa ter ne eds to be at a temperature of at least 120 F-
° ° °
140 F(49 C-60 C).Check to make sure the inlet hoses a re properly
connected (E.g. Hot t o hot & cold to cold).
* Water leaks: This m ay be due to incorrectiy installed drain hose or fill
hoses. Your home dra in may be clogged . You may need to ti ghten hoses,
check the plumbing or call a plum ber for assistance.
* Water will not drain: This may be due to not instal ling your drain hose
correctly. Check the position of the drain hose . In order to drain
properly, m ake sure that top of dr ain outlet is less than 5 ft. (1.5 m)
above the floor.
°
Washer is making noise:
* Washer may need to be reinstalled ( Check washer installation
section).
* Washer load may need to be re-balan ced, as the load may be uneven.
* Coins, loo se change, buttons or other heavy objects could cre ate
noise related sounds .
* Squealing sound: Due to overlo aded wash tub.
* Vibration Noise: may be caused by no t leveli ng washer properly on the
floor or uneven distribution of c loth es in the tub.
Normal Operating Sounds
* Th e following sounds are normally heard during the
operation of the washer:
* Tumbling sounds: This is normal as the heavy wet clothe s in
the washer are continuously being lossed around.
* Air rushing noise: This happens when the washer tub spins at
very high speeds.
* Wash and Rinse cycles going on and off will also make clicking
sounds.
9
Page 11

Problems with clothes:
*
Clothes become excessive ly creased: this is due to improper sorting,
overloading or washing in excessively hot water repeatedly. Avoid
overloading and resort your load. Wash in cooler wate r.
*
Soap residue: detergent may not b e dissolved in water.
*
Check water temperature, add detergent as wash t ub is being filled
with water. Reduce detergent dosage or pre-disso lve detergent befo re
adding to wash.
*
Spots or stains on your cl othes: this is due to incorrect use of fabric
softener. Refer to manufacturers instructio ns on the container and
follow directions .
*
Clothes are grayed or yellowed : this may be due to not using
sufficient detergent for large loads. Add more de tergent to the load.
*
Clothes are ripped & have h oles/excessive wear & tear: this may be
due to sharp objects left i n washing. Remove all small loose sharp
objects, fasten bel ts, zippers, metal snaps etc . Check if you are using
undiluted bleach. N ever add undiluted bleach to wa sh.
LED Display Notes:
Trouble Codes
Rinse and sp in i nd ic at or s fl ash
All pro ce ss indicators f la sh
All wate r level i ndicators fla sh
“Mediu m” a nd “Sm al l” l oad size
(water l eve l) i ndicators fla sh
“Super ” an d “Lar ge ”lo ad size
(water l eve l) i ndicators fla sh
Beeps
Unit does no t dr ai n, or th e speed of draining i s to o sl ow.
The washer i s ou t of b al an ce . Ple as e op en t he l id
and reb alance the load .
The wate r in le t ti me e xc ee ds t he pre se t ti me.
Water over fl ow p rote ct io n.
The wate r level s ensor fault - Call se rvice .
Top lid n ot c lo se p rope rly.
Reas ons
INSTALLATION INSTRUCTIONS
Tools and Materials Required
You will need to have following tools to help you
with the installation of your washer:
Pliers, Wrench, Tape Measure, Gloves, Level
10
Page 12

Accessories Supplied
1.Hot & Cold inlet hoses
2.Drain Hose Hook
3.Pipe Clip/brace
4.Outer Drain Hose
1
2
Quantity
2
1
1
1
3
4
Unpacking Your Washer:
*
Remove all packing materials. This includes the foam base and all
adhesive tape holding the washer accessories in side and outside .
*
Open the top lid to remove the drum brace. Pull to remove .
NOTE: Save drum brace. Reinstall when moving the washer.
*
Inspect and remove any remains of pa ckin g, tape or printed ma terials
before using the washer.
WARNING: To avoid danger of suffocation, keep plastic bag and other
packing material away from babies and children. Do not use this bag in
cribs,carriages and playpens. The plastic bag could block nose and m outh
and prevent breathing. This bag is not a toy.
Leveling Your Washer
*
Your washer h as 4 level ing legs; which are located on the four bottom
corners.
*
After prop erly placing your wa sher i n its final position, you can level
your washer.
*
Leveling legs can be adjusted by turning them counterclockwise to
raise your washer or tur ning t hem clockwise to lower your washer.
Adjustable foot
High Low
WARNING:L evelin g of washer is very important to prevent v ibration
during spin.
11
Page 13

Steps for Installation
• Select a suitable location for the washer on a hard even surface away
from dire ct sunlight or heat source e.g. r adiators, baseboard heaters,
cooking appliances etc. Any f loor unevenness should be corrected with
the leveling legs located on the bo ttom corners of the washer. The
washer must be placed at room tempe ratu re. You must not place
washer where the tempe ratu re is at below freezi ng.
For this machine having ventilation ope ning s in the base, make sure the
openings must not be obstructed by a carpet.
Installing Your Washer
Read installation instruc tions carefully before installation.
1. Do no t use water inlet hoses without a flat washer on each end. The
washer in the coupling has to be pl aced firmly. Flat water inlet hose
washers are preinst alled in each end of the water inlet hoses.
New hose-sets supplied with the appliance are to be used and tha t old
hose-sets should not be reused.
NOTE: You may have to use pliers to tighten the coupling.
Do not over tighten because you may ca use damage to the valve .
Cold wat er i nl et h os e
Hot wate r in le t ho se
2. Con nect t he hot and cold water inlet hoses to the hot and cold water
faucet.
12
Page 14

3. Ins tall t he drain hose to the back of the washer using the drain hos e
clamp provided. T he dra in hose must be placed in to a drain pipe or sink
at least 3.5cm in diameter. Use the goose neck to fix the hose in place.
To avoid possible flush back of water, the drain hose must be fixed a t a
minimum height of 1000mm and a maximum height of 1500mm.
Water Inlet
Goose Neck
Water Supply Hose
Hose Bend
Drain Hose
4.Plug the wash er into a regu lar 220-24 0Volt/ 50Hz,10Amp outl et.
Note :Car efu lly insp ect ar ound the mac h ine for an y leak s, and ti ghten an y
loose connecti ons.
Caution: If, afte r completing these steps, you are unsure that
unit is properly installe d, contact a qualified installer.
To ensu re that your washer is properly installed, it is
recommended th at it be installed by a cer tified installer.
13
Page 15

Page 16

Note:Default settings when you choose this program after power on
* These times are for reference only and may not match your model exactly.
Default settings
Cycle Fabric Type
Wash
Process
Estimated
Time(Min)*
Temp
Wash Warm/Cold
Rinse Hot/Cold
Spin Cold/Cold
Soak Warm/Cold
Wash Hot/Cold
Rinse
Spin
Wash Warm/Cold
Rinse Hot/Cold
Spin Cold/Cold
Soak Cold/Cold
Wash Warm/Cold
Rinse
Spin
Wash Warm/Cold
Rinse Hot/Cold
Spin Cold/Cold
Wash Warm/Cold
Rinse Hot/Cold
Spin Cold/Cold
Wash Warm/Cold
Rinse Hot/Cold
Spin Cold/Cold
25
64
68
68
Cold/Cold
20
heavily soiled durable
colorfast fabrics
Hot/Cold
Dark and color dyed
fabrics
Lingerie sheer fabrics
with lace trim
27
34
Normal
Cottons,Linens and
mixed garments
Quick
Whites
White garments
Heavy Duty
Bulky
Colors
Cottons,Linens and
mixed garments
Delicate
Cottons,Linens and
mixed garments
 Loading...