

Page 1
Haier Washing Machine
HWM90DD
Page 2

IMPORTANT SAFETY INSTRUCTIONS
Warning - To reduce the risk of fire, electric shock, or
injury when using your appliance, follow basic
precautions,including the following:
1. Read all instructions before using the appliance.
2. Use this appliance only for its intended purpose as described in this user
and care guide.
3. Use only detergents or softeners recommended for use in this appliance
and keep them out of the reach of children.
4. This appliance must be properly installed in accordance with the
installation instructions before it is used.
5. Never unplug your appliance by pulling on the power cord. Always
grasp the plug firmly and pull straight out from the outlet.
6. Replace worn power cords, loose plugs and power outlets immediately.
7. Unplug your appliance before cleaning or before making any repairs.
8. Do not operate your appliance in the presence of explosive fumes.
9. Do not use hot water that exceeds 60 C in temperature.
10. Do not use this appliance to wash clothes soaked, spotted or washed in
gasoline, dry cleaning solvents or any other explosive or flammable
substances that could ignite and explode.
11. Clothes or rags used to clean flammable or explosive materials should
not be washed in this appliance till all traces of this material has been
removed, to avoid an accident.
12. Do not add or mix any flammable or explosive substances to the wash.
13. Do not try to remove clothes while the tub is moving. Let it come to a
complete stop.
14. The lid must be closed when bowl is spinning.
15. Do not operate your appliance when parts are missing or broken.
1
Page 3

16. Do not use this appliance for commercial clothes washing.
17. Do not operate this appliance unless all enclosure panels are
properly in place.
18. Do not tamper with controls.
19. The appliance is not instruct for use of young children of infirm
persons without supervision. Young children should be supervised
to ensure that they do not play with the appliance.
20. This appliance must be connected to a proper electrical outlet with
the correct electrical supply.
21. Do not repair or replace any part of the appliance or attempt any
servicing unless specifically recommended in the user-repair
instructions. Make sure that you understand and have the skills to
carry out.
22. To reduce the risk of electric shock or fire, do not use extension
cords or adapters to connect the unit to electrical power source.
23. If the washing machine is connected to a cord extension set or
electrical portable outlet device, make sure it is not in a position
where it is subject to splashing or ingress of moisture.
24. Ensure carpet does not obstruct the opening in the bases.
25. Use the new hose provided. The old hose should not be reused.
2
Page 4

TABLE OF CONTENTS
PAG E
IMPORTANT SAFETY INSTRUCTIONS..................
OPERATING INSTRUCTIONS...............................
Parts and Features.
Operations.............................................................
Normal Operating Sounds........................................
Lint Filter ..............................................................
Install the linner cover
CARE AND CLEANING GUIDE...............................
Cleaning and Maintenance.....................................
Moving & Vacationing .............................................
Storage of Your Washer in Cold Environment..............
TROUBLE SHOOTING..........................................
INSTALLATION INSTRUCTIONS...........................
Tools and Materials Required.................................
Unpacking Your Washer.........................................
Leveling Your Washer...........................................
Steps for Installation.............................................
ELECTRICAL REQUIREMENTS............................
Power Interruptions..............................................
SPECIFICATION
.................................................
.....................................................
......................................
Back Cover
10
10
10
11
12
14
14
15
15
16
18
18
1-2
4
4
5
8
9
9
3
Page 5

OPERATING INSTRUCTIONS
Parts and Features
Cycles
HandWash
Quick wash
Delicate Casual
Wrinkle Control
Process
Soak
Wash
Rinse
Spin
Extra
Rinse
Wash
Speed
Delay Time
Spin
Speed
Delay
6
Estimated Time
Water
Level
7
Signal
8
10
9
Heavy Duty
Normal
Whites
Colors
1
2
3
4
Level
Soil
Stain Wash
Heavy
Medium
Light
11
Hot/Cold
Warm/Cold
Cold/Cold
Warm/Warm
Wash/Rinse
Tem p
12
Power
On/Off
Start
Pause
13
14
15
5
Top lid
1
Control panel
2
Control panel seat
3
Cabinet
4
Leveling legs
5
Inner cover
6
Door switch
7
Bleach injection inlet
8
Front door
9
Filter, Filter Cover
10
11
Outer tub cover
12 Balance ring
4
16
13 Inner tub
14 Paddle
15 Pulsator
16 Drain hose
joint
Page 6

Operations
Heavy Duty
Normal
Whites
Colors
Cycles
Hand Wash
Quick Wash
Delicate Casual
Wrinkle Control
Process
Soak
Wash
Rinse
Spin
Extra
Rinse
Wash
Speed
Delay Time
Spin
Speed
Delay
Estimated Time
Water
Level
Signal
Delay
When not activated, the display shows cycle remaining time
through the wash process.
When delay is selected the indicator light will display a minimum
delay of 2 hours. Push button once for every additional1hour
delay for up to 24 hours. Number of hours will reduce until
program starts.
Cycles
Heavy Duty-For washing bigger ,thicker and heavier dirty
laundries.
Normal- For washing cottons and linens,Loads that are
moderately or heavily soiled.
Whites-For washing the clothes that is not easy to wash and
need good rinse effection,such as underwear,and children's
clothes.
Colors-For washing color fabrics.
Hand Wash-To have hand wash effect on clothes.
Quick Wash-For quick washing of light dirty laundries. It need
24-30 minutes without extra rinse.
Delicate Casual-For washing of delicate fabrics.
Wrinkle Control-Helps to reduce wrinkles and easy ironing.
Process
This is to select washing process.
Soak will not work in the Cycles:Hand Wash,Quick Wash,
Delicate Casual and Wrinkle Control.
Soil
Level
StainWash
Heavy
Medium
Light
Hot/Cold
Warm/Cold
Cold/Cold
Warm/Warm
Wash/Rinse
Temp
Power
On/Off
Start
Pause
5
Page 7

Water level indicator will shut off if only Spin is selected.
Extra Rinse
Once a program is selected, press this button to have a extra
rinse.The washer will add a extra rinse.
Wash Speed/Spin Speed
For selecting the speed of washing or spinning .
Water level
Water levels may be set at the beginning of the wash or at pause.
During Soak, Wash or Rinse press this button to manually
replenish water. Release to stop. Function automatically is
inactive when water reaches the overflow protection level.
Signal
Signal volume can be adjusted softer, louder or off.
Soil Level
According to clothes soil level, press this button to change
washing time.
Wash cycle increases 2minutes for every soil level.
Temp
To select inlet water temperature for wash and rinse.
Power On/Off
Push the Power On/Off button to switch the machine on or off.
Start/Pause
Once washer is powered and selections are chosen, push this
button once to start washing.
While unit is working, push this button once to pause it.
If unit is in Pause mode, push this button once to resume
operation.
Delay Start and Estimated Time Indicator
Indicates remaining minutes when cycle is in progress.
6
Page 8

Indicates remaining hours during delay process.
Indicates fault codes or conditions that are not normal.
Loading the Washer:
Load each item loosely.
Separate the white and colored clothes.Separate heavy clothes
from light clothes.
Carefully check all pockets and cuffs for small items.
They can easily slide in to the tub and may damage the tub.
Pre-treat all stains and heavily soiled areas for best results.
Do not overload your washer.
When loading wet items,keep water level high enough so items
can float easily in the water.
Close the door properly after loading the clothes.if you keep the
lid up,the washer will not start.
Proper Use of Detergent:
It is good washing practice to add the detergent to the water
before you add the clothes so that the detergent can work
effectively on your clothes.
Notes: You can less or more detergent depending on the size of
the load,water type in your living area,whether it is soft
or hard and whether the clothes are heavily soiled or
lightly soiled.
Bleach Dispenser:
Bleach dispenser is located on front corner under the loading
door.
Pour in recommended amount of bleach into dispenser during
the first wash fill.
7
Page 9

Note:Use only liquid bleach in dispenser.
Warning: Be careful not to spill undiluted bleach on the washer
cabinet or your clothes.As it is a storng chemical,it
maydamage some of your clothes or the finish of the
washer if not properly diluted.
Use the manufacturer s chart,on product container
for recommended use of liquid or powder bleach.
Softener inlet
SOFTENER
Please follow softener instructions for dose usage.
Before washing put the softener into the filling entrance(can be
found on the balancing ring by rotating the inner tub, as illustrated
in the drawing).
Try to avoid adding softener in, if you do not intend to wash
immediately. The softener may harden and may cause a poor flow.
Please do not use softener in the following cases Selected rinsing
times more than two; Choosing rinse/spin two-in-one program.
Softener
inlet
Normal Operating Sounds
Of the washer:
Tumbling sounds: This is normal as the heavy wet clothes in
The washer are continuously being lossed around.
Air rushing noise: This happens when the washer tub spins at
Very high spining speed.
Wash and Rinse cycles going on and off will also make clicking
Sounds.
The following sounds are normally heard during the operation
8
Page 10

Lint Filter
The lint filter must be used during washing.
It must be cleaned after each wash.
Take off the lint filter.
1
2
Clean out the lint in the filter.
3
Install the lint filter.
Take off
Install the inner cover
(To prevent water spillage from tub)
1.Open the top lid of the washing machine.
2.Put the inner cover component on the outer tub cover, lining up
the inner cover shaft to the installation hole of the corresponding
outer tub cover shaft groove.
3.Firstly insert the inner cover shaft of one side into the corresponding
outer tub cover shaft groove, then push the other inner cover
shaft into the corresponding outer tub cover shaft groove. Please
install in the designated position to guarantee there is no abnormal
sound in opening and closing of the inner cover, and the operation
shall be smooth. Do not remove the inner cover component after
washing.
Install
Take off
Install
Outer tub cover
Outer tub cover
shaft groove
Inner cover shaft
Inner cover
Section I enlarging
Push
9
Page 11

CARE AND CLEANING GUIDE
Warning: Always unplug your washer to avoid electric shock before
cleaning. Ignoring this warning may result in injury. Before using
cleaning products, always read and follow manufacturer
warnings to avoid personal Injury or product damage.
Cleaning and Maintenance
Use only damp or sudsy cloth for cleaning control panel.
To avoid any kind of damage to cabinet finish, wipe washer cabinet as
needed. If you spill liquid/powdered softener bleach or detergent on
the cabinet, wipe cabinet immediately because it can damage the
finish.
Do not use any abrasive, harsh chemicals, ammonia, chlorine bleach,
concentrated detergent, solvents or metal scouring pads. Some of
these chemicals may dissolve, damage and/or discolor your washer.
Remove pins or other sharp objects from clothes to prevent scratching
of interior parts.
Leave lid open after you are done washing to allow inside of washer
y and prevent bad odors.
to dr
Moving & Vacationing
Turn off water supply faucet's and disconnect hoses. Drain water from
all hoses.This will prevent from damaging due to water leakage if the
hoses accidentally get ruptured or they become loose.
Disconnect electrical plug.
Dry inner wash tub. If moving washer disconnect drain
Turn the leveling legs clockwise all the way in.
Move and store your washer in upright position only
To prevent mold or mildew, leave lid open so moisture inside machine
can evaporate.
hose.
.
10
Page 12

Storage of Your Washer
The washer must be stored at room temperature.
If you just got delivery of a washer when outside temperature is below
freezing,do not operate until washer has warmed to room temperature.
Do not install or operate your washer where room temperature is
below freezing.
11
Page 13

TROUBLE SHOOTING
Washer does not operate:
Check if unit is plugged in. The plug may have come loose.
Check if the electrical wall receptacle is of proper voltage.
Check if the circuit breaker needs to be reset or if the fuse need to be
replaced.
Check if the washer is overloaded :load may need to be re-balanced
and clothes may need to be redistributed.
Check if the lid is open. You may have to close the lid properly.
The washer pauses in some cycles. This is normal in delicate or
hand-wash cycle which has short period of time. You will not hear
washer operation for a short period of time . When the soak time is
over, it will start automatically.
Problems with water:
Not enough water coming out: Water faucet may need to be turned
on fully water . Hoses may be tangled or wrinkled up. Straighten out
hoses. Check water level selection, it may need to be readjusted.
Water temperature is incorrect: Check your water heater temperature
Hot water needs to be at a temperature of at least 120 F-140 F(49 C
-60 C).Check to make sure the inlet hoses are properly connected.
(E.g. Hot to hot & cold to cold)
Water leaks: This is due to not properly installing drain hose or
fill hoses. Your home drain may be clogged . You may need to tighten
hoses, check the plumbing or call a plumber.
Water will not drain: This is due to not installing your drain hose
properly. Check theposition of the drain hose. In order to drain
properly, make sure that top of drain outlet is less than 5 ft. (1.5 m)
above the floor.
Washer is making noise:
Washer may need to be reinstalled. (Check washer installation
section)
.
12
Page 14

Washer load may need to be re-balanced, as the load may be uneven.
Coins, loose change, buttons or other heavy objects could make
noise(read Operating Guide-Normal Operating Sounds).
Squealing sound: Due to overloaded wash tub.
Vibration Noise: Due to not leveling washer properly on the floor and
uneven distribution of clothes in the tub.
Problems with clothes:
Clothes are too wrinkled: this is due to improper sorting, overloading
and washing in too hot water repeatedly.Avoid overloading and resort
your load. Do not mix heavy clothes such as work clothes with light
clothes such as blouses, light shirts and delicate items. You may need
to wash in warm or cold water
Have soap residue: detergent may not be dissolving in water.
Check water temperature or you need to add detergent as wash
tub is being filled with water.
Spots or stains on your clothes: this is due to incorrect use of fabric
softener. You may need to read proper instructions on the container
and follow proper directions when using the softener.
Clothes are grayed or yellowed: this is due to not pouring enough
detergent for large loads. You may have to add more detergent to the
load.
Clothes are ripped & have holes/excessive wear & tear: this is due to
sharp objects such as pins and belt buckles left in pockets. You will
need to remove small loose sharp objects. Fasten belts, zippers,
metal snaps etc. Check if you are using undiluted bleach. Never add
undiluted bleach to wash.
Note:
Trouble Codes
E0 Top lid not closed during delay start sequence
E1 Blockage of drain hose
E2 Top lid not closed during wash operation
E4
E7
F2
Reason
The water inlet time exceeds the preset time
(30minutes)
The communication is bad
The protection of water overflow
13
Page 15

INSTALLATION INSTRUCTIONS
Tools and Materials Required
You will need to have following tools to help
you with the installation of your washer:
Pliers
Wrench
Tape Measure
Gloves
Level
Accessories Supplied
1.Hot & Cold inlet hoses
2.Drain Hose Hook
3.Pipe Hoop
4.Inner Tub Cover
5.Outer Drain Hose
1
4
14
Quantity
2
1
1
1
1
2
5
3
Page 16

Unpacking Your Washer
Remove all packing materials. This Includes the foam base and all
adhesive tape holding the washer accessories inside and outside
Open the top lid to remove the styrofoam drum brace. Pull to remove.
Before using this washing machine,
please remove this shipping bar by
pulling handle and dispose it
properly, otherwise the washing
machine will be damaged.
.
Pull out
Leveling Your Washer
Your washer has 4 leveling legs; which are located on the
bottom corners. After properly placing your washer in its final
position, you canlevel your washer.
Leveling legs can be adjusted by turning them counter clockwise
to raise your washer or turning them clockwise to lower your
washer.
Adjustable foot
High
Low
Warning: Leveling of washer is very important to prevent
vibration during spin.
Shipping bar
15
Page 17

Steps for Installation
Select a away suitable location for the washer on a hard even surface
from direct sunlight or heat source e.g. radiators, base board heaters,
cooking appliances etc.Any floor unevenness should be corrected with
the leveling legs located on the bottom corners of the washer.The
washer must be placed at room temperature.You must not place washer
where the temperature is at below freezing.
Installing Your Washer:
Read through these instructions carefully before installation.
1. Connect the hot and cold water inlet hoses to the hot and cold water
faucet.
2. Connect the other end to the corresponding washer inlet located at the
back of machine.
Cold water inlet hose
Hot water inlet hose
Note: You may have to use pliers to tighten the coupling. Do not over tighten
because you may cause damage to the valve.
You should use the new hose-sets supplied with the washer. Old
hose-sets should not be reused.
16
Page 18
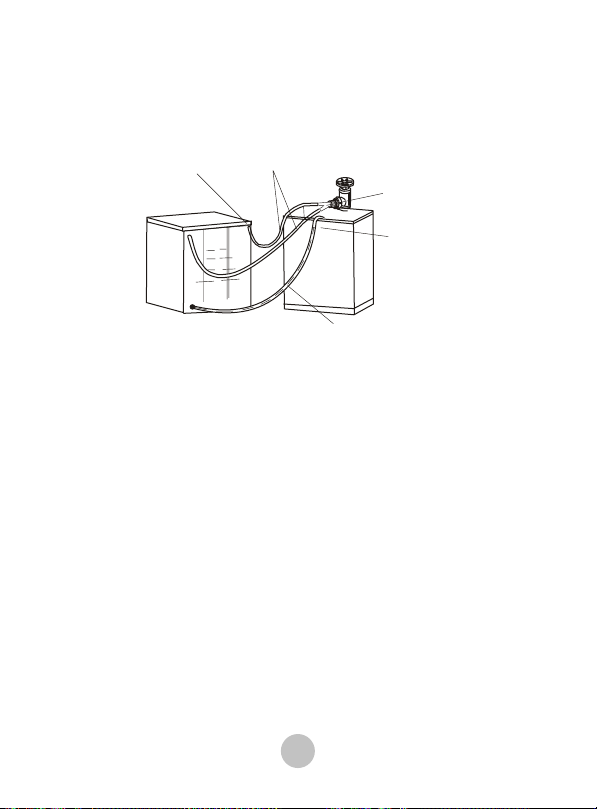
4. Install the drain hose to the side of the washer using the drain hose
damp provided. The drain hose must be placed into a drain pipe or sink
at least 1 1/2inches in diameter. Use the goose neck to the hose in
place. To avoid possible water back up, the drain hose must reach a
minimum height of 1000mm and a maximum height of 1500mm.
Water Inlet
5.Plug the washer into a regular 220-240Volt/50Hz,10Amps outlet.
Note :Carefully inspect all around the machine and at the back for any
leaks, and tighten any loose connections.
Caution:If, after completing these steps, you are unsure that unit is
properly installed, contact a qualified installer.To ensure that
your washer is properly installed, it is recommended that it
be installed by a certified installer.
Water Supply Hose
Goose Neck
Hose Bend
Drain Hose
17
Page 19

ELECTRICAL REQUIREMENTS
Grounding Instructions
This appliance must be grounded. In the event of an electrical short
circuit, grounding reduces the risk of electric shock by providing an
escape wire for the electric current. This appliance is equipped with a
cord having a grounding wire with a grounded plug. The plug must be
inserted into an outlet that is properly installed and grounded.
Improper use of the plug can result in a risk of electric shock.
Consult a qualified electrician or service person if the grounding
instructions are not completely understood or if doubt exists as
to whether the appliance is properly grounded.
Wiring Requirements:
The washer must be plugged into at least 10AMP 220-240 VOL,
50 HZ GROUNDED OUTLET.
Note: Where a standard two-prong
outlet is encountered,
it is the personal responsibility
and obligation of the
consumer to have it replaced
with a properly grounded
three-prong outlet.
Extension Cords:
We do not recommend that you use an extension cord.
Power Interruptions
Occasionally there may be power interruptions due to thunderstorms or
other causes. Remove the power cord from AC outlet when a power
outage occurs. When power has been restored re-plug power cord to AC
outlet. If outage is for a prolonged period, clean washer before using it
again.
T
18
Page 20

SPECIFICATION
Rated voltage frequency 220-240V~ 50Hz
Rated washing / spinning capacity
Spin speed max
Water level/Water quantity (about L) 1/28 2/36 3/49 4/54 5/61
Max water consumption
Injection pressure 0.03MPa-1.0MPa
Weight(approx)
9.0kg
700rpm
7/73 8/79 9/89 10/95
6/67
About 122L(Normal program)
79kg
 Loading...