

Haier HWM80-1401 User Manual
Sport
8kg
HWM80-1401
Spin
Speed
Extra Rinse
Rinse Hold
Wash
Temp.
HIGH SPEED
1400rpm
AUTOMATIC FRONT LOADING WASHING MACHINE
USER MANUAL
HWM70-1201
HWM80-1401
DISPLAY CODES> ...............................18
TROUBLESHOOTING........................1> 9
IMPORTANT SAFETY INFORMATION.. .....20 >
TABLE OF CONTENTS
IMPORTANT DISPOSAL INSTRUCTIONS
As a responsible manufacturer we care about the environment. As such we urge you to follow the
correct disposal procedure for your product and packaging materials.
This will help conserve natural resources and ensure that it is recycled in a manner that protects health
and the environment.
You must dispose of this product and its packaging according to local laws and regulations. Because
this product contains electronic components, the product and its accessories must be disposed of separately from household
waste when the product reaches its end of life.
Contact your local authority to learn about disposal and recycling. The product and packaging should be taken to your local
collection point for recycling. We apologise for any inconvenience caused by minor inconsistencies in these instructions,
which may occur as a result of product improvement and development.
LEGEND
For your safety, any instructions in this manual with this "Warning" sign must be followed strictly.
Yes
No
Optional
03 - 09
10 - 15
16- 20
COMPONENTS> ................................03
PREPARATION................................0> 4
SAFETY INSTRUCTIONS> ....................05
INSTALLATION> .................................06
CONTROL PANEL> .............................08
BEFORE USE USING THE APPLIANCE MAINTENANCE
PROGRAM SELECTION> ......................10
CONSUMPTION AND TECHNICAL DATA> .....
11
WASHING METHODS> .......................12
CLEANING & CARE> ...........................16

03
Before use
1x Inlet hose assembly
1x Drain hose bracket
1x User manual
4x Blanking plugs
Sport
8kg
HWM80-1401
Spin
Speed
Extra Rinse
Rinse Hold
Wash
Temp.
HIGH SPEED
1400rpm
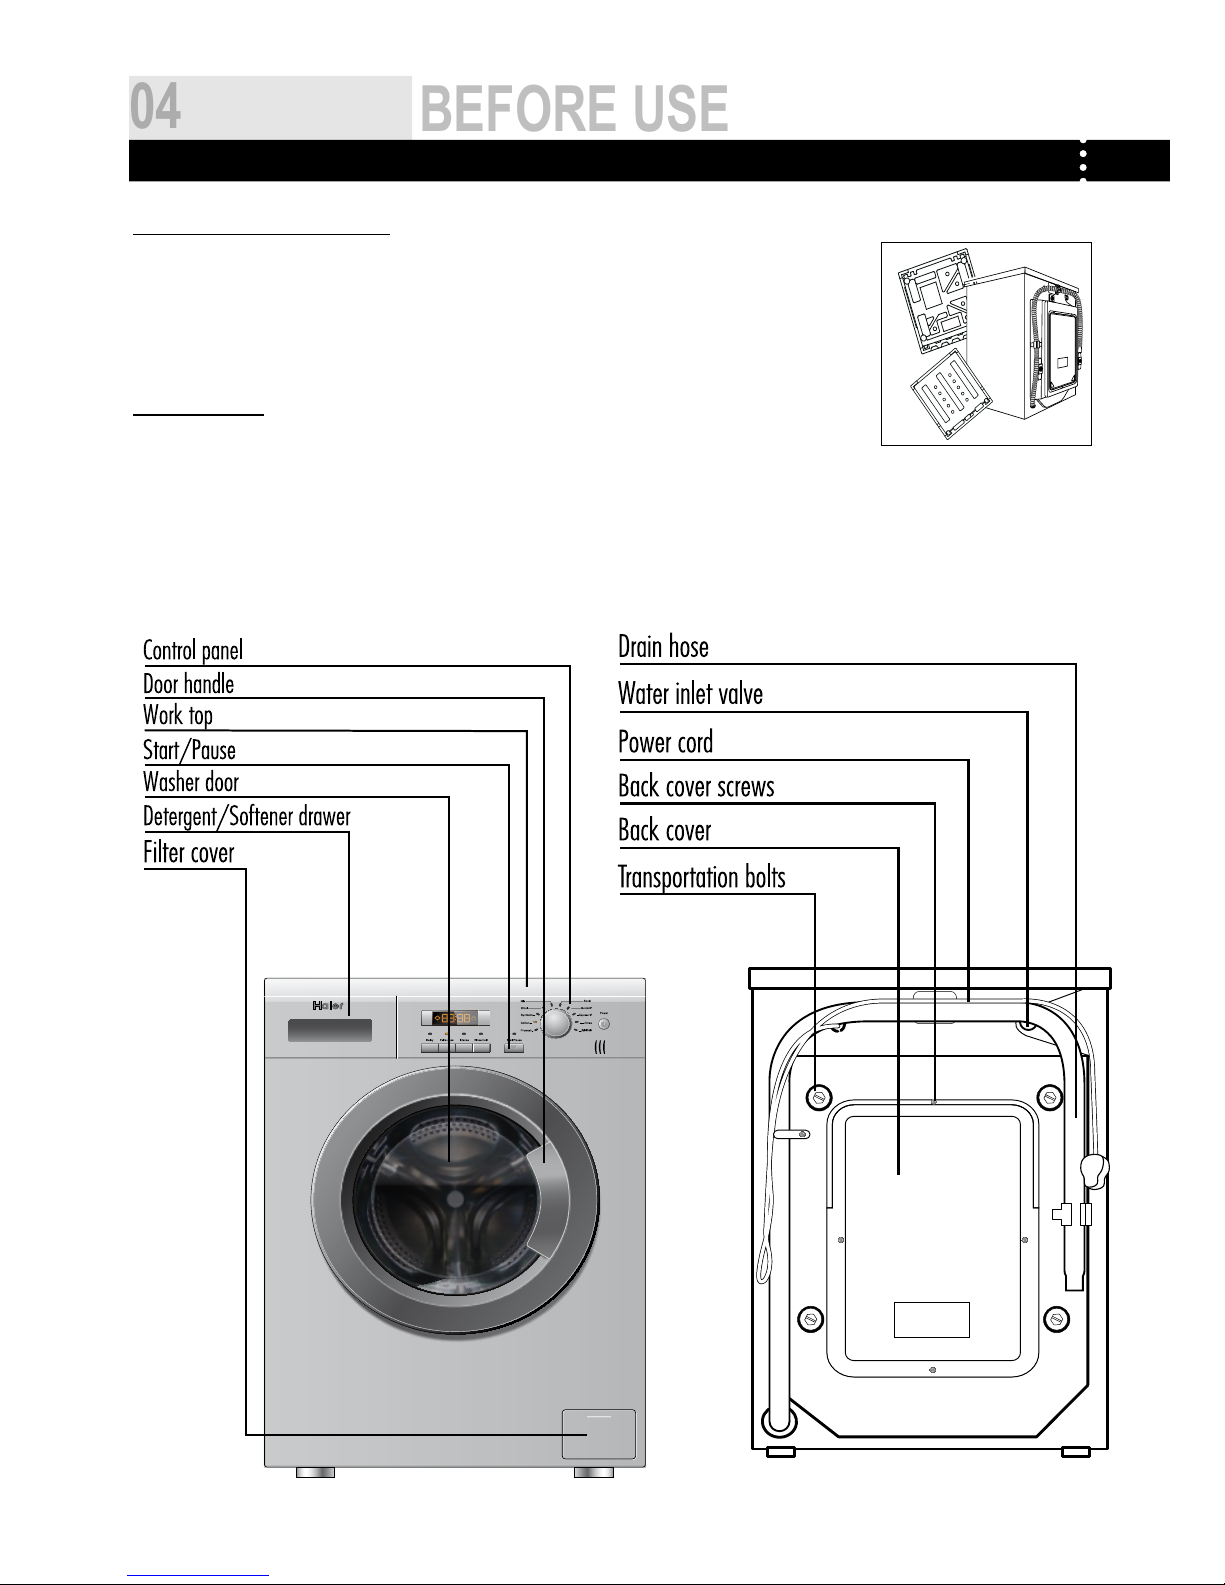
COMPONENTS
THANKS FOR PURCHASING A HAIER PRODUCT
Please read these instructions carefully before using this appliance. The instructions contain important information which will help you
get the best out of the appliance and ensure safe and proper installation, use and maintenance.
Keep this manual in a convenient place so you can always refer to it for the safe and proper use of the appliance.
If you sell the appliance, give it away, or leave it behind when you move house, make sure you also pass on this manual so that the
new owner can become familiar with the appliance and safety warnings.
ACCESSORIES
Check the accessories and literature in accordance with this list:
HWM80-1401
1x Warranty card
Manufacturer’s Warranty
Please read this warranty card carefully. Attach your purchase rece ipt to this warranty car d and keep in
a safe place. You must produce both warranty card a nd proof of purcha se in the event of a warran ty
repair being required.
When you purchase any new Haier Product you automatically receiv e a two year Manufacturer's
Warranty covering parts and labour for servicing.
The Manufacturer undertakes to:
Repair or, at its opti on, replace without cost to the owner either for materi al or labour any p art of the
Product, the serial number of which a ppears on the Product, which is found to be defective within TWO
YEARS from the
date of purchase.
This warranty DOES NOT cover:
A Service calls which are not related to any defect in the Product. The cost of a service call will be
charged if the problem is not found to be a Product related fault. For exampl e:
1. Correct the installatio n of the product.
2. Provide Instruction on use of the product or chang e the setup of the product.
3. Replace house fuse s or correct house wiring.
4. Correcting fa ult(s) caused by the user.
5. Noise or vibra tion that is considered normal.
6. Water on the floor due to i ncorrect loading or excessive suds.
7. Blocked pumps, remov al of foreign objects/substan
ces from the machine, including the pump
and inlet house filters.
8. Correcting damage caused by pests, eg. rats, cockroaches etc.
9. Correct corrosion or discolouration due to chemical attack.
10. Power outages or surges.
B Defects caused by factors other than:
1. Normal domestic use or
2. Use in accordance with the Product’s User Guide.
C Defects to the Product caused by accident, neglect, misuse or ‘Act of God’.
D The cost of repairs car ried out by non-authorised repairers or the cost of c orrecting such
unauthorised repairs.
E Normal recommended maintenance as set out in the Product’s User Guide.
F Repairs when the appliance has been
dismantled, r epaired or servic ed by other than an
AUTHORISED CUSTOMER SERVICE CENTRE or the selling dealer.
G Pick up and delivery.
H Transportation or travelling costs in volved in the repair when the product is installed outside the
AUTHORISED CUSTOMER SERVICE CENTRE’S normal service area.
This product has been designed for use in a nor mal domestic environment. It is not intended for
commercial use. Doing so may affect product warranty.
Service under this warranty must be provided by an Authorised Service R epairer (refer to t he Customer
Care section for c ontact detail s). Such service sh all be provided duri
ng normal business hours. T his
warranty certificate should be shown when making any claim.
Note:
This Warranty is an extra benefit and does not affect your legal rights an d applies only to product
purchased in New Zealand and Australia. Please keep this Warranty Card in a safe place.
For Australian customers:
Our goo ds come with guarantees that cannot be excluded under the Australia n Consumer
Law. You are entitled to a replacement or refund f or a major failure and for compe nsation for any ot her
reasonably foreseeable loss or damage. You are also enti tled to have the goods repaired or re placed if
the goods fail to be of
acceptable quality and the failure does not amount to a major failure.
04
Before use
HWM80-1401
Spin
Speed
Wash
Temp.
8kg
HIGH SPEED
1400rpm
T1
T2
T3
S1
S2
S4
S3
T4
PREPARING THE MACHINE
Remove all the packing materials prior to use, including the polystyrene base. Upon opening the
package, water drops may be seen on the plastic bag and the porthole. This is normal phenomenon
resulting from water tests in the factory.
DESCRIPTION
This diagram may differ slightly from the layout of the washing machine you have just purchased due
to technical improvements.
PREPARATION
05
Before use
SAFETY INSTRUCTIONS
DO ...
... Make sure that the transport bolts are removed.
... Use a separate earthed socket for the power supply.
... Make sure that the plug is accessible.
... Hold the plug and not the electric cable when
unplugging the power supply.
... Make sure that the fuses in the power circuit are rated
for 15A.
... Keep away from heat sources and direct sun light to
prevent plastic and rubber components from aging.
... Make sure that the power cord is not caught under or
in the appliance and avoid damage to the power cable.
... Check that hose joints and connections are firm and no
water can leak. If joints are loose or there is leakage, turn off the
water supply and refix. Do not use the washing machine until the
hoses are properly fixed.
DO ...
... Pull up zips and fix loose threads to prevent the items
from being entangled. If necessary, put small items into a laundry
bag to avoid damage.
... Turn off the machine after each wash program and
switch it off at the mains to save electricity and for safety. Wipe
clean the lower part of the porthole.
... Keep the door slightly open when the washing machine
is not in use to prevent formation of odours.
... The power cord must be replaced by the manufacturer,
service agent or qualified persons, if it is damaged.
... Ensure that the appliance is not used by persons
with reduced physical, sensory or mental capabilities, lack of
experience and knowledge without supervision or instruction by a
person responsible for their safety.
... Supervise children to ensure that they do not play with
the appliance.
DO NOT ...
... Touch or use the appliance when barefoot or with wet
or damp hands or feet.
... Use flammable detergent or dry cleaning agent.
... Use any flammable sprays in close vicinity to the
appliance.
... Remove or insert the plug in the presence of flammable
gas.
... Allow children or infirm persons to play with the appliance
or packing materials.
... Install the appliance outdoors in a damp place, or in an
area which may be prone to water leaks such as under or near a
sink unit. In the event of a water leak allow the machine to dry
naturally.
... Place the washing machine directly on a carpet, or close
to a wall or furniture.
DO NOT ...
... Touch the washer door during the washing process - it
gets hot!
...Place heavy objects or sources of heat or damp on top
of the appliance.
... Hot wash foam rubber or sponge-like materials.
... Open the detergent distribution drawer during the wash
cycle.
... Force the washer door open. The door is fitted with a
self-lock device and will open shortly after the washing procedure
is ended.
... Open the washer door if the water level is visibly over
the porthole.
... Cover the washing machine with a cover that may keep
dampness in.
BEFORE SWITCHING THE APPLIANCE ON FOR THE FIRST TIME
DURING DAILY USE OF THE APPLIANCE
06
Before use
3.
1.
2.
4.
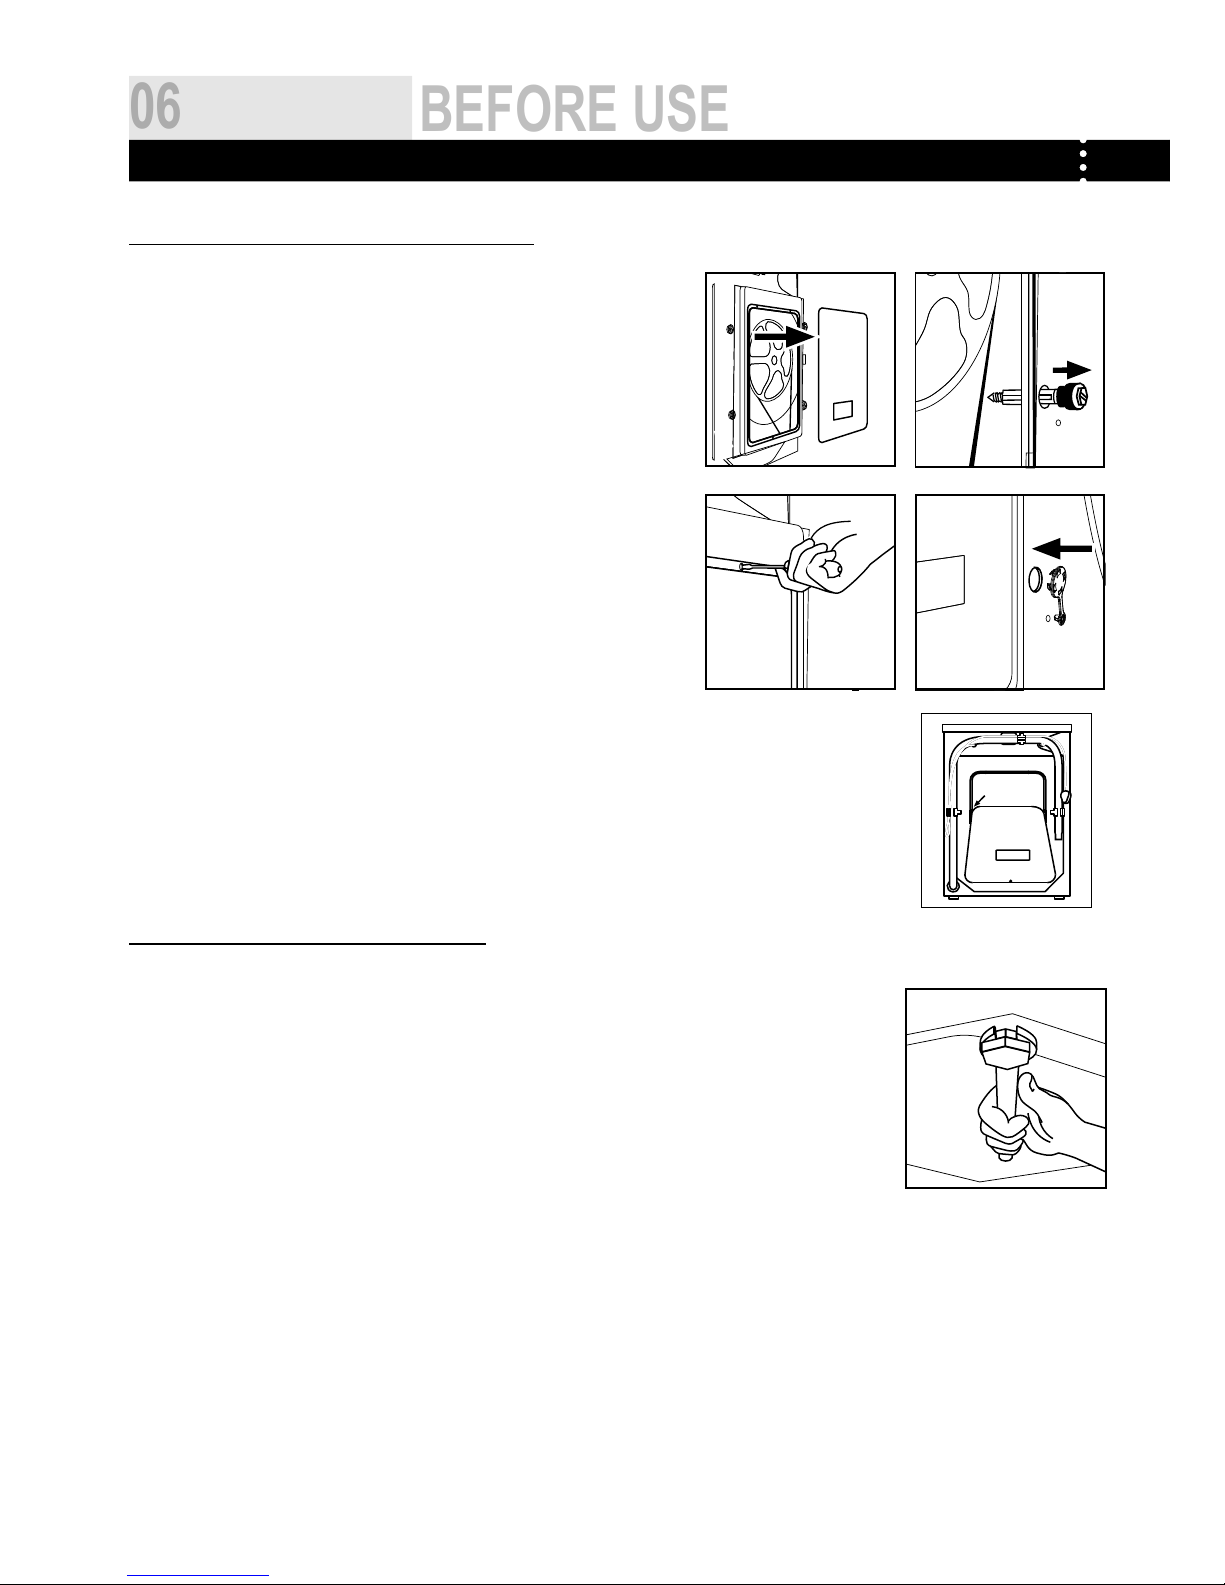
REMOVING THE TRANSPORTATION BOLTS
The transportation bolts are designed for clamping anti-vibration components
inside of the washing machine during the transportation process.
Remove the back cover.1.
Remove the four bolts on the rear side and take out the synthetic 2.
stabilisers from within the machine.
Replace the back cover.3.
Fill the holes left by the bolts with blanking plugs.4.
Note:
1.When replacing the back cover, ensure convex surface is
facing outwards, and insert the back cover between he gap
as shown in Fig. 5.
2.Keep the transportation bolts and synthetic stabilisers
in a safe place for later use.
ADJUSTING THE WASHING MACHINE
There are adjustable feet under the bottom of the washing machine. Before use, they should be
adjusted so that the machine is level. This will minimise vibrations and thus noise during use. It will also
reduce wear and tear. We recommend using a spirit level to level the appliance.The floor should be as
stable and flat as possible.
INSTALLATION
5.
 Loading...