

Page 1

Fully Automatic Washing Machine User's manual
This manual is for
HWM58-020
Please read this manual
carefully before using.
Retain it for future reference.
Page 2

Contents
Names of the parts...............................................................................................1
Safety precautions .............................................................................................2
Installation and adjustment ...................................................................................4
Install the water inlet hose....................................................................................6
Preparation before washing .................................................................................8
Put in the laundries ..............................................................................................9
Usage of the detergent ........................................................................................9
Use the operation buttons ..................................................................................10
Close the top lid .................................................................................................13
Finish washing ....................................................................................................13
Disposal after washing .......................................................................................14
Trouble shooting Answer to question.............................................................15
Packing list Specification...................................................................................16
Page 3

Names of the parts
Top lid B
Detergent box
(Installed by user)
Lint filter
Control panel
Filter cover
Inner tub
Control panel
film
Pulsator
Cabinet
base frame
Top lid A
Cabinet handle
Drain hose
Adjustable foot
Sop mat
water valve
Meaning and description of the symbols
Warning sign
Contents marked with that symbol are related to the safety
of the product and the personal safety of the users. Please
operate in strict conformity to the contents, otherwise it may
cause damage of the machine or injure the personal safety
of the user.
Power line
back cover
fixed foot (3)
Forbidden sign
Contents marked with that symbol are actions forbidden to
perform. Performing of those actions may result in damage
of the machine or injure the personal safety of the user.
1
Page 4

Safety precautions
Please plug the plug on special receptacle
with rated voltage. Be sure to use singlephase three pins receptacle. Ensure the
earthing prong of the power receptacle is
earthed reliably. Use leakage protector if
possible.
Do not damage the power cord, bend ,extend, twist, bind or alter it by force. Do not press or
nip it with weight. If the power cord or the power plug is bad, or the power plug becomes
flexible, to avoid risk it is required to have it replaced by
the technicians of our special shop or the after-sale
service department. Keep the pin of the power plug
clean, if the power plug is polluted with dust, please
wipe with dry cloth carefully.
Do not put the machine at damp place like
the bathroom. Never wash it with water.
Not put wet laundries on the control panel.
The power cord plug should be convenient
to be pluged in or pluged out with hand
while the washing machine runs normally.
Be sure to pull the plug out and close the
water tap when the machine is idle, when
moving the machine, or when cleaning
the machine. Do not use wet hand to insert
or pull out the power plug.
Do not use water hotter above 50 C .
In case the washing machine is installed
on ground with carpet, do not block the
ventilation hole with carpet.
The ventilation holes
at the bottom
soft items
Do not let the machine share one receptacle with other
electric appliances. If the power plug is damaged, or
the plugging into the receptacle is loose,
do not use the plug any more.
Do not wash water-proof laundries like
the raincoat, bike covers etc. to avoid
abnormal vibrations in spinning.
2
Page 5

Safety precautions
Do not stretch hands into the working
machine. It is dangerous even if the
rotation is slow. Take special care of
the children. Do not let the children
climb the washing machine.
Do not put any hot or heavy items (such
as the kettle with hot water ) on the
washing machine.
The handicapped or children without
care shall not use the machine.
Do not decompose, repair or alter the
machine by yourself.
Do not wash laundries with volatile
materials (such as thinner, petrol etc.)
l
o
r
t
r
e
n
Pe
n
i
h
T
Keep the machine away from direct
sunlight and heat source like the heater.
To prevent the lint inside the tub from blocking
the cascade outlet during washing, please
keep the lint filter in good condition, and
install it to proper position. If the lint filter
is lost or damaged, please contact the local
after-sales service department of our company.
Install
Dismantle
Install
Dismantle
To pr ote ct your lau ndr ies and was hing machine, please take out all of the
coins, buttons, sand, hairpin and
other foreign materials before washi ng.
Plea se chec k if the wa ter fau cet is open,
and if th e co nne ction of the wate r in let
pipe is prop er.
It is sug ges ted to use foa mle ss washin g
pow der.
3
Page 6
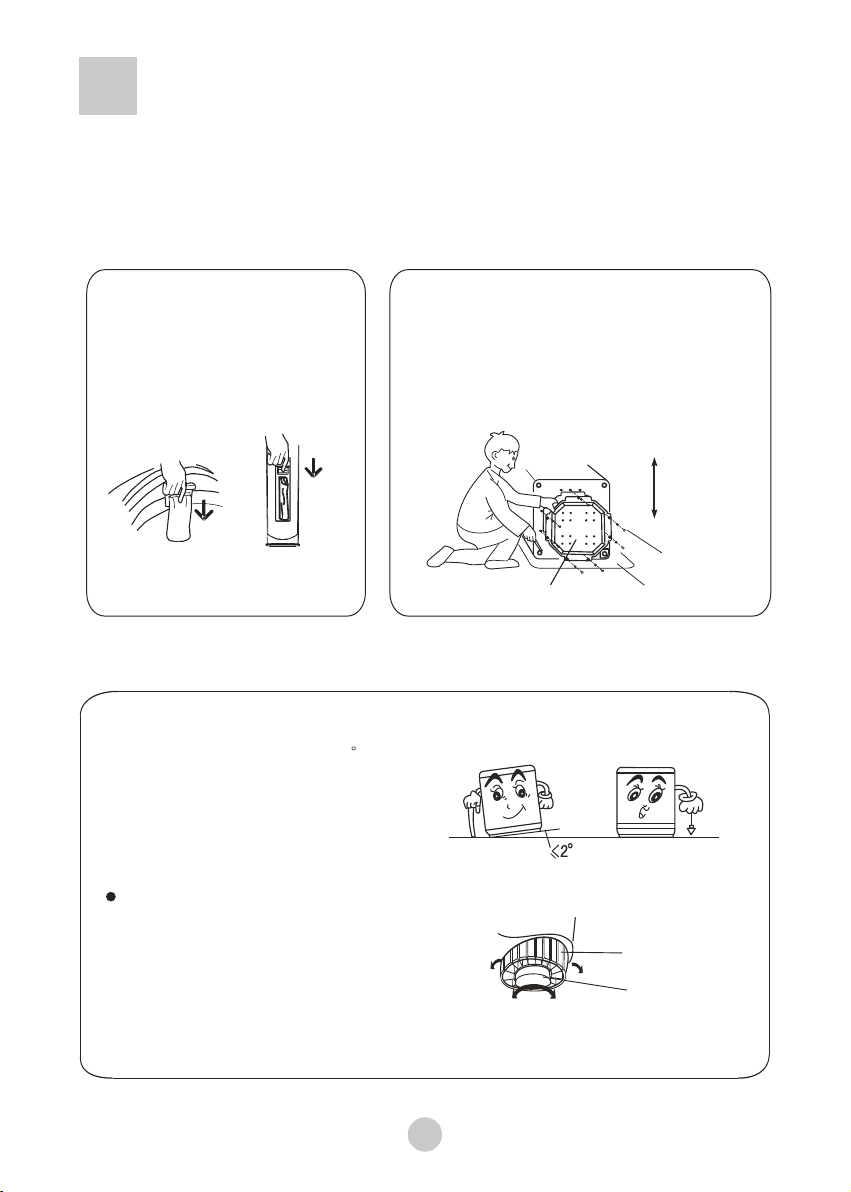
Installation and adjustment
Please install and adjust the machine according to the requirement of the manual. It is
very important to your security and correct operating the machine.
Install the lint filter
Push the lint filter downward to
location for lint filter.
Install the bottom plate
After you open the package, please lean
the washing machine gently down on soft
items ( like the towel cloth, blanket, etc. ).
Install the bottom plate to the bottom of the
machine with the seven screws by a cross
screwdriver, then lift the machine up gently.
See to the figure:
Adjust the installation position
The largest allowed slope of the
shank base of the machine is 2 .
The slanting or rough ground will
result in unstable running or
stoppage of the machine. Please
adjust it with following methods:
Bottom plate
Back
Back
Front
Screw
Soft items
Adjust the adjustable foot:
1.To twist the adjustable foot, please
first lift up the side of the foot slightly,
loosen the adjustable nut, and twist
the foot.
2.Fasten the nut after adjustment.
Loosen
4
High
adjustable nut
Fasten
adjustable foot
Low
Page 7

How to change the direction of the drain hose
1.Dismantle the back cover of the washing
machine.
2.Put down the drain hose. Take off the
drain hose frame. As indicated in Figure
1, put the drain hose into the cabinet.
Then stretch one hand into the cabinet
to nip the claw of the drain hose bushing to remove the claw from original
position. Take off the drain hose bushing with the other hand. (As indicated in
Figure 2 and 3).
Outer
drain
hose
Cabinet
Outer
Press
Press
Drain hose bushing
Figure 2
Drain hose
bushing
Take off
Figure 3
Drain hose frame
Figure 1
Drain hose
bushing claw
Inner
Usage of the drain hose
The dra in ho se shall dr ain smoot hly
1.The height of the drain hose shall be
less than 10cm, or the drainage will not
be smooth, and cost such long time that
the machine may stop at mid way.
2.Do not trample or press the drain hose.
3.Dismantle the protecting cover of the
drain outlet at the other side (method
the same as the bushing). Install the
bushing as per indicated in Figure 4.
4.Extend the drain hose from the other
side. Fix the drain hose onto the base
frame with the drain hose frame. (As
indicated in Figure 5)
Drain outlet
protecting cover
Drain hose bushing
Figure 4
Figure 5
5.Install the protecting cover of the drain
outlet at the other side as per indicated
in Figure 6.
Figure 6
4.If extra drain hose is needed, please
make separate purchase. The inner
diameter of the extra hose shall not
less than 30mm, and the length shall
not exceed 1.5m.
If the drain hose is too long, cut it at mid
point. To make smooth drainage, cut the
front end of the hose slantingly.
5
5.If th e ext ra hose is to o lon g, cut i t
eithe r at A or at B p oint.
Page 8

Install the water inlet hose
Confirm the water tap
Water tap,suitable
Outlet end surface
>10mm
It is req uir ed tha t the f ront end sh all be long er than 10m m.
The out let e nd sur fac e of the tap sh all be flat a nd smooth . If no t plea se fi le it to
avoid l eak age.
Connection between the water inlet hose jointer and
the water tap
1.Press the lower end of the lock lever and push down the slider. Take off the water
inlet hose jointer from the water inlet hose component. See to Figure 1.
2.Loosen the screw till the water tap can be accessed. Put the jointer of the water
inlet hose on the tap. See to Figure 2. (If the tap diameter is too large and the jointer
can not be set on the water tap, please loosen the four screws and take out the
bushing in the jointer. See to the figure3.)
Water inlet pipe jointer
Slider
Water tap,not suitable
Screw
Locking lever
Water inlet pipe
Screwdriver
Figure 1
Mark label
Figure 2
bushing
Figure 3
3.Fasten the four screws evenly. See to Figure 4.
4.Take off the nameplate. Twist the fastening nut as per the indication of the figure.
See to Figure 5.
Remar ks: B efore twi sti ng the fast eni ng nut, the t hre ad is 4mm abo ve th e
upper s urf ace of the nu t. Aft er twisti ng th e fasteni ng nu t, the thre ad is 2 mm
above t he up per surfa ce of t he nut. See t o Fig ure 6.
About 4mm before twisting
About below 2mm after twisting
Nut
Figure 4
Figure 5
Figure 6
6
Page 9

Connection b e tween the water inlet ho se and the
wa shing machine
1.Do no t take off t he wat er ab sorp tion
Nut of the water inlet hose
cushi on. Pleas e chec k if th e cushion
is drop ped or dama ged befor e each
usage . If it happe ns please c onta ct
our aft er-sale d epar tme nt immedi atel y.
2.Put t he nut of the w ater inle t hose o n
the val ve jointe r.
3.Fas ten the nut . Swaying i t gent ly to
confi rm if it's su itable.
Jointer of the water inlet valve
Wat er a bs orp ti on c ushio n
Connection betw een the jointer of the water inlet
hose and the water inlet hose
1.Pus h down t he sli der. In sert t he
water i nlet h ose in to the j oint er.
Locking lever
2.Han g the lo ck lev er to th e join ter.
Relea se the s lide r till a c lick
sound i s hear d.
Jointer of the water
inlet hose
Slid er
Check the connection betw een the jointer of the
water inlet hose and the water tap
1.Swaying the hose gently to confirm if it is fastened stable.
2.After installation, open the tap to check if it leaks.
3.Do not bend the hose with overstrain.
4.Before each usage please check if
the co nnection between the jointer
of the w ate r inl et hose and the water
tap, a nd th e ins tallation of the
wate r inlet hose are firm, so as to
prevent dropping from improper
Inst allation position.
Take down the water inlet hose
1.Close th e wat er ta p.
2.Press th e loc kin g lev er. Push dow n the s lid er. Then
pull off th e wat er in let hose. I f the m ach ine i s used
more than on ce ev ery w eek , the jointer of t he wa ter
inlet hose c an be k ept o n the t ap to p revent
damaging t he fi xin g scr ew.
7
Lock in g le ve r
Slider
Page 10

Preparation before washing
Preparation before washing
1.Connect the water inlet hose and open the
water tap .
2.Confirm that the washing machine is earthed
reliably . Then insert the power plug into the
receptacle. Do not connect the earth ter minal to the gas pipe and tap water pipe.
3.Put down the drain hose.
4.Slanting or uneven ground may result in
unstable working or abnormal noise. Please
make the machine stand horizontally.
Pay attention to followings before washing the laundries
Confirm if
there's special
requirement for
the laundries.
a. Please check if the laundries are applicable for washing.
b. Separate those not colorfast from other laundries.
c. For laundries not water absorbing, please put them into water with hands.
d. For laundries with much soil, please remove the soil first. You can add detergent on the
part with serious soil directly. It is much easier to remove the soil by that mean.
e. For laundries likely to get lint ball or with long fiber, please first turn the inside out before
putting them into the water.
f. Do not put the laundries polluted with chemicals directly into the washing machine.
For those small laundries ,laundries likely to be twisted or worn, and woolen laundries,
please put them into mesh bag before washing.
Clear the pocket.
Take out the
coins , sand,
hairpins etc.
Fasten the
buttons and
zippers.
The quantity of
the laundries
shall not exceed
the rated value.
The big laundries
like the jeans
shall be put in
loosely.
When the pulsator
is running , the
buttons of the
l a un dr ie s m a y
cause noise . For
t h e s a k e o f
discretion, p lease
put the laundries
with buttons into
other laund ries.
8
Page 11

Put in the laundries
The ca pac ity o f was hin g and s pin nin g of th e
mach ine r efe r to th e lar ges t wei ght o f the
stan dar d lau ndr ies u nde r dry c ond iti on th at
can be w ash ed or s pin ned i n one t ime . One
time w ash ing q uan tit y sha ll be l owe r tha n the
rate d cap aci ty.
The th ick nes s, si ze, t ype o f the c lot h wil l inf luen ce th e act ual w ash ing c apa cit y. It i s sui tabl e for o ne ti me wa shi ng to p ut in r eas ona ble am oun t of la und rie s and t he la und rie s can
be tur ned r oun d in wa shi ng.
To wash th in la und rie s lik e the s toc kin g, si lk
etc , pl eas e fir st pu t the m int o was hin g mes h
bag (w hic h can b e pur cha sed s epa rat ely )
befo re wa sh.
Usage of the detergent
How t o u se the washing
powde r
Direct dissolved in the machine
1.Fill water to "Low" water level.
2.Add the power. Run for 30 seconds
to dissolve it completely.
Inlet box of the detergent
How to use the whitener
Fill wa ter to d ecid ed lev el. Di lute
the whi tene r with c onta iner. P our
it slow ly int o the wa shin g tub.
Avoid usin g whit ener o n
laund ries w ith co lor or p atte rn as
they ar e pron e to los e colo r.
The whi tene r shal l not to uch th e
laund ries d irec tly.
Refer t o the us er's m anua l for
the usa ge and q uant ity of t he
white ner.
For pow der wh iten er, ple ase
disso lve it b efor e use.
3.Put in the laundries. Select
suitable water level.
The instant dissolving of the washing
powder:
1.Prepare warm water of 30 a nd a
container.
2.Add the powder while stirring to
fully dissolve it.
Put in the proper quantities deterge nt
according to the water level and the
laundries quantities .
It is suggested not to use high
sudsing detergent.
Washing powder with poor quality o r
long time storage maybe caked.
Please pay attention to cleaning the
detergent box in time
9
Page 12

Use the operation buttons
a.
Description of the function of the buttons
SURPLUS(MIN)
To indicate -- during sensing.
To indicate remaining min. During
program running.
To indicate remaining reserved
time (hrs) during reservation period.
To indicate fault symbols for abnormal
conditions (see page 15)
PROCEDURE STATUSPROGRAM STATUS
STANDARD
JEANS
GENTLE
QUICK WASH
WASH
SPIN
Page 15
SOAK
WASH
RINSE
SPIN
WATER LEVEL
"POWER ON/OFF"button
Pres s "P owe r On /Off" b ut ton t o co nne ct
powe r su ppl y.
Afte r po wer i s co nne ct ed, p re ssi ng t his
butt on w ill c ut o ff t he su pp ly.
"START/PAUSE"button
Afte r th e pow er i s swi tc hed o n, p res s it t o
star t th e mac hi ne
Duri ng w ork in g, pu sh i t to pa us e wor ki ng.
Duri ng p aus e, p ush t hi s but to n to re st art
and co nt inu e op era ti on.
START
PROGRAM
RESERVATION
PAUSE
POWER
ON/OFF
o
t n
ut
b
"
N
O
TI
A
V
R
E
S
E
R
/
M
A
R
G
O
R
P
"
"PROGRAM/RESERVATION " button
Press
programs
" WATER LEVEL"button
The user selects a suitable water level
depending on the load.
you can select one or several of
Standard Jeans Gentle, Quick Wash, Wash
and Spin
Press
over 2 seconds, the program
of reservation. T
reserved hours to the wash cycle end. The
indicator flashes to indicate in-reservation.
, ,
.
"PROGRAM/RESERVATION " button
you can select
ixie
he n tube displays the
Remarks: 1. After pressing "POWER ON/OFF" to connect power supply, if the washing
machine lasts idle more than 5 min, it would automatically shut off the supply.
10
Page 13

b.
Operating p roced u re and explan ations for the
buttons
PROCEDURE STATUSPROGRAM STATUS
STANDARD
JEANS
GENTLE
QUICK WASH
WASH
SPIN
SOAK
WASH
RINSE
SPIN
WATER LEVEL
PROGRAM
RESERVATION
START
PAUSE
POWER
ON/OFF
1 Press the " POWER ON/OFF " button to switch on
the power suppl y
POWER
ON/OFF
2 Press the button of" " to
PROGRAM/RESERVATION
select a suitable full-automatic program
PROGRAM
RESERVATION
Afte r switc hin g on , the " St and ar d" pr ogram w ill b e th e def au lt. I f ot her f ul l-a utoma tic p ro gra m is
desi red, yo u can p re ss th e bu tto n " " to get t he corr esp on din g
indi cator o n. Re fe r to th e "B utt on o f " "
para graph o n pag e 10 .
PROG RAM/R ESE RVATI ON
PROG RAM/R ESE RVATI ON
Page 10
Exam ple: Us e the " Qu ick " pr ogr am f or sl ightl y soile d art ic les .
When " sta nd ard " progr am is s el ect ed, the w ash in g mac hin e wi ll pe rform f ull -a uto matic all y
cont rol le d fuz zy prog ram t o se t wat er leve l, wa te r flo w and w as h dur ation a cco rd ing t o the
clot h nat ur e and w eight
If there is water inside the tub, the machine cannot detect the laundries and will display
middle level. If wet laundries are put in, it may display high level. You must set suitable
water level by yourself.
11
Page 14

Attention
Even there's no water in the tub, the
spinning will start after a certain period.
Do not use soak process for woolen
laundries.
Wash the laundries that are prone to lose
colors separately from other laundries.
The pulsator will not rotate unless the
water is filled to selected water level.
Selection me t hod of the pr ocedur e p rog rams
Times of pushing
the"select"button
0
1
2
3
4
5
If you pu sh the " P ROGR AM/ " butto n for 6 ti mes, i t will
Selected program
STANDARD
JEANS
GENTLE
QUICK WASH
WASH
SPIN
Applicable procedure
Normal wash
Large, thick or heavily soiled
laundry
The laundry needn't spin to
avoid wrinkles
For load below 1 kg
Repe at u sin g th e was hi ng
liqu id
When t he l aun dr ies n ee d onl y
spin ni ng af te r man ua l
wash in g (fi rs t dra in t hen s pi n)
RESERVATION
Contents(t indicates
the programs about to run)
Wash (bb) Rinse(cc) Spin(dd)
Wash (bb) Rinse(cc) Spin(dd)
Wash (bb) Rinse(cc) Spin(dd)
Wash (bb)
Spin(dd)
the nixie tube
Soak (AA) Wash (bb)
Rinse (CC) Spin (dd)
resume the original mode, and it will circulate like that.
If you se lect t he"Q UICK WAS H" pro gram , you ha ve to se t the fu ll pro cedu re
of wash , rins e and sp in. The pro cedure can not be se lected.
12
Page 15

3 Press the "W ATER LEVEL" but ton to select s u itable
water l evel
WATER LEVEL
Af ter sw i tchi ng on t he po w er , press the bu tton "WATER LE VEL" t o sel ect a wat er leve l acc ordi ng
to t he loa d. Plea se ref er to the bu t ton " Wat er l eve l" on pa ge 10 .
Page 10
4 Push the " " button
PROGRAM/RESERVATION
to select suitable reserve program
Afte r swi tc hin g on, t he w ash ing m ac hin e res er ved w ash p ro gra m wil l be a uto mat ic all y set
inac tiv e. I f you d esi re a w ash c ycl e to e nd at a r ese rv ed ti me, y ou c an pr ess t he
" "b ut ton o ver 2 sec ond s to set a re ser ved was h pro gram.
PROG RAM /R ESE RVATIO N
Refe r to The bu tton of " " o n pag e 10.
Confi rm th e rese rve p rogr am
When " Reservation " bec omes ac tiv e, the ni xie t ube
disp lay s the tim e to th e en d of th e res er ved w ash c yc le, a nd
the in dic ator tu rns o n.Dur ing r eserv e pro cedur e,p ush the
"R es erv ati on " but ton to di spl ay the re ser ve mode .
To chang e the r unnin g pro gram or c anc el the re ser vatio n,
you sh oul d cut off the s upp ly and re sel ect.
5 Press the "s tar t/pause " b utton
PROG RAM /R ESE RVATIO N
Page 10
the washing will finish
about 18 hours later
START
PAUSE
Close the top lid
Except water filling ,washing, rinsing and draining, if the top cover is opened, the
washing machine will stop running and alarm.
Finish washing
PROGRAM
RESERVATION
START
PAUSE
The wa shing machine cuts of f the p owe r sup ply a uto mat ica lly w hen w ash c ycl e end s.
13
Page 16

Disposal after washing
After using, please clean the lint and foreign materials of the lint filter etc. in time.
Otherwise it may influence your using the machine.
Please first pull off the power plug from the receptacle before cleaning.
When washing, lint filter must be used
After using, please clean it in time.
Lint filter:
1.Pull upward to detach
2.Clean the lint
Put it in water and clean while it is still wet.
(See to Figure 1).
3.Press downward to assemble.
Dismantle
Clean
Install
Figure 2
Figure 1
Dismantle
Install
The fil ter sc reen o f the wa ter in let
valve i s like ly to be b lock ed by
forei gn mat eria ls and i nflu ence
the wat er inl et. Pl ease c lean i t
If the ca bine t is dir ty, wi pe it wi th wet c loth
Do not flush it directly with water.
Wipe it with neutral detergent.
Do not wipe it with thinner, petrol,
alcohol etc.
l
ho
o
lc
r
e
A
n
n
i
Th
Petrol
1.After washing, close the water faucet. ( If needed, you can dismantle the water inlet hose).
2.Do not store water in the washing machine for a long period. Drain the water completely after each using.
3.Be sure to pull off the power plug before maintenance.
4.Hang up the power cord and drain hose.
5.Wipe off the water drops on the surface of the machine and inside the tub. Open the top lid for some time
(about 1 hour), then close the top lid.
14
Page 17

Trouble shooting Answer to question
(I f th er e's b re akd ow n, p lea se p ull o ff t he p ow e r pl ug b efo re c he c ki ng ) Th e fol lo wi n g
ph en om ena a re n ot br ea kd o wn s so met im es . P le as e con fi rm a g ai n be for e se nd i ng i t to
re pa ir. I f t he re a re re al b re a kd ow ns, p le ase c om e to t he sp ec ial m ai nt e na nc e dep ar tm e nt o r
af te r- sal e se rvi ce d ep art me nt of o ur c om p an y. Do n ot r epa ir i t by yo ur se lf.
Phenomena
Buzz in g upon re serva ti on star ts,
Nixi e tu be indi cates " E0 "
No or slow drain, nixie tube
indicates "E1" , buzz ing.
Running pauses during spin,
nixie tube indicates “E2”,
buzz in g
Safety swi tch ac tuates , no t sp in,
(af ter se l f-correcti on twice),
nixi e tube displ ay s "E 3", bu zzing
No or slow water filling not
reaching the level in 15min ,
nixie tube indicates "E4 ",
buzz in g
Poor or no waterfall flow
Not wash
The machine
does not act
Not sp in
There's abnormal sound
inside the machine
The wa ter fau cet l eaks
The to p li d is not cl osed
Is the drain hose put down?
Is the drain hose blocked
by foreign material?
The top cover leaves open
Are th e lau ndrie s put
slan tin gly?
Is the m achin e sla nting ?
The wa ter t ap i s not o pen
The water inlet va lve is b lo cked
The wa ter p res sur e is too
low an d the c urr ent i s
too sm all
If the noz zl e is c ho ked wit h
foreig n bo di es
Is there power failure?
Is the pow er p lu g loose ?
Does the w at er l evel ar ri ve a t th e
set wate r le ve l?
Is the power plug loose?
Is the top lid closed?
Are the la un dr ies put ord er ly ?
Is the ma c hi ne s lanti ng ?
Are the la un dr ies sla nt in g in
spinni ng ?
Is the jointer screw of the water
inlet hose is loose or twisted
awry?
Common phenomena
Phenomena Explanation
The spinning is intermittent when it starts.
Push the "Procedure selection" button to
select "Spin", but it doesn't work.
There may be some water flowing out of
the drain hose in the first use of the machine.
While water filling in wash and rinse, the
pulsator pauses rotation
Wash pauses
The reason How to settle
Close the top lid
Put down th e drain hose.
Open and close th e to p li d onc e.
Cle an the foreign mate ria l.
Open and close th e to p li d onc e.
Close the top lid
Re-orde r t he l au nd ri es . Cl os e the
top lid.Lev el the mac hine in right
position.
Ope n an d cl os e the top lid on ce .
Open the water tap. Push the
"Start/Pause" button.
Clean the water inlet valve.
push the "Start/P ause" button.
Wait for the normal water pressure before use.
Remo ve t he fo re ign b od ies
Use it when the power is on.
Insert the power plug tightly.
Affusion to the set water level.
Insert the power plug tightly.
Close the top lid
Put the laundries orderly.
Level the machine properly.
Re-order the laundries.
Fast en th e jo int er scre w
prop erl y.
Balance the laundries to avoid slanting.
The program is setting the drain time. Some time is
needed before it starts spinning.
It is the water remained in the factory inspection of
performance.
To prevent splash during water filling.
Supplementary water filling 48 s after
sensor tests cloth material.
15
Page 18

Page 19

Page 20

 Loading...