

Page 1

Washing Machine
TIME
REMAINING
HEAVY
SOAK
NORMAL
WASH
LARGE
HOT
GENTLE
RINSE
MEDIUM
WARM
QUICK
SPIN
SMALL
COLD
HWM50TLF
TEMP
SELECT
TIME ON
TART
DELAY S
YCLE
WATER
WASH C
PROCESS
LEVEL
POWER
ON
OFF
HWM50TLF
Page 2

IMPORTANT SAFETY INSTRUCTIONS
Warning - To reduce the risk of fire, electric shock, or injury
when using your appliance, follow basic precautions,
including the following:
1. Read all instructions before using the appliance.
2. Use this appliance only for its intended purpose as described in this use
and care guide.
3. Use only detergents or softeners recommended for use in this appliance
and keep them out of the reach of children.
4. This appliance must be properly installed in accordance with the installa tion instructions before it is used.
5. Never unplug your appliance by pulling on the power cord. Always
grasp the plug firmly and pull straight out from the outlet.
6. Replace worn power cords, loose plugs/power outlets immediately.
7. Unplug your appliance before cleaning or before making any repaiers.
8. Do not operate your appliance in the presence of explosive fumes.
9. Do not use hot water that exceeds 60 C in temperature.
10. Do not use this appliance to wash clothes soaked, spotted or washed in
gasoline, dry cleaning solvents or any other explosive or flammable sub stances that could ignite and explode.
11. Clothes or rags used to clean flammable or explosive materials should
not be washed in this appliance till all traces of this material has been
removed, to avoid an accident.
12. Do not add or mix any flammable or explosive substances to the wash.
13. Do not try to remove clothes while the tub is moving. Let it come to a
complete stop.
14. The lid must be closed when bowl is spinning.
15. Do not operate your appliance when parts are missing or parts
are broken.
1
Page 3

16. Do not use this appliance for commercial clothes washing.
17. Do not operate this appliance unless all enclosure panels are properly
in place.
18. Do not tamper with controls.
19. To reduce risk of injury do not allow children to play with the appliance.
Close supervision of children is necessary when the appliance is used
near children.
20. This appliance must be connected to a proper electrical outlet with the
correct electrical supply.
21. Do not repair or replace any part of the appliance or attempt any servicing unless specifically recommended in the user-repair instructions
that you understand and have skills to carry out.
22. To reduce the risk of electric shock or fire, do not use extension cords or
adapters to connect the unit to electrical power source.
2
Page 4

Table Of Contents
PAGE
IMPORTANT SAFETY INSTRUCTIONS..................
OPERATING INSTRUCTIONS.................................
Parts and Features................................................
Operations.............................................................
Normal Operating Sounds.......................................
Lint Filter...............................................................
Safety Lid Switch...................................................
Care and Cleaning Guide......................................
Cleaning and Maintenance.....................................
Moving..................................................................
Storage of Your Washer..........................................
Troubleshooting..................................................
INSTALLATION INSTRUCTIONS...........................
Tools and Materials Required.................................
Unpacking Your Washer.........................................
Levelling Your Washer...........................................
Steps for Installation.............................................
Electrical Requirements.....................................
Power Interruptions..............................................
1
4
4
6
10
11
11
12
12
13
13
14
16
16
17
17
17
19
19
Specifications..........................................
3
Back cover
Page 5
OPERATING INSTRUCTIONS
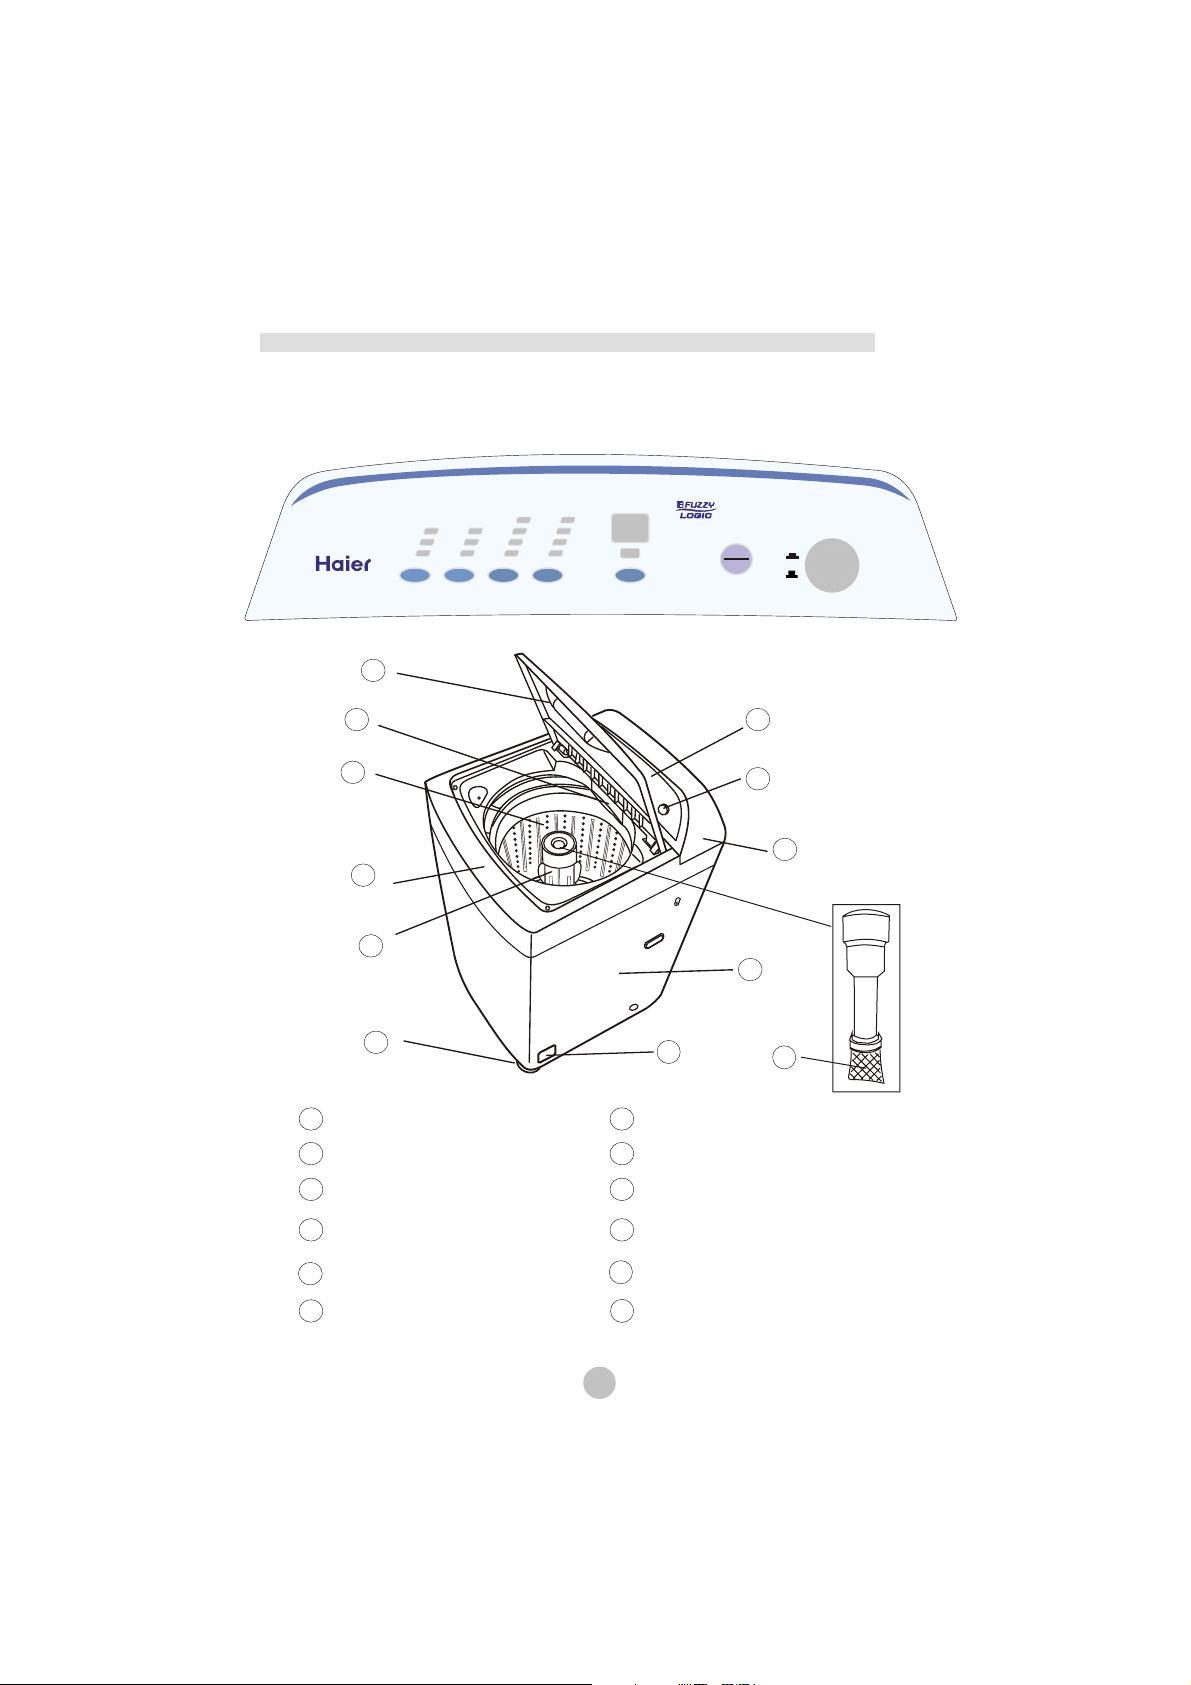
Parts and Features
TIME
REMAINING
TIME ON
DELAY START
START
PAUSE
ON
OFF
HWM50TLF
SOAK
HEAVY
WASH
WARM
COLD
HOT
TEMP
SELECT
LARGE
MEDIUM
SMALL
WATER
LEVEL
RINSE
SPIN
PROCESS
NORMAL
GENTLE
QUICK
WASH CYCLE
1
POWER
2
3
4
5
6
Top lid
1
Detergent box
2
Inner tub
3
Control panel seat
4
Hight Pulsator
5
10
1111
Control panel film
7
Power switch
8
Back faceplate
9
Cabinet
10
Adjustable foot seam
1111
7
8
9
12
Adjustable foot
6
4
12
Lint Filter
Page 6

1
2
3
5
6
7
4
Hot Water inlet valve
1
Cold Water inlet valve
2
Power cord
3
4
Drain hose bushing
5
Handle
5
Hook
6
Back cover
7
Page 7
OPERATIONS
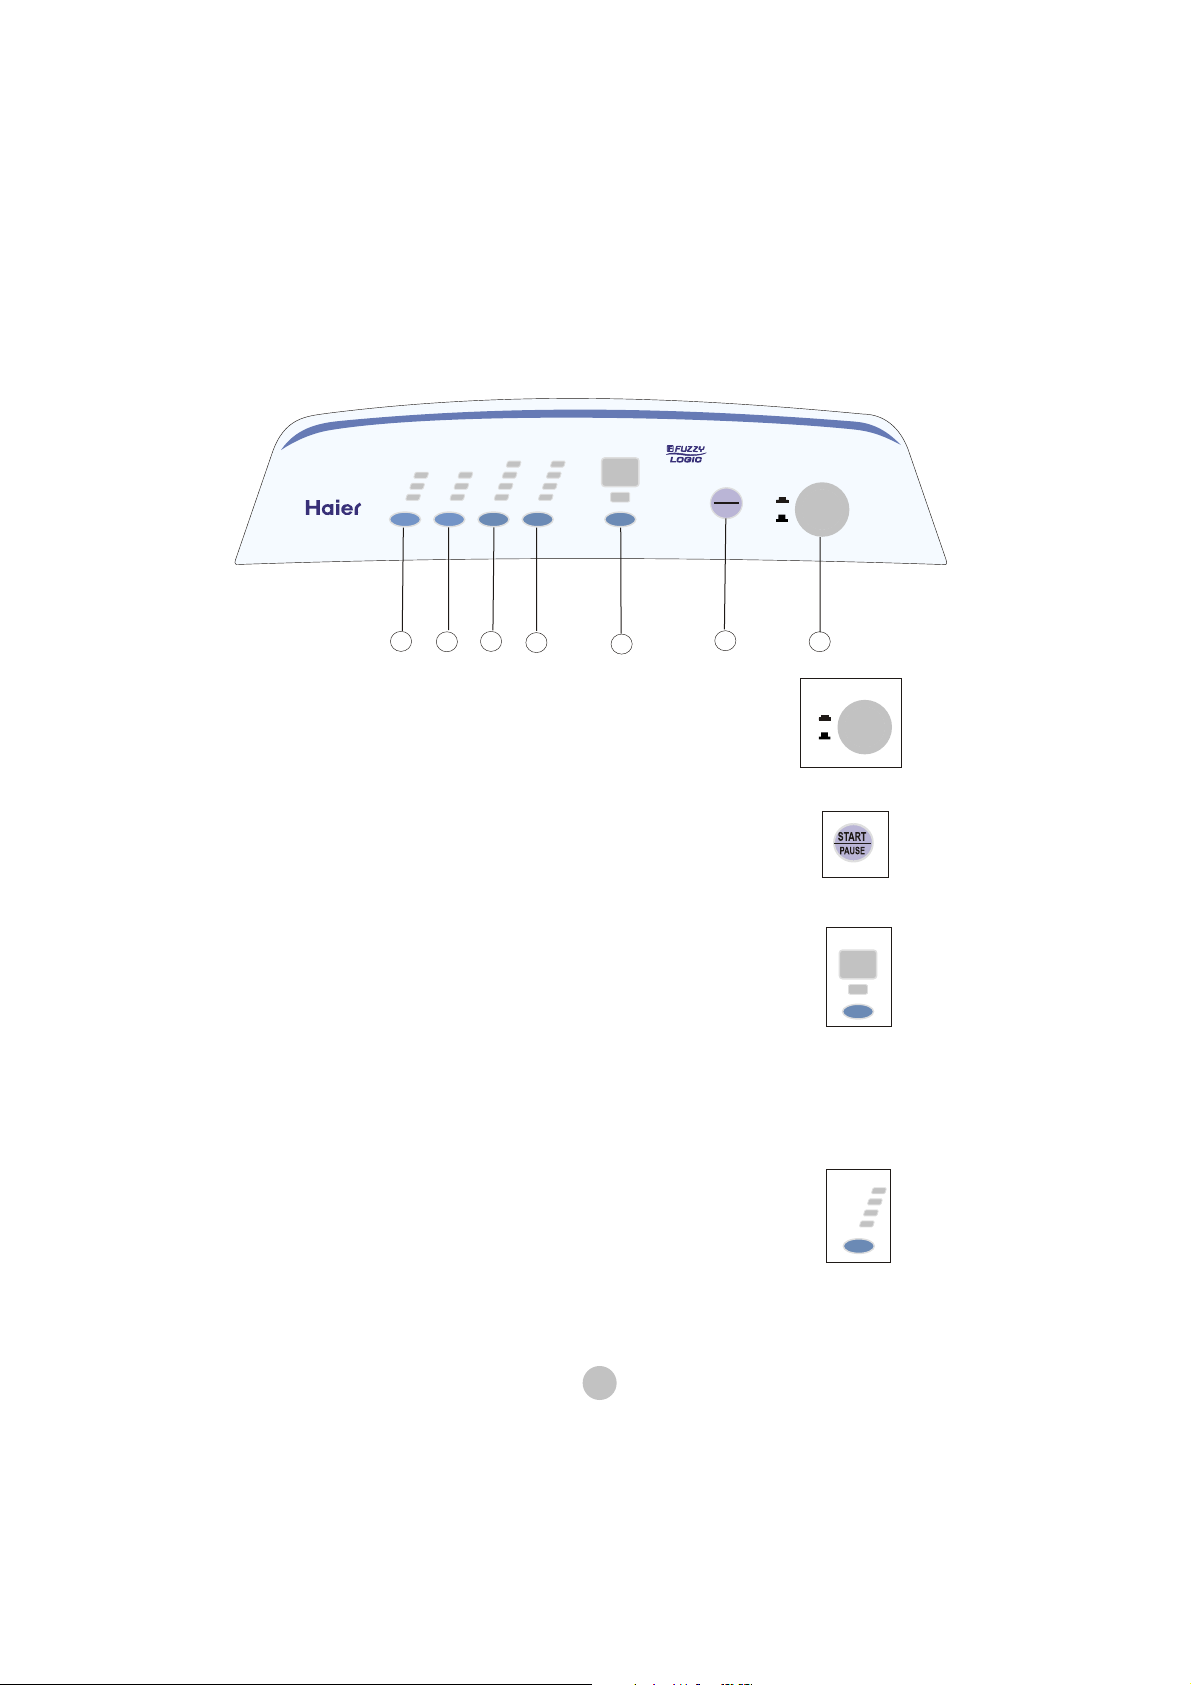
Understanding the Control Panel
SOAK
HEAVY
WASH
HWM50TLF
WARM
COLD
HOT
TEMP
SELECT
LARGE
MEDIUM
SMALL
WATER
LEVEL
RINSE
SPIN
PROCESS
NORMAL
GENTLE
QUICK
WASH CYCLE
TIME
REMAINING
TIME ON
DELAY START
START
PAUSE
POWER
ON
OFF
7
5
6
4
3
2
Power Button:(1)
Press the button in to turn the power ON and press the button
out to turn the power OFF.
Button in=Power On
Button out=power Off
Start/Pause Button:(2)
Press this button when you want the machine to start running.
During machine running, press this button to pause and press
once again to resume operation.
Delay Start Button:(3)
This convenient feature lets you delay the start of the wash cycle
between 2 to 24 hours.
Confirming a reserved program
When reserve starts, program selected indicator turns off, while
the reserve Indicator and remaining time turn on. During
reservation period, pressing Delay/Start button could get reservation conditions displayed.
Altering the running program or cancelling reserve needs to
cut off power and choose again.
Wash cycle button:(4)
After switching on, the Normal cycle will be the default. If other
cycle is desired, you can press this button to get the corresponding
indicator on.
Heavy Cycle
Washing the bigger, thicker or heavier dirty laundries.
Normal Cycle
Common washing, about 60 minutes.
1
POWER
ON
OFF
TIME
REMAINING
TIME ON
DELAY START
HEAVY
NORMAL
GENTLE
QUICK
WASH CYCLE
6
Page 8

Gentle Cycle
Washing the woollen textile or underwear
Quick Cycle
Quick washing of the light dirt laundries only 25 minutes
PROCESS Button:(5)
This is to selectwashing process.
Soak will not work in Quick cycles.
W ater level indicatorwill shut off if only Spin is selected.
WASH
RINSE
SPIN
PROCESS
SOAK
WATER LEVEL Button:(6)
W ater levels maybe set at thebeginningof thewash or at pause.
During Soak, W ash or Rinse press this buttonto manually
replenish water.
Release
to stop.
LARGE
MEDIUM
SMALL
WATER
LEVEL
Functionautomaticallyis inactivewhen water reachestheoverflow
tion level.
Protec
TEMP SELECT Button:(7)
To selectinlet water temperaturefor wash and rinse.
Initial setting is W arm/Cold whenwasher is poweredon.
Press buttonto change
selectionbasedon clothesput
WARM
COLD
HOT
TEMP
SELECT
in the washer.
Operating Procedure
1. Press power on button.
The washer will now be in the working status in the Nor mal cycle.
If the Start/Pause buttonis not pressedwithin 5 minutesafter poweringon theunit
it will automaticallyswitch off and return to thestand by mode.
The washer will also return to thestand by modeimmediatelyafter completionof
the wash process.
Regardlessof thesettingsby pressing thepower on/off buttonall programswill
stop and return to thestandby mode.
2. Selectionof Cycles
When the washer is poweredon theNor malcycleis the defaultcycle.If other
cycleis required press thecyclebuttonfor desired program.
3. ProcessSelect
Oncethe power is switchedon thewashing machinewill automaticallyset the
Nor mal cyclewhich will W ash, Rinse andSpin. If other selectioncombinations
7
Page 9

are desired,press the ProcessSelectbuttonto choose.
Note: Spin shall begin after sometimeevenif thereis no water in the tub. Do not
use soak processfor woolen clothes.Clothesprone to fadingshould be
washedseparately.
4. Water Level Selection
After W ash Cycleselectionpress the Water Level buttonto selectthe proper water
level for wash.
Note: See chart belowfor LoadSize selection.
The Capacityof
Washing (kg.)
4.5~6.5
2.0~4.5 Medium
Below 2.0 Small
Level
W ater W ater
Large About 55L
About 44L
About 35L
Quantity
5.Temp of Wash and Rinse Water Selection
Initial setting is W arm/Cold when washer is poweredon.
selectionbasedon clothesput
in the washer.
Press buttonto change
6. Delay Start
To start thewasher at a later lime press the Delay Start buttonand set the time.
When activatedtheindicator displays 2. Push buttononcefor every 1 hour delay
for up to 24 hours
Press Start buttonto activateDelay Start.
When the delay timer starts theprogram selectindicatorturns off. The indicator
will display the remaining time to turn on theunit. In the lower right corner of the
display, a blinking light will indicatethatDelay Start has beenactivated.
By pressing theDelay/Star t buttonthe selectedProcessprogramswill be
displayed.
By altering therunning program,the washer will haveto bereset.
7. Start/Pause
Press this buttonwhen you want the machineto start.
During operationpress this buttonto pauseandpress it again to resumeoperation.
Note: By openingthe top lid will stopthe machineexceptfor water filling or
draining.
8
Page 10

Loading the W asher:
Loadeachitemloosely.
Separatethe white and coloredclothes.Separateheavyclothesfrom light clothes.
Carefully checkall pocketsandcuffs for small items.
They caneasily slide in to thetub and may damagethe
Pre-treat all stains and heavily soiled areas for best results.
Do not overloadyour washer.
When loading wet items,keepwater levelhigh enoughso items
canfloat easily in the water.
Avoid wrapping large itemssuchas bedsheetsaround the agitator.
Closethe door properly after loading theclothes.If you keepthe lid
up, the agitation will not start.
tub.
Pr oper Use of Deter gent:
It is goodwashing practiceto addthe detergentto the water
beforeyou addthe clothesso thatthe detergentcanwork
effectivelyon your clothes.
Note: You canuse less or more detergentdependingon thesize of the load, water
typein your living area, whetherit is soft or hard andwhether the clothes
are heavily soiled or lightly soiled.
detergent dispenser
Fabric Softener Dispenser:
The fabric softenerdispenseris locatedon thetop of the agitator.
Dispenser will automaticallyreleaseliquid fabric softenerat proper time during
rinse cycle.
Steps to use thedispenser:
1. Pour in liquid fabric softenerinto dispenseras recommended
by themanufacturer.
2. Add water up to its fill level, but do not exceedthe level.
W arning: Never pour fabricsoftenerdirectly ontoclothesbecauseit will stain
your clothesor you maygetspots on your clothes.
Do not stop washer during its first spin or dispenserwill automatically
releasethe softenerin to the wash load.
Do not use powderform of softenerinto dispenserotherwise it will
clogup thedispenser. This dispenseris only designedfor liquid form.
fabric softener dispenser
9
Page 11

Bleach Dispenser:
Bleachdispenseris locatedon front corner under the loadingdoor.
Pour in recommendedamountof bleachinto dispenser
during thefirst wash fill.
Note: Use only liquid bleachin dispenser.
W arning: Be carefulnot to spill undilutedbleachon
the washer cabinetor your
a strong chemical,it may damagesomeof
clothesor the finish of the washer if not properly diluted.
your
the manufacturer s
Use
use of liquid or powderbleach.
Bleach Dispenser
clothes.As it is
chart, on productcontainerfor recommended
Normal Operating Sounds
The following sounds are normally heard during the
operation of the washer:
Tumblingsounds: This is normal as theheavywet clothesin the W asher
are continuouslybeing tossedaround.
Air rushing noise: This happenswhenthe W asher tub spins at
very high RPM.
W ash and Rinse cyclesgoingon andoff will also makeclickingsounds.
10
Page 12

Lint Filter
The lint filter mustbe used during washing.
It mustbe cleanedin timeafter eachusing.
1. Take off the lint filter.
Pull up thelint filter from theagitator.
2. Remove lint
Press the lint screenclip with your thumband index finger, and getthe screen
downward as shown in figure below. While wet, removethe lint from thescreen.
3. Install the lint filter
After cleaning,install the screenbackonto the lint filter. Then put the lint filter
backin the agitator barrel.
Press
Press
Figure 2
Figure 3
Safety Lid Switch
If for any reasonyou openthe lid in the middleof the wash cycle,the
washer will not spin and will shut off automatically. Oncethe lid is
closed,thewasher will start backon.
Lint Screen
Pull up out
Figure
Lint filter
Agitator
11
Page 13

Careand CleaningGuide
W arning: Always unplug your washer to avoid electricshockbeforecleaning.
Ignoring this warning may result in deathor injur y. Before using
cleaningproducts,always read and follow manufacturers instructions
and warnings to avoidpersonalinjur y or productdamage.
Cleaning and Maintenance
Use only dampor sudsy clothfor cleaningcontrolpanel.
To avoidany kind of damageto cabinetfinish, wipe washer cabinetas
needed.If you spill liquid/powdered softener, bleachor detergenton the
cabinet,wipe cabinetimmediatelybecauseit candamagethe finish.
Do not use any abrasive,harsh chemicals,ammonia,chlorine bleach,
concentrateddetergent,solvents or metalscouring pads. Someof these
chemicalsmaydissolve, damageand/or discolor your washer.
Removepins or other sharp objectsfrom clothesto preventscratchingof
interior parts.
Leavelid openafter you are donewashing to allow inside of washer to
dry and preventbad odors.
12
Page 14

Moving & Vacationing
Turn off water supply faucet'sand disconnecthoses.Drain water from all hoses.
This will preventfrom damagingdueto water leakageif the hosesaccidentally
getruptured or they becomeloose.
Disconnectelectricalplug.
Dr y inner wash tub. If movingwasher, disconnectdrain hose.
Turn the levelinglegs clockwiseall the way in.
Move and store your washer in upright position only.
To preventmoldor mildew, leavelid openso moistureinside
machinecanevaporate.
Storage of Your W asher in Cold Envir onment
The W asher mustbe stored at roomtemperature.
If you just got delivery of a washer when outsidetemperatureis below freezing,
do not operateuntil washer has warmedto roomtemperature.
Do not install or operateyour washer where room temperatureis belowfreezing.
13
Page 15

Troubleshooting
W asher does not operate:
Checkif unit is pluggedin. The plug mayhavecomeloose.
Checkif the electricalwall receptacleis of proper voltage.
Checkif the circuit breaker needsto be reset or if the fuse
needsto be replaced.
Checkif the washer is overloaded:load may needto be
re-balancedandclothesmayneedto beredistributed.
Checkif the lid is open.You mayhave to closethelid properly.
The washer pausesin somecycles.This is normal in delicateor
hand-washablecycle,which has short soak periodwhere your clothes
are beingsoakedfor very short period of time.You will not hear washer
operationfor a short period of time.When the soak timeis over,
it will start automatically.
Pr oblems with water:
Not enoughwater comingout: Water faucetmay needto be turned on
fully. W ater hosesmay be tangledup or wrinkled up. Straightenup
hoses.Checkwater level selection,it may needto bereadjusted.
W ater Temperatureis incorrect:Checkyour water heatertemperature.
Hot water needsto beat a temperatureat least 120 F. -140 F
(49 C 60 C.).Checkto makesure the inlet hosesare properly
connected.(e.g. hot to hot & coldto cold)
W ater leaks: This is dueto not properly installing drain hose or fill
hoses.Your homedrain maybe cloggedor having constant
water pressure.You mayneedto tightenhoses,checkthe
plumbingor call a plumber.
W ater will not drain: This is dueto not installing your drain hose
properly. You mayneedto connectthe drain hose properly. Checkthe
position of thedrain hose. In order to drain properly, makesure that top
of drain outletis less than4 ft. (1.2 m) abovethefloor.
14
Page 16

W asher is making noise:
W asher mayneedto be reinstalled. (Checkwasher installation section)
W asher load may needto bere-balanced,as theload may beuneven.
Coins, loose change,buttonsor other heavyobjectscouldmakenoise
(read Operating Guide Nor mal Operating Sounds).
SquealingSound: Due to overloadedwash tub.
Vi bration Noise: Due to notleveling washer properly on the floor and
unevendistribution of clothesin the tub.
Pr oblems with clothes:
Clothesare toowrinkled: this is dueto impropersorting, overloading
and washing in too hot water repeatedly. A void overloadingandresort
your load. Do not mix heavyclothessuchas work clotheswith light
clothessuchas blouses,light shir ts and delicateitems.You mayneedto
wash in warm or coldwater.
Have soapresidue: detergentmaynot be dissolving in water.
Checkwater temperatureor you needto adddetergentas wash
tub is being filled with water beforeyou load your clothesto avoid
soapresidue on clothes.
Spots or stains on your clothes:this is due to incorrectuse of fabric
softener. You mayneedto read proper instructionson thecontainer
and follow proper directionsfor using the softener.
Clothesare grayedor yellowed:this is dueto not pouring
enoughdetergentfor large loads. You mayhave to addmore
detergentto the load.
Clothesare ripped& haveholes/excessivewear & tear: this is dueto
sharp objectssuchas pins and belt bucklesleft in pockets.You will need
to removesmall loose sharp objects.Fastenbelts, zippers, metalsnaps
etc.Checkif you are using undilutedbleach.Never addundiluted
bleachto wash.
Note:
roubleCodes Reason
T
E0 Top lid not closedduring delaystart sequence
E1 Blockageof drain hose
E2 Top lid not closedduring wash operation
E4 The water inlet time exceeds the preset time(30minutes)
15
Page 17

INSTALLATION INSTRUCTIONS
TOOLS and Materials Required
You will need to have the following tools to help
you in the installation of your Washer:
.Scissors
.Phillips Screwdriver
.Standard Screwdriver
.pliers
.Wrench
.Tape Measure
.Gloves
.Level
Accessories Supplied
1. Bottom panel 1
2. Screws for the bottom panel 8
3. Water inlet hose
4. Drain hose
5. Drain hose clamp 1
6. Drain book(goose neck)
1
2
5
3
6
Quantity
2
1
1
4
16
Page 18

Unpacking Your W asher
Removeall packingmaterials. This includesthe foambaseand all
adhesivetapeholdingthe washer accessoriesinside andoutside.
Open the top lid to removethestyrofoamdrum brace.Pull to remove.
Note: Save drumbrace.Reinstall when movingthe washer.
Inspectand removeany remainsof packing,tapeor printed
materialsbeforeusing thewasher.
Leveling Your W asher
Adjustable foot
Your washer has 4 leveling legs; which
are locatedon thefour bottom
corners. After properly placingyour washer in its final position, you can
level your washer.
Levelinglegs canbe adjustedby turning themcounterclockwiseto raise
your washer or turning themclockwiseto lower your washer.
High
Low
Steps for Installation
Selecta suitablelocationfor the washer on a hard evensurfaceaway from direct
sunlight or heatsourcee.g. radiators, baseboardheaters,cookingappliancesetc.
Any floor unevennessshould be correctedwith theleveling legs locatedon the
bottomcorners of thewasher. The washer mustbe placedat roomtemperature.
You mustnot placewasher where thetemperatureis at belowfreezing.
Installing the Bottom Panel:
The purpose of the bottom panel installation is to block the
noise and give you quiet performance of the washer during
the operation.
Steps:
1.You must first lay the washer on its back.
2.Locate the panel on to the bottom of the machine.
3.Use a screwdriver to tighten the screws securing the panel to
bottom of the washer.(8 screws are supplied)
4.Once all screws are tight and the panel is secure return the washer to
its standing position.
17
Page 19

Installing Your W asher:
Read though these
1. Insert a new flat washer into eachend of the water inlet hoses.
Fir mly put the washers in the coupling.
2. Connectthe hot and coldwater inlet hosesto thehot and
coldwater Faucet.
3. Connect the other end to the corresponding washer inlet located at the back of
machine.
Instructions
Carefully
beforeinstallation.
Note: You mayhave to use pliers to tightenthe coupling.
becauseyou maycausedamageto the valve.
You should use the new hose-sets supplied with the washer. Old hose-sets
should not be reused.
4.install the drain hose to the side of the washer using the drain hose damp provided.
The drain hose must be placed into a drainpipe or sink at least 1 1/2inches in diameter.
Use the gooseneck to the hose in place. To avoid possible water back up, the drain
hose must reach a minimum height of 900mm and a maximum height of 1200mm.
Water Inlet
5.Pug in the washer to a regular 230-240Volt/50Hz,10Amps outlet.
Note :Carefully inspect all around the machine and at the back for
any leaks, and tighten any loose connections.
Water Supply Hose
Drain Hose
Do not over tighten
Goose Neck
Hose Bend
Caution: If, after completingthesesteps, you are unsurethat unit is properly
installed, contacta qualifiedinstaller. To ensurethat your W asher is
properly installedit is recommendedthatit be installedby a certified
installer.
18
Page 20

ElectricalConnections
Grounding Instructions
This appliancemustbe grounded.In the eventof an electricalshort circuit,
groundingreducesthe risk of electricshockby providing an escapewire for
the electriccurrent.This applianceis equippedwith a cordhaving a grounding
wire with a groundedplug. The plug must be inserted into an outletthat is
properly installedand grounded.
Improperuse of the plug canresult in a risk of electricshock.
Consulta qualifiedelectricianor service person if the grounding
instructions are not completelyunderstoodor if doubtexists as to
whetherthe Applianceis properly grounded.
Wiring Requirements:
The washer mustbe pluggedinto at least
50 HZ GROUNDED OUTLET .
Note: Where a standardtwo-prong
outletis encountered,
it is the personal responsibility
and obligation of the
consumerto haveit replaced
with a properly grounded
three-prongoutlet.
Extension Cords:
W e do not recommendthat you usean cord.
extension
AMP 230-240 VOLT,
10
Power Interruptions
Occasionallytheremay be power interruptions dueto thunderstorms or other
causes.Removethepower cord from AC outletwhen a power outageoccurs.
When power has beenrestoredre-plug power cordto AC outlet.If outageis
for a prolongedperiod, cleanwasher beforeusing it again.
19
Page 21

Specification
Model HWM50TLF
Rated voltage frequency 230-240V~ 50Hz
Rated washing / spinning capacity 5kg (weight of standard dry cloth)
Water level/Water quantity (about) Large/55L Medium/44L Low/35L
Max water consumption
Injection pressure 0.03MPa-0.78MPa
Rated washing power 450W
Rated spinning power 300W
Weight( ) 37kg
Dimension 540x560x940
About 110L(High water level; Normal program)
 Loading...