

Page 1
ROOM AIR CONDITIONER
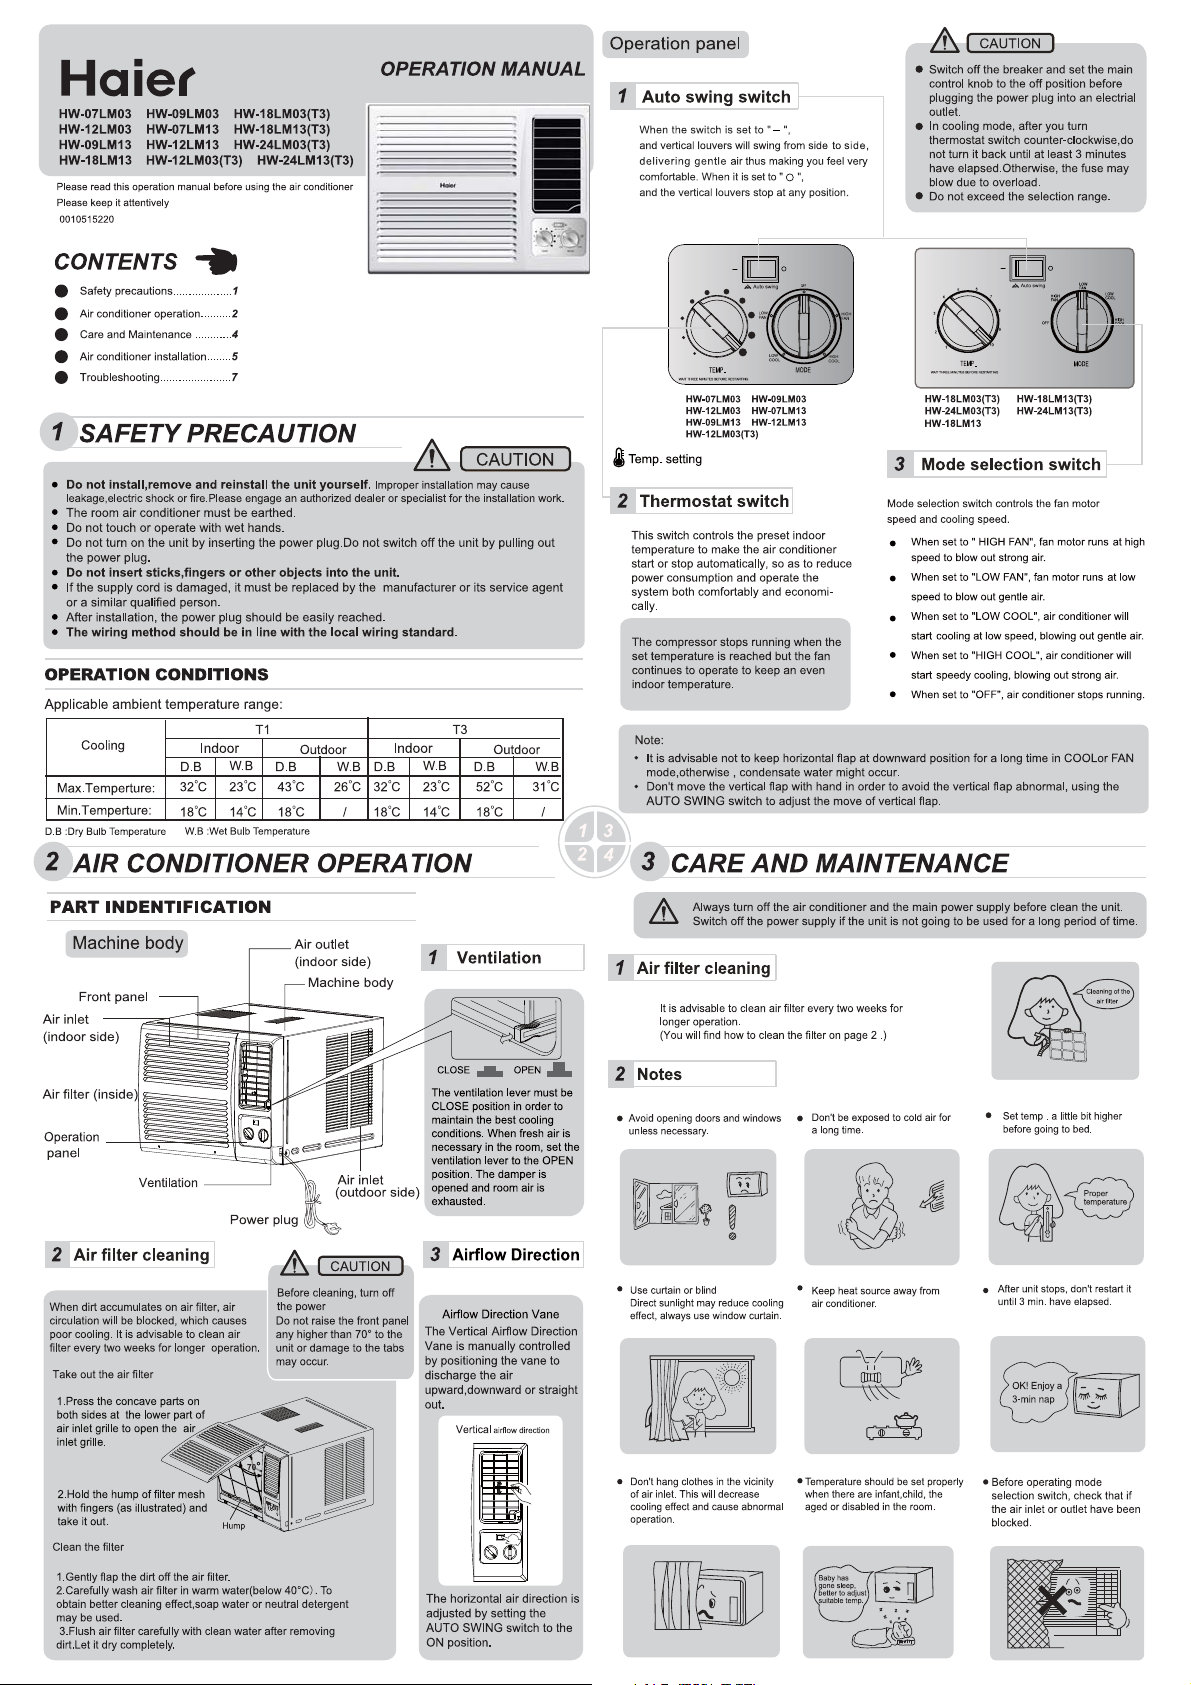
Page 2

4
AIR CONDITIONER INSTALLATION
(ONLY FOR REFERANCE)
INSTALLATION PROCEDURES
SELECTION OF THE INSTALLATION POSITION
1,The air-conditioner is better installed in shadow or in a place
with short period of sunshine. In case the air-conditioner is
installed at the point exposed directly to the sunshine, it should
be protected from the direct sunlight as possible in order to
avoid the long time of direct sunlight otherwise its performance
will be lowered. (As illustrated in Fig. 1).
2. For the convenience of operation, it is
recommended that air-conditioner be installed at
least at the height of 760-1300 mm above the
floor and no obstacles before it for a free airflow.
3.The shutters at both sides and the top of
air-conditioner should be protruded outdoors free
from being blocked by wall, window,ect.
4.The back of air-conditioner should be kept over
500mm from the obstacles (for example, wall,
etc.) (As illustrated in Fig. 2).
5.To have an efficient drainage, the back part of
the air-conditioner should be inclined downward
by 5-10mm (As illustrated in Fig. 3).
>500mm
NOTES:
For longer and trouble-free operation of the unit, pay special attention to the following:
Install air-con at a place strong enough to support the unit.
Leave enough space around air inlet and outlet for better circulation.
Avoid places where flammable gas leaks.
Problems may occur if unit is installed in the following places:
Place where oil exists in the air including engine oil or seaside with
salt breeze blows and hot spring area with sulphurous gas in the air.
cover
support
5-10mm
fig.2
THE ENCLOSED ACCESSORIES OF THE CONDITIONER
fig.1
fig.3
1. Fix the prefabricated iron frame to stable position by expansible screws.
2. Put the whole machine with all the accessories installed,
on the iron frame. If there's water outlet flexible pipe, lead
it to needed position(see Fig.1).
Wall
Water outlet flexible
pipe(provide by user)
Fig.1
3. Fill any distance between the wall hole and the machine body with flexible sponge rubber strip to
prevent the entering of outer noise and the leaking of the coolness.
4. After installation of the conditioner, insert the power plug into the outlet and perform test-run.
Cautions
Power cord: Be sure to use the exclusive power cord.
Change installation place: If air-con need to be changed to another
place please contact the dealer, who sold you the unit.
Always use at the rated voltage and with specfic air conditioning circuit
HW-07LM03
HW-09LM03
HW-12LM03
HW-18LM13
HW-18LM03(T3)
HW-18LM13(T3)
HW-12LM03(T3)
Name
Figure
HW-07LM13
HW-09LM13
HW-12LM13
HW-24LM03(T3)
HW-24LM13(T3)
Outlet pipe fitting
Rubber lid
11 1 13
11 1 1
Manual
1
PREPARATIONS BEFORE INSTALLATION
Make the wall hole or window hole (see Fig.1)
MODEL A B
HW-07LM03 HW-07LM13
HW-09LM03 HW-09LM13
HW-12LM03 HW-12LM13
HW-12LM03(T3)
HW-18LM03(T3)
HW-24LM03(T3)
HW-18LM13(T3)
HW-24LM13(T3)
HW-18LM13
Prepare unit for installation:
1.Take out the conditioner and accessories from the package .
2.Choose one way from below two options
Generally there are two methods available on disposal of the condensed water:
Method 1
Block the bottom plate hole of the conditioner
with rubber lid, install outlet pipe fitting on the
back hole and let the condensing water flow from
the back hole of the conditioner. (See Fig.1 ) In
this method, the accumulated condensed water
in the bottom plate is hit by the fan onto the heat
exchanger, and evaporated and blown out
from the machine. It can cool the heat
exchanger adiator more quickly, and improve
the energy efficiency of the conditioner. But the
hitting noise by the fan at the outdoor side is
relatively large.
Method 2
If the surrounding humidity is high:
Block the back hole of the conditioner with
rubber lid and install outlet pipe fitting to the
bottom hole, which can make the condensed
water flow out from the bottom plate. (See Fig.2)
If necessary the above two methods can both
have extra pipe added on the
(available on the market).
370mm 485mm
395mm 615mm
440mm 635mm
on disposal of the condensed water.
outlet pipe fitting
A
Outlet pipe fitting
Rubber lid
Fig.1
Rubber lid
Fig.2
Outlet pipe fitting
Sealed gasket
B
Fig. 1
Iron frame
Width of the wall
Back hole
Bottom plate hole
Back hole
Bottom plate hole
5
TROUBLESHOOTING
5
7
6
8
Phenomenon SolutionCause or check points
Switch on the machine but it
does not work immediately.
Switch on the machine but it
does not work.
The cooling effect is not good.
Before calling for service.
Check the following points before calling for repairs or service.
If the machine is started after stop,it will need about 3 minutes
to re-start so as to prevent the fuse from break.
Is plug firmly inserted?
Is there power failure?
Does fuse get burned?
Is thermostat switch
wrongly adjusted?
Is there any direct
sunlight in the room?
Are doors or windows
left open?
Are there any obstacles
blocking air inlet and
outlet?
Is air filter clogged?
Is there too much heat
source in the room?
Readjust power supply
Replace fuse.
Readjust the thermostat.
Use curtain or blind.
Shut doors and windows.
Remove the obstacles.
Clean it.
Remove the heat source
NOTE:For some model the air conditioner is
designed to splash the condensed water on the
heat exchanger for maximun cooling efficiency,the
extra condensed water will be blown out from the
machine , But the hitting noise by the fan at the
outdoor side is relatively.
(See Fig.3)
Fig.3
If problems can not be solved please pull out power plug and contact
your dealer.
Bottom plate
 Loading...