

Page 1

WINDOW TYPE ROOM AIR CONDITIONER
OPERATION
MANUAL
HW-18C03/R1
Please read this operation manual
before using the air conditioner.
Please keep it attentively.
No.0010546097
Page 2

Contents
Contents
Part Names
Operation Guide
Maintenance
Cautions
Trouble shooting
Installation Instructions
Installation Guide
............................................................................. 2
.......................................................................... 3
............................................................. 4-5
...................................................................... 6
........................................................................... 7
............................................................... 8
............................................................... 10
..................................................... 9
2
Page 3
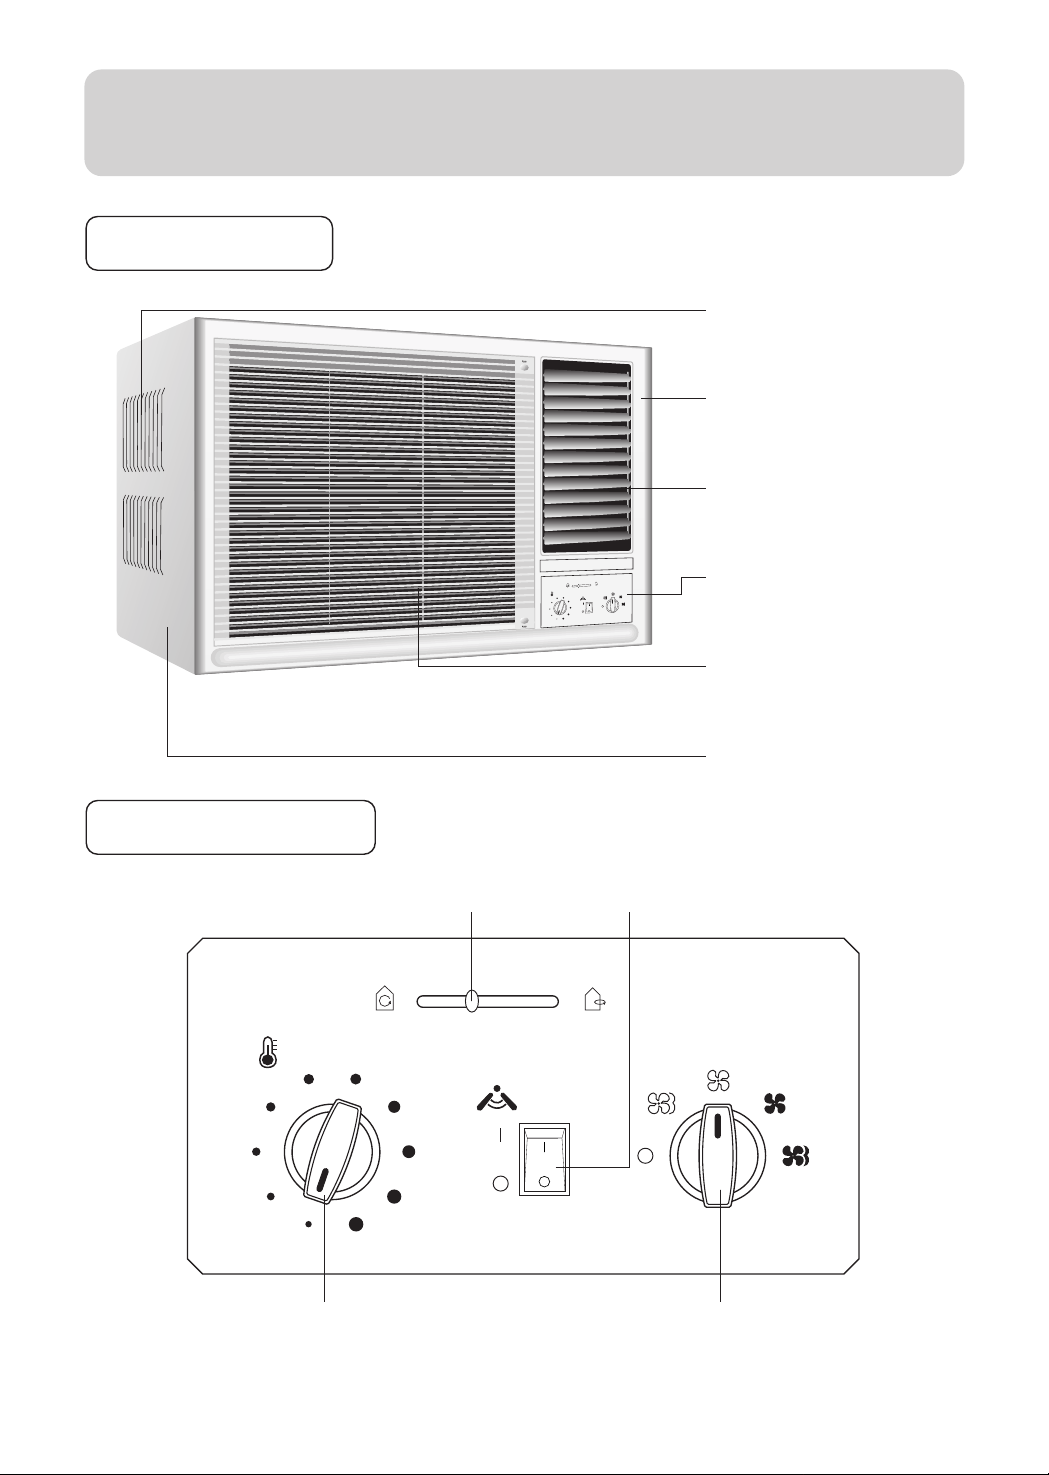
Parts Name
Machine body
Air inlet (outdoor side)
Front panel
Air outlet (indoor side)
Operation panel
Ventilation lever
VENTILATOR
Mode selection
Temp. setting
Auto swing
WAIT 3 MINUTES BEFORE RESTARTING
Auto swing switch
Operation panel
Air inlet (indoor side)
Cabinet
Thermostat switch
Mode selection switch
3
Page 4

Operation Guide
Auto air deflector switch
Auto swing
Mode selection switch
Mode selection
When the switch is set to " ", the indicator lights
up, and vertical louvers will swing from side to side,
delivering gentle air thus making you feel very
comfortable. When it is set to " ", the indicator
goes out, and the vertical louvers stop at any position.
Mode selection switch controls the fan motor
speed and cooling speed.
<1>
When set to " ", fan motor runs at high
speed to blow out strong air.
When set to " ", fan motor runs at low speed
<2>
to blow out gentle air.
<3>
When set to " ", air conditioner will start
cooling at low speed, blowing out gentle air.
<4>
When set to " ", air conditioner will start
speedy cooling, blowing out strong air.
Hint
<5>
When set to " ", air conditioner stops running.
When the mode selection switch is turned to " " or " " ,
the air conditioner will only blow out air without cooling.
If the mode selection switch is turned from cooling mode to fan
mode, do not turn it back until at least 3 minutes have elapsed.
4
Page 5

Operation Guide
Thermostat switch
Temp. setting
Vertical Airflow Direction Vane (Airflow
direction adjustment Up-and-Down)
The Vertical Airflow Direction Vane is
manually controlled by positioning the
vane todischarge the air upward,
downward or straight out.
This switch controls the preset indoor temperature
to makethe air conditioner start or stop automatically,
so as to reduce power consumption and operate the
system both comfortably and economically.
Remarks:
The compressor stops running when the
set temperature is reached but the fan
continues to operate to keep an even
indoor temperature.
Vertical airflow direction
Ventilation Lever
VENTILATOR VENTILATOR
" " position, the vent door
opens to allow air, smoke or
odors to be expelled from the
When the slide lever is at the:
" " position, the vent door is
closed and the air inside the room
is circulated and conditioned.
room.
CAUTION
In cooling mode, after you turn thermostat switch counter-clockwise,
do not turn it back until at least 3 minutes have elapsed.
Otherwise, the fuse may blow due to overload.
Do not exceed the selection range.
5
Page 6

Maintenance
Air filter cleaning: Please clean the air filter every two weeks
When dirt accumulates in the air filter, air circulation will be blocked, and causes poor
cooling. It is advisable to clean the air filter every two weeks for efficient operation.
Removal of air filter
PUSH
(1) Loosen the air inlet by pushing " PUSH " at
both edges as shown.
(2) Open the air inlet.
(3) Hold the handle at lower part of the air filter
and draw outward to remove the air filter.
Air inlet
VENTILATOR
Mode selection
Temp. setting
Auto swing
WAIT 3 MINUTES BEFORE RESTARTING
PUSH
Air filter cleaning
1. Gently tap the dirt off the air filter.
2. Carefully wash the air filter in warm water
(below 40 oC). To obtain better cleaning
effect, soapy water or neutral detergent
may be used.
3. Flush the air filter carefully with clean water
after removing the dirt. Let it dry completely.
Installation of filter
(1) Put the air filter on.
(2) Push the part marked " PUSH " until you hear a click.
CAUTION
Power cord: Only to use an exclusive power cord.
Changing installation site: If the air conditioner needs to be changed to another
location, please contact the dealer that sold you the unit.
Washing
air filter
6
Page 7

Cautions
Avoid opening doors and windows
as much as possible.
Use curtain or blinds.
Direct sunlight may reduce cooling
effect, so always use window curtain.
No entrance
Do not hang clothes in the vicinity
of the air inlet. This will decrease
the cooling effect and cause abnormal
operation.
Keep heat sources away from the
air conditioner.
Keep away from me
Before operating the mode selection
switch, check whether the air inlet
or outlet has been blocked.
Go away!
For longer and trouble-free operation of the unit, pay special attention to
the following:
Install the air conditioner at a location strong enough to support the unit.
Leave enough space around the air inlet and outlet for better circulation.
Avoid sites where flammable gas leaks.
Problems may occur if the unit is installed in the following areas:
Place where oil exists in the air including engine oil, seaside with
salt breeze, and hot springs area with air-borne sulfurous gas.
7
Page 8

Troubleshooting
Condition
Doesn't
operate
No cool air or
poor cooling
Check Item
Is plug firmly inserted?
Is fuse burned out?
Is there power failure?
Is thermostat switch
incorrectly adjusted?
Is there direct sunlight
into the room?
Is mode selection switch
set to fan mode?
Are doors or windows left
open?
Corrective Action
Restore power or replace
fuse.
Adjust the thermostat.
Use curtain or blinds.
Shut doors and windows.
Is there any obstacle
blocking air inlet or outlet?
Is the fresh air knob
shifted to the right?
Is there a strong heat
source in the room?
Is air filter clogged? Remove and clean.
If problems cannot be solved, please pull out power plug and contact your
dealer.
8
Remove the obstacle.
Close vent by shifting
knob to the left.
Remove or turn off the
heat source.
Page 9

Installation Instructions
Selection of the installation position
1. Select position where the structure is firm.
2. Select position where the air inlet and outlet are not blocked by obstacles.
3. Select position where the cooled air can be blown to every corner of the room.
4. Select position where there's no direct sunlight. If sunlight cannot be avoided, some means of
sun shade is required.
5. Select position where the outdoor airflow will not bother neighbors.
6. Select position where condensation drainage is not impeded.
7. Select position where there's no dangerous gas or oil vapor nearby.
8. An extension cord is not recommended.
Installation diagram
The unit must be installed so that the back (outdoor side) is lower to allow drained water to flow
out smoothly.
Width of wall should be
less than 295mm
400mm
400mm
5 ~ 10mm
400mm
700mm
Minimum distance
Requirements for electricity:
1. Applicable ambient temperature range :
Cooling
Indoor
Outdoor
2. If the power supply cord is damaged, it must be replaced by the manufacturer, the service,
agent or a similar qualified supplier. An extension cord is not recommended.
3. The wiring method should comply with local wiring standards.
4. After installation, the power plug should be easy to access.
5. The breaker of the air conditioner should be an all-pole switch (25A) and the distance between its
two contacts should be no less than 3mm.
6. The appliance must be connected to a socket outlet with the appropriate rating.
7.The appliance is not intended for use by young children or infirm persons without supervision.
8.Young children should be supervised to ensure that they do not play with the appliance.
Maximum:
Minimum:
Maximum:
Minimum:
D.B/W.B
D.B/W.B
D.B/W.B
D.B
32oC/23oC
18oC/14oC
43oC/26oC
18oC
NOTE:For HW-18C03/R1 are CFC mode, which adopt the R407c refrigerant.
9
Page 10

Installation Guide
Installation of air conditioner (only for reference)
1. Make a wooden frame. (Fig.1)
Model
HW-18C03/R1
BA
670mm440mm
2. Attach a metal support (not provided by
manufacturer) in a firm location with expanding
screws or bolts.
3. Remove the air conditioner from its packing
carton.
4. Place the air conditioner on the metal support.
5. Stuff gaps in the wall or window with soft
sponge material or rubber gaskets to block
outside noise and keep cool air from escaping.
6. Lift the back of the machine body slightly.
You can see the drain hole at the back of
the bottom plate. (see Fig. 2).
7. After installation of all the accessories,
put the whole machine on the metal support.
If there's water outlet flexible pipe, lead
the pipe to needed position (see Fig.3).
Metal support
A
B
Fig.1
Thickness of wall
Condenser
Rubber lid
Fig.2
Wall
water outlet
flexible pipe
Supplied accessory parts.
Name
Appearance
Quantity
Manual1Side screw2Front screw
1
Note: After finishing the installation of the air conditioner,
fix the panel board onto the casing with one front
attachment screw and two side attachment screws.
10
Fig.3
 Loading...