

Page 1
COLOUR TV RECEIVER
OWNER'S MANUAL
Please read this manual carefully
before operating the unit, and keep
it for future reference.
The Owner's Manual for the Follow Models:
21F9D, 21T9D, 21F9K, 21TA1(S),
21TA1(D), 21FA1, 21TA1, 21T9D(D),
21T9D(S), 21T9D(B), 21F7A, HT-3728,
HT-3768, 37T6D-T, 15F6B 21TA1(B),
21TA1(BG)
Page 2
CONTENTS
Before Operation
Warning and Cautions
Installation
Antenna connection
Preparation for the remote control
Position of keys and plug-ins
Front panel
Back panel
Using the remote control
Basic Operation
Power on and power off
Viewing TV programs
Viewing TV programs
Program scan and screen display
Tuning
Automatic search. . .
Manual search
MFT
Skip
Adjusting the picture and the sound
Multiple picture modes . . . . . . . . . . . . . . . . . . . . . . . . . . . . . . . . . . . . ... .. . . . . . . . . . . . .
Multiple sound modes
S.C.C,count and mute
Setting the Timer
Timer off. . .
Sleep timer and timer on
Channels appointment
Setting the other function
Language, screen protection
Curtain function and calendar display
Channel exchange
Setting the lock
Changing your password
Setting the lock
Game
Game control buttons and method of playing the game
Technical operation
Connecting Additional Equipments
Connecting additional equipment
Others
Troubleshooting
Specifications
Page 3
Warning and Cautions
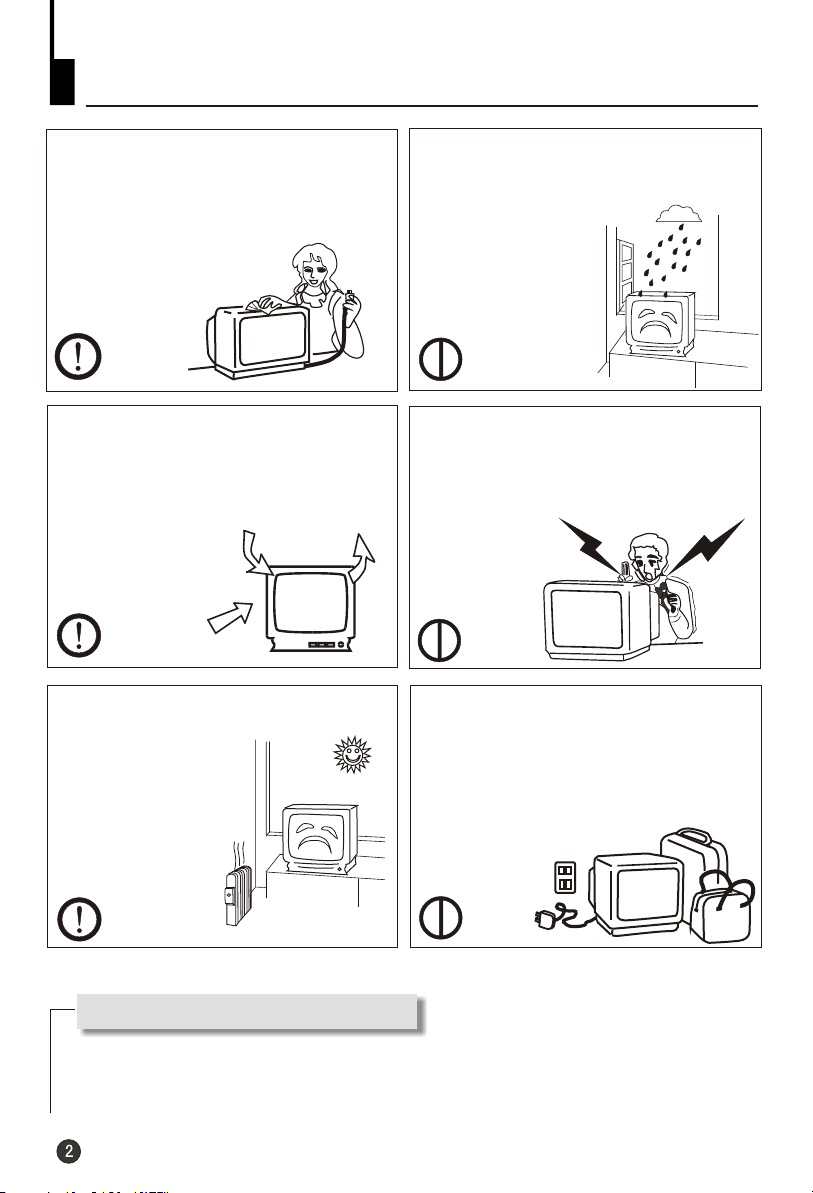
1. When you clean the TV set, please
pull out the power plug from AC outlet.
Don't clean the cabinet and the
screen with benzene, petrol and other
chemicals.
2. In order to prolong the using life of
the TV set, please place it on a
ventilated place.
3. Don't place the
TV set in the
sunshine or near
heat source.
4. To prevent the TV set from firing
and electric shock, don't expose the
TV set to rain or moisture.
5. Don't open the back cover,
otherwise it is possible to damage the
components in the TV set and harm
you.
6. When the TV set isn't going to be
used for long time or it is in thunder
and lightening, please pull out the
plug from AC outlet and the antenna
plug from the cover of the TV set.
Explanation on the display tube
In general, it is not needed to clean the tube surface. However, necessary,
it's surface can be cleaned with a dry cotton cloth after cutting off the power.
Don't use any cleanser. If using hard cloth, the tube surface will be damaged.
Page 4

Installation
Antenna connection
Generally speaking, to enjoy a clearer picture, we recommend that you use a CATV
system or an outdoor antenna. In different places, the suitable antenna type and position
are different.
300 twin-lead cable
Antenna adapter
75 coaxial cable
Plug
(additional purchase)
AC power socket
Mixer
additional
purchase
Antenna input
75 standard
coaxial type
Note
* It is recommended that you'd better use 75
coaxial cable to remove the
disturbance caused by airwave.
* Don't bind antenna cable and electric wire together.
Preparation for the remote control
Battery installation Tips for remote operation
!
Remove the batteries cover.
!
Insert two size AA batteries matching
the +/-polarities of the battery to the +/marks inside the battery compartment.
! The battery life should be about one year
under normal use.
! When the remote control will not be used
for a long period of time or when the
batteries are worn out, remove the batteries
to prevent leakage.
! Do not throw the batteries into a fire.
Dispose of used batteries in the specified
manner.
! Do not drop, dampen or disassemble the
Page 5
Position of Keys and Plug-ins
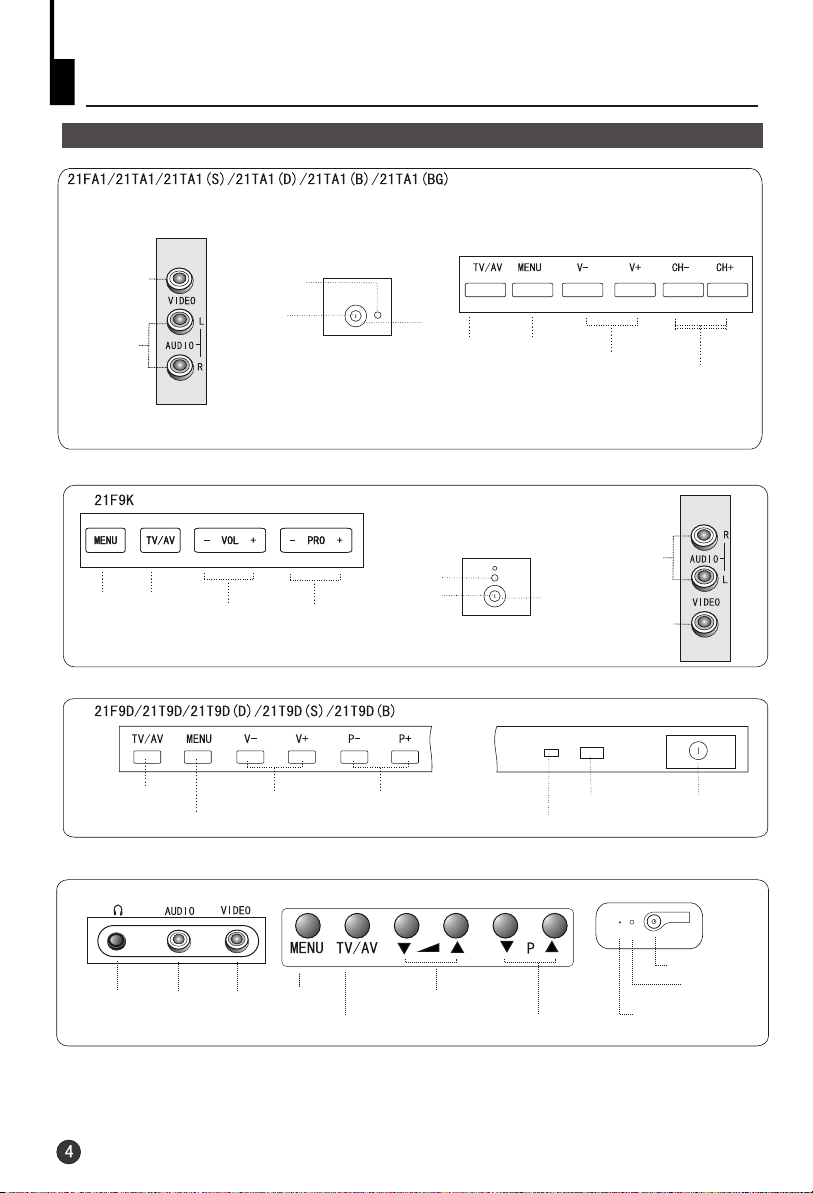
Front panel
VIDEO
L/R audio
Menu
TV/AV switch
TV/AV switch
Menu
Signal receiver
Power switch
Volume down/up
Volume down/up
Channel down/up
Channel down/up
Power
indicator
Signal receiver
Power switch
TV/AV switch
Menu
Power
indicator
Power
indicator
Volume down/up
L/R audio
Signal receiver
Channel down/up
VIDEO
Power switch
15F6B
Power switch
Power
indicator
Signal receiver
AUDIOHEADPHONE
VIDEO
Menu
TV/AV switch
Volume down/up
Channel down/up
Page 6

Position of Keys and Plug-ins
Front panel
HT-3768/37T6D-T
Power switch
Signal receiver
V+
V-
Volume down/up
Menu
TV/AV switch
P-
P+
Channel down/up
21F7A
AUDIO R/LHEADPHONE VIDEO
MENU
Menu
Power
indicator
TV/AV
TV/AV switch
HT-3728
VIDEO
L/R audio
TV/AV switch
Menu
Note: Please do not use the side and back AV terminals simultaneously.
Volume down/up
Channel down/up
Back panel
Volume down/up
Signal receiver
Power switch
Power switch
Power
indicator
Signal receiver
Channel down/up
Power
indicator
Audio left channel output terminal
Video output terminal
Video Y input terminal
Video Cb input terminal
S-VIDEO input terminal
Video input terminal
ÒôƵ×óÉùµÀÊä³ö¶Ë×Ó
Audio right channel output terminal
Antenna input socket
Video Cr input terminal
ТфЖµУТЙщµАКдИл¶ЛЧУ
Audio right channel input terminal
ÒôƵ×óÉùµÀÊä³ö¶Ë×Ó
ÒôƵ×óÉùµÀÊä³ö¶Ë×Ó
Audio left channel input terminal
Note: The audio channel in some models doesn't have the function of stereo.
S-VIDEO is only available in some models.
Page 7
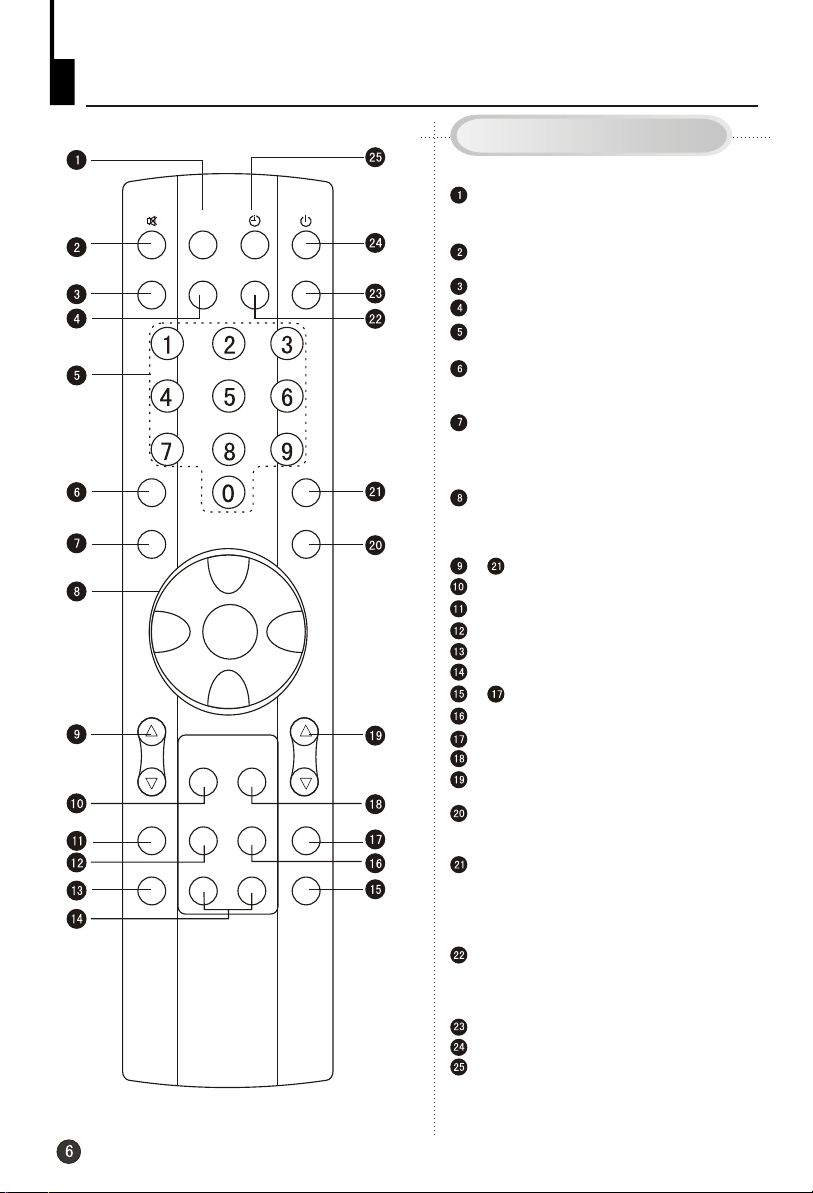
Using the Remote Control
Buttons and Descriptions
TV and AV Exchange Button
To exchange between TV and
other available video inputs
Mute Button
Press to conceal the sound of programs.
Screen Display Button
System Adjust Button
Direct-digit Choosing Button
Directly select channel numbers
Lock Setting button
Used for setting lock for channel-
searching, channel,AV and clock,etc.
Picture Mode Select Button
There are DYNAMIC, STANDARD,
MILD,MEMORY, PICTURE MUTE and
COLOR MUTE six modes of picture.
Menu Select/ Adjust Button
Use this button to adjust the menu,
the volume and the channels, as well
as to control the game.
=
Program Play-forward Button
Calendar
Game Background Select Button
BAR Button(not available)
Fire Button(can call the calendar)
=
Restart Game Button
Game Exit Button
Program Play-backward Button
Chromatic Belt Width Adjust Button
(not available)
Sound Mode Select Button
There are high,normal and low three
kinds of sound modes.
Stopwatch Button
The stopwatch can work 1 hour without
interruption and when you use this
function, do not operate other
function button as well.
Digit Select Button
Change the channel position number
between one digit, two-digits and three
-digits.
Program Scan Button
DC Standby Button
Sleep Timer Button
DISP
LOCK
WID
CALENDAR
BAR
TV/AV
SYSTEM
PRE
MODE
FIRE
CH+
MENU
CH-
-/--
BACK
RESTART
FIRE
SCAN
WATCH
S.STDP.STD
VOL+VOL-
HIT
EXIT
LIGHT
Page 8

Power On and Power Off
Below are methods on how to power on/off the TV set with the switch on the TV and
on the remote control.
Power on/off
Connect/disconnect to the power
1.Connect the power supply wire, then press
power switch button, the power indicator will
light.
2. If the TV is in the state of standby, press the
button on the remote control.
NOTE
1.You can also press the 0-9
button to call off the standby
status instead of pressing the
DC Standby button. Press the
digit button of the preset channel
(limited to one digit) , you can
complete the selection of channel while you turn on the
TV set( To operate the preset of TV channel, please see
2.When you do not use the remote control, you can
directly press the the button on the television to call off
the standby status.
on page 10-13). TUNING
DC Standby Button
Direct-digit Choosing Button
3. Press the button on the remote control
to get into the standby state.
4. Press the button on the TV set to
completely turn off the TV.
Power supply auto-off function
When the (black background) is set ,
and there is no signal , game screen protection
works, and ,in15 minutes later, it will change
into standby status.
B.B ON
Page 9
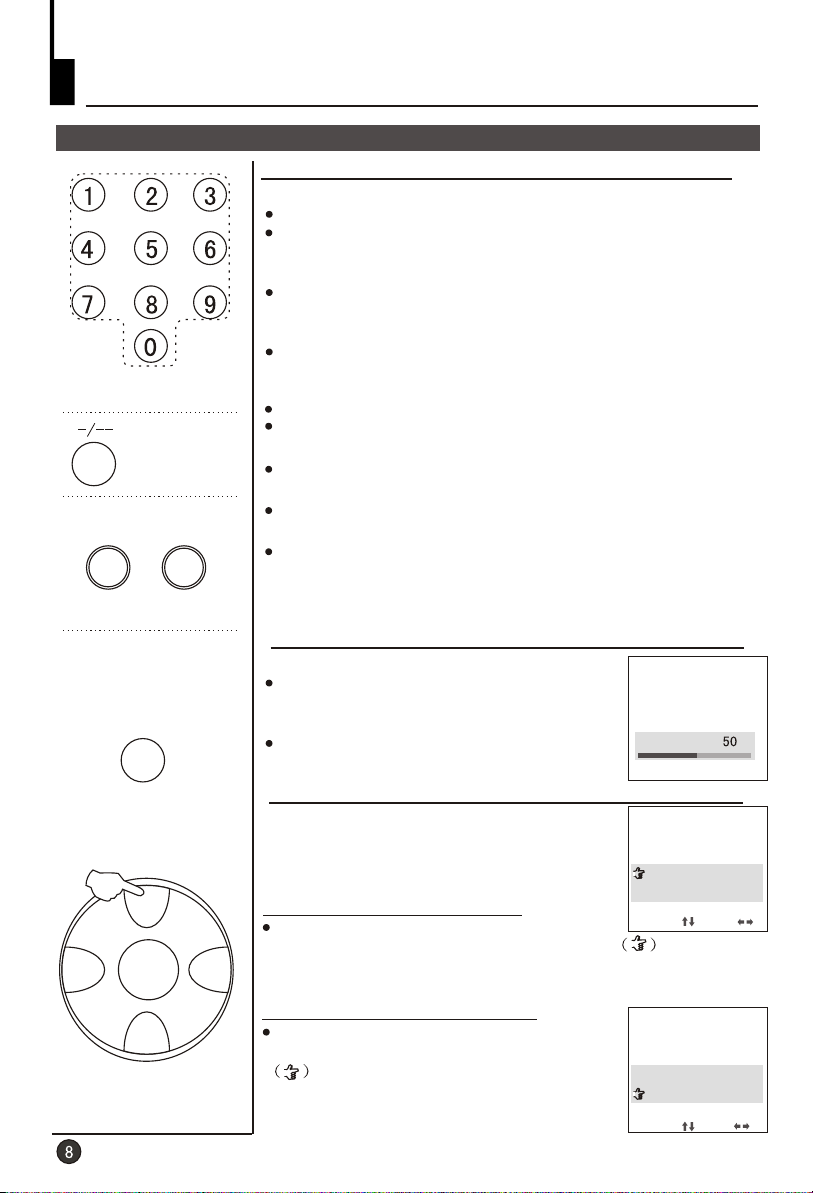
Viewing TV Programs
Viewing TV programs
How to select the TV program
1.Use the direct-digit choosing button
Press the button from 0-9 to select a one digit channel.
If you want to select a two-digits channel, press the
Digit Select button and change it into two-digits mode,
then press the number of the channel.
If you want to select a three-digits channel, press the
Digit Select button and change it into three-digits mode,
then press the number of the channel.
If the channel position number you select is larger than 218,
Direct-digit Choosing
button
VOL- VOL+
Digit Select
button
PRE BACK
SYSTEM
CH+
MENU
CH-
the TV will use the first two number as the channel position.
2.Use button
CH+/-
Press to increase the channel position number.
Press to decrease the channel position number.
CH+
CH-
3.Use button and buttonPRE BACK
Press button, you can go back to the channels you
PRE
viewed (as many as four).
Then, press Back button, you can return to the channels you
were watching just now (as many as four) .
For example, if you have viewed channel 1,2,3,4,5,6 after the
TV is powered on, and the channel you are watching now is
number 7, then press button, you can view channel 6,5,
4,3, and you may press the button to return to channel 7.
Choose the proper volume you like
Press VOL+/- button to adjust the volume.
VOL STORE ON
If the is set , the volume of
the pre-fifty channel will be stored
independently.
Press to increase the volume, press
VOL+
to decrease the volume.
VOL-
If the color or sound of one channel is abnormal
It might be because the color or sound
system has been set improperly.You may
follow the instruction below to adjust it.
SYSTEM
Press button, and you can see
the form.
If the color of the picture is abnormal
Press button, and move the indicator to ,
and press button to select the proper color(
NTSC4.43 NTSC3.58
please set to .
If the sound is abnormal
Press button, and move the indicator
to select the proper sound if it can be
selected.
CH+/- COLOR
VOL+ AUTO,PAL,
and will appear alternately). Generally,
AUTO
CH+/-
SOUND VOL+/-
to , and press button
PRE
BACK
VOLUME
COLOR AUTO
SOUND DK
SELECT ADJUST
COLOR AUTO
SOUND DK
SELECT ADJUST
Page 10
Viewing TV Programs(continued)
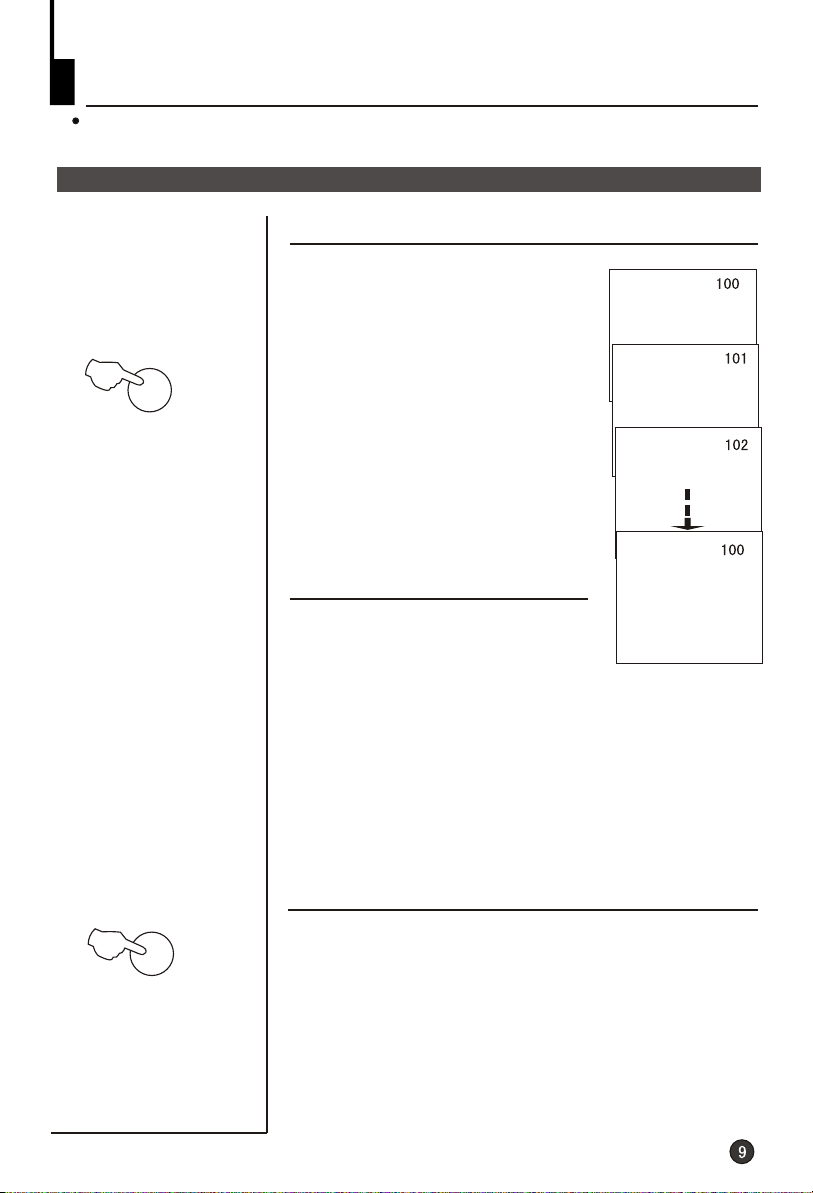
Program scanning function is to let the television automatically scan all
preconcerted channel program(about two seconds per channel).
Program scan and screen display
½ÚÄ¿ä¯ÀÀ¼°ÆÁÄ»ÏÔʾ¹¦ÄÜ
Program scanning function
1.If you want to scan the programs
and select your favorite channel ,
SCAN
SCAN
just press the button, then
the television will start scanning
from the present channel with a
rate of two seconds per channel
and until all the preconcerted
programs have been displayed
once, the TV set will return to the
starting channel.
2.If you want to terminate this
function during the scanning, press
SCAN
the button again, and the
program will stay at the present channel.
DISP
Screen display
Usually, when you press the button, the channel
number will appear on the top right corner of the screen
and press it again, the screen's top left corner will
display the present time( the adjustment of time please
see Setting the Timer ).If press it for a third time, the
channel number and time will both disappear .
DISP
Page 11
Tuning
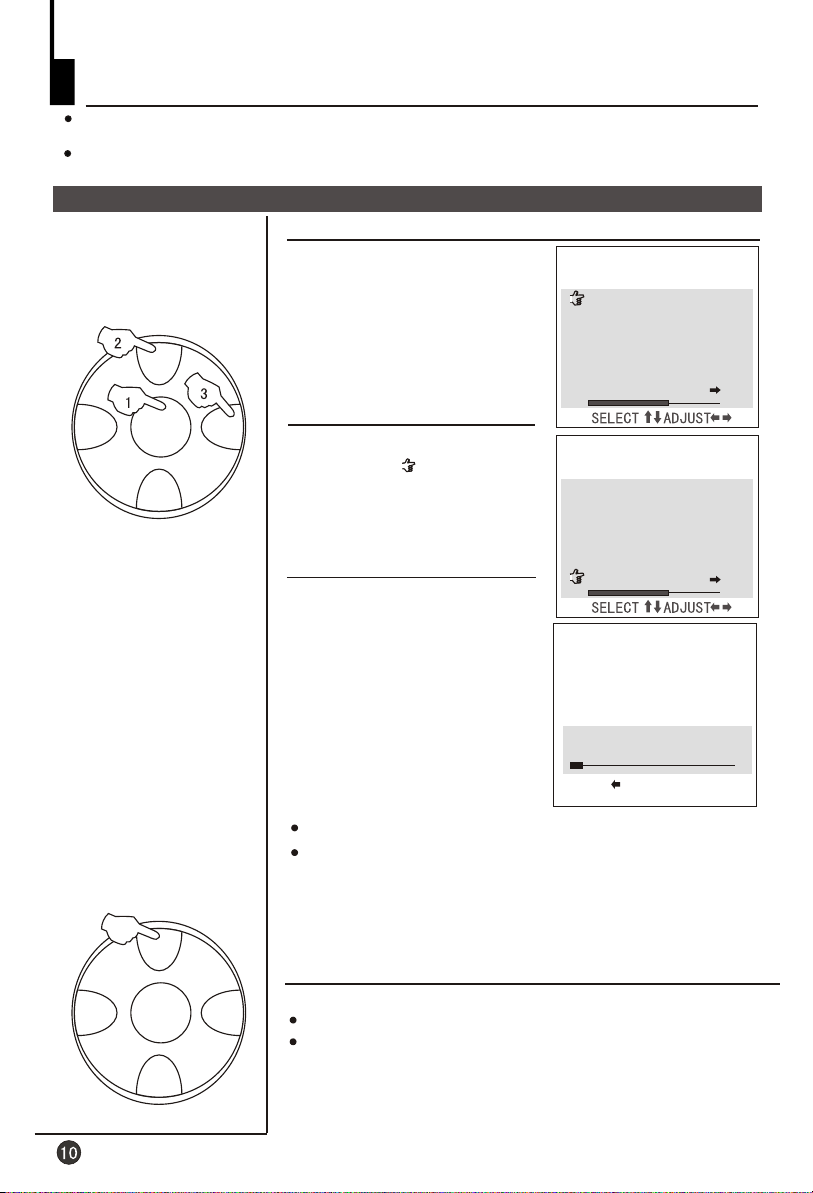
There are three ways of searching: automatic search, manual search and MFT
(manual fine tune).
You may operate it either on the TV or on the remote control. Here is mainly about
the remote control.
Automatic search
Automatic search
1. Press button, until
TUNING
CH+
MENU
appears on the screen.
TUNING
POSITION 1
BAND UHF
SKIP OFF
SEARCH UP
MFT DOWN
AUTO MEMORY
VOL- VOL+
VOL- VOL+
MENU
CH-
CH+
MENU
CH-
2. Press button to move
the indicator( )to
AUTO MEMORY
3. Press , then
AUTO MEMORY
CH+/-
VOL+
.
mode will work.
TUNING
POSITION 1
BAND UHF
SKIP OFF
SEARCH UP
MFT DOWN
AUTO MEMORY
The TV set will search
automatically all available
programs, after that, all
available programs will be
stored in turn and the TV set
will return to the first channel.
If you want to stop the search, just press button.
ASM VHFL 0
STOP
VOL-
The order of the automatic search is due to the frequency
of the program, generally speaking, it is used only at the
first time you search the program, and once the order of
the program has been confirmed, you don't have to use
this function, otherwise the order of the program will be
changed.
After searching
CH+/-
Press button to check the channels.
If the color or sound is abnormal in a certain channel, it
may be the color or sound system has not been set properly,
so you should adjust it to the proper system (Reference to
page 8).
Page 12
Tuning(continued)
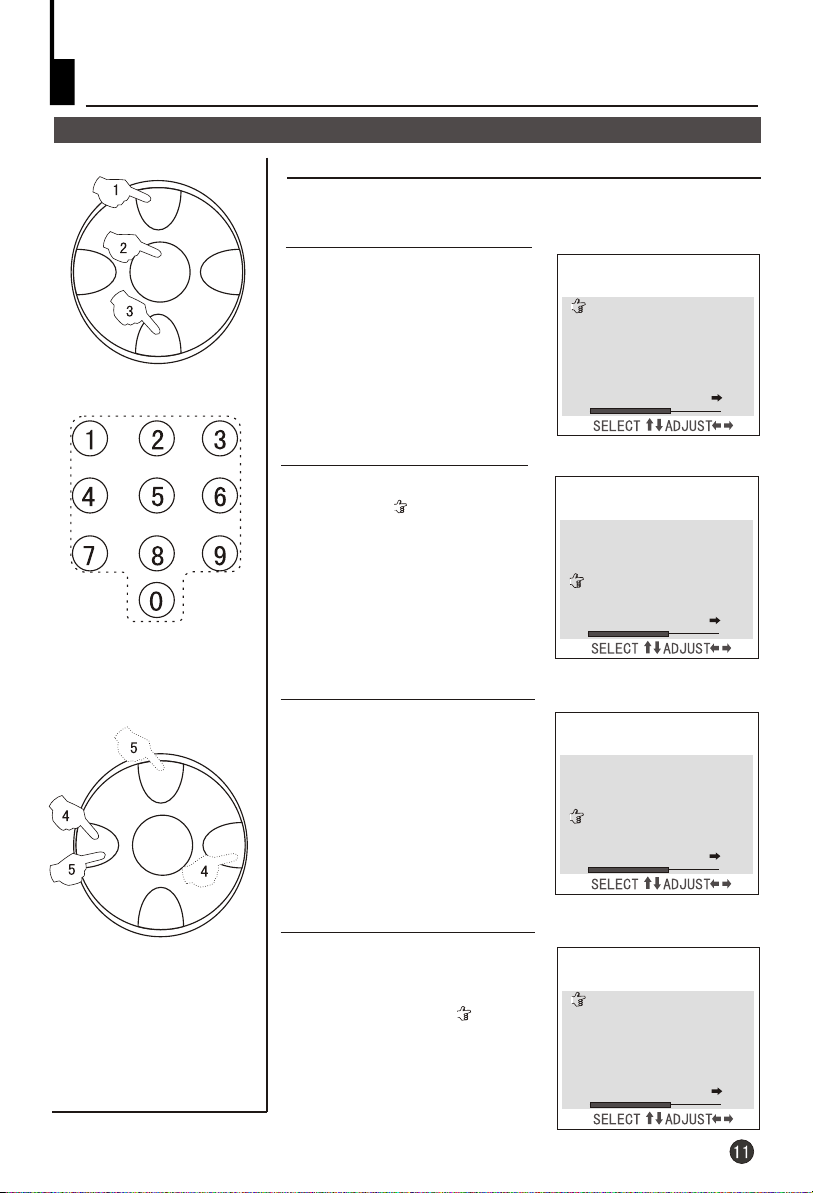
Manual search
Manual search
CH+
1. Press button or the Direct-digit Choosing button to
select a channel directly(take channel 1 for example).
CH+/-
VOL- VOL+
Direct-digit Choosing
Button
VOL- VOL+
MENU
CH-
CH+
MENU
2. Press button, until
TUNING
3. Press button and move
the indicator( ) to .
4. Press button to start
MENU
appears on the screen.
CH-
SEARCH
VOL+/-
searching.
VOL-
button is used to search the
lower frequency channel.
VOL+
button is used to search the
higher frequency channel.
Repeat the steps until you find
the channel you need.
TUNING
POSITION 1
BAND UHF
SKIP OFF
SEARCH UP
MFT DOWN
AUTO MEMORY
TUNING
POSITION 1
BAND UHF
SKIP OFF
SEARCH UP
MFT DOWN
AUTO MEMORY
TUNING
POSITION 1
BAND UHF
SKIP OFF
SEARCH UP
MFT DOWN
AUTO MEMORY
CH-
5.When you plan to store
another new channel at a new
place, use button and
CH+/-
move the indicator( ) to
POSITION VOL+/-
, then press
button to select a channel
number and press button
to move to , then
SEARCH
CH+/-
repeat the fourth step.
TUNING
POSITION 1
BAND UHF
SKIP OFF
SEARCH UP
MFT DOWN
AUTO MEMORY
Page 13
Tuning(continued)
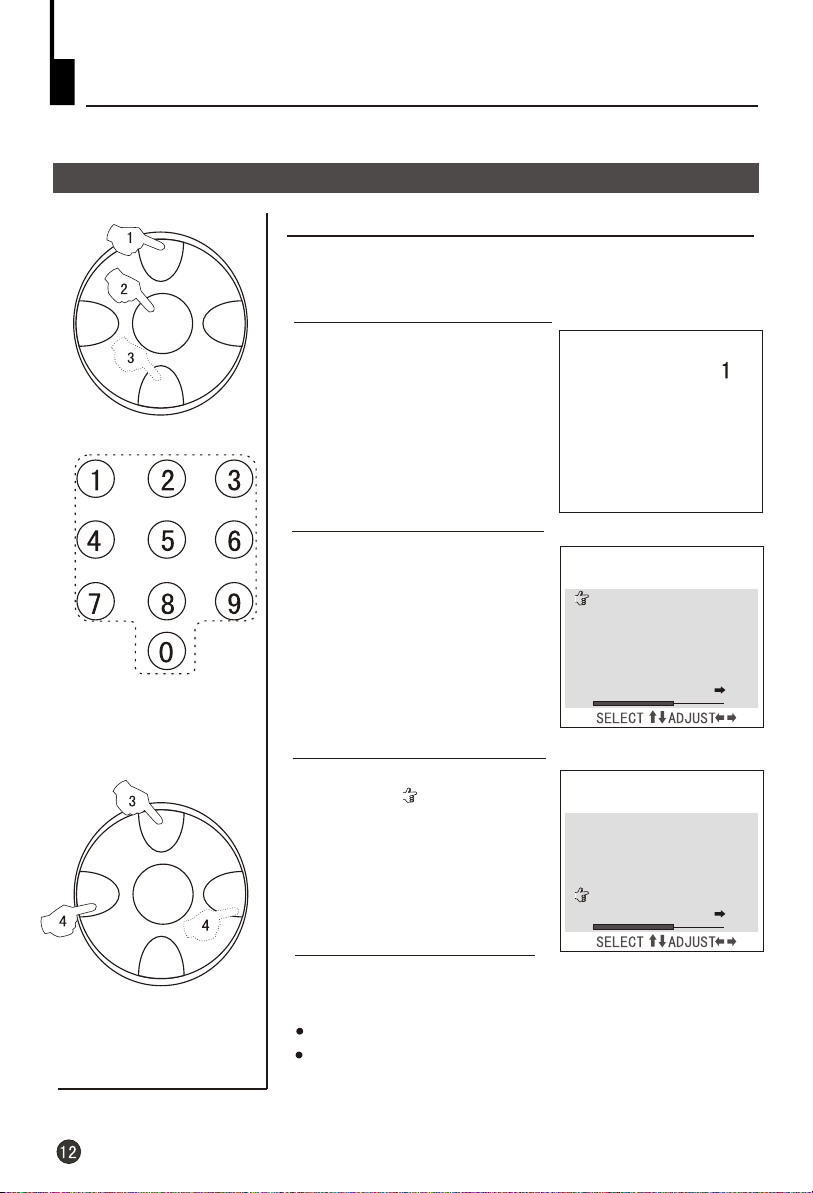
MFT
MFT(manual fine tune)
CH+
VOL- VOL+
Direct-digit Choosing
Button
VOL- VOL+
MENU
CH-
CH+
MENU
When you can't get a satisfactory picture and audio effect,
you can fine tune to obtain.
1. Press button or the
CH+/-
Direct-digit Choosing button
to select a channel directly (take
channel 1 for example).
2. Press button, until
TUNING
3. Press button and move
the indicator( ) to .
MENU
appears on the screen.
CH+/-
MFT
TUNING
POSITION 1
BAND UHF
SKIP OFF
SEARCH UP
MFT DOWN
AUTO MEMORY
TUNING
POSITION 1
BAND UHF
SKIP OFF
SEARCH UP
MFT DOWN
AUTO MEMORY
CH-
4. Press button repeatedly to fine tune, until the
VOL+/-
picture and the sound become satisfactory.
button is used to search the lower frequency channel.
VOL-
button is used to search the higher frequency channel.
VOL+
Page 14
Tuning(continued)
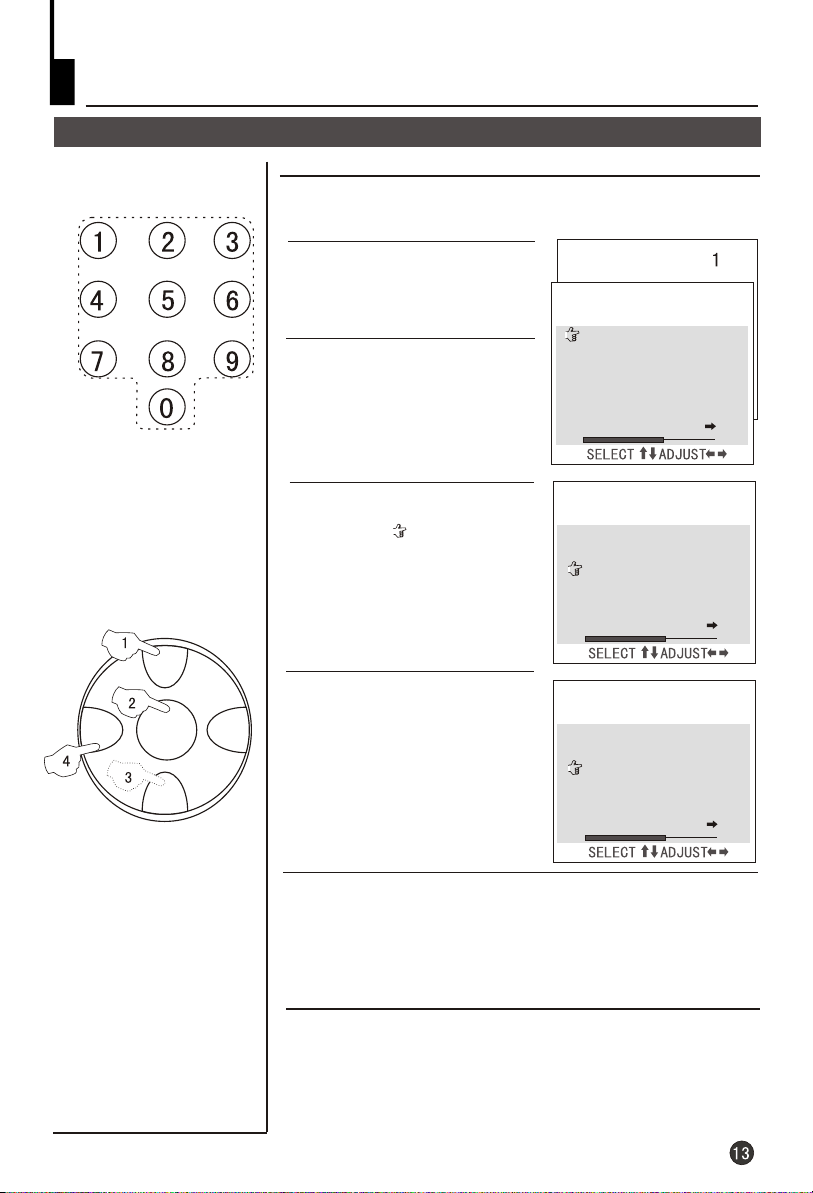
Skip
Skip
After the programs are preset, you can skip some
programs so that to select your favorite channels only.
Direct-digit Choosing
Button
CH+
VOL- VOL+
MENU
CH-
1. Press button or
CH+/-
Direct-digit Choosing button to
select a channel directly (take
channel 1 for example).
2. Press button, until
TUNING
3. Press button and move
the indicator( ) to .
4. Press button to set it
ON
MENU
appears on the screen.
CH+/-
SKIP
VOL+/-
.
TUNING
POSITION 1
BAND UHF
SKIP OFF
SEARCH UP
MFT DOWN
AUTO MEMORY
TUNING
POSITION 1
BAND UHF
SKIP OFF
SEARCH UP
MFT DOWN
AUTO MEMORY
TUNING
POSITION 1
BAND UHF
SKIP ON
SEARCH UP
MFT DOWN
AUTO MEMORY
5. Press button to close the menu. When you
select channels with button, this channel will be
MENU
CH+/-
skipped. However, you can also use the Direct-digit Choosing
button on the remote control to select this channel directly.
If you want to recover the skipped channel
1. Use Direct-digit Choosing button to select the number of the
channel to be recovered.
2. Do the above steps again.
3. Press button to set VOL+/- SKIP OFF.
Page 15
Adjusting the Picture and the Sound
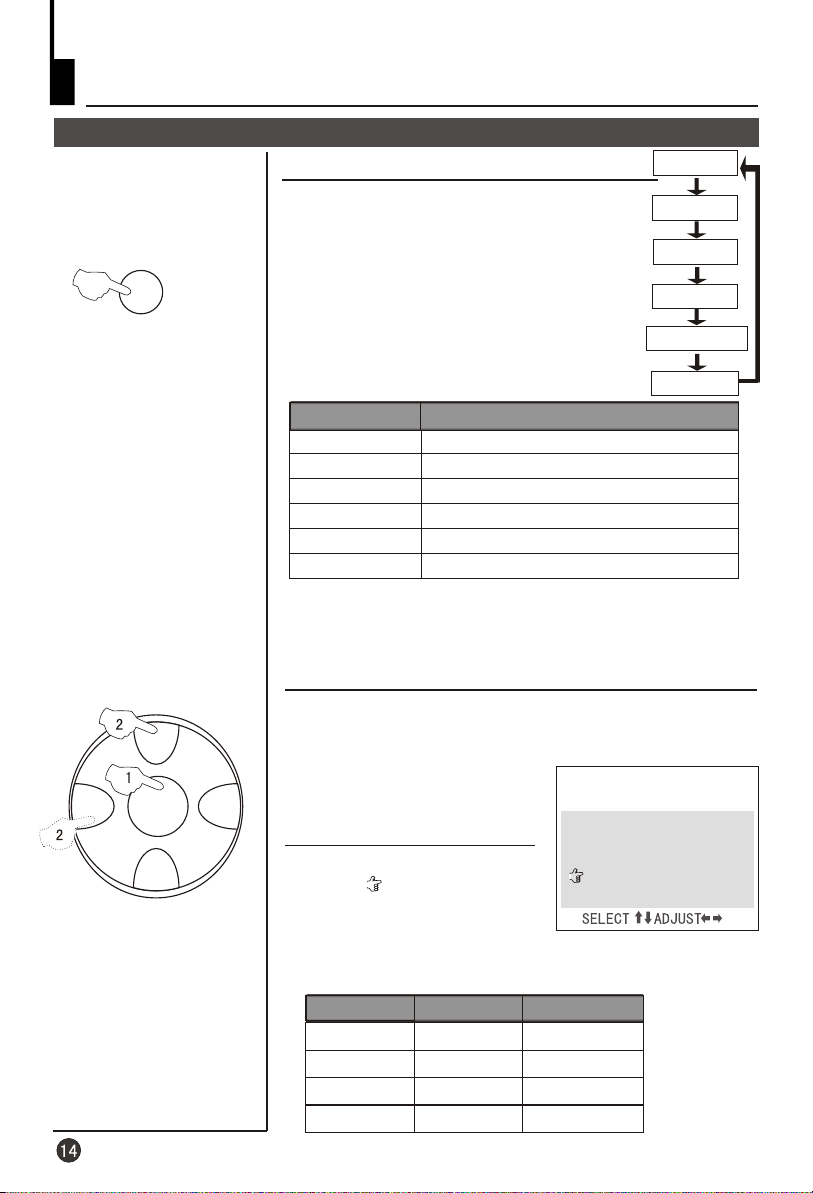
Multiple picture modes
How to select the picture mode
DYNAMIC
P.STD
CH+
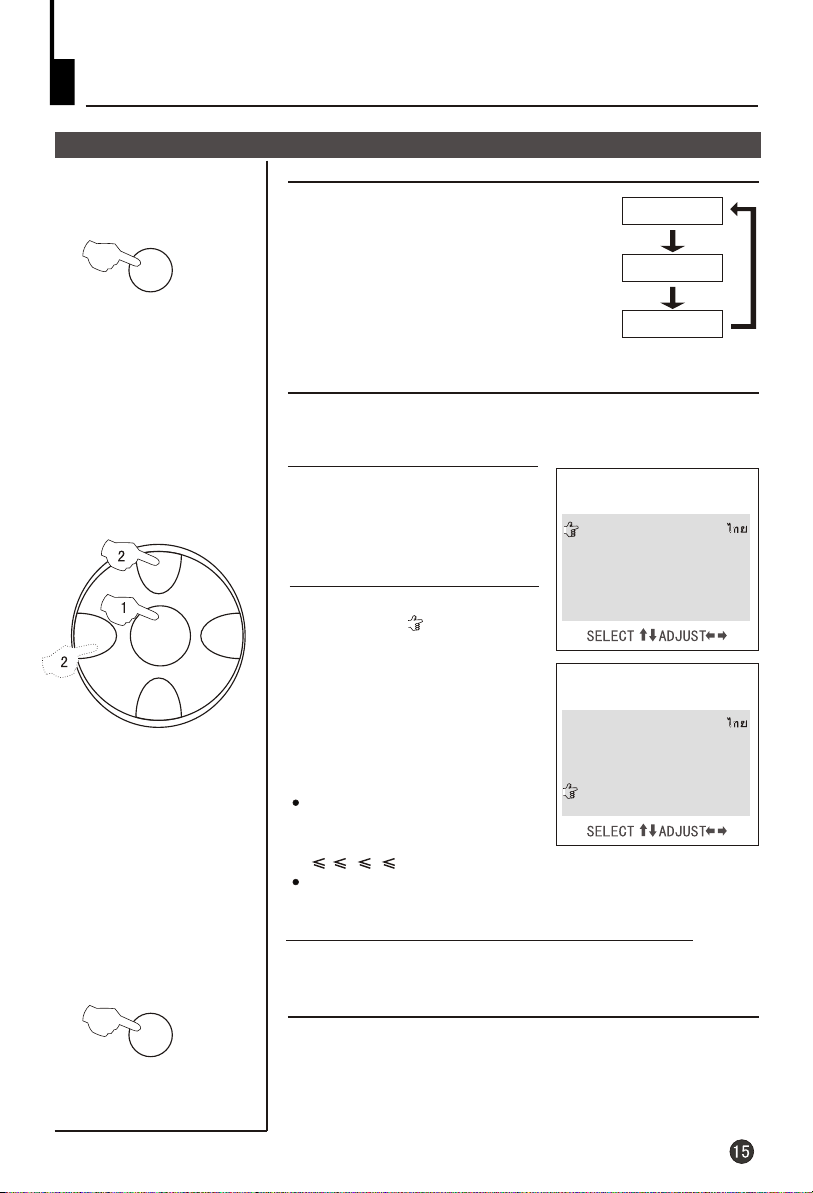
You may select the mode you want from the
five preset modes and one individual mode.
Press the button to select a mode you
like.
P. STD
DYNAMIC PICTURE, STANDARD
PICTURE, MILD PICTURE, MEMORY,
PICTURE MUTE COLOR MUTE and ,
totally six picture modes can be selected
alternately.
MODE
DYNAMIC
STANDARD
MILD
MEMORY
PICTURE MUTE
COLOR MUTE
If the picture mode is set to or
,it will auto renew to mode when you
MUTE MEMORY
PICTURE QUALITY
BRIGHT COLOR
MEDIUM COLOR AND BRIGHTNESS
LOW COLOR AND BRIGHTNESS
SET BY YOURSELF
NO PICTURES
BLACK & WHITE
PICTURE MUTE COLOR
restart your TV set.
Set the parameter of MEMORY
1. Press button, until appears on the screen.MENU PICTURE
STANDARD
MILD
MEMORY
PICTURE MUTE
COLOR MUTE
VOL- VOL+
MENU
CH-
PICTURE
CONTRAST 100
BRIGHT 50
2. Press button, move the
CH+/-
indicator( ) to the option you
want to adjust, then press
VOL+/-
button to do the
COLOR 50
SHARP 50
B.B ON
adjustment.Then the parameter will be automatically stored
MEMORY
in option.
OPTION
CONTRAST
BRIGHT
COLOR
SHARP
BRIGHT DARK
THICK LIGHT
SHARP SOFT
VOL+
STRONG WEAK
VOL-
Page 16
·½±ãµÄͼÏñºÍÉùÒôµ÷Õû¹¦ÄÜ£¨½ÓÉÏÒ³£©
Adjusting the Picture and the Sound
(continued)
Multiple Sound Modes
How to select the sound mode
S.STD
CH+
VOL- VOL+
MENU
CH-
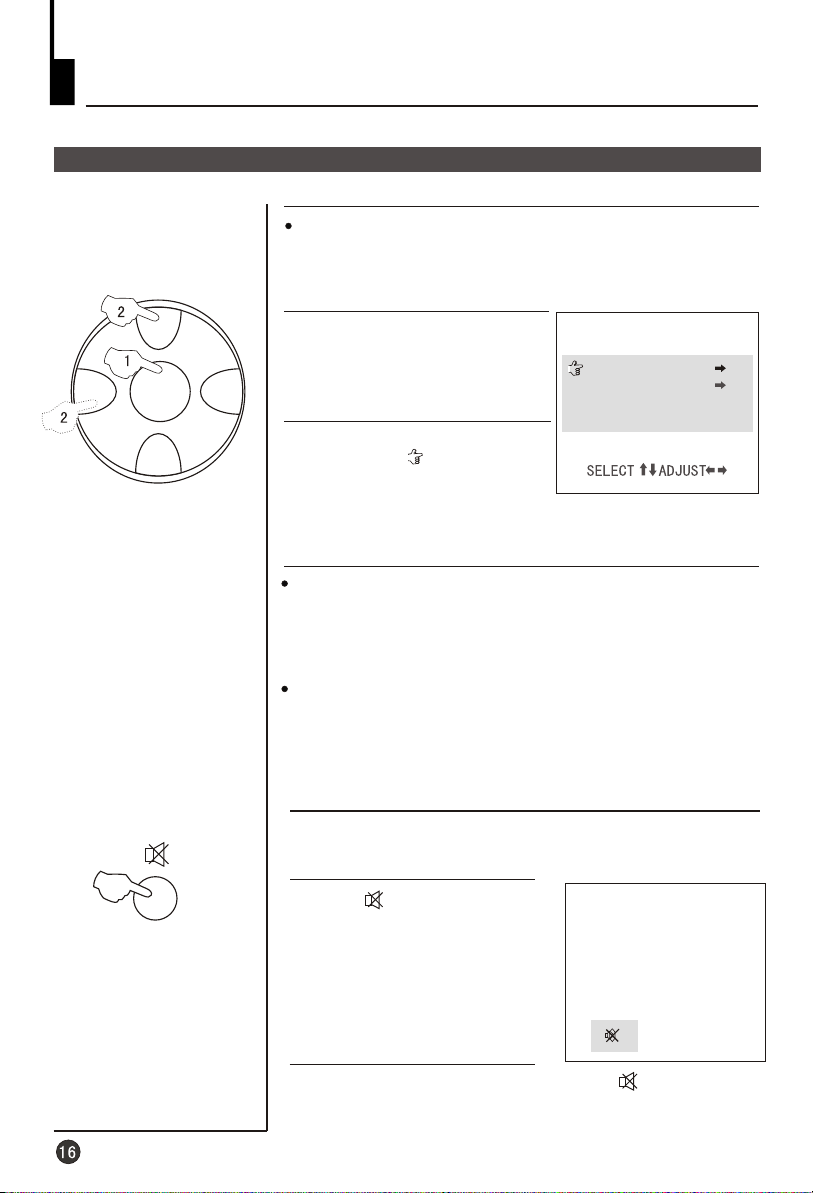
You can quickly select you most favored
sound mode from the following three
kinds of modes.
Press the button to select the
sound quality that you want.
VOL,HIGH VOL LOW VOL
S.STD
NORMAL
and can be
selected in turn(their parameter may
be adjusted due to your need).
Setting the sound
This function can let you regulate the volume to the
preconcerted parameter quickly( such as the
HIGH VOL LOW VOL
1.Press button, until
FUNCTION 1
screen.
2.Press button, move
the indicator( ) to the
VOL VOL+/-
button to adjust the parameter
you expect. With the same
method, you can adjust the
parameter of the
VOL LOW VOL
Suppose the is A,
is B,
NORMAL VOL HIGH
VOL
0 A B C 100
When adjusting the three modes,you should press them in
proper order as HIGH VOL,NORMAL VOL, LOW VOL.
or ).
MENU
appears on the
CH+/-
HIGH
, then press
NORMAL
or the .
LOW VOL
is C, then that will be:
NORMAL VOL
HIGH VOL
LOW VOL
NORMAL VOL,
FUNCTION 1
LANG. ENGLISH
CURTAIN III
LOW VOL 00
NORMAL VOL 00
HIGH VOL 00
VOL STORE OFF
FUNCTION 1
LANG. ENGLISH
CURTAIN III
LOW VOL 00
NORMAL VOL 00
HIGH VOL 00
VOL STORE OFF
S.STD
3.Press the button repeatedly to select the
S.STD
different sound setting modes.
Volume store
When the ( as above chart) is set , the
sudden change of the volume can be avoided when you
change the channel( only the pre-50 channels volume).
VOL STORE ON
Page 17
Adjusting the Picture and the Sound
(continued)
S.C.C, count and mute
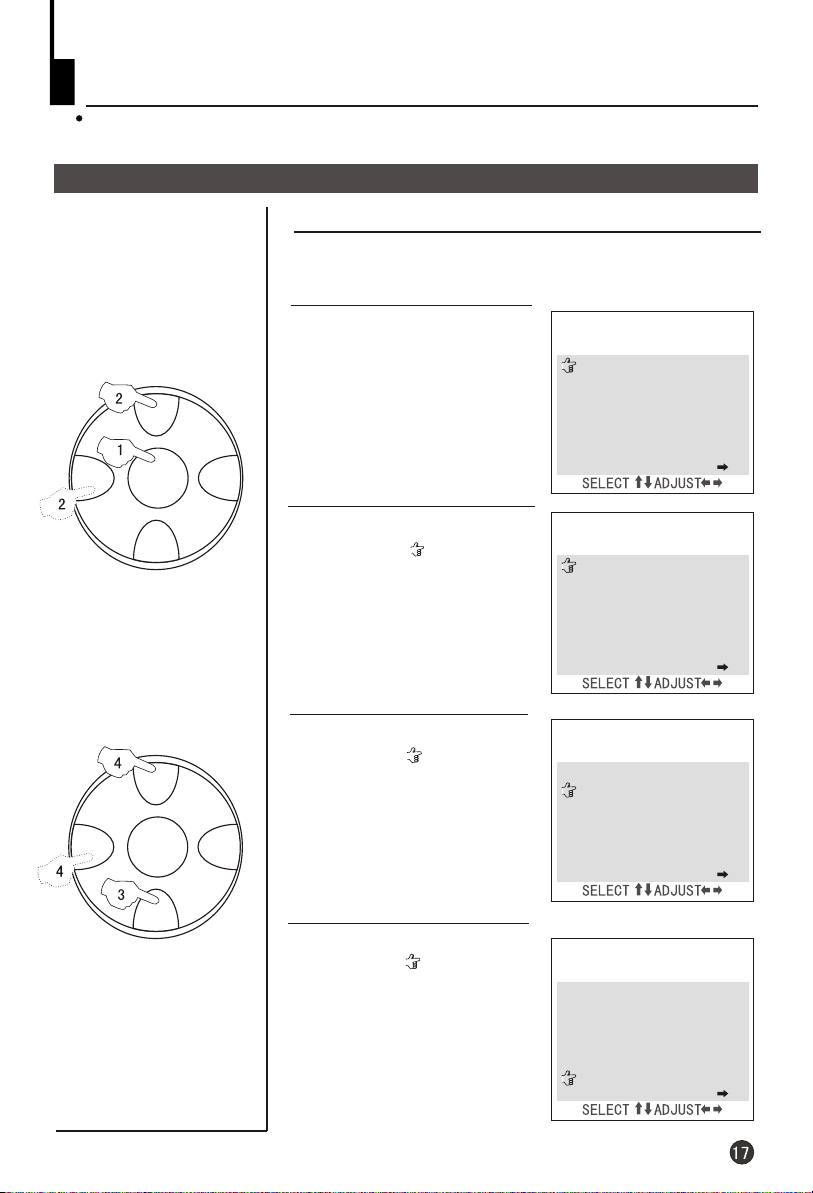
How to use the S.C.C(soft change channel)
This TV set provides you with the function of
When it is set " ", the picture will fade in and fade
out when the channel is changed.
ON
S.C. C.
CH+
VOL- VOL+
MENU
CH-
1.Press button, until
FUNCTION 2
screen.
2.Press button, move
the indicator( ) to the
then press button to
set it or .
MENU
appears on the
CH+/-
VOL+/-
ON OFF
FUNCTION 2
SUBMARINE
POS.EX.
S.C.C OFF
COUNT 0:00
S.C.C,
How to use the COUNT function
This TV set provides you with the function of ,
if you want to know how long your TV set has been
used, you can press button, and find
FUNCTION 2
, then you can know the time the TV has
MENU
been on(count from 0 after 100,000 hours).
The time displayed is the total time when you watch the
TV(time of standby status will not be included), the
number cannot be altered through operating by the
remote control or on the TV set.
COUNT
How to use the functionMUTE
When you want to pay attention to the environment or
answer a telephone, or to meet guests, using the mute
function is very convenient.
1.Press button, a sign will
appear at the button left corner
of the screen, and the sound of
the TV set is cut off.
2.In order to recover the sound, press button again
or press button.VOL+/-
Page 18
This TV set provides you with three timer functions such as timer on, timer off
and sleep off.
Timer off
Timer off
Using this function can turn the TV set automatically
into standby status at the preconcerted time.
CH+
VOL- VOL+
VOL- VOL+
MENU
CH-
CH+
MENU
1.Press button, until
TIMER
MENU
appears on the
screen.
2.Press button, move
the indicator( ) to
TIMER VOL+/-
button to set it ,
EVERY OFF
3.Press button, move
CH+/-
OFF
, then press
ONCE
,or .
CH-
the indicator( ) to the next
row. Then, press
VOL+/-
button to set the time.
TIMER
OFF TIMER OFF
19:00
ON TIMER OFF
22:00
POS 0
CLOCK 1:40
APPOINTMENT
TIMER
OFF TIMER ONCE
19:00
ON TIMER OFF
22:00
POS 0
CLOCK 1:40
APPOINTMENT
TIMER
OFF TIMER ONCE
19:30
ON TIMER OFF
22:00
POS 0
CLOCK 1:40
APPOINTMENT
CH-
4.Press button, move
the indicator( ) to ,
press button, and you
CH+/-
CLOCK
VOL+/-
can set the time(It will be the
standard of the clock of
TIMER ON/OFF
).
TIMER
OFF TIMER ONCE
19:30
ON TIMER OFF
22:00
POS 0
CLOCK 1:40
APPOINTMENT
Page 19
Setting the Timer (continued)
Sleep timer and timer on
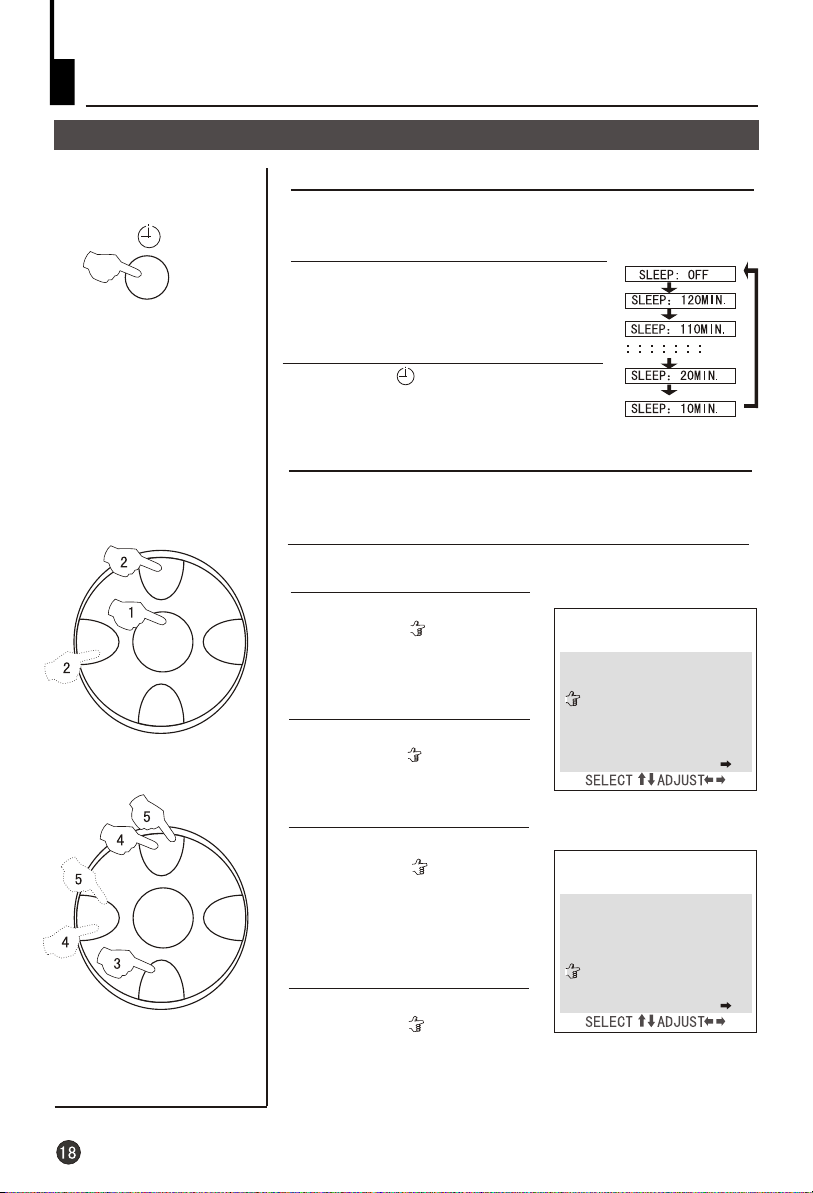
Sleep timer
Using this function, the TV set can be changed into the
standby status after a period of preset time from when
this function is activated.
1.The utmost time for this function is
120 minutes, and the time interval is
10 minutes.There are totally 12 kinds
of off-time.
2.Press the button repeatedly,
the screen will show in turn as the
right form.
Timer on
When this function is used, the TV set can
automatically turn the power on at the preset time in
the standby status and display the preset program.
CH+
VOL- VOL+
MENU
CH-
1.Press button, until appears on the
screen.
2.Press button, move
the indicator( ) to the
TIMER VOL+/-
button to set it
EVERY OFF
3.Press button, move
the indicator( ) to the below.
Then, press button to
set the time.
MENU TIMER
CH+/-
ON
, then press
ONCE ,
or .
CH-
VOL+/-
TIMER
OFF TIMER EVERY
19:00
ON TIMER EVERY
POS 0
CLOCK 1:40
APPOINTMENT
22:00
CH+
VOL- VOL+
MENU
CH-
4.Press button, move
the indicator( ) to
POS 0 VOL+/-
button to set the channel
with which the TV is turned
on(take 5 for example).
5.Press button, move
the indicator( ) to
press button, and you can set the time(same as
TIMER OFF
TIMER ON/OFF
CH+/-
, press
CH+/-
TIMER
OFF TIMER EVERY
19:00
ON TIMER EVERY
22:00
POS 5
CLOCK 1:40
APPOINTMENT
CLOCK,
VOL+/-
and it will be the standard of the clock of
).
Page 20
Setting the Timer (continued)
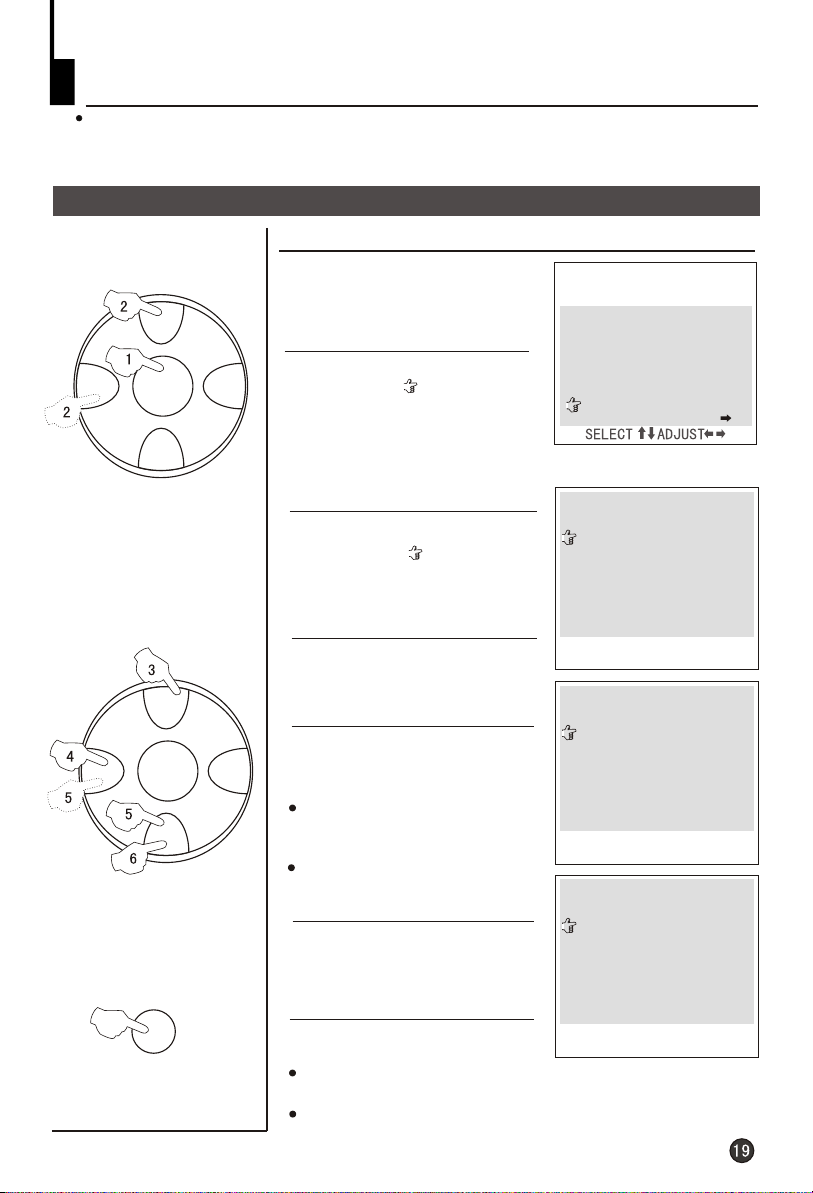
The channels appointment function can help you conveniently preset as many
as six programs at a time. At the preset time, the TV set will automatically
change to the preconcerted channel. If two or more programs are set in a same
time, the last channel number will be selected.
Channels appointment
Channels appointment
CH+
VOL- VOL+
MENU
CH-
CH+
VOL- VOL+
MENU
CH-
DISP
1.Press button, until
TIMER
screen.
2.Press button, move
the indicator( ) to ,
press button, and you
can set the time(same as
TIMER OFF
standard of the clock of ).
3.Press button, move
the indicator( ) to
APPOINTMENT
VOL+
sub-menu.
4.Press button to set
the channel number you want
(e.g. 100).
5.Press button to enter
the TIME item.Press
button to set the time.
Repeatedly press button,
the time changes with a rate of
one minute;
Press the button without
releasing, the time changes
with a rate of ten minutes.
6.Press the button, and
follow the instructions of step
4 and 5, you can do the setting
of the next channel.
7.Press button to exit
the menu.
At the preset time, the TV set will automatically change
to the preconcerted channel;
This function is available only when the TV set is on, and
it cannot be used in the status of standby or power off.
MENU
appears on the
CH+/-
CLOCK
VOL+/-
and it will be the
CH+/-
, then press
button to enter the
VOL+/-
CH-
VOL+/-
CH-
DISP
TIMER
APPOINTMENT
VOL+/-
APPOITMENT
POS TIME
100 OFF
000 OFF
000 OFF
000 OFF
000 OFF
APPOITMENT
POS TIME
100 OFF
000 OFF
000 OFF
000 OFF
000 OFF
APPOITMENT
POS TIME
100 12:58
000 OFF
000 OFF
000 OFF
000 OFF
TIMER
OFF TIMER EVERY
19:00
ON TIMER EVERY
22:00
POS 0
CLOCK 1:40
APPOINTMENT
000 OFF
000 OFF
000 OFF
Page 21
Setting the other Function
ÆÁÄ»ÓïÑÔ¼°ÆÁÄ»±£»¤¹¦ÄÜ
ÆÁÄ»ÓïÑÔ¼°ÆÁÄ»±£»¤¹¦ÄÜ
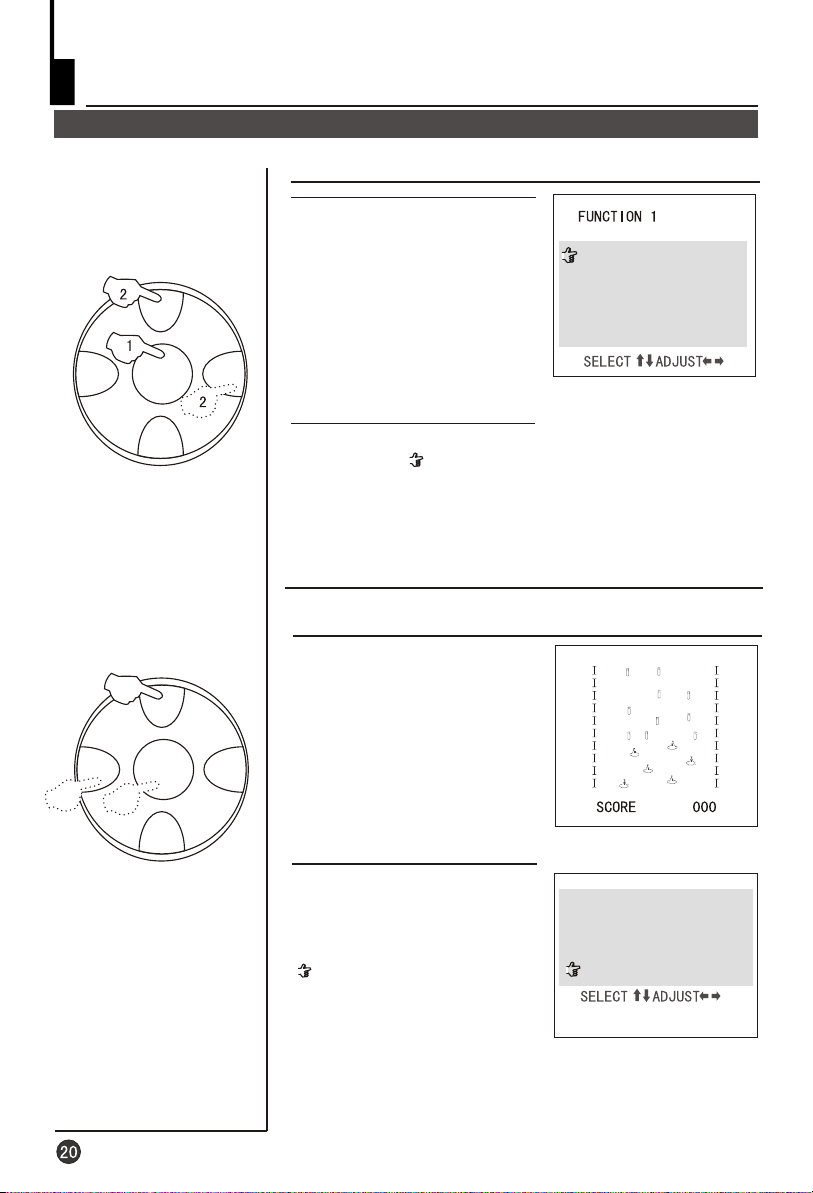
Language and Screen protection
How to select the language on the screen
CH+
VOL- VOL+
VOL- VOL+
MENU
CH-
CH+
MENU
1.Press button, until
FUNCTION 1
screen.
2.Press button, move
the indicator( ) to ., then press button to
MENU
appears on the
CH+/-
LANG. ENGLISH
CURTAIN
LOW VOL 00
NORMAL VOL 00
HIGH VOL 00
VOL STORE OFF
LANG VOL+
select the language and the menu on the screen will
be displayed with the language you select.
Notice:This function is not available, It only shows that
the menu on the screen will be displayed with English.
How to activate the function of screen protection
If no signal has been received
by the TV set,when the
function is set , the screen
ON
will change into the form on
the right shows( game
background ) .
B.B
III
CH-
Press button, until
PICTURE
screen. Then press
MENU
appears on the
CH-
button to move the indicator
B.B
( ) to , an d pr ess
VOL+/- ON
button to set it .
PICTURE
CONTRAST 100
BRIGHT 50
COLOR 50
SHARP 50
B.B ON
Page 22
Setting the other Function(continued)
Curtain function and calendar display
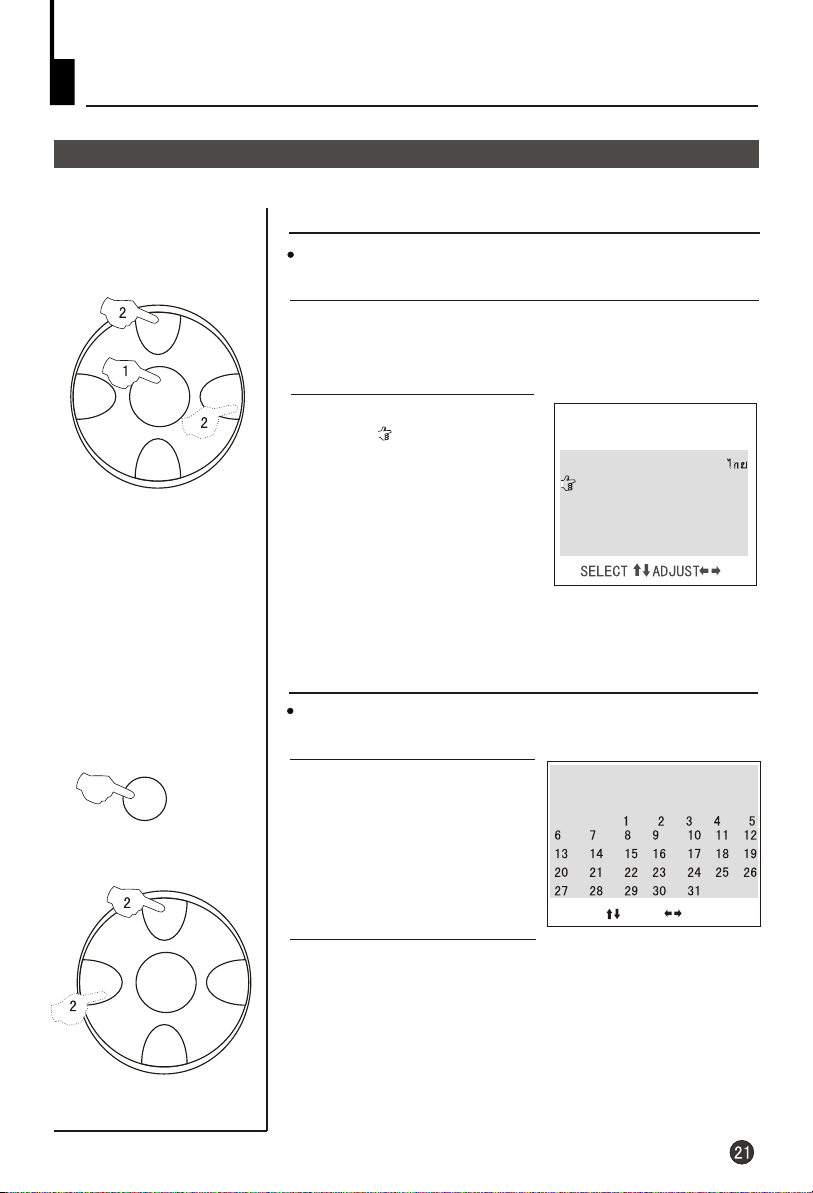
How to use the Curtain function
This TV set provides three types of Curtain function
for you to select.
CH+
VOL- VOL+
MENU
CH-
CALENDAR
CH+
1.Press the button, until the
MENU FUNCTION 1
appears on the screen.
2.Press , and move the
indicator( ) to ,
then press to select
from and .
I
: curtain
II
: fade in and fade out
III
CH+/-
VOL+
I,II III
: mixed I and II
CURTAIN
FUNCTION 1
LANG. ENGLISH
CURTAIN III
LOW VOL 00
NORMAL VOL 00
HIGH VOL 00
VOL STORE OFF
How to use the functionCALENDAR
This TV set has been designed to store the calendar
from the year 1901 to 2050.
1.Press the
button and then the
calendar will appear on
the screen(Press the
CALENDAR
to conceal the display).
CALENDAR
button again
SU MO TU WE TH FR SA
OCT 2002
YEAR MONTH
VOL- VOL+
MENU
CH-
2.Press button to adjust the ,press
button to adjust the .
CH+/- YEAR VOL+/-
MONTH
Page 23
Setting the other Function(continued)
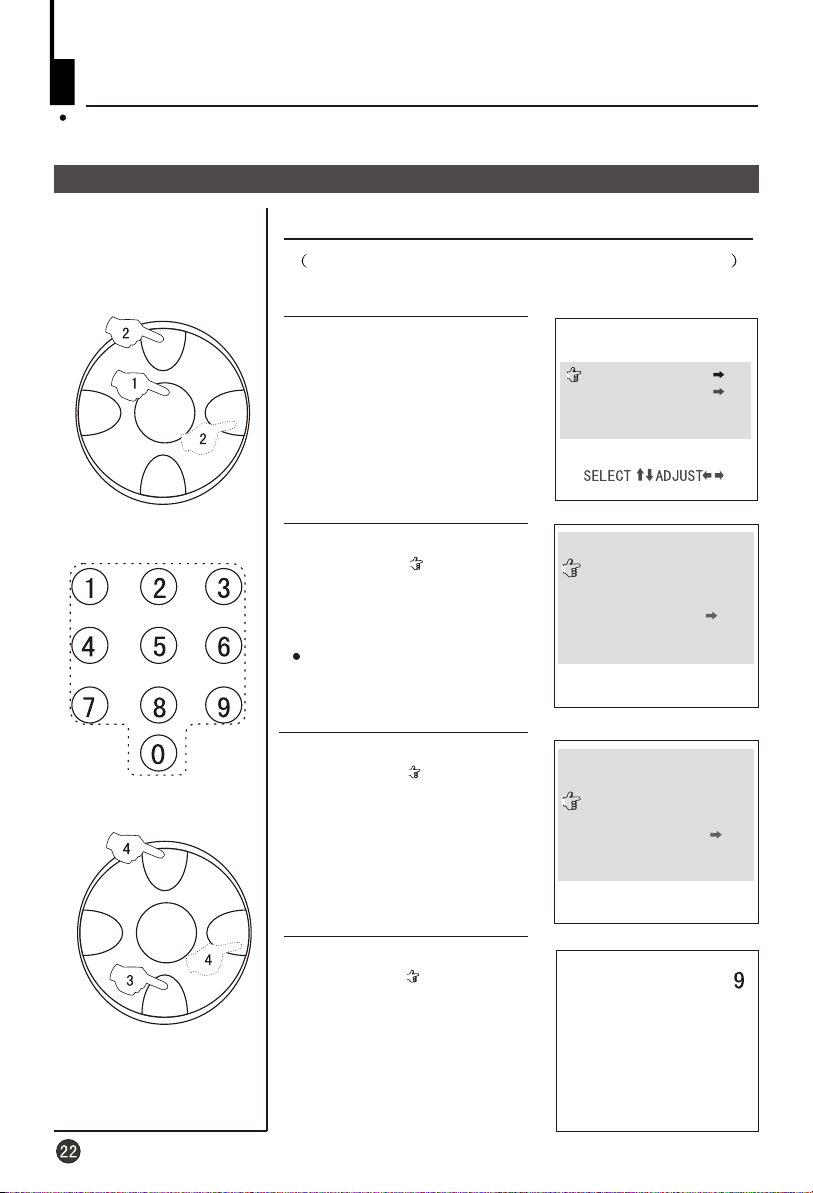
The function of channel exchange will enable you to exchange any two programs
and you can conveniently adjust the order of the programs due to your own need.
Channel exchange
Channel Exchange
for example, to change between channel1 and 9
CH+
VOL- VOL+
Direct-digit Choosing
Button
MENU
CH-
CH+
1.Press button, until
FUNCTION 2
MENU
appears on the
screen.
2.Press button, move
the indicator( ) to ,
Then press button to
CH+/-
POS.EX.
VOL+
enter the sub-menu.
The number shown in
EX.POS1 EX.POS2
number of the present channel.
3.Press button, move
the indicator( ) to ,
then press button to set
and is the
CH+/-
EX.POS2
VOL+
the channel number to 9.
FUNCTION 2
SUBMARINE
POS.EX.
S.C.C OFF
COUNT 0:00
POS.EX.
EX.POS1 1
EX.POS2 1
EXCHANGE ?
RETURN
POS.EX.
EX.POS1 1
EX.POS2 9
EXCHANGE ?
RETURN
VOL- VOL+
MENU
CH-
4.Press button, move
CH+/-
the indicator( ) to
EXCHANGE VOL+
, then press
button to confirm.Then the
programs of the two channel
will be exchanged.
Page 24
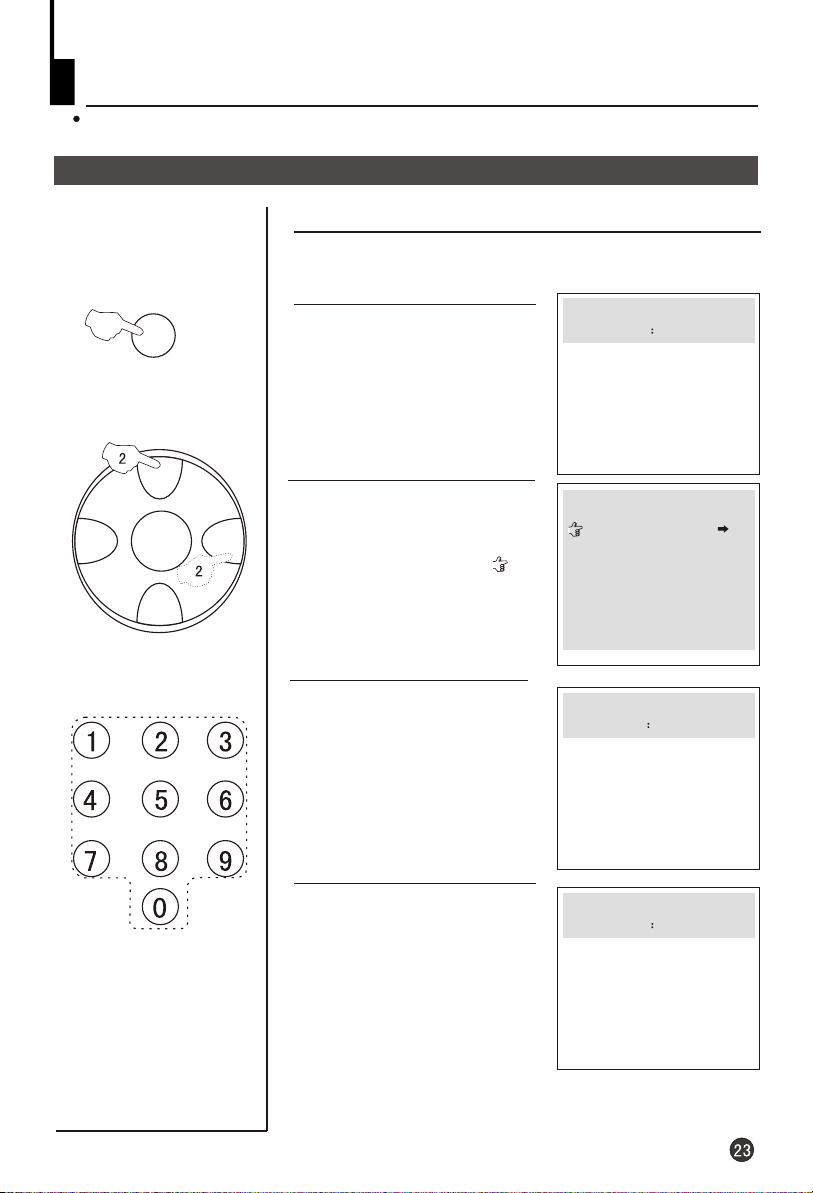
Setting the Lock
This TV set provides you with the LOCK function, you can choose it due to your
need to protect your TV set.
Changing your password
Changing your password
This TV set can set a four digit password, the original
one is 0000, if you want to reset it, please follow the
LOCK
CH+
VOL- VOL+
MENU
CH-
instructions below.
1.Press button, the
LOCK
screen will show as the form
on the right.
2.Press the 0 button four times,
and enter the menu of
LOCK
setting. Press CH+/- button
and move the indicator( ) to
CHANGE PASS
VOL+
button to enter the
. , and press
sub-menu of change
password.
LOCK OR UNLOCK
PASSWORD ----
LOCK OR UNLOCK
CHANGE PASS.
SEARCH LOCK OFF
POS LOCK ON
AV LOCK OFF
TIMER LOCK ON
CHILD LOCK OFF
ALL CLEAR OFF
Direct-digit Choosing
Button
3. Press the Direct-digit
Choosing button and input a
four-digits password.
4. After inputting the new
password, return to the
original status as shown on
the right form, then, you can
input the new password to
enter the menu of
LOCK
setting.
CHANGE PASS.
NEW PASS. ----
LOCK OR UNLOCK
PASSWORD ----
Page 25
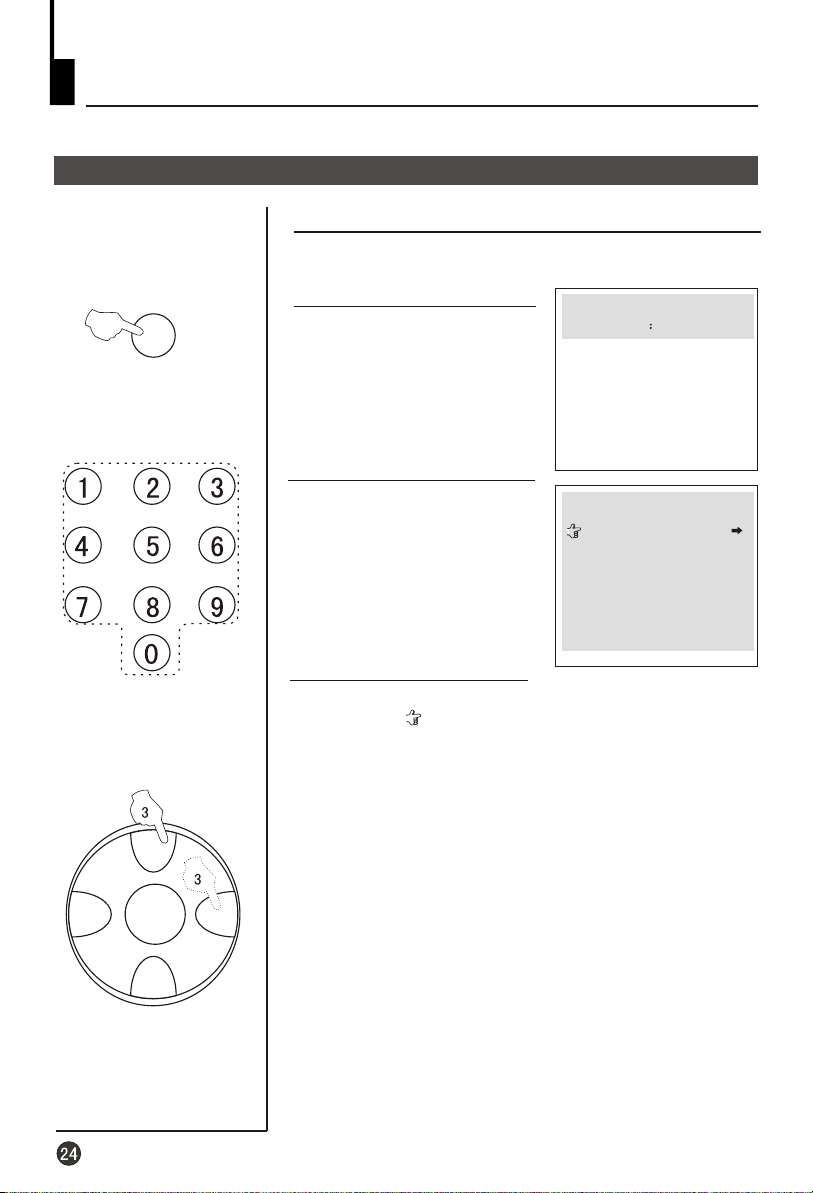
Setting the Lock(continued)
Setting the Lock
Setting the Lock
SEARCH LOCK,POS LOCK,AV LOCK,
and five lock setting,you
LOCK
LOCK
There are
TIMER LOCK CHILD LOCK
can set it due to your need.
1.Press the button, the
screen will show as the form
on the right.
LOCK OR UNLOCK
PASSWORD ----
Direct-digit Choosing
Button
CH+
VOL- VOL+
MENU
CH-
2.Press the Direct-digit
Choosing button 0 for four
times( or input the password
you set), and enter the menu
of . LOCK
3.Press button, move
CH+/-
LOCK OR UNLOCK
CHANGE PASS.
SEARCH LOCK OFF
POS LOCK ON
AV LOCK OFF
TIMER LOCK ON
CHILD LOCK OFF
ALL CLEAR OFF
the indicator( ) to
SEARCH LOCK
VOL+ ON
button to set it or
, then press
OFF.
Note:
1.When the or is set ,
the channel or av cannot be used, hence the
screen will change into black and indicate that
it has been locked. The TV set will be in the
state of mute.
2.When the is set , if the buttons
on the TV are pressed, it will indicate that the TV
set is in the status of , and the
buttons won't work.
3.When the or the
is set if you want to enter the or
TIMER
CHANNEL AV LOCK ON
CHILD LOCK ON
CHILD LOCK
SEARCH LOCK TIMER LOCK
ON, TUNING
menu,you will have to type the password.
Page 26
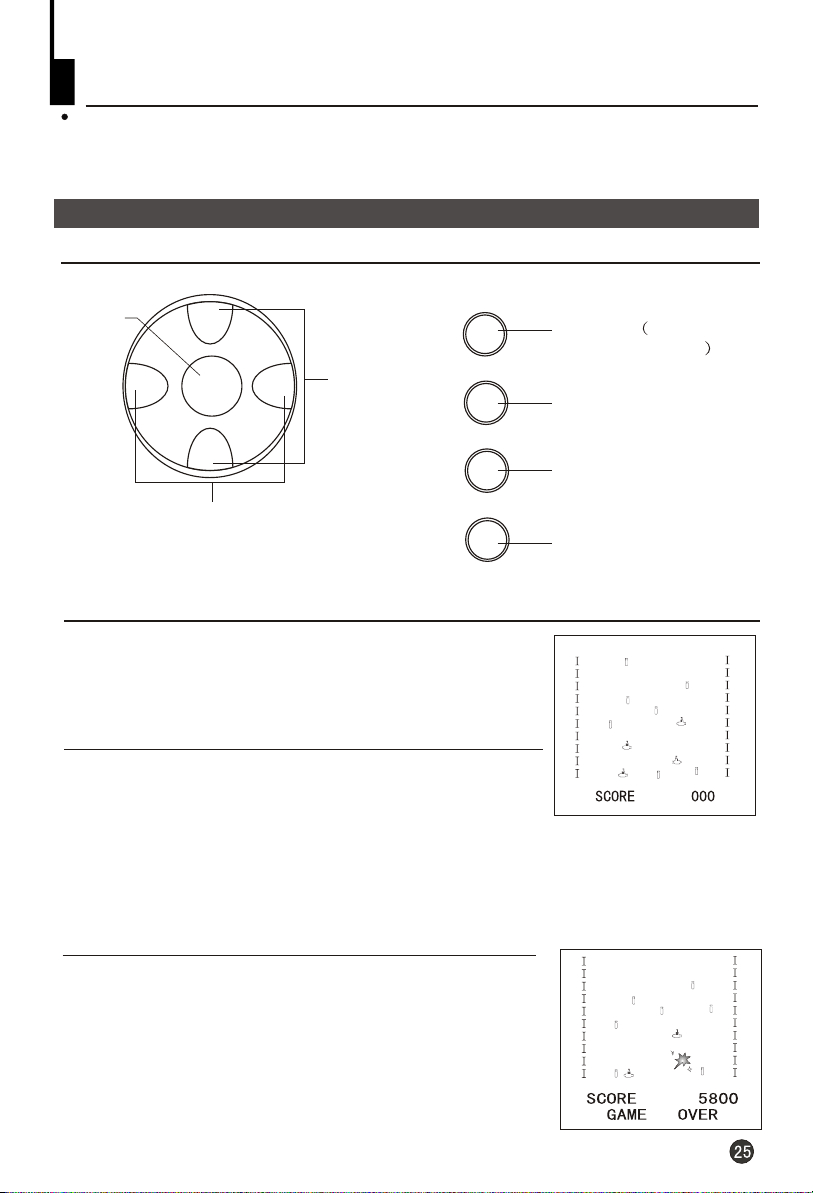
Game
This TV set provides you with the SUBMARINE game, after entering the game,
except the buttons that are appointed in the game( for example, the game button,
VOL+/-and CH+/-, etc.)and the DC Standy button, the other buttons cannot be
used.
Game control buttons and method of playing the game
Game control buttons
Fire button
CH+
FIRE
To shoot also use
the buttonMENU
VOL- VOL+
MENU
CH-
Used to turn
up or down
MODE
RESTART
To select the background
when playing game
To restart the game
Used to turn left or right
EXIT
To exit game
Method of playing the game
1.Press button until appears on
the screen. Press the buttons to select the
SUBMARINE VOL+
game.
2.On the screen, the submarine figures in yellow is
operated by you. Press and buttons to
move the submarine up, down, left or right to change the
position and avoid the attacks from submarines (in blue,green and purple) of
an enemy. Press or button on the remote control to fire. You will get a
mark of 100 when you destroy an enemy submarine or a shell.Specially, when you
shoot down a red submarine appears on the top row, you will get a mark of 1000!
Scores will be filed if the submarine of an enemy is destroyed.
MENU FUNCTION2
CH+/-
item. Then press button to start the
CH+/- VOL+/-
MENU FIRE
3.You can press the button to restart the
game when it is or during the process of
RESTART
GAME OVER
the game.
Page 27
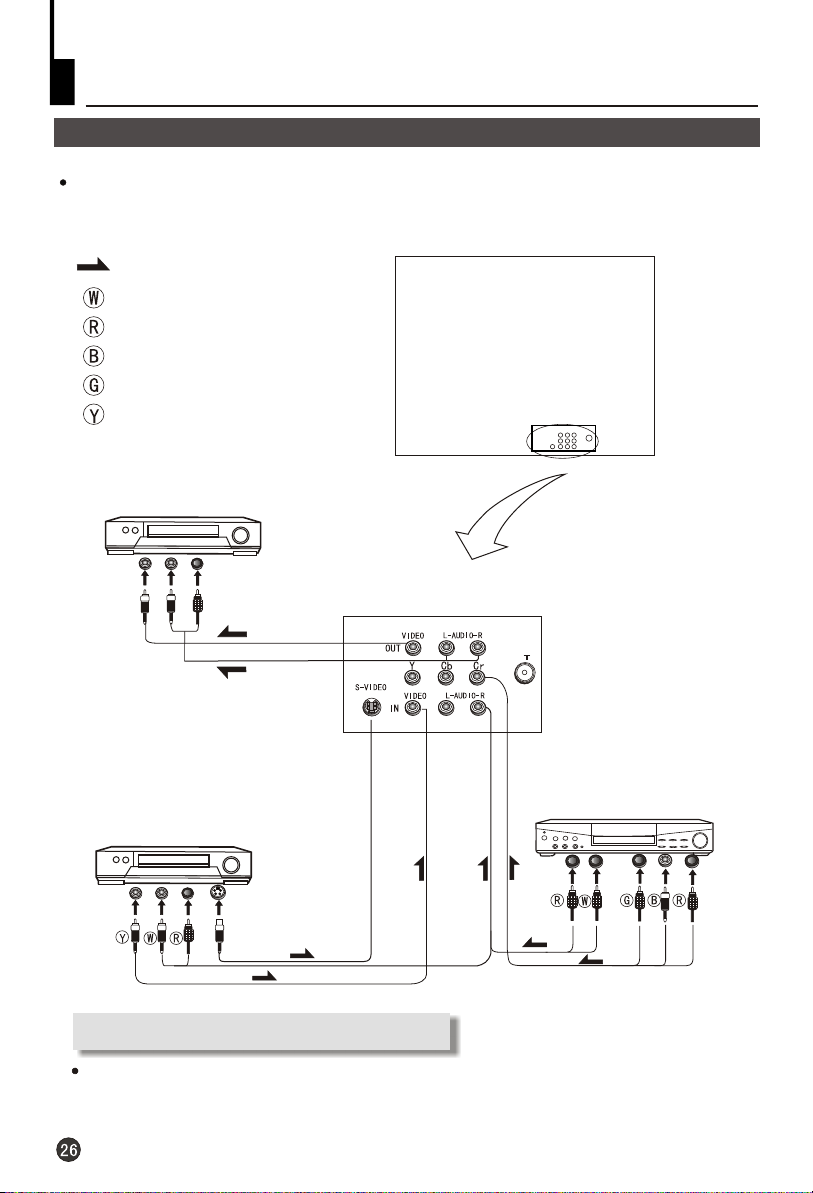
Connecting Additional Equipments
Connecting additional equipments
You can connect the DVD,VCR and stereo system to the AV output to enjoy a
higher quality of picture and sound effect.
Signal flow
White (Audio left channel)
Red (Cr and audio right channel)
Blue (Cb)
Green (Y)
Yellow (Video)
DVD, VCD or other units
Video output
Audio output
Laser DVD with output terminal
DVD, VCD or other units
ut
p
n
i
O
E
VID
-
o S
To video input
T
To audio input
To audio output
Note: About the terminals
You should only connect S-VIDEO or VIDEO terminal when you use the first AV terminal .
Do not connect the both at the same time .
To DVD output
Page 28
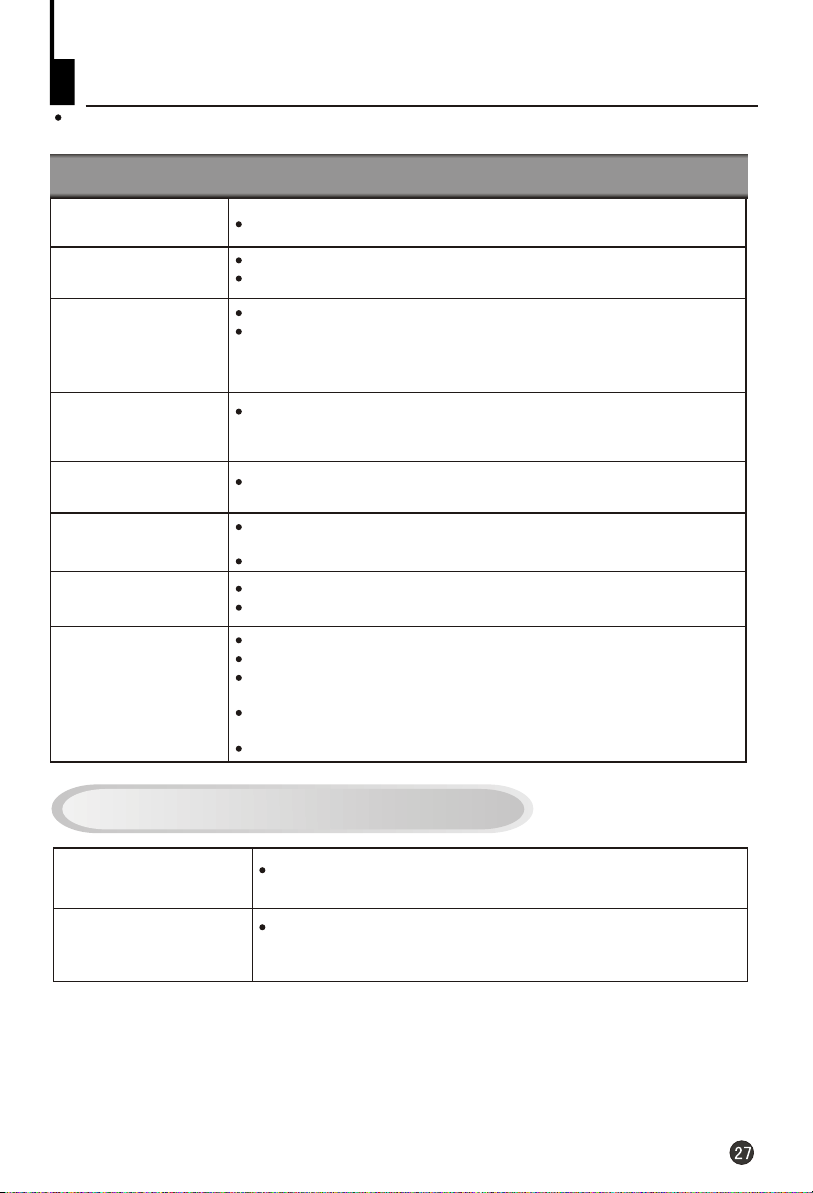
Troubleshooting
Before calling service personnel, please check the following chart for a
possible cause to the trouble you are experiencing.
Symptom
Check these things
TV is not
turned on
Good picture ,
no sound
Poor color / tint,
good sound
Spots appear
on the screen
Lines appear
on the screen
Double images
or ghosts
Snowy picture or
black screen
Remote control
does not work
Be sure the power cord is plugged in.
The MUTE function may be used.
Adjust the volume of the TV set.
The contrast, color and tint may be incorrectly adjusted.
If you change the direction of the TV while the TV is on, the picture
may suffer from color shading. If so, turn off the TV and allow about
30 minutes to cool, then turn on the TV again.
The broadcast signal may be jammed by other electrical sources such
as cars, motorcycles, electric trains, high tension lines, neon signs, hair
dryers.
The broadcast signal may be jammed by other TV receivers, personal
computers, and TV games, as well as interference from radio stations.
Interference may be due to broadcast waves reflected from mountains
or buildings.
Check if the direction of the antenna is changed.
The antenna may be disconnected or falling out.
Check if the direction of the antenna is changed.
The batteries in the remote control may be exhausted.
The batteries may be improperly installed.
Check if there are obstacles between the remote control and the
remote (infrared ray) receiver.
Check if there is strong light interference around the remote (infrared)
receiver.
Check if the main power is ON.
The following conditions are not troubles
Clacking noise inside
the receiver
Uneven colour in a
certain portion of the
screen
It may result from the expansion of the shell caused by a temperature
change. This will not affect the picture and sound quality.
If the picture is too bright, this may occur according to the nature of
the pictures. Reduce the contrast, and it may resume to normal.
CAUTION
In case of problems, have your TV serviced by qualified personnel.Never
attempt to service the set yourself since opening the cabinet may expose
you to dangerous voltage or other hazards.
Page 29
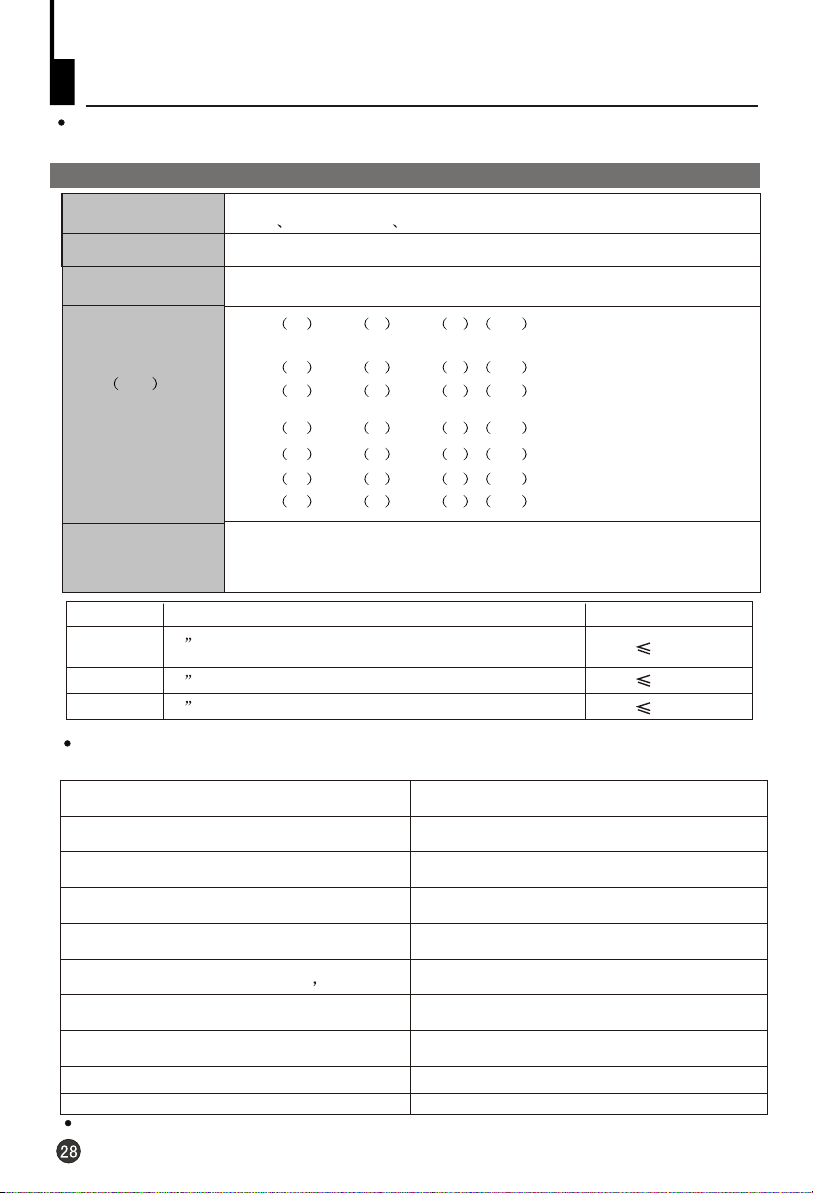
Specifications
The specifications offered you here are only for reference and, with the improvement
of the products, there may be some different between the description and the practicality.
Specifications
Color system
Sound system
Sound output power
Size mm
Accessories
MODEL
HT-3728
HT-3768
15F6B
Other models
14 color picture tube(the viewable dimension is 34cm)
15 color picture tube(the viewable dimension is 34cm)
21 color picture tube(the viewable dimension is 51cm)
PAL AV NTSC3.58 NTSC4.43
DK(BG,I,M)
3W
576 W x491 D x441 H mm 21FA1/21TA1/21TA1(S)
/21TA1(D)/21TA1(B)/21TA1(BG)
576 W x475 D x458 H mm 21F9K
603 W x475 D x430 H mm 21F9D/21T9D/21T9D(S)
/21T9D(D)/21T9D(B)
424 W x344 D x343 H mm HT-3768/37T6D-T
365 W x375 D x345 H mm HT-3728
410 W x365 D x348 H mm 15F6B
472 W x620 D x454 H mm 21F7A
Remote control X1
Owner's manual X1
Circuit diagram X1
Picture tube
Warranty card X1
Battery(AA) X2
Power consumption
Warranty card and circuit diagram are only for the special country or area.
Power supply input list
Country or Area
Korea
Mongolia, Moldova, Cyprus, Russia,
Turkmenstan, Ukraine, Latvia, Bulgaria
Jordan, Oman, UAE, Lebann,India,
Yemen, Kuwait, Bahrain
Indonisia
Philippine ,Srilanka Bengal
New Zealand, Australia,Malaysia
Power supply input
~90V-240V, 50/60Hz
~150V-250V, 50Hz
~160V-250V, 50/60Hz
~150V-240V, 50Hz
or ~150V-250V, 50/60Hz
~150V-240V, 50/60Hz
~150V-250V, 50/60Hz
60W
70W
70W
Hong Kong, Algeria, Nepal, Turkey
Yugoslavia
Saudi Arabia, Pakistan
~220V, 50Hz
~220V-230V, 50/60Hz
~90V-250V, 50/60Hz
The actual voltage and frenquency of the TV set is for the country or area. different
Page 30

01
0090504564A
 Loading...