

Page 1

HT-2599HT-2599
COLOUR TELEVISION
OPERATING
INSTRUCTIONS
◆Stage curtain for open and close effect
2
◆Digital I C bus control
◆Auto search tuning & 218 programs stored
◆Full infrared remote control
◆Multi-picture modes selection
◆Multi-function timer,appointing programme
Page 2
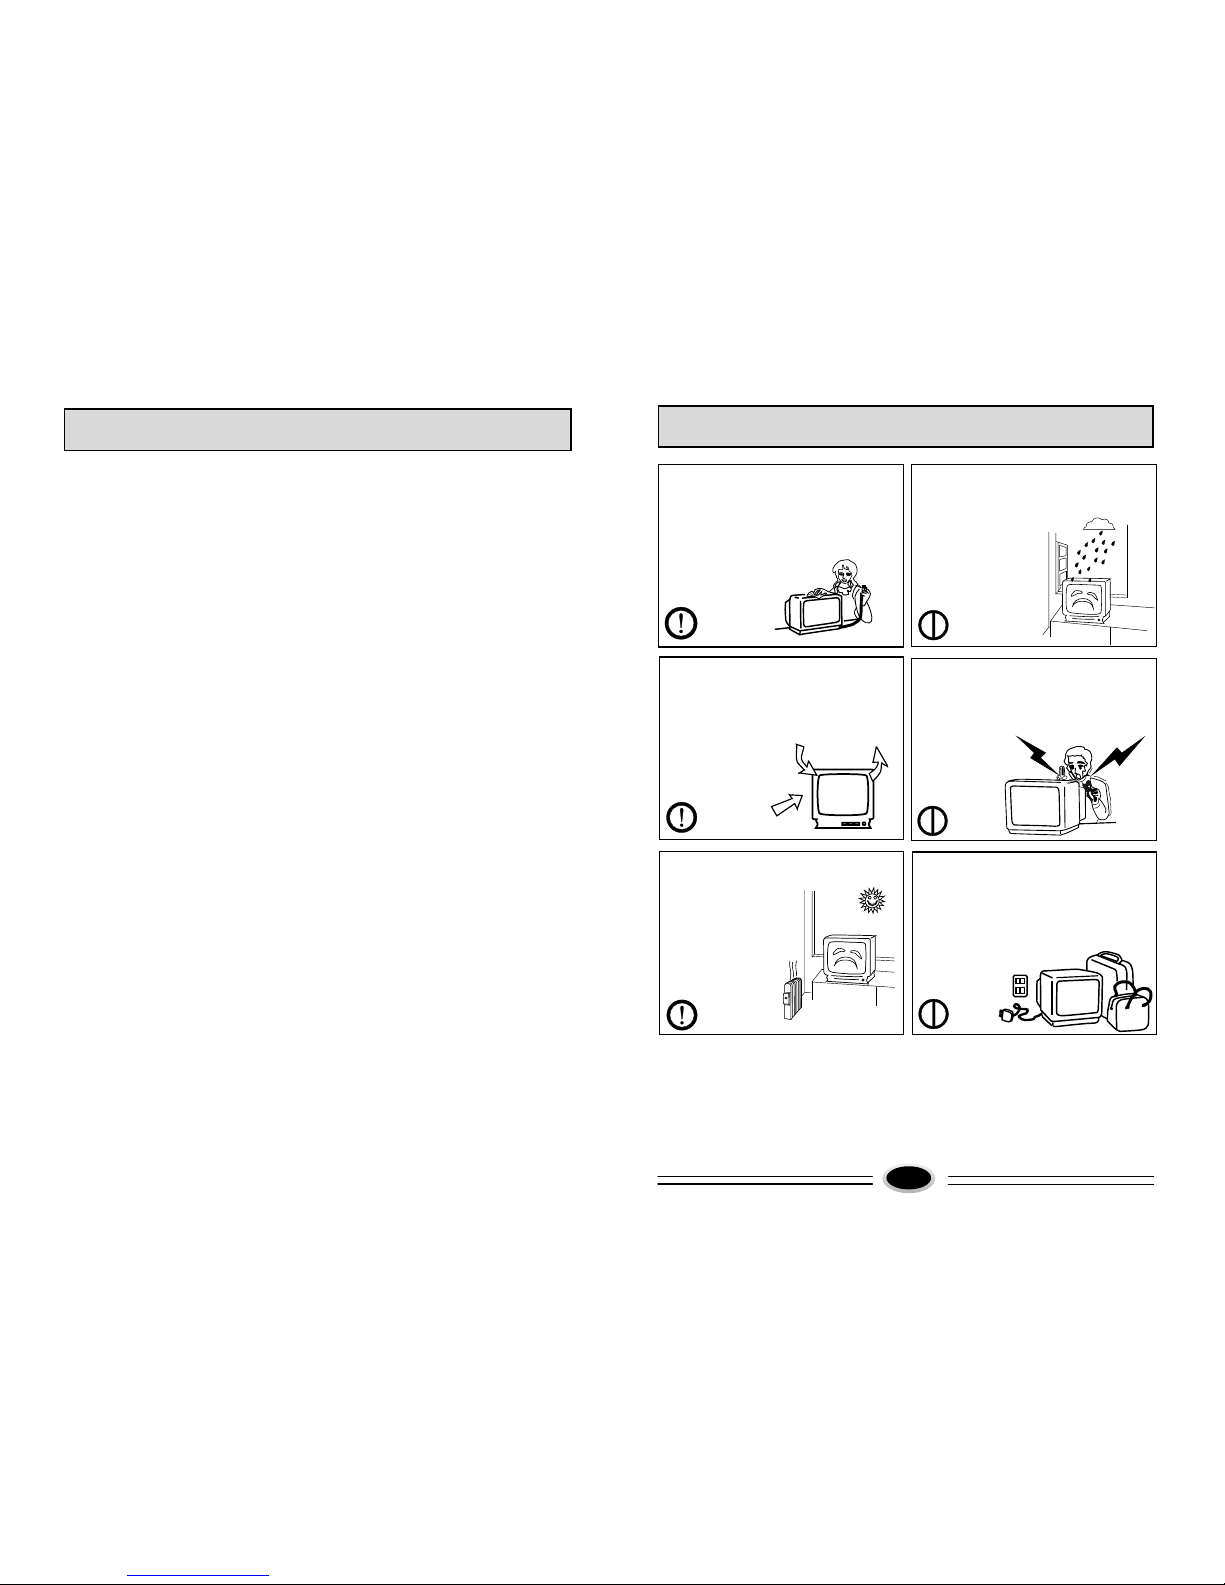
WARNING AND CAUTIONS
1. When you clean the TV set, please pull
out the power plug from AC outlet.
Or may result in electric shock, fire or
damage to the TV set. Don't clean the
cabinet and the screen with benzene,
petrol and other chemicals.
4. Do not place the TV set near rain
or moisture as it may cause an electric
shock, or the TV set to catch fire. The TV
set must only be used
in dry indoor location.
2. In order to prolong the using life of the
TV set, please place it at a well ventilated
location.
5. The back cover must only be removed
by a registered electrical service person.
Removing the back cover may result in
electric shock, fire or damage to
the TV set.
3. Don't place the TV
set in direct sunlight
or near heat source.
6. If the TV set is not going to be used for
a long time, or there is a severe thunder &
lightening storm, it is recommended that
the TV set be disconnected from the AC
power outlet and the aerial plug
removed.
Explanation on the display tube
When the picture tube requires cleaning, please disconnect the power and use a
dry soft cotton cloth. Do not use any cleaner or abrasive cloth.
1
CONTENTS
Warning and cautions.............................................................................................1
Basic feature...........................................................................................................2
Technical specification...........................................................................................2
Preparing for operations.........................................................................................3
Function buttons and external sockets....................................................................4
AV connection.........................................................................................................5
Remote controller guide..........................................................................................6
Power supply...........................................................................................................7
Tuning procedure....................................................................................................7
Picture adjustment...................................................................................................9
Other functions......................................................................................................10
Multi function timer...............................................................................................14
Lock function.........................................................................................................15
Trouble shooting guide..........................................................................................17
Page 3

BASIC FEATURE
●I C bus control
●218 programs stored
●Display full functions on the screen and infrared remote control
●Multi picture modes and sound modes selection
●Auto searching, function selecting and program number skipping
●Multi function timer
●Progammes scanning
●Game, multi-function lock
●Stage curtain for open and close effect
2
TECHNICAL SPECIFICATION
1.POWER SUPPLY: See rating plate
2.COLOUR SYSTEM: PAL N TSC4.43/3.58(AV)
3.AUDIO SYSTEM: B/G
4.CRT: 25"
5.ANTENNA INPUT : 75Ω Standard Coaxial Cable
6.SOUND OUTPUT POWER: 5W
7.POWER CONSUMPTION: See rating plate
8.NET WEIGHT(kg): 29
9.NET DIMENSION(mm): 688 x 480 x 526
Supplied accessories:
Infrared remote control handset 1
Battery(AA) 2
Operating instruction 1
Design and specifications are subject to change without notice.
2
Figure A Figure B
Antenna cable
with a plug
Figure C Figure D
Antenna feeder
Antenna adapter
75-300Ω
Coaxial cable(75Ω) twin-lead cable(300Ω)
Antenna connection
Connect an antenna to the antenna socket on
the TV set, we recommend using a Cable TV
system for better picture and audio quality.
1.If you use a coaxial cable(75Ω),insert the
antenna plug (see figure C) into 75Ωsocket
(see figure A).
2.If you use a twin-lead cable(300Ω),please
shape the cable as figure D, and connect the
leads to antenna adapter and then insert the
antenna adapter into the 75Ωsocket (see
figure B).
Power source wire connection
Insert the power plug into AC outlet.
Install and replace batteries of the
remote control unit:
1.Place the remote control unit with the face
down, then open the battery cover of the
unit.
2.Place the two"AA"size batteries, matching
the + and - signs on each battery to the +
and -signs of the battery compartment.
3.Close the cover of the battery compartment.
NOTE:
(1)Don't drop or wet or dismantle the unit.
(2)If you don't intend to use the unit for a
long period or the electricity of the
batteries is used up, remove the batteries
to prevent batteries acid from leaking
into the battery compartment.
(3)Replace the two old batteries at the
same time.
(4)Don't use charge battery (Ni-cd )and
don't mix battery type.
(5)Don't throw your batteries into a fire.
Dispose of your batteries in a required
place.
PREPARING FOR OPERATIONS
3
合理安放
Antenna
Page 4
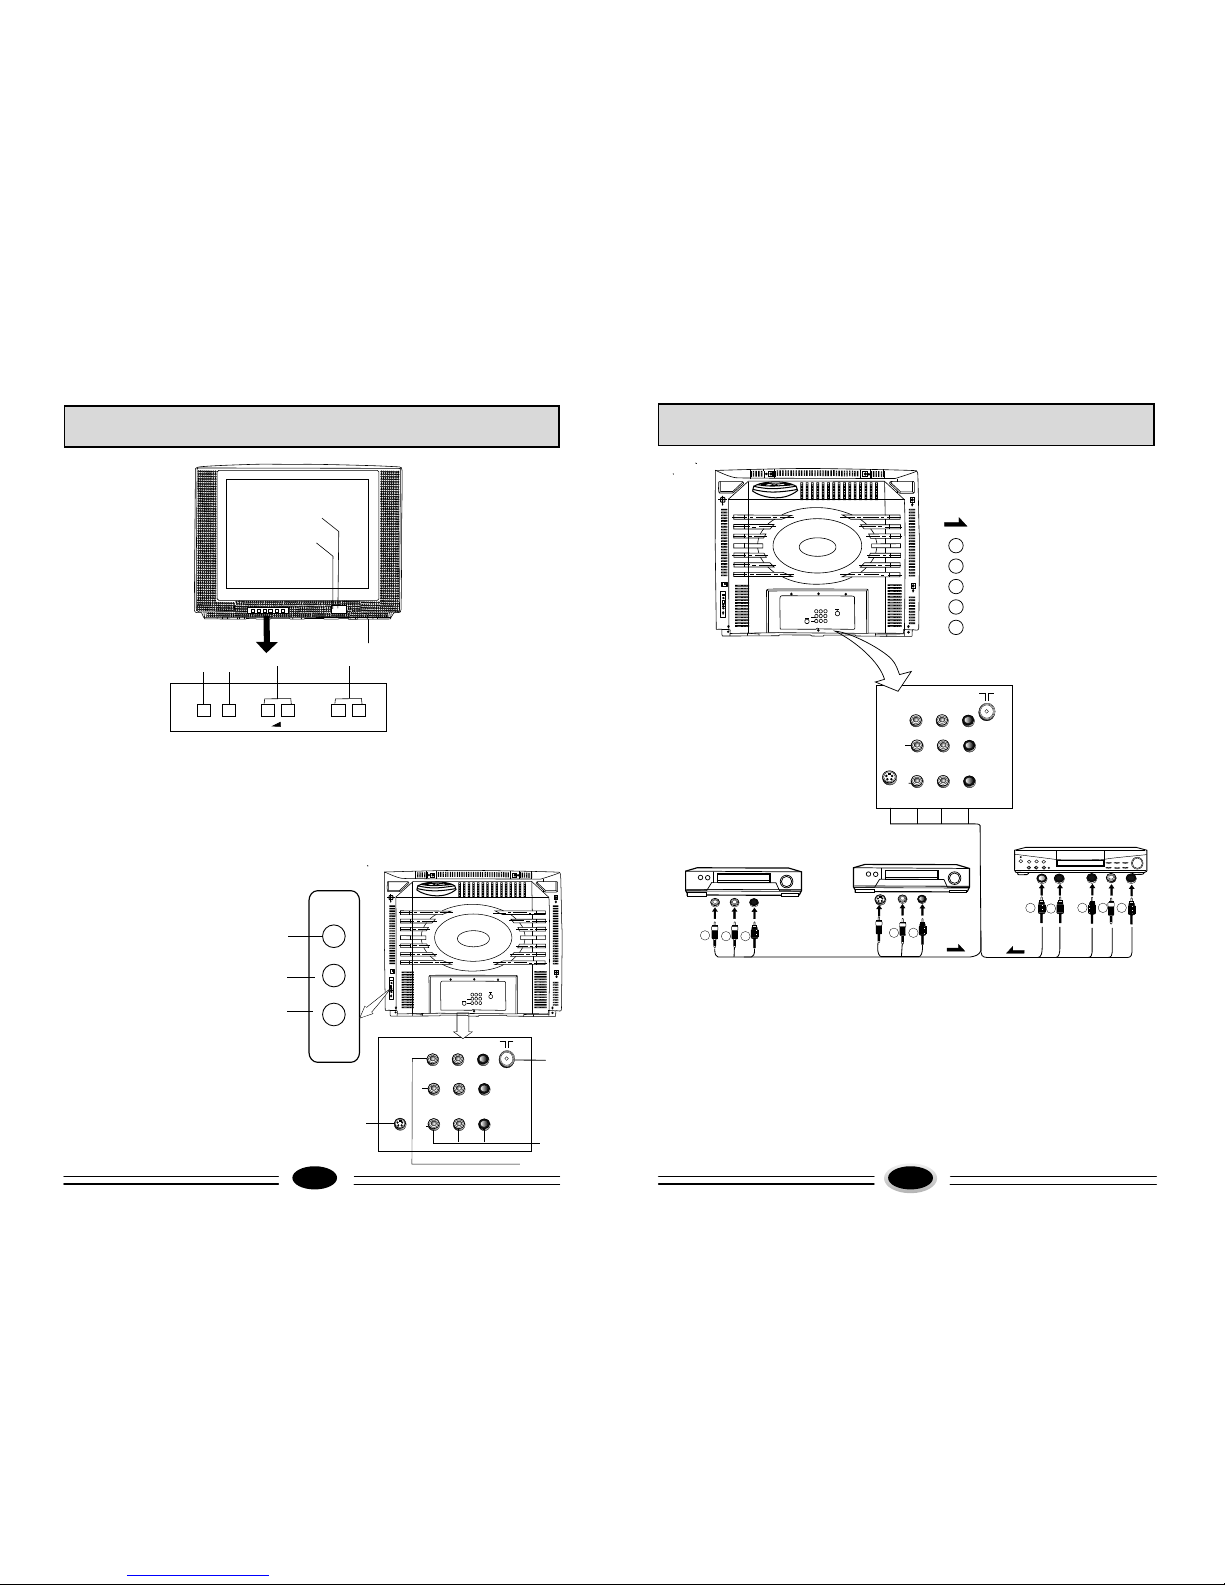
AV CONNECTION
5
FUNCTION BUTTONS AND EXTERNAL SOCKETS
4
1.Front Panel
(1)Power switch: press the button to turn on the TV set ,press the button again to
turn off the TV set.
(2)Program up/down button
(3)Volume up/down button
(4)TV/AV switch button
(5)Menu button
(6)Power indicator: the indicator lights in standby status .The indicator glints
when you use remote controller.
(7)Remote sensor: let the remote
controller aim here, the TV set
can receive remote control signal.
2.The sockets on the rear and side panel
(1)Antenna socket
(2)Audio/Video socket
(3)S-Video socket
(4)DVD component socket
(5)Video input socket
(6)Audio(L) input socket
(7)Audio(R) input socket
W
R
B
G R
DVD(with DVD component)
W
R
G
B
Direction of signal
white(left audio)
red(C /right audio )
blue(C )
green(Y)
yellow(video)
r
b
Y
VCR (without S-VIDEO terminal)
Y
W R
T
o
a
dio
u
t
u
o
VCR (with S-VIDEO terminal)
W R
s
- e
tp
To v
i
d
o
ou
u
t
v oT
o
id
e
o u
tput
o
mp
e
t u
T
c
o
on n
o
t
Note:
1.When receive s-video signal, you must remove video signal; when receive
video signal, you must remove s-video signal.
2.When receive front video signal, you must remove back video signal; when
receive back video signal, you must remove front video signal.
(1)
(2)
(4)
(3)
VIDEO
IN
L AUDIO R
S-VIDEO
3
Y
Cb
Cr
OUT
VIDEO
IN
L AUDIO R
Y
Cb
Cr
OUT
S-VIDEO
(1)
(2)
(3)
(4)
(5)
MENU TV/AV
- + - +
P
(7)
(6)
VIDEO
L
AUDIO
R
(5)
(6)
(7)
Page 5
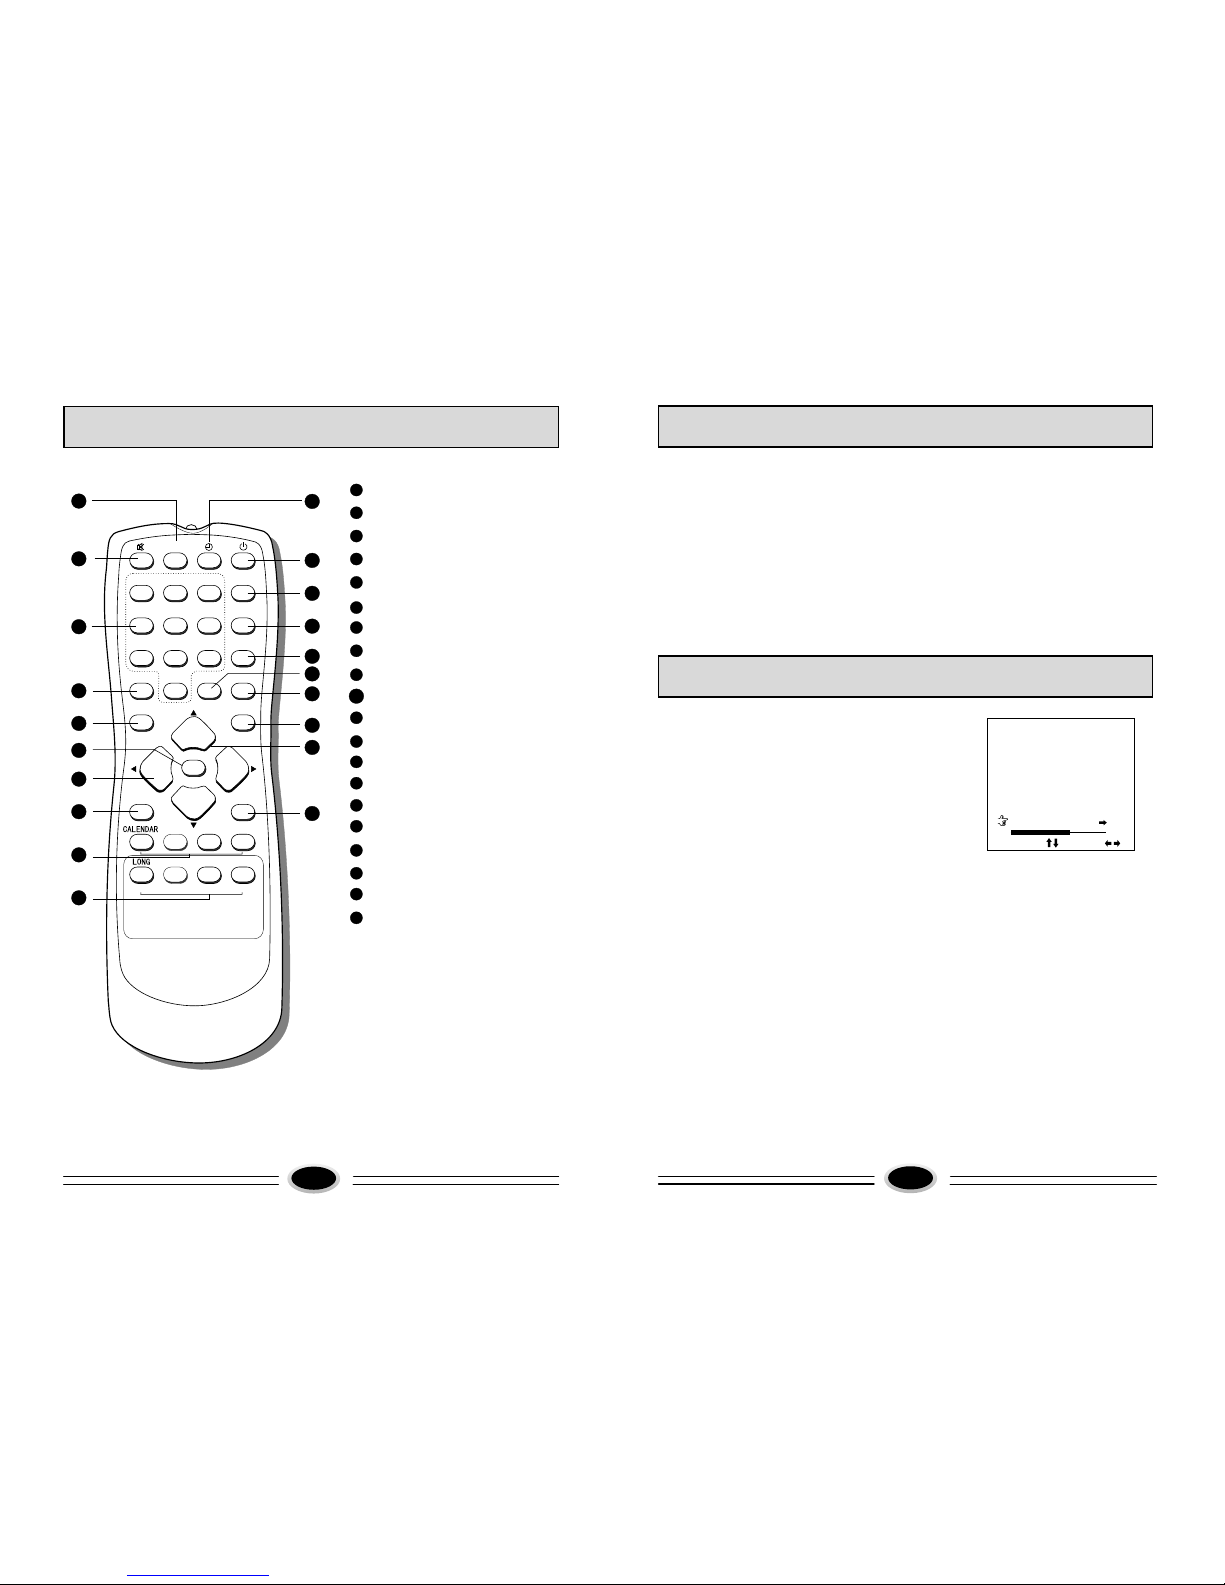
Remote control functions
TV/AV exchanging button
Mute button
Numeric button
One/two/three digital buttons
Picture mode selection
Volume up/dwon button
1
2
3
4
5
6
11
15
16
17
17
18
16
3
15
14
13
12
11
1 2 3
4 5 6
7 8 9
0
TV/AV
SCAN
LOCK
SYSTEM
DISPLAY
-/--
BAR
MENU
CH+
RESTART
WIDE
PRE
FIRE
FIRE
MIX
SHORT
SECOND
EXIT
LIGHT
NARROW
BACK
SELC.PIC SELC.VOL
CH-
VOL- VOL+
1
2
5
4
6
7
8
9
10
7
Recall
8
Calendar/game selection
9
10
Second timer button
Volume mode selection
12
Display
13
Invalid button
14
System preset button
Lock preset button
Scan button
DC standby button
18
Sleep timer
Programme promote
10
Note :Because there is no bar function in the TV,"LONG", "SHORT",
“WIDE", "NARROW" buttons are invalid.
6
20
19
19
20
Program number up/down button
Menu button
REMOTE CONTROLLER GUIDE
POWER SUPPLY
1.Power supply (switch on/off to set main power supply).
Press power switch button and the set shall be under normal receiving condition.
Press it again and the power shall be off.
2.Standby button (remote control power supply).
Press the button and the set enters standby condition, press it again and the set
enters normal receiving condition.
1.Preparation
Connect the aerial and power supply
wire, press power switch button, the
power indicator will light after a few
seconds.
2.Auto-search
The TV set will automatically search all
programs, after the search is finished, all
.
fine tuned programs will be stored automatically.
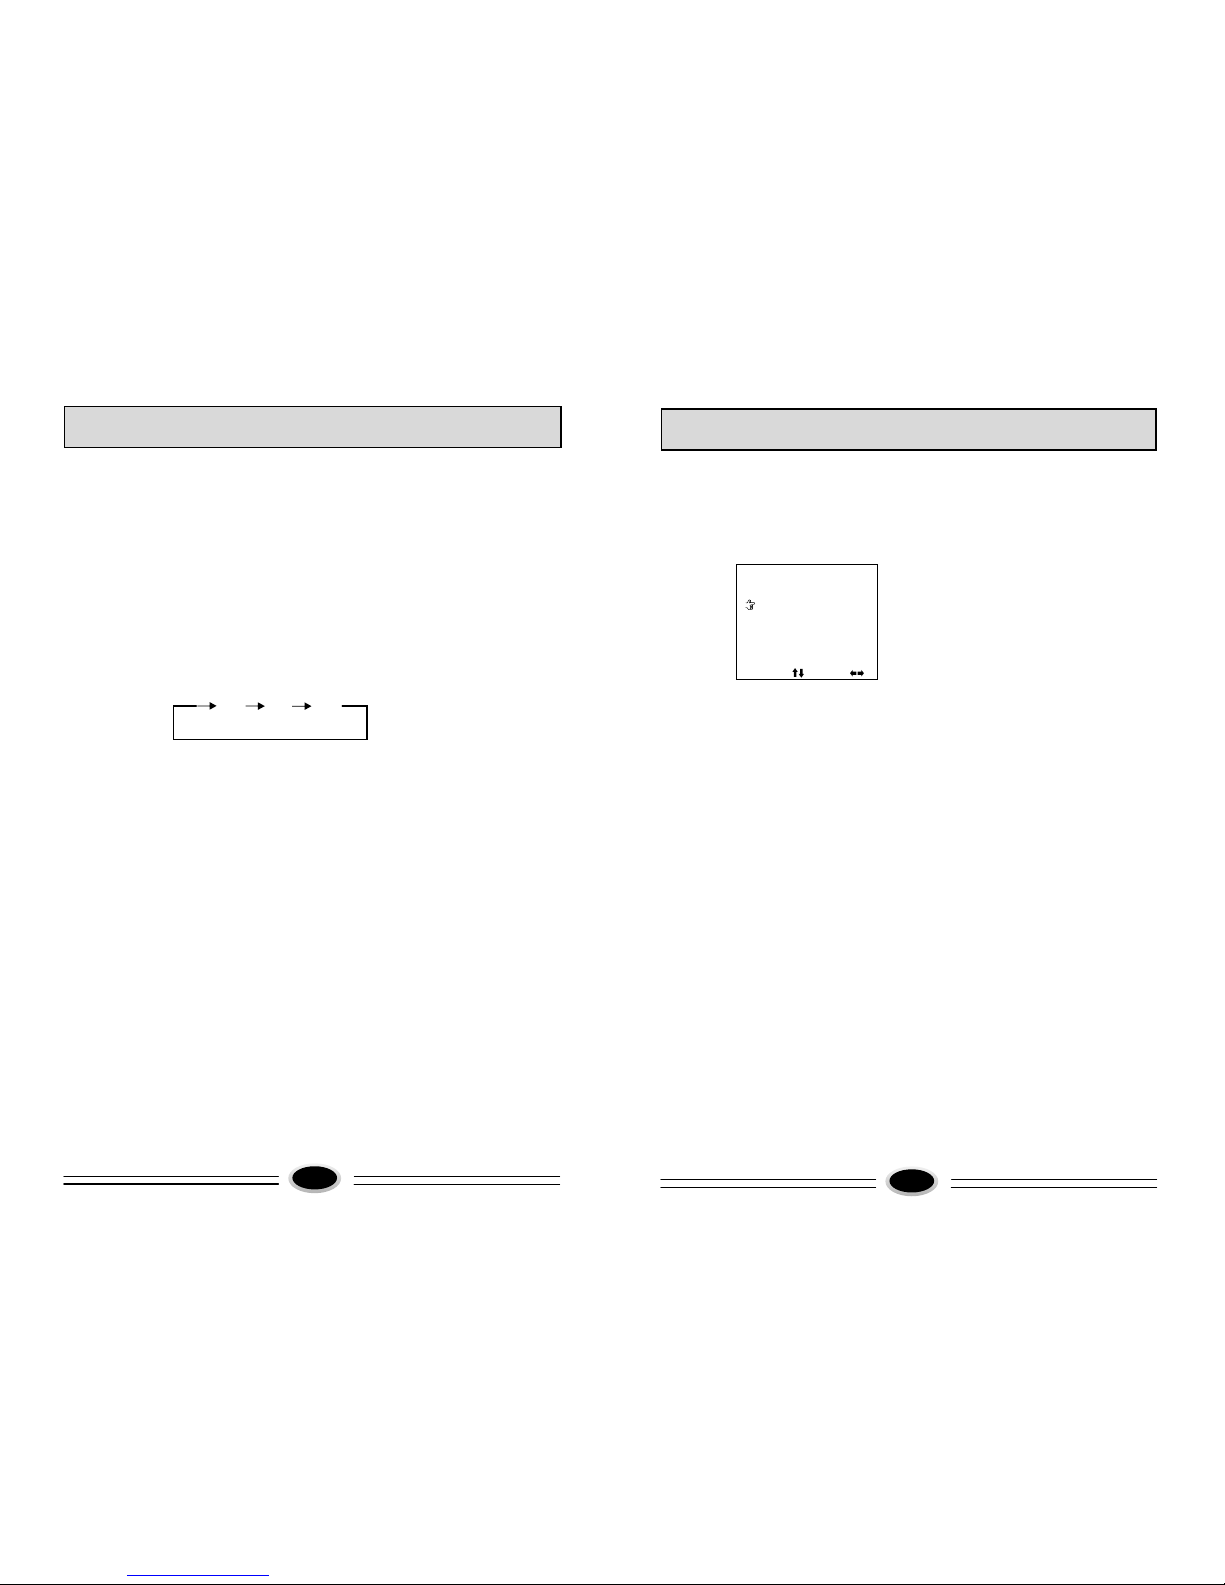
(1)Press [MENU] buttons, let TUNING menu display on the screen.
(2)Press [-CH+] buttons, and select AUTO MEMORY item.
(3)Press [VOL+] button, the TV set will begin to search programs from program
number 0. After the searching is finished, program number 0 will display on
the screen.
(4)During auto-search, if you want to stop searching, press [VOL-] button.
3.Semi-Auto search
You can preset the program you need to the pointed channel.
TUNING PROCEDURE
POSITION 1
BAND UHF
SKIP OFF
SEARCH UP
MFT DOWN
AUTO MEMORY
SELECT ADJUST
TUNING
7
Page 6
VHFL VHFH UHF
TUNING PROCEDURE
(1)Press [MENU] button, let TUNING menu display on the screen.
(2)Press [-CH+] buttons, and select SEARCH item.
(3)Press [-VOL+] buttons to change channel number into pointed channel
number.
(4)Press [-VOL+] buttons, when the TV set has searched a program, stop
searching, if the program isn't the one you need, press[-VOL +] buttons
again, the set will search continually until it has searched the program you
need. And pointed program is stored in pointed channel.
4.Selecting band
In the semi-auto search mode, if the signal you want to search isn't on
the present band, you can change the band to improve searching speed.
(1)Press [MENU] button, let TUNING menu display on the screen.
(2)Press [-CH+] buttons to select BAND item.
(3)Press [-VOL+] buttons to select the band you need.
5.Fine tuning
Because of some reasons, if auto searching effect of program
isn't good, please fine tune your TV set.
(1)Press [-CH+] buttons to select MFT item.
(2)Press and hold [-VOL +] buttons until the effects of the picture
and audio are good.
6.Skip
The function can skip the TV program which you don't need.
(1)Press [-CH+] buttons or numeric button, select the program
number which you want to skip. (for example: channel 002)
(2)Press [MENU] button to select TUNING menu.
(3)Press [-CH+] buttons to select SKIP item.
(4)Press [-VOL+] buttons to preset SKIP ON mode.
Note: When a certain program number is in SKIP ON
mode, the program number will not appear when you select
program with the [-CH+] buttons, but program number will
appear with numeric button. When a certain program number
is in the SKIP OFF mode, the program number will appear
when you select program with the [-CH+] buttons.
8
Press [MENU] button, and select PICTURE menu.
Press [-CH+] buttons, and select an item.
Press [-VOL+] buttons to adjust the value of the item function.
Brightness adjustment:
Press [-CH+] buttons to select BRIGHT item.
Press [-VOL+] buttons to adjust brightness.
Contrast adjustment:
Press [-CH+] buttons to select CONTRAST item.
Press [-VOL+] buttons to adjust contrast.
Colour adjustment:
Press [-CH+] buttons to select COLOR item.
Press [-VOL+] buttons to adjust colour.
Sharpness adjustment:
Press [-CH+] buttons to select SHARP item.
Press [-VOL+] buttons to adjust sharpness.
Background selection:
Press [-VOL+] buttons to select a background on or off.
PICTURE ADJUSTMENT
CONTRAST 100
BRIGHT 50
COLOR 50
SHARP 50
B.B OFF
SELECT ADJUST
PICTURE
9
Page 7
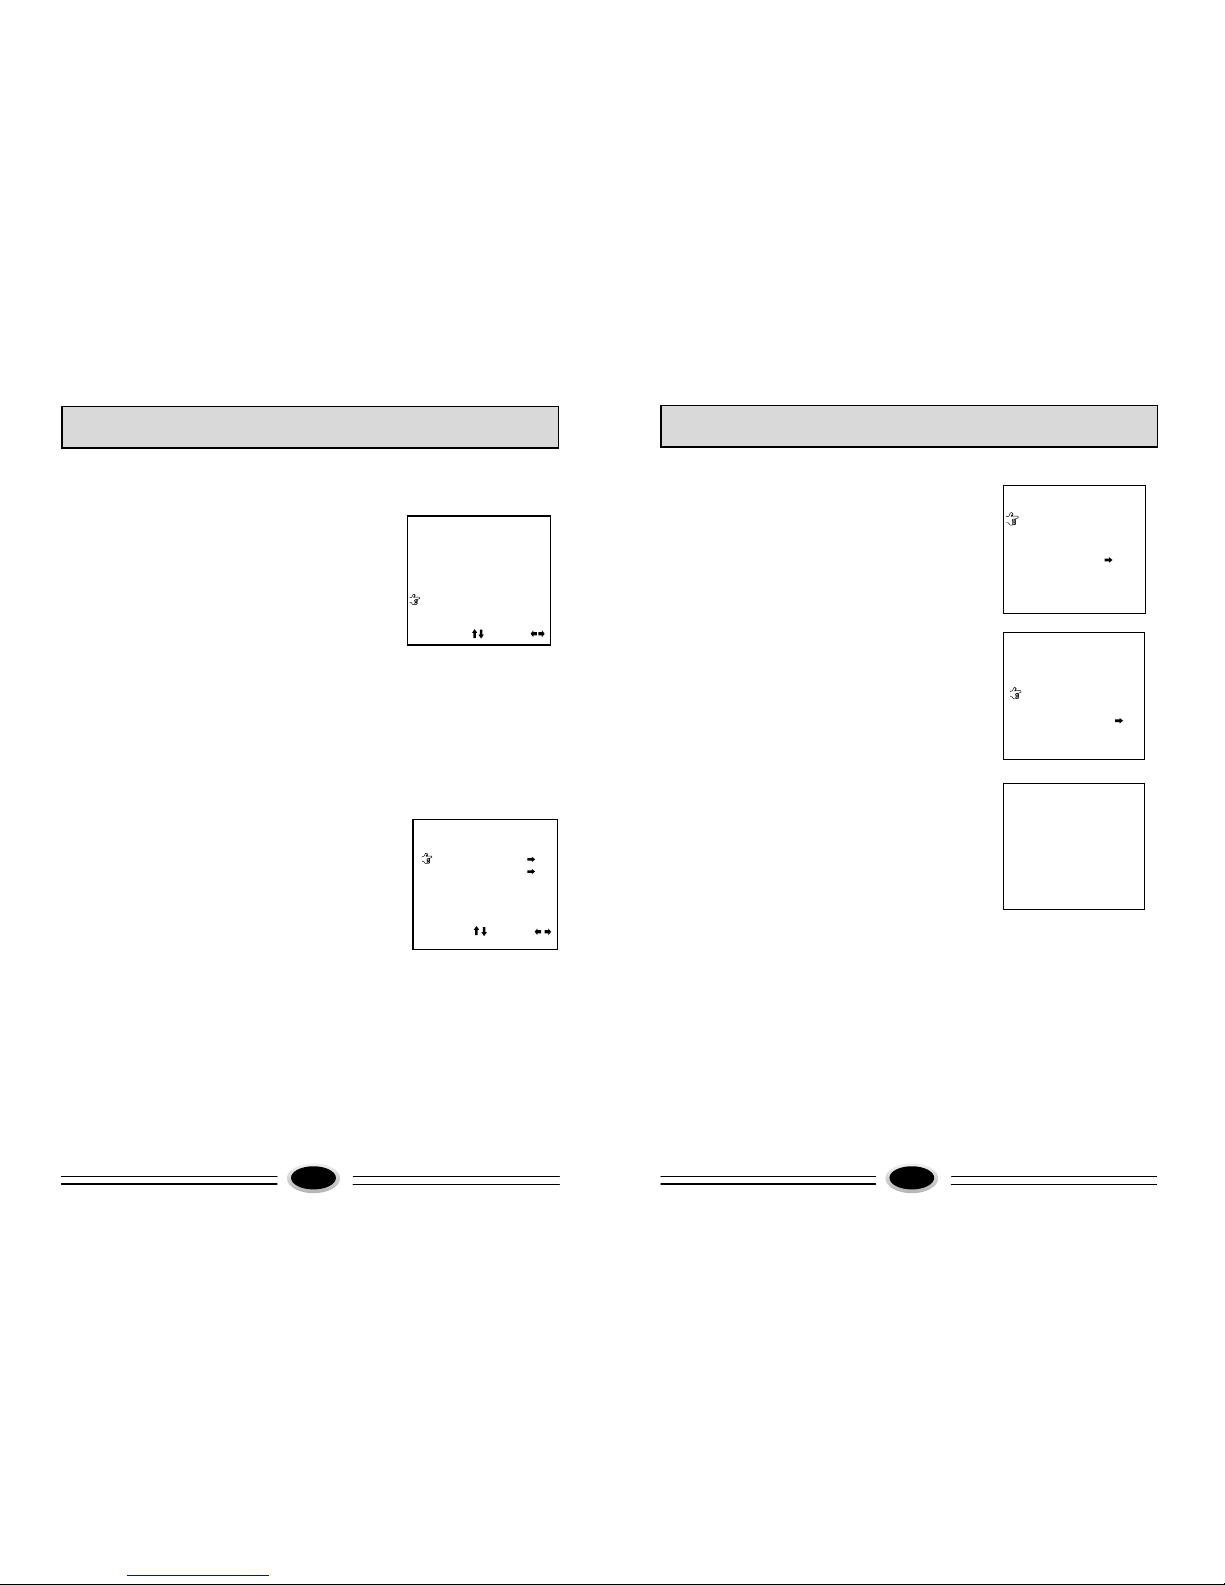
OTHER FUNCTIONS
2.FUNCTION 2
(1)Press [MENU] button, and select FUNCTION1menu.
(2)Press [-CH+] buttons, and select an item.
(3)Press [-VOL+] buttons to set function of the item .
(1)Press [MENU] button, and select FUNCTION2 menu.
(2)Press [-CH+] buttons, and select an item.
(3)Press [-VOL+] buttons to set function of the item .
Note:
(1)If you select COUNT item , you can get
the total time of receiving TV program
(except standby time).
(2)Soft-exchanging channel No. function:
select S.C.C ON, so when you exchange channel No.,
the picture will fade in/out.
Note:
(1)When you select VOL STORE ON, the TV set can hold the same volume with
changing channel No. .(The channel No. must be 1 between 50.)
(2)When you select CURTAIN item, you can select three curtain modes: I, II and
III.
LANG. ENGLISH
I
CURTAIN
LOW VOL 20
NORMAL VOL 40
HIGH VOL 60
VOL STORE OFF
SELECT ADJUST
FUNCTION1
SELECT ADJUST
SUBMARINE
POS.EX
S.C.C OFF
COUNT 13:21
FUNCTION2
10
3.POS.EX item:
Press [VOL+] button to enter its sub-menu(digits
in POS.EX and EX.POS2 items are present
channel No.).
Press [-CH+] buttons to select EX.POS2 item.
Press [CH+] button to put into channel No.(for
example:9).
Press [-CH+] buttons to select EXCHANGE item,
press [VOL+] button to approve. The program in
channel No. 1 will change with the program in
channel No.9.
OTHER FUNCTIONS
POS.EX.
EX.POS1 23
EX.POS2 23
EXCHANGE ?
RETURN
POS.EX.
EX.POS1 1
EX.POS2 9
EXCHANGE ?
RETURN
9
11
1.FUNCTI ON 1
The function can select OSD language, curtain mode, volume mode and volume
memory mode.
Page 8
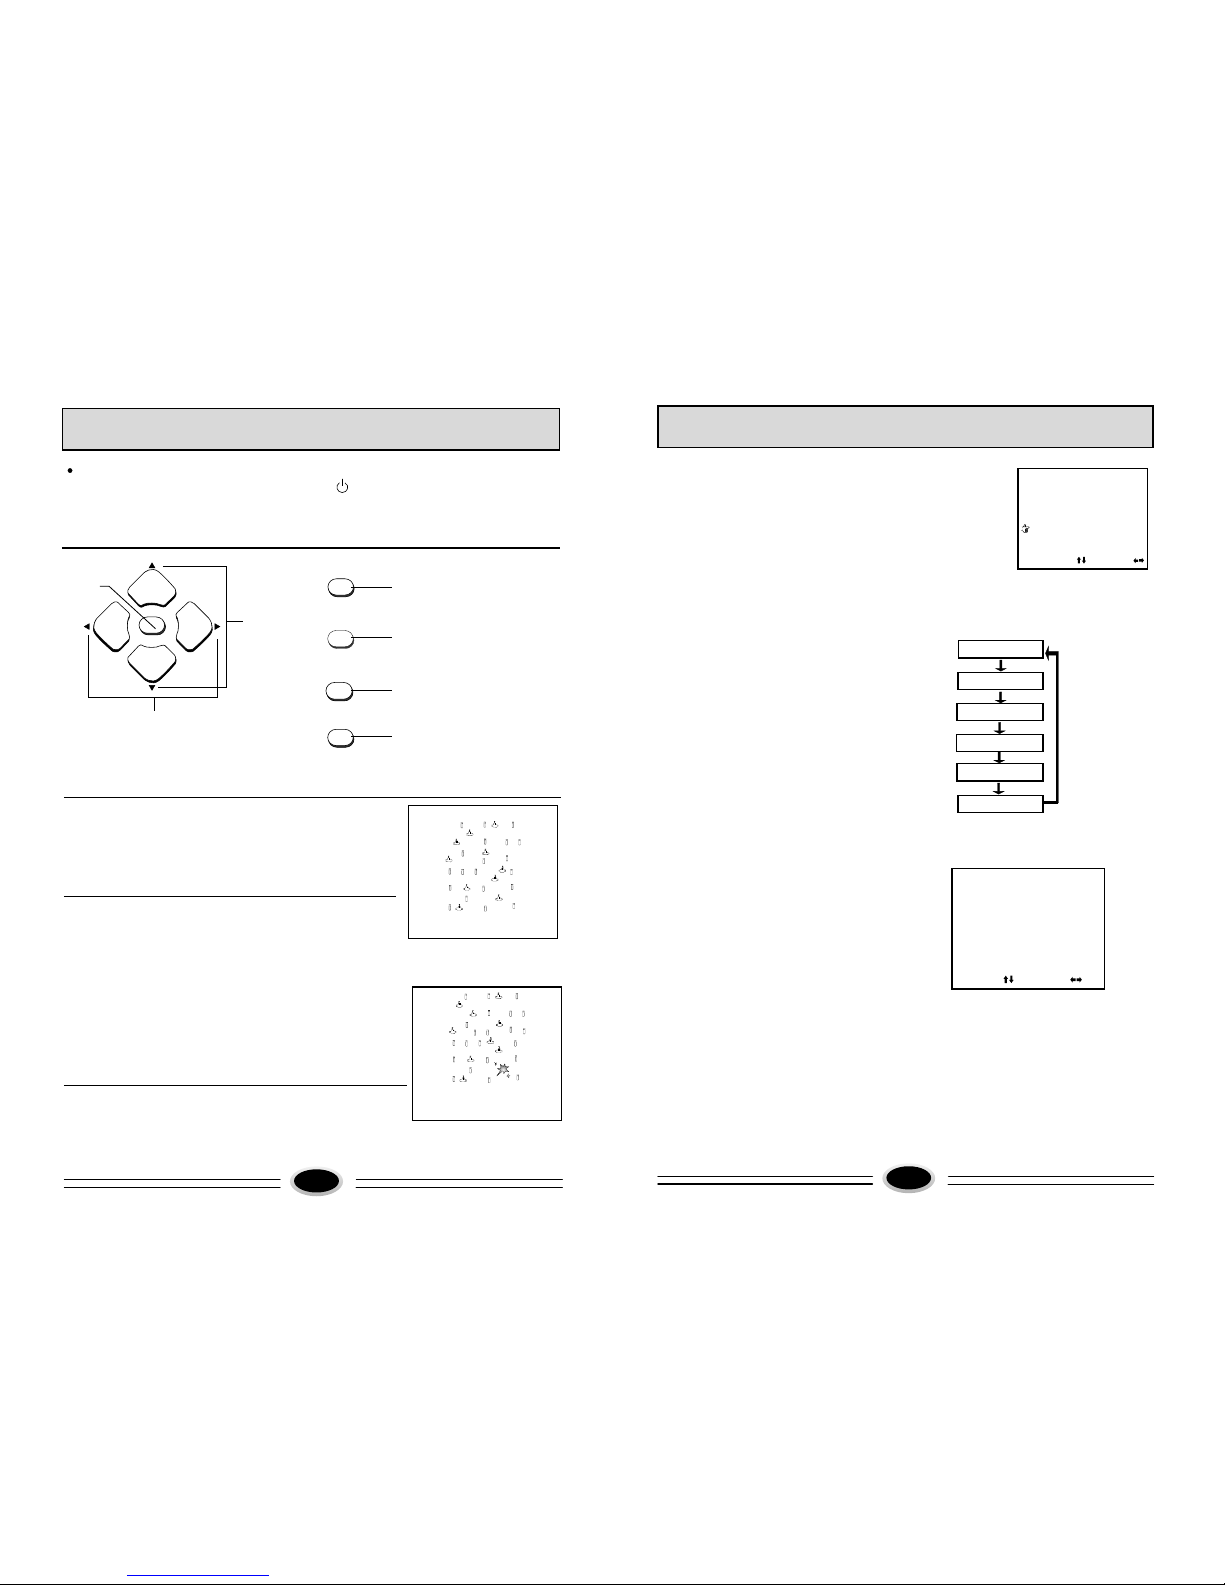
When you select“SUBMARINE”game item, enter game mode and the other
buttons (except [GAME],[VOL-/+],[CH+/-], ) are invalid.
Play game:
Instructions of game controlling buttons
2.Press red game button and game begins ,
use the remote controller to operate yellow
battle ship. Yellow battle ship bump one of
green ship or blue ship or purple ship or red
ship or blue shot. and game is over. Yellow ship
use [MENU] or blue [FIRE] button shoot shots.
The shot bump green ship or blue ship or purple
ship or blue shot and win 100scores,the shot
bumps red ship, and win 1000 scores.
3.During game or game is over, press red button
and game can restart. Ship obtaining highest
scores wins.
I
I
I
I
I
I
I
I
I
I
I
I
I
I
I
I
I
I
I
I
SCORE 000
I
I
I
I
I
I
I
I
I
I
I
I
I
I
I
I
I
I
I
I
SCORE 5800
GAME OVER
1.Press [MENU] button to make FUNCTION2 menu
display, then press[ CH-/+] buttons to select
SUBMARINE item, and press [VOL+] button to enter
SUBMARINE game mode.
MENU
CH+
FIRE
CH-
VOL- VOL+
RESTART
MIX
EXIT
LIGHT
FIRE
Fire button
Up/Down
button
Left/Right
button
Fire button
Selection buttons of
game background
Game restart button
Game exit button
OTHER FUNCTIONS
12
CALENDAR
OTHER FUNCTIONS
3.System selection:
(1)Press [SYSTEM] button, then OSD is as figure.
(2)Press [-CH+] buttons, and select an item.
(3)Press [-VOL+] buttons to select a system(color system or
sound system) you need.
COLOR AUTO
SOUND B/G
SELECT ADJUST
4.Picture mode selection:
Press [SELC.PIC] button and select a
picture mode you need:
DY NAM IC
MILD
ME MORY
COLOR MUTE
5.Calendar function:
(1)Press [CALENDAR] button, and OSD is
as figure(press the button again, the OSD
disappears.).
(2)Press [-CH+] buttons to select year,
press [-VOL+] buttons to select month.
STANDARD
PICTURE MUTE
OC T 200 2
YE AR
MO NTH
6 7 8 9 10 11 12
13 14 15 16 17 18 19
20 21 22 23 24 25 26
27 28 29 30 31
SU
MO
TU WE TH FR
SA
13
1
2
3
4 5
Page 9
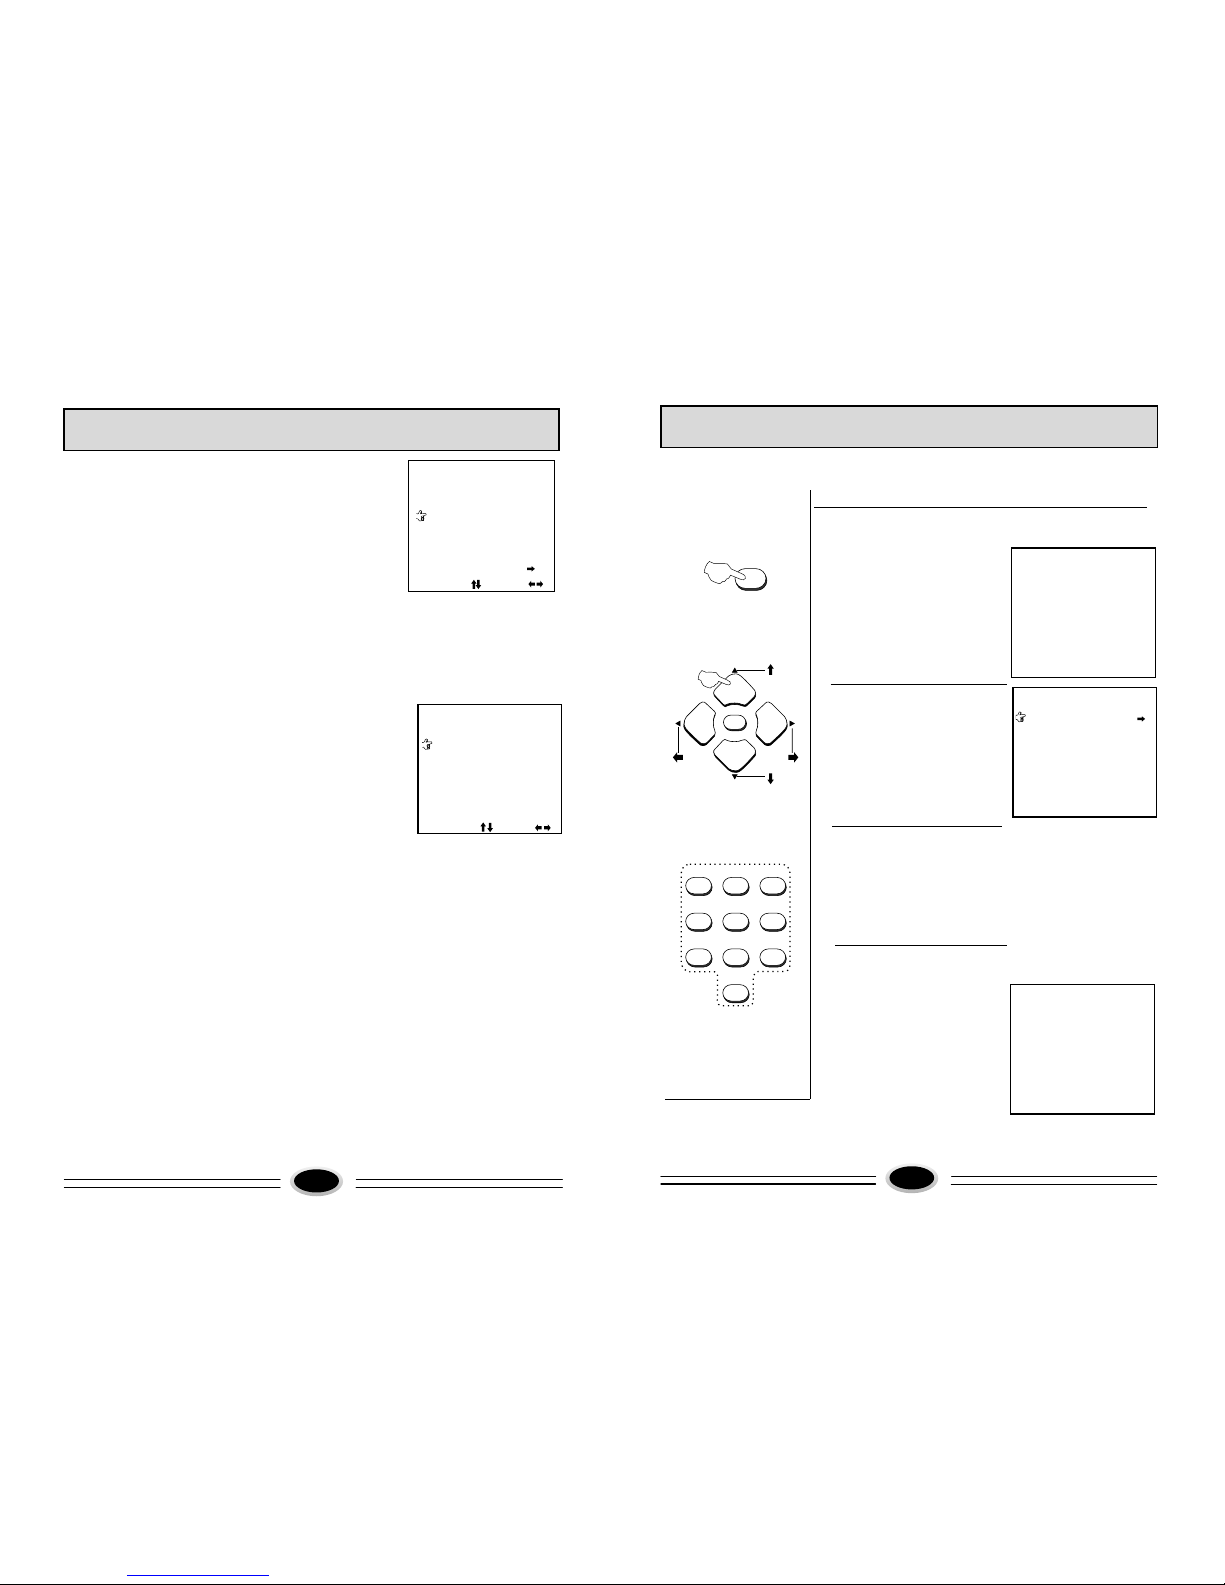
Press [MENU] button, and select TIMER menu.
(1)Clock
Press [-CH+] buttons to select CLOCK item;
Press [-VOL+] buttons to set present time.
Note: At first, you must set CLOCK item,
then you can set other items.
(2)On-timer and off-timer
Press [-CH+] buttons to select ON-TIMER
or OFF-TIMER item, press [-VOL+] buttons
to set.(ON-TIMER/OFF-TIMER can be set to ONCE or EVERY or OFF.)
(3)Appointing time
Press [-CH+] buttons, and select APPOINTMENT item.
Press [CH-] button, and enter "appointing program" sub-menu.
Press [-VOL+] buttons to select a channel No.(for example :100).
Press [CH-] button, and enter APPOINTMENT mode, then press
[-VOL+] buttons to preset time.
(Note:
1.Press [-VOL+] buttons once and time changes
with one minute unit; press and hold [-VOL+]
buttons and time changes with 10 minutes unit.
2.When it is appointing time, the TV set changes
channel No. into appointing channel No. .
3.The function is valid only in TV mode.)
Press [DISPLAY] button and exit APPOINTMENT
menu.
MULTI FUNCTION TIMER
OFF TIMER OFF
0:00
ON TIMER OFF
0:00
POS 0
CLOCK 0:50
APPOINTMENT
SELECT ADJUST
APPOINTMENT
POS. TIME
001 0:01
002 0:02
003 0:03
004 0:04
005 0:05
006 0:06
SELECT ADJUST
TIMER
14
The password of the TV set is preset "0000" in
manufacture, if you want to change the password,
you can fill in four digits.
Changing password
3.Press numeric buttons and fill in
four digits.
1.Press [LOCK] button, OSD is
as the right figure.
4.You can fill in new password.
LOCK OR UNLOCK
PASSWORD: ----
LOCK OR UNLOCK
CHANGE PASS
SEARCH LOCK OFF
POS LOCK OFF
AV LOCK OFF
TIMER LOCK OFF
CHILD LOCK OFF
ALL CLEAR OFF
CHANGE PASS:
NEW PASS: ----
LOCK
1 2 3
4 5 6
7 8 9
0
MENU
CH+
CH-
VOL+VOL-
15
2.Press "0" button directly for
four times, and enter LOCK
OR UNLOCK menu.
Press [CH+/- ] buttons to
select "CHANGE PASS" item,
then press [VOL+] button to
enter "CHANGE PASS"
sub-menu.
LOCK FUNCTION
FIRE
Page 10
The TV set can lock search, channel number,
AV, timer and child lock items, if you need to lock
them.
Lock preset
3.Press [CH+/-] buttons to
select "SEARCH LOCK"
item, and press [VOL+]
button to select "ON" or
"OFF".
1.Press [LOCK] button, and
OSD is as the right figure.
LOCK
1 2 3
4 5 6
7 8 9
0
MENU
CH+
CH-
VOL+VOL-
LOCK OR UNLOCK
PASSWORD: ----
LOCK OR UNLOCK
CHANGE PASS
SEARCH LOCK OFF
POS LOCK OFF
AV LOCK OFF
TIMER LOCK OFF
CHILD LOCK OFF
ALL CLEAR OFF
CHANGE PASS:
NEW PASS: ----
Note:
1.After locking channel or AV, screen is black, no
picture and no sound.
2.After locking child lock, the buttons on the TV set
are invalid.
3.After locking channel search or timer, if you want
to enter menu, you need to fill in password.
2.Press "0" button directly
for four times (or press the
four-digit password you have
changed) to enter LOCK
OR UNLOCK menu.
16
LOCK FUNCTION
Note:1.If the problem can not be fixed after you check above items. DO NOT attempt
to remove the back cover by yourself.
2.If the snapping sound from the cabinet of the TV set can be heard occasionally
because of temperature changing of environment, it is normal, you can use it
reassuringly.
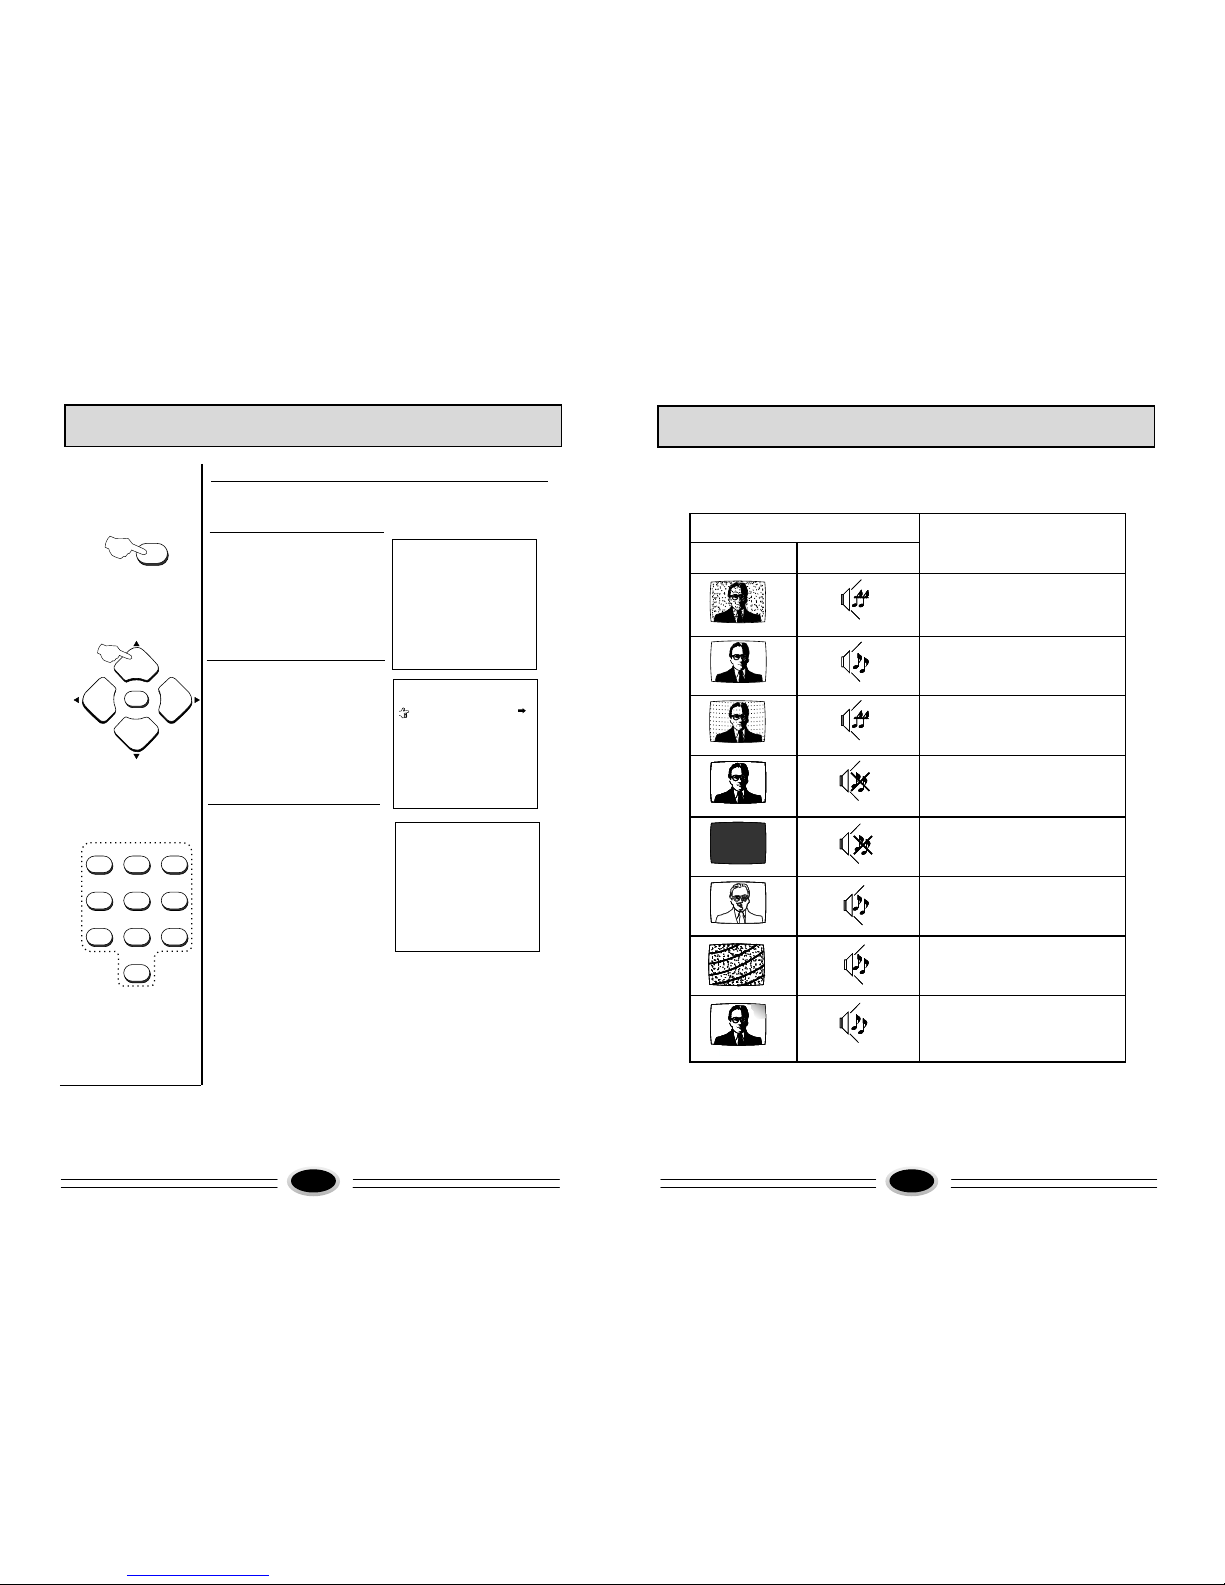
TROUBLE SHOOTING GUIDE
BREAKDOWN PHENOMENON
PICTURE
SOUND
CHECKING
The direction and connection of the
antenna
Direction, station and connection
of the antenna
Interference from electric
appliance. Automobile、Motor,
Vehicle Fluorescence lamp etc.
Volume, Sound mute
The power plug isn't plugged in AC
outlet. The main power isn't turned
on. The setting up of contrast, brightness and volume.
Adjust color control
Adjust channel again
Moving the TV set or using magnetic electric appliance near TV, Which will lead to color spot on screen. Please remove the electric appliance and cut
off power. After 120 minutes turn the TV on, the picture will be recovered.
The following problems are not always caused by hardware failure, please use the
follow trouble shooting guide before you call for service:
17
?
Picture with s now
Color Spot
No Color
No Picture
Normal
Disturb
Double or Triple Image
Noise
Normal
Noise
No Sound
No Sound
Normal Volume
Normal or Weak Volume
Normal Volume
??
Scramble
FIRE
 Loading...