

Page 1
HSU-07HC03/R2
HSU-09HC03/R2
HSU-12HC03/R2
HSU-14HB03/R2
HSU-18HB03/R2
HSU-22HB03/R2
HSU-22HC03/R2
HSU-22HD03/R2
H2SM-14HB03/R2
H2SM-18HB03/R2
H2SM-14HC03/R2
H2SM-18HC03/R2
HSU-14HR03/R2
HSU-18HR03/R2
No.0010552407
Page 2

IT
4
4
CONFORMITÀ ALLE DIRETTIVE EUROPEE PER I MODELLI:
HSU-07HC03/R2 HSU-09HC03/R2 HSU-12HC03/R2 HSU-14HB03/R2 HSU-14HR03/R2
HSU-18HB03/R2 HSU-22HB03/R2 HSU-22HC03/R2 HSU-22HD03/R2 HSU-18HR03/R2
H2SM-14HC03/R2 H2SM-18HC03/R2 H2SM-14HB03/R2 H2SM-18HB03/R2
CE
Tutti i prodotti sono conformi alle seguenti normative europee:
- Direttiva 73/23/EEC Basso Voltaggio
-
Direttiva Basso Voltaggio
- Direttiva 89/336/EEC Compatibilità elettromagnetica
- Direttiva
ROHS
Il prodotto è conforme alla normativa 2002/95/EEC sulla
restrizione d’uso di sostanze inquinanti negli apparecchi elettrici ed elettronici.
WEEE
Informativa al consumatore come previsto dalla normativa
europea 2002/96/CE riguardante i rifiuti di apparecchiature
elettriche ed elettroniche.
EN
200 /956
200 /
EUROPEAN REGULATIONS CONFORMITY FOR THE MODELS:
/EC
/EC
8
Compatibilità elettromagnetica
SPECIFICHE DI SMALTIMENTO:
mento, nonché il recupero del refrigerante, dell’olio e di qualsiasi altra parte devono essere eseguiti da un installatore qualificato in conformità alla legislazione locale e nazionale vigente in materia.I climatizzatori devo essere trattati presso una
struttura specializzata nel riutilizzo, riciclaggio e recupero dei
materiali. Il corretto smaltimento del prodotto eviterà le possibili conseguenze negative all’ambiente e alla salute dell’uomo. Per maggiori informazioni contattare l’installatore o le
autorità locali. Le batterie devono essere tolte dal telecomando e smaltite separatamente conformemente alla legislazione
locale e nazionale vigente in materia.
Il climatizzatore è contrassegnato con questo simbolo, ciò significa che i prodotti elettrici ed elettronici non possono essere
smaltiti insieme ai rifiuti domestici non differenziati.
Non cercare di demolire il sistema da soli:
la demolizioni dei sistemi di condiziona-
HSU-07HC03/R2 HSU-09HC03/R2 HSU-12HC03/R2 HSU-14HB03/R2 HSU-14HR03/R2
HSU-18HB03/R2 HSU-22HB03/R2 HSU-22HC03/R2 HSU-22HD03/R2 HSU-18HR03/R2
H2SM-14HC03/R2 H2SM-18HC03/R2 H2SM-14HB03/R2 H2SM-18HB03/R2
CE
All the products are in conformity with the following European
provision:
- Low Voltage Directive 73/23/EEC
-
Low Voltage Directive /EC
- Electromagnetic CompatibilitY 89/336/EEC
- Electromagnetic CompatibilitY
ROHS
The products are fulfilled with the requirements in the directive
2002/95/EEC of the European parliament and of the council
on the Restriction of the use of Certain Hazardous Substances in Electrical and Electronic Equipment (EU RoHS
Directive).
WEEE
In accordance with the directive 2002/96/CE of the European
parliament, herewith we inform the consumer about the disposal requirements of the electrical and electronic products
200 /956
200 /
8
/EC
DISPOSAL REQUIREMENTS:
Your air conditioning product is marked
with this symbol. This means that electrical
and electronic products shall not be mixed
with unsorted household waste.
Do not try to dismantle the system yourself:
the dismantling of the air conditioning sys-
tem, treatment of the refrigerant, of oil and
of other part must be done by a qualified installer in accordance with relevant local and national legislation.
Air conditioners must be treated at a specialized treatment
facility for re-use, recycling and recovery. By ensuring this
product is disposed of correctly, you will help to prevent
potential negative consequences for the environment and
human health. Please contact the installer or local authority
for more information.
Battery must be removed from the remote controller and disposed of separately in accordance with relevant local and
national legislation.
Page 3

CE
Tous les produits sont conformes aux directives européennes
suivantes:
- Directive 73/23/CEE Basse tension
- Directive 89/336/CEE Compatibilité électromagnétique
ROHS
L'appareil est conforme à la directive 2002/95/CEE relative à
la limitation de l'utilisation de certains substances dangereuses dans les équipements électriques et électroniques.
DEEE (WEEE)
Information au consommateur comme le prévoit la directive
européenne 2002/96/CE relative aux déchets d'équipements
électriques et électroniques.
SPECIFICATIONS POUR L'ELIMINATION:
Ce pictogramme, apposé sur le climatiseur,
signifie que les équipements électriques et
électroniques ne peuvent pas être éliminés
avec les déchets ménagers non triés.
Ne pas essayer de démanteler l'équipe-
ment soi-même: le démantèlement des
systèmes de climatisation, ainsi que la récupération du frigorigène, de l'huile et de toute autre partie doivent être effectués par un installateur qualifié conformément à
la législation locale et nationale en vigueur en la matière. Les
climatiseurs doivent être traités dans un centre spécialisé dans
la réutilisation, le recyclage et la valorisation des matériaux.
L'élimination correcte de ces appareils permet d'éviter les
effets nocifs sur l'environnement et la santé humaine.
Pour plus de renseignements contacter l'installateur ou les
autorités locales. Les piles doivent être retirées de la télécommande et éliminées séparément, conformément à la
législation locale et nationale en vigueur en la matière.
CONFORMITÉ AUX DIRECTIVES EUROPÉENNES POUR LES MODÈLES:
FR
CE
Alle Produkte erfüllen die folgenden europäischen Richtlinien:
- Niederspannungsrichtlinie 73/23/EWG
- EMV-Richtlinie 89/336/EWG
ROHS
Das Produkt erfüllt die Richtlinie 2002/95/EWG zur Beschränkung der Verwendung bestimmter gefährlicher Stoffe in
Elektro- und Elektronikgeräten.
WEEE
Verbraucherinformation laut europäischer Richtlinie 2002/96/EG
zu Elektro- und Elektronik-Altgeräten.
HINWEISE ZUR ENTSORGUNG:
Das Klimagerät ist mit diesem Symbol
gekennzeichnet, das darauf hinweist, dass
Elektro- und Elektronikgeräte getrennt vom
Hausmüll entsorgt werden müssen.
Verschrotten Sie die Anlage nicht selbst:
die Verschrottung von Klimaanlagen, sowie
die Rückgewinnung des Kältemittels, des
Öls und aller sonstigen Teile müssen durch einen qualifizierten
Installateur in Übereinstimmung mit den einschlägigen geltenden örtlichen und nationalen Vorschriften erfolgen. Die Klimageräte müssen bei einem Unternehmen entsorgt werden, das
auf die Verwertung, das Recycling und die Rückgewinnung
der Materialien spezialisiert ist. Die richtige Entsorgung des
Produkts hilft negative Auswirkungen auf Umwelt und
Gesundheit zu vermeiden. Für weitere Informationen wenden
Sie sich bitte an den Installateur oder die örtlichen Behörden.
Die Batterien müssen aus der Fernbedienung entfernt und in
Übereinstimmung mit den einschlägigen geltenden örtlichen
und nationalen Vorschriften getrennt entsorgt werden.
ÜBEREINSTIMMUNG MIT DEN EUROPÄISCHEN RICHTLINIEN FÜR DIE MODELLE:
DE
-
Directive
Basse tension
/
200 /95
6
CE
-
Niederspannungsrichtlinie
E
G
/
200 /95
6
- Directive
CE
Compatibilité électromagnétique
- EMV-Richtlinie
E
G
4
4
HSU-07HC03/R2 HSU-09HC03/R2 HSU-12HC03/R2 HSU-14HB03/R2 HSU-14HR03/R2
HSU-18HB03/R2 HSU-22HB03/R2 HSU-22HC03/R2 HSU-22HD03/R2 HSU-18HR03/R2
H2SM-14HC03/R2 H2SM-18HC03/R2 H2SM-14HB03/R2 H2SM-18HB03/R2
200 /
/
8
HSU-07HC03/R2 HSU-09HC03/R2 HSU-12HC03/R2 HSU-14HB03/R2 HSU-14HR03/R2
HSU-18HB03/R2 HSU-22HB03/R2 HSU-22HC03/R2 HSU-22HD03/R2 HSU-18HR03/R2
H2SM-14HC03/R2 H2SM-18HC03/R2 H2SM-14HB03/R2 H2SM-18HB03/R2
200 /
/
8
Page 4

SPLIT TYPE ROOM AIR CONDITIONER
OPERATION MANUAL
HSU-14HR03/R2
HSU-18HR03/R2
Please read this operation manual before using the air conditioner.
Page 5

Cautions
Disposal of the old air conditioner
Before disposing an old air conditioner that
goes out of use, please make sure it's
inoperative and safe. Unplug the air conditioner
in order to avoid the risk of child entrapment.
It must be noticed that air conditioner system
contains refrigerants, which require specialized waste disposal. The valuable materials
contained in an air conditioner can be recycled.
Contact your local waste disposal center for
proper disposal of an old air conditioner and
contact your local authority or your dealer if
you have any question. Please ensure that
the pipework of your air conditioner does not
get damagedprior to being picked up by the
relevant waste disposal center, and contribute
to environmental awareness by insisting on an
appropriate, anti-pollution method of disposal.
All these valuable materials may be taken to
a waste collecting center and used again after
adequate recycling.
Consult your local authorities for the name
and address of the waste materials collecting
centers and waste paper disposal services
nearest to your house.
Safety Instructions and Warnings
Before starting the air conditioner, read the
information given in the User's Guide carefully. The User's Guide contains very important observations relating to the assembly,
operation and maintenance of the air
conditioner.
The manufacturer does not accept responsibility for any damages that may arise due
to non-observation of the following
instruction.
Disposal of the packaging of your
new air conditioner
All the packaging materials employed in the
package of your new air conditioner may be
disposed without any danger to the
environment.
The cardboard box may be broken or cut into
smaller pieces and given to a waste paper
disposal service. The wrapping bag made of
polyethylene and the polyethylene foam pads
contain no fluorochloric hydrocarbon.
Damaged air conditioners are not to be
put into operation. In case of doubt, consult
your supplier.
Use of the air conditioner is to be carried
out in strict compliance with the relative
instructions set forth in the User's Guide.
Installation shall be done by professional
people, don't install unit by yourself.
1
Page 6

Cautions
For the purpose of the safety,the air conditioner must be properly grounded in accordance with specifications.
Always remember to unplug the air
conditioner before openning inlet grill. Never
unplug your air conditioner by pulling on
the power cord. Always grip plug firmly and
pull straight out from the outlet.
All electrical repairs must be carried out
by qualified electricians. Inadequate repairs
may result in a major source of danger for
the user of the air conditioner.
Do not damage any parts of the air
conditioner that carry refrigerant by piercing
or perforating the air conditioner's tubes
with sharp or pointed items, crushing or
twisting any tubes, or scraping the coatings
off the surfaces. If the refrigerant spurts
out and gets into eyes, it may result in
serious eye injuries.
Do not obstruct or cover the ventilation
grille of the air conditoner.Do not put fingers
or any other things into the inlet/outlet and
swing louver.
Specifications
The refrigerating circuit is leak-proof.
Remark per EMC Directive 89/336/EEC.
To prevent flicker impression during the
start of the compressor(Technical Process)
and the adversely influence caused by
the 2nd harmonies of compressor following
installation conditions do apply:
1.The power connection for air conditioner
has to be done at the main power
distribution.This distribution has to be of a
Iow impedance. Normally the required
impedance is reached at a 32A fusing point.
2.No other equipment has to be connected:
to this power line.
3.For the details installation acceptance
please refer to your contract with the power
supplier, if restrictions do apply for products:
like washing machines,air conditioners or
electrical ovens.
4.For the details of the power of air,
conditioner, please refer to the rating plate
of the product.
5.For any question contact your local dealer.
Do not allow children to play with the air
conditioner.In no case should children be
allowed to sit on the outdoor unit.
2
Page 7
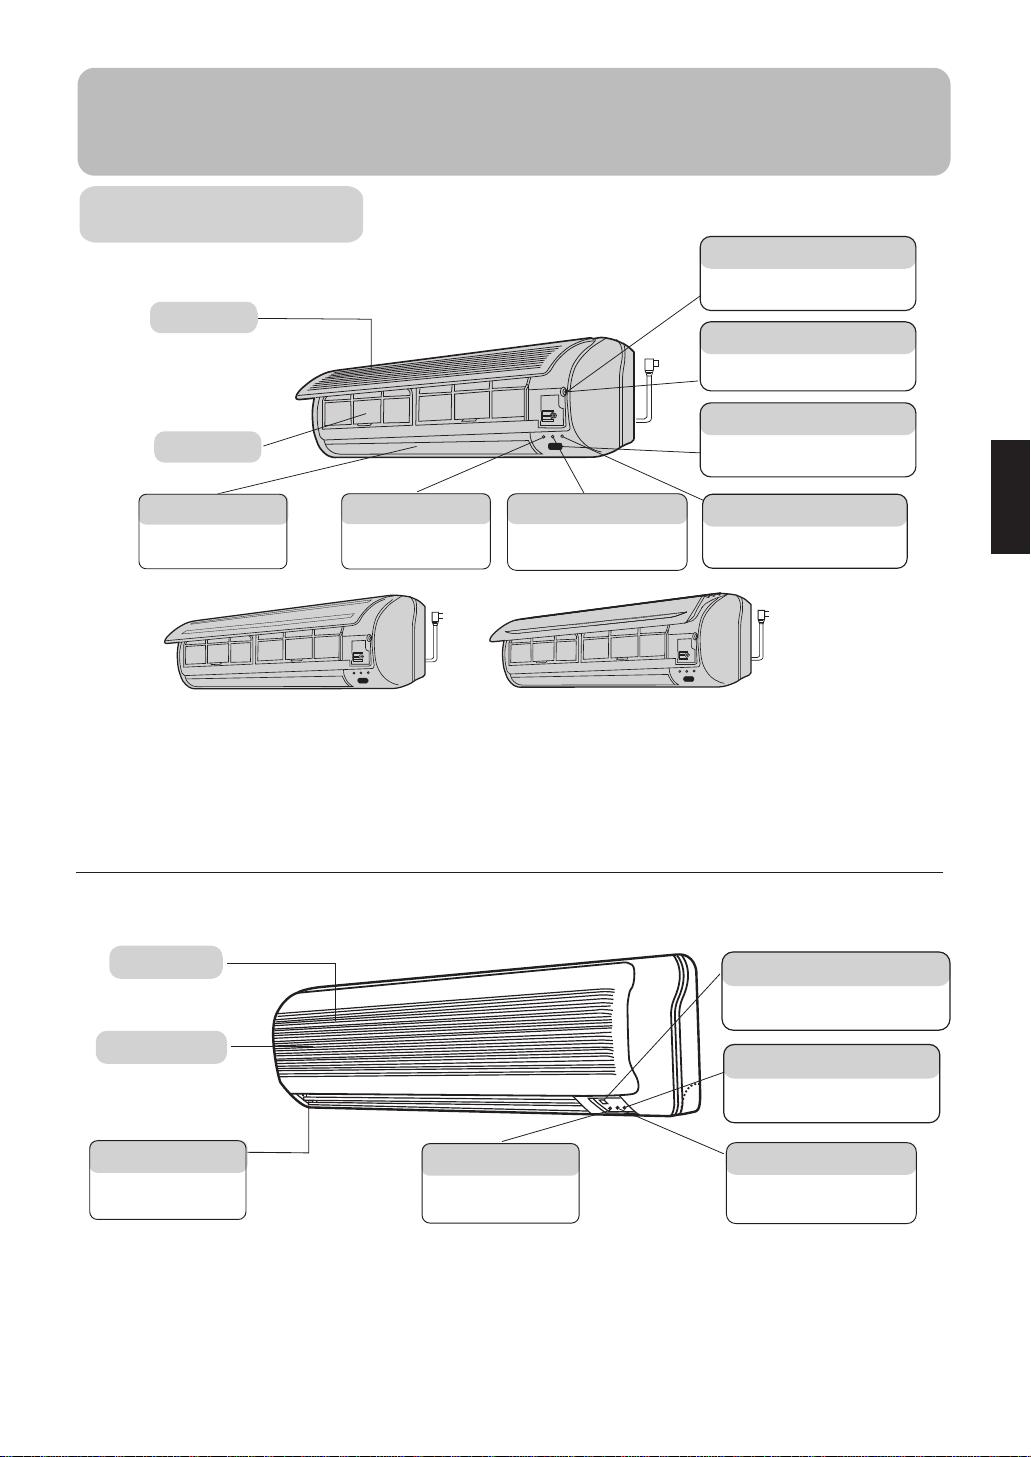
Parts and Functions
Indoor Unit
Inlet grille
Air filter
Test running switch(manual)
Used only for test running in cooling
when room temp. is below 16oC.
Don't use it in normal operation.
Emergency switch(manual)
Used when remote controller is lost or
defective. Unit will run temporarily.
Remote signal receiver
A beeping sound is generated when
a signal from remote controller is
received.
Vertical flap
Use remote controller to
adjust up and down air flow.
(Don't adjust it manually.)
Power indicator
Lights up when unit starts.
Timer mode indicator
Lights up when Timer operation
is selected.
Operation mode indicator
Lights up during compressor
running.
Actual inlet grille may vary from the one shown in the manual according to
the product purchased
For models: HSU-14HB03/R2
HSU-07HC03/R2 HSU-09HC03/R2 HSU-12HC03/R2
H2SM-14HB03/R2 H2SM-18HB03/R2
H2SM-14HC03/R2 H2SM-18HC03/R2
HSU-14HR03/R2 HSU-18HR03/R2
For multi-split type, the power plug is on the outdoor unit.
Inlet grille
Air filter(inside)
Remote signal receiver
A beeping sound is generated when
a signal from remote controller is
received.
Operation mode indicator
Lights up during compressor
running.
HSU-18HB03/R2
Vertical flap
Use remote controller to
adjust up and down air flow.
(Don't adjust it manually.)
For models:
HSU-22HB03/R2
HSU-22HC03/R2
Power indicator
Lights up when unit starts.
HSU-22HD03/R2
Timer mode indicator
Lights up when Timer operation
is selected.
3
Page 8

Parts and Functions
Outdoor Unit
For models:
The machine is adaptive in following situation
1. Applicable ambient temperature range:
Cooling
Heating
HSU-07HC03/R2 HSU-09HC03/R2
CONNECTING PIPING AND
ELECTRICAL WIRING
INLET
OUTLET
Indoor
Outdoor
Indoor
Outdoor
Maximum:D.B/W.B
Minimum:D.B/W.B
Maximum:D.B/W.B
Minimum:D.B
Maximum:D.B
Minimum:D.B
Maximum:D.B/W.B
Minimum:D.B/W.B
DRAIN HOSE
32oC/23oC
18oC/14oC
43oC/26oC
18oC
27oC
15oC
24oC/18oC
-7oC/-8oC
2. If the supply cord is damaged, it must be replaced by the manufacturer or its service agent
or a similar qualified person. The type of connecting wire is H05RN-F or H07RN-F.
3. If the fuse on PC board is broken please change it with the type of T.3.15A/250V.
4. The distance between the indoor unit and the floor should be more than 2m.
5. The wiring method should be in line with the local wiring standard.
6. After installation, the power plug should be easily reached.
7. The waste battery should be disposed properly.
8. The appliance is not intended to use by young children or infirm persons without supervision
9.Young children should be supervised ensure that they do not play with the appliance.
10.The appliance must be installed on strong enough supporter.
11 .The wiring diagram is attached inside the machine.
4
Page 9

Parts and Functions
For models: HSU-12HC03/R2
HSU-14HB03/R2
HSU-14HR03/R2
HSU-18HR03/R2
For models: HSU-18HB03/R2
For models: HSU-22HB03/R2
HSU-22HC03/R2
HSU-22HD03/R2
For models: H2SM-14HB03/R2
H2SM-18HB03/R2
H2SM-14HC03/R2
H2SM-18HC03/R2
5
Page 10
Parts and Functions
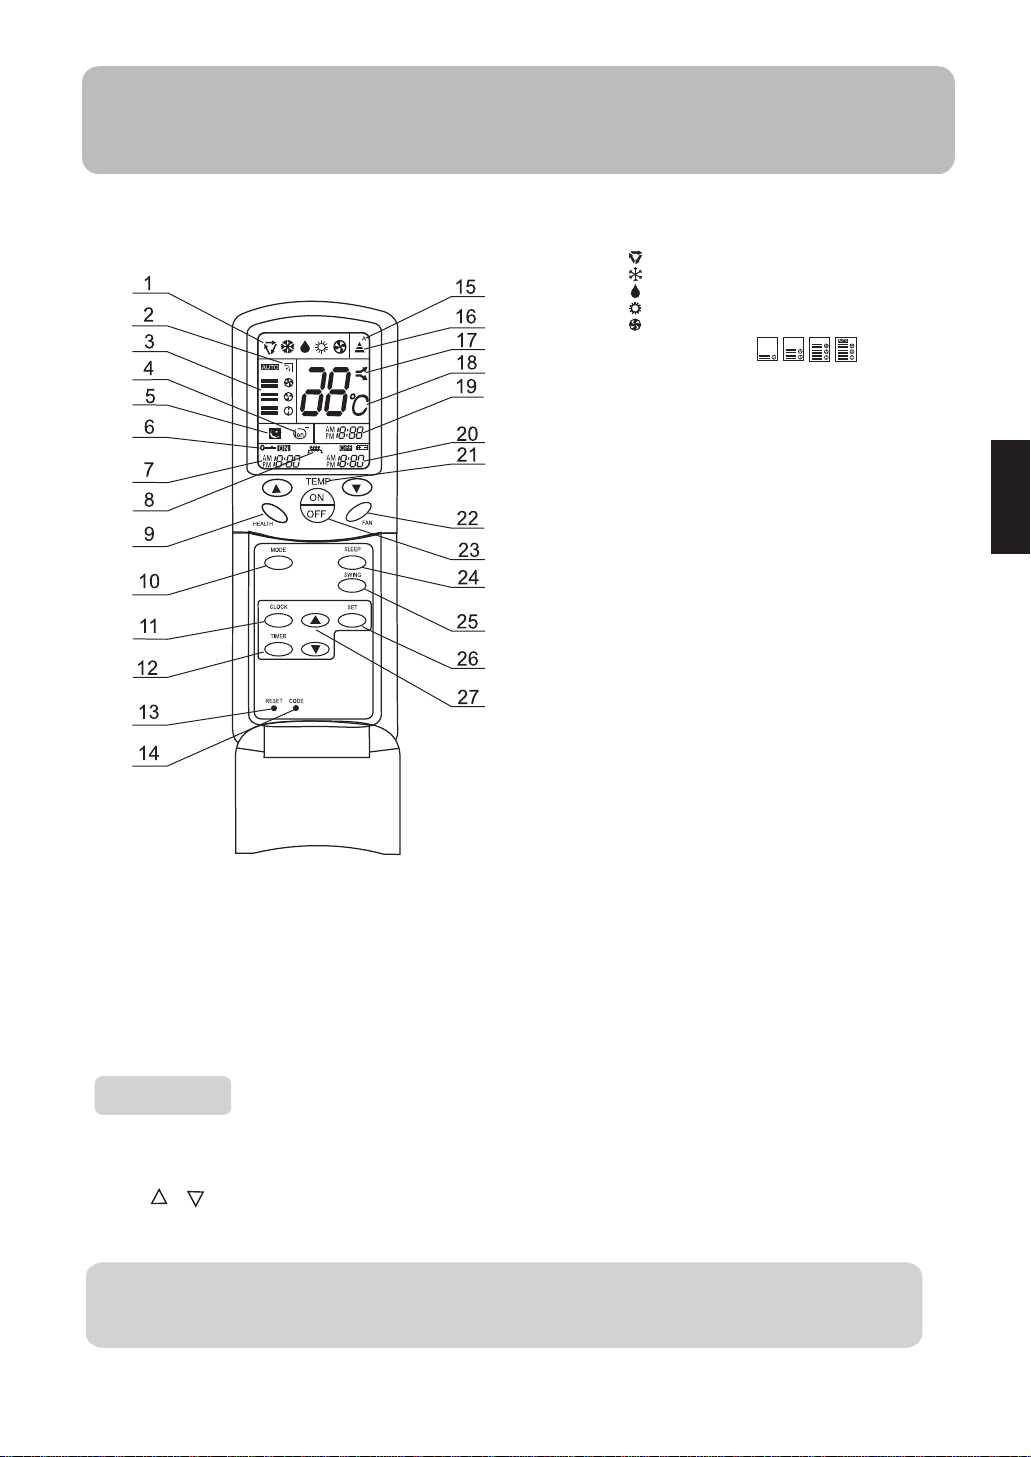
Buttons and display of the remote controller.
1.Mode display
AUTO
COOL
DRY
HEAT
FAN
2. SWING display
3. FAN SPEED display
4. HEALTH display
5. SLEEP display
6. LOCK display
7. TIMER ON display
8. AUXILIARY HEAT display
9. HEALTH
10. MODE
Used to select AUTO,COOL,DRY,HEAT
and FAN
11. CLOCK
Used to set correct time
12. TIMER
Used to select TIMER ON,TIMER OFF
13. RESET
Used to reset the controller back to
normal condition.
14. CODE
Used to select code A or B with a press,A
or B will be displayed on LCD.please
select A without special explanation
15. CODE display
16. SIGNAL SENDING display
17. POWER/SOFT display
18. TEMP. display
19. CLOCK display
20. TIMER OFF display
21. TEMP
Used to select your desired temperature
22. FAN
Used to select fan speed
25. SWING
26. SET
Used to confirm timer and clock settings
27. HOUR
Used to set clock and timer settings
NOTE:(1)The following functions and related displays are not available: AUXILIARY HEAT display, POWER/SOFT display, LOCK display.
(2)If the Air conditioner don't have the function of the code ,press code B can cause it not available.
(3)Cooling only unit do not have functions and displays related with heating.
23. POWER ON/OFF
Used for unit start or stop
24. SLEEP
Used to select sleep mode
LOW MED HI AUTO
Clock set
When unit is started for the first time and after replacing batteries in remote controller, clock should
be adjusted as follows:
Press CLOCK button, "AM" or "PM" flashes.
Press or to set correct time. Each press will increase or decrease 1min. If the button is kept
depressed, time will change quickly.
After time setting is confirmed, press SET, "AM "and "PM" stop flashing, while clock starts working.
Hints
After replacing with new batteries, remote controller will conduct self-check, displaying
all information on LCD. Then, it will become normal.
6
Page 11
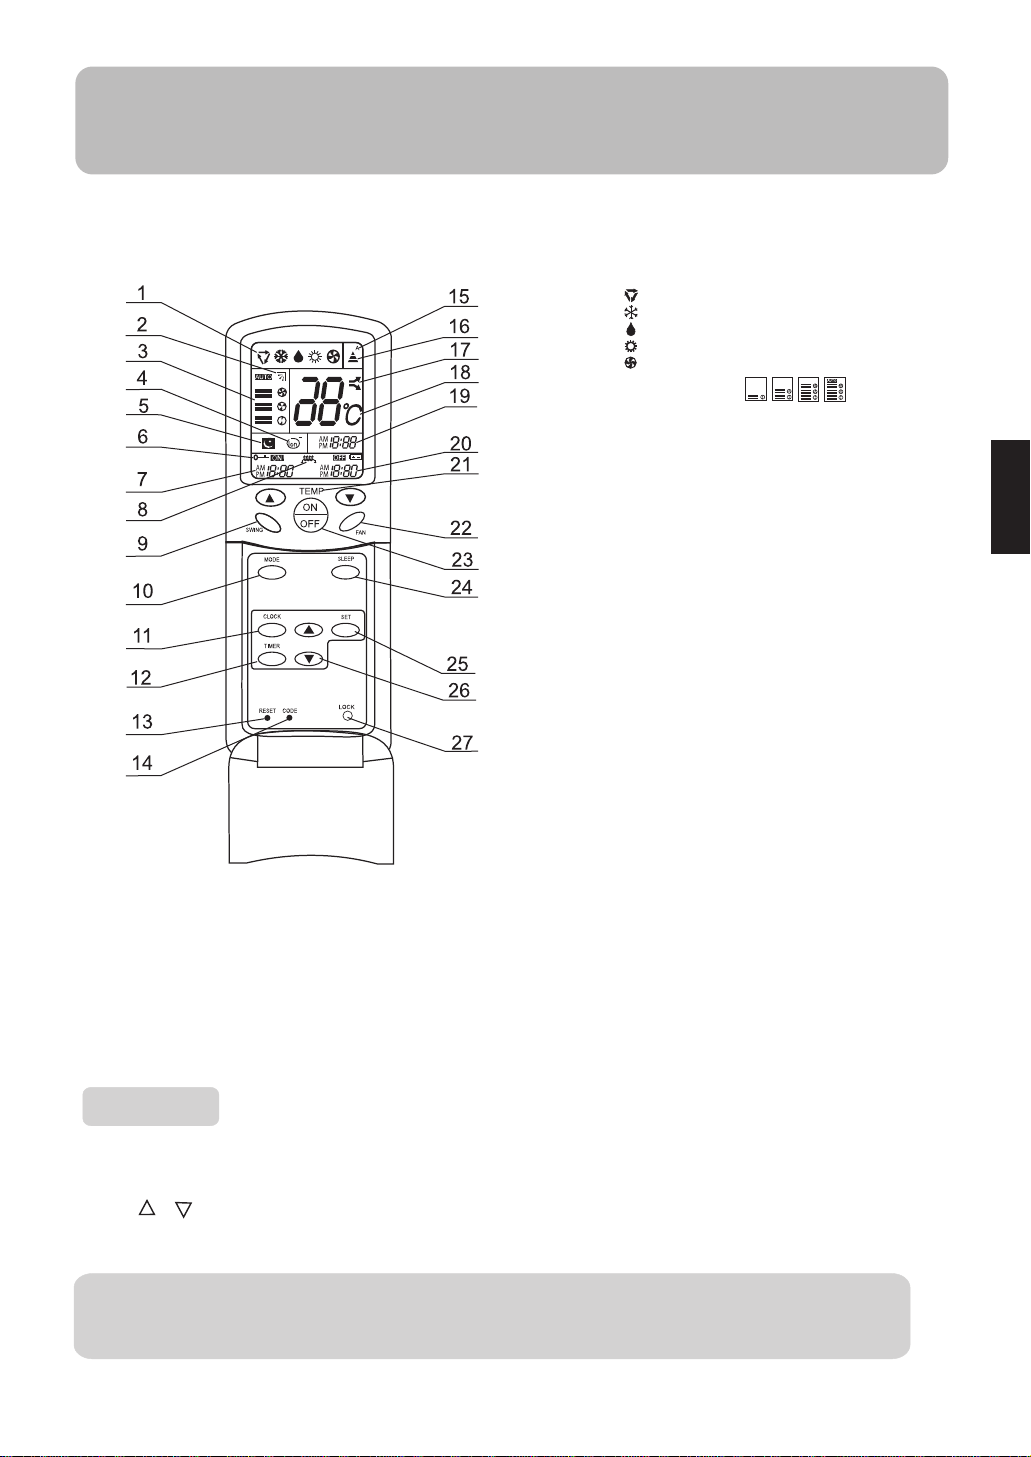
Parts and Functions
Buttons and display of the remote controller.
If the unit which you purchased has not health function, remote controller should
like the following figure:
1.Mode display
AUTO
COOL
DRY
HEAT
FAN
2. SWING display
3. FAN SPEED display
4. HEALTH display
5. SLEEP display
6. LOCK display
7. TIMER ON display
8. AUXILIARY HEAT display
9. SWING
10. MODE
Used to select AUTO,COOL
and FAN
11. CLOCK
Used to set correct time
12. TIMER
Used to select TIMER ON,TIMER OFF
13. RESET
Used to reset the controller back to
normal condition.
14. CODE
Used to select code A or B with a press,A
or B will be displayed on LCD.please
select A without special explanation
15. CODE display
16. SIGNAL SENDING display
17. POWER/SOFT display
18. TEMP. display
19. CLOCK display
20. TIMER OFF display
21. TEMP
25. SET
Used to confirm timer and clock settings
26. HOUR
Used to set clock and timer settings
27.LOCK
Used to lock buttons and LCD display.
NOTE:(1)The following functions and related displays are not available: AUXILIARY HEAT display, POWER/SOFT display,HEALTH display.
(2)If the Air conditioner don't have the function of the code ,press code B can cause it not available.
(3)Cooling only unit do not have functions and displays related with heating.
Used to select your desired temperature
22. FAN
Used to select fan speed
23. POWER ON/OFF
Used for unit start or stop
24. SLEEP
Used to select sleep mode
LOW MED HI AUTO
Clock set
When unit is started for the first time and after replacing batteries in remote controller, clock should
be adjusted as follows:
Press CLOCK button, "AM" or "PM" flashes.
Press or to set correct time. Each press will increase or decrease 1min. If the button is kept
depressed, time will change quickly.
After time setting is confirmed, press SET, "AM "and "PM" stop flashing, while clock starts working.
Hints
After replacing with new batteries, remote controller will conduct self-check, displaying
all information on LCD. Then, it will become normal.
7
Page 12
Operation
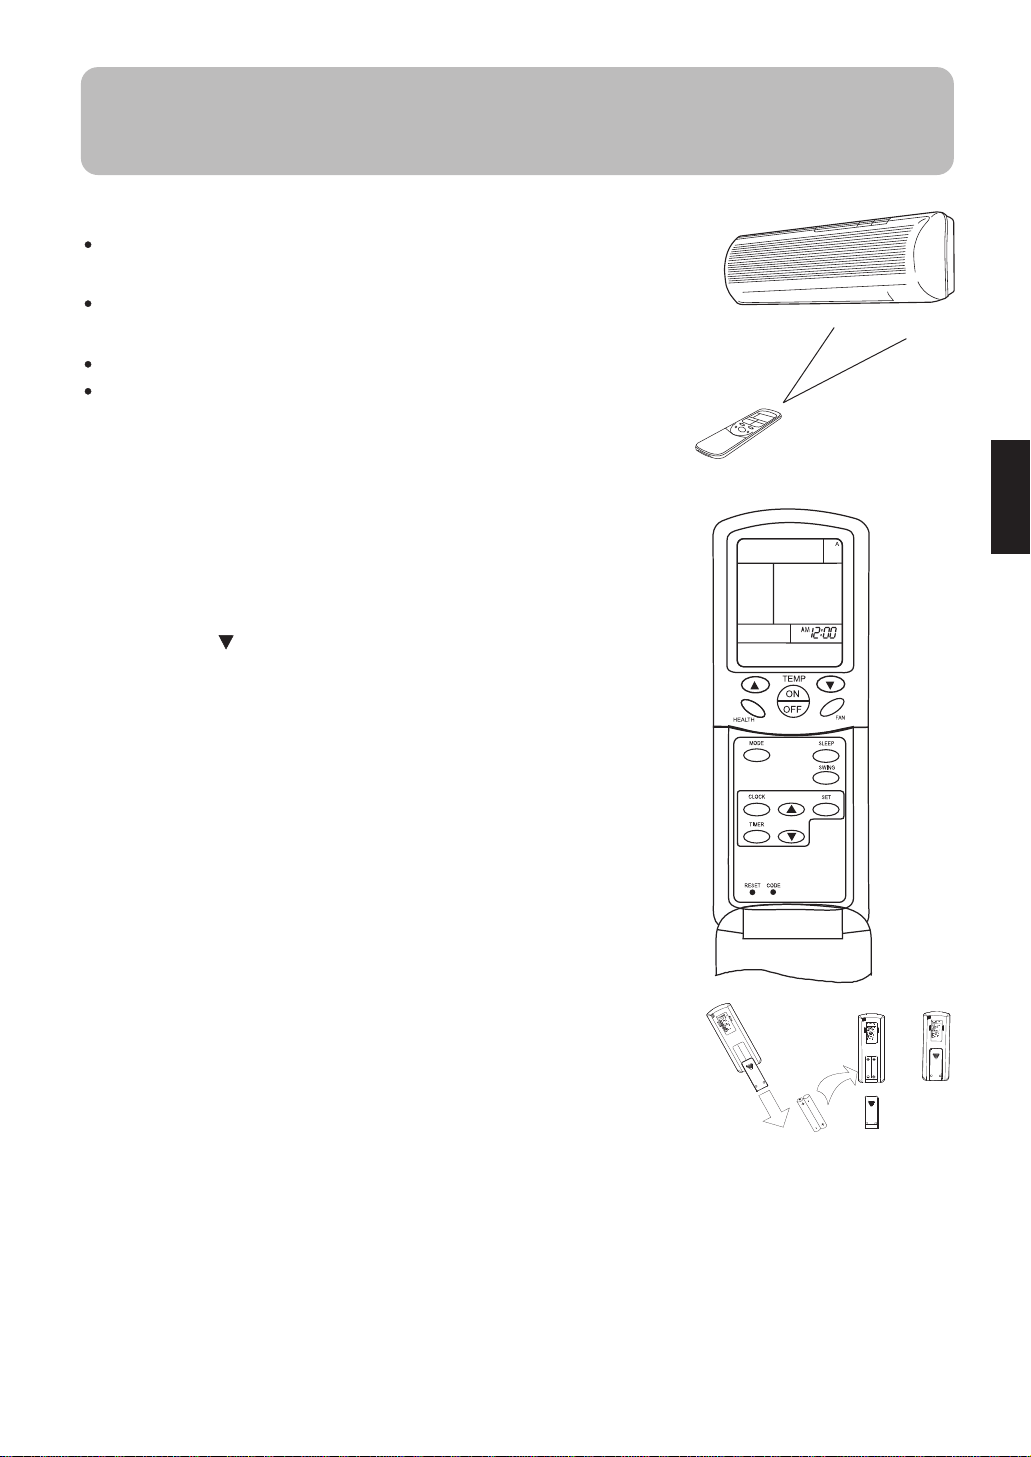
Remote controller's operation
When in use, put the signal transmission head directly to the
receiver hole on the indoor unit.
The distance between the signal transmission head and the
receiver hole should be within 7 m without any obstacle as well.
Don't throw the controller, prevent it from being damaged.
When electronic-started type fluorescent lamp or change-over
type fluorescent lamp or wireless telephone is installed in the
room, the receiver is apt to be disturbed in receivering the signals
so the distance to the indoor unit should be shorter.
Loading of the battery
Load the batteries as illustrated. 2 R-03 batteries,
resetting key (cylinder)
Remove the battery cover:
Slightly press " " and push down the cover.
Load the battery:
Be sure that the loading is in line with the" + "/"-"
pole request as illustrated.
Put on the cover again
Confirmation indicator:
In disorderation, reload the batteries or load the new batteries
after 6 mins.
Note:
Use two new same-typed batteries when loading.
If the remote controller can't run normally or doesn't work at all,
use a sharp pointed item to press the reset key.
Hint:
Remove the batteries in case unit won't be in usage for a long period.
If there are any display after taking-out just need to press reset key.
Power failure resume(please set and apply as necessary)
If sudden power failure occurs, the unit will resume original operation when power is
supplied again.
Note:
When sudden power failure happens during unit operation in power failure resume mode, if
the air conditioner is not desired for use in a long period, please shut off the power supply
in case that the unit automatically resume operation when power is re-supplied, or press
ON/OFF to turn off the unit when power resumes.
8
Page 13

Operation
Auto run, Fan operation
Enjoy yourself by just a gentle press.
(1) Unit start
Press ON/OFF button, unit starts.
Previous operation status appears on display.
(Not Timer setting)
Power indicator on indoor unit lights up.
(2) Select operation mode
Press MODE button. For each press, operation
mode changes as follows:
AUTO COOL DRY HEAT FAN
Unit will run in selected mode.
Stop display at " " AUTO or " "FAN.
(3) FAN
Press FAN button. For each press, fan speed changes
as follows:
LO MED HI AUTO
(4) Unit stop
Unit will run at selected fan speed.
Note:AUTO is not available in FAN mode.
Press ON/OFF button.
Only time remains on LCD.
All indicators on indoor unit go out.
Vertical flap closed automatically.
Hints
Remote controller can memorize settings in each operation mode. To run it next time just
select the operation mode and it will start with the previous setting.
No reselecting is needed.(TIMER ON/OFF needs reselecting)
Cautions: Note:
On cooling only unit, heating mode is not available, The above information is the
After replacing batteries, press ON/OFF, and display explanation of the displayed
becomes as follows: information therefore varies
Operation mode: AUTO, Temp. No with those displayed in actual
Timer mode: No, Fan speed :AUTO operation.
9
Page 14

Operation
COOL,HEAT and DRY operation
Recommendations:
Use COOL in summer. Use HEAT in winter
Use DRY in spring, autumn and in damp climate.
(1) Unit start
Press ON/OFF button, unit starts.
Previous operation status appears on display.(Not Timer setting)
Power indicator on indoor unit lights up.
(2) Select operation mode
Press MODE button. For each press, operation
mode changes as follows:
AUTO COOL DRY HEAT FAN
Unit will run in operation mode displayed on LCD.
Stop display at your desired mode.
(3) Select temp. setting
Press TEMP button.
Every time the button is pressed, temp. setting increases 1oC
Every time the button is pressed, temp. setting decreases 1oC
Unit will start running to reach the temp. setting on LCD.
(4) Fan speed selection
Press FAN button. For each press, fan speed changes
as follows:
LO MED HI AUTO
COOL operation starts when room
temp. is higher than temp. setting.
Unit runs at the speed displayed on LCD.
In HEAT mode,warm air will blow out after a short period
of time due to cold-draft prevention function.
In DRY mode, when room temp. becomes 2oC higher than
temp. setting, unit will run intermittently at LO speed
regardless of FAN setting.
Temp. setting+2oC
Temp. setting
On reaching temp. setting, unit
will run in mild DRY mode.
Hints
On cooling only unit, heating mode is not available.
Remote controller can memorize each operation status. When starting it next time,
just press ON/OFF button and unit will run in previous status.
10
Ultra-low air flow
Page 15

Operation
(5) Air flow direction adjustment
After operation mode is selected, vertical flap will open automatically according to the mode.
Referring to the Fig.
COOL
About 10
o
Up and down (Use remote controller)
Press SWING button, vertical flap will move within
the range shown in the Fig. Press SWING button
stop it at a fixed position.
o
o
o
COOL
HEAT
About 10
About 45
About 60
Cautions:
It is advisable not to keep vertical flap at
downward position for a long time in COOL
or DRY mode, otherwise, condensate
water might occur.
(6) Unit stop
Press ON/OFF button.
Only time remains on LCD.
All indicators on indoor unit go out.
Vertical flap closes automatically.
HEAT
About 60
o
Left and right air flow adjustment
(manual)
Move the horizontal blade by a knob on air
conditioner to adjust left and right direction
referring to Fig.
Cautions:
When humidity is high, condensate water
might occur at air outlet if all horizontal
louvers are adjusted to left or right.
Cautions:
Unit won't restart until 3 minutes have
elapsed, due to system protection.
HEAT mode is not available on
cooling only unit.
Hints
As cold air flows downward in COOL mode, adjusting air flow horizontally will be much more
helpful for a better air circulation.
As warm air flows upward in HEAT mode, adjusting air flow downward will be much more
helpful for a better air circulation.
Be careful not to catch a cold when cold air blows downward.
It is harmful to your health in summer to go frequently in and out of places where temp.
difference is above 7oC. Temp. difference of 3-5oC will remove your fatigue.
More than this, unit's load can be reduced and power consumption cut down as well. So, you'd
better set a temp. difference of 3-5
C between indoor and outdoor temp. in COOL mode.
11
Page 16

Operation
TIMER Operation
Set Clock correctly before starting Timer operation
You can let unit start or stop automatically at following times: Before you wake up in the
morning, or get back from outside or after you fall asleep at night.
TIMER ON/OFF
(1)After unit start, select your desired operation mode.
Operation mode will be displayed on LCD.
Power indicator on indoor unit lights up.
(2)TIMER mode selection
Press TIMER button to change TIMER mode.
Every time the button is pressed, display changes as follows:
ON OFF ON OFF
TIMER ON TIMER OFF TIMER ON-OFF
Select your desired TIMER mode (TIMER ON or TIMER
OFF) ON or OFF will flash.
blank
(3)Timer setting
Press HOUR / button.
Every time the button is pressed, time increases 10 min.
If button is kept depressed, time will change quickly.
Every time the button is pressed, time decreases 10 min.
If button is kept depressed, time will change quickly. Time
will be shown on LCD. It can be adjusted within 24 hours.
(4)Confirming your setting
After setting correct time, press SET button to confirm, "ON"
or "OFF" stops flashing
Time displayed: Unit starts or stops at x hour x min. (TIMER
ON or TIMER OFF).
Timer mode indicator on indoor unit lights up.
To cancel TIMER mode
Just press TIMER button several times until TIMER mode disappears.
Hints
After replacing batteries or a power failure happens, Time setting should be reset.
Remote controller possesses memory function, when use TIMER mode next time, just
press SET button after mode selecting if timer setting is the same as previous one.
12
Page 17

Operation
TIMER ON-OFF
TIMER ON-OFF
(1)After unit start, select your desired operation mode.
Operation mode will be displayed on LCD.
Power indicator on indoor unit lights up.
(2) Press TIMER button to change TIMER mode.
Every time the button is pressed, display changes as follows:
ON OFF ON OFF
TIMER ON TIMER OFF TIMER ON-OFF
Select TIMER ON-OFF. "ON" will flash.
(3)Time setting for TIMER ON
Press HOUR button.
Every time the button is pressed, time increases 10 min.
If button is kept depressed, time will change quickly.
Every time the button is pressed, time decreases 10 min.
If button is kept depressed, time will change quickly.
Time will be shown on LCD.
It can be adjusted within 24 hours.
AM refers to morning and PM to afternoon
(4) Time confirming for TIMER ON
After time setting, press TIMER button to confirm.
"ON" stops blinking, While "OFF" starts blinking.
Time displayed: Unit starts at x hour x min.
(5)Time setting for TIMER OFF
blank
Follow the same procedures in "Time setting for TIMER ON".
(6) Time confirming for TIMER OFF
After time setting, press SET button to confirm, "OFF" stops flashing
Time displayed: Unit stops at X hour X min.
To cancel TIMER mode
Just press TIMER button several times until TIMER mode disappears.
13
Page 18

Operation
HEALTH Mode operation
(1) Press the ON/OFF switch.
(2) Press the "HEALTH" once," "
is displayed, now the air conditioner
is operating the health function.
(3) Press the "HEALTH"again,then
the health function stops.
BRIEF INTRODUCTION TO HEALTH OPERATION
The anion generator in the air conditioner can generate a lot of anion to
effectively balance the quantity of position and anion in the air and also to kill
bacteria and speed up the dust sediment in the room and finally clean the air
in the room.
14
Page 19

Operation
Emergency and Test Operation
Emergency operation:
Use this operation only when the remote controller is defective or lost.
When the emergency operation switch is pressed,the" Pi "sound is heard once, which
means the start of this operation.
In this operation, it is possible to change the
settings of temperature and air flow speed, it is
also impossible to do an operation by the timer.
Follow the requirements below.
Pi
Room
temperature
More than 23oC
Less than 23oC 23oC
Designated
temperature
26oC
Timer
mode
CONTINUOUS
CONTINUOUS
Air flow
speed
AUTO
AUTO
Operation
mode
COOL
HEAT
If an air conditioner is a model for both cooling and heating.
Cooling when the room temperature at the start of operation is above 23oC.
Heating when the room temperature at the start of operation is below 23oC
Test operation:
Use this switch in the test operation when the room
temperature is less 16oC, do not use it in the normal
operation.
Continue to press the test operation switch for more
than 5 seconds. After you hear the "Pi" sound twice,
release your finger from the switch, the cooling
operation starts with the air flow speed setting "Hi".
Pi...Pi
Removal of the restriction of emergency or test operation:
Press once more the emergency operation switch, or manipulate through the remote
controller, a "Pi" sound causes the restriction of emergency or test operation to be
removed.
When the remote controller is manipulated for the removal, then the selected operation
by the remote controller.
15
Page 20

Operation
Comfortable SLEEP
Before going to bed at night, you can simply press
the SLEEP button and unit will bring you a sound
sleep in selected mode.
In COOL mode
One hour after SLEEP mode starts, temp. will
become 1oC higher than temp. setting. After
running for another 1 hour, temp. rises by 1oC
further. Unit will run for 6 hours then stops
automatically. Temp. is higher than temp.
setting so that room temp. won't be too Iow
for your sleep.(As shown in Fig.l)
In HEAT mode
One hour after SLEEP mode starts, temp. will
become 2oC lower than temp. setting. After
running for another 1 hour, temp. decreases
by 2oC further. Unit will run for 3 hours at this
temp. then increases another 1oC and stops
automatically 3 hours later. Temp. is lower
than temp. setting so that room temp. won't
be too high for your sleep.
(As shown in Fig .2)
Power Failure Resume Function
If the unit is started for the first time, the
compressor will not start running unless 3
minutes have elapsed. When the power
resumes after power failure, the unit will run
automatically, the power indicator lights up, and
3 minutes later the compressor starts running
with the indicator lighting up.
Note:
In AUTO mode, unit will run in SLEEP
function according to operation mode.
In FAN mode, comfortable sleep is not
available.
SLEEP operation starts SLEEP operation stops
Approx. 6 hrs
1 hr
1 hr
Temp. setting Unit stop
Rises 1oC
Rises 1oC
Fig.1
Temp. setting Unit stop
1 hr
SLEEP mode starts SLEEP mode stops
decreases 2oC
1 hr
decreases 2oC
3 hrs
Approx. 3 hrs
Rises 1oC
Fig.2
16
Page 21

Maintenance
Different models have different appearance
Cleaning of unit casing
Cleaning of remote controller
Cleaning of air filter
Cut off power supply
before cleaning unit casing with soft cloth.
In case of heavy stain, clean it with neutral detergent.
squeeze water in the cloth, wipe off the detergent on unit
casing completely.
Don't use water to wash unit casing, please use dry cloth.
Don't use glass cleaner or cloth soaked with chemicals.
1.Open inlet grille by pulling it upward.
3.Clean the filter
Use a vacuum
cleaner to remove
dust,or wash the
filter with water.
After washing,
dry the filter
completely in the shade.
5.Close the inlet grille.
Air Filter
2.Remove air filter
Push up the filter's center tab
slightly until it is caesura of
the stopper. Remove it by
pulling down.
4.Attach the filter
Attach filter behind the stopper so that
the "Front" indication is facing to the front. Make sure
that it is completely behind the stopper, otherwise
problems might occur.
17
Page 22

Maintenance
Replacement of Purifying Filter
Open the Inlet Grille
1
Open the inlet grille by pushing each end
of the inlet grille upward.
Detach the standard air Filter
2
Slide the knob slightly upward to release the
filter,then withdraw it.
3
Detach the Air Purifying Filter
Replace old Air Purifying Filter with
new one into the frame.
Attach the Air Purifying Filter
4
Attaching each of the Air Purifying Filters to
the indoor unit as white side face to front.
For the units of 22,the purifying filter is put
into the standard filter.
Attach the standard air Filter
5
(make sure to be attached)
Operating without standard air filter may cause
trouble with the machine.
Close the inlet Grille
6
Close the Grille surely.
The air conditioner which you are using may be different from the upper illustration,
please refer to the upper installation methods.
Air Filter
Air Purifying Filter
NOTE:
Please replace the Air Purifying Filter in 3-6 months as standard.
Stuffed filter are not usable even washing.Please purchase new one at sales shop.
18
Page 23

Maintenance
Better use of air conditioner
Proper room temperature. Cleaning of the air filter.
Proper
temperature
Once every
two weeks
Closing of doors and windows
during operation
Curtains or blinds
for windows
Never fail to observe the followings
Do not sprinkle water over
the unit.
Do not block the inlet or outlet.
Effective use of the timer.
Avoid time-wasteful
operation
Do not pull power plug. Do not use for other purposes.
Such as food preservation
plant cultivation or animal
breeding.
19
Page 24

Trouble shooting
Before asking for service, check the following first.
Normal
Performance
inspection
Phenomenon
The system does not restart
immediately.
Noise is heard
Smells are generated.
Mist or steam are blown out.
Cause or check points
When unit is stopped, it won't restart
immediately until 3 minutes have elapsed
to protect the system.
When the electric plug is pulled out and
reinserted, the protection circuit will work
for 3 minutes to protect the air conditioner.
During unit operation or at stop, a swishing
or gurgling noise may be heard. At first 2-3
minutes after unit start, this noise is more
noticeable. (This noise is generated by
refrigerant flowing in the system.)
During unit operation, a cracking noise may
be heard. This noise is generated by the
casing expanding or shrinking because of
temperature changes
Should there be a big noise from air flow in
unit operation, air filter may be too dirty.
This is because the system circulates smells
from the interior air such as the smell of
furniture, cigarettes.
During COOL or DRY operation, indoor unit
may blow out mist. This is due to the sudden
cooling of indoor air.
Does not work at all.
Multiple
check
Poor cooling
Application temp. range of air conditioner -7oC~43oC.
Is power plug inserted?
Is there a power failure?
Is fuse blown out?
Is the air filter dirty? Normally it should be
cleaned every 15 days.
Are there any obstacles before inlet and outlet?
Is temperature set correctly?
Are there some doors or windows left open?
Is there any direct sunlight through the
window during the cooling operation?(Use
curtain)
Are there too much heat sources or too many
people in the room during cooling operation?
20
Page 25

AIRE ACONDICIONADO TIPO SPLIT
MANUAL DE
FUNCIONAMIENTO
Leer detenidamente este manual de funcionamiento antes de utilizar el aire acondicionado.
Page 26

Precauciones
Eliminación del aire acondicionado
viejo
Antes de eliminar un aire acondicionado
que se ha dejado de utilizar, verificar que
está inoperativo y seguro. Desenchufar el
aire acondicionado con el fin de evitar el
riesgo de que quede atrapado algún niño.
Hay que señalar que el sistema de aire
acondicionado contiene refrigerantes, que
requieren una eliminación especializada
en vertederos. Los materiales valiosos
contenidos en un aire acondicionado
pueden reciclarse. Ponerse en contacto
con el centro local de eliminación de
residuos para desechar adecuadamente
el aire acondicionado viejo y ponerse en
contacto con el proveedor o la autoridad
local en caso de duda. Verificar que los
conductos del aire acondicionado no están
dañados antes de que éste sea recogido
por el centro de eliminación de residuos
correspondiente y contribuir a la
concienciación medioambiental insistiendo
en un método de eliminación apropiado
contra la contaminación.
Eliminación del embalaje del aire
acondicionado nuevo
Todos los materiales de embalaje utilizados
en el embalaje de su aire acondicionado
nuevo pueden eliminarse sin peligro para
el medio ambiente.
La caja de cartón puede romperse o
cortarse en trozos más pequeños y enviarse
a un servicio de reciclaje de papel. La bolsa
del envoltorio está formada de polietileno
y bloques de espuma de polietileno.
Todos estos materiales valiosos pueden
llevarse a un centro de recogida de residuos
y volver a utilizarse después de un reciclaje
adecuado.
Consultar a las autoridades locales el
nombre y la dirección de los centros de
recogida de materiales residuales y los
servicios de reciclaje de papel más
cercanos al domicilio.
Instrucciones de seguridad y
advertencias
Antes de poner en marcha el aire
acondicionado, leer detenidamente la
información que aparece en la Guía del
Usuario. La Guía del Usuario contiene
observaciones muy importantes en relación
con el montaje, la utilización y el
mantenimiento del aire acondicionado.
El fabricante no acepta ninguna
responsabilidad por los daños que puedan
surgir debido al incumplimiento de la
siguiente instrucción.
Los aires acondicionados dañados no
deben ponerse en marcha. En caso de
duda, consultar al proveedor.
La utilización del aire acondicionado
debe efectuarse cumpliendo estrictamente
las instrucciones correspondientes
señaladas en la Guía del Usuario.
La instalación debe ser efectuada por
profesionales; no instalar la unidad por
propia cuenta y riesgo.
1
Page 27

Precauciones
Por razones de seguridad, el aire
acondicionado debe disponer de una toma
de tierra adecuada conforme a las
especificaciones.
No olvidar desenchufar el aire
acondicionado antes de abrir la rejilla de
entrada. No desenchufar jamás el aire
acondicionado tirando del cable de
alimentación. Sujetar siempre con firmeza
el enchufe y tirar de él recto en relación
con la toma.
Todas las reparaciones eléctricas deben
ser efectuadas por electricistas cualificados.
Las reparaciones inadecuadas pueden
constituir una fuente importante de peligro
para el usuario del aire acondicionado.
No dañar ninguna pieza del aire
acondicionado que lleve refrigerante ni
perforando ni agujereando los tubos del
aire acondicionado con elementos afilados
o puntiagudos, ni aplastando ni retorciendo
ningún tubo, ni descascarillando los
recubrimientos de las superficies. Si se
produce una fuga de refrigerante y entra
en contacto con los ojos, puede provocar
graves lesiones oculares.
No obstaculizar ni tapar la rejilla de
ventilación del aire acondicionado. No poner
los dedos ni ningún otro elemento en la
entrada/salida ni en la lama giratoria.
Especificaciones
El circuito de refrigeración es a prueba de
fugas.
Nota según Directiva EMC 89/336/EEC
Para impedir una impresión de intermitencia
durante el arranque del compresor (Proceso
Técnico) y la influencia adversa provocada
por los armónicos de 2º nivel del compresor,
se aplican las siguientes condiciones de
instalación:
1.La conexión de alimentación para el aire
acondicionado debe realizarse a la red de
distribución principal. Esta distribución debe
ser de baja impedancia. Normalmente, la
impedancia necesaria se alcanza en un
punto de 32 A.
2.No se debe conectar ningún otro equipo:
a esta línea de tensión.
3.Para conocer los detalles de la adecuación
de la instalación, consulte el contrato con
su proveedor de tensión para comprobar si
se aplican restricciones a productos: tales
como lavadoras, aires acondicionados u
hornos eléctricos.
4.Para obtener los detalles de la tensión
del aire acondicionado, consulte la placa
de características del producto.
5. Para cualquier otra cuestión, póngase
en contacto con su distribuidor local.
No dejar que los niños jueguen con el aire
acondicionado. En ningún caso se debe
permitir a los niños que se sienten sobre la
unidad exterior.
2
Page 28

Piezas y funciones
Unidad interior
Rejilla de entrada
Interruptor de funcionamiento de prueba (manual)
Se usa únicamente para el funcionamiento de prueba durante la
refrigeración No utilizar durante el funcionamiento normal cuando la
temp. ambiente es inferior a 16º C.
Interruptor de emergencia (manual)
Se usa cuando el mando a distancia se ha perdido o no funciona
correctamente. La unidad estará en marcha temporalmente.
Receptor señal remota
Filtro de aire
Faldón vertical
Usar mando a distancia para
subir y bajar el flujo de aire
(No ajustarlo manualmente)
Para los modelos:
HSU-18HR03/R2
Indicador de tensión
Se enciende cuando se
pone en marcha la unidad.
Indicador temporizador
Se enciende cuando está seleccionado
el funcionamiento con Temporizador.
HSU-07HC03/R2 HSU-09HC03/R2 HSU-12HC03/R2
H2SM-14HB03/R2 H2SM-18HB03/R2
H2SM-14HC03/R2 H2SM-18HC03/R2
Se oye un pitido cuando recibe una
señal del mando a distancia
Indicador del modo de funcionamiento
Se enciende cuando el compresor está
en funcionamiento.
Para el tipo multi-split, el enchufe de red se halla en la unidad exterior.
Interruptor de funcionamiento de prueba (manual)
Se usa únicamente para el funcionamiento de prueba durante la
Rejilla de entrada
refrigeración No utilizar durante el funcionamiento normal cuando la
temp. ambiente es inferior a 16º C.
Interruptor de emergencia (manual)
Se usa cuando el mando a distancia se ha perdido o no funciona
correctamente. La unidad estará en marcha temporalmente.
HSU-14HR03/R2
Filtro de aire
Faldón vertical
Usar mando a distancia para
subir y bajar el flujo de aire
(No ajustarlo manualmente)
Para los modelos: HSU-14HB03/R2HSU-18HB03/R2
Indicador de tensión
Se enciende cuando se
pone en marcha la unidad.
Rejilla de entrada
Filtro de aire (interior)
Faldón vertical
Usar mando a distancia para
subir y bajar el flujo de aire
(No ajustarlo manualmente)
HSU-22HB03/R2Para los modelos:
Indicador temporizador
Se enciende cuando está seleccionado
el funcionamiento con Temporizador.
Indicador de tensión
Se enciende cuando se
pone en marcha la unidad.
HSU-22HC03/R2
HSU-22HD03/R2
3
Receptor señal remota
Se oye un pitido cuando recibe una
señal del mando a distancia
Indicador del modo de funcionamiento
Se enciende cuando el compresor está
en funcionamiento.
Receptor señal remota
Se oye un pitido cuando recibe una
señal del mando a distancia
Indicador del modo de funcionamiento
Se enciende cuando el compresor está
en funcionamiento.
Indicador temporizador
Se enciende cuando está seleccionado
el funcionamiento con Temporizador.
Page 29

Piezas y funciones
Unidad Exterior
Para los modelos:
TUBERÍA DE CONEXIÓN Y
CABLEADO ELÉCTRICO
ENTRADA
HSU-07HC03/R2 HSU-09HC03/R2
SALIDA
TUBO DE
DESAGÜE
La máquina puede adaptarse a las siguientes condiciones
1. Rango aplicable de temperatura ambiente:
Máximo::D.B/W.B
Mínimo:D.B/W.B
Máximo:D.B/W.B
Mínimo:D.B
Máximo:D.B
Mínimo:D.B
Máximo:D.B/W.B
Mínimo:D.B/W.B
Refrigeración
Calefacción
Interior
Exterior
Interior
Exterior
o
32
C/23oC
18oC/14oC
o
43
C/26oC
o
18
C
o
27
C
o
15
C
o
24
C/18oC
o
-7
C/-8oC
2. Si el cable de alimentación está dañado, debe ser sustituido por el fabricante o su agente
de mantenimiento o una persona con cualificación similar. El tipo de cable de conexión
es H05RN-F o H07RN-F.
3. Si el fusible de la placa PC está roto, cambiarlo por uno del tipo T 3,15A /250V.
4. La distancia entre la unidad interior y el suelo debe ser superior a 2 m.
5. El método de cableado debe ser conforme a la norma local sobre cableado.
6. Después de la instalación, se debe poder llegar con facilidad al enchufe de red.
7. La pila agotada debe eliminarse de forma adecuada.
8. El electrodoméstico no está diseñado para ser utilizado por menores o personas
discapacitadas sin supervisión.
9. Debe controlarse a los menores para que no jueguen con el aparato de aire acondicionado.
10. El aparato debe instalarse sobre un soporte suficientemente resistente.
11. El diagrama del cableado se adjunta en el interior de la máquina
4
Page 30

Piezas y funciones
Para los modelos: HSU-14HB03/R2
HSU-12HC03/R2
HSU-14HR03/R2
HSU-18HR03/R2
Para los modelos: HSU-18HB03/R2
Para los modelos: HSU-22HB03/R2
HSU-22HC03/R2
HSU-22HD03/R2
Para los modelos: H2SM-14HB03/R2
H2SM-18HB03/R2
H2SM-14HC03/R2
H2SM-18HC03/R2
5
Page 31

Piezas y funciones
Botones y display del mando a distancia.
1.Display de modo
AUTO
COOL
DRY
HEAT
FAN
2. Display SWING
3. Display FAN SPEED
4. Display HEALTH
5. Display SLEEP
6. Display LOCK
7. Display TIMER OFF
8. Display AUXILIARY HEAT
9. HEALTH
10. MODE
Se utiliza para seleccionar AUTO,COOL
y FAN
11. CLOCK
Se utiliza para ajustar la hora correcta.
12. TIMER
Se utiliza para seleccionar TIMER
ON,TIMER OFF
13. RESET
Se usa para resetear el controlador a su
condición normal
14. CODE
Se usa para seleccionar el código A o B
con una pulsación, A o B aparecerán en el
DISPLAY. Seleccione A sin una explicación
especial
15. Display CODE
16. Display SIGNAL SENDING
17. Display POWER/SOFT
18. Display TEMP.
19. Display CLOCK
20. Display TIMER OFF
21. TEMP
Se usa para seleccionar la temperatura
deseada.
22. FAN
Selecciona la velocidad del ventilador:
23. POWER ON/OFF
25. SWING
26. SET
Se usa para confirmar el reloj y el temporizador
27. HOUR
Se usa para ajustar el reloj y el temporizador
NOTA: (1) Las siguientes funciones y displays asociados no están disponibles: Display AUXILIARY HEAT, display POWER/SOFT,
display LOCK.
(2) Si el Aire Acondicionado no tiene la función del código, al pulsar el código B éste puede estar no disponible.
(3) La unidad sólo refrigeración no dispone de las funciones y displays asociados con el calentamiento.
Se utiliza para encender y apagar la unidad.
24. SLEEP
Se usa para configurar el modo sleep.
LOW MED HI AUTO
Puesta en hora del reloj
Cuando la unidad se ponga en marcha por primera vez y después de cambiar las pilas del mando a distancia,
habrá que ajustar el reloj del siguiente modo:
Pulsar el botón CLOCK, "AM" o "PM" parpadean.
Pulsar " " o " " para fijar la hora correcta. Con cada pulsación se incrementa o disminuye 1 minuto. Si se
mantiene pulsado el botón, la hora cambia rápidamente.
Después de confirmar la hora, pulsar SET; "AM" o "PM" dejarán de parpadear al tiempo que el reloj se pone
en marcha.
Consejos
Consejos
Después de colocar pilas nuevas, el mando a distancia efectuará una autocomprobación, mostrando toda la información
en la LCD. A continuará, volverá a la normalidad.
6
Page 32

Piezas y funciones
Botones y display del mando a distancia
Si la unidad que ha adquirido no dispone de la función healthy, el mando a
distancia debe asemejarse a la siguiente figura:
1.Display de modo
AUTO
COOL
DRY
HEAT
FAN
2. Display SWING
3. Display FAN SPEED
4. Display HEALTH
5. Display SLEEP
6. Display LOCK
7. Display TIMER OFF
8. Display AUXILIARY HEAT
9. SWING
10. MODE
Se utiliza para seleccionar AUTO,COOL
y FAN
11. CLOCK
Se utiliza para ajustar la hora correcta.
12. TIMER
Se utiliza para seleccionar TIMER
ON,TIMER OFF
13. RESET
Se usa para resetear el controlador a su
condición normal.
14. CODE
Se usa para seleccionar el código A o B
con una pulsación; aparecerá
A o B en el DISPLAY. Seleccione
A sin explicación especial.
15. Display CODE
16. Display SIGNAL SENDING
17. Display POWER/SOFT
18. Display TEMP.
19. Display CLOCK
20. Display TIMER OFF
21. TEMP
Se usa para seleccionar la temperatura
25. SET
Se usa para confirmar el reloj y el temporizador
26. HOUR
Se usa para ajustar el reloj y el temporizador
27.LOCK
Se usa para bloquear botones y la pantalel DISPLAY.
NOTA: (1) Las siguientes funciones y displays asociados no están disponibles: Display AUXILIARY HEAT, display POWER/SOFT,
display LOCK.
(2) Si el Aire Acondicionado no tiene la función del código, al pulsar el código B éste puede estar no disponible.
(3) La unidad sólo refrigeración no dispone de las funciones y displays asociados con el calentamiento.
deseada.
22. FAN
Selecciona la velocidad del ventilador:
23. POWER ON/OFF
Se utiliza para encender y apagar la unidad.
24. SLEEP
Se usa para configurar el modo sleep.
LOW MED HI AUTO
Puesta en hora del reloj
Cuando la unidad se ponga en marcha por primera vez y después de cambiar las pilas del mando a distancia,
habrá que ajustar el reloj del siguiente modo:
Pulsar el botón CLOCK, "AM" o "PM" parpadean.
Pulsar " " o " " para fijar la hora correcta. Con cada pulsación se incrementa o disminuye 1 minuto. Si se
mantiene pulsado el botón, la hora cambia rápidamente.
Después de confirmar la hora, pulsar SET; "AM" o "PM" dejarán de parpadear al tiempo que el reloj se pone
en marcha.
Consejos
Después de colocar pilas nuevas, el mando a distancia efectuará una autocomprobación, mostrando toda la información
en la LCD. A continuará, volverá a la normalidad.
7
Page 33

Funcionamiento
Funcionamiento del mando a distancia
La distancia entre el cabezal de transmisión de la señal y el orificio
receptor debe estar a menos de 7m sin ningún obstáculo entre ellos.
Cuando esté siendo utilizado, situar la señal de transmisión
directamente en el orificio receptor de la unidad interior
No dejar caer el controlador; e impedir que resulte dañado.
Cuando haya en la sala fluorescentes tipo puesta en marcha
electrónica o fluorescentes tipo transferencia o teléfonos
inalámbricos, el receptor puede ver perturbada su recepción de
las señales, de modo que la distancia a la unidad interior debe
ser inferior.
Carga de la pila
Cargar las pilas tal como se ilustra. 2 pilas R-03, tecla de reseteado
(cilindro)
Soltar la tapa de la pila.
Pulsar ligeramente " " y bajar la tapa.
Carga de la pila:
Verificar que la carga corresponde a la polaridad
"+" / "-" solicitada según la imagen
Volver a poner la tapa.
Indicador de confirmación:
En caso de colocación errónea, volver a cargar las pilas o poner pilas
nuevas después de 6 minutos.
Nota:
Usar dos pilas nuevas de las mismas características al realizar la carga.
Si el mando a distancia no funciona con normalidad o no funciona de
ningún modo, usar un artículo con punta para presionar la tecla reset.
Consejo:
Quitar las pilas en caso de que no se vaya a usar la unidad durante un
período de tiempo prolongado. Si aparece algún display después de quitar
las pilas, hay que pulsar la tecla reset.
Reanudación tras fallo de tensión (determinar y aplicar según corresponda)
Si se produce una fallo de tensión repentino, la unidad reanudará el funcionamiento
original cuando regrese la tensión.
Nota:
Cuando se produce un fallo de tensión repentino cuando la unidad está en funcionamiento
en modo reanudación tras fallo de tensión, si no se desea utilizar el aire acondicionado
durante un período de tiempo prolongado, desconectar la toma de alimentación en caso que
la unidad reanude automáticamente el funcionamiento cuando regrese la tensión, o pulse
ON/OFF para apagar la unidad cuando vuelva la tensión.
8
Page 34

Funcionamiento
Funcionamiento automático, funcionamiento del ventilador
(1) Puesta en marcha de la unidad
Disfrute con sólo tocar un botón.
Pulsar el botón ON/OFF . La unidad se pone en marcha.
El estado de funcionamiento previo aparece en el display.
(Valor Sin Temporizador)
El indicado de alimentación de la unidad interior se enciende.
(2) Seleccionar el modo de funcionamiento
Pulsar el botón MODE. Con cada pulsación, el modo
de funcionamiento cambia del siguiente modo:
AUTO COOL DRY HEAT FAN
La unidad se activará en el modo seleccionado.
Para el display en " " AUTO o " "FAN.
(3) FAN
Pulsar el botón FAN. Con cada pulsación, la velocidad
del ventilador cambia del siguiente modo:
LO MED HI AUTO
(4) Parada de la unidad
La unidad se activará con la velocidad del ventilador
seleccionada.
Nota: AUTO no está disponible en modo FAN.
Pulsar el botón ON/OFF
Sólo permanecen en la LCD la hora.
Todos los indicadores de la unidad interior
se apagan. El faldón vertical se cierra
automáticamente.
Consejos
El mando a distancia puede memorizar valores de todos los modos de funcionamiento. Para activarlo la siguiente
vez que se utilice la unidad, seleccionar el modo de funcionamiento y se pondrá en marcha con el valor anterior.
No es necesario volver a elegir (TIMER ON/OFF debe ser nuevamente seleccionado)
Precauciones: Nota:
En la unidad sólo refrigeración, no está disponible el modo de
calentamiento.
Después de cambiar las pilas, pulsar ON/OFF y el display aparecerá
del siguiente modo:
Modo de funcionamiento: AUTO, Temp. Nº
Modo temporizador: No, Velocidad del ventilador:AUTO
La información previa es la explicación
de la información mostrada; por lo tanto,
es diferente a la mostrada en el
funcionamiento real.
9
Page 35

Funcionamiento
Funcionamiento COOL,HEAT y DRY
Recomendaciones:
Usar COOL en verano. Usar HEAT en invierno
Usar DRY en primavera, otoño y en climas húmedos.
(1) Puesta en marcha de la unidad
Pulsar el botón ON/OFF . La unidad se pone en marcha.
El estado de funcionamiento previo aparece en el display (Valor Sin Temporizador).
El indicador de alimentación de la unidad interior se enciende.
(2) Seleccionar el modo de funcionamiento
Pulsar el botón MODE. Con cada pulsación, el modo de
funcionamiento cambia del siguiente modo:
AUTO COOL DRY HEAT FAN
La unidad entrará en el modo de funcionamiento mostrado en la LCD.
Parar el display en el modo deseado.
(3) Seleccionar la temperatura
Pulsar el botón TEMP.
Cada vez que se pulsa el botón, la temperatura aumenta 1º.
Cada vez que se pulsa el botón, la temperatura disminuye 1º.
La unidad se´guirá funcionando hasta alcanzar la temp. de la LCD.
(4) Selección de la velocidad del ventilador
Pulsar el botón FAN. Con cada pulsación, la velocidad del ventilador
cambia del siguiente modo:
LO MED HI AUTO
El funcionamiento de refrigeración
se pone en marcha cuando la temp.
de la sala es superior al valor de la
temp.
La unidad funciona a la velocidad mostrada en la LCD.
En modo DRY, cuando la temperatura ambiente supere en
o
C
Temp. +2
Valor de la temp.
2º C la temperatura establecida, la unidad funcionará de
forma intermitente a velocidad LOW independientemente
del valor FAN.
Al llegar al valor de la temp., la
unidad empezará a funcionar en
modo DRY suave.
Consejos.
El modo de calefacción no está disponible en las unidades de refrigeración.
El mando a distancia puede memorizar todos los estados de funcionamiento. Al ponerse en marcha la siguiente
vez, al pulsar el botón ON/OFF la unidad se encenderá en el estado anterior.
10
Caudal de aire
súper bajo
Page 36

Funcionamiento
(5) Ajuste de la dirección del flujo de aire
Tras seleccionar el modo de funcionamiento, el faldón vertical se abre automáticamente de
acuerdo con el modo. Referring to the Fig.
COOL
Aprox. 10
o
Arriba y abajo (usar el mando a distancia)
Pulsar el botón SWING, el faldón vertical se moverá
en el rango mostrado en la Fig. Pulsar el botón
SWING para detenerlo en una posición fija.
o
o
o
COOL
HEAT
Aprox. 10
Aprox. 45
Aprox. 60
Precauciones:
Es aconsejable no mantener el faldón vertical en
posición hacia abajo durante un período de tiempo
prolongado en modo COOL o DRY; en otro caso, podría
producirse condensación de agua.
(6) Parada de la unidad
Pulsar el botón ON/OFF .
Sólo permanecen en la LCD la hora. Todos los
indicadores de la unidad interior se apagan. El
faldón vertical se cierra automáticamente.
HEAT
Aprox. 60
o
Ajuste de la dirección del flujo de aire
izquierda y derecha (manual)
Mover la aleta horizontal con una bola situada
en el mando a distancia para ajustar la dirección
izquierda y derecha consultar la Fig.
Precauciones:
Cuando la humedad sea elevada, se puede producir
condensación de agua en la salida de aire si todas
las rejillas de ventilación están ajustadas a la izquierda
o a la derecha.
Precauciones:
La unidad no volverá a ponerse en marcha hasta
que hayan transcurrido 3 minutos, debido a la
protección del sistema.
El modo HEAT no está disponible en la unidad sólo
refrigeración.
Hints
Ya que en modo COOL, el aire frío fluye hacia abajo, el ajuste del flujo de aire horizontalmente resultará mucho más útil para
mejorar la circulación de aire
Ya que en modo COOL, el aire templado fluye hacia arriba, el ajuste del flujo de aire hacia abajo resultará mucho más útil
para mejorar la circulación de aire
Tener cuidado de no resfriarse cuando el aire frío descienda directamente sobre la persona.
En verano, resulta nocivo para la salud entrar y salir con frecuencia de lugares en los que la diferencia de temp. es superior
a 7ºC. Una diferencia de temp. de 3-5ºC eliminará la fatiga.
Más aún, la carga de la unidad puede reducirse y también disminuir el consumo de energía. Por lo tanto, es mejor fijar una
diferencia de temp. de 3-5ºC entre la temp. interior y exterior en modo COOL.
11
Page 37

Funcionamiento
Funcionamiento TIMER
Fijar correctamente el reloj antes de poner en marcha el funcionamiento TIMER
Puede dejar que la unidadse ponga en marcha o se detenga automáticamente en los siguientes momentos: Antes de
levantarse por la mañana o de regresar de la calle o después de quedarse dormido por la noche.
TIMER ON/OFF
(1)Después de la puesta en marcha, seleccionar el modo de funcionamiento deseado.
El modo de funcionamiento aparecerá en la LCD.
El indicado de alimentación de la unidad interior se enciende.
(2)Selección del modo TIMER
Pulsar el botón TIMER para cambiar el modo TIMER.
Cada vez que se pulsa el botón, el display cambia del siguiente modo:
ON OFF ON OFF
TIMER ON TIMER OFF TIMER ON-OFF
Seleccionar el modo TIMER deseado (TIMER ON o TIMER OFF)
ON u OFF comenzarán a parpadear.
blank
(3)Valor del Temporizador
Pulsar el botón HOUR / .
Cada vez que se pulsa el botón, el tiempo aumenta 10 minutos.
Si se mantiene pulsado el botón, la hora cambia rápidamente.
Cada vez que se pulsa el botón, el tiempo disminuye 10 minutos.
Si se mantiene pulsado el botón, la hora cambia rápidamente.
El tiempo aparecerá en la LCD. Puede ajustarse 24 horas.
(4) Confirmación del valor
Después de fijar la hora correcta, pulsar el botón SET para confirmar,
"ON" u "OFF" dejarán de parpadear
Tiempo mostrado: La unidad arranca o para a las X horas X minutos
(TIMER ON o TIMER OFF)
El indicador de modo temporizador de la unidad interior se enciende.
Para cancelar el modo TIMER
Simplemente, pulsar el botón TIMER varias veces hasta que el modo TIMER desaparezca.
Consejos
Después de cambiar las pilas o tras producirse un fallo de tensión, se debe reiniciar la hora.
El mando a distancia posee función de memoria, cuando se utilice el modo TIMER en la
siguiente ocasión, pulsar el botón SET después de seleccionar el modo si el valor del tiempo
es el mismo que el anterior.
12
Page 38

Funcionamiento
TIMER ON-OFF
TIMER ON-OFF
(1)Después de la puesta en marcha de la unidad, seleccionar el modo de funcionamiento deseado.
El modo de funcionamiento aparecerá en la LCD.
El indicador de alimentación de la unidad interior se enciende.
(2) Pulsar el botón TIMER para cambiar el modo TIMER.
Cada vez que se pulsa el botón, el display cambia del siguiente modo:
ON OFF ON OFF
TIMER ON TIMER OFF TIMER ON-OFF
Seleccionar TIMER ON-OFF. "ON" parpadeará.
blank
(3)Fijación del tiempo para TIMER ON
Pulsar el botón HOUR.
Cada vez que se pulsa el botón, el tiempo aumenta 10 minutos.
Si se mantiene pulsado el botón, la hora cambia rápidamente.
Cada vez que se pulsa el botón, el tiempo disminuye 10 minutos.
Si se mantiene pulsado el botón, la hora cambia rápidamente.
El tiempo aparecerá en la LCD.
Puede ajustarse 24 horas.
AM indica el horario matutino y PM el vespertino.
(4) Confirmación del tiempo para TIMER ON
Después de fijar el tiempo correcto, pulsar el botón TIMER para confirmar.
"ON" deja de parpadear, al tiempo que "OFF" se enciende intermitentemente.
Tiempo mostrado: La unidad se pone en marcha a las X horas X minutos.
(5)Fijación del tiempo para TIMER OFF
Seguir los mismos procedimientos que en "Fijación del tiempo para TIMER ON".
(6) Confirmación del tiempo para TIMER OFF
Después de fijar el tiempo correcto, pulsar el botón SET para confirmar; "OFF" deja de parpadear.
Tiempo mostrado: La unidad se detiene a las X horas X minutos.
Para cancelar el modo TIMER
Simplemente, pulsar el botón TIMER varias veces hasta que el modo TIMER desaparezca.
13
Page 39

Funcionamiento
Funcionamiento en Modo HEALTH
(1) Pulsar el interruptor ON/OFF.
(2) Pulsar una vez "HEALTH", aparece ," "
ahora, el aire acondicionado
está activado con la función health.
(3) Volver a pulsar "HEALTH";
la función health se detiene.
BREVE INTRODUCCIÓN AL FUNCIONAMIENTO HEALTH
El generador de aniones del aire acondicionado puede generar gran cantidad
de aniones para equilibrar de forma efectiva la cantidad y la posición de aniones
en el aire y también para matar bacterias y acelerar la sedimentación de polvo
en la sala, y finalmente limpiar el aire de la misma.
14
Page 40

Funcionamiento
Funcionamiento de emergencia y funcionamiento de prueba
Funcionamiento de emergencia:
Usar este modo de funcionamiento únicamente cuando el mando a distancia falle o esté perdido.
Cuando se pulsa el interruptor de funcionamiento de emergencia, se escucha una vez un pitido,
que indica el inicio de este modo de funcionamiento.
En este modo de funcionamiento, no es posible cambiar los valores de
la temperatura y la velocidad del flujo de aire; también es imposible
utilizar el temporizador.
Seguir los siguientes requisitos.
Pi
Temperatura
ambiente
Más de 23oC
Menos de 23
Si un aparto de aire acondicionado es un modelo tanto para refrigeración como para calentamiento.
Refrigeración cuando la temperatura ambiente en la puesta en marcha es superior a 23ºC.
Calentamiento cuando la temperatura ambiente en la puesta en marcha es inferior a 23ºC.
Temperatura
designada
26
o
C 23oC
o
C
Modo
Timer
CONTINUOUS
CONTINUOUS
Velocidad del
flujo de aire
AUTO
AUTO
Operation
mode
COOL
HEAT
Funcionamiento de prueba:
Usar este interruptor en el funcionamiento de prueba cuando la
temperatura ambiente sea inferior a 16º C; no usarlo en el modo de
funcionamiento normal.
Pulsar el interruptor de funcionamiento de prueba más de 5 segundos.
Tras escuchar dos veces el sonido "Pi", soltar el interruptor, el modo
refrigeración se pone en marcha con el valor de la velocidad del flujo
de aire "Hi".
Pi...Pi Pi
Finalización de la restricción del funcionamiento de emergencia o de prueba
Pulsar otra vez el interruptor de funcionamiento de emergencia o emplear el mando a distancia; se emite
un pitido y el funcionamiento de emergencia o de prueba finaliza.
Cuando se utilice el mando a distancia para esto, seleccionar a continuación el funcionamiento con el
mando a distancia.
15
Page 41

Funcionamiento
SLEEP confortable
Antes de ir a la cama, simplemente hay que pulsar el botón
SLEEP y la unidad funcionará en modo SLEEP, lo que le
proporcionará un sueño confortable.
En modo COOL
1 hora después del inicio del modo SLEEP, la temp. será 1º C
superior al valor de la temp. Después de otra hora, la temp.
aumenta otro grado. La unidad estará en funcionamiento otras 6
horas y, a continuación, se detendrá. La temp. es superior al valor
de la temp. de modo que la temperatura ambiente no será
demasiado escasa para un sueño confortable.
En modo HEAT
1 hora después del inicio del modo SLEEP, la temp. será 2º
C inferior al valor de la temp. Después de otra hora, la temp.
disminuye otros 2º C. La unidad estará en funcionamiento
durante 3 horas a esta temperatura, a continuación aumentará
otro 1º C y se detendrá automáticamente 3 horas después.
La temp. es inferior al valor de la temp., de modo que la
temperatura ambiente no seá demasiado a alta para dormir.
(Tal como se muestra en la Fig .2)
Función Reanudación Fallo de Tensión
Si la unidad se pone en marcha por primera vez, el compresor
no comenzará a funcionar hasta que hayan transcurrido 3
minutos. Cuando vuelva la tensión después de un fallo, la
unidad se pondrá en marcha automáticamente, el indicador
de alimentación se encenderá y, 3 minutos después, el
compresor se pondrá en marcha con el indicador encendido.
Nota:
IEn modo AUTO, la unidad trabajará en modo SLEEP de
acuerdo con el modo de funcionamiento.
En modo FAN, el sueño confortable no está disponible.
se inicia el funcionamiento SLEEP se detiene el funcionamiento SLEEP
Approx. 6 hrs
1 hr
1 hr
Valor de la temp. Parada de la unidad
Aumenta 1ºC
Aumenta 1ºC
Fig.1
Valor de la temp. Parada de la unidad
1 hr
se inicia el modo SLEEP se detiene el modo SLEEP
disminuye 2ºC
1 hr
disminuye 2ºC
3 hrs
Approx. 3 hrs
Aumenta 1ºC
Fig.2
16
Page 42

Mantenimiento
Diferentes modelos tienen apariencias distintas
Limpieza de la caja de la unidad
Desenchufar la toma de alimentación antes de limpiar la caja de la
unidad con un paño suave.
En caso de manchas resistentes, limpiarla con un detergente neutro.
Humedecer el paño y eliminar el detergente de la unidad por completo.
Limpieza del mando a distancia
No usar agua para limpiar la caja de la unidad; utilizar un paño seco.
No usar limpiacristales ni paños humedecidos en productos químicos.
Limpieza del filtro de aire
1.Abrir la rejilla de entrada tirando de la
misma hacia arriba.
3.Limpiar el filtro
Utilizar un aspirador para
eliminar el polvo o lavar
el filtro con agua.
Después de lavar, secar
completamente el filtro
a la sombra.
5.Cerrar la rejilla de entrada
Filtro del aire
2.Quitar el filtro de aire
Tirar suavemente hacia arriba
de la pestaña central del filtro
hasta que llegue al tope.
Quitarla tirando hacia abajo.
4.Colocar el filtro.
Colocar el filtro detrás del tope, de modo
que la indicación "Front" quede hacia
delante. Verificar que está situado
completamente detrás del tope; en otro
caso, podrían producirse problemas.
17
Page 43

Mantenimiento
Sustitución del filtro purificador de aire
Abrir la rejilla de entrada
1
Abrir la rejilla de entrada tirando hacia arriba de los
extremos de la misma.
Separar el filtro estándar de aire
2
Deslizar ligeramente el botón hacia arriba para soltar
el filtro y, a continuación, retirarlo.
3
Retirada del filtro purificador de aire
Retirar el Filtro Purificador de Aire antiguo y colocar
uno nuevo en el marco.
Colocación del filtro purificador de aire
4
Colocar cada uno de los Filtros Purificadores de Aire en la
unidad interior con el lado de color blanco hacia delante.
Para las unidades de 22, el filtro purificador se introduce en
el filtro estándar.
Colocación del filtro estándar de aire
5
(verificar que está colocado)
Utilizar la unidad sin el filtro de aire estándar puede causar
problemas con la máquina.
Cerrar la rejilla de entrada
6
Cerrar firmemente la rejilla.
El aire acondicionado que está utilizando puede ser diferente del de la ilustración
anterior; consulte los métodos de instalación comentados previamente.
Filtro de aire
Filtro Purificador de aire
NOTA:
Sustituir el Filtro Purificador de Aire cada 3-6 meses como promedio.
Los filtros obstruidos no deben utilizarse aunque sean lavados. Adquirir uno nuevo
en la tienda
18
Page 44

Mantenimiento
Mejor uso del aire acondicionado
Temperatura ambiente apropiada Limpieza del filtro de aire
Temperatura
apropiada
Una vez cada
dos semanas
Cerrar puertas y ventanas durante el
Uso efectivo del temporizador.
funcionamiento
cortinas o persianas
para las ventanas
Evitar tiempo de
funcionamiento
no necesario
Cumplir siempre lo siguiente
No derramar agua sobre la unidad. No bloquear la entrada o salida de aire.
No tirar del cable de alimentación. No usar para otros fines.
Por ejemplo, conservación de
alimentos, cultivo de plantas o
alimentación de animales.
19
Page 45

Resolución de problemas
Antes de solicitar servicio, verificar en primer lugar lo siguiente.
Inspección de
funcionamiento
normal
Fenómeno
El sistema no se vuelve a poner
en marcha inmediatamente
Se escuchan ruidos
Produce olor.
Se expulsa neblina o vapor
Causa o puntos de comprobación
Cuando la unidad se detiene, no se vuelve a poner en
marcha inmediatamente hasta transcurridos 3 minutos
para proteger el sistema.
Cuando se saca el enchufe y se vuelve a introducir, el
circuito de protección wiU se activa durante 3 minutos
Durante el funcionamiento de la unidad o la parada se
puede escuchar un borboteo Durante los primeros 2-3
minutos en los que la unidad está en marcha, este
borboteo es más apreciable. (Este ruido está
generado por el flujo del refrigerante en el sistema).
Durante el funcionamiento de la unidad se puede
percibir un ruido de rotura. Este ruido está producido
por la expansión o contracción de la carcasa debido a
las fluctuaciones de la temperatura.
Si se produce un ruido importante en el
funcionamiento de la unidad, el filtro de aire puede
Esto es debido a que el sistema mueve el olor del aire
del interior tales como el olor a tabaco o a mobiliario.
Durante el funcionamiento COOL o DRY, la unidad
interior puede expulsar neblina. Esto se debe al
enfriamiento repentino del aire interior.
Verificación
múltiple
No funciona nada
Mala refrigeración
¿Está introducido el enchufe de red?
¿Existe un fallo de tensión?
¿Está quemado algún fusible?
¿Está sucio el filtro de aire? Normalmente, debe
limpiarse cada 15 días.
¿Existe algún obstáculo ante la entrada y la salida?
¿Está correctamente fijada la temperatura?
¿Se ha dejado abierta alguna puerta o ventana?
¿Entra directamente la luz del sol por la ventana
durante la refrigeración? (Usar cortina)
¿Existen demasiadas fuentes de calor o demasiadas
personas en la sala durante la refrigeración?
Aplicación rango de temp. del aire acondicionado -7°C~43°C.
20
Page 46

IST HA023 Rev. 00-2004
• Si prega di leggere il presente manuale di istruzioni prima di utilizzare il climatizzatore
• Conservare il presente manuale per ogni futura evenienza.
Modello: Entry Line - Parete
Manuale di istruzioni
Page 47

2
1. Indicatori modalità operativa:
2. Indicatore direzione del flusso d'aria alto/basso.
3. Indicatori velocità del flusso d'aria:
4. Indicatore funzione Health.
5. Indicatore funzione Sleep.
6. Indicatore Lock (blocco tasti).
7. Indicatore modalità Timer On.
8. Indicatore funzione Riscaldamento ausiliario.
9. Tasto HEALTH
Per impostare la funzione Health (salute).
10. Tasto MODE
Per selezionare la modalità operativa desiderata. Ad ogni pressione del tasto, la modalità varia come segue:
11. Tasto CLOCK
Per impostare l'orologio.
12. Tasto TIMER
Per impostare le funzioni "TIMER ON", "TIMER OFF", "TIMER
ON-OFF".
ON: il climatizzatore si avvia dopo il periodo impostato.
OFF: il climatizzatore si arresta dopo il periodo impostato.
13. Tasto RESET
Premere questo tasto con un oggetto appuntito per ripristinare
l'impostazione iniziale del telecomando, ad esempio in caso di
malfunzionamento dovuto a una sorgente elettromagnetica.
14. Tasto CODE
Per selezionare il codice A o B. Si prega di selezionare A.
15. Indicatore codice A o B.
Tasti e display del telecomando
AUTO
BASSA MEDIA ALTA AUTO
RAFFREDDAMENTO
DEUMIDIFICAZIONE RISCALDAMENTO
VENTILAZIONE
AUTO RAFFREDDAMENTO DEUMIDIFICAZIONE RISCALDAMENTO VENTILAZIONE
Page 48

3
16. Indicatore invio segnale.
17. Indicatore modalità Power/Soft.
18. Indicatore Temp (visualizza la temperatura impostata).
19. Indicatore Clock (orologio).
20. Indicatore modalità Timer Off.
21. Tasti TEMP (impostazione temperatura)
La temperatura indicata aumenta di 1°C ad ogni
pressione.
La temperatura indicata diminuisce di 1°C ad ogni
pressione.
22. Tasto FAN
Per regolare la velocità del flusso d'aria: bassa, media, alta,
auto.
23. Tasto ON/OFF
Per accendere e spegnere il climatizzatore.
24. Tasto SLEEP
Per selezionare la modalità notturna Sleep (spegnimento automatico).
25. Tasto SWING
Per modificare la direzione del flusso d'aria verticalmente
(verso l'alto e verso il basso).
26. Tasto SET
Per confermare le impostazioni del Timer e dell'orologio.
27. Tasti HOUR (ora)
Per regolare l'ora dell'orologio e impostare l'orario del Timer.
Nota:
Questa unità non dispone delle funzioni relative ai punti: 6, 8,
17.
Page 49

Uso del telecomando
• Dopo aver acceso il climatizzatore, puntare il telecomando direttamente verso il sensore di ricezione segnali sull’unità interna.
• La distanza tra la testina di trasmissione del segnale e il sensore di ricezione non deve essere superiore ai 7 metri e non devono
esserci ostacoli.
• Evitare di far cadere il telecomando ed evitare che venga danneggiato.
• Se nella stanza viene installata una lampada fluorescente ad avviamento elettronico, o una lampada fluorescente di tipo a
commutatore, o un telefono portatile, la ricezione dei segnali da parte del telecomando può essere disturbata, quindi la distanza
dall’unità interna dovrebbe essere diminuita.
Inserimento delle batterie
Inserire le batterie come illustrato.
• Rimuovere il coperchio del vano batterie sulla parte posteriore del telecomando:
premere leggermente “ ” nella direzione della freccia e far scorrere il coperchio.
• Inserire le batterie: accertarsi di allineare correttamente le polarità.
• Richiudere nuovamente il coperchio del vano batterie.
• Indicazione della corretta esecuzione dell’operazione: se dopo aver premuto il tasto ON/OFF, il display del telecomando
lampeggia, togliere e inserire di nuovo le batterie dopo 6 minuti.
Note:
•Una visualizzazione completa o non chiara sul display del telecomando indica che le batterie si stanno scaricando e che quindi
devono essere sostituite.
•Utilizzare batterie nuove dello stesso tipo.
• Se dopo aver sostituito le batterie, il telecomando non funziona normalmente o non funziona per niente, premere il tasto RESET
con un oggetto appuntito.
• Rimuovere le batterie se l’apparecchio non viene utilizzato per lungo tempo. Qualora il display riportasse ugualmente delle
indicazioni dopo la rimozione delle batterie, è sufficiente premere il tasto RESET con un oggetto appuntito.
•Dopo la sostituzione delle batterie, il telecomando è automaticamente impostato nel seguente modo: modalità Auto, temperatura
disattiva, Timer disattivo, velocità ventilatore Auto.
Impostazione dell'orologio
Quando l’apparecchio viene avviato per la prima volta e dopo aver sostituito le batterie del
telecomando, l’orologio dovrebbe essere impostato come segue:
1. Premere il tasto CLOCK, sul display apparirà la scritta lampeggiante “AM” o “PM”.
2. Premere o per regolare l’ora esatta. Ad ogni pressione del tasto, l’ora aumenterà o
diminuirà di un minuto. Se il tasto viene tenuto premuto, l’ora cambierà rapidamente.
3. Per confermare l’ora predisposta, premere il tasto SET. “AM” e “PM” smetteranno di lampeggiare,
mentre l’orologio inizierà a funzionare. (AM si riferisce alla mattina e PM al pomeriggio).
Page 50

5
(1) Avvio del climatizzatore
Premere il tasto ON/OFF sul telecomando, il climatizzatore si
avvia. Sul display a cristalli liquidi appare lo stato di
funzionamento precedente (eccettuata la modalità Timer).
L'indicatore luminoso Power sull'unità interna si accende.
(2) Selezione della modalità operativa
Premere il tasto MODE; ad ogni pressione, la modalità
operativa varia come segue:
Arrestare il display sul simbolo della modalità desiderata.
(3) Impostazione della temperatura
Premere gli appositi tasti TEMP.
La temperatura indicata aumenta di 1°C ad ogni pressione.
Se il tasto viene tenuto premuto, la temperatura impostata
aumenterà rapidamente.
La temperatura indicata diminuisce di 1°C ad ogni
pressione. Se il tasto viene tenuto premuto, la temperatura
impostata diminuirà rapidamente.
Selezionare la temperatura desiderata.
(4) Selezione della velocità del ventilatore
Premere il tasto FAN; ad ogni pressione, la velocità del
ventilatore varia come segue:
Il climatizzatore funzionerà con la velocità del flusso d'aria
selezionata. Quando FAN è impostato su “AUTO”, il
climatizzatore regola automaticamente la velocità del
ventilatore in base alla temperatura ambiente.
(5) Arresto del climatizzatore
Premere il tasto ON/OFF, il climatizzatore si arresta. Tutti gli
indicatori luminosi sull'unità interna si spengono. I deflettori si
chiudono automaticamente.
La funzione raffreddamento inizia
quando la temperatura ambiente
è più alta di 2°C rispetto a quella
impostata.
Al raggiungimento della temperatura
impostata l’unità funzionerà in DRY deumidificazione.
Debole flusso d’aria.
Temperatura
impostata
Temperatura
impostata +2°C
Funzionamento Raffreddamento, Deumidificazione, Riscaldamento
Note:
• In modalità Deumidificazione, quando la temperatura ambiente supera di 2°C la temperatura impostata, l’unità inizia a funzionare a
intermittenza in modalità Raffreddamento con velocità del ventilatore bassa, indipendentemente dalla velocità del ventilatore
impostata.
• In modalità Riscaldamento, l’aria calda viene emessa solo dopo un breve periodo di tempo per evitare l’effetto “cold-draft” (aria
fredda).
• Il telecomando è in grado di memorizzare l'impostazione di ciascuna modalità operativa. Semplicemente selezionare la modalità
operativa desiderata e il climatizzatore si avvierà con l'impostazione della volta precedente (la modalità Timer deve essere
reimpostata).
AUTO RAFFREDDAMENTO DEUMIDIFICAZIONE RISCALDAMENTO VENTILAZIONE
BASSA MEDIA ALTA AUTO
Page 51

6
Funzionamento AUTO, Ventilazione
(1) Avvio del climatizzatore
Premere il tasto ON/OFF sul telecomando, il climatizzatore si
avvia. Sul display a cristalli liquidi appare lo stato di
funzionamento precedente (eccettuata la modalità Timer).
L'indicatore luminoso Power sull'unità interna si accende.
(2) Selezione della modalità operativa
Premere il tasto MODE; ad ogni pressione, la modalità
operativa varia come segue:
Arrestare il display sul simbolo della modalità Auto o
Ventilazione. In modalità AUTO, il climatizzatore seleziona
automaticamente la modalità operativa più appropriata a
seconda della temperatura ambiente.
(3) Selezione della velocità del ventilatore
In modalità Ventilazione, premere il tasto FAN; ad ogni
pressione, la velocità del ventilatore varia come segue:
Il climatizzatore funzionerà con la velocità del flusso d'aria
selezionata.
(4) Arresto del climatizzatore
Premere il tasto ON/OFF, il climatizzatore si arresta. Tutti gli
indicatori luminosi sull'unità interna si spengono. I deflettori si
chiudono automaticamente.
Note:
•In modalità Ventilazione, il funzionamento AUTO FAN e la modalità Sleep non sono disponibili. Inoltre, non è possibile impostare la
temperatura ambiente.
• Il telecomando è in grado di memorizzare l'impostazione di ciascuna modalità operativa. Semplicemente selezionare la modalità
operativa desiderata e il climatizzatore si avvierà con l'impostazione della volta precedente (la modalità Timer deve essere
reimpostata).
AUTO RAFFREDDAMENTO DEUMIDIFICAZIONE RISCALDAMENTO VENTILAZIONE
BASSA MEDIA ALTA
Page 52

7
Regolazione della direzione flusso d’aria
Avvertenze:
•È consigliabile non mantenere l’aletta verticale orientata verso il basso per lungo tempo nella modalità Raffreddamento o
Deumidificazione, altrimenti potrebbe formarsi dell’acqua dovuta alla condensa.
• Quando il tasso di umidità è elevato, si può formare della condensa in corrispondenza della bocca di ventilazione se tutte le alette
orizzontali sono regolate verso sinistra o destra.
Suggerimenti:
• Dato che l’aria fredda scende verso il basso nella modalità Raffreddamento, è consigliabile regolare orizzontalmente il flusso
dell’aria per una migliore circolazione.
• Dato che l’aria calda sale verso l’alto nella modalità Riscaldamento, è consigliabile regolare verso il basso il flusso dell’aria per una
migliore circolazione.
• Fare attenzione a non prendere freddo quando l’aria fredda scorre verso il basso.
• D’estate è dannoso per la salute passare dentro e fuori da luoghi dove la differenza della temperatura è superiore a 7°C.
• Una differenza di temperatura di 3-5°C è sufficiente ad allontanare il senso di stanchezza. Inoltre, ciò riduce il carico ed il consumo
elettrico dell’apparecchio. Quindi nella modalità Raffreddamento è consigliabile impostare una differenza di temperatura di 3-5°C
tra la temperatura interna e quella esterna.
Funzione SWING
Dopo aver selezionato la modalità operativa, l’aletta verticale si aprirà automaticamente in base alla modalità operativa selezionata.
Verso l’alto e basso (tramite telecomando)
Premere il tasto SWING, l’aletta verticale oscillerà all’interno
della gamma indicata in figura. Premere nuovamente il tasto
SWING per bloccarla in una posizione fissa.
Verso sinistra e destra (manuale)
Spostare l’aletta orizzontale per regolare il flusso verso destra o
verso sinistra. Vedi figura sottostante.
Page 53

8
Funzione notturna SLEEP
Premendo il tasto SLEEP prima di andare a dormire, il climatizzatore funzionerà in
modo da rendere il vostro sonno più confortevole nella modalità selezionata.
Utilizzo della funzione Sleep
Dopo aver avviato l’unità, selezionare la modalità operativa desiderata e premere il
tasto SLEEP assicurandosi di aver regolato l’orologio in modo corretto.
Funzionamento in modalità Raffreddamento e Deumidificazione
Un'ora dopo l’avvio della funzione Sleep, la temperatura ambiente aumenterà di
1°C rispetto alla temperatura impostata. Dopo un'altra ora, la temperatura ambiente
aumenterà di un altro grado. Mantenendo questa stessa temperatura, l’unità
funzionerà per altre sei ore e poi si arresterà automaticamente.
La temperatura ambiente è più alta rispetto a quella impostata in modo che non sia
troppo freddo durante la notte.
Funzionamento in modalità Riscaldamento
Un'ora dopo l’avvio della funzione Sleep, la temperatura ambiente si abbasserà di
2°C rispetto alla temperatura impostata. Dopo un'altra ora, la temperatura ambiente
si abbasserà di altri due gradi. Dopo altre 3 ore, la temperatura ambiente si alzerà di
1°C. Mantenendo questa stessa temperatura, l’unità funzionerà per altre tre ore e
poi si arresterà automaticamente.
La temperatura ambiente è più bassa rispetto a quella impostata in modo che non
sia troppo caldo durante la notte.
Funzionamento in modalità Auto
L’ unità funzionerà con la funzione Sleep in base alla modalità operativa scelta
automaticamente dal sistema.
Funzionamento in modalità Ventilazione
La funzione Sleep non è disponibile.
Inizio funzione Sleep
Fine funzione Sleep
Temperatura
impostata
Arresto
circa 6 ore
1 ora
1 ora
MODALITÀ COOL, DRY
aumento di 1°C
aumento di 1°C
Inizio funzione Sleep
Fine funzione Sleep
Temperatura impostata
Arresto
MODALITÀ HEAT
1 ora
1 ora
3 ore
circa 3 ore
aumento di 1°C
diminuzione di 2°C
diminuzione di 2°C
Page 54

9
Modalità TIMER ON - TIMER OFF
Regolare correttamente l’orologio prima di utilizzare la modalità
Timer. E' possibile far avviare o arrestare automaticamente il
climatizzatore prima di alzarsi la mattina, o prima di rientrare a
casa da fuori, o dopo essere andati a letto la sera.
(1) Avvio dell’unità e selezione della modalità operativa
desiderata
Dopo aver avviato il climatizzatore, il display a cristalli liquidi
visualizzerà la modalità operativa impostata. L'indicatore
luminoso Power sull'unità interna si accende.
(2) Selezione della modalità Timer
Premere il tasto TIMER; ad ogni pressione, la modalità Timer
varia come segue:
Selezionare la modalità Timer desiderata (TIMER ON oppure
TIMER OFF), o lampeggiano sul display.
(3) Impostazione del timer
Premere i tasti HOUR per l’impostazione dell’orario
Ad ogni pressione, l’ora indicata aumenta di 10 minuti. Se il
tasto viene tenuto premuto l’ora cambierà rapidamente.
Ad ogni pressione, l’ora indicata diminuisce di 10 minuti. Se
il tasto viene tenuto premuto l’ora cambierà rapidamente.
L’ora verrà visualizzata sul display a cristalli liquidi. E’ possibile
impostare il Timer nell’arco di 24 ore. AM si riferisce alla
mattina e PM al pomeriggio.
(4) Conferma dell’impostazione
Dopo aver impostato correttamente l’orario, premere il tasto
SET per confermare.
o sul telecomando smettono di lampeggiare.
Ora visualizzata: l’unità si avvierà (TIMER ON) o si arresterà
(TIMER OFF) all’ora x e x minuti. L'indicatore luminoso Timer
sull'unità interna si accende.
(5) Disattivazione del Timer
Premere il tasto TIMER diverse volte finché la modalità Timer
scompare dal display.
Suggerimenti:
• Dopo aver sostituito le batterie, o in caso di interruzione di corrente, è necessario reimpostare il Timer.
• Il telecomando possiede una funzione memoria, quindi, quando si utilizza la modalità Timer la volta successiva, dopo aver
selezionato la modalità operativa è sufficiente premere il tasto TIMER se l’impostazione del Timer è uguale alla volta precedente.
VUOTO
Page 55

10
Modalità TIMER ON/OFF
Regolare correttamente l’orologio prima di utilizzare la modalità
Timer.
(1) Avvio dell’unità e selezione della modalità operativa
desiderata
Dopo aver avviato il climatizzatore, il display a cristalli liquidi
visualizzerà la modalità operativa impostata. L'indicatore
luminoso Power sull'unità interna si accende.
(2) Selezione della modalità Timer
Premere il tasto TIMER; ad ogni pressione, la modalità Timer
varia come segue:
Selezionare la modalità Timer desiderata (TIMER ON-OFF),
lampeggia sul display.
(3) Impostazione dell’orario per TIMER ON
Premere i tasti HOUR per l’impostazione dell’orario
Ad ogni pressione, l’ora indicata aumenta di 10 minuti. Se il
tasto viene tenuto premuto l’ora cambierà rapidamente.
Ad ogni pressione, l’ora indicata diminuisce di 10 minuti.
Se il tasto viene tenuto premuto l’ora cambierà
rapidamente.
L’ora verrà visualizzata sul display a cristalli liquidi. E’ possibile
impostare il Timer nell’arco di 24 ore. AM si riferisce alla
mattina e PM al pomeriggio.
(4) Conferma dell’impostazione per TIMER ON
Dopo aver impostato correttamente l’orario, premere il tasto
TIMER per confermare.
sul telecomando smette di lampeggiare, allo stesso
tempo inizia a lampeggiare.
Ora visualizzata: l’unità si avvierà all’ora x e x minuti.
(5) Impostazione dell’orario per TIMER OFF
Seguire la stessa procedura che per “Impostazione dell’orario
per TIMER ON”.
(6) Conferma dell’impostazione per TIMER OFF
Dopo aver impostato correttamente l’orario, premere il tasto
SET per confermare.
sul telecomando smette di lampeggiare.
Ora visualizzata: l’unità si arresterà all’ora x e x minuti.
Disattivazione del Timer
Premere il tasto TIMER diverse volte finché la modalità Timer
scompare dal display.
VUOTO
Page 56

11
Funzione HEALTH
(1) Avvio del climatizzatore
Premere il tasto ON/OFF sul telecomando, il climatizzatore si
avvia. Selezionare la modalità operativa desiderata.
(2) Funzione Health
Premere il tasto HEALTH, sul display del telecomando appare
" "; lo ionizzatore si avvia e la funzione Health è attivata.
(3) Disattivazione funzione Health
Premere nuovamente il tasto HEALTH, il simbolo della funzione
scompare e la funzione è quindi disattivata.
Breve presentazione della funzione HEALTH
Lo ionizzatore può generare una grande quantità di ioni negativi
per bilanciare efficacemente la quantità di ioni positivi e ioni
negativi nell’aria, neutralizzare i batteri e accelerare il deposito di
polveri, e quindi purificare l’aria dell'ambiente.
Funzione Auto-restart
Grazie alla funzione Auto-restart, nel caso si verifichi un’interruzione di corrente mentre il climatizzatore è in funzione, l’apparecchio
riprenderà automaticamente a funzionare con le stesse impostazioni non appena torna la corrente.
Note:
Quando si verifica un’interruzione di corrente mentre il climatizzatore è in funzione, se il climatizzatore non verrà utilizzato per un lungo
periodo di tempo, si consiglia di staccare l’alimentazione per evitare che il climatizzatore riprenda a funzionare quando torna la
corrente, oppure premere il tasto ON/OFF quando torna la corrente.
Page 57

IST HA023 Rev. 00-2004
 Loading...