

Page 1
HSM09RU03/R2(DB)
HSM09RU03/R2(DB)
2HUM18R03/R2(DB)
HSM09RU03/R2(DB)
HSM12RU03/R2(DB)
2HUM18R03/R2(DB)
No, 0010503373
Page 2
Contents
Cautions
Parts and functions
Operation
Maintenance
Trouble shooting
2
6
9
22
27
Page 3
Cautions
Disposal of the old air conditioner
Before disposing an old air conditioner that
goes out of use, please make sure it's inoperative and safe. Unplug the air conditioner
in order to avoid the risk of child entrapment.
It must be noticed that air conditioner system
contains refrigerants, which require specialized waste disposal. The valuable materials
contained in an air conditioner can be recycled
.Contact your local waste disposal center for
proper disposal of an old air conditioner and
contact your local authority or your dealer if
you have any question. Please ensure that
the pipework of your air conditioner does not
get damagedprior to being picked up by the
relevant waste disposal center, and contribute
to environmental awareness by insisting on an
appropriate, anti-pollution method of disposal.
Safety Instructions and Warnings
Before starting the air conditioner, read the
information given in the User's Guide carefully. The User's Guide contains very important observations relating to the assembly,
operation and maintenance of the air
conditioner.
The manufacturer does not accept responsibility for any damages that may arise due
to non-observation of the following
instruction.
Damaged air conditioners are not to be
put into operation. In case of doubt, consult
your supplier.
Use of the air conditioner is to be carried
out in strict compliance with the relative
instructions set forth in the User's Guide.
Disposal of the packaging of your
new air conditioner
All the packaging materials employed in the
package of your new air conditioner may be
disposed without any danger to the
environment.
The cardboard box may be broken or cut into
smaller pieces and given to a waste paper
disposal service. The wrapping bag made of
polyethylene and the polyethylene foam pads
contain no fluorochloric hydrocarbon.
All these valuable materials may be taken to
a waste collecting center and used again after
adequate recycling.
Consult your local authorities for the name
and address of the waste materials collecting
centers and waste paper disposal services
nearest to your house.
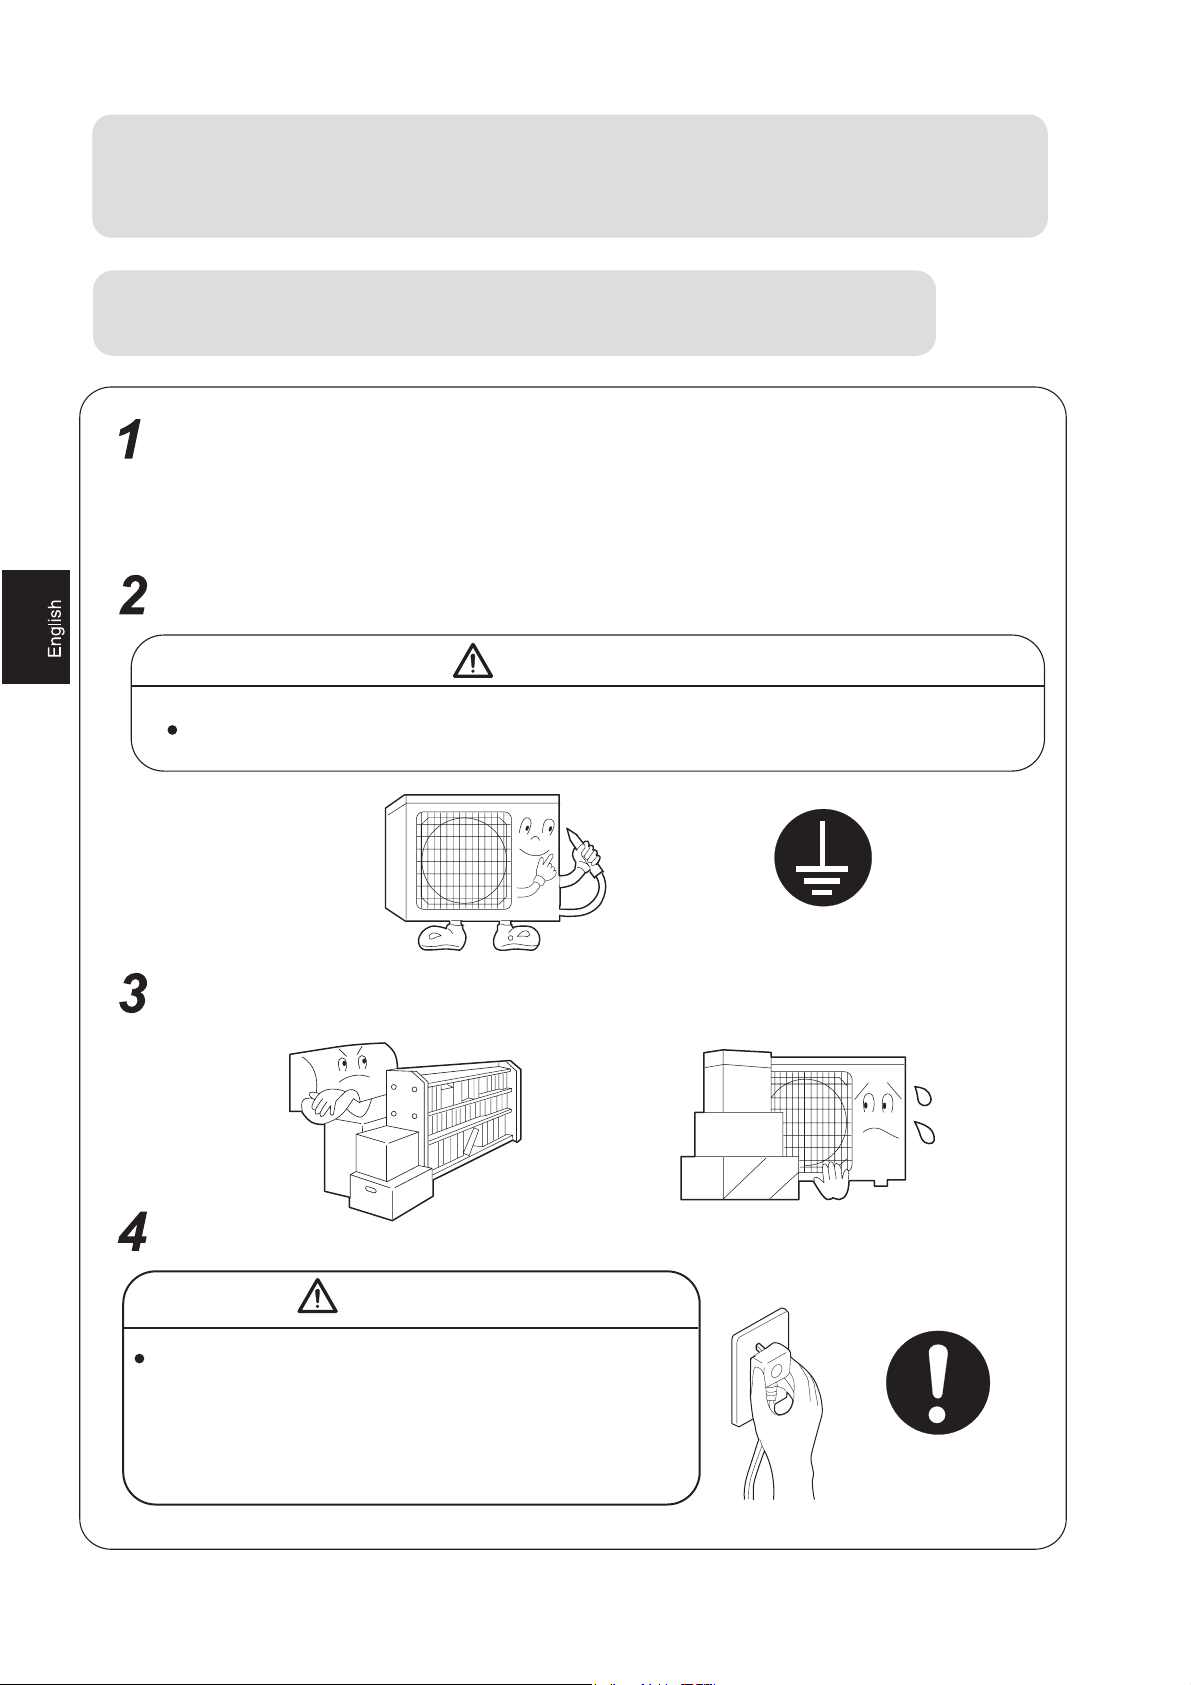
Installation shall be done by professional
people, don't install unit by yourself.
For the purpose of the safety,the air conditioner must be properly grounded in accordance with specifications.
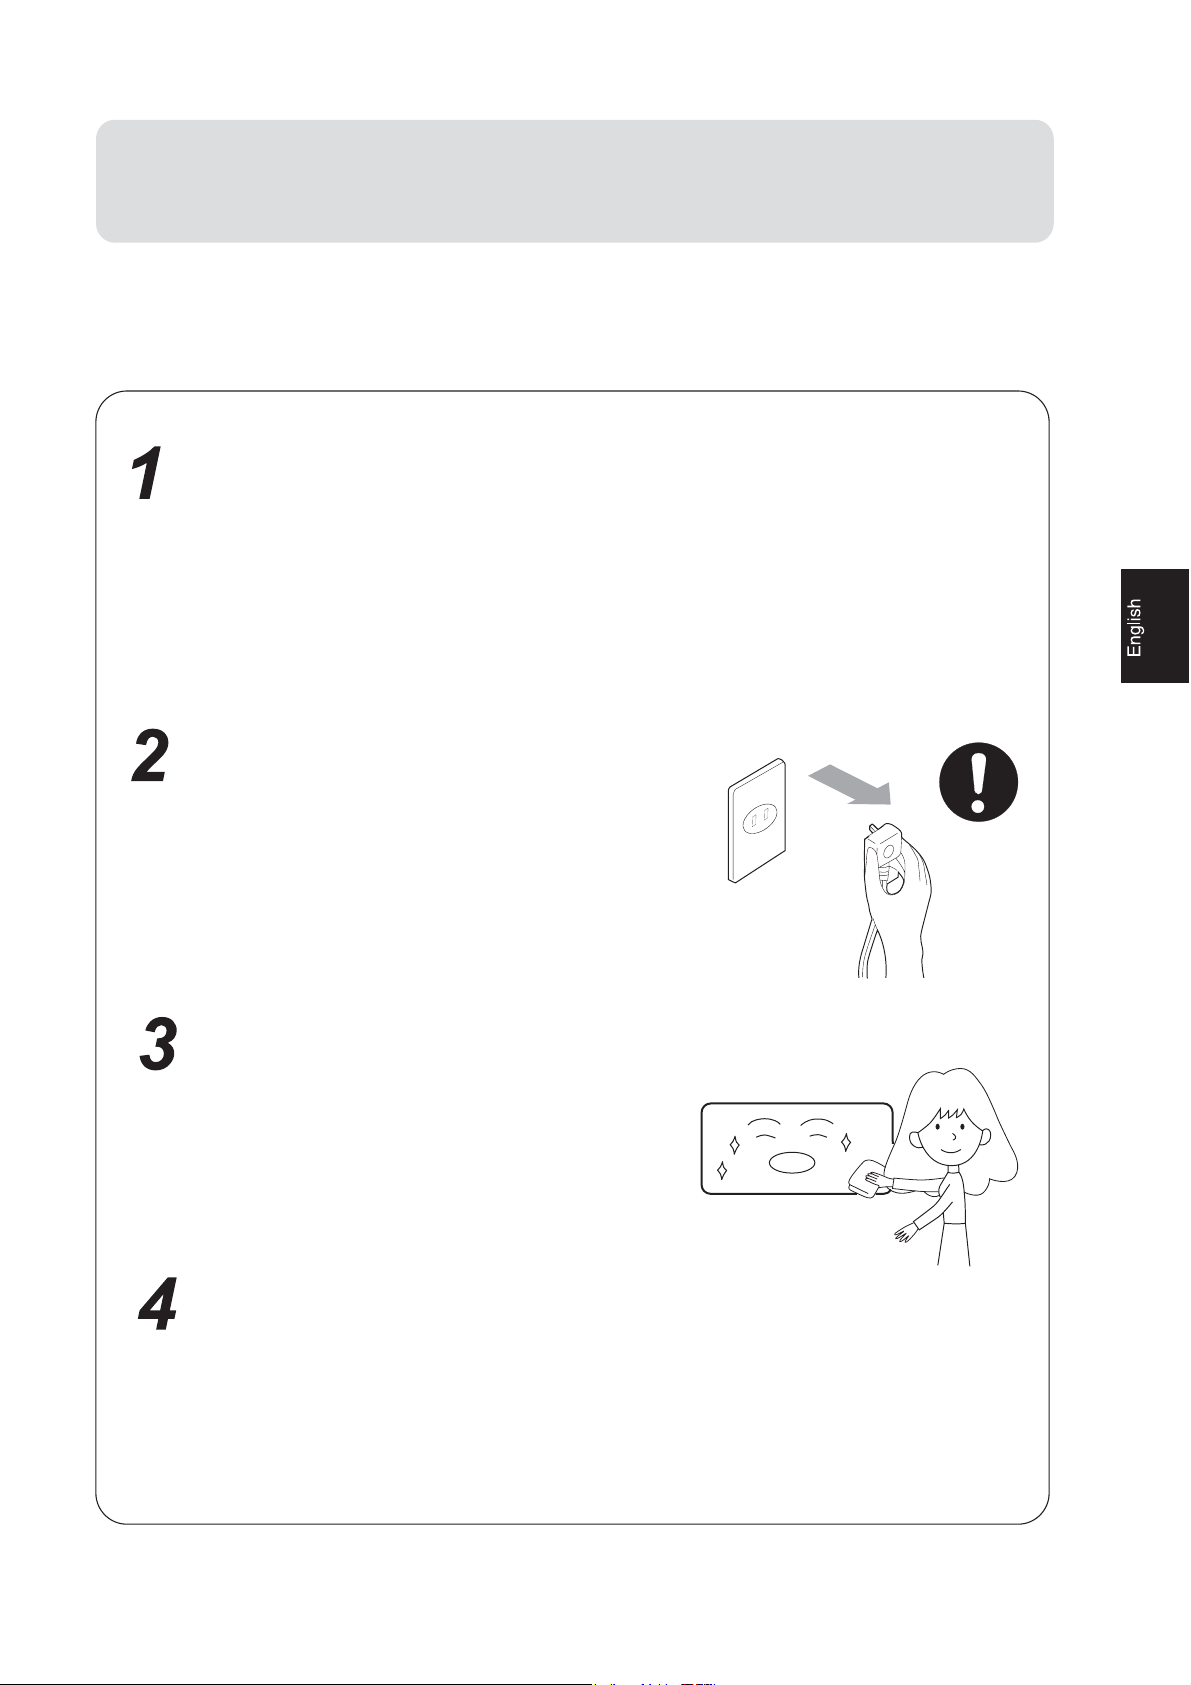
Always remember to unplug the air
conditioner before openning inlet grill. Never
unplug your air conditioner by pulling on
the power cord. Always grip plug firmly and
pull straight out from the outlet.
All electrical repairs must be carried out
by qualified electricians. Inadequate repairs
may result in a major source of danger for
the user of the air conditioner.
Do not damage any parts of the air
conditioner that carry refrigerant by piercing
or performating the air conditioner's tubes
with sharp or pointed items, crushing or
twisting any tubes, or scraping the coatings
off the surfaces. If the refrigerant spurts
out and gets into eyes, it may result in
serious eye injuries.
2
Page 4
Cautions
Do not obstruct or cover the ventilation
grille of the air conditoner.Do not put fingers
or any other things into the inlet/outlet and
swing louver.
Do not allow children to play with the air
conditioner.In no case should children be
allowed to sit on the outdoor unit.
Specifications
The refrigerating circuit is leak-proof.
The machine is adaptive in following
situation
1.Applicable ambient temperature range:
o
32
18
43
18
27
15
24
-7
o
C/23oC
o
C/14oC
o
C/26oC
o
C
o
C
o
C
o
C/18oC
C/-8oC
Cooling
Heating
Indoor
Outdoor
Indoor
Outdoor
Maximum:D.B/W.B
Minimum:D.B/W.B
Maximum:D.B/W.B
Minimum:D.B
Maximum:D.B
Minimum:D.B
Maximum:D.B/W.B
Minimum:D.B/W.B
7. The appliance is not intended for use
by young children or infirm persons
without supervision.
8. Young children should be supervised
to ensure that they do not play with
the applience.
9.Please employ the proper power plug,
which fit into the power supply cord.
10 .The power plug and connecting cable
must have acquired the local attestation.
11.In order to protect the units,please turn
off the A/C first, and at least 30 seconds
later, cutting off the power.
2. If the power supply cord is damaged, it
must be replaced by the manufacturer
or its service agent or a similar qualified
person.
3. If the fuse of indoor unit on PC board is
broken,please change it with the type of
T. 3.15A/ 250V. If the fuse of outdoor
unit is broken,change it with the type of
T.25A/250V
4. The wiring method should be in line with
the local wiring standard.
5. After installation, the power plug should
be easily reached.
6. The waste battery should be disposed
properly.
3
Page 5
Cautions
Safety Instruction
Please read the following Safety Instructions carefully prior to use.
The instructions are classified into two levels, WARNING and CAUTION according to
the seriousness of possible risks and damages as follows. Compliance to the
instructions are strictly required for safety use.
Installation
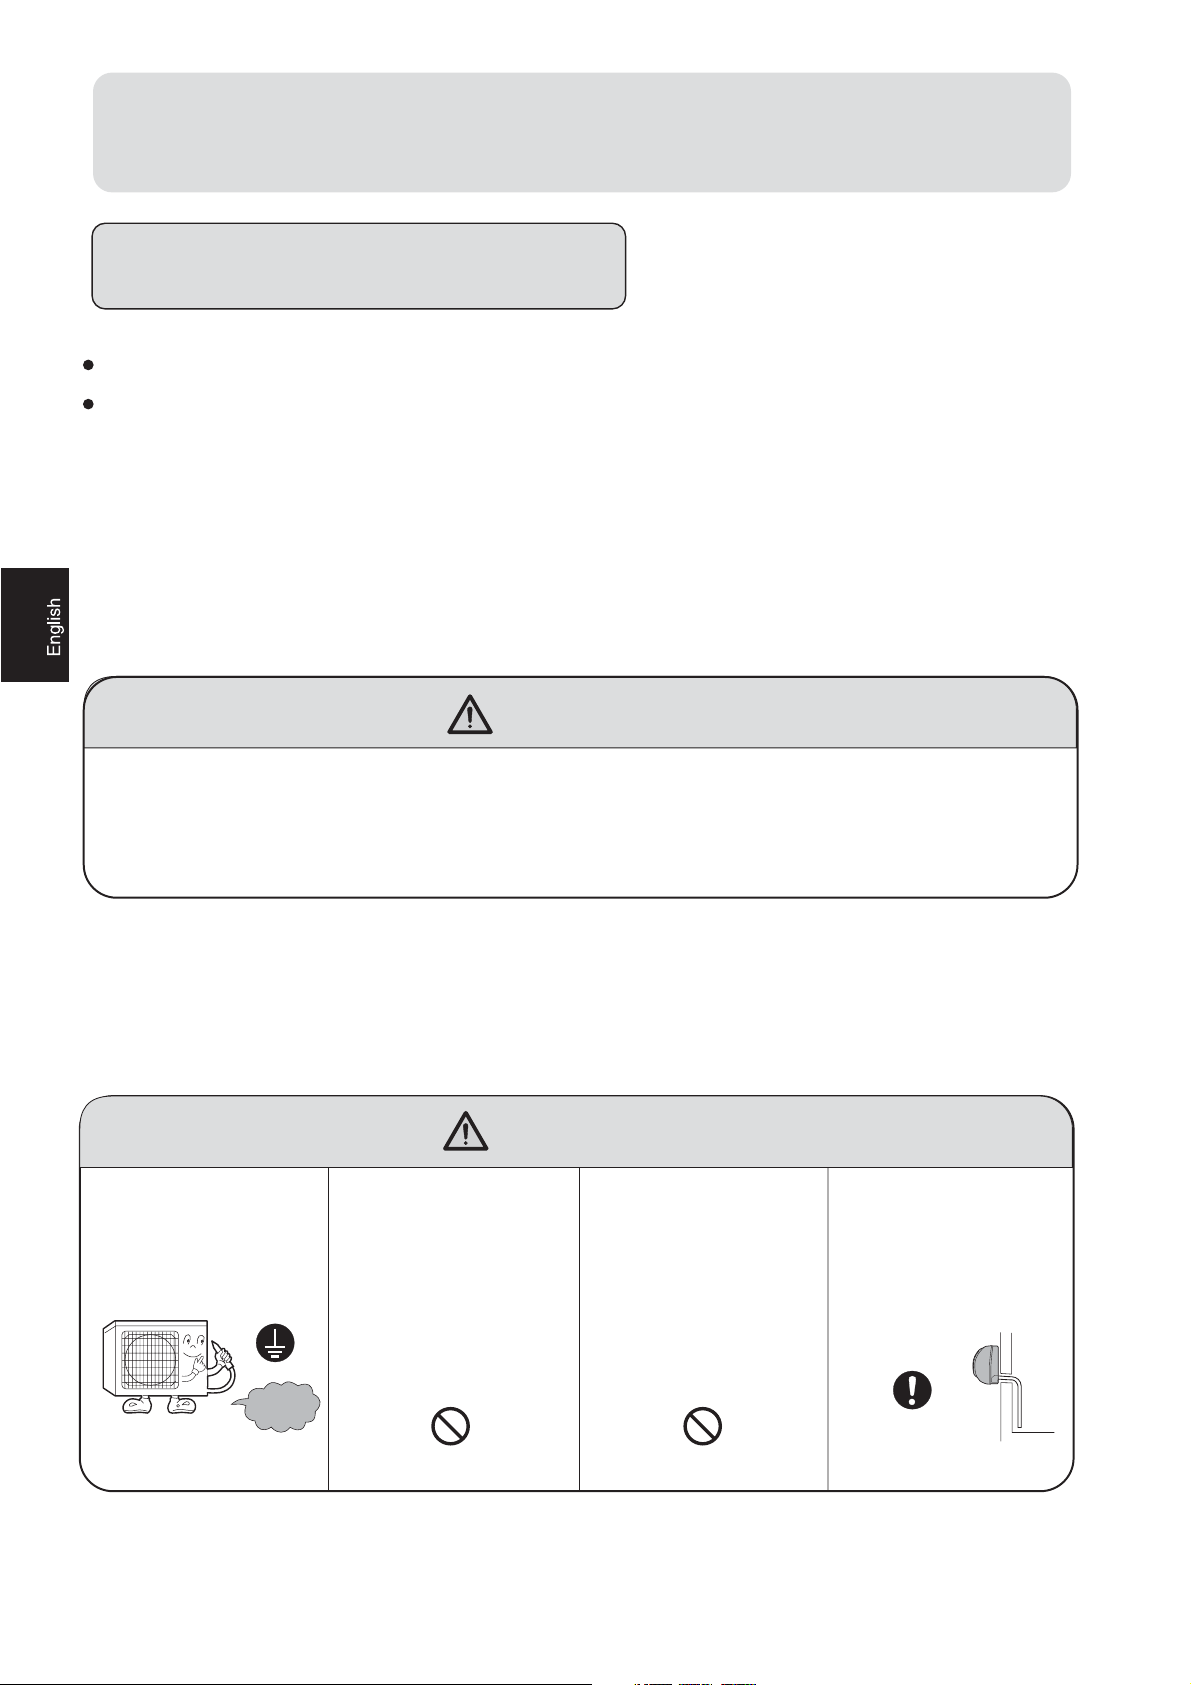
WARNING
Please call Sales/Service Shop for the Installation.
Do not attempt to install the air conditioner by yourself because improper works
may cause electric shock, fire, water leakage.
lnstallation in a inadequate place may cause accidents. Do not install in the following place.
CAUTION
Connect the earth
cable.
Do not install in the
place where there is
any possibility of
inflammable gas
leakage around the
unit.
Do not get the unit
exposed to vapor
or oil steam.
Check proper
installation of the
drainage securely
earthing
PROHIBITION PROHIBITION
4
STRICT
ENFORCEMENT
Page 6
Cautions
When abnormality such as burnt-small found,
immediately stop the operation button and
contact sales shop.
WARNING
Use an exclusive power source with a
circuit breaker
OFF
Connect power supply cord
to the outlet completely
STRICT
ENFORCEMENT
Do not use power supply cord
in a bundle.
PROHIBITION
Do not start or stop the
operation by disconnecting
the power supply cord and so on.
PROHIBITION
STRICT
ENFORCEMENT
Use the proper voltage
STRICT
ENFORCEMENT
Take care not to damage
the power supply cord.
PROHIBITION
Do not channel the air flow directly
at people, especially at infants or
the aged.
PROHIBITION
Do not use power supply cord
extended or connected in halfway
PROHIBITION
Do not insert objects into the air
inlet or outlet.
PROHIBITION
Do not try to repair or reconstruct
by yourself.
Do not use for the purpose of storage of
food, art work, precise equipment,
breeding, or cultivation.
PROHIBITION
Do not install the unit near a fireplace
or other heating apparatus.
PROHIBITION
Do not place animals or plants in
the direct path of the air flow
PROHIBITION
CAUTION
Take fresh air occasionally especially
when gas appliance is running at the
same time.
STRICT
ENFORCEMENT
Check good condition of the
installation stand
PROHIBITION
Do not place any objects on or
climb on the unit.
PROHIBITION
Do not operate the switch with
wet hand.
PROHIBITION
Do not pour water onto the unit
for cleaning
PROHIBITION
Do not place flower vase or water
containers on the top of the unit.
PROHIBITION
5
Page 7
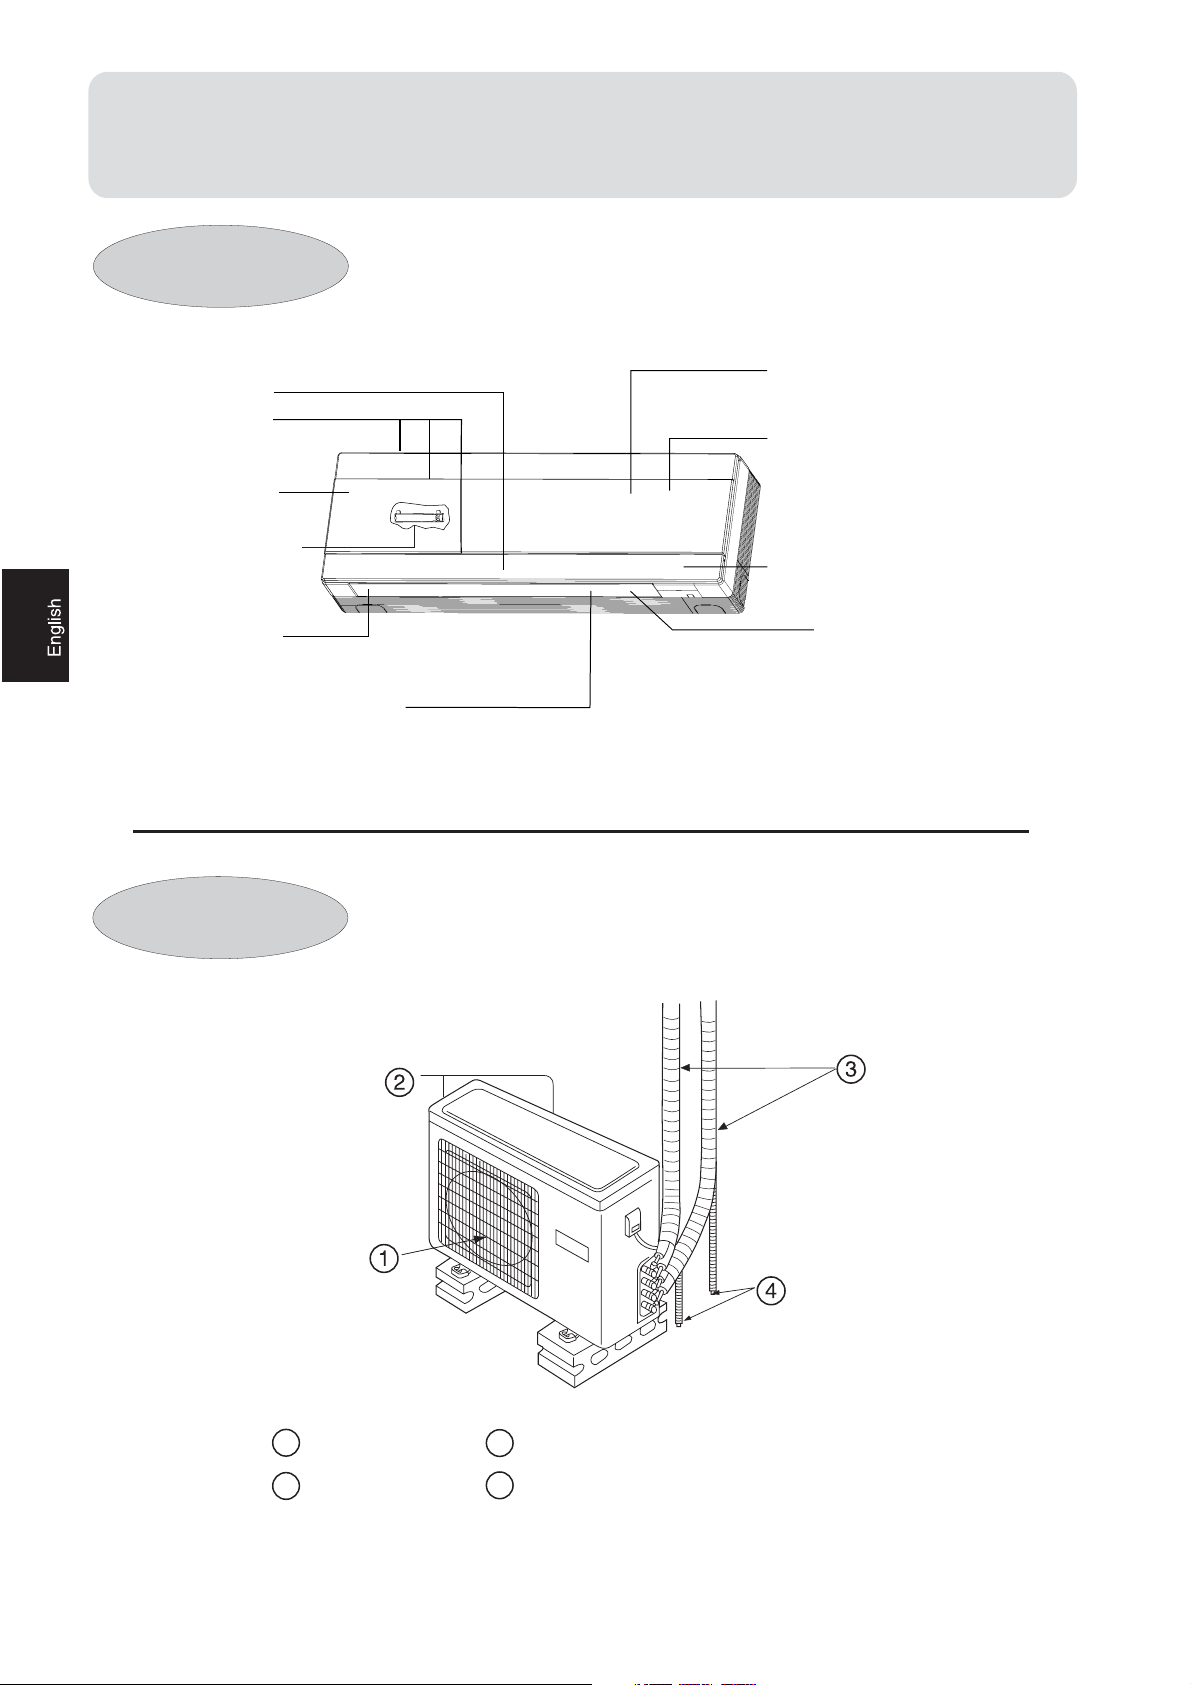
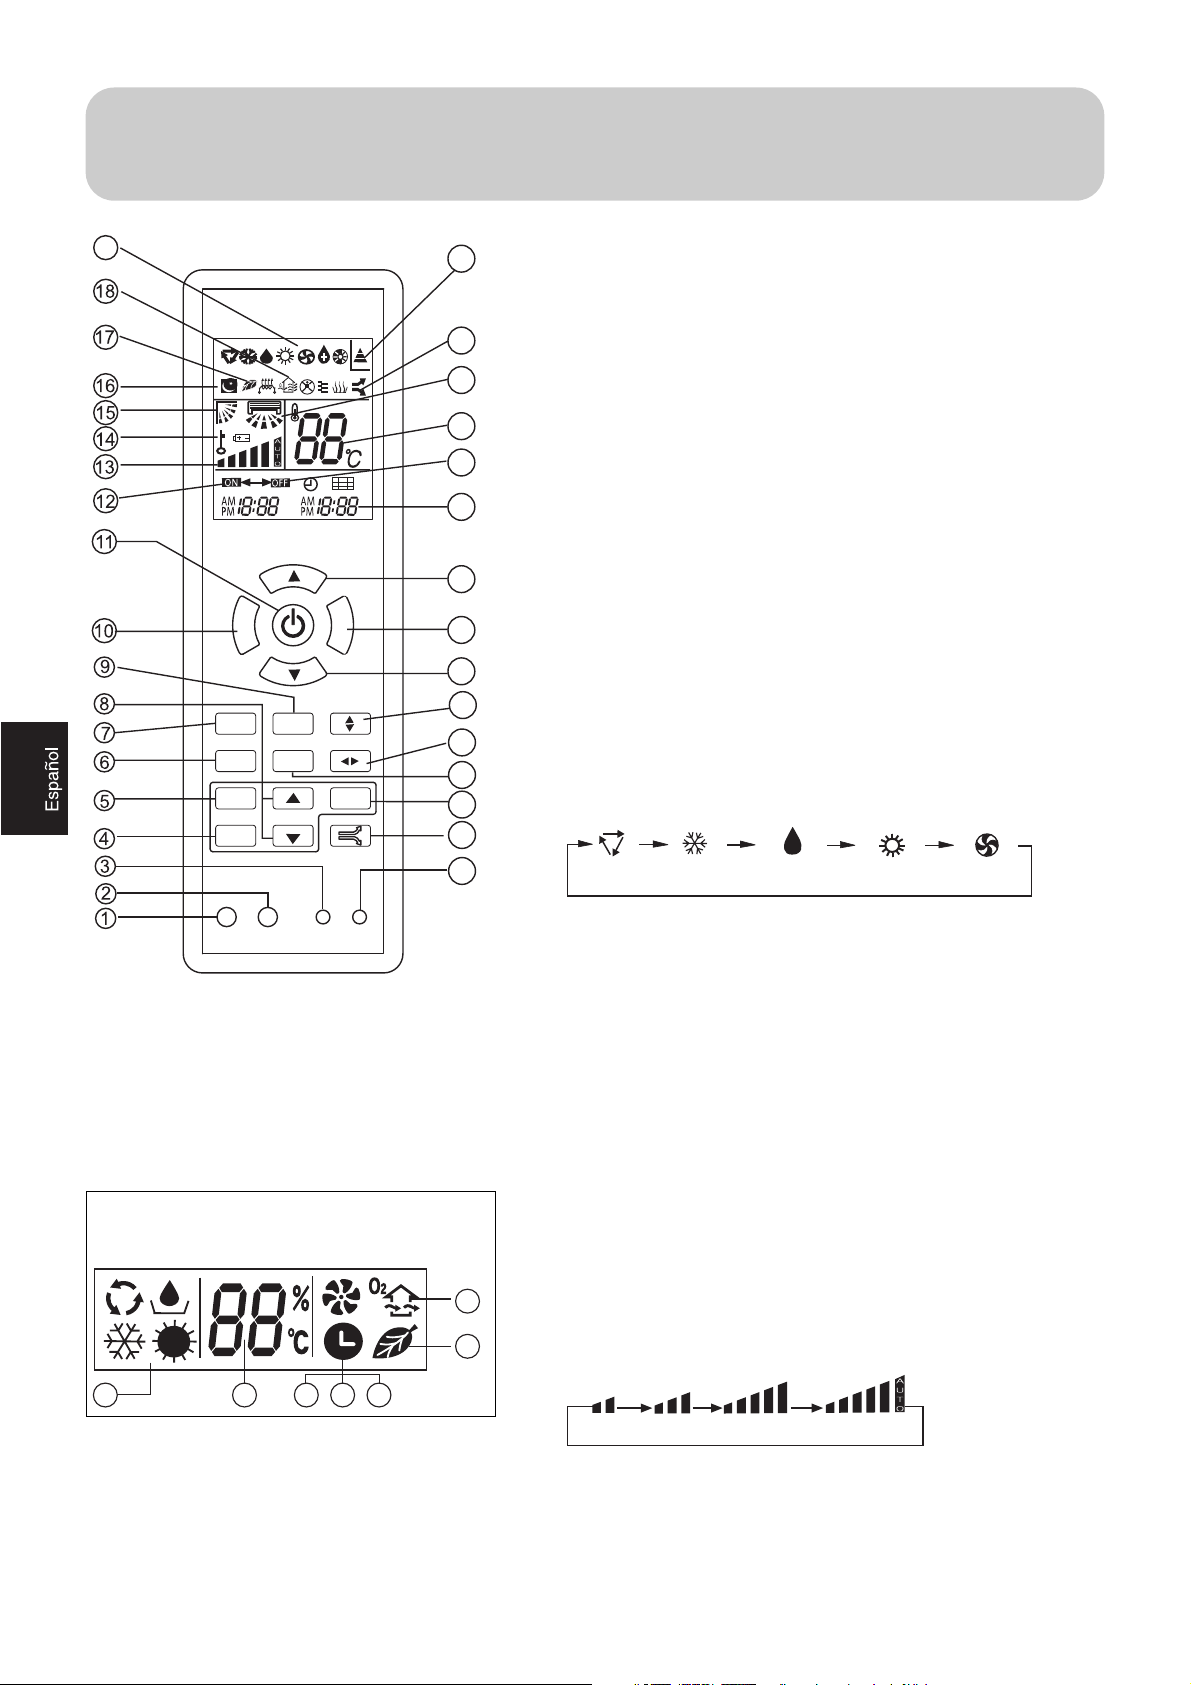
Parts and Functions
Indoor unit
Air Purifying Filter
Outlet
Inlet
Inlet grille
UV light degerming
device (inside)
Air filter(inside)
display board(inside)
(inside)
Anion generator
(inside)
Horizontal louver(inside)
(adjust left and right air flow)
Outdoor unit
Vertical flap
(adjust up and down air flow.
Don't adjust it manually)
1
OUTLET CONNECTING PIPING AND ELECTRICAL WIRING
2
INLET
3
4
DRAIN HOSE
6
Page 8
Parts and Functions
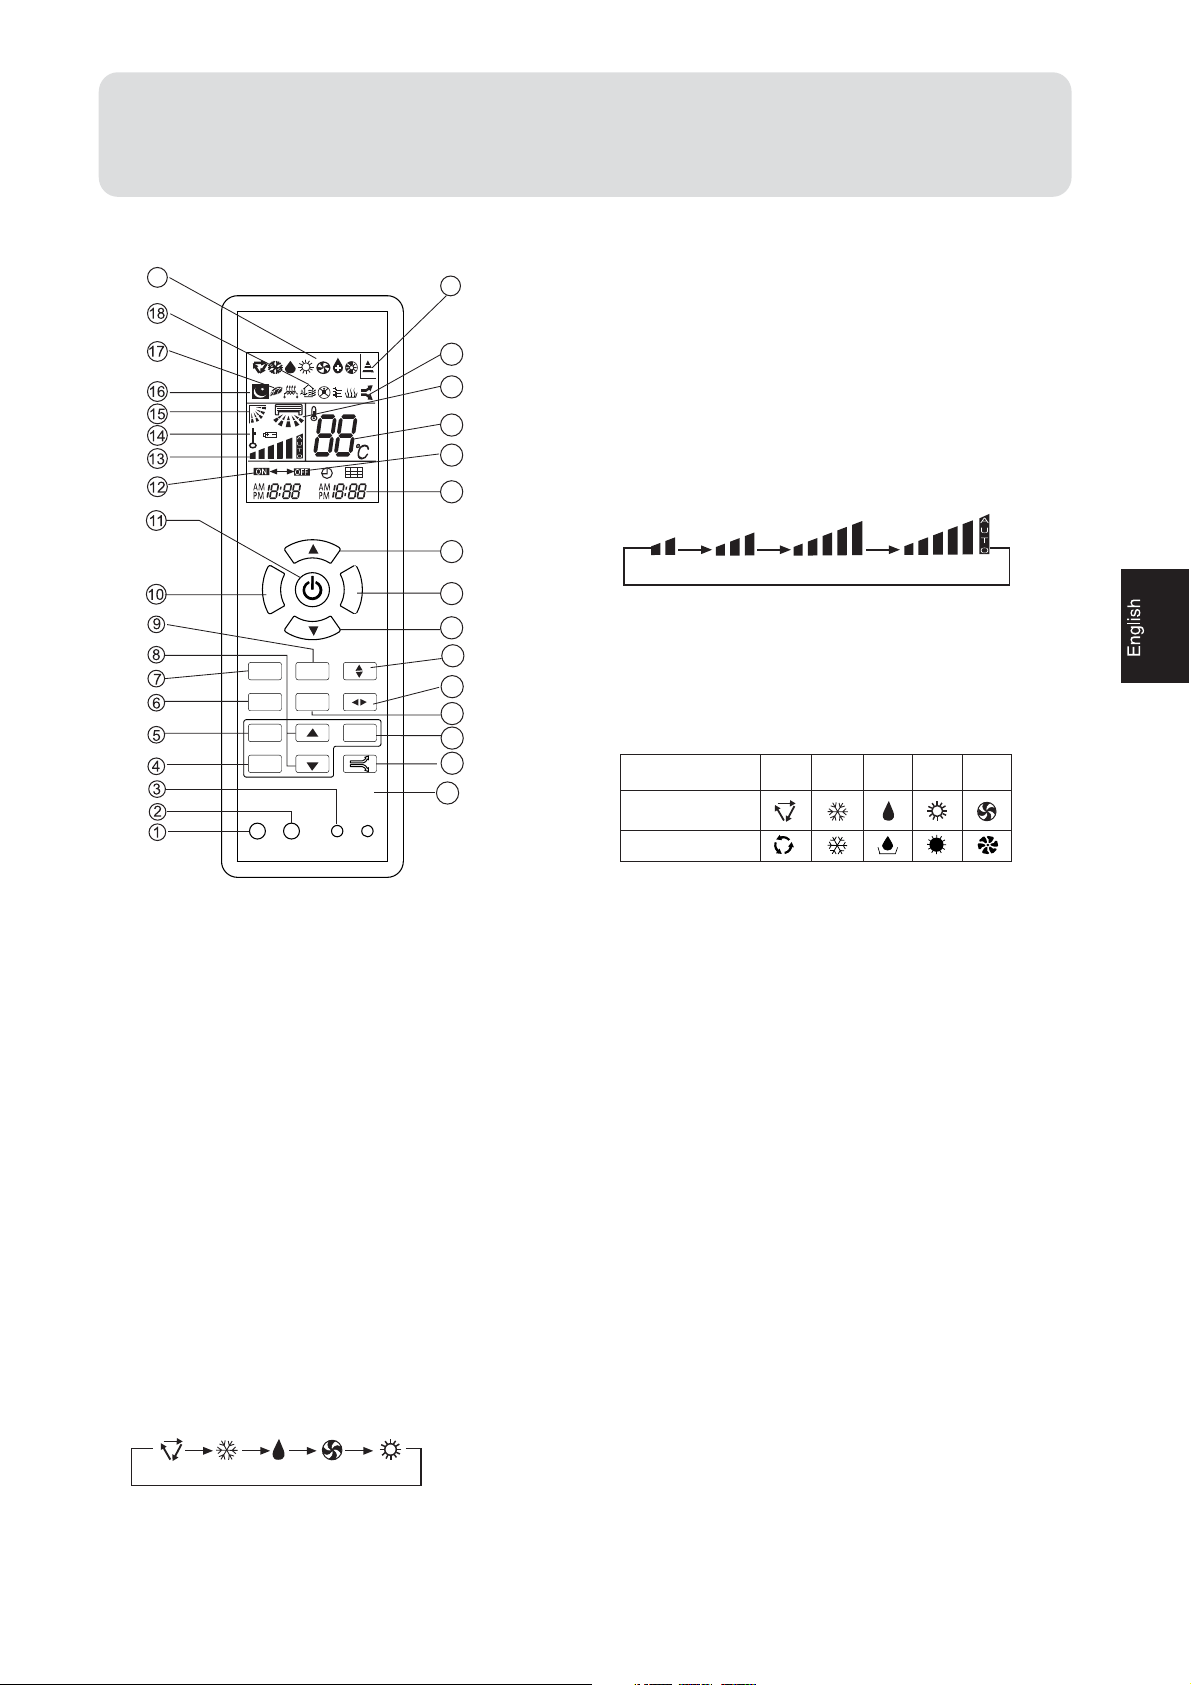
19
TEMP
HEALTH FAN
SWING
H.AIR.
MODE
FRESHSLEEP
CLOCK
TIMER
LOCK RESETLIGHT
SET
CODE
33
20
21
22
23
24
25
26
27
26
29
30
31
32
28
8. HOUR button
Used to set clock and timer setting.
9. HEALTH AIRFLOW button
Used to set the health airflow mode.
10. HEALTH button
Used to set healthy operation.
11. ON/OFF button
Used for unit start and stop.
12. TIMER ON display
13. FAN SPEED display
LOW HI
MED AUTO
14. LOCK display
15. SWING UP/DOWN display
16. SLEEP display
17. HEALTH display
18.FRESH AIR display
19. Operation mode display
Operation mode
Remote controller
Display board
AUTO HEAT FANCOOL DRY
1. LOCK
Used to lock buttons and LCD display. If pressed, the
other buttons will be disabled and the lock condition
display appears. Press it once again, lock will be
canceled and lock condition display disappears.
2.LIGHT button
Control the lightening and extinguishing of
the indoor LED display board.
3.CODE
Used to select CODE A or B with a press,A or B
will be displayed on LCD.
Please select A without special explanation.
4. TIMER button
Used to select TIMER ON, TIMER OFF,
TIMER ON-OFF.
5. CLOCK button
Used to set correct time.
6. SLEEP button
Used to select sleep mode.
7. MODE button
AUTO COOL DRY FAN HEAT
20.Singal sending display
21. POWER/SOFT display
22. Left/right air flow display
23. TEMP display
Remote controller: to display the TEMP. setting.
24. TIMER OFF display
25. CLOCK display
26. TEMP button
Used to select your desired temperature.
27. FAN button
Used to select fan speed: LOW,MED, HI, AUTO.
28. SWING UP/DOWN button
Used to select up or down air sending direction.
29. SWING LEFT/RIGHT button
Used to select left/right air flow.
30.
FRESH
button
Use to set fresh air function.
31. SET button
Used to confirm timer and clock settings.
32. POWER/SOFT button
Use to set power/soft function.
33. RESET
When the remote controller appears abnormal,
use a sharp pointed article to press this button
to reset the remote controller normal.
NOTE: Cooling only unit do not have functions and displays related with heating.
The fresh function is optional.
7
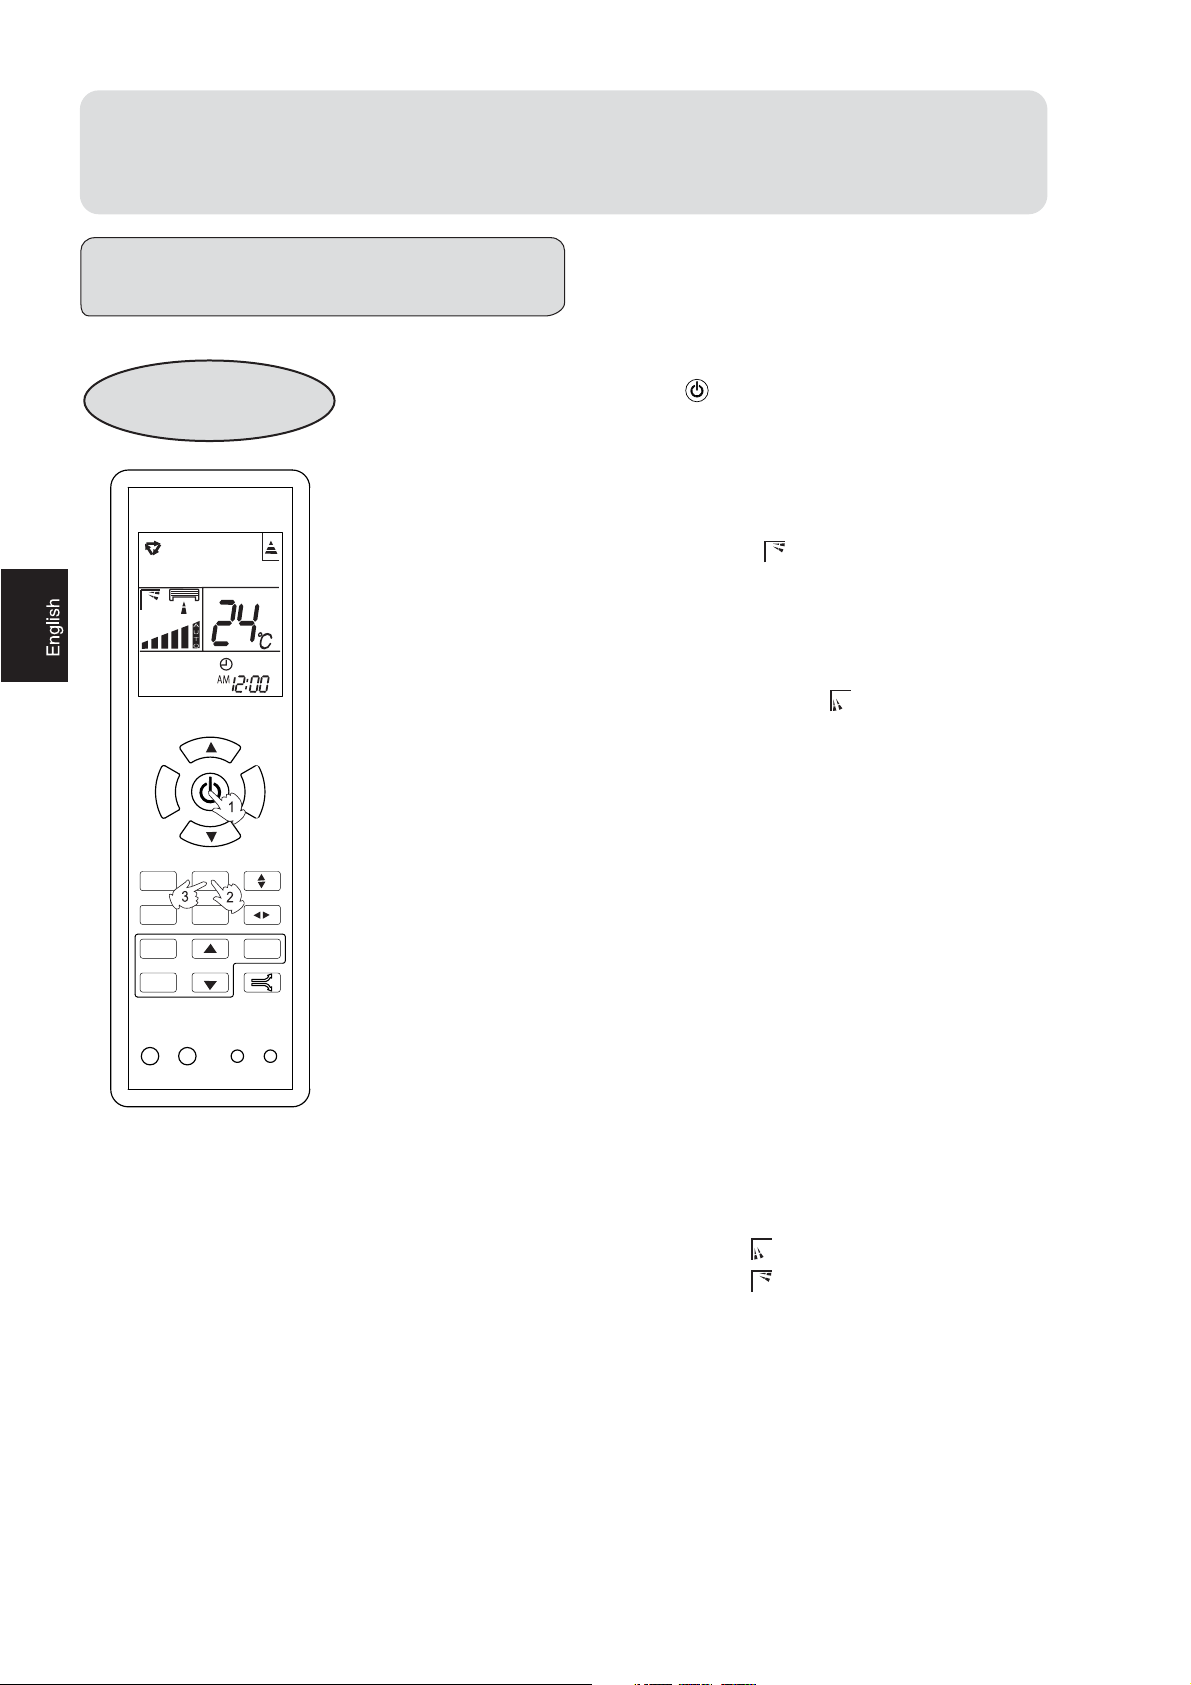
Page 9
Parts and Functions
Clock Set
When unit is started for the first time and after replacing batteries in
remote controller, clock should be adjusted as follows:
1. Press CLOCK button,"AM" or "PM" flashes.
2. Press or to set correct time. Each press will increase or decrease
1 min. If the button is kept depressed, time will change quickly.
3. After time setting is confirmed, press SET, "AM" or "PM" stop flashing,
while clock starts working.
Remote controller's operation
When in use, put the signal transmission head directly to the receiver hole on the indoor unit.
The distance between the signal transmission head and the receiver hole should be within
7m without any obstacle as well.
Don't throw or knock the remoter controller.
When electronic-started type fluorescent lamp or change-over type fluorescent lamp or
wireless telephone is installed in the room, the receiver is apt to be disturbed in receiving
the signals, so the distance to the indoor unit should be shorter.
Loading of the battery
Load the batteries as illustrated right
2 R-03 (7#) batteries
Remove the battery cover:
Slightly press" "area and push down the cover
as illustrated.
Load the battery:
Be sure that the loading is in line with the "+" / "-".
request as illustrated on the bottom of the case.
Put on the cover again.
Confirmation indicator:
After pressing power "
Note:
Full display or unclear display during operation indicates the batteries have been used up.
Please change batteries.
Used two new same-typed batteries when loading.
If the remote controller can't run normally during operation, please remove the batteries and
reload several minutes later.
", if no display, reload the batteries.
Hint:
Remove the batteries in case unit won't be in usage for a long period. If there are any display
after taking-out, just need to press reset key.
8
Page 10
Operation
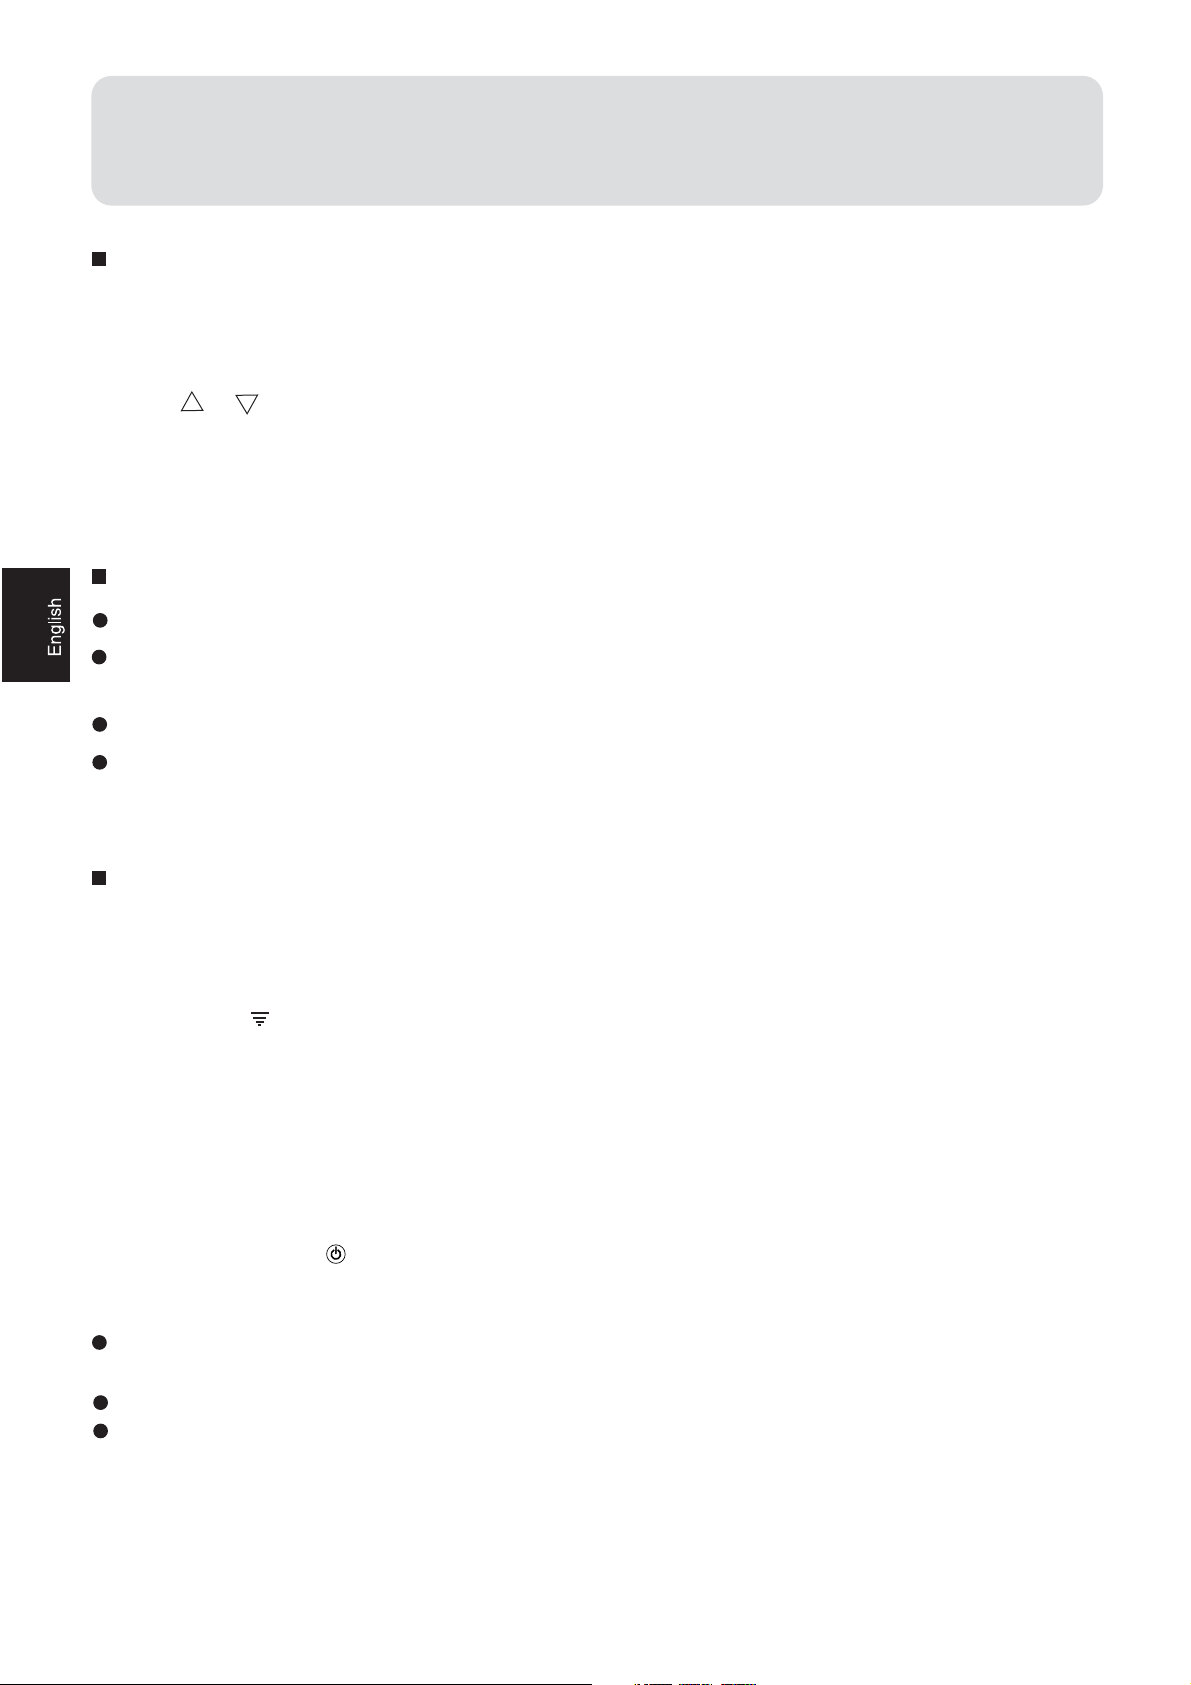
HEALTH operation
1.Unit start
Remote controller
TEMP
Press on/off button (" ") on the remote controller, unit starts.
Health function includes health anion function, UV light
degerming function.
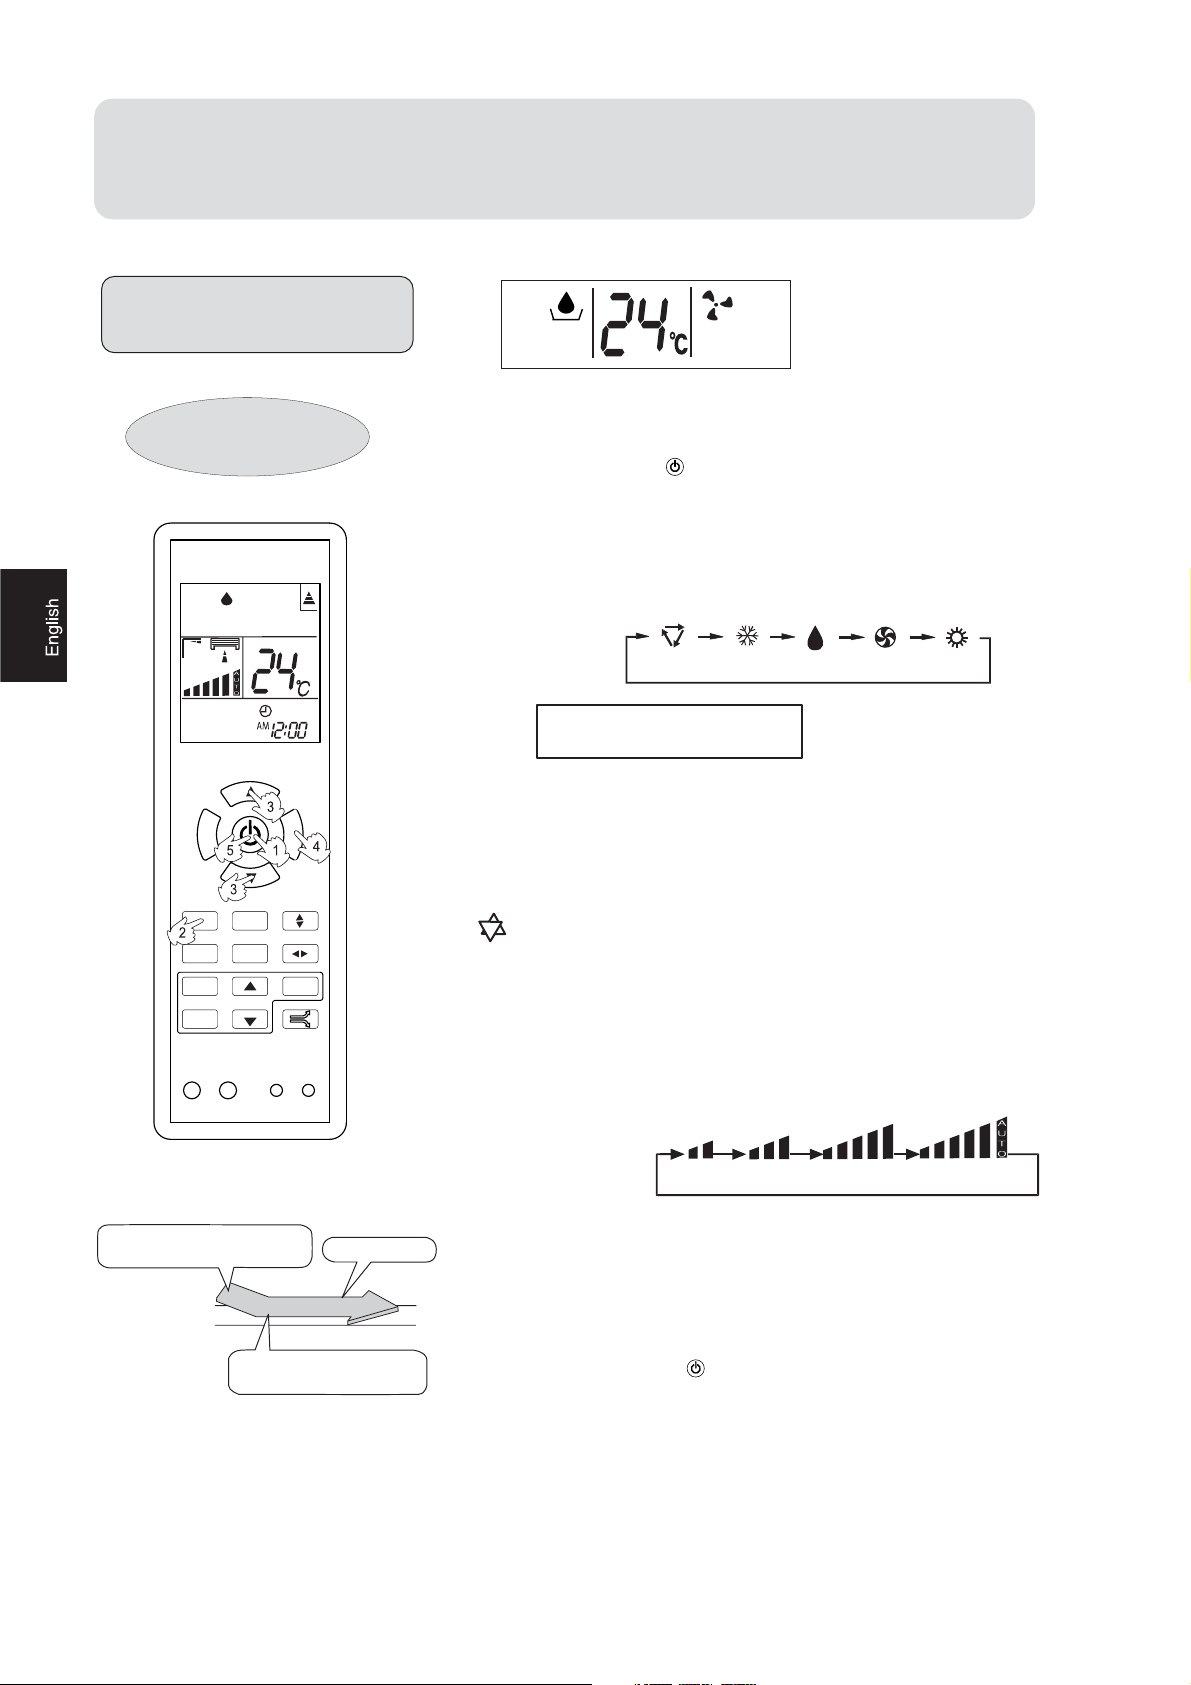
2.Health anion function
Press HEALTH button. For each press, is displayed.
Air conditioner starts health anion function operation.
For twice press, disappears,the operation stops.
When indoor fan motor is running, it has healthy
process function. (It's available under any mode)
When the fan in the indoor unit does not work, the health lamp
lights up, but the anion generator does not release anion.
HEALTH FAN
SWING
H.AIR.
MODE
FRESHSLEEP
CLOCK
TIMER
LOCK RESETLIGHT
SET
CODE
BRIEF INTRODUCTION TO HEALTH ANION FUCTION
The anion generator in the air conditioner can generate a lot of
anion effectively balance the quantity of position and anion in the
air and also to kill bacteria and speed up the dust sediment in
the room and finally clean the air in the room.
About UV light degerming function
UV light emitted by the UV light device of the indoor unit catalytically
2
activates the nano TiO
and the degerming effect is highly efficient and lasting.
Note: when the function is running, don't open the inlet grille.
on the multi-lights touching intermediary,
9
Page 11
Operation
Auto Operation
Remote controller
TEMP
HEALTH FAN
SWING
H.AIR.
MODE
FRESHSLEEP
CLOCK
SET
1. Unit start
Press on/off button (" ") on the remote controller, unit starts.
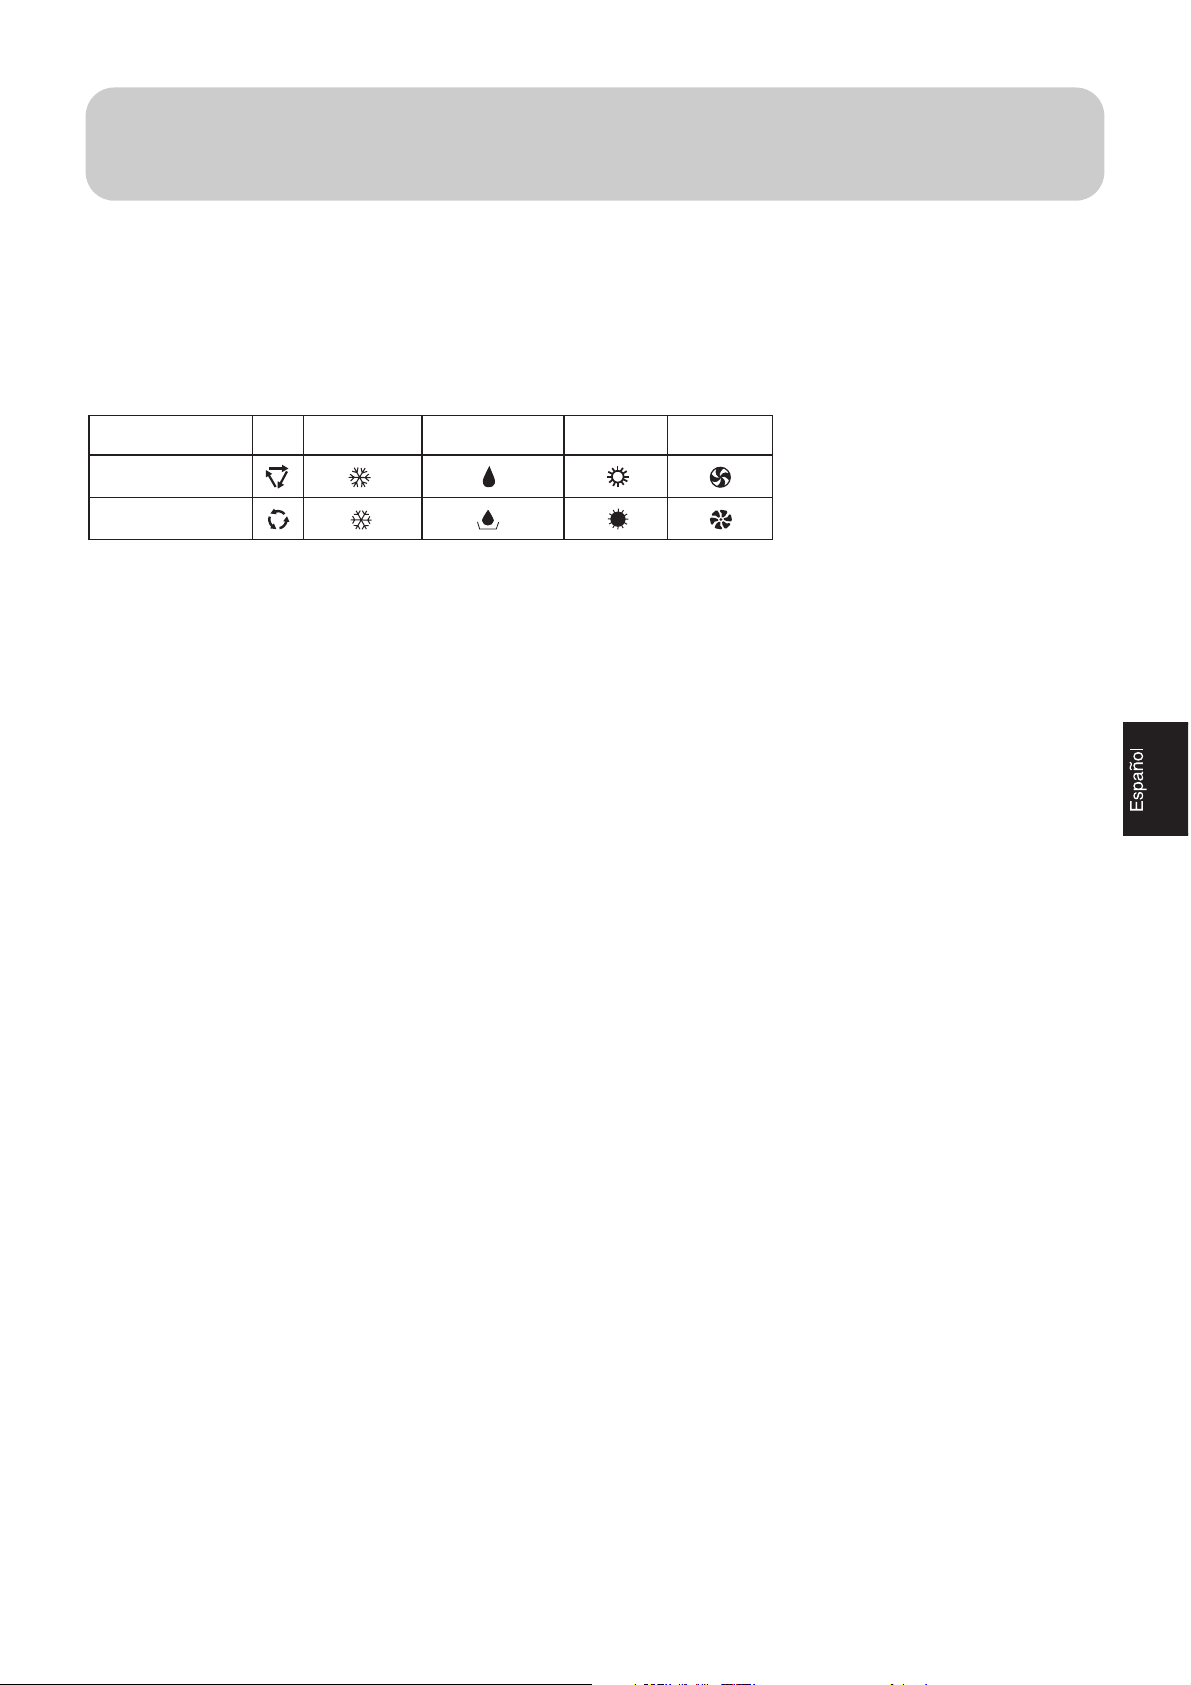
2.Select operation mode
Press MODE button. For each press, operation mode
changes as follows:
Remote controller:
AUTO COOL DRY FAN HEAT
Then
Select Auto operation
3.Select temp.setting
Press TEMP. button
Every time the button is pressed, temp.setting
increase 1
rapidly
Every time the button is pressed, temp.setting
decrease 1
rapidly
Select a desired temperature.
o
C,if kept depressed, it will increase
o
C,if kept depressed, it will decrease
TIMER
LOCK RESETLIGHT
CODE
4.Fan speed selection
Press FAN button. For each press, fan speed changes as
follows:
Remote controller:
LOW
MED
HI
AUTO
Air conditioner is running under displayed fan speed.
When FAN is set to AUTO, the air conditioner
automatically adjusts the fan speed according to room
temperature.
5.Unit stop
Press on/off button (" "), the unit stops.
About Auto Operation
Under the mode of auto operation, air conditioner will
automatically select Cool or Heat operation according
to room temperature.
10
Page 12
Operation
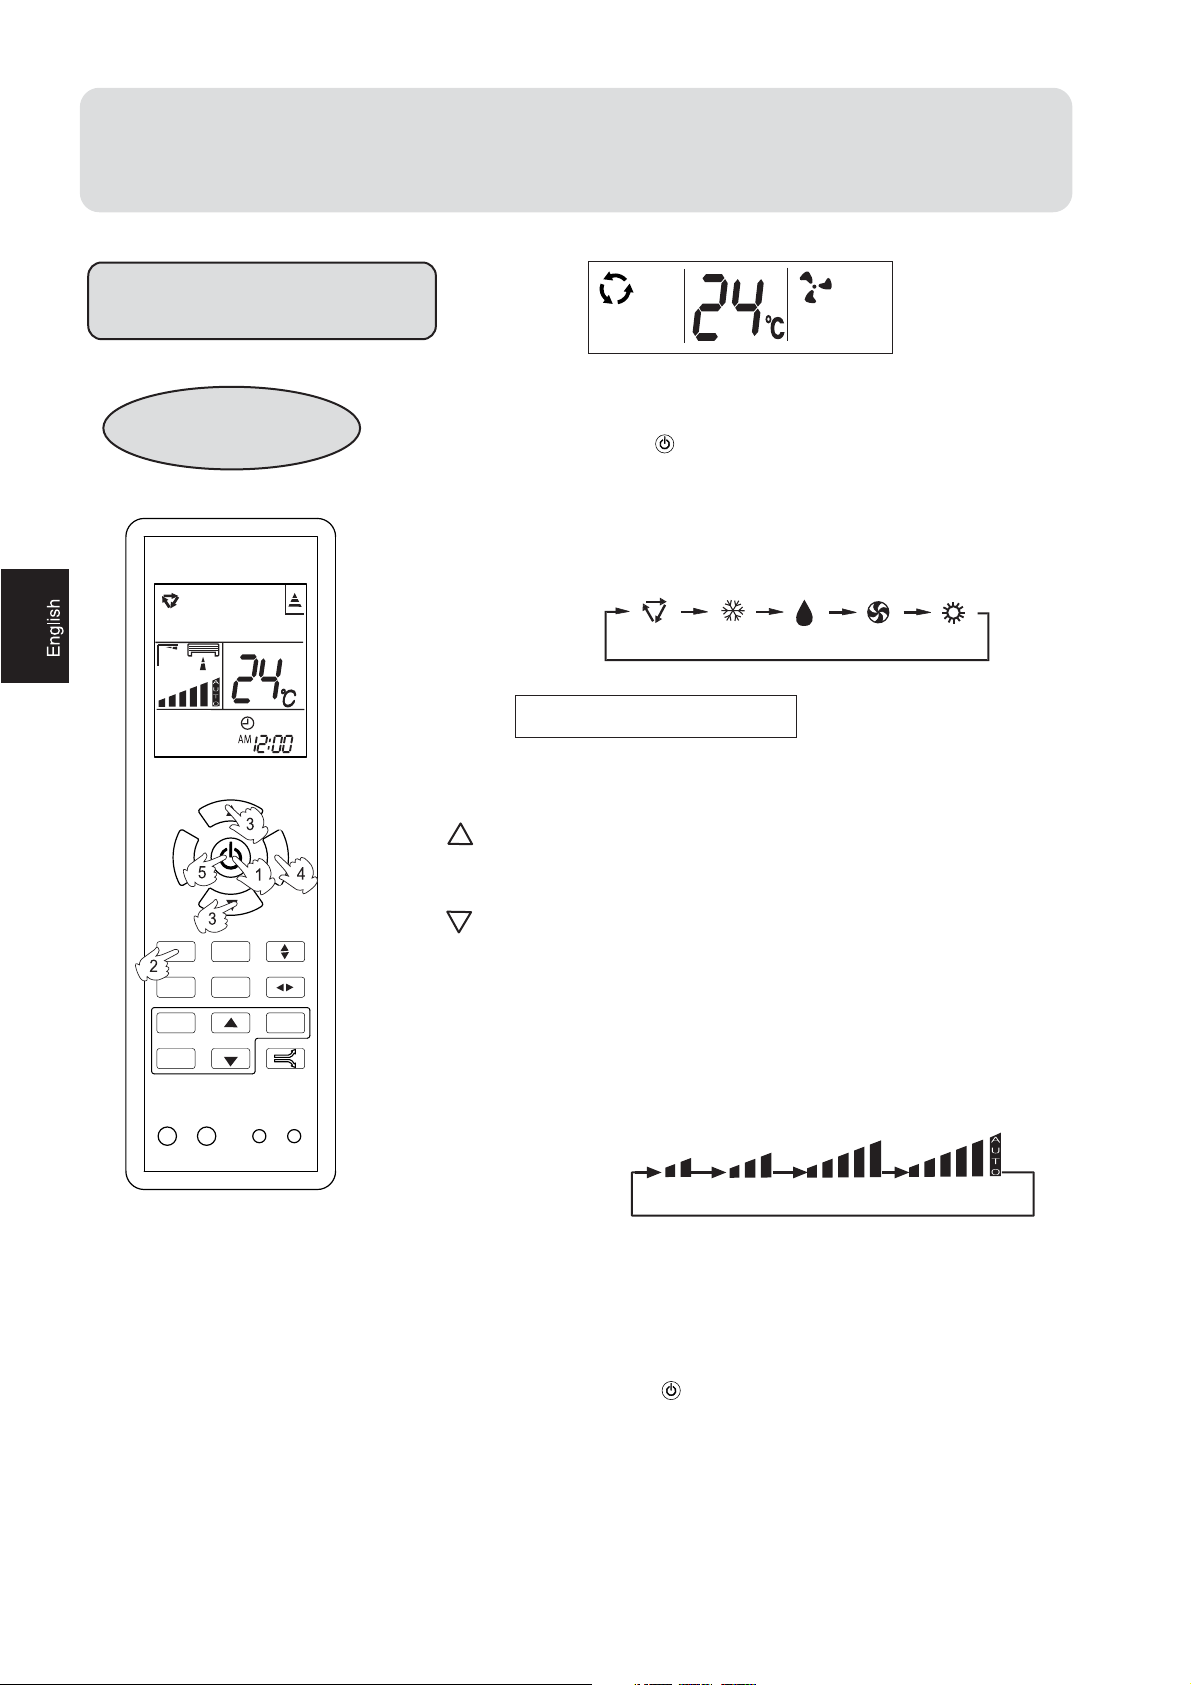
Cool Operation
Remote controller
TEMP
HEALTH FAN
SWING
H.AIR.
MODE
FRESHSLEEP
CLOCK
TIMER
SET
1. Unit start
Press on/off button (" ") on the remote controller, unit starts.
2.Select operation mode
Press MODE button. For each press, operation mode
changes as follows:
Remote controller:
AUTO
COOL DRY FAN HEAT
Then Select COOL operation
3.Select temp.setting
Press TEMP. button
Every time the button is pressed, temp.setting
increase 1
rapidly
Every time the button is pressed, temp.setting
decrease 1
rapidly
Select a desired temperature.
o
C,if kept depressed, it will increase
o
C,if kept depressed, it will decrease
LOCK RESETLIGHT
CODE
4.Fan speed selection
Press FAN button. For each press, fan speed changes as
follows:
Remote controller:
LOW
MED
HI
AUTO
Air conditioner is running under displayed fan speed.
When FAN is set to AUTO, the air conditioner
automatically adjusts the fan speed according to room
temperature.
5.Unit stop
Press on/off button (" "), the unit stops.
11
Page 13
Operation
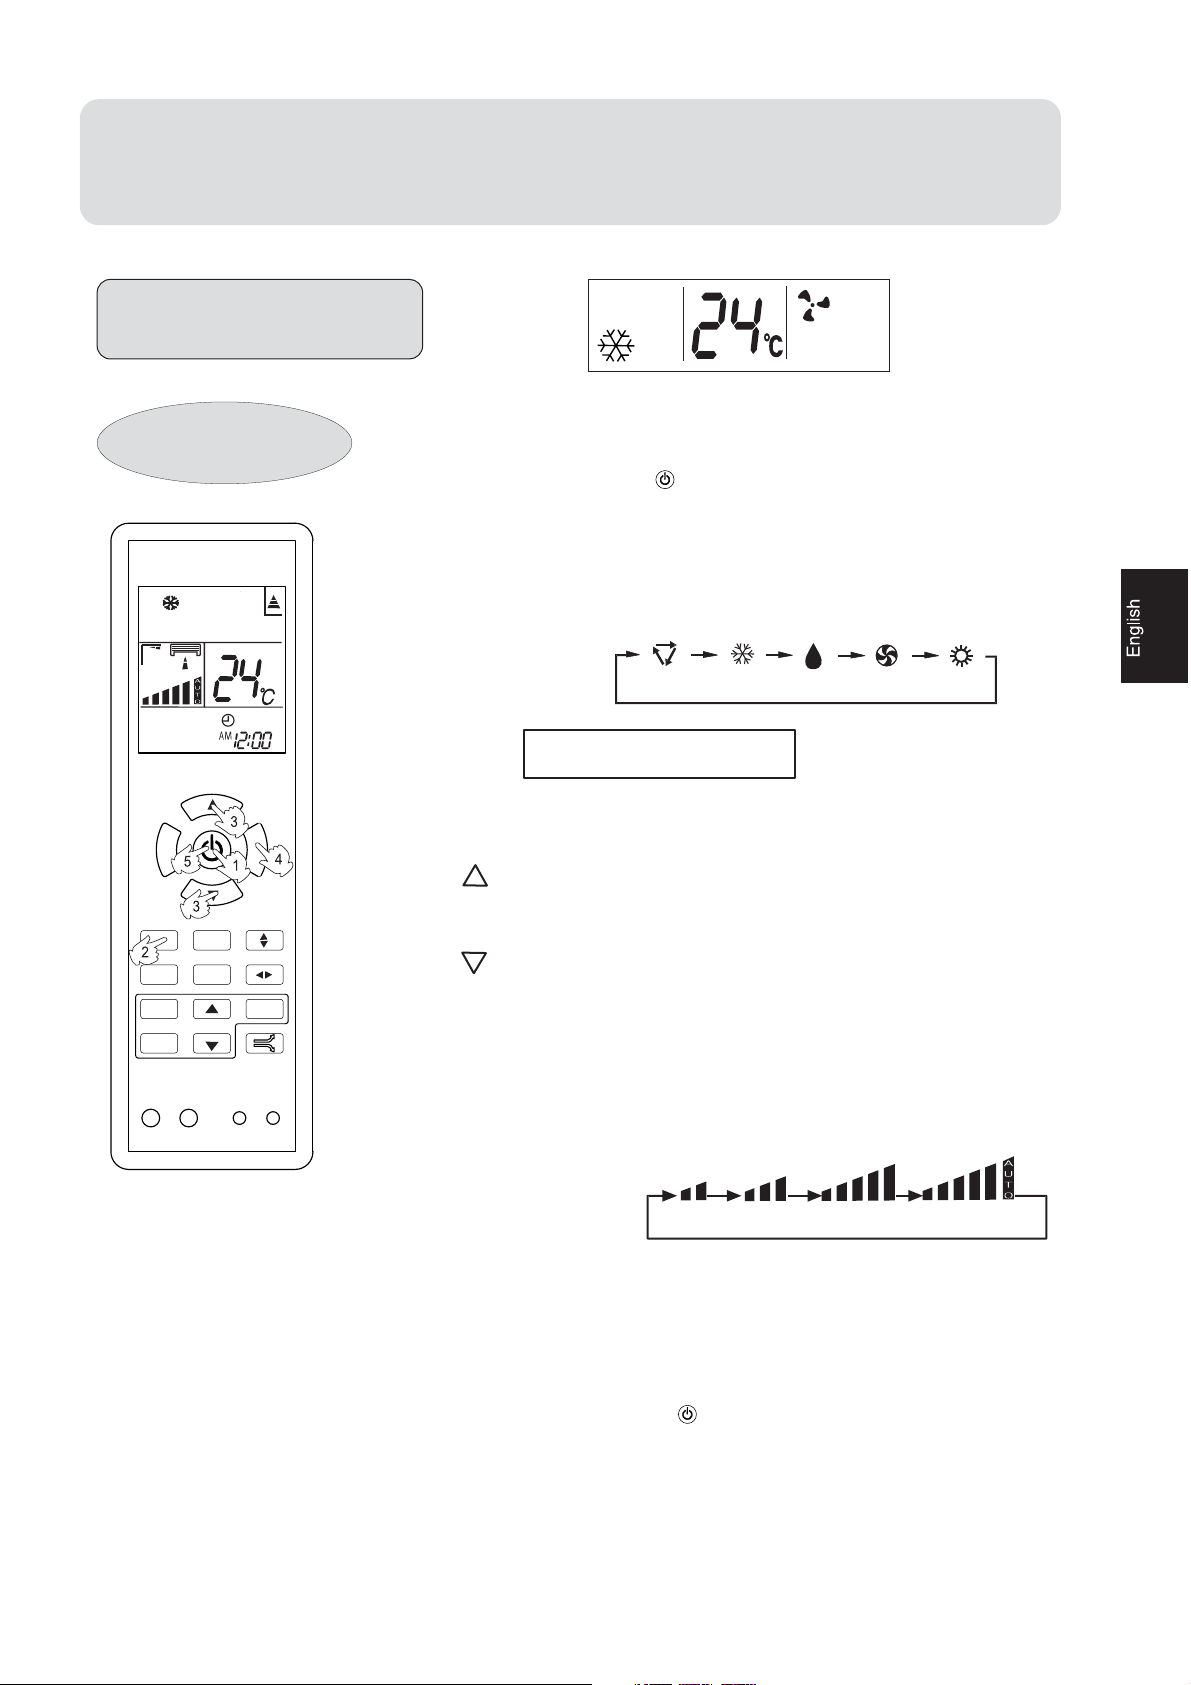
Dry Operation
Remote controller
TEMP
HEALTH FAN
SWING
H.AIR.
MODE
FRESHSLEEP
CLOCK
TIMER
SET
1. Unit start
Press on/off button (" ") on the remote controller, unit starts.
2.Select operation mode
Press MODE button. For each press, operation mode
changes as follows:
Remote controller:
AUTO
COOL DRY FAN HEAT
Then Select DRY operation
3.Select temp.setting
Press TEMP. button
Every time the button is pressed, temp.setting
increase 1
rapidly
Every time the button is pressed, temp.setting
decrease 1
rapidly
Select a desired temperature.
o
C,if kept depressed, it will increase
o
C,if kept depressed, it will decrease
LOCK RESETLIGHT
COOL operation starts when room
temp.is higher than temp.setting.
o
Temp.setting+2
Temp.setting
C
CODE
On reaching temp.setting +2
unit will run in mild DRY mode.
Ultra-low air flow
o
C
4.Fan speed selection
Press FAN button. For each press, fan speed changes as
follows:
Remote controller:
LOW
MED
HI
AUTO
Air conditioner is running under displayed fan speed.
In DRY mode, when room temperature becomes
lower than temp.setting+2
o
C,unit will run intermittently
at LOW speed regardless of FAN setting.
5.Unit stop
Press on/off button (" "), the unit stops.
12
Page 14
Operation
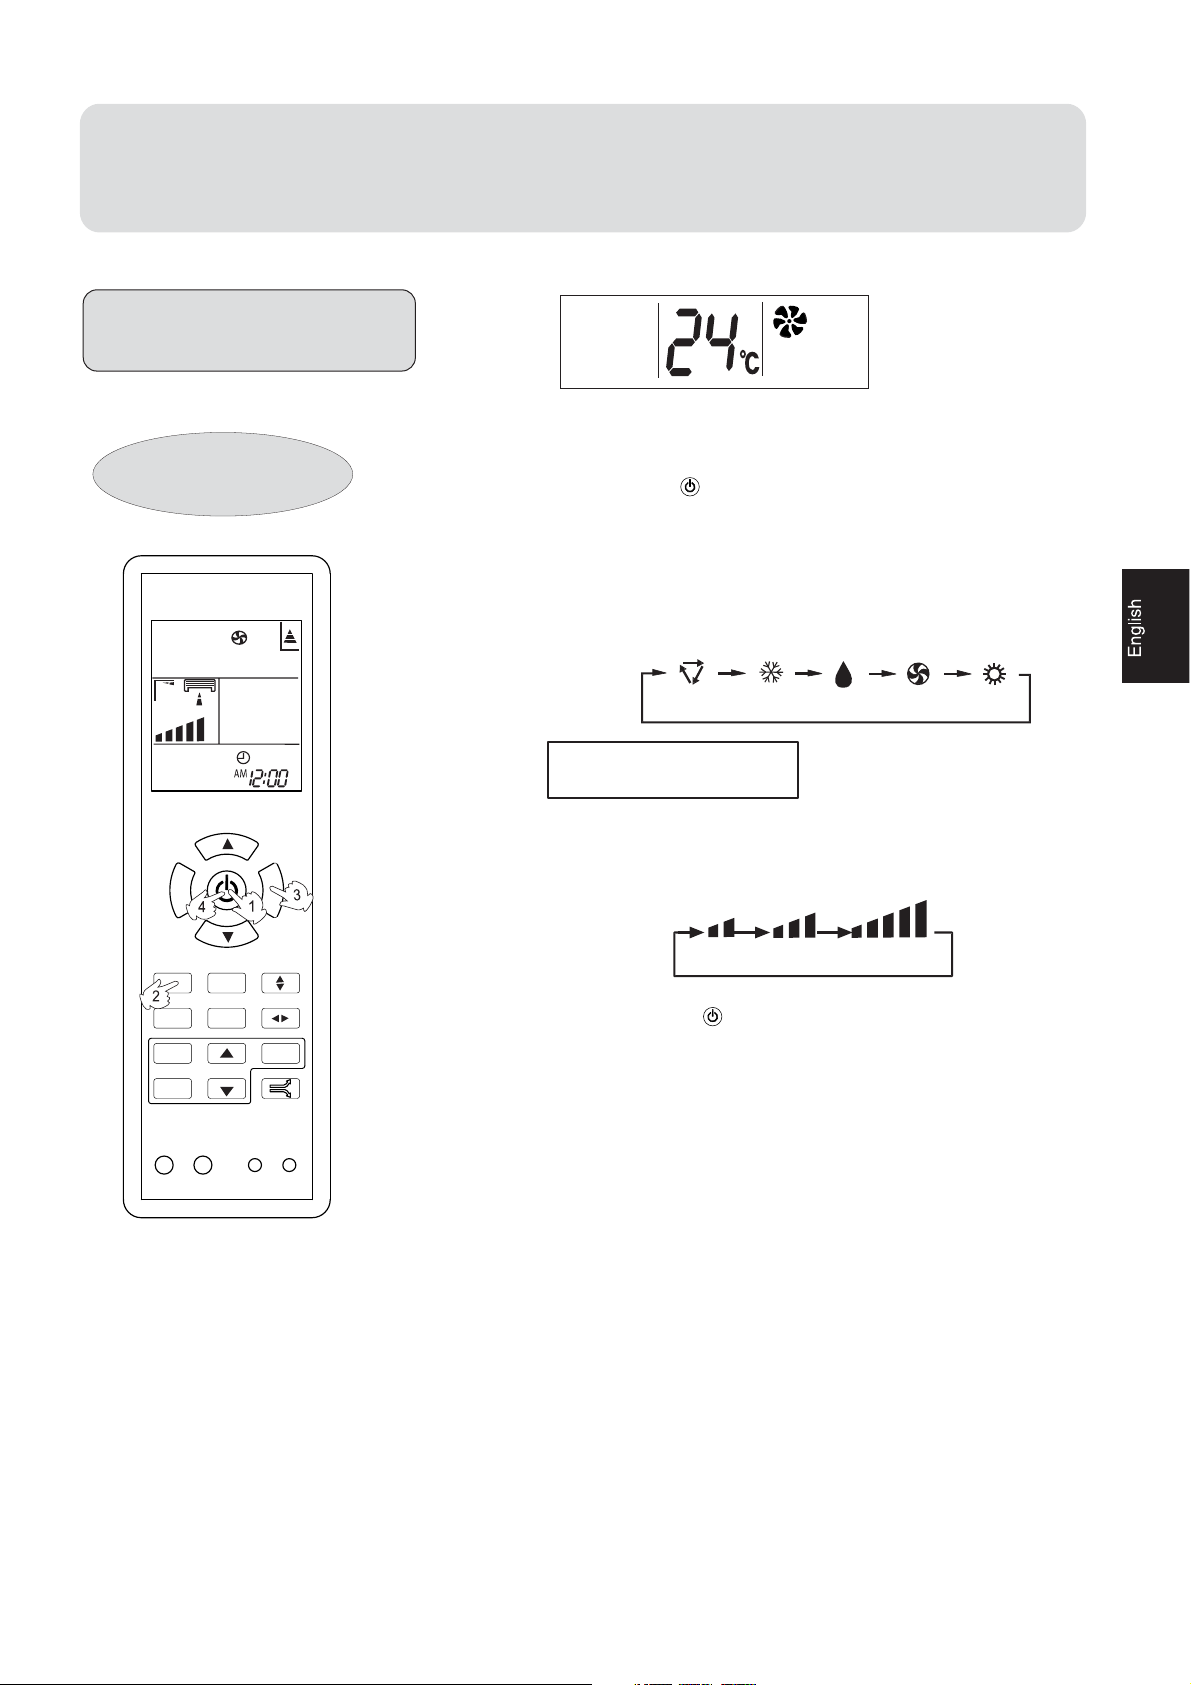
Fan Operation
Remote controller
1. Unit start
Press on/off button (" ") on the remote controller, unit starts.
2.Select operation mode
Press MODE button. For each press, operation mode
changes as follows:
Remote controller:
TEMP
HEALTH FAN
SWING
H.AIR.
MODE
FRESHSLEEP
CLOCK
TIMER
LOCK RESETLIGHT
SET
CODE
AUTO
COOL DRY FAN HEAT
Then Select FAN operation
3.Fan speed selection
Press FAN button. For each press, fan speed changes as
follows:
Remote controller:
LOW
MED
HI
4.Unit stop
Press on/off button(" "), the unit stops.
About FAN operation
In FAN operation mode, the unit will not operate in
COOL or HEAT mode but only in FAN mode ,AUTO is
not available in FAN mode.And temp.setting is disabled.
In FAN mode,SLEEP operation is not available.
13
Page 15
Operation
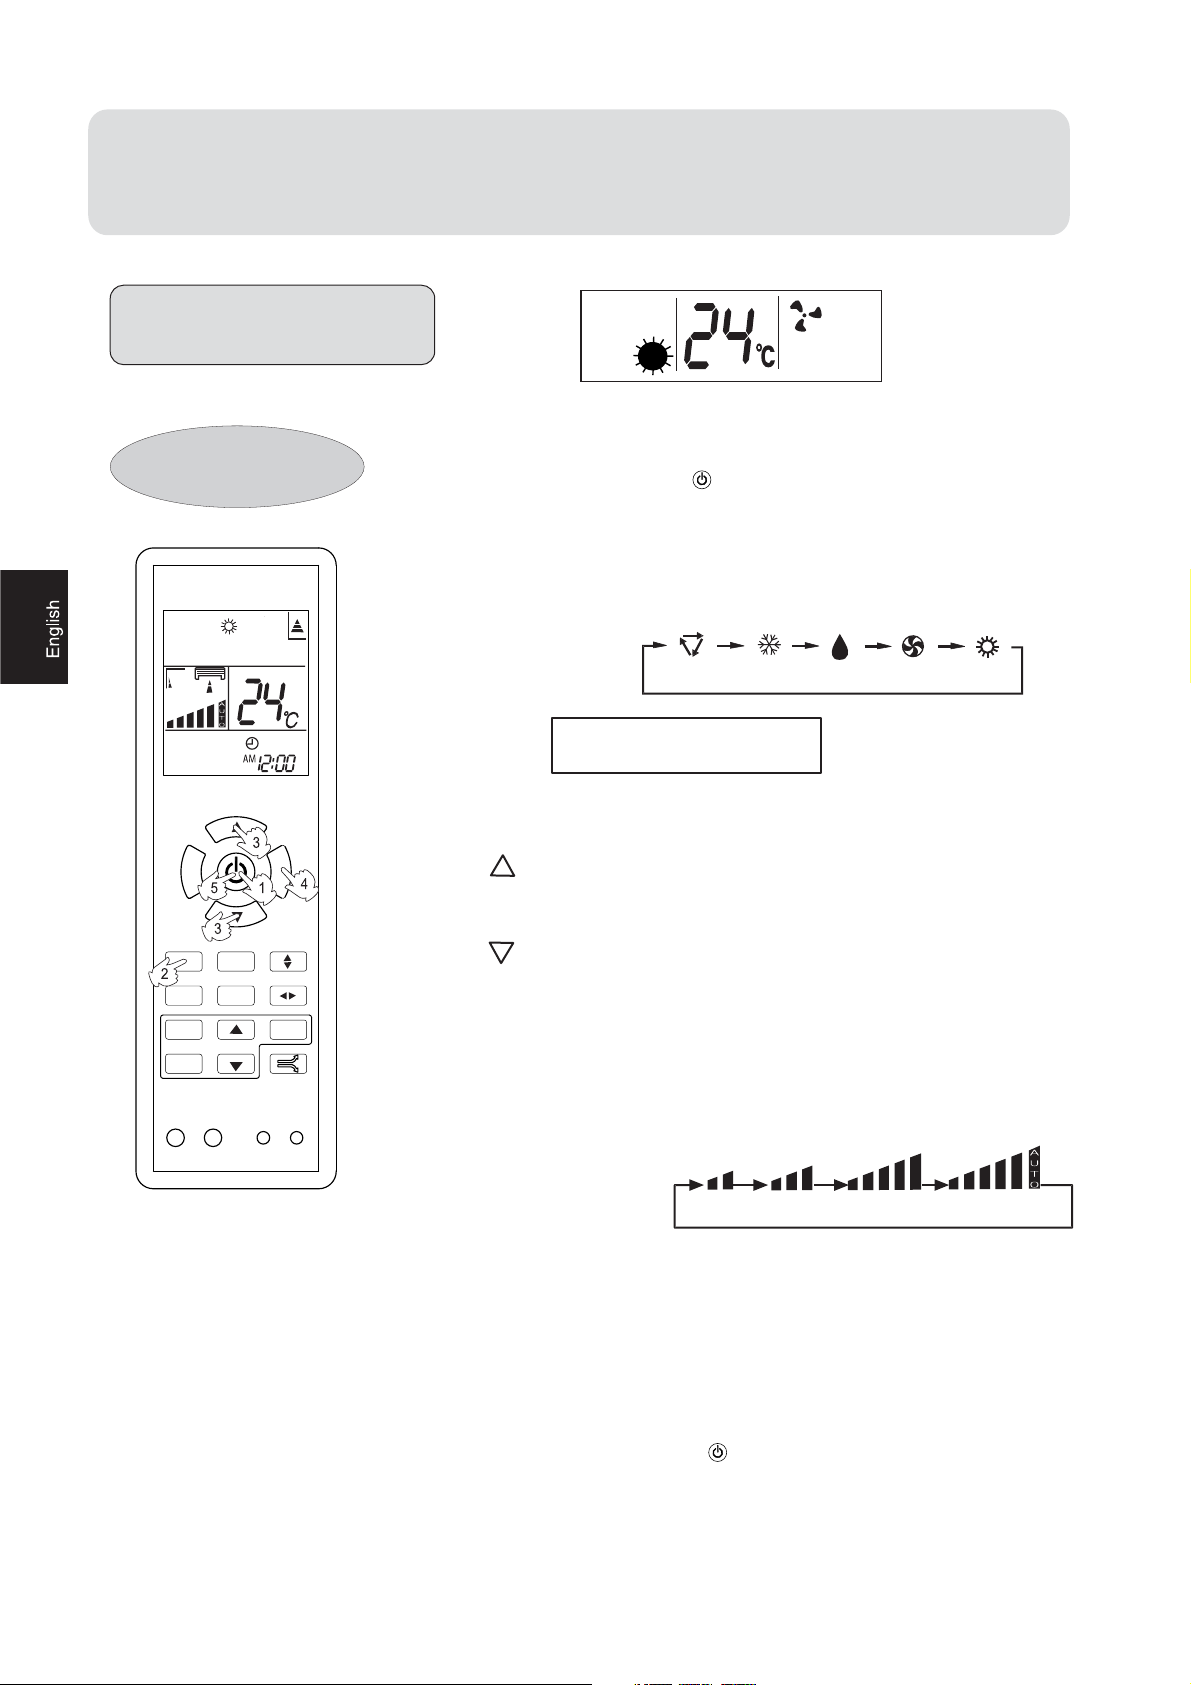
Heat Operation
Remote controller
2.Select operation mode
1. Unit start
Press on/off button (" ") on the remote controller, unit starts.
Press MODE button. For each press, operation mode
changes as follows:
Remote controller:
TEMP
HEALTH FAN
SWING
H.AIR.
MODE
FRESHSLEEP
CLOCK
TIMER
LOCK RESETLIGHT
SET
CODE
AUTO
COOL DRY FAN HEAT
Then Select HEAT operation
3.Select temp.setting
Press TEMP. button
Every time the button is pressed, temp.setting
increase 1
o
C,if kept depressed, it will increase
rapidly
Every time the button is pressed, temp.setting
decrease 1
o
C,if kept depressed, it will decrease
rapidly
Select a desired temperature.
4.Fan speed selection
Press FAN button. For each press, fan speed changes as
follows:
Remote controller:
LOW
MED
HI
Air conditioner is running under displayed fan speed
IN HEAT mode, warm air will blow out after a short period
of the time due to cold-draft prevention function.
When FAN is set to AUTO, the air conditioner
automatically adjusts the fan speed according to room
temperature.
AUTO
5.Unit stop
Press on/off button (" "), the unit stops.
14
Page 16
Operation
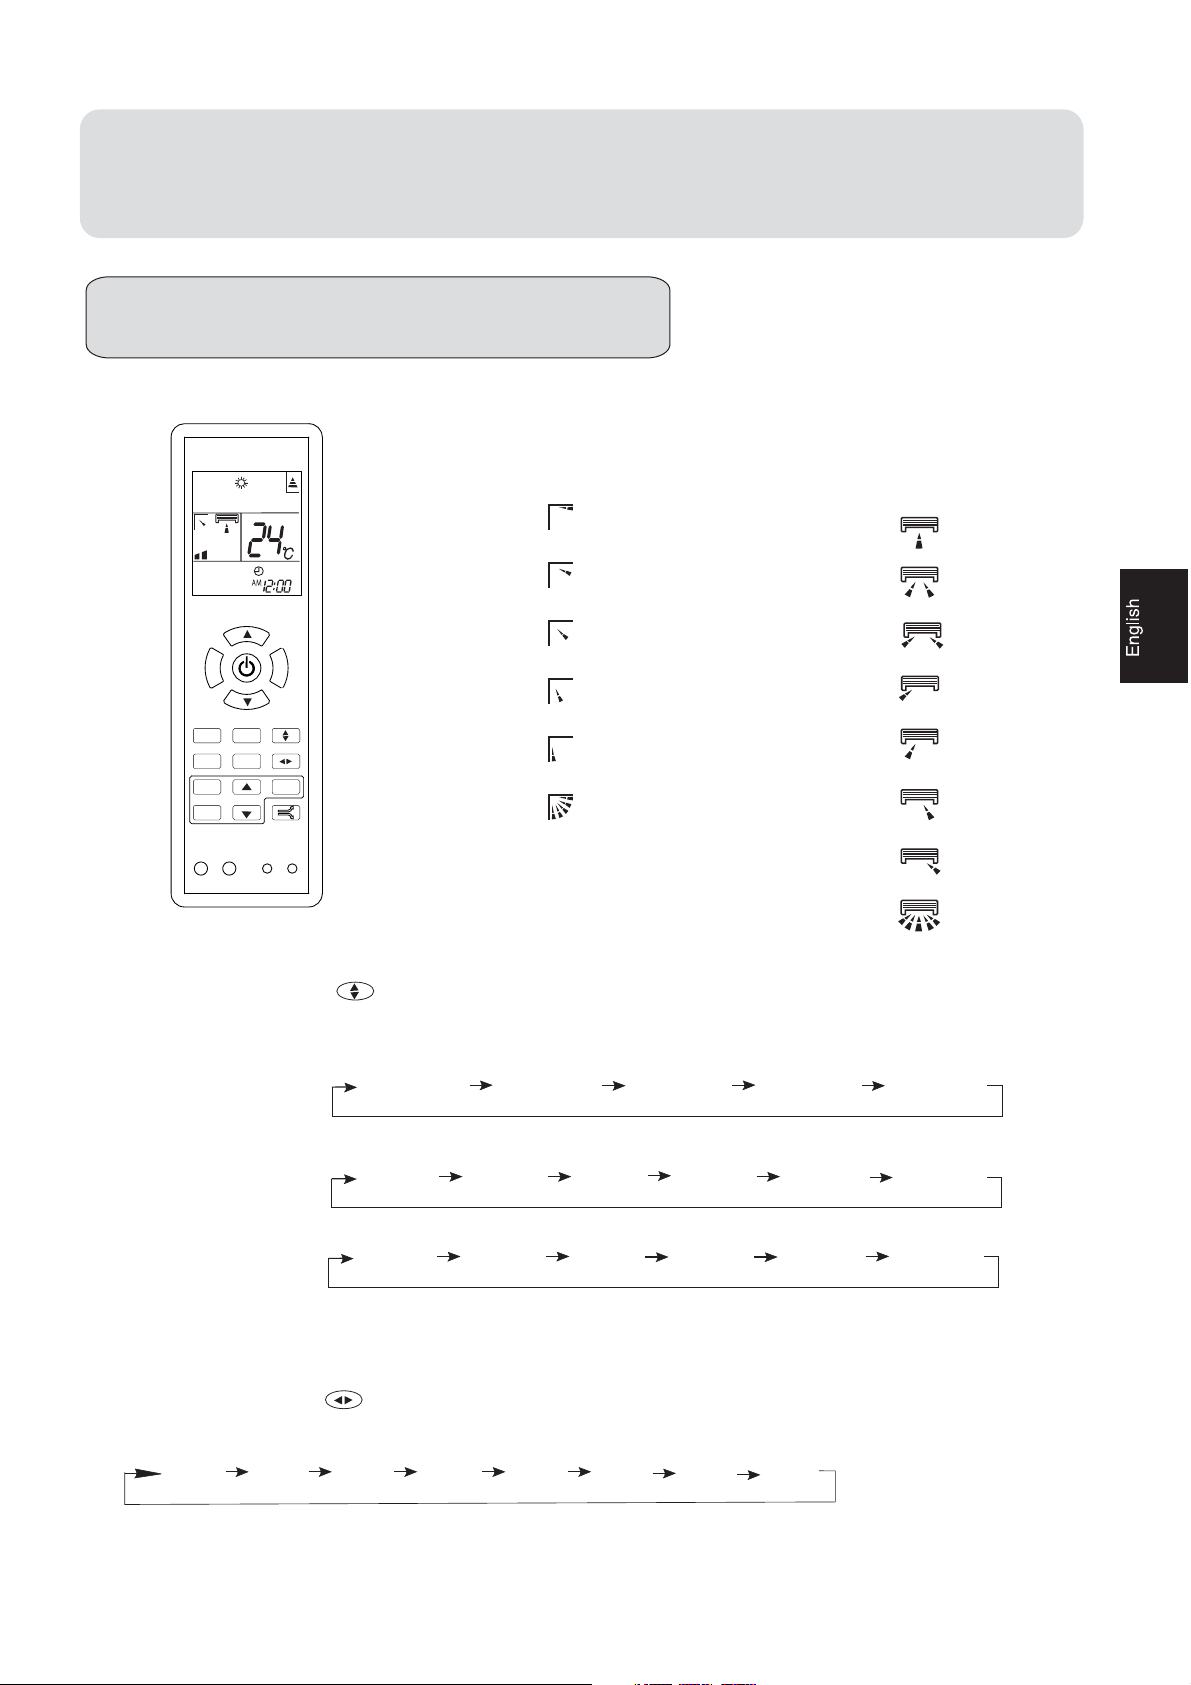
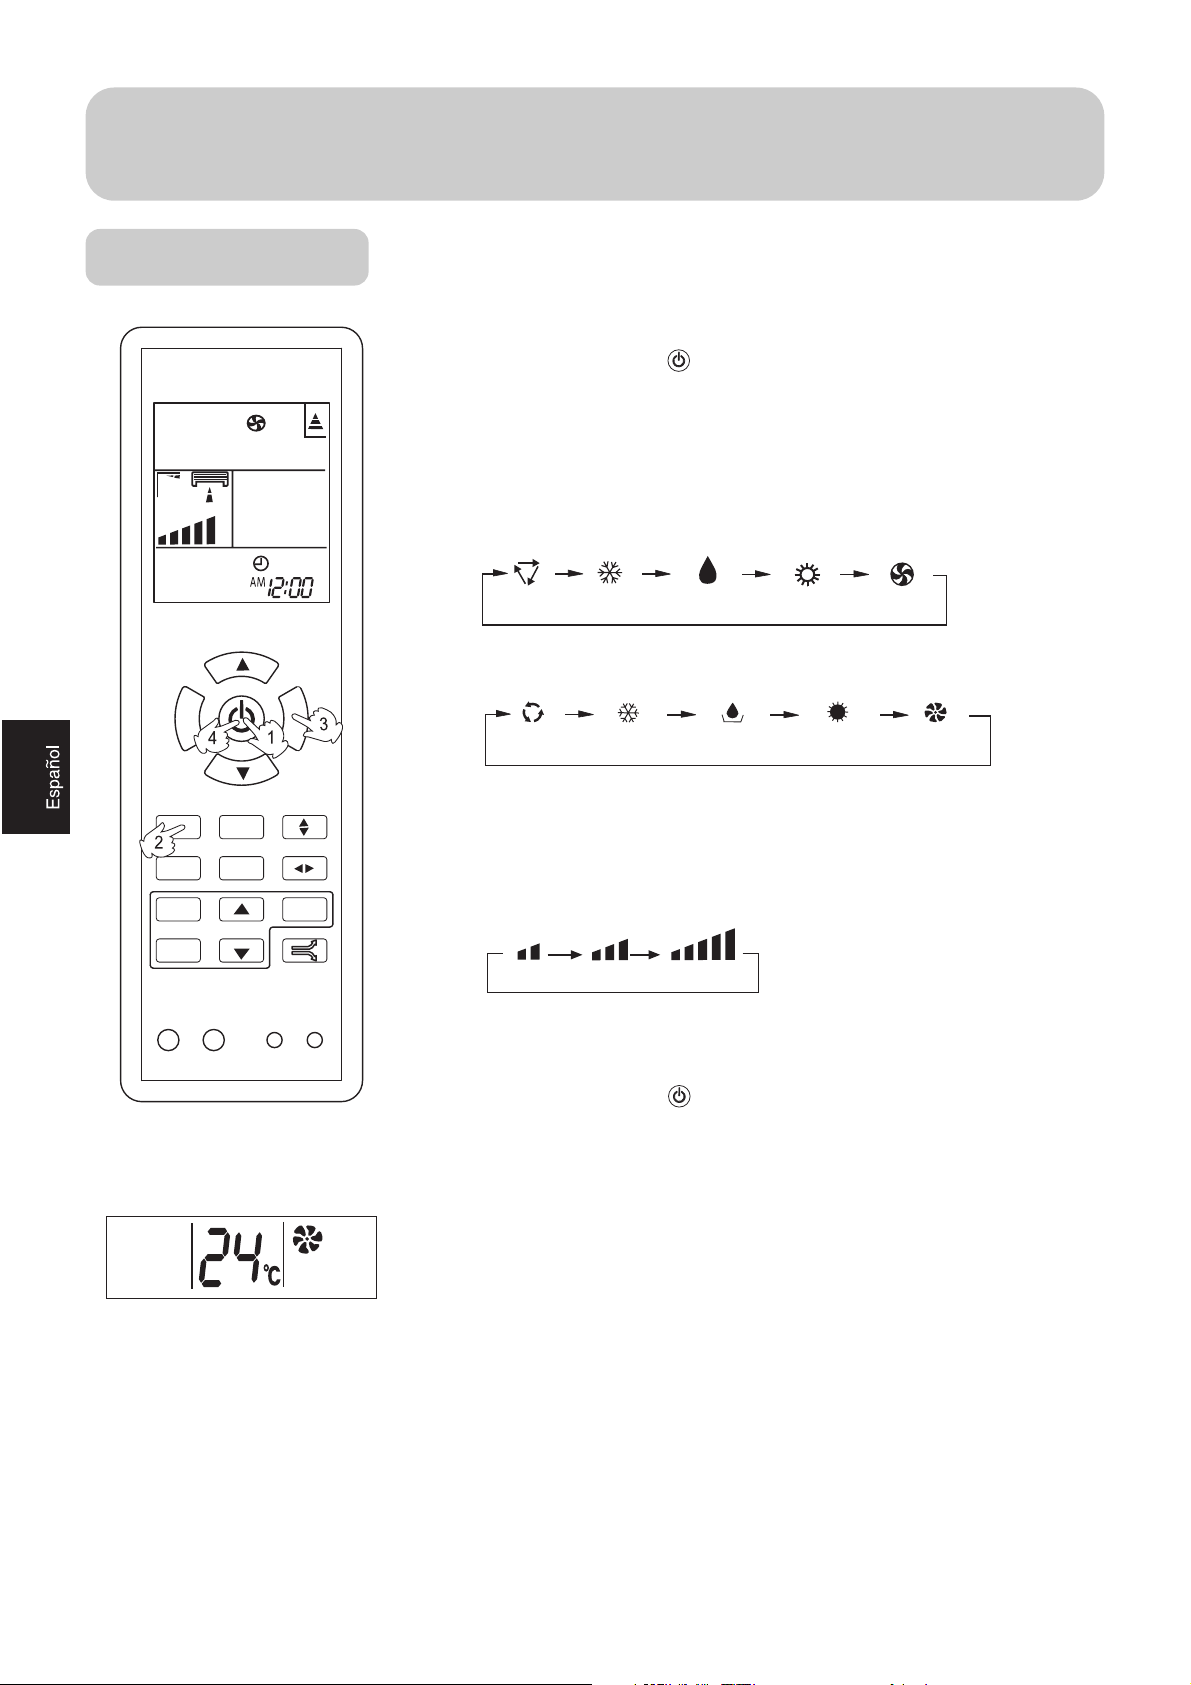
Air Flow Direction Adjustment
1.Status display of air sending
TEMP
HEALTH FAN
SWING
H.AIR.
MODE
FRESHSLEEP
CLOCK
TIMER
LOCK RESETLIGHT
SET
CODE
Vertical flap
Pos.1
Pos.2
Pos.3
Pos.4
Pos.5
Pos.6
(Auto swing)
Horizontal louvers
Pos.1
Pos.2
Pos.3
Pos.4
Pos.5
Pos.6
Pos.7
Pos.8
2.Up and down air flow direction
For each press of button, air flow direction on remote controller displays
as follows according to different operation modes:
COOL/DRY/FAN
remote controller:
:
Pos.1 Pos.2 Pos.3 Pos.4 Pos.6
HEAT:
remote controller:
Pos.5 Pos.4 Pos.3 Pos.2 Pos.1 Pos.6
AUTO:
remote controller:
Pos.1 Pos.2 Pos.3 Pos.4 Pos.5 Pos.6
The vertical flap will swing according to the above positions
3.Left and right air flow direction
For each press of button, remote controller displays as follows :
remote controller:
Pos.1 Pos.2 Pos.3 Pos.4 Pos.5 Pos.6 Pos.7 Pos.8
The horizontal louvers will swing according to the above positions.
Note:When restart after remote turning off, the remote controller will automatically
memorize the previous set swing position.
15
Page 17
Operation
Sleep Operation
Before going to bed, you can simply press the
SLEEP button and unit will operate in SLEEP
mode and bring you a sound sleep.
Use of SLEEP function
After the unit starts, set the operation status,
then press SLEEP button before which the
clock must be adjusted and time being set.
Operation Mode
1. In COOL,DRY mode
1 hours after SLEEP mode starts, temp. will
become 1
another 1 hours, temp. rises by 1
The unit will run for further 6 hours then stops.
Temp. is higher than temp. setting so that room
temperature won't be too Iow for your sleep.
Remote Controller
O
C higher than temp. setting. After
O
C further.
SLEEP operation starts SLEEP operation stops
Approx.6hrs
O
Rises 1
C
O
C
Unit stop
1 hr
Temp.setting
1 hr
Rises 1
In COOL, DRY mode
In HEAT mode
2.
1 hours after SLEEP mode starts, temp
O
will become 2
C lower than temp.
setting. After another 1 hours, temp
O
decrease by 2
another 3 hours, temp. rises by 1
C further. After more
O
further. The unit will run for further 3
hours then stops. Temp. is lower than
temp. setting so that room temperature
won't be too high for your sleep.
C
TEMP
HEALTH FAN
SWING
H.AIR.
MODE
FRESHSLEEP
CLOCK
TIMER
LOCK RESETLIGHT
SET
CODE
Temp.setting
1 hr
1 hr
SLEEP
operation starts
Decreases 2OC
Decreases 2
3 hrs
Unit stop
O
C
3 hrs
Rises 1OC
SLEEP
operation stops
In HEAT mode
In AUTO mode
3.
The unit operates in corresponding sleep
mode adapted to the automatically selected
operation mode.
4. In FAN mode
It has no SLEEP function.
5.Set the wind speed change when sleeping
If the wind speed is high or middle before
setting for the sleep, set for lowing the wind
speed after sleeping.
If it is low wind, no change.
16
Page 18
Operation
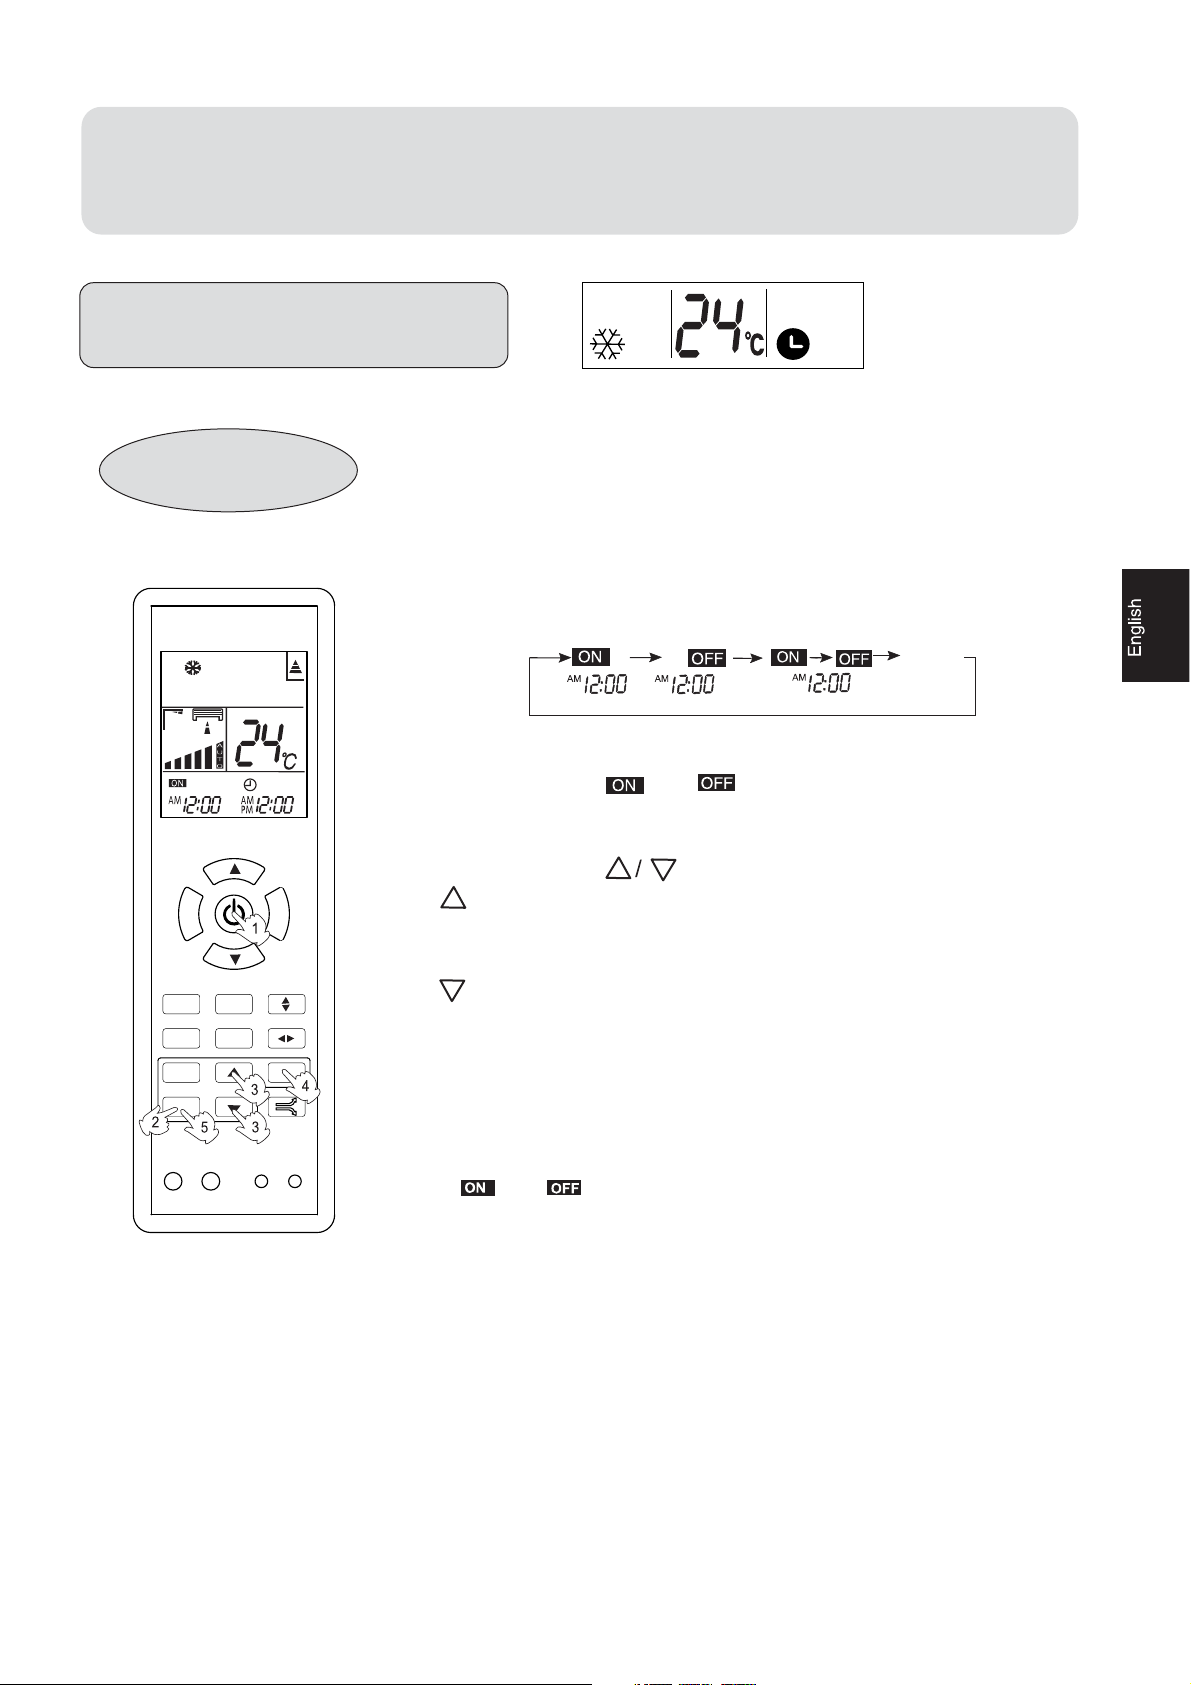
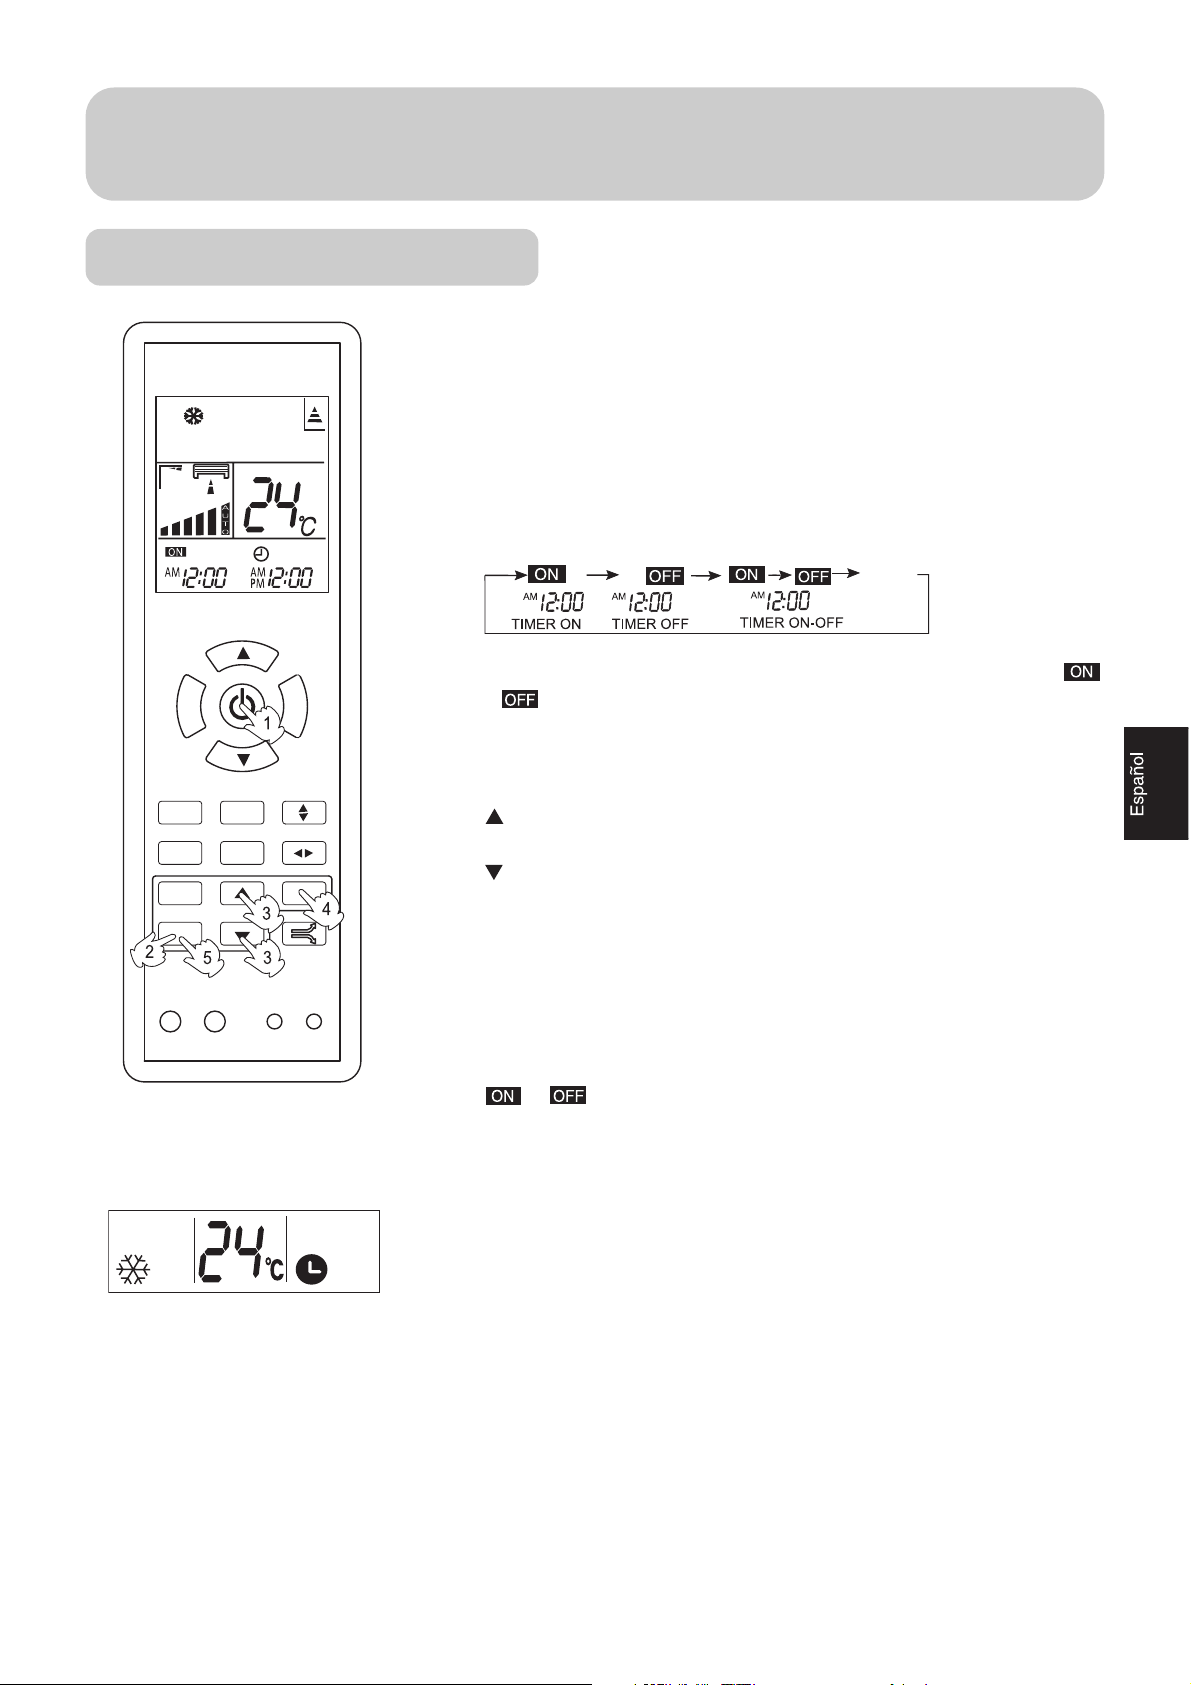
Timer On/Off Operation
Set clock correctly before starting TIMER operation.
Remote Controller
1. After unit starts, select your desired operation mode
Operation mode will be displayed on LCD.
2. Timer mode selection
Press TIMER button to change TIMER mode. Every
time the button is pressed, display changes as follows:
Remote controller:
Then select your desired TIMER mode (TIMER ON or
TIMER OFF). " "or " "will flash.
BLANK
TIMER ON TIMER OFF TIMER ON-OFF
TEMP
HEALTH FAN
SWING
H.AIR.
MODE
FRESHSLEEP
CLOCK
TIMER
LOCK RESETLIGHT
SET
CODE
3.Time setting
Press HOUR button.
Every time the button is pressed, time setting
increases 1 min, if kept depressed, it will increase
rapidly.
Every time the button is pressed, time setting
decreases 1 min, if kept depressed, it will decrease
rapidly.
It can be adjusted within 24 hours.
4.Confirming your setting
After setting correct time, press SET button to confirm
" "or" "on the remote controller stops flashing.
Time displayed: Unit starts or stops at x hour x min.
(TIMER ON or TIMER OFF).
5.Cancel TIMER mode
Just press TIMER button several times until TIMER
mode disappears.
Hints:
After replacing batteries or a power failure happens, time setting should be reset.
Remote controller possesses memory function, when use TIMER mode next time,
just press SET button after mode selecting if time setting is the same as previous one.
17
Page 19
Operation
Timer On-Off Operation
Set clock correctly before starting TIMER operation.
Remote Controller
TEMP
HEALTH FAN
SWING
H.AIR.
MODE
FRESHSLEEP
CLOCK
TIMER
SET
1. After unit starts, select your desired operation mode
Operation mode will be displayed on LCD.
2. Timer mode selection
Press TIMER button to change TIMER mode. Every time
the button is pressed, display changes as follows:
Remote controller:
Then select your desired TIMER mode (TIMER ON - OFF).
" "will flash.
3.Time setting
Press HOUR button.
Every time the button is pressed, time setting increases
1 min, if kept depressed, it will increase rapidly.
Every time the button is pressed, time setting decreases
1 min, if kept depressed, it will decrease rapidly.
It can be adjusted within 24 hours.
4.Timer confirming for TIMER ON
After setting correct time, press TIMER button to confirm
" " on the remote controller stops flashing.
" " starts flashing.
Time displayed: Unit starts or stops at x hour x min.
BLANK
TIMER ON TIMER OFF TIMER ON-OFF
LOCK RESETLIGHT
CODE
5.Time setting for TIMER OFF
Just press HOUR button ,follow the same procedure in
"Time setting for TIMER ON"
6.Time confirming for TIMER OFF
After time setting,press SET button to confirm.
" " on the remote controller stops blinking.
Time displayed:Unit stops at x hour x min.
To cancel TIMER mode
Just press TIMER button several times until TIMER
de disappears.
According to the Time setting sequence of TIMER ON
or TIMER OFF, either Start-Stop or Stop-Start can be
achieved.
18
Page 20
Operation
POWER/SOFT Operation
POWER Operation
When you need rapid heating or cooling, you can use this function.
Remote controller
Selecting of POWER operation
Press POWER/SOFT button. Every time the button is pressed,display
changes as follows:
Stop the display at
In POWER operation status:
In HEAT or COOL mode, compressor runs in high frequency
for 15 min then returns to original status setting.
POWER
BLANK
SOFT
TEMP
HEALTH FAN
SWING
H.AIR.
MODE
FRESHSLEEP
CLOCK
TIMER
LOCK RESETLIGHT
SET
CODE
To cancel POWER operation
Press POWER/SOFT button twice ,POWER/SOFT disappears.
SOFT Operation
You can use this function when silence is needed for rest or reading.
Selecting of SOFT operation
Press POWER/SOFT button. Every time the button is pressed,display
changes as follows:
POWER
Stop the display at
In SOFT operation mode, fan speed automatically takes"ultra-low"
SOFT
To cancel SOFT operation
Press POWER/SOFT button twice ,POWER/SOFT disappears.
BLANK
Hints:
During POWER operation, in rapid HEAT or COOL mode, the room
will show inhomogeneous temperature distribution.
Long period SOFT operation will cause effect of not too cool
or not too warm.
19
Page 21
Operation
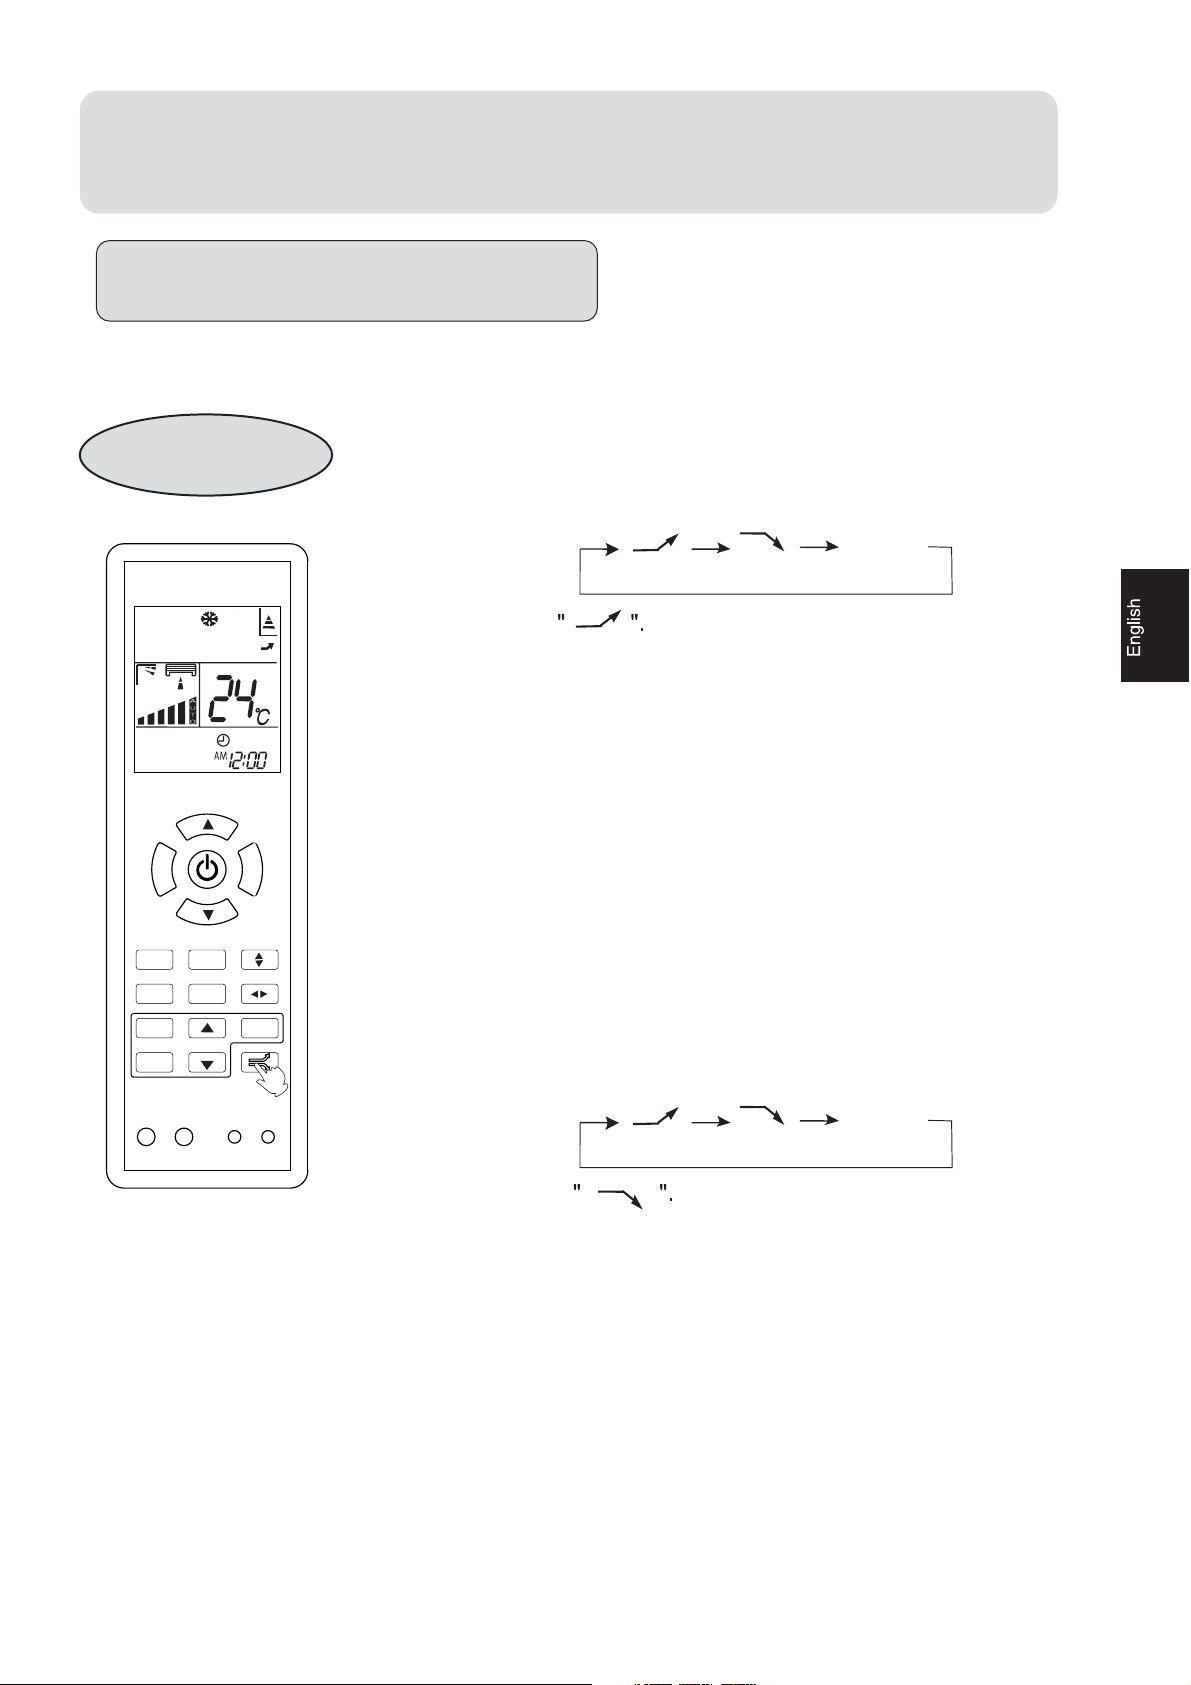
Health airflow Operation
Remote controller
TEMP
HEALTH FAN
SWING
H.AIR.
MODE
FRESHSLEEP
CLOCK
TIMER
LOCK RESETLIGHT
SET
CODE
1.Press ON/OFF button (" ") to starting
The liquid crystal will display the working state of last time
(Except timer, sleeping, power/soft and health airflow).
Setting the comfort work conditions.
2.The setting of health airflow function
1).Press the button of health airflow, appears on the
display. The nether inlet and outlet grills of the air conditioner are closed and the airflow is blown horizontally from
the above inlet and outlet grills. Avoid the strong airflow
blows direct to the body.
2).Press the button of health airflow again, appears on
the display. The above inlet and outlet grills of the air conditioner are closed and the airflow is blown vertically from the
nether inlet and outlet grills. Avoid the strong airflow blows
direct to the body.
3.The cancel of the health airflow function
Press the button of health airflow again, both the inlet and
outlet grills of the air conditioner are opened, and the unit
goes on working under the condition before the setting of
health airflow function.
After stopping, the outlet grille will close automatically.
Notice: Cannot pull direct the outlet grille by hand. Otherwise,
the grille will run incorrectly. If the grille is not run correctly,
stop for a minute and then start, adjusting by remote controller.
Note:
1 .After setting the health airflow function, the position of inlet
and outlet grills is fixed.
2.In heating, it is better to select the mode.
3.In cooling, it is better to select the mode.
4.In cooling and dry, using the air conditioner for a long time
under the high air humidity, a phenomenon falling drips of
water occurs at the outlet grille .
5.Select the appropriate fan direction according to the actual
conditions.
20
Page 22
Operation
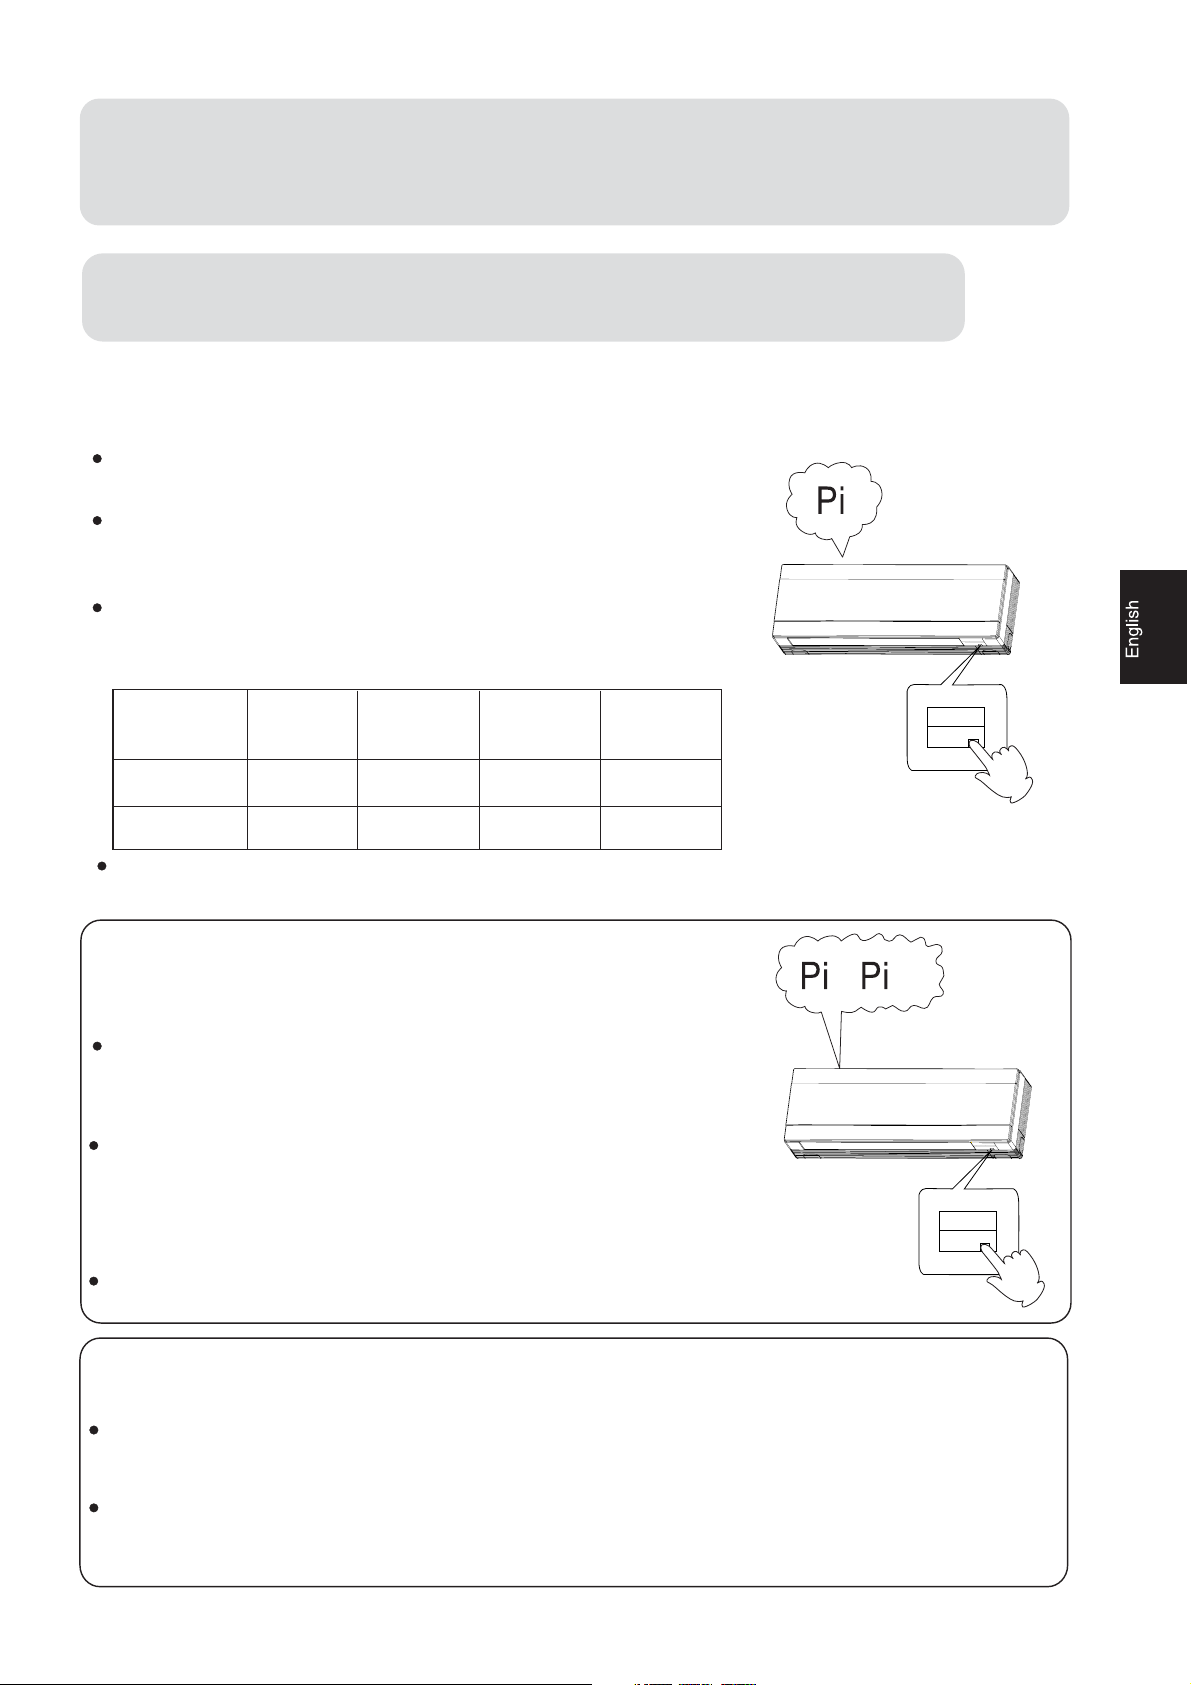
Emergency and Test Operation
Emergency operation:
Use this operation only when the remote controller
is defective or lost.
When the emergency operation switch is
pressed,the" Pi "sound is heard once, which means
the start of this operation.
In this operation, the system automatically selects
the operation modes, cooling or heating, according
to the room temperature.
Temperature
ABOVE 21
BELOW 21
Operation
mode
O
COOLING
C
O
C
HEATING
Designated
temperature
O
24
C
O
24
C
Timer
mode
NO
NO
Air flow
AUTOMATIC
AUTOMATIC
It is not possible to operate in dry mode.
Test operation:
Test operation switch is the same as emergency switch.
Use this switch in the test operation when the room
temperature is below 16
operation.
Continue to press the test operation switch for more
than 5 seconds. After you hear the "Pi" sound twice,
release your finger from the switch: the cooling operation
starts with the air flow speed "Hi".
After 30 minutes, test operation ends automatically.
O
C, do not use it in the normal
Removal of the restriction of emergency or test operation
Press the emergency operation switch once more, or manipulate through the
remote controller; the "Pi" sound, the emergency or test operation is terminated.
When the remote controller is manipulated, it gets the system back to the
normal operation mode.
21
Page 23
Maintenance
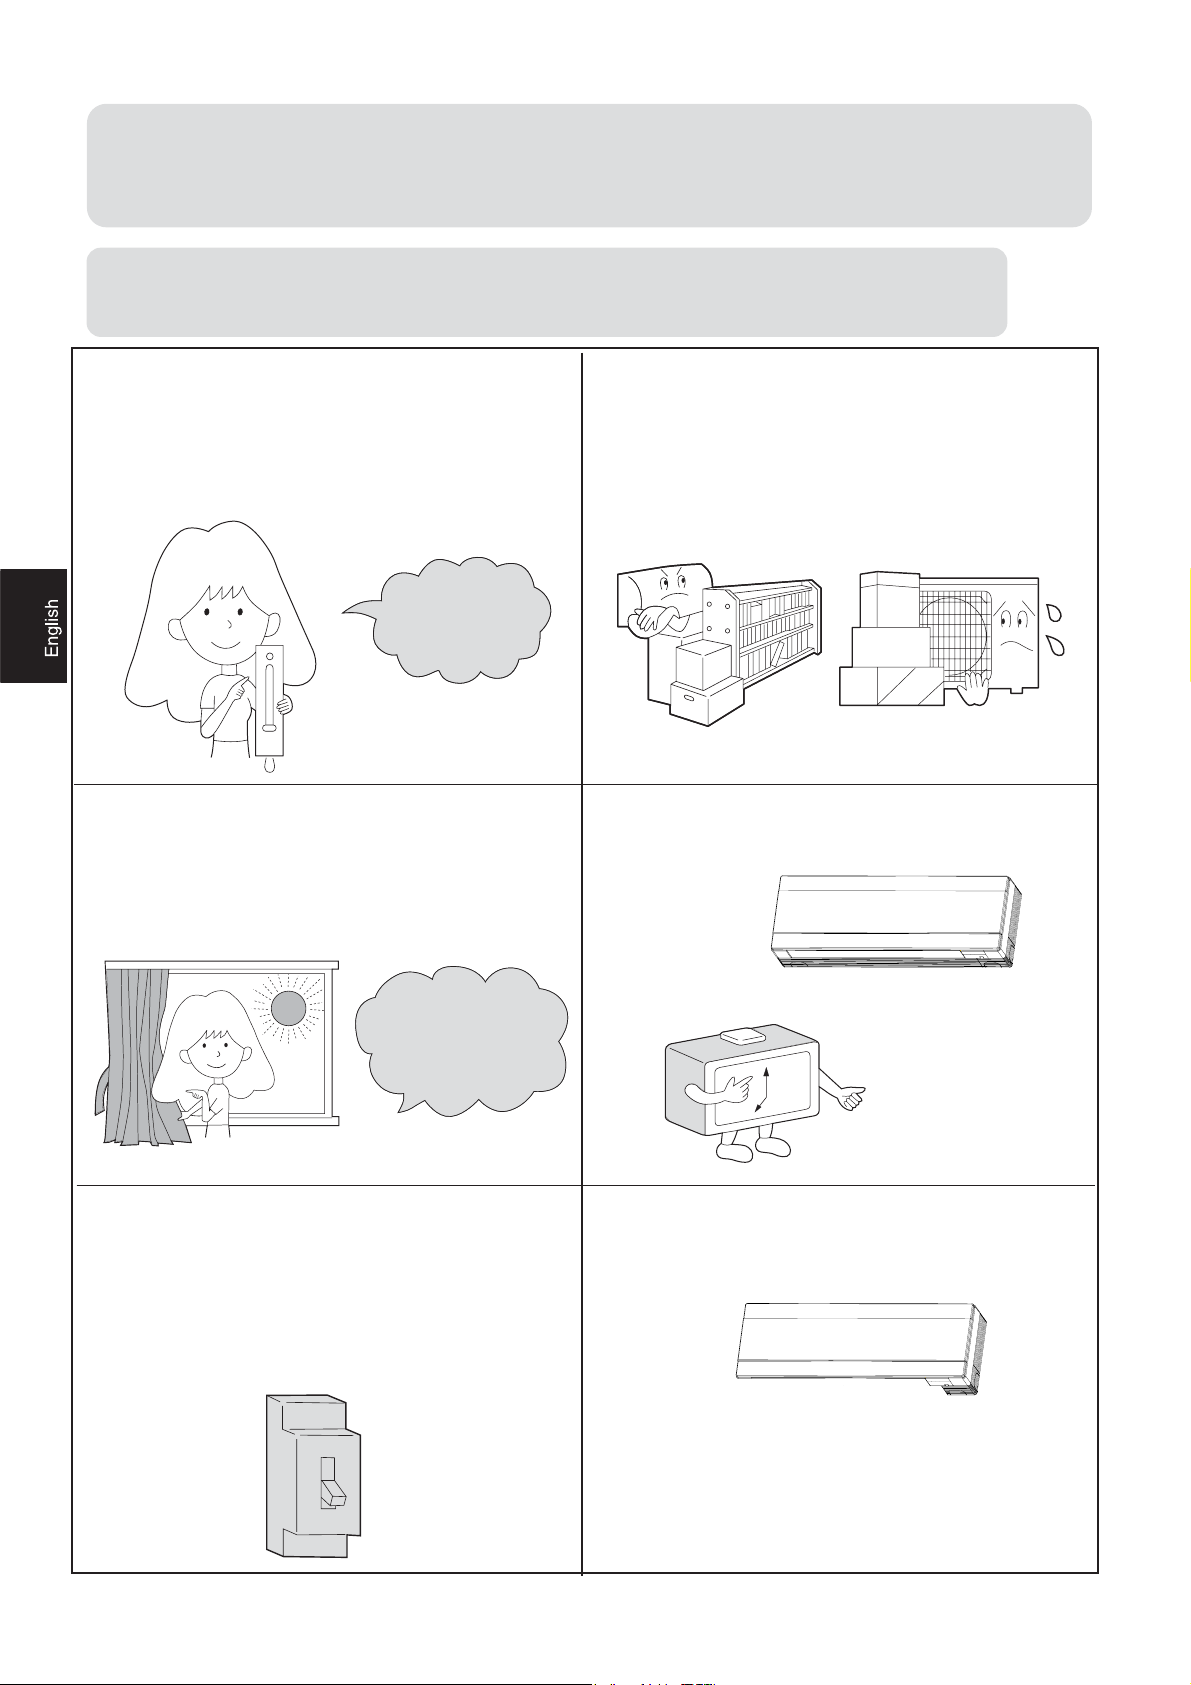
For Smart Use of The Air Conditioner
Setting of proper room
temperature
Proper
2TQRGT
temperature
VGORGTCVWTG
Close doors and windows
%NQUGFQQTUCPFYKPFQYU
FW
during operation
TKPIQRGTCVKQP
Do not block the air inlet
or outlet
Use the timer effectively
7UGVJGVKOGTGHHGEVKXGN[
During cooling operation
&WTKPIEQQNKPIQRGTCVKQP
prevent the penetration of
RTGXGPVVJGRGPGVTCVKQPQH
direct sunlight with
FKTGEVUWPNKIJVYKVJ
curtain or blind
EWTVCKPQTDNKPF
If the unit is not to be used
+HVJGWPKVKUPQVVQDGWUGF
for a long time, turn off the
HQTCNQPIVKOGVWTPQHHVJG
power supply main switch.
RQYGTUWRRN[OCKPUYKVEJ
OFF
Use the louvers effectively
7UGVJGNQWXGTUGHHGEVKXGN[
22
Page 24
Maintenance
For Smart Use of The Air Conditioner
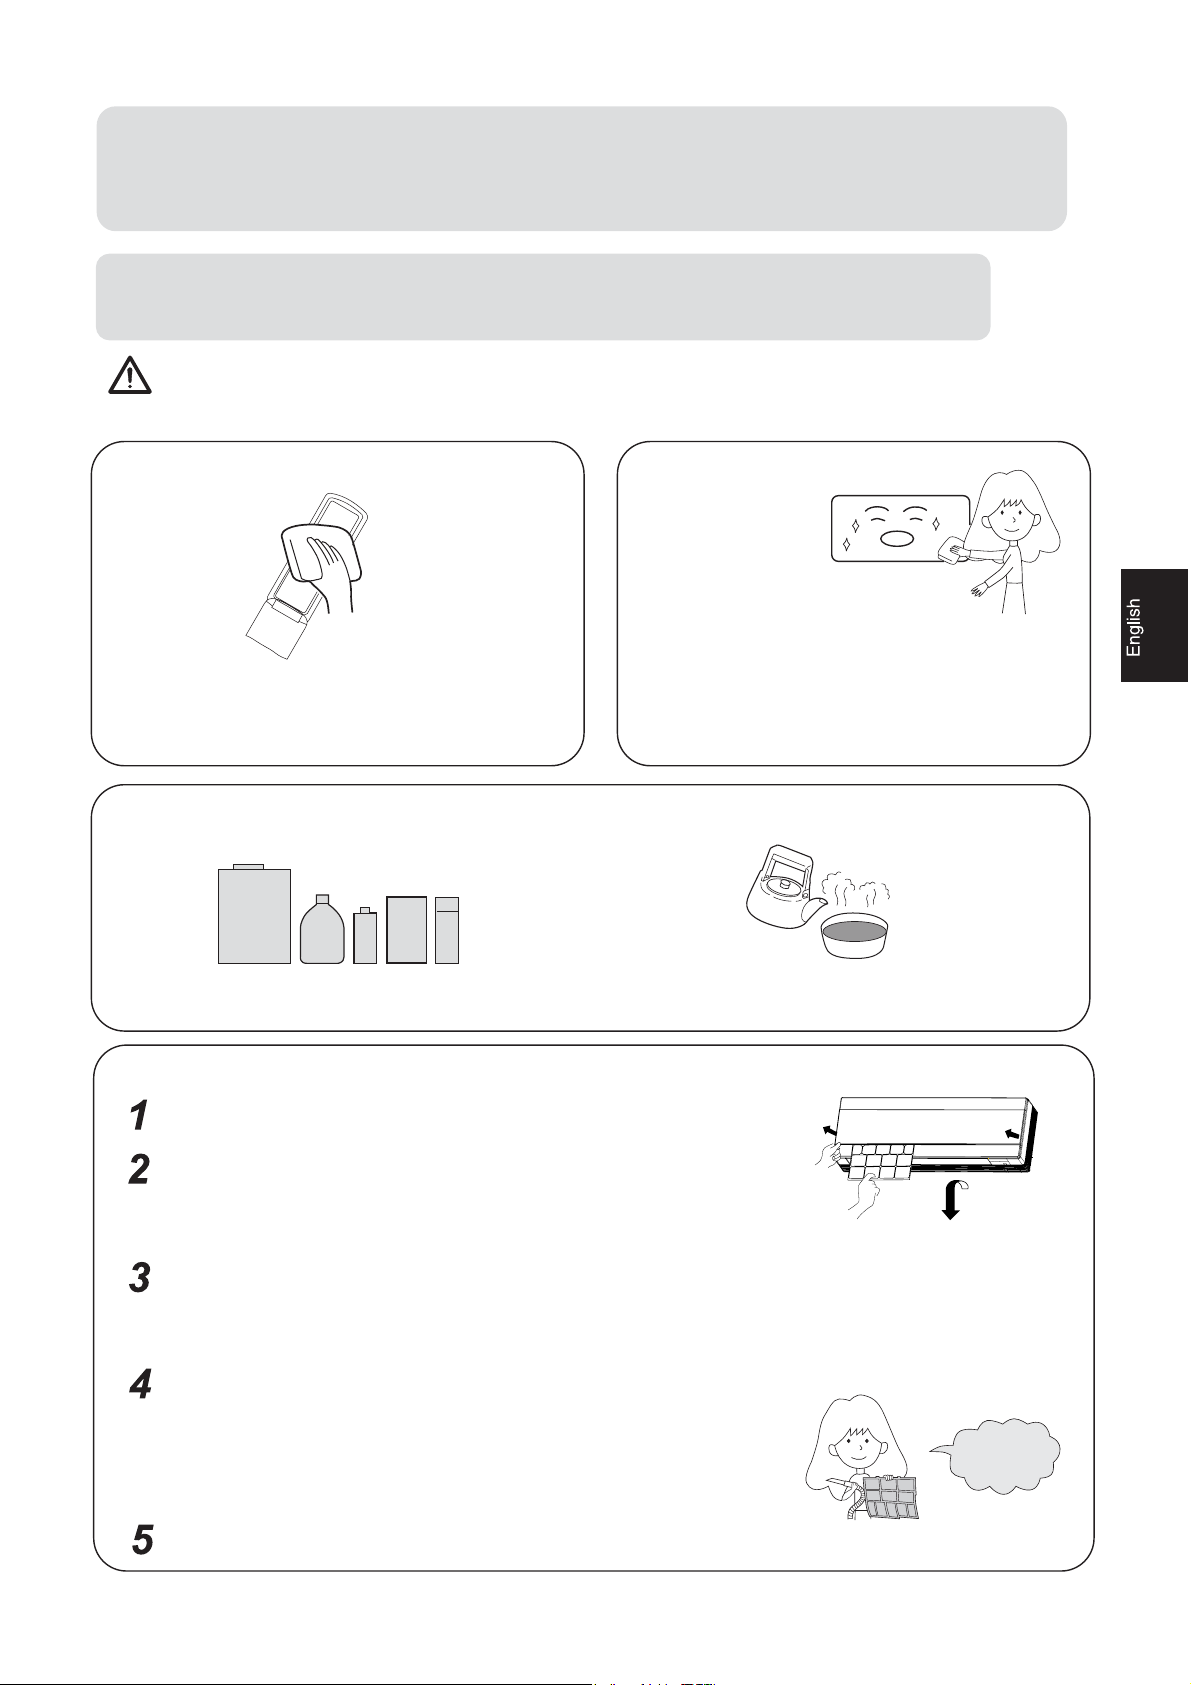
WARNING
Before maintenance,be sure to turn off the system and the circuit breaker.
Remote Controller
Do not use water, wipe the controller with a
dry cloth.Do not use glass cleaner or chemical
cloth.
Do not use the following for cleaning
Gasoline,benzine, thinner or cleanser may
damage the coating of the unit.
Indoor Body
Wipe the air conditioner by using a soft and
dry cloth.For serious stains,use a neutral
detergent diluted with water.Wring the water
out of the cloth before wiping.then wipe off
the detergent completely.
O
Hot water over 40
discoloring or deformation.
C(104OF) may cause
Air Filter cleaning
Open the inlet grille by pulling it upward.
Remove the filter.
Push up the filter's center tab slightly until it is released
from the stopper, and remove the filter downward.
Clean the filter.
Use a vacuum cleaner to remove dust, or wash the filter with
water.After washing, dry the filter completely in the shade.
Attach the filter.
Attach the filter correctly so that the "FRONT" indication is
facing to the front.Make sure that the filter is completely
fixed behind the stopper.If the right and left filters are not
attached correctly, that may cause defects.
Close the inlet grille.
23
Once every
two weeks
Page 25

Maintenance
Replancement of Air Purifying Filter
1.Open the lnlet Grille
Open the inlet grille by pushing each ends of
the inlet grille upward.(use thumbs to push
up)
2.Detach the standard air filter
Slide the knob slightly upward to release the
filter, then withdraw it.
3.Attach old Air Purifying Filter
Put air purifying filter appliances into the
right and left filter frames.
Detach old Air Purifying Filter
The green aspect of the bacteria-killing medium
4.Attach the standard air filter
(Necessary installation)
5.Close the Inlet Grille
Close the Grille surely
air purifying filter will face outside, the white
aspect will face to the machine.
Note: the bacteria-killing mediums placed on the
right side. the multi-lights touching intermediary is
placed on the left side.
Common sense:
1.For the units with UV light degerming function,the air purifying filter of the bacteria-killing
medium and the multi-lights touching intermediary is effective for a long time and don't need
to be changed (UV light emitted by the UV light device of the indoor unit catalytically activates
the nano TiO
efficient and lasting. multi-lights touching intermediary don't need to be exposed to the sunlight.).
2.For the units without UV light degerming function,the air purifying filter of the multi-lights
touching intermediary will be solarized in fixed time. In normal family,it will be solarized
every 6 months. The solarization time will last no less than 8 hours under the state of
abundant sun.
3.But in the use, please note to clean the filter frequently (take off the back suction cleaner
or lightly pat it) to avoid the operating effect is lowered due to the dust covering the filter.
Multi-lights touching intermediary and bacteria-killing medium filter is strictly prohibited
from being cleaned by water.
The the bacteria-killing medium filter not in use should be stored in shade, cool and dry place.
Please don't expose it to the sunlight for a long time otherwise the degerming performance will
drop.
on the multi-lights touching intermediary, and the degerming effect is highly
2
24
Page 26
Maintenance
To Keep Your Air conditioner in Good Condition
after Season.
Operate in cooling mode for 2-3 hours.
To prevent breeding mold or bad smell, be sure to
O
operate at the designated temperature or 30
mode and High speed fan mode for 2-3 hours.
Put off the power supply cord.
C,cooling
Cleaning the body.
Take out the batteries from the
wireless remote controller.
25
Page 27
Maintenance
Before Setting in High season
Cleaning the standard air filter.
Operation without filter may cause troubles.Be sure
to attach both right and left filters prior to the operation.
Each of them are of different shapes.
Connecting the earthing cable.
Caution
Incomplete earthing may cause an electric shock.
Do not block the air inlet or outlet.
Plug-in
Caution
After brush away dust at the plug, insert the
plug of the power supply cord into the outlet
completely.In case of suing exclusive circuit
breaker,switch on the circuit breaker.
EARTHING
NO WET HAND
26
Page 28
6TQWDNGUJQQVKPI
$GHQTGCUMKPIHQTUGTXKEGEJGEMVJGHQNNQYKPIHKTUV
0QTOCN
2GTHQTOCPEG
KPURGEVKQP
2JGPQOGPQP
6JGU[UVGOFQGUPQVTGUVCTV
KOOGFKCVGN[
0QKUGKUJGCTF
5OGNNUCTGIGPGTCVGF
%CWUGQTEJGEMRQKPVU
9JGPWPKVKUUVQRRGFKVYQPVTGUVCTV
KOOGFKCVGN[WPVKNOKPWVGUJCXGGNCRUGF
VQRTQVGEVVJGU[UVGO
9JGPVJGGNGEVTKERNWIKURWNNGFQWVCPF
TGKPUGTVGFVJGRTQVGEVKQPEKTEWKVYKNNYQTM
HQTOKPWVGUVQRTQVGEVVJGCKTEQPFKVKQPGT
&WTKPIWPKVQRGTCVKQPQTCVUVQRCUYKUJKPI
QTIWTINKPIPQKUGOC[DGJGCTF#VHKTUV
OKPWVGUCHVGTWPKVUVCTVVJKUPQKUGKUOQTG
PQVKEGCDNG6JKUPQKUGKUIGPGTCVGFD[
TGHTKIGTCPVHNQYKPIKPVJGU[UVGO
&WTKPIWPKVQRGTCVKQPCETCEMKPIPQKUGOC[
DGJGCTF6JKUPQKUGKUIGPGTCVGFD[VJG
ECUKPIGZRCPFKPIQTUJTKPMKPIDGECWUGQH
VGORGTCVWTGEJCPIGU
5JQWNFVJGTGDGCDKIPQKUGHTQOCKTHNQYKP
WPKVQRGTCVKQPCKTHKNVGTOC[DGVQQFKTV[
6JKUKUDGECWUGVJGU[UVGOEKTEWNCVGUUOGNNU
HTQOVJGKPVGTKQTCKTUWEJCUVJGUOGNNQH
HWTPKVWTGEKICTGVVGU
/WNVKRNG
EJGEM
/KUVQTUVGCOCTG
&QGUPQVYQTMCVCNN
2QQTEQQNKPI
DNQYPQWV
&WTKPI%11.QT&4;QRGTCVKQPKPFQQTWPKV
OC[DNQYQWVOKUV6JKUKUFWGVQVJGUWFFGP
EQQNKPIQHKPFQQTCKT
+URQYGTRNWIKPUGTVGF!
+UVJGTGCRQYGTHCKNWTG!
+UHWUGDNQYPQWV!
+UVJGCKTHKNVGTFKTV[!0QTOCNN[KVUJQWNFDG
ENGCPGFGXGT[FC[U
#TGVJGTGCP[QDUVCENGUDGHQTGKPNGVCPFQWVNGV!
+UVGORGTCVWTGUGVEQTTGEVN[!
#TGVJGTGUQOGFQQTUQTYKPFQYUNGHVQRGP!
+UVJGTGCP[FKTGEVUWPNKIJVVJTQWIJVJG
YKPFQYFWTKPIVJGEQQNKPIQRGTCVKQP!7UG
EWTVCKP
#TGVJGTGVQQOWEJJGCVUQWTEGUQTVQQOCP[
RGQRNGKPVJGTQQOFWTKPIEQQNKPIQRGTCVKQP!
27
Page 29
Índice
Precauciones para el uso
Denominación de los componentes
Teclas y display del mando a distancia
Funcionamiento
Mantenimiento
Guía para la búsqueda de las averías
2
9
1
3
3
2
4
3
5
4
4
9
28
Page 30

Precauciones para el uso
• Antes de usar el climatizador lea el presente manual de instrucciones
• Las precauciones de seguridad que figuran a continuación se subdividen en PELIGRO y ATENCIÓN . La palabra PELIGRO
corresponde a precauciones que, en caso de no observarse, pueden comportar serias consecuencias como muerte, lesiones graves, etc. No obstante, la palabra ATENCIÓN también corresponde a precauciones que, en caso de no observarse,
pueden causar serios problemas, según la situación.
PELIGRO
En caso de mal funcionamiento como
olor de quemado, pare inmediatamente el aparato, desenchúfelo de la toma
de corriente y contacte con el servicio
de asistencia.
Use una fuente de alimentación exclusiva
con un disyuntor de corriente.
Antes de conectar el aparato introduzca
completamente el enchufe en la toma de
corriente. Use la tensión de alimentación
prescrita.
No use un cable de alimentación con un alargo o empalmado.
No use el cable de alimentación enrollado.
ATENCIÓN
No use el aparato para conservar comida, obras de arte, aparatos de precisión,
para la cría de animales o el cultivo de
plantas.
Ventile la estancia de vez en cuando si al
mismo tiempo está funcionando un electrodoméstico a gas.
No toque el interruptor de emergencia
con las manos mojadas.
No instale el climatizador cerca de una
chimenea u otro aparato para la calefacción.
Verifique periódicamente que el soporte
de la unidad externa esté en perfectas
condiciones.
Vigile de no dañar el cable de alimentación.
No introduzca ningún objeto en la rejilla
de aspiración o en la boca de salida.
No pare o ponga en marcha el aparato
tirando o introduciendo el cable de alimentación.
No dirija el flujo de aire directamente a
las personas, en especial a los recién
nacidos o ancianos.
No intente reparar o volver a montar el
aparato usted mismo.
No vierta agua sobre el climatizador para
limpiarlo.
No exponga directamente al flujo del aire
a plantas o animales.
No apoye ningún objeto sobre el aparato
ni se suba encima del mismo.
No apoye jarrones con flores o recipientes con agua sobre el aparato.
29
Page 31

Advertencias
Normas de eliminación del climatizador viejo
Antes de eliminar su climatizador viejo asegúrese de que esté
apagado y separe el enchufe de la toma de corriente. El refrigerante que contiene en su interior requiere un proceso de eliminación especial. Los materiales de valor contenidos en el
climatizador pueden ser reciclados, infórmese en su Ayuntamiento o en el centro de recogida selectiva de su ciudad. Vigile de no dañar las tuberías del climatizador antes de llevarlo
al centro de recogida selectiva. Contribuya a la protección del
medio ambiente usando un método de eliminación correcto y
no contaminante.
Normas de eliminación del embalaje del climatizador
nuevo
Todos los materiales de embalaje del climatizador deben eliminarse sin perjudicar el medio ambiente. El embalaje de
cartón se debe cortar en trozos y depositar en el contenedor
de recogida de papel. El envoltorio de plástico y poliestireno
no contiene flúor ni cloro hidrocarburos. Todos estos materiales se pueden llevar al vertedero y reciclarlos después mediante el tratamiento adecuado. Infórmese en su Ayuntamiento sobre las modalidades de eliminación de residuos.
Normas de seguridad
Antes de usar el climatizador, lea atentamente el presente
Manual de Instrucciones. El fabricante declina cualquier responsabilidad sobre los posibles daños derivados del incumplimiento de las siguientes normas de seguridad.
• No ponga en funcionamiento un climatizador estropeado.
En caso de duda, consulte con el vendedor.
• El climatizador debe usarse siguiendo las instrucciones
que figuran en el presente Manual.
• La instalación debe ser realizada por personal cualificado
y autorizado. No intente instalar el aparato usted solo.
• Por razones de seguridad, el climatizador debe estar provisto de toma de tierra.
• Antes de abrir el panel frontal, desenchufe siempre el cable de alimentación. No tire del cable, extraiga el enchufe
de la toma de corriente.
• Póngase en contacto con el servicio de asistencia para
eventuales reparaciones. Las reparaciones de carácter
eléctrico deberán ser realizadas por electricistas cualificados. Las operaciones inadecuadas pueden ocasionar graves daños al usuario.
• No dañe los componentes del climatizador que contengan
líquido refrigerante: no perfore, aplaste o deforme las tuberías, y no rasque el revestimiento de superficie. Si el refrigerante entra en contacto con los ojos, puede ocasionar
lesiones graves.
• No obstruya o cubra la rejilla de salida del climatizador.
No introduzca los dedos u otros objetos en las rejillas de
salida/entrada o en los deflectores.
• No deje que los niños jueguen con el climatizador. No
suba encima de la unidad externa.
Límites de funcionamiento
Gama útil de las temperaturas ambiente:
Temperatura interna
Refrigeración
Temperatura externa
Temperatura interna
Calefacción
Temperatura externa
• Si el cable de alimentación está dañado, deberá ser sustituido por personal del servicio de asistencia o en cualquier caso
por personal cualificado.
• Si el fusible de la tarjeta electrónica de la unidad interna salta, sustituirlo por uno del tipo T.3.15A/250V.
• Si el fusible de la tarjeta electrónica de la unidad externa salta, sustituirlo por uno del tipo T.25A/250V.
• El método de cableado debe estar en línea con el estándar local.
• Elimine las pilas descargadas del mando a distancia del modo adecuado.
máx. D.B./W.B.
mín. D.B./W.B.
máx. D.B./W.B.
mín. D.B.
máx. D.B.
mín. D.B.
máx. D.B./W.B.
mín. D.B./W.B.
30
32/23°C
18/14°C
43/26°C
18°C
27°C
15°C
24/18°C
-7/-8°C
Page 32

Denominación de los componentes
Unidad interna
Salida aire
Entrada aire
Panel frontal
Dispositivo antibacterias
con rayos UV (en el interior)
Ionizador (en el interior)
Aletas verticales (para regular la
dirección derecha/izquierda del flujo de aire)
En los modelos dualsplit, el enchufe de alimentación se halla en la unidad externa.
Filtro purificador (en el interior)
Filtro de aire (en el interior)
Panel indicadores luminosos
(en el interior)
Deflectores horizontales
(para regular la dirección
arriba/abajo del flujo de aire
mediante el mando a distancia)
Unidad externa
Rejilla de salida del aire
Rejilla de aspiración
Tubería de conexión y cable eléctrico
Tubo de evacuación del agua de condensación
31
Page 33
Teclas y display del mando a distancia
19
TEMP
HEALTH FAN
SWING
CLOCK
TIMER
H.AIR.
FRESHSLEEP
SET
MODE
20
21
22
23
24
25
26
27
26
28
29
30
31
32
1. Tecla LOCK
Para bloquear las teclas y el display del mando a distancia.
2. Tecla LIGHT
Control el encendido y el apagado del panel indicadores luminosos
en el panel de la unidad interna.
3. Tecla CODE
Para seleccionar el código A o B. Se ruego seleccionar A
4. Tecla TIMER
Para programar las funciones "TIMER ON", "TIMER OFF", "TIMER
ON/OFF".
5. Tecla CLOCK (Reloj)
Para programar el reloj.
6. Tecla SLEEP
Para seleccionar la función nocturna Sleep (apagado automático).
7. Tecla MODE
Para seleccionar la modalidad operativa que desee. A cada presión
de la tecla la modalidad operativa varia del siguiente modo:
LOCK RESETLIGHT
CODE
Panel unidad interna
19
23
12
16
24
33
18
17
AUTO REFRIGERACIÓN DESHUMIDIFICACIÓN CALEFACCIÓN VENTILACIÓN
8. Teclas HOUR (programación horaria)
Para regular la hora del reloj y programar el horario del Timer.
9. Tecla HEALTH AIRFLOW
Para seleccionar la función “flujo de aire saludable”.
10. Tecla HEALTH
Para programar la función Health (ionizador).
11. Tecla ON/OFF
Para encender y apagar el climatizador.
12. Indicador modalidad Timer ON
(el climatizador se pone en marcha después del período programado)
13. Indicadores velocidad del ventilador
Indica la velocidad del ventilador seleccionada mediante la tecla FAN.
BAJA MEDIA ALTA AUTO
14. Indicador Lock (bloqueo teclas)
15. Indicador de la dirección del flujo de aire arriba/abajo
32
Page 34
Teclas y display del mando a distancia
16. Indicador función Sleep
17. Indicador función Health
18. Indicador función “cambio de aire”
19. Indicadores modalidad operativa
Modalidad operativa
Mando a distancia
Panel unidad interna
20. Indicador envío señal
21. Indicador modalidad Power/Soft
22. Indicador de la dirección del flujo de aire izquierda/derecha
23. Indicador temperatura programada
24. Indicador Timer Off (el climatizador se para después del período
programado)
25. Indicador horario Timer/Sleep
26. Teclas TEMP (programación temperatura)
Para programar la temperatura ambiente deseada.
27. Tecla FAN (Ventilador)
Para seleccionar la velocidad del ventilador: baja, media, alta, auto.
AUTO REFRIGERACIÓN DESHUMIDIFICACIÓN CALEFACCIÓN VENTILACIÓN
28. Tecla SWING (arriba/abajo)
Para modificar la dirección del flujo de aire verticalmente (hacia arriba y
hacia abajo).
29. Tecla SWING (izquierda/derecha)
Para modificar la dirección del flujo de aire horizontalmente (hacia la izquierda y hacia la derecha).
30. Tecla FRESH
Para seleccionar la función “cambio de aire”.
31. Tecla SET
Para confirmar las programaciones del Timer y del reloj.
32. Tecla POWER/SOFT
Para seleccionar la modalidad Power/Soft.
33. Tecla RESET
Para restablecer la programación inicial del mando a distancia.
Nota: La función “cambio de aire” (tecla 30) es opcional.
33
Page 35

Funcionamiento
Uso del mando a distancia
• Después de haber encendido el climatizador, apunte el mando a distancia directamente hacia el sensor de recepción de se-
ñales de la unidad interna.
• La distancia entre la cabeza de transmisión de la señal y el sensor de recepción no debe ser superior a los 7 metros y no de-
ben haber obstáculos.
• Evite que le caiga el mando a distancia y que se dañe.
• Si en la estancia se instala una lámpara fluorescente de encendido electrónico, o una lámpara fluorescente del tipo con con-
mutador, o un teléfono móvil, la recepción de las señales por el mando a distancia puede verse obstaculizada y por lo tanto
le distancia hasta la unidad interna deberá disminuirse.
Introducción de las pilas
• Retire la tapa del alojamiento de las pilas situadas en la parte posterior del mando a distancia: apriete ligeramente “ ” en
la dirección de la flecha y deslice la tapa.
• Introduzca las pilas: asegúrese de alinear correctamente las polaridades.
• Vuelva a cerrar de nuevo la tapa del alojamiento de las pilas.
• Indicación de la correcta ejecución de las operaciones: si después de haber pulsado la tecla ON/OFF , el display del mando a distancia sigue apagado, retire y vuelva a introducir las pilas.
Notas:
• Una visualización incompleta o no clara en el display del mando a distancia indica que las pilas se están descargando y que
por lo tanto se deben sustituir.
• Use pilas nuevas del mismo tipo.
• Si el mando a distancia no funciona normalmente, retire las pilas y vuelva a colocarlas después de algunos minutos.
Sugerencias:
• Retire las pilas si el aparato no se tiene que utilizar durante mucho tiempo.
• En caso de que el display usara igualmente las indicaciones después de la eliminación de las pilas, basta con pulsar la tecla
RESET con un objeto puntiagudo.
Programación del reloj
Cuando el aparato se pone en marcha por primera vez y después de haber sustituido las pilas del mando a distancia, el reloj
deberá programarse del siguiente modo:
1. Pulse la tecla CLOCK, en la display aparecerá la inscripción parpadeante “AM” o “PM”.
2. Pulse o para regular la hora exacta. A cada presión de la tecla, la hora aumentará o disminuirá un minuto. Si la tecla
se mantiene pulsada, la hora cambiará rápidamente.
3. Para confirmar la hora preestablecida, pulse la tecla SET. “AM” y “PM” dejarán de parpadear y el reloj empezará a funcio-
nar. (AM se refiere a la mañana y PM a la tarde).
34
Page 36

Funcionamiento
Auto, Refrigeración, Calefacción, Deshumidificación
(1) Puesta en marcha del climatizador
Pulse la tecla ON/OFF del mando a distancia para poner en marcha el climatizador.
(2) Selección de la modalidad operativa
A cada presión de la tecla MODE la modalidad operativa varia del siguiente modo:
Mando a distancia
AUTO REFRIGERACIÓN DESHUMIDIFICACIÓN CALEFACCIÓN VENTILACIÓN
TEMP
HEALTH FAN
SWING
MODE
CLOCK
TIMER
LOCK RESETLIGHT
H.AIR.
FRESHSLEEP
SET
CODE
Panel unidad interna
Panel unidad interna
AUTO REFRIGERACIÓN DESHUMIDIFICACIÓN CALEFACCIÓN VENTILACIÓN
Pare el display en el símbolo de la modalidad deseada.
(3) Programación de la temperatura
Pulse las teclas TEMP.
La temperatura indicada aumenta 1°C a cada pulsación. Si la tecla se
mantiene pulsada, la temperatura programada aumentará rápidamente.
La temperatura indicada disminuye 1°C a cada pulsación. Si la tecla se
mantiene pulsada, la temperatura programada disminuirá rápidamente.
Seleccione la temperatura deseada.
(4) Selección de la velocidad del ventilador
Pulse la tecla FAN; a cada pulsación, la velocidad del ventilador variará del siguiente modo:
BAJA MEDIA ALTA AUTO
El climatizador funcionará con la velocidad del flujo de aire seleccionada.
Cuando FAN se ha programado en “AUTO”, el climatizador regula automáticamente la velocidad del ventilador en base a la temperatura ambiente.
(5) Detención del climatizador
Pulse la tecla ON/OFF , el climatizador se para.
Notas:
• En modalidad AUTO, el climatizador selecciona automáticamente la modalidad operativa más adecuada según la tempera-
tura ambiente y la temperatura programada (Refrigeración o Calefacción).
• En la modalidad Deshumidificación, cuando la temperatura ambiente supera en 2ºC la temperatura programada, la unidad
empieza a funcionar con velocidad del ventilador baja, con independencia de la velocidad del ventilador programada.
• En modalidad Calefacción, el aire caliente se emite después de un breve período de tiempo para evitar el efecto “cold-draft”
(aire frío).
35
Page 37
Funcionamiento
Ventilación
(1) Puesta en marcha del climatizador
Pulse la tecla ON/OFF del mando a distancia para poner en marcha el climatizador.
(2) Selección de la modalidad operativa
A cada presión de la tecla MODE la modalidad operativa varia del siguiente
modo:
Mando a distancia
AUTO REFRIGERACIÓN DESHUMIDIFICACIÓN CALEFACCIÓN VENTILACIÓN
TEMP
Panel unidad interna
HEALTH FAN
SWING
MODE
CLOCK
TIMER
LOCK RESETLIGHT
H.AIR.
FRESHSLEEP
SET
CODE
Panel unidad interna
AUTO REFRIGERACIÓN DESHUMIDIFICACIÓN CALEFACCIÓN VENTILACIÓN
Pare el display en el símbolo de la modalidad Ventilación.
(3) Selección de la velocidad del ventilador
Pulse la tecla FAN; a cada pulsación, la velocidad del ventilador variará del siguiente modo:
BAJA MEDIA ALTA
El climatizador funcionará con la velocidad del ventilador seleccionada.
(4) Detención del climatizador
Pulse la tecla ON/OFF , el climatizador se para.
Nota:
En la modalidad Ventilación, el climatizador no funciona ni en Refrigeración ni
en Calefacción, sino que sólo funciona en Ventilación.
El funcionamiento FAN AUTO y la modalidad Sleep y Power/Soft no están disponibles. Además no se puede programar la temperatura ambiente.
36
Page 38
Funcionamiento
Regulación de la dirección del flujo de aire
TEMP
HEALTH FAN
SWING
H.AIR.
MODE
FRESHSLEEP
CLOCK
TIMER
LOCK RESETLIGHT
SET
CODE
Deflectores horizontales
Posición 1
Posición 2
Posición 3
Posición 4
Posición 5
Posición 6
1
2
Oscilación
automática
Aletas verticales
Posición 1
Posición 2
Posición 3
Posición 4
Posición 5
Posición 6
Posición 7
Posición 8
1) Dirección del flujo de aire arriba/abajo
Pulse la tecla SWING (flechas arriba/abajo), a cada pulsación, la dirección del flujo de aire varía del siguiente modo en
base a la modalidad operativa en uso:
Refrigeración/Deshumidificación/Ventilación:
Posición 1 Posición 2 Posición 3 Posición 4 Posición 6
Calefacción:
Posición 5 Posición 4 Posición 3 Posición 2 Posición 1 Posición 6
Auto:
Posición 1 Posición 2 Posición 3 Posición 4 Posición 5 Posición 6
El deflector horizontal oscilará según el esquema ilustrado más arriba.
2) Dirección del flujo de aire izquierda/derecha
Pulse la tecla SWING (flechas derecha/izquierda), a cada pulsación, la dirección del flujo de aire varía del siguiente modo:
Posición 1 Posición 2 Posición 3 Posición 4 Posición 5 Posición 6 Posición 7 Posición 8
Las aletas verticales oscilarán según el esquema anterior.
Nota:
Cada vez que el climatizador se vuelve a encender, el mando a distancia memoriza la dirección del flujo de aire anteriormente
programada.
37
Page 39

Funcionamiento
Inicio función Sleep
Fin función Sleep
Temperatura
programada
Paro
cerca de 6 horas
1 hora
1 hora
REFRIGERACIÓN, DESHUMIDIFICACIÓN
Aumento de 1°C
Aumento de 1°C
Inicio función Sleep
Fin función Sleep
CALEFACCIÓN
Temperatura programada
Paro
1 hora
1 hora
3 horas
cerca de 3 horas
Aumento de 1°C
disminución de 2°C
disminución de 2°C
Función SLEEP
Pulsando la tecla SLEEP antes de irse a dormir, el climatizador funcionará de
modo que hace su sueño más confortable en la modalidad seleccionada.
Uso de la función Sleep
Después de haber puesto en marcha la unidad, seleccione la modalidad operativa deseada y pulse la tecla SLEEP asegurándose de que haya regulado el
reloj de modo correcto.
Funcionamiento en modalidad Refrigeración y Deshumidificación
Una hora después de la puesta en marcha de la función Sleep, la temperatura ambiente aumentará 1ºC respecto a la temperatura programada. Después
de otra hora, la temperatura ambiente aumentará otro grado. Manteniendo
esta misma temperatura, la unidad funcionará durante otras seis horas y luego se parará automáticamente. La temperatura ambiente es más alta que la
programada de modo que no haga demasiado frío durante la noche.
Funcionamiento en modalidad Calefacción
Una hora después de la puesta en marcha de la función Sleep, la temperatura ambiente disminuirá 2ºC respecto a la temperatura programada. Después
de otra hora, la temperatura ambiente disminuirá otros dos grados. Después
de otras 3 horas, la temperatura ambiente aumentará 1ºC. Manteniendo esta
misma temperatura, la unidad funcionará durante otras tres horas y luego se
parará automáticamente. La temperatura ambiente es más baja que la programada de modo que no haga demasiado calor durante la noche.
Funcionamiento en modalidad Auto
La unidad funcionará con la función Sleep en base a la modalidad operativa
seleccionada automáticamente por el sistema.
TEMP
HEALTH FAN
SWING
H.AIR.
MODE
FRESHSLEEP
CLOCK
TIMER
LOCK RESETLIGHT
SET
CODE
Funcionamiento en modalidad Ventilación
La función Sleep no está disponible
Velocidad del ventilador durante la función Sleep
En caso de que, antes de la programación de la función Sleep, la velocidad
del ventilador fuera media o alta, después de la programación de la función
Sleep el ventilador cambiará automáticamente a baja velocidad.
38
Page 40
Funcionamiento
Timer ON - Timer OFF
Antes de usar la modalidad Timer regule correctamente el reloj.
(1) Puesta en marcha de la unidad y selección de la modalidad operativa
El display de cristales líquidos mostrará la modalidad operativa programada.
(2) Selección de la modalidad Timer
Pulse la tecla TIMER; a cada pulsación la modalidad Timer variará del siguiente modo:
TEMP
Seleccione la modalidad Timer deseada (TIMER ON o bien TIMER OFF),
o parpadean en el display.
VACÍO
HEALTH FAN
SWING
MODE
CLOCK
TIMER
LOCK RESETLIGHT
H.AIR.
FRESHSLEEP
SET
CODE
Panel unidad interna
(3) Programación del timer
Pulse las teclas HOUR para la programación horaria.
La hora indicada aumenta 1 minuto a cada pulsación.
Si la tecla se mantiene pulsada, la hora cambiará rápidamente.
La hora indicada disminuye 1 minuto a cada pulsación.
Si la tecla se mantiene pulsada, la hora cambiará rápidamente.
La hora aparecerá en el display de cristales líquidos. Se puede programar el
Timer en un arco de 24 horas. AM se refiere a la mañana y PM a la tarde.
(4) Confirmación de la programación
Después de haber programado correctamente la hora, pulse la tecla SET para confirmar.
o en el mando a distancia dejan de parpadear.
Hora visualizada. La unidad se pondrá en marcha (TIMER ON) o se parará (TIMER OFF) a la hora x y x minutos.
(5) Desactivador del Timer
Pulse la tecla TIMER varias veces hasta que la modalidad Timer desaparezca
del display.
Sugerencias:
• Después de haber cambiado las pilas, o en caso de interrupción del suministro eléctrico, es necesario volver a programar el
Timer.
• El mando a distancia posee una función memoria, por lo tanto cuando se vuelve a usar la modalidad Timer, después de haber seleccionado la modalidad operativa basta con pulsar la tecla SET si la programación del Timer es igual a la de la vez anterior.
39
Page 41

Funcionamiento
Timer ON/OFF
Antes de usar la modalidad Timer regule correctamente el reloj.
(1) Puesta en marcha de la unidad y selección de la modalidad operativa
El display de cristales líquidos mostrará la modalidad operativa programada.
(2) Selección de la modalidad Timer
Pulse la tecla TIMER; a cada pulsación la modalidad Timer variará del siguiente modo:
TEMP
Seleccione la modalidad Timer deseada (TIMER ON-OFF), parpadean
en el display.
VACÍO
HEALTH FAN
SWING
MODE
CLOCK
TIMER
LOCK RESETLIGHT
H.AIR.
FRESHSLEEP
SET
CODE
Panel unidad interna
(3) Programación del horario para TIMER ON
Pulse las teclas HOUR para la programación horaria.
La hora indicada aumenta 1 minuto a cada pulsación.
Si la tecla se mantiene pulsada, la hora cambiará rápidamente.
La hora indicada disminuye 1 minuto a cada pulsación.
Si la tecla se mantiene pulsada, la hora cambiará rápidamente.
La hora aparecerá en el display de cristales líquidos. Se puede programar el
Timer en un arco de 24 horas. AM se refiere a la mañana y PM a la tarde.
(4) Configuración de la programación por TIMER ON
Después de haber programado correctamente la hora, pulse la tecla TIMER
para confirmar. en el mando a distancia deja de parpadear, al mismo
tiempo empieza a parpadear.
Hora visualizada: La unidad se podrá en marcha a la hora x y x minutos.
(5) Programación del horario para TIMER OFF
Siga el mismo procedimiento que para la “Programación del horario por TIMER ON”.
(6) Confirmación de la programación para TIMER OFF
Después de haber programado correctamente la hora, pulse la tecla SET para confirmar. en el mando a distancia deja de parpadear.
Hora visualizada: la unidad se parará a la hora x y x minutos.
Desactivación del Timer
• Pulse la tecla TIMER varias veces hasta que la modalidad Timer desaparez-
ca del display.
•
En base a la secuencia de programación del horario por TIMER ON y TIMER
OFF, se puede obtener Puesta en marcha-Paro o bien Paro-Puesta en marcha.
40
Page 42

Funcionamiento
Función Power/Soft
MODALIDAD OPERATIVA POWER
Modalidad aconsejada para obtener un rápido calentamiento o enfriamiento
de la estancia.
Activación
Pulse una vez la tecla POWER/SOFT. En el mando a distancia aparece la indicación " " y se pone en marcha el funcionamiento en la modalidad Power. El ventilador gira automáticamente en velocidad “ALTA” durante 15 minutos, para luego volver a la velocidad programada.
Desactivación
Pulse dos veces la tecla POWER/SOFT. En el mando a distancia al pulsar una
vez aparece la indicación “ ” que desaparece al pulsar la tecla una segunda vez; por lo tanto el funcionamiento se reanuda en la modalidad normal.
MODALIDAD OPERATIVA SOFT
Modalidad aconsejable para reducir el nivel de ruido del aparato, por ejemplo
cuando se duerme o se lee. El funcionamiento resulta más silencioso ya que
viene controlado el flujo de aire en la unidad interna.
Activación
Pulse dos veces la tecla POWER/SOFT. En el mando a distancia aparece la
indicación " " y se pone en marcha el funcionamiento en la modalidad
Soft. El ventilador gira automáticamente a velocidad “BAJA”.
Desactivación
Pulse una vez la tecla POWER/SOFT. La indicación " " desaparece a la
primera pulsación de la tecla, y por lo tanto el funcionamiento se reanuda en
la modalidad normal.
TEMP
HEALTH FAN
SWING
MODE
CLOCK
TIMER
LOCK RESETLIGHT
H.AIR.
FRESHSLEEP
SET
CODE
Notas:
• Como consecuencia del funcionamiento intensivo (Power) durante un breve período de tiempo, puede ser que la temperatura ambiente no sea uniforme.
• La modalidad Soft puede no resultar suficientemente potente para mantener durante largo tiempo la temperatura ambiente
a los niveles programados.
41
Page 43

Funcionamiento
Función HEALTH
La función Health comprende la función ionización y a función germinicida.
(1) Avvio del climatizzatore
Pulse la tecla ON/OFF del mando a distancia para poner en marcha el climatizador.
(2) Activación de la función Health
Función ionización
Pulse una vez la tecla HEALTH, en el display del mando a distancia aparece
el símbolo " ": el ionizador se activa. Pulsando otra vez la tecla HEALTH,
TEMP
el símbolo " " desaparece y el ionizador se para. El ionizador genera una
gran cantidad de iones negativos para equilibrar con eficacia la cantidad de
iones positivos e iones negativos en el aire, neutralizar las pilas y acelerar el depósito de polvo, y por lo tanto purificar el aire de la estancia.
HEALTH FAN
SWING
MODE
CLOCK
TIMER
LOCK RESETLIGHT
H.AIR.
FRESHSLEEP
SET
CODE
Panel unidad interna
Función germicida
Pulsando la tecla HEALTH, también se activa automáticamente el dispositivo
de rayos UV dentro de la unidad. Los rayos UV emitidos por el dispositivo catalizan los nano TiO2 en el filtro purificador de regeneración solar, realizando
así una acción antibacteriana y esterilizante eficaz y de larga duración.
Notas:
• Cuando el ventilador de la unidad interna no funciona el indicador luminoso
relativo a la función Health está encendido, pero el ionizador no emite iones.
• Mientras que el dispositivo de rayos UV está activo, no abra el panel frontal
de la unidad interna.
42
Page 44

Funcionamiento
Función HEALTH AIRFLOW
(1) Puesta en marcha del climatizador
Pulse la tecla ON/OFF del mando a distancia para poner en marcha el
climatizador. El display muestra la programación precedente (excepto las
modalidades Timer, Sleep y Health airflow). Seleccione la modalidad operativa que desee.
(2) Programación de la función “flujo de aire saludable”
1. Pulse una vez la tecla HEALTH AIRFLOW, en el display del mando a distancia aparece el símbolo " ". Las rejillas inferiores de aspiración y salida de la unidad interna están cerradas; el flujo de aire sale horizontal-
TEMP
HEALTH FAN
SWING
MODE
CLOCK
TIMER
H.AIR.
FRESHSLEEP
SET
mente de las rejillas superiores. No exponerse directamente al flujo de
aire.
2. Vuelva a pulsar la tecla HEALTH AIRFLOW, en el display del mando a
distancia aparecerá el símbolo " ". Las rejillas superiores de aspiración y salida de la unidad interna están cerradas; el flujo de aire sale verticalmente de las rejillas inferiores.
No permanezca directamente bajo el flujo de aire.
(3) Desactivación de la función “flujo de aire saludable”.
Vuelva a pulsar la tecla HEALTH AIRFLOW todas las rejillas de aspiración
y salida de la unidad interna se abren y el climatizador sigue funcionando
con la programación que había anteriormente.
LOCK RESETLIGHT
CODE
Advertencia:
No toque las aletas con las manos, de otro modo podría dañarse.
Si no funcionara correctamente apague el climatizador y vuelva a encenderlo después de un minuto.
Notas:
• Después de haber programado la función “flujo de aire saludable”, la po-
sición de las aletas es fija.
•
En la modalidad Calefacción, es preferible seleccionar la posición .
• En la modalidad Refrigeración, es preferible seleccionar la posición .
• En Refrigeración y Deshumidificación, si el climatizador está en funcio-
namiento desde hace mucho tiempo con un elevado porcentaje de humedad en el ambiente, se pueden formar gotas de condensación en las
aletas de la unidad interna.
43
Page 45

Funcionamiento
Funcionamiento de emergencia y de prueba
Funcionamiento de emergencia
• Realice esta operación sólo cuando el mando a distancia es defectuoso o bien se ha estropeado o dañado.
• Cuando se pulsa el botón de funcionamiento de emergencia, se oye un único pitido que señala el inicio de esta operación.
• En el funcionamiento de emergencia, el sistema selecciona automáticamente la modalidad
operativa (Refrigeración o Calefacción) en base a la temperatura ambiente:
Temp. ambiente
> 21°C Refrigeración 24°C No Auto
< 21°C Calefacción 24°C No Auto
• La modalidad Deshumidificación no está disponible.
Funcionamiento de prueba
•
El pulsador del funcionamiento de prueba es el mismo que el del funcionamiento de emergencia.
• Use este pulsador para el funcionamiento de prueba sólo cuando la temperatura ambiente sea
inferior a 16ºC, no lo use para el funcionamiento normal.
• Siga pulsando la tecla del funcionamiento de prueba durante más de 5 segundos. Después de
haber oído el pitido dos veces, suelte la tecla, y la Refrigeración se pondrá en marcha con la
velocidad del ventilador alta.
• Después de 30 minutos, el funcionamiento de prueba acaba automáticamente.
Desactivación del funcionamiento de emergencia o de prueba
• Sencillamente vuelva a pulsar la tecla de funcionamiento de emergencia y oirá un pitido: el funcionamiento de emergencia o
de prueba habrá finalizado.
• Para desactivar el funcionamiento de emergencia con el mando a distancia, pulse la tecla ON/OFF del mando a distancia y
se oirá un pitido. El climatizador funcionará en la modalidad operativa que figura en el display de cristales líquidos.
Modalidad operativa
Temp. programada
Modalidad Timer
Velocidad del ventilador
Función Auto-restart
Para activar la función Auto-restart (nueva puesta en marcha automática después de una interrupción del suministro eléctrico),
pulse la tecla SLEEP diez veces en 5 segundos, se oirán cuatro pitidos. Para desactivar la función, vuelva a pulsar la tecla SLEEP diez veces en 5 segundos, se oirán dos pitidos.
44
Page 46

Mantenimiento
Para un uso correcto del climatizador
Programe la temperatura ambiente de modo correcto.
Temperatura
adecuada
Cierre las puertas y las ventanas durante el funcionamiento
en la modalidad Refrigeración
En la modalidad
Refrigeración impida que
el sol entre directamente
en la estancia usando para
ello cortinas o persianas.
No coloque obstáculos delante de las rejillas de aspiración y
de salida
Use el Timer de modo eficaz
Si el climatizador no se usa durante un largo período de
tiempo, desconecte la alimentación eléctrica.
OFF
Use los deflectores de modo eficaz
45
Page 47

Mantenimiento
Una vez cada
15 días
Para un uso correcto del climatizador
ATENCIÓN
Antes de realizar la limpieza, retire el enchufe de la toma de corriente o desconecte el interruptor de la alimentación eléctrica
general.
Limpieza del mando a distancia
No use agua, use un paño seco.
No use líquidos limpiacristales ni un paño empapado con
sustancias químicas.
No use las siguientes sustancias para realizar la limpieza
Gasolina, desengrasantes o detergentes que pueden dañar el revestimiento del aparato.
Limpieza de la unidad interna
Limpie el aparato con un paño suave y seco. En caso e
manchas persistentes, limpie el aparato con un detergente
neutro. Estruje con cuidado el paño y elimine completamente cualquier traza de detergente.
Agua caliente por encima de los 40ºC que puede descolorear o deformar las partes de plástico.
Limpieza del filtro del aire
1. Abra el panel frontal empujándolo hacia arriba con los pulgares
2. Retire el filtro del aire
Empuje ligeramente hacia arriba la aleta central del filtro hasta que se desenganche. Retire el filtro tirando hacia abajo.
3. Limpie el filtro
Use una aspiradora para eliminar el polvo, o bien lave el filtro con agua.
Después del lavado, seque completamente el filtro a la sombra.
4. Volver a colocar el filtro
Introduzca el filtro de modo que la inscripción “FRONT” se halle hacia delante.
Asegúrese de que el filtro esté completamente enganchado, en caso contrario
podrían producirse anomalías.
5. Cierre el panel frontal
46
Page 48

Mantenimiento
Cambio de los filtros purificadores
1. Abra el panel frontal empujándolo hacia arriba con los pulgares.
2. Retire el filtro del aire.
Empuje ligeramente hacia arriba la aleta central del filtro hasta que se desenganche.
Retire el filtro tirando hacia abajo.
3. Retire el filtro purificador antibacteriano viejo y sustitúyalo por uno nuevo,
introduciéndolo en el marco del filtro del aire. El lado de color verde va hacia el exterior,
mientras que el lado de color blanco va hacia el interior del aparato.
4. Volver a colocar el filtro del aire.
5. Cierre el panel frontal.
Notas:
• El filtro purificador antibacteriano se halla en la parte izquierda de la unidad interna, mientras que el filtro purificador de
regeneración solar se halla en la parte derecha.
• Para los modelos no provistos de dispositivo de rayos UV, los filtros con regeneración solar deben exponerse al sol a
intervalos regulares, en general, cada 6 meses deberán exponerse a la luz solar directa al menos durante 8 horas.
• De cualquier modo los filtros purificadores antibacterianos y los filtros con regeneración solar se limpian con frecuencia, para
evitar que el polvo reduzca las prestaciones del climatizador; use una aspiradora o sacúdalos ligeramente para eliminar el
polvo. Está absolutamente prohibido lavarlos con agua.
• Los filtros purificadores antibacterianos, cuando no se usan, deben conservarse a la sombra, en un lugar fresco y seco.
No exponerlos al sol durante mucho tiempo, en caso contrario se anularía su eficacia germicida.
47
Page 49

Mantenimiento
TOMA DE TIERRA
A principios de estación
1. Limpiar los filtros del aire
Si el climatizador se hace funcionar sin filtros del aire, se podrían producir anomalías.
Asegúrese de introducir los filtros derecho e izquierdo (de modo distinto) antes de poner en marcha el climatizador.
2. Conecte el cable de toma de tierra
ATENCIÓN
Una toma de tierra incompleta puede provocar descargas eléctricas.
3. Retire los eventuales obstáculos situados delante de las
rejillas de aspiración y de salida
4. Introduzca el enchufe en la toma de corriente
ATENCIÓN
Después de haber retirado el polvo eventual del enchufe, introduzca
completamente el enchufe del cable de alimentación en la toma de corriente.
NO CON LAS
MANOS MOJADAS
Al final de estación
1. Haga funcionar el climatizador en modalidad Refrigeración durante 2-3 horas
Para impedir la formación de moho o malos olores, haga funcionar el climatizador durante 2 o 3 horas a la temperatura
programada de 30°C, en modalidad Refrigeración y con el ventilador a alta velocidad.
2. Retire el enchufe de la toma de corriente
3. Limpie el cuerpo del aparato
4. Retire las pilas del mando a distancia
48
Page 50

Guía para la búsqueda de las averías
Antes de dirigirse al Servicio de asistencia, realice las siguientes comprobaciones
El aparato no se pone en marcha inmediatamente.
Se oyen ruidos raros.
Se sienten olores.
•
Una vez que el climatizador está apagado, no se vuelve a poner
en marcha hasta después de 3 minutos para proteger al sistema.
• Cuando el cable de alimentación se saca o se vuelve a introducir el circuito de protección entra en funcionamiento durante
3 minutos para proteger al aparato.
• Durante el funcionamiento o el paro del climatizador se pueden
oír ruidos, aun más evidentes durante los 2-3 minutos posteriores a la puesta en marcha del aparato. Este tipo de ruido se
debe al paso del líquido refrigerante por las tuberías.
• Durante el funcionamiento, se pueden oír crujidos.
Ello se debe a la contracción o a la expansión del cuerpo del
aparato a causa de la variación de temperatura.
• En caso de que se oiga mucho ruido durante la emisión del aire por el climatizador, podría indicar que el filtro del aire está demasiado sucio.
• Ello se debe al hecho de que el aparato pone en circulación
olores procedentes del ambiente interno, como olores de humo, de muebles, etc.
La unidad interna desprende vapor.
El climatizador no funciona.
Malas prestaciones de Refrigeración.
En caso de señalización de alarma o falta de funcionamiento podría no tratarse de una avería sino de una protección normal
del aparato por causas externas. Para restablecer el correcto funcionamiento se debe cortar la tensión como mínimo durante
3 minutos y luego volver a dar la tensión a la instalación. Si el problema debiera persistir contacte con la asistencia técnica autorizada.
• Durante el funcionamiento en la modalidad Refrigeración o
Deshumidificación, la unidad interna puede emitir neblina o
vapor.
Ello se debe al repentino enfriamiento del aire en la estancia.
• ¿El enchufe está en la toma de corriente?
• ¿Se ha producido una caída de tensión?
• ¿El fusible está quemado?
• ¿El filtro del aire está sucio? Normalmente debería limpiarse cada 15 días.
•
¿Hay obstáculos que bloquean la aspiración o la emisión del aire?
• ¿Se ha programado correctamente la temperatura ambiente?
• ¿Hay puertas o ventanas abiertas?
• ¿La luz solar entra directamente en la estancia? (Corra las cortinas).
• ¿Hay demasiadas fuentes de calor o demasiada gente en la
estancia?
49
Page 51

Indice
Precauzioni per l'uso
Denominazione dei componenti
Tasti e display del telecomando
Funzionamento
Manutenzione
Guida alla ricerca dei guasti
5
1
5
3
4
5
6
5
7
6
1
7
50
Page 52
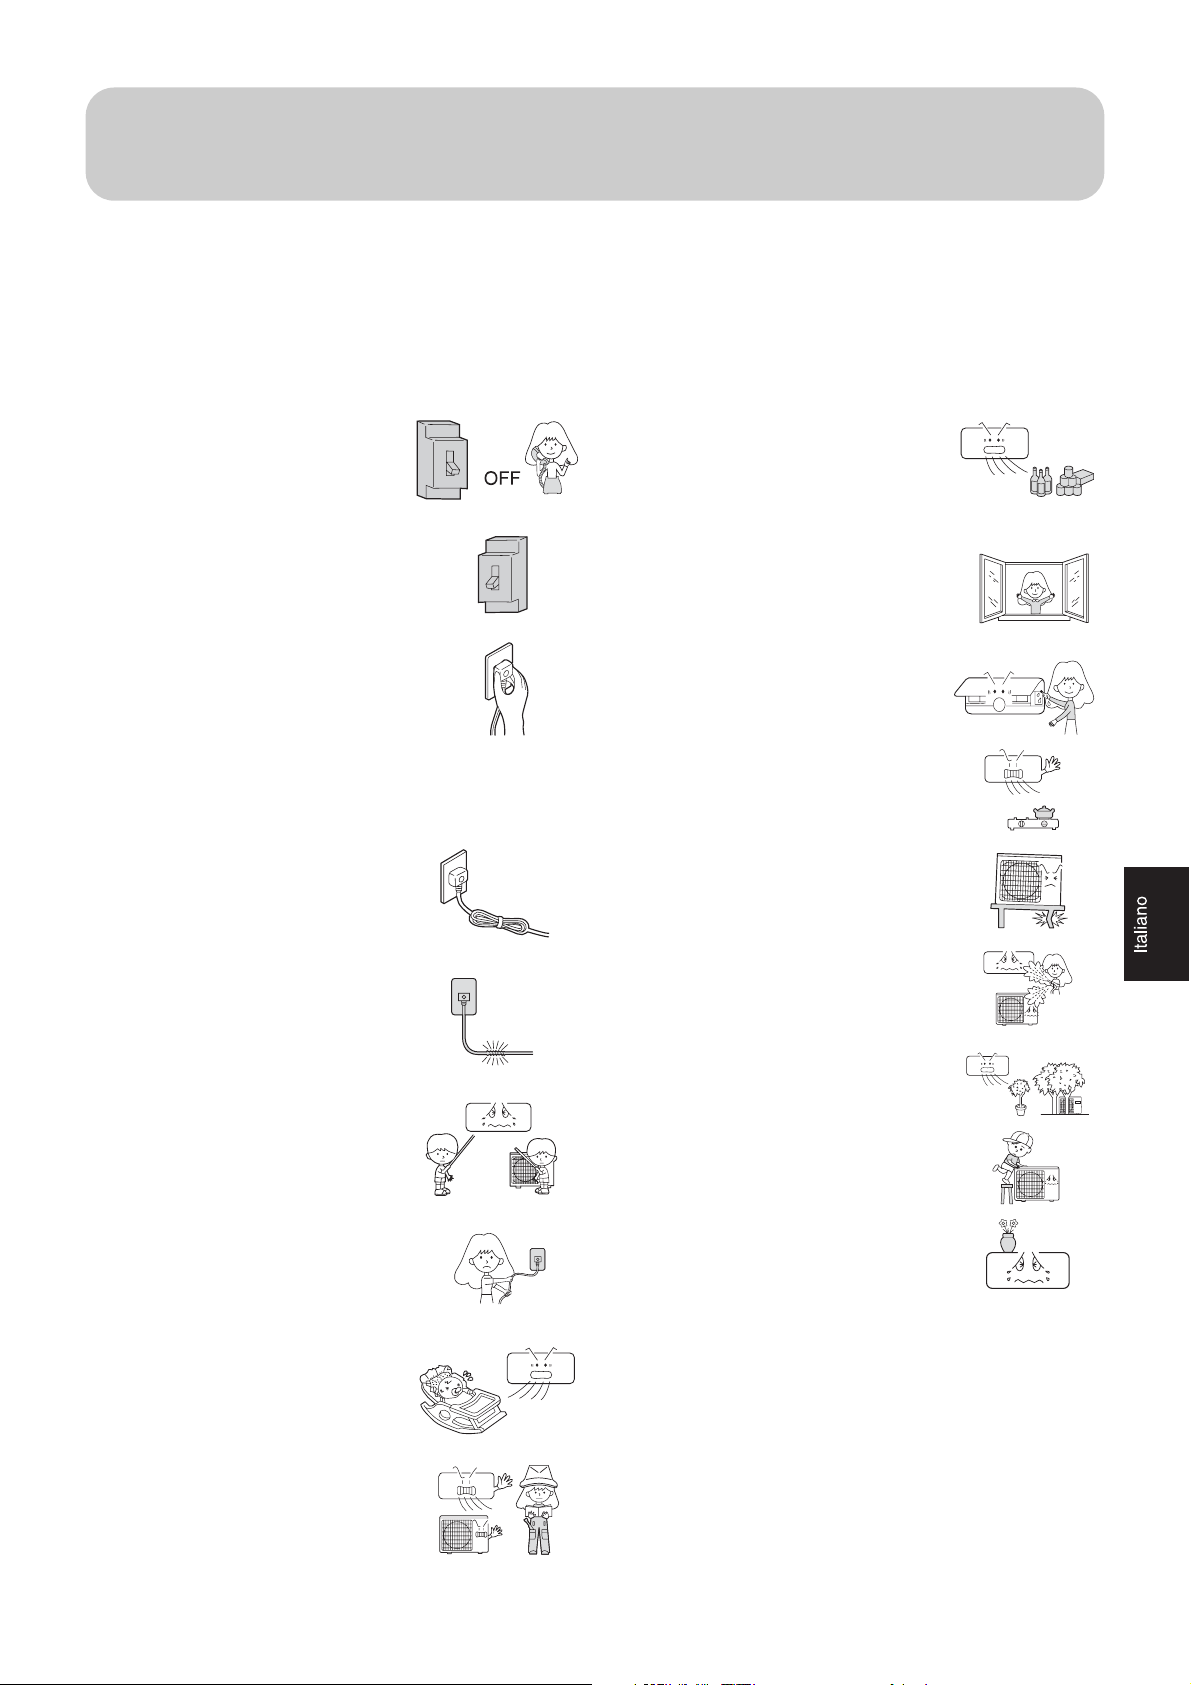
Precauzioni per l’uso
• Si prega di leggere il presente manuale di istruzioni prima di utilizzare il climatizzatore.
• Le precauzioni di sicurezza di seguito elencate si suddividono in PERICOLO e ATTENZIONE. La voce PERICOLO riguarda
precauzioni che, se non seguite, possono portare a serie conseguenze, quali morte, gravi lesioni, ecc. Tuttavia, anche la voce ATTENZIONE riguarda precauzioni che, se non osservate, possono causare seri problemi, a seconda della situazione.
PERICOLO
In caso di disfunzioni quali odore di
bruciato, arrestare immediatamente
l’apparecchio, staccare l’alimentazione
e contattare il servizio assistenza.
Usare una sorgente di alimentazione
esclusiva, con un sezionatore di corrente.
Inserire completamente la spina nella
presa di corrente prima di alimentare
l'apparecchio. Usare la tensione di
alimentazione prescritta.
Non utilizzare un cavo di alimentazione prolungato o
collegato a metà.
Non utilizzare il cavo di alimentazione
avvolto.
ATTENZIONE
Non utilizzare l’apparecchio allo scopo di
conservare cibo, opere d’arte, attrezzature
di precisione, per allevamento di animali o
coltivazione di piante.
Aerare la stanza di tanto in tanto,
specialmente se è contemporaneamente
in funzione un elettrodomestico a gas.
Non agire sull’interruttore di emergenza
con le mani bagnate.
Non installare il climatizzatore vicino a un
caminetto o altre apparecchiature per il
riscaldamento.
Controllare periodicamente che il
supporto dell’unità esterna sia in perfette
condizioni.
Prestare attenzione a non danneggiare
il cavo di alimentazione.
Non inserire oggetti nella griglia di
aspirazione o nella bocca di uscita.
Non arrestare o avviare l'apparecchio
tirando o inserendo il cavo di
alimentazione.
Non dirigere il flusso d'aria
direttamente sulle persone, in modo
particolare neonati o anziani.
Non tentare di riparare o ricostruire
l'apparecchio da soli.
Non versare acqua sul climatizzatore per
pulirlo.
Non collocare piante o animali
direttamente esposti al flusso d’aria.
Non appoggiare alcun oggetto
sull’apparecchio e non salirvi sopra.
Non appoggiare vasi di fiori o contenitori
d’acqua sull’apparecchio.
51
Page 53

Avvertenze
Norme di smaltimento del vecchio climatizzatore
Prima di smaltire il vostro vecchio climatizzatore, accertatevi
che sia spento e staccate la spina dalla presa di corrente. Il refrigerante contenuto all'interno richiede una speciale procedura per lo smaltimento. I materiali di valore contenuti nel climatizzatore possono essere riciclati, informatevi presso il vostro
Comune o la discarica della vostra città. Fate attenzione a non
danneggiare le tubazioni del climatizzatore prima di conferirlo
in discarica. Contribuite alla salvaguardia dell'ambiente seguendo un metodo di smaltimento corretto e non inquinante.
Norme di smaltimento dell'imballaggio del nuovo climatizzatore
Tutti i materiali di imballaggio del climatizzatore devono essere smaltiti senza recare danno all'ambiente. L'imballo di
cartone deve essere tagliato in pezzi e conferito presso una
campana raccolta carta. L'involucro di plastica e polistirolo
non contiene fluoro o cloro idrocarburi. Tutti questi materiali
possono essere conferiti in discarica e riciclati dopo un adeguato trattamento. Informatevi presso il vostro Comune circa le modalità di smaltimento rifiuti.
Norme di sicurezza
Prima di utilizzare il climatizzatore, leggere attentamente il
presente Manuale di istruzioni. Il produttore declina ogni responsabilità per eventuali danni derivanti dalla non osservanza delle seguenti norme di sicurezza.
• Non mettere in funzione un climatizzatore danneggiato. In
caso di dubbio, contattare il rivenditore.
• L'utilizzo del climatizzatore deve avvenire in stretta osservanza delle istruzioni contenute nel presente Manuale.
• L'installazione deve essere eseguita da personale qualificato e autorizzato. Non tentare di installare l'apparecchio
da soli.
• Per ragioni di sicurezza, il climatizzatore deve essere dotato di messa a terra.
• Prima di aprire il pannello frontale, staccare sempre il cavo
dell'alimentazione. Non tirare il cavo, ma estrarre la spina
dalla presa di corrente.
• Per eventuali riparazioni, contattare il Servizio Assistenza.
Le riparazioni di carattere elettrico devono essere eseguite
da elettricisti qualificati. Operazioni non adeguate possono
provocare gravi danni all'utente.
• Non danneggiare i componenti del climatizzatore che contengono liquido refrigerante: non perforare, schiacciare o
deformare le tubazioni, e non raschiarne il rivestimento di
superficie. Se il refrigerante viene a contatto con gli occhi,
può causare gravi lesioni.
• Non ostruire o coprire la griglia di uscita del climatizzatore.
Non inserire dita o altri oggetti nelle griglie di uscita/entrata
o nei deflettori.
• Non lasciar giocare i bambini con il climatizzatore. Non salire sopra l'unità esterna.
Limiti di funzionamento
Gamma utile delle temperature ambiente:
Temperatura interna
Raffreddamento
Temperatura esterna
Temperatura interna
Riscaldamento
Temperatura esterna
• Se il cavo dell’alimentazione è danneggiato, deve essere sostituito da personale del servizio assistenza o comunque da personale qualificato.
• Se il fusibile sulla scheda elettronica dell'unità interna salta, sostituirlo con uno di tipo T.3.15A/250V. Se il fusibile sulla scheda elettronica dell'unità esterna salta, sostituirlo con uno di tipo T.25A/250V.
• Il metodo di cablaggio deve essere in linea con lo standard locale.
• Smaltire le batterie scariche del telecomando in modo appropriato.
max. D.B./W.B.
min. D.B./W.B.
max. D.B./W.B.
min. D.B.
max. D.B.
min. D.B.
max. D.B./W.B.
min. D.B./W.B.
52
32/23°C
18/14°C
43/26°C
18°C
27°C
15°C
24/18°C
-7/-8°C
Page 54

Denominazione dei componenti
Unità interna
Uscita aria
Entrata aria
Pannello frontale
Dispositivo anti-batterico
a raggi UV (all'interno)
Ionizzatore (all’interno)
Alette verticali (per regolare la
direzione destra/sinistra del flusso d’aria)
Nei modelli dualsplit, la spina di alimentazione è sull'unità esterna.
Filtro purificatore (all’interno)
Filtro dell’aria (all’interno)
Pannello indicatori luminosi
(all'interno)
Deflettori orizzontali
(per regolare la direzione
alto/basso del flusso
d’aria tramite telecomando)
Unità esterna
Griglia di uscita aria
Griglia di aspirazione
Tubazione di collegamento e cavo elettrico
Tubo scarico condensa
53
Page 55

Tasti e display del telecomando
19
TEMP
HEALTH FAN
SWING
CLOCK
TIMER
H.AIR.
FRESHSLEEP
SET
MODE
20
21
22
23
24
25
26
27
26
28
29
30
31
32
1. Tasto LOCK
Per bloccare i tasti e il display del telecomando.
2. Tasto LIGHT
Controlla l'accensione e lo spegnimento degli indicatori luminosi sul
pannello dell’unità interna.
3. Tasto CODE
Per selezionare il codice A o B. Si prega di selezionare A.
4. Tasto TIMER
Per impostare le funzioni "TIMER ON", "TIMER OFF", "TIMER ONOFF".
5. Tasto CLOCK
Per impostare l'orologio.
6. Tasto SLEEP
Per selezionare la modalità notturna Sleep (spegnimento automatico).
7. Tasto MODE
Per selezionare la modalità operativa desiderata. Ad ogni pressione
del tasto, la modalità operativa varia come segue:
LOCK RESETLIGHT
CODE
Pannello unità interna
19
23
12
16
24
33
18
17
AUTO RAFFREDDAMENTO DEUMIDIFICAZIONE RISCALDAMENTO VENTILAZIONE
8. Tasti HOUR (impostazione oraria)
Per regolare l'ora dell'orologio e impostare l'orario del Timer.
9. Tasto HEALTH AIRFLOW
Per selezionare la funzione "flusso d'aria salutare".
10. Tasto HEALTH
Per impostare la funzione Health (ionizzatore).
11. Tasto ON/OFF
Per accendere e spegnere il climatizzatore.
12. Indicatore modalità Timer On
(il climatizzatore si avvia dopo il periodo impostato)
13. Indicatori velocità ventilatore
Indica la velocità del ventilatore selezionata tramite il tasto FAN.
BASSA MEDIA ALTA AUTO
14. Indicatore Lock (blocco tasti)
15. Indicatore direzione del flusso d'aria alto/basso
54
Page 56
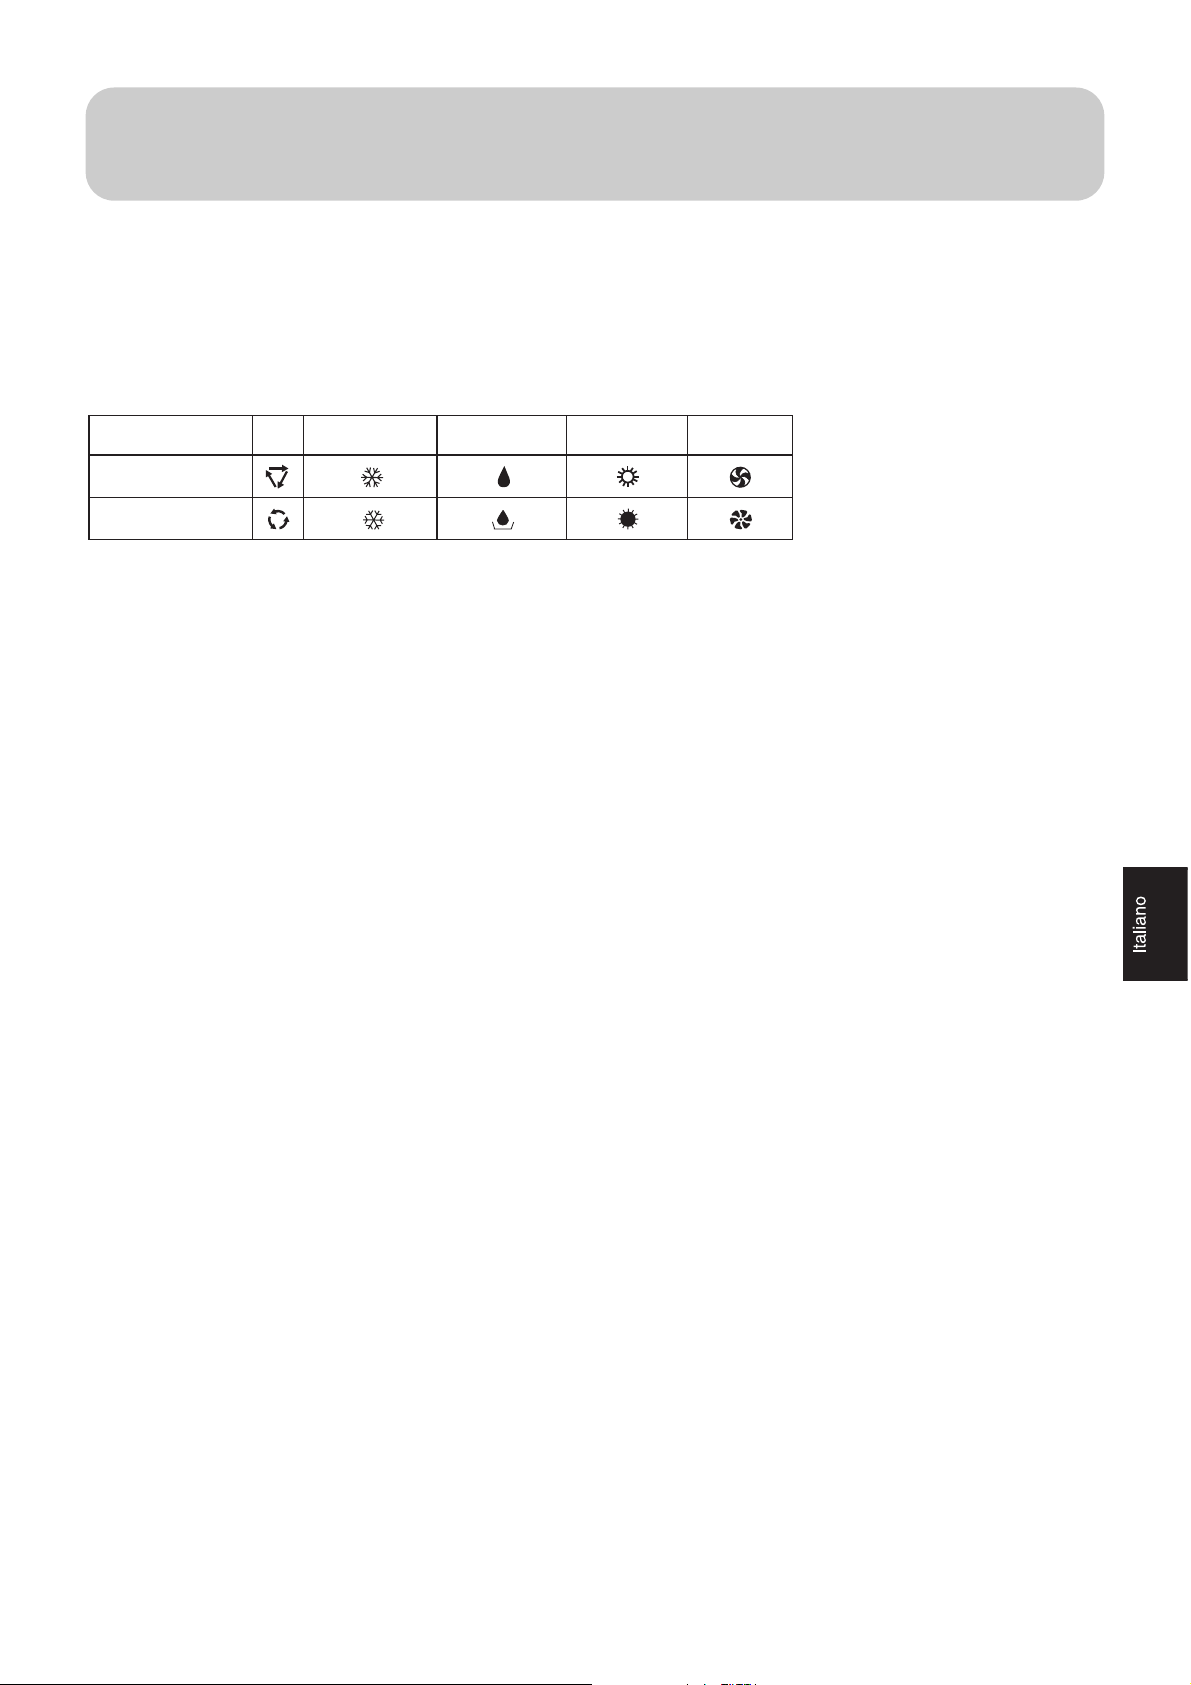
Tasti e display del telecomando
16. Indicatore funzione Sleep
17. Indicatore funzione Health
18. Indicatore funzione "ricambio d'aria"
19. Indicatori modalità operativa
Modalità operativa
Telecomando
Pannello unità interna
20. Indicatore invio segnale
21. Indicatore funzione Power/Soft
22. Indicatore direzione del flusso d'aria sinistra/destra
23. Indicatore temperatura impostata
24. Indicatore Timer Off (il climatizzatore si arresta dopo il perio-
do impostato)
25. Indicatore orarioTimer/Sleep
26. Tasti TEMP (impostazione temperatura)
Per impostare la temperatura ambiente desiderata.
27. Tasto FAN
Per regolare la velocità del ventilatore: bassa, media, alta, auto.
AUTO RAFFREDDAMENTO DEUMIDIFICAZIONE RISCALDAMENTO VENTILAZIONE
28. Tasto SWING (alto/basso)
Per modificare la direzione del flusso d'aria verticalmente (verso l'alto e verso il basso).
29. Tasto SWING (sinistra/destra)
Per modificare la direzione del flusso d'aria orizzontalmente (verso
sinistra e verso destra).
30. Tasto FRESH
Per selezionare la funzione "ricambio d'aria"
31. Tasto SET
Per confermare le impostazioni del Timer e dell'orologio.
32. Tasto POWER/SOFT
Per selezionare la modalità Power/Soft.
33. Tasto RESET
Per ripristinare l'impostazione iniziale del telecomando.
Nota: La funzione "ricambio d'aria" (tasto 30) è opzionale.
55
Page 57
Funzionamento
Uso del telecomando
• Dopo aver acceso il climatizzatore, puntare il telecomando direttamente verso il sensore di ricezione segnali sull’unità interna.
• La distanza tra la testina di trasmissione del segnale e il sensore di ricezione non deve essere superiore ai 7 metri e non de-
vono esserci ostacoli.
• Evitare di far cadere il telecomando ed evitare che venga danneggiato.
• Se nella stanza viene installata una lampada fluorescente ad avviamento elettronico, o una lampada fluorescente di tipo a com-
mutatore, o un telefono portatile, la ricezione dei segnali da parte del telecomando può essere disturbata, quindi la distanza
dall’unità interna dovrebbe essere diminuita.
Inserimento delle batterie
• Rimuovere il coperchio del vano batterie sulla parte posteriore del telecomando: premere leggermente “ ” nella direzione
della freccia e far scorrere il coperchio.
• Inserire le batterie: accertarsi di allineare correttamente le polarità.
• Richiudere nuovamente il coperchio del vano batterie.
• Indicazione della corretta esecuzione dell’operazione: se dopo aver premuto il tasto ON/OFF , il display del telecomando
resta spento, togliere e inserire di nuovo le batterie.
Note:
• Una visualizzazione completa o non chiara sul display del telecomando indica che le batterie si stanno scaricando e che quindi devono essere sostituite.
• Utilizzare batterie nuove dello stesso tipo.
• Se il telecomando non funziona normalmente, rimuovere le batterie e inserirle di nuovo dopo qualche minuto.
Suggerimenti:
• Rimuovere le batterie se l'apparecchio non viene utilizzato per lungo tempo.
• Qualora il display riportasse ugualmente delle indicazioni dopo la rimozione delle batterie, è sufficiente premere il tasto RESET
con un oggetto appuntito.
Impostazione dell'orologio
Quando l’apparecchio viene avviato per la prima volta e dopo aver sostituito le batterie del telecomando, l’orologio dovrebbe
essere impostato come segue:
1. Premere il tasto CLOCK, sul display apparirà la scritta lampeggiante “AM” o “PM”.
2. Premere o per regolare l’ora esatta. Ad ogni pressione del tasto, l’ora aumenterà o diminuirà di un minuto. Se il tasto
viene tenuto premuto, l’ora cambierà rapidamente.
3. Per confermare l’ora predisposta, premere il tasto SET. “AM” e “PM” smetteranno di lampeggiare, mentre l’orologio inizierà
a funzionare. (AM si riferisce alla mattina e PM al pomeriggio).
56
Page 58

Funzionamento
Auto, Raffreddamento, Riscaldamento, Deumidificazione
(1) Avvio del climatizzatore
Premere il tasto ON/OFF sul telecomando, il climatizzatore si avvia.
(2) Selezione della modalità operativa
Premere il tasto MODE; ad ogni pressione, la modalità operativa varia come
segue:
Telecomando
AUTO RAFFREDDAMENTO DEUMIDIFICAZIONE RISCALDAMENTO VENTILAZIONE
TEMP
HEALTH FAN
SWING
MODE
CLOCK
TIMER
LOCK RESETLIGHT
H.AIR.
FRESHSLEEP
SET
CODE
Pannello unità interna
Pannello unità interna
AUTO RAFFREDDAMENTO DEUMIDIFICAZIONE RISCALDAMENTO VENTILAZIONE
Arrestare il display sul simbolo della modalità desiderata.
(3) Impostazione della temperatura
Premere gli appositi tasti TEMP.
La temperatura indicata aumenta di 1°C ad ogni pressione. Se il tasto viene tenuto premuto, la temperatura impostata aumenterà rapidamente.
La temperatura indicata diminuisce di 1°C ad ogni pressione. Se il tasto
viene tenuto premuto, la temperatura impostata diminuirà rapidamente.
Selezionare la temperatura desiderata.
(4) Selezione della velocità del ventilatore
Premere il tasto FAN; ad ogni pressione, la velocità del ventilatore varia come
segue:
BASSA MEDIA ALTA AUTO
Il climatizzatore funzionerà con la velocità del flusso d'aria selezionata. Quando FAN è impostato su “AUTO”, il climatizzatore regola automaticamente la
velocità del ventilatore in base alla temperatura ambiente.
(5) Arresto del climatizzatore
Premere il tasto ON/OFF , il climatizzatore si arresta.
Note:
• In modalità AUTO, il climatizzatore seleziona automaticamente la modalità operativa più appropriata a seconda della tempe-
ratura ambiente e della temperatura impostata (Raffreddamento o Riscaldamento).
• In modalità Deumidificazione, quando la temperatura ambiente supera di 2°C la temperatura impostata, l'unità inizia a funzio-
nare con velocità del ventilatore bassa, indipendentemente dalla velocità del ventilatore impostata.
• In modalità Riscaldamento, l'aria calda viene emessa solo dopo un breve periodo di tempo per evitare l'effetto "cold-draft" (aria
fredda).
57
Page 59

Funzionamento
Ventilazione
(1) Avvio del climatizzatore
Premere il tasto ON/OFF sul telecomando, il climatizzatore si avvia.
(2) Selezione della modalità operativa
Premere il tasto MODE; ad ogni pressione, la modalità operativa varia come
segue:
Telecomando
AUTO RAFFREDDAMENTO DEUMIDIFICAZIONE RISCALDAMENTO VENTILAZIONE
TEMP
HEALTH FAN
SWING
MODE
CLOCK
TIMER
LOCK RESETLIGHT
H.AIR.
FRESHSLEEP
SET
CODE
Pannello unità interna
Pannello unità interna
AUTO RAFFREDDAMENTO DEUMIDIFICAZIONE RISCALDAMENTO VENTILAZIONE
Arrestare il display sul simbolo della modalità Ventilazione.
(3) Selezione della velocità del ventilatore
Premere il tasto FAN; ad ogni pressione, la velocità del ventilatore varia come
segue:
BASSA MEDIA ALTA
Il climatizzatore funzionerà con la velocità del ventilatore selezionata.
(4) Arresto del climatizzatore
Premere il tasto ON/OFF , il climatizzatore si arresta.
Nota:
In modalità Ventilazione, il climatizzatore non funziona né in Raffreddamento né
in Riscaldamento, ma solo in Ventilazione.
Il funzionamento FAN AUTO e le modalità Sleep e Power/Soft non sono disponibili. Inoltre, non è possibile impostare la temperatura ambiente.
58
Page 60

Funzionamento
Regolazione della direzione flusso d’aria
TEMP
HEALTH FAN
SWING
H.AIR.
MODE
FRESHSLEEP
CLOCK
TIMER
LOCK RESETLIGHT
SET
CODE
Deflettori orizzontali
Posizione 1
Posizione 2
Posizione 3
Posizione 4
Posizione 5
Posizione 6
1
2
oscillazione
automatica
Alette verticali
Posizione 1
Posizione 2
Posizione 3
Posizione 4
Posizione 5
Posizione 6
Posizione 7
Posizione 8
1) Direzione del flusso d’aria basso/alto
Premere il tasto SWING (freccette su/giù); ad ogni pressione, la direzione del flusso d’aria varia come segue in base alla
modalità operativa in uso:
Raffreddamento/Deumidificazione/Ventilazione:
Posizione 1 Posizione 2 Posizione 3 Posizione 4 Posizione 6
Riscaldamento:
Posizione 5 Posizione 4 Posizione 3 Posizione 2 Posizione 1 Posizione 6
Auto:
Posizione 1 Posizione 2 Posizione 3 Posizione 4 Posizione 5 Posizione 6
Il deflettore orizzontale oscillerà secondo lo schema sopra illustrato.
2) Direzione del flusso d’aria sinistra/destra
Premere il tasto SWING (freccette destra/sinistra); ad ogni pressione, la direzione del flusso d’aria varia come segue:
Posizione 1 Posizione 2 Posizione 3 Posizione 4 Posizione 5 Posizione 6 Posizione 7 Posizione 8
Le alette verticali oscilleranno secondo lo schema sopra illustrato.
Nota:
Ogni volta che il climatizzatore viene riacceso, il telecomando memorizza la direzione flusso d’aria precedentemente impostata.
59
Page 61

Funzionamento
Inizio funzione Sleep
Fine funzione Sleep
Temperatura
impostata
Arresto
circa 6 ore
1 ora
1 ora
RAFFREDDAMENTO, DEUMIDIFICAZIONE
aumento di 1°C
aumento di 1°C
Inizio funzione Sleep
Fine funzione Sleep
RISCALDAMENTO
Temperatura impostata
Arresto
1 ora
1 ora
3 ore
circa 3 ore
aumento di 1°C
diminuzione di 2°C
diminuzione di 2°C
Funzione SLEEP
Premendo il tasto SLEEP prima di andare a dormire, il climatizzatore funzionerà in modo da rendere il vostro sonno più confortevole nella modalità selezionata.
Utilizzo della funzione Sleep
Dopo aver avviato l’unità, selezionare la modalità operativa desiderata e premere il tasto SLEEP assicurandosi di aver regolato l’orologio in modo corretto.
Funzionamento in modalità Raffreddamento e Deumidificazione
Un'ora dopo l’avvio della funzione Sleep, la temperatura ambiente aumenterà
di 1°C rispetto alla temperatura impostata. Dopo un'altra ora, la temperatura
ambiente aumenterà di un altro grado. Mantenendo questa stessa temperatura, l’unità funzionerà per altre sei ore e poi si arresterà automaticamente.
La temperatura ambiente è più alta rispetto a quella impostata in modo che
non sia troppo freddo durante la notte.
Funzionamento in modalità Riscaldamento
Un'ora dopo l’avvio della funzione Sleep, la temperatura ambiente si abbasserà di 2°C rispetto alla temperatura impostata. Dopo un'altra ora, la temperatura ambiente si abbasserà di altri due gradi. Dopo altre 3 ore, la temperatura ambiente si alzerà di 1°C. Mantenendo questa stessa temperatura, l’unità funzionerà per altre tre ore e poi si arresterà automaticamente.
La temperatura ambiente è più bassa rispetto a quella impostata in modo che
non sia troppo caldo durante la notte.
TEMP
HEALTH FAN
SWING
H.AIR.
MODE
FRESHSLEEP
CLOCK
TIMER
LOCK RESETLIGHT
SET
CODE
Funzionamento in modalità Auto
L’unità funzionerà con la funzione Sleep in base alla modalità operativa scelta
automaticamente dal sistema.
Funzionamento in modalità Ventilazione
La funzione Sleep non è disponibile.
Velocità ventilatore durante la funzione Sleep
Nel caso in cui, prima dell'impostazione della funzione Sleep, la velocità del
ventilatore sia media o alta, dopo l'impostazione della funzione Sleep il ventilatore girerà automaticamente a bassa velocità.
60
Page 62

Funzionamento
Timer ON - Timer OFF
Regolare correttamente l’orologio prima di utilizzare la modalità Timer.
(1) Avvio dell’unità e selezione della modalità operativa
Il display a cristalli liquidi visualizzerà la modalità operativa impostata.
(2) Selezione della modalità Timer
Premere il tasto TIMER; ad ogni pressione, la modalità Timer varia come segue:
TEMP
Selezionare la modalità Timer desiderata (TIMER ON oppure TIMER OFF),
VUOTO
o lampeggiano sul display.
HEALTH FAN
SWING
MODE
CLOCK
TIMER
LOCK RESETLIGHT
H.AIR.
FRESHSLEEP
SET
CODE
Pannello unità interna
(3) Impostazione del timer
Premere i tasti HOUR per l’impostazione dell’orario
Ad ogni pressione, l’ora indicata aumenta di 1 minuto. Se il tasto viene te-
nuto premuto l’ora cambierà rapidamente.
Ad ogni pressione, l’ora indicata diminuisce di 1 minuto. Se il tasto viene
tenuto premuto l’ora cambierà rapidamente.
L’ora verrà visualizzata sul display a cristalli liquidi. E’ possibile impostare il Timer nell’arco di 24 ore. AM si riferisce alla mattina e PM al pomeriggio.
(4) Conferma dell’impostazione
Dopo aver impostato correttamente l’orario, premere il tasto SET per confermare.
o sul telecomando smettono di lampeggiare.
Ora visualizzata: l’unità si avvierà (TIMER ON) o si arresterà (TIMER OFF) all’ora x e x minuti.
(5) Disattivazione del Timer
Premere il tasto TIMER diverse volte finché la modalità Timer scompare dal
display.
Suggerimenti:
• Dopo aver sostituito le batterie, o in caso di interruzione di corrente, è necessario reimpostare il Timer.
• Il telecomando possiede una funzione memoria, quindi, quando si utilizza la modalità Timer la volta successiva, dopo aver selezionato la modalità operativa è sufficiente premere il tasto SET se l’impostazione del Timer è uguale alla volta precedente.
61
Page 63

Funzionamento
Timer ON/OFF
Regolare correttamente l’orologio prima di utilizzare la modalità Timer.
(1) Avvio dell’unità e selezione della modalità operativa
Il display a cristalli liquidi visualizzerà la modalità operativa impostata.
(2) Selezione della modalità Timer
Premere il tasto TIMER; ad ogni pressione, la modalità Timer varia come segue:
TEMP
Selezionare la modalità Timer desiderata (TIMER ON-OFF), lampeggia
sul display.
VUOTO
HEALTH FAN
SWING
MODE
CLOCK
TIMER
LOCK RESETLIGHT
H.AIR.
FRESHSLEEP
SET
CODE
Pannello unità interna
(3) Impostazione dell’orario per TIMER ON
Premere i tasti HOUR per l’impostazione dell’orario
Ad ogni pressione, l’ora indicata aumenta di 1 minuto. Se il tasto viene tenuto premuto l’ora cambierà rapidamente.
Ad ogni pressione, l’ora indicata diminuisce di 1 minuto. Se il tasto viene
tenuto premuto l’ora cambierà rapidamente.
L’ora verrà visualizzata sul display a cristalli liquidi. E’ possibile impostare il Timer nell’arco di 24 ore. AM si riferisce alla mattina e PM al pomeriggio.
(4) Conferma dell’impostazione per TIMER ON
Dopo aver impostato correttamente l’orario, premere il tasto TIMER per confermare. sul telecomando smette di lampeggiare, allo stesso tempo
inizia a lampeggiare.
Ora visualizzata: l’unità si avvierà all’ora x e x minuti.
(5) Impostazione dell’orario per TIMER OFF
Seguire la stessa procedura che per “Impostazione dell’orario per TIMER ON”.
(6) Conferma dell’impostazione per TIMER OFF
Dopo aver impostato correttamente l’orario, premere il tasto SET per confermare. sul telecomando smette di lampeggiare.
Ora visualizzata: l’unità si arresterà all’ora x e x minuti.
Disattivazione del Timer
• Premere il tasto TIMER diverse volte finché la modalità Timer scompare dal
display.
• In base alla sequenza di impostazione dell’orario per TIMER ON e TIMER
OFF, si può ottenere Avvio-Arresto oppure Arresto-Avvio.
62
Page 64

Funzionamento
Funzione Power/Soft
MODALITÀ OPERATIVA POWER
Modalità consigliata per ottenere un rapido riscaldamento o raffreddamento
dell'ambiente.
Attivazione
Premere il tasto POWER/SOFT una volta. Sul telecomando appare l'indicazione " " e viene avviato il funzionamento in modalità Power.
Il ventilatore gira automaticamente in velocità “ALTA”
nare alla velocità impostata.
per 15 minuti, per poi tor-
Disattivazione
Premere il tasto POWER/SOFT due volte. Sul telecomando appare l'indicazione " " alla prima pressione, che scompare alla seconda pressione del
tasto; quindi il funzionamento riprende in modalità normale.
MODALITÀ OPERATIVA SOFT
Modalità consigliabile per ridurre il livello di rumorosità dell'apparecchio, per
esempio quando si dorme o si legge. Il funzionamento risulta più silenzioso in
quanto viene controllato il flusso d'aria in uscita dall'unità interna.
Attivazione
Premere il tasto POWER/SOFT due volte. Sul telecomando appare l'indicazione " " e viene avviato il funzionamento in modalità Soft. Il ventilatore gira automaticamente in velocità “BASSA”.
Disattivazione
Premere il tasto POWER/SOFT una volta. L'indicazione " " scompare alla prima pressione del tasto, quindi il funzionamento riprende in modalità normale.
TEMP
HEALTH FAN
SWING
MODE
CLOCK
TIMER
LOCK RESETLIGHT
H.AIR.
FRESHSLEEP
SET
CODE
Note:
• Come conseguenza del funzionamento intensivo (Power) per un breve periodo di tempo, può succedere che la temperatura
ambiente non sia uniforme.
• La modalità Soft può non risultare sufficientemente potente da mantenere per lungo tempo la temperatura ambiente ai livelli
impostati.
63
Page 65

Funzionamento
Funzione HEALTH
La funzione Health comprende la funzione ionizzazione e la funzione germicida.
(1) Avvio del climatizzatore
Premere il tasto ON/OFF sul telecomando, il climatizzatore si avvia.
(2) Attivazione funzione Health
Funzione ionizzazione
Premere una volta il tasto HEALTH, sul display del telecomando appare il simbolo " ": lo ionizzatore si attiva. Premendo nuovamente il tasto HEALTH, il
simbolo " " scompare e lo ionizzatore si arresta.
TEMP
Lo ionizzatore genera una grande quantità di ioni negativi per bilanciare efficacemente la quantità di ioni positivi e ioni negativi nell'aria, neutralizzare i batteri e accelerare il deposito di polveri, e quindi purificare l'aria della stanza.
HEALTH FAN
SWING
MODE
CLOCK
TIMER
LOCK RESETLIGHT
H.AIR.
FRESHSLEEP
SET
CODE
Pannello unità interna
Funzione germicida
Premendo il tasto HEALTH, viene automaticamente attivato anche il dispositivo a raggi UV all'interno dell'unità. I raggi UV emessi dal dispositivo catalizzano i nano TiO
2
sul filtro purificatore a rigenerazione solare, svolgendo così un'a-
zione anti-batterica e sterilizzante efficace e di lunga durata.
Note:
• Quando la ventola dell'unità interna non è in funzione, l'indicatore luminoso
relativo alla funzione Health è acceso, ma lo ionizzatore non emette ioni.
• Mentre il dispositivo a raggi UV è attivo, non aprire il pannello frontale dell'unità interna.
64
Page 66

Funzionamento
Funzione HEALTH AIRFLOW
(1) Avvio del climatizzatore
Premere il tasto ON/OFF sul telecomando, il climatizzatore si avvia.
Il display visualizza l'impostazione precedente (eccettuate le modalità
Timer, Sleep e Health airflow). Selezionare la modalità operativa desiderata.
(2) Impostazione della funzione "flusso d'aria salutare"
1. Premere il tasto HEALTH AIRFLOW, sul display del telecomando appare il simbolo " ". Le griglie inferiori di aspirazione e uscita dell'unità interna sono chiuse; il flusso d'aria fuoriesce orizzontalmente
TEMP
HEALTH FAN
dalle griglie superiori. Non sostare direttamente nel flusso d'aria.
2. Premere ancora il tasto HEALTH AIRFLOW, sul display del telecomando appare il simbolo " ". Le griglie superiori di aspirazione e
uscita dell'unità interna sono chiuse; il flusso d'aria fuoriesce verticalmente dalle griglie inferiori.
Non sostare direttamente nel flusso d'aria.
MODE
CLOCK
TIMER
LOCK RESETLIGHT
H.AIR.
FRESHSLEEP
CODE
SWING
SET
(3) Disattivazione della funzione "flusso d'aria salutare"
Premere nuovamente il tasto HEALTH AIRFLOW; tutte le griglie di aspirazione e uscita dell'unità interna si aprono, e il climatizzatore continua
a funzionare con l'impostazione che aveva precedentemente.
Avvertenza:
Non spostare le alette con le mani, altrimenti potrebbero danneggiarsi.
Se non dovessero funzionare correttamente, spegnere il climatizzatore
e riaccenderlo dopo un minuto.
Note:
• Dopo aver impostato la funzione "flusso d'aria salutare", la posizione
delle alette è fissa.
•
In modalità Riscaldamento, è preferibile selezionare la posizione
•
In modalità Raffreddamento, è preferibile selezionare la posizione .
.
• In Raffreddamento e Deumidificazione, se il climatizzatore è in funzio-
ne da molto tempo con un alto tasso di umidità nell'ambiente, si possono formare delle gocce di condensa sulle alette dell'unità interna.
65
Page 67

Funzionamento
Funzionamento d’emergenza e di prova
Funzionamento d'emergenza
• Effettuare questa operazione solo quando il telecomando è difettoso oppure è stato smarrito o
danneggiato.
• Quando viene premuto il pulsante del funzionamento d'emergenza, si sente un "Piii" una volta
sola, che segnala l'inizio di questa operazione.
• Nel funzionamento d'emergenza, il sistema seleziona automaticamente la modalità operativa
(Raffreddamento o Riscaldamento) in base alla temperatura ambiente:
Temp. ambiente Modalità operativa Temp. impostata Modalità Timer Velocità ventilatore
> 21°C Raffreddamento 24°C No Auto
< 21°C Riscaldamento 24°C No Auto
• La modalità Deumidificazione non è disponibile.
Funzionamento di prova
• Il pulsante del funzionamento di prova è lo stesso di quello del funzionamento d'emergenza.
• Utilizzare questo pulsante per il funzionamento di prova solo quando la temperatura ambiente
è inferiore a 16°C, non utilizzarlo per il funzionamento normale.
• Continuare a premere il pulsante del funzionamento di prova per più di 5 secondi. Dopo aver
sentito il segnale "Piii" due volte, rilasciare il tasto, e viene avviato il Raffreddamento con velocità del ventilatore alta.
• Dopo 30 minuti, il funzionamento di prova termina automaticamente.
Disattivazione del funzionamento d'emergenza o di prova
• Semplicemente premere nuovamente il pulsante funzionamento d'emergenza e si sentirà un suono "Piii": il funzionamento d'emergenza o di prova è terminato.
• Per disattivare il funzionamento d'emergenza col telecomando, premere il tasto ON/OFF sul telecomando, e si sentirà un suono "Piii". Il climatizzatore funzionerà nella modalità operativa riportata sul display a cristalli liquidi.
Funzione Auto-restart
Per attivare la funzione Auto-restart (riavvio automatico dopo un'interruzione di corrente), premere il tasto SLEEP dieci volte in 5
secondi, si sentirà un suono "biiip" per quattro volte. Per disattivare la funzione, premere nuovamente il tasto SLEEP dieci volte
in 5 secondi, si sentirà un suono "biiip" per due volte.
66
Page 68

Manutenzione
Per un uso corretto del climatizzatore
Impostare la temperatura ambiente in modo adeguato
Temperatura
adeguata
Chiudere porte e finestre durante il funzionamento
In modalità Raffreddamento
In modalità Raffreddamento,
impedire che il sole entri
direttamenre nella stanza
utilizzando tende o persiane
Non collocare ostacoli davanti alle griglie di aspirazione e di
uscita
Utilizzare il Timer in maniera efficace
Se il climatizzatore non viene usato per un lungo periodo di
tempo, staccare l'alimentazione elettrica
OFF
Utilizzare i deflettori in maniera efficace
67
Page 69

Manutenzione
Una volta ogni
15 giorni
Per un uso corretto del climatizzatore
ATTENZIONE
Prima di effettuare la pulizia, togliere la spina dalla presa di corrente o staccare l'interruttore dell'alimentazione elettrica generale.
Pulizia del telecomando
Non utilizzare acqua, si prega di usare un panno asciutto.
Non usare liquido lavavetri o un panno imbevuto di sostanze chimiche.
Non usare le seguenti sostanze per la pulizia
Benzina, sgrassanti o detersivi possono danneggiare il rivestimento dell'apparecchio.
Pulizia dell'unità interna
Pulire l'apparecchio con un panno morbido e asciutto.
In caso di macchie persistenti, pulire l'apparecchio con detergente neutro. Strizzare accuratamente il panno e rimuovere completamente ogni traccia di detergente.
Acqua calda sopra i 40°C può scolorire o deformare le parti in plastica.
Pulizia del filtro dell'aria
1. Aprire il pannello frontale spingendolo verso l'alto con i pollici
2. Rimuovere il filtro dell'aria
Spingere leggermente verso l'alto l'aletta centrale del filtro finché non è sganciata. Rimuovere il filtro tirando verso il basso.
3. Pulire il filtro
Utilizzare un aspirapolvere per rimuovere la polvere, oppure lavare il filtro con acqua.
Dopo il lavaggio, asciugare completamente il filtro all'ombra.
4. Reinserire il filtro
Inserire il filtro in modo che la scritta "FRONT" sia rivolta in avanti. Accertarsi che
il filtro sia completamente agganciato, in caso contrario potrebbero verificarsi
delle anomalie.
5. Chiudere il pannello frontale
68
Page 70

Manutenzione
Sostituzione dei filtri purificatori
1. Aprire il pannello frontale spingendolo verso l'alto con i pollici.
2. Rimuovere il filtro dell'aria.
Spingere leggermente verso l'alto l'aletta centrale del filtro finché non è sganciata.
Rimuovere il filtro tirando verso il basso.
3. Rimuovere il filtro purificatore anti-batterico vecchio e sostituirlo con uno nuovo,
inserendolo all'interno della cornice del filtro dell'aria. Il lato di colore verde va rivolto
verso l'esterno, mentre il lato di colore bianco va rivolto verso l'interno dell'apparecchio.
4. Reinserire il filtro dell'aria.
5. Chiudere il pannello frontale.
Note:
• Il filtro purificatore anti-batterico è posizionato sulla parte sinistra dell'unità interna, mentre il filtro purificatore a rigenerazione
solare è posizionato sulla parte destra.
• Per i modelli dotati di dispositivo a raggi UV, i filtri a rigenerazione solare restano efficaci per lungo tempo e quindi non è
necessario sostituirli.
• Per i modelli non dotati di dispositivo a raggi UV, i filtri a rigenerazione solare devono essere esposti al sole a intervalli
regolari; in genere, ogni 6 mesi vanno esposti alla luce solare diretta per almeno 8 ore.
• Ad ogni modo, entrambi i filtri purificatori antibatterici e i filtri a rigenerazione solare vanno puliti di frequente, per evitare che la
polvere riduca le prestazioni del climatizzatore; utilizzare un aspirapolvere o sbatterli leggermente per togliere la polvere.
E' assolutamente vietato lavarli con acqua.
• I filtri purificatori antibatterici, quando non in uso, devono essere conservati all'ombra, in un luogo fresco e asciutto. Non
esporli al sole per lungo tempo, altrimenti la loro efficacia germicida verrà annullata.
69
Page 71

Manutenzione
A inizio stagione
1. Pulire i filtri dell'aria
Se il climatizzatore viene fatto funzionare senza filtri dell'aria, ciò potrebbe causare anomalie. Accertarsi di inserire entrambi i
filtri destro e sinistro (di forma diversa) prima di avviare il climatizzatore.
2. Collegare il cavo di messa a terra
ATTENZIONE
Una messa a terra incompleta può causare scosse elettriche.
3. Rimuovere eventuali ostacoli davanti alle griglie
di aspirazione e di uscita
MESSA A TERRA
4. Inserire la spina nella presa di corrente
ATTENZIONE
Dopo aver rimosso eventuale polvere dalla spina, inserire
completamente la spina del cavo di alimentazione dentro la
presa di corrente.
NON CON LE MANI
BAGNATE
A fine stagione
1. Far funzionare il climatizzatore in modalità Raffreddamento per 2-3 ore
Per impedire la formazione di muffe o cattivi odori, far funzionare il climatizzatore per 2-3 ore alla temperatura impostata
di 30°C, in modalità Raffreddamento e con il ventilatore ad alta velocità.
2. Staccare la spina dalla presa di corrente
3. Pulire il corpo dell'apparecchio
4. Rimuovere le batterie dal telecomando
70
Page 72

Guida alla ricerca dei guasti
Prima di rivolgersi al Servizio assistenza, effettuare le seguenti verifiche:
L'apparecchio non si riavvia immediatamente.
Si sentono rumori insoliti.
Si sentono odori.
• Una volta spento il climatizzatore, questo non si riavvia prima
di 3 minuti per proteggere il sistema.
• Quando il cavo di alimentazione viene tirato o reinserito, il circuito di protezione entra in funzione per 3 minuti per proteggere l’apparecchio.
• Durante il funzionamento o all’arresto del climatizzatore, si
possono sentire dei gorgoglii, ancora più evidenti nei primi 23 minuti dopo l’avvio dell’apparecchio. Questo tipo di rumore
è dovuto allo scorrere del liquido refrigerante nelle tubazioni.
• Durante il funzionamento, si possono sentire degli scricchiolii.
Ciò è dovuto alla contrazione o all’espansione del corpo dell’apparecchio a causa della variazione di temperatura.
• Nel caso si senta un forte rumore durante l’emissione di aria
dal climatizzatore, ciò potrebbe indicare che il filtro dell’aria è
troppo sporco.
• Ciò è dovuto al fatto che l’apparecchio mette in circolazione gli
odori provenienti dall’ambiente interno, quali odore di fumo,
odore di mobili, ecc.
L’unità interna emette vapore.
Il climatizzatore non funziona.
Scadenti prestazioni in Raffreddamento.
In caso di segnalazione di allarme o comunque di mancato funzionamento potrebbe non trattarsi di un guasto ma di una normale protezione dell’apparecchio da cause esterne. Per ripristinare il corretto funzionamento è necessario togliere tensione per
almeno 3 minuti e successivamente ridare tensione all’impianto. Se il problema dovesse persistere contattare l’assistenza tecnica autorizzata.
• Durante il funzionamento in modalità Raffreddamento o Deumidificazione, l’unità interna può emettere nebbiolina o vapore. Ciò è dovuto al repentino raffreddamento dell’aria nella
stanza.
• La spina è inserita nella presa di corrente?
• Si è verificato un calo di tensione?
• Il fusibile è bruciato?
• Il filtro dell’aria è sporco? Normalmente dovrebbe essere pulito ogni 15 giorni.
• Vi sono ostacoli che bloccano l’aspirazione o l’emissione dell’aria?
• La temperatura ambiente è stata impostata correttamente?
• Vi sono porte o finestre aperte?
• La luce solare entra direttamente nella stanza? (Tirare le tende).
• Vi sono troppe fonti di calore o troppe persone nella stanza?
71
Page 73

Sommaire
Consignes d’utilisation 3
Dénomination des composants
Touches et écran de la télécommande
Fonctionnement
Entretien
Recherche des pannes
7
7
7
7
8
9
5
6
8
9
3
72
Page 74

Précautions d’emploi
• Lire ce manuel d’instructions avant d'utiliser le climatiseur.
• Les conseils de sécurité sont classés en deux catégories: DANGER et ATTENTION. La rubrique DANGER concerne des précautions dont le non-respect peut provoquer des risques graves pour l'utilisateur (mort, lésions graves, etc.) Les précautions
figurant sous la rubrique ATTENTION doivent, elles aussi, être respectées car elles pourraient entraîner des problèmes très
graves suivant la situation.
DANGER
En cas de mauvais fonctionnements
ou d'odeur de brûlé, arrêter
immédiatement l'appareil, le
débrancher et contacter le SAV.
Utiliser une source d’alimentation
exclusive, avec un sectionneur de courant.
Brancher solidement la fiche dans la prise
de courant avant d’alimenter l’appareil.
Utiliser la tension d’alimentation
prescrite.
Ne pas utiliser de rallonge au câble d’alimentation ou un
câble à moitié raccordé.
Ne pas utiliser de câble d’alimentation
enroulé.
ATTENTION
Ne pas utiliser l’appareil pour conserver
des aliments, des oeuvres d’art ou des
équipements de précision, ni pour élever
des animaux ou cultiver des plantes.
Aérer la pièce de temps en temps, et
spécialement si un autre électroménager à
gaz est aussi en marche.
Ne pas toucher l’interrupteur d’urgence
les mains mouillées.
Ne pas installer le climatiseur près d’une
cheminée ou autres appareils de
chauffage.
S’assurer périodiquement que le
support de l’unité extérieure est en
parfaites conditions.
Veiller à ne pas endommager le câble
d’alimentation.
Ne pas mettre d’objets dans la grille
d’aspiration ou dans la grille de
soufflage.a.
Ne pas éteindre ou mettre en marche
l’appareil en tirant ou en branchant le
câble d’alimentation.
Ne pas diriger le flux d’air directement
sur les personnes et, notamment, sur
les nouveaux-nés ou les personnes
âgées.
Ne pas tenter de réparer ou de
reconstruire l'appareil soi-même.
Ne pas verser d’eau sur le climatiseur
pour le nettoyer.
Ne pas exposer directement des plantes
ou des animaux au flux d’air.
Ne rien poser sur l’appareil et ne pas
monter dessus.
Ne pas mettre des vases de fleurs ou
des récipients d’eau sur l’appareil.
73
Page 75

Avertissements
Consignes d'élimination du climatiseur usé
Arrêter le climatiseur et le débrancher avant de procéder à l’élimination du climatiseur usé. L’élimination du frigorigène se
trouvant à l'intérieur requiert une procédure spéciale. Les matériaux de valeur du climatiseur peuvent être recyclés, renseignez-vous auprès de votre. Mairie ou à la décharge de votre
ville. Faire attention à ne pas endommager les tuyaux du climatiseur avant de le mettre à la décharge. Vous devez contribuer à la protection de l’environnement en suivant une méthode d’élimination correcte et non polluante.
Consignes d'élimination de l'emballage du nouveau
climatiseur
Tous les matériaux d'emballage du climatiseur doivent être
éliminés selon la réglementation en vigueur. L'emballage de
carton doit être coupé en morceaux et mis dans un conteneur pour la collecte du papier. Le plastique et le polystyrène ne contiennent pas de fluor ni d'hydrocarbures chlorés.
Tous ces matériaux peuvent être mis à la décharge et recyclés après un traitement adéquat. Renseignez-vous auprès
de votre Mairie sur les modalités d'élimination des déchets.
Consignes de sécurité
Avant d'utiliser le climatiseur, lire attentivement le mode
d'emploi. Le fabricant décline toute responsabilité pour les
dommages éventuels entraînés par le non-respect des
consignes de sécurité suivantes.
• Ne pas mettre en marche un climatiseur endommagé.
En cas de doute, contacter le revendeur.
• Respecter scrupuleusement les instructions contenues
dans ce manuel.
• L'installation doit être exécutée par un technicien qualifié et
agréé. Ne pas tenter d'installer l'appareil soi-même.
• Pour des raisons de sécurité, le climatiseur doit être raccordé à une prise de terre.
• Avant d’ouvrir le panneau frontal, débrancher toujours le
câble d'alimentation électrique. Ne pas tirer sur le câble
mais débrancher la fiche de la prise de courant.
• Faire appel au SAV pour toute réparation. Les réparations
électriques doivent être effectuées par un électricien qualifié. Des réparations inadéquates peuvent être très dangereuses pour l'utilisateur.
• Ne pas endommager les composants du climatiseur
contenant le frigorigène: ne pas perforer, écraser ou déformer les tuyauteries, et ne pas gratter le revêtement de surface. Le frigorigène peut provoquer de graves lésions en
cas de contact avec les yeux.
• Ne pas obstruer ni couvrir la grille de soufflage du climatiseur. Ne pas mettre les doigts ni aucun objet dans les
grilles de soufflage/entrée ni dans les déflecteurs.
• Ne pas laisser les enfants jouer avec le climatiseur. Ne pas
monter sur l’unité extérieure.
Limites de fonctionnement
Plage de températures ambiantes:
Température intérieure
Refroidissement
Température extérieure
Température intérieure
Chauffage
Température extérieure
• Si le câble d'alimentation est endommagé, il doit être remplacé par le SAV ou par un technicien spécialisé.
• Si le fusible sur la carte électronique de l’unité intérieure saute, le remplacer par un fusible du type T.3.15A/250 V.
• Si le fusible sur la carte électronique de l’unité extérieure saute, le remplacer par un fusible du type T.25A/250 V.
• La méthode de câblage doit être conforme au standard local.
• Éliminer les piles usagées de la télécommande de manière appropriée.
maxi D.B./W.B.
mini D.B./W.B.
maxi D.B./W.B.
mini D.B.
max. D.B.
mini D.B.
maxi D.B./W.B.
mini D.B./W.B.
74
32/23°C
18/14°C
43/26°C
18°C
27°C
15°C
24/18°C
-7/-8°C
Page 76

Dénomination des composants
Unité intérieure
Sortie air
Entrée d’air
Panneau frontal
Dispositif antibactérien
à rayons UV (à l’intérieur)
Ionisateur (à l’intérieur)
Ailettes verticales (pour régler la
direction droite/gauche du flux d'air)
Les modèles dualsplit ont la fiche d’alimentation sur l’unité extérieure.
Filtre purificateur (à l’intérieur)
Filtre à air (à l’intérieur)
Panneau témoins lumineux
(à l’intérieur)
Déflecteurs horizontaux
(pour régler la direction
haut/bas du flux d'air par
la télécommande)
Unité extérieure
Grille sortie air
Grille d’aspiration
Tuyauterie de raccordement et câble électrique
Tuyau évacuation condensats
75
Page 77

Touches et écran de la télécommande
19
TEMP
HEALTH FAN
SWING
CLOCK
TIMER
H.AIR.
FRESHSLEEP
SET
MODE
20
21
22
23
24
25
26
27
26
28
29
30
31
32
1. Touche LOCK
Pour bloquer les touches et l'afficheur de la télécommande.
2. Touche LIGHT
Contrôle l’allumage et l’extinction du panneau témoins lumineux sur
le panneau de l’unité intérieure.
3. Touche CODE
Pour sélectionner le code A ou B. Veuillez sélectionner le code A.
4. Touche TIMER
Pour programmer les fonctions "TIMER ON", "TIMER OFF",
"TIMER ONOFF".
5. Touche CLOCK (Horloge)
Pour régler l'horloge.
6. Touche SLEEP
Pour sélectionner le mode nuit Sleep (arrêt automatique).
7. Touche MODE
Pour sélectionner le mode de fonctionnement désiré. A chaque
pression, le mode de fonctionnement varie de la façon suivante:
LOCK RESETLIGHT
CODE
Panneau unité intérieure
19
23
12
16
24
33
18
17
AUTO REFROIDISSEMENT DÉSHUMIDIFICATION CHAUFFAGE VENTILATION
8. Touches HOUR (programmation horaire)
Pour régler l’heure de l’horloge et programmer l’heure de la minuterie.
9. Touche HEALTH AIRFLOW
Pour sélectionner la fonction ¨flux d'air salutaire".
10. Touche HEALTH (Santé)
Pour programmer la fonction Health (ionisateur).
11. Touche ON/OFF
Pour mettre en marche et arrêter le climatiseur.
12. Témoin mode Timer On (le climatiseur démarre après le
temps programmé)
13. Témoins vitesse du ventilateur
Indique la vitesse du ventilateur sélectionnée par la touche FAN.
PETITE MOYENNE GRANDE
AUTO
14. Témoin Lock (verrouillage touches)
15. Témoin direction du flux d’air haut/bas
76
Page 78

Touches et écran de la télécommande
16. Témoin fonction Sleep
17. Témoin fonction Health (santé)
18. Témoin fonction “changement d’air”
19. Témoins mode de fonctionnement
Mode de fonctionnement
Télécommande
Panneau unité intérieure
20. Témoin envoi signal
21. Témoin mode Power/Soft
22. Témoin direction du flux d’air gauche/droite
23. Témoin température programmée
24. Témoin Timer Off (le climatiseur s’arrête après le temps pro-
grammé)
25. Témoin horaire Timer/Sleep
26. Touches TEMP (programmation température)
Pour programmer la température ambiante désirée.
27. Touche FAN (Ventilateur)
Pour régler la vitesse du ventilateur: basse, moyenne, grande, auto.
AUTO REFROIDISSEMENT DÉSHUMIDIFICATION CHAUFFAGE VENTILATION
28. Touche SWING (haut/bas)
Pour modifier la direction du flux d'air verticalement (vers le haut et
vers le bas).
29. Touche SWING (gauche/droite)
Pour modifier la direction du flux d'air horizontalement (vers la gauche et vers la droite).
30. Touche FRESH
Pour sélectionner la fonction “changement d’air”.
31. Touche SET
Pour confirmer les programmations de la minuterie et de l'horloge.
32. Touche POWER/SOFT
Pour sélectionner le mode Power/Soft.
33. Touche RESET
Pour rétablir la programmation initiale de la télécommande.
Note: La fonction ¨changement d’air" (touche 30) est en option.
77
Page 79

Fonctionnement
Utilisation de la télécommande
• Après avoir allumé le climatiseur, pointer la télécommande directement vers le récepteur des signaux sur l'unité intérieure.
• La distance entre l'émetteur du signal et le récepteur ne doit pas être supérieure à 7 mètres et il ne doit pas y avoir d'obstacles.
• Éviter de faire tomber la télécommande et éviter qu'elle ne soit endommagée.
• Si une lampe fluorescente à mise en marche électronique, ou une lampe fluorescente à commutateur, ou un téléphone sans
fil se trouve dans la pièce, la réception des signaux peut être perturbée, la distance de l'unité intérieure devra donc être diminuée.
Mise en place des piles
• Retirer le couvercle au dos de la télécommande: appuyer légèrement sur " " dans la direction de la flèche et faire glisser le
couvercle.
• Introduire les piles: s'assurer qu'elles sont insérées dans le bon sens.
• Refermer le couvercle du compartiment piles.
• Pour voir si l’opération a été correctement effectuée: si, après avoir appuyé sur la touche ON/OFF , l’écran de la télé-
commande reste éteint, retirer les piles et les mettre à nouveau
Remarques:
• Un affichage incomplet ou pas clair sur l’écran de la télécommande indique que les piles sont presque déchargées et qu’el-
les doivent donc être remplacées.
• Utiliser de nouvelles piles du même type.
• Si la télécommande ne fonctionne pas normalement, retirer les piles et les mettre à nouveau.
Suggestions:
• Retirer les piles si l'appareil n'est pas utilisé pendant une période prolongée.
• Si l’écran affiche tout de même des indications après avoir retiré les piles, il suffit d’appuyer sur la touche RESET avec un ob-
jet pointu.
Programmation de l'horloge
Quand on met l'appareil en marche pour la première fois et après avoir remplacé les piles de la télécommande, il faut régler
l'horloge de la manière suivante:
1. Appuyer sur la touche CLOCK: "AM" ou "PM" clignotera sur l'afficheur.
2. Appuyer sur o pour régler l’heure exacte. A chaque pression de la touche l'heure augmente ou diminue d'une mi-
nute. Un appui prolongé sur la touche permet le défilement rapide de l’heure.
3. Appuyer sur la touche SET pour confirmer. ¨AM¨ et ¨PM¨ cesseront de clignoter tandis que l'horloge commencera à fonc-
tionner. (AM correspond au matin et PM à l'après-midi).
78
Page 80

Fonctionnement
Auto, Refroidissement, Chauffage, Déshumidification
(1) Mise en marche du climatiseur
Appuyer sur la touche ON/OFF de la télécommande pour démarrer le climatiseur.
(2) Sélection du mode de fonctionnement
Appuyer sur la touche MODE; à chaque pression le mode de fonctionnement
varie de la façon suivante:
Télécommande
AUTO REFROIDISSEMENT DÉSHUMIDIFICATION CHAUFFAGE VENTILATION
TEMP
Panneau unité intérieure
AUTO REFROIDISSEMENT DÉSHUMIDIFICATION CHAUFFAGE VENTILATION
HEALTH FAN
SWING
MODE
CLOCK
TIMER
LOCK RESETLIGHT
H.AIR.
FRESHSLEEP
SET
CODE
Panneau unité intérieure
Arrêter l’afficheur sur le symbole du mode désiré.
(3) Programmation de la température
Appuyer sur les touches TEMP.
La température indiquée augmente de 1°C à chaque pression. Un appui
prolongé sur la touche permet d'augmenter rapidement la température
programmée.
La température indiquée diminue de 1°C à chaque pression. Un appui
prolongé sur la touche permet de diminuer rapidement la température
programmée. Sélectionner la température désirée
(4) Sélection de la vitesse du ventilateur
Appuyer sur la touche FAN; à chaque pression, la vitesse du ventilateur varie
de la façon suivante
PETITE MOYENNE GRANDE
AUTO
Le climatiseur fonctionnera avec la vitesse du flux d'air sélectionnée. Lorsque
FAN est programmé sur ¨AUTO¨, le climatiseur règle automatiquement la vitesse de ventilation en fonction de la température ambiante.
(5) Arrêt du climatiseur
Appuyer sur la touche ON/OFF , le climatiseur s'arrête.
Remarques:
• En mode AUTO, le climatiseur sélectionne automatiquement le mode de fonctionnement le plus approprié selon la température ambiante et la température programmée (Refroidissement ou Chauffage).
• En mode Déshumidification, quand la température ambiante est supérieure de 2°C à la température programmée, l'unité commence à fonctionner avec la vitesse du ventilateur basse, indépendamment de la vitesse du ventilateur programmée.
• En mode Chauffage, l'air chaud n'est soufflé qu'au bout de quelques instants pour éviter l'effet "cold-draft" (air froid).
79
Page 81

Fonctionnement
Ventilation
(1) Mise en marche du climatiseur
Appuyer sur la touche ON/OFF de la télécommande pour démarrer le climatiseur.
(2) Sélection du mode de fonctionnement
Appuyer sur la touche MODE; à chaque pression le mode de fonctionnement
varie de la façon suivante:
Télécommande
AUTO REFROIDISSEMENT DÉSHUMIDIFICATION CHAUFFAGE VENTILATION
TEMP
Panneau unité intérieure:
AUTO REFROIDISSEMENT DÉSHUMIDIFICATION CHAUFFAGE VENTILATION
HEALTH FAN
SWING
MODE
CLOCK
TIMER
LOCK RESETLIGHT
H.AIR.
FRESHSLEEP
SET
CODE
Panneau unité intérieure
Arrêter l’afficheur sur le mode Ventilation.
(3) Sélection de la vitesse du ventilateur
Appuyer sur la touche FAN; à chaque pression, la vitesse du ventilateur varie
de la façon suivante:
PETITE MOYENNE GRANDE
Le climatiseur fonctionnera avec la vitesse du ventilateur sélectionnée.
(4) Arrêt du climatiseur
Appuyer sur la touche ON/OFF , le climatiseur s'arrête.
Note:
En mode Ventilation, le climatiseur ne fonctionne ni en Refroidissement ni en
Chauffage mais uniquement en Ventilation.
Le fonctionnement AUTO FAN et les modes Sleep et Power/Soft ne sont pas
disponibles.
De plus, il est impossible de régler la température ambiante.
80
Page 82
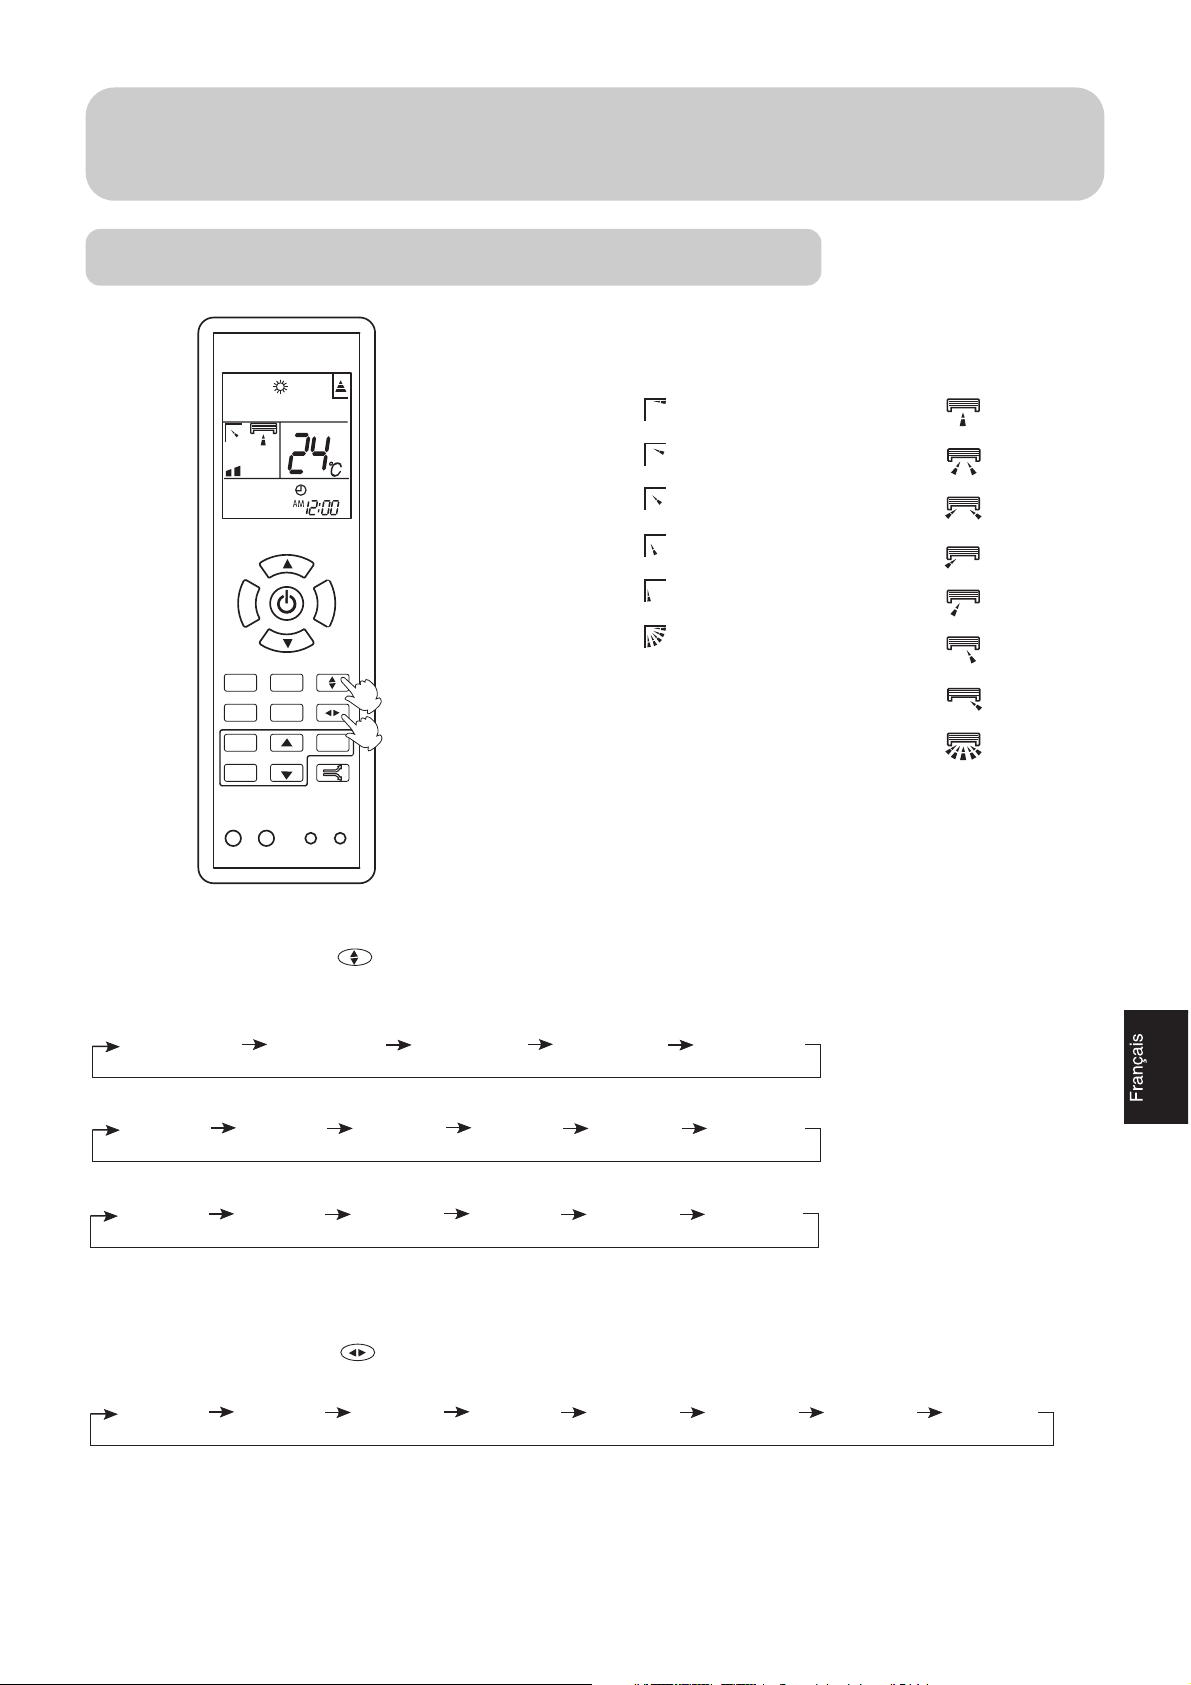
Fonctionnement
Réglage de la direction du flux d'air
TEMP
HEALTH FAN
SWING
H.AIR.
MODE
FRESHSLEEP
CLOCK
TIMER
LOCK RESETLIGHT
SET
CODE
Déflecteurs horizontaux
Position 1
Position 2
Position 3
Position 4
Position 5
Position 6
1
2
oscillation
automatique
Ailettes verticales
Position 1
Position 2
Position 3
Position 4
Position 5
Position 6
Position 7
Position 8
1) Direction du flux d’air bas/haut
Appuyer sur la touche SWING (flèches haut/bas); à chaque pression la direction du flux d’air varie comme suit en fonction
du mode de fonctionnement utilisé:
Refroidissement/Déshumidification/Ventilation:
Position 1 Position 2 Position 3 Position 4 Position 6
Chauffage:
Position 5 Position 4 Position 3 Position 2 Position 1 Position 6
Auto:
Position 1 Position 2 Position 3 Position 4 Position 5 Position 6
Le déflecteur horizontal oscillera selon le schéma illustré ci-dessus.
2) Direction du flux d’air gauche/droite
Appuyer sur la touche SWING (flèches droite/gauche); à chaque pression, la direction du flux d’air varie de la façon suivante:
Position 1 Position 2 Position 3 Position 4 Position 5 Position 6 Position 7 Position 8
Les ailettes verticales oscilleront selon le schéma illustré ci-dessus.
Note:
Chaque fois que le climatiseur est remis en marche, l’écran de la télécommande mémorise la direction du flux d’air précédemment programmée.
80
Page 83
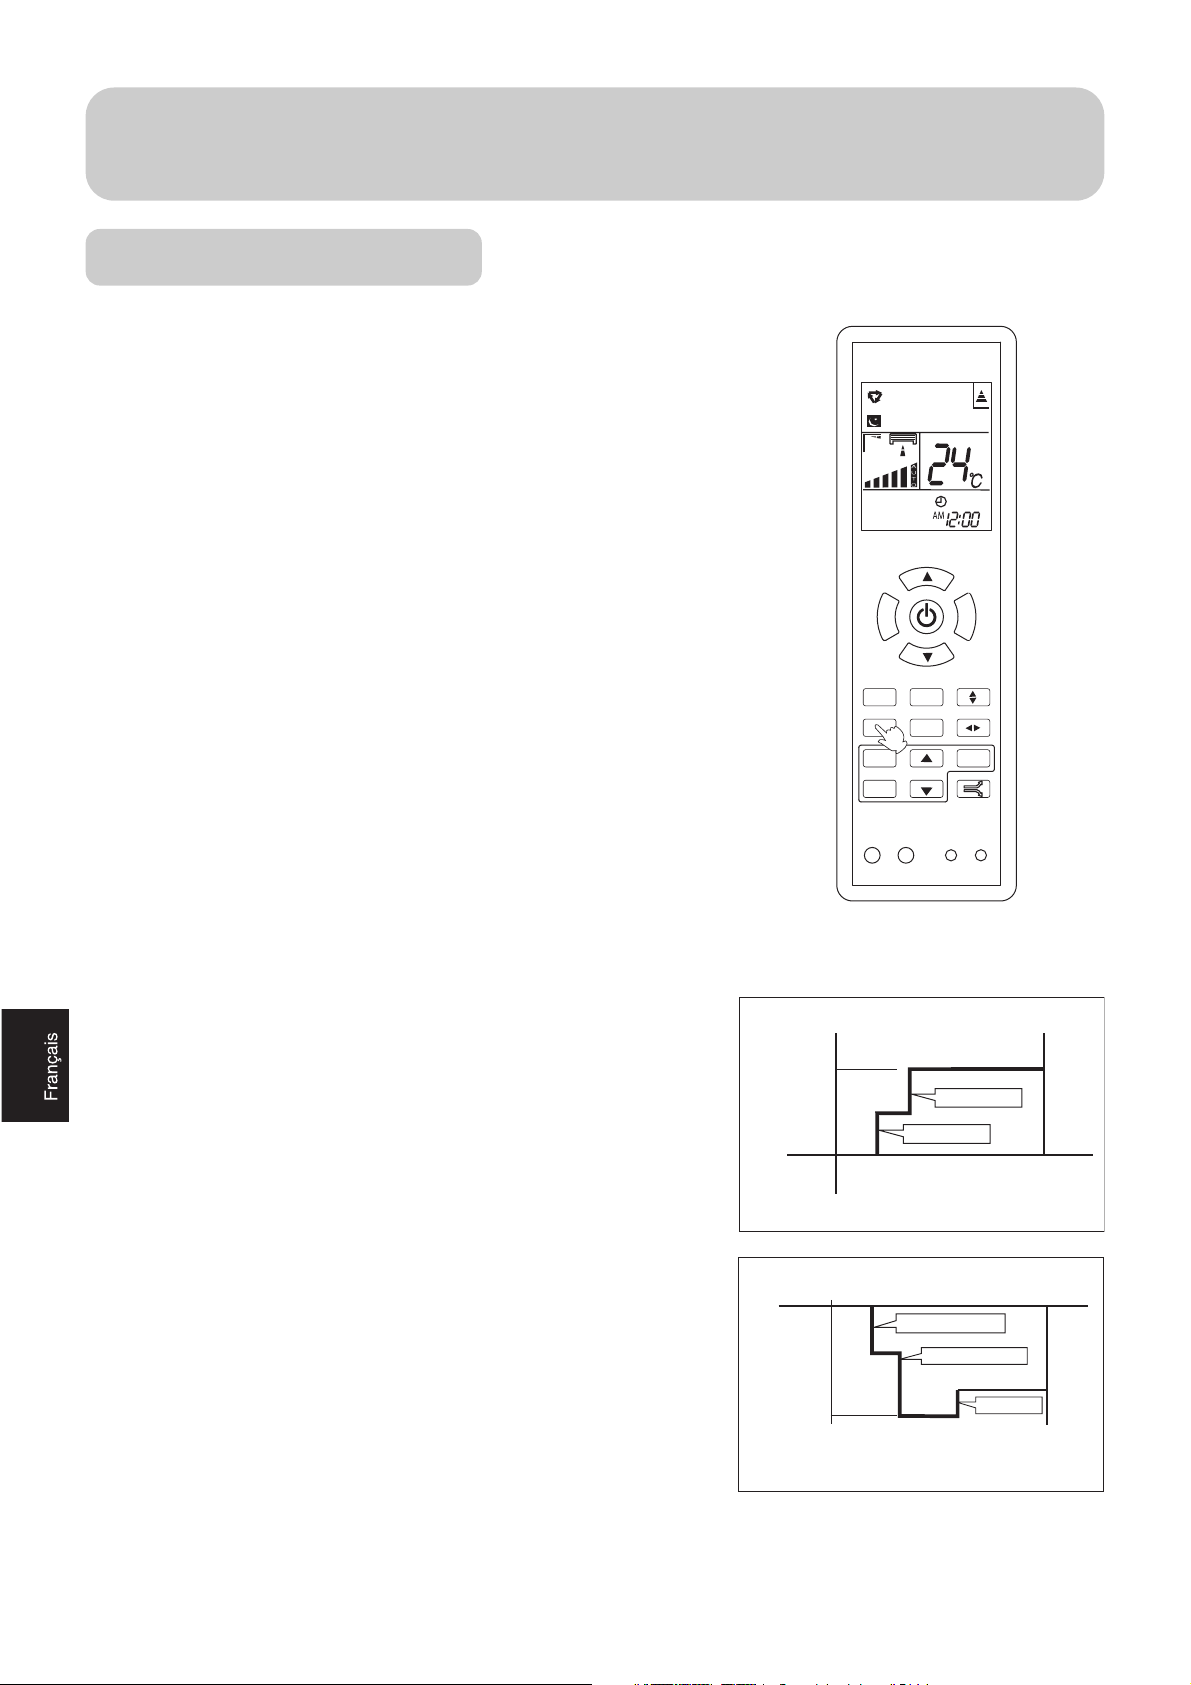
Fonctionnement
Démarrage fonction Sleep
Fin fonction Sleep
Température
programmée
Arrêt
environ 6 heures
1 heure
1 heure
REFROIDISSEMENT, DÉSHUMIDIFICATION
augmentation de 1°C
augmentation de 1°C
Démarrage fonction Sleep
Fin fonction Sleep
1 heure
1 heure
CHAUFFAGE
Température programmée
Arrêt
3 heures
environ 3 heures
augmentation de 1°C
diminution de 2°C
diminution de 2°C
Fonction nuit SLEEP
Quand on appuie sur la touche SLEEP avant d'aller se coucher, le climatiseur
adapte son fonctionnement afin que les conditions de repos soient optimales.
Utilisation de la fonction Sleep
Après avoir mis en marche l'unité, sélectionner le mode de fonctionnement
désiré et appuyer sur la touche SLEEP en s’assurant d’avoir bien réglé l’horloge.
Fonctionnement en mode Refroidissement et Déshumidification
Une heure après le démarrage de la fonction Sleep, la température ambiante
augmente de 1°C par rapport à la température programmée. Puis d'un autre
degré une heure après. L'unité fonctionne pendant 6 heures à cette température, puis s'arrête automatiquement. La température ambiante est supérieure
à la température programmée pour qu'il ne fasse pas trop froid pendant la nuit.
Fonctionnement en mode Chauffage
Une heure après le démarrage de la fonction Sleep, la température ambiante
baisse de 2°C par rapport à la température programmée. Une heure après, elle baisse encore de deux degrés. Au bout de 3 heures, la température ambiante augmente de 1°C. L'unité fonctionnera encore pendant trois heures à
cette température, puis elle s'arrêtera automatiquement. La température ambiante est inférieure à la température programmée pour qu'il ne fasse pas trop
chaud pendant la nuit.
Fonctionnement en mode Auto
L'unité fonctionne avec la fonction Sleep selon le mode de fonctionnement
choisi automatiquement par le système.
Fonctionnement en mode Ventilation
La fonction Sleep n’est pas disponible.
TEMP
HEALTH FAN
SWING
H.AIR.
MODE
FRESHSLEEP
CLOCK
TIMER
LOCK RESETLIGHT
SET
CODE
Vitesse ventilateur pendant la fonction Sleep
Si avant la programmation de la fonction Sleep, la vitesse du ventilateur est
moyenne ou grande, après la programmation de la fonction Sleep, le ventilateur tourne automatiquement à vitesse basse.
82
Page 84

Fonctionnement
Timer ON - Timer OFF
Régler correctement l'horloge avant d'utiliser le mode Timer.
(1) Mise en marche de l'unité et sélection du mode de fonctionnement
L'afficheur à cristaux liquides affiche le mode de fonctionnement programmé.
(2) Sélection du mode Timer
Appuyer sur la touche TIMER; à chaque pression, le mode Timer varie comme suit:
TEMP
Sélectionner le mode Timer voulu (TIMER ON ou TIMER OFF), o
clignotent sur l'afficheur.
VIDE
HEALTH FAN
SWING
MODE
CLOCK
TIMER
LOCK RESETLIGHT
H.AIR.
FRESHSLEEP
SET
CODE
Panneau unité intérieure
(3) Programmation du Timer
Appuyer sur les touches HOUR pour la programmation de l’horaire.
À chaque pression, l’heure indiquée augmente de 1 minute. Un appui pro-
longé permet le défilement rapide de l’heure.
À chaque pression, l’heure indiquée diminue de 1 minute. Un appui pro-
longé permet le défilement rapide de l’heure.
L'heure est affichée sur l'afficheur à cristaux liquides. Il est possible de programmer le Timer sur 24 heures. AM correspond au matin et PM à l'aprèsmidi.
(4) Confirmation de la programmation
Après avoir programmé correctement l'horaire, appuyer sur la touche SET
pour confirmer.
o sur la télécommande arrêtent de clignoter.
Heure affichée: l'unité se met en marche (TIMER ON) ou s'arrête (TIMER OFF)
à l'heure x et x minutes.
(5) Désactivation du Timer
Appuyer sur la touche TIMER plusieurs fois jusqu'à ce que le mode Timer
disparaisse de l'écran.
Suggestions:
• Après avoir remplacé les piles ou en cas de coupure de courant, il faut reprogrammer le Timer.
• La télécommande possède une fonction mémoire, il suffit donc, quand on utilise le mode Timer la fois suivante, d'appuyer, après
avoir sélectionné le mode de fonctionnement, sur la touche SET si la programmation du Timer est la même que la fois précédente.
83
Page 85
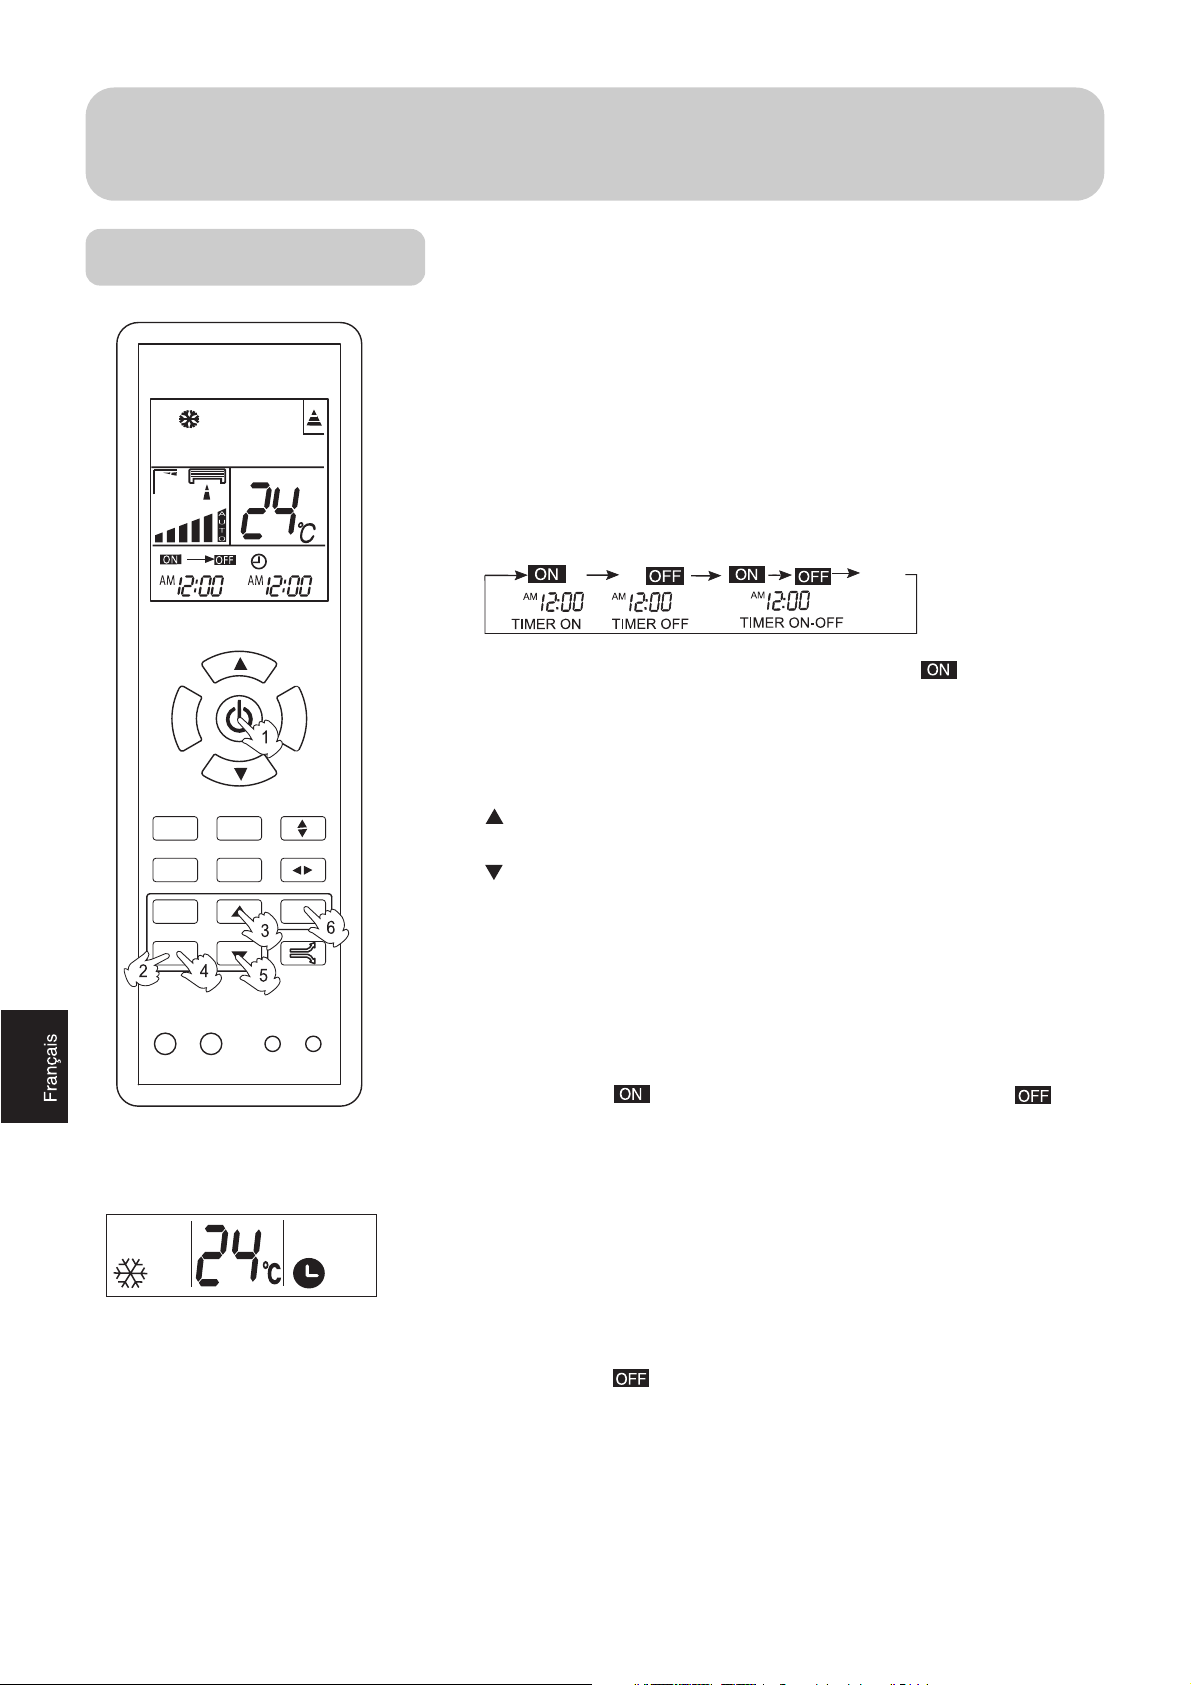
Fonctionnement
Timer ON/OFF
Régler correctement l'horloge avant d'utiliser le mode Timer.
(1) Mise en marche de l'unité et sélection du mode de fonctionnement
L'afficheur à cristaux liquides affiche le mode de fonctionnement programmé.
(2) Sélection du mode Timer
Appuyer sur la touche TIMER; à chaque pression, le mode Timer varie comme suit:
TEMP
Sélectionner le mode Timer désiré (TIMER ON-OFF), clignote sur l'afficheur.
VIDE
HEALTH FAN
SWING
MODE
CLOCK
TIMER
LOCK RESETLIGHT
H.AIR.
FRESHSLEEP
SET
CODE
Pannello unità interna
(3) Programmation de l'horaire pour TIMER ON
Appuyer sur les touches HOUR pour la programmation de l’horaire.
À chaque pression, l’heure indiquée augmente de 1 minute. Un appui prolongé permet le défilement rapide de l’heure.
À chaque pression, l’heure indiquée diminue de 1 minute. Un appui pro-
longé permet le défilement rapide de l’heure.
L'heure est affichée sur l'afficheur à cristaux liquides. Il est possible de programmer le Timer sur 24 heures. AM correspond au matin et PM à l'aprèsmidi.
(4) Confirmation de la programmation pour TIMER ON
Après avoir programmé correctement l'horaire, appuyer sur la touche TIMER
pour confirmer. sur la télécommande cesse de clignoter et commence à clignoter. Heure affichée: l'unité se mettra en marche à l'heure x et x
minutes.
(5) Programmation de l'horaire pour TIMER OFF
Suivre la même procédure que pour "Programmation de l'horaire pour TIMER
ON".
(6) Confirmation de la programmation pour TIMER OFF
Après avoir programmé correctement l'horaire, appuyer sur la touche SET
pour confirmer. sur la télécommande cesse de clignoter.
Heure affichée: l'unité s’arrêtera à l'heure x et x minutes.
Désactivation du Timer
• Appuyer sur la touche TIMER plusieurs fois jusqu'à ce que le mode Timer
disparaisse de l'écran.
• Selon la séquence de programmation de l'horaire pour TIMER ON et TIMER
OFF, on peut obtenir Marche-Arrêt ou Arrêt-Marche.
84
Page 86

Fonctionnement
Fonction Power/Soft
MODE DE FONCTIONNEMENT POWER
Mode conseillé pour obtenir un réchauffement ou un refroidissement rapide de
la pièce.
Activation
Appuyer une seule fois sur la touche POWER/SOFT. L’indication ¨ ¨ est
affichée sur la télécommande et le fonctionnement en mode Power est activé. Le ventilateur tourne automatiquement à la vitesse ¨GRANDE¨ pendant 15
minutes et il revient ensuite à la vitesse configurée.
Désactivation
Appuyer deux fois sur la touche POWER/SOFT. A la première pression, l’indication “ ” est affichée sur la télécommande et elle disparaît à la seconde
pression; le fonctionnement en mode normal est activé.
MODE DE FONCTIONNEMENT SOFT
Mode conseillé pour réduire le niveau de bruit de l’appareil, par expl. lorsque
l’on dort ou l’on lit. Le fonctionnement est plus silencieux car le flux d’air du
soufflage de l’unité intérieure est contrôlé.
Activation
Appuyer deux fois sur la touche POWER/SOFT. L’indication " " est affichée sur la télécommande et le fonctionnement en mode Soft est activé.
Le ventilateur tourne automatiquement à la vitesse ¨PETITE¨.
Désactivation
Appuyer une seule fois sur la touche POWER/SOFT. A la première pression,
l’indication " " disparaît et le fonctionnement en mode normal est donc
activé.
TEMP
HEALTH FAN
SWING
MODE
CLOCK
TIMER
LOCK RESETLIGHT
H.AIR.
FRESHSLEEP
SET
CODE
Remarques:
• Le fonctionnement intensif (Power) peut entraîner pendant un laps de temps bref une température qui n’est pas uniforme
dans toute la pièce.
• Le mode Soft pourrait ne pas être suffisamment puissant pour maintenir pendant longtemps la température ambiante
programmée.
85
Page 87
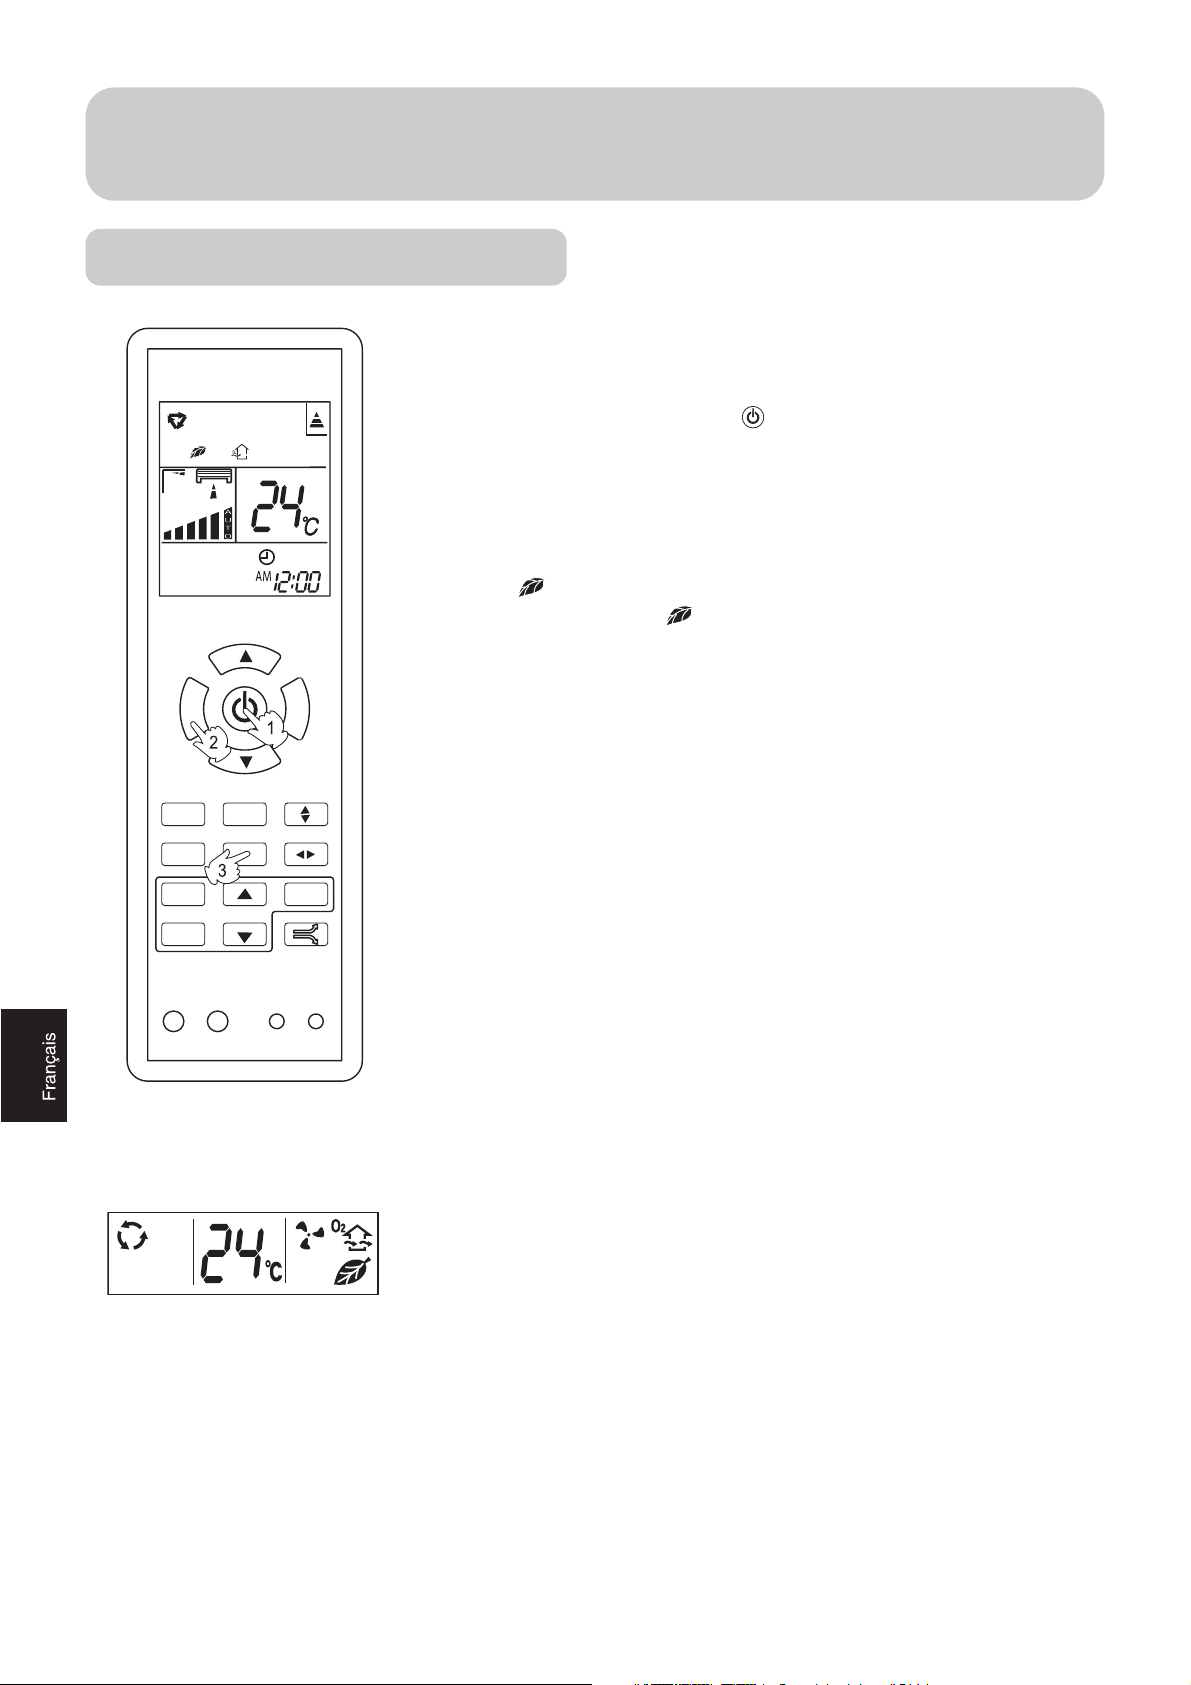
Fonctionnement
Fonction HEALTH (santé)
La fonction Health comprend la fonction ionisation et la fonction germicide.
(1) Mise en marche du climatiseur
Appuyer sur la touche ON/OFF de la télécommande pour démarrer le climatiseur.
2) Activation de la fonction Health
Fonction ionisation
Appuyer une fois sur la touche HEALTH et sur l’afficheur apparaîtra le symbole " ". l’ionisateur est activé. En appuyant à nouveau sur la touche
TEMP
HEALTH FAN
HEALTH, le symbole " " disparaît et l’ionisateur s’arrête.
L’ionisateur génère une grande quantité d’ions négatifs pour équilibrer efficacement la quantité d’ions positifs et d’ions négatifs dans l'air, neutraliser les
bactéries et accélérer la déposition des poussières et, donc, purifier l’air de la
pièce.
SWING
MODE
CLOCK
TIMER
LOCK RESETLIGHT
H.AIR.
FRESHSLEEP
SET
CODE
Pannello unità interna
Fonction germicide
En appuyant sur la touche HEALTH, le dispositif à rayons UV à l’intérieur de
l’unité est automatiquement activé. Les rayons UV générés par le dispositif catalysent les nano particules de TiO2 sur le filtre purificateur à régénération solaire, avec une action antibactérienne et de stérilisation efficace de longue durée.
Remarques:
• Lorsque le ventilateur de l’unité intérieure n’est pas en marche, le voyant lumineux correspondant à la fonction Health est allumé mais l’ionisateur n’émet pas d’ions.
• Lorsque le dispositif à rayons UV est actif, ne pas ouvrir le panneau frontal
de l’unité intérieure.
86
Page 88
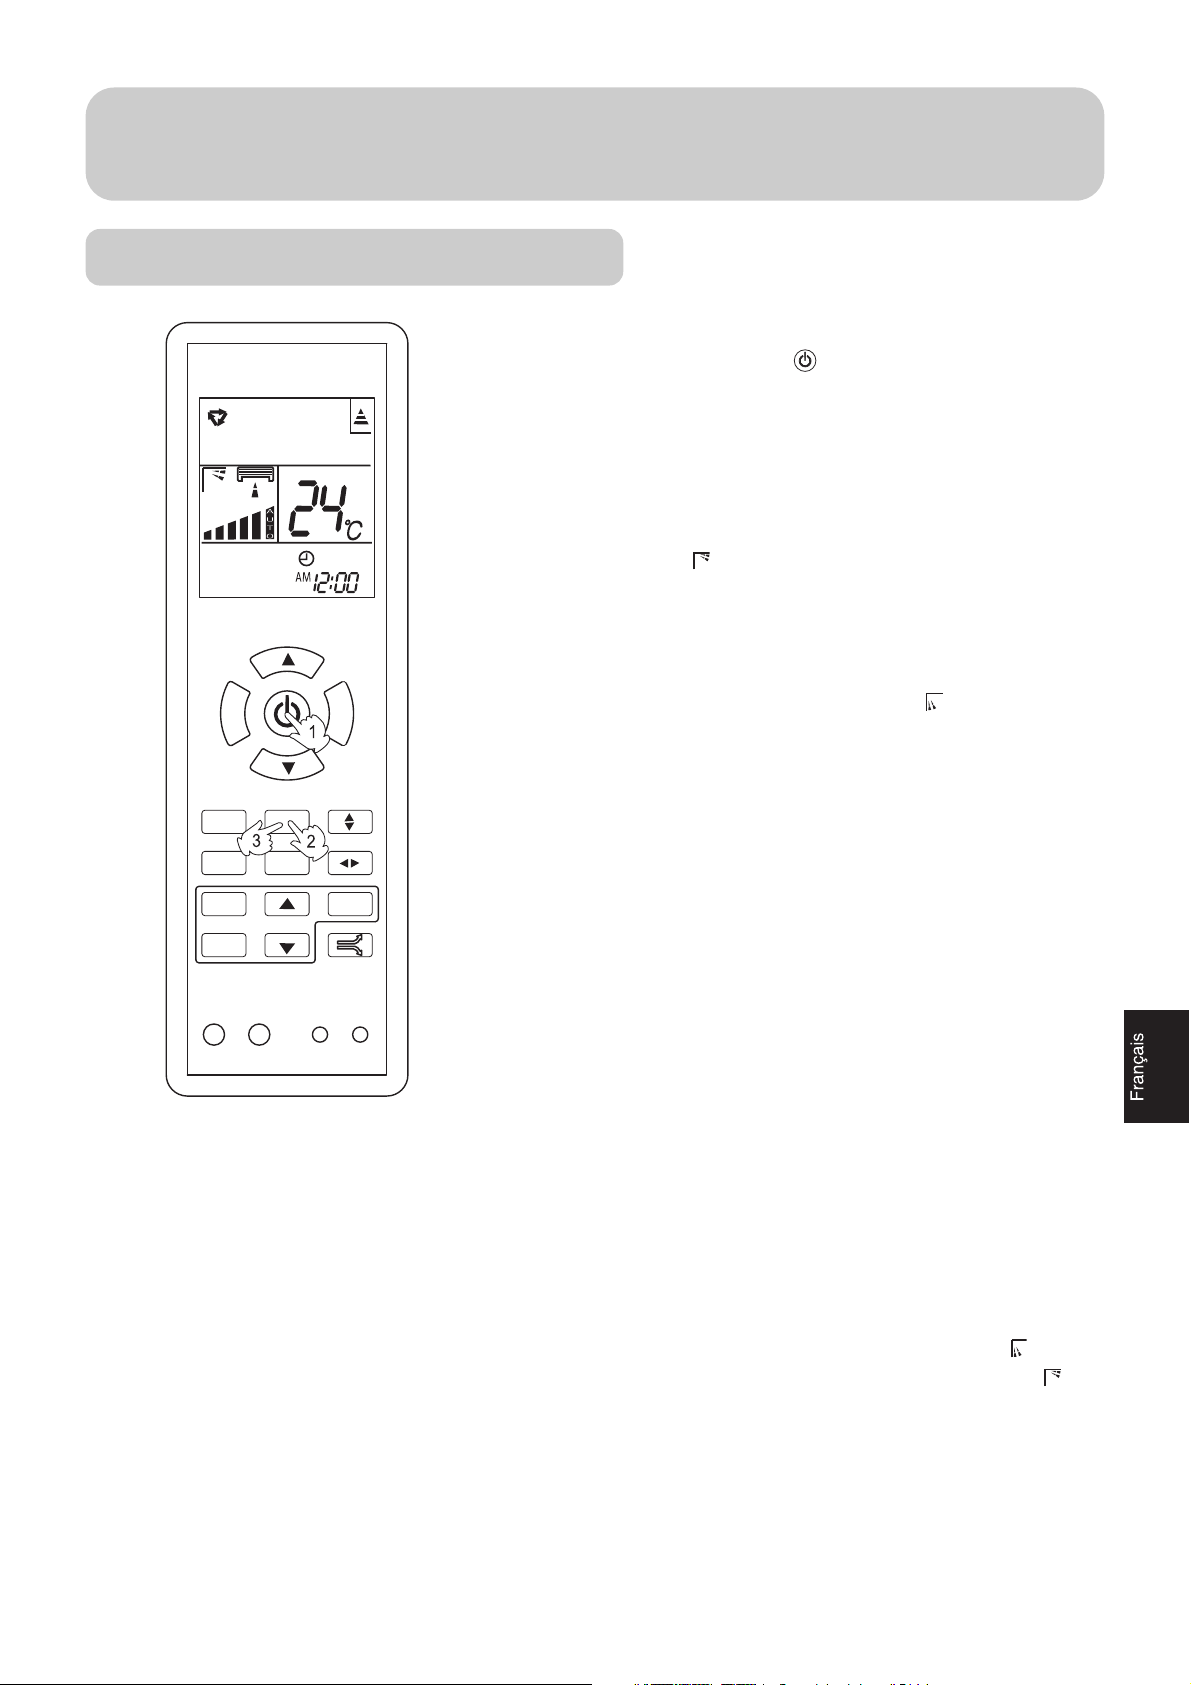
Fonctionnement
Fonction HEALTH AIRFLOW
(1) Mise en marche du climatiseur
Appuyer sur la touche ON/OFF de la télécommande pour démarrer
le climatiseur. L’écran affiche l’état de fonctionnement précédent (sauf
pour les modes Timer, Sleep et Health airflow). Sélectionner le mode de
fonctionnement désiré.
(2) Programmation de la fonction ¨flux d’air salutaire¨
1. Appuyer sur la touche HEALTH AIRFLOW et sur l’afficheur apparaîtra le symbole " ". Les grilles d’aspiration et de soufflage inférieures de l’unité intérieure sont fermées; le flux d’air sort horizontale-
TEMP
HEALTH FAN
SWING
MODE
CLOCK
TIMER
H.AIR.
FRESHSLEEP
SET
ment des grilles supérieures. Ne pas demeurer directement dans le
flux d’air.
2. Appuyer encore sur la touche HEALTH AIRFLOW et sur l’afficheur
de la télécommande apparaîtra le symbole " ". Les grilles d’aspiration et de soufflage supérieures de l’unité intérieure sont fermées;
le flux d’air sort verticalement des grilles inférieures.
Ne pas demeurer directement dans le flux d’air.
(3) Désactivation de la fonction “flux d’air salutaire”
Appuyer de nouveau sur la touche HEALTH AIRFLOW; toutes les grilles
d’aspiration et de soufflage de l’unité intérieure s’ouvriront et le climatiseur continuera à fonctionner avec la programmation précédente.
LOCK RESETLIGHT
CODE
Recommandation:
Ne pas déplacer les ailettes avec les mains sous peine de les endommager. Si elles ne fonctionnent pas correctement, éteindre le climatiseur et le rallumer après une minute.
Remarques:
• Après avoir programmé la fonction ¨flux d’air salutaire¨, la position des
ailettes est fixe.
•
En mode Chauffage, il vaut mieux sélectionner la position
•
En mode Refroidissement, il vaut mieux sélectionner la position .
.
• En Refroidissement et Déshumidification, si le climatiseur est en mar-
che depuis longtemps avec un taux humidité de la pièce élevé, des
gouttes de condensation peuvent se former sur les ailettes de l’unité
intérieure.
87
Page 89
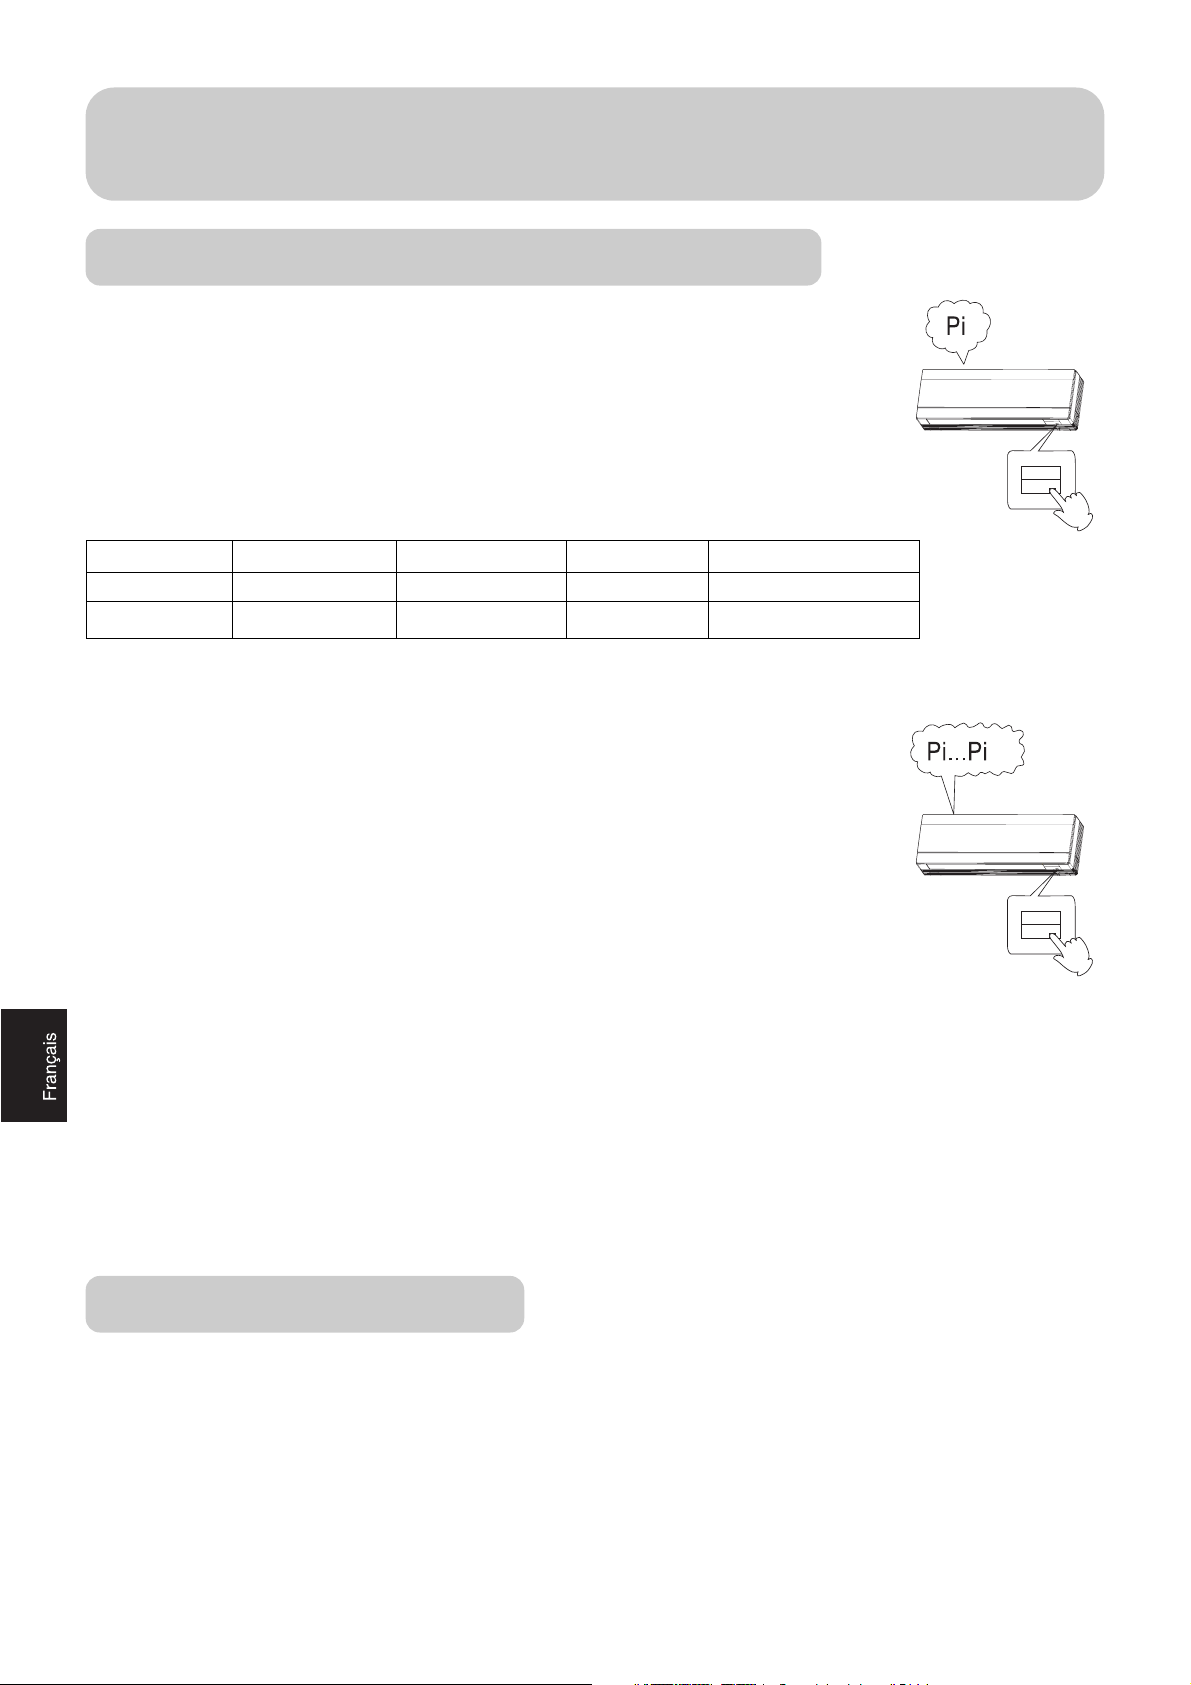
Fonctionnement
Fonctionnement d’urgence et de test
Fonctionnement d’urgence
• Effectuer cette opération uniquement lorsque la télécommande est défectueuse, égarée ou
endommagée.
• Lorsque l’on appuie sur la touche du fonctionnement d’urgence, on entendra un bip sonore signalant le début de cette opération.
• En fonctionnement d’urgence, le système sélectionne automatiquement le mode de fonctionnement (Refroidissement ou Chauffage) en fonction de la température ambiante:
Temp. ambiante
> 21°C Refroidissement 24°C Non Auto
< 21°C Chauffage 24°C Non Auto
• Le mode Déshumidification n’est pas disponible.
Test de fonctionnement
• La touche du test de fonctionnement est celle du fonctionnement d’urgence.
• Utiliser cette touche pour le test de fonctionnement uniquement lorsque la température ambiante est inférieure à 16 °C, ne pas l’utiliser en fonctionnement normal.
• Maintenir appuyée pendant plus de 5 secondes la touche du test de fonctionnement.
Après avoir entendu deux bips sonores, relâcher la touche, ce qui active le Refroidissement
avec le ventilateur à grande vitesse.
• Le test de fonctionnement s’achève automatiquement après 30 minutes.
Désactivation du fonctionnement d’urgence ou de test
• Appuyer de nouveau sur la touche du fonctionnement d’urgence, vous entendrez alors un bip sonore: le fonctionnement d’urgence ou de test est terminé.
• Pour désactiver le fonctionnement d’urgence par la télécommande, appuyer sur la touche ON/OFF de cette dernière et vous
entendrez alors un bip sonore. Le climatiseur fonctionnera dans le mode affiché sur l'afficheur à cristaux liquides.
Mode de fonctionnement
Temp. programmée
Mode Timer Vitesse du ventilateur
Fonction Auto-restart
Pour activer la fonction Auto-restart (redémarrage automatique après une coupure de courant), appuyer 10 fois sur la touche
SLEEP en 5 secondes et vous entendrez donc 4 bips sonores. Pour désactiver la fonction, appuyer de nouveau 10 fois sur la
touche SLEEP en 5 secondes et vous entendrez donc 2 bips sonores.
88
Page 90

Entretien
Pour une utilisation correcte du climatiseur
Programmer la température ambiante de façon adéquate
Température
adéquate
Fermer les portes et les fenêtres pendant le
fonctionnement en mode Refroidissement
En mode Refroidissement,
empêcher que le soleil
n’entre directement dans
la pièce par des rideaux
ou des volets
Ne pas placer d’obstacles devant les grilles d’aspiration et
de soufflage
Utiliser efficacement la minuterie
Si le climatiseur n’est pas utilisé pendant une période
prolongée, débrancher l’alimentation électrique
OFF
Utiliser efficacement les déflecteurs
89
Page 91
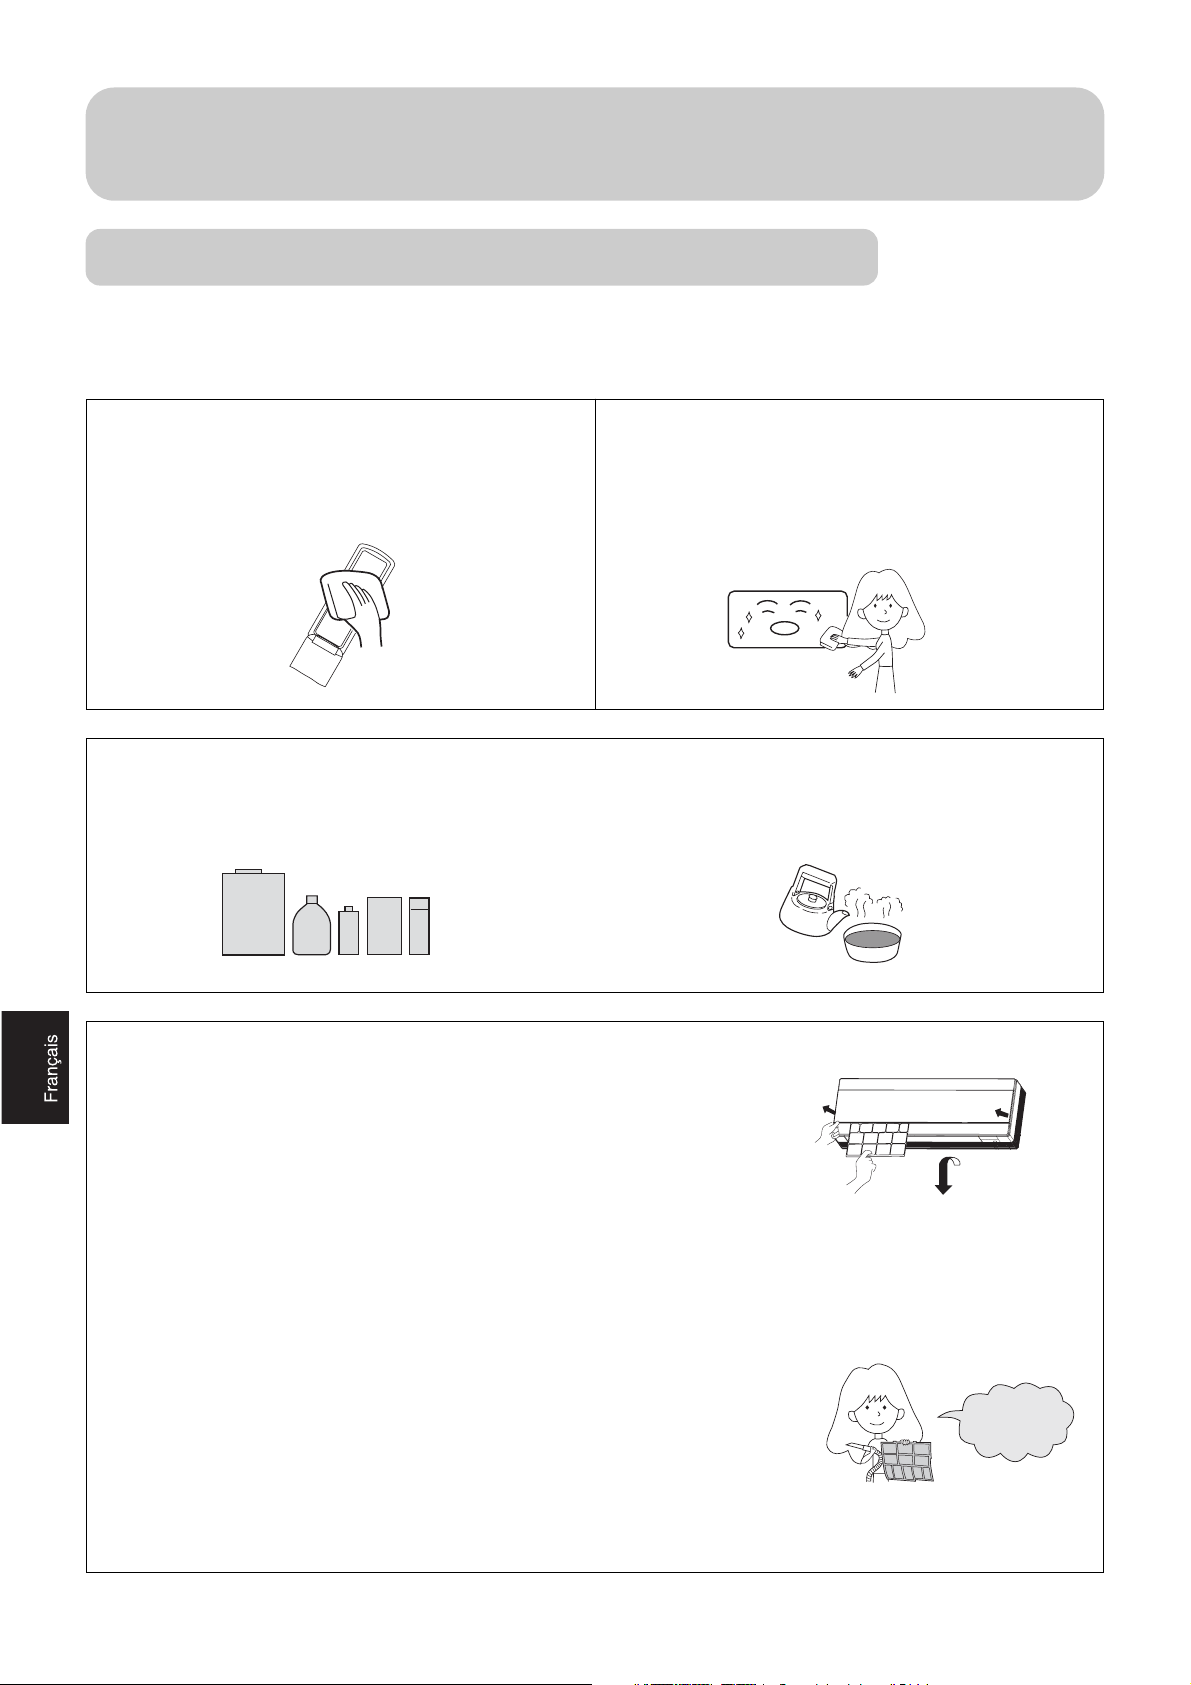
Entretien
Une fois tous
les 15 jours
Pour une utilisation correcte du climatiseur
ATTENTION
Avant de nettoyer l’appareil, débrancher la fiche de la prise de courant ou couper l’alimentation de l’interrupteur électrique général.
Nettoyage de la télécommande
Ne pas nettoyer à l’eau et utiliser un chiffon sec.
Ne pas utiliser de liquide pour vitres ou de chiffon imbibé de
substances chimiques.
Ne pas utiliser pour le nettoyage les substances suivantes. Essence, dégraissants ou détergents pouvant abî-
mer le revêtement de l’appareil.
Nettoyage de l'unité intérieure
Nettoyer l’appareil avec un chiffon doux et sec.
En cas de taches tenaces, nettoyer l’appareil avec un détergent neutre. Essorer avec soin le chiffon et rincer toutes
traces de détergent.
L’eau chaude à plus de 40°C peut décolorer ou déformer
les pièces en plastique.
Nettoyage du filtre à air
1. Ouvrir le panneau frontal en le poussant vers le haut avec les pouces
2. Retirer le filtre à air
Pousser légèrement vers le haut l’ailette centrale du filtre jusqu‘à ce qu’elle se
décroche. Retirer le filtre en tirant vers le bas.
3. Nettoyer le filtre
Utiliser un aspirateur pour la poussière ou laver le filtre à l’eau.
Après le lavage, laisser sécher le filtre à l’ombre.
4. Remettre le filtre
Replacer le filtre de façon à ce que l’indication "FRONT" soit tournée vers l’avant. S’assurer que le filtre est solidement accroché, faute de quoi il pourrait se
produire des anomalies.
5. Refermer le panneau avant
90
Page 92

Entretien
Remplacement des filtres purificateurs
1. Ouvrir le panneau avant en le poussant vers le haut avec les pouces.
2. Retirer le filtre à air.
Pousser légèrement vers le haut l’ailette centrale du filtre jusqu‘à ce qu’elle se
décroche. Retirer le filtre en tirant vers le bas.
3. Enlever le filtre purificateur antibactérien et le remplacer par un nouveau, en
l’introduisant à l’intérieur du cadre du filtre à air. Le côté de couleur verte doit être
tourné vers l’extérieur tandis que le côté de couleur blanche doit être tourné vers
l’intérieur de l’appareil.
4. Remettre le filtre à air.
5. Refermer le panneau avant.
Remarques:
• Le filtre purificateur antibactérien est situé sur la gauche de l’unité intérieure tandis que le filtre purificateur à régénération
solaire est situé sur la droite.
• Pour les modèles qui ne sont pas équipés de dispositif à rayons UV, les filtres à régénération solaire doivent être exposés au
soleil à intervalles réguliers, ils doivent être généralement exposés tous les 6 mois au soleil pendant au moins 8 heures.
• Il faut cependant nettoyer fréquemment les filtres purificateurs antibactériens et les filtres à régénération solaire pour éviter
que la poussière diminue les prestations du climatiseur; utiliser un aspirateur ou les secouer légèrement pour éliminer la
poussière. Il est absolument défendu de les laver à l’eau.
• Lorsque les filtres purificateurs antibactériens ne sont pas utilisés, il faut les conserver à l’ombre, dans un endroit frais et sec.
Ne pas les exposer au soleil pendant trop longtemps pour ne pas annuler leur efficacité germicide.
91
Page 93

Entretien
En début de saison
1. Nettoyer les filtres à air
Le fonctionnement du climatiseur sans les filtres à air pourrait causer des anomalies. S’assurer que les filtres de droite et de
gauche (de forme différente) sont bien insérés avant de mettre le climatiseur en marche.
2. Raccorder le câble de mise à la terre
ATTENTION
Une mise à la terre incomplète pourrait provoquer des chocs électriques.
3. Enlever les obstacles éventuels devant les grilles d’aspiration et
de soufflage
MISE À LA TERRE
4. Brancher solidement la fiche dans la prise de courant
ATTENTION
Après avoir éliminé la poussière sur la fiche, brancher solidement la
fiche du câble d’alimentation dans la prise de courant.
PAS AVEC LES
MAINS MOUILLÉES
En fin de saison
1. Faire fonctionner le climatiseur en mode Refroidissement pendant 2-3 heures
Pour empêcher la formation de moisissures ou de mauvaises odeurs, faire fonctionner le climatiseur pendant 2-3 heures à la température programmée de 30°C, en mode Refroidissement et avec le ventilateur à grande vitesse.
2. Débrancher la fiche de la prise de courant
3. Nettoyer le corps de l’appareil
4. Retirer les piles de la télécommande
92
Page 94

Recherche des pannes
Avant d’appeler le SAV, effectuer les vérifications suivantes:
L’appareil ne redémarre pas immédiatement.
Il y a des bruits insolites.
Il y a des odeurs.
• Lorsque l’appareil est éteint, il ne redémarre pas pendant 3 minutes pour protéger le système.
• Lorsque le cordon de l’alimentation est débranché ou rebranché, le circuit de protection se met en fonction pendant 3 minutes pour protéger l’appareil.
•
Pendant le fonctionnement ou à l’arrêt du climatiseur, il peut y
avoir des gargouillements encore plus forts au cours des 2-3
minutes après le démarrage de l’appareil. Ce genre de bruit est
dû à l’écoulement du liquide frigorigène dans les tuyauteries.
• Pendant le fonctionnement, il peut y avoir des craquements.
Cela est dû à la contraction ou à l’expansion du corps de l’appareil en raison de la variation de température.
• Un bruit fort pendant l’émission d’air du climatiseur peut indiquer que le filtre à air est trop sale.
• Cela est dû au fait que l’appareil fait circuler les odeurs de l’air
ambiant, comme les odeurs des meubles, de fumée, etc.
L’unité intérieure émet de la vapeur.
Le climatiseur ne fonctionne pas.
Mauvaises prestations de Refroidissement.
En cas de signal d’alarme ou de non fonctionnement, il pourrait ne pas s’agir d’une panne mais d’une simple protection de l’appareil contre des causes extérieures. Pour rétablir le fonctionnement correct, il faut couper le courant pendant au moins 3 minutes puis réalimenter en courant. Si le problème persiste, contacter le SAV.
• Pendant le fonctionnement en mode Refroidissement ou Déshumidification, l’unité intérieure peut émettre de la buée ou de
la vapeur. Cela est dû au brusque refroidissement de l’air dans
la pièce.
• Est-ce que la fiche est insérée dans la prise de courant?
• Y a-t-il eu une chute de tension?
• Est-ce que le fusible a sauté?
• Est-ce que le filtre à air est sale? Il devrait être normalement
nettoyé tous les 15 jours.
• Y a-t-il des obstacles bloquant l’aspiration ou l’émission de
l’air?
• La température ambiante est-elle correctement programmée?
• Y a-t-il des portes ou des fenêtres ouvertes?
• La lumière du soleil entre-t-elle directement dans la pièce?
(Fermer les rideaux).
• Y a-t-il des sources de chaleur ou trop de personnes dans la
pièce?
93
 Loading...