

Page 1
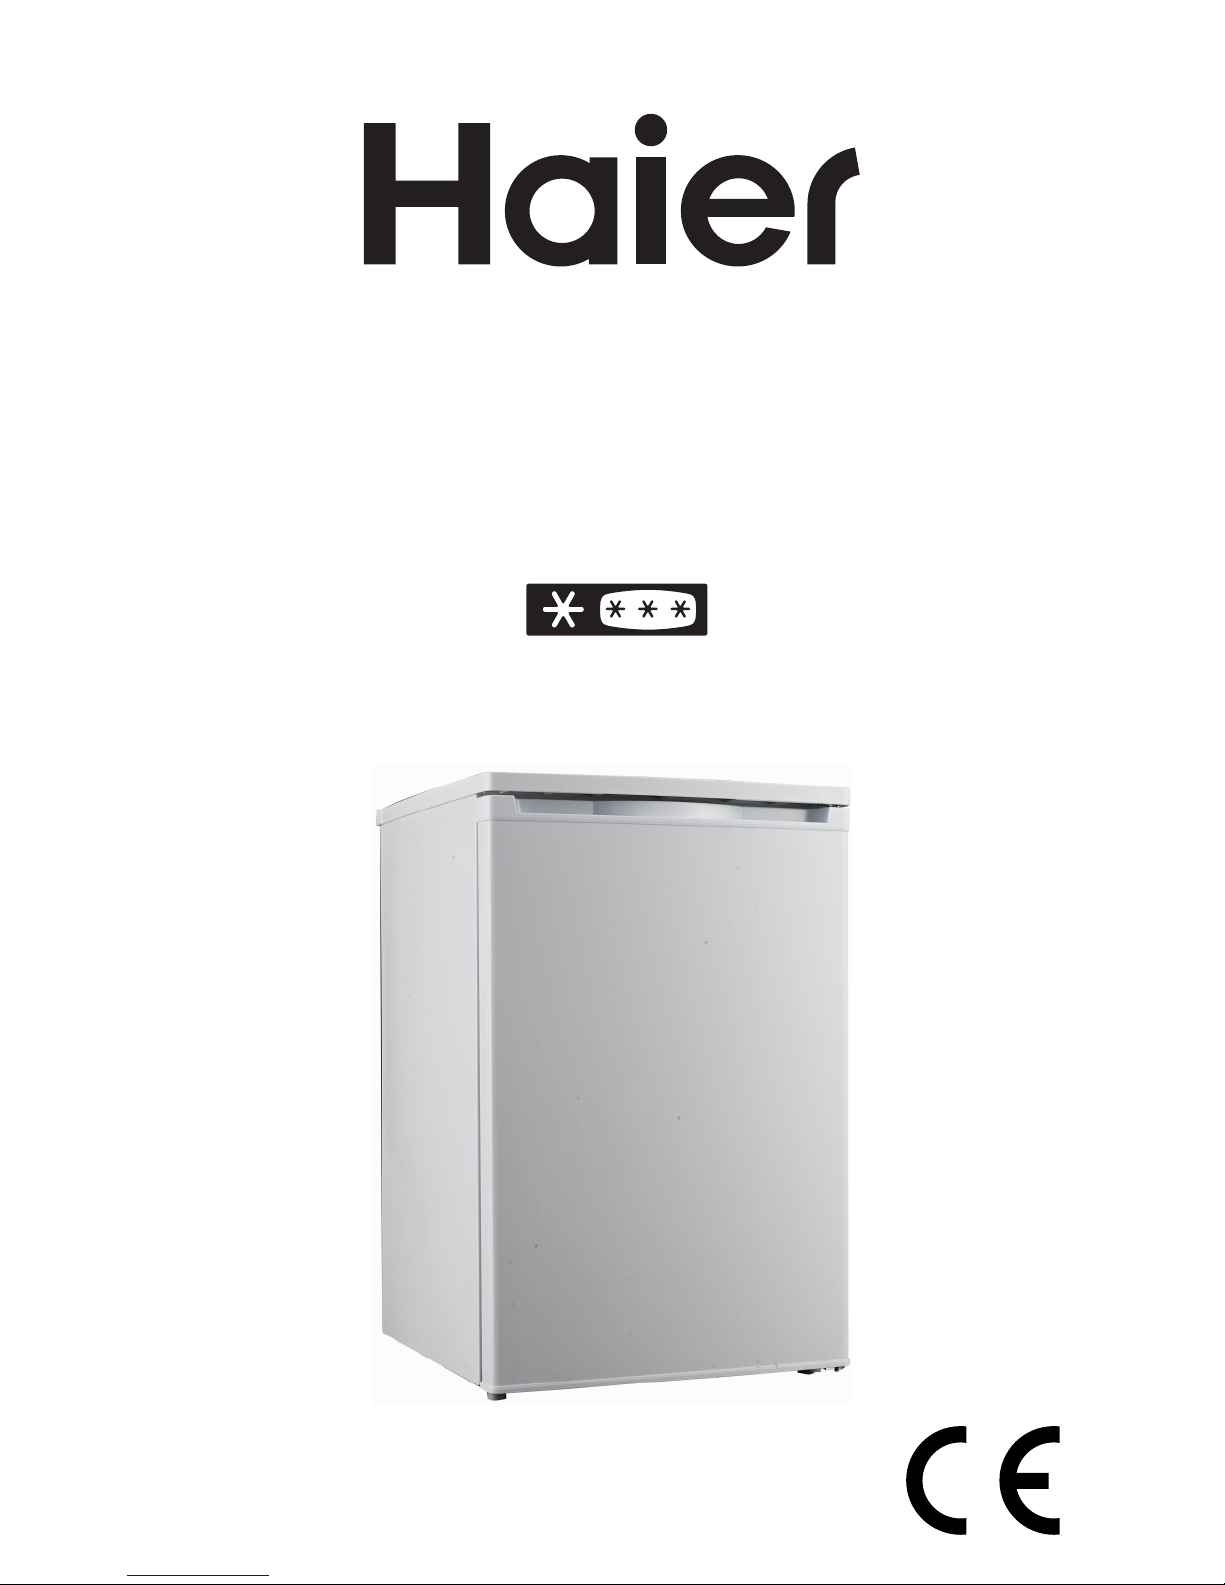
Refrigerator-freezer
USER’S INSTRUCTIONS
HRK-176AA
HRK-176AAB
HRK-176AAS
Page 2

TABLE OF CONTENTS
Structure illustration
Transport and handling
Installation
Storage of food
Defrosting
- 4 -
- 5 -
- 6 -
- 4 -
- 4 -
Temperature control
- 5 -
General instructions for care and maintenance
- 11 -
Test
- 5 -
Important safety instruction
- 1 -
Door reverse
Troubleshooting
Technical specifications
- 6 -
- 7 -
- 9 -
Page 3
IMPORTANT SAFETY INSTRUCTIONS
This product is for household use only!
Please read these instructions carefully before the first use of this product
and save this manual for your future reference.
1. This appliance can be used by children aged from 8
years and above and persons with reduced physical,
sensory or mental capabilities or lack of experience
and knowledge if they have been given supervision
or instruction concerning use of the appliance in a
safe way and understand the hazards involved.
Children shall not play with the appliance. Cleaning
and user maintenance shall not be made by children
without supervision.
2. This appliance is intended to be used in household
and similar applications such as:
- Staff kitchen areas in shops, offices and other
working environments
- Farm houses and by clients in hotels, motels and
other residential type environments
- Bed and breakfast type environments
- Catering and similar non-retail applications
3. Warning: Do not use mechanical devices or other
mean to accelerate the defrosting process, other
than those recommended by the manufacturer.
4. Warning: Except the items recommended by
manufacturer, DO NOT use any electric
appliance in the units.
-1 -
Page 4

5. Warning: Never try to use this appliance for
applications or in a way which is not described in
the instruction, otherwise severe hazards may
occur.
6. Warning: If the supply cord is damaged, or if the
appliance has malfunctions or it has been damaged
in any manner, please return the appliance to the
manufacturer, its authorized service agent or
similarly qualified persons for examination, repair or
adjustment in order to avoid a hazard.
7. WARNING: Keep ventilation openings, in the
appliance enclosure or in the built-in structure,
clear of obstruction.
8. WARNING: Do not damage the refrigerant circuit.
9. WARNING: Do not use electrical appliances inside
the food storage compartments of the appliance,
unless they are of the type recommended by the
manufacturer.
10. Do not use the appliance in a dusty environment
or in an explosive and inflammable atmosphere
(inflammable gases, vapors, vapors from organic
solvents, etc.)
11. Do not store explosive substances such as aerosol
cans with a flammable propellant in this appliance.
12. Do not pour water directly onto the freezer,
which may cause declining of insulation and
corrosiveness.
13. Insert the plug into a single grounded socket.
Make sure to place the plug all the way into socket
when connecting your appliance.
-2 -
Page 5
14. To prevent possible harm to the environment or
human health from uncontrolled waste disposal,
recycle it responsibly to promote the sustainable
reuse of material resources. And the disposal should
only be done through public collection points.
15. Appliance should be placed on a horizontal floor
and keep the ventilation freely. Don't try to replace
or repair any components by yourself, ask the service
agency for help if necessary.
16. Always handle the appliance to avoid any damage.
17. Caution: Do not connect grounding wire to a water
or gas pipe.
18. Strictly no storing strong base, strong acid, organic
solvent and corrosive goods together with food.
19. Please refer to the “Trouble Shooting” references
when the unit is facing some problems. Do not
attempt to solve the problem on your own, please
refer to certified technician only.
20. As regards the information for the installation,
operation, maintenance and disposal of the device,
refer to the following parts of the manual.
This device was tested according to all
relevant current CE guidelines, such as
electromagnetic compatibility and low
v o l t a g e d i r e c t i v e s , a n d w a s
manufactured in accordance with the
latest safety regulations.
-3 -
Page 6
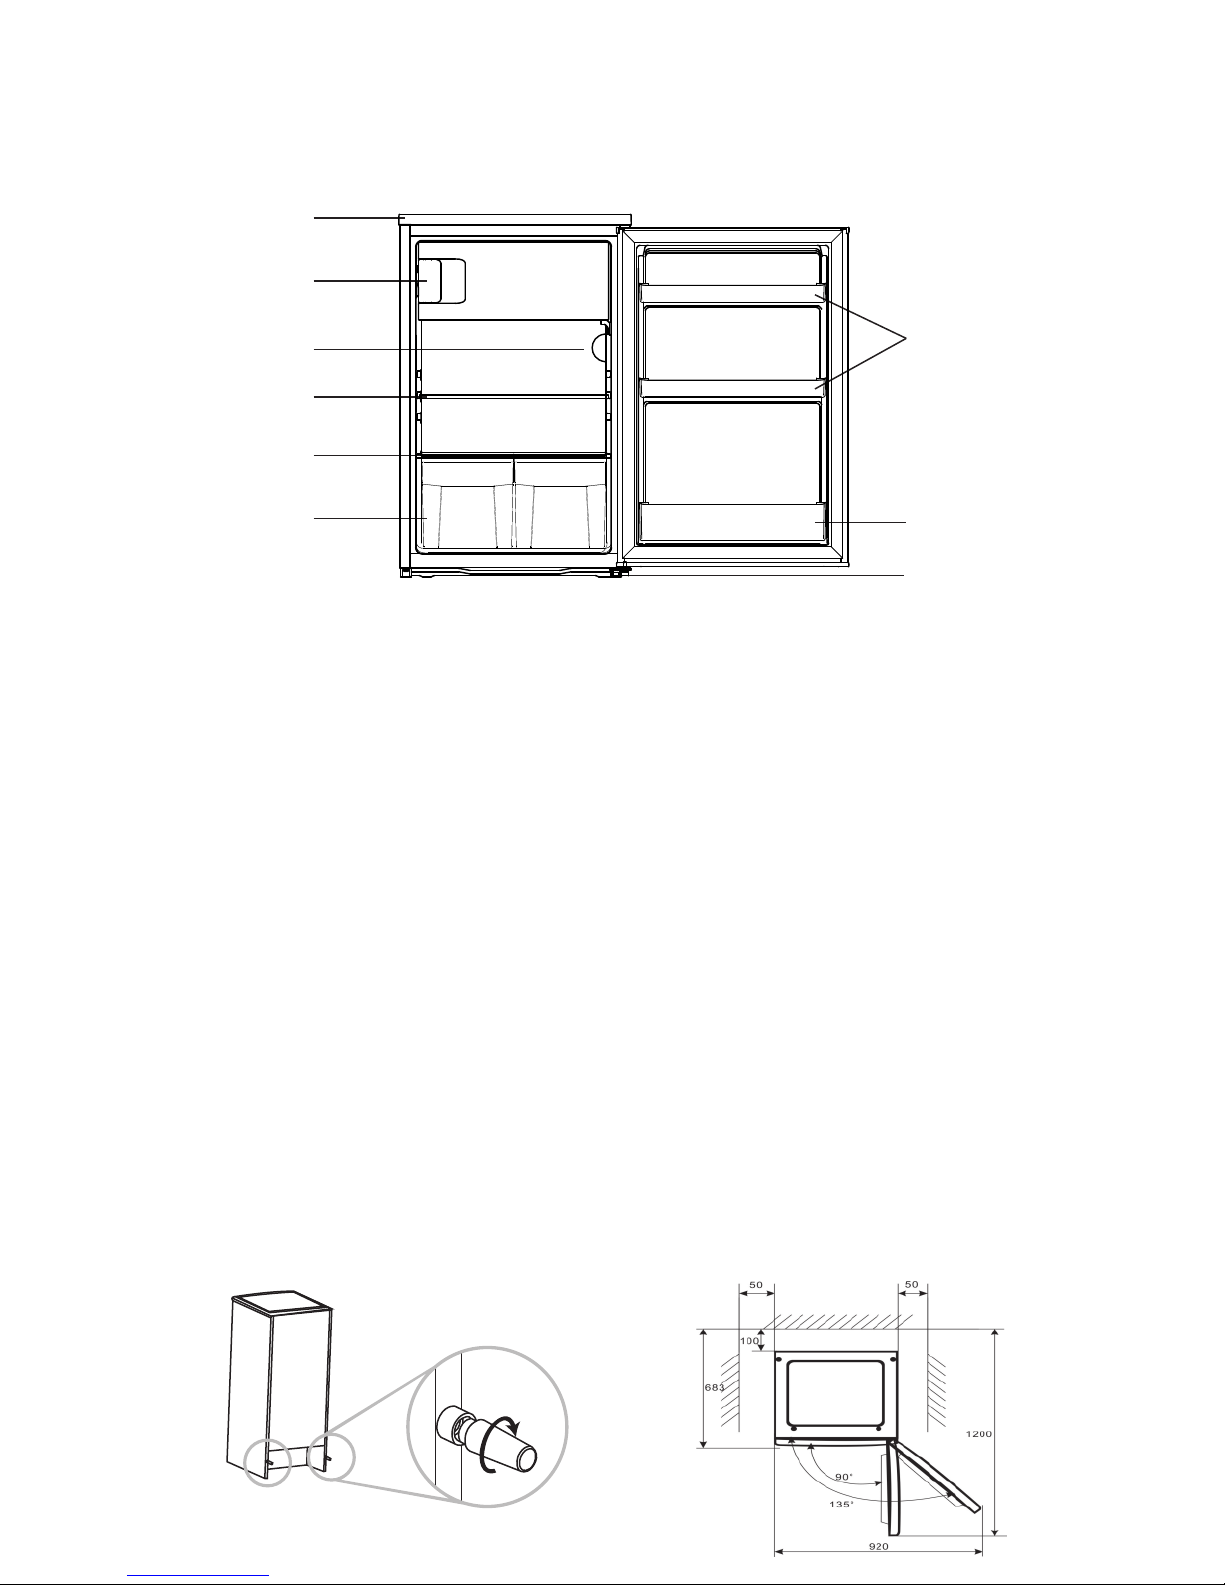
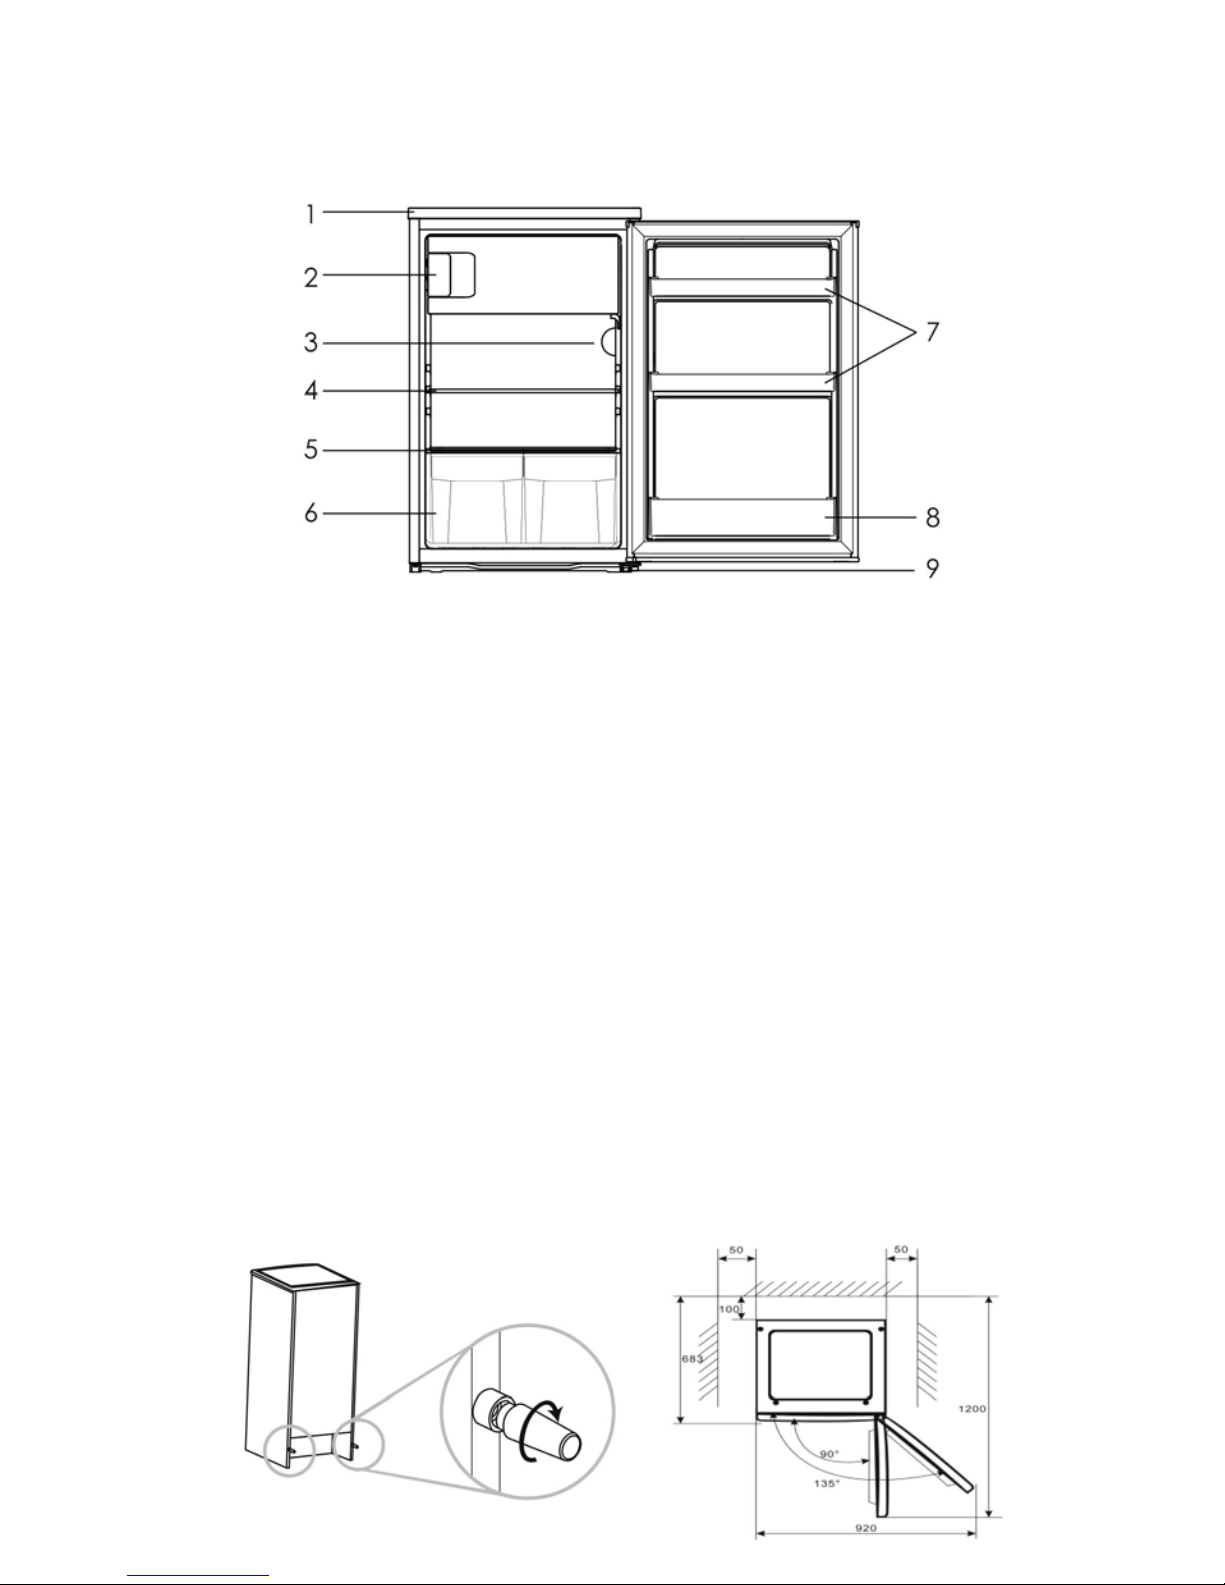
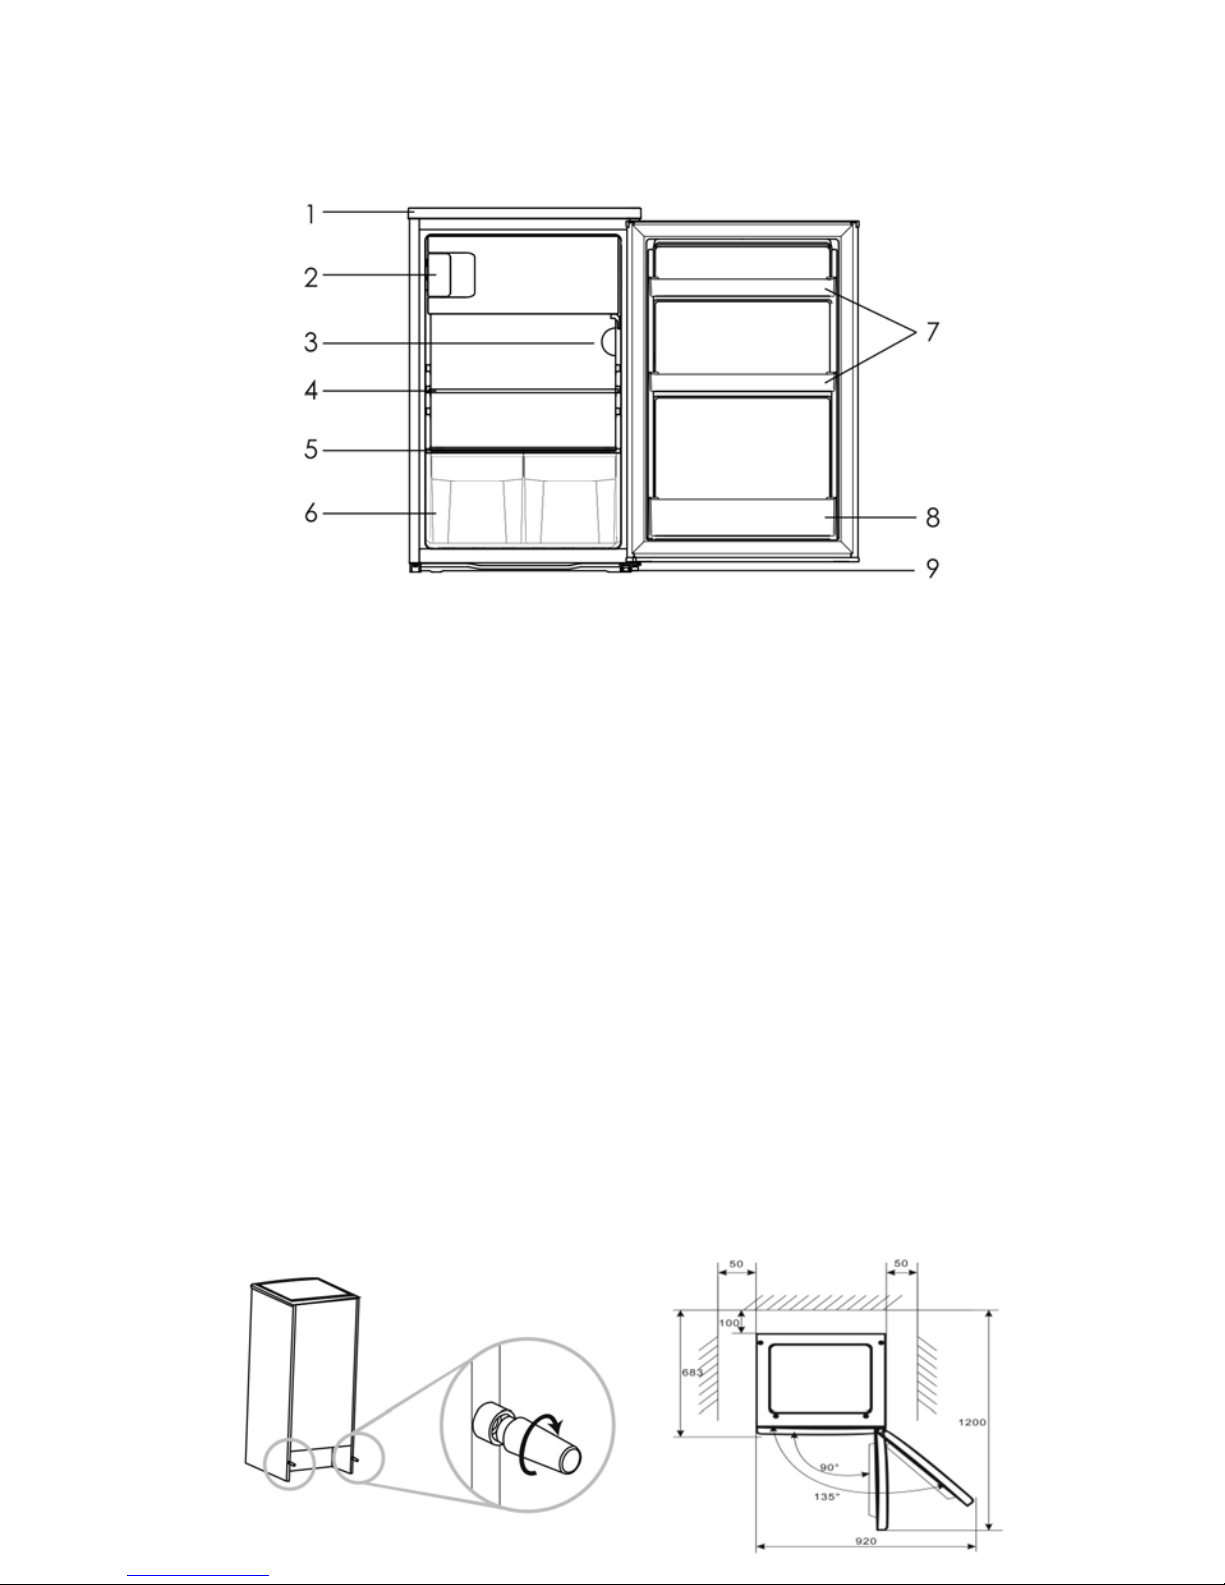
STRUCTURE ILLUSTRATION
TRANSPORT AND HANDLING
When transportation, hold the base and lift the refrigerator carefully with an angle
inferior at 45 degree. Never hold the door handle as support. Never place it upside down
nor horizontally. Push refrigerator on its basis and place it thanks to its roller feet.
INSTALLATION
To fix stably, the appliance must be placed on a flat and solid surface. It should not be
laid on any soft material.
Choose a well-ventilated place. A space of at least 5cm must be left at the sides and
10cm at the back of the refrigerator. The cabinet spacers supplied with the appliance
must be installed to protect and control distance from the wall.
Choose a location where there is no heat source. Keep the refrigerator away from direct
sunlight or other appliance producing heat.
Choose a dry and well-ventilated place where there is no corrosive air.
-4 -
1. Top cover
2. Freezer component
3.Thermostat device
4. Glass shelf
5. Crisper cover
6. Crisper
7. Door balcony
8. Bottle balcony
9. Adjustable feet
1
2
3
4
5
6
7
9
8
Page 7

TEST
Clean the parts of the refrigerator with lukewarm water on a soft cloth or with a neutral
detergent and with clear water, then wipe them dry.
Notes: Electric parts of the refrigerator can only be wiped by dry cloth.
Turn the thermostat knob on the "3" position and turn on electricity. The compressor
and the light inside the refrigerator begin to work.
Close the door and wait 30 minutes. If the temperature in the freezer compartment
decreased obviously, it shows that the refrigerator system works well. When the
refrigerator operates for a period of time, the temperature controller will automatically
set the temperature on conditions that the door is not too often opened.
If the above steps are successful, the trial operations are finished. The refrigerator works
normally.
-5 -
TEMPERATURE CONTROL
The temperature in the refrigerator compartment and in the freezer compartment is
controlled by the temperature controller installed on the right side of the refrigerator
compartment.
Turn the thermostat knob to regulate the temperature inside the refrigerator.
The marks on the knob are not the exact number of the degrees of temperature but the
temperature grades from “0” to “7”. The first grade corresponds to a forced STOP of the
refrigeration and the 7th grade corresponds to the lowest temperature the refrigerator
can produce. Turn the knob from "1"position to "7"position, the temperature decreases
continuously.
Set the thermostat knob to "3-4"position for a normal use.
Notice that the product is set for operation at a specific ambient range between 16 and
38°C. The appliance may not work properly if it is left for a long period at a temperature
above or below the indicate range.
The indoor temperatures are influenced by the following factors:
l Ambient temperature
l Frequency of door opening
l Amount of stored foods
l Installation of the appliance
STORAGE OF FOOD
How to Use the Freezer Compartment?
l Put fresh food, such like fish or meat, into the freezer to save their taste and
nutrient.
l Wrapped food has to be frozen in aluminum sheet or cellophane sheet or in airtight
plastic boxes.
l Do not put fresh food directly in contact with food already frozen.
l If you buy frozen food, bring it home and place it in freezer as quickly as possible.
Page 8

-6 -
l Never re-freeze a defrosted product.
l Do not store liquids in bottles or cans(besides high percentage spirits) especially
carbonated beverages in the freezer, as these will burst during freezing
l The storage time for the respective food (especially for commercially frozen food)
recommended by the food manufactures should not be exceeded. Only take the
required amount of food out pf the freezer.
l During defrost or, maintenance and care the temperature of frozen food could
arise and the storage time could be shorter
How to Use the Refrigerator Compartment?
l Eggs have to be put in the eggs’ pockets, bottles in the bottles’ pocket, etc.
l Fruits and vegetables have to be put in the salad crisper.
l Jars have to take place in the tubs of the door of the refrigerator.
l Other perishable food, or which can loosen stenches in the refrigerator, must be
separately packed.
Placement of Food
l Please not accumulate too much food in the refrigerator because it would
engender a loss of cold.
l Food has to be wrapped separately in aluminum sheet or in cellophane sheet or in
airtight plastic boxes.
l Hot food cannot be put in the refrigerator or in the freezer until they have reached
the ambient temperature, or it will increase electrical consumption.
l Never place vegetables and fruits into freezer compartment because they will be
unfit for the consumption once defrosted.
When the refrigerator working for a long time, the inner surface of the freezer will be
covered with a layer of hoarfrost. It may raise the electricity consumption and decrease
the effect of refrigeration. Then you should defrost your freezer once a month.
When defrosting, cut off the power, open the door and move frozen foods to a cool
place. Use a plastic spatula to remove the hoarfrost. Then remove the hoarfrost so
unstuck and wipe the inside of your freezer with a sweet and dry cloth.
Notes: Never use metal tools to defrost your freezer because it could damage it.
DEFROSTING
GENERAL INSTRUCTIONS FOR CARE AND MAINTENANCE
The refrigerator should be cleaned once a month. Before cleaning, the electric plug must
be removed from the power supply.
Wipe the inside and the outside of the refrigerator with a wet soft cloth.
If it's too dirty, clean with a soft cloth with neutral detergent and, then remove the
moisture with dry cloth.
If you leave the refrigerator idle for a long time, proceed as follows:
l Disconnect the refrigerator from the electric power supply.
Page 9
-7 -
l Remove all food.
l Clean and dry the inside as instructed in the direction given above for cleaning.
l Leave the doors open to prevent any unpleasant smells while the refrigerator is not
used.
Cleaning
When cleaning the refrigerator the electric plug must be removed from the power
supply.
Use water or a non-abrasive detergent on a soft cloth and remove the moisture with a
dry soft cloth. Remember to clear the defrost drain at the back just above the glass
cover.
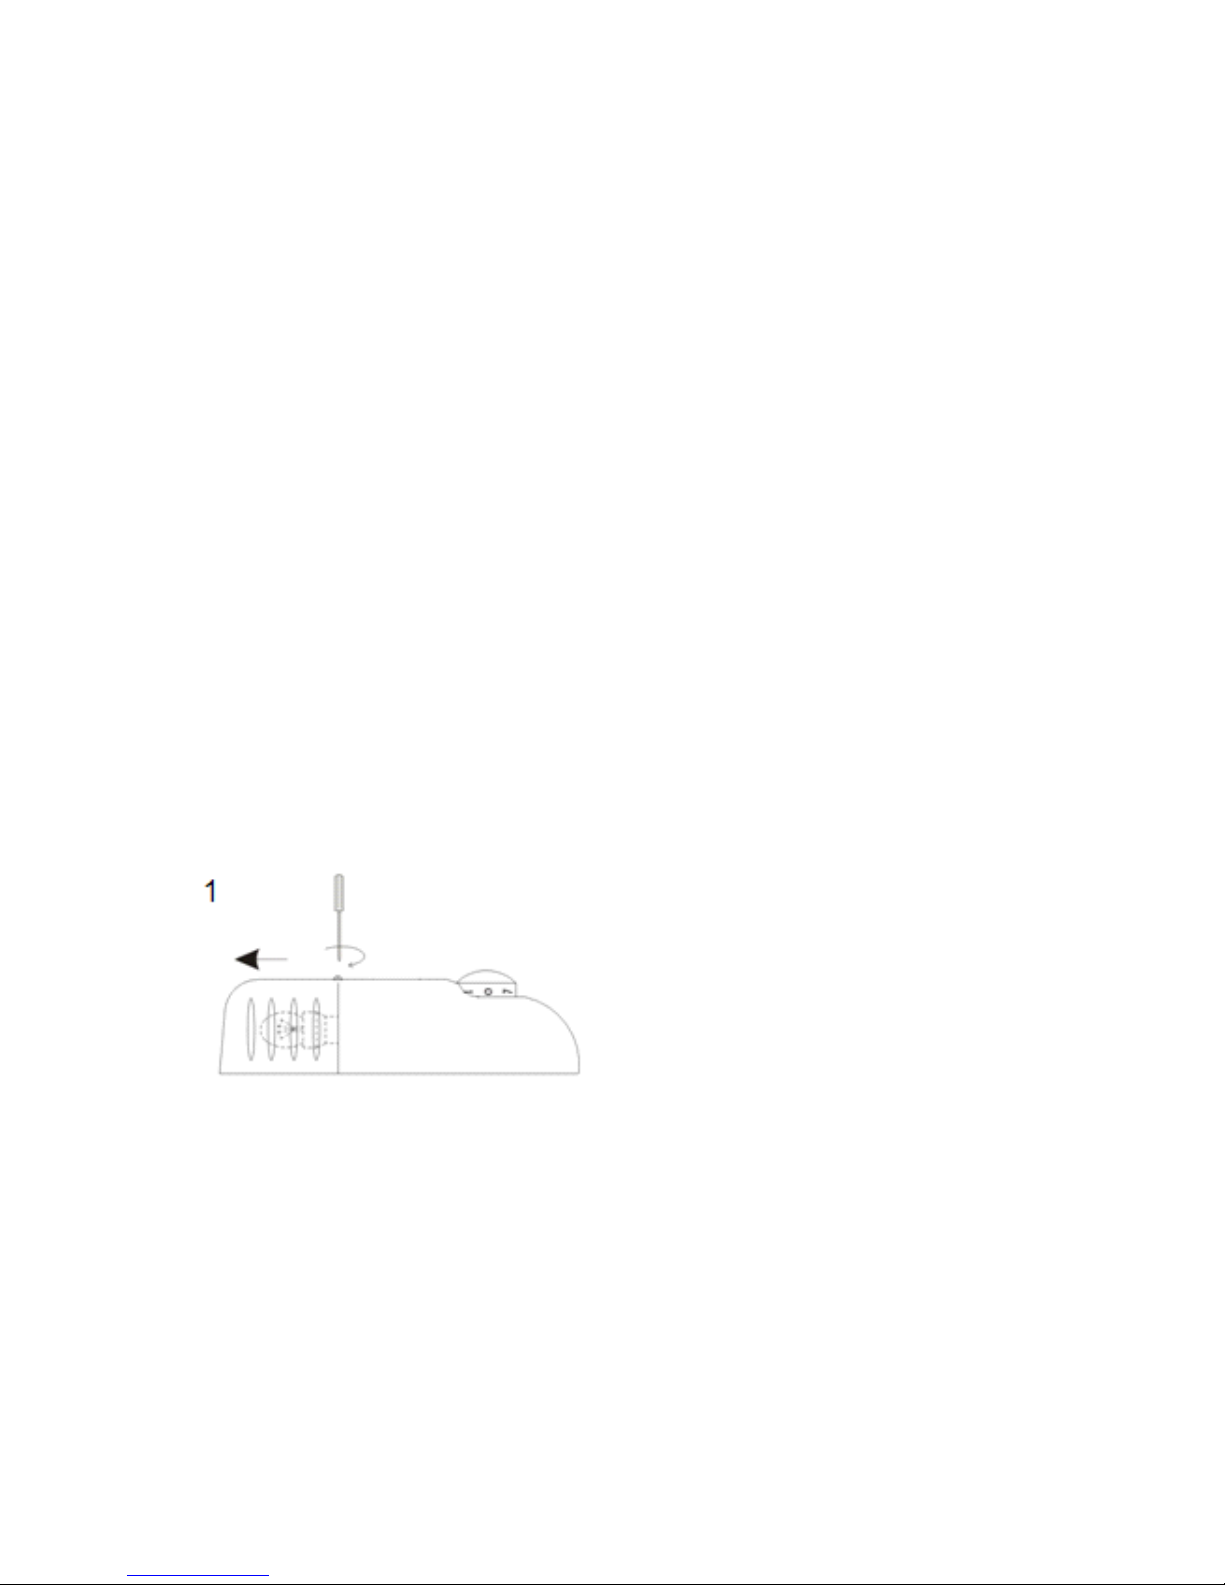
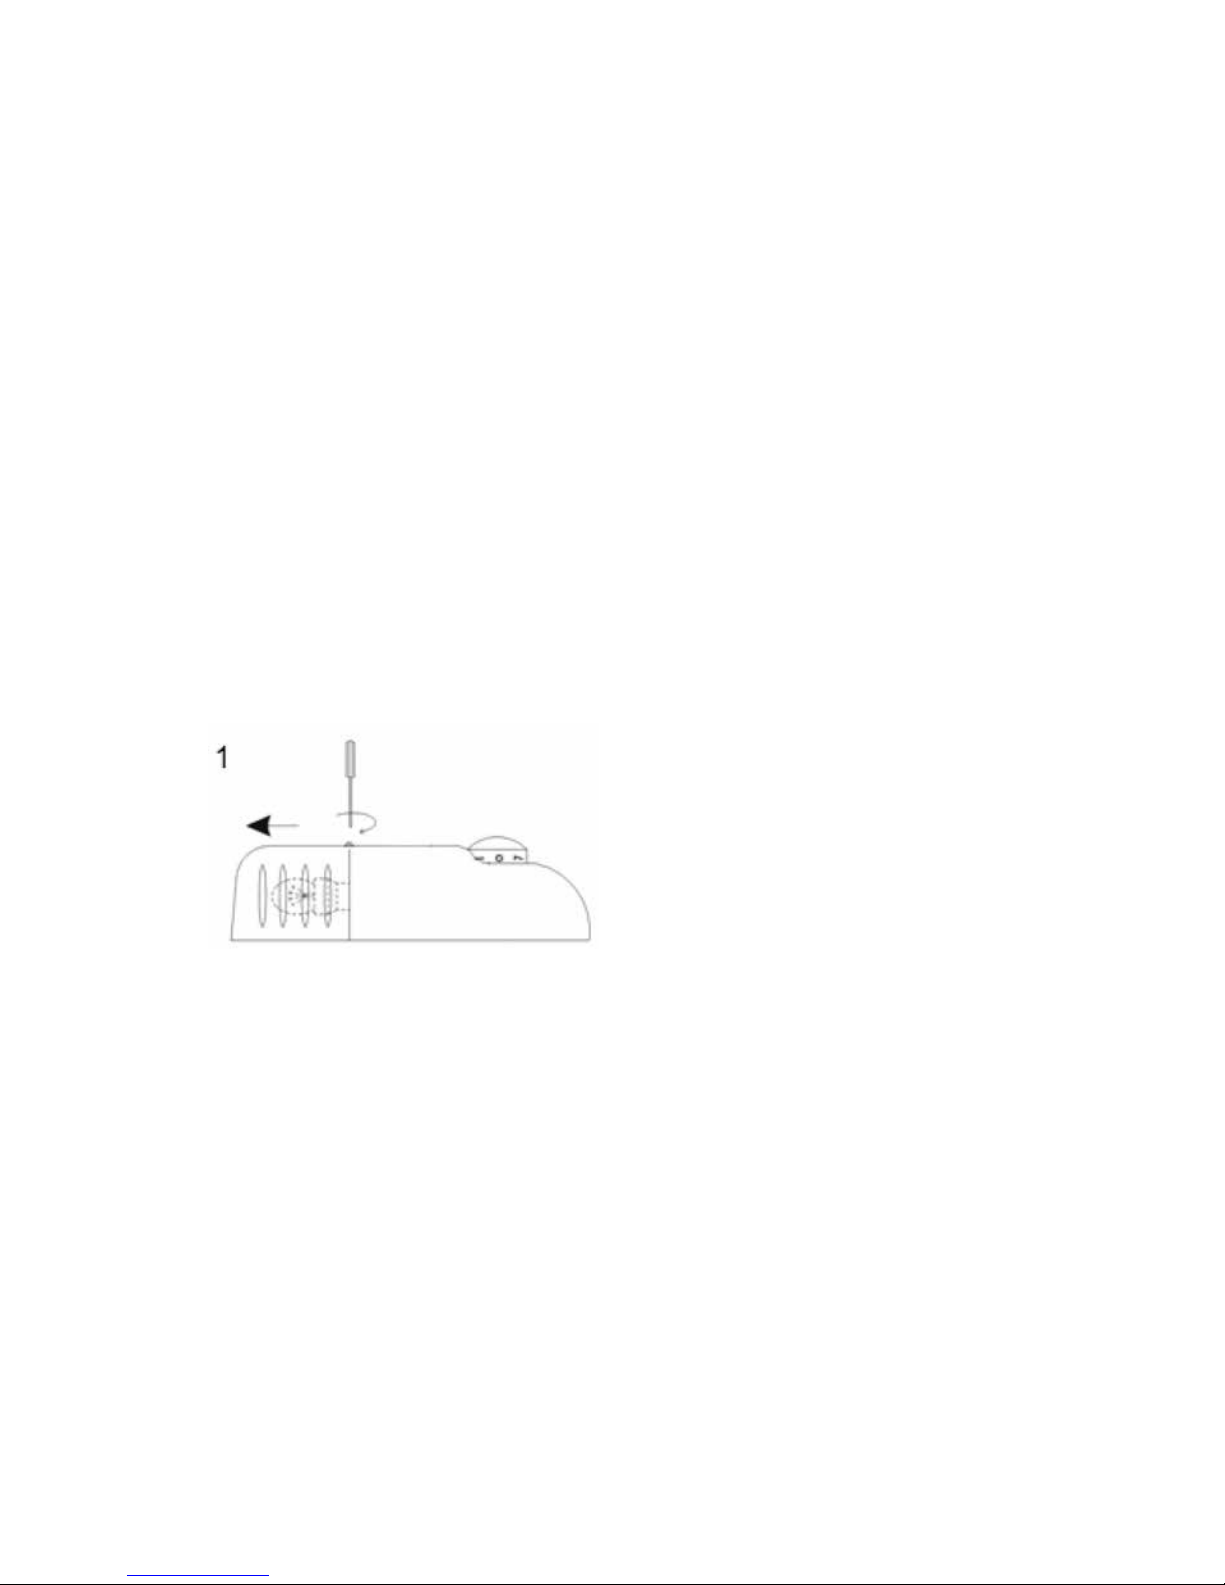
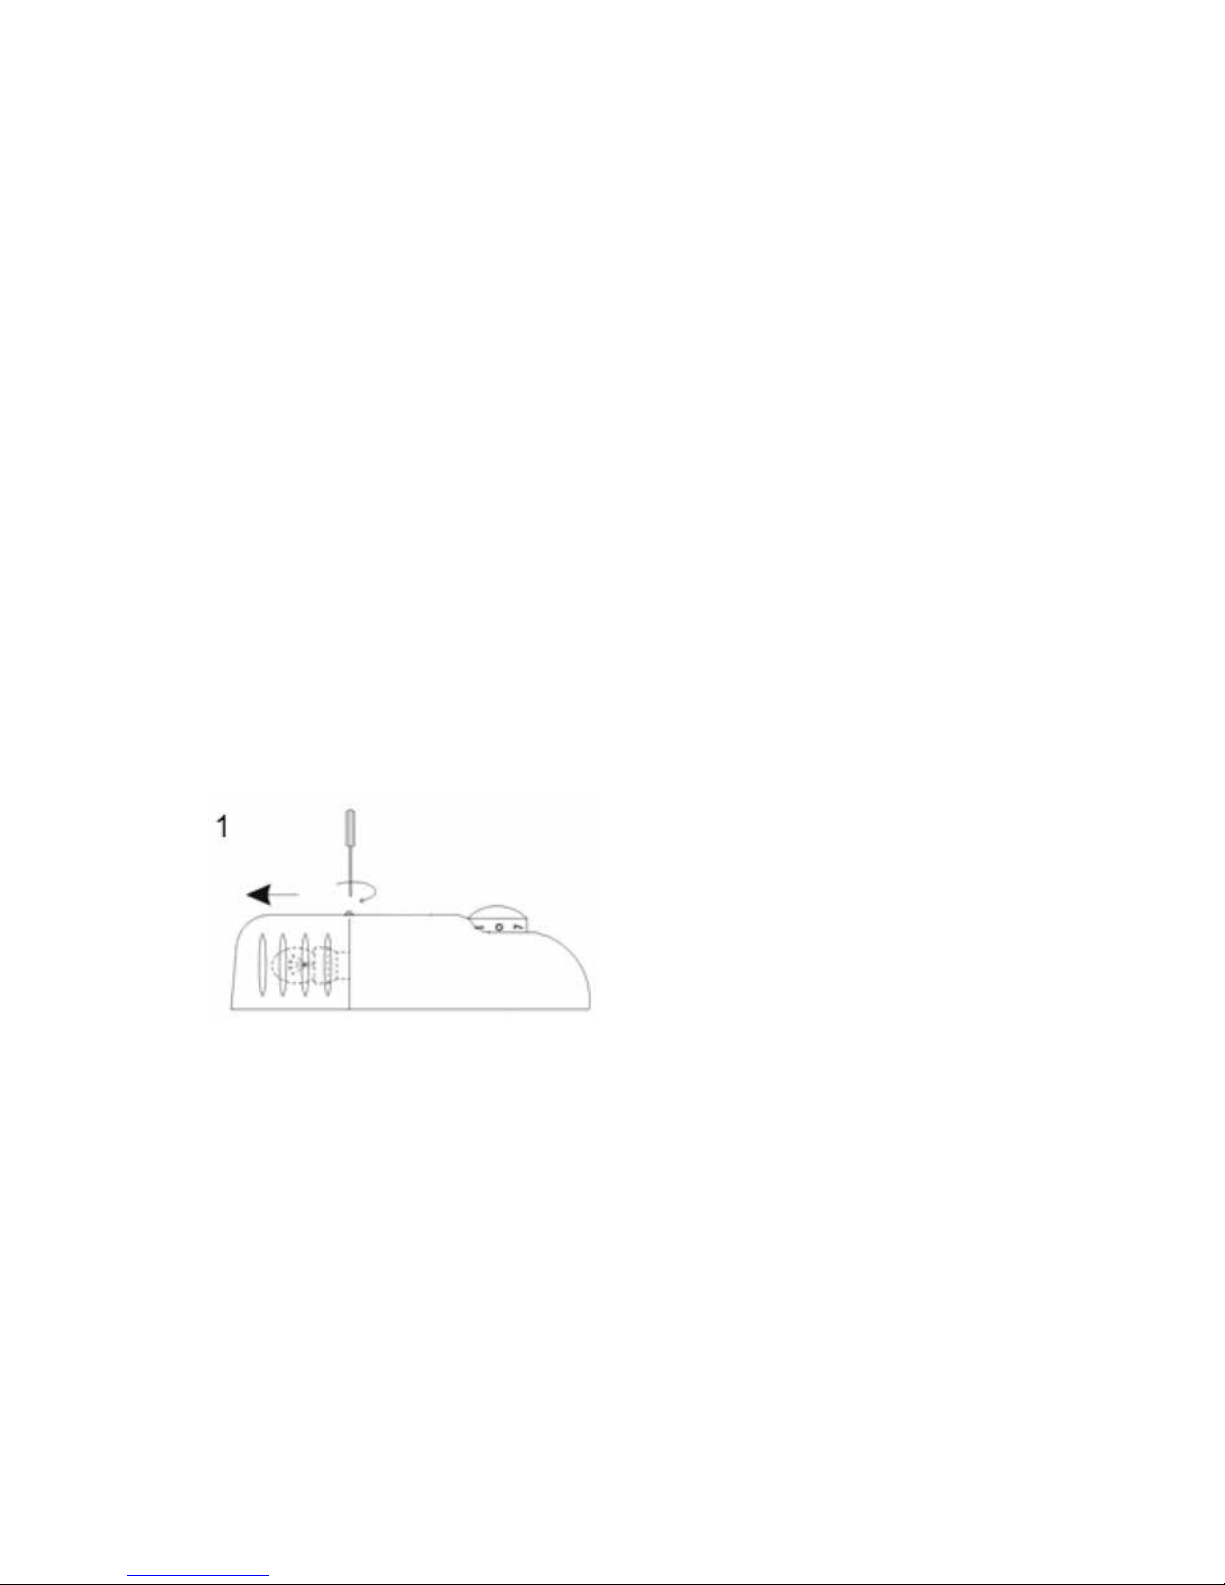
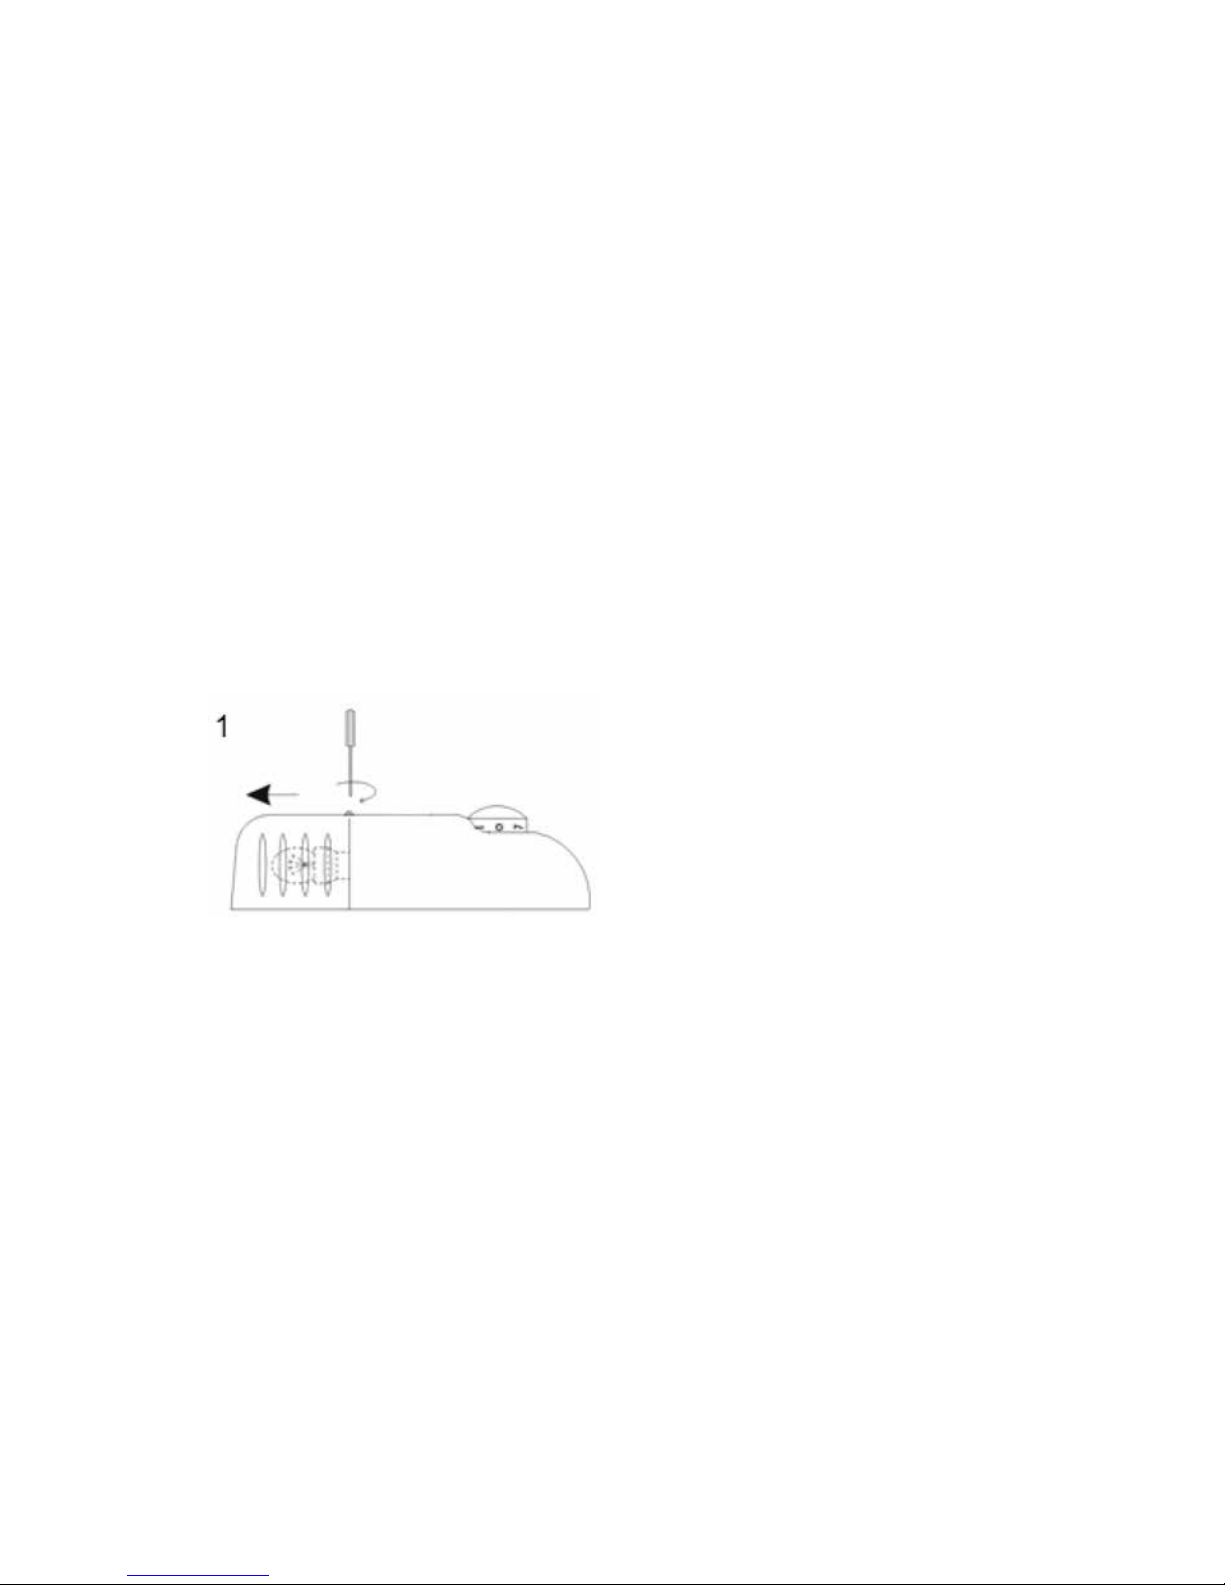
Replacing the light bulb
If the internal light does not work anymore, disconnect then reconnect at once the
device. If the light does not still work, verify if the light bulb is correctly screwed. If in
spite of these tests, there is no light, it is necessary to change the light bulb. Use a 220240V~, 10W light bulb.
l Disconnect the appliance;
l Open the light cover (1);
l Undo the defective light bulb anticlockwise.
l Screw the new light bulb clockwise.
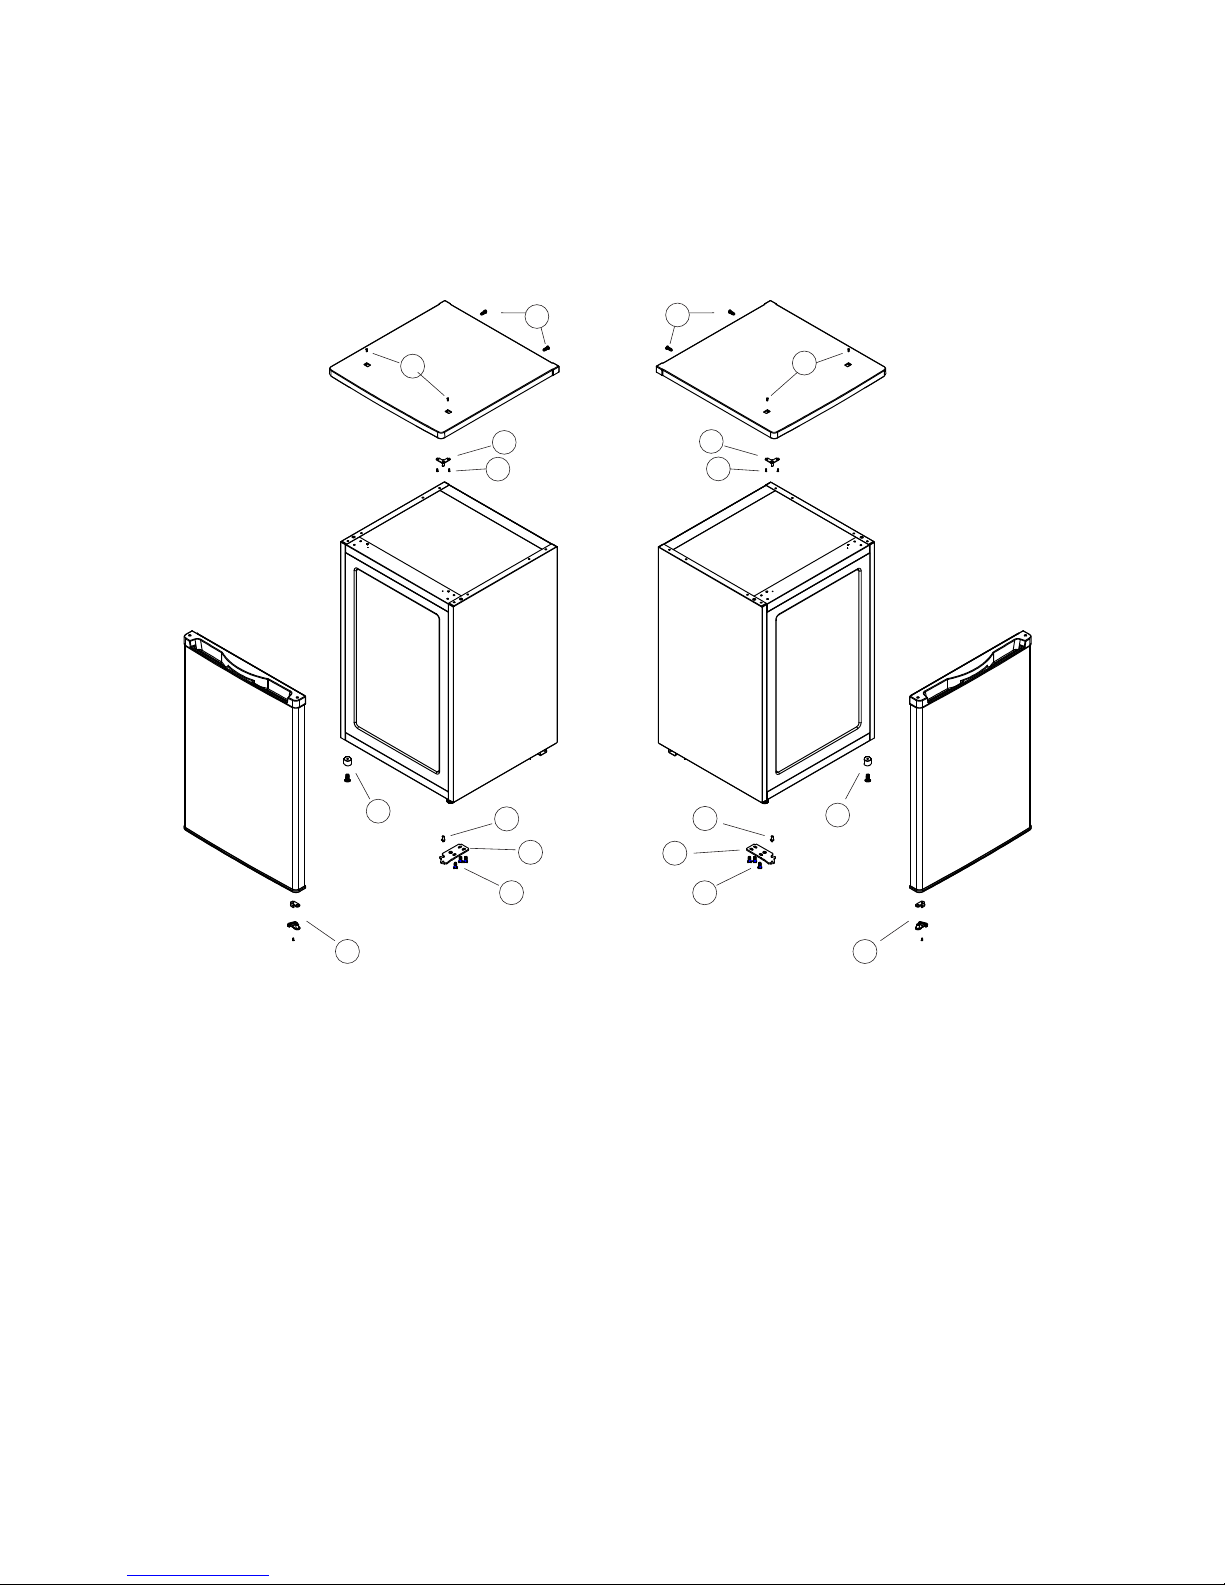
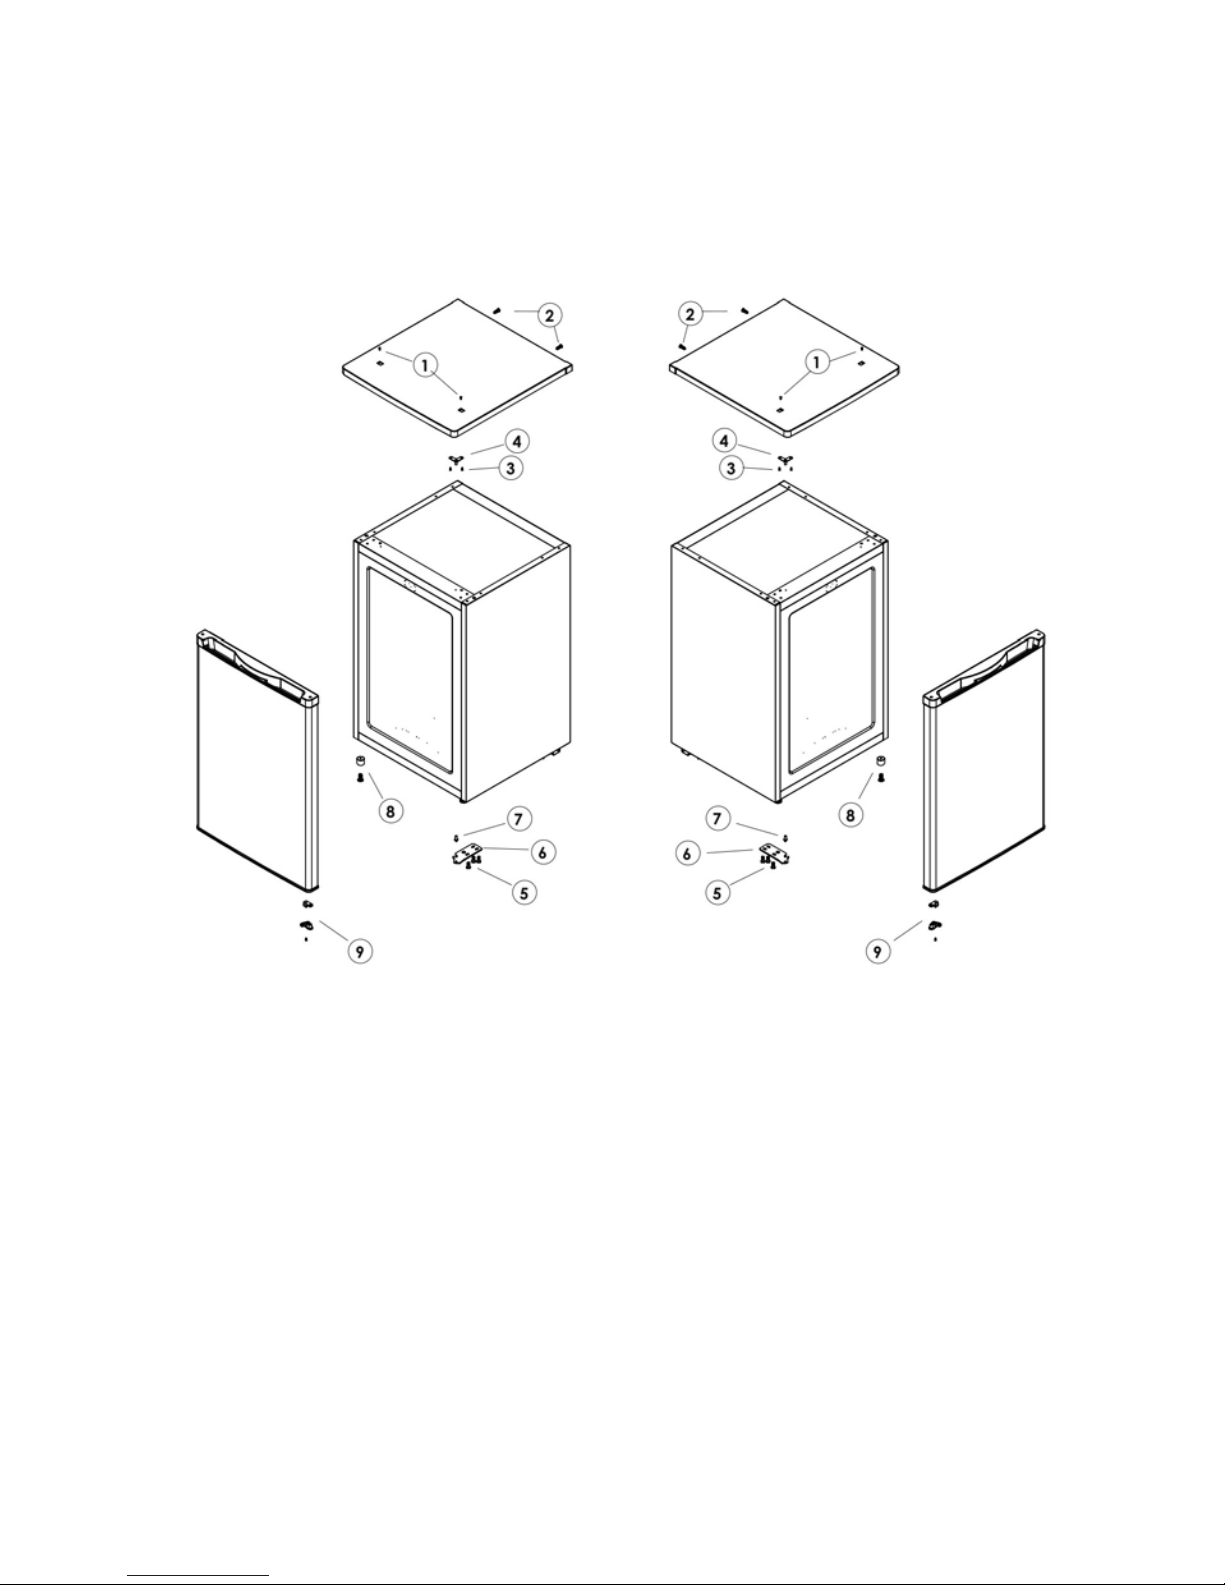
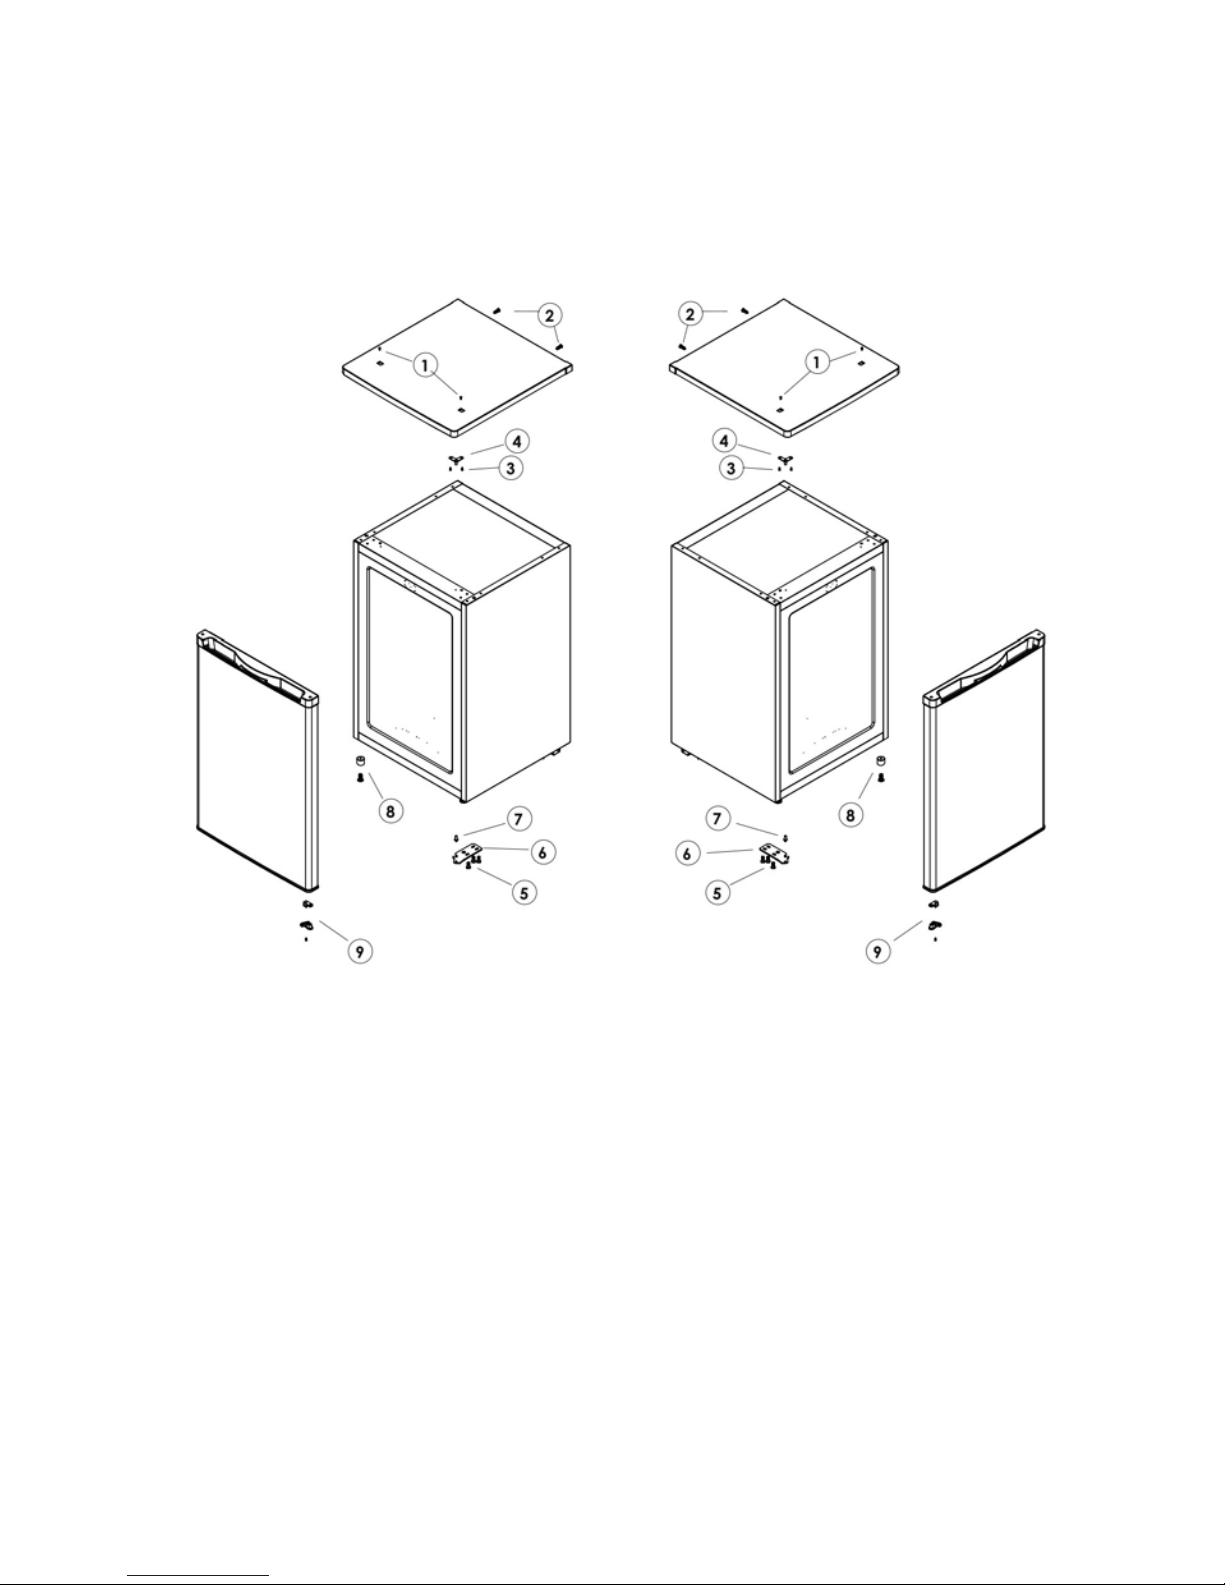
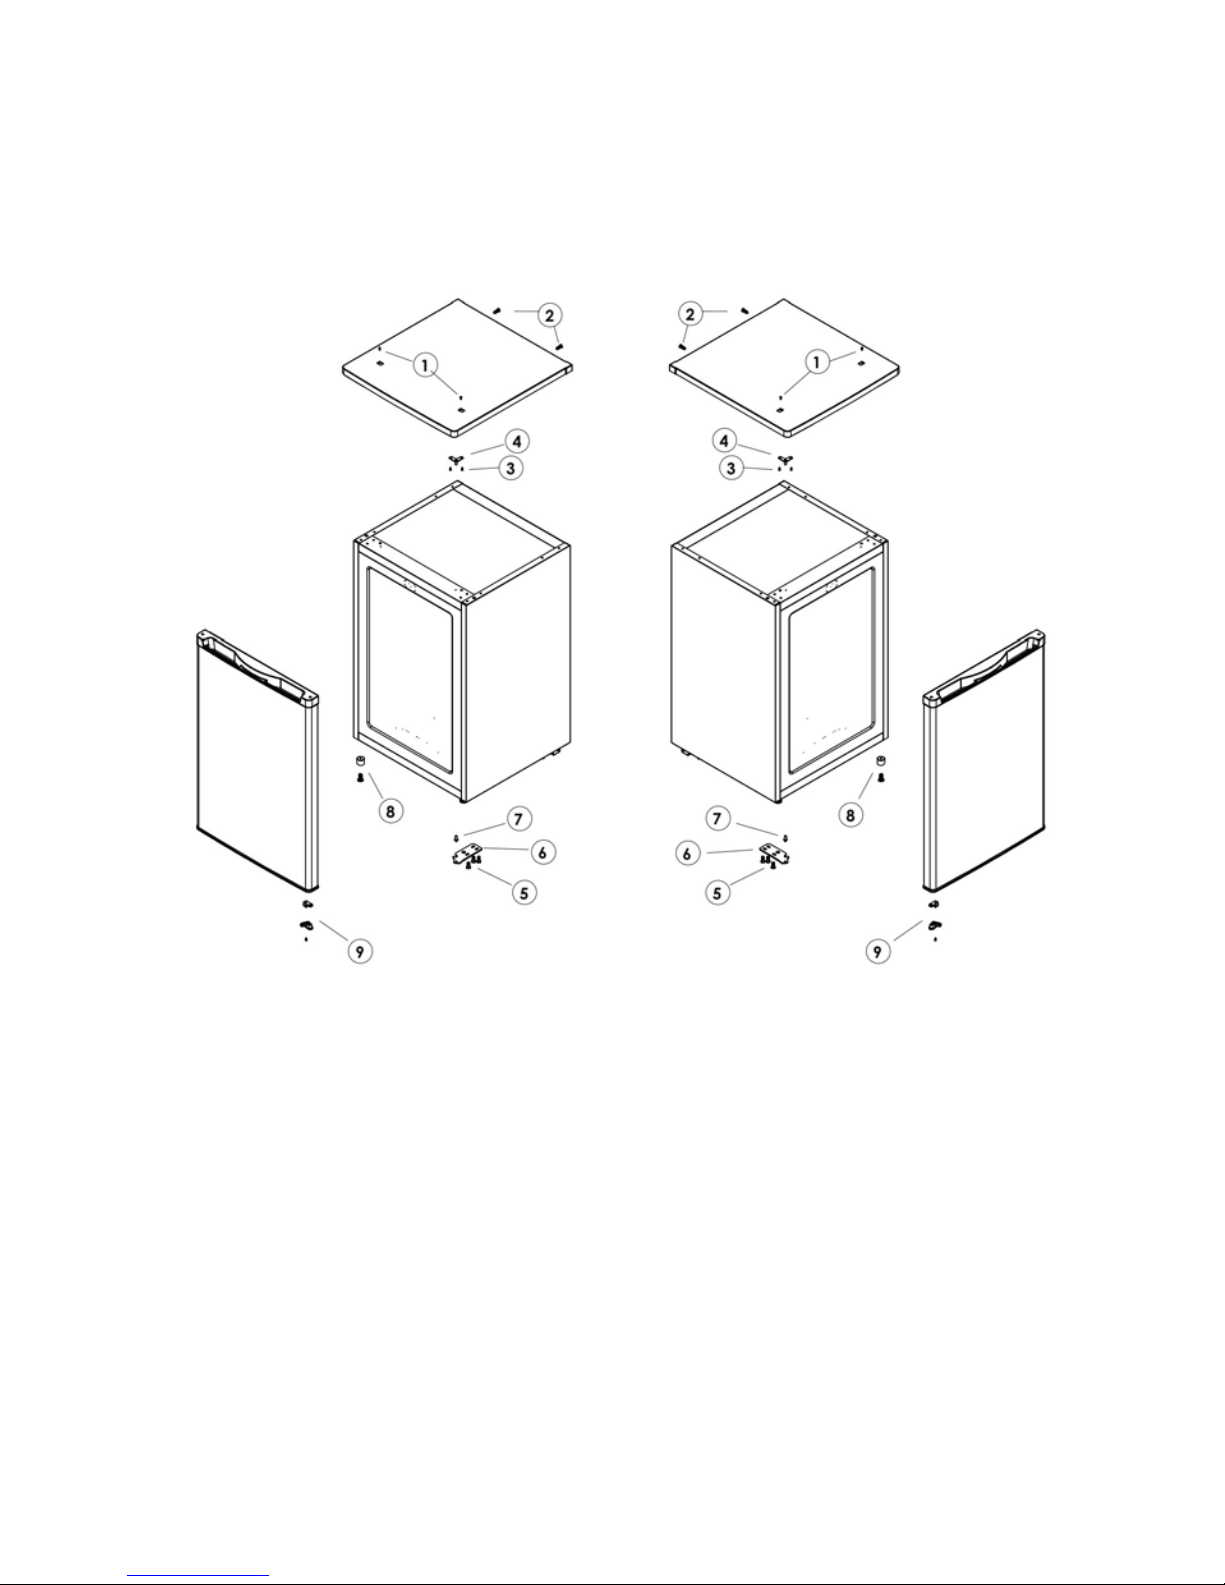
DOOR REVERSE
This fridge has been built with the door hinges on the right. If you want to change the opening
direction, please follow the instruction below:
1. Remove the four screws (1) (2) and take away the top.
2. Remove the two screws (3) that hold the upper hinge (4) and take away the upper hinge (4).
3. Lift the door and place it on a padded surface to prevent scratching it.
4. Remove the three screws (5) that hold the lower hinge (6) and make sure to remove the
lower hinge(6).
5. Remove the adjustable leg (8) and transfer it to right side.
6. Remove the bolt-pin (7) and reverse the direction of lower hinge (6). Install the lower hinge
(6) into left side with three screws (7).
7. Insert the bolt-pin (7) to the lower hinge (5).
Page 10
-8 -
8. Remove the hinge pin (9) that is in the bottom of door. At the other side of door, insert the
replacement hinge pin that is supplied with the appliance.
9. Set the door to its place and make sure the door seat at the lower hinge (6).
10. Fix the upper hinge (4) with the two screws (3) and the top with four screws (1) (2).
1
2
3
4
5
7
8
9
6
figure 1 figure 2
9
5
6
7
8
2
1
4
3
Figure 1: Represents position of components prior to door reversal
Figure 2: Represents position of components after door reversal
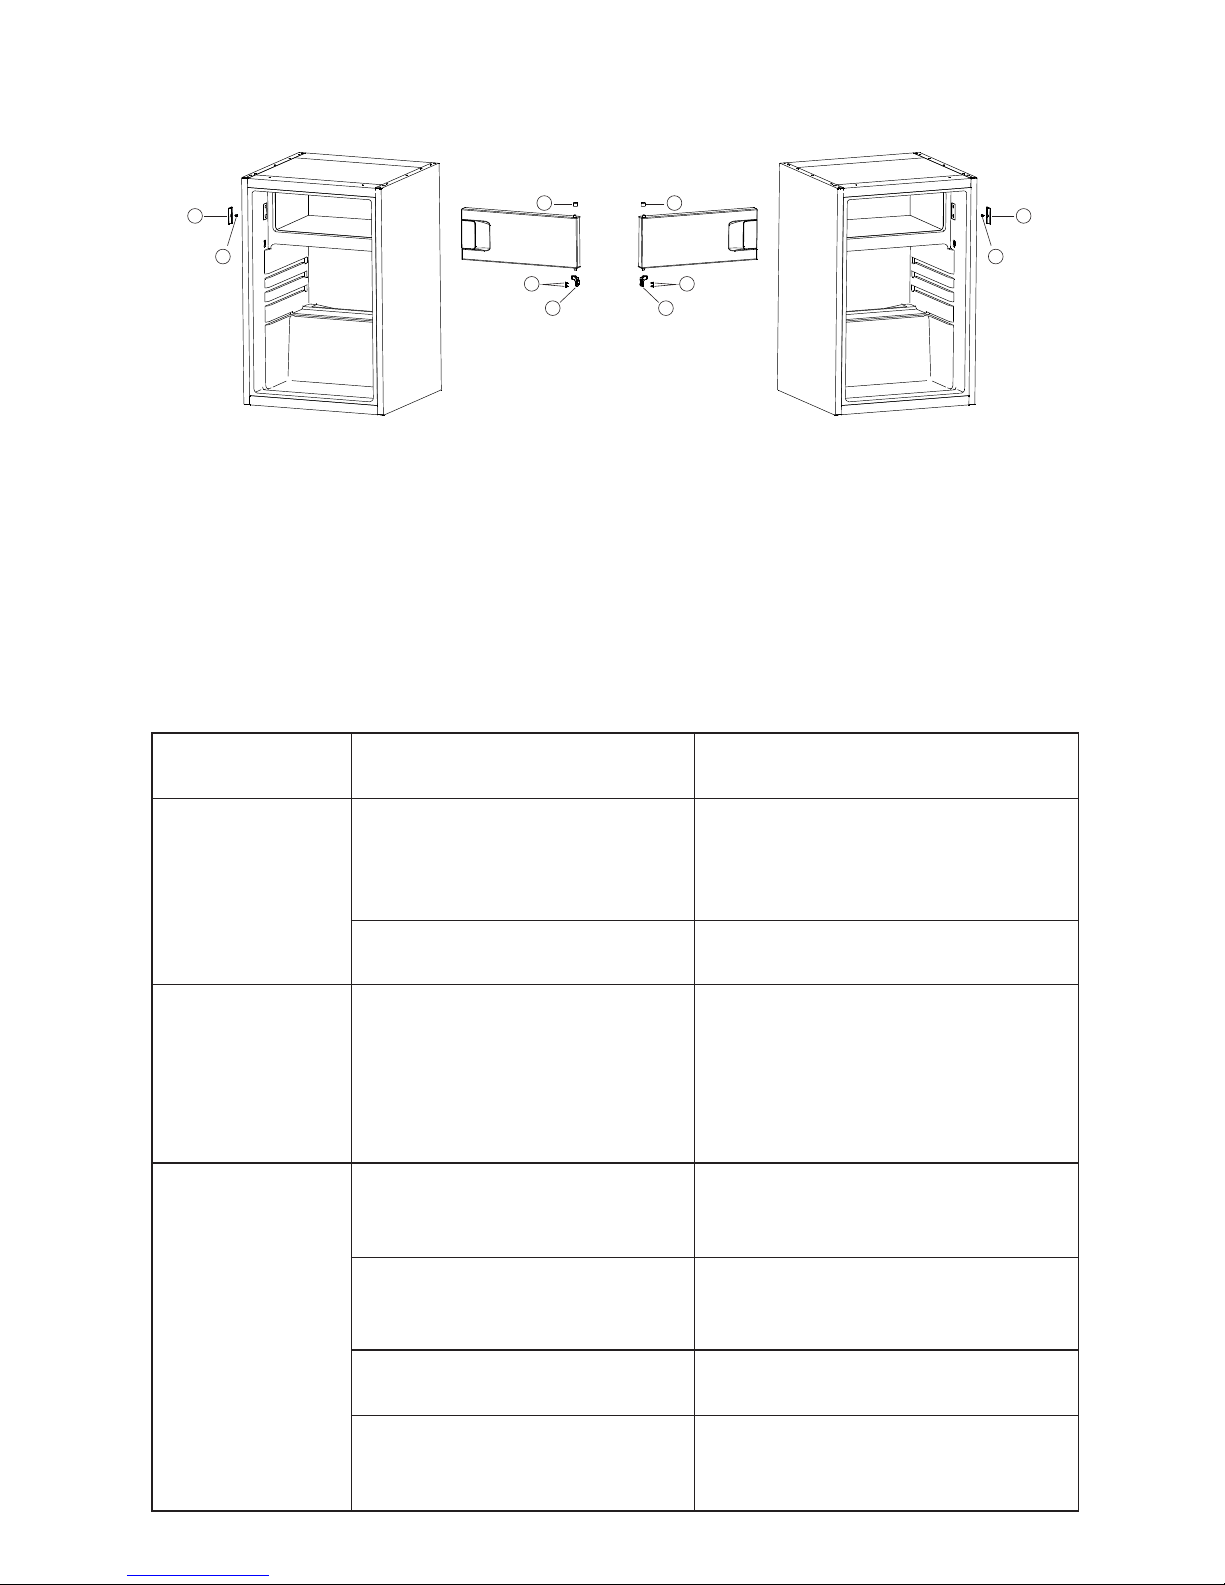
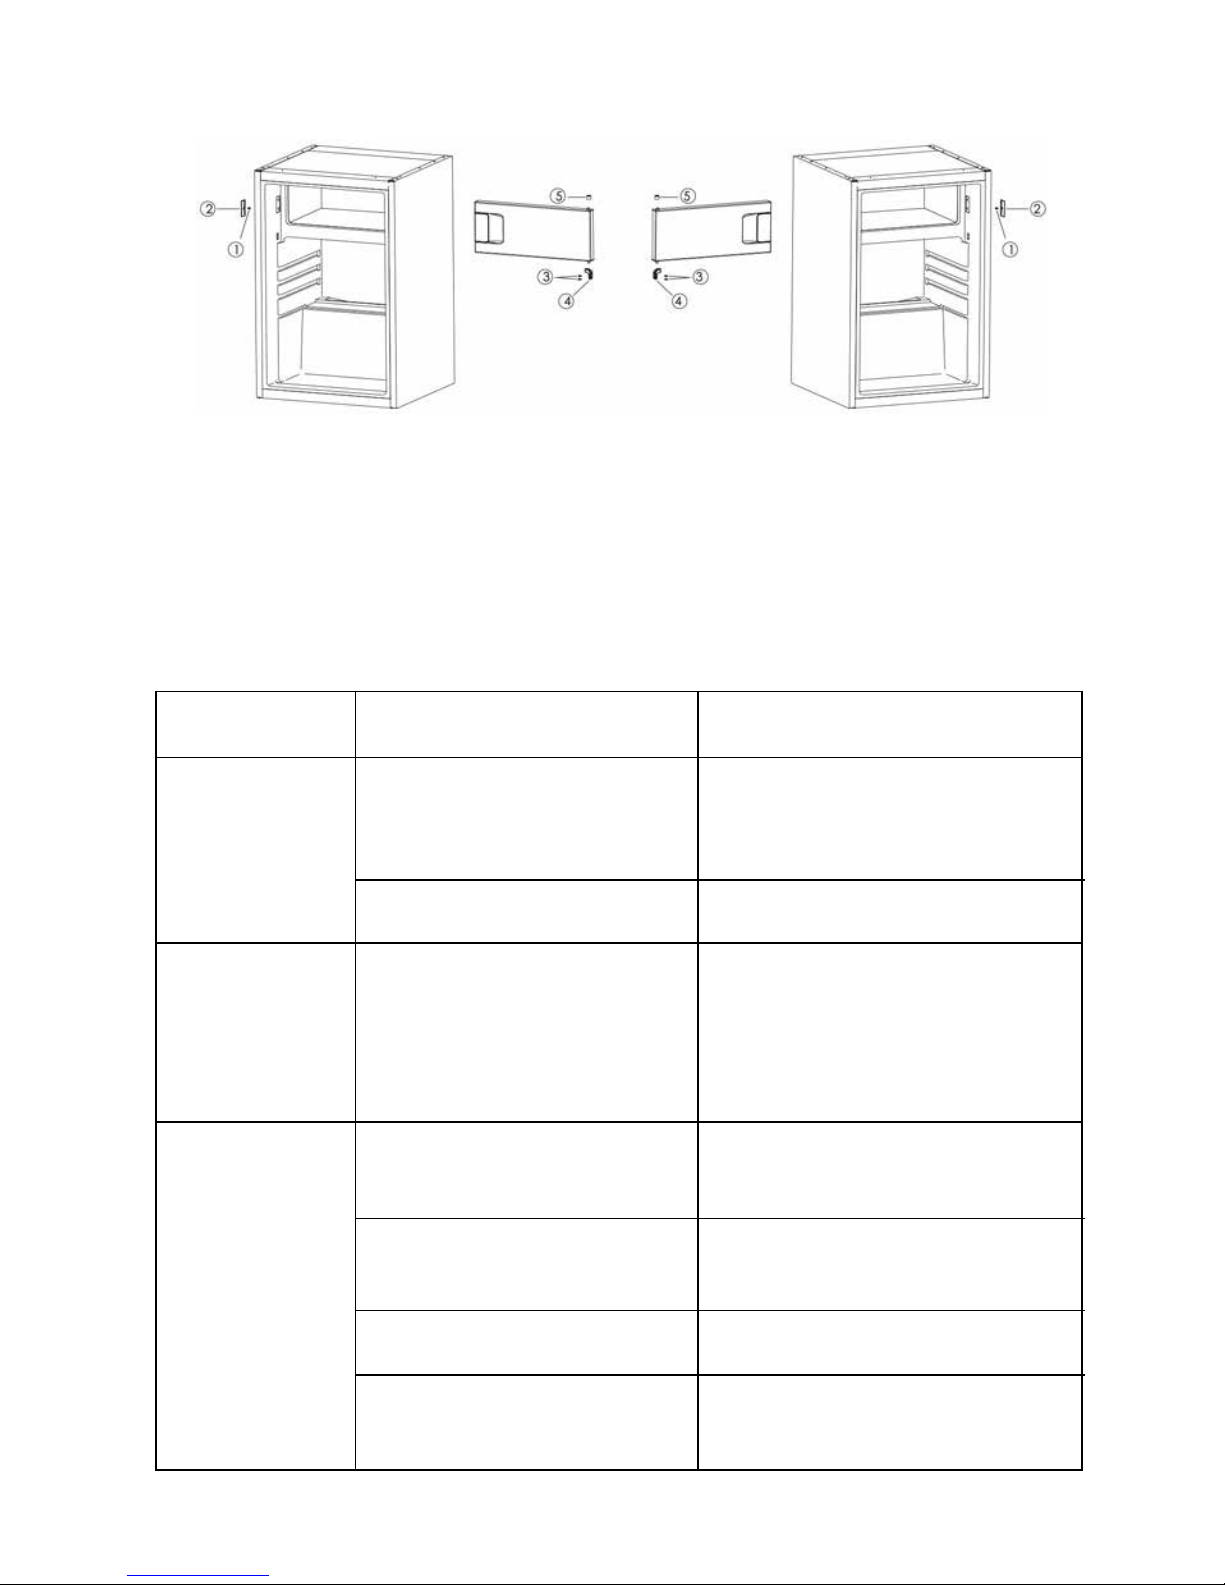
If you also want to change the opening direction of freezer door inside, please follow the
instruction below:
1. Remove the one screw (1) and take away the lock button (2).
2. Remove the two screws (3) that hold the down axis cover (4) and take away the cover (4).
3. Remove the door and place it on a padded surface to prevent scratching it.
4. Remove the up axis cover (5) and transfer it to opposite position.
5. Turn the door for 180° and set it to the up axis cover.
6. Fix the down axis cover (4) with the two crews (4).
7. Fix the lock button (2) with the one screw (1)
Page 11
-9 -
1
2
3
4
5
1
2
3
4
5
figure 1 figure 2
Figure 1: Represents position of components prior to door reversal
Figure 2: Represents position of components after door reversal
If your device shows the other symptoms that those described above, please call the service
after sale of the shop a retailer.
TROUBLESHOOTING
Symptom Cause
Solution
The appliance
does not work
There is no power supply
Check the plug connecting it others
appliance, or verify that the
appliance is connected to the plug
The fuse doesn’t work Replace the fuse
The appliance
makes a lot of
noise
The appliance is too close to
the wall, or is not stable, or the
accessories inside the
refrigerator are placed in wrong
position
Stabilize the base of the refrigerator
by adjusting the position of feet,
take away the device of the wall,
place correctly the accessories
inside the refrigerator
The appliance
doesn’t cool
enough
The door is too often opened or
was left opened for a long time
Close the door and do not open it
too much frequently
The refrigerator is too close to
the wall
Take away the device of the wall to
favor the ventilation
The refrigerator is too full Remove food of the device
The temperature is badly,
adjusted
Turn the knurl of regulation of
temperature on "3" or more
Page 12
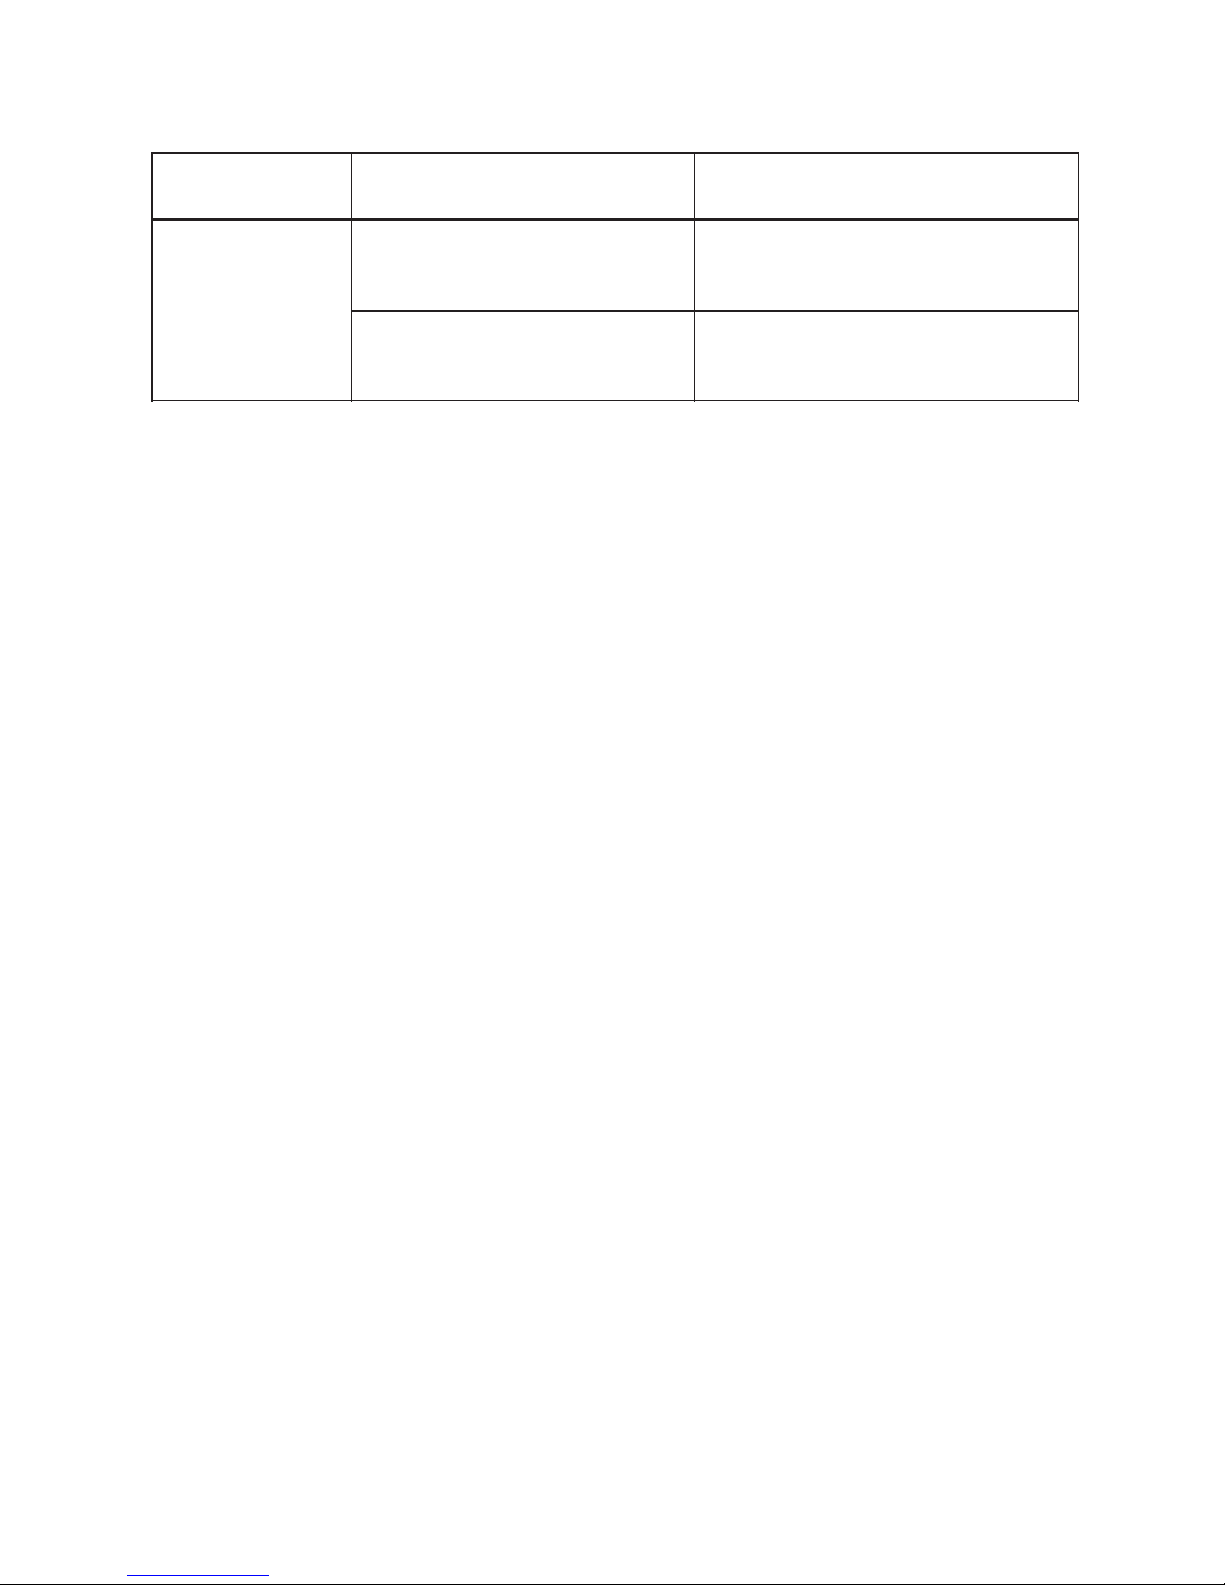
There are smells
in the appliance
Food made obsolete inside the
refrigerator
Throw away obsolete food and wrap
the other
The inside of the device at need
to be cleaned
Clean the inside of the refrigerator
The following symptoms are not breakdowns:
l The noise of the cooling liquid which circulates in pipes can be heard, it is normal.
l The humidity on the surface outside of the device during the wet seasons is not a
problem of the device; you just need to wipe it with a dry soft cloth.
l The compressor and the condenser can warm more during the periods of strong heat.
l The frame of the door is a bit hot; it means that the condenser works to evacuate the
humidity of air.
In the event of a power cut, food should remain safely cold for about 16 hours. Follow these
tips during a prolonged power interruption, especially in summer:
l Open the door/drawer as few times as possible.
l Do not put additional food into the appliance during a power interruption.
l If prior notice of a power interruption is given and the interruption duration is longer
than 16 hours, make some ice and put it in a container in the top of the refrigerator
compartment.
l An inspection of the goods is required immediately after the interruption.
l AS temperature in the refrigerator will rise during a power interruption or other failure,
the storage period and edible quality of food will be reduced. Any food that defrosts
should be either consumed, or cooked and refrozen (where suitable) soon afterwards in
order to prevent health risks.
-1 0 -
Symptom Cause Solution
Page 13
-11 -
TECHNICAL SPECIFICATIONS
R
Rated voltage:
Rated current:
Lamp power:
Total net volume:
Storage volume refrigerator:
Storage volume freezer:
Climate tape:
Freezing capacity:
Energy consumption:
Protection against electrical shock:
Foam:
Energy class:
eference:
Rated power:
Rated frequency:
Refrigerant:
HRK-176AA;HRK-176AAB;HRK-176AAS
220-240V~
0.6A
10W
114L
97L
17L
ST
2kg/24h
168kWh/year
I
CYCLOPENTANE
A+
65W
50Hz
R600a(34g)
We decline liability for any damage or accident derived from any use of this product
which is not in conformity with the instructions contained in this booklet.
DISPOSAL
Help protect the environment and human health. Put the
packaging in applicable containers to recycle it. Help to recycle
waste of electrical and electronic appliances. Do not dispose
appliances marked with this symbol with the household waste.
Return the product to your local recycling facility or contact your
municipal office.
Risk of injury or suffocation!
Refrigerants and gases must be disposed of professionally. Ensure that the tubing of the
refrigerant circuit is not damaged before being properly disposed of. Disconnect the
appliance from the mains supply. Cut off the mains cable and dispose of it. Remove the
trays and drawers as well as the door catch and seals, to prevent children and pets to get
closed in the appliance.
WARNING!
Page 14
MODE D’EMPLOI
Réfrigérateur-congélateur
HRK-176AA
HRK-176AAB
HRK-176AAS
Page 15

TABLE DES MATIÈRES
Consignes de sécurité importantes - 1 -
Présentation des composants - 4 -
Transport et manipulation - 4 -
Installation - 4 -
Test - 5 -
Contrôle de température - 5 -
Conservation des aliments - 5 -
Dégivrage - 6 -
Consignes générales d’entretien et de maintenance - 6 -
Inversion de la position de la porte - 7 -
Dépannage - 9 -
Spécications techniques - 11 -
Page 16
Cet appareil est exclusivement destiné à un usage domestique !
Avant la première utilisation de cet appareil, veuillez lire attentivement ces instructions et
conservez le manuel pour une utilisation future.
CONSIGNES IMPORTANTES DE SÉCURITÉ
1. Cet appareil peut être utilisé par des enfants âgés d’au minimum
8 ans, ainsi que par des personnes avec des capacités physiques, sensorielles ou mentales réduites ou sans expérience et
connaissances, si elles sont supervisées ou ont été formées à
l’utilisation sécurisée de l’appareil et comprennent les risques y
relatifs. Les enfants ne doivent pas jouer avec l’appareil. Le net-
toyage et l’entretien par l’utilisateur ne doivent pas être effectués
par les enfants sans surveillance.
2. Cet appareil est destiné à un usage domestique et dans des endroits similaires, tels que :
- les espaces cuisine des boutiques, les bureaux et autres envi-
ronnements de travail ;
- les maisons de campagne, les chambres d’hôtel, de motel et
autres types de résidence ;
- les chambres d’hôtes ;
- les restaurants et les endroits similaires de vente autre qu’au
détail.
3. Avertissement : N’utilisez pas d’appareils mécaniques ou des
moyens autres que ceux recommandés par le fabricant pour ac-
célérer le processus de dégivrage.
4. Avertissement : N’UTILISEZ aucun appareil électrique dans les
unités, excepté ceux recommandés par le fabricant.
-1-
Page 17

5. Avertissement : N’essayez jamais d’utiliser cet appareil pour
des applications ou d’une façon qui n’est pas décrite dans les
présentes consignes ; cela pourrait entraîner des risques graves.
6. Avertissement : Si le cordon d’alimentation est endommagé ou
l’appareil présente des dysfonctionnements ou a été endommagé de quelque façon, veuillez le retourner chez le fabricant,
l’agent d’entretien agréé ou les personnes qualiées pour examen, réparation ou mise au point an d’éviter tout risque.
7. AVERTISSEMENT : Tenez les ouvertures d’aération du boîtier
de l’appareil ou du modèle encastrable libres de toute obstruction.
8. AVERTISSEMENT : N’endommagez pas le circuit de réfrigérant.
9. AVERTISSEMENT : N’utilisez pas d’appareils électriques de
types autres que ceux recommandés par le fabricant, à l’intérieur
des compartiments de stockage d’aliments de l’appareil.
10. N’utilisez pas l’appareil dans un environnement poussiéreux ou
en présence d’une atmosphère explosive et inammable (gaz
et vapeurs inammables, vapeurs provenant des solvants organiques, etc.)
11. Ne stockez pas dans l’appareil des substances explosives comme des aérosols contenant un agent propulseur inammable.
12. Ne versez pas directement de l’eau sur le congélateur ; cela
pourrait détériorer l’isolation et entraîner la corrosion.
13. Insérez la che dans une prise de masse unique. Lorsque vous
branchez l’appareil, assurez-vous que la che est bien insérée
dans la prise.
-2-
Page 18
14. Pour prévenir tout dommage éventuel sur l’environnement et
la santé humaine en raison d’une élimination anarchique des
déchets, veuillez recycler l’appareil de façon responsable, an
de promouvoir la réutilisation durable des ressources. Mettez
l’appareil au rebut uniquement dans les points de collecte pub-
lics.
15. Placez l’appareil sur une surface horizontale et tenez les aérations libres de toute obstruction. N’essayez pas de remplacer ou
de réparer vous-même un composant ; si nécessaire, contactez
une agence d’entretien.
16. Effectuez toujours la maintenance de l’appareil an d’éviter tout
dommage.
17. Mise en garde : Ne connectez pas le câble de masse à un conduit d’eau ou de gaz.
18. Il est strictement déconseillé de conserver des éléments à forte
basicité, à forte acidité, des solvants organiques et des matériaux corrosifs avec les aliments.
19. Veuillez-vous référer à la section « Dépannage » lorsque l’appareil
présente des dysfonctionnements. N’essayez pas de résoudre
le problème vous-même ; veuillez contacter un technicien agréé.
20. En ce qui concerne les informations d’installation, de fonc-
tionnement, de maintenance et de mise au rebut de l’appareil,
référez-vous aux sections suivantes du manuel.
Cet appareil a été testé selon toutes les directives
CE actuelles applicables, notamment la directive sur
la compatibilité électromagnétique et les directives
sur la basse tension et a été fabriqué conformément
aux normes de sécurité les plus récentes.
-3-
Page 19
PRÉSENTATION DE L’APPAREIL
TRANSPORT ET MANIPULATION
Lors du transport, tenez le socle du réfrigérateur et soulevez-le soigneusement à un angle inférieur à 45
degrés. Ne vous servez jamais des poignées de la porte comme support. Ne placez jamais l’appareil à
l’envers ou à l’horizontale. Poussez le réfrigérateur sur son socle et installez-le à l’aide des pieds à roulettes.
INSTALLATION
Pour le stabiliser, l’appareil doit être placé sur une surface plane et solide. Ne le placez pas sur un matériau
mou.
Choisissez un emplacement bien aéré. Laissez un espace de 5 cm minimum sur les côtés et de 10 cm à
l’arrière du réfrigérateur. Les butoirs de meuble fournis avec l’appareil doivent être installés pour la protection et le contrôle de la distance par rapport au mur.
Choisissez un emplacement exempt de source de chaleur. Tenez le réfrigérateur à l’abri des rayons directs
du soleil et éloigné des appareils produisant de la chaleur.
Choisissez un emplacement sec et bien aéré, dépourvu d’air corrosif.
-4-
1. Couvercle supérieur
2. Compartiment congélateur
3. Thermostat
4. Étagère en verre
5. Couvercle du bac à légumes
6. Bac à légumes
7. Étagère de la porte
8. Étagère range-bouteilles
9. Pieds réglables
Page 20

TEST
Nettoyez les pièces du réfrigérateur à l’aide d’un chiffon imbibé d’eau tiède ou avec du détergent neutre
dans de l’eau claire, puis séchez-les en essuyant.
Remarques : Essuyez les pièces électriques uniquement avec un chiffon sec.
Tournez le bouton du thermostat à la position « 3 » et mettez l’appareil sous tension. Le compresseur et la
lumière à l’intérieur du réfrigérateur commencent à fonctionner.
Fermez la porte et patientez 30 minutes. Si la température du compartiment congélateur baisse de façon
évidente, cela indique que le système du réfrigérateur fonctionne correctement. Lorsque le réfrigérateur
fonctionne pendant une période, le régulateur de température dénit automatiquement la température selon
que la porte n’est pas fréquemment ouverte.
Les étapes ci-dessus exécutées avec succès marquent la n des tests. Le réfrigérateur fonctionne normale-
ment.
CONTRÔLE DE LA TEMPÉRATURE
Le régulateur de température installé à la droite du compartiment réfrigérateur contrôle la température dans
les compartiments réfrigérateur et congélateur.
Tournez le bouton du thermostat pour réguler la température à l’intérieur du réfrigérateur.
Les marques sur le bouton ne sont pas les nombres de degrés de température exacts, mais la température
varie de « 0 » à « 7 ». Le premier degré correspond à un ARRÊT forcé de la réfrigération et le 7ème degré
correspond à la température la plus basse produite par le réfrigérateur. Tournez le bouton de la position « 1
» à la position « 7 » pour continuellement réduire la température.
Réglez le bouton du thermostat sur les positions « 3-4 » pour une utilisation normale.
Notez que l’appareil est programmé pour fonctionner à une plage de température ambiante spécique
comprise entre 16 et 38 °C. L’appareil peut ne pas fonctionner correctement s’il est laissé longtemps à un
niveau de température supérieur ou inférieur à la plage recommandée.
Les températures intérieures sont inuencées par les facteurs suivants :
•
la température ambiante ;
•
la fréquence d’ouverture de la porte ;
•
la quantité d’aliments conservés ;
• l’installation de l’appareil.
CONSERVATION DES ALIMENTS
Comment utiliser le compartiment congélateur ?
•
Placez les aliments frais, tels que le poisson ou la viande dans le congélateur pour conserver leur
saveur et leurs nutriments.
•
Faites congeler les aliments emballés dans une feuille d’aluminium, une feuille de cellophane ou
des boîtes en plastique hermétiques.
• Évitez de placer les aliments frais au contact direct des aliments déjà congelés.
•
Si vous achetez les aliments congelés, placez-les le plus rapidement possible dans le congélateur.
-5-
Page 21

•
Ne recongelez jamais un aliment décongelé.
•
Ne conservez pas de boissons en bouteille ou en cannette dans le congélateur (à l’exception de vins
et spiritueux fortement alcoolisés), notamment les boissons gazéiées, car elles peuvent exploser
pendant la congélation.
•
Ne dépassez pas le temps de conservation des différents aliments (notamment les surgelés) recommandé par les fabricants. Sortez du congélateur uniquement la quantité d’aliments qui vous sera utile.
• Au cours du dégivrage, de la maintenance et de l’entretien, la température des aliments congelés
pourrait augmenter, réduisant ainsi le temps de conservation.
Comment utiliser le compartiment réfrigérateur ?
• Placez les œufs et les bouteilles dans les cavités prévues à cet effet, etc.
•
Les fruits et légumes doivent être placés dans le bac à légumes.
•
Placez les pots sur les balconnets de la porte du réfrigérateur.
•
Emballez séparément les autres aliments périssables, ou susceptibles de dégager des puanteurs
dans le réfrigérateur.
Positionnement des aliments
•
Évitez toute accumulation excessive d’aliments dans le réfrigérateur, car cela pourrait entraîner une
perte de fraîcheur.
•
Emballez séparément les aliments dans une feuille d’aluminium, une feuille de cellophane ou dans
des boîtes en plastique hermétiques.
•
Pour éviter toute augmentation de la consommation électrique, laissez les aliments chauds atteindre
la température ambiante avant de les placer dans le réfrigérateur ou dans le congélateur.
• Ne placez jamais les légumes et les fruits dans le compartiment congélateur, car ils ne seront plus
consommables une fois dégivrés.
DÉGIVRAGE
Lorsque le réfrigérateur fonctionne pendant longtemps, la surface interne du congélateur se recouvre d’une
couche de givre. Elle peut augmenter la consommation électrique et réduire la réfrigération. Pour cela, vous
devez dégivrer votre congélateur une fois par mois.
Lors du dégivrage, coupez l’alimentation, ouvrez la porte et déplacez les aliments congelés vers un endroit
frais. Retirez le givre à l’aide d’une spatule en plastique. Retirez ensuite le givre décollé, puis essuyez
l’intérieur de votre congélateur à l’aide d’un chiffon doux et sec.
Remarques : Évitez d’utiliser des outils métalliques pour dégivrer votre congélateur, car ils pourraient
l’endommager.
CONSIGNES GÉNÉRALES D’ENTRETIEN ET DE MAINTENANCE
Nettoyez le réfrigérateur une fois par mois. Avant le nettoyage, débranchez la che de l’alimentation électrique de la prise.
Essuyez l’intérieur et l’extérieur du réfrigérateur à l’aide d’un chiffon humide et doux.
S’il est trop sale, utilisez un chiffon doux imbibé d’un détergent neutre, puis nettoyez l’humidité avec un
chiffon sec.
Si vous laissez votre réfrigérateur vide pendant longtemps, veuillez procéder ainsi qu’il suit :
• Débranchez le réfrigérateur de la prise de courant.
-6-
Page 22
•
Retirez tous les aliments.
•
Nettoyez et séchez l’intérieur selon les consignes de nettoyage ci-dessus.
• Lorsque vous n’utilisez pas le réfrigérateur, laissez la porte ouverte pour éviter les odeurs indésirables.
Nettoyage
Lors du nettoyage du réfrigérateur, débranchez la che de la prise électrique.
Utilisez un chiffon doux imbibé d’eau ou un détergent non-abrasif pour nettoyer et séchez avec un chiffon
doux et sec. Gardez à l’esprit de nettoyer le conduit d’eau de dégivrage situé à l’arrière, juste au-dessus
du couvercle en verre.
Remplacement des ampoules
Si l’éclairage interne ne fonctionne plus, débranchez et branchez à nouveau l’appareil. Si l’éclairage ne
fonctionne toujours pas, vériez que l’ampoule est correctement vissée. Si le problème persiste en dépit de
ces tests, veillez remplacer les ampoules. Utilisez une ampoule de 220 - 240 V~, 10 W.
•
Débranchez l’appareil ;
• Ouvrez le couvercle de l’ampoule (1) ;
•
Démontez l’ampoule défectueuse dans le sens antihoraire.
•
Montez la nouvelle ampoule dans le sens horaire.
INVERSION DE LA POSITION DE LA PORTE
Ce réfrigérateur a été conçu avec la charnière de porte située sur la partie droite. Si vous désirez changer
le sens d’ouverture, veuillez suivre les instructions ci-dessous :
1. Retirez les quatre vis (1) (2) et le couvercle.
2. Retirez les deux vis (3) qui supportent la charnière supérieure (4) et la charnière supérieure (4).
3. Soulevez la porte et placez-la sur la surface rembourrée pour éviter qu’elle ne se raye.
4. Retirez les trois vis (5) qui supportent la charnière inférieure (6) et retirez la charnière inférieure (6).
5. Retirez le pied réglable (8) et transférez-le du côté droit.
6. Retirez la goupille de culasse (7) et inversez la direction de la charnière inférieure (6). Installez la
charnière inférieure (6) du côté gauche à l’aide de trois vis (7).
7. Insérez la goupille de culasse (7) dans la charnière inférieure (5).
-7-
Page 23
-8-
gure 1 gure 2
Figure 1 : Représente la position des composants avant l’inversion de la porte
Figure 2 : Représente la position des composants après l’inversion de la porte
Si vous désirez également changer la direction d’ouverture de la face intérieure de la porte du réfrigérateur, veuillez suivre les instructions ci-dessous :
1. Retirez l’unique vis (1) et le bouton de verrouillage (2).
2. Retirez les deux vis (3) qui supportent le couvercle de l’axe inférieur (4) et retirez le couvercle (4).
3. Retirez la porte et placez-la sur une surface rembourrée pour éviter qu’elle ne se raye.
4. Retirez le couvercle de l’axe supérieur (5) et transférez-le vers le côté opposé.
5. Tournez la porte à 180° et installez-la par rapport au couvercle de l’axe supérieur.
6. Fixez le couvercle de l’axe inférieur (4) à l’aide de deux vis (4).
7. Fixez le bouton de verrouillage (2) à l’aide d’une vis (1)
8. Retirez la goupille de la charnière (9) située au bas de la porte. De l’autre côté de la porte, insérez la
goupille de charnière de rechange fournie avec l’appareil.
9. Remettez la porte en place et assurez-vous qu’elle s’emboîte dans la charnière inférieure (6).
10. Fixez la charnière supérieure (4) à l’aide de deux vis (3) et le couvercle à l’aide de quatre vis (1) (2).
Page 24
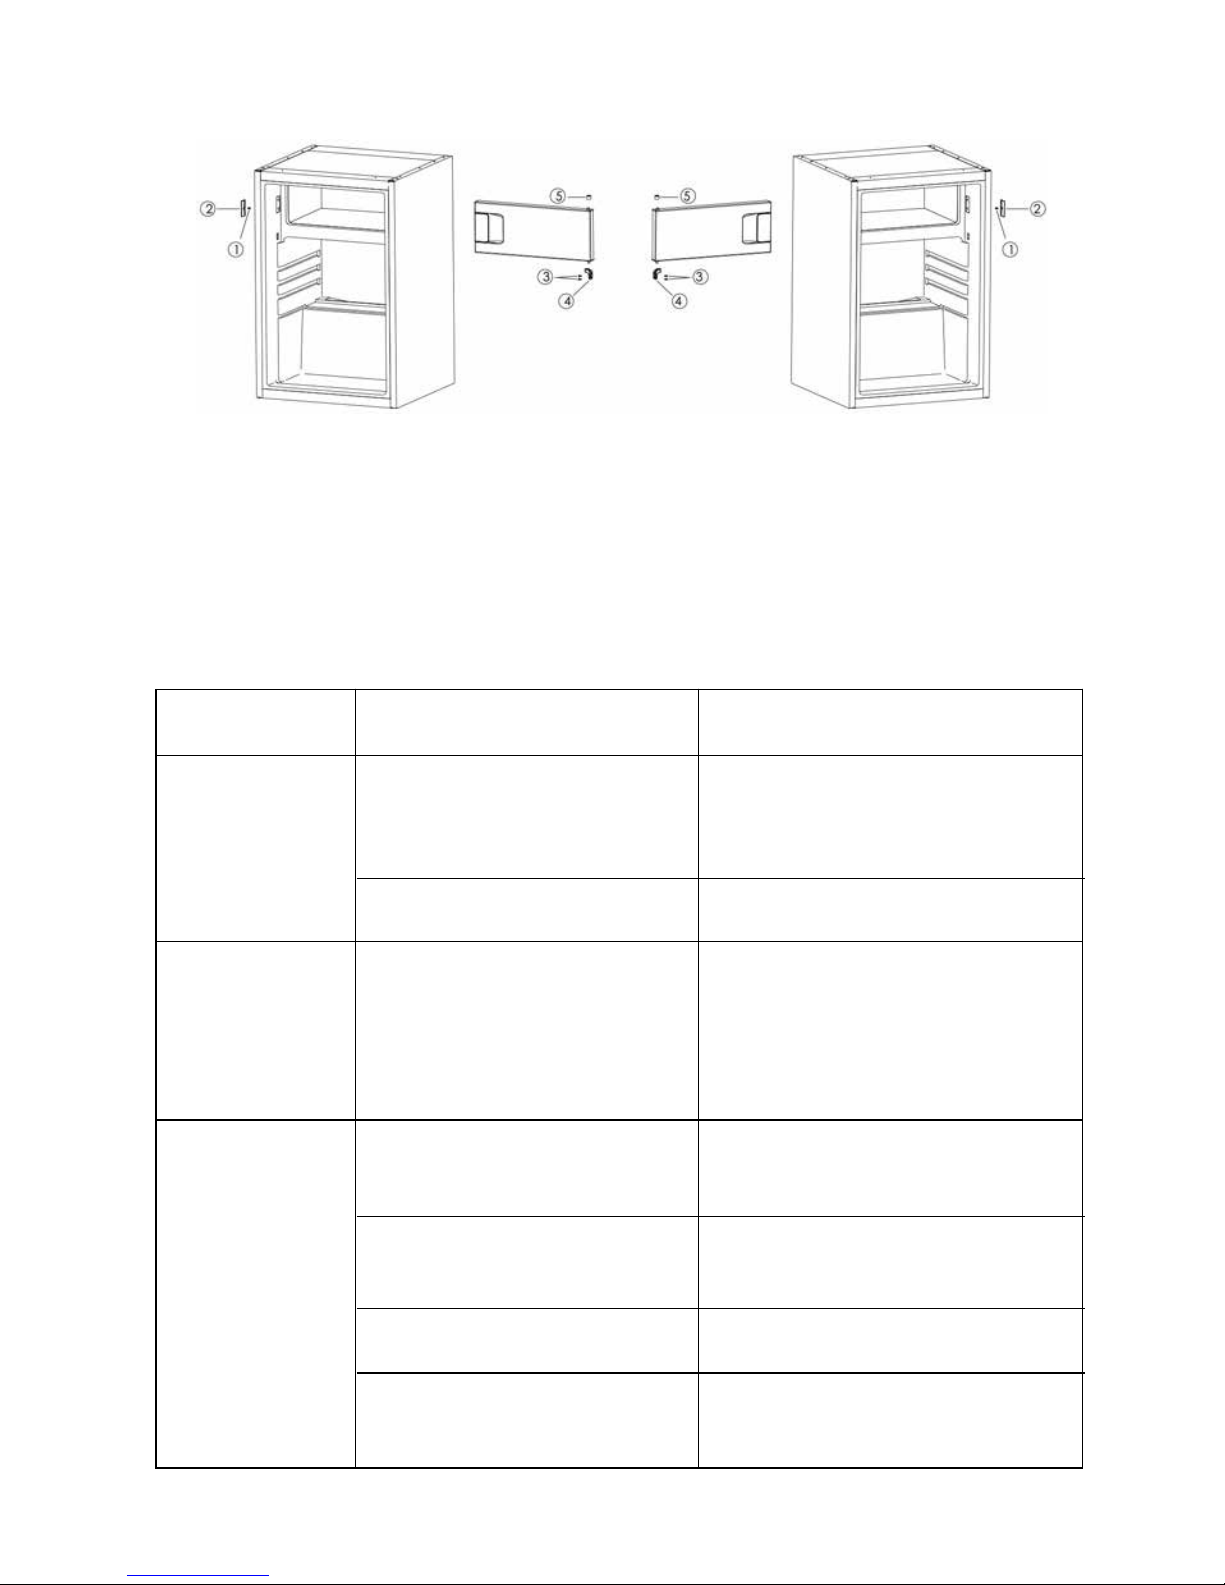
Figure 1 : Représente la position des composants avant l’inversion de la porte
Figure 2 : Représente la position des composants après l’inversion de la porte
DÉPANNAGE
Si votre appareil présente des problèmes autres que ceux décrits plus haut, veuillez contacter le service
après-vente ou le magasin de vente au détail.
-9-
gure 1 gure 2
Problème Cause Solution
L’appareil ne
fonctionne pas.
Il n’y a pas d’alimentation électrique.
Vériez que la che n’est pas branchée
à un autre appareil ou que l’appareil est
effectivement branché sur la prise.
Le fusible ne fonctionne pas. Remplacez le fusible.
L’appareil est très
bruyant.
L’appareil ne
refroidit pas suf-
samment.
L’appareil est trop proche du mur.
Le congélateur est trop plein. Réduisez la quantité d’aliments dans
l’appareil.
La température est mal
réglée.
Éloignez-le du mur pour permettre une
bonne aération.
L’appareil est trop proche du mur,
ou est instable ou encore les
accessoires à l’intérieur du congélateur sont mal positionnés.
Stabilisez le socle du congélateur en
ajustant la position des pieds, éloignez
l’appareil du mur, positionnez correctement les accessoires à l’intérieur du
congélateur.
La porte est trop fréquemment
ouverte ou a été laissée ouverte
pendant longtemps.
Fermez la porte et ne l’ouvrez pas trop
fréquemment.
Placez le bouton de régulation de la
température sur la position « 3 » ou plus
Page 25
L’appareil dégage
des odeurs.
L’intérieur de l’appareil doit être
nettoyé.
Nettoyez l’intérieur du réfrigérateur.
Les problèmes suivants ne sont pas des pannes :
• Le bruit du liquide de refroidissement circulant dans la tuyauterie est audible, c’est normal.
•
L’humidité sur la surface externe de l’appareil pendant les saisons humides ne constitue pas un problème ; essuyez juste avec un chiffon doux et sec.
•
Le compresseur et le condensateur peuvent être plus chauds pendant les périodes de forte chaleur.
•
La paroi de la porte est un peu chaude ; cela indique que le condensateur évacue normalement
l’humidité de l’air.
En cas de coupure d’électricité, les aliments sont en sécurité au froid pendant près de 16 heures. Suivez les
conseils suivants pour une interruption de courant prolongée, notamment en été :
•
Ouvrez la porte/tiroir à des fréquences très réduites.
•
Ne placez pas plus d’aliments dans l’appareil pendant une coupure de courant.
•
Si vous êtes informé à l’avance de la coupure et que celle-ci durera plus de 16 heures, faites des blocs
de glace, mettez-les dans un récipient et placez le récipient au-dessus du compartiment réfrigérateur.
•
Une inspection de l’état des aliments est nécessaire une fois le courant rétabli.
• Parce que la température à l’intérieur du réfrigérateur augmente en cas de coupure de courant ou de
toute autre panne, la période de conservation et la qualité des aliments seront réduites. Tout aliment
décongelé doit être consommé, cuisiné ou recongelé (si possible), immédiatement après, pour éviter
tout risque sur la santé.
-10-
Problème Cause Solution
Les aliments se sont décomposés
dans le réfrigérateur.
Débarrassez-vous des aliments
décomposés et emballez-en d’autres.
Page 26
Référence :
Tension nominale :
Puissance nominale :
Fréquence nominale :
Courant nominal :
Réfrigérant :
Puissance de l’ampoule :
Volume net total :
Volume de stockage du réfrigérateur :
Volume de conservation du congélateur :
Diagramme climatique :
Capacité de congélation :
Consommation énergétique :
Protection contre les chocs électriques :
Mousse :
Classe énergétique :
MISE AU REBUT
Contribuez à la protection de l’environnement et de la santé humaine. Veuillez
mettre les emballages au rebut dans les espaces prévus pour leur recyclage.
Contribuez à recycler les déchets d’appareils électriques et électroniques. Ne
mettez pas rebut les appareils marqués de ce symbole avec les déchets ménagers. Veuillez déposer l’appareil chez votre usine de recyclage locale, ou pren-
dre contact avec votre bureau municipal.
Risque de blessure ou d’asphyxie !
Les réfrigérants et les gaz doivent être mis au rebut par des professionnels. Avant toute mise au rebut,
assurez-vous que la tuyauterie du système de réfrigération n’est pas endommagée. Débranchez l’appareil
du secteur. Coupez les câbles primaires et mettez-les au rebut. Retirez les plateaux, les tiroirs, le verrou de
la porte et les joints pour éviter qu’un enfant ou un animal domestique ne soit coincé dans l’appareil.
CARACTÉRISTIQUES TECHNIQUES
Nous déclinons toute responsabilité pour tout dommage ou accident dû à une utilisation de ce
produit qui ne soit pas en conformité avec les instructions contenues dans ce manuel.
AVERTISSEMENT !
-11-
220 - 240 V~
65W
50Hz
0,6A
R600a (34g)
10W
114L
97L
17L
ST
2 kg/24 h
168 kWh/an
I
CYCLOPENTANE
A+
HRK-176AA;HRK-176AAB;HRK-176AAS
Page 27
BENUTZUNGSHINWEISE
Kühl-gefriergerät
HRK-176AA
HRK-176AAB
HRK-176AAS
Page 28

INHALTSVERZEICHNIS
Wichtige Sicherheitshinweise - 1 -
Schematische Darstellung - 4 -
Transport und Handhabung - 4 -
Aufstellung - 4 -
Test - 5 -
Temperaturkontrolle - 5 -
Lagerung von Lebensmitteln - 5 -
Abtauen - 6 -
Allgemeine Hinweise zur Pege und Wartung - 6 -
Türöffnungsrichtung ändern - 7 -
Fehlerbehebung - 9 -
Technische Eigenschaften - 11 -
Page 29
Dieses Gerät ist nur für den Gebrauch im Haushalt vorgesehen.
Bitte lesen Sie sich diese Hinweise aufmerksam durch, bevor Sie das Gerät in Betrieb nehmen. Bewahren Sie diese Unterlagen für späteres Nachschlagen auf.
WICHTIGE SICHERHEITSHINWEISE
1. Dieses Gerät kann von Kindern ab 8 Jahre und Personen mit
eingeschränkten physischen, sensorischen oder geistigen Fähigkeit oder fehlender Erfahrung und Wissen verwendet werden,
wenn diese vorher über die sichere Verwendung des Gerätes unterrichtet wurden und die damit zusammenhängenden Gefahren
verstanden haben. Kinder dürfen nicht mit dem Gerät spielen.
Die Reinigung und Anwenderwartung sollte nicht von Kindern
ohne Aufsicht durchgeführt werden.
2. Dieses Gerät ist für den Einsatz im Haushalt und zu vergleichbaren Zwecken vorgesehen, wie:
- Teeküchen für Mitarbeiter in Läden, Büros und ähnlichen Einrichtungen
- In landwirtschaftlichen Betrieben und für den Gebrauch von
Gästen in Hotels, Motels und anderen wohnungsähnlichen
Umgebungen
- In Gästehäusern oder Pensionen
- Zum Catering und ähnlichen Einsatzbereichen (kein Einzelhandel)
3. Warnung: Verwenden Sie keine mechanischen Geräte oder andere, als die vom Hersteller empfohlenen Mittel, um den Abtauprozess zu beschleunigen.
4. Warnung: Mit der Ausnahme der durch den Hersteller empfohlenen Komponenten DÜRFEN KEINERLEI Elektrogeräte in diesem Gerät zum Einsatz kommen.
-1-
Page 30

5. Warnung: Versuchen Sie niemals dieses Gerät in anderer Form
bzw. für andere Zwecke als den in dieser Bedienungsanleitungen beschriebenen zu verwenden, da andernfalls das Risiko
schwerer Unfälle besteht.
6. Warnung: Im Falle eines beschädigten Netzkabels oder von Fehlfunktionen oder einer Beschädigung des Geräts, muss das Gerät
durch den Hersteller, den dazu befugten Kundendienst oder eine
Fachkraft mit vergleichbarer Qualikation überprüft, repariert
bzw. neu eingestellt werden, um Umfälle oder Verletzungen zu
vermeiden.
7. WARNUNG: Sorgen Sie dafür, dass die Lüftungsöffnungen im
Gerätegehäuse beziehungsweise in der Einbaustruktur nicht zugestellt werden.
8. WARNUNG: Beschädigen Sie nicht das Kühlaggregat.
9. WARNUNG: Verwenden Sie keine elektrisch betriebenen Geräte
oder Vorrichtungen im Inneren der Lagerfächer, sofern dies nicht
ausdrücklich durch den Hersteller empfohlen wird.
10. Das Gerät darf nicht in einer staubigen Umgebung bzw. in einer
zündfähigen Atmosphäre (brennbare Gasen, Ausdünstungen,
Dämpfe organischer Lösungsmittel usw.) betrieben werden.
11. Lagern Sie keine explosiven Substanzen, wie zum Beispiel
Spraydosen mit einem entammbaren Treibgas, in diesem Gerät.
12. Gießen Sie kein Wasser auf das Gerät, da so die Isolierung beeinträchtigt und sich Roststellen bilden könnten.
13. Verbinden Sie den Netzstecker in eine geerdete Einzelsteckdose. Achten Sie beim Anschluss des Geräts darauf, dass der
Netzstecker richtig und vollständig in der Steckdose sitzt.
-2-
Page 31
14. Um mögliche Schäden für die Umwelt oder die menschliche Gesundheit durch unzulässige Müllentsorgung zu vermeiden, müssen Sie das Gerät verantwortungsbewusst und vorschriftmäßig
einer nachhaltigen Wertstoffwiederaufarbeitung zuführen. Eine
Entsorgung darf ausschließlich über die dafür vorgesehenen
öffentlichen Sammelstellen erfolgen.
15. Das Gerät muss auf einem ebenen Untergrund und an einem gut
belüftbaren Platz stehen. Versuchen Sie nicht einzelne Komponenten eigenmächtig auszutauschen oder zu reparieren, sondern
wenden Sie sich in solchen Fällen an den Kundendienst.
16. Handhaben Sie das Gerät stets mit Vorsicht, um mögliche
Schäden zu vermeiden.
17. Vorsicht: Bringen Sie das Erdungskabel niemals mit einer Wasser- oder Gasleitung in Berührung.
18. Lagern Sie unter keinem Umständen stark basische oder säurehaltige Substanzen, organische Lösungsmittel oder aber ätzende
Stoffe zusammen mit Lebensmitteln.
19. Lesen Sie bitte den Abschnitt „Fehlerbehebung“, wenn am Gerät
Probleme auftreten sollten. Versuchen Sie nicht, technische
Probleme eigenmächtig zu lösen, sondern wenden Sie sich dazu
an einen qualizierten Monteur.
20. Informationen zur Aufstellung, dem Betrieb, der Wartung und der
Entsorgung des Geräts nden Sie in den folgenden Abschnitten
dieser Bedienungsanleitung.
Dieses Gerät wurde gemäß den entsprechenden, zur Zeit geltenden CE-Richtinien, wie z.B. der
Richtlinie zur elektromagnetisch Kompatibilität und
der Niederspannungsrichtlinie überprüft und unter
Beachtung der gegenwärtigen Sicherheitsvorschriften hergestellt.
-3-
Page 32
SCHEMATISCHE DARSTELLUNG
TRANSPORT UND HANDHABUNG
Fassen Sie den Kühlschrank für den Transport am Boden und heben Sie ihn vorsichtig in einem Winkel von
45 Grad an. Heben Sie das Gerät niemals an den Griffen hoch. Sie dürfen das Gerät auf keinen Fall mit
der Oberseite nach oben aufstellen oder aber ach auf den Boden legen. Schieben Sie das Gerät an seiner
Basis mit Hilfe der Rollfüße an die gewünschte Stellen.
AUFSTELLUNG
Für eine ausreichende Standfestigkeit muss das Gerät auf einer achen und stabilen Unterlage aufgestellt
werden. Es darf keinesfalls auf eine aus weichem Material bestehenden Unterlage gestellt werden.
Wählen Sie einen gut belüfteten Standort aus. An den Geräteseiten muss jeweils ein Abstand von mind-
estens 5 cm und an der Geräterückwand ein Abstand von mindestens 10 cm gelassen werden. Die im
Lieferumfang enthaltenen Abstandshalter sind als Schutz und für die Einhaltung des korrekten Abstands
zur Wand anzubringen.
Wählen Sie Standort, der sich nicht in der Nähe einer Hitzequelle bestellt. Vermeiden Sie direkte Sonneneinstrahlung und halten Sie den Kühlschrank von hitzeerzeugenden Geräten fern.
Wählen Sie einen trockenen und gut belüfteten Ort mit geringer Luftfeuchtigkeit aus.
-4-
1. Obere Abdeckung
2. Gefrierschrankkomponente
3. Thermostat
4. Glaseinschub
5. Gemüsefach-Abdeckung
6. Gemüsefach
7. Türfach
8. Flaschentürfach
9. Justierbare Füße
Page 33

TEST
Reinigen Sie den Kühlschrank und dessen Teile mit einem in lauwarmem Wasser angefeuchteten Tuch bzw.
mit einem milden Reinigungsmittel und klarem Wasser, wischen Sie anschließend alles trocken.
Hinweise: Alle elektrischen Teile dürfen nur mit einem trockenen Tuch abgewischt werden.
Drehen Sie den Thermostatregler auf die Position „3“ und schalten Sie den Strom ein. Der Kompressor und
die Innenbeleuchtung schalten sich nun ein.
Schließen Sie die Tür und warten Sie 30 Minuten. Wenn in diesem Zeitraum die Temperatur im Gefrierfach
deutlich zurückgegangen ist, ist das Zeichen, dass das Kühlsystem ordnungsgemäß funktioniert. Wenn
der Kühlschrank eine längere Zeit gelaufen ist, reguliert die Temperaturkontrolle automatisch, sofern die
Kühlschranktür nicht zu häug geöffnet wird.
Wenn während der vorherigen Schritte keine Probleme aufgetreten sind, war die Testphase erfolgreich. Der
Kühlschrank arbeitet ordnungsgemäß.
TEMPERATURKONTROLLE
Die Temperaturen im Kühlschrankfach bzw. im Gefrierfach werden durch die Temperaturkontrolle gesteuert,
der an der rechten Seite des Kühlschrankfachs installiert ist.
Drehen Sie den Thermostatregler, um die Temperatur im Kühlschrankinnenraum zu regulieren.
Die Skala auf dem Regler zeigt keine genauen Temperaturwerte an, sondern hat eine Temperaturskala von
„0-7“. Die erste Stufe entspricht einem erzwungenen ABBRUCH der Kühlung und die 7. Stufe steht für die
niedrigste Temperatur, die der Kühlschrank erzeugen kann. Wenn Sie den Regler von „1“ in Richtung „7“
drehen, sinkt die Temperatur kontinuierlich.
Stellen Sie für den Normalbetrieb den Temperaturregler auf die Position „3-4“.
Bitte beachten Sie, dass das Gerät für den Einsatz bei Umgebungstemperaturen von 16° bis 38°C vorge-
sehen ist. Das Gerät arbeitet möglicherweise nicht richtig, wenn es über einen längeren Zeitraum hinweg
höheren oder niedrigeren Temperaturen ausgesetzt wird.
Die Innenraumtemperaturen werden durch die folgenden Faktoren beeinusst:
•
Umgebungstemperatur
•
Häugkeit der Türöffnungen
•
Menge der gelagerten Lebensmittel
• Aufstellungsort des Geräts
LAGERUNG VON LEBENSMITTELN
Verwendung des Gefrierfachs
•
Lagern Sie frische Lebensmittel wie Fisch oder Fleisch im Gefrierfach, um deren Geschmack und
Nährstoffe zu konservieren.
•
Lebensmittel müssen sich zum Einfrieren in Verpackungen aus Alufolie und gefrierfachtauglicher
Kunststofffolie oder luftdichten Kunststoffbehältern benden.
• Bringen Sie frische Lebensmittel nicht in direkten Kontakt mit solchem, die bereits gefroren sind.
•
Tiefkühlprodukte müssen nach dem Einkauf so schnell wie möglich nach Hause gebracht und in
das Gefrierfach gelegt werden.
-5-
Page 34

•
Frieren Sie niemals einmal aufgetaute Produkte noch einmal ein.
•
Gießen Sie Flüssigkeiten, insbesondere solche mit Kohlensäure, (mit Ausnahme von hochprozentigen Alkohol) zum Einfrieren niemals in Flaschen oder Dosen, da diesen während des Einfrierens
platzen können.
•
Die jeweilige durch den Hersteller angegebene Haltbarkeitsfrist sollte (insbesondere bei industriell
eingefrorenen Lebensmitteln) nicht überschritten werden. Nehmen Sie stets nur die gerade benötigte
Menge aus dem Gefrierfach.
•
Während des Abtauens bzw. bei Wartungs- und Pegemaßnahmen kann sich das Gefriergut erwär-
men, sodass sich dessen verbeibene zulässige Lagerdauer verkürzt.
Verwendung des Kühlschrankfachs
•
Legen Sie die Eier in die vorgesehene Ablage, Flasche in das Flaschenregal usw.
•
Obst und Gemüse sollten im Gemüsefach aufbewahrt werden.
•
Gefäße mit Flüssigkeiten werden in den Seitenfächern der Kühlschranktür gelagert.
• Sonstige verderbliche Lebensmittel oder Produkte, die möglicherweise Gerüche absondern, müssen
separat verpackt werden.
Lagerung von Lebensmitteln
• Bitte lagern Sie nicht zu viele Lebensmittel im Kühlschrank, da dies dessen Leistungsfähigkeit bee-
inträchtigt.
•
Lebensmittel müssen sich in Verpackungen aus Alufolie und Kunststofffolie oder luftdichten Kunstst-
offbehältern benden.
•
Um übermäßigen Stromverbrauch zu vermeiden, dürfen heiße Speisen nicht in den Kühlschrank oder
das Gefrierfach gelegt werden, bevor sie sich nicht auf die Umgebungstemperatur abgekühlt haben.
•
Legen Sie niemals unverpacktes Obst oder Gemüse in das Gefrierfach, da es andernfalls nach dem
Auftauen nicht mehr genießbar ist.
ABTAUEN
Wenn der Kühlschrank über einen längeren Zeitraum in Betrieb war, bilden sich an den Innenseiten des Gefrierfachs Vereisungen. Diese erhöhen den Stromverbrauch und vermindern die Gefrierleistung. Sie sollten
das Gefrierfach daher einmal monatlich abtauen.
Ziehen Sie zum Abtauen das Netzkabel, öffnen Sie die Tür und lagern Sie das Gefriergut vorübergebend an
einem kühlen Platz. Entfernen Sie die Vereisungen mit Hilfe eines Kunststoffsschabers. Nehmen Sie die
so abgelösten Eisstücke heraus und wischen den Innenraum des Gefrierfachs mit einem sauberen Tuch
trocken.
Hinweise: Verwenden Sie niemals Metallgegenstände zum Ablösen der Vereisungen, da diese das Gerät
beschädigen könnten.
ALLGEMEINE HINWEISE ZUR PFLEGE UND WARTUNG
Der Kühlschrank sollte einmal monatlich gesäubert werden Vor der Reinigung muss der Netzstecker gezogen werden.
Wischen Sie den Innenraum sowie die Außenseiten mit einem weichen und feuchten Tuch ab.
Bei starken Verschmutzungen können Sie einen milden Haushaltsreiniger verwenden und anschließend die
Feuchtigkeit mit einem trockenen Tuch entfernen.
Falls Sie den Kühlschrank für eine längere Zeit stilllegen wollen:
•
Ziehen Sie den Gerätenetzstecker.
-6-
Page 35
•
Nehmen Sie sämtliche Lebensmittel aus dem Gerät heraus.
•
Reinigen und trocknen Sie den Innenraum wie im Abschnitt oben zur Pege und Wartung beschrieben.
•
Lassen Sie die Tür geöffnet, um die Bildung von unangenehmen Gerüchen zu vermeiden.
Reinigung
Zur Reinigung des Kühlschranks muss der Netzstecker gezogen werden.
Säubern Sie das Gerät mit einem in Seifenwasser angefeuchteten Tuch und entfernen Sie die Feuchtigkeit
anschließend mit einem trockenen Tuch. Denken Sie daran, den an der Rückwand direkt unter der Glasab-
deckung bendlichen Abtauabuss von Verschmutzungen zu säubern.
Austausch der Gerätelampe
Sollte die Lampe im Geräteinnenraum nicht mehr funktionieren, schalten Sie das Gerät versuchsweise
einmal ab und anschließend wieder ein. Falls die Lampe weiterhin nicht funktioniert, prüfen Sie nach, ob
das Gewinde richtig eingeschraubt wurde. Wenn trotz dieser Versuche es weiterhin kein Licht gibt, muss
der Leuchtkörper der Kühlschranklampe ausgetauscht werden. Sie benötigen dazu eine 220-240V~, 10W
Glühlampe.
•
Schalten Sie das Gerät aus;
•
Öffnen Sie die Lampenabdeckung (1);
•
Drehen Sie die Glühlampe gegen den Uhrzeigersinn heraus.
•
Schrauben Sie die neue Glühlampe durch Drehungen im Uhrzeigersinn ein.
TÜRÖFFNUNGSRICHTUNG ÄNDERN
Der Kühlschrank wurde standardmäßig mit den Türscharnieren auf der rechten Seite montiert. Wenn Sie
die Türöffnungsrichtung ändern wollen, verfahren Sie bitte folgendermaßen:
1. Entfernen Sie die vier Schrauben (1) (2), und nehmen Sie obere Abdeckung ab.
2. Entfernen Sie die beiden Schrauben (3), die das obere Scharnier befestigen, und nehmen Sie das
obere Scharnier (4) ab.
3. Heben Sie die Tür an, und legen Sie diese auf eine gepolsterte Unterlage, um deren Zerkratzen zu
vermeiden.
4. Entfernen Sie die drei Schrauben (5), die dass untere Scharnier (6) befestigen, und nehmen Sie auch
das untere Scharnier (6) ab.
5. Entfernen Sie den einstellbaren Fuß (8), und montieren Sie diesen auf der rechten Seite.
6. Entfernen Sie den Bolzen (7) und wechseln Sie die Ausrichtung des unteren Scharniers (6). Installieren
Sie das untere Scharnier (6) auf der linken Seite mit drei Schrauben (7).
7. Setzen Sie den Bolzen (7) in das untere Scharnier (5) ein.
-7-
Page 36
-8-
Abb. 1 Abb. 2
Abbildung 1: Zeigt die Position der Komponenten vor der Änderung der Türöffnungsrichtung.
Abbildung 2: Zeigt die Position der Komponenten nach der Änderung der Türöffnungsrichtung.
Wenn Sie die Türöffnungsrichtung ändern wollen, verfahren Sie bitte folgendermaßen:
1. Entfernen Sie die eine Schraube (1) und nehmen Sie die Verrieglungstaste ab (2).
2. Entfernen Sie die beiden Schrauben (3), die die Achsenabdeckung (4) festhalten, und nehmen Sie
die Abdeckung (4) ab.
3. Heben Sie die Tür an, und legen Sie diese auf eine gepolsterte Unterlage, um deren Zerkratzen zu
vermeiden.
4. Entfernen Sie die obere Achsenabdeckung (5), und montieren Sie diese auf der gegenüberliegen-
den Seite.
5. Drehen Sie die Tür um 180°, und setzen Sie diese zur Achsenabdeckung.
6. Befestigen Sie untere Achsenabdeckung (4) mit zwei Schrauben (4).
7. Befestigen Sie die Verrieglungstaste (2) mit der einen Schraube (1).
8. Entfernen Sie den Scharnierstift (9) am Boden der Tür. Führen Sie den im Lieferumfang enthaltenen
Ersatz-Scharnierstift auf der anderen Seite der Tür ein.
9. Setzen Sie die Tür an ein und achten Sie darauf, dass diese auf dem unteren Scharnier (6) aufsitzt.
10. Fixieren Sie das obere Scharnier (4) mit zwei Schrauben (3) und die Abdeckung mit vier Schrauben (1)
(2).
Page 37
Symptom Ursache Lösung
Das Gerät arbeitet nicht
Die Stromversorgung ist unterbrochen
Überprüfen Sie die Steckdose, indem Sie
andere Geräte anschließen. Stellen Sie
sicher, dass das Gerät ordnungsgemäß
mit der Steckdose verbunden ist
Die Sicherung ist ausgefallen Tauschen Sie schadhafte Sicherungen
aus
Das Gerät
erzeugt laute
Geräusche
Das Gerät kühlt
nicht richtig
Das Gerät steht zu nahe an der
Wand
Das Gerät ist überfüllt Nehmen Sie Lebensmittel aus
dem Gerät heraus
Die Temperatureinstellung ist
ungeeignet
Abbildung 1: Zeigt die Position der Komponenten vor der Änderung der Türöffnungsrichtung.
Abbildung 2: Zeigt die Position der Komponenten nach der Änderung der Türöffnungsrichtung.
PROBLEMBEHANDLUNG
Sollten an Ihrem Gerät andere als die hier beschriebenen Störungen auftreten, kontaktieren Sie bitte
entweder den Kundendienst oder aber den Händler, bei dem Sie das Gerät erworben haben.
-9-
Vergrößern Sie den Abstand zur Wand,
um eine bessere Belüftung zu ermöglichen
Das Gerät steht zu nahe an der
Wand bzw. steht nicht stabil,
oder aber die Zubehörteile im
Innenraum
des Kühlschranks sind falsch
angebracht.
Bringen Sie den Kühlschrank in eine
standfeste Position, indem Sie die
einstellbaren Füße nachjustieren,
vergrößern Sie den Abstand zur Wand,
befestigen Sie die Zubehörteile ordnungsgemäß
Die Tür wird zu häug geöffnet
oder stand über längere Zeit offen.
Schließen Sie die Tür, und vermeiden
Sie zu häuge Öffnungen.
Stellen Sie den Temperaturregler auf „3“
oder höher
Abb. 1 Abb. 2
Page 38
Der Gerätinnenraum riecht
unangenehm
Der Geräteinnenraum muss
gereinigt werden
Reinigen Sie den Kühlschrankinnenraum
Folgende Symptome sind keine Anzeichen für eine Störung:
• Die Geräusche der Kühlüssigkeit, die im Kühlkreislauf zirkuliert, sind normal.
•
Kondensfeuchtigkeit an der Geräteaußenseite bei feuchten Wetter ist kein Zeichen einer
Gerätestörung; wischen diese einfach mit einem trockenem Tuch ab.
•
Der Kompressor und der Kondensator erwärmen sich bei heißen Temperaturen stärker.
•
Der Türrahmen ist leicht erwärmt; das ist ein Zeichen, dass der Kondensator arbeitet und die Feuchtigkeit ableitet.
Bei einem Stromausfall, bleiben die Lebensmittel in der Regel ca. 16 Stunden lang sicher gekühlt. Beachten
Sie bei einem Stromausfall insbesondere im Sommer die folgenden Hinweise:
•
Öffnen Sie die Türen und Schubladen so wenig wie möglich.
•
Legen Sie während eines Stromausfalls keine weiteren Lebensmittel in das Gerät.
•
Sofern es sich um einen angekündigten Stromausfall handelt und die vermutliche Dauer mehr als 16
Stunden betragen sollte, stellen Sie vorher Eis her und legen Sie das in ein Gefäß in der obersten
Einlage im Kühlschrankfach.
•
Überprüfen Sie die Lebensmittel unmittelbar nach dem Ende des Stromausfalls.
•
Die gestiegenen Temperaturen im Kühlschrank während eines Stromausfalls bzw. einer anderen
Störung können die Lagerdauer und die Qualität einzelner Lebensmittel beeinträchtigen. Um gesundheitliche Schäden zu vermeiden, sind sämtliche aufgetauten Lebensmittel entweder sofort zu
verbrauchen oder müssen einmal erhitzt (sofern zulässig) werden, bevor diese wieder eingefroren
werden können.
-10-
Symptom Ursache Lösung
Es benden sich verdorbene
Lebensmittel im Gerät
Werfen Sie die verdorbenen Lebensmittel weg und lagern Sie die anderen
Lebensmittel in geschlossenen
Gefäßen oder gut eingepackt.
Page 39
Referenz:
Spannung:
Leistung:
Frequenz:
Stromstärke:
Kältemittel:
Lampenleistung:
Gesamtnettovolumen:
Lagervolumen des Kühlfachs:
Lagervolumen des Gefrierfachs:
Klimazone:
Gefrierleistung:
Energieverbrauch:
Schutz gegen Stromschläge:
Schaumtreibmittel:
Energieklasse:
ENTSORGUNG:
Tragen Sie zum Schutz der Umwelt und der menschlichen Gesundheit bei. Entsorgen Sie die Verpackung in den dafür vorgesehenen Müllcontainern, damit
diese recycelt werden kann. Tragen Sie zum Recycling von Elektro- und Elektronikgeräten bei. Entsorgen Sie die mit diesem Symbol markierten Geräte nicht
in den Hausmüll. Bringen Sie das Gerät entweder zur Ihrer örtlichen Sammelstelle oder wenden Sie sich an den zuständige Entsorgungsunternehmen.
Gefahr von Verletzungen oder Erstickung!
Die Kühlmittel und Gase müssen fachgerecht entsorgt werden. Achten Sie darauf, dass die Leitungen des
Kühlkreislaufs nicht beschädigt werden, bevor das Gerät der Entsorgung zugeführt wird. Ziehen Sie den
Gerätenetzstecker. Schneiden Sie das Gerätekabel ab und entsorgen Sie dieses. Nehmen Sie die Einschübe und Schubladen heraus und entfernen Sie die Schließvorrichtung sowie die Dichtung an der Tür,
um zu verhindern, dass spielende Kinder oder Tiere in dem Gerät versehentlich eingeschlossen werden.
TECHNISCHE EIGENSCHAFTEN
Wir weisen jegliche Haftung für Schäden und Unfälle zurück, die aus der nicht zweckgemäßen Verwendung des Produkts gemäß den Vorgaben dieser Bedienungsanleitung herrühren.
WARNUNG!
-11-
220-240V~
65W
50Hz
0,6A
R600a (34g)
10W
114L
97L
17L
ST
2 kg/24 h
168kWh/Jahr
I
CYCLOPENTAN
A+
HRK-176AA;HRK-176AAB;HRK-176AAS
Page 40
ISTRUZIONI D′USO
Frigo-congelatore
HRK-176AA
HRK-176AAB
HRK-176AAS
Page 41

INDICE
Istruzioni importanti per la sicurezza - 1 -
Illustrazione struttura - 4 -
Trasporto e gestione - 4 -
Installazione - 4 -
Test - 5 -
Regolazione della temperatura - 5 -
Conservazione degli alimenti - 5 -
Sbrinamento - 6 -
Istruzioni generali per la cura e la manutenzione - 6 -
Inversione della porta - 7 -
Guida alla risoluzione dei problemi - 9 -
Speciche tecniche - 11 -
Page 42
Questo prodotto è unicamente per uso domestico.
Si prega di leggere le seguenti istruzioni con attenzione prima di iniziare a usare il dispositivo.
Inoltre, conservare il manuale per poterlo consultare in futuro.
ISTRUZIONI IMPORTANTI PER LA SICUREZZA
1. Questa apparecchiatura può essere usata da bambini a partire dagli 8 anni e da adulti con limitate capacità siche, senso-
riali o mentali o con scarsa esperienza o conoscenza sull’uso
dell’apparecchiatura, solamente se sorvegliati o se sono stati
istruiti relativamente all’uso dell’apparecchiatura e se hanno
compreso i rischi coinvolti. I bambini non devono giocare con
l’apparecchiatura. La pulizia e gli interventi di manutenzione non
devono essere eseguiti dai bambini senza supervisione.
2. L’apparecchiatura è destinata all’uso domestico e applicazioni
simili, tra cui:
- Cucine per il personale in negozi, ufci e altri ambienti di lavoro
- Fattorie e clienti di hotel, motel e altri ambienti residenziali
- Ambienti tipo bed and breakfast
- Catering e usi simili non di vendita
3. Avvertenza: Non usare dispositivi elettrici o altri mezzi articiali
non raccomandati dal produttore allo scopo di accelerare il processo di sbrinamento
4. Avvertenza: Eccetto per quanto indicato dal produttore, NON usare dispositivi elettrici all’interno delle unità.
-1-
Page 43

5. Avvertenza: Non cercare mai di usare il dispositivo per applicazioni o in modi non descritti nelle istruzioni; in caso contrario si
potrebbero correre gravi pericoli.
6. Avvertenza: Qualora il cavo di alimentazione sia danneggiato,
o qualora il dispositivo abbia delle anomalie di funzionamento
di qualsiasi tipo, invitiamo a restituirlo al produttore, all’agente
di servizio autorizzato o a persone con qualica simile che procederanno al suo esame, alla sua riparazione o a qualsiasi altro
intervento per evitare di correre pericoli.
7. AVVERTENZA: Tenere le aperture di ventilazione,
nell’alloggiamento del dispositivo o nella struttura a incasso,
senza ostruzioni.
8. AVVERTENZA: Non danneggiare il circuito refrigerante.
9. AVVERTENZA: Non utilizzare apparecchiature elettriche
all’interno dei comparti di conservazione degli alimenti, ad eccezione di quelli consigliati dal costruttore
10. Non usare il dispositivo in ambienti polverosi o in atmosfere in-
ammabili (gas inammabili, vapori, vapori da solventi organici,
ecc.)
11. Non stoccare sostanze esplosive quali ad esempio aerosol con
propellente inammabile in questo dispositivo.
12. Non versare acqua direttamente sul congelatore; ciò potrebbe
compromettere l’isolamento e causare fenomeni di corrosione.
13. Inserire la spina in una presa dotata di messa a terra. Vericare
di spingere la spina no in fondo in fase di collegamento del dis-
positivo.
-2-
Page 44
14. Al ne di evitare possibili danni all’ambiente o all’uomo, derivanti
da uno smaltimento corretto dei riuti, riciclarlo in modo responsabile al ne di promuovere un riutilizzo disponibile delle risorse
materiali. Lo smaltimento dovrebbe avvenire unicamente tramite
i punti di raccolta pubblici.
15. Il dispositivo va collocato su una supercie orizzontale; sarà inoltre opportuno garantire un’adeguata ventilazione. Non cercare
di sostituire o riparare le componenti in modo autonomo; ove
necessario, chiedere aiuto all’agenzia di addetta alla manutenzione.
16. Gestire sempre il dispositivo per evitare eventuali danni.
17. Attenzione: Non collegare il cavo di messa a terra a tubi dell’acqua
o tubi del gas.
18. Attenzione: non conservare basi forti, acidi forti, solventi organici
o beni corrosivi insieme agli alimenti.
19. Rimandiamo alla sezione “Guida alla risoluzione dei problemi”
quando l’unità riscontra dei problemi. Non cercare di risolvere i
problemi da soli; rimandiamo unicamente al tecnico certicato.
20. Per quanto riguarda le informazioni sull’installazione, il funzionamento, la manutenzione e lo smaltimento del dispositivo rimandiamo alle seguenti sezioni del manuale.
Il dispositivo è stato testato conformemente a tutte le
linee guida CE del caso, ad esempio direttive sulla
compatibilità elettromagnetica e sulla bassa ten-
sione, ed è stato realizzato in conformità con le più
recenti normative di sicurezza.
-3-
Page 45
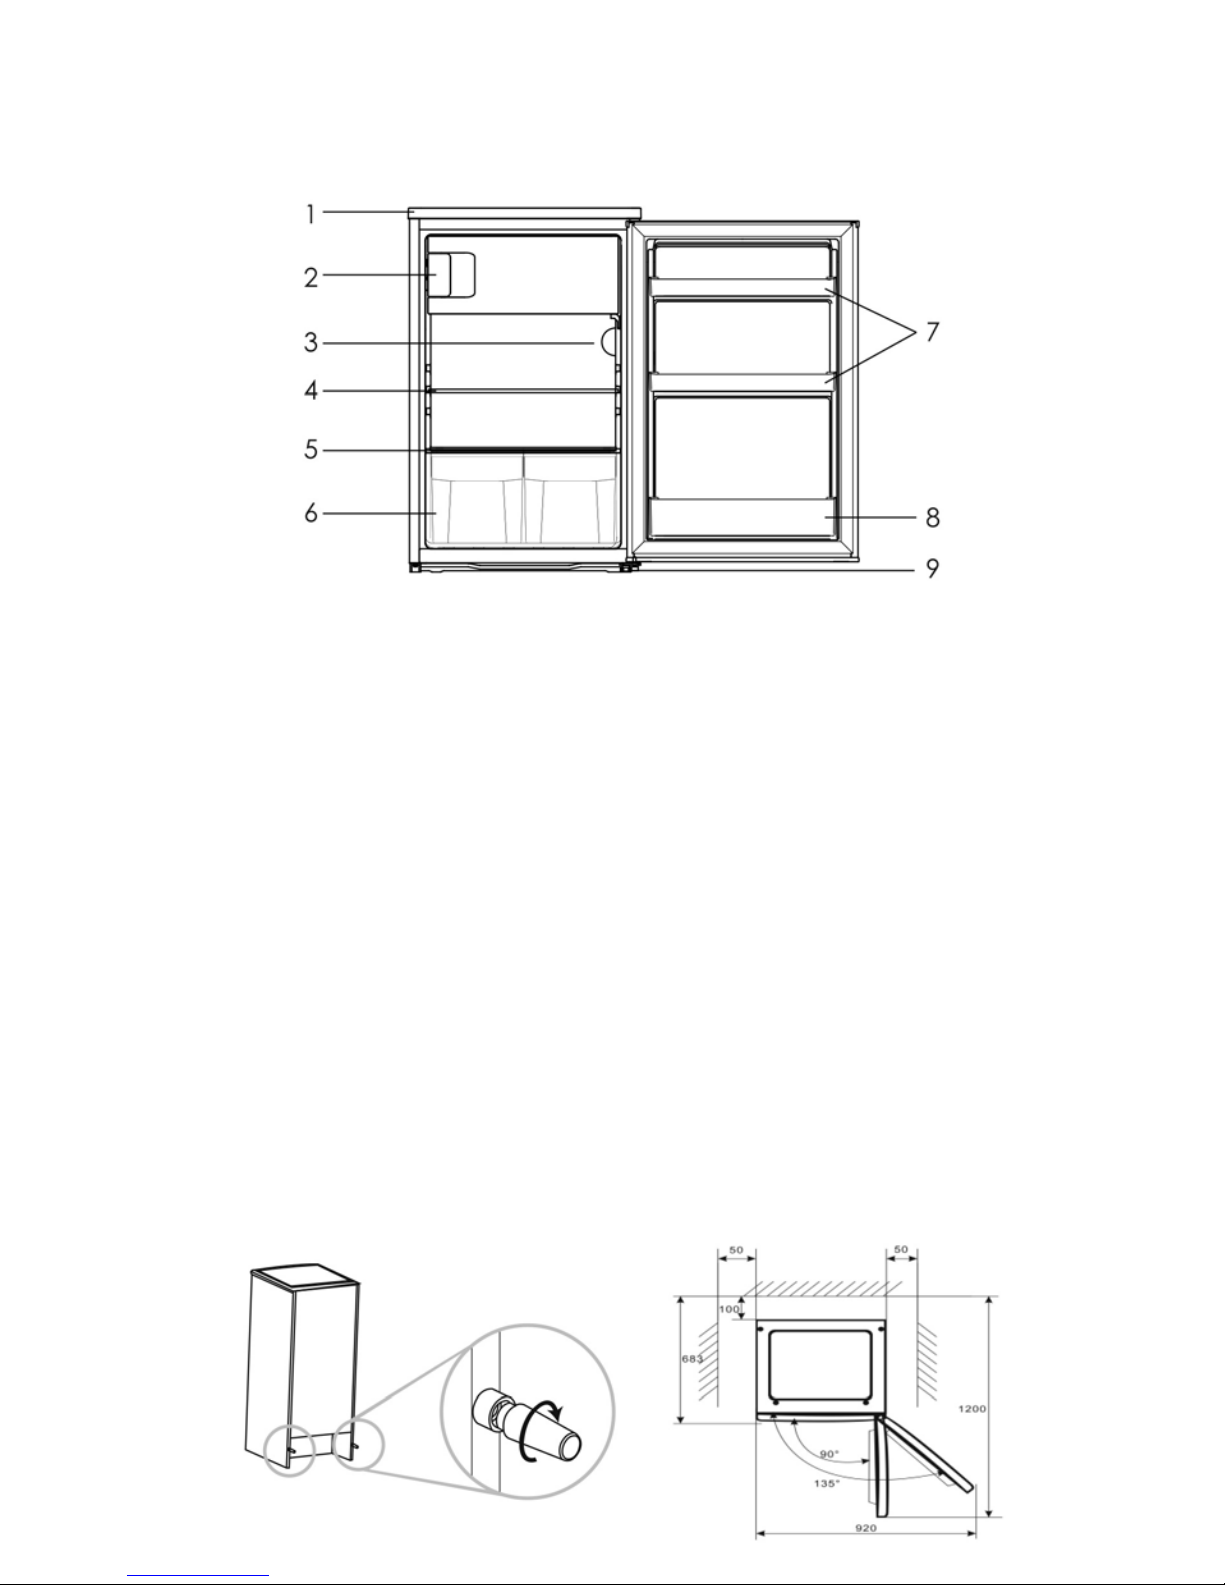
ILLUSTRAZIONE STRUTTURA
TRASPORTO E GESTIONE
In fase di trasporto, tenere la base e sollevare il frigorifero con attenzione, a un angolo inferiore a 45 gradi.
Non tenere mai la maniglia della porta come supporto. Non capovolgere mai il dispositivo e non disporlo in
orizzontale. Spingere il frigorifero sulla base e posizionarlo grazie ai piedini con ruote.
INSTALLAZIONE
Per essere ssata in modo stabile, il dispositivo va collocato su una supercie piana e solida. Non dovrebbe
essere appoggiato su materiali morbidi.
Scegliere un luogo ben ventilato. Lasciare uno spazio di almeno 5 cm sui lati e 10 cm sulla parte posteriore
del frigorifero. I distanziatori del mobiletto forniti in dotazione col dispositivo devono essere installati per
proteggere e controllare la distanza dalla parete.
Scegliere una posizione in cui non vi siano fonti di calore. Tenere il frigorifero lontano dalla luce solare diretta
o da altri dispositivi che producono calore.
Scegliere un luogo asciutto e ben ventilato, dove non vi sia aria corrosiva.
-4-
1. Coperchio superiore
2. Scomparto congelatore
3. Dispositivo termostato
4. Ripiano in vetro
5. Coperchio del cassetto verdura
6. Cassetto verdura
7. Ripiano porta
8. Portabottiglie
9. Piedini regolabili
Page 46

TEST
Pulire le componenti del frigorifero con acqua tiepida o con un panno morbido o ancora con un detergente
naturale e con acqua pulita, quindi asciugare il dispositivo.
Note: Le componenti elettriche del frigorifero possono essere asciugate solo con un tessuto asciutto.
Ruotare la manopola termostato no a portarla sulla posizione “3”, quindi attivare l’elettricità. Il compressore
e la luce all’interno del frigorifero iniziano a funzionare.
Chiudere la porta e attendere 30 minuti. Qualora la temperatura dello scomparto congelatore registri un
brusco calo, signica che il sistema funziona correttamente. Quando il frigorifero funziona per un po’ di
tempo, il controller della temperatura imposterà automaticamente la temperatura a condizione che la porta
non venga aperta troppo spesso.
Qualora i summenzionati passaggi avvengano con esito positivo, le operazioni di prova possono essere
considerate concluse. Il frigorifero funziona normalmente.
CONTROLLO DELLA TEMPERATURA
La temperatura nello scomparto frigorifero e nello scomparto congelatore viene controllata dal controller
della temperatura installato sul lato destro dello scomparto del frigorifero.
Ruotare la manopola del termostato per regolare la temperatura all’interno del frigorifero.
I simboli sulla manopola non sono il numero esatto di grado di temperatura, ma la temperatura va da “0”
a “7”. Il primo grado corrisponde a uno STOP forzato della refrigerazione e il 7° grado corrisponde alla
temperatura più bassa che il frigorifero è in grado di produrre. Ruotare la manopola dalla posizione “1” alla
posizione “7”, la temperatura è in costante diminuzione.
Impostare la manopola termostato sulla posizione “3-4”per un uso normale.
Si prega di notare che il prodotto funziona a una temperatura compresa fra i 16 e i 38°C. Il dispositivo
potrebbe non funzionare correttamente se viene lasciato a lungo a temperature superiori o inferiori alla
gamma indicata.
La temperatura interna è inuenzata dai seguenti fattori:
•
Temperatura ambiente
•
Frequenza di apertura della porta
•
Quantitativo di cibi conservati
• Installazione del dispositivo
CONSERVAZIONE DEGLI ALIMENTI
Come faccio a usare lo scomparto congelatore?
•
Collocare alimenti freschi, quali ad esempio pesce o carne, nel congelatore per conservarne il
gusto e i valori nutrizionali.
•
Il cibo, incartato, deve essere congelato in pellicola di alluminio o fogli di cellophane o ancora in
scatole di plastica a tenuta d’aria.
• Non mettere alimenti freschi direttamente a contatti con alimenti già surgelati.
•
Qualora vengano acquistati alimenti congelati, portarli a casa e collocarli in congelatore quanto
più rapidamente possibile.
-5-
Page 47

•
Non ri-congelare mai un prodotto scongelato.
•
Non conservare i liquidi in bottiglie o lattine (oltre alle bevande con elevato contenuto alcolico) in
particolare bevande gassate all’interno del congelatore, dato che potrebbero esplodere in fase di
congelamento.
•
Il tempo di conservazione per gli specici alimenti (in particolare per gli alimenti surgelati a livello
commerciale) consigliati dai produttori non vanno superati. Estrarre solo il quantitativo di cibo che
serve dal frigorifero.
•
In fase di scongelamento o manutenzione e assistenza, la temperatura degli alimenti congelati potrebbe aumentare, dunque il tempo di conservazione si potrebbe ridurre.
Come faccio a usare lo scomparto frigorifero?
•
Le uova vanno collocate nell’apposito spazio, lo stesso vale per le bottiglie, ecc.
•
Frutta e verdura vanno collocate nell’apposito cassetto.
•
I vasetti vanno collocati sui ripiani della porta del frigorifero.
• Gli altri alimenti che possono scadere o che possono emettere cattivi odori nel frigorifero vanno in-
cartati separatamente.
Posizionamento degli alimenti
• Non accumulare troppi cibi nel frigorifero, dato che ciò potrebbe causare una perdita di freddo.
•
I vari alimenti, incartati separatamente, devono essere congelati in pellicola di alluminio o fogli di cel-
lophane o ancora in scatole di plastica a tenuta d’aria.
•
Gli alimenti caldi non possono essere messi nel frigorifero o nel congelatore no a che non hanno
raggiunto temperatura ambiente. In caso contrario potrebbe aumentare il consumo elettrico.
• Non mettere mai frutta e verdura nello scomparto congelatore, in quanto, dopo lo scongelamento, non
saranno adatti per essere consumati.
SCONGELAMENTO
Quando il frigorifero funziona a lungo, la supercie interna del congelatore sarà coperta da uno strato di
gelo. Potrebbe aumentare il consumo elettrico e ridurre l’effetto del raffreddamento. Quindi, sbrinare il congelatore una volta al mese.
In fase di sbrinamento, togliere la corrente, aprire la porta e spostare gli alimenti congelati in un luogo fresco.
Servirsi di una spatola in plastica per togliere lo strato di gelo. Quindi, togliere il gelo e pulire l’interno del
congelatore con un panno delicato e asciutto.
Note: Non usare mai oggetti metallici per scongelare il congelatore, dato che questa operazione lo potrebbe
danneggiare.
ISTRUZIONI GENERALI PER LA CURA E LA MANUTENZIONE
Il frigorifero dovrebbe essere pulito una volta al mese. Prima dell’operazione di pulizia, scollegare la spina
dalla presa di corrente.
Pulire l’interno e l’esterno del frigorifero con un panno sofce e umido.
Se è troppo sporco, pulire con un panno morbido con detergente neutro; quindi, rimuovere l’umidità con un
panno asciutto.
Qualora il frigorifero venga lasciato inattivo a lungo, procedere come segue:
• Scollegare il frigorifero dal dispositivo di alimentazione elettrica.
-6-
Page 48
•
Estrarre tutti gli alimenti.
•
Pulire e asciugare l’interno conformemente alle istruzioni summenzionate per la pulizia.
• Lasciare le porte aperte per evitare la formazione di cattivi odori quando il frigorifero non è in uso.
Pulizia
In fase di pulizia del frigorifero, scollegare la spina dalla presa di corrente.
Usare acqua o detergente non-abrasivo su un panno morbido, quindi rimuovere l’umidità con un panno
asciutto. Ricordarsi di pulire lo scarico del disgelo sul retro appena sopra al coperchio in vetro.
Sostituzione della lampadina del forno
Qualora la luce interna non funzioni più, scollegare e poi ricollegare il dispositivo. Qualora la luce non
funzioni, controllare che la lampadina sia avvitata correttamente. Qualora, anche dopo aver eseguito questi
test, non vi sia luce, sarà necessario sostituire la lampadina. Usare una lampadina da 220-240V~, 10W.
• Scollegare il dispositivo;
•
Aprire il coperchio della lampadina (1);
•
Togliere la lampadina difettosa ruotandola in senso anti-orario.
•
Avvitare la nuova lampadina ruotandola in senso orario.
INVERSIONE DELLA PORTA
Questo frigorifero è stato costruito con le cerniere della porta sul lato destro. Per modicare la direzione di
apertura attenersi alle seguenti istruzioni:
1. Togliere le quattro viti (1) (2) e rimuovere il coperchio superiore.
2. Togliere le due viti (3) che tengono in posizione la cerniera superiore (4), quindi togliere la cerniera
superiore (4).
3. Sollevare la porta e collocarla su una supercie imbottita al ne di evitare che si graf.
4. Togliere le tre viti (5) che tengono in posizione la cerniera inferiore (6) e vericare di togliere la cerniera
inferiore (6).
5. Togliere la gamba regolabile (8) e trasferirla sul lato destro.
6. Togliere il bullone-perno (7) e invertire la direzione della cerniera inferiore (6). Installare la cerniera
inferiore. (6) nel lato sinistro con tre viti (7).
7. Inserire il bullone-perno (7) nella cerniera inferiore (5).
-7-
Page 49
-8-
gura 1 gura 2
Figura 1: Rappresenta la posizione delle componenti prima dell’inversione della porta
Figura 2: Rappresenta la posizione delle componenti dopo l’inversione della porta
Qualora si desideri modicare anche la direzione di apertura della porta del congelatore all’interno, attenersi alle seguenti istruzioni:
1. Togliere la vite (1) e togliere il pulsante di blocco (2).
2. Togliere le due viti (3) che tengono in posizione il copri asse (4), quindi togliere il coperchio (4).
3. Togliere la porta e collocarla su una supercie imbottita al ne di evitare che si graf.
4. Togliere il copri asse (5) e trasferirlo sul lato opposto.
5. Ruotare la porta di 180° e impostarla sul copriasse superiore.
6. Fissare il copriasse inferiore (4) con due viti (4).
7. Fissare il pulsante di blocco (2) con una vite (1)
8. Togliere il perno della cerniera (9) che si trova nel lato inferiore della porta. Sull’altro lato della porta,
inserire il perno della cerniera sostitutiva fornito in dotazione col dispositivo.
9. Collocare la porta in posizione e vericare che la porta si ssi sulla cerniera inferiore (6).
10. Fissare la cerniera superiore (4) con le due viti (3) e la parte superiore con quattro viti (1) (2).
Page 50
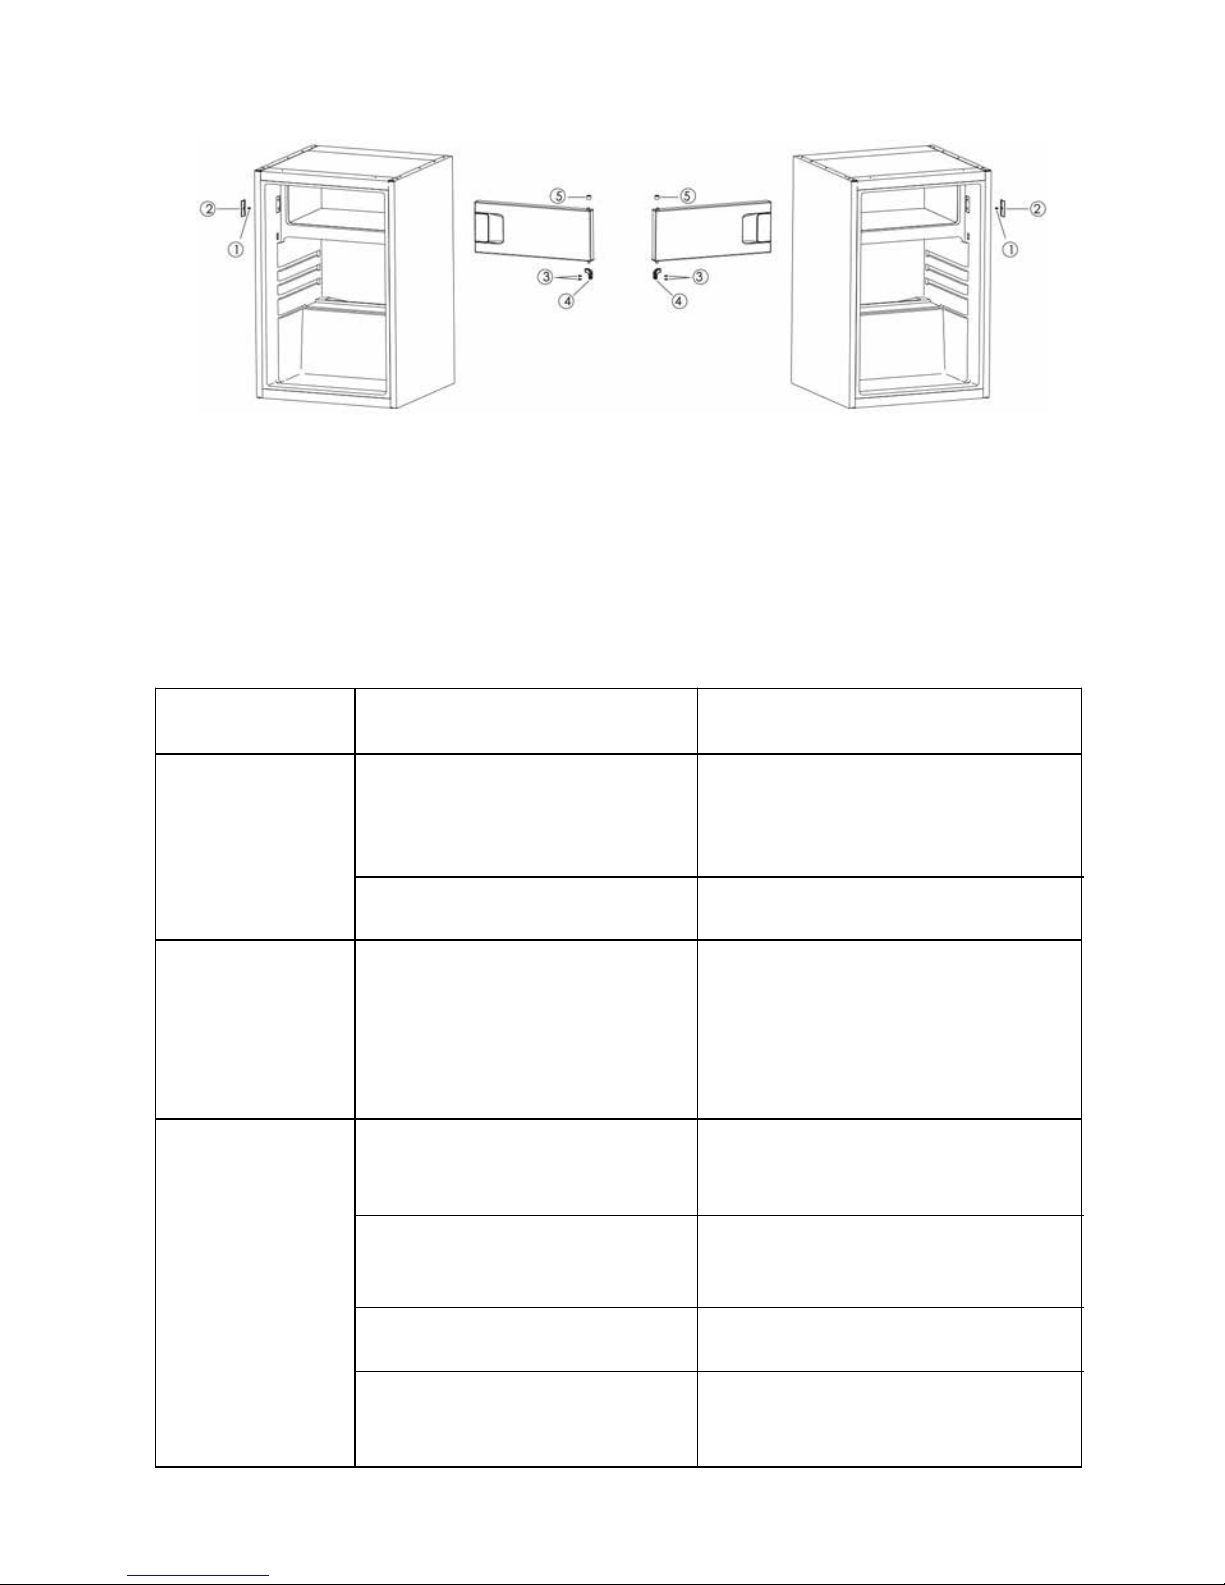
Figura 1: Rappresenta la posizione delle componenti prima dell’inversione della porta
Figura 2: Rappresenta la posizione delle componenti dopo l’inversione della porta
GUIDA ALLA RISOLUZIONE DEI PROBLEMI
Qualora il dispositivo mostri altri sintomi rispetto a quelli sopra descritti, contattare l’assistenza clienti op-
pure il negozio presso il quale è stato acquistato il dispositivo.
-9-
gura 1 gura 2
Sintomo Causa Soluzione
Il dispositivo non
funziona.
Non c’è alimentazione Controllare la spina che lo collega ad altri
dispositivi o vericare che il dispositivo
sia collegato alla presa di corrente
Il fusibile non funziona Sostituire il fusibile
Il dispositivo
emette molto
rumore
Il dispositivo non
raffredda a suf-
cienza
Il dispositivo è troppo vicino alla
parete
Il congelatore è troppo pieno Estrarre alimenti dal dispositivo
La temperatura non è stata
regolata correttamente
Allontanare il dispositivo da parete per
favorire la ventilazione
Il dispositivo è troppo vicino alla
parete oppure non è stabile o
ancora gli accessori all’interno del
congelatore sono posizionati in
modo errato.
Stabilizzare la base del congelatore
regolando la posizione dei piedini,
allontanare il dispositivo dalla parete,
collocare in modo adeguato gli accessori
all’interno del congelatore
La porta viene aperta troppo
spesso o è stata lasciata aperta
a lungo
Chiudere la porta e non aprirla con eccessiva frequenza
Ruotare la manopola di regolazione della
temperatura no a posizionarla sul livello
“3” o
Page 51
Ci sono cattivi
odori all’interno del
dispositivo
Sarà necessario pulire l’interno del
dispositivo
Pulire l’interno del frigorifero
I seguenti sintomi non sono segnali di malfunzionamento:
• Si potrebbe sentire il rumore del liquido di raffreddamento che circola nei tubi: non si tratta di
un’anomalia di funzionamento.
• L’umidità sulla supercie esterna del dispositivo durante le stagioni umide non costituisce un problema
per il dispositivo; sarà sufciente pulirla con un panno morbido asciutto.
• Il compressore e il condensatore si possono riscaldare maggiormente nei periodi di caldo più intenso.
•
Il telaio del dispositivo è leggermente caldo; signica che il condensatore sta funzionando per evacu-
are l’umidità presente nell’aria.
In caso di black out, gli alimenti dovrebbero rimanere al fresco in modo sicuro per all’incirca 16 ore. Attenersi
alle seguenti indicazioni durante un black out prolungato, in particolar modo se ciò avviene d’estate:
•
Aprire la porta o i cassetti solamente quando ciò è strettamente necessario.
•
Non collocare alimenti aggiuntivi all’interno della dispositivo durante un blackout.
•
Qualora sia stata fornita una notica del black out, e il black out si prolunghi per più di 16 ore, recuperare del ghiaccio e collocarlo in un contenitore sulla parte superiore dello scomparto frigorifero.
•
Non appena viene ripristinata la corrente, consigliamo di ispezionare immediatamente gli alimenti
contenuti all’interno.
•
Dato che in caso di black out la temperatura all’interno del frigorifero aumenta, il periodo di conservazione, nonché le qualità di commestibilità degli alimenti verranno ridotte. l Gli eventuali alimenti
che si scongelano dovranno essere consumati, cotti o nuovamente congelati, ove necessario, subito
dopo, al ne di evitare rischi per la salute.
-10-
Sintomo Causa Soluzione
Cibi obsoleti all’interno del
frigorifero
Buttare gli alimenti obsoleti e avvolgere gli altri
Page 52
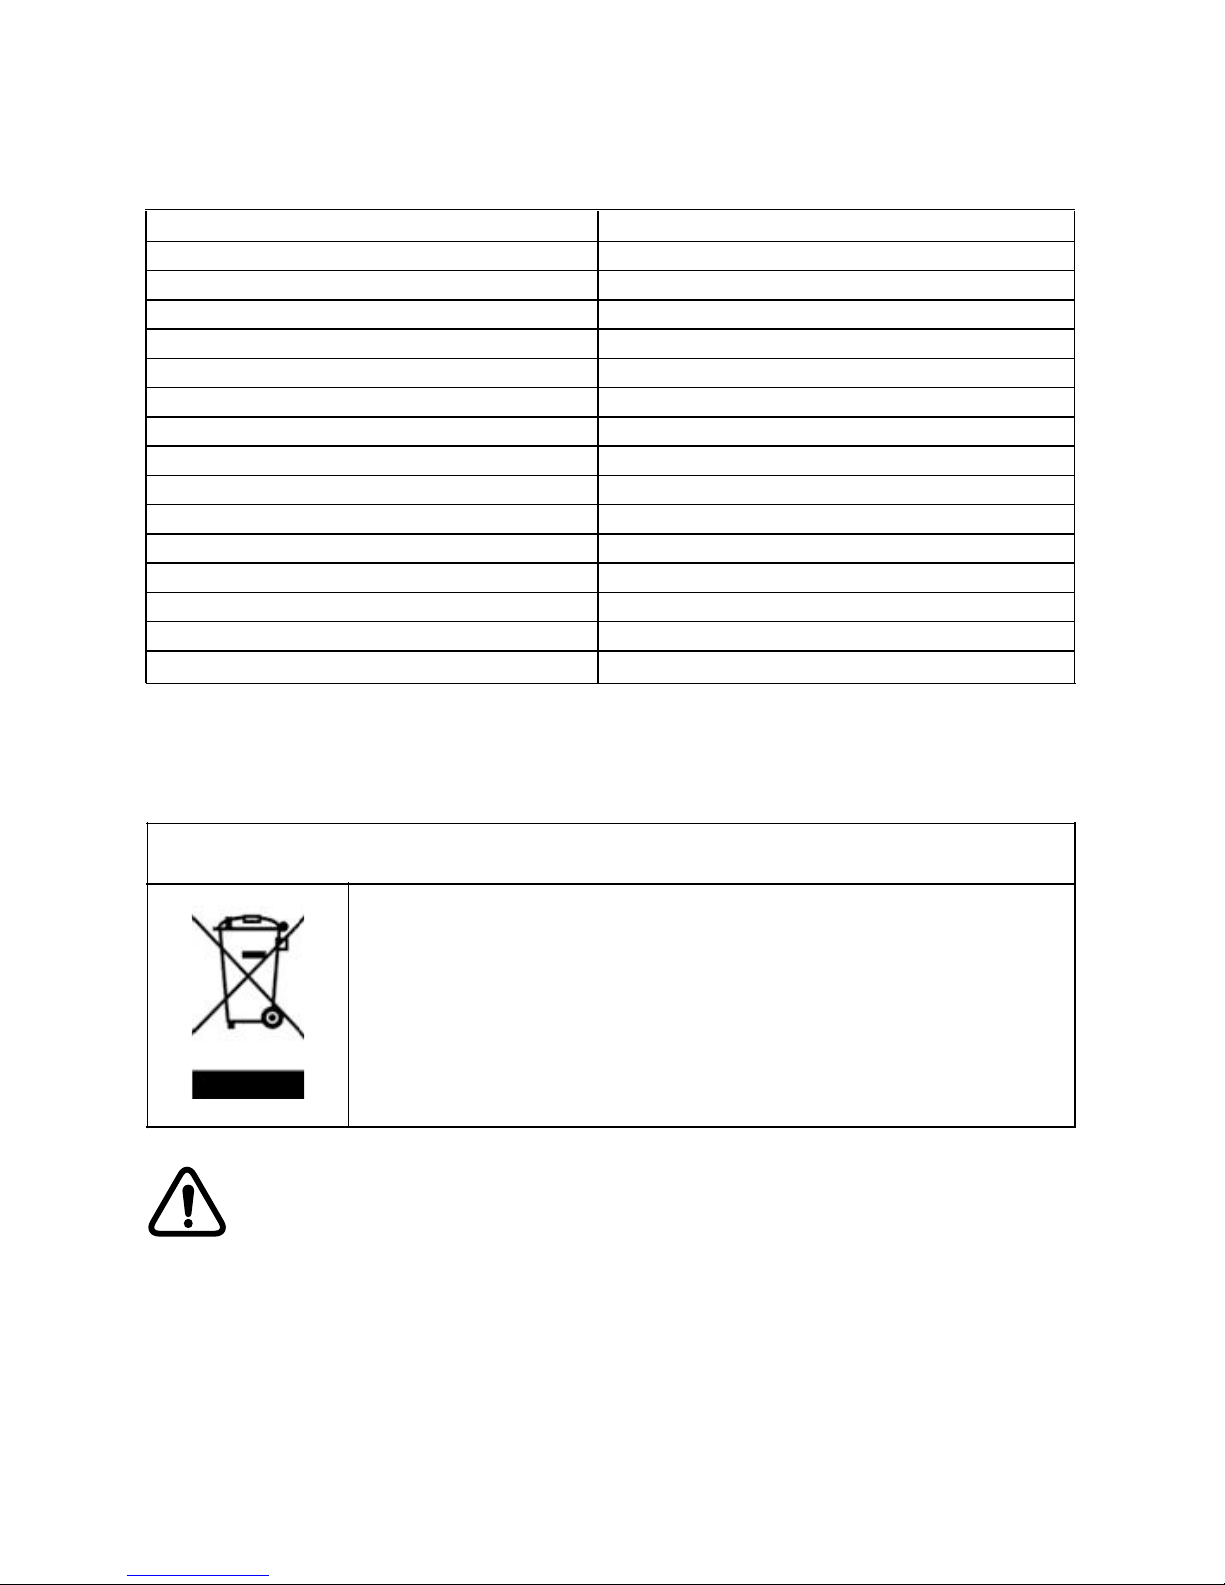
Riferimento:
Tensione nominale:
Potenza nominale:
Frequenza nominale:
Corrente nominale:
Refrigerante:
Potenza lampada:
Volume netto totale:
Volume di conservazione del frigorifero:
Volume di conservazione del congelatore:
Nastro clima:
Capacità di congelamento:
Consumo energetico:
Protezione da scosse elettriche:
Schiuma:
Classe energetica:
SMALTIMENTO
Contribuire alla protezione dell’ambiente e alla salute umana. Collocare
l’imballaggio in contenitori adeguati per poterlo riciclare. Contribuire al riciclaggio
dei riuti provenienti da dispositivi elettrici ed elettronici. Non smaltire i dispositivi
recanti questo simbolo con i normali riuti domestici. Riportare il prodotto presso
la struttura di riciclaggio locale o contattare il proprio ufcio municipale compe-
tente in merito.
Rischio di lesione o soffocamento!
I refrigeranti e i gas vanno smaltiti in modo professionale. Vericare che i tubi del circuito refrigerante non
si siano danneggiati prima di smaltirli in modo adeguato. Scollegare il dispositivo dalla presa di corrente.
Tagliare il cavo di rete e smaltirlo. Togliere i vassoi e i cassetti, oltre che il lucchetto e le guarnizioni della
porta al ne di evitare che i bambini e gli animali domestici rimangano intrappolati all’interno del dispositivo.
SPECIFICHE TECNICHE
Decliniamo qualsiasi responsabilità per eventuali danni o incidenti derivati da usi del prodotto non
conformi alle istruzioni contenute nel presente libretto.
AVVERTENZA!
-11-
220-240V~
65W
50Hz
0,6A
R600a(34g)
10W
114L
97L
17L
ST
2kg/24h
168kWh/anno
I
CYCLOPENTANO
A+
HRK-176AA;HRK-176AAB;HRK-176AAS
Page 53
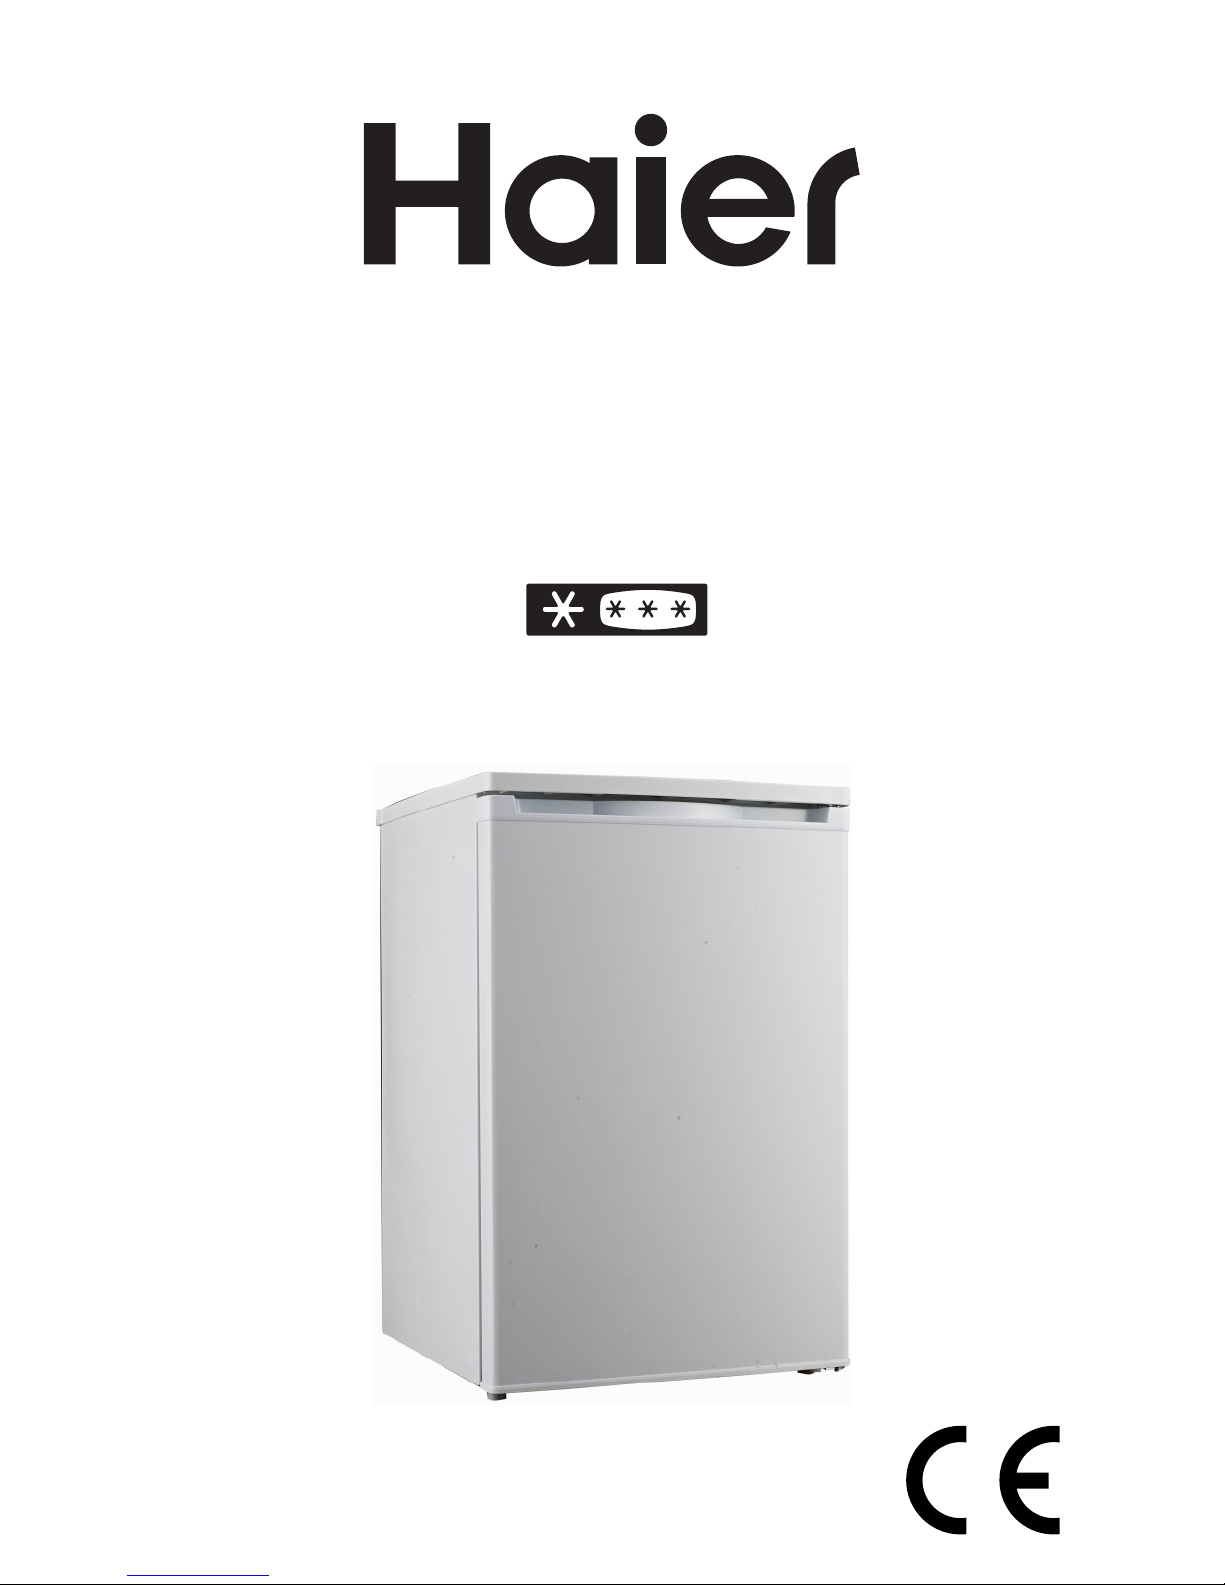
INSTRUCCIONES PARA EL USUARIO
Refrigerador-congelador
HRK-176AA
HRK-176AAB
HRK-176AAS
Page 54

Tabla de contenido
Instrucciones importantes de seguridad - 1 -
Ilustración de las piezas que componen el exprimidor - 4 -
Transporte y manipulación - 4 -
Instalación - 4 -
Prueba - 5 -
Control de temperatura - 5 -
Almacenamiento de alimentos - 5 -
Descongelamiento - 6 -
Instrucciones generales para el ciudado y mantenimiento - 6 -
Revertir la puerta - 7 -
Solución de problemas - 9 -
Especicaciones técnicas - 11 -
Page 55
Este producto es solo para uso doméstico!
Lea atentamente estas instrucciones antes del primer uso de este producto y guarde este
manual para su referencia en el futuro.
INSTRUCCIONES DE SEGURIDAD IMPORTANTES
1. Este aparato puede ser utilizado por niños de 8 años o más y las
personas con una discapacidad física, sensorial o mental o falta
de experiencia y conocimientos que hayan recibido supervisión
o instrucciones relativas al uso del aparato de una manera segura y comprendan los riesgos involucrados. Los niños no deben
jugar con el aparato. La limpieza y mantenimiento por parte del
usuario no deberá ser realizada por niños sin supervisión.
2. Este aparato está diseñado para un uso en entorno doméstico y
similares como:
- Cocinas de personal en tiendas, ocinas y otros entornos de
trabajo
- Granjas y cocinas para clientes de hoteles, moteles y entornos
residenciales similares
- Entornos de hospedaje en régimen de alojamiento y desayuno.
- Aplicaciones de servicios de banquetes y similares privados
3. Advertencia: No utilice ningún dispositivo mecánico, ni ningún
otro aparato, para acelerar el proceso de descongelación, salvo
los recomendados por el fabricante.
4. Advertencia: Excepto los elementos recomendados por el fabri-
cante, NO use ningún aparato eléctrico en las unidades.
-1-
Page 56

5. Advertencia: Nunca trate de utilizar este aparato para aplicaciones o de una manera que no se describa en las instrucciones, de
lo contrario se pueden producir riesgos graves.
6. Advertencia: Si el cable de alimentación está dañado, o si el
aparato tiene un mal funcionamiento o se ha dañado de alguna
manera, por favor devuelva el aparato al fabricante, su agente
de servicio autorizado o por personal cualicado para su revisión,
reparación o ajuste con el n de evitar un peligro.
7. ADVERTENCIA: Mantenga las aberturas de ventilación, en el
aparato o en la estructura incorporada, sin obstáculos.
8. ADVERTENCIA: No dañe el circuito frigoríco.
9. ADVERTENCIA: No utilice aparatos eléctricos dentro de los
compartimentos para alimentos del aparato, a menos que sean
del tipo recomendado por el fabricante.
10. No utilice el aparato en un ambiente polvoriento o en una atmós-
fera explosiva e inamable (gases inamables, vapores, vapores
de disolventes orgánicos, etc.)
11. No guarde dentro del aparato ninguna sustancia explosiva, como
aerosoles que contengan propelentes inamables.
12. No vierta agua directamente en el congelador, lo que puede provocar la disminución del aislamiento y corrosividad.
13. Inserte el enchufe en una sola toma de corriente con conexión a
tierra. Asegúrese de colocar el tapón hasta el nal en la toma al
conectar su aparato.
-2-
Page 57
14. Para evitar cualquier daño medioambiental o a la salud humana
derivado de un desecho incorrecto, recicle responsablemente
para así fomentar la reutilización sostenible de los recursos ma-
teriales. Y el desecho solo debe hacerse a través de los puntos
de recolección públicos.
15. El aparato debe colocarse sobre un suelo horizontal y mantener
la ventilación libremente. No trate de reemplazar o reparar los
componentes por sí mismo, diríjase a la agencia de servicio para
obtener ayuda si es necesario.
16. Siempre maneje el aparato evitando cualquier daño.
17. Precaución: No conecte el cable de puesta a tierra a una tubería
de agua o gas.
18. Queda estrictamente prohibido el almacenamiento de una base
fuerte, ácido fuerte, solvente orgánico y productos corrosivos,
junto con los alimentos.
19. Consulte las referencias “Solución de problemas” cuando la unidad presenta algunos problemas. No intente resolver el prob-
lema por su cuenta, consulte a un técnico certicado solamente.
20. En cuanto a la información para la instalación, operación, mantenimiento y eliminación del dispositivo, consulte las siguientes
partes del manual.
Este dispositivo fue probado de acuerdo a las normativas actuales y relevantes, como la compatibili-
dad electromagnética y directivas de voltaje bajo, y
fue fabricado de acuerdo con las últimas normas de
seguridad.
-3-
Page 58
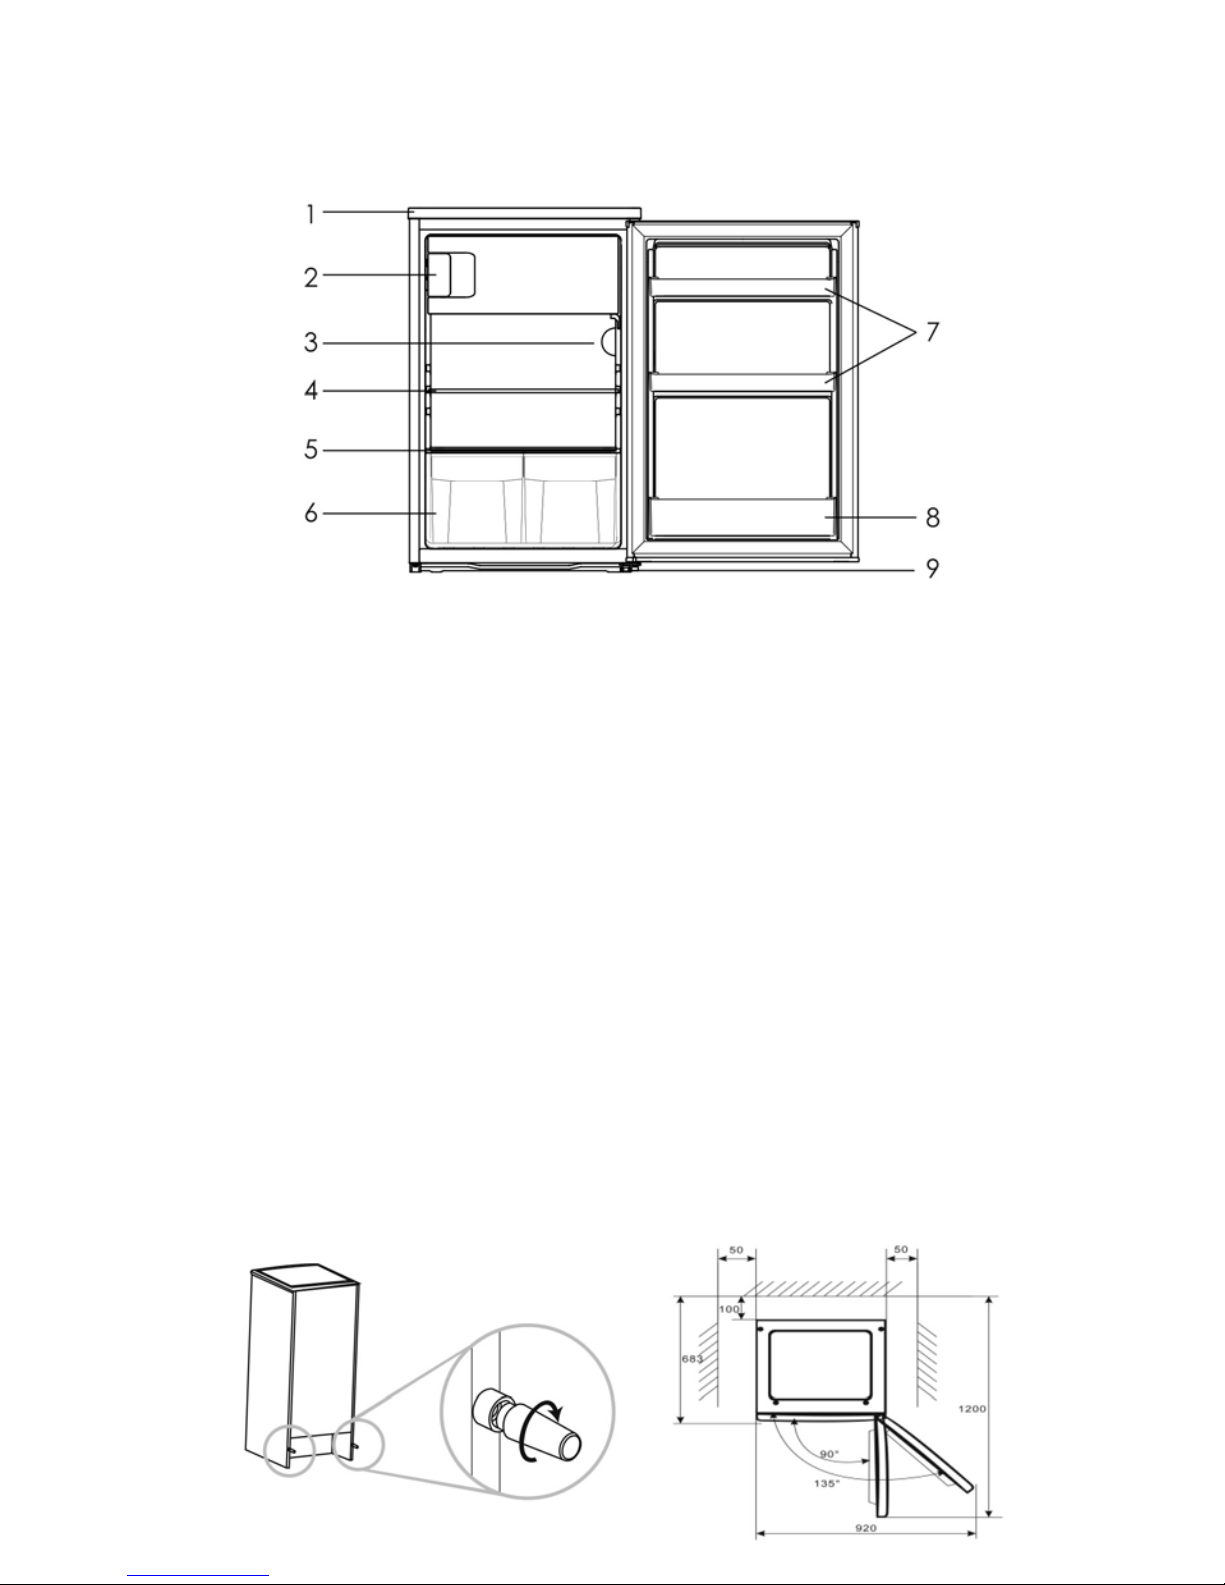
ILUSTRACIÓN DE LA ESTRUCTURA
TRANSPORTE Y MANIPULACIÓN
Al transportarlo, sujete la base y levante el frigoríco cuidadosamente con un ángulo inferior a 45 grados.
Nunca sostenga la manija de la puerta como soporte. Nunca lo coloque boca abajo ni horizontalmente.
Empuje el frigoríco en su fundamento y colóquelo usando sus patas giratorias.
INSTALACIÓN
Para jar la estabilidad, coloque el aparato sobre una supercie plana y sólida. No se debe colocar sobre
ningún tipo de material blando.
Escoja un lugar bien ventilado. Un espacio de al menos 5 cm se debe dejar a los lados y 10 cm en la parte
trasera del frigoríco. Los espaciadores del gabinete provistos con el aparato deben ser instalados para
protegerlo y controlar la distancia desde la pared.
Escoja un lugar donde no haya una fuente de calor. Mantenga el frigoríco lejos de la luz solar directa o en
la producción de calor del aparato.
Escoja un lugar seco y bien ventilado, donde no haya aire corrosivo.
-4-
1. Cubierta superior
2. Componente del congelador
3. Dispositivo de termostato
4. Estante de vidrio
5. Cubierta del cajón de vegetales
6. Cajón de frutas y verduras
7. Contenedor de la puerta
8. Contenedor de botellas
9. Patas ajustables
Page 59

PRUEBA
Limpie las partes de la nevera con agua tibia y un paño suave o con un detergente neutro y con agua limpia,
luego séquelos.
Notas: Las partes eléctricas del frigoríco solo pueden ser limpiadas con un paño seco.
Gire el mando del termostato a la posición “3” y encienda la electricidad. El compresor y la luz en el interior
del frigoríco comienzan a trabajar.
Cierre la puerta y espere 30 minutos. Si la temperatura en el compartimiento congelador disminuyó obvia-
mente, muestra que el sistema refrigerador funciona bien. Cuando el frigoríco opera durante un período
de tiempo, el controlador de temperatura ajusta automáticamente la temperatura si la puerta no es abierta
con mucha frecuencia.
Si los pasos anteriores tienen éxito, las operaciones de prueba están terminadas. El frigoríco funciona con
normalidad.
CONTROL DE TEMPERATURA
La temperatura en el compartimento del frigoríco y en el compartimento congelador está controlada por el
controlador de temperatura instalado en el lado derecho del compartimiento del frigoríco.
Gire el mando del termostato para regular la temperatura en el interior del frigoríco.
Las marcas en el mando no son el número exacto de los grados de temperatura, sino los grados de tem-
peratura de “0” a “7”. El primer grado corresponde a una parada forzosa de la refrigeración y el séptimo
grado corresponde a la temperatura más baja que el frigoríco puede producir. Gire la perilla de la posición
“1” a la posición “7”, la temperatura disminuirá continuamente.
Ajuste el mando del termostato a la posición “3-4” para un uso normal.
Tenga en cuenta que el aparato ha sido diseñado para funcionar en un rango de temperatura ambiente
especíco de 16°C a 38°C. Si se lo deja durante mucho tiempo en un lugar con temperaturas superiores o
inferiores al rango indicado, es posible que el aparato no funcione de forma adecuada.
Los siguientes factores afectan a las temperaturas internas del frigoríco:
•
Temperatura ambiente
•
Frecuencia de apertura de la puerta
•
Cantidad de alimentos almacenados
• Instalación del aparato
ALMACENAMIENTO DE ALIMENTOS
Cómo utilizar el compartimento del congelador?
•
Ponga los alimentos frescos, como el pescado o la carne, en el congelador para guardar su sabor
y nutrientes.
•
Los alimentos envueltos tienen que ser congelados en papel de aluminio o lámina de celofán o en
cajas de plástico herméticamente.
• No ponga los alimentos frescos directamente en contacto con los alimentos ya congelados.
•
Si usted compra los alimentos congelados, llévelos a casa y colóquelos en el congelador lo más
rápido posible.
-5-
Page 60

•
Nunca vuelva a congelar un producto descongelado.
•
No guarde líquidos en botellas o latas (aparte de las bebidas de alta graduación alcohólica), especial-
mente bebidas gaseosas, en el congelador, ya que pueden estallar al congelarse
•
No debe sobrepasar el tiempo de almacenamiento para cada alimento (en especial para los alimen-
tos congelados de manera comercial) recomendado por el fabricante. Solo retire del congelador la
cantidad de alimentos que necesita.
• Durante la descongelación o, el mantenimiento y el cuidado de la temperatura de los alimentos con-
gelados podrían aumentar y el tiempo de almacenamiento podría ser más corto
Cómo utilizar el compartimento del frigoríco?
• Los huevos tienen que ser puestos en los recipientes para el huevo, las botellas en los contenedores
para botellas, etc.
•
Las frutas y verduras tienen que ser puestas en el cajón de vegetales.
•
Los tarros tienen su lugar en las tinas de la puerta del frigoríco.
• Otros alimentos perecederos o que pueden soltar hedores en el frigoríco, deben ser embalados por
separado.
Colocación de los alimentos
• No acumule demasiada comida en el frigoríco, ya que generaría una pérdida de frío.
•
Los alimentos envueltos tienen que ser congelados en papel de aluminio o lámina de celofán o en
cajas de plástico herméticamente.
•
La comida caliente no se puede poner en el frigoríco ni en el congelador hasta que hayan alcanzado
la temperatura ambiente, o aumentarán el consumo eléctrico.
• Nunca coloque las verduras y frutas en el compartimiento del congelador porque no serán aptas para
el consumo, una vez descongeladas.
DESCONGELACIÓN
Cuando el frigoríco trabaja por un largo tiempo, la supercie interior del congelador estará cubierta con
una capa de escarcha. Puede aumentar el consumo de electricidad y disminuir el efecto de refrigeración.
Entonces usted debe descongelar el congelador una vez al mes.
Al descongelar, corte la energía, abra la puerta y mueva los alimentos congelados a un lugar fresco. Use
una espátula de plástico para eliminar la escarcha. Entonces retire la escarcha suelta y limpie el interior de
su congelador con un paño suave y seco.
Notas: Nunca utilice herramientas de metal para descongelar el congelador, ya que podría dañarlo.
INSTRUCCIONES GENERALES PARA EL CUIDADO Y
MANTENIMIENTO
El frigoríco debe limpiarse una vez al mes. Antes de la limpieza, el enchufe eléctrico debe ser retirado de
la fuente de alimentación.
Limpie el interior y el exterior del frigoríco con un paño suave y húmedo.
Si es demasiado sucio, límpielo con un paño suave con detergente neutro y, a continuación, elimine la
humedad con un paño seco.
Si el frigoríco permanece inactivo por mucho tiempo, haga lo siguiente:
•
Desconecte el frigoríco de la fuente de alimentación eléctrica.
-6-
Page 61
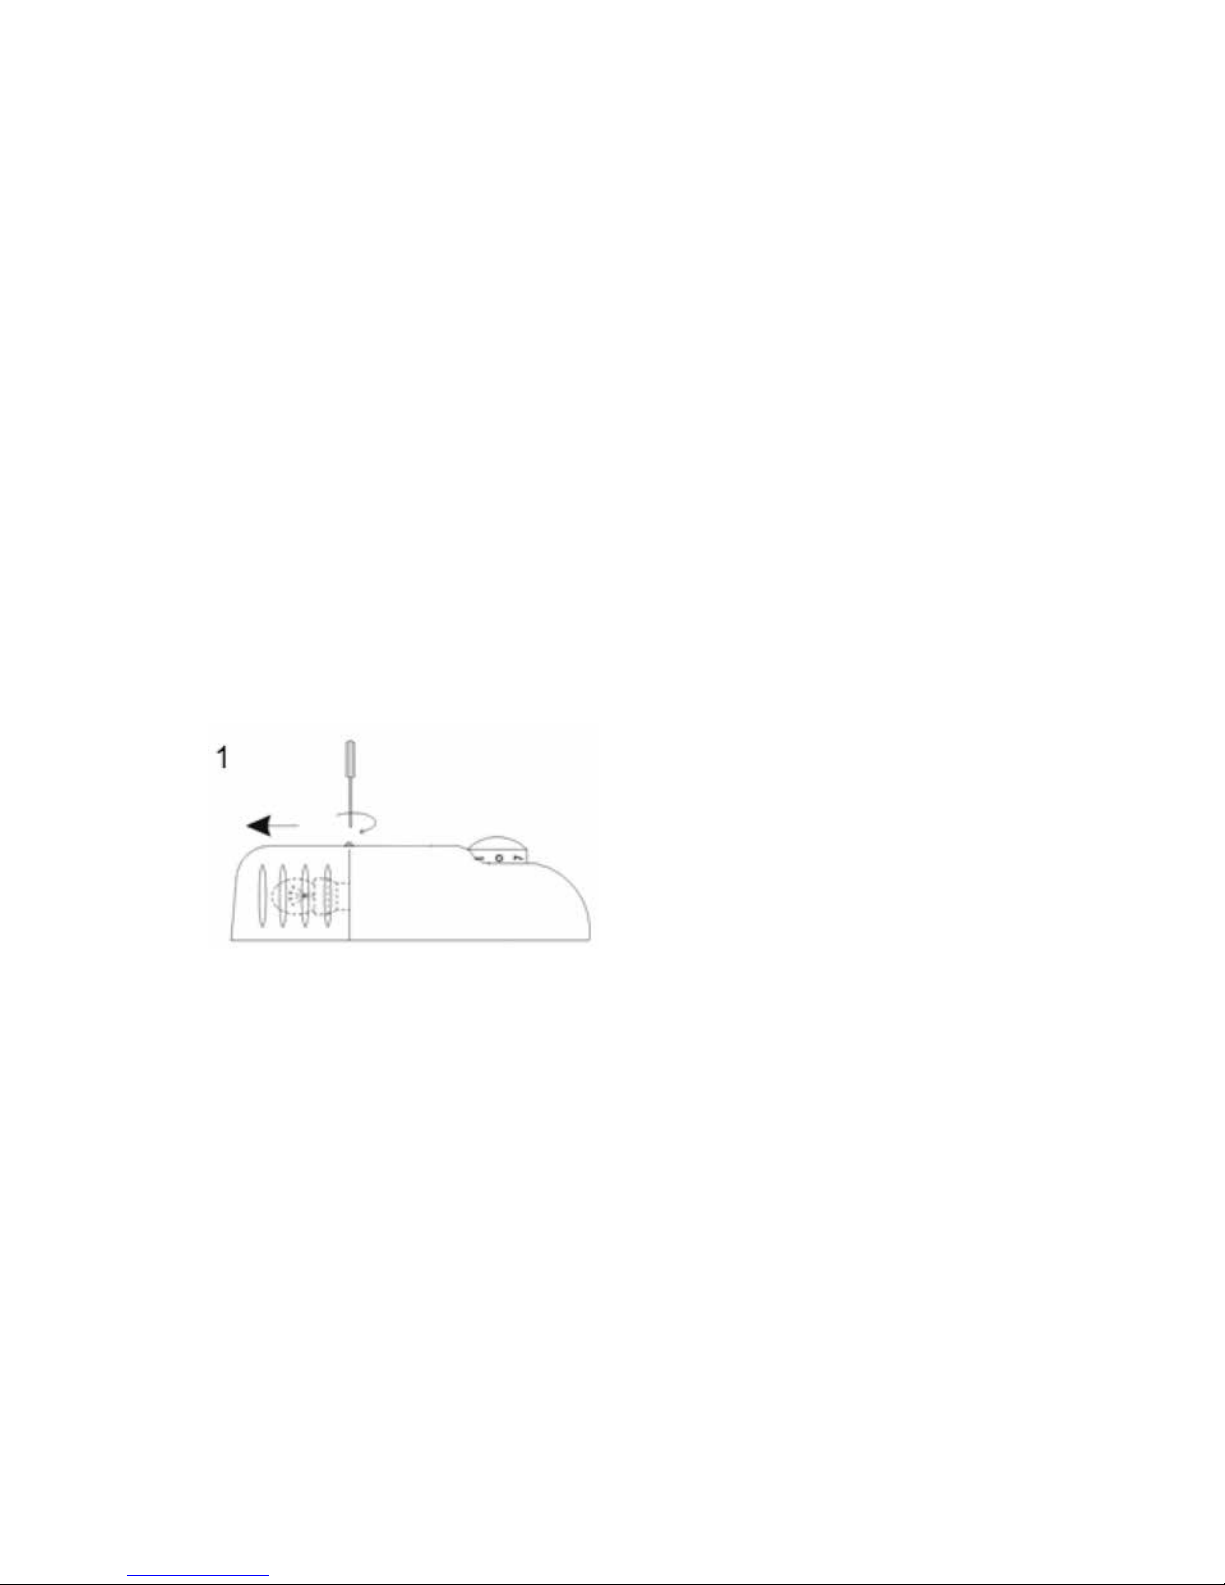
•
Retire todos los alimentos.
•
Limpie y seque el interior como se indicó en la dirección indicada anteriormente para la limpieza.
• Deje las puertas abiertas para evitar olores desagradables mientras que el frigoríco no se utiliza.
Limpieza
Antes de la limpieza, el enchufe eléctrico debe ser retirado de la fuente de alimentación.
Use agua o detergente no abrasivo en un paño suave y quite la humedad con un paño suave y seco. Recuerde que debe limpiar el desagüe de descongelación en la parte posterior justo por encima de la cubierta
de cristal.
Sustitución de la lámpara
Si la luz interna ya no funciona, desconecte y vuelva a conectarla a la vez que el dispositivo. Si la luz no
funciona todavía, verique si la bombilla está enroscada correctamente. Si a pesar de estas pruebas, no hay
luz, hay que cambiar la bombilla. Use una bombilla de 220- 240V~, 10W.
•
Desconecte el aparato;
• Abra la cubierta de la lámpara (1);
•
Desenrosque la bombilla defectuosa hacia la izquierda.
•
Enrosque la bombilla nueva hacia la derecha.
REVERTIR LA PUERTA
Este frigoríco ha sido construido con las bisagras de la puerta a la derecha. Si desea cambiar la dirección
de apertura, por favor siga las instrucciones abajo:
1. Retire los cuatro tornillos (1) (2) y quite la tapa superior.
2. Retire los dos tornillos (3) que sostienen la bisagra superior (4) y quite la bisagra superior (4).
3. Levante la puerta y póngala en una supercie acojinada para evitar que se raye.
4. Retire los tres tornillos (5) que sostienen la bisagra inferior (6) y asegúrese de remover la bisagra
inferior(6).
5. Retire la pata ajustable (8) y transérala al lado derecho.
6. Retire el perno (7) e invierta la dirección de la bisagra inferior (6). Instale la bisagra inferior. (6) en el lado
izquierdo con tres tornillos (7).
7. Inserte el perro (7) en la bisagra inferior (5).
-7-
Page 62
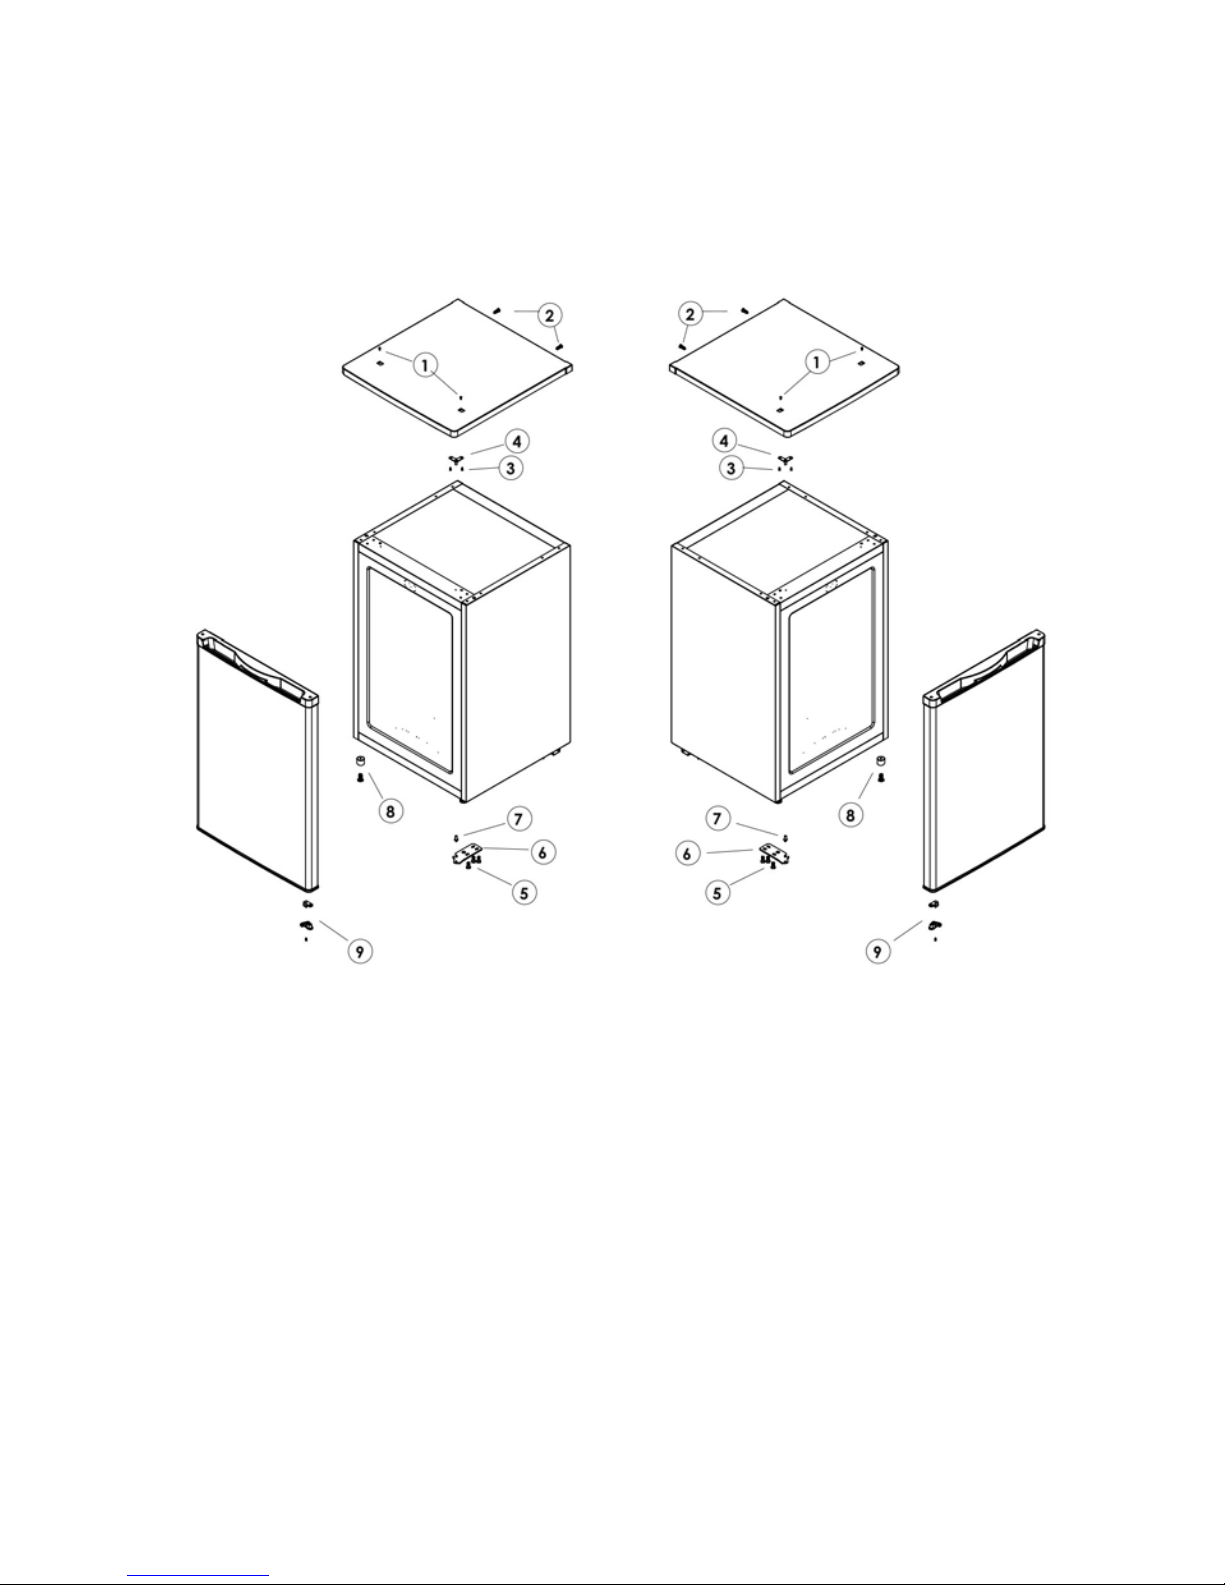
-8-
gura 1 gura 2
Figura 1: Representa la posición de los componentes antes de revertir la puerta
Figura 2: Representa la posición de los componentes después de revertir la puerta
Si desea cambiar también la dirección de apertura del congelador, por favor siga las instrucciones
abajo:
1. Retire el tornillo (1) y quite el botón de bloqueo (2).
2. Retire los dos tornillos (3) que sostienen el eje de la cubierta (4) y quítela (4).
3. Retire la puerta y póngala en una supercie acojinada para evitar que se raye.
4. Retire la cubierta del eje (5) y transérala a la dirección opuesta.
5. Voltee la puerta 180° y póngala en la parte superior de la cubierta del eje.
6. Fije la cubierta inferior del eje (4) con los dos tornillos (4).
7. Fije el botón de bloqueo (2) con su tornillo (1)
8. Remueva el perno de la bisagra (9) que está en la parte inferior de la puerta. En el otro lado de la puerta,
inserte el perno de repuesto de la bisagra provisto con el aparato.
9. Ponga la puerta en su lugar y asegúrese de que asiente en la bisagra inferior (6).
10. Asegure la bisagra superior (4) con los dos tornillos (3) y la tapa superior con cuatro tornillos (1) (2).
Page 63
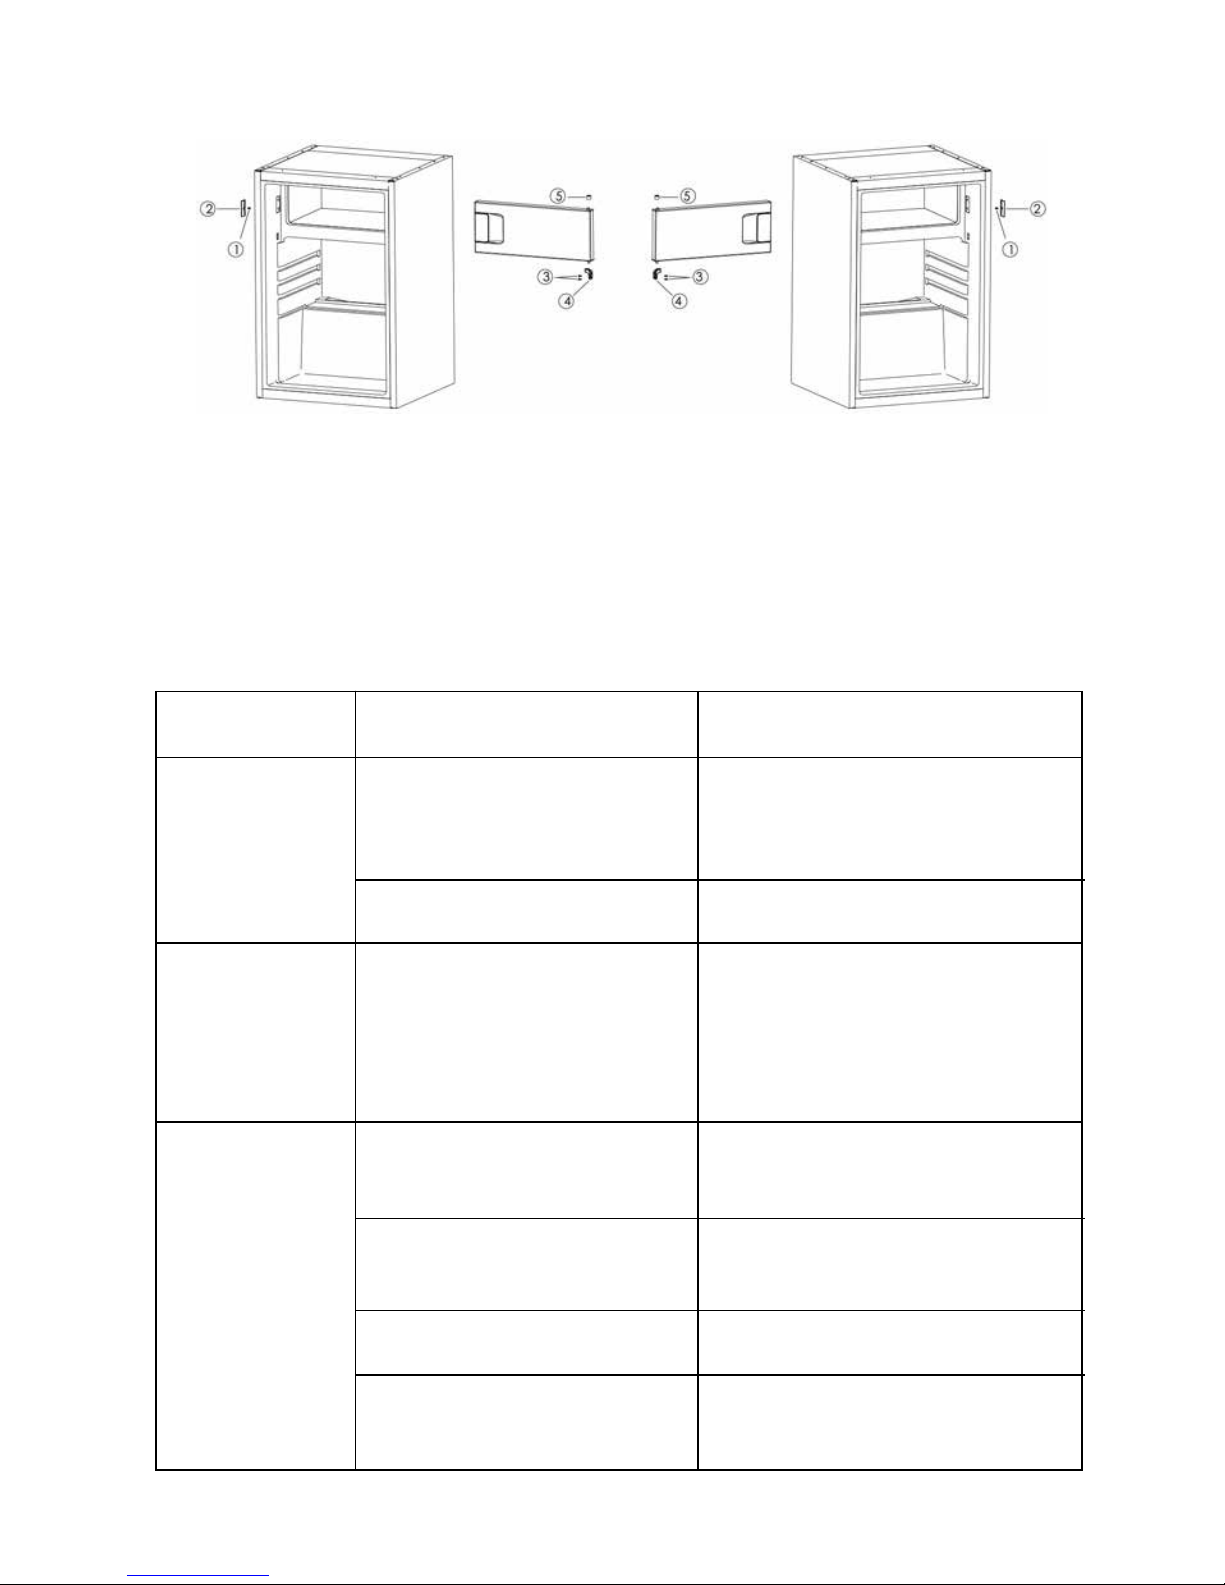
Síntoma Causa Solución
El aparato no
funciona
No hay fuente de alimentación Revise el enchufe conectando otros elec-
trodomésticos, o verique que el aparato
está conectado a la clavija
El fusible no funciona Reemplace el fusible
El aparato hace
mucho ruido
El aparato no en-
fría lo suciente
El frigoríco está demasiado
cerca de la pared
El frigoríco está demasiado lleno Retire el alimento del disposi-
tivo
La temperatura está mal
ajustada
Figura 1: Representa la posición de los componentes antes de revertir la puerta
Figura 2: Representa la posición de los componentes después de revertir la puerta
SOLUCIÓN DE PROBLEMAS
Si su dispositivo muestra otros síntomas que los descritos anteriormente, por favor llame al servicio post
venta del distribuidor.
-9-
Separar el dispositivo de la pared
favorece la ventilación
El aparato está demasiado cerca
de la pared, o no es estable, o los
accesorios en el interior del
frigoríco están colocados en
posición incorrecta
Estabilice la base del frigoríco
ajustando la posición de las patas,
separe el aparato de la pared, coloque
correctamente los accesorios dentro del
frigoríco
La puerta se abre demasiado a
menudo o se dejó abierta por un
largo tiempo
Cierre la puerta y no la abra con demasiada frecuencia
Gire la perilla de la regulación de la
temperatura a “3” o más
gura 1 gura 2
Page 64
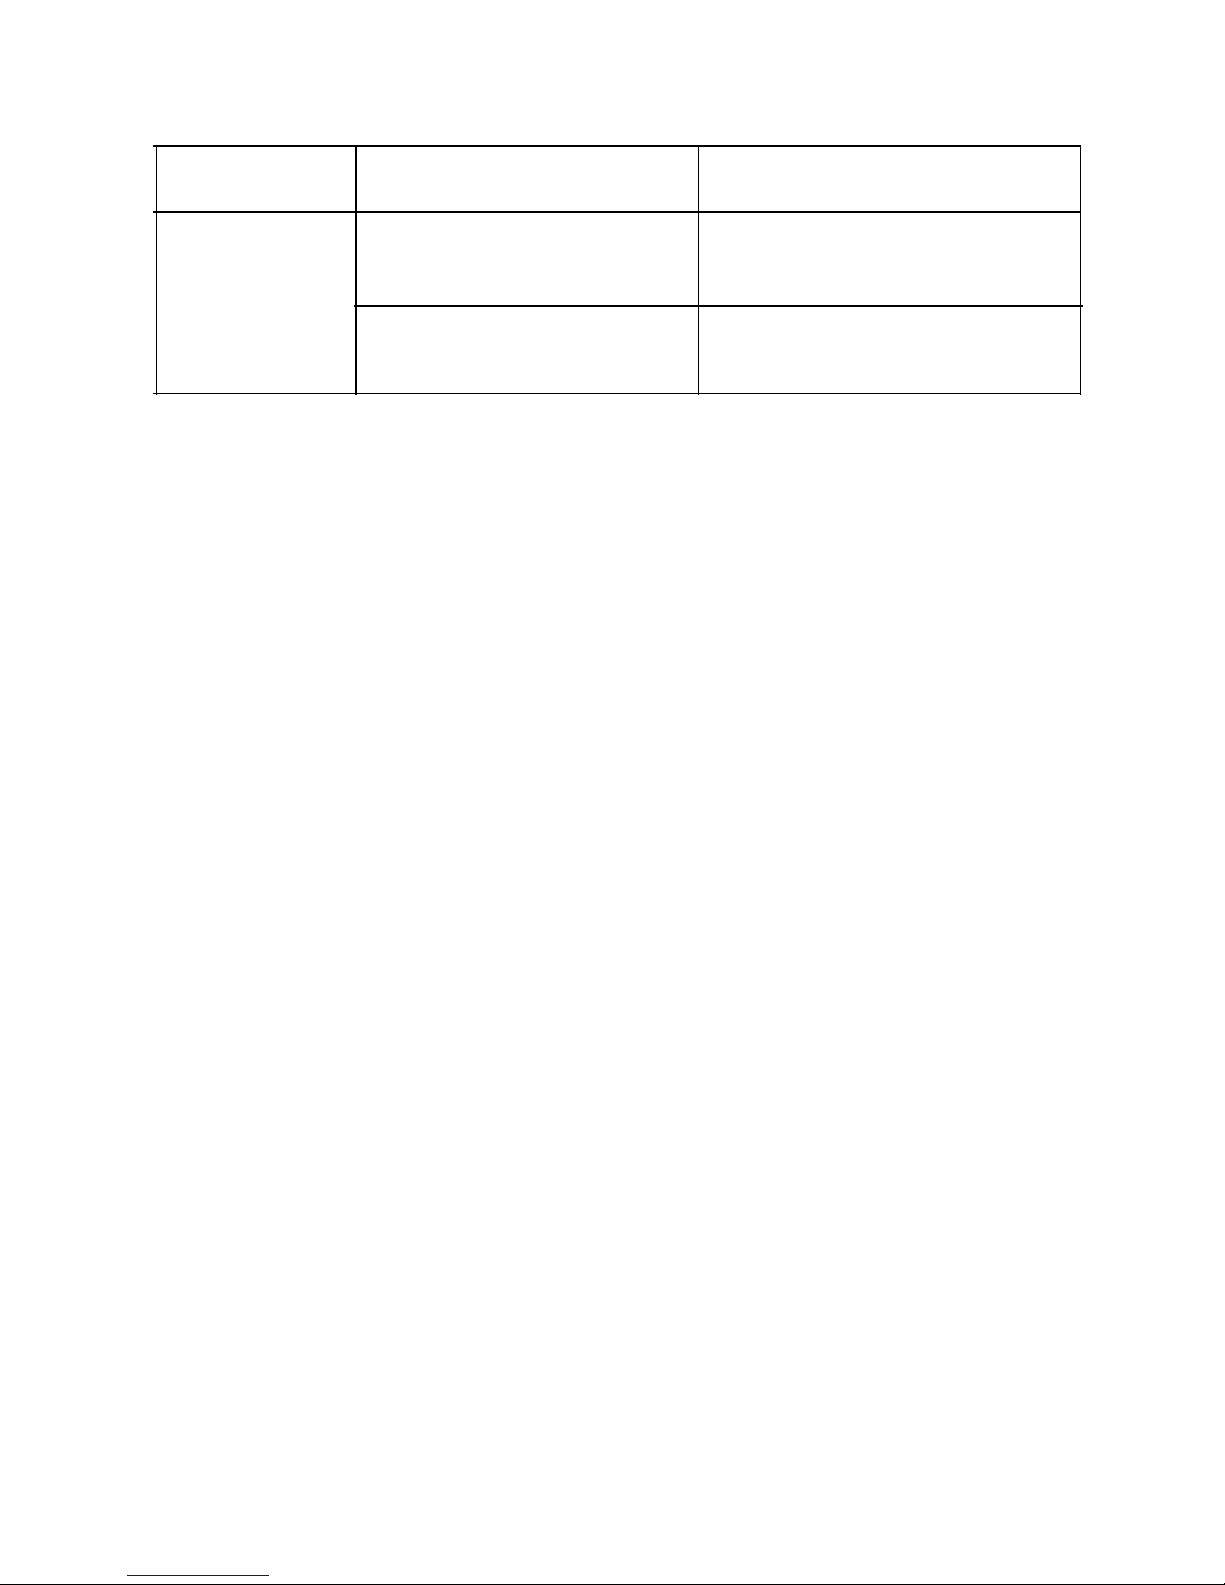
Hay olores en el
aparato
El interior de este dispositivo
necesita ser limpiado
Limpie el interior del frigoríco
Los siguientes síntomas no son averías:
• El ruido del líquido refrigerante que circula por las tuberías puede ser oído, es normal.
•
La humedad en la supercie exterior del dispositivo durante las estaciones húmedas no es un prob-
lema del dispositivo, sólo lo tiene que limpiar con un paño suave y seco.
•
El compresor y el condensador pueden calentarse más durante los períodos de más calor.
•
El marco de la puerta está un poco caliente, signica que el condensador funciona para evacuar la
humedad del aire.
En caso de un corte de energía, el aparato debería mantener los alimentos refrigerados de forma segura
durante aproximadamente 16 horas. Siga estos consejos durante una interrupción prolongada del suminis-
tro de energía eléctrica, especialmente en verano.
•
Abra la puerta o los cajones lo menos posible.
•
No coloque otros alimentos en el frigoríco durante el corte eléctrico.
•
Si se trata de un corte programado con aviso y el suministro de energía eléctrica estará interrumpido
por más de 16 horas, prepare hielo y colóquelo en un contenedor en la parte superior del compar-
timiento del frigoríco.
•
Debe comprobar el estado de los alimentos de inmediato luego del corte de energía.
•
Como se producirá un aumento de la temperatura dentro del frigoríco durante un corte de energía u
otra falla, esto reducirá el periodo de almacenamiento y la calidad de los alimentos para el consumo.
Puede consumir, cocinar o volver a congelar (en los casos en que sea adecuado) cualquier alimento
que se descongele a la brevedad luego del corte para evitar riesgos de salud.
-10-
Síntoma Causa Solución
Alimentos obsoletos dentro del
frigoríco
Tire a la basura alimentos obsoletos y
envuelva los otros
Page 65
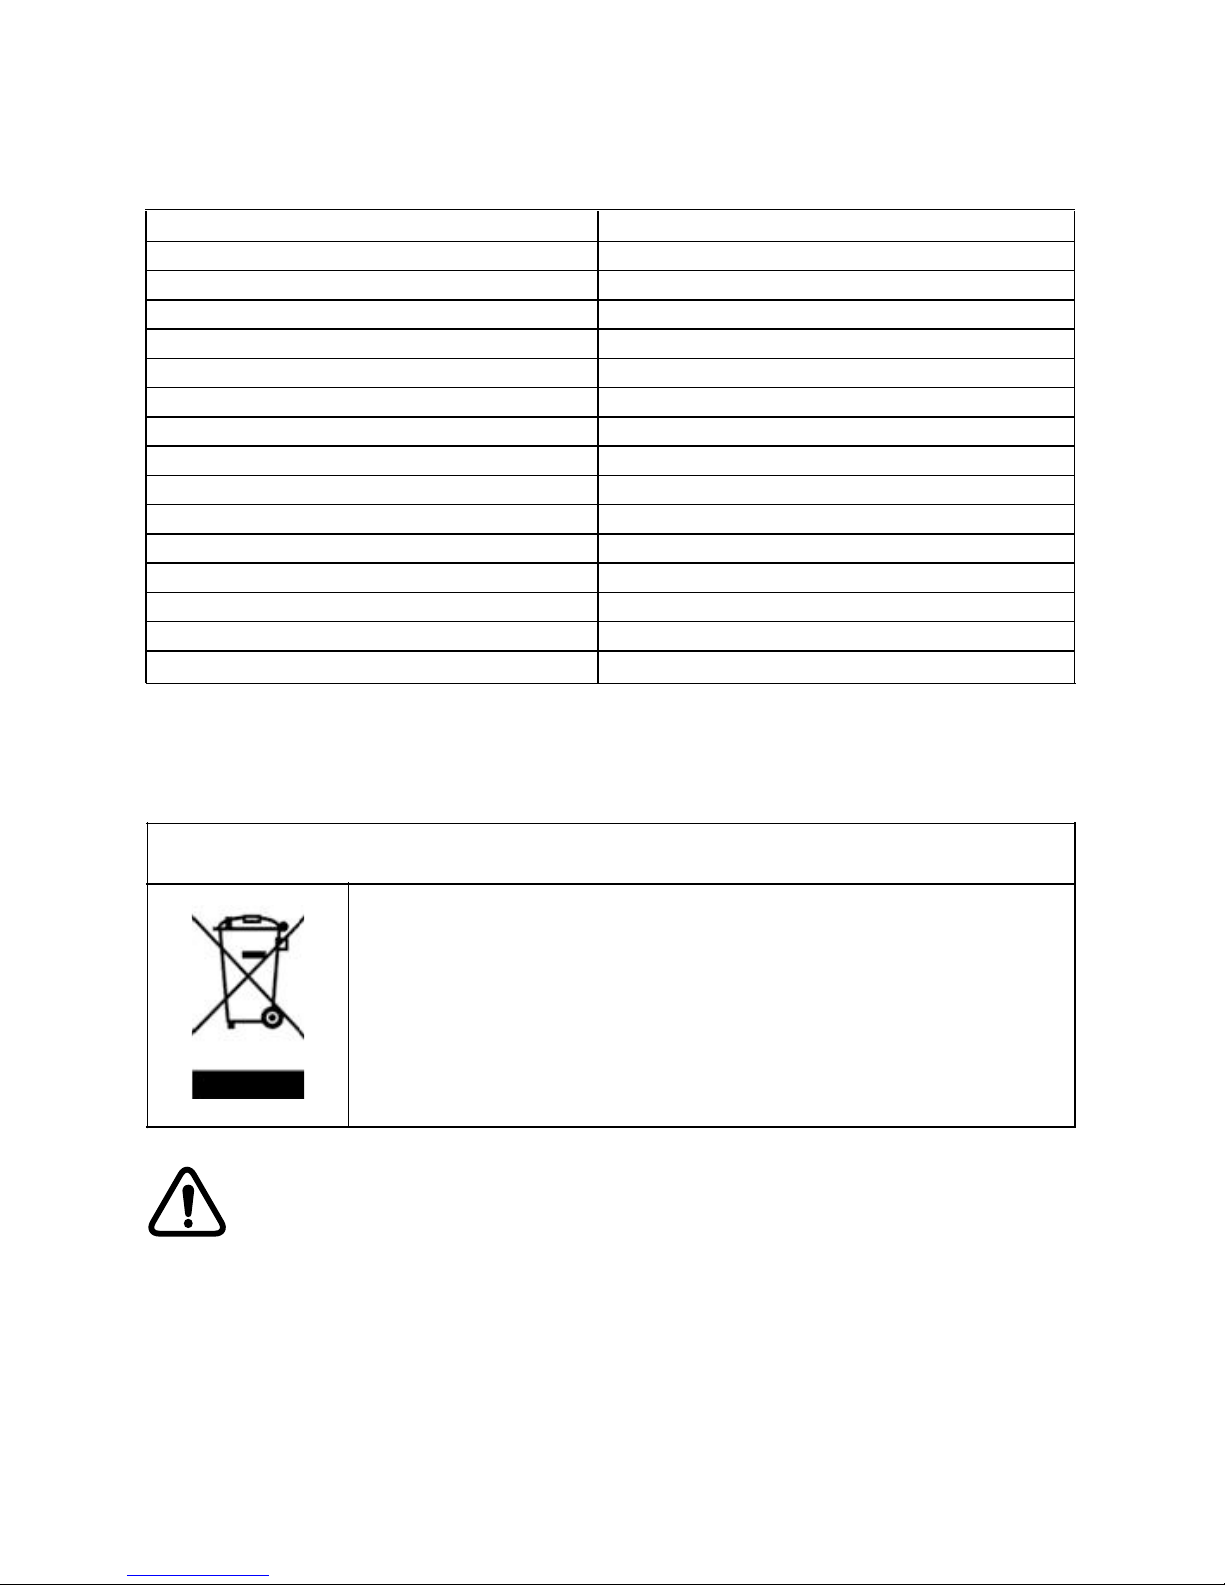
Referencia:
Voltaje nominal:
Potencia nominal:
Frecuencia nominal:
Corriente nominal:
Refrigerante:
Potencia de la lámpara:
Volumen total neto:
Volumen de almacenamiento en el frigoríco:
Volumen de almacenamiento en el congelador:
Tipo de clima:
Capacidad de congelación:
Consumo de energía:
Protección contra descargas eléctricas:
Espuma:
Clase de energía:
DESECHO
Ayude a proteger el medio ambiente y la salud de las personas. Coloque el
embalaje en los contenedores adecuados para reciclarlo. Ayude a reciclar los
desechos de aparatos eléctricos y electrónicos. No deseche aparatos que contengan este símbolo junto con los residuos domésticos. Lleve el producto a las
instalaciones de reciclaje local o comuníquese con su ocina municipal.
Riesgo de lesiones o asxia!
Se deben desechar los refrigerantes y gases de manera profesional. Verique que las tuberías del circuito
de refrigeración no estén dañadas antes de desecharlas de forma adecuada. Desconecte el aparato de la
fuente de energía eléctrica. Corte el cable de alimentación y deséchelo. Extraiga las bandejas y cajones, y
los cierres y sellos de las puertas, para evitar que los niños y mascotas queden encerrados en el aparato.
INFORMACIÓN TÉCNICA
Declinamos toda responsabilidad en caso de accidentes derivados del uso de este producto que no
está en conformidad con las instrucciones contenidas en este folleto.
ADVERTENCIA!
-11-
220-240V~
65W
50Hz
0,6A
R600a(34g)
10W
114L
97L
17L
ST
2kg/24h
168kWh/año
I
CICLOPENTANO
A+
HRK-176AA;HRK-176AAB;HRK-176AAS
Page 66
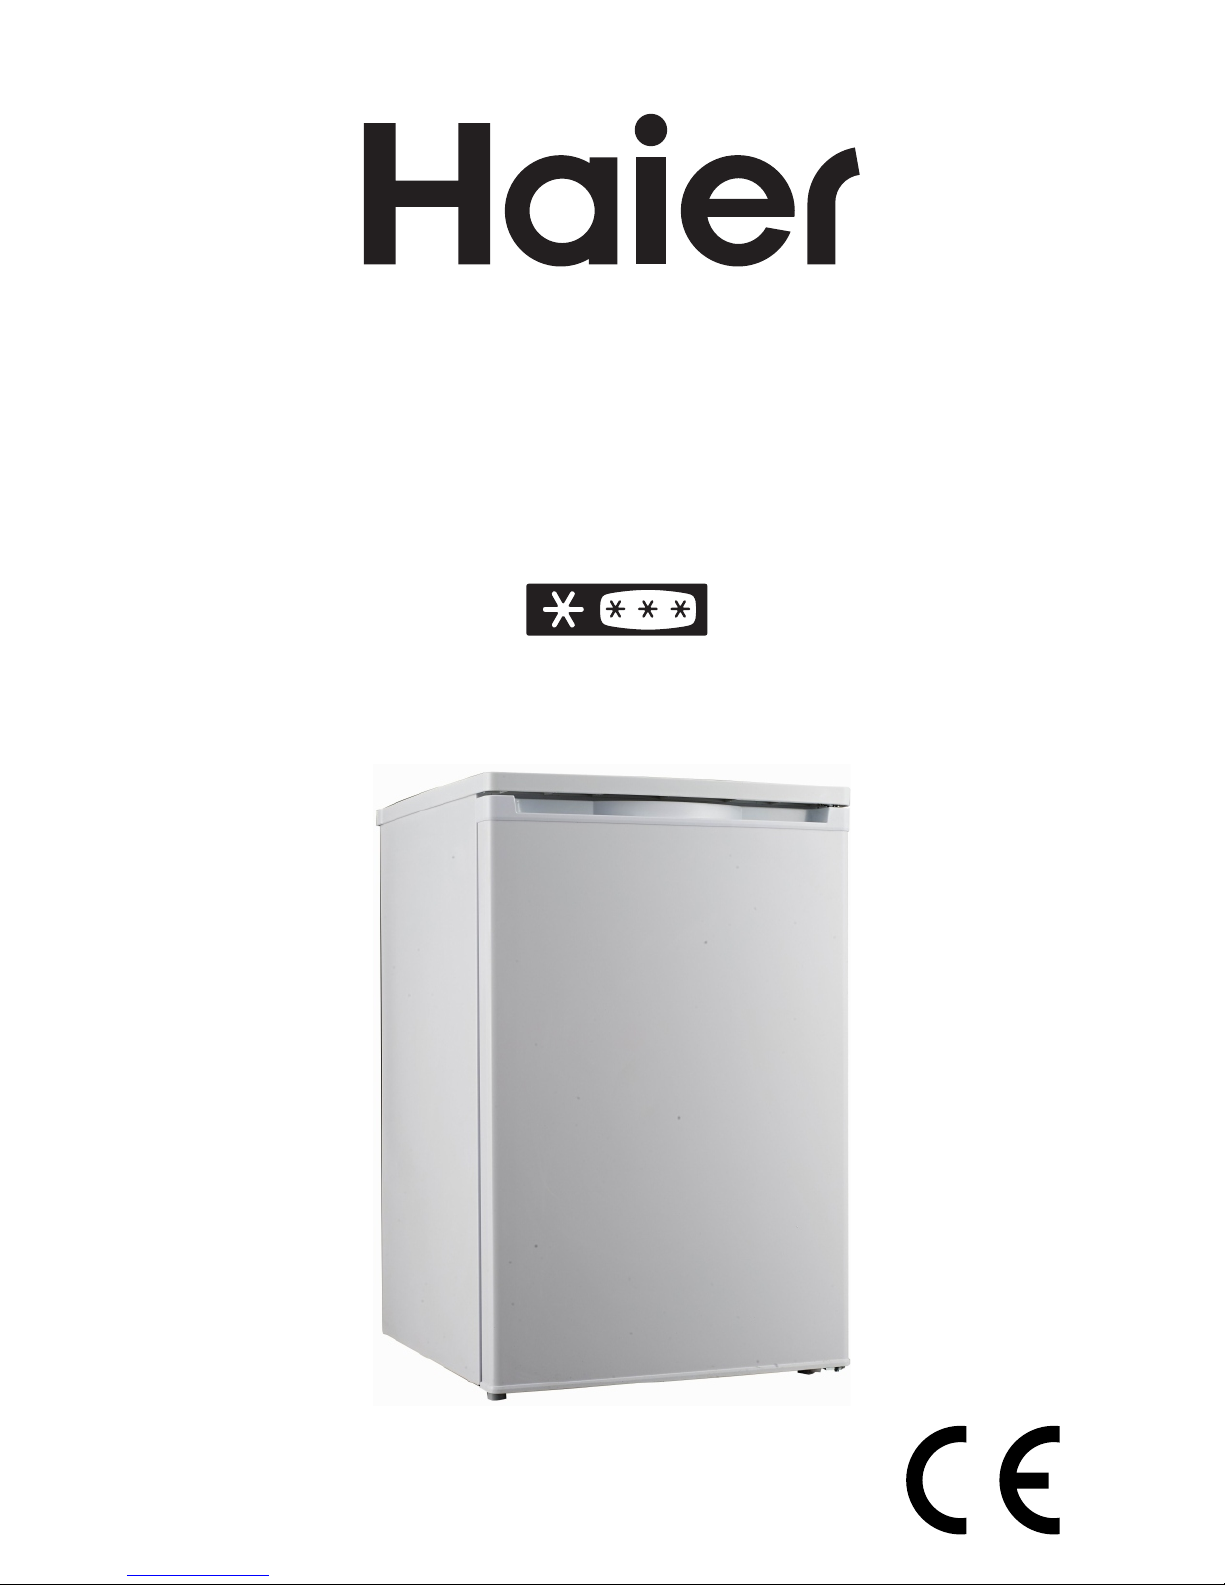
INSTRUKCJA UZYTKOWNIKA
·
Lodówko-zamrazarka
·
HRK-176AA
HRK-176AAB
HRK-176AAS
Page 67

SPIS TREŚCI
Ważne informacje dotyczące bezpieczeństwa - 1 -
Rysunki - 4 -
Transport i przenoszenie produktu - 4 -
Instalacja - 4 -
Test - 5 -
Regulator temperatury - 5 -
Przechowywanie żywności - 5 -
Rozmrażanie - 6 -
Ogólne instrukcje dotyczące czyszczenia i konserwacji - 6 -
Zmiana otwierania drzwi - 7 -
Rozwiązywanie problemów - 9 -
Specykacja techniczna - 11 -
Page 68
Urządzenie jest przeznaczone wyłącznie do użytku domowego!
Prosimy uważnie przeczytać niniejszą instrukcję przed pierwszym użyciem tego urządzenia
i przechowywać ją do wykorzystania w przyszłości.
WAŻNE INFORMACJE DOTYCZĄCE BEZPIECZEŃSTWA
1. Urządzenie to może być używane przez dzieci w wieku od lat 8
lub starsze, osoby z obniżoną sprawnością zyczną, zmysłową
lub umysłową, osoby z brakiem doświadczenia i wiedzy, jeśli są
one nadzorowane lub gdy je poinstruowano jak korzystać z tego
urządzenia w bezpieczny sposób, i gdy zdają sobie sprawę z
istniejących niebezpieczeństw. Dzieci nie powinny bawić się tym
urządzeniem. Czyszczenie i konserwacja nie mogą być wykonywane przez dzieci bez nadzoru.
2. Urządzenie to jest przeznaczone do użytku domowego lub w
podobnych miejscach, np:
- W kuchniach dla personelu w sklepach, biurach i innych miejscach pracy;
- W gospodarstwach rolnych, przez klientów hoteli, moteli i innych miejsc typu mieszkalnego;
- W pensjonatach oferujących nocleg ze śniadaniem
- W cateringu i podobnych zastosowaniach niehandlowych.
3. Ostrzeżenie: Nie używaj urządzeń mechanicznych, ani innych
środków do przyspieszenia procesu rozmrażania, poza tymi,
które zaleca producent.
4. Ostrzeżenie: Z wyjątkiem produktów zalecanych przez producenta, NIE WOLNO używać żadnych urządzeń elektrycznych
wewnątrz tego urządzenia.
-1-
Page 69

5. Ostrzeżenie: Nigdy nie używaj tego urządzenia do innych
zastosowań lub w sposób, który nie jest opisany w niniejszej instrukcji obsługi, gdyż związane jest to z poważnymi zagrożeniami.
6. Ostrzeżenie: Jeżeli uszkodzony jest kabel zasilający lub jeśli
urządzenie nie działa prawidłowo lub jeśli zostało ono uszkodzone w dowolny sposób, należy zwrócić się do producenta, jego
autoryzowanego przedstawiciela serwisowego lub odpowiednio
wykwalikowanej osoby, aby wykonać sprawdzenie urządzenia,
jego naprawę lub regulację w celu uniknięcia niebezpieczeństwa.
7. OSTRZEŻENIE: Nie blokuj otworów wentylacyjnych w obudowie
urządzenia ani tych w zabudowie.
8. OSTRZEŻENIE: Nie uszkodź obiegu chłodzącego.
9. OSTRZEŻENIE: Nie używaj urządzeń elektrycznych w komorze
do przechowywania żywności, chyba, że są rekomendowane
przez producenta.
10. Nie wolno korzystać z urządzenia w środowisku o dużym zapyleniu lub w środowisku wybuchowym i łatwopalnym (gazów palnych, oparów, oparów z rozpuszczalników organicznych itp.)
11. Nie przechowuj w tym urządzeniu materiałów wybuchowych, takich jak puszki z aerozolem, który zawiera łatwopalny propelent.
12. Nie wolno wlewać wody bezpośrednio na zamrażarkę, gdyż
może to spowodować uszkodzenie izolacji oraz korozję.
13. Włóż wtyczkę do pojedynczego uziemionego gniazdka elektrycznego. Podczas podłączania zasilania urządzenia, upewnij się, że
wtyczka weszła całkowicie do gniazdka elektrycznego.
-2-
Page 70
14. Aby zapobiec możliwej szkodliwości dla środowiska lub zdrowia
ludzi związanego z niekontrolowaną utylizacją odpadów, poddaj to urządzenie odpowiedzialnemu recyklingowi, promując
zrównoważone ponowne wykorzystanie materiałów. Utylizacja
urządzenia może być przeprowadzona wyłącznie przez publiczne punkty zbierania.
15. Urządzenie należy umieścić na poziomym podłożu i zapewnić
swobodną wentylację. Nie należy próbować samodzielnie
wymienić lub naprawić żadnych komponentów, należy to w razie
potrzeby powierzyć odpowiedniemu serwisowi.
16. Należy zawsze obsługiwać urządzenie tak, aby uniknąć
uszkodzeń.
17. Uwaga: Nie wolno podłączać przewodu uziemiającego do rur
wodnych lub gazowych.
18. Absolutnie nie wolno przechowywać mocnych kwasów, rozpuszczalników organicznych i substancji żrących razem z żywnością.
19. W przypadku wystąpienia jakichkolwiek problemów z
urządzeniem, należy zapoznać się z rozdziałem „Rozwiązywanie
problemów”. Nie próbuj rozwiązać problemów na własną rękę,
skontaktuj się z autoryzowanym serwisem.
20. W sprawach dotyczących instalacji, działania, konserwacji i utylizacji urządzenia, należy zapoznać się z odpowiednimi sekcjami
niniejszej instrukcji.
Urządzenie zostało przetestowane zgodnie z
wszystkimi aktualnymi wymogami CE, takimi jak
kompatybilność elektromagnetyczna oraz dyrektywami dotyczącymi niskiego napięcia i zostało wyprodukowane zgodnie z najnowszymi przepisami
dotyczącymi bezpieczeństwa.
-3-
Page 71
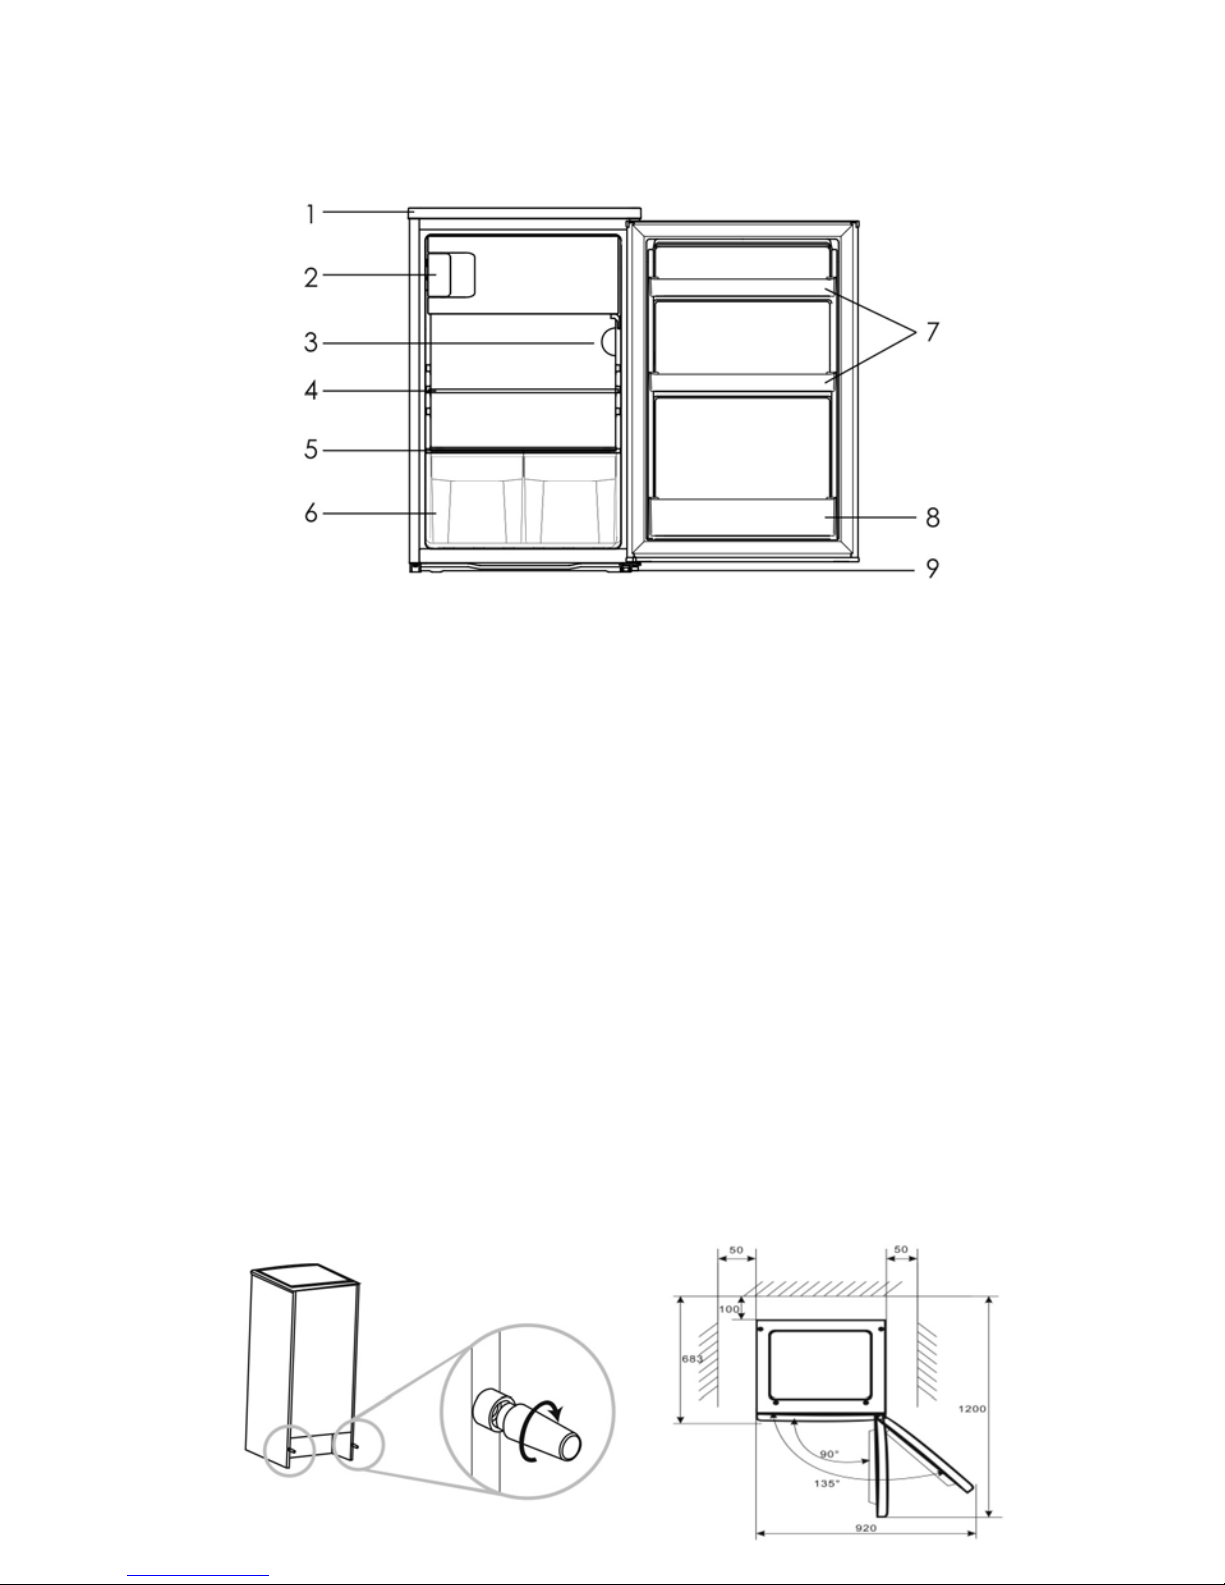
RYSUNKI
TRANSPORT I PRZENOSZENIE PRODUKTU
Podczas transportu, przytrzymaj podstawę i ostrożnie podnieś lodówkę, pamiętając by kąt pochylenia nie
był większy jak 45 stopni. Nigdy nie podnoś urządzenia trzymając za uchwyt. Nigdy nie stawiaj urządzenia
do góry nogami ani poziomo. Przesuń na miejsce lodówkę trzymając za jej podstawę, ułatwią to stopki
obrotowe.
INSTALACJA
Urządzenie powinno być umieszczone na płaskiej i stabilnej powierzchni. Nie wolno go umieszczać na
żadnym miękkim podłożu.
Wybierz dobrze wentylowane miejsce. Należy zachować wolną przestrzeń przy urządzeniu — minimum 5
cm po bokach i 10 cm z tyłu lodówki. Elementy dystansowe szafki dostarczane wraz z urządzeniem muszą
być zainstalowane w celu ochrony i zachowania właściwej odległości od ściany.
Wybierz miejsce, gdzie nie ma żadnego źródła ciepła. Lodówkę należy umieścić z dala od bezpośredniego
światła słonecznego lub innego urządzenia wytwarzającego ciepło.
Wybierz suche i dobrze wentylowane miejsce, w którym nie ma powietrza o właściwościach żrących.
-4-
1. Pokrywa górna
2. Część zamrażarki
3. Termostat
4. Szklana półka
5. Pokrywa pojemnika na owoce i warzywa
6. Pojemnik na świeże owoce i warzywa
7. Półka na drzwiach
8. Półka na butelki
9. Regulowane nóżki
Page 72

TEST
Oczyścić części lodówki w letniej wodzie na miękkiej szmatce lub neutralnym detergentem i czystą wodą, a
następnie wytrzeć do sucha.
Uwaga: Części elektryczne chłodziarki można czyścić tylko przez wytarcie ich suchą szmatką.
Obrócić pokrętło termostatu na pozycję „3” miejsce i włączyć zasilanie. Uruchomi się sprężarka, a wewnątrz
lodówki zapali się światło.
Zamknąć drzwi i odczekać 30 minut. Jeśli temperatura w komorze zamrażarki wyraźnie spadła, oznacza to,
że lodówka działa dobrze. Gdy lodówka pracuje przez pewien okres czasu, sterownik temperatury będzie
automatycznie regulować temperaturę pod warunkiem, że drzwi nie są zbyt często otwierane.
Jeżeli powyższe czynności zakończyły się powodzeniem, test jest zakończony. Lodówka działa normalnie.
REGULATOR TEMPERATURY
Temperatura w komorze chłodziarki i zamrażarki jest sterowana przez regulator temperatury zamontowany
po prawej stronie komory chłodziarki.
Obrócić pokrętło termostatu, aby wyregulować temperaturę wewnątrz lodówki.
Oznaczenia na pokrętle nie oznaczają konkretnej temperatury w stopniach, ale przedstawiają zakres tem-
peratur w skali od „0” do „7”. Pierwszy zakres oznacza wymuszone zatrzymanie agregatu chłodniczego, z
zakres nr 7 oznacza najniższą temperaturę, jaka jest możliwa do uzyskania w lodówce. Obrócić pokrętło z
pozycji „1” na pozycję „7”, a temperatura będzie spadać w sposób ciągły.
Dla normalnego użytkowania należy ustawić termostat w pozycji „3-4”.
Należy pamiętać, że urządzenie jest przeznaczone do pracy przy temperaturze otoczenia pomiędzy 16
i 38°C. Urządzenie może nie działać prawidłowo, jeśli jest używane przez dłuższy czas w temperaturze
niższej lub wyższej od podanego zakresu.
Następujące czynniki mają wpływ na temperatury w urządzeniu:
•
Temperatura otoczenia
• Częstotliwość otwierania drzwi
•
Ilość przechowywanych produktów spożywczych
•
Instalacja urządzenia
PRZECHOWYWANIE ŻYWNOŚCI
Jak korzystać z komory zamrażarki?
• Włóż świeżą żywność do zamrażalnika, taką jak ryby lub mięso, aby zachować ich smak i wartości
odżywcze.
• Opakowana żywność musi być zamrażana w folii aluminiowej, w celofanie lub w hermetycznych,
plastikowych pojemnikach.
•
Unikaj bezpośredniego kontaktu świeżej żywności z żywnością już zamrożoną.
•
W przypadku zakupu mrożonek, należy je przywieźć do domu i umieścić w zamrażalniku tak
szybko jak to możliwe.
-5-
Page 73

•
Nie wolno ponownie zamrażać rozmrożonego produktu.
•
Nie należy umieszczać w zamrażalniku płynów w butelkach lub puszkach (oprócz wysokoprocentowych alkoholi), a zwłaszcza napoi gazowanych, gdyż mogą one wybuchnąć podczas zamrażania.
•
Czas przechowywania żywności (szczególnie dla żywności mrożonej), zalecany przez producentów
żywności, nie powinien być przekroczony. Wyciągaj tylko potrzebną ilość żywności z zamrażalnika.
•
Podczas rozmrażania lub konserwacji i pielęgnacji urządzenia, temperatura zamrożonej żywności
może wzrosnąć i czas jej przechowywania może zostać skrócony
Jak korzystać z komory chłodziarki?
•
Jajka należy przechowywać w pojemniku na jajka, butelki w miejscu na butelki itp.
• Owoce i warzywa należy przechowywać w pojemniku na nie.
•
Słoiki należy umieszczać w przegródkach na drzwiach chłodziarki.
•
Szybko psująca się żywność, lub taka, która wydziela nieprzyjemne zapachy w chłodziarce, musi być
oddzielnie opakowana.
Umieszczanie żywności
•
Nie należy umieszczać w chłodziarce zbyt dużo żywności, gdyż pogorszy to sprawność chłodzenia.
•
Żywność musi być oddzielnie opakowana w folii aluminiowej, w celofanie lub w hermetycznych, plastikowych pojemnikach.
•
Nie wolno umieszczać gorącego jedzenia ani w chłodziarce ani w zamrażalniku; należy odczekać, aż
osiągnie ono temperaturę otoczenia, w przeciwnym wypadku wzrośnie zużycie energii elektrycznej.
•
Nie należy wkładać warzyw i owoców do zamrażalnika, ponieważ będą one niezdatne do spożycia
po rozmrożeniu.
ROZMRAŻANIE
Gdy lodówka pracuje przez długi czas, wewnętrzna powierzchnia zamrażarki będzie pokryta warstwą szronu. Może on podnieść zużycie energii i zmniejszyć efekt chłodzenia. W takim przypadku należy rozmrozić
zamrażarkę raz w miesiącu.
Podczas rozmrażania, zależy odłączyć zasilanie, otworzyć drzwi i przenieść zamrożoną żywność w chłodne
miejsce. Zeskrobać szron za pomocą plastikowej szpachelki. Następnie usunąć cały szron i powycierać
wnętrze zamrażarki czystą i suchą szmatką.
Uwaga: Nie wolno używać metalowych narzędzi do rozmrażania, ponieważ mogłoby to spowodować uszkodzenie zamrażarki.
OGÓLNE INSTRUKCJE DOTYCZĄCE CZYSZCZENIA I KONSERWACJI
Lodówka powinna być czyszczona raz w miesiącu. Przed rozpoczęciem czyszczenia, należy wyjąć wtyczkę
zasilającą z gniazdka.
Powycierać lodówkę od wewnątrz i od zewnątrz mokrą, miękką szmatką.
Jeśli urządzanie jest bardzo brudne, należy nałożyć na szmatkę neutralny detergent, a następnie usunąć
wilgoć suchą szmatką.
Jeśli lodówka nie ma być używana przez długi czas, należy postępować w następujący sposób:
•
Odłączyć lodówkę od zasilania elektrycznego.
-6-
Page 74
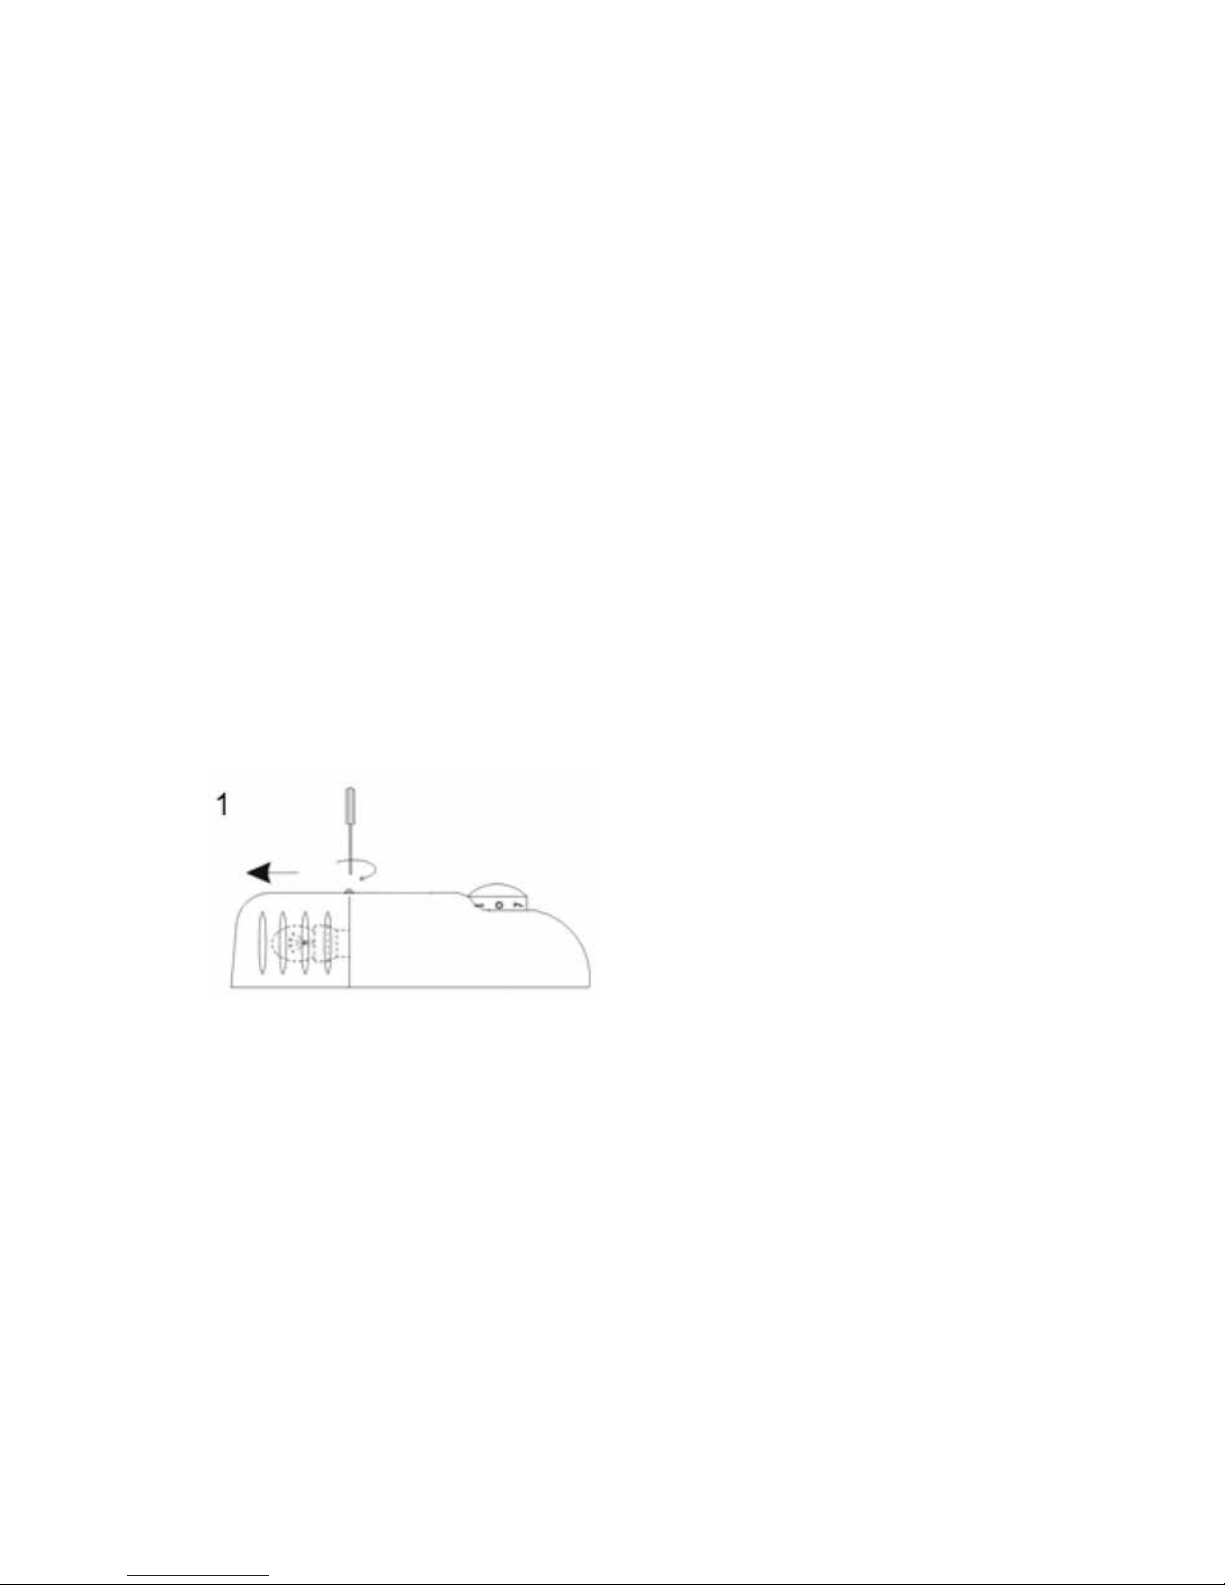
•
Usunąć wszystkie produkty żywnościowe.
•
Umyć i wysuszyć wnętrze, zgodnie z przedstawioną powyżej instrukcją czyszczenia.
• Zostawić otwarte drzwi, aby zapobiec powstawaniu przykrego zapachu kiedy lodówka nie jest
używana.
Czyszczenie
Przed rozpoczęciem czyszczenia lodówki należy wyjąć wtyczkę zasilającą z gniazdka.
Do czyszczenia używać wody lub detergentów nie zawierających środków ściernych rozprowadzanych
miękką szmatką, po zakończeniu usunąć wilgoć za pomocą suchej, miękkiej szmatki. Pamiętaj, aby odpływ
rozmrażania był zawsze czysty, znajduje się on tuż nad szklaną pokrywą.
Wymiana żarówki
Jeżeli wewnętrzne światło nie działa, należy odłączyć, a następnie pomownie podłączyć urządzenie do
zasilania. Jeżeli światło nadal nie działa, sprawdź, czy żarówka jest prawidłowo przykręcona. Jeżeli pomimo powyższych działań, nadal nie ma światła, należy wymienić żarówkę. Należy zastosować żarówkę
220–240V~, o mocy 10 W.
•
Wyłączyć zasilanie urządzenia
•
Otworzyć pokrywę światła (1);
•
Wykręcić uszkodzoną żarówkę w lewo.
• Wkręcić nową żarówkę w prawo.
ZMIANA OTWIERANIA DRZWI
Ta lodówka została złożona z zawiasami po prawej stronie. Jeśli chcesz zmienić kierunek otwierania drzwi,
należy postępować zgodnie z instrukcją poniżej:
1. Wyjmij cztery śruby (1) (2) i zdejmij gorę.
2. Odkręć dwie śruby (3) mocujące górny zawias (4) i wyjmij go (4).
3. Podnieś drzwi i umieścić ją na miękkiej powierzchni, aby uniknąć porysowania.
4. Odkręć trzy śruby (5) mocujące dolny zawias (6) i wyjmij go (6).
5. Wyjmij regulowaną stopkę (8) i przenieść ją na prawą stronę.
6. Wyjmij śrubę-trzpień (7) i odwrócić kierunek dolnego zawiasu (6). Zamontuj dolny zawias (6) po lewej
stronie za pomocą trzech śrub (7).
7. Włóż śrubę-trzpień (7) w dolny zawias (5).
-7-
Page 75
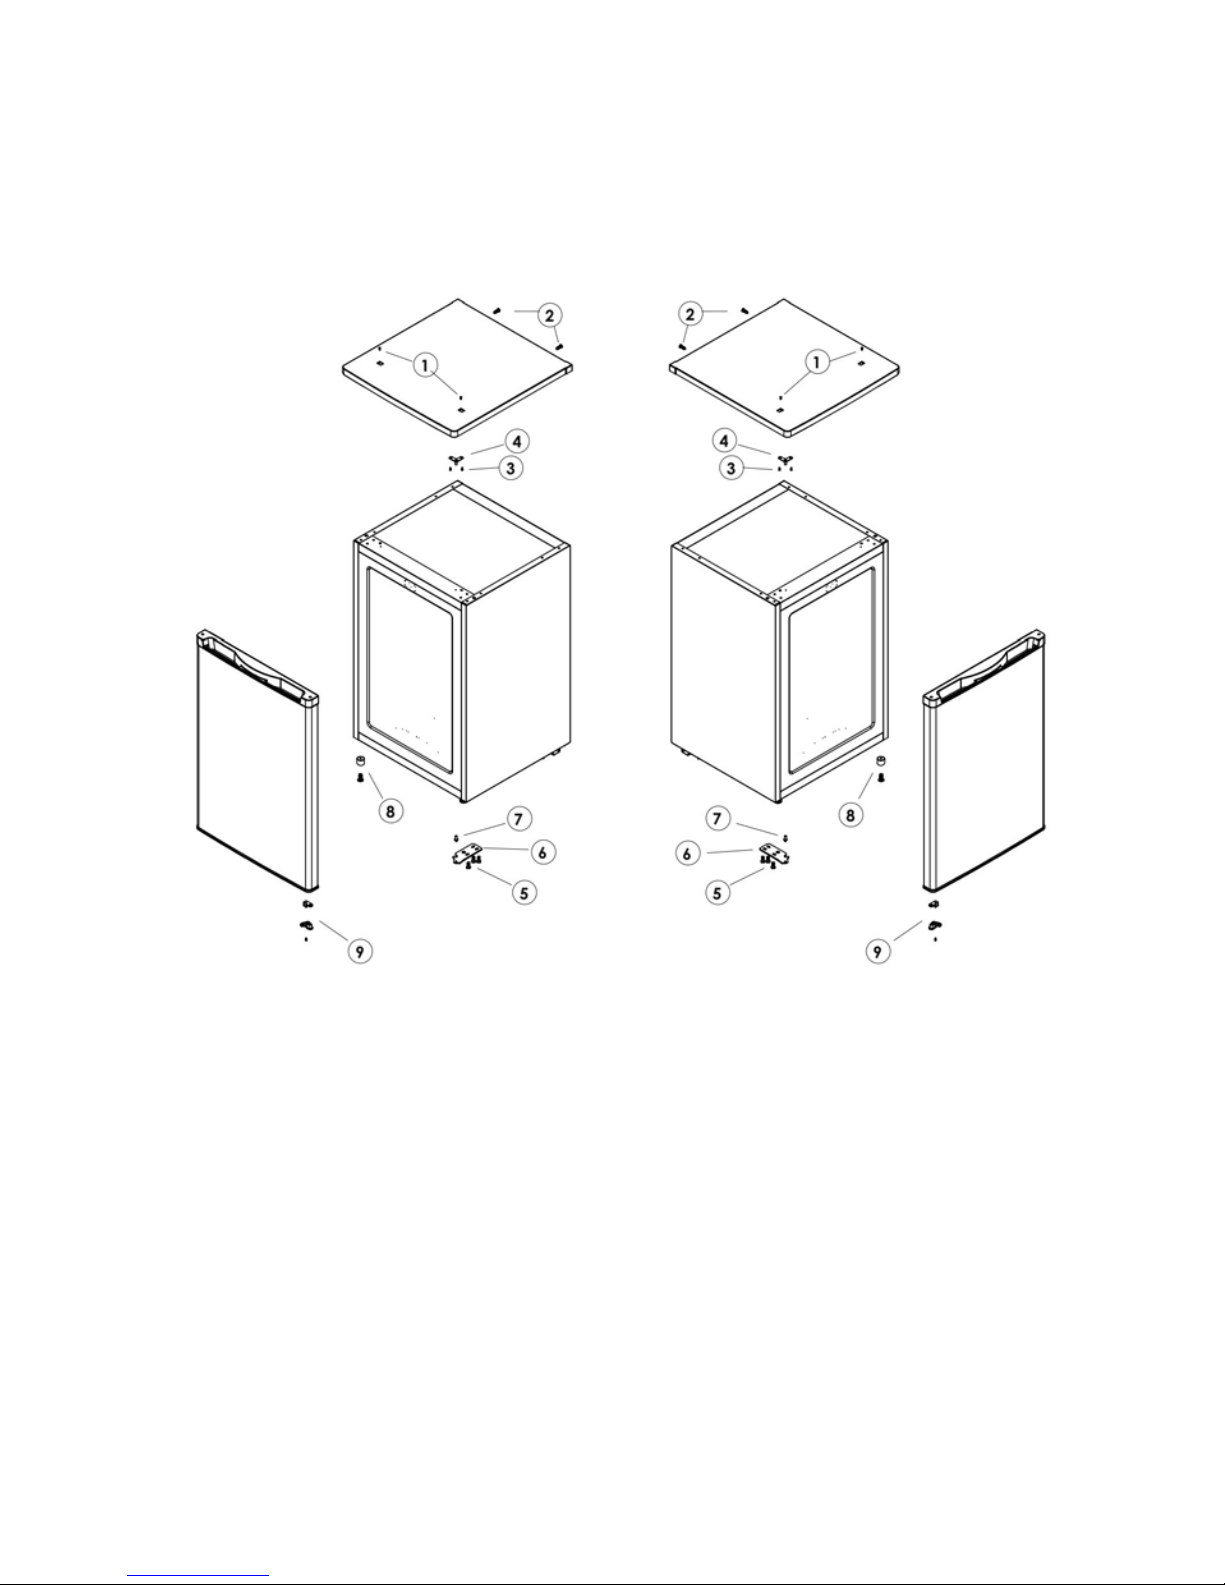
-8-
Rysunek 1 Rysunek
Rysunek 1: Reprezentuje pozycję elementów przed przełożeniem drzwi
Rysunek 2: Przedstawia położenie elementów po przełożeniu drzwi
Jeśli chcesz również zmienić kierunek otwierania drzwi zamrażarki, należy postępować zgodnie z
instrukcją poniżej:
1. Wykręć śrubę (1) i wyjmij przycisk blokady (2).
2. Odkręć dwie śruby (3) przytrzymujące osłonę trzpienia (4) i zdejmij ją (4).
3. Zdejmij drzwi i umieść je na miękkiej powierzchni, aby uniknąć porysowania.
4. Wyjmij trzpień (5) i przenieść go na drugą stronę.
5. Obróć drzwi do 180° i ustaw je na trzpieniu.
6. Zamontuj osłonę trzpienia (4) dwoma śrubami (4).
7. Zamontuj przycisk blokady (2) śrubą (1)
8. Wymontuj sworzeń zawiasu, który znajduje się w dolnej części drzwi. Z drugiej strony drzwi umieść
zastępczy sworzeń zawiasu, który jest dostarczany wraz z urządzeniem.
9. Ustaw drzwi do swoim miejscu i upewnij się, że drzwi osadzone są na dolnym zawiasie (6).
10. Zamocuj zawias górny (4) za pomocą dwóch śrub (3) i górę za pomocą czterech śrub (1) (2).
Page 76
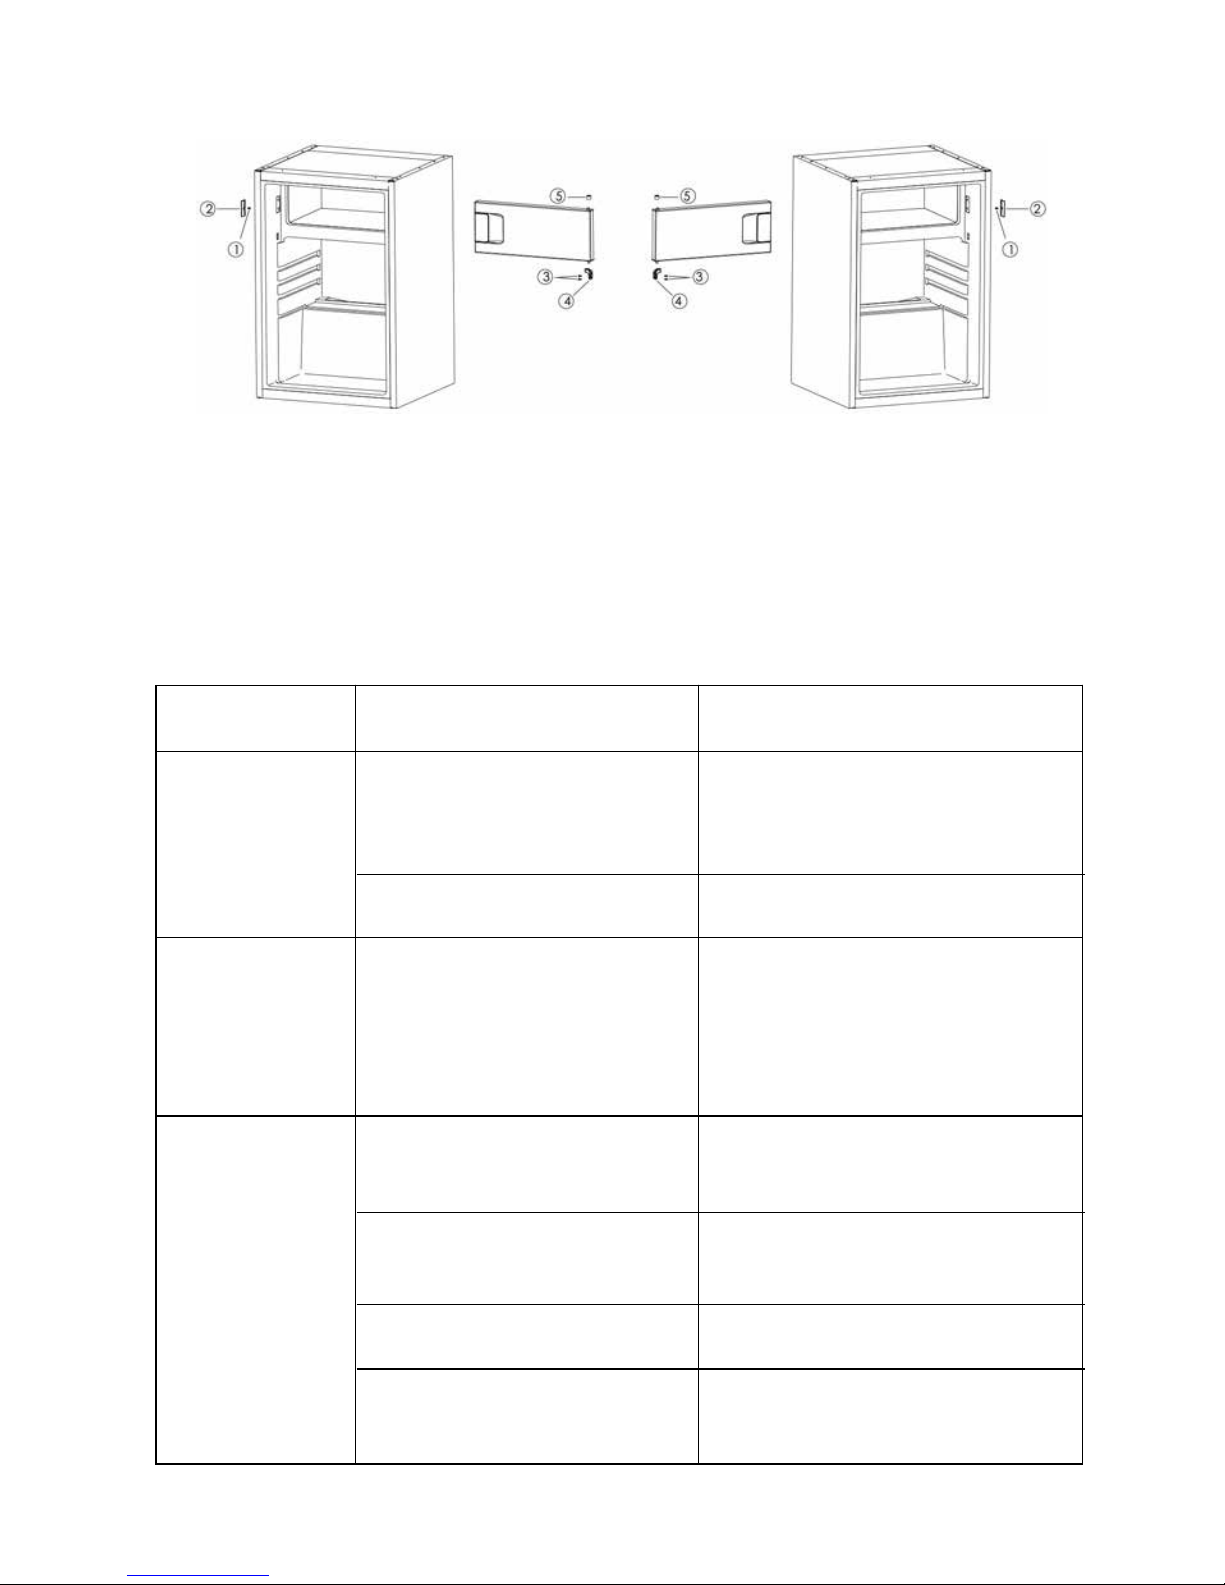
Rysunek 1: Reprezentuje pozycję elementów przed przełożeniem drzwi
Rysunek 2: Przedstawia położenie elementów po przełożeniu drzwi
ROZWIĄZYWANIE PROBLEMÓW
Jeżeli urządzenie wykazuje inne objawy niż opisane powyżej, prosimy skontaktować się z serwisem
posprzedażnym.
-9-
Rysunek 1 Rysunek 2
Objaw Przyczyna Rozwiązanie
Urządzenie nie
działa.
Brak zasilania Sprawdzić czy wtyczka zasilająca jest
poprawnie umieszczona w gniazdku
elektrycznym.
Bezpiecznik jest uszkodzony Wymienić bezpiecznik
Urządzenie
bardzo hałasuje.
Urządzenie
nie chłodzi
wystarczająco
dobrze
Lodówka jest zbyt blisko ściany
Lodówka jest przepełniona Wyjąć żywność z urządzenia
Temperatura jest
nieprawidłowo wyregulowana
Odsunąć lodówkę od ściany, aby
poprawić wentylację
Urządzenie jest ustawione zbyt
blisko ściany, nie stoi stabilnie lub
akcesoria wewnątrz zamrażalnika
umieszczone są w niewłaściwej
pozycji
Ustabilizować położenie lodówki poprzez
regulację położenia stopek, odsunąć
urządzenie od ściany, rozmieścić
prawidłowo akcesoria wewnątrz lodówki
Drzwi są zbyt często otwierane
lub pozostawiono je otwarte przez
długi czas
Zamknąć drzwi i nie otwierać ich zbyt
często
Obrócić pokrętło regulacji temperatury na
„3” lub więcej
Page 77
W urządzeniu
występują
nieprzyjemne
zapachy
Wnętrze urządzenia wymaga
oczyszczenia
Wyczyścić wnętrze lodówki
Następujące objawy nie oznaczają uszkodzenia urządzenia:
• Słychać hałas cieczy chłodzącej, która krąży w rurach – jest to zjawisko normalne.
•
Występowanie wilgoci na zewnętrznej powierzchni urządzenia w warunkach dużej wilgotności
powietrza – nie oznacza to żadnego problemu z urządzeniem; wystarczy wytrzeć je suchą, miękką
szmatką.
• Sprężarka i skraplacz rozgrzewają się bardziej w okresie, kiedy temperatura zewnętrzna jest wyższa.
•
Rama drzwi jest trochę cieplejsza; oznacza to, że skraplacz pracuje, usuwając wilgoć z powietrza.
W przypadku awarii zasilania, jedzenie powinno pozostać bezpiecznie zimne przez około 16 godzin.
Postępuj zgodnie z poniższymi poradami podczas długotrwałego braku zasilania, zwłaszcza w lecie:
•
Jak najrzadziej otwieraj drzwi/szuady.
•
Nie wkładaj nowych produktów do urządzenia podczas przerwy w zasilaniu.
•
Jeżeli wcześniej jest podana wiadomość o przerwaniu zasilania, a czas przerwy jest dłuższy niż 16
godzin, przygotuj trochę lodu i umieścić go w pojemniku na górze komory chłodziarki.
•
Po przerwie w zasilaniu konieczna jest niezwłoczna kontrola produktów.
• Jako że temperatura w lodówce podniesie się podczas przerwy w zasilaniu lub innej awarii, zmniejszy
się okres przechowywania żywności i jej przydatność do spożycia. Każdy produkt, który się rozmroził
należy jak najszybciej skonsumować lub ugotować i ponownie zamrozić (jeśli to konieczne), aby zapobiec zagrożeniom dla zdrowia.
-10-
Objaw Przyczyna Rozwiązanie
Wewnątrz lodówki jest przeterminowana żywność
Wyrzucić przeterminowaną żywność,
a pozostałą zawinąć
Page 78
Numer urządzenia:
Napięcie znamionowe:
Moc znamionowa:
Częstotliwość znamionowa:
Prąd znamionowy:
Czynnik chłodniczy:
Moc lampy:
Łączna pojemność netto:
Pojemność chłodziarki:
Pojemność zamrażarki
Typ klimatu:
Wydajność zamrażania:
Zużycie energii:
Klasa ochrony przed porażeniem elektrycznym:
Pianka:
Klasa energetyczna:
UTYLIZACJA URZĄDZENIA
Pomóż chronić środowisko naturalne i zdrowie ludzkie. Wyrzuć opakowanie
do stosownych pojemników do recyklingu. Pomóż w recyklingu odpadów z
urządzeń elektrycznych i elektronicznych. Nie wyrzucaj urządzeń oznaczonych
tym symbolem razem z odpadami domowymi. Oddaj produkt do miejscowego
zakładu recyklingu lub skontaktuj się z urzędem miasta.
Ryzyko obrażeń lub uduszenia!
Czynniki chłodnicze i gazy muszą być usuwane profesjonalnie. Przed utylizacją upewnij się, że przewody
układu chłodniczego nie są uszkodzone. Wyciągnij wtyczkę urządzenia z kontaktu. Odetnij przewód
zasilający i wyrzucić go. Usuń tace i szuady oraz zamek drzwi i uszczelki, aby zapobiec zamknięciu się
dzieci i zwierząt w urządzeniu.
SPECYFIKACJA TECHNICZNA
Niniejszym zrzekamy się wszelkiej odpowiedzialności za szkody lub wypadki wynikające z
użytkowania tego produktu w sposób niezgodny z instrukcjami zawartymi w niniejszej broszurze.
OSTRZEŻENIE!
-11-
220–240 V~
65W
50Hz
0,6A
R600a(34g)
10W
114L
97L
17L
Umiarkowany
2 kg/24 h
168kWh/rok
I
CYCLOPENTANE
A+
HRK-176AA;HRK-176AAB;HRK-176AAS
Page 79
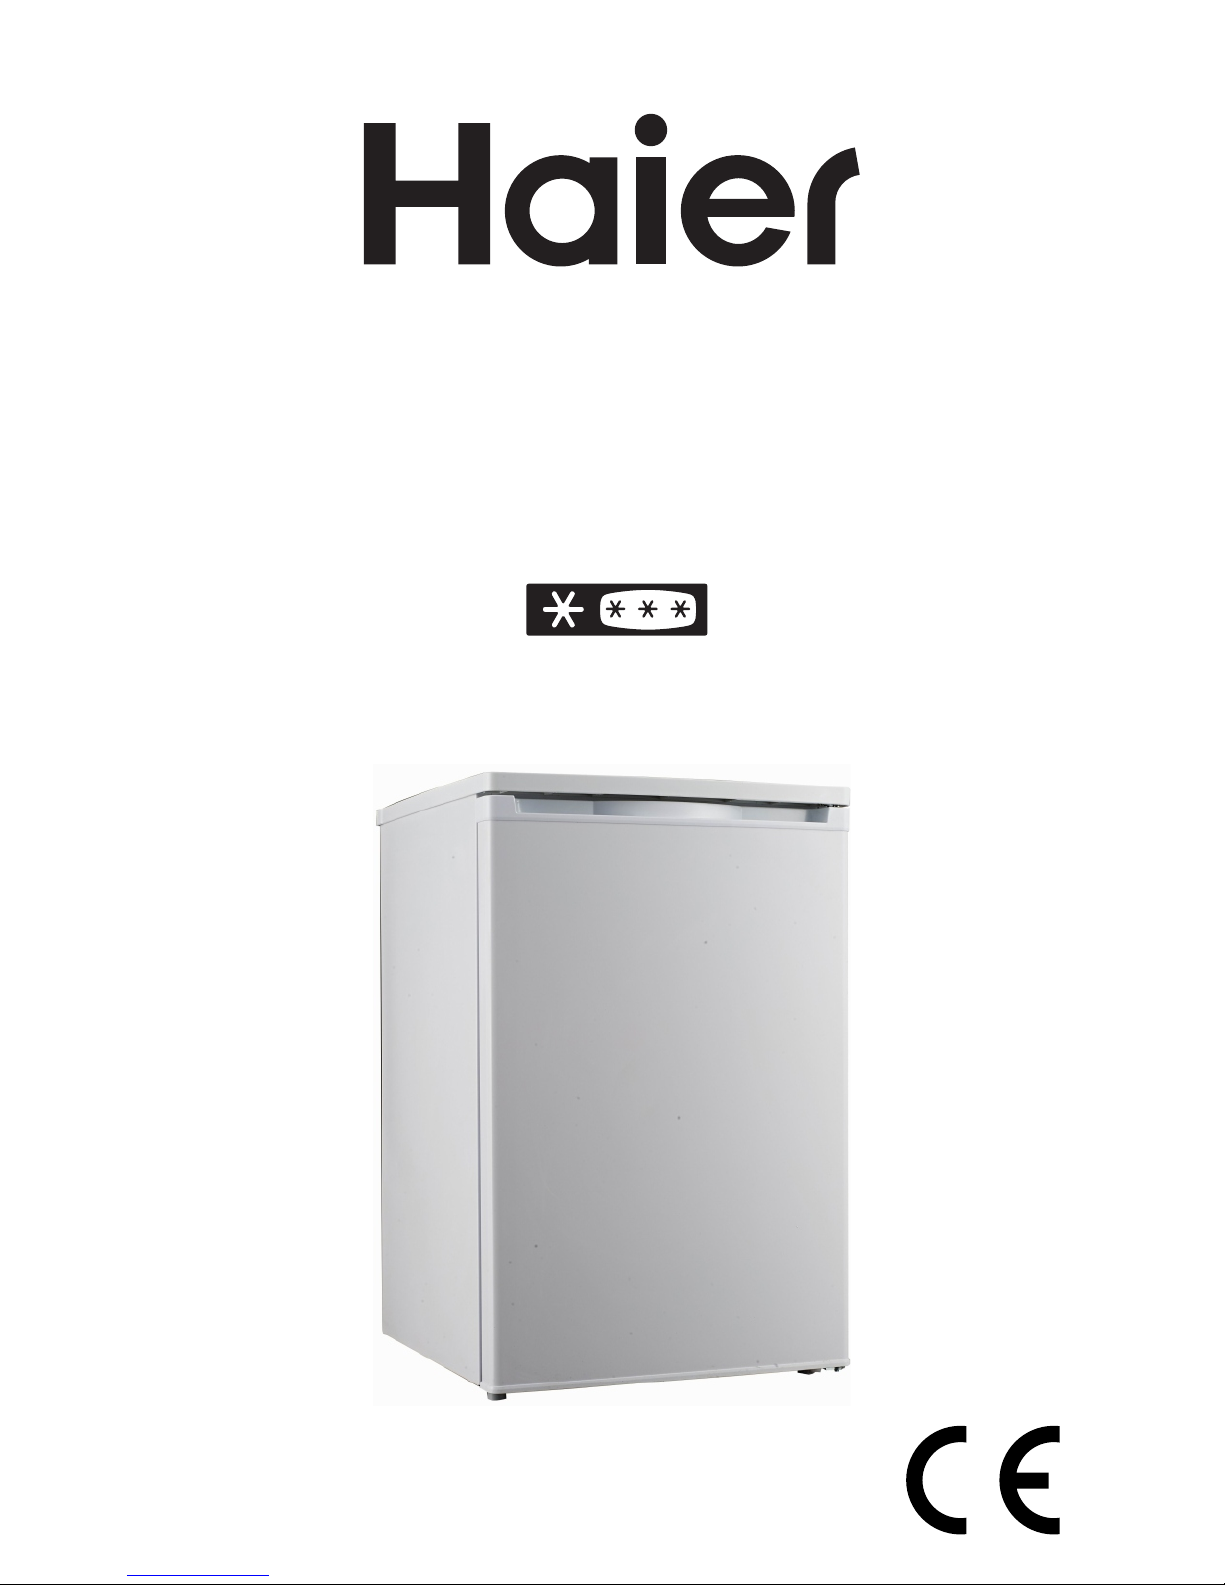
ИНСТРУКЦИИ ЗА УПОТРЕБА
Хладилник с фризер
HRK-176AA
HRK-176AAB
HRK-176AAS
Page 80

СЪДЪРЖАНИЕ
Важна инструкция за безопасност - 1 -
Илюстрация на структурна - 4 -
транспортиране и Монтаж - 4 -
Инсталиране - 4 -
Тест - 5 -
Температурен контрол - 5 -
Съхранение на храна - 5 -
Размразяване - 6 -
Общи инструкции за грижа и поддръжка - 6 -
Обръщане на вратата - 7 -
Отстраняване на неизправности - 9 -
Технически спецификации - 11 -
Page 81
Tози продукт е предназначен само за домашна употреба!
Моля, прочетете внимателно тези инструкции преди първото използване на този
продукт и запазете това ръководство за бъдещи справки.
ВАЖНА ИНФОРМАЦИЯ ЗА БЕЗОПАСНОСТ
1. Този уред може да се използва от деца над 8 годишна възраст,
хора с физически, слухови или умствени затруднения, както и
от хора с липса на опит или познания, ако е осигурен контрол
или им е предоставена информация относно опасностите.
Децата не трябва да си играят с уреда. Почистването и
поддръжката не трябва да се извършват от деца, оставени
без надзор.
2. Този уред е предназначен да се използва в битови и подобни
приложения, като например:
- от служители в кухненските зони на магазините, офисите и
други работни среди
- Фермерски къщи и от клиенти в хотели, мотели и други
типове жилищни среди
- Различни видове настаняване с нощувка със закуска
- Кетъринг и подобни приложения различни от търговия на
дребно
3. Предупреждение: Не използвайте механични устройства или
друго средство за ускоряване на процеса на размразяване,
различни от тези, препоръчани от производителя.
4. Предупреждение: С изключение на позициите, препоръчани
от производителя, НЕ използвайте електрически уред в
блоковете.
-1-
Page 82

5. Предупреждение: Никога не се опитвайте да използвате
този уред за приложения или по начин, който не е описан
в инструкцията, в противен случай могат да възникнат
сериозни опасности.
6. Предупреждение: Ако захранващият кабел е повреден, или
ако уредът има неизправности или е повреден по някакъв
начин, моля, върнете уреда на производителя, негов
упълномощен сервизен агент или квалифицирано лице за
проверка, ремонт или настройка, за да се избегне опасност.
7. ПРЕДУПРЕЖДЕНИЕ!: пазете чисти и безпрепятствени
вентилационните отвори на уреда или във вградената
конструкция.
8. ПРЕДУПРЕЖДЕНИЕ!: Не повреждайте охладителната
верига.
9. ПРЕДУПРЕЖДЕНИЕ!: Не използвайте електрически уреди
вътре в хладилните отделения за съхранение на храна на
уреда, освен ако не са от препоръчания от производителя
тип.
10. Не използвайте уреда в запрашена среда или във
взривоопасна и запалима атмосфера (запалими газове,
пари, пари от органични разтворители и т.н.)
11. Не съхранявайте взривни вещества, като аерозолни флакони
със запалимо гориво, в този уред.
12. Не изливайте вода директно върху фризера, тъй като
това може да предизвика влошаване на изолацията и
корозионност.
13. Поставете щепсела в един заземен контакт. Уверете се, че
щепселът е поставен докрай в контакта, когато свързвате
Вашия уред.
-2-
Page 83
14. За да се предотврати възможно увреждане на околната
среда или човешкото здраве от неконтролирано изхвърляне
на отпадъци, рециклирайте го отговорно, за да насърчавате
устойчивата многократна употреба на материални ресурси.
Депонирането трябва да става само чрез обществени
пунктове за събиране.
15. Уредът трябва да бъде поставен на хоризонтална повърхност
и да се поддържа свободна вентилация. Не се опитвайте да
смените или поправите сами компоненти, обърнете се към
оторизиран сервиз, ако е необходимо.
16. Винаги дръжте уреда, за да избегнете евентуални повреди.
17. Внимание: Не свързвайте заземителен проводник към вода
или газ тръба.
18. Задължително не съхранявайте силна основа, силна
киселина, органични разтворители и корозивни стоки заедно
с храна.
19. Моля, направете справка с раздела “Отстраняване на
проблеми”, когато имате някакви проблеми с уреда. Не се
опитвайте да решите проблема сами, моля, консултирайте
се само със сертифициран техник.
20. По отношение на информацията за монтаж, експлоатация,
поддръжка и депониране на уреда, направете справка със
следващите раздели на това ръководство.
Този уред се изпитва в съответствие с всички
съответни настоящите насоки за CE, като
например директивите за електромагнитната
съвместимост и ниско напрежение, и е
произведено в съответствие с най-новите
изисквания за безопасност.
-3-
Page 84
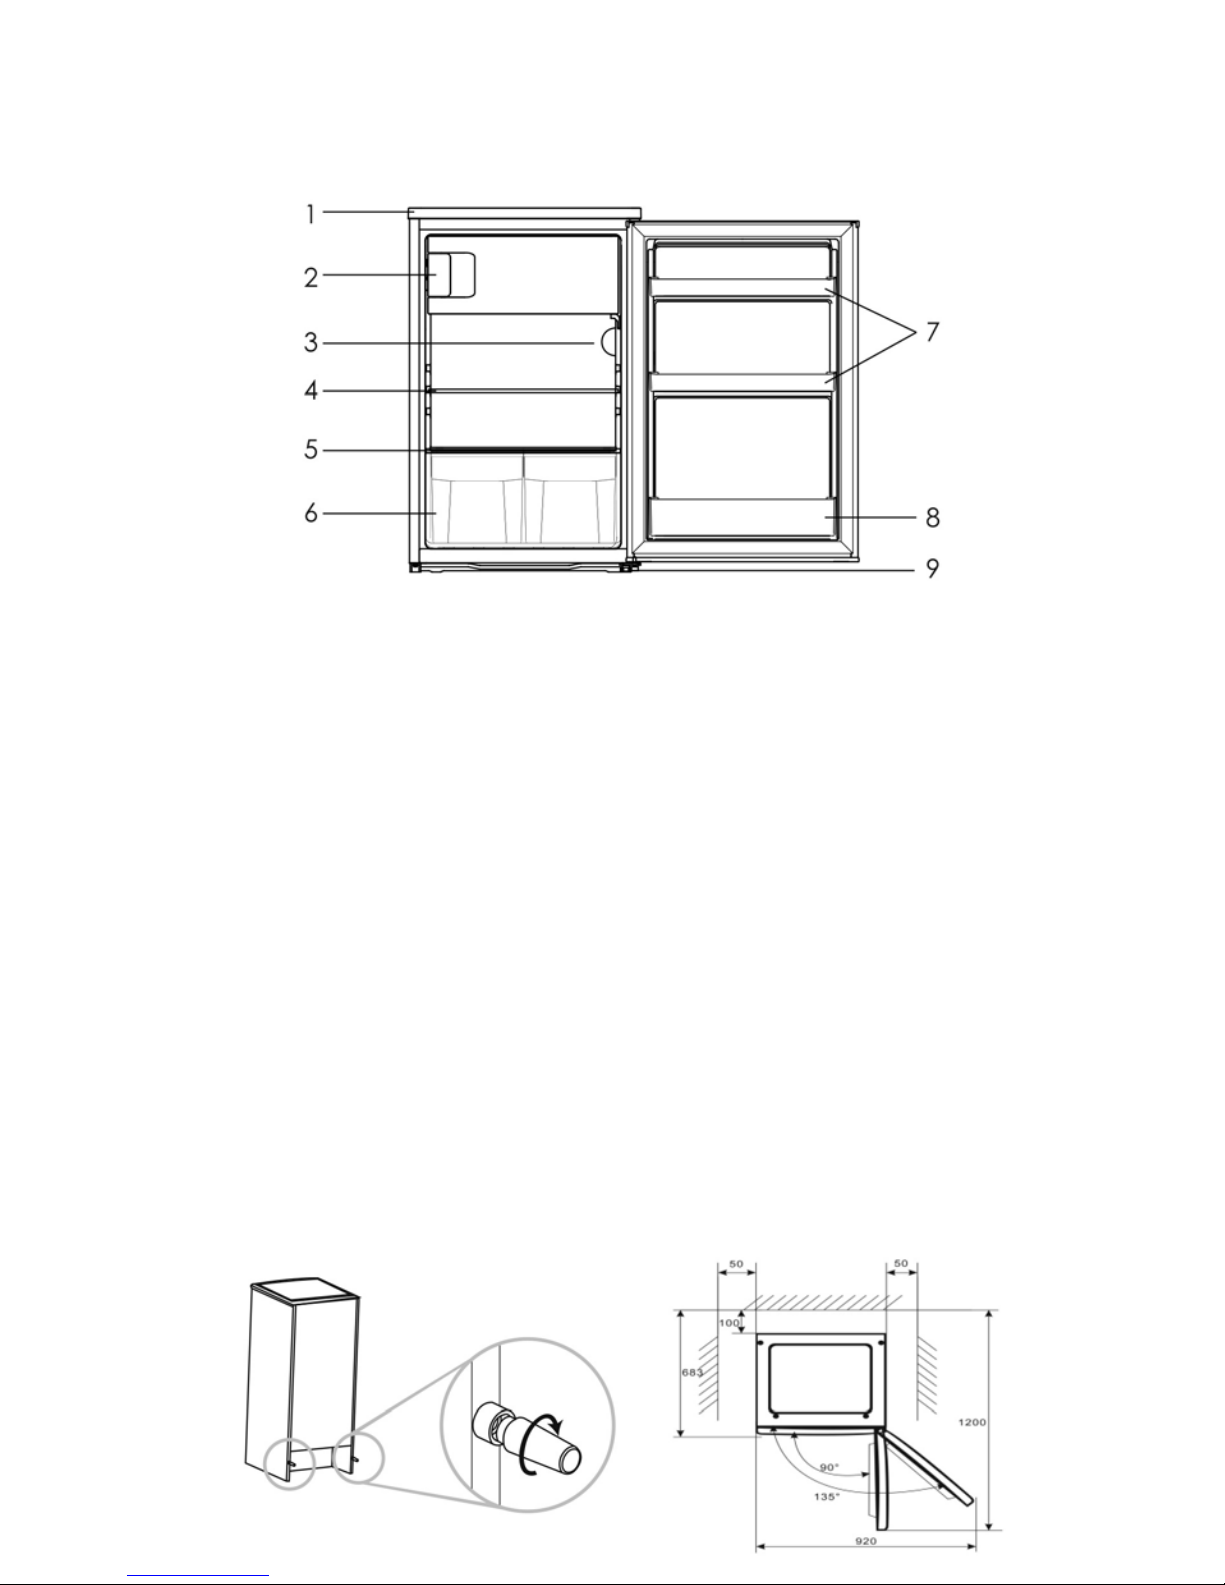
ИЛЮСТРАЦИЯ НА СТРУКТУРАТА
ТРАНСПОРТИРАНЕ И БОРАВЕНЕ
При транспортиране, задръжте основата и повдигнете внимателно хладилника под ъгъл по-малък
от 45 градуса. Никога не дръжте дръжката на вратата като опора. Никога не го поставяйте с главата
надолу, нито хоризонтално Притиснете хладилника върху основата и го регулирайте чрез ролковите
крачета.
ИНСТАЛИРАНЕ
За да бъде здраво закрепен, уредът трябва да бъде поставен върху равна и твърда повърхност. Не
трябва да бъде поставен върху всяка мек материал.
Изберете добре проветриво място. Пространство от поне 5cm трябва да се остави отстрани и 10
сантиметра отзад на хладилника. Ограничителите на шкафа, доставени с уреда, трябва да се
монтират, за да защитават и контролират разстоянието от стената.
Изберете място, където няма източник на топлина. Съхранявайте хладилника далеч от пряка
слънчева светлина или друг уред за производство на топлинна енергия.
Изберете сухо и добре проветриво място, където няма корозивен въздух.
-4-
1. Горен капак
2. Фризерно отделение
3. Термостат
4. Стъклен рафт
5. Капак против обледяване
6. Отделение за плодове и зеленчуци
7. Страничен рафт на вратата
8. Рафт за бутилки
9. Регулируеми крачета
Page 85

ТЕСТ
Почистете частите на хладилника с хладка вода и мека кърпа или с неутрален препарат и с чиста
вода, след това избършете и подсушете.
Забележки: Електрическите части на хладилника могат да бъдат бърсани само със суха кърпа.
Завъртете копчето на термостата на позиция “3” и включвете електричеството. Компресорът и
лампичката в хладилника започват да работят.
Затворете вратата и изчакайте 30 минути. Ако температурата във фризера е осезателно намаляла,
това показва, че системата за хладилника работи добре. Когато хладилникът работи за определен
период от време, температурният регулатор автоматично ще определи температурата, ако вратата
не се отваря твърде често.
Ако описаните по-горе стъпки са успешни, тестовите операции са завършени. Хладилникът работи
нормално.
КОНТРОЛ НА ТЕМПЕРАТУРАТА
Температурата в отделението на хладилника и във фризера се контролира от термостатно реле,
инсталирано от дясната страна на отделението на хладилника.
Завъртете копчето на термостата за регулиране на температурата в хладилника.
Деленията на копчето не са точният брой на степените на температурата, като температурните
деления са от “0” до “7”. Клас 1 съответства на принудителен STOP на хладилника, а Клас 7
съответства на най-ниската температура, която хладилникът може да произведе. Завъртете копчето
от позиция “1” до позиция “7”, температурата непрекъснато намалява.
Настройте термостата на позиция “3-4” за нормална употреба.
Обърнете внимание, че продуктът е настроен за работа на определен диапазон на температура на
околната среда между 16 и 38°C. Уредът може да не работи правилно, ако се остави за дълъг период
при температура над или под посочения диапазон.
Температурата във вътрешността на уреда се влияе от следните фактори:
•
Температура на околната среда
•
Честота на отваряне на вратата
•
Размер на съхраняваните храни
• Монтаж на уреда
СЪХРАНЕНИЕ НА ХРАНА
Как да използваме фризера?
•
Сложете пресни хранителни продукти като като риба или месо, във фризера, за да се запази
техният вкус и хранителни вещества.
•
Опаковани храни трябва да бъдат замразени в алуминиев лист или целофан, или в
херметически затворени пластмасови кутии.
• Не поставяйте прясна храна директно в контакт с храни, които вече са замразени.
•
Ако купувате замразена храна, занесете я в къщи и я поставете във фризера възможно
най-бързо.
-5-
Page 86

•
Никога не замразявайте повторно вече размразен продукт.
•
не съхранявайте течности в бутилки или кутии (освен високоалкохолни спиртни напитки),
особено газирани напитки във фризера, тъй като ще се спукат по време на замразяване.
•
Времето за съхранение на съответната храна (особено за готови замразени храни),
препоръчано от производителя, не трябва да се надвишава. Изваждайте само необходимото
количество храна от фризера.
• При размразяване или поддръжка, температурата на замразените храни може да се повиши и
времето за съхранение може да бъде по-кратко.
Как да използваме фризера?
• Яйцата трябва да бъдат поставени на поставките за яйца, бутилките в отделението за
бутилките, и т.н.
•
Плодовете и зеленчуците трябва да се поставят в отделението за свежо съхранение.
•
Бурканите трябва да се поставят в отделенията на вратата на хладилника.
• Други развалящи се храни, или които могат да изпуснат неприятни миризми в хладилника,
трябва да бъдат опаковани поотделно.
Разпределяне на храната
• Моля, не натрупвайте прекалено много храна в хладилника, защото това ще предизвика загуба
на студ.
•
Опакованите храни трябва да бъдат замразени в алуминиев лист или целофан, или в
херметически затворени пластмасови кутии.
•
Топла храна не може да се сложи в хладилника или във фризера, докато не достигне до
температурата на околната среда, или ще се увеличи консумацията на електричество.
•
Никога не поставяйте зеленчуци и плодове в фризера, защото веднъж размразени ще бъдат
негодни за консумация.
РАЗМРАЗЯВАНЕ
Когато хладилника работи дълго време, вътрешната повърхност на фризера ще бъде покрита със
слой от скреж. Това може да повиши консумацията на електроенергия и да се намали ефектът на
охлаждане. След това фризерът трябва да се размразява веднъж месечно.
Когато размразявате, спрете електричеството, отворете вратата и преместете замразените храни на
хладно място. Използвайте пластмасова шпатула, за да премахнете. След това извадете скрежа и
избършете вътрешността на фризера с влажна мека кърпа.
Забележки: Никога не използвайте метални инструменти за размразяване на фризера, защото това
може да го повреди.
Общи инструкции за грижа и поддръжка
Хладилникът трябва да се почиства веднъж месечно. Преди почистване, електрическият щепсел
трябва да бъде изваден от захранването.
Избършете вътрешната и външната страна на хладилника с влажна мека кърпа.
Ако е прекалено замърсен, почистете с мека кърпа с неутрален препарат и след това отстранете
влагата със суха кърпа.
Ако оставите хладилника неизползван в продължение на дълъг период от време, действайте, както
следва:
•
Изключете хладилника от електрозахранването.
-6-
Page 87
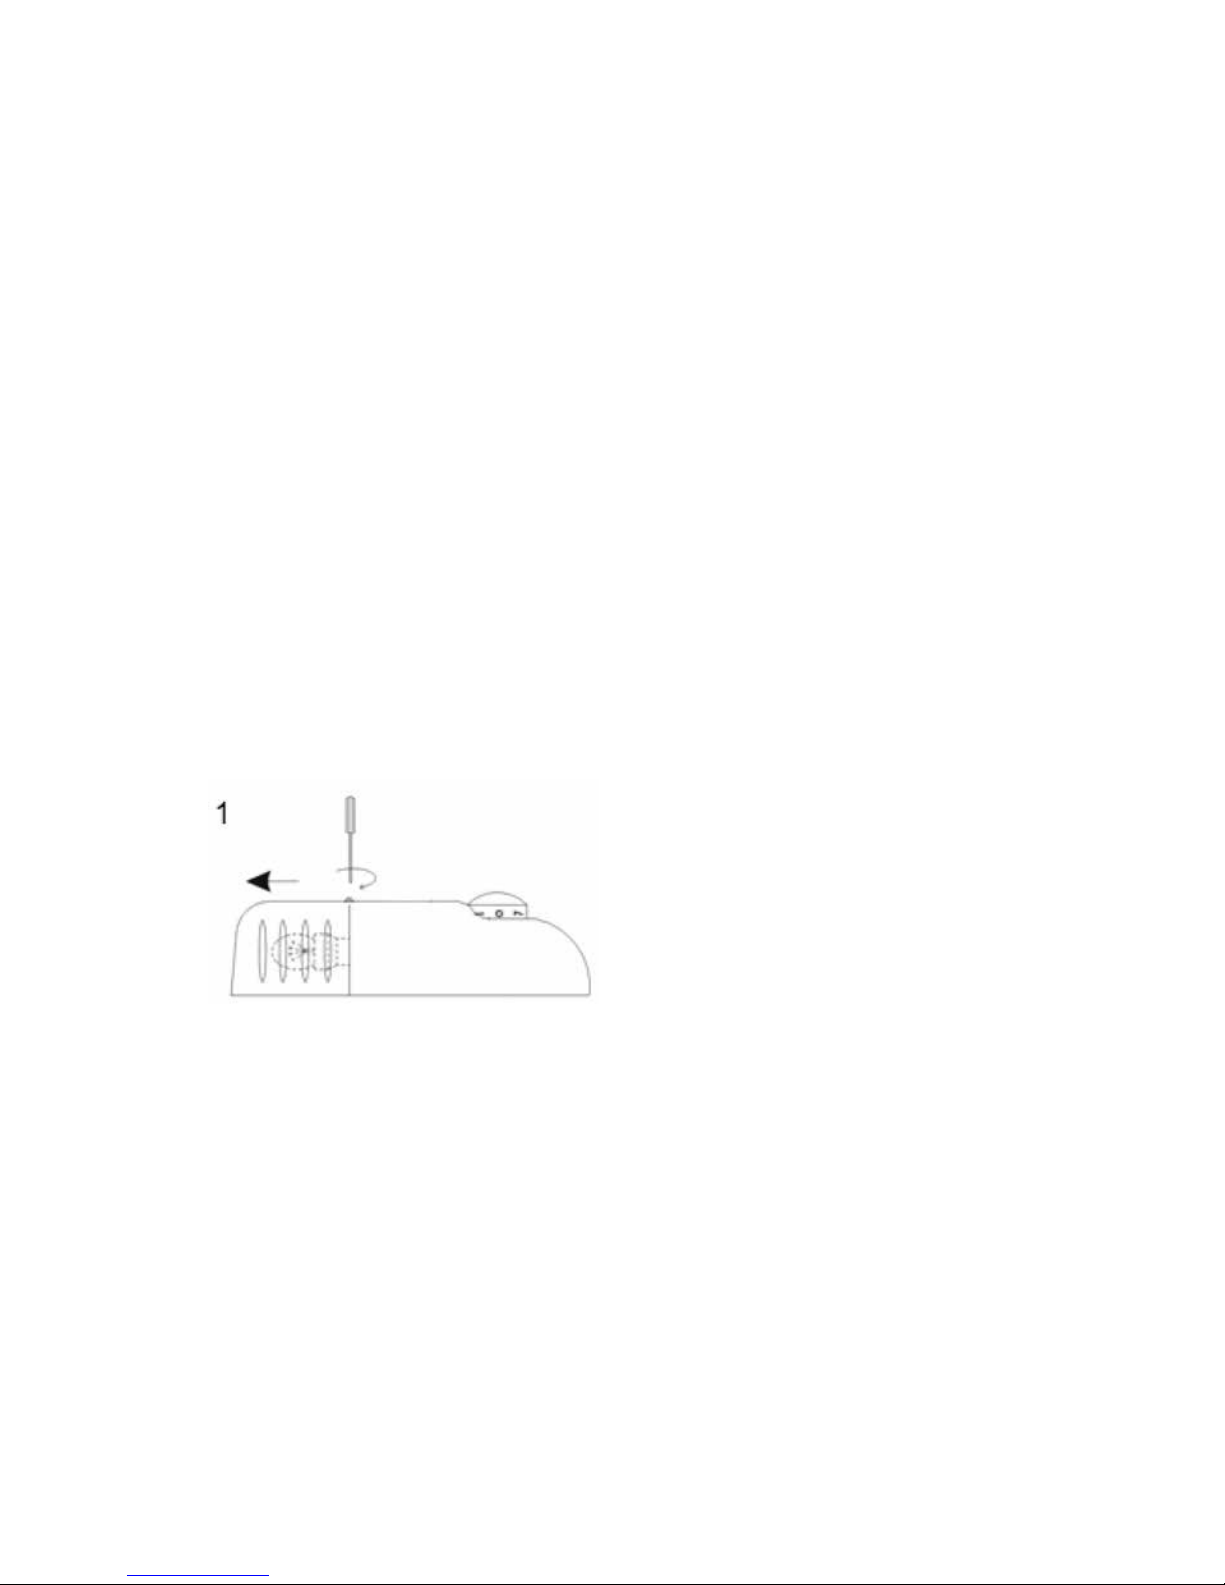
•
Отстранете всички храни.
•
Почистете и подсушете отвътре, както е указано в указанията по-горе за почистване.
•
Оставете вратите отворени за предотвратяване на всякакви неприятни миризми, докато
хладилникът не се използва.
Почистване
При почистване, електрическият щепсел трябва да бъде изваден от захранването.
Използвайте вода или неабразивен почистващ препарат върху мека кърпа и отстранете влагата със
суха мека кърпа. Не забравяйте да изчистите тръбата за размразяване, точно над стъкления капак.
Подмяна на лампичката за осветяване
Ако вътрешната лампичка вече не работи, изключете и след това отново включете уреда. Ако
лампичката все още не работи, проверете дали крушката е правилно завинтена. Ако въпреки тези
тестове, няма светлина, необходимо е да се смени електрическата крушка. Използвайте крушка 220-
240V~, 10W.
•
Изключете уреда;
•
Отворете капака за лампичката (1);
•
Отвийте неработещата лампичка обратно на часовниковата стрелка крушка
•
Завийте нова крушка по посока на часовниковата стрелка
ОБРЪЩАНЕ НА ВРАТАТА
Хладилникът е монтиран с панти на вратите отдясно. Ако искате да смените посоката на отваряне,
моля, следвайте инструкциите по-долу:
1. Свалете четирите винта (1) (2) и снемете горната част.
2. Свалете двата винта (3), които държат горната панта (4) и свалете горната панта (4).
3. Вдигнете вратата и я поставете върху подплатена повърхност, за да не я надраскате.
4. Свалете трите винта (5), които държат долната панта (6) и свалете долната панта (6).
5. Снемете регулируемия крак (8) и го прехвърлете отдясно.
6. Свалете шпилката (7) и обърнете посоката на долната панта (6). Монтирайте долната панта
(6) отляво с три винта (7).
7. Поставете шпилката (7) в долната панта (5).
-7-
Page 88
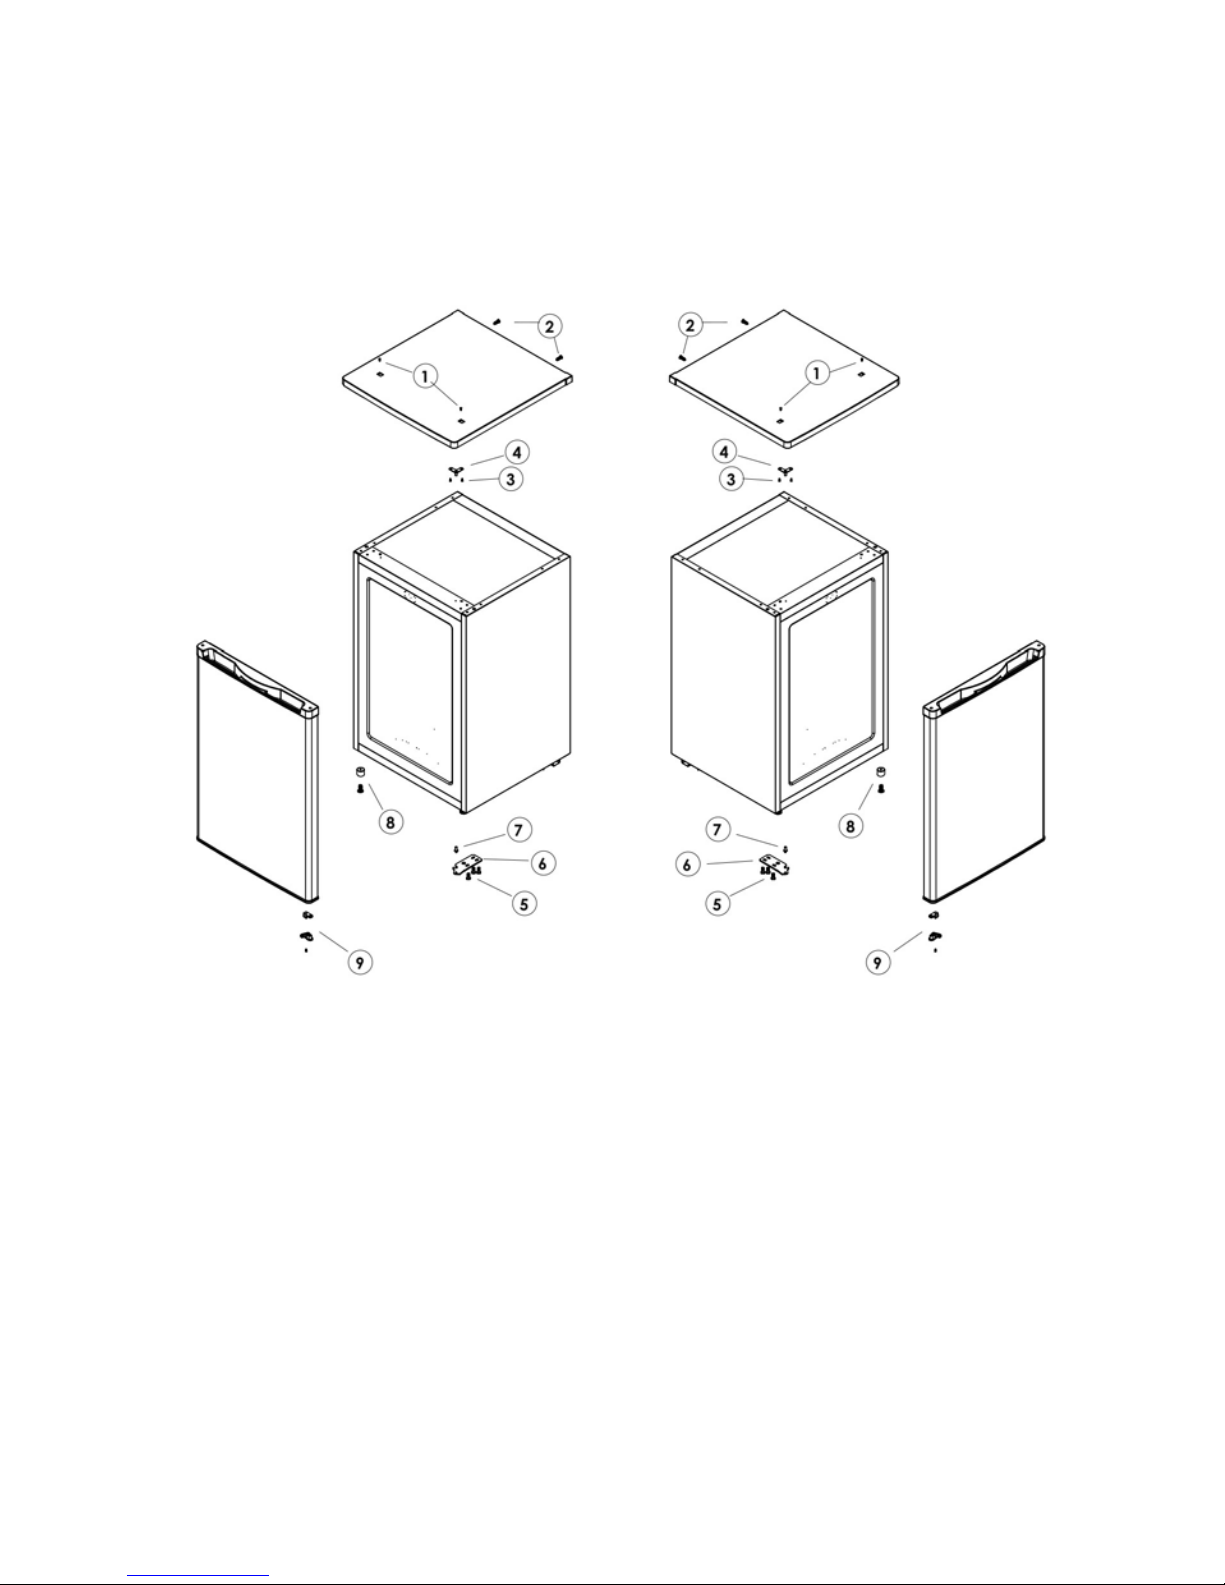
-8-
Фигура 1 Фигура 2
Фигура 1: Показва позицията на компонентите преди обръщане на вратата
Фигура 2: Показва позицията на компонентите след обръщане на вратата
Ако искате да смените посоката на отваряне на вратата на фризера отвътре, моля, следвайте
инструкциите по-долу:
1. Свалете единия винт (1) и снемете бутона за заключване (2).
2. Свалете двата винта (3), които държат капака на долната ос (4) и свалете капака (4).
3. Свалете вратата и я поставете върху подплатена повърхност, за да не я надраскате.
4. Снемете капака на горната ос (5) и го прехвърлете в противоположна позиция.
5. Завъртете вратата на 180° и я поставете на капака на горната ос.
6. Фиксирайте капака на оста надолу (4) с двата винта (4).
7. Фиксирайте бутона за заключване (2) с един винт (1)
8. Отстранете щифта на пантата (9) в долната част на вратата. На другата страна на вратата
поставете алтернативният щифт за панти, който се доставя заедно с уреда.
9. Поставете вратата на мястото й и се уверете, че вратата е застанала на долната панта (6).
10. Фиксирайте горната панта (4) с двата винта (3), а горната - с четирите винта (1) (2).
Page 89
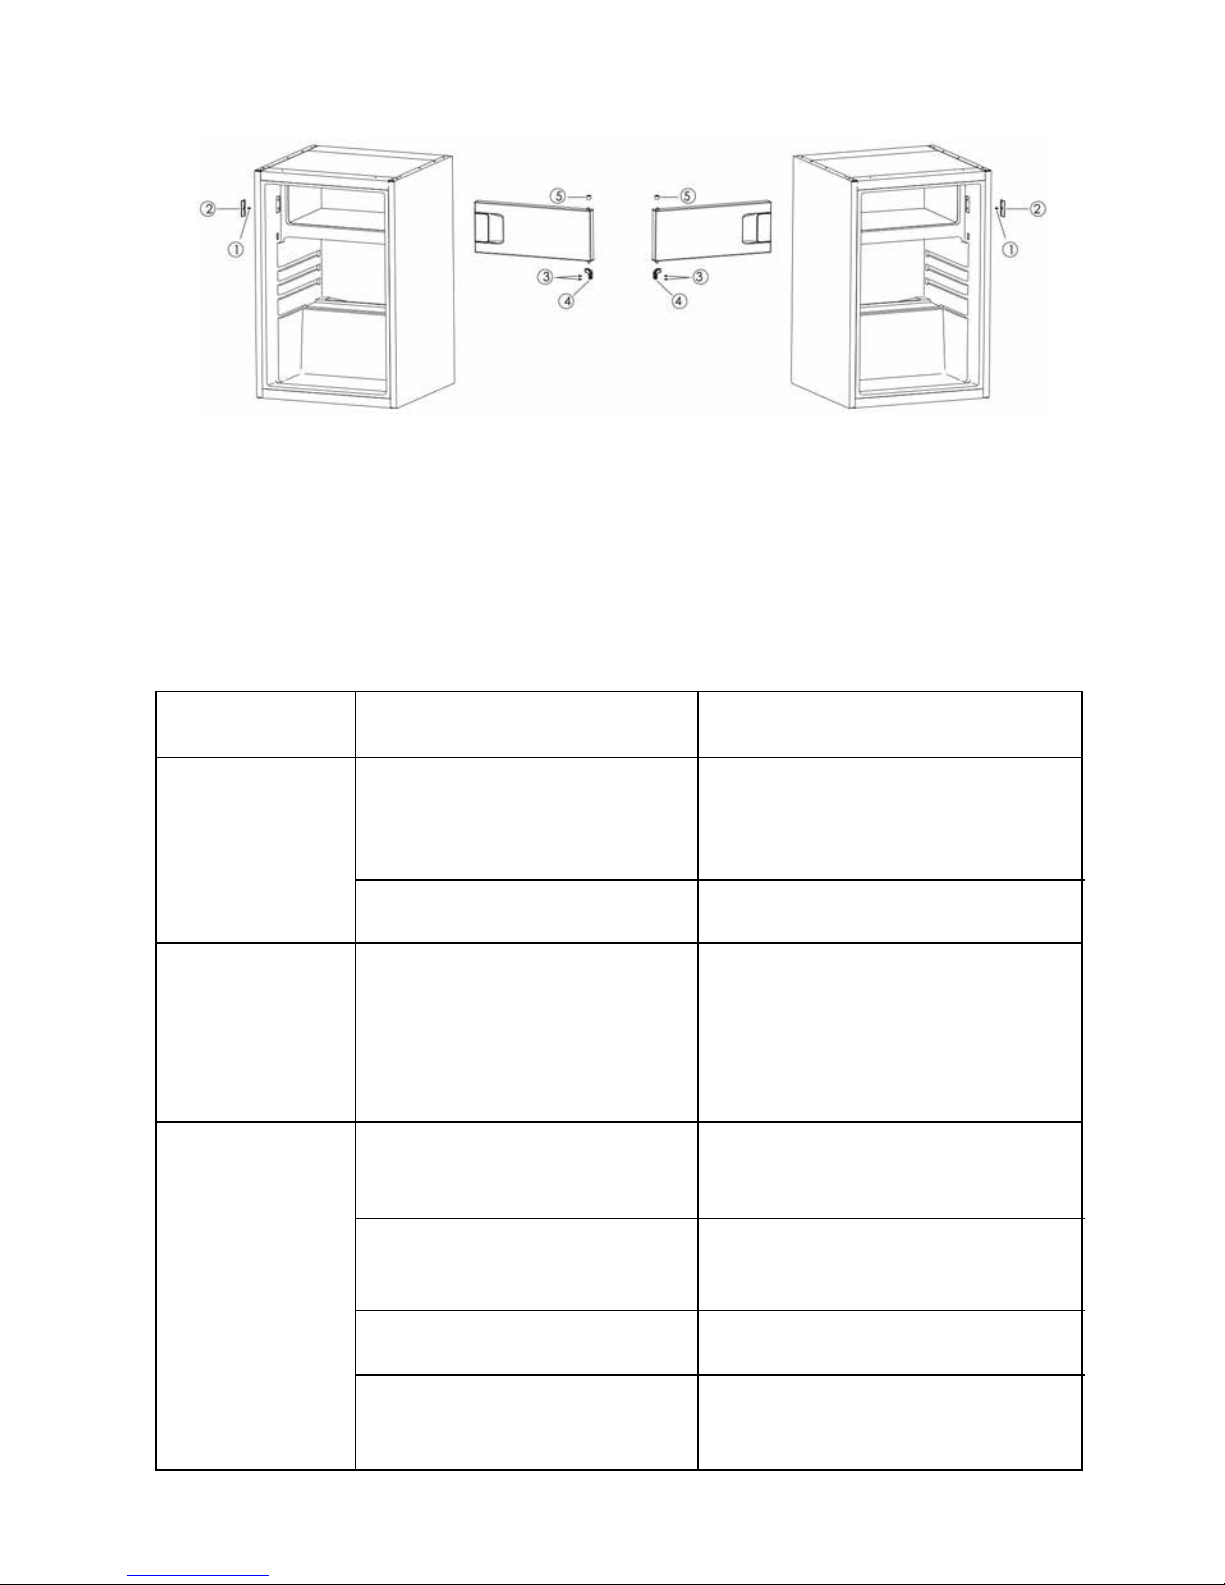
Проблем Причина Решение
Уредът не
работи.
Няма захранване
Проверете щепсела, свързващ го с
другите уреди, или проверете дали
уредът е свързан към щепсела
Предпазителят не работи Сменете предпазителя
Уредът издава
много шум
Уредът не
достатъчно
изстуден
Хладилникът е прекалено
близо до стената
Хладилникът е прекалено пълен Махнете храни от уреда
Температурата е
неправилно настроена
Фигура 1: Показва позицията на компонентите преди обръщане на вратата
Фигура 2: Показва позицията на компонентите след обръщане на вратата
ОТСТРАНЯВАНЕ НА ПРОБЛЕМИ
Ако Вашият уред показва другите проблеми от описаните по-горе, моля, обадете се на сервизния
център към магазина.
-9-
Отдалечете уреда от стената, за да
подобрите вентилацията
Уредът е твърде близо до
стената, или не е стабилна, или
аксесоарите вътре в
хладилника са поставени в
погрешна позиция
Стабилизирайте основата на
хладилника чрез коригиране
на положението на крачетата,
отстранете уреда от стената,
поставете правилно аксесоарите във
вътрешността на хладилника
Вратата се отваря твърде често
или е оставена отворена за
дълго време
Затворете вратата и не я отваряйте
прекалено често
Завъртете копчето за регулиране на
температурата на позиция “3” или
повече
Фигура 1 Фигура 2
Page 90
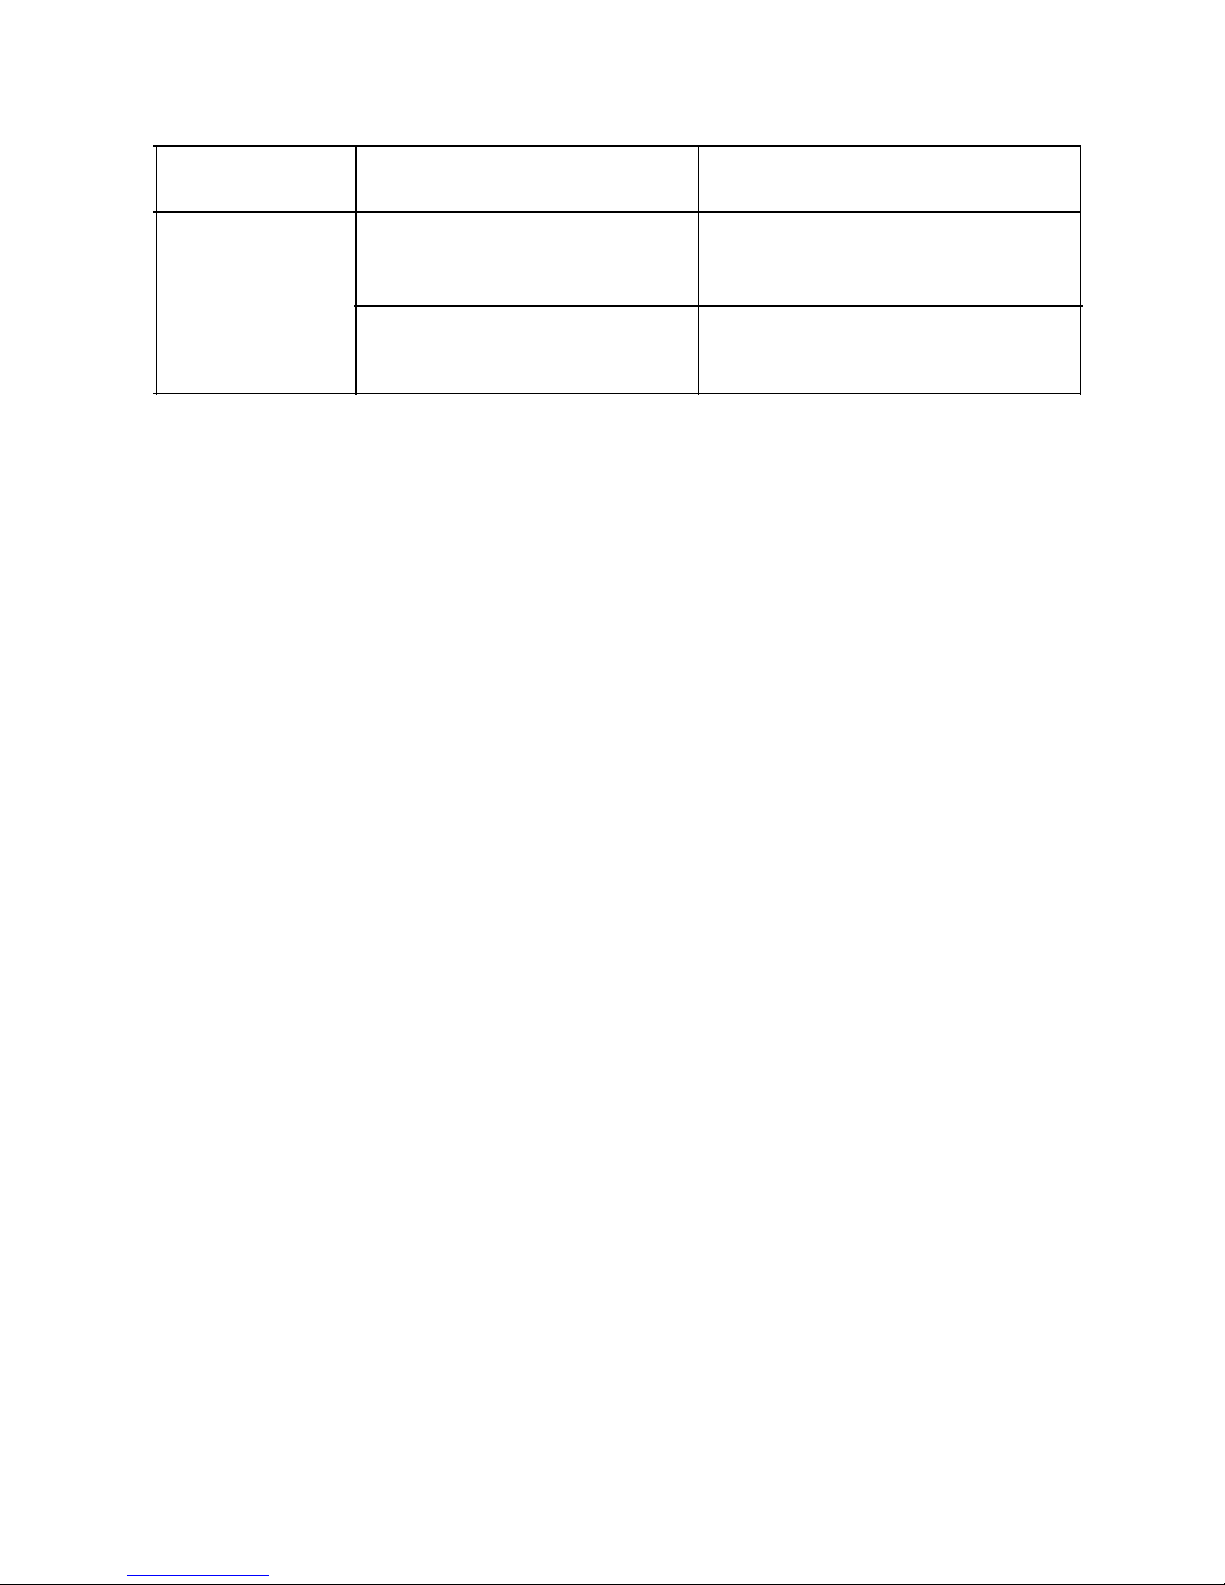
Има неприятни
миризми вътре в
уреда
Вътрешността на устройството
трябва да се почисти
Почистете вътрешността на
хладилника
Следните проблеми не са разгледани:
• Шумът на охлаждащата течност, която циркулира в тръбите, може да се чува, това е нормално
•
Влажността на външната повърхност на изделието по време на мокри сезони не е проблем на
уреда; просто трябва да забършете със суха мека кърпа.
•
Компресорът и кондензаторът може да се затоплят допълнително през топлите сезони.
•
Рамката на вратата е малко нагорещена; това означава, че кондензаторът работи, за да се
изпари влажността на въздуха
В случай на спиране на захранването, храната ще остане безопасно охладена в продължение на
около 16 часа. Следвайте тези съвети при по-продължително прекъсване на захранването, особено
през лятото:
•
Отваряйте вратата/чекмеджето колкото е възможно по-рядко.
•
Не поставяйте допълнителна храна в уреда при прекъсване на захранването.
•
Ако е дадено предизвестие за прекъсване на захранването и продължителността на
прекъсването е повече от 16 часа, направете малко лед и поставете в съд в горната част на
отделението на хладилника.
•
Веднага след прекъсване на захранването веднага проверете продуктите.
•
Тъй като температурата в хладилника ще се повиши по време на прекъсване на захранването
или поради друга повреда, срокът за съхранение и годността на храните ще бъдат съкратени.
Всяка храна, която трябва се размразява, трябва или да се консумира, или да бъде сготвена
и повторно замразена (ако е подходящо) скоро след това, за да се предотвратят рисковете за
здравето.
-10-
Проблем Причина Решение
Развалени храни в хладилника Изхвърлете остаряла храна и
увийте останалата храна
Page 91
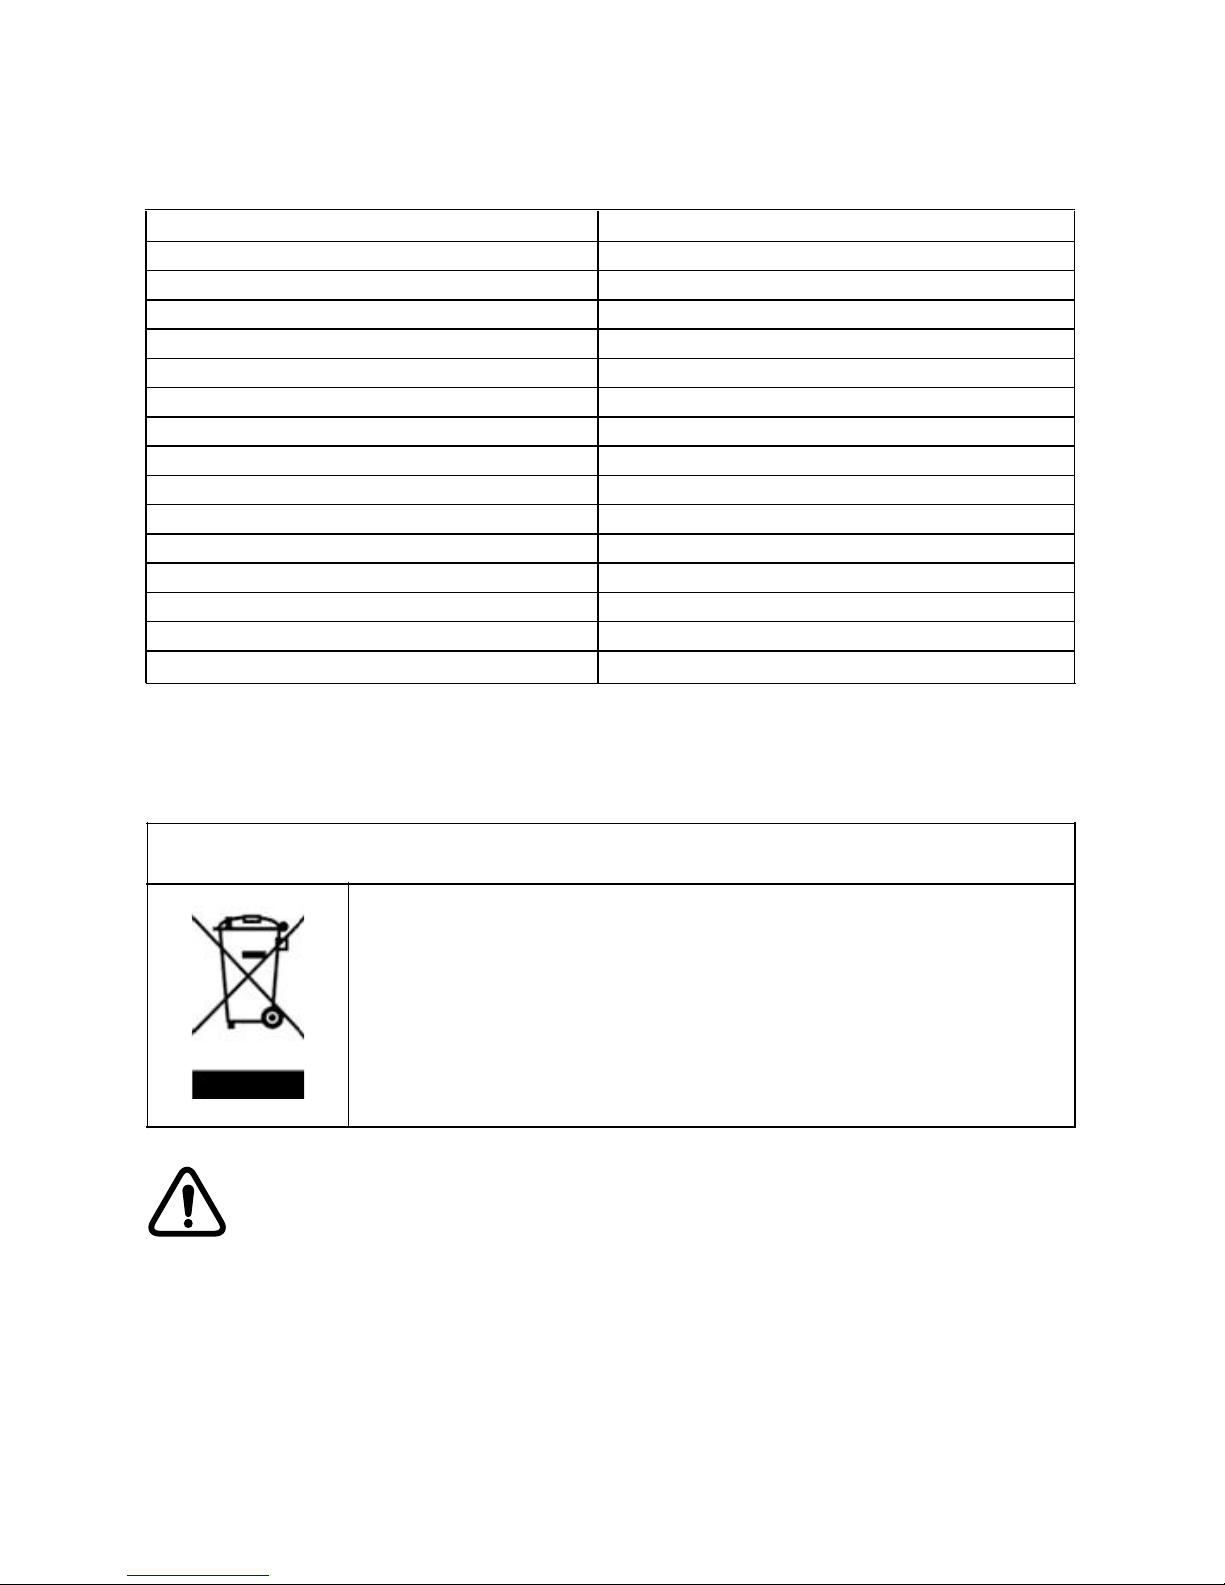
Референтен номер:
Номинално напрежение:
Номинална мощност:
Номинална честота:
Номинален ток:
Хладилен агент:
Мощност на лампата:
Общ нетен обем:
Обем за съхранение на хладилника:
Обем за съхранение за замръзване:
Климатична лента:
Капацитет на замразяване:
Енергопотребление:
Защита срещу токов удар:
Пяна:
Енергиен клас:
ДЕПОНИРАНЕ
Помогнете за опазване на околната среда и човешкото здраве. Поставете
опаковката в предвидените за целта контейнери за рециклиране. Помогнете
за рециклиране на отпадъци от електрически и електронни уреди. Не
изхвърляйте уреди, обозначени с този символ, заедно с битовите отпадъци.
Върнете продукта на Вашия местен оператор за рециклиране или се
свържете с компетентните местни власти.
Съществува риск от нараняване или задушаване!
Охладителни агенти и газове трябва да се изхвърлят по професионален начин. Проверете
дали тръбите на хладилната верига не са повредени, преди да изхвърлите по правилния начин.
Изключете уреда от електрическата мрежа. Отрежете захранващия кабел и го изхвърлете. Махнете
тавите и чекмеджета, както и дръжките на вратата и уплътненията, за да предотвратите риска деца
и домашни любимци да се затворят вътре в уреда.
ТЕХНИЧЕСКИ ДАННИ
Ние не носим отговорност за повреди или злополука, получени в резултат от използването на
този продукт в съответствие с инструкциите, съдържащи се в тази брошура.
ПРЕДУПРЕЖДЕНИЕ!
-11-
220-240V~
65W
50Hz
0,6A
R600a (34 грама)
10W
114L
97L
17L
ST
2 кг/24 часа
168kWh / годишно
I
Циклопентан
A+
HRK-176AA;HRK-176AAB;HRK-176AAS
 Loading...