

Page 1

Inspired living
Refrigerator/Freezer Combo
User's Guide
HRF-663IRG
Thank you very much for choosing to purchase a Haier-brand refrigerator.
This User's Guide will help you properly install and operate your newly acquired
appliance.
For future reference, please write down the model and serial number in the spaces
provided below.
You can retrieve that information from the product label attached to the inside of
the refrigerator.
Model number:
Serial number:
Date of purchase:
Page 2

Contents
Before operation
Your refrigerator's features..............................................................1
Components.....................................................................................2
Precautions...................................................................................3-5
Preparations..................................................................................6-9
Door removal............................................................................10-11
Setting up the Refrigerator/Freezer Combo ..................................12
Start-up..........................................................................................13
Digital display operation..........................................................14-19
Notes on the refrigerator compartment
Refrigerator compartment........................................................20-22
Notes on refrigeration ...................................................................23
Tips on refrigeration ......................................................................24
Notes on the freezer compartment
Freezer compartment.....................................................................25
Notes on freezing ..........................................................................26
Ice maker and dispenser operation ..........................................27-28
Removing and installing the ice cube container............................29
Dispenser operation.......................................................................30
Dispenser precautions....................................................................31
Defrosting Cleaning Inoperation
Defrosting......................................................................................32
Cleaning ........................................................................................32
Inoperation ...............................................................................33-34
Troubleshooting & Customer Service
Troubleshooting .......................................................................35-36
Customer service ......................................................................37-39
Technical Data
Technical Data ...............................................................................40
Before start-up, be sure to read the User's Guide.
Keep the User's Guide in a safe place.
Page 3

Your refrigerator's features
Your Haier-brand Refrigerator/Freezer Combo is equipped with numerous innovative,
space-saving and energy-efficient features.
(1) Ice cube maker
Automatic ice cube maker, powerful ice crusher, refrigerated water dispenser
(2) Sliding glass shelves
Sliding shelves and baskets in the refrigerator and freezer compartments make storing
foods easy. With the doors fully opened, all shelves can furthermore be removed for
convenient cleaning.
(3) Slim profile with spacious interior
This Refrigerator/Freezer Combo was developed according to our customers' wishes.
Thanks to the latest space-saving insulating materials, the freezer and refrigerator
compartments now offer even more space. The shelves and baskets are made of high-grade
safety glass.
(4) The freezer compartment is equipped with a user-friendly frost-free system and manages to
freeze foods quickly and evenly.
(5) Temperature adjustment before defrosting
(6) Automatic trouble indicator
(7) This Refrigerator/Freezer Combo is equipped with a condenser, and the cold air is
circulated by a fan in order to achieve optimum cooling.
(8) Buzzer warning when door is open
A buzzer sounds intermittently when the door is left open permanently or is not closed
properly.
(9) Intelligent mode
Optimum cooling is automatically adjusted in relation to the interior and surrounding
temperatures.
1
Page 4
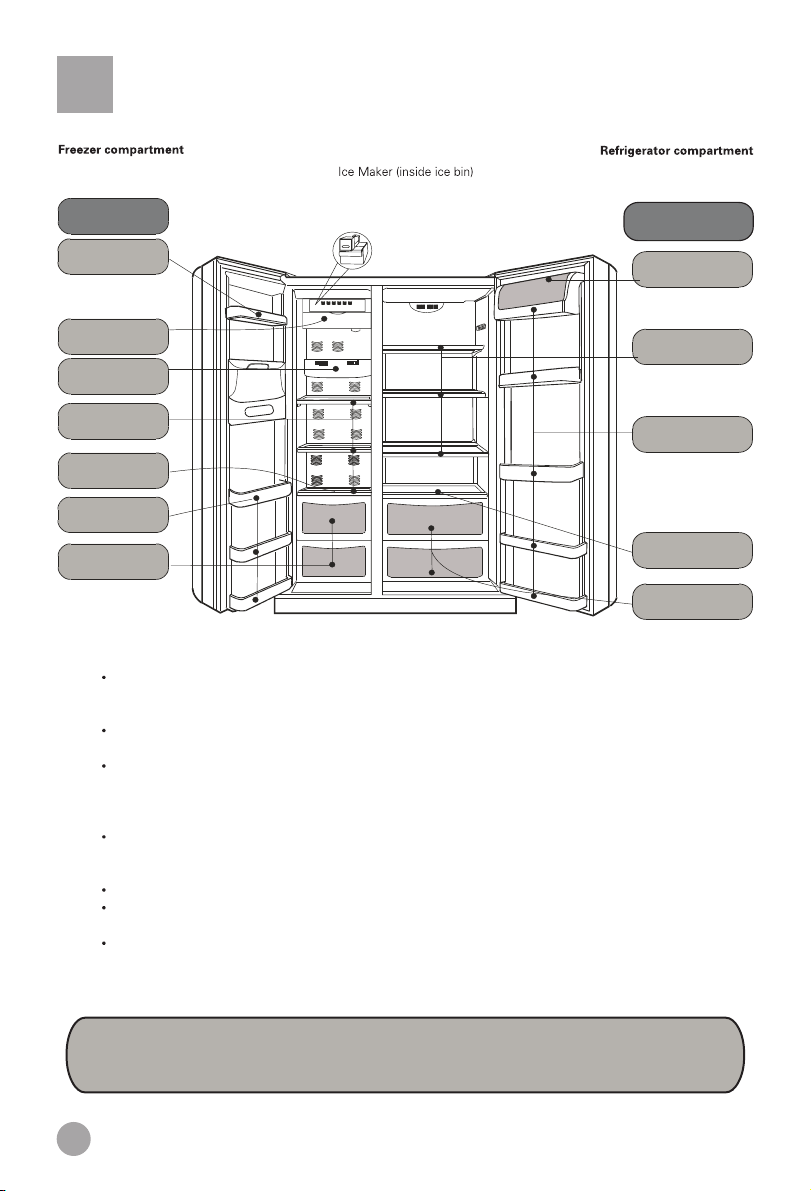
Components
Freezer
Bottle rack
Ice maker
Light
Shelves
Drawer cover
Bottle rack
Freezer drawers
Note
The power plug must remain accessible after setting up the appliance.
If damaged, the power cord of this appliance must be replaced by the maker, their customer
service or an equally qualified person so as to prevent any hazards.
Check the appliance for damages sustained during transportation. Do not connect the appliance if
it is damaged. In case of damage, contact your supplier.
Make sure that no part of the refrigerant circuit is damaged when transporting and setting up the
appliance.
Should the refrigerant circuit have been damaged, keep away all sources of fire or sparks and
thoroughly air the room.
Children frequently do not recognise the hazards related to handling household appliances.
Therefore, children and people with impairments should only be allowed to use the refrigerator
under the supervision of a qualified person. Do not let children play with the appliance.
To prevent damage to the appliance, its ventilation openings must not be covered or blocked.
Do not use any mechanical or artificial devices or any tools other than those recommended by the
maker in order to accelerate the defrosting process.
Do not operate any electrical devices inside the food storage area, unless instructed to do so by
the maker.
Refrigerator
compartment
Bottle cover
Shelves
Bottle rack
Veggie drawer cover
Veggie drawer
Our company continually thrives towards improving all models and versions. For that
reason, we hope that you can accept our right to change their appearance, equipment or
operation.
2
Page 5
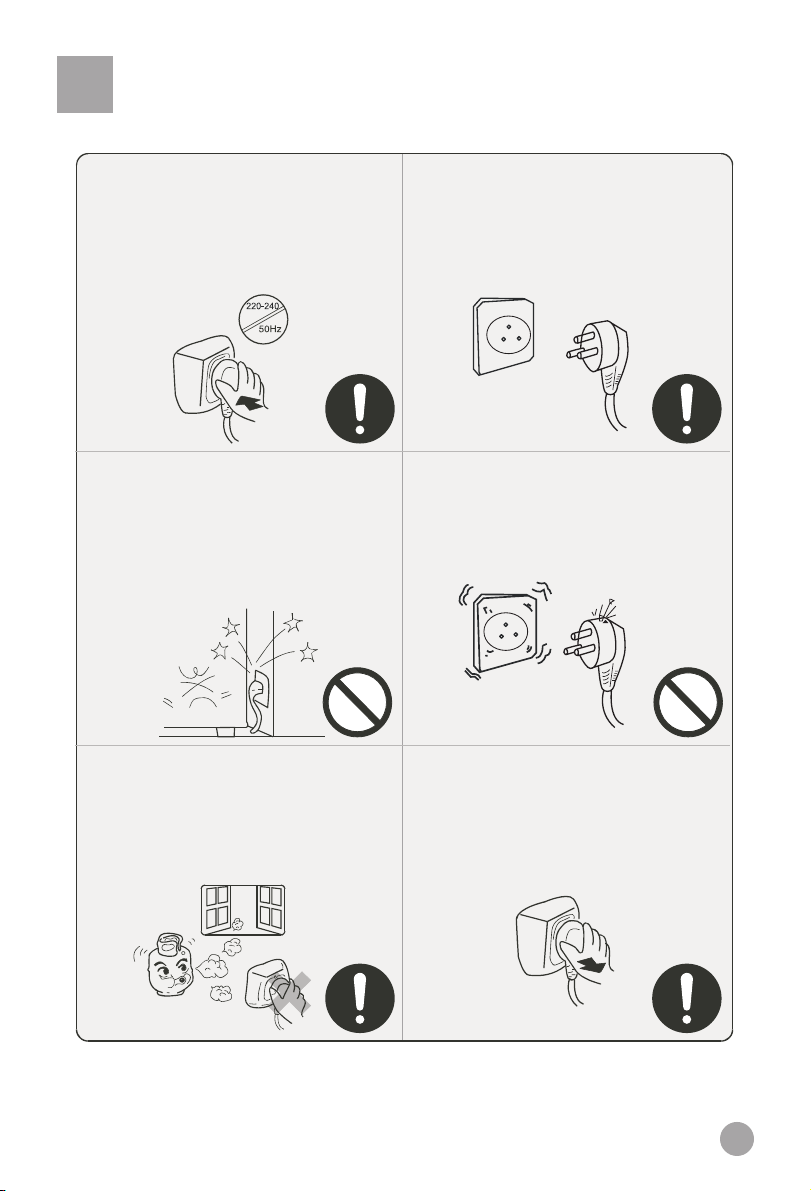
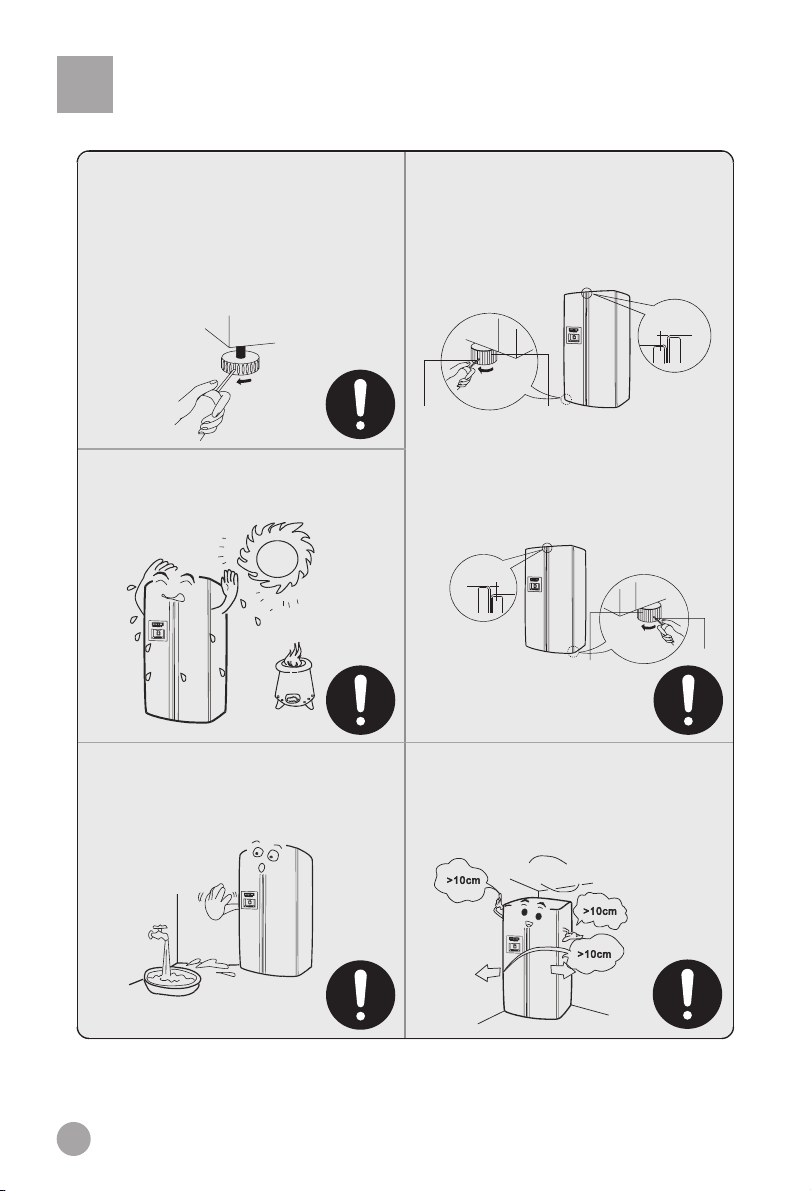
Precautions
This appliance requires a 220-240V/50Hz power
supply.
If the voltage is outside of the 187-252V range,
malfunctions and damages of the controls,
thermostat or compressor may result, unless a
regulator of at least 750W was installed.
Do not damage the power cord.
*Never pull the plug out by the cord; always
grab and pull the plug
*Do not place the power cord under the
appliance or walk on it.
*Be sure not to damage the power cord when
moving the appliance away from the wall.
A dedicated grounded outlet is required. The
appliance is equipped with a standard
shockproof plug, whose grounding should not be
disabled. The power plug of the appliance
should always be accessible.
If the power cord is damaged or the plug cracked
or worn, the power cord must be replaced with a
matching one, available from the maker or their
customer service. The power cord may only be
replaced by the maker, their customer service or
an equally qualified person.
In the case of a gas or other flammable leak:
*Close the valve.
*Open the doors and windows.
*Do not pull out or insert the power cord of the
appliance.
Pull out the power plug:
*Before cleaning or repair
*When replacing a burned-out bulb
3
Page 6
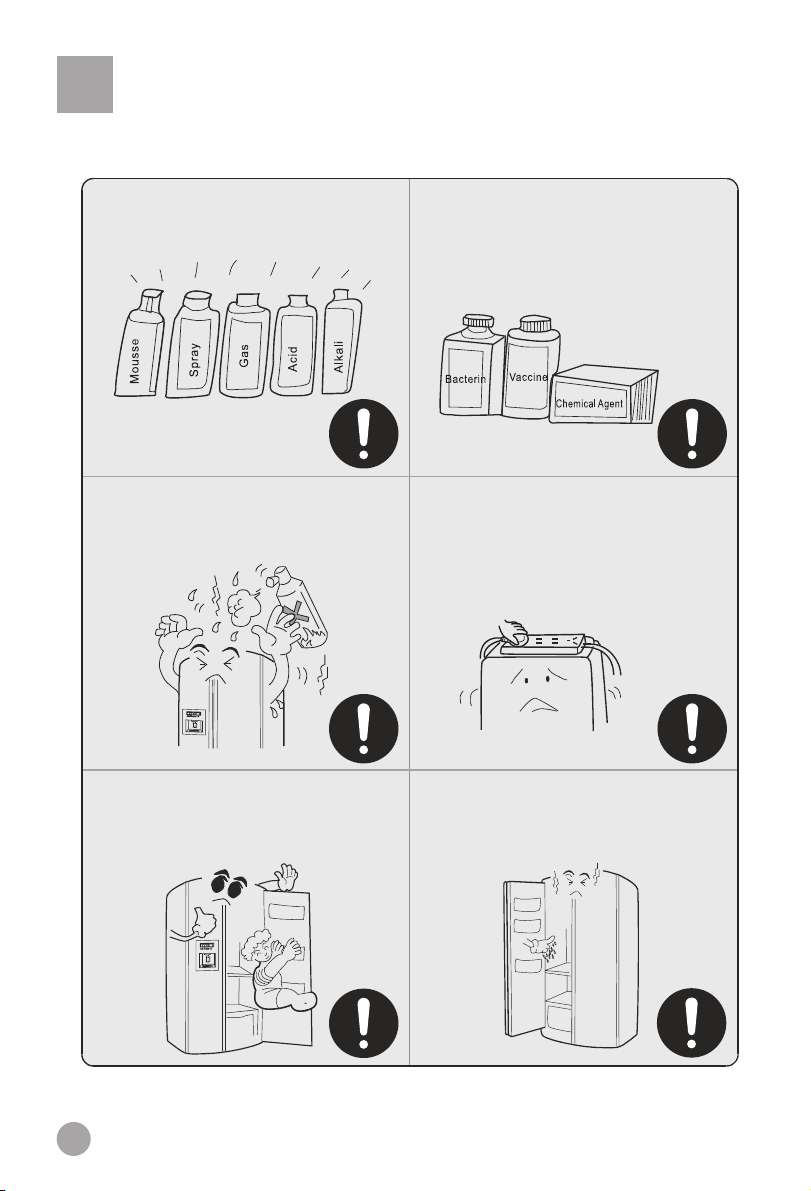
Precautions
Never place flammable, explosive or corrosive
materials in the refrigerator.
Do not store fuel and other flammable products
near this appliance.
This appliance is intended strictly for storing
and freezing foods. It is not suitable for storing
such things as vaccines, bacteria or chemical
samples, which have demanding temperature
requirements.
Do not put microwave ovens, voltage
regulators or power strips on this appliance. Do
not operate electrical devices and such inside
the refrigerator (except if instructed to do so by
the maker).
To avoid injuries, do not let children climb on
or hang from the appliance door.
4
Once the appliance has been started up, do not
touch the inside of the freezer compartment
with wet hands, otherwise they may get stuck
on the surface.
Page 7

Precautions
To avoid injury, keep fingers away from the
door crack when opening or closing the doors.
Keep children away from the appliance doors
being opened and closed.
Refrigerators may only be repaired or altered by
professionals. Improper repair may cause
considerable damage. Please contact your dealer
or our customer service should your appliance
require repair or modification.
Do not pour water onto the appliance or set it up
in wet areas.
Keep bottles and tins out of the freezer. They
could burst when the content freezes.
Pull out the power plug in the case of a power
outage, repair or cleaning.
When disposing of the appliance, remove the
door or door seal and shelves to prevent playing
children from locking themselves in and putting
their lives at risk.
5
Page 8
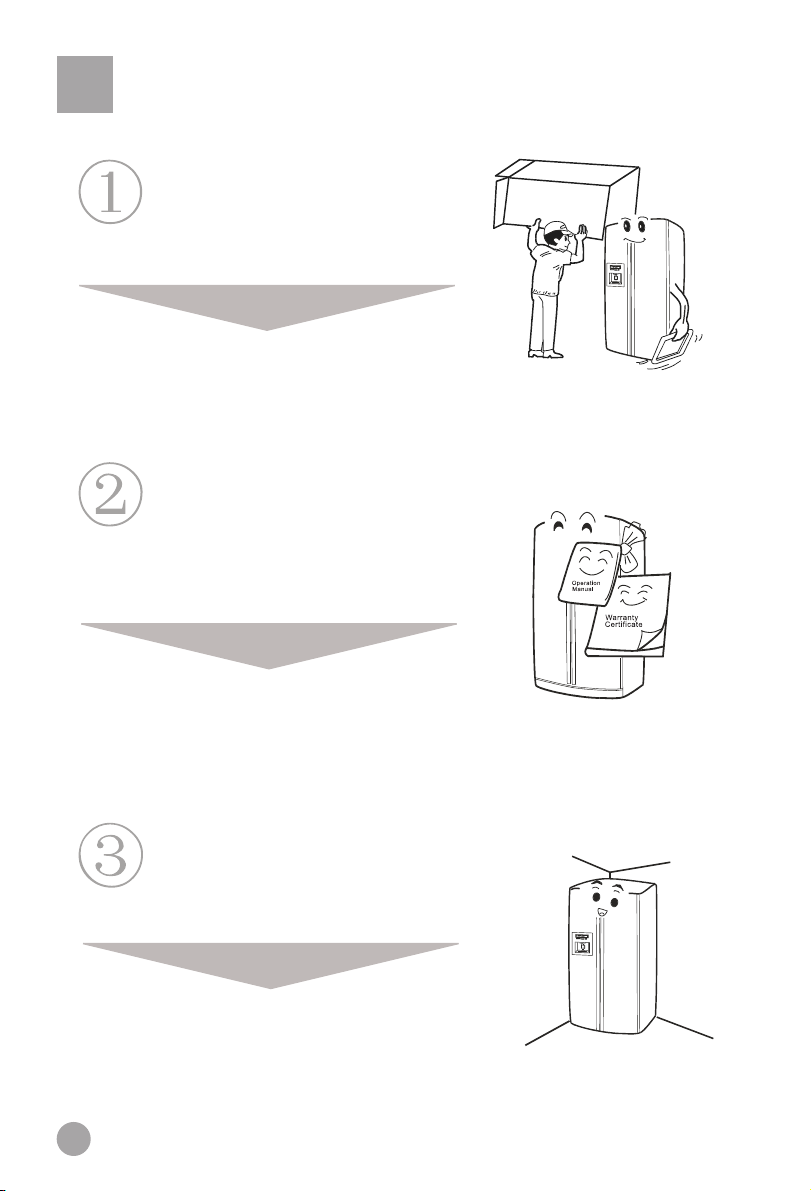
Preparations
Unpacking
Remove the entire packing material,
including the foam underlay and pieces of
tape used to hold accessories in place.
Separate and count the included
accessories.
Check the items in the box against the
packing list.
In case of a mismatch, please contact your
supplier.
Set up the appliance in a suitable
area.
(Details under “Setting up”.)
6
Page 9

Preparations
Attaching the toe moulding
Open the refrigerator and freezer doors, remove the moulding
from the refrigerator compartment, and then affix it as shown in
the illustration.
7
Page 10
Preparations
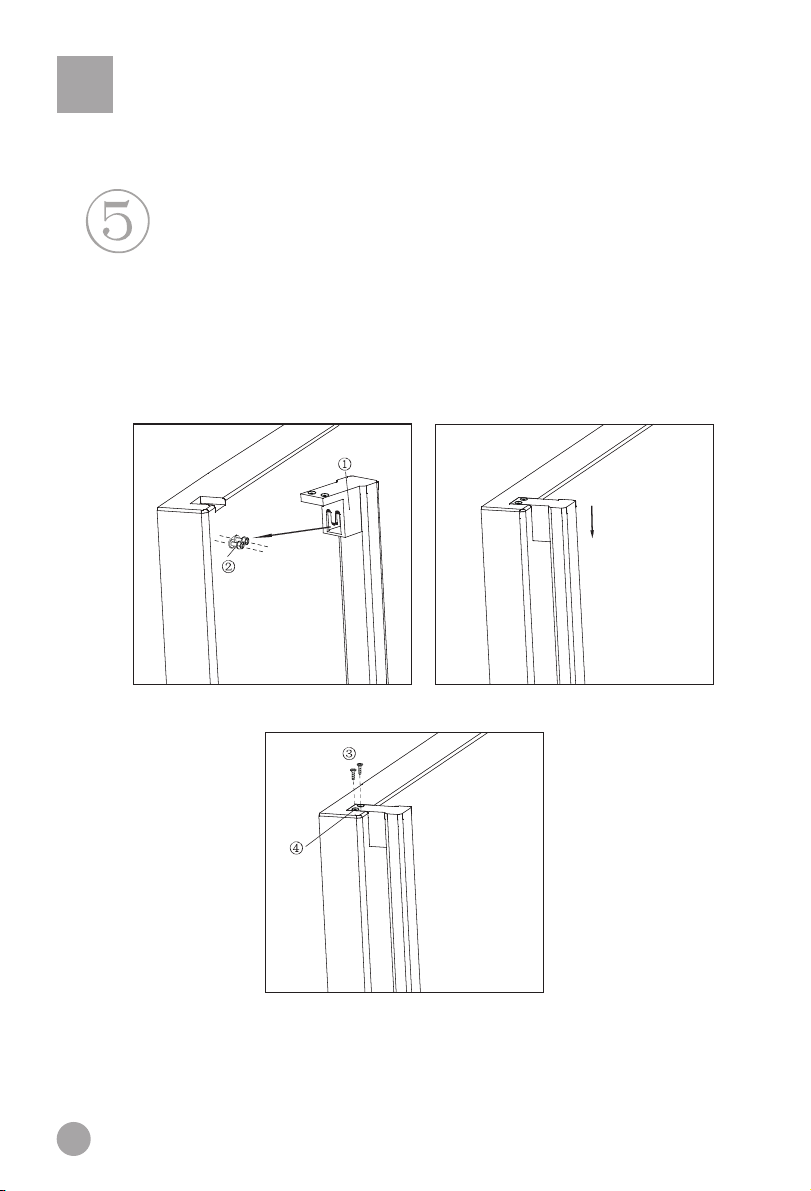
Please following the below operations when you are
assembling the Door Handle:
1)Put the pothook of handle(1) into the connector(2), (as illustration 1); then pull
down the handle hardly while the top of handle and top of door are in the same
level(as illustration 2).
2)Put the bolt(3) into the right holes(4) with the help of screwdriver(as illustration
3).
3)When you are disassembling the door handle,please operate as the opposite
way of assembling.
Handle Holder
Handle
Connector
illustration 1
illustration 3
illustration 2
Attention:
In case of no any special need,please do not disassemble the Refrigerator door handle,In case
of any need to change the handle,please get in touch with the technicians.
8
Page 11
Preparations
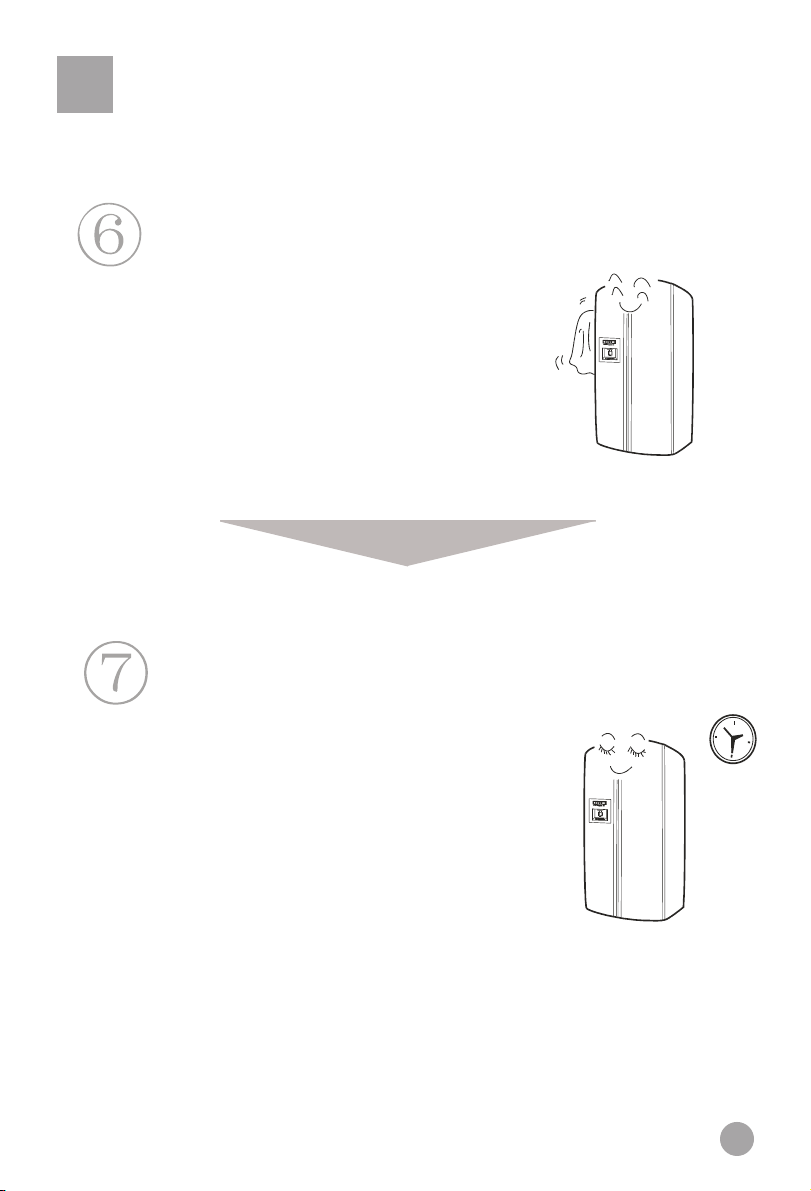
It is recommended to clean the interior before
starting up the appliance. (Details under
“Cleaning”.)
Standstill
After cleaning, let the appliance stand still for at
least six hours before turning it on to start it up.
9
Page 12
Door removal
Removing the door
If your house door is too narrow, remove the refrigerator door and carry the
refrigerator in narrow side first.
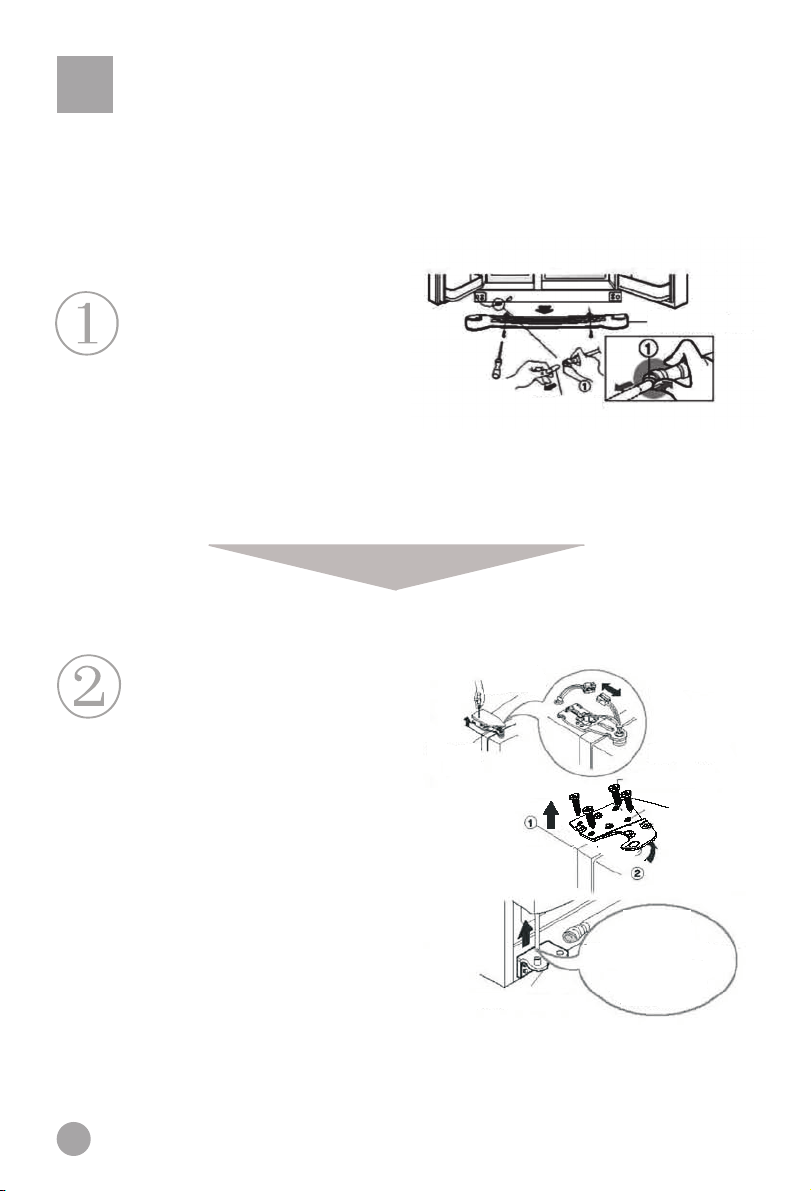
Remove the toe moulding, and then
release the water coupler.
Slide the toe moulding up to remove it, and then release
the water coupler while pressing on area (1) as shown in
the illustration.
Remove the freezer compartment door.
1) Unscrew the hinge covers. Disconnect all
wires except for the grounding wire.
2) Remove the screws from the upper hinge
following the direction as indicated by Arrow (1).
Then remove the upper hinge following the
direction as indicated by Arrow (2).
Upper
(hinge)
Toe moulding
Water coupler
Hinge cover
Wire s
Grounding wire
Upper hinge
Screw
3) Lift the freezer compartment door to remove
it. Next, lift the door enough to be able fully
pull out the water line.
10
Lower
hinge
Lift until water
line can be fully
removed.
Page 13
Door removal
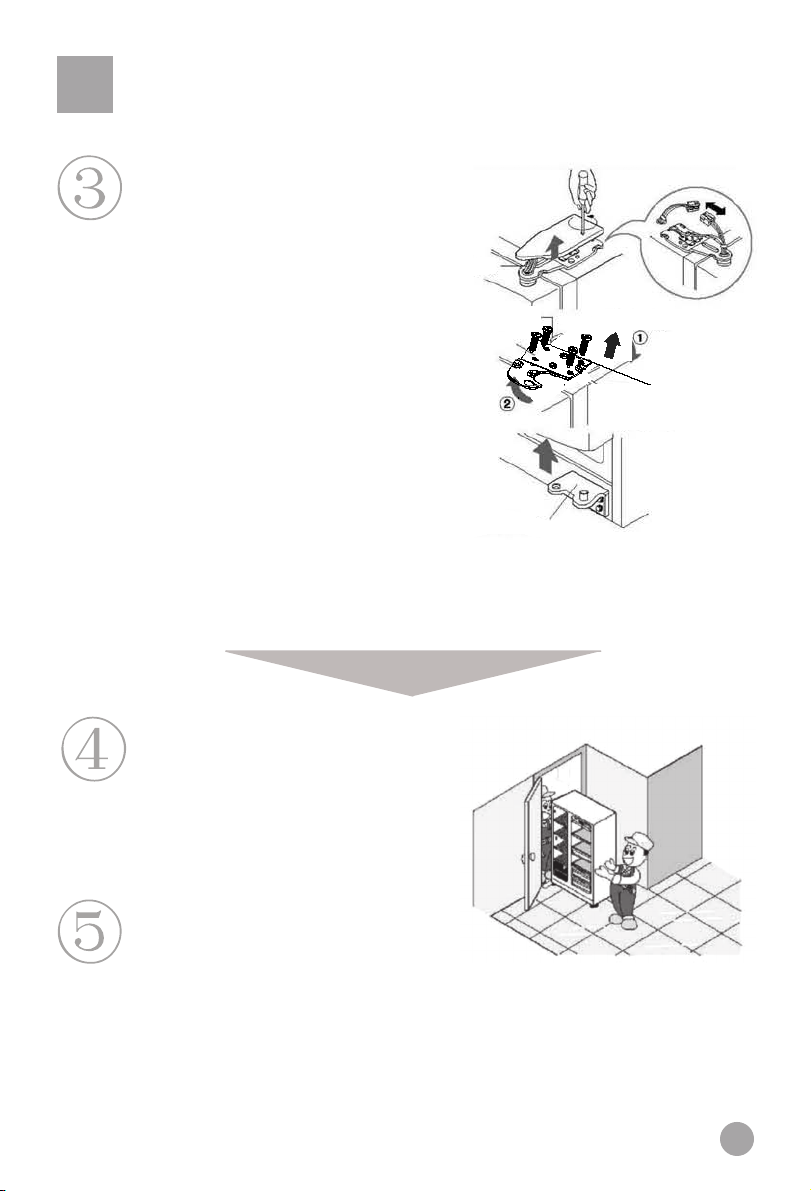
Remove the refrigerator compartment
door.
1)Loosen the hinge cover bolts, and then
remove the cover. Disconnect any wires
except for the grounding wire.
2) Remove the screws from the upper hinge
following the direction as indicated by Arrow (1).
Then remove the upper hinge following the
direction as indicated by Arrow (2).
3)Lift the refrigerator compartment door to
remove it.
Slide the refrigerator through the
door opening.
Slide the refrigerator through the door
opening as shown in the illustration.
Wires
Upper hinge
Screw
Lower hinge
Reinstall the door.
Bring the doors in the house, and then
reinstall them by reversing the removal steps.
11
Page 14
Setting up the Refrigerator/Freezer Combo
Be sure to choose a flat and level setup location.
Use sturdy and fireproof supports to correct an
unevenness in the floor. Turning an appliance
foot clockwise raises the appliance, turning it
anticlockwise lowers the appliance.
Protect the setup location against direct sunlight
or heat sources.
Door adjustment
If the freezer compartment door is lower than
that of the refrigerator compartment, insert the
wrench in the groove of the left screw and turn it
in the direction of the arrow until both doors are
the same height.
Wrench Left screw
refrigerator
If the compartment door is lower
than that of the compartment, insert the
Height difference
freezer
Height
difference
wrench in the groove of the right screw and turn
it in the direction of the arrow until both doors
are the same height.
Height difference
Height difference
Right bolt
Wrench
Avoid a damp setup location. Remove water
and dirt with a soft rag.
12
Be sure to leave at least 10 cm of space around
the appliance. When installing the appliance in
an enclosed area, leave at least 25 cm of space
on the sides and 5 cm on the top and back.
Spacing
Page 15

Start-up
Power connection
After connecting it to the power, the appliance is automatically set to the
Intelligent and Crushed Ice modes.
This appliance has a memory function which, in the event of a power failure,
automatically stores the operating mode that was last used and restores it when
the power is turned on again.
Operating modes
Recommendation:
T
he Intelligent mode allows the appliance to achieve the
best and most energy-efficient cooling effect, regardless
of ambient temperature variations and without requiring
you to make any settings at all.
Choose one of the following two operating modes.
(1)Intelligent mode: If there are no special requirements, it is recommended to choose the
Intelligent operating mode. Press the Intelligent key once; the indicator lights up and the
appliance is started automatically. (Details in the “Features” section.
(2)(Manual mode: Make manual temperature settings using the temperature adjustment keys.
Loading foods
Operate the refrigerator empty for a while. Start
loading the refrigerator with foods only after it has
sufficiently cooled down.
Please note that changes in the temperature settings come into effect slowly.
This depends on variations of the ambient temperature, how frequently the
door is opened and the amount of foods loaded.
13
Page 16

Digital display operation
Control panel
HL
GK I J
A
B
C
A---Fuzzy logic
B---Freezer temperature
C---Lock function
D---Ice/Water
E--- Refrigerator temperature
F----Quick freeze
G----Fuzzy logic indicator
H----Water filter indicator
I-----Ice maker indicator
Fuzzy logic function
A
F
E
D
MNOP
J----- Quick freeze indicator
K----- Freezer temperature indicator
L------ Refrigerator temperature
indicator
M-----Lock function indicator
N-----Water selected indicator
O-----Cubed ice selected indicator
P-----Crushed ice selected indicator
G
If fuzzy logic is activated, the appliance will adjust inside temperature automatically
according to ambient temperature. Fuzzy logic is activated and inactivated by consecutive
press of button A, then Fuzzy logic indicator G will turned on and off.
14
Page 17

Using the digital display
Quick Freeze
Quick freeze function is designed to preserve the nutritional value of food as the food will
freeze completely in the shortest period possible. To use the 'Quick Freeze' function, press
button F. Indicator J will illuminate to show you that the function is operational,
freezing function will be automatically deactivated after 14 to 42 hours. It is depending on
the actual quantity of food in the freezer compartment.
the 'Quick Freeze' condition, press button F again indicator J will go out.
Note: the Quick freeze can not be activated if the fuzzy logic is set.
Note:Super freezing is used to freeze large quantities of fresh food and, depending on the
quantity, must be switched on up to 12 hours before the food is placed in the freezer
compartment.
J
F
Super
. To switch 'Quick Freeze' off under
Setting and Adjusting the Temperature
GK
L
A
BE
The appliance is preset at fuzzy logic, which can be inactivated by a press of Fuzzy logic
button A, indicator G will go out.
Setting and adjusting temperature as follows: (Fuzzy logic must be inactivated.)
To adjust the refrigerator temperature under unlocked condition, press button E, the indicator
L will flash. Each subsequent press of button E will adjust the temperature circled as follows:
543765.
To adjust the freezer temperature under unlocked condition, press button B, the indicator K
will flash. Each subsequent press of button B will adjust the temperature circled as follows:
-1 -20 -22 - 15 - 17 -18 .
15
Page 18

Using the digital display
Ice cube/water select
Crushed ice
Cool water
D
P
D
N
Ice cubes
O
The appliance is pre-set at crushed ice condition when the power supply is connected,
indicator P illuminates. Press the button D to choose the option you want.
16
D
Page 19

Using the digital display
Switching the icemaker on/off
HL
GK I J
A
B
C
MNOP
To close the ice maker, press and hold the button F and A for 3 seconds, indicator I and N
comes on, it is indicating that the ice maker has been turned off, this will shut off the water
supply to the ice maker, no cubed and crushed ice, Ice/Water button can not be used for
selecting between water, cubed ice and crushed ice, but it will not affect the water dispenser,
cool water is still available.
If you want to turn on the ice maker, press and hold the button F and A for 3 seconds,
indicator I turns off, ice maker restart to run as usual.
Note: 1) if indicator N, O and P can not be selected, please confirm if the ice maker has
Been turned off according to the above information.
2) the ice maker turns on when you re-connect the electricity supply.
F
E
D
Switching the refrigerator On/Off
L
E
17
Page 20

Using the digital display
To switch off the refrigerator, press and hold button E for 3 seconds, indicator L will
disappear, but the light will continue to illuminate.
To switch the refrigerator on again, press and hold button E. indicator L will reappear and
the refrigerator will begin to run as usual.
Locking and Unlocking the appliance
C
M
To lock the appliance, press and hold button C for 3 seconds under the unlock condition,
indicator M will light;
To unlock the appliance, press and hold button C for 3 seconds, indicator M will go out.
Note : (2)-(7) functions can not be used when the appliance has been locked.
Changing the water filter
H
When the water filter indicator light H comes on, it is indicating that the water filter requires
changing (approximately every 6 months). After finishing the change, press and hold button
D for 3 seconds, indicator light H will disappear.
18
D
Page 21

Using the digital display
Error Codes
In the event of an error occurring, the Freezer temperature indicator K and
Refrigerator temperature indicator L will show one of the following codes:
E0, E1, E2,F1,F2,F3.
If this happens, please contact Customer Service to have the refrigerator
repaired.
Open door warning
If any door and home bar is left for more than 30 seconds the Door Alarm
function will start to remind you to close the door.
Control Function Display
30 seconds after the final press of any button, the display will be blank. The
display will illuminate when the door is opened, or if you press any button.
Power-breaking Memorising Function
When the refrigerator turns off as a result of a power surge, the state of the
refrigerator before the power break is memorized. Once restarted, this allows
the refrigerator to operate with the programmed default values as before the
power break.
Note : this function is not suit for switching ice maker off and locking the
refrigerator.
19
Page 22

Refrigerator compartment
Use the refrigerator compartment for short-term
food storage
The average refrigerator temperature of 0 °C-10 °C is not
low enough for long-term storage of foods; it is suitable
only for short-term food storage.
Adjusting the height of glass shelves
The shelves are height-adjustable to accommodate
various item sizes.
The shelves can be taken out for height adjustment and
cleaning. To clean a shelf, pull it in direction 1, and
then tilt it in direction 2 until it is in a vertical position.
Finally, remove the shelf in direction 3. To remove a
shelf, the appliance door must be open 90º.
Adjusting and cleaning bottle rack
Hold both sides of the bottle rack and pull it out in
directions (1) and (2).
Caution:
Frozen foods (such as ice cream) should not be
placed in the bottle rack but rather inside the freezer
compartment to avoid that they spoil as a result of
being exposed to the temperature changes from
opening and closing the door.
After cleaning, re-place the bottle rack or adjust its
position.
20
Page 23

Refrigerator compartment
Stocking example
Foodsshouldbegroupedaccordingto
the various temperature ranges in the
refrigerator compartment.
(1) Eggs, butter, cheese
(2) Tinned drinks and foods,
seasonings
(3) Drinks, bottles
(4) Preserves
(5) Meats
(6) Flours, preserves, milk
(7) Processed meats, sausage
(8) Fruits, vegetables, lettuce
Removing the veggie drawer cover
First, lift the rear of the shelf in direction (1), and
then pull the shelf out in direction (2). Finally, tilt
the shelf in direction (3) and remove the veggie
drawer once the door is open 90º.
21
Page 24

Refrigerator compartment
Using the veggie drawer
The appliance is equipped with a veggie drawer
suitable for keeping fruits and vegetables. The
humidity level in the veggie drawer is adjustable.
Reducing or closing the opening increases the
humidity inside the veggie drawer, which is
desirable for keeping cucumbers, grapes, kiwi,
plums, etc.
Increasing the opening reduces the humidity
inside the veggie drawer, which is suitable for
keeping strawberries, mandarins, beans, garlic,
water melon, plums, tomatoes, etc.
Make sure that the front of the veggie drawer
cover is located on the inside of the veggie drawer.
Remove the veggie drawer before removing its
cover.
Installation is reversed.
Replacing the bulb at the top of refrigerator
compartment
Bulb specifications: 220-240 V / 25 W
Socket: E27 (Do not use a replacement bulb of more
than 25 W.)
Replacing the bulb
Unplug the power cord.
Remove the screws under the cover.
Lift the cover in direction (1), and then pull it out in
direction (2).
Install the bulb.
22
Page 25

Notes on refrigeration
Let warm foods and drinks cool down to room
temperature before putting them in the
refrigerator compartment.
Pack and seal foods before storing them. This
prevents drying and odour dissipation.
Wash and dry off fresh foods before storing
them.
Pack the food into portions suitable for your
household. Place the foods that will be
consumed the soonest towards the front so as
not to leave the appliance door open longer
than necessary.
Do not overstock the refrigerator.
Be sure to leave space between foods and between the foods and the interior compartment walls.
23
Page 26

Tips on refrigeration
Remove the leaves of root vegetables to
prevent them from absorbing the nutrients.
Items not requiring refrigeration: Onions,
peppers, garlic, ginger.
Thawing frozen foods inside the refrigerator
helps conserve energy.
Items not suitable for refrigeration: Gourds,
melons, bananas, pineapple. Refrigeration
promotes their decomposition. Do refrigerate
unripe fruits.
24
Caution: Do not use the egg tray as an ice cube tray and never place it in the freezer or
Superfrost area to prevent it from cracking.
Page 27

Freezer compartment
Use the freezer compartment for
long-term food storage
A low temperature in the freezer compartment is
necessary for long-term food storage. Do not
exceed the maximum length of storage indicated
on the package.
Removing and cleaning glass shelves
First, lift the rear of the shelf in direction (1), and
then pull the shelf out in direction (2). Finally, tilt
the shelf in direction (3) and remove it once the
door is open 90º.
Interior light and replacement of bulb
Bulb specifications: 220-240 V / 40 W
Socket: E27 (Do not use a replacement bulb of
more than 40 W.)
Replacing the bulb
Pull out the power plug or neutralise the
fuse.
Lift the cover in direction (1), and then
pull it out in direction (2).
Twist the bulb anticlockwise, and then
remove it. Install a new bulb of equal
specifications.
Re-install the cover.
Adjusting and cleaning bottle rack
Hold both sides of the bottle rack and pull it out in
directions (1) and (2). Clean the bottle rack, and
then re-place it or adjust its position.
Caution:
Frozen foods (such as ice cream) should not be placed in the bottle rack but rather
inside the freezer compartment to avoid that they spoil as a result of being exposed to
the temperature changes from opening and closing the door.
25
Page 28

Notes on freezing
Let warm foods and drinks cool down to room
temperature before putting them in the freezer
compartment.
Package the food before freezing it. The
packages should be dry to prevent their sticking
together. Use only freezer-compatible packing
material; this should be strong, taste-neutral,
air- and watertight so as to minimize taste
contamination and loss of quality.
Pack the food into portions of up to 2.5 kg
suitable for your household. As a result, the
portions will freeze faster and the quality after
thawing remain optimal for preparation.
Always write the content and freezing date on
the packing, and do not exceed the
recommended length of storage so as to prevent
loss of quality.
Remove only the required amount to be thawed.
Thawed foods must never be frozen again.
26
Never place more fresh food in the freezer at
one time than the maximum freezing capacity.
Page 29

Starting up the ice maker and dispenser
Preparations before starting up the ice maker and dispenser
The ice maker can be connected either directly to a water supply line if fitted
with a filter (option A) or to a drinking water container if fitted with a water
pump (option B).
Cut the water line to the right length to prevent it from kinking. The
recommended maximum length for the water line is 12 m. The pressure drop
resulting from an excessively long water line could adversely affect the ice cube
maker capacity.
Keep the water line away from heat sources.
The water supply line should be installed and checked by professionals.
When calling for refrigerated water for the first time, keep pressure on the
dispenser lever for one minute several times until water flows out, in order to
allow the water tank inside the appliance to fill up. Be sure not to hold the
dispenser lever pressed for too long, otherwise the water valve may overheat.
Option A:
Water supply line installation
The pressure of the cold water supplied to the ice maker should be within 1.5-8.5
bar.
It is recommended to use drinking water for producing ice cubes since the filter
does not sterilise bacteria.
Option B:
The water pump must be connected to its own outlet and properly grounded.
Removal or modification of the water pump and modification or repair of the
water supply line by unauthorised persons are not permissible.
To prevent fire, do not store or use flammable products such as fuel near the
water pump.
The water pump is to be used solely with room temperature water; it is not
suitable for use with chemicals, fruit juice or other grainy drinks, coffee or other
hot liquids.
If the water pump will not be used for en extended period of time, pull out its
power plug.
Periodically check the water tank to make sure that the water level is sufficient.
Do not push, shake or knock the water pump.
Place the water pump and drinking water container on a sturdy and level surface.
After opening the small lid of the drinking water container, protect the opening
with a dust cover. Guide one end of a hose to the bottom of the container and
connect the other end to the water pump inlet (indicated by an INLET symbol).
Connect one end of another hose to the water pump outlet (indicated by an
OUTLET symbol) and the other end to the water valve inlet under the back of the
refrigerator.
27
Page 30

Ice maker and dispenser operation
Precautions
Do not connect the ice maker water line when the temperature is below 0 ºC,
otherwise the water line may freeze
Open the valve and flush the water line to check the line connections for possible
leaks. Close the valve again when the water is clean and clear.
The ice maker does not become operational until the temperature has reached or
gone under -15 °C. (Do not consume the first batch of ice cubes.)
After setting up the appliance, be sure to check that the water supply line is
properly positioned so that it will not be pinched or damaged.
The ice maker must be installed by an authorized representative.
The ice maker must be connected to a standard cold water pipe.
If the water dispenser indicator does not work, contact customer service or a
qualified professional for repair.
Ice maker operation
28
Each cycle produces eight ice cubes. The ice cube production capacity depends on
variations of the ambient temperature and how frequently the door is opened.
Caution: Let the appliance operate at least 24 hours before starting ice
cube production
Do not consume the first ice cubes after starting up the appliance for the first time or
following a long period of inoperation.
Arrange the ice cubes manually to make sure that the container has been filled.
A few of the eight ice cubes produced in one ice maker cycle may stick together.
Page 31

Removing and installing the ice cube container
Removing the ice cube container
Press the middle section of the ice cube container in and pull it off its shelf.
Re-placing the ice cube container
Slide the ice cube container in the channel on both sides of the inner sleeve until it is clasped
into position.
If the ice cube container cannot be fit into position, take it out again, rotate the support by
90°, and then re-insert the container so that the clamp locks with the channel.
Support
Turn
29
Page 32

Dispenser operation
Dispenser operation
Choose crushed ice, refrigerated water or ice cubes. Slightly push a glass against the ice/water lever as
shown in the illustration.
(1) Dispensing crushed ice
Press the appropriate button so that the
indicator for crushed ice lights up.
Lightly press against the lever so that
crushed ice is supplied.
(2) Dispensing ice cubes
Press the appropriate button so that the
indicator for ice cubes lights up.
Lightly press against the lever so that ice
cubes are supplied.
(3) Dispensing refrigerated water
Press the appropriate button so that the
indicator for refrigerated water lights up.
Lightly press against the lever so that
refrigerated water is supplied.
Dispensing crushed ice
Even with the ice cube option selected, some crushed ice may be supplied simultaneously. It is also
possible that the crushed ice supply is mingled with a few ice cubes.
When crushed ice is frequently called for, it is normal for frost to build up around the outlet, but it
will eventually evaporate.
Keep the glass close to the dispenser to prevent ice from spilling.
Dispensing refrigerated water
Due to air in the water supply line, refrigerated water may not be available immediately after
installation. In this case, hold the dispenser lever pressed in for as long as two minutes to evacuate
any remaining air.
After that, the supplied water will become increasingly cooler.
Refrigerated water does not contain any ice cubes. To lower the temperature of the refrigerated water,
add crushed ice or ice cubes to it.
Caution: Keep fingers and objects away from the dispenser.
30
Page 33

Dispenser precautions
Precautions
The following instructions refer only to products equipped with an ice cube maker, ice crusher and
refrigerated water dispenser.
Do not use very tall or short glasses.
Hold the glass as close as possible to the ice cube outlet so as to prevent dropping ice cubes or
jamming the ice cube supply.
The outlet closes five seconds after ice cubes have been supplied.
When helping yourself to ice cubes, hold the glass under the outlet for 2 to 3 seconds after
releasing the switch, as more ice cubes may be delivered.
When helping yourself to water, hold the glass under the outlet for 10 to 20 seconds after
releasing the switch, as more water may be delivered.
Regularly empty the water collection tray and wipe off water drops from the dispenser using a
rag.
When selecting ice cubes after crushed ice was last dispensed, a few remaining pieces of
crushed ice may be delivered.
Remove any remaining ice shavings from the outlet to prevent jamming.
Do not place drinks or other foods in the ice cube container, as this may damage the ice maker.
To avoid injuries, do not touch the ice outlet with your hand and do not remove the ice maker
cover.
Do not consume the first seven or so glasses of water and 20 or so ice cubes after starting up
the appliance for the first time or following a long period of inoperation.
Do not place ice cubes other than the ones produced by the appliance in the ice cube container,
as they may not be properly delivered or crushed.
An insufficient water supply line may cause ice cubes to be too small. An excessive water
supply line may cause ice cubes to be too large. Moreover, water may overflow into the ice
cube container, causing the ice cubes to stick together. Adjust the faucet accordingly or contact
an authorised professional.
Caution: The valve and relay may produce audible sounds while ice
cubes are being supplied
31
Page 34

Defrosting · Cleaning
Defrosting
The appliance defrosts automatically.
Cleaning
Clean the refrigerator regularly to prevent odour build-up.
For safety reasons, first unplug the power cord.
Clean the appliance using a soft rag or sponge and
lukewarm water, to which you may add a little bit of a
neutral dishwashing liquid.
Dry off surface water with a rag.
Caution: Do not use pointed objects, metal brushes or the following chemical
solvents:
abrasive cleansers, varnish, amyl acetate, hot water, acid, alkaline cleaners, etc.
Caution: Do not pour water onto the appliance.
Use a rag or sponge to clean and dry the controls and lights.
Be sure to clean the door seal regularly.
32
Page 35

Inoperation
In the event of a power outage
Even in the summer, foods can be kept cool for several
hours during a power outage.
In the event of a power outage, refrain from adding
foods to the appliance and opening the doors.
Caution:
A temperature drop in the freezer compartment,
caused by a power outage or other malfunction,
reduces the storage life span and quality of the foods.
If you know there will be a power outage, produce
more ice cubes and place them in the top section of
the refrigerator.
Caution:
A temperature drop in the freezer compartment, caused by a power outage
or other malfunction, reduces the storage life span and quality of the foods.
Putting the appliance out of operation
If the appliance is to remain idle for a long period of time,
you must press the power button and unplug the power cord.
Clean the appliance as described. During the period of
inoperation the doors must be left open to prevent odour
build-up.
Caution: Avoid putting the appliance out of operation, as this will
shorten its life expectancy.
Caution: Wait at least five minutes before turning on the appliance after
turning it off.
33
Page 36

Inoperation
When on vacation
Before a long vacation, turn off the appliance,
take out the food, remove the frost, clean the
interior and leave the door open to prevent
odour build-up.
Transportation
Unplug the power cord.
Remove all foods from the refrigerator.
Secure the shelves, drawers and baskets with
tape.
Close the appliance door and secure it with
tape.
During transportation, do not tilt the
appliance more than 45° (in relation to the
vertical position), otherwise malfunctions of
the refrigeration system may be caused.
34
Caution:
Do not carry the appliance or let it stand horizontally.
Page 37

Troubleshooting
Long operation time and a temperature
increase of housing and compressor are
normal during initial operation.
During initial operation, the appliance housing
may become warm to prevent condensation.
Some of the sounds produced during initial
operation or at start-up will fade during normal
operation.
At start-up and during operation, the
compressor may produce an audible sound
when starting or stopping
Click
Click
The sound of the refrigerant flowing through
the evaporator and compressor is normal. A
continuous or intermittent flowing sound after
operation is normal.
Swoosh
Swoosh
During the defrosting process, thaw water may
drip onto the heating elements, causing audible
sounds in the evaporator.
Hiss
Hiss
35
Page 38

Troubleshooting
When operating, the fan produces an audible
sound.
Moan
Moan
The evaporator lines may produces audible
sounds when the temperature is changing.
The specified power consumption at an ambient
temperature of 25 with 5 in the refrigerator
and -18 in the freezer after 24 hours of
normal operation complies with government
standards. Higher power consumption is normal
with large amounts of food in the freezer and
when the appliance door is opened frequently or
for long times.
Wipe off any condensation that may form on
the exterior housing and centre beam at high
humidity with a soft cloth.
°C °C
°C
36
Page 39

Customer service
Should a malfunction occur that you cannot resolve as described below, contact the nearest
customer service. In such a case, please indicate the full model name, serial number and
spare part register. (See the product label at the back of the appliance.)
Confirm the following before ordering a repair.
Unit does not cool
The appliance is not connected to the power (plug,
outlet, fuse) or is switched off.
Voltage too low.
Light does not come on
Bulb is burned
out.
The appliance is not
connected to the power.
Temperature is not cold enough
Appliance door not fully
closed, opened too
frequently or for too long.
Exposed to direct sunshine,
a stove or other heat source.
Unusual noises
Caution: Do not carry
the appliance or let it
stand horizontally.
Poor ventilation. The back
or sides of the appliance are
blocked.
The appliance is
touching the wall or
other object.
37
Page 40

After-sales Service
Confirm the following before ordering a repair.
Compressor runs often or for a long time
This is normal during initial operation.
Normal after loading with large amounts of foods.
Appliance door not fully closed.
Appliance door is opened frequently.
Ambient temperature is high.
Wrong temperature setting. See “Starting up”.
Poor ventilation
Foods are covered with frost or ice
Normal if unpackaged food was placed in
the freezer.
Appliance door not fully closed.
Appliance door is opened too frequently
or for too long.
Food placed too close to air outlet.
Ice maker does not work properly.
Ice cubes stick together. Take out
the lump of ice cubes, crush it and
return only the separated ice cubes
to the ice cube container.
Ice cubes may end up sticking
together if stored for too long.
Unusual odour
Strongly smelling food is not packed
appropriately.
Food has spoiled.
The appliance interior needs to be
cleaned.
Adjust the ice maker water supply if
the ice cubes are too small or too
large.
In the case of a power outage,
empty, clean, dry and re-place the
ice cube container to avoid that the
ice cubes melt and drip into the
freezer compartment.
38
Page 41

Customer service
Dispenser not supplying
No ice cubes in the ice cube
container. Wait until ice cubes
are supplied.
The water supply valve is
closed. Open the water supply
valve.
Dispenser jammed
Defrosting water has frozen on
the spindle due to long period of
idleness, large temperature
swings or voltage peaks. Empty,
clean, wipe and re-place the ice
cube container.
Freezer temperature is set too
high. Lower the freezer
temperature to improve the
performance of the ice cube
maker.
The freezer or refrigerator door
is not fully closed. Close all
appliance doors.
Ice cubes are jammed between
the ice cube maker and
container. Remove the ice
cubes.
Ice cubes are stuck together.
Use the dispenser more
frequently.
Other ice cubes were placed in the dispenser. Only the ice cubes produced by
the ice maker can be used by the dispenser
39
Page 42

Technical Data
Model HRF-663IRG Input power 200W
Climate class
Protection class
Gross volume
Rated voltage
Rated frequency
T
I
563L
220-240V~
50Hz
Defrost power
Refrigerant
Refrigerating capacity
Weight
Dimension(DXWXH)
270W
R134a 155g
8kg/24h
131kg
750x890x1770
40
Page 43

The symbol on the product or on its packaging indicates
that this product is not to be treated as regular household waste.
Instead, it must be taken to a recycling collection point for
electrical and electronic equipment. By properly disposing of this
product, you are contributing to the preservation of the
environment and the wellbeing of your fellow citizens. Improper
disposal is hazardous to health and environment. You can obtain
further information on how to recycle this product from your
municipality, your waste management service or the shop where
you purchased it.
Page 44

0060513570
 Loading...