

Page 1
User's Manual
HR-7857A
Household Microwave Oven
Double Grill
Contents
Before Use
';:5)5513+4;
:KG)ULLKK
:GTJUUXO,OYN
'[ZU*KLXUYZ
8K.KGZ
*NUQRG
)NOIQKT:OQQG
9VOTGIN)NKKYK
*KROMNZ
<KMKZGHRK6[RGU
*[GR
8UGYZ
'[ZU'JP[YZ
Features of the Product
Names of the Parts
Safety Precautions
=KOMNZ
'JP[YZ
)USHO
)UUQ
3OIXU]G\K
6U]KX
9ZGXZ
Installation Environment
5JU[X,XKK
6G[YK)GTIKR
Open the Package Carton * Installation
2
3
4-5
6
6
Usage
Instructions of the Control Panel Functions
Usage
Recipes
Selection of the Cooking Dishware
Cooking Tips
7
8-12
13-15
16
17
Maintenance * Repair
Maintenance * Repair
Answers to Questions
18
19
HAIER WARRANTY
Page 2

Before use
Dear users,
Thank you for your selection and usage of Haier products.
Haier products integrate hi-tech, precision and advanced science, and possess
high quality and excellent performance among similar products. To facilitate
you to use the product, please read the user's manual carefully and operate
according to the steps stated in the manual. Please retain the manual for
future reference.
You can be rest assured that the international star-level services of Haier
will always accompany you. No matter what kind of problems you meet in
usage, please contact us according to the telephone and address stated in the
warranty certificate. We are at your service all the time. Thanks again for
your choosing Haier product. Due to the improvement of the product, the
Haier microwave oven you have may be different from the figure in the
user's manual on some part. We apologize for any inconvenience occurred
therefrom.
Page 3

Features of the Product
Safe to use
The door adopts unique anti-choke structure and integrated punch forming, and
thus effectively prevents the microwave from leaking.
It is controlled by two-step interlock switch. The power will be switched off
automatically when the door is open, therefore it is much safer to use.
Beautiful in appearance
The streamline appearance makes it elegant and graceful; the hand door design
makes it easy and simple and convenient in use.
Healthy and germicidal
It is produced with antiseptic materials, and can suppress the reproduction of the
bacteria effectively.
The special function of the microwave oven can eliminate the germ in the food
quickly and completely.
Cubic roast
It is the patent technology of Haier. Besides the conventional top heating pipe
roast, it also adopts heating pipe at the bottom of cavity to make auxiliary heating
during roast, to confirm even roasting of the food from every direction. The result
is better taste.
It adopts temperature sensor to monitor the roast for the full procedure to guarantee
stable roast temperature.
Page 4
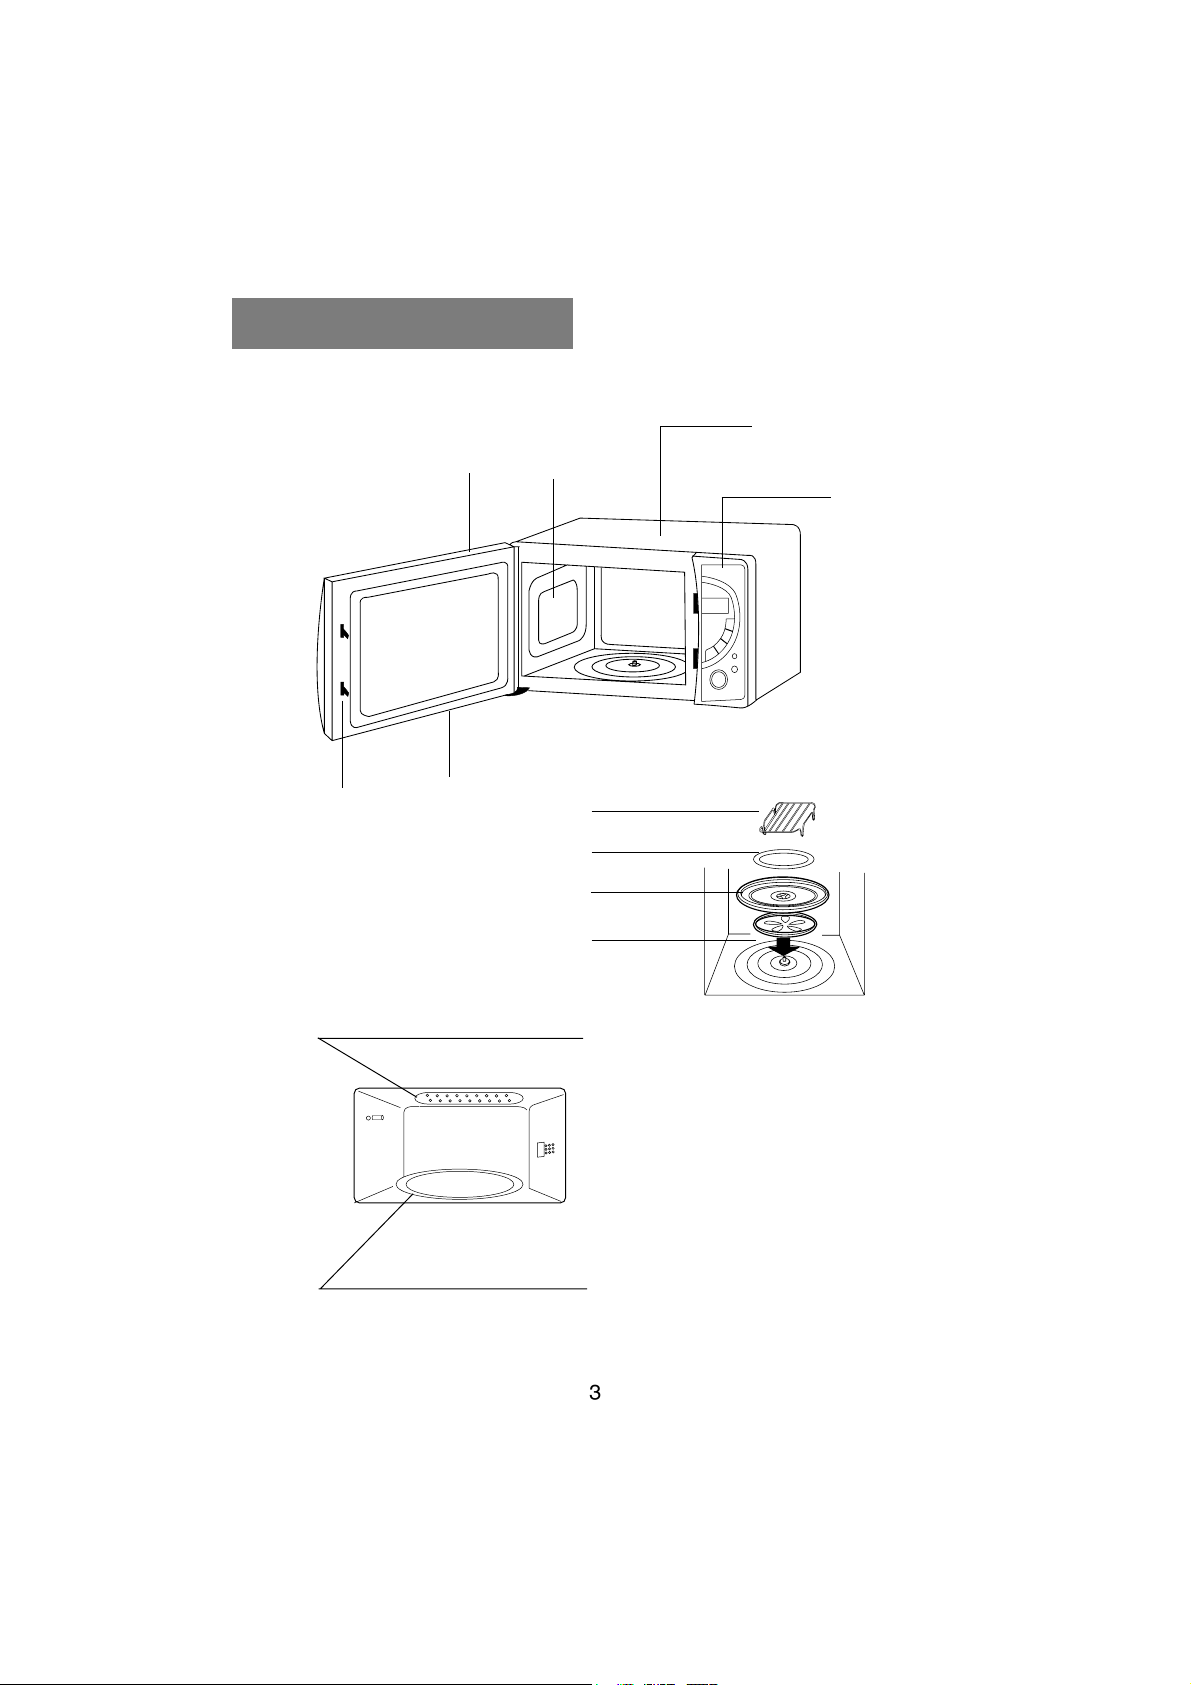
Names of the Parts
door
cavity
shell
';:5)5513+4;
:KG)ULLKK
=KOMNZ
:GTJUUXO,OYN
'JP[YZ
'[ZU*KLXUYZ
8K.KGZ
*NUQRG
)USHO
)NOIQKT:OQQG
)UUQ
9VOTGIQ)NKKYK*KROMNZ
<KMKZGHRK6[RGU
3OIXU]G\K
6U]KX
*[GR
8UGYZ
5JU[X,XKK
6G[YK)GTIKR
9ZGXZ
'[ZU'JP[YZ
volume of the
operation
board
door hook
door seal
mesh board
(heating pipe on board)
cavity
roast
mesh
roast tray
glass rotary
tray
tray support
cavity is 24 L
Page 5
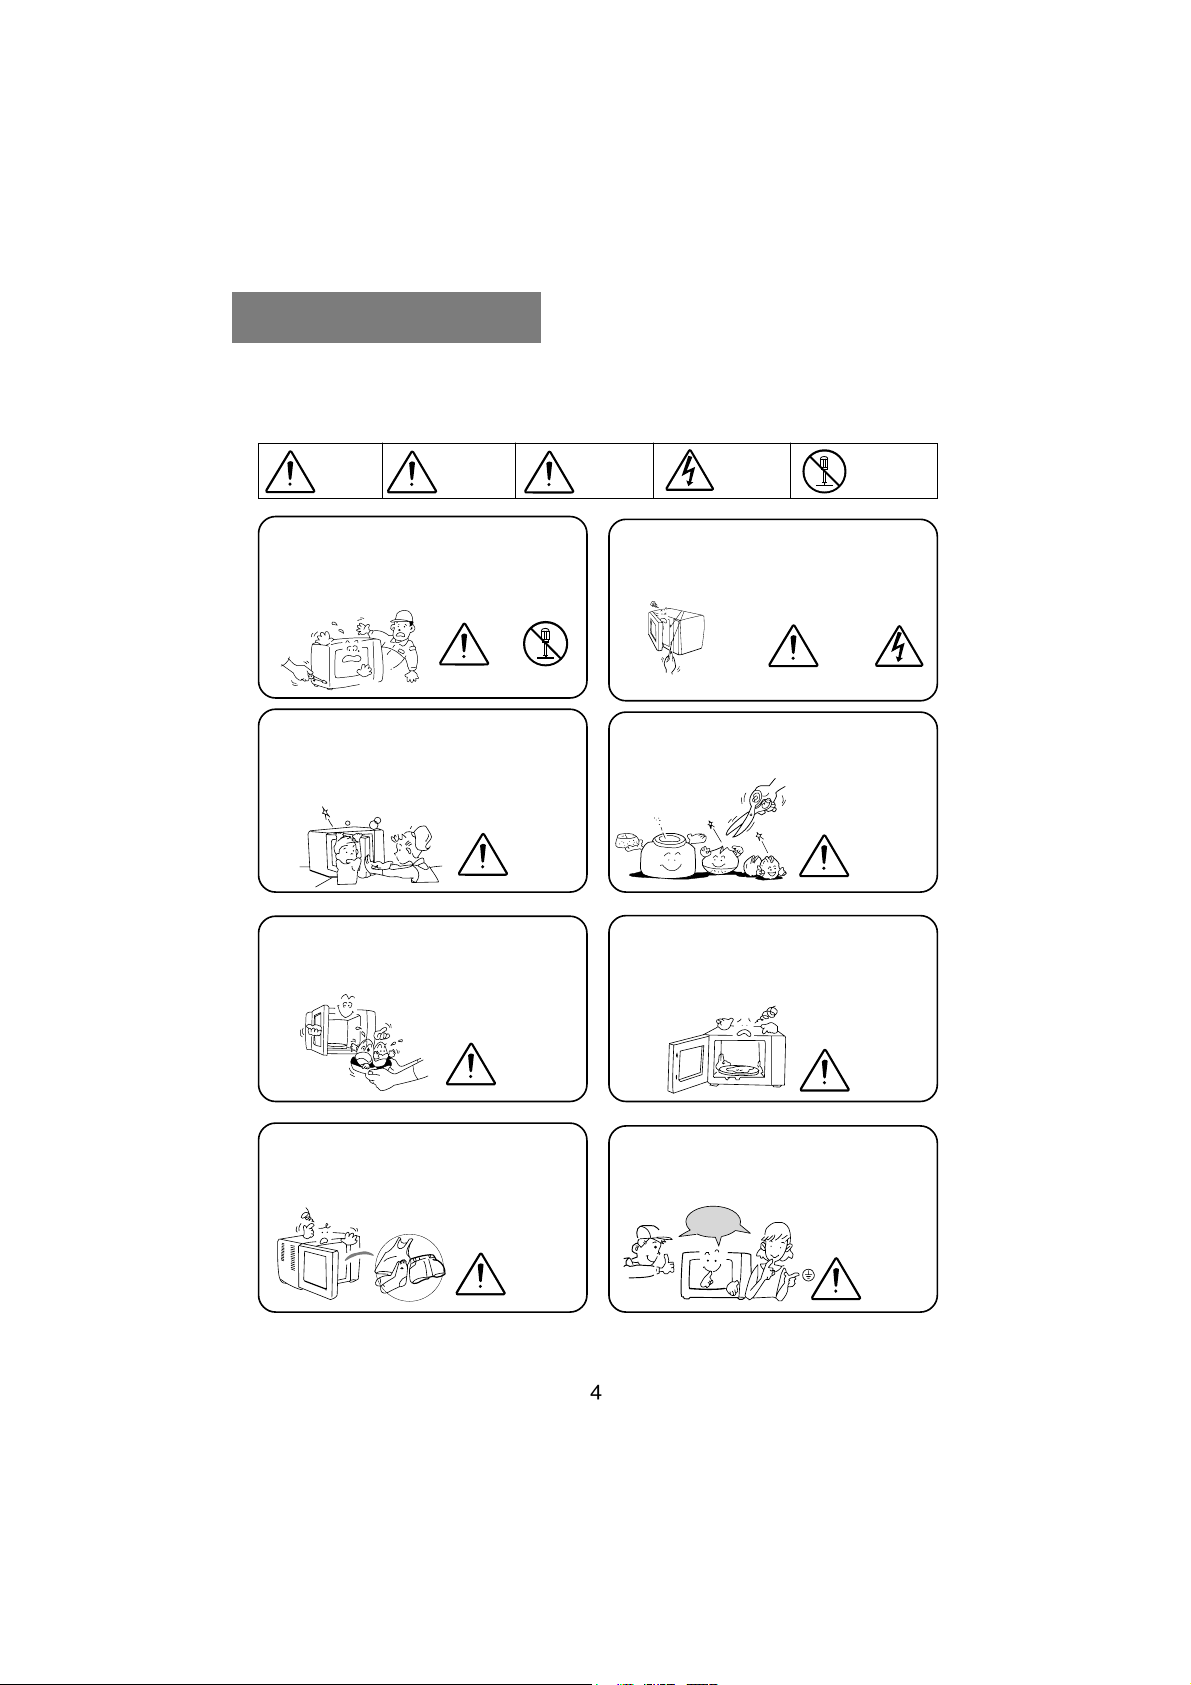
Safety Precautions
* Please read the safety precautions carefully to guarantee safe and
convenient use of Haier microwave oven.
Danger Warning
No one except the professional technicians is permitted to disassemble the
microwave oven, or it may result in
electric shock.
Danger Danger
Do not add excess strength to the direction opposite to the door. It may
cause transformation of the door and
result in microwave leakage.
Warning
Do not cook eggs with shell to avoid
splashing.
Electric
Attention
shock
hazard
Do not use metal rod to enter the interlock switch hole on the front side of
the cavity. It may cause hazard.
Do not use enclosed container. For
those foods with skin, please prick
holes on the skin.
Remember to clear the grease remained
inside the cavity. Otherwise it may
cause smoke or fire during heating.
No
dismantle
Warning
Warning
Do not use the microwave oven for
purposes other than cooking.
Warning
Warning
Be sure to ground the oven in installation and usage.
safe and
reliable
Warning
Page 6
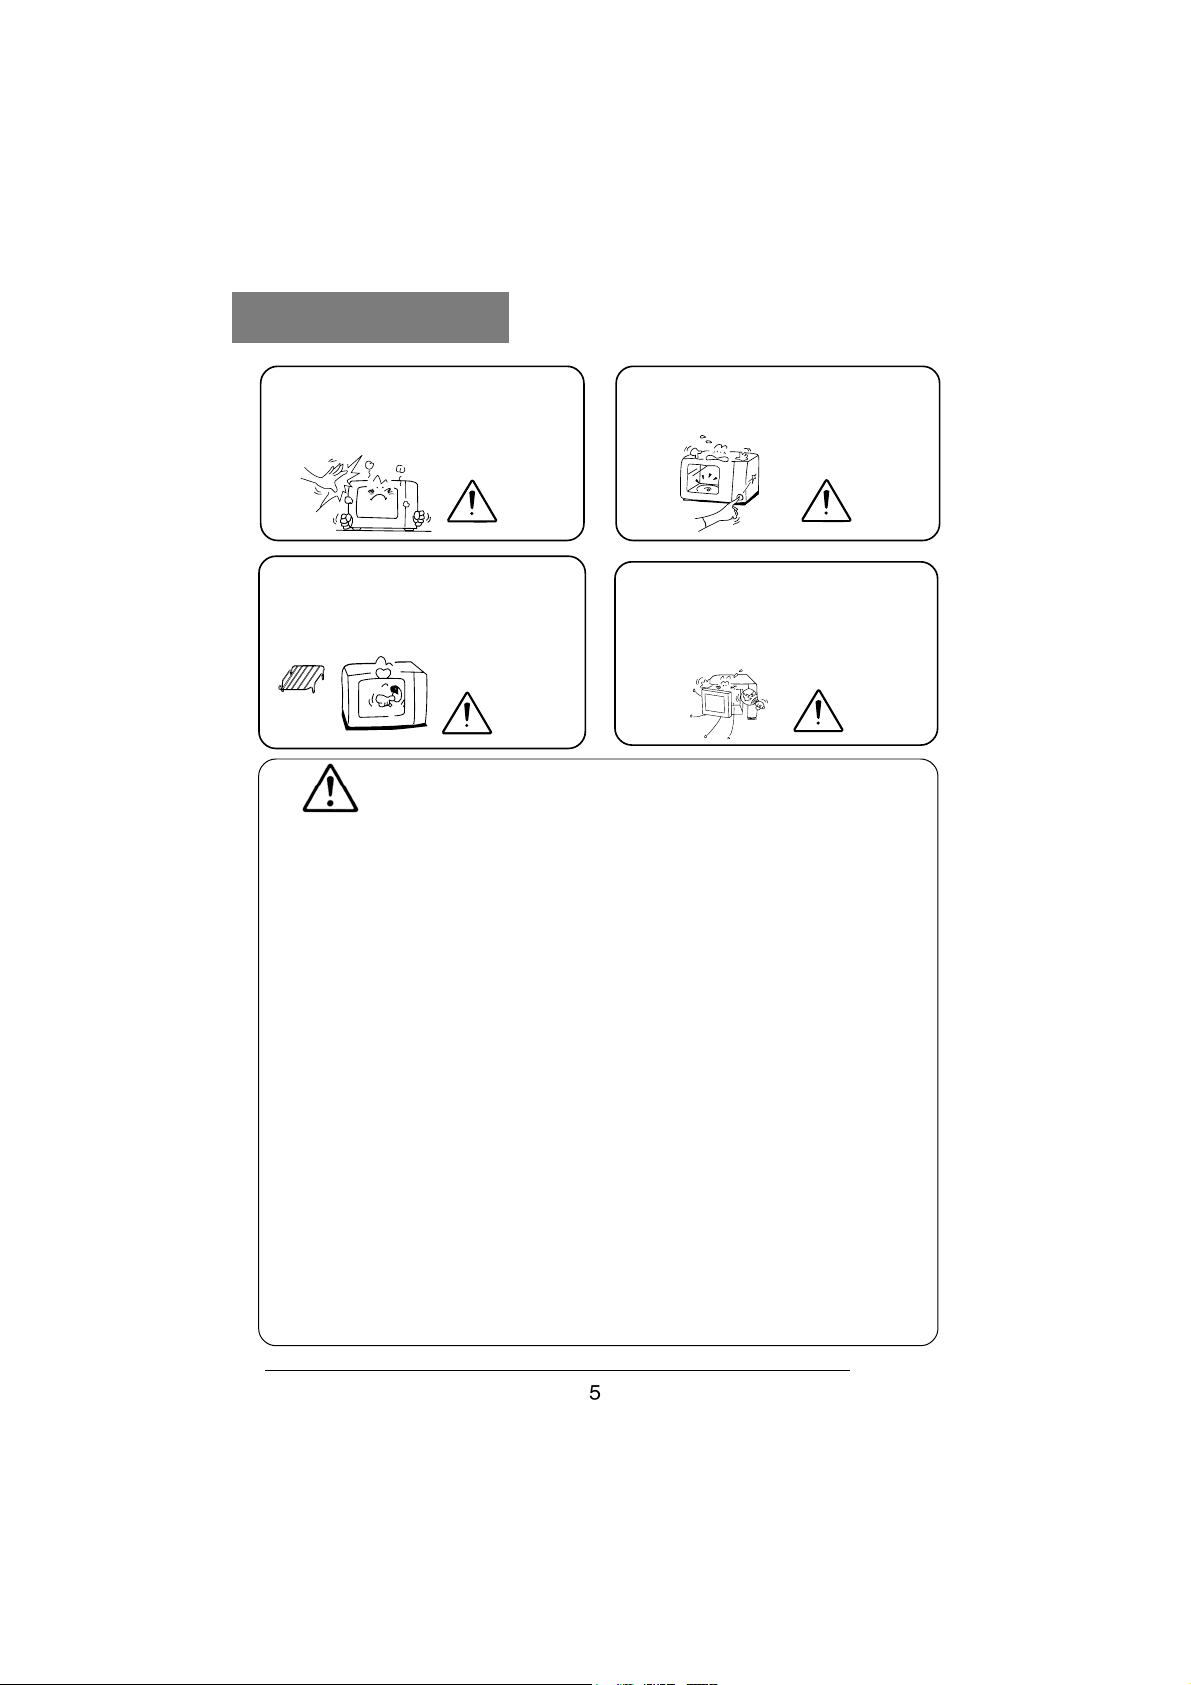
Safety Precautions
In roast, pay attention not to touch the
door screen and upside of the shell to
avoid scalding.
Warning Warning
Do not use metallic dishware to cook.
Otherwise it will strike arc.
Warning
Do not use it with the cavity empty.
It will damage the microwave oven.
When the cavity is in high-temperature
(e.g. when the roast-cooking is just
finished), do not use it to cook until it
is cooled down completely.
Warning
Warning
1. If the door or door seals are damaged, the oven must not be operated until
it has been repaired by a competent person;
2. It is hazardous for anyone other than a competent person to carry out any
service or repair operation that involves the removal of a cover which gives
protection against exposure to microwave energy.
3. Liquids and other foods must be heated in sealed containers since they are
liable to explode.
4. Only allow children to use the oven without supervision when adequate
instructions have been given so that the child is able to use the oven in a
safe way and understands the hazards of improper use;
5. Only use utensils that are suitable for use in microwave ovens;
6. When heating food in plastic or paper containers, keep an eye on the oven
due to the possibility of igniton;
7. If smoke is observed, switch off or unplug the appliance and keep the door
closed in order to stifle any flames;
8. Microwave heating of beverages can result in delayed eruptive boiling,
therefore care must be taken when handing the container;
9. The contents of feeding bottles and baby food jars shall be stirred or shaken
and the temperature checked before consumption, in order to avoid burns;
10.Eggs in their shell and whole hard-boiled eggs should not be heated in
microwave ovens since they may explode, even after microwave heating
has ended.
11.Do not cook popcorn except in a microwave approved popcorn bag or in a
commercial package.
Do not use the product for any industrial and commercial purpose.
Page 7
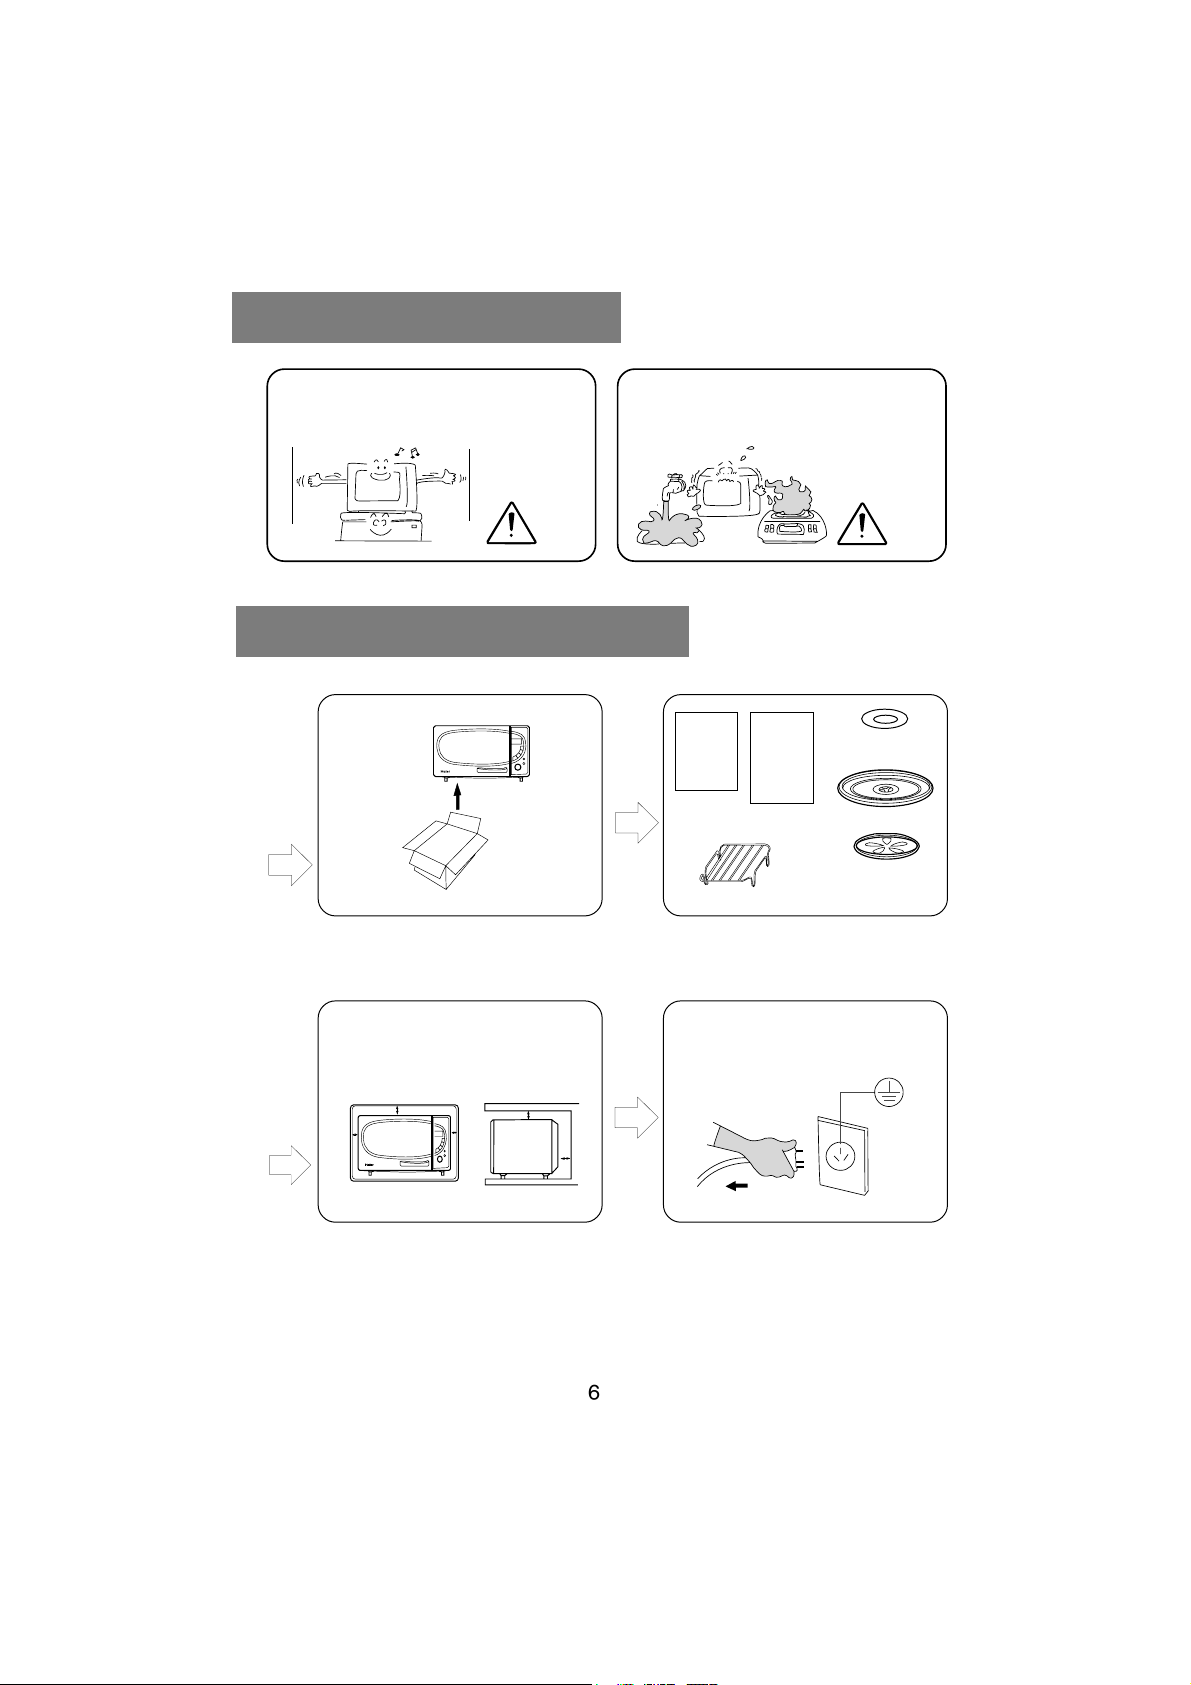
Installation Environment
Radiating space is required in installation of the microwave oven.
Do not install the microwave oven in
environment that is humid or with high
temperature.
Open the Package Carton Installation
user’s
manual
Open the
carton
qualification
cerificate
(include in manual)
roast mash
rotary tray support
Roast screen
glass rotary tray
Install
Put the microwave oven levelly
at the positio you choose. Keep
good ventilation.
';:5)5513+4;
:KG)ULLKK
=KOMNZ
'JP[YZ
:GTJUUXO,OYN
'[ZU*KLXUYZ
)USHO
8K.KGZ
)UUQ
*NUQRG
3OIXU]G\K
6U]KX
)NOIQKT:OQQG
*[GR
9VOTGIQ)NKKYK*KROMNZ
8UGYZ
<KMKZGHRK6[RGU
5JU[X,XKK
6G[YK)GTIKR
9ZGXZ
'[ZU'JP[YZ
The gaps shall be all above 15cm
Select independent special
socket, with current at least
10A. Be sure to ground it
reliable.
Page 8

Instructions of the Control Panel Functions
';:5)5513+4;
Set the Roast
function
:KG)ULLKK
:GTJUUXO,OYN
'[ZU*KLXUYZ
8K.KGZ
*NUQRG
)NOIQKT:OQQG
9VOTGIN)NKKYK
*KROMNZ
<KMKZGHRK6[RGU
3OIXU]G\K
6U]KX
*[GR
8UGYZ
=KOMNZ
'JP[YZ
)USHO
)UUQ
5JU[X,XKK
Adjust the
MENU weight
combined roast
function
"microwave+roast"
The button for
cooling cavity
'[ZU'JP[YZ
9ZGXZ
pause or cancel
6G[YK)GTIKR
Code switch
Turn right or left
to adjust time
and Auto menu
Page 9

Usage
This model of microwave oven offers four different design of usage according to the demand
of the users: I. Microwave only; II. Double-side roast; III. Combination of the microwave
and double-side roast; IV. Auto-menu. Details as per following:
I Use the microwave only.
Set the power level of microwave
For example: Cook for 10 minute
with P70.
1. Push the "microwave power" button once. The LED displays
2. Push the "microwave power" button again.
3. Turn the coding switch to 10:00. The
indicator light starts flashing
4. Push the "start" button.
start
Description: The microwave oven starts counting down.
The power level of the microwave is divided into
five types: P100, P70. P50, P30, P10. You can set
the power level first, and then set the cooking time
to do cooking.
The LED displays
The LED displays
The LED displays
II Use the double-side roast only.
Set the roast function
For example: To do roasting for 3
minute and 50 second.
1. Push the "Dual roast" button.
Description: In daily usage, you can use the coding switch directly to decide the cooking
time, without setting the power level (the microwave will have the highest power level:
P100)
You can use the roast function to color up the
food, or do thin-block roasting.
The LED displays
Page 10

Usage
2. Turn the coding switch. The cooking
indicator light starts flashing.
3. Push the "start" button.
start
Description: In cooking, it's better to do microwave cooking before roasting. It can save
time and electricity, and maintain the color, fragrant smell and taste.
Remarks: The stepping of the coding switch in adjusting the cooking time:
0-1 minute: stepping for 5 second
1-5 minute: stepping for 10 second
5-20 minute: stepping for 30 second
20-90 minute: stepping for 1 minute, the longest cooking time is 90 minute
III Use the microwave and double-side roast in combination.
Set the combination roast
For example: Make 5 minute cooking
with the combination roast.
The LED displays
The LED displays
By combination roast, you can complete the
function of microwave and roast in one
operation and avoid repeating setting.
1. Push the "combi cook" button.
2. Turn the coding switch to set the time
to 5 minute.
The LED displays
The LED displays
Page 11

Usage
3. Push the "start" button to start working.
The LED displays
start
Description: Combination roast is the function combination of microwave and roast. In
detail setting, each 1 minute and 30 second is one cycle. In one cycle, the microwave
works for 30 second, and the roast works for 1 minute.
IV Set the auto-menu
For example: To cook 300g
vegetables
1. Turn the coding switch to the left.
2. Turn the coding switch continuously
till it displays "7". Push the "weight
Adjust" button.
3. Turn the coding switch to 0.3. The LED displays
By the auto-menu function, you only need to set
the type and weight of the food to start cooking
with the microwave oven. You do not need to set
the cooking time.
The LED displays
The LED displays
The digital "0.3" refers to 0.3kg. You can
adjust it according to different weight.
Page 12

Usage
4. Push the "start" button to start working. The LED displays
start
Description: The microwave oven will set the cooking time automatically according to the
weight, and start counting down. The setting of the other kinds of auto-menu is the same as
above.
1 Tea / Coffee 2 Tandoori Fish
Weight
0.2kg
0.4kg
0.6kg
0.8kg
3 Auto-Defrost
Time
3’ 00’’
3’ 40’’
4’ 20’’
5’ 00’’
Weight
0.2kg
0.4kg
0.6kg
0.8kg
1.0kg
Time
3’ 50’’
6’ 00’’
7’ 30’’
9’ 00’’
10’ 30’’
Number
1
2
3
4
5
6
7
8
9
10
11
12
13
14
15
Weight
(kg)
0.1
0.2
0.3
0.4
0.5
0.6
0.7
0.8
0.9
1.0
1.1
1.2
1.3
1.4
1.5
Total timer
(minute
2’ 30’’
7’ 30’’
12’ 30’’
17’ 30’’
22’ 30’’
24’ 36’’
28’ 12’’
31’ 48’’
35’ 24’’
5’
10’
15’
20’
21’
39’
second)
Number
16
17
18
19
20
21
22
23
24
25
26
27
28
29
30
Weight
(kg)
1.6
1.7
1.8
1.9
2.0
2.1
2.2
2.3
2.4
2.5
2.6
2.7
2.8
2.9
3.0
Total timer
(minute
42’ 36’’
46’ 12’’
49’ 48’’
53’ 24’’
second)
57’
60’
1:04’
1:07’
1:11’
1:15’
1:18’
1:22’
1:25’
1:29’
1:33’
Page 13

Usage
4 Re-Heat
Weight
0.1kg
0.2kg
0.3kg
0.4kg
0.5kg
6 Chicken Tikka
Weight
0.1kg
0.2kg
0.3kg
0.4kg
8 Vegetable Pulao
Weight
0.1kg
0.2kg
0.3kg
0.4kg
Power level 1
100%
100%
100%
100%
Total time
0’ 30’’
1’ 00’’
1’ 30’’
2’ 00’’
2’ 30’’
Time
12’ 00’’
15’ 00’’
17’ 00’’
18’ 00’’
Time 1
5’ 00’’
6’ 30’’
7’ 00’’
8’ 00’’
5 Dhokla
Weight
100kg
200kg
300kg
7 Spinach Cheese Delight
Weight
0.2kg
0.3kg
0.4kg
0.5kg
Power level 2
50%
50%
50%
50%
Time 2
13’ 00’’
13’ 30’’
17’ 00’’
19’ 00’’
Time
4’ 00’’
5’ 30’’
7’ 00’’
Time
3’ 00’’
3’ 30’’
4’ 30’’
5’ 40’’
Total time
18’ 00’’
20’ 00’’
24’ 00’’
27’ 00’’
Voice reminder:
All of the valid button operation will be accompanied with one beep of the buzzer. If
there's no beep, the operation is invalid. When the cooking is finished, the buzzer will
make 5 beeps.
Odor-removing function:
After usage, the microwave may produce strange odor. Use this function to remove the
odor.
Under "standby" mode, push the "odour-free" button directly. The fan and rotary tray
will work for 1 minute. Each push of the button will add one minute. The max value is
5 minute.
One-button microwave cooking:
Under "standby" mode, push the "start" button directly. The microwave oven will make
cooking instantly with one minute and 100% power level. Each push of the "start" button
will add one minute on cooking time. The max value is 30 minute.
Page 14

Recipes
Tandoori Fish
Ingredients
Fish 200gms
Onion 1 (cut into Slices)
For marination
Lemon Juice 2Table spoon
Ginger -garlic paste 2Tea spoon
Green Chilies 2 crushed
Salt to taste
Method:
* Put all the marinate ingredients in a bowl & mix well.
* Wash and cut the fish into pieces. Marinate the fish for an hour in this marinade.
* Place the fish pieces on the metal rack, which is kept on the turntable.
* Press auto cook menu at 2 and set weight to 200gms. Press start.
* Serve hot with sliced onions and green chutney.
Dhokla
Ingredients
Besan 80gms
Suji 20gms
Curd 3Table spoon
Baking Soda 1/2Tea spoon
Oil 1Tea spoon
Salt 1/2Tea spoon
Sugar 1Tea spoon
Method:
* In a bowl mix besan, suji, salt, sugar and curd. Make a batter in the form of pakora
consistency. If necessary add little water. Mix well
* Add baking powder and oil into the batter, mix well to a homogeneous consistency.
* Pour the batter into a microwave safe dish. Put the dish on the turntable .Select 5 on auto
cook menu and set weight at 100gms.
* Push start button.
For Garnishing
* In a pan heat 1tea spoon of oil add mustard seeds, green chillies and curry leaves.
Pour it over the Dhokla.
Serve it.
Page 15

Recipes
Chicken Tikka
Ingredients
Chicken boneless 200gms
Garlic 5 cloves
Ginger 2 cm piece
Green chilies 2
Curd 3- 4Table spoon
(Curd hung in a muslin cloth
so that the whey separates)
Salt to taste
Red Chilies 1/2Tea spoon
Yellow Colour a pinch
Method:
* Make the paste of the ginger, garlic & green chilies. Mix them into the curd together in a
bowl.
* Add red chilies, salt, & colour and marinate the chicken pieces into this mixture for 2
hours.
* Place the chicken pieces on the metal rack, which is kept on the turntable and press auto
cook menu at 6 and set the weight to 200gms. Press start.
* After 7 minutes press pause. Turn the chicken pieces and press start again.
* Serve hot with green chutney & onion slices.
Method:
* Chop & wash spinach leaves. Put in a microwave safe dish & cover.
Page 16

Recipes
Spinach Cheese Delight
Ingredients
Spinach (chopped) 200gms
Paneer (crumbled) 100gms
Onion 1 small
Tomato 1 small
Salt to taste
Red chilli 1/2Tea spoon
Butter 20gms
Method:
* Chop & wash spinach leaves. Put in a microwave safe dish & cover.
* Cook for 3min at P- 100. Take it out and mash in the form of a puree.
* Add 100 gms paneer, chopped onion, tomato, two chopped green chilli, salt, red chilli
and mix well.
* Pour butter on it. Select 7 at auto cook menu and set weight at 300gms. Push start.
* Serve it hot.
Variation:
Instead of Paneer you can use boiled corn or sauted mushroom.
Vegetable Pulao
Ingredients
Rice 100gms
Peas 100gms
Carrot 1 small
Oil 2Table spoon
Cumin Seeds 1Tea spoon
Cinnamon stick 1 small
Cloves 5
Water 2 cups
Salt to taste
Method:
* Wash & Soak the rice for half an hour.
* Chop the carrot finely into small pieces.
* Put oil in a microwave safe dish & set microwave power at 100 for 2 min. Add cumin
seeds, cinnamon stick, cloves and cook again for at same power for 2 min.
* After 2 min add the peas, carrot, rice, salt and 2 cups water. Press auto cook menu at 8 and
set weight to 200gms.
* Press start.
* Serve hot.
Page 17

Selection of the Cooking Dishware
Selection of the microwave cooking dishware
Please select suitable cooking dishware for the microwave oven.
Microwave characters
absorbed by the food
Cooking dishware
Heatproof
glass
container
Non heatproof
glass container
Heatproof plastic
container
Non heatproof plastic
container
Ceramic container
Lacquer
container
Metal
containers such
as aluminum
Wooden,
bamboo,
paper
container
Film
Aluminum
foil
Microwave cooking
Ye s
No No No
Ye s
* Please use containers labeled
with “apply for microwave oven”
mark
No
* Materials deteriorated by microwave can not be used.
* The foam tray can be used in single
defrosting the fresh food.
Ye s
* Containers with color pattern
or golden/silver decoration can
not be used.
No
* It may cause paint drops, breaking etc.
No
* The metal screen may also cause arc, and
thus can not be used.
* The coloring plate special for microwave
oven (metal product) can not be used either
No
* It may cause combustion
Ye s
* Do not use it in cooking with much oil
because it will produce high temperature
No
* It can be used for suitable extent in
defrosting food
penetrate the glass reflected by the metal
Roast-cooking
Combined cooking
Ye s Ye s
No No
No
Yes
* Containers with
color pattern at inner
side may cause color
drops. Please avoid
using such containers.
No
Ye s
No No
Ye s
* If the container
has resin handle,
No
do not use it.
No
* Those paper containers
treated with heatproof
processing can be used.
No
* It will melt under
high temperature
Ye s
* Wrap the food with
aluminum foil to do
roasting
No
No
No
Page 18

Cooking Tips
Cooking tips for microwave oven
Food temperature
Food moisture
Food shape
Food density
Food quantity
Bone and fat
Add cover
Lower temperature requires longer cooking time. Frozen
food needs longer heating time than common food.
As the microwave is easy to be absorbed by humid food,
larger humidity results in shorter cooking time.
As the microwave can only penetrate 2-4cm into the food,
the thickness of the food will influence the cooking time.
Heating times are different between close food and loose
food. The former requires longer time.
The energy of the microwave is a certain value, and will not
change along with the quantity of the food. Therefore larger
quantity of food requires longer cooking time.
Bones have quicker heat transmission, and fats absorb
more energy. Therefore please pay attention to the overheat possibility in cooking the meat with bones and fats.
It can reduce the radiation of heat and vapor to put the food
into container with cover, and thus shorten the cooking time.
Settle
Stir
Seal
Lay aside
Please settle the food in circular shape during cooking, and
avoid piling up as far as possible. It can improve the evenness.
When cooking liquid food like the soap, juice or beverage
etc., stir it slightly before and during cooking. It can avoid
splashing effectively.
Seal the food with freshness-preserve film to avoid splashing and contaminating the cavity. It can also preserve the
moisture and nutrition.
When the food is taken out of the microwave oven, the inside of the food is still heating. Lay it aside for some time.
Take the factor of duration into consideration.
Page 19

Maintenance * Repair
Maintenance: Frequently cleaning and maintenance can guarantee normal performance of the microwave oven.
Be sure to switch off the power
before cleaning.
Use neutral soapy water to clean the
shell, and wipe it with soft cloth.
Use wet cloth to clean the food scrap
on the door, door seal and inside the
cavity. Use wet cloth soaked with
soap water to clean the oily dirt.
Keep the inner side of the door clean.
Keep it free from food scrap.
Take it out at least once per week,
put into water to clean, to prevent the
oily dirt from corroding the rotary
wheel.
Note that the power supply cable
shall not be damaged or broken. If
the power supply cable is damaged,
it must be replaced by the
manufacturer, its service agent or
similarly qualified persons in order
to avoid a hazard.
Do not use detergent and materials containing metal to clean the
cavity and door.
alkaline
detergent
forbidden
acid
detergent
forbidden
whitener
combustible
detergent
forbidden
Remarks: If the microwave oven is idle for a long time, please clean the water stain
and oily dirt that may remain on each part of the oven to avoid rusting.
If the microwave oven appears abnormal or is damaged, do
Warning
not use it any more before it is repaired by professional
technicians.
Page 20

Answers to Questions
Answers to questions
Why is the lamp not on?
Why is the vapor emitted from
the air discharge outlet? Why
is there water overflowing
below the door?
Can the microwave leak
from the view window of the
door?
If start the microwave oven
without load of food, will it
damage the oven?
Why does the food need to be
laid aside after cooking?
Why is it not so quick as stated
in the manual to cook with my
microwave oven?
Why is there lightening or
cracking sound during cooking
sometimes?
1. The lamp is bad.
2. The timer is not set.
It is normal that the vapor may emit during cooking. Sometimes as the vapor is too thick and gathered inside the oven,
finally condensed into water and flows out. It is normal
phenomenon.
No. The metal shelter can reflect the energy back into the
oven. The view window only allows harmless light to pass
through. The microwave can not pass through.
Yes. NEVER do that.
It is important to lay the food aside for several minutes.
Cooking by microwave oven makes the food gathering heat
inside. After you take out the food from the oven, the inside of the food will continue heating for 2-3 minutes. It
can cook the jointer of the food, big block of vegetables or
cookies completely outside the oven by laying aside.
Check the user’s manual. Confirm that you follow the instruction
completely. Find out the reason for setting different times. The
setting of cooking time is only for reference. To avoid excess
cooking, you shall learn the technology of cooking with
microwave. The volume, weight and shape of the food can all
influence the cooking. Take the instruction as reference, and learn
it independently.
It may be owing to following:
1. Dishware with metal part is used (including gold and
silver);
2. Fork or other metal dishware are left in the oven;
3. Too many metallic foil are used;
4. Metallic thread is used to bind the food.
In maintenance, the technicians shall pay attention that:
Components that are easy to dismantled and likely
to touch voltage above 250V:
1. Magnetron
2. High-voltage transformer
3. High-voltage capacitor
4. High-voltage diode
5. AK rectifier
Microwave radiation
Do not expose yourself inside the radiation of the microwave generator or other
components that transfer the microwave energy.
Components that may cause excess microwave
leakage:
1. Improper installation of the magnetron on the wave
guide
2. Improper adjusting of the door hook, door body and
up/down hinges
3. Door body and shell are damaged
The above problems can cause excess microwave leakage
Page 21

Customer Name .....................................................
Technology
Address ..................................................................
......................................Serial No ...........................
Date of purchase ...................Model.......................
Dealer Seal .............................................................
HAIER WARRANTY
HAIER Appliances (India) P.Ltd (hereinafter referred to as "the company") hereby offers the following warranty to
the original domestic purchaser commencing from the date of the purchase. The company will, free of charge
repair or replace any defective part or parts which prove to be defective in workmanship and / or materials and
not due to abnormal or improper usage at its sole discretion.
Product
Period
Colour TV
Refrigerator
Washing
Machine
Airconditioner
Microwave
Dishwasher
Cloth Dryer
DVD
TERMS AND CONDITIONS
1) This warranty will automatically terminate on the expiry of the warranty period from the date of delivery.
2) The Company is not liable for any delay in servicing due to reasons beyond the control of the Company or any of its authorized
service centers.
3) Parts replaced or repaired under this warranty are warranted throughout the remaining of the original warranty period.
4) It is entirely left to Company's discretion to repair/replace parts at the site of installation or at the authorized service center of the
Company.
5) This warranty shall be strictly limited to the repairs or replacement of defective parts specified in the warranty. This warranty shall
not cover any consequential or resulting liability.
6) This warranty shall not in any case extend towards payment of any monetary consideration whatsoever or replacement or return
of the Product.
7) The Company may repair/supply parts free of cost during the warranty period. This warranty does not cover any Excise duty.
Central or Sales tax,octroi and Other local taxes or levies on the components/part.
8) The parts shall be replaced by functionally operating equivalent material only and not with brand new ones and are likely to be
different from the one originally fitted. The parts thus removed shall be taken back by the company.
9) The Company reserves the right to retain any part or component replaced at its sole discretion during the warranty period.
10) In no event the Company or its authorized service center be liable for any consequential damages or resulting liability, damage or
loss arising directly or indirectly out of any defect in the Appliance.
11) This warranty is not valid in case of the following events:
spunous/non-genuine components, attacked by household pest/rodents, fire, flood, earthquake, lightning and/or any other act of
God/natural calamilies.
12) For any service under this warranty beyond city/town/municipal limits from the Company/authorized service center, a fixed charge
of Rs.50 will be collected from the customer in addition to the actual to and fro charges by the shortest route.
13) Any change of location or change in the ownership during the warranty period must be intimated in writing to the Company.
14) The Company's employees or its authorized representatives have no authority to vary the terms of this warranty.
15) This Warranty is effected in New Delhi and claims, if any, shall be made only before the courts having jurisdiction in New Delhi and
no claim shall be made against the Company outside New Delhi notwithstanding that the Appliance may have been sold or delivered
elsewhere.
a) If the Product has been installed/Serviced/Repaired/Opened or tampered by any unauthorized personnel.
b) If defects arise/caused by accidents, alteration, misuse, neglect, substitution of original components with
c) The product is shifted outside India.
12 Months
Comprehensive: 12 Months
Compressor: 60 Months
Comprehensive: 24 Months
Motor: 60 Months
Comprehensive: 12 Months
Compressor: 60 Months
12Months
24 Months
12Months
12Months
HAIER APPLIANCES (INDIA) PVT LTD. B-1/A-14 Mohan Co-operative Industrial Estate,New Delhi-44
Ph: 26952470/71/72/73. Fax: 011-26971562
Technology
Warranty
Parts not covered
Remote, Cabinet
Plaslic , Glassware ,
light Bulb
Top Lid Outer Steel
Gasing
Air Filter , Front Grill
Glass , Plate , Bulb
Customer Name .....................................................
Address ..................................................................
......................................Serial No ...........................
Date of purchase ...................Model.......................
Dealer Seal .............................................................
Page 22

0050500613
 Loading...