

T
im
e
R
e
m
a
i
n
i
n
g
(
M
i
n
)
M
o
r
e
T
i
m
D
r
y
C
o
o
l
d
o
w
n
G
DZ
2
2
-2
C
y
c
l
e
c
o
m
p
Ex
t
e
n
d
t
r
u
e
M
o
r
e
D
r
y
T
i
m
e
O
n
(
H
o
u
r
)
D
e
H
l
a
i
g
y
h
L
es
l
e
t
e
d
S
t
a
r
t
Cu
s
t
o
m
e
r
M
e
d
i
u
m
m
b
l
e
N
o
r
m
a
l
L
o
w
L
e
s
s
D
r
y
A
i
r
O
n
l
y
(
N
o
H
e
a
t
)
D
r
y
n
e
s
s
H
e
a
v
y
Du
ty
L
e
v
e
l
T
e
m
p
C
y
c
l
e
s
T
o
we
l
s
/
Co
tt
o
n
P
o
w
e
r
O
n
/O
ff
O
n
s
T
i
m
e
L
o
u
d
e
r
St
a
r
t
O
ff
Aut
o
D
r
y
S
o
ft
e
r
P
a
u
s
e
B
u
l
k
y
I
te
m
s
T
i
m
e
d
D
r
y
O
f
f
W
r
i
n
k
l
e
R
a
c
k
D
R
Y
C
a
r
e
C
y
c
l
e
Ca
s
u
a
l
T
i
m
e
d
Si
g
n
a
l
C
y
c
l
e
s
De
l
i
c
a
te
HLF11P

WARNING

Tables Of Contents
PAGE
Safety Instructions ............................................................................ 1
OPERATING INSTRUCTIONS ............................................................ 5
Understanding the Control Panel
Preparations before drying
Load clothes into dryer
Auto Dry cycle
Timed Dry cycle
Rack Dry cycle
Other Features ................................................................................. 12
Normal Operating Sounds................................................................. 13
Tips................................................................................................. 13
Care and Cleaning Guide ............................................................... 14
Troubleshooting .............................................................................. 15
INSTALLATION INSTRUCTIONS ....................................................... 16
Tools and Materials Required.............................................................. 16
Electrical Requirements...................................................................... 16
Unpacking Your Dryer ........................................................................ 16
...................................................................................
.................................................................................
.................................................................................
...................................................................... 8
.......................................................... 5
.................................................................. 7
11
11
8
Exhaust System Connections .......................................................... 17
Requirements and Instructions............................................................ 17
Materials ............................................................................................18
Location of Your Dryer ........................................................................ 20
Installation in Mobile Home ............................................................... 21
Electrical Connections .................................................................... 22
Requirements and Instructions............................................................. 22
3-Wire Cord Connections................................................................... 23
4-Wire Cord Connections...................................................................
Specification
..................................................................................
4
24
25
OPERATING INSTRUCTIONS
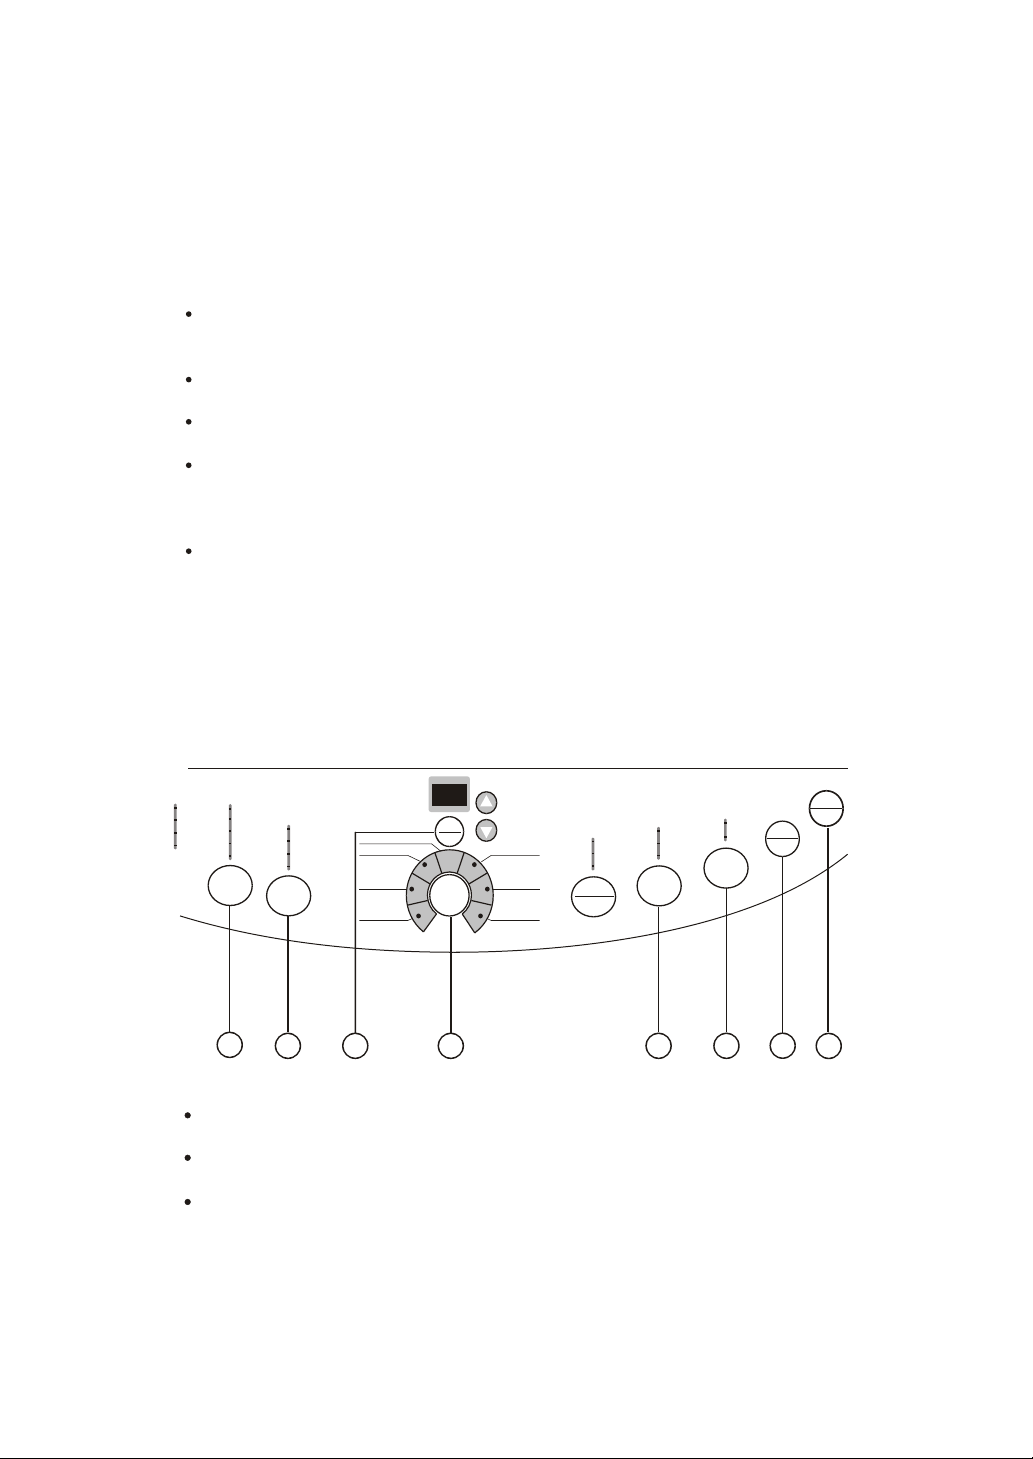
Understanding the Control Panel
TimeRemaining(Min)
TimeOn(Hour)
Delay
Start
Cycles
More Time
Less Time
Bulky Items
Casual
MoreTime
LessTime
BulkyItems
Delicate
Casual
Timed
Cycles
Auto Dry
TimedDry
Rack Dry
Timed
Cycles
Auto Dry
Timed D ry
Rack dry
Dry
Cool down
Cycle completed
Extend trumble
Dryness
Level
More Dry
Less Dry
High
Medium
Low
Air Only(No Heat)
Tem p
Dry
More Dry
Cool down
Cycle completed
Extend trumble
Dryness
High
Customer
Medium
Normal
Low
Less Dry
Air Only(No Heat)
Level
HeavyDuty
Temp
Towels/Cotton
12
TimeRemaining(Min)
TimeOn(Hour)
Delay
Customer
Normal
Heavy Duty
Towels/Cotton Delicate
Start
Cycles
Louder
Softer
Off
Cycle
Signal
Cycle
Signal
Louder
Softer
Off
Wrinkle
Care
On
Off
Wrinkle
Care
Power
On/Off
Start
Pause
Power
Start
Pause
On/Off
On
Off
10
11
9 37 6 5 4
8
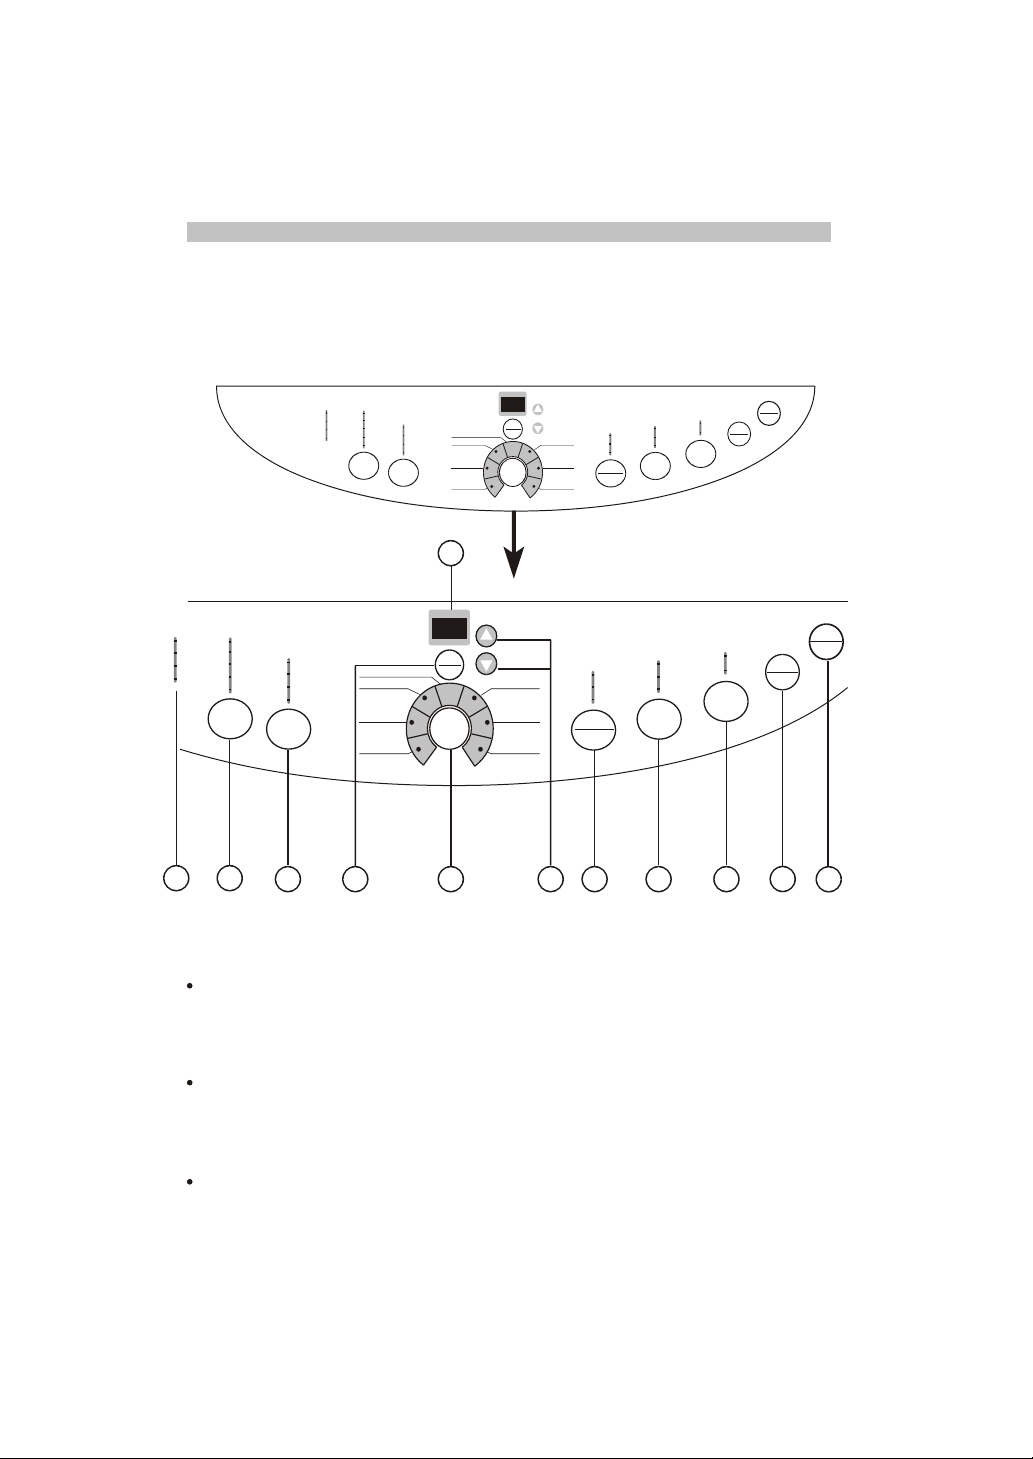
Power On/Off Button: (1)
Press the button once to operate the dryer. Press the button once again to turn
the dryer "OFF".
Start/Pause Button: (2)
Press this button once to start the dry process. Press this button once again to
pause the activity during the dry cycle.
Wrinkle Care Button: (3)
Used to select wrinkle-proof function. Automatically set as off after powering on.
This function is used together with delay start function.
2
1
5
Cycle Signal Button: (4)
Used to select buzzing volume or turn off the buzzer.
Timed/Cycles Button: (5)
"Timed/Cycles" button will let you select your desired dry mode.
Auto Dry: automatically set "Dryness Level", "Temp", "Cycle Signal",
"Wrinkle Care" buttons status according to clothes loaded.
Timed Dry: you can set status of "Temp", "Cycle Signal" and "Wrinkle Care"
buttons and dry time with "More Time" and "Less Time" buttons by yourself.
Rack Dry: the program used to dry article like sport shoes.
More Time & Less Time Button: (6)
Set time from 0 to 180 minute when Timed Dry or Rack Dry cycle selected.
Cycles Button: (7)
"Cycle" button will let you select your desired dry cycles. For your convenience,
there are seven fabric care dry cycles programmed in this mode:Customer,
Normal, Heavy Duty, Towels/Cotton, Delicate, Casual and Bulky Items.
Customer
Normal
Heavy Duty
Towels/Cotton
Delicate
Casual
Bulky Items
The drying program defined by user himself and stored.
Normal drying
Big clothes drying like jeans
Special drying for cotton clothes
Drying small quantity clothes
Drying underwear or clothes requiring smoothness
Drying bulky clothing
Delay Start Button: (8)
This convenient feature lets you delay the start of the dry cycle between 3 to
24 hours. Press the "Delay Start" to choose the number of hours you want to
delay the start of the cycle.
If no delay, the delay start indicator is off and remaining time indicator is on.
The nixie display indicates remaining time of non-reserved program.
If setting "Delay Start" in standby status, the nixie display indicates 3 hr, which
will increase by 1 hr with each pressing (until 24 and return to 3). If keep
pressed for 1.5 s, nixie display indicated value will increase continuously.
Temp Button: (9)
Used to set drying temperature. There are 4 available drying temperatures:
High, Medium, Low, and Air only(no heat).
Dryness Level Button: (10)
Used to set drying time of auto-programs. If no auto-program is selected,
pressing the button is inactive and will get alarms.
6
Status lights: (11)
Status lights give notification of which part of the cycle the machine is in.
Nixie display: (12)
Indicate remaining time (min) during cycle operation.
Indicate remaining reserved time (hr) during reservation.
Note: if door opened during cycle running, displays "E2" and alarms.
Understanding the Function Light Indicator:
The function "display light" indicates selected feature is "ON" or the
cycle is about to begin.
During the dry cycle, "flashing light" indicates current running program.
Rapidly flashing light indicates that the dryer is not operating properly.
Preparations before drying
Group the clothes of the same kind (cotton, chemical fibres, woolen) to dry.
Dark and light colored clothes shall be separately dried. Fabrics prone to falling
lint and those prone to adhering lint shall be separately dried. Clothes prone to
falling lint shall be turned inside out before putting into the dryer.
Make sure buttons and ornaments on the clothes are high temperature resistant
and won't damage drum surface. Before loading, the clothes shall have their
zippers zipped up, buttons and hooks done up and belts tied so as to avoid
entanglement or other obstacles.
If possible, turn out the clothes pockets for uniform drying.
Check if clothes remain soiled. If yes, wash it away again, otherwise the soils after
drying may not be removed permanently.
Small articles shall be collected in a mesh bag before loading and drying, so as
to avoid entanglement and ensure easy to be taken out.
Make sure power socket is reliably grounded. The grounding terminal shall not be
connected to gas or tap water pipelines.
Make sure exhaust duct has been connected with extension pipe.
Make sure lint filter is clean and then assemble it properly. If lint filter is not
in place, tumbling items could enter the exhaust system and cause damage
to the dryer.
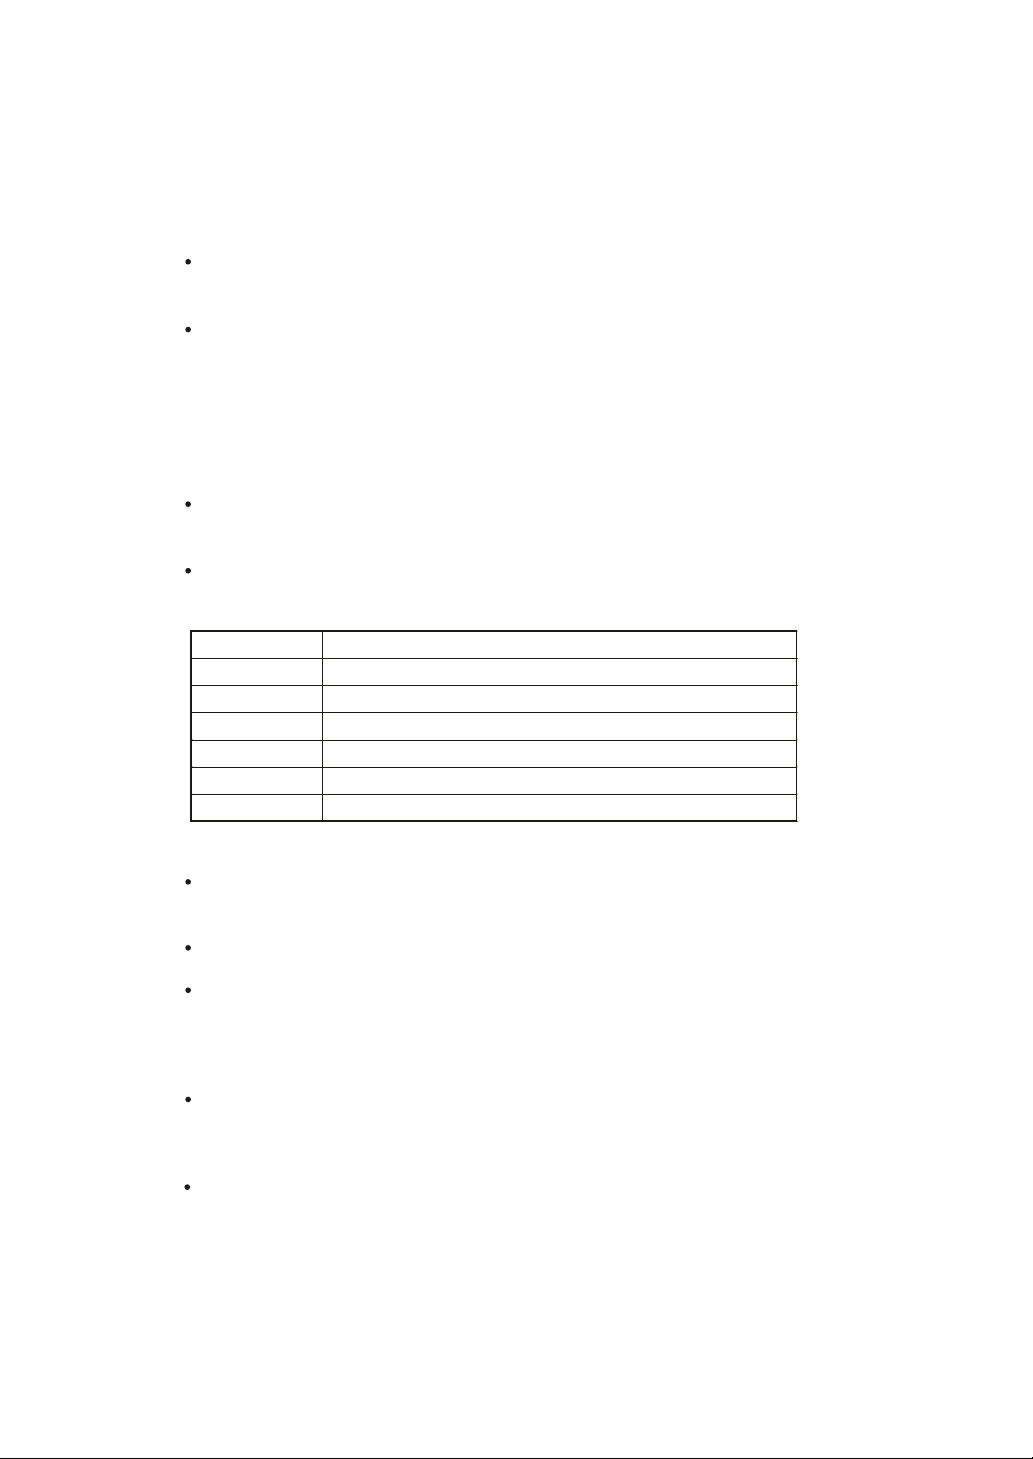
Notes: It applies to Auto Dry cycle and Timed Dry cycle. For Rack Dry cycle,
remove the lint filter and assemble the drying rack with its rear end slightly
downward inclined. The assembled status is as shown in the following figure:
Drying rack
Drum
Front door
7
Load clothes into dryer
Auto Dry cycle and Timed Dry cycle
The appropriate load shall be 1/3 ~ 1/2 of the drum volume. Avoid too much load,
for a certain space is needed to allow clothes free rotation for uniform and wrinkleproof drying.
When drying big articles, only 2-3 pieces shall be loaded at a time and
supplemented with middle and small articles.
For elaborate clothes or less load, two towels without lint falling may be added to
get better drying and wrinkle-proof effects.
Do not excessively dry clothes to avoid wrinkles, shrinkage, roughness, electrostatic
chargesaccumulation and more lint.
Rack Dry cycle
This program is designed specially for articles like sport shoes. During drying
please make sure the clothes reliably stay on the rack with no risk of entangling
the agitation blade while drum is rotating.
Note: If drying rack is not in place, rolling inner tub could collid with
drying rack and causes damage to the dryer and drying rack.
Auto Dry cycle
TimeRemaining(Min)
Dry
Cool down
Cycle completed
Extend trumble
Dryness
Level
More Dry
Less Dry
High
Medium
Low
Air Only(No Heat)
Tem p
Delay
Start
More Time
Less Time
Bulky Items
Casual
TimeOn(Hour)
Customer
Normal
Heavy Duty
Towels/Cotton Delicate
Cycles
Timed
Cycles
Auto Dry
Timed D ry
Rack dry
Cycle
Signal
Louder
Softer
Off
On
Off
Wrinkle
Care
Start
Pause
Power
On/Off
3
4 72 5
6
8
1. Press "Power On/Off" button to power on
Turn on the power switch, the computer board beeps once and the dryer transfers
from off status to the initial operating status (Normal program);
If no "Start/Pause" button is pressed in 5 min after powering on, it automatically
cuts off power and returns to off status;
It returns to off status immediately upon end of a cycle;
Whatever status the computer board is (start, pause, alarm etc.), Pressing
"Power On/Off" button will stop all operations and it enters off status.
8
1

Various button initial status for "Normal program"
Cycle Signal
Wrinkle Care
Cycles
Nixie display
Temp
Dryness Level
Timed/Cycles
Softer
Off
Normal
Indicate current program remaining time
High
More Dry
Auto-program
2. Press "Cycles" button to select a suitable full automatic cycle
The Normal program will be automatically selected after powering on. If other
full automatic program is desired, press "Auto-program Selection" button
until corresponding indicator turns on.
Customer
Normal
Bulky Items
Heavy Duty
Cycles
Towels/Cotton Delicate
Casual
Initial status of various buttons when setting "Auto-program Selection".
Cycles
Wrinkle Care
Cycle Signal
Delay Start
Timed/ Cycles
Temp
Dryness Level
Normal Heavy Duty Towels/Cotton Delicate Casual Bulky Items
To be used together with reserve function, off if reserve is disabled
Softer
Indicate current selected program remaining time
Auto Dry
High
More Dry
Notes: If "Customer" is selected, various buttons will indicate previous conditions
set by the user.
"Customer" function is a program designed to facilitate user's operation. It can
memorize programs defined by user himself and display the previous program
upon next application of this function.
Use details are as follows:
After powering on, press "Cycles" until "Customer" status, then set "Cycles" to
Timed Dry or Rack Dry, and set status of other buttons. Press "Start/Pause" button
or after half a minute, the program defined by user himself will be stored and
will be directly displayed upon next use.
Notes: Pressing "Dryness Level" button will be inactive during use of "Customer"
function.
9

3. Press "Dryness Level" button to select a suitable drying time
After powering on, the clothes dryer automatically sets dryness at "More Dr y",
which means the normal drying time. If other drying time is desired, press
"Dryness Level" button to select a shorter time.
4. Press "Temp" button to set a suitable drying temperature
After switching on, the dryer sets corresponding temperature adapting to
different program selected. If other drying temperature is wanted, press
"Temp" button to enable such a selection.
5. Press "Cycle Signal" button, you will be reminded up upon
end of a cycle
After switching on, the dryer automatically sets buzzer at "Softer", while the
user may define three prompt sound conditions "Louder", "Softer" and "Off".
6. Press "Delay Start" button to select a suitable reserved drying
program
After powering on, the dryer delay start drying program automatically sets as disabled.
When you desire a drying cycle ends at a delay time, press "Delay Start" button to
set delay start drying program. After initial pressing, the nixie display indicates 3 hrs,
which will be increased until 24 hrs by an increment 1 hr with every pressing. Press
again will display drying time. Here if press again, it will repeat from 3 hrs. If keep
pressed for 1.5 s, nixie display will increase continuously.
When "Delay Start" is enabled, your selected program indicator turns off while
"Delay Start" indicator and remaining reservation time indication turn on. During
reserved period, pressing "Delay Start" button can indicate reserve status.
To change operating program or cancel delay, you should cut off the supply and
re-select.
7. Press "Wrinkle Care" button to select wrinkle-proof drying mode
Wrinkle Care automatically sets "Off" upon powering on. Press "Wrinkle Care"
button, it sets wrinkle Care drying mode.
Notes:"Wrinkle Care"function is provided to match
a
"Delay Start"
"
Wrinkle Care" function operates in tumbling clothes by intermittently rotating drum
to avoid clothes wrinkling.
drying cycle ends, clothes remained in hot drum is prone to creasing.
"Delay Start"
program. When
8. Press "Start/Pause" button
If starting the machine, firstly close the front door and then press this button.
If pause is needed during machine operating, press this button. Pressing again will
resume operation.
10

Timed Dry cycle
TimeRemaining(Min)
Delay
Start
More Time
Less Time
Bulky Items
Casual
On
Off
Wrinkle
Care
Start
Pause
Timed
Cycles
Auto Dry
Timed D ry
Rack dry
Cycle
Signal
Louder
Softer
Off
3
Dry
Cool down
Cycle completed
Extend trumble
Dryness
Level
More Dry
High
Medium
Low
Less Dry
Air Only(No Heat)
Tem p
4 72 6
Customer
Normal
Heavy Duty
Towels/Cotton Delicate
5
TimeOn(Hour)
Cycles
1. Press "Power On/Off" button to power on
2. Press "Timed/Cycles" button and select "Timed Dry" cycle
After powering on, press "Timed/Cycle" button to select "Timed Dry" program.
3. Press "More Time" And "Less Time" buttons to set a suitable time
After setting "Timed/Cycle" to "Timed Dry" , you can press these two buttons to
increase or decrease drying time as you desires.
4-7. Press buttons "Temp", "Cycle Signal", "Delay Start", and "Wrinkle
Care" to define your desired program
Notes: For "Timed Dry" program, use of buttons "Temp", "Cycle Signal", "Delay
Start" and "Wrinkle Care" is the same as for auto-programs. "Dryness Level" is
here inactive, pressing of which will get alarms.
8. Press "Start/Pause" button
Power
On/Off
8
1
Rack Dry cycle
Dry
More Dry
Cool down
Cycle completed
Extend trumble
Dryness
Level
High
Medium
Low
Less Dry
Air Only(No Heat)
Tem p
4 72 6
TimeRemaining(Min)
Delay
Start
More Time
Less Time
Bulky Items
TimeOn(Hour)
Customer
Normal
Heavy Duty
Towels/Cotton Delicate
Cycles
5
Casual
Power
Start
Pause
8
On/Off
1
On
Off
Wrinkle
Care
Timed
Cycles
Auto Dry
Timed D ry
Rack dry
Cycle
Signal
Louder
Softer
Off
3
11

1. Press "Power On/Off" button to power on
2. Press "Timed/Cycles" button and select "Rack Dry" cycle
After powering on, press "Timed/Cycle" button to select "Rack Dry" program.
3. Press "More Time" And "Less Time" buttons to set a suitable time
After setting "Timed/Cycle" to "Rack Dry" , you can press these two buttons to
increase or decrease drying time as you desires.
4-7. Press buttons "Temp", "Cycle Signal", "Delay Start", and "Wrinkle
Care" to define your desired program
Notes: For "Rack Dry" program, use of buttons "Temp", "Cycle Signal", "Delay
Start" and "Wrinkle Care" is the same as for auto-programs. "Dryness Level" is
here inactive, pressing of which will get alarms.
8. Press "Start/Pause" button
Other Features
Your dryer also has the following features for your convenience:
Lint Filter:
All dryers come with a lint filter that needs to be cleaned before or after
every use (read Care and CleaningGuide Section).
Leveling Legs:
Your dryer has four leveling legs which are located in the front and rear
corners of your dryer. After installingyour dryer in its final position,
you can level your dryer.
12
Leveling legs can be adjusted by turning them clockwise to raise your
dryer or by turning them counterclockwise to lower your dryer.

13141516171819


Location of Your Dryer
Do Not Install Your Dryer:
In an area exposed to dripping water or outside weather conditions.
In an area where it will come in contact with curtains, thick carpet,
or anything that will obstruct the flow of combustion and ventilation air.
On carpet. Floor must be solid with a maximum slope of 1inch (2.54 cm).
DIMENSIONS
20

Installation in Mobile Home
Dryer must be exhausted outside (outdoors, not beneath the mobile
home) using metal ducting that will not support combustion.
Metal ducting must be 4 inches (10.16 cm) in diameter with
no obstructions. Rigid metal duct is preferred.
If dryer is exhausted through the floor and area beneath the
mobile home is enclosed, the exhaust system must terminate
outside the enclosure with the termination securely fastened to the
mobile home structure.
Refer to previous pages for other important venting requirements.
Installation must conform to current Manufactured Home
Construction & Safety Standard.
Correct Incorrect
Correct Incorrect
Correct Incorrect
21

22

Circuit
L1
Computer Program
Controller
RELAY
N
CONTROL
THERMOSTAT
MOTOR
THERMAL
LIMITER
DOOR
SWITCH
HIGHLIMIT
THERMOSTAT
HEATER
L2
23

Circuit
RELAY
N
E
L1
Computer Program
Controller
CONTROL
THERMOSTAT
MOTOR
THERMAL
LIMITER
DOOR
SWITCH
HIGH LIMIT
THERMOSTAT
HEATER
L2
24
Circuit

25

Specifications
Model HLF11P
Rated voltage , frequency 120V/240V~ 60Hz
Rated dry capacity 10 kg
Rated dry power 5000W
Weight (about) 55 kg
Dimension L712mm W686mm H1115mm
 Loading...