

Haier HL24XK2, HL24XK2a Owner's Manual

Ple ase READ t his man ual car eful ly befo re opera ting yo ur TV, and ret ain it for
fut ure ref eren ce.
Veui lle z li re ce guid e a tten tive ment et en tière ment av ant d'u tili ser vot re
tél évis eur, cons erve z ce gui de p our vous y r epor ter ulté rie ureme nt.
Se rec omie nda lee r con atenc ión es te manu al ante s d e poner e n
fun cion amie nto su t elev isor y cons erva rlo para con sult as f utu ras.
HL 24 XK 2
LCD HDT V
Te levi seur HD à ec ran a DCL
HDTV LCD
OWNER’S MANUAL
GUIDED’UTILISATI ON
DEL T ELEV IS OR LE D HD TV
01
0090509587A

Warning
EN-1 Haier LCD HDTV
Warning
CAUTION
!
CAUTION: TO REDUCE THE RISK OF ELECTRIC SHOCK,
DO NOT REMOVE COVER (OR BACK).
NO USER SERVICEABLE PARTS INSIDE.
REFER SERVICING TO QUALIFIED SERVICE
PERSONNEL.
RISK ELECTRIC SHOCK
DO NOT OPEN
!
The lightning ash with arrowhead
symbol, within an equilateral triangle is
intended to alert the user to the presence
of uninsulated dangerous voltage within
the product’s enclosure that may be of
sufficient magnitude to constitute a risk of
electric shock.
The exclamation point within an equilateral
triangle is intended to alert the user to
the presence of important operating and
maintenance (servicing) instructions in the
literature accompanying the appliance.
WARNING: TO PREVENT FIRE OR SHOCK HAZARD, DO NOT EXPOSE THIS APPLIANCE TO RAIN OR
MOISTURE.
CAUTION: TO PREVENT ELECTRIC SHOCK DO NOT USE THIS POLARIZED PLUG WITH AN EXTENSION
CORD, RECEPTACLE OR OTHER OUTLET UNLESS THE BLADES CAN BE FULLY INSERTED TO
PREVENT BLADE EXPOSURE.
!
Caution:
These servicing instructions are for use by qualified service personnel only. To reduce the risk of electric shock, do •
not perform any servicing other than that contained in the operating instructions unless you are qualified to do so.
Important Safety Instructions
Read t1. hese instructions.
Keep these instructions.2.
Heed all warnings.3.
Follow all instructions.4.
Do not use this apparatus near water.5.
Clean only with dry cloth.6.
Do not block any ventilation openings. Install in accordance with the manufacturer’s instructions.7.
Do not install near any heat sources such as radiators, heat registers, stoves, or other apparatus (including 8.
amplifiers) that produce heat.
Protect the power cord from being walked on or pinched particularly at plugs, convenience receptacles, and the 9.
point where they exit from the apparatus.
Only use attachments/accessories specified by the manufacturer.10.
Use only with the cart, stand, tripod, bracket, or table specified by the manufacturer, or sold with the apparatus. 11.
When a cart is used, use caution when moving the cart/ Apparatus combination to avoid injury
from tip-over.
Unplug this apparatus during lightning storms or when unused for long periods of time.12.
Refer all servicing to qualified service personnel. Servicing is required when the apparatus has 13.
been damaged in any way, such as power-supply cord or plug is damaged, liquid has been spilled
or objects have fallen into the apparatus, the apparatus has been exposed to rain or moisture,
does not operate normally, or has been dropped.
The apparatus shall not be exposed to dripping or splashing and that no objects filled with liquids, such as vases, 14.
shall be placed on the apparatus.
The mains plug or appliance inlet is used as the disconnect device, remain it readily operable during the apparatus 15.
normal use.
Class I apparatus shall be connected to a mains socket outlet with a protective earthing connection.

Safety Instructions
Haier LCD HDTV EN-2
SAVE THESE INSTRUCTIONS
Thank you for purchasing the Haier product. This easy-to-use manual will guide you in getting the best use of your
product. Remember to record the model and serial number. They are on label in back of the unit.
Model number
serial number
Date of purchase
Staple your receipt to your manual. You will need it to obtain warranty service.

Contents
EN-3 Haier LCD HDTV
Contents
Choose the Menu Language .......................................... 10
Choose the Input source .................................................10
Video Menu Options ..........................................11
Function ................................................................................. 11
Audio Menu Options .........................................11
Function ................................................................................. 12
Channel Menu Options .....................................12
Function ................................................................................. 12
Function Menu Options ....................................14
Function ................................................................................. 14
Lock Menu ..........................................................16
Function ................................................................................. 16
PC Menu .............................................................18
USB Input ...........................................................18
To play pictures ................................................................... 19
To play music ....................................................................... 19
To play video ........................................................................ 20
Maintenance 21
Specification 21
Troubleshooting 21
Warranty 22
Warning 1
Safety Instructions 2
Introduction 4
Controls ................................................................4
Connection Options ............................................ 5
Connecting a DC input ........................................5
Remote control 6
Installation 7
External Equipment Connections ......................7
Accessories ..............................................................................7
Antenna Connection ............................................................7
Choose Your Connection ....................................................8
Connecting a VCR ..................................................................8
External A/V Source Setup .................................................8
Conmponent Setup ..............................................................8
Connecting a computer ......................................................9
Cable TV Setup .......................................................................9
HDMI input ........................................................................... 10
Operation 10
Switching On/O the TV set ........................................... 10
Introduction
Haier LCD HDTV EN-4
Introduction
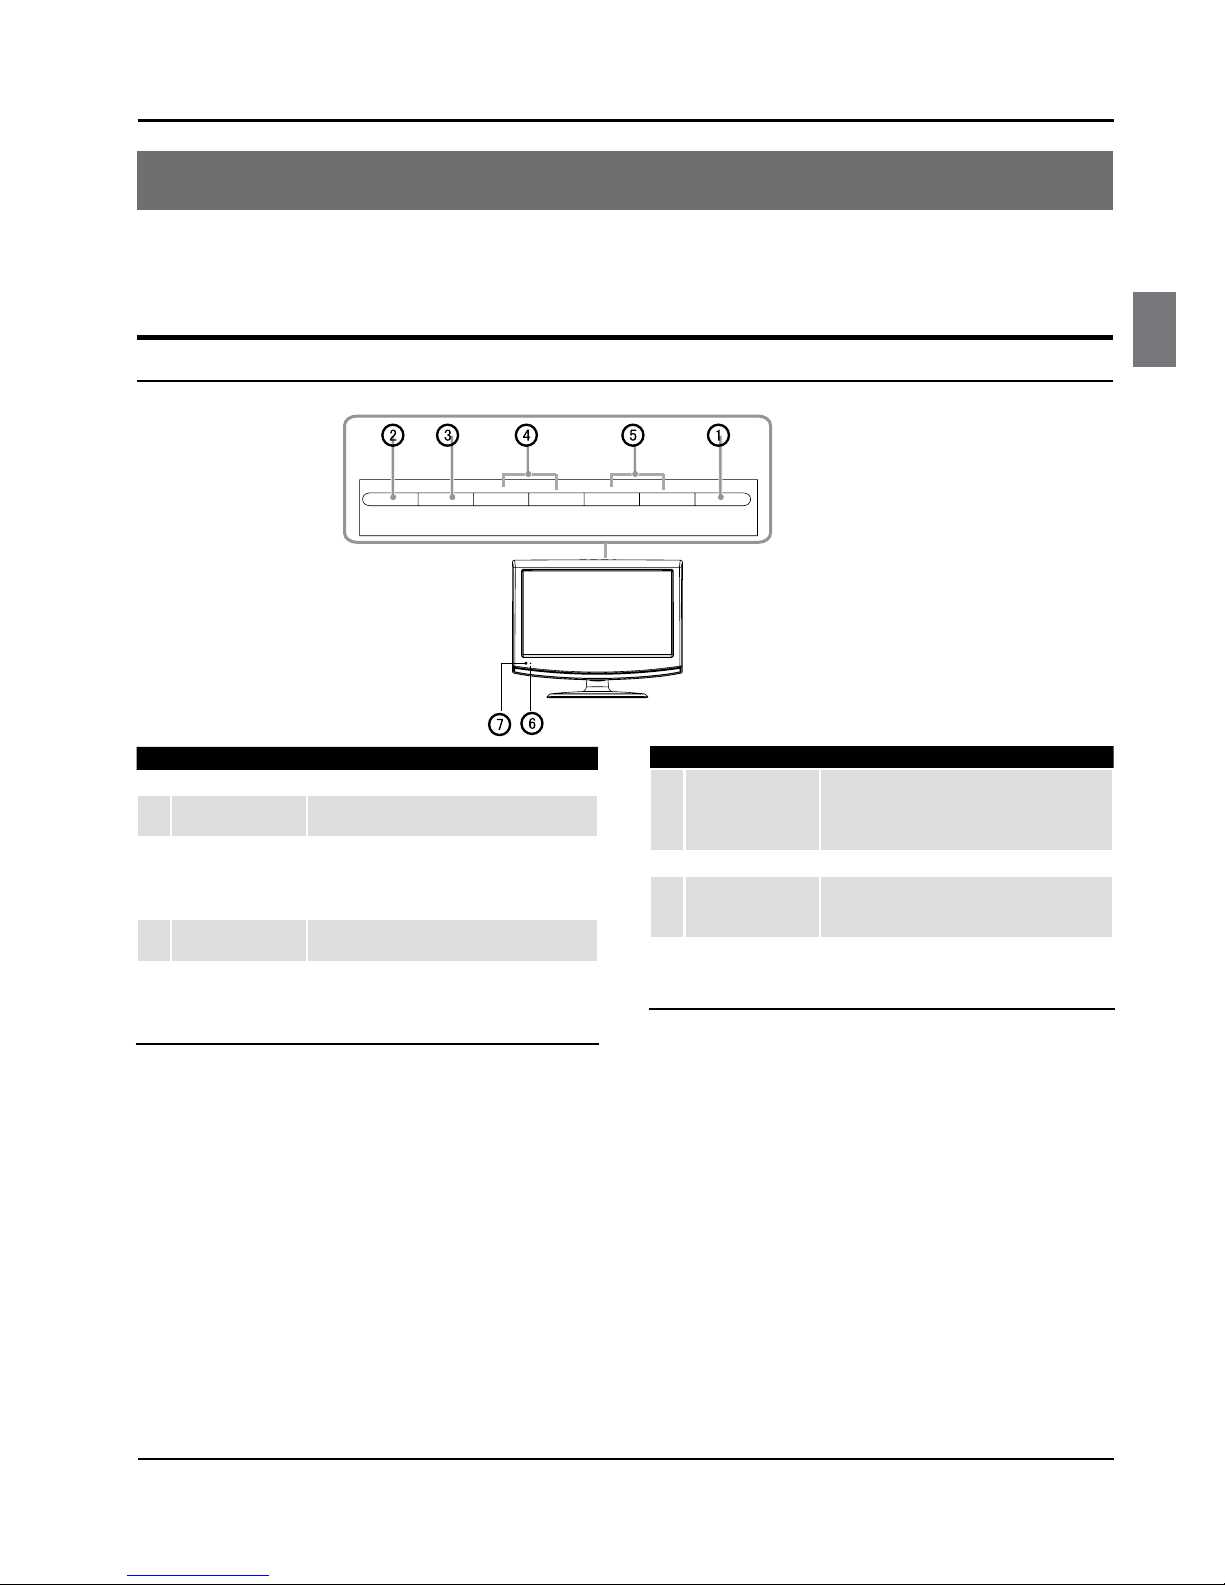
Controls
This is a simplied representation of the TV front panel, side panel control buttons and side inputs.
TV Side panel controls and connections
MENU INPUT VOL-VOL+CH- CH+ POWER
1
POWER Press to turn on and o the TV.
2
MENU
Menu display. Press to access the on-screen
menu display.
3
INPUT
Press to access the input source mode. Press
repeatedly to change the source to the one
you want to watch. In the MENU screen, the
INPUT button serves as the ENTER button.
4
VOL +/-
Press to adjust the volume. In the MENU screen,
these buttons serve as left/right buttons.
5
CH+/-
Press to scan through channels. To scan
quickly through channels, press and hold
down either+/-. In the MENU screen these
buttons serve as up/down buttons. .
6
Power indicator
7
Remote Sensor
Receivers IR signals from the remote control.
Do not put anything near the sensor, which
may block the remote control signal.

Introduction
EN-5 Haier LCD HDTV
Connection Options
Back panel connections
DC IN
VIDEO
AV IN
COMPONENT
IN
Y Pb Pr
USB
PC/DVI AUDIO IN
AUDIO OUT
PC IN
L -AUDIO- R
L R
L -AUDIO- R
HDMI IN
ANT IN
DIGITAL OUT
(COAXIAL)
1
DC IN Direct current input.
2
Headphone
jack
Headphone audio output terminal.
3
USB input
Connect a USB ash drive to view MPEG2 videos,
JPEG images or listen to MP3 songs.
4
Digital Out
Connect various types of digital audio
equipment.
5
HDMI In
Connect a HDMI device to receive digital audio
and uncompressed digital video.
6
VIDEO In
Connect the video signal from a video device to
this jack.
7
Component
Input
Connect a component video device to these jacks.
8
AUDIO In
Connect the audio L/R cables from the video signal
source to these jacks.
9
AUDIO In
Connect the audio L/R cables from the video signal
source to these jacks.
0
PC Audio In
Connect the audio L/R cables from a computer to
this jack.
A
AUDIO OUT
Connect the audio L/R cables to your audio
equipment.
B
PC Video In
Connect a video cable from a computer to this
jack.
C
Antenna
Input
Connect cable or antenna signals to the TV, either
directly or through your cable box.

Introduction
Haier LCD HDTV EN-6
1
PICTURE Press repeatedly to cycle through the available picture modes
2
ARC
Select the aspect ratio
3
CCD (closed caption) Select a closed caption option
4
INPUT Show the input source
5
MENU Press to open the on-screen menu
6
Thumbstick (Up/Down/
Left/Right)
Volume/Channel Selection, Allows you to navigate the on-screen
menus and adjust the system settings to your preference.
7
EXIT
Clears all on-screen displays and returns to TV viewing from any
menu
8
USB
Press to switch input source to USB in
9
USB PLAY/PAUSE
0
USB fast reverse
A
USB fast forward
B
DISPLAY
Press to display the TV status information on the top of the TV screen
C
GUIDE
Display the guide when you are watching analog or digital channels
D
Power Press to turn on and o the TV
E
AUDIO Press to cycle through dierent sound settings
F
SLEEP button Press to display the sleep timer option
G
MTS/SAP Select MONO, STEREO, SAP in NTSC system
H
Number buttons Press to change a channel
I
• button
Press to select digital channels. For example, to enter “54-3”,
press “54”, “• ” and “3”
J
MUTE
Switches the sound on or o
K
ENTER
Accesses the highlighted item in the on-screen menu
L
RECALL
Press to jump back and forth between two channels
M
USB REPEAT
N
USB STOP
O
USB Next Chapter
P
USB Previous Chapter
Q
CH.LIST Open the channel list in TV
R
FAVORITE Open the favourite channel list in TV
PICTURE
CCD
INPUT
ARC
MENU
VOL-
EXIT
USB
PLAY/PAUSE
REV
DISPLAYGU IDE
MTS/SAP
CH+
CH-
VOL+
ENTER
STOP
PREV
FAVORITE
AUDIO
SLEEP
REPEAT
NEXT
CH.LIST
MUTE
RECALL
1
2
3
4
5
6
7
8
9
10
11
12
13
14
15
16
17
18
19
20
21
22
23
24
25
26
27
28
Red
UP DOWN LEFT RIGHT
Green
Yellow
Blue
Color buttons
When functions are attached to the
color buttons, the color buttons are
shown on screen.
Remote control
The remote control cannot be operated unless the batteries are properly loaded.
When using the remote control, aim it at the remote sensor on the TV.
Remote Control
Battery loading
1. Slide open the cover of the battery compartment on
the back of the remote controller.
2. Load two (AAA) alkaline batteries in the compartment,
(plus and minus poles to respective mark)
3. Replace the cover of the battery compartment.
Precautions
1. As strong light may interfere the signals, change
your position to operate the remote controller if the
television cannot be turned on or o as you expect.
2. Keep the remote controller away from heat source or
humid area to ensure eective performance of the
remote controller.
3. Make sure that two AAA alkaline batteries are
loaded. The batteries must be of the same type. The
batteries must be located properly. The batteries are not
rechargeable.
4. Make sure that there is no obstacle between the
remote controller and television set.
 Loading...