

Page 1

HF-180T
Domestic Freezer
Operation Instructions
Contents
Cautions
Parts
Installation
Basic Operation
Operation Instructions
Defrosting/Cleaning
Troubleshooting
1-2
3
4
5-8
9-11
12-13
14
Page 2

Cautions
Disposal of the old appliance
Before disposing an old appliance that goes
out of use, please make sure it’s
inoperative and safe. Unplug the appliance
and remove or destroy all of the springs,
latches, or bolt-locks in order to avoid the
risk of child entrapment.
It must be noticed that refrigeration system
contains insulating gases and refrigerants,
which require specialized waste disposal.
The valuable materials contained in a
refrigerator can be recycled. Contact your
local waste disposal center for proper
disposal of an old appliance and contact
your local authority or your dealer if you
have any question. Please ensure that the
pipework of your refrigerator does not get
damaged prior to being picked up by the
relevant waste disposal center, and
contribute to environmental awareness by
insisting on an appropriate, anti-pollution
method of disposal.
Disposal of the packaging of your
new appliance
All these valuable materials may be taken
to a waste collecting center and used again
after adequate recycling.
Consult your local authorities for the name
and address of the waste materials
collecting centers and waste paper disposal
services nearest to your house.
Safety Instructions and Warnings
Before starting the appliance, read the
information given in the User’s Guide
carefully. The User’s Guide contains very
important observations relating to the
assembly, operation and maintenance of
the appliance.
Keep the User’s Guide in a safe place and
remember to hand it over to the subsequent
owner, if you ever sell the appliance.
The manufacturer does not accept
responsibility for any damages that may
arise due to non-observation of the
following instruction.
All the packaging materials employed in the
package of your new appliance may be
disposed without any danger to the
environment.
The cardboard box may be broken or cut
into smaller pieces and given to a waste
paper disposal service. The wrapping foil
is made of polyethylene and the
polyethylene pads and stuffing contain no
fluorochloric hydrocarbon.
Damaged appliances are not to be put
into operation. In case of doubt, consult
your supplier.
Connection and installation of the
appliance are to be carried out in strict
compliance with the relative instructions set
forth in the User’s Guide.
.1.
Page 3
Cautions
For the purpose of safety, the appliance
must be properly grounded in accordance
with specifications.
Always remember to unplug the appliance
before cleaning. Never unplug your
refrigerator by pulling on the power cord.
Always grip plug firmly and pull straight out
from the outlet.
All electrical repairs must be carried out
by qualified electricians. Inadequate repairs
may result in a major source of danger for
the user of the appliance.
Keep high-proof beverages in airtight
bottles or containers and always store in an
upright position. In addition, do not store any
explosive substances inside the appliance-
Danger of explosion!
Do not damage any parts of the
appliance that carry refrigerant by piercing
or perforating the refrigerant’s grooves with
sharp or pointed items, crushing or twisting
any tubes, or scraping the coatings off the
surfaces. If the refrigerant spurts out and gets
into eyes, it may result in serious eye injuries.
If the supply cord is damaged, it must
replaced by the manufacturer or its service
agent or a similarly qualified person in or-
to avoid a hazard.
der
be
Specifications
This appliance is designed for frozen
food storage.
It is intended strictly for household use.
If using it for industrial or commercial
purpose, be sure to observe the relevant
norms and regulations.
The refrigerating circuit is leak-proof.
!
WARNING:
The plug should be accessible after the
appliance positioned.
Never store anything dangerous in the
appliance, such as combustibles,
exposives, strong acid and alkali. etc.
The appliance is not intended for use
by young children or infirm persons
without supervision.
Young children should be supervised
to ensure that they do not play with the
appliance.
Do not obstruct or cover the ventilation
grille of the appliance.
Do not allow children to play with the
appliance. In no case should children be
allowed to sit on the drawers or hang to
the door.
.2.
Page 4

Parts
Control Panel
Temperature Indicator
Freezer Tray
Slider
Freezer Chart
Drawer
Plug
The manufacturer reserves the right to improve the product
from time to time without further notice.
.3.
Page 5
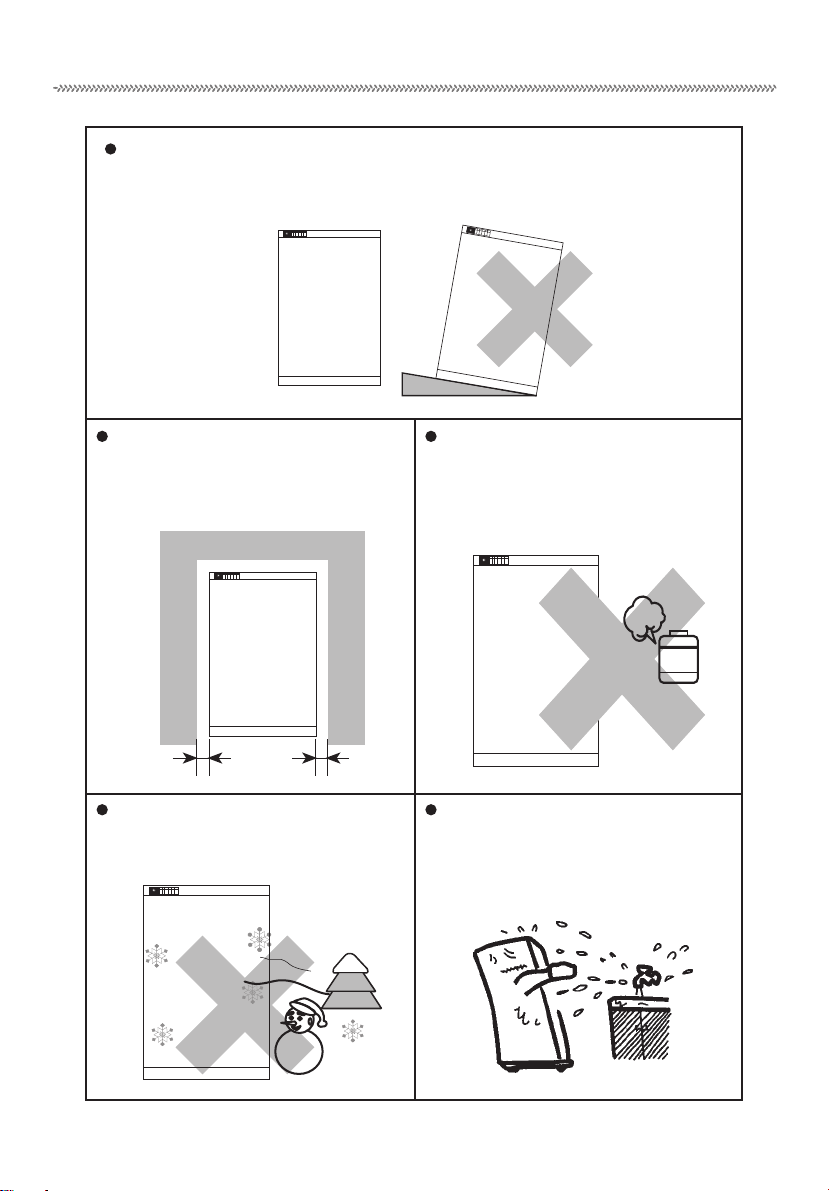
Installation
The appliance must stand on even flooring. If the freezer is not level, adjust
the front leveling leg to raise or lower it.
Install the appliance in a wellventilated
room. Allow 10cm on each side and
10cm over the top of the freezer for easy
installation and proper air circulation.
>10cm
An extremely cold room is unsuitable
for installation of the appliance.
>10cm
Do not expose the appliance to direct
sunlight or a heat source as cookers,
radiators, heaters, etc.
To prevent electric shock, do not
expose the appliance to rain or moisture.
.4.
Page 6

Basic Operation
Please clean inner compartment of the
appliance before the initial start-up.
After the appliance is levelled and cleaned,
allow it to stand still for 30 minutes before
start-up.
Reversible door
Reversible door available.To Reverse the
door, follow the steps described as below:
1. Remove the two screws at lower hinge
for later use.
2. Take out the door downwards and put
it aside.
3. Remove component ‘1’ and fix it in the
corresponding position of the right side.
Fasten it.
4. Remove component ‘3’ and fix it in the left
hole of lower hinge ‘2’.
5. Remove the upper hinge ‘4’ and fix it in
the corresponding position of the left side.
6. Install the door to the hinge ‘4’ carefully.
7. Install the two screws dismounted in step
1 to the lower hinge ‘2’ on the left side.
8. Remove handle plug ‘6’ for later use.
9. Remove the screw cover and screw ‘7’ of
the door handle, fix the door handle ‘5’ to
the corresponding position on the right side
and fasten it. Install the handle plug
dismounted in step 8 to the right side.
10. After reassembling, open the door for
several times to make sure that all screws
and hinges are well fastened.
.5.
Page 7

Basic Operation
1 2 3 4 5 6
987
1
23
4
C
Illustration of Control Panel
1. Temperature indicator
2. Temperature regulator
3. Green power indicator
4. Yellow fast-freeze indicator
5. Red warning indicator
6. Orange buzzer-off indicator
7. On/Off button
8. Fast freeze button
9. Buzzer-off button
Green power indicator (3)
The green power indicator lights after the
appliance is started. If it doesn’t work,
check:
whether the plug connection is loose
broken fuse of power failure
whether the power switch is off.
Red warning indicator (5)
The red warning indicator lights with
buzzing signal when the inner temperature
is not cold enough. The reason may be:
the appliance is newly started.
there is large amount of fresh food in
the appliance.
the temperature regulator is adjusted
from a low setting to a higher one.
The red warning indicator goes off
automatically when the inner temperature
is cold enough. If the red warning indicator lights irregularly, check:
whether the freezer door is well closed.
whether there was a long power failure
before.
Yellow fast-freeze indicator (4)
Press the fast-freeze button to start the
system. The yellow indicator lights. Press
the fast-freeze button again to stop the
system and the yellow indicator goes off.
Orange buzzer-off indicator (6)
The buzzer-off function makes it possible
to stop long buzzing as desire.
Press button (9) to turn off the buzzing
and the buzzer-off indicator lights.
Press button (9) again and the orange
indicator goes off.
.6.
Page 8

Basic Operation
1 2 3 4 5 6
987
1
23
4
C
Start-up
Start the appliance 4 hours before storing
foods in it.
The On/Off button is children-proof. Use
a thin and flat tool (e.g. a pen) to press the
light color circle on the button when starting
the appliance. The green power indicator and
the red warning indicator are turned on with
buzzing signal.
The red warning indicator is off after the
inner compartment is cold enough.
Temperature Display
The temperature indicator shows a
temperature of reference.
The temperature indicator (1) is
independent of the power supply. It shows
the max. temperature value of frozen foods
when the appliance is in normal operation.
When temperature regulator is adjusted,
the temperature of frozen foods changes
accordingly as well as the temperature
display.
When the appliance door is opened for
food arrangement, the
shows a higher figure
escape. The figure will keep unchanged if
the door is opened and then shut quickly.
temperature indicator
because of cold air
Temperature Selection
The inner temperature may be adjusted
by the regulator (2). Use a accessory key
or a coin to rotate the regulator.
Position ‘1’ : Min. capacity
Position ‘4’ : Max. capacity
Generally, the regulator is to be set
between position ‘2’ and ‘3’.
Note:
When the regulator is adjusted, it takes
some time for the temperature of the inner
compartment to change accordingly. The
period will be longer or shorter, depending
on the ambient temperature, amount of
foods and how often the door is opened.
.7.
Page 9

Basic Operation
13
10
12
11
13
Door switch
Functions of the door switch (10)
Warning signal at door opening
Switch of illuminating light
After the freezer is operation, the door
switch is at position ‘ll’ when the appliance
door is opened. At the moment:
the illuminating lamp (12) lights.
when the door has been kept open for
30 seconds or more, the door alarm rings
and the red light twinkles to remind you to
close the door promptly.
After the door is well closed, the door switch
is at position ‘l’. At the moment:
the illuminating lamp goes out .
the alarm stops and the red light goes
out. (The red light keeps twinkling if the
inner temperature is not cold enough.)
Note: It’s advisable not to adjust the
door switch (10) to position ‘0’,
otherwise the door switch loses all the
functions mentioned above. At the
moment:
the illuminating lamp doesn’t light.
the alarm doesn’t ring .
If the door switch is adjusted to position ‘0’
by mistake, it can be restored to position ‘I’
or ‘II’ by hand. If the stop block (11) doesn’t
work when the door is opened or closed,
rotate the screw (13) as illustrated. If
rotated clockwise, the stop block moves
forwards. The stop block moves backwards
when the screw is rotated anti-clockwise.
.8.
Page 10

Operation Instructions
Use the freezer for long-time
food storage.
The inner temperature of the freezer is
lower than -18 . Bacteria reproduction
is completely suppressed under such
circumstance. Therefore, the freezer is
suitable for long-time food storage,
provided that the expiry date on the food
package is observed.
Tips for freezing
The amount of food to be frozen at one
time should not exceed the freeze capacity
of the freezer.
Allow warm food or beverage to cool
down before placing them inside the
appliance.
Divide a large amount into smaller pieces
that are easy to be frozen thoroughly, so
that the quality of food is best preserved.
Wrap or cover foods well before storing
them into the freezer. The packing
material must be durable, odorless,
impermeable and not breathable so as to
keep the foods in good condition.
.9.
Page 11

Operation Instructions
It’s advisable to take out the necessary
amount of food only. Don’t refreeze foods
that have been thawed completely. Cook
the thawed foods before refreezing them.
Do not store bottles of beverages inside
the appliance.
When storing frozen foods, the
description of storage time must be
observed. Label on the package the
expiry date for reference.
Ice Making
Fill 3/4 of the ice tray with water and place
it in the freezer compartment. To
the ice cube, twist the ice tray gently
stay in running water for a while.
remove
or has it
.10.
Page 12

Operation Instructions
10
12
11
14
Illuminating light
The technical parameter is 200-240V~/50Hz,
15W. Light bulbs with the power larger than
15W are strictly prohibited.
Unplug the appliance before replacing the
light bulb. Pry up the light cover (14) with a
flat screw driver. Take out the light cover
and then screw out the light bulb (12).
Freezer chart
The freezer Chart can be found at the
inner door.
The figures in the chart refers to the standard
storage period in month. See the descriptions
on food package or relative observations for
details. The storage time may depend on the
food quality, pretreatment and requirements
of different families.
SF
..2....7
..4....9
..4....10
..7....11
Information
..6...12
..4...6
..1...4
..2...4
SF
*
..4...8
..2...7
..2...4
..2...4
6h
..2...6
..2...6
..4...6
*
..4...6
..2...6
..1...3
..2...6
..5...8
24h
*
.11.
..6...12
.
.
.
..6...12
..6...8
..2...3
SF
SF
Page 13

Defrosting/Cleaning
Defrosting
The freezer compartment ices up when the
refrigerating system is working. A thick layer of
frost or ice will increase energy consumption.
When the layer is as thick as 4 to 6 mm, use a
plastic scraper to remove it.
Never use a metallic tool to defrost, to protect the appliance from damage.
Unplug the appliance before defrosting.
Remove the food and ice cube tray from the
freezer compartment. Wrap foods in several
layers of newspaper and store in a cold place.
To take out the drawer, pull forward, tilt up and
remove it.
To speed up the defrosting process, place a
saucepan of warm water (water temperature
lower than 70˚C) in the refrigerator.
Never use an electric heater to defrost.
Keep the door open during defrosting. Clean
and dry the freezer with a cloth or a sponge.
Cleaning
Unplug the appliance before cleaning.
To clean the inner compartment, remove food
and shelves. Wash the inner compartment with
lukewarm water and neutral detergent. Do not
use cleansers such as soaps, scouring powder
or spray cleaners, boiled water or acid, etc.
Clean the outside of the refrigerator with a
damp cloth. Dry thoroughly.
For electric safety, do not splash water directly
on the refrigerator.
Make sure that water doesn’t get into electric
components as temperature regulator or
illuminating light.
Keep the door seal clean.
For efficient operation, dirt and dust should be
removed from back and bottom of the appliance.
.12.
Page 14

Defrosting/Cleaning
At power failure
Even in summer, power failure that lasts
for several hours doesn’t affect the frozen
food in the appliance. If a power failure is
announced.
Turn on the fast freeze system so as to
make the foods as cold as possible.
Do not place any fresh food in the freezer
at the power failure.
Prepare more ice cubes and place them
on the top refrigeration compartment.
Note:
A continued power failure will have adverse
effect on the storage period and the food
quality.
When not in use
If the appliance will not be used for a
period of time, turn the unit off and unplug.
Clean the appliance as described above.
Leave the door open to keep the
appliance from unpleasant odor.
Note:
Do not stops the appliance frequently for
the sake of its service life.
Transportation
Unplug the appliance before transportation.
Take out foods from the appliance.
Fix the drawers with adhesive tape.
Keep the door closed during transportation
with adhesive tape.
.13.
Page 15

Troubleshooting
Before calling the service center, check the following points
and see if you can solve the problem yourself.
Problem
The freeze doesn’t work
The illuminating light
doesn’t work
Unusual noise
The inner compartment
isn’t cold enough.
Possible Cause
Not plugged in.
Voltage is too low.
The power switch is off.
The light bulb is broken.
The door switch is at position ‘0’.
The appliance doesn’t stand level.
The appliance is placed so near the wall that some
part of it rubs against the wall.
Large amounts of foods are stored in the appliance.
Wrong temperature display.
Initial start-up.
The door is opened frequently.
The temperature regulator is not properly set.
The appliance is exposed to direct sunlight or a
heating vent.
Poor ventilation. The ventilating grille is blocked
or the condenser needs to be cleaned.
The red indicator lights.
Check as described in the section ‘Red warning
indicator’.
.14.
Page 16

 Loading...