

Page 1

Counter Top, 6 Place Setting, Dishwasher
Lavavajillas para la encimera con
capacidad para 6 cubiertos
User Manual
Manual del Usuario
HDC2406TW / TB/ TS
Quality n Innovation n Style
Page 2

READ ALL INSTRUCTIONS BEFORE USE.
WARNING - To reduce the risk of fire, electric shock, or
injury to persons when using your appliance, follow the
basic precautions, including the following:
1. Read all of the instructions before using this appliance.
2. Use the dishwasher only for its intended function.
3 The manufacturer cannot be responsible for problems caused by ignoring these safety
and caution instructions.
4. Use only detergents or wetting agents recommended for use in a dishwasher and keep
them out of the reach of children.
5. This appliance must be properly installed in accordance with the installation instructions
before it is used.
6. Never unplug your appliance by pulling on the power cord. Always grasp the plug
firmly and pull straight out from the outlet.
7. Replace immediately worn power cords, loose plugs/power outlets.
8. Disconnect electrical power and water intake hose to dishwasher before cleaning or
servicing.
9. If your old appliance is not being used, we recommend that you remove the door. This
will reduce the possibility of danger to children.
10. Do not operate your appliance in the presence of explosive fumes.
11. Do not add or mix any flammable or explosive substances to the wash.
12. Dishwasher door must be closed during the operation of the machine.
13. Do not operate your appliance when parts are missing or parts are broken.
14. Do not abuse, sit on or stand on the door or dish rack of the dishwasher.
15. Do not use this appliance for commercial dishwashing purposes.
16. Do not wash plastic items unless they are marked “dishwasher safe “ or the equivalent.
For plastic items not so marked, check the manufacturer’s recommendations.
17. Do not operate this appliance unless all enclosure panels are properly in place.
18. Do not tamper with controls.
19. When loading items to be washed:
A) locate sharp items so that they are not likely to damage the door seal, and
B) load sharp knives with the handles up to reduce the risk of cut-type injuries.
20. Do not touch the HEATING ELEMENT during or immediately after use.
21. To reduce risk of injury do not allow children to play in or on the appliance. Close
supervision and observation needed when children are around the dishwasher
22. This appliance must be connected to proper electrical outlet with the correct electrical
supply.
23. Proper grounding must be ensured to reduce the risk of shock and fire. DO NOT CUT
OR REMOVE THE GROUNDING PLUG. If you do not have a three-prong electric
receptacle outlet in the wall, have a certified electrician install the proper receptacle.
The wall receptacle MUST be properly grounded.
English
1
IMPORTANT SAFETY INSTRUCTIONS
Page 3

DANGER
Risk of child entrapment. Before you throw away your old
appliance, take off the door so that children may
not easily get trapped inside. Also cut off power cord and
detach all hoses
Thank you for purchasing our Haier
product. This easy-to-use manual
will guide you in getting the best
use of your appliance.
Remember to record the model and
serial number. They are on a label
in back of the appliances.
Model number
Serial number
Date of purchase
Staple your receipt to your manual. You will need it to obtain
warranty service.
Please register online at www.prodregister.com/Haier
24. Hydrogen gas may be produced if the water heater has not been used in more then 2
weeks. This could be explosive and can explode under certain circumstances. If this is
the case, before using this appliance turn on all the hot faucets and let the hot water run
for a few minutes. This will let the trapped hydrogen escape. During this process do not
turn on an electric appliance, smoke, light a match/lighter or use a flame to avoid an
accident, as hydrogen gas is flammable and can explode.
25. Do not repair or replace any part of the appliance or attempt any servicing unless
specifically recommended in the user-repair instructions that you understand and have
skills to carry out.
26. To reduce the risk or electric shock or fire, do not use extension cords or adapters to
connect the unit to electrical power source.
27. Do not use this dishwasher outdoors.
SAVE THESE INSTRUCTIONS
HOUSEHOLD USE ONLY
English
2
Unpacking
1. Inspect and remove all packing materials. This includes the foam and
any adhesive tape both inside and outsiide of the unit.
2. Inspect and remove any remains of packing, tape, or printed
materials before powering on your Haier appliance.
UNPACKING YOUR APPLIANCE
PRODUCT REGISTRATION
Page 4
Attempting any maintenance or cleaning:
To minimize the possibility of electric shock, unplug this appliance from the power
supply or disconnect at the household electrical panel by removing the fuse or
switching off the circuit breaker before attempting any maintenance or cleaning.
NOTE: Pressing the Power ON/OFF button to an off position does NOT discon-
nect the appliance from the power supply.
English
3
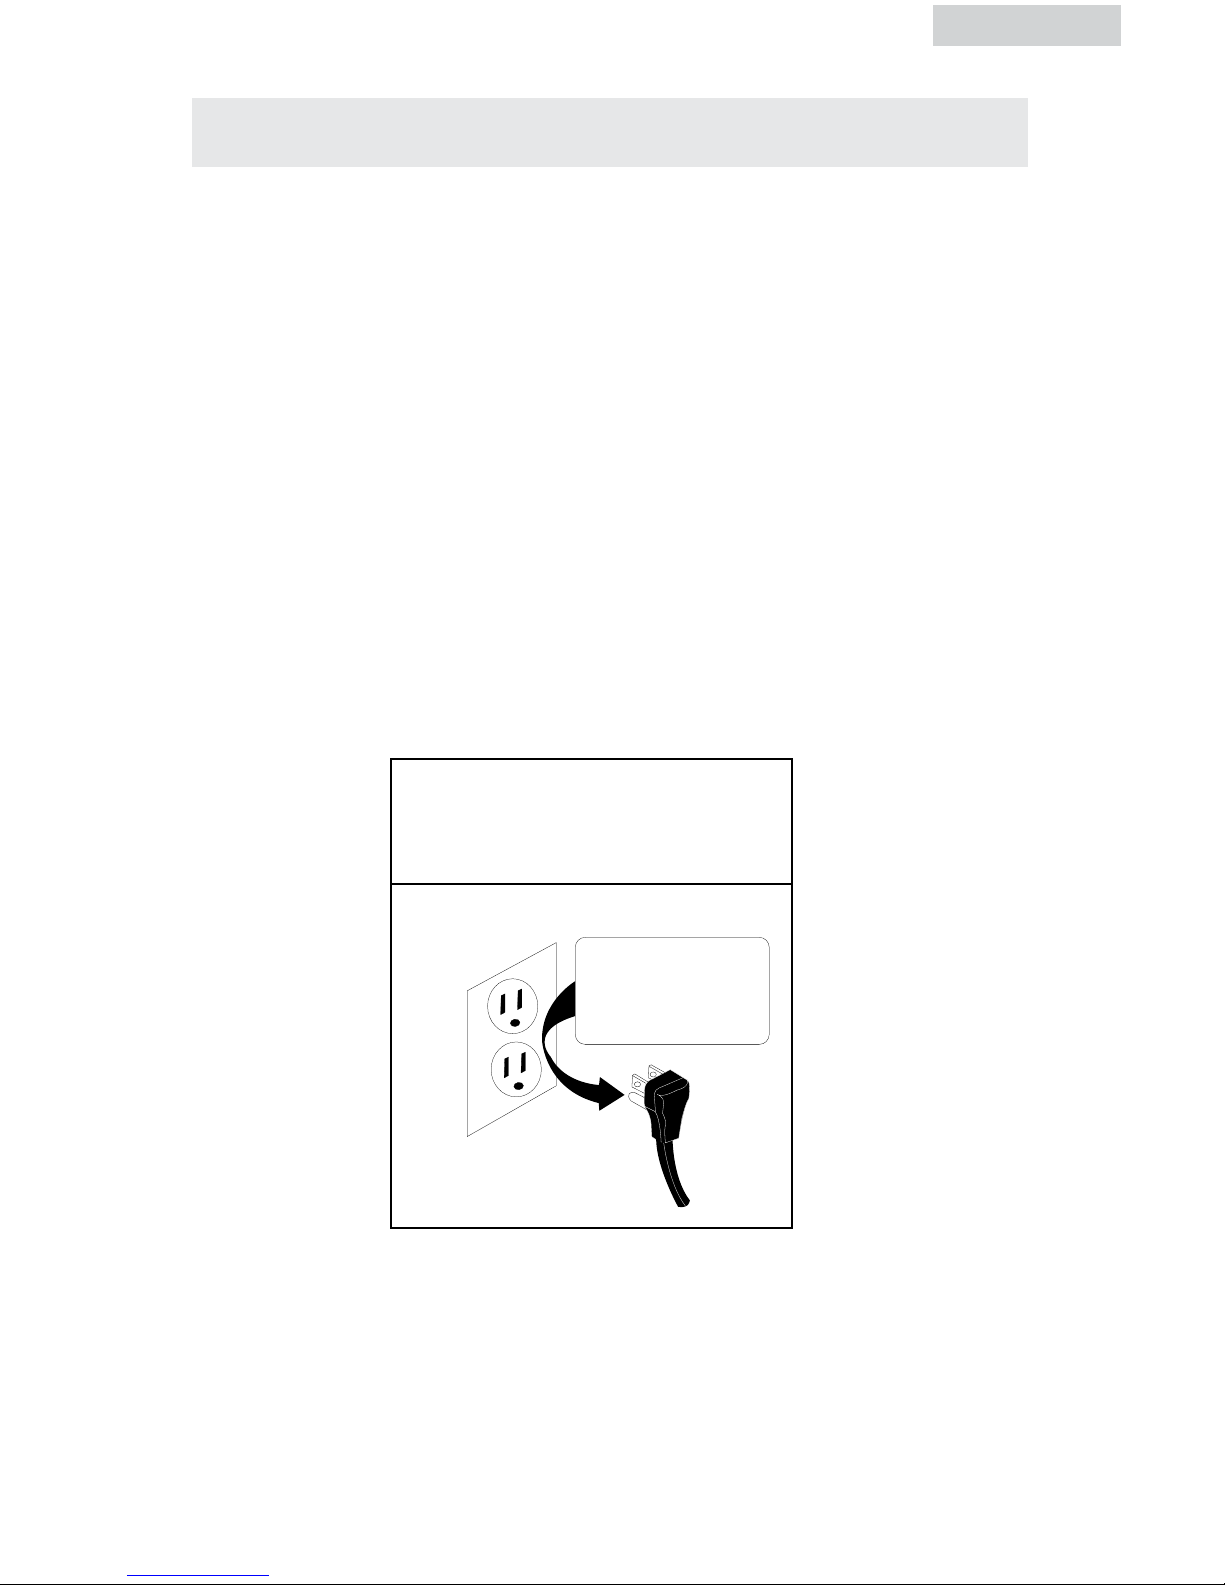
SAFETY REQUIREMENTS
WARNING: Avoid fire hazard or electric
shock. Do not use an extension cord or an
adapter plug. Do not remove any prong
from the power cord.
Do not, under any
circumstances,
cut, remove,
or bypass the
grounding prong.
Power supply cord with
3-prong grounding plug
Electrical Requirements
Grounding Instructions
This appliance must be plugged into at least a 15 AMP 120 Volt 60 Hz
Grounded Outlet. This appliance must be grounded. It is equipped with a 3-Wire
cord having a grounding plug. The plug must be plugged into an outlet that is
properly installed and grounded.
Warning! Improper use of the grounded wire can result in the risk of electric
shock. Consult a qualified electrician if necessary. Do not attempt to
defeat this safety feature by modifying the plug.
Avoid the use of an extension cord because it may overheat and cause a risk of
fire. However, if it is necessary to use an extension cord:
A. Use only 3-wire extension cord with 3-blade grounding plug.
B. The marked rating of the extension cord must be equal to or greater than the
rating of this appliance.
C. It should be positioned such that it does not drape over the counter or table-
top where it can be pulled by children or tripped over.
Grounding type
wall receptacle
Page 5

TABLE OF CONTENTS
4
English
Specification Table
Model HDC2406TW / TB / TSS
Power input 680W
Outer dimension(LxWxH) 21.7" x 19.7" x 17.2"
Weight 48.4 LBS
Max. water Consumption 2.83 Gallons (10.7L)
Water pressure 0.04~1MPa
Operation Electronic
Detergent Capacity .42 Oz (12g)
Plate Capacity 6 Standard Place Settings
IMPORTANT SAFETY INSTRUCTIONS ............................................ 1
SAFETY REQUIREMENTS / ELECTRICAL REQUIREMENTS .............. 3
Specifications .................................................................................... 4
PARTS AND FEATURES ................................................................5-6
INSTALLATION INSTRUCTIONS ..................................................... 7
Proper Location .................................................................................. 7
REMOVE ALL PACKING MATERIALS .............................................. 7
QUICK FAUCET ADAPTOR CONNECTION ..................................... 8
PERMANENT INSTALLATION ......................................................... 9
RECOMMENDATIONS FOR USE ...................................................11
Water, Pressure and Temperature ....................................................... 11
Preparing to wash dishes .................................................................. 11
Loading your Dishwasher .................................................................. 12
Cutlery Basket .................................................................................13
PROPER USE OF DETERGENT ......................................................14
Using the 3-in-1 Agent ...................................................................... 15
CYCLE SEQUENCE ......................................................................... 16
OPERATIONAL INSTRUCTIONS ................................................... 15
Pausing The Wash Cycle / Program ..................................................17
At the End of the Wash Cycle ...........................................................18
CHILD LOCK FUNCTION .............................................................. 18
CARE AND CLEANING GUIDE ..................................................... 19
TROUBLESHOOTING .................................................................... 21
WARRANTY .................................................................................. 23
Page 6

5
4. Power Indicator Light
5. Program Indicator LED Display
A.
Front View
Control Panel
PARTS AND FEATURES
5
A
C
G
7
4
Page 7

Inside View Back View
PARTS AND FEATURES
4. Filter System
5. Rinse Aid Dispenser
5
7
6
BEFORE USING YOUR DISHWASHER
Page 8

The minimum height clearance required to install your dishwasher on
There are 2 types of Hook-ups; using the Quick
The suggested way is to operate this
INSTALLATION INSTRUCTIONS
REMOVE ALL PACKING MATERIALS
top to Cabinet 17.8"
Page 9

English
8
QUICK FAUCET ADAPTER CONNECTION
The Quick Faucet Adapter easily connects to the sink faucet
A. First remove aerator from your faucet nozzle and
attach the quick connect threaded adapter to the
faucet. The quick connect faucet adapter allows
easy snap-on/snap-off connection to standard
(7/8” diameter) faucets.
B. Connect the dishwasher Quick Connect
Faucet Adapter to the faucet first to ensure the hose length fits
the dishwasher’s selected location. Both hose end fittings must be
connected to the back of the dishwasher. The water intake and drain
plastic fittings are each a unique design and made to easily fit the
dishwasher to insure there is no mistake.
WARNING: A hose that attaches to a sink spray can burst if it is
installed on the same water line as the dishwasher. If your sink has one, it
is recommended that the hose be disconnected and the hole plugged.
C. Water Intake Hose: Connect to the rear of the
dishwasher using the large, 4-corner shaped
wing nut.
D. Drain Hose: Connect to the rear of the
dishwasher. It is suggested you use pliers to
tighten but DO NOT over tighten.
E. With both hoses connected, make sure you
can plug the power cord into a 120 volt,
grounded AC outlet, then turn the dishwasher
so it is facing forward.
F. Red Pressure Release Button: This red button, located on the Quick
Release Faucet Adapter, is used to release the water line pressure.
When you first connect to the water faucet, you can press the red
button to check the water is at the desired temperature or to use the
faucet normally without removing the whole Quick Release Faucet
Adapter.
Faucet Water
Connection
Red Pressure
Release Button
Water Hose
Drain Hose
Drain
Water Intake
Hose
Page 10

English
9
G. With all the fittings connected, open the tap to test to make sure there
are no leaks. Connect the A/C power cord and use the dishwasher as
outlined in the manual.
H. When finished using the dishwasher, you need to close the water
supply to the tap and disconnect the power supply cord..
WARNING: The water intake hose is now pressurized.
Press the red pressure release button on the Quick Release Faucet
Adapter, which will depressurize the water intake hose to easily remove
without squirting water which can be very hot and cause scalding.
The Quick Release Faucet Adapter should then be disconnected from the
faucet and stored for next use.
CAUTION: Do not let children disconnect the dishwasher. Close
supervision of children is always important around
appliances.
The permanent installation will require connecting the dishwasher to a
permanent “HOT” water intake, usually tapped off from the sink’s hot
water line. Also, the dishwasher’s grey drain hose (included) needs to
be connected to a special sink drain pipe (not included) under the sink /
counter.
We recommend that you Contact a qualified person to carry out
the permanent installation. The dishwasher must be installed to meet
all local codes and ordinances for electrical and plumbing connections.
Parts Needed for Permanent Installation
Intake Hose: You will need to purchase a standard 3/4" intake
dishwasher hose and fittings to make a permanent installation.
Direct connect dishwasher tail pipe:
You will need to purchase a dishwasher tail pipe designed to connect to
a kitchen sink drain, and a matching hose clamp.
PERMANENT INSTALLATION
Page 11

This unit has a special grey drain hose included. If you
This should be done by a professional and qualified
The quick connect faucet adapter and hoses must be removed from the
4.
The intake hose should be connected to the HOT water pipe.
The drain hose should be below the height of the base of the
Water Hose
Special Grey Drain HoseSpecial Grey Drain Hose
Sink Drain
To the Sink HOT water pipe
Change intake valve to standard
Grey "L" Hose to dishwasher
drain connector
Tail Pipe
Back of Dishwasher
Page 12

English
11
RECOMMENDATIONS FOR USE
Water, Pressure and Temperature
For best operating results, incoming water should be HOT and the
pressure should be between 0.03~1Mpa. Incoming water supply for
the dishwasher is controlled by a ‘low water switch’ application, so
if household water ceases, dishwasher will stop. We recommend for
maximum efficiency and optimum results use HOT WATER ONLY.
How it works:
Your dishwasher cleans by spraying a mixture of hot clean water and
detergent (under pressure) against the soiled surface of dishes. The
water is pumped through a rotating spray arm, drained through a filter
removing food and soiled particles and pumped back through the spray
arm.
Soiled water is pumped out and replaced with clean water at the end
of each cycle . For best cleaning results, the water temperature must be
at least 120ªF. To prevent dishwasher damage, the temperature of the
incoming water supply should not exceed 150ªF.
Note: Hard Water conditions will adversely affect the wash ability
performance of your dishwasher. Hard water conditions will also
contribute to “Lime” (white film substance) deposits and/or “Scaling” on
the stainless steel surface of the dishwasher tub and “Heater Element”
located in the sump underneath the removable filter screen. To assist in
minimizing these conditions, it is recommended to periodically operate/
rinse the inside of the dishwasher (empty) using 1 cup of white vinegar
(at least once a week) or special cleaning products that clean calcium
and lime deposits.
Preparing to wash dishes:
For best results, rinse the dishware and perform the following steps before
loading:
• Discard big chunks of food from the plate.
• Remove oils and grease.
• Remove sticky and loosen burned-on, foods.
• Empty liquids such as juice, soup, soda, coffee or tea from glasses and
cups.
Page 13

12
English
Tips to avoid stains and films:
The following suggestions are recommended to prevent stains and films
from dishware and utensils items:
• You must rinse all dishware, silverware, glassware and food containers
right a way after use. Some citric based food products, coffee, tea
and iron deposits in water can cause yellow or brown film on inside
surfaces when left on for a long time and not rinsed immediately.
• Rinse off acid based liquid, such as vinegar or lemon juice right away.
This may cause discoloration over time to your plates, food containers
or internal cabinet.
• Always check manufacturer’s recommendations before you start
washing items.
• You must check your water hardness to see whether you need to use
more or less detergent to wash. If water is extremely hard then it may
be causing stains on items. You may need to use water softener.
• Do not overload the dishwasher.
• Avoid improper loading by overcrowding or nesting plates together.
• Make sure water temperature is at
recommended temperature to wash dishware.
• Do not use too little detergent.
• Do not use old or damp powder detergent.
• Do not load aluminum utensils improperly.
Aluminum utensils can cause gray or black
marks to porcelain utensils if they touch during
the wash cycle.
Loading your Dishwasher
The dishwasher is designed for a standard “6 place setting”.
Optimum Capacity
Page 14

English
13
Note: The standard plate is 10" inches. For ease of lading/unloading
large size dinner plates from the dish rack, it maybe necessary to
(temporarily) remove the cutlery basket. When loading/unloading
is complete, return the cutlery basket to its original position.
How to load items:
• Locate sharp items so that they are not likely to damage the door seal.
• Do not load plastic items unless they are marked “dishwasher
safe” or the equivalent. For plastic items not so marked, check the
manufacturer’s recommendations.
• Cups, glasses and bowls must have their openings facing downwards.
• Do not load glasses over the dish rack pins. Glasses loaded over dish
rack pins are not properly supported and are likely to get damaged.
• Arrange all items with recessed or curved sections on a slant to drain
water away.
• Ensure cutlery is not nesting or stuck together. They need to be evenly
spread out. Make sure the cutlery has not fallen through the basket and
stopped the spray arm from rotating.
• Items with wooden or bone handles and items joined together with glue
are unsuitable as they cannot withstand hot water.
Cutlery Basket
Silverware should be placed in the basket with handles at the bottom. If
the rack has side baskets, the spoon should be loaded individually into
the appropriate slots, especially long utensils should be placed in the
horizontal position on the cup shelf.
WARNING: Do not let any item extend through the bottom
of the rack or cutlery basket.
WARNING: Always load sharp utensils with the sharp
point down!
For personal safety and top quality cleaning, placing the silverware in the
basket using the following guidelines:
• Do not nest utensils together.
• Place silverware with handles down with the exception of knives and
other potentially dangerous utensils which should have handles up.
Page 15

English
14
NOTE: Use ONLY detergent specifically made for automatic dishwashers.
Check product packaging to be certain. Keep your detergent fresh
and dry. Do not put powder detergent into the dispenser until
you’re ready to wash dishes.
The amount of detergent to use depends on whether your water is hard
or soft. With hard water, you need extra detergent. With soft water, you
need less detergent. Your water company should be able to tell you how
hard your water is.
For heavily soiled loads, use the HEAVY, NORMAL WASH cycle, fill one
or both of the interior cups, depending on the hardness of your water, and
also fill the open cup on the dispenser lid.Use the information in the table
below as a guideline to determine the amount of automatic dishwasher
detergent to place in the dispenser:
To open the detergent storage cover, press the button
and the cover will ip back. After you finish, close the
cover securley. See diagram at right.
Using a Rinsing Agent
Using a rinse aid will help prevent unsightly spots,
films on dishes and glassware, and reduce drying
time. A rinse agent is specially formulated to rinse
away food and detergent residues that can be left
behind on your dishes. Used regularly, a rinse agent
will automatically provide you with cleaner dishes
every time you wash.
Filling the Dispenser
The Rinse Aid dispenser holds 3.5 oz. of rinse agent.
Under normal conditions, this will last approximately one month. Try to
keep it full, but do not overfill.
1) Make sure the dishwasher door is fully open.
2) Turn the dispenser knob to the left and lift it out.
3) Add rinse agent until the indicator window looks full.
4) Clean up any spilled rinse agent with a damp cloth.
5) Replace the dispenser knob.
PROPER USE OF DETERGENT
Number of Place Settings Loaded Detergent Recommendation
Less than 4 Fill compartment marked “15” (A)
4 to 6 Fill compartment marked “25” (B)
A B
Page 16

English
15
Rinse Aid Setting
The amount of rinse agent released into the final wash can be adjusted.
The factory setting is at the midpoint. If there are rings of calcium (hard
water) spots on dishes, try a higher setting.
To Adjust the Rinse Aid Setting
Remove the dispenser knob; then turn the adjuster counterclockwise to
increase the amount of rinse agent.
Low Rinse Aid Level Indicator
When the rinse aid level becomes low in the dispenser, the "Rinse Aid"
icon in the display will light. Once the dispenser is refilled, the icon will
shut off.
Using the 3-in-1 program
Your dishwasher has ability to utilize 3-in-1
tablets.
1. Hang the 3-in-1 tablet container on to rack
(see diagram below)
2. Put the 3-in-1 tablet into the container and
press the 3-in-1 button on the control panel.
A “3-in-1” icon in the display will illuminate.
Note: Performance will not be as effective if you attempt to us tablets
when dishwasher is set to program other than 3-in-1.
Page 17

16
English
NOTE: Cycle times listed are for reference only as they can change based
on conditions such as inlet water temperature, whether dishwasher
is partially or fully loaded, and the heating element power rating.
CYCLE SEQUENCE
Cycle Water (Approx) Time (Approx) Sequence
Heavy
4.7 Gallons 110 Minutes
Pre-wash
Pre-wash (122ºF/50ºC)
Pre-wash (122ºF/50ºC)
Wash (140ºF/60ºC)
Wash (122ºF/50ºC)
Rinse
Rinse (149ºF/65ºC)
Dry
Normal
3.8 Gallons 85 Minutes
Pre-wash
Pre-wash
Pre-wash
Wash (131ºF/55ºC)
Rinse
Rinse (149ºF/65ºC)
Dry
Eco
3.4 Gallons 75 Minutes
Pre-wash
Pre-wash (122ºF/50ºC)
Wash (122ºF/50ºC)
Rinse
Rinse (140ºF/60ºC)
Dry
Rapid
2.9 Gallons 70 Minutes
Pre-Wash
Wash (122ºF/50ºC)
Rinse
Rinse (140ºF/60ºC)
Dry
Rinse
3.0 Gallons 45 Minutes
Pre-wash
Pre-wash (122ºF/50ºC)
Wash (122ºF/50ºC)
Rinse
Rinse (131ºF/55ºC)
Pre-Wash
0.7 Gallons 10 Minutes Pre-wash
Page 18

English
17
Operating Your Dishwasher
1. Ensure that all electrical, water, and drain connections have been
installed correctly before proceeding.
2. Load the dishwasher (See the “Loading your Dishwasher” section).
3. Make sure that the water supply is turned on to full pressure.
4. Add the appropriate amount of dishwasher detergent to the dispenser
(see Proper Use of Detergent Section).
5. Close the door and ensure that the door latch has engaged.
6. Turn the dishwasher ON by pressing the ON / OFF button.
7. Select appropriate wash cycle / program (See Cycle Sequence
Section).
8. Press the Start/Reset button. The LED display will flash intermittently to
indicate the dishwasher is in “RUN” mode.
NOTE: When you press the Start/Reset button to pause the unit during
washing, the LED display will stop blinking and the dishwasher
will stop working until the Start/Reset button is pressed again.
Pausing the Wash Cycle / Program:
In order to make any changes to the selected wash program / cycle, load
additional items, or remove previously loaded items the dishwasher must
be put in “PAUSE” status. The dishwasher can be put into PAUSE mode at
any time during the wash cycle.
To temporarily pause the washing process:
1. Press and hold the START / RESET button for approximately 3 seconds
to cancel the existing program mode.
2. Make the necessary changes to the wash program / cycle selection or
add/remove items from the dishwasher.
3. Ensure that the door is closed and the latch is fully engaged.
4. Press the START / RESET button once
5. The dishwasher will immediately resume operation using the most
recently selected wash program / cycle.
NOTE: If the door is opened at any time during the washing process,
the dishwasher will automatically go to PAUSE mode. Once the
door is closed and the latch is fully engaged the dishwasher will
immediately resume operation. Although the dishwasher will be
put in the PAUSE mode by opening the door, it is recommended
that you instead follow the steps above to PAUSE the washing
process.
OPERATING INSTRUCTIONS
Page 19

18
English
Changing the Wash Program / Cycle:
If at any time during the washing process you would like to change the
selected wash program /cycle;
1. Press and hold the START / RESET button for approximately 3 seconds.
(The START / RESET indicator light will be ON indicating that the unit is
in PAUSE mode.)
2. Select the desired wash program / cycle by pressing the program
button.
3. Press the START / RESET button again, the dishwasher will resume
operation using the newly selected wash program / cycle.
NOTE: If you change the wash program / cycle after the detergent
has been dispensed or the dishwasher has already drained the
water, you will need to refill the detergent dispenser for the newly
selected program / cycle accordingly.
At the End of the Wash Cycle
Once the dishwasher has completed the selected wash cycle / program,
there will be a buzzer sound for 8 seconds indicating the end of the cycle.
1. Shut off the water supply.
2. Turn the dishwasher OFF by pressing the ON/OFF button.
3. Open the door slightly with caution to allow any residual steam to
escape.
4. Wait a few minutes (approximately 15 minutes) before unloading the
dishwasher as the dishes and cutlery will be hot. This also aids in the
drying process.
5. The interior of the dishwasher will be wet, this is normal and will dry
naturally.
WARNING: It is dangerous to open the door when dishwasher in
operation as hot water may scald you.
Checking the Water Temperature
For the most effective cleaning and to prevent damage to the dishes being
cleaned, the water supplied to the dishwasher should be at a temperature
of at least 120ºF (49ºC) and no more than 150ºF (66ºC).
Child Lock Function
The child lock function will prevent the unit from functioning and the door
from being able to open if it is in the fully closed position.
To engage the function, press the “3-in-1” button and the “Delay” button at
the same time. The “lock” icon will illuminate in the display when the child
lock function is activated.
To disengage, press the “3-in-1” button and the “Delay” button at the same
time. The “lock” icon will go off in the display when the child lock function
is deactivated.
Page 20

CARE AND MAINTENANCE
Filter system
The filter system consists of a coarse filter, a at (main filter) and a micro
filter (fine filter).
1. Main filter: Food and soil particles
trapped by this filter are pulverized
by a special jet on the spray arm and
washed down the drain.
2. Fine filter: This filter holds soil and
food residue in the sump area and
prevents it from being deposited on the
dishes during wash cycle.
3. Coarse filter: Larger items, such as those that could block the drain,
are trapped in the coarse filter. To remove the items caught by the filter,
gently squeeze the tap on the top of this filter and lift out.
The filter efficiently removes food particles from the wash water,
allowing it to be recycled.
For best performance and results, the filter assembly must be cleaned
regularly. For this reason, it is a good idea to remove
the larger food particles trapping in the filter after each
wash cycle by rinsing the filter assembly under running
water. To clean the coarse filter and the fine filter, use
a soft cleaning brush. Reassemble the filter parts as
shown in the diagram and reinsert the entire assembly
in the dishwasher, positioning in its seat and pressing
downward.
To remove the filter assembly, grab the handle of the
fine filter, rotate it counter clockwise then pull in an upward direction.
Step 1: rotate the fine filter counter clockwise;
Step 2: lift fine filter up;
Step 3: lift main filter up
NOTE: Reverse this procedure to reinstall the filter.
English
19
Using The Delay Feature
The start of the HDC2406 can be delayed between 1 and 24 hours in
one hour increments. To utilize this feature:
1. Press “ON/OFF” button to “on” position
2. Press “PROGRAM” button
3. Press “DELAY” button once for each hour of delay (i.e. press 3 times to
delay start 3 hours)
To cancel the delay feature:
1. Press “ON/OFF” button to “off” position.
Page 21

Remarks:
- Inspect the filters for blocking every time the dishwasher has been used.
- By unscrewing the coarse filter you can remove the filter system. Remove
any food remnants and clean the filters under running water.
WARNING: ·Never run the dishwasher without the filters in place.The
dishwasher must never be used without the filters.Improper replacement of
the filter may reduce the performance level of the appliance and damage
dishes and utensils.The entire filter system should be cleaned once a week
·When cleaning the filters do so carefully as otherwise filters may lose
their shape and the performance of the dishwasher could be effected.
Cleaning The Spray Arm
It is necessary to clean the spray arm regularly for
hard water chemicals that can clog the spray arm
jets and bearings. Wash the arm in soapy and
warm water and use a soft brush to clean the jets.
Cleaning The Control Panel
• To clean the control panel use a lightly dampened cloth then dry
thoroughly. To clean the exterior use a good appliance polish wax.
• Never use sharp objects, scouring pads or harsh cleaners on any part of
the dishwasher.
Cleaning The Door
To clean the edge around the door, you should use only a soft warm,
damp rag
WARNING: Never use a spray cleaner to clean the
door panel for it could damage the door
lock and electrical components. It is not
recommended to use abrasive cleansers
or rough surface paper towels because of
the risk of scratching or leaving spots on
the stainless steel surface.
How To Maintain Your Dishwasher
After every wash
After every wash, leave the door slightly ajar so that moisture and odors
are not trapped inside.
Do Not Use Solvents or abrasive cleaning products
To clean the exterior and rubber parts of the dishwasher, do not use
solvents or abrasive cleaning products. Rather, use only a cloth and warm
soapy water. To remove spots or stains from the surface of the interior,
use a cloth dampened with water and a little white vinegar, or a cleaning
product made specifically for dishwashers.
20
English
Page 22

TROUBLESHOOTING
Problem Possible Causes Possible Solution:
Dishwasher does
not start
Fuse is blown or the
circuit breaker has
tripped.
Replace the fuse or reset the circuit breaker. Remove
any other appliances sharing the same circuit with the
dishwasher.
Power supply is not
turned on.
• Make sure the dishwasher is turned on and the door
is closed securely.
• Make sure the power cord is properly plugged into
the wall socket.
Dishwasher door is not
closed properly.
Close the door making sure the door latch is engaged.
Water is not
pumped from the
dishwasher
Drain hose is kinked Check the drain hose and ensure there are no kinks.
Filter is clogged Check the filter assembly and remove any debris, if
any, that may be blocking the filter.
Kitchen sink is clogged Check the kitchen sink for adequate drainage. If the
kitchen sink is not draining you may need to contact a
plumber to inspect your drainage pipe.
Suds in tub Improper detergent Use only detergent specifically designed and marked
for use with dishwashers.
Spilled rinse aid Always wipe up rinse aid spills immediately.
Stained tub
interior
Detergent with colorant
was used.
If suds occur, open the dishwasher and let them
evaporate.
White film on the
inside surface
Hard water minerals Add approximately 1 gallon of cold water to the tub,
close and secure the door.
There are
rust stains on
silverware /
cutlery
The affected items are not
corrosion resistant
Select the “PRE-WASH” program. Press the Start / Rest
button to drain out the water. Repeat if necessary.
Knocking noise
in the washing
cabinet
The spray arm is knocking
against an item loaded in
the rack.
Pause the wash cycle and rearrange the items
accordingly.
Rattling noise
in the washing
cabinet
Items are not loaded
securely and are vibrating
against each other
Pause the wash cycle and rearrange the items
accordingly.
Knocking noise in
the water pipes
Vibration or loose
connections at cross
sections of the piping.
Will not affect dishwasher operation. If in doubt,
contact a qualified plumber.
English
21
Page 23

22
English
ERROR CODES
Code Meaning Possible cause
E1 Water Intake Problem Faucet is not opened, water intake is restricted, or
water pressure is too low.
E4 Overow Some element of dishwasher is leaking. Turn main
water supply off immediately! Remove water from
around base before restarting dishwasher.
Your dishwasher has an error code indicator function. For certain appliance malfunctions, the corresponding error code will
be shown in the LED display:
Problem Possible Causes Possible Solution:
The dishes are
not clean.
The dishes were not loaded correctly See “Loading the Dishwasher Rack” section
of this manual.
The program selected was not the
appropriate cycle for the condition of
the dishes.
Select a more intense program.
Not enough detergent was dispensed. Use more detergent, or change the type of
detergent being used.
Items were blocking the rotation path
of the water spray arm.
Rearrange the items accordingly so that the
spray arm can rotate freely.
The filter assembly in the base of the
unit is not clean, is clogged, or is not
installed correctly.
(This may cause the spray arm jets to
become clogged).
Clean and/or fit the filter assembly
correctly.
Clean the spray arm jets. See the
“Cleaning the Spray Arm “section of this
manual.
Cloudiness on
the glassware.
This is a combination of soft water and
too much detergent.
Use less detergent if you have soft water
and select a shorter cycle to wash the
glassware to get them clean.
Black or gray
marks on dishes.
Aluminum utensils have rubbed against
the dishes.
Use a mild abrasive cleaner to remove the
marks
Detergent left
in the dispenser
cups.
Dishes blocked the detergent cups
not allowing them to open completely
during the wash cycle.
Rearrange the dishes accordingly and rerun the wash cycle.
The dishes are
not dry
Improper loading See “Loading the Dishwasher Rack” section
of this manual.
Too little rinse aid Increase the amount of rinse aid dispensed
or refill the rinse aid dispenser if empty.
Dishes were removed from the washer
too soon.
Do not empty your dishwasher immediately
after the cycle ends. Open the door slightly
so that the steam can escape. Begin
unloading the dishwasher once the dishes
are barely warm to the touch.
Wrong program / cycle selected. Shorter cycles/programs use lower
temperatures which also lowers cleaning
performance. Choose a cycle / program
with a longer wash time.
Using cutlery with a low quality
coating.
Water drainage is more difficult with these
items. Cutlery or dishes of this type are not
suitable for dishwasher use.
Page 24

LIMITED WARRANTY
What is covered and for how long?
This warranty covers all defects in
workmanship or materials for a period of:
The warranty commences on the date of
with proof of the date of purchase and the
Commercial or Rental Use
warranty:
What is covered?
The mechanical and electrical parts of
The limited warranty does not cover any
What will be done?
Any mechanical or electrical part that
will be repaired or replaced at Haier’s
SERVICE
ONL
Y
SERVICE CENTERS,
AN AUTHORIZED HAIER
If it is
with a refurbished or new product the
There will be no charge to the purchaser
THIS WARRANT
COVERS
APPLIANCES WITHIN THE
THIS LI
M
Y
IS GIVEN
WARRANTIES OF
M
Y
AND FITNESS FOR A PARTICULAR
The remedy provided in this
warranty is exclusive and is granted in lieu
you. Some states do not allow limitations on
warranty gives you specific legal rights, and
you may have other rights, which vary from
Page 25

120V~60Hz
Made in China
Fabriqué en Chine
Hecho en China
Haier America
New York, NY 10018
Printed in China
HDC2406TW / TB / TS
Issued: July 2010
©2010 Haier America Trading, LLC. All Rights Reserved.
IMPORTANT
Do Not Return This Product To The Store
If you have a problem with this product, please contact the "Haier Customer
Satisfaction Center" at 1-877-337-3639.
DATED PROOF OF PURCHASE REQUIRED FOR WARRANTY SERVICE
IMPORTANT
Ne pas Réexpédier ce Produit au Magasin
Pour tout problème concernant ce produit, veuillez contacter le service des
consommateurs ‘Haier Customer Satisfaction Center’ au 1-877-337-3639.
UNE PREUVE D’ACHAT DATEE EST REQUISE POUR BENEFICIER DE LA GARANTIE.
IMPORTANTE
No regrese este producto a la tienda
Si tiene algún problema con este producto, por favor contacte el "Centro de Servicio al
Consumidor de Haier" al 1-877-337-3639 (Válido solo en E.U.A).
NECESITA UNA PRUEBA DE COMPRA FECHADA PARA EL SERVICIO DE LA GARANTIA
 Loading...